Cardio 30 - Sports Watch Bryton - Free user manual and instructions
Find the device manual for free Cardio 30 Bryton in PDF.

User questions about Cardio 30 Bryton
0 question about this device. Answer the ones you know or ask your own.
Ask a new question about this device
Download the instructions for your Sports Watch in PDF format for free! Find your manual Cardio 30 - Bryton and take your electronic device back in hand. On this page are published all the documents necessary for the use of your device. Cardio 30 by Bryton.
USER MANUAL Cardio 30 Bryton
Auto Calibrate Time by GPS .....8
Use Stopwatch 8
Clock Mode Settings .....9
Exercise Mode 12
Start / Stop Running .....12
Mark Lap 13
View Exercise Info 13
Set Training 14
Link Sensors ....18
View Training Record ......18
Turn GPS On/Off 19
Set Training Type ......19
Stride Length 19
Set Profile ......20
Set Unit 21
Clear Storage 21
Icons 22
Specifications 23
Screen Terminologies ...... 24
Introduction
Cardio 30, the smallest GPS sports watch on the market, is for all levels of athletes. By setting goals in the pre-training programs, Cardio 30 can accurately calculate and record your location, speed, distance, pace, stride rate, cadence*, heart rate*, and more. Your training results can then be shared and analyzed at brytonsport.com. Also, with the built-in sensor in Cardio 30, no extra foot pod is needed for indoor exercise.
Package Contents
Make sure the following items are in the box:
Cardio 30•
USB cable•
User's Guide•
Optional accessories:
Heart rate monitor•
Speed / Cadence sensor•
* HRM or SPD/CAD sensor is required.

Getting Started
Step 1. Connect, Sync, and Charge
- Connect Cardio 30 to a PC using the supplied USB cable.
- Download the Bryton Bridge application at bb.brytonsport.com and sync with Cardio 30.
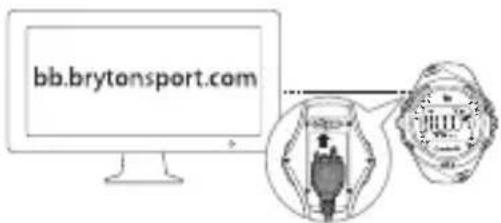
text_image
bb.brytonsport.comKeep Cardio 30 connected to the PC to charge the battery.
Note: For first time use, charge the battery for at least 2.5 hours.
Step 2. Turn On
Short press the OK button to turn on Cardio 30.
Note: To turn off, long press the OK button for 5 seconds.
Step 3. Initial Setup
For first time use, the setup wizard appears.
- Select your preferred language.
- Select the unit of measurement.
-
Enter your user profile (recommended).
Note: Data accuracy will highly affect your training analysis. -
Enter your max heart rate.
- Go outdoors to acquire GPS signal. Once the GPS signal is fixed, Cardio 30 automatically sets the date and time. To manually set the date and time, go to Time settings (see page 8).
- Press OK to complete setup.
Modes
Cardio 30 operates in two modes:
Clock Mode Exercise Mode
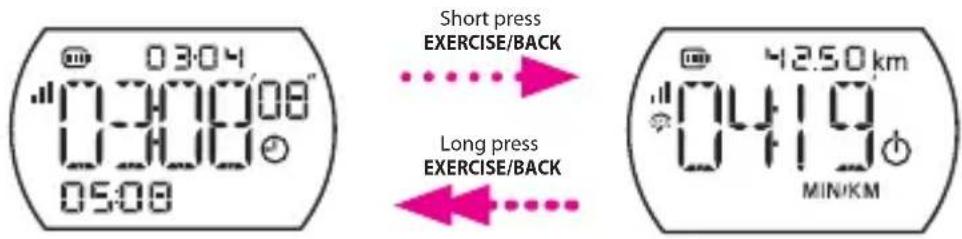
text_image
03:04 "03:00'08" 05:08 Short press EXERCISE/BACK Long press EXERCISE/BACK 42.50 km 0419 MIN/KMThe typical wristwatch, with:
Date and time•
Alarm•
Stopwatch•
Provides training analysis:
Time• Heart Rate•
Distance• Calorie•
Pace• Lap•
Speed• Stride Rate•
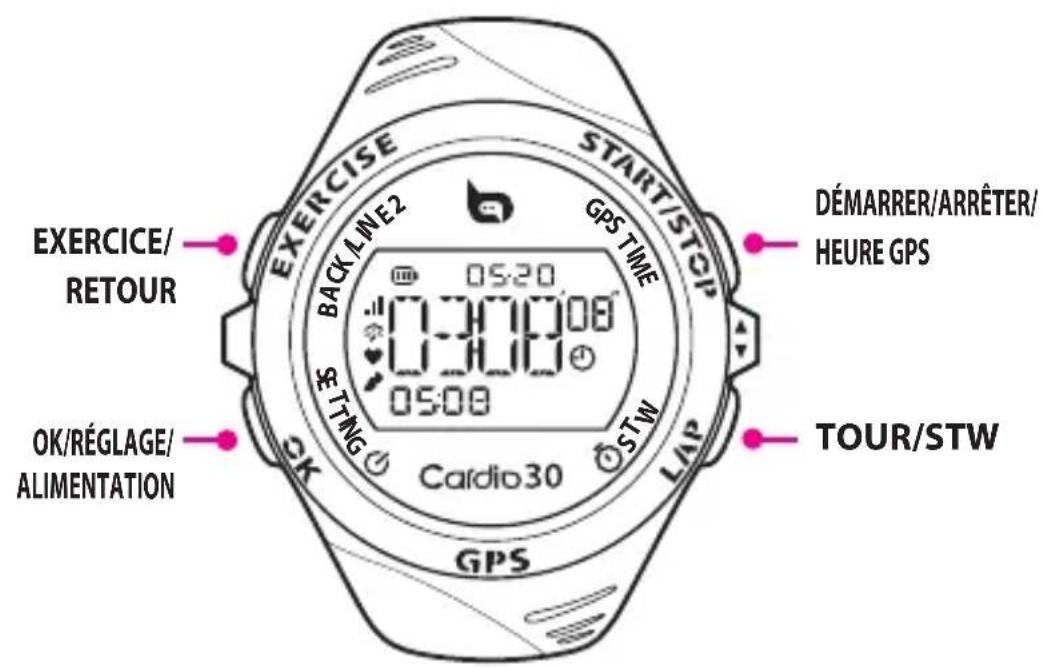
Buttons
Cardio 30 has four buttons that are used for multiple functions.
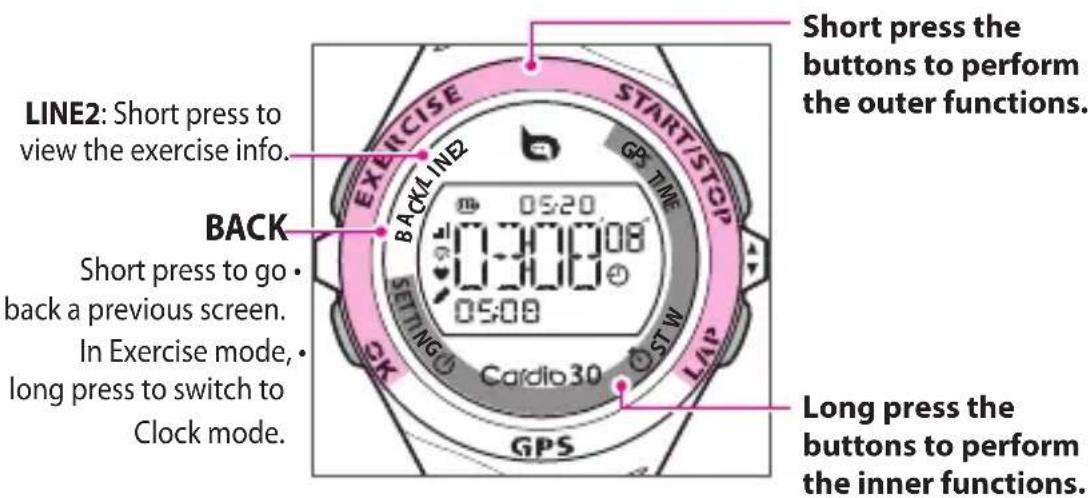
text_image
LINE2: Short press to view the exercise info. BACK Short press to go back a previous screen. In Exercise mode, long press to switch to Clock mode. SHORT PRESS THE BUTTONS TO PERFORM THE OUTER FUNCTIONS. LONG PRESS THE BUTTONS TO PERFORM THE INNER FUNCTIONS. EXERCISE START/STOP G8 TIME 05:20 0:30:00 0:30:00 Cardio 30 GPSThe table below provides a graphical indication on using the buttons which will be used in later sections.
| Buttons Short Press Buttons | Long Press | ||
| EXERCISE/BACK/LINE2 | ......> | BACK | ......> |
| OK/Backlight | ——> | SETTING/POWER | ——> |
| START/STOP GPS TIME | ......> | ......> | |
| LAP STW | ......> | ......> | |
Menu Structure
Long press OK/SETTING to access Settings.
Short press EXERCISE/BACK to go back the previous page.
Clock Mode Menu
(Accessible in Clock Mode only)
Exercise Mode Menu
(Accessible in Exercise Mode only)
| 1. Alarm |
| 2. Date |
| 3. Time |
| 4. Backlight |
| 5. Tone |
| 6. Language |
| 1. Training1.1 Easy1.1.1 Time1.1.2 Distance1.1.3 Calories1.2 Zone1.2.1 HR1.2.2 Pace1.2.3 Speed1.3 Lap1.4 Interval | 2. Link1.1 Foot pod1.2 HRM1.3 Speed1.4 Cadence1.5 Combo | 5. Type5.1 Run5.2 Bike5.3 Treadmill |
| 6. Stride | ||
| 7. Profile | ||
| 3. File | 8. Unit | |
| 4. GPS | 9. ClearStorage |
When navigating on the menu settings, similar screen may appear:

Clock Mode Exercise Mode
Each space represents a menu level ( 1^st , 2^nd , 3^rd , 4^th ).
The number indicates the sequence of the current option in the menu.
Z

Clock Mode
The Clock mode displays the date and time with alarm and stopwatch functions.

text_image
Time 1 Current time Time 2 Secondary time 03:04 03:08 05:08 Date Clock/Alarm indicatorDisplay/Hide Time 2
Long press EXERCISE/BACK to display/hide Time2.
Auto Calibrate Time by GPS
Long press START/STOP to reset the date and time based on your GPS location.
Use Stopwatch
- Enter stopwatch mode, long press LAP/STW.
- To start timer, short press START/STOP.
- To mark lap, short press LAP/STW.
- To stop timer, short press START/STOP.
View Stopwatch History
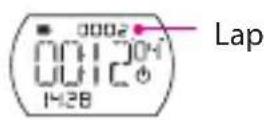
Use the Stopwatch setting to view the stopwatch history record.
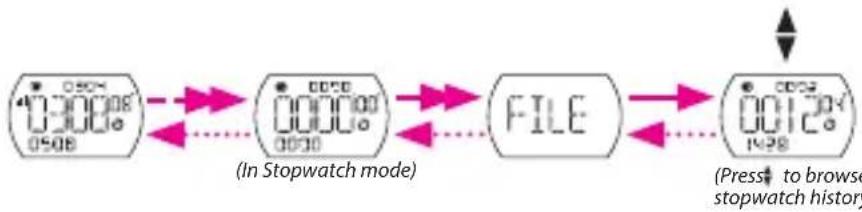
flowchart
graph LR
    A["0508 0508"] --> B["0000 0000"]
    B --> C["FILE"]
    C --> D["0012 0012"]
    D --> E["(Press to browse stopwatch history)"]
    style A fill:#f9f,stroke:#333
    style B fill:#ccf,stroke:#333
    style C fill:#cfc,stroke:#333
    style D fill:#fcc,stroke:#333
    style E fill:#ffc,stroke:#333
Clock Mode Settings
Set Alarm
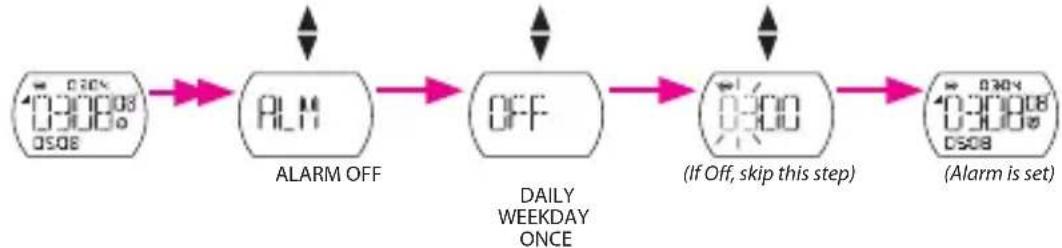
flowchart
graph LR
    A["ALARM OFF"] --> B["OFF"]
    B --> C["(If Off, skip this step)"]
    C --> D["(Alarm is set)"]

Set Date and Time
Use the Date setting to set the date and time manually.

flowchart
graph LR
    A["0:30:08 0:30:08 05:08"] --> B["DATE"]
    B --> C["0:30:08"]
    C --> D["0:30:00"]
    D --> E["(Set hour, minute)(Set year, month, day)"]

Set Time2
Use the Time setting to set and display a secondary time (Time2) or adjust the current time (Time1) manually.

flowchart
graph LR
    A["0.0008<br>0.0008<br>0.0008"] --> B["TIME"]
    B --> C["TIME1<br>TIME 2"]
    C --> D["OFF<br>ON<br>(Select On)"]
    D --> E["0.0008<br>0.0008<br>0.0008"]
Set Time Format
Use the Format setting to select the time format.

flowchart
graph LR
    A["0:00:08 0:00:08 05:08"] --> B["TIME"]
    B --> C["FMT"]
    C --> D["12HR"]
    D --> E["0:30:08 0:30:08 05:08"]
    style A fill:#f9f,stroke:#333
    style B fill:#ccf,stroke:#333
    style C fill:#cfc,stroke:#333
    style D fill:#fcc,stroke:#333
    style E fill:#cff,stroke:#333

Set Backlight
Use the Backlight setting to set the backlight.
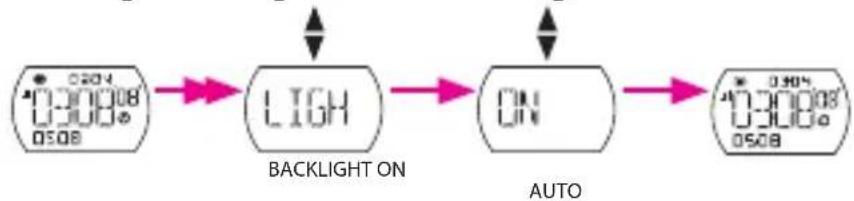
flowchart
graph LR
    A["0.3008 0.3008 0.508"] --> B["LIGH"]
    B --> C["ON"]
    C --> D["AUTO 0.3008 0.3008 0.508"]
    style A fill:#f9f,stroke:#333
    style D fill:#f9f,stroke:#333
    note1["BACKLIGHT ON"] --> B
    note2["AUTO"] --> C
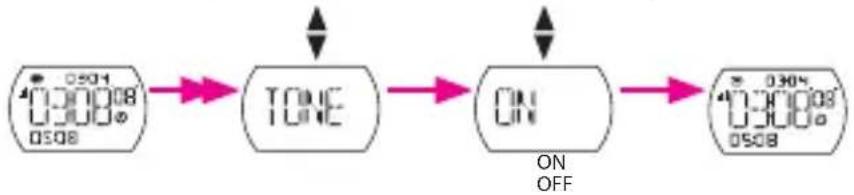
Set Tone
Use the Tone setting to enable or disable the key tone.
flowchart
graph LR
    A["0:00:08 0:00:08 0:00:08"] --> B["TONE"]
    B --> C["ON"]
    C --> D["0:30:08 0:30:08 0:30:08"]
    style A fill:#f9f,stroke:#333
    style D fill:#f9f,stroke:#333
Change Language
Use the Language setting to select desired language.

flowchart
graph LR
    A["0.30008\n0.30008\n0.508"] --> B["LANG"]
    B --> C["EN"]
    C --> D["0.30008\n1.00008\n0.508"]
    style A fill:#f9f,stroke:#333
    style D fill:#f9f,stroke:#333
    note right of B: LANGUAGE ENGLISH (EN)
FRENCH (FR)
GERMAN (DE)
ITALIAN (IT)
ESPAÑOL (ES)
DUTCH (DU)
Brazilian Portuguese (PTBR)

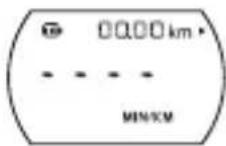
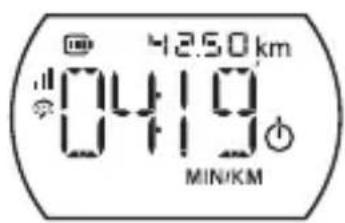
Exercise Mode
The Exercise mode allows you to measure and record your running activities and displays your current performance. Displayed information varies on user preference.

text_image
00.00 km Distance traveled LINE2 Time Exercise/ETA/L Training analysi Current time 1743LINE2
Time (Exercise / ETA / Lap / Interval)
Training analysis (Pace / Heart Rate /
Calorie / Distance / Speed / Stride Rate)

Before you start
Link sensors (page 13), optional•
Start / Stop Running
Short press START/STOP to start or end an activity.
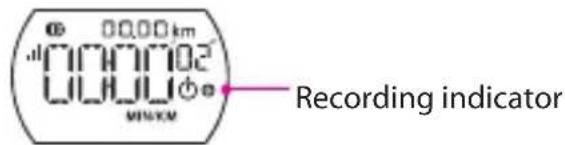
text_image
00.00 km Recording indicatorNote: Please go outdoors to acquire GPS signal when you see "Find GPS" on the screen.
12

Mark Lap

text_image
Lap mode Recording indicator- Start an activity first by short pressing START/STOP.
- Short press LAP to mark lap.
View Exercise Info
View Time/Training Analysis Display
By default, time and training analysis are shown on LINE2. Press EXERCISE/BACK (LINE2) to change display.
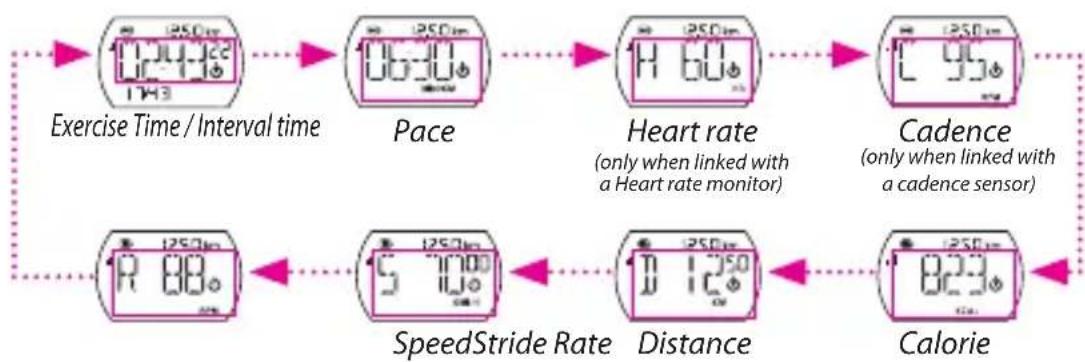
flowchart
graph LR
    A["Exercise Time / Interval time"] --> B["Pace"]
    B --> C["Heart rate (only when linked with a Heart rate monitor)"]
    C --> D["Cadence (only when linked with a cadence sensor)"]
    D --> E["Calorie"]
    E --> F["Distance"]
    F --> G["SpeedStride Rate"]
    G --> H["Speed Stride Rate"]
    H --> I["Balance/Time Scale"]

Note: The type of data displayed depends on the current mode:
Total time is displayed when an activity is started.
Lap info appears only when training is set to Lap mode.
Interval time appears only when training is set to Interval mode.
ETA (Estimated Time of Arrival) appears only when training is set to distance.
Screen legends:•
| H = Heart Rate S = Speed = Distance | 3 |
| C = Cadence R = Stride Rate |
If the screen below appears, the device cannot detect the sensor. Adjust the • sensor and connect again.

Set Training
Use the Training setting to select the type of training you want. Training can be based on easy, zone, lap, or interval.
Note: After setting the Training mode, short press START/STOP to record the results of your training.
By Time/Distance / Calories
Training can be set by time, distance, or calories burned.

flowchart
graph LR
    A["TRAI Training Time"] --> B["EASY"]
    B --> C["TIME"]
    C --> D["(Set value)"]
    D --> E["(Displayed info varies)"]
    E --> F["(Displayed screen varies depending on selected training)"]
    F --> A
By Heart Rate / Pace / Speed
Training can be set by heart rate, pace, or speed.

flowchart
graph LR
    A["0.00012 TMS"] --> B["TRAI"]
    B --> C["ZONE"]
    C --> D["HR"]
    D --> E["(Set value)"]
    E --> F["(Displayed info varies)"]
    F --> G["(Displayed screen varies depending on selected training)"]
    style A fill:#f9f,stroke:#333
    style B fill:#ccf,stroke:#333
    style C fill:#cfc,stroke:#333
    style D fill:#fcc,stroke:#333
    style E fill:#cff,stroke:#333
    style F fill:#ffc,stroke:#333
    style G fill:#fcc,stroke:#333

By Interval
Use the Interval setting to specify the interval between training, warm up, and cool down time. By default, warm up and cool down time are set to 10 minutes.
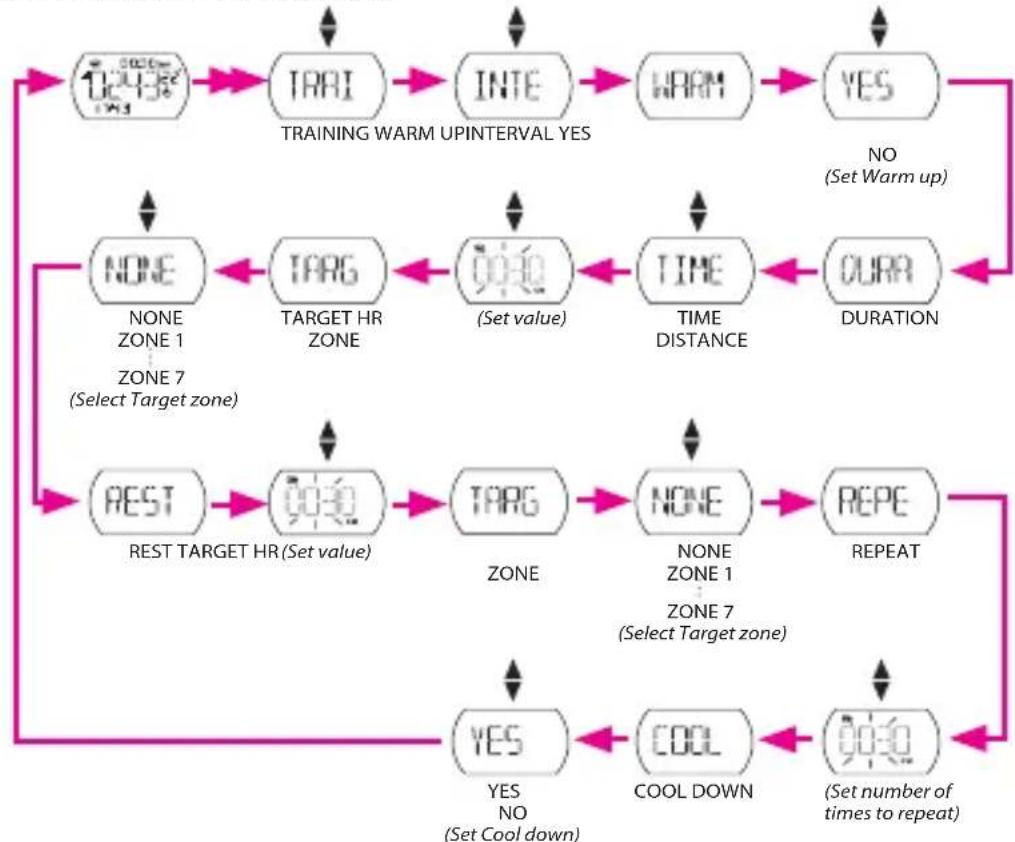
flowchart
graph TD
    A["100%"] --> B["TARI"]
    B --> C["INTE"]
    C --> D["WARM"]
    D --> E["YES"]
    E --> F["NO (Set Warm up)"]
    F --> G["OUR"]
    G --> H["DURATION"]
    H --> I["TIME"]
    I --> J["SET value"]
    J --> K["TARG"]
    K --> L["TARGET HR ZONE"]
    L --> M["NONE ZONE 1"]
    M --> N["NONE ZONE 7 (Select Target zone)"]
    N --> O["REST TARGET HR (Set value)"]
    O --> P["TARG"]
    P --> Q["NONE ZONE 1"]
    Q --> R["REPEAT"]
    R --> S["REPE"]
    S --> T["COOL DOWN"]
    T --> U["SET number of times to repeat"]
    U --> V["COOL"]
    V --> W["YES NO (Set Cool down)"]
    W --> X["REST TARGET HR (Set value)"]
    X --> Y["TARG"]
    Y --> Z["NONE ZONE 1"]
    Z --> AA["REPEAT"]
By Lap Distance / Lap Location
Use Lap by Distance to specify the distance of each lap. After running a specified distance, Cardio 30 will automatically mark the lap.
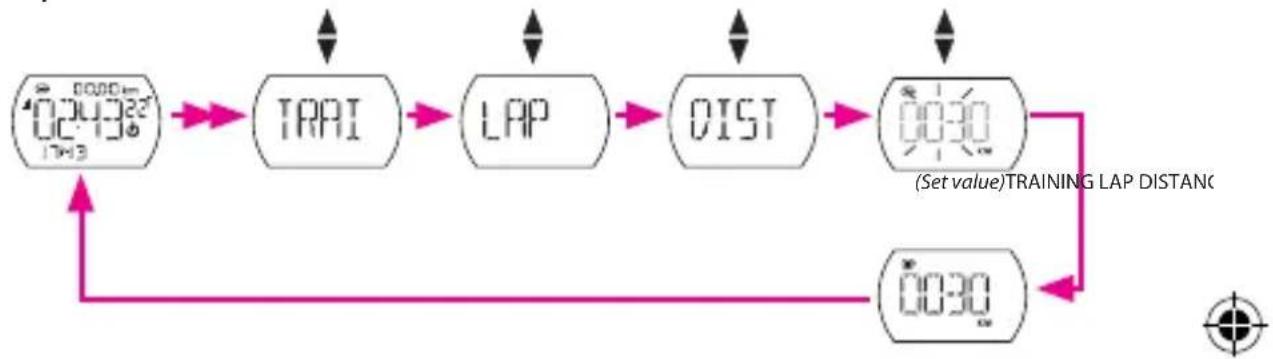
flowchart
graph LR
    A["0.000m 17x3"] --> B["TRAI"]
    B --> C["LAP"]
    C --> D["DIST"]
    D --> E["0.030"]
    E --> F["(Set value)TRAINING LAP DISTANCE"]
    F --> G["0.030"]
    G --> H["End"]
Use Lap by Location setting to set your current location as the lap point. Upon reaching the lap point, Cardio 30 will automatically mark the lap.

flowchart
graph LR
    A["1743"] --> B["TRAI"]
    B --> C["LAP"]
    C --> D["LOCA"]
    D --> E["1743"]

Link Sensors
Use the Link setting to pair sensors and other optional accessories to Cardio 30.

flowchart
graph LR
    A["400000Hz UCL12o TH3"] --> B["LINK"]
    B --> C["FOOT"]
    C --> D["OFF"]
    D --> E["(Displayed icon varies depending on selected sensor)"]
    style A fill:#f9f,stroke:#333
    style B fill:#ccf,stroke:#333
    style C fill:#cfc,stroke:#333
    style D fill:#fcc,stroke:#333
    style E fill:#cff,stroke:#333
Note: Choose SCAN if it is the first time to pair with the sensor. Choose ON if the sensor has been paired before.
View Training Record
Use File to view your training history.
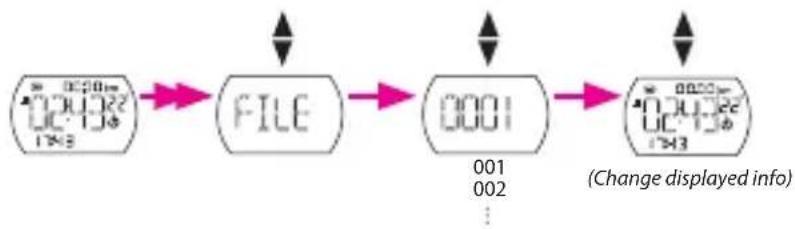
flowchart
graph LR
    A["001"] --> B["002"]
    B --> C["003"]
    C --> D["Change displayed info"]
Turn GPS On/Off
Use the GPS setting to turn GPS on or off.
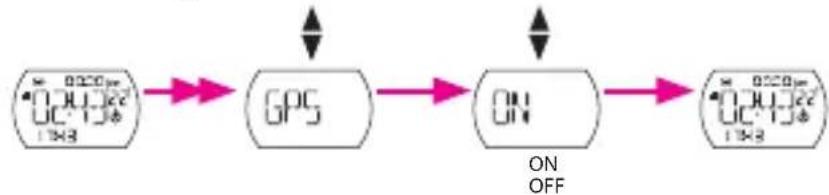
flowchart
graph LR
    A["Digital Display"] --> B["GPS"]
    B --> C["ON"]
    C --> D["OFF"]
    style A fill:#f9f,stroke:#333
    style B fill:#ccf,stroke:#333
    style C fill:#cfc,stroke:#333
    style D fill:#fcc,stroke:#333
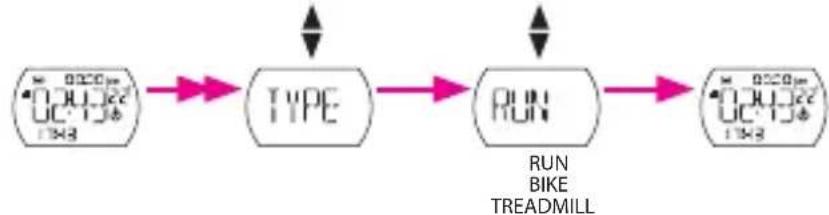
Set Training Type
Use the Type setting to select the training type: RUN, BIKE or TREADMILL.
flowchart
graph LR
    A["Timer"] --> B["TYPE"]
    B --> C["RUN"]
    C --> D["Treadmill"]
    style A fill:#f9f,stroke:#333
    style B fill:#ccf,stroke:#333
    style C fill:#cfc,stroke:#333
    style D fill:#fcc,stroke:#333
Stride Length
You can calibrate stride length by fixed 800m or input your own stride length manually.

flowchart
graph LR
    A["0.000μm<br>0.000μs<br>1.0Hz"] --> B["STRI"]
    C["0.000μm<br>0.000μs<br>1.0Hz"] --> D["CALI"]
    B --> E["STRIDE LENGTH CALIBRATE (Fixed at 800m)<br>SET (manual input)"]
    D --> F["0.000μm<br>0.000μs<br>1.0Hz"]

Note: Availability of the Stride Length setting depends on the selected training type: Stride length is not available in BIKE training.
In RUN training, CALIBRATE is not available because the built-in sensor calibrates • your stride length automatically or you can manually input it by SET.
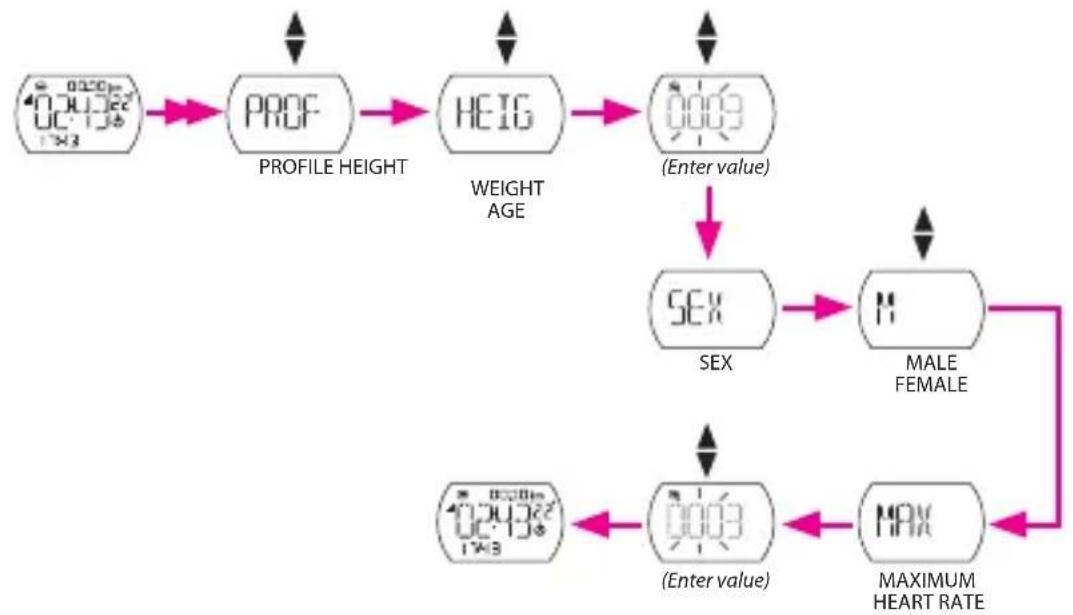
Set Profile
Use Profile to enter or update your profile.
Note: All information must be entered accurately. Missing or inaccurate data may cause inconsistencies of training results.
flowchart
graph TD
    A["Profile Height"] --> B["PROF"]
    B --> C["HEIG"]
    C --> D["(Enter value)"]
    D --> E["SEX"]
    E --> F["MALE FEMALE"]
    F --> G["(Enter value)"]
    G --> H["MAXIMUM HEART RATE"]
    H --> I["MAX"]
    style A fill:#f9f,stroke:#333
    style B fill:#ccf,stroke:#333
    style C fill:#cfc,stroke:#333
    style D fill:#fcc,stroke:#333
    style E fill:#cff,stroke:#333
    style F fill:#ffc,stroke:#333
    style G fill:#cfc,stroke:#333
    style H fill:#fcc,stroke:#333
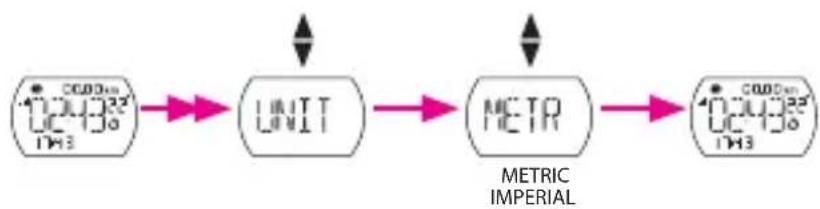
Set Unit
Use the Unit setting to set the default unit of measurement.
flowchart
graph LR
    A["1000nm"] --> B["UNIT"]
    B --> C["METR"]
    C --> D["1000nm"]
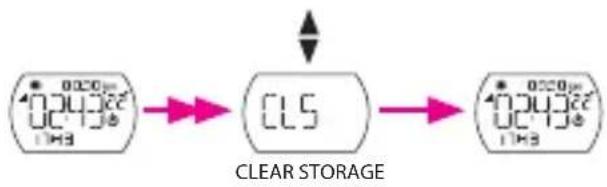
Clear Storage
Use Clear Storage to delete all training and lap records in Cardio 30.
Note: Make sure you have backed up all your data through the Bryton Bridge application before using this function.
flowchart
graph LR
    A["0.020μs"] --> B["Clear Storage"]
    B --> C["0.020μs"]
Icons
| Icon Item Solid icon | Flashing icon | ||
 | Battery icon | Battery level Battery charging | |
 | - Battery low | ||
 | GPS icon GPS | signal level Searching GPS signal | |
 | Memory icon | Memory full, must clear storage | - |
 | Record icon - | Recording in progress | |
 | Heart rate icon | Linked with heart rate monitor | Pairing with heart rate monitor in progress |
  | Foot pod or cadence icon | Linked with food pod or cadence sensor | Pairing with foot pod or cadence sensor in progress |
 | Speed sensor icon | Linked with speed sensor | Pairing with speed sensor in progress |
 | Alarm icon Alarm is set - | ||
 | Stopwatch icon | Stopwatch is set - | |
 | Clock icon Clock mode is set - | ||
Specifications
Cardio 30
| Item Description | |
| Display 23.18 x 14 mm | Positive FSTN Segemet LCD |
| Physical size 4.2 x 6.9 x 1.25 cm | |
| Weight 47 g | |
| Operating temperature | -10°C ~ 50°C |
| Battery charge temperature | 0°C ~ 40°C |
| Battery life Up to 35 days in clock modeUp to 8.5 hours in training mode with GPS on | |
| GPS Integrated high-sensitivity Sirf IV receiver with embedded patch antenna | |
| RF transceiver 2.4 GHz ANT+ transceiver with embedded antenna | |
| Storage Embedded 512 MB serial flash | |
| G-Sensor 3-axis acceleration sensor | |
Screen Terminologies
| Terminology Screen Display | |
| Alarm ALM | |
| Stopwatch STW | |
| Time format FMT | |
| Language LANG | |
| Daily DAY | |
| Weekday WDAY | |
| Time1 TM1 | |
| Time2 TM2 | |
| Clear storage CLS | |
| Combo sensor DUAL | |
| Speed SPD | |
| Calorie CAL | |
| Exercise EXE | |
| HR Zone 1 HRZ1 | |


Cardio 30
Guide d'utilisation
FR
text_image
EXERCISE BACK/LNE2 START/STCP GPS TIME 05:20 13:00:00 05:00 DÉMARRER/ARRÊTER/ HEURE GPS OK/RÉGLAGE/ ALIMENTATION Cardio30 LAP TOUR/STW GPSbb.brytonsport.com
FR
Table des matières
Introduction 3
Prise en main 4
Modes ....5
Boutons 6
Structure du menu 7
Mode Horloge......8
Par Heure/Distance/Calories
flowchart
Process flowchart for a three-zone control system with training, training, and testing phases, including key events like KEIN, ZIEL, and JA.text_image
03:04 12:00:08 03:08 05:08Data
Orologio/ Spia allarme
Ora 2
Orario secondario
text_image
@ 00.00 km 00:41:22 00:43:22 MIN/CMDistanza percorsa
LINEA2
text_image
00:00 km MIN/KMDistancia recorrida
LÍNEA2
Training instellen ....14
Link sensoren....18
Trainingrecord bekijken......18
* HRM of SPD/CAD-senor vereist
Aan de slag
flowchart
graph LR
    A["0.30% 0.50%"] --> B["TAAL"]
    B --> C["0U"]
    C --> D["0.30% 0.50%"]
NL
Oefenmodus
text_image
00.00 km 10:44:22 00:43 MINIKMAfgelegde afstand
REGEL2
flowchart
graph TD
    A["10000"] --> B["TRNG"]
    B --> C["INTL"]
    C --> D["OPW"]
    D --> E["JA"]
    E --> F["NEE (Opwarmen instellen)"]
    F --> G["OUUR"]
    G --> H["DUUR"]
    H --> I["REPEAT"]
    I --> J["AFKOELN"]
    J --> K["JA NEE (Aantal herhalingen instellen)"]
    K --> L["RA"]
    L --> M["NEE (Selecteer doelzone)"]
    M --> N["RUST DOEL"]
    N --> O["DOEL (Waarde instellen)"]
    O --> P["DOEL (Waarde instellen)"]
    P --> Q["DOEL (Waarde instellen)"]
    Q --> R["NEET (Selecteer doelzone)"]
    R --> S["GEEN ZONE 1"]
    S --> T["NEE (Selecteer doelzone)"]
    T --> U["NEET (Selecteer doelzone)"]
    U --> V["NEET (Selecteer doelzone)"]
    V --> W["NEET (Selecteer doelzone)"]
    W --> X["NEET (Selecteer doelzone)"]
    X --> Y["NEET (Selecteer doelzone)"]
    Y --> Z["NEET (Selecteer doelzone)"]
    Z --> AA["NEET (Selecteer doelzone)"]
    AA --> AB["NEET (Selecteer doelzone)"]
    AB --> AC["NEET (Selecteer doelzone)"]
    AC --> AD["NEET (Selecteer doelzone)"]
    AD --> AE["NEET (Selecteer doelzone)"]
    AE --> AF["NEET (Selecteer doelzone)"]
    AF --> AG["NEET (Selecteer doelzone)"]
    AG --> AH["NEET (Selecteer doelzone)"]
    AH --> AI["NEET (Selecteer doelzone)"]
    AI --> AJ["NEET (Selecteer doelzone)"]
    AJ --> AK["NEET (Selecteer doelzone)"]
    AK --> AL["NEET (Selecteer doelzone)"]
    AL --> AM["NEET (Selecteer doelzone)"]
    AM --> AN["NEET (Selecteer doelzone)"]
    AN --> AO["NEET (Selecteer doelzone)"]
    AO --> AP["NEET (Selecteer doelzone)"]
    AP --> AQ["NEET (Selecteer doelzone)"]
    AQ --> AR["NEET (Selecteer doelzone)"]
    AR --> AS["NEET (Selecteer doelzone)"]
    AS --> AT["NEET (Selecteer doelzone)"]
    AT --> AU["NEET (Selecteer doelzone)"]
    AU --> AV["NEET (Selecteer doelzone)"]
    AV --> AW["NEET (Selecteer doelzone)"]
    AW --> AX["NEET (Selecteer doelzone)"]
    AX --> AY["NEET (Selecteer doelzone)"]
flowchart
graph LR
    A["GPS"] --> B["ANN"]
    B --> C["AAN/UIT"]
Trainingtype instellen
text_image
03:04 12:00:08 12:00:08 05:08Premir brevemente
EXERCÍCIO/VOLTAR

Manter premido
EXERCÍCIO/VOLTAR

text_image
42.50 km 0419 MIN/KMO relógio de pulso típico, com:
Data e hora•
Alarme•
Cronómetro•
Oferece análise de treino:
Hora•
Distância•
Ritmo•
Velocidade•
Frequência •
cardíaca
Caloria•
Lap•
flowchart
graph LR
    A["October 2023"] --> B["IPO"]
    B --> C["Corr"]
    C --> D["October 2024"]
    style A fill:#f9f,stroke:#333
    style D fill:#f9f,stroke:#333
    note right of B: CORRIDA BICICLETA PASSADEIRA
Accessories (Optional)
Heart Rate Monitor Moniteur de fréq. card. Herzfrequenzmesser Cardiofrequenzimetro Monitor de ritmo cardíaco Hartslagmonitor Sensor de frequência Cardiaca
1

natural_image
Illustration of a curved object with arrows indicating direction, no text or symbols present2

natural_image
Simple line drawing of a circular device with a curved arrow and circular button, no text or symbols present.3
natural_image
Diagram of a mechanical lever mechanism with rotating head and base (no text or symbols)4

natural_image
Diagram of a mechanical component with a circular feature and directional arrow (no text or symbols):5
natural_image
Diagram showing a faucet being inserted into a water tank (no text or symbols present)6

natural_image
Illustration of a human torso with a belt and inset showing a close-up of the blade structure (no text or symbols)Speed/Cadence Sensor •Capteur de vitesse/Capteur de cadence • Geschwindigkeitssensors/Kadenzsensor • Sensore di velocità/Sensore di cadenza • Sensor de velocidad/Sensor de cadencia • Snelheidssensor/Ritmesensor • Sensor de Velocidade/Cadência

natural_image
Illustration of a square electronic device with a circular dial and an arrow indicating rotation (no text or symbols)
natural_image
Diagram of a device with a magnified inset showing internal components (no text or symbols)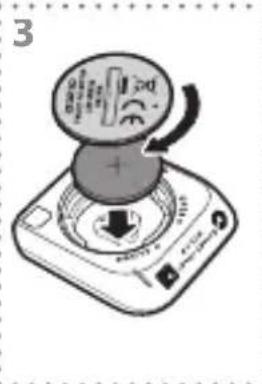
natural_image
Illustration of a mechanical device with a circular dial and a plus button, showing motion arrows (no text or symbols)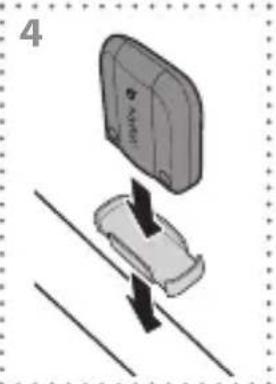
natural_image
Diagram showing a car inside a vehicle's seat with directional arrows indicating motion (no text or symbols)
text_image
5a 3 177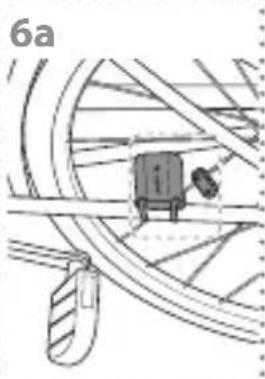
natural_image
Technical line drawing of a mechanical assembly with no visible text or symbols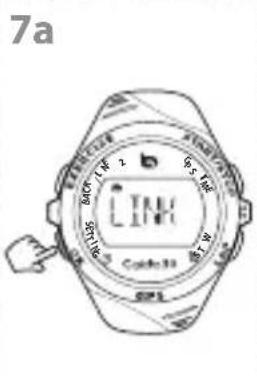
text_image
7a LINK Code 33
text_image
8a
Bike Mount • Mountainbike • Vélo tout terrain • Bicicleta de montaña • Mountain Bike • Mountainbike • Bicicleta de montanha
1
natural_image
Diagram of a mechanical device with directional arrows indicating motion (no text or symbols)2

natural_image
Illustration of a hand holding a small object with an arrow indicating direction (no text or symbols)3

natural_image
Illustration of a hand holding a cylindrical object with a magnified inset showing a close-up of the ring (no text or symbols)3

| EN Specification Heart Rate Monitor Speed/Cadence Sensor | ||
| Physical size 66 x 37 x 11 mm | 37.5 x 35 x 12 mm | |
| Weight 44 g 25 g | ||
| Water resistance 10 ATM 1 ATM | ||
| Transmission rate 3 m 3 m | ||
| Battery life 1 hour per day for | 16 months (480 hours) 1 hour per day for 22 months (660 hours) | |
| Operating temperature 5°C ~ | 40°C 5°C ~ 40°C | |
| Radio frequency/protocol 2.4GHz / Dynastream ANT + Sport wireless communications protocol | 2.4GHz / Dynastream ANT + Sport wireless communications protocol | |
Note: Accuracy may be degraded by poor sensor contact, electrical interference, and receiver distance from transmitter.