Cardio 40E - Sports Watch Bryton - Free user manual and instructions
Find the device manual for free Cardio 40E Bryton in PDF.

| Product Type | Sports Watch |
| Brand | Bryton |
| Model | Cardio 40E |
| Display | 1.28-inch color LCD |
| Dimensions (Case) | 45 x 45 x 13 mm |
| Weight | 50 g |
| Battery Type | Rechargeable lithium-ion |
| Battery Life | Up to 14 days in smartwatch mode, up to 24 hours with GPS |
| Water Resistance | 5 ATM (50 meters) |
| GPS | Built-in GPS + GLONASS |
| Heart Rate Monitor | Optical heart rate sensor |
| Activity Tracking | Steps, distance, calories, sleep, heart rate |
| Sport Modes | Running, cycling, swimming, hiking, and more |
| Connectivity | Bluetooth 4.0 |
| Compatible OS | iOS and Android |
| Charging Method | USB clip charger |
| Memory | Up to 200 hours of activity data |
| Care & Cleaning | Wipe with a soft, damp cloth. Avoid harsh chemicals. |
| Safety | Not a medical device; consult doctor for health metrics. |
| Spare Parts & Repairability | Contact Bryton support for replacement straps or battery service. |
| General Information | Designed for outdoor and fitness enthusiasts. |
Frequently Asked Questions - Cardio 40E Bryton
User questions about Cardio 40E Bryton
0 question about this device. Answer the ones you know or ask your own.
Ask a new question about this device
Download the instructions for your Sports Watch in PDF format for free! Find your manual Cardio 40E - Bryton and take your electronic device back in hand. On this page are published all the documents necessary for the use of your device. Cardio 40E by Bryton.
USER MANUAL Cardio 40E Bryton
text_image
SAT 05/05 10:30 AM Cardio 40 User's Guide brytonCardio 40

text_image
1 SAT 05/05 10:30 AM 2 brylan 3 OK CAP1 Light / Power (\*)
Press and hold to turn the • device on or off.
Press to turn on or off the • backlight.
2 Back (D)
Pr• ess to return to the previous page or cancel an operation.
In Training mode, press to • pause or stop recording log. While the recording is paused, press again to stop.
3 OK (OK)
In Clock view, press to • enter the menu mode. In Menu, press to enter or • confirm a selection. When recording, press to • mark the lap.
4 Up (▲)
In Menu, press to move up to scroll through menu options. Press and hold to fast scroll up through menu options.
5 Down (▼/□)
In Menu, press to move down to scroll through menu options. Press and hold to fast scroll down through menu options. In meter view, press to switch meter screen page.
Getting Started
Turn On/Off
Press and hold to turn the device on or off.
Reset
To reset the device, press and hold all three keys (OK/▼) at the same time.
Initial Setup
When turning the device on for the first time, the setup wizard appears on screen. Follow the instructions to complete setup.
- Select the display language.
- Select the unit of measurement.
- Enter your "user profile". It is recommended to input the data. Data accuracy will highly affect your training analysis.
- Read and accept the Safety Agreement.
Connect, Sync, and Charge
- Connect the device to a PC using the supplied USB charging clipper.
- Download the Bryton Bridge 2 application at brytonsport.com and sync with the device.
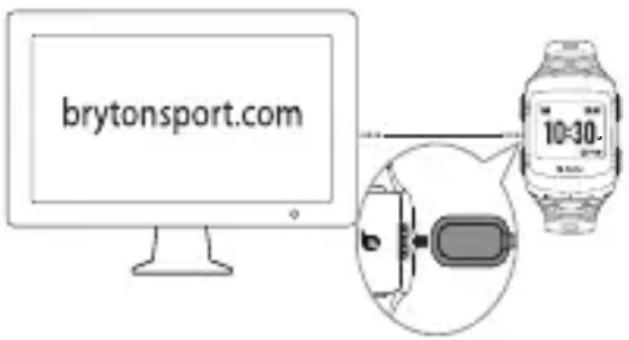
text_image
brytonsport.com 10:30.Keep the device connected to the PC to charge the battery. Attach the USB charging clipper onto the device and plug the other end to a PC.
Note:
For first time use, charge the battery • for about 3 hours.
Please send the watch back to local distributor for any battery issues.
Improper battery replacement may cause an explosion. When replacing a new battery, use only the original battery or a similar type of battery specified by the manufacturer.
Disposal of the used batteries must be carried out in accordance to the regulations of your local authority.

For better environmental protection, waste batteries should be collected separately for recycling or special disposal.
View Status Bar

text_image
GPS G GPS on/off status GPS Fixed Battery level Sensors are successfully linked to Cardio 40 Recording indicator Meter modeIcons
| iconDescription | |
| GPS Signal Strength | |
 | No signal |
 | Poor * |
 | Fair ** |
 | Good ** |
| GPS Positioning Status | |
 | No signal (not fixed) |
 | Weak signal |
 | Strong signal |
 | Heart Rate Sensor Active |
| iconDescription | |
| Training mode | |
| Meter mode | |
| Log Record in Progress | |
| Recording is paused | |
| Power Status | |
| Full battery | |
| Half battery | |
| Low battery | |
Note:
Only the active icons are displayed on the screen.
* Please go to an open area for better reception.
** When blinking, please wait until it stops blinking.
Clock View

text_image
Current day SAT 05/05 Current date Time 1 (local time) Time 2 (alternate time) 10:30 AM 04:30 AM Alarm icon Reminder iconSet Time
- Press ▼ to enter the menu mode.
- Press ▲/▼ to select Settings > Watch > Time > Set Time 1 or Set Time 2 and press OK to enter its submenu.
- Press ▲/▼ to select the desired setting and press OK to confirm.

text_image
Time Set Time 1 Set Time 2 OFFSet Alarm (Time1)
- In Menu, press ▲/▼ to select Settings > Watch > Alarm and press OK to enter its submenu.
- Press ▲/▼ to select the desired setting and press OK to confirm.
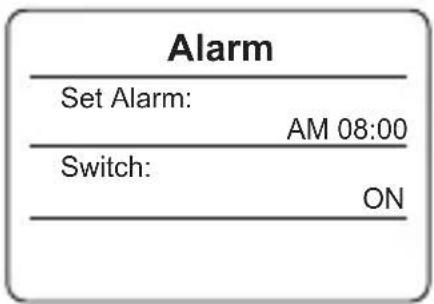
text_image
Alarm Set Alarm: AM 08:00 Switch: ONNote: To enable the alarm, select Settings > Watch > Alarm > Switch > On.
Exercise/Training
During exercise or training, Cardio 40 allows you to measure and record your running activities and displays your current performance.
Note: Displayed information varies on exercise mode and user preference.
Ready for Simple Training
- Press ▼ to enter the menu mode.
-
Press ▲/▼ to select Train & Test and press OK to enter Training menu.
-
To set a simple workout, select To Plan > Simple > By Time, By Distance, or By Calorie.
- Set the training target and press OK to confirm.
Note: Select Yes to save the workout. To perform the workout, go to Train & Test > My Workout.
- Enter the workout name using the on-screen keyboard.
When finishing the name, choose END to save the workout name.
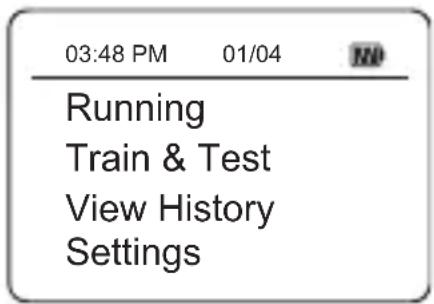
text_image
03:48 PM 01/04 Running Train & Test View History Settings
text_image
Simple By Time By Distance By Calorie
text_image
Simple Save to my workout? YesCustomize Workouts
To set a customize workout, select Train & Test > To Plan > Customize > Add New. Then set the training target and press OK to confirm.
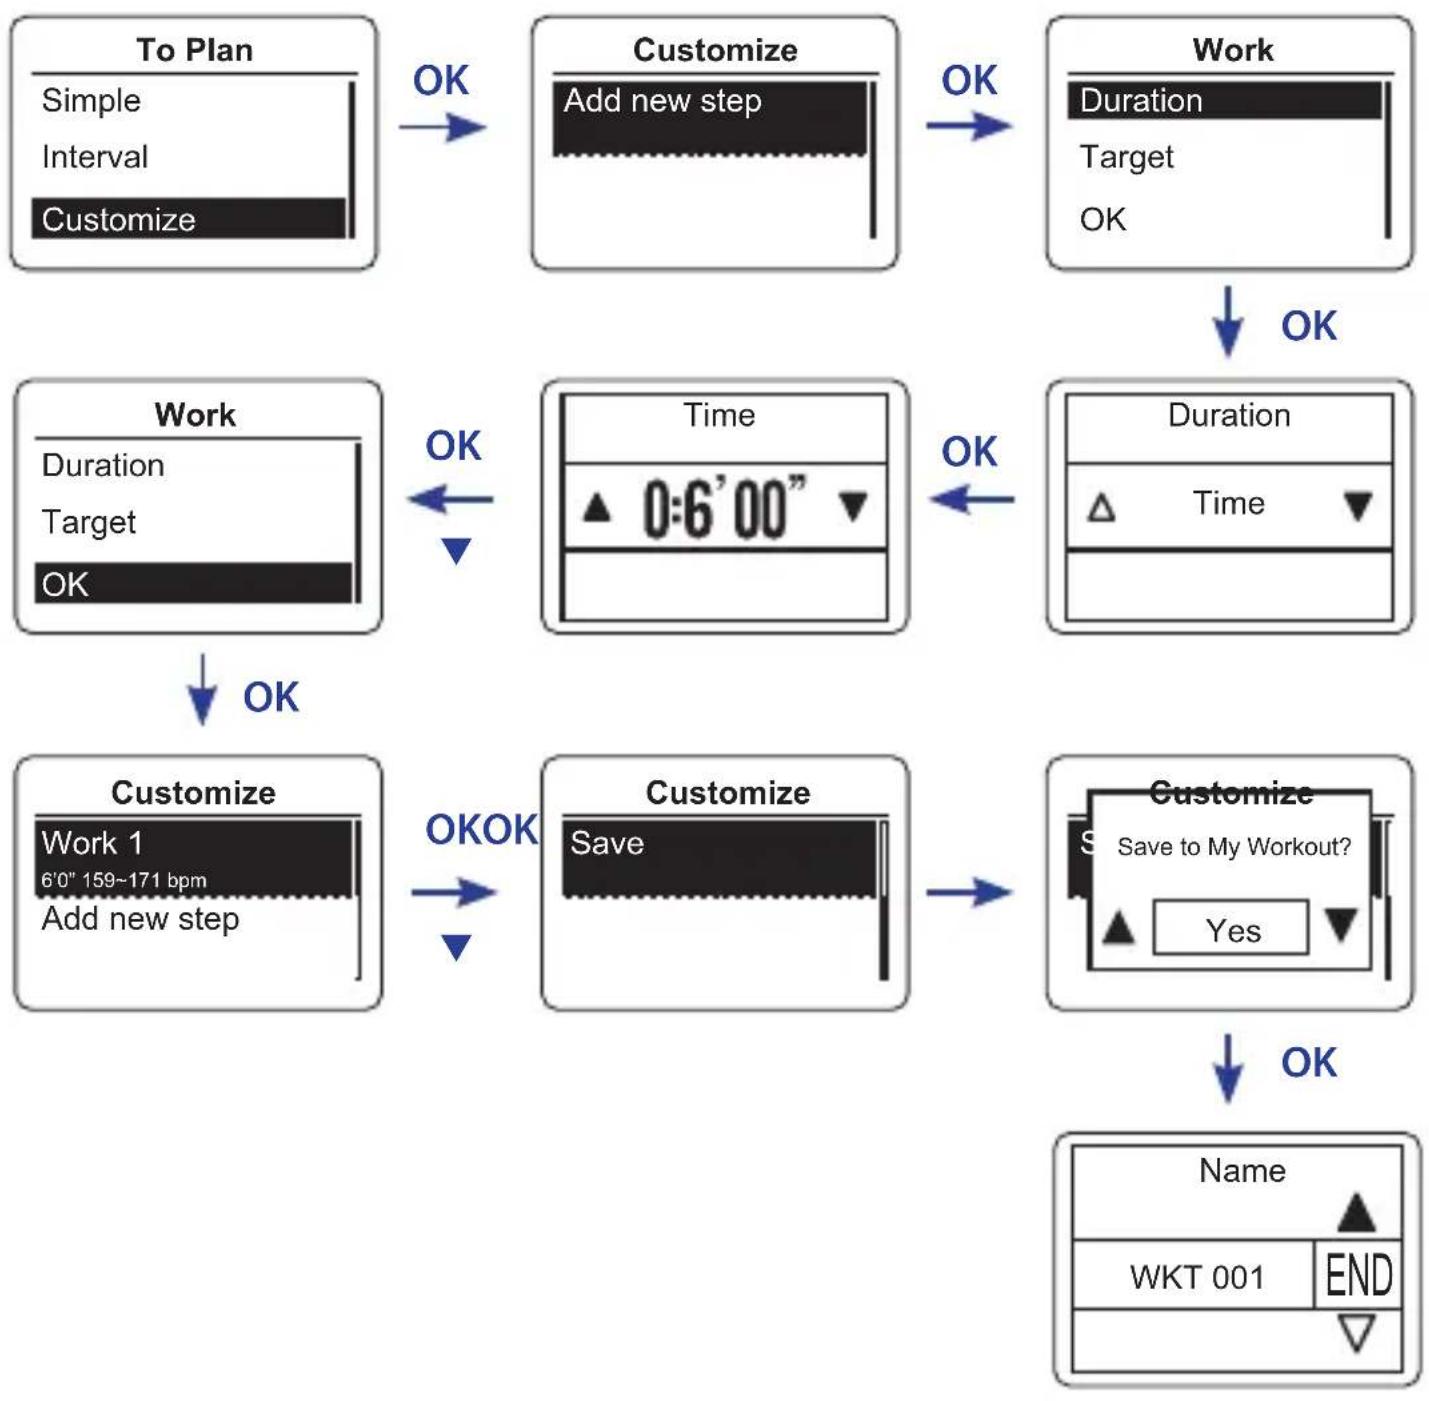
flowchart
graph TD
    A["To Plan\nSimple\nInterval\nCustomize"] -->|OK| B["Customize\nAdd new step"]
    B -->|OK| C["Work\nDuration\nTarget\nOK"]
    C -->|OK| D["Work\nDuration\nTarget\nOK"]
    D -->|OK| E["Customize\nWork 1\n6'0" 159~171 bpm\nAdd new step"]
    E -->|OK| F["Customize\nSave"]
    F -->|OK| G["Customize\nSave to My Workout?\nYes"]
    G -->|OK| H["Name\nWKT 001\END"]
Note: If user does not enter the workout name, the system will automatically label the file name according to the current date and time.
Bryton Test & Workout
- In Menu, press ▲/▼ to select Train & Test and press OK to enter Training menu.
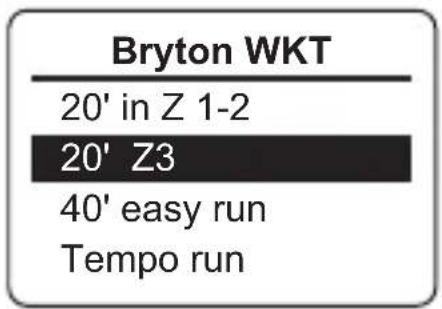
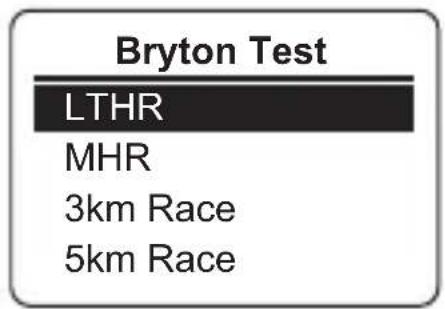
- Press ▲/▼ to select Bryton WKT or Bryton Test and press OK to enter its submenu.
text_image
Bryton WKT 20' in Z 1-2 20' Z3 40' easy run Tempo runBryton Workout
text_image
Bryton Test LTHR MHR 3km Race 5km RaceBryton Test
- Press ▲/▼ to select the desired setting and press OK to confirm.
Note: When the 🖱️ icon appears on the screen, press ▲ to skip the current Interval.

text_image
1/34 | 85 r 156 147 140 00:05:00Interval Workouts
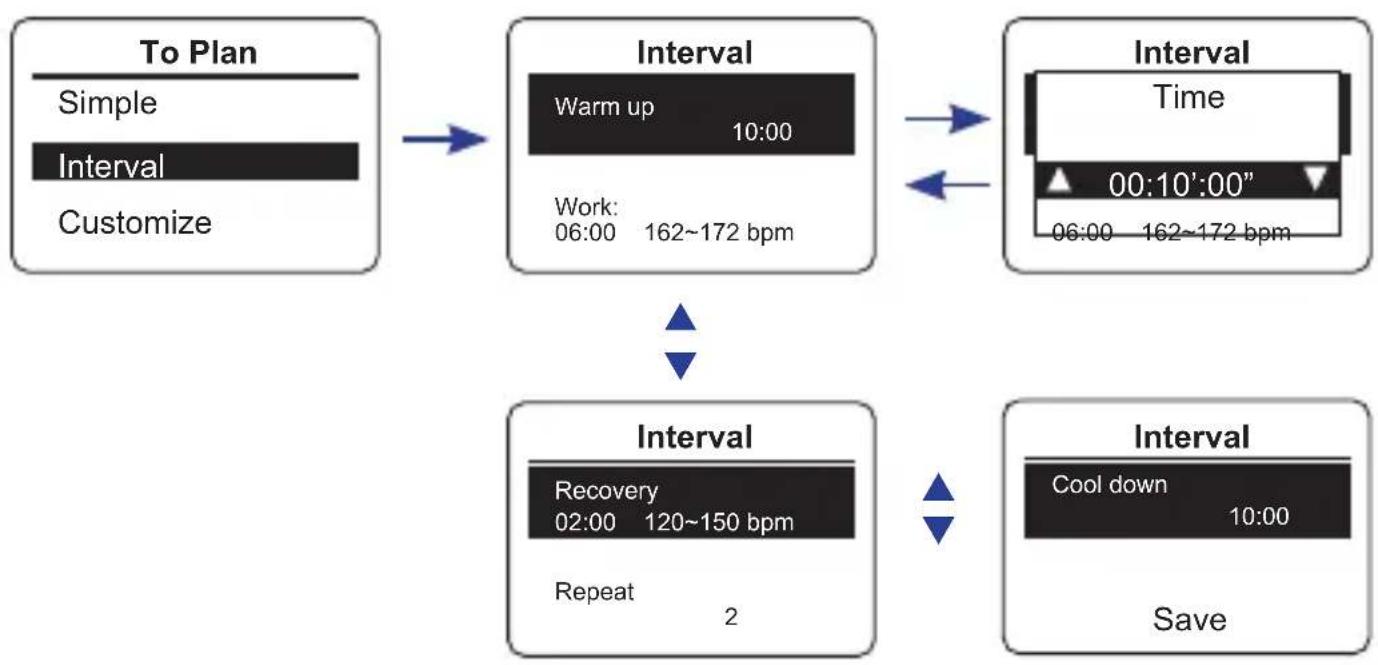
To set an interval workout, select Train & Test > To Plan > Interval. Then set the training target and press OK to confirm.
flowchart
graph TD
    A["To Plan\nSimple\nInterval\nCustomize"] --> B["Interval\nWarm up 10:00\nWork: 06:00 162~172 bpm"]
    B --> C["Interval\nTime\n00:10':00''\n06:00 162~172 bpm"]
    C --> D["Interval\nRecovery\n02:00 120~150 bpm\nRepeat 2"]
    D --> E["Interval\nCool down 10:00\nSave"]
Start / Pause / Stop Exercising/Training
Press • toKstart recording the log.
Press = to pause the recording and press ■ gain to stop the recording.
Note:
During exercising/training, press and hold □ to enter Shortcut menu.
When recording, press ■vice to stop recording.

text_image
1/1 | 85 rpm Do you want to stop? Yes 00:05:00My Lap
To start a Lap workout, select Settings > Exercise > My Lap > Distance or Location and press OK. Then set the training target and press OK to confirm.
Mark Lap
Start an activity first by pressing OK. While recording, press OK to mark lap. When using Lap, the Lap screen will be displayed while you are doing exercise or training.
View History
-
In Menu, press ▲/▼ to select View History and press OK to confirm.
-
Use ▲/▼ to view your history. Choose More for more details.

text_image
12/2512:23 00:06:00run 12km 5 m 512kcal 5laps More 2/5Delete All Exercise/Training Info
- In Menu, press ▲/▼ to select View History and press OK to confirm.
- Press ▲/▼ to select Delete All and press OK to enter its submenu. A "Please backup data first. Erase?" message appears on the screen. To delete the data, press ▲/▼ to select Yes and press OK to confirm.

text_image
Delete Please backup data first. Erase? YesSetting Reminder
- In Menu, press ▲/▼ to select Settings > Exer. Remind > Time, Distance, Stride Rate, HR, or Pace and press OK to enter the submenu.
- Press ▲/▼ to set the desired setting and press OK to confirm.

flowchart
graph TD
    A["Time: Exercise Exer. Remind"] --> B["HR"]
    B --> C["90"]
    C --> D["180"]
    D --> E["Pace"]
    E --> F["7"]
    F --> G["5"]
Cardio 40 User's Guide10
Link Sensors
Use the Link setting to pair sensors to Cardio 40.
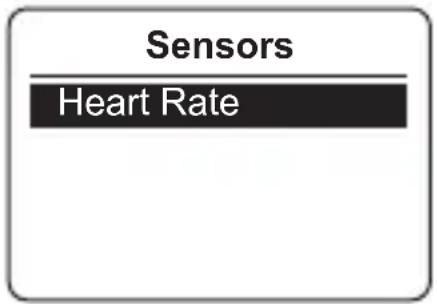
- In Menu, press ▲/▼ to select Settings > Sensors > Heart Rate and press OK to enter its submenu.
text_image
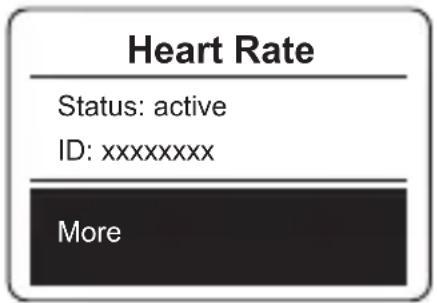
Sensors Heart Rate- Press ▲/▼ to select More and press OK to enter the selected sensor submenu.
- When the sensor is successfully connected, the sensor ID will be displayed on the screen. Verify that the sensor ID is correct.
text_image
Heart Rate Status: active ID: xxxxxxxxx MoreNote: The information on the sensors ID are included in the package.
- Press ▲/▼ to select the desired option and press OK to confirm. Rescan• : rescan to detect the sensor. Turn Off• (*only if the device has paired with the sensor): disable the sensor.

text_image
Sensor Rescan Turn OffCustomize the Display Settings
- In Menu, press ▲/▼ to select Settings > Exercise > Meter > Meter > Meter 1, Meter 2, Meter 3, or Meter 4 and press OK to enter its submenu.
Note: Lap only has two options (Meter 1 / Meter 2).
-
Press ▲/▼ to select the number of data fields and press OK to confirm.
-
Press ▲/▼ to select the item field that you want to customize, and press OK to confirm the selection.
- Press ▲/▼ to select the desired setting and press OK to confirm.
Note: After the setting is complete, the Lap screen appears only when Lap function starts.
Personalize User Profile
- In Menu, press ▲/▼ to select Settings > Profile > User and press OK to enter its submenu.
- Press ▲/▼ to select the setting that you want to change and press OK to confirm.
Change Backlight Off Settings
- In Menu, press ▲/▼ to select Settings > General > System > Backlight off and press OK to enter its submenu.
- Press ▲/▼ to select the desired setting and press OK to confirm.
Backlight off
5 seconds
15 seconds
30 seconds
1 Mins
Enable Key Tone / Alert
In Menu, press ▲/▼ to select Settings > General > System > Key Tone or Alert and press OK to enter its submenu. Then press ▲/▼ to select ON and press OK to enable the setting.
Note: When the alert is set OFF, the sound will go off during workout and free exercise.
Set the Unit/Language
In Menu, press ▲/▼ to select Settings > General > System > Unit or Language and press OK. Then press ▲/▼ to select the desired setting and press OK to confirm.
View GPS
In Menu, press ▲/▼ to select Settings > General > GPS and press OK.
Full Power• : GPS is set on and provide more accurate position but consume more power.
PowerSaving• : GPS is set on. The GPS positioning will be less accurate but battery hours can be last longer.
Specifications
| Item Description | |
| Display 1.4" Mono LCD | |
| Physical size 42.9 x | 48.4 x 17.7mm |
| Weight 48 g | |
| Operating temperature | -10°C ~ 50°C |
| Battery charge temperature | 0°C ~ 40°C |
| Battery life | Up to 14 days in clock modeUp to 8 hours in training mode in open-sky environment |
| GPS | Integrated high-sensitivity receiver with embedded antenna |
| RF transceiver | 2.4 GHz ANT+ transceiver with embedded antenna |
| G-Sensor 3-axis acceleration sensor | |
*Design and specifications are subject to change without prior notice.