Cardio 35 - Sports Watch Bryton - Free user manual and instructions
Find the device manual for free Cardio 35 Bryton in PDF.

User questions about Cardio 35 Bryton
0 question about this device. Answer the ones you know or ask your own.
Ask a new question about this device
Download the instructions for your Sports Watch in PDF format for free! Find your manual Cardio 35 - Bryton and take your electronic device back in hand. On this page are published all the documents necessary for the use of your device. Cardio 35 by Bryton.
USER MANUAL Cardio 35 Bryton
Exercise/Training 10
Start / Pause / Stop Exercising ..10
Mark Lap ......11
View Exercise/Training Info .....12
Training Settings ......13
Set Training 13
Set LAP training .....17
Link Sensors ....18
View Exercise/Training
Record 21
Using Stopwatch 21
Stride Length 22
Auto Scrolling 23
Clear Storage 23
Icons 24
Specifications ......25
Screen Terminologies .....26
Introduction
Cardio 35 GPS sports watch is for casual activities and professional training. Cardio 35 can accurately calculate and record your location, speed, distance, pace, stride rate, calories, cadence*, heart rate* and more. Your training results can be shared and analyzed at brytonsport.com. With the built-in sensor, no extra foot pod is needed for indoor exercise. Cardio 35 is for both running and cycling activities.
Package Contents
Make sure the following items are in the box:
Cardio 35•
USB cable•
User's Guide•
Optional accessories:
Heart rate monitor•
Speed / Cadence sensor•
* HRM or SPD/CAD sensor is required.
Getting Started
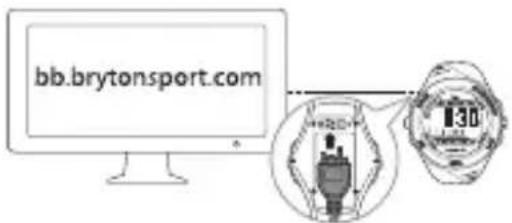
Step 1. Connect, Sync, and Charge
- Connect Cardio 35 to a PC using the supplied USB cable.
- Download the Bryton Bridge 2 application at bb.brytonsport.com and sync with Cardio 35.
text_image
bb.brytonsport.comKeep Cardio 35 connected to the PC to charge the battery.
Note: For first time use, charge the battery for at least 2.5 hours.
Step 2. Turn On
Press button 1 to turn on Cardio 35.
Note: To turn off, long press button 1 for 5 seconds.
Step 3. Initial Setup
For first time use, do the following:
- Select your preferred language.
- Select the unit of measurement.
- Enter your user profile (recommended).
Note: Data accuracy will highly affect your training analysis. -
Select you preferred date format.
-
Enter your max heart rate.
- Go outdoors to acquire GPS signal. Once the GPS signal is fixed, Cardio 35 automatically sets the date and time. To manually set the date and time, refer to Time settings (see page 8).
- Press button 2 to complete setup.
Note: If you want to change your profile, please connect your device to Brytonsport.com and change the setting via My Device -> Manage Device Data. Or go to Settings > Others > Profile and change your settings.
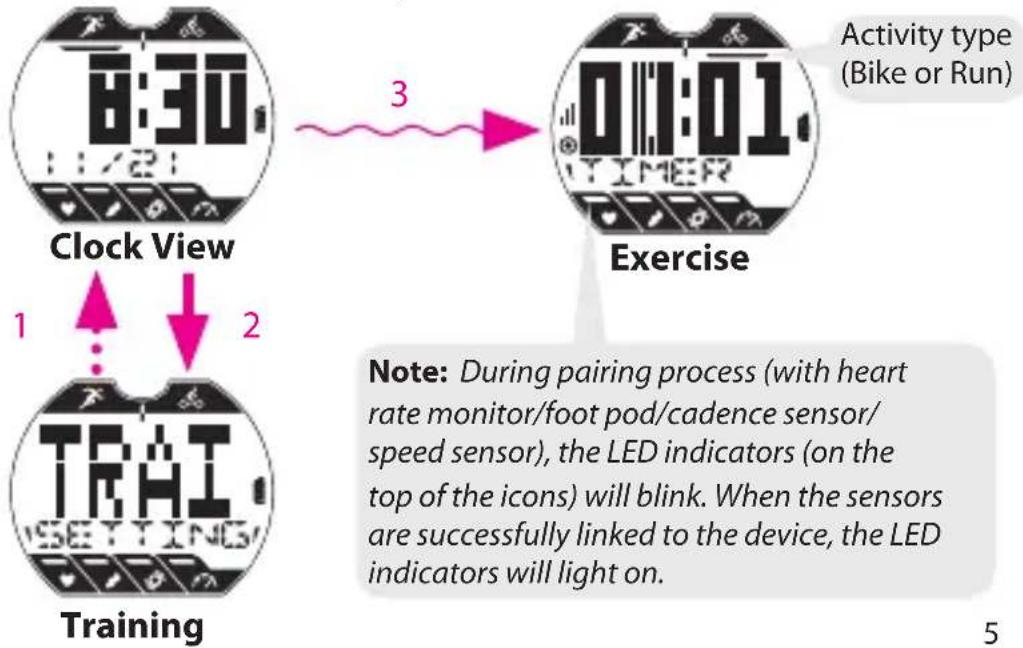
Step 4. Start a training or exercise
Cardio 35 operates in three major modes:
flowchart
graph TD
    A["Clock View"] --> B["Training"]
    B --> C["Exercise"]
    C --> D["Activity type (Bike or Run)"]

    subgraph Training
        E["1: Clock View"]
        F["2: Clock View"]
        G["3: Clock View"]
    end

    subgraph Exercise
        H["0:01:01 TIMER"]
    end

    style A fill:#f9f,stroke:#333
    style B fill:#f9f,stroke:#333
    style C fill:#ccf,stroke:#333
    style D fill:#cfc,stroke:#333
    style E fill:#fcc,stroke:#333
    style F fill:#fcc,stroke:#333
    style G fill:#fcc,stroke:#333
    style H fill:#cff,stroke:#333
Buttons
Cardio 35 has four buttons that are used for multiple functions.
Power/BACK (1)
Press to turn on Cardio 35. Press and hold to turn it off.
After a training/exercise is stopped, press to switch to clock view.
In Setting and Stopwatch modes, press to go back to clock view.
OK (2)
In Clock view, press to access Setting. In Exercise/Training, press to scroll your exercise data.
- In Setting, press to enter or confirm a selection.
In Stopwatch, press to view the file • for lap data.
START/STOP (3)
In Clock view, press to start/pause/stop exercise, and it will also start/pause/stop recording at the same time.
In Setting, press to move up to scroll through menu options.

text_image
1 BACK START/STOP PACS CLOCK B:30 SETTING LAP 2 OK GPS 3 4In Stopwatch, press to start/stop the stopwatch.
LAP (4)
In Clock view, press to switch Bike or Run mode.
In Exercise or Stopwatch, press to mark lap.
In Setting, press to move down to • scroll through menu options.
After stopwatch is stopped, press to • reset the stopwatch.
The table below provides a graphical indication on using the buttons which will be used in later sections.
| Buttons Indication | |
| Power/BACK 1 | ......→ |
| OK 2 | ——→ |
| START/STOP 3 / | ▲ ~~~→ |
| LAP 4 / | ▼ -- → |
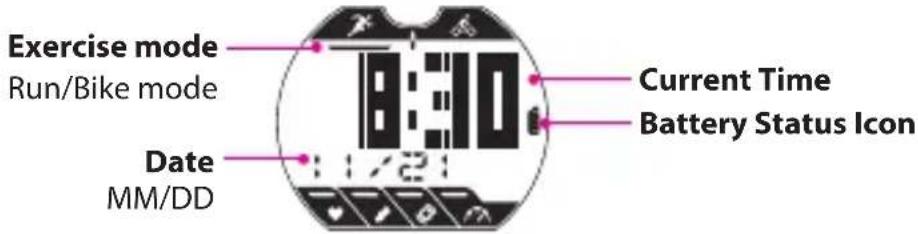
Clock View
There are two types of clock view:
Type 1: Display current time (HH:MM) and date (MM-DD).
text_image
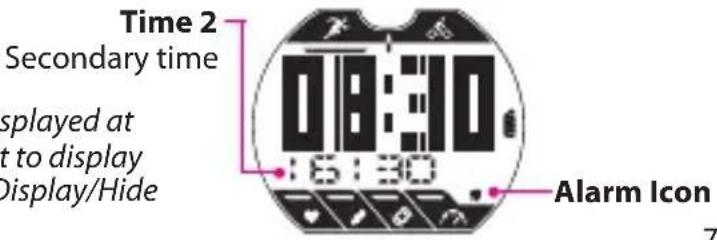
Exercise mode Run/Bike mode Date MM/DD Current Time Battery Status IconType 2: Display current time (HH:MM) and secondary time (24-hour format).
text_image
Time 2 Secondary time displayed at t to display Display/Hide 18:30 Alarm IconNote: By default, "Date" is displayed at "Time 2" location. If you want to display secondary time, please see "Display/Hide Time 2" on page 9.
Clock Settings Auto Calibration by GPS
Use this setting to reset the date and time based on your GPS location.
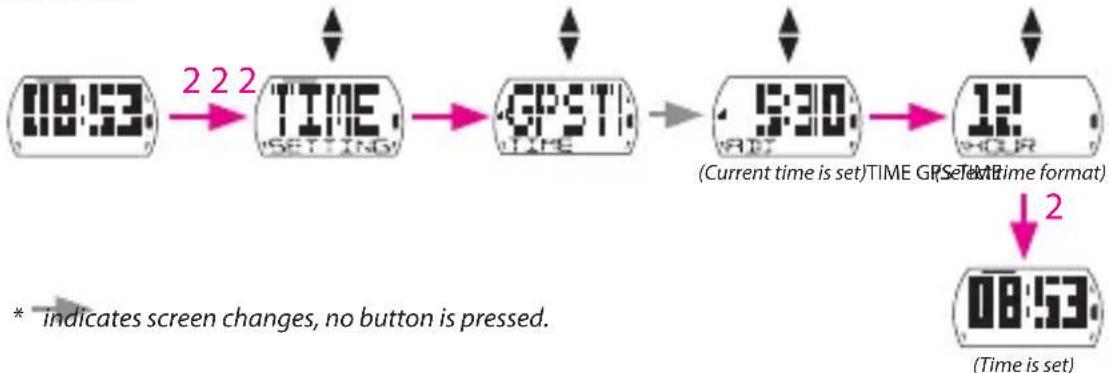
flowchart
graph LR
    A["18:53"] -->|2 2 2| B["TIME, SETTING"]
    B --> C["GPSTI, TIME"]
    C --> D["5:30"]
    D --> E["12, 04R Time format"]
    E --> F["08:53"]
    F --> G["(Time is set)"]
    style A fill:#f9f,stroke:#333
    style B fill:#ccf,stroke:#333
    style C fill:#cfc,stroke:#333
    style D fill:#fcc,stroke:#333
    style E fill:#cff,stroke:#333
    style F fill:#ffc,stroke:#333
    style G fill:#cfc,stroke:#333
    note right of F
        * indicates screen changes, no button is pressed.
    end
Set Alarm
Use this setting to set alarm with Cardio 35.
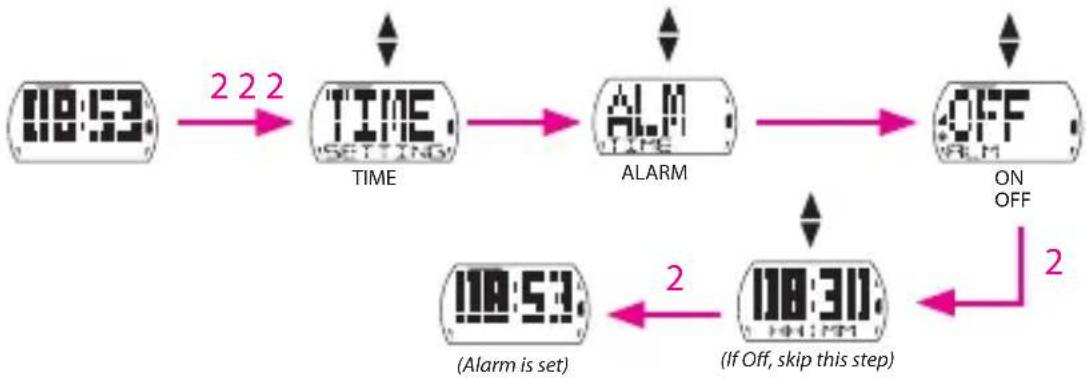
flowchart
graph LR
    A["18:53"] -->|2 2 2| B["TIME SETTING"]
    B --> C["ALM"]
    C --> D["OFF ON OFF"]
    D --> E["18:53 (Alarm is set)"]
    E -->|2| F["18:30 (If Off, skip this step)"]
    F -->|2| G["End"]
Display/Hide Time 2
Use this setting to display/hide Time2.

flowchart
graph LR
    A["04:53"] -->|2 2 2| B["TIME SETTING"]
    B --> C["TIME TIME"]
    C --> D["OFF TIME"]
    D --> E["ON OFF"]
    F["08:30"] -->|2| G["08:30 Time 2 is set"]
    G --> H["Time 2 display"]
Note: After you hide Time 2, Clock view will show Date below current time.
Set Daylight Saving Time
Use this setting to set the daylight saving time.

flowchart
graph LR
    A["08:53"] -->|2 2 2| B["TIME SETTING"]
    B --> C["Daylight Saving Time"]
    C --> D["+0:00 Select setting"]
    D --> E["08:53 (Daylight saving time is set)"]
    E -->|2| D
Exercise/Training
During exercise or training, Cardio 35 allows you to measure and record your running activities and displays your current performance.
You can choose the following activity type:
Bike Mode •
Run Mode•
Note:
Displayed information varies on exercise mode and user preference.
• You can switch Bike or Run mode while in clock view by pressing button 4.
Before you start
Link sensors (page 18), optional•
Start / Pause / Stop Exercising
Press button 3 to start, pause, or end an activity.
Exercise type
GPS signal
Recording indicator

text_image
011:11 TIMERDisplay data
Display item
Note: Please go outdoors to acquire GPS signal when you see "FIND GPS" on the screen.

flowchart
graph LR
    A["53:00"] -->|3| B["YES"]
    B -->|4| C["NO"]
    C -->|2| D["FIND"]
    style A fill:#f9f,stroke:#333
    style B fill:#ccf,stroke:#333
    style C fill:#cfc,stroke:#333
    style D fill:#fcc,stroke:#333
Mark Lap
- Start an activity first by pressing button 3.
- Press button 4 to mark lap.

text_image
00 -- Second 01 -- Minute Lap number 11:00 Recording time 2H -- HourView Exercise/Training Info
Run Mode

flowchart
graph LR
    A["08:53"] --> B["00:00"]
    B --> C["00:01"]
    C --> D["0,00"]
    D --> E["01:00"]
    E --> F["CALORIESPACE DIS'"]
    style A fill:#f9f,stroke:#333
    style B fill:#ccf,stroke:#333
    style C fill:#cfc,stroke:#333
    style D fill:#fcc,stroke:#333
    style E fill:#cff,stroke:#333
    style F fill:#ffc,stroke:#333
Note: If Heart Rate sensor and foot pod are detected, the exercise info will be displayed as following order:
HEART RATE > FOOT POD > PACE > TIMER > DISTANCE > CALORIES > CLOCK.
Bike Mode

flowchart
graph LR
    A["08:53"] --> B["0.00"]
    B --> C["0.00"]
    C --> D["00:01"]
    D --> E["00:01"]
    E --> F["2"]
    F --> G["CALORIESPEED TIP"]
Note: If Heart Rate, Cadence, or Combo sensor is detected, the exercise info will be displayed as following order:
HEART RATE > CADENCE > COMBO > SPEED > DISTANCE > TIMER > CALORIES.
Note: The type of data displayed depends on the current mode:
- If you have marked laps, press button 4 to see Lap info. Interval time appears only when training is set to interval training. ETA (Estimated Time of Arrival) appears only when training is set to distance. If the screen below appears, the device cannot detect the sensor. Adjust the sensor and connect again.

natural_image
Simple line drawing of a vehicle or container with no text, numbers, or symbolsNo sensor is detected
Training Settings
You can customize the training settings, link the sensors, view history, and other settings.
Set Training
Use the Training setting to select the type of training you want. Training can be based on time, distance, calories burn, heart rate, pace, speed, or interval.
Note:
During training set up, the display screen varies depending on selected training.
• After setting the Training mode, press button 3 to record the results of your training.
- If you want to cancel it, press button 1 to go back to clock view.
By Time/Distance / Calories
Training can be set by time, distance, or calories burned.

flowchart
graph TD
    A["08:53"] -->|2 2 2 3 TRAINING TIME| B["TIME"]
    B --> C["01:10 (Set value)"]
    C --> D["STAR\nStart log for training"]
    D -->|1| A
By Heart Rate / Pace / Speed
Training can be set by heart rate, pace, or speed.

flowchart
graph TD
    A["08:53"] -->|2 2 2 2| B["TRAI"]
    B --> C["HR"]
    C --> D["MAX"]
    D --> E["130. (Set value) TRAINING MAXIM"]
    E -->|2| F["TIME"]
    F -->|2| G["101:10. (Set value)"]
    G --> H["03. (Set value)"]
    H -->|2| I["STAR (Start log for training)"]
    I -->|2| J["MIN"]
    J -->|2| K["100. (Set value) MINIMUM"]
    K -->|2| L["TIME"]
    L -->|4 3| M["DIST"]
    M -->|4 3| N["SKIP"]
    N -->|2| I
    style A fill:#f9f,stroke:#333
    style B fill:#f9f,stroke:#333
    style C fill:#f9f,stroke:#333
    style D fill:#f9f,stroke:#333
    style E fill:#f9f,stroke:#333
    style F fill:#f9f,stroke:#333
    style G fill:#f9f,stroke:#333
    style H fill:#f9f,stroke:#333
    style I fill:#f9f,stroke:#333
    style J fill:#f9f,stroke:#333
    style K fill:#f9f,stroke:#333
    style L fill:#f9f,stroke:#333
    style M fill:#f9f,stroke:#333
    style N fill:#f9f,stroke:#333
    style O fill:#f9f,stroke:#333
By Interval
Use the Interval setting to specify the interval between training, warm up, and cool down time. By default, warm up and cool down time are set to 5 minutes.
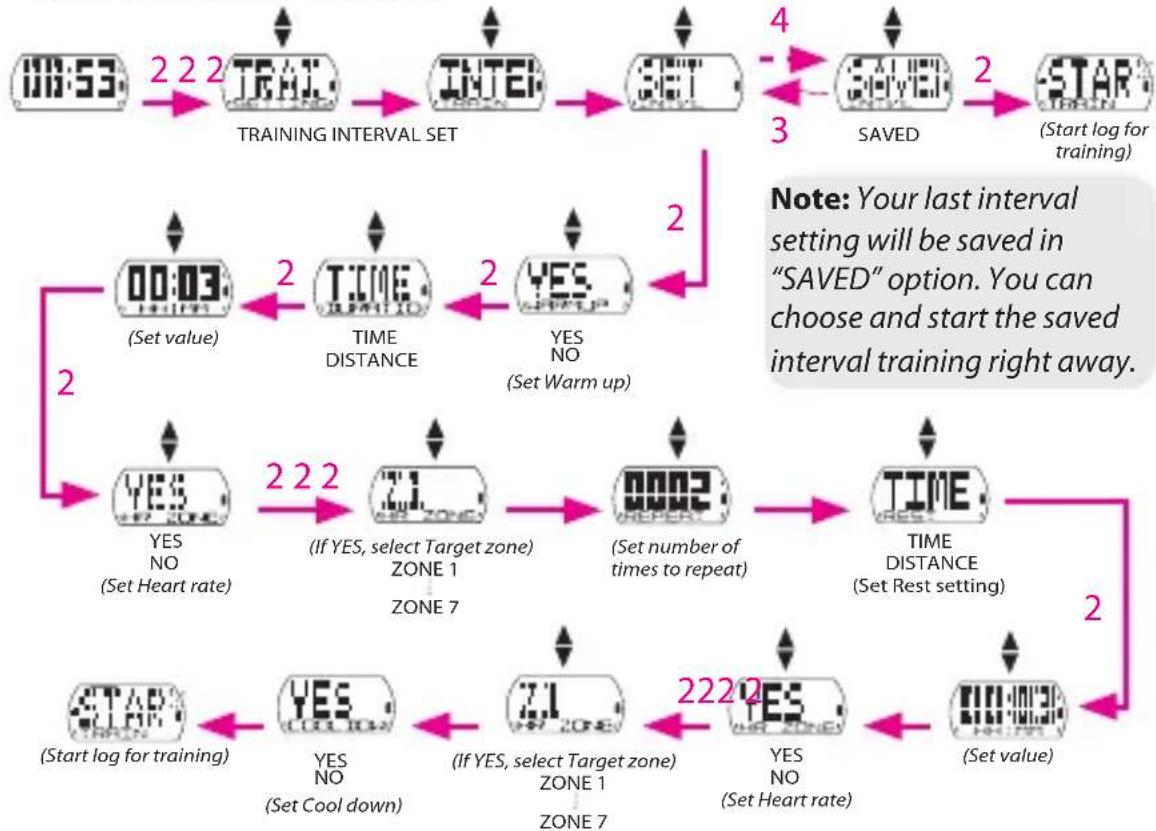
flowchart
graph TD
    A["18:53"] -->|2 2 2 TRAINING INTERVAL SET| B["TRAIL"]
    B --> C["INTEI"]
    C --> D["SET"]
    D -->|4| E["SAVEID"]
    E -->|3| F["STAR (Start log for training)"]
    F --> G["TIME DISTANCE (Set warm up)"]
    G --> H["TIME DISTANCE (Set Rest setting)"]
    H -->|2| I["YES NO (Set Heart rate)"]
    I --> J["TIME DISTANCE (Zone 7)"]
    J --> K["TIME DISTANCE (Zone 1)<br>(If YES, select Target zone)"]
    K --> L["TIME DISTANCE (Zone 7)<br>(If YES, select Target zone)"]
    L --> M["TIME DISTANCE (Zone 1)<br>(If YES, select Target zone)"]
    M --> N["TIME DISTANCE (Zone 7)<br>(If YES, select Target zone)"]
    N --> O["TIME DISTANCE (Zone 1)<br>(If YES, select Target zone)"]
    O --> P["TIME DISTANCE (Zone 7)<br>(If YES, select Target zone)"]
    P --> Q["TIME DISTANCE (Zone 1)<br>(If YES, select Target zone)"]
    Q --> R["TIME DISTANCE (Zone 7)<br>(If YES, select Target zone)"]
    R --> S["TIME DISTANCE (Zone 1)<br>(If YES, select Target zone)"]
    S --> T["TIME DISTANCE (Zone 7)<br>(If YES, select Target zone)"]
    T --> U["TIME DISTANCE (Zone 1)<br>(If YES, select Target zone)"]
    U --> V["TIME DISTANCE (Zone 7)<br>(If YES, select Target zone)"]
    V --> W["TIME DISTANCE (Zone 1)<br>(If YES, select Target zone)"]
    W --> X["TIME DISTANCE (Zone 7)<br>(If YES, select Target zone)"]
    X --> Y["TIME DISTANCE (Zone 1)<br>(If YES, select Target zone)"]
    Y --> Z["TIME DISTANCE (Zone 7)<br>(If YES, select Target zone)"]
    Z --> AA["TIME DISTANCE (Zone 1)<br>(If YES, select Target zone)"]
    AA --> AB["TIME DISTANCE (Zone 7)<br>(If YES, select Target zone)"]
    AB --> AC["TIME DISTANCE (Zone 1)<br>(If YES, select Target zone)"]
    AC --> AD["TIME DISTANCE (Zone 7)<br>(If YES, select Target zone)"]
    AD --> AE["TIME DISTANCE (Zone 1)<br>(If YES, select Target zone)"]
    AE --> AF["TIME DISTANCE (Zone 7)<br>(If YES, select Target zone)"]
    AF --> AG["TIME DISTANCE (Zone 1)<br>(If YES, select Target zone)"]
    AG --> AH["TIME DISTANCE (Zone 7)<br>(If YES, select Target zone)"]
    AH --> AI["TIME DISTANCE (Zone 1)<br>(If YES, select Target zone)"]
    AI --> AJ["TIME DISTANCE (Zone 7)<br>(If YES, select Target zone)"]
    AJ --> AK["TIME DISTANCE (Zone 1)<br>(If YES, select Target zone)"]
    AK --> AL["TIME DISTANCE (Zone 7)<br>(If YES, select Target zone)"]
    AL --> AM["TIME DISTANCE (Zone 1)<br>(If YES, select Target zone)"]
    AM --> AN["TIME DISTANCE (Zone 7)<br>(If YES, select Target zone)"]
    AN --> AO["TIME DISTANCE (Zone 1)<br>(If YES, select Target zone)"]
    AO --> AP["TIME DISTANCE (Zone 7)<br>(If YES, select Target zone)"]
    AP --> AQ["TIME DISTANCE (Zone 1)<br>(If YES, select Target zone)"]
    AQ --> AR["TIME DISTANCE (Zone 7)<br>(If YES, select Target zone)"]
Set LAP training
Use Lap by Distance to specify the distance of each lap. After running a specified distance, Cardio 35 will automatically mark the lap.

flowchart
graph LR
    A["03:53"] -->|2 2 2 2| B["LAP SETTING"]
    B --> C["DIST"]
    C --> D["03 KM"]
    D --> E["STAR"]
    E --> F["(Start log for LAP)"]
    G["2"] --> A
Use Lap by Location setting to set your current location as the lap point. Upon reaching the lap point, Cardio 35 will automatically mark the lap.
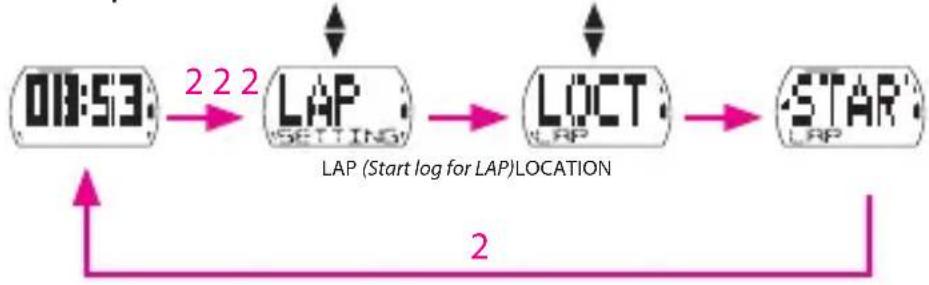
flowchart
graph LR
    A["01:53"] -->|2 2 2| B["LAP SETTING"]
    B --> C["LOCT"]
    C --> D["STAR"]
    D -->|2| A
    style A fill:#f9f,stroke:#333
    style B fill:#ccf,stroke:#333
    style C fill:#cfc,stroke:#333
    style D fill:#fcc,stroke:#333
Link Sensors
Use the Link setting to pair sensors and other optional accessories to Cardio 35.
Bike Mode

flowchart
graph LR
    A["08:53"] -->|2| B["LINK (SETTING)"]
    B -->|2| C["SCAN"]
    C -->|2| D["Heart Rate sensor"]
    D --> E["95"]
    F["(Current Cadence data)"] --> G["SCAN"]
    G -->|2| H["2096 (Set Wheel Size)"]
    H -->|2| I["400"]
    I --> J["Speed sensor"]
    J --> K["SCAN"]
    style A fill:#f9f,stroke:#333
    style F fill:#f9f,stroke:#333
    style G fill:#f9f,stroke:#333
    style H fill:#f9f,stroke:#333
    style I fill:#f9f,stroke:#333
    style J fill:#f9f,stroke:#333
    style K fill:#f9f,stroke:#333
Note: To view and check data on the connected sensor(s), select "LINK > INFO".

flowchart
graph LR
    A["08:53"] -->|2 2 2| B["LINK"]
    B --> C["SCAN"]
    C --> D["SCAN HRM"]
    D --> E["(Current HR data)"]
    F["00:32"] --> G["(Current Foot pod data)"]
    H["SCAN FOOT POD"] --> I["Foot pod sensor"]
    style A fill:#f9f,stroke:#333
    style B fill:#ccf,stroke:#333
    style C fill:#cfc,stroke:#333
    style D fill:#fcc,stroke:#333
    style E fill:#cff,stroke:#333
    style F fill:#ffc,stroke:#333
    style G fill:#cfc,stroke:#333
    style H fill:#fcc,stroke:#333
Calibrate Foot Pod

flowchart
graph LR
    A["08:53"] -->|2 2 2| B["LINK SETTING"]
    B --> C["FACT FOOTPOX"]
    C --> D["CALIT FOOTPOX"]
    D --> E["7800 RUN"]
    F["DONE CRUAR"] -->|1| A
    G["Start running"] -->|3| H["AND"]
    I["Complete 800m?"] -->|3| H
    style A fill:#f9f,stroke:#333
    style B fill:#ccf,stroke:#333
    style C fill:#cfc,stroke:#333
    style D fill:#fcc,stroke:#333
    style E fill:#cff,stroke:#333
    style F fill:#ffc,stroke:#333
    style G fill:#cfc,stroke:#333
    style H fill:#fcc,stroke:#333
Set foot pod length manually

flowchart
graph TD
    A["08:53"] -->|2 2 2| B["LINK SETFACTOR"]
    B --> C["FACTS FOOTPOD"]
    C --> D["SET FOOTPOD"]
    D --> E["(Set value) (Current value)"]
    E --> F["1000 FOOTPOD"]
    F --> G["1000 FACTOR"]
Note:
- When the sensors are successfully connected, Cardio 35 will release a short beep and the LED indicators (on the top of the icons) will blink for 5 seconds.
- Once connected, the sensor ID will be displayed on the screen.
For example:

text_image
Heart Rate sensor 95 bPM Current data Sensor ID (Current heart rate and sensor ID is display)Press button 2 to confirm and move to search next item. If you do not want to connect the current detected sensor, press button 1 to abort.
Be sure to keep the distance between the similar sensors approximately 30 meters. If you see below illustration on the screen, this indicates that there are more than 2 sensors are detected. Press button 1 to rescan the sensor.

View Exercise/Training Record
Use File to view your training history.
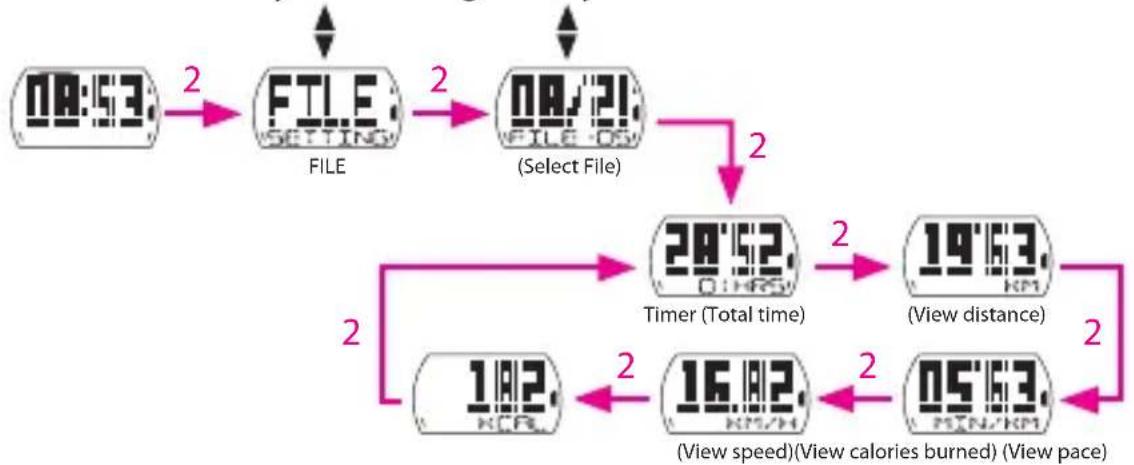
flowchart
graph TD
    A["08:53"] -->|2| B["FTLE SETTING FILE"]
    B -->|2| C["08/21 FILE-OS (Select File)"]
    C -->|2| D["28'52.01HRS Timer (Total time)"]
    D -->|2| E["19'63 View distance"]
    E -->|2| F["16A2.KR/HR (View speed)(View calories burned) (View pace)"]
    F -->|2| G["05'63.PEN/KR/HR"]
    G -->|2| D
Using Stopwatch
You can use Cardio 35 as a stopwatch.

flowchart
graph LR
    A["08:53"] --> B["OTHERI SETTING"]
    B --> C["STOP OTHERS"]
    C --> D["00:00"]
    D --> E["01:28"]
    E --> F["3"]
    style A fill:#f9f,stroke:#333
    style B fill:#ccf,stroke:#333
    style C fill:#cfc,stroke:#333
    style D fill:#fcc,stroke:#333
    style E fill:#cff,stroke:#333
    style F fill:#ffc,stroke:#333
Note: After stopwatch is stopped, press button 4 to reset it or press button 2 to view files of lap data.

Stride Length
You can calibrate stride length by fixed 800m or input your own stride length manually.
Set stride length manually

flowchart
graph LR
    A["08:53"] --> B["OTHER SETSTRIDE"]
    B --> C["STRID OTHERS"]
    C --> D["SET STRIDE"]
    D --> E["(Set value)"]
Calibrate stride length

flowchart
graph LR
    A["08:53"] -->|2 2 2 2| B["OTHERS CALIBRATESTRIDE (Prepare to run 800m)"]
    B --> C["STRII OTHERS"]
    C --> D["CALI I STRIDE"]
    D --> E["800 RUN"]
    F["DONE"] -->|3 Complete 800m?| G["(Start running)"]
    G -->|3| H["(DONE - Calibration complete) (FAIL - Fail to complete 800m run)"]
Note: You can only calibrate stride length if you are indoors.
Auto Scrolling
Use the Auto Scrolling setting to enable or disable the auto scrolling feature. If this feature is enabled, all exercise info will be displayed in sequences without pressing any button while you are doing exercise or training.
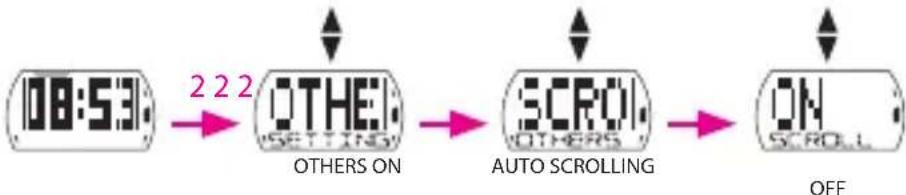
flowchart
graph LR
    A["08:53"] -->|222| B["OTHERS ON"]
    B -->|222| C["SCROLL"]
    C -->|222| D["ON SCROLL"]
    D -->|222| E["OFF"]
Clear Storage
Use Clear Storage to delete all training and lap records in Cardio 35.
Note: Make sure you have backed up all your data through the Bryton Bridge 2 application before using this function.
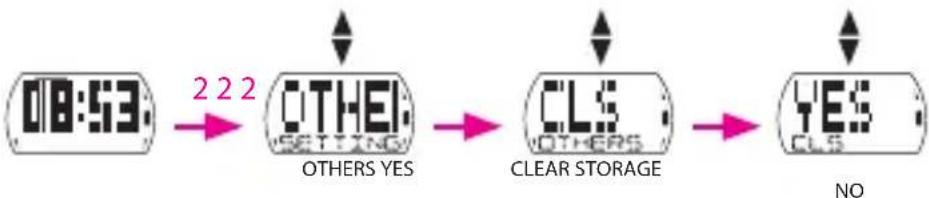
flowchart
graph LR
    A["08:53"] -->|222| B["OTHERS YES"]
    B -->| Clear Storage| C["CLS"]
    C -->| NO| D["YES"]
Icons
| Icon Item Solid icon Flashing icon | |||
| Battery icon | Battery level Battery charging | ||
| - Battery low | |||
| GPS icon GPS | signal level Searching GPS signal | ||
| Record icon | Memory full, must clear storage | Recording in progress | |
| Heart rate icon - | |||
| Foot pod icon - | |||
| Cadence sensor icon | - | - | |
| Speed sensor icon | - | - | |
| Alarm icon Alarm is set - | |||
Specifications
Cardio 35
| Item Description | |
| Display 23.18 x 14 mm | Positive FSTN Segemet LCD |
| Physical size 4.2 x 6.9 x 1.25 cm | |
| Weight 47 g | |
| Operating temperature | -10°C ~ 50°C |
| Battery charge temperature | 0°C ~ 40°C |
| Battery life Up to 35 days in clock modeUp to 7.5 hours in training mode with GPS on | |
| GPS Integrated high-sensitivity SiRFstarIV receiver with embedded antenna | |
| RF transceiver 2.4 GHz ANT+ transceiver with embedded antenna | |
| Storage Embedded 1 | MB serial flash |
| G-Sensor 3-axis acceleration sensor | |
Screen Terminologies
| Terminology Screen Display | |
| Alarm ALM | |
| Stopwatch STW | |
| Time2 TM2 | |
| Clear storage CLS | |
| Combo sensor DUAL | |
| Speed SPD | |
| Calorie CAL | |
| HR Zone 1 HRZ1 | |
| Cadence CAD | |
| Adjust ADJ | |
| Daylight saving DST | |
| Information INFO | |
| Interval INT | |
| Distance DIST | |
| Location LOCT | |
| Multiple sensors MULT SENS | |
| Calibrate CALIB | |
| Key Tone TONE | |

Cardio 35
natural_image
Simple line drawing of a container with handles and internal compartments (no text or symbols)natural_image
Simple line drawing of a vehicle or container with no text, numbers, or symbolsKein Sensor erkannt
natural_image
Simple line drawing of a vehicle or container with no text, numbers, or symbolstext_image
io 110:01 TEMPORnatural_image
Simple line drawing of a vehicle or container with no text, numbers, or symbolsRONDE training instellen .....17
Sensoren koppelen ....18
Oefening/Trainingrecord
weergeven 21
* HRM of SPD/CAD-sensor vereist
Aan de slag
natural_image
Simple line drawing of a vehicle or container with no text, numbers, or symbolstext_image
10:01 TEMPORExibição da data
Exibição de ícone