GP-E2 - Camera CANON - Free user manual and instructions
Find the device manual for free GP-E2 CANON in PDF.

User questions about GP-E2 CANON
0 question about this device. Answer the ones you know or ask your own.
Ask a new question about this device
Download the instructions for your Camera in PDF format for free! Find your manual GP-E2 - CANON and take your electronic device back in hand. On this page are published all the documents necessary for the use of your device. GP-E2 by CANON.
USER MANUAL GP-E2 CANON
natural_image
Line drawing of a medical device attached to a patient's abdomen, showing no text or symbolsnatural_image
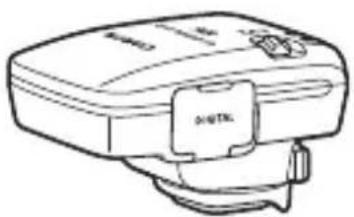
Line drawing of a portable electronic device with a label and handle (no readable text or symbols)GP-E2 収納ケース

natural_image
Simple line drawing of a rectangular object with a handle, resembling a stylized tool or device (no text or symbols)
natural_image
Line drawing of a mechanical device with clamped ends and a handle (no text or symbols)携帯用ケース
接続ケーブル

natural_image
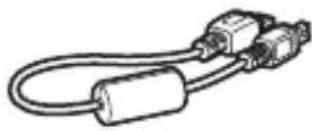
Illustration of a USB cable with two connectors (no text or symbols)約25cm
natural_image
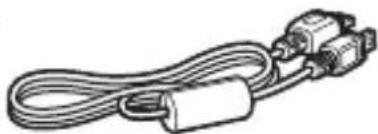
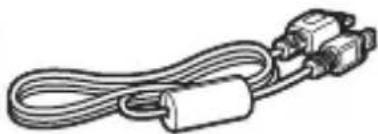
Line drawing of a USB cable with two connectors (no text or symbols)約1.5m

『お使いになる前にお読みください』
規制内容の
記載書類
ケースについて
text_image
Diagram of a device control panel with labeled parts and directional arrows indicating rotation or movement.1 ふたを開ける
natural_image
Close-up of a battery plug with a switch and battery symbol (no text or labels visible)2 電池を入れる
- 電池のマイナス極を奥に入れます。

text_image
Diagram of a camera lens with labeled parts and directional arrows indicating motion or movement3 ふたを閉じる
text_image
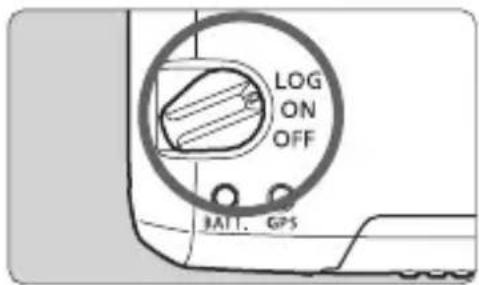
LOG ON OFF BATT GPS電池チェック
〈BATT.〉ランプで確認します。
● 迅い点滅:残量OK
● 速い点滅:残量わずか
- 消灯:電池切れ
〈ON〉 ポジション
text_image
LOG ON OFF BATT GPStext_image
LOG ON OFF BATT. GPSnatural_image
Illustration of a hand holding a bottle above a glass with liquid, no text or symbols presentflowchart
graph TD
    A["1: Camera Setup"] --> B["2: Assembly"]
    B --> C["3: Packaging"]
4 カメラを動かす
natural_image
Line drawing of a DSLR camera with attached cable and connector (no text or symbols)
The GPS Receiver GP-E2 can geotag your shots and record the route you travel. The log file containing the shooting location and movement can be saved to a computer or converted to a KMZ file format with the EOS software GPS Log File Utility (p.28). The receiver can also set the camera time.
Before Use
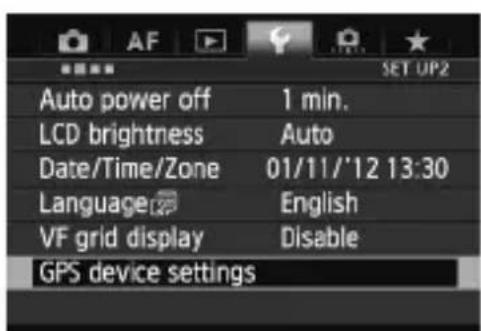
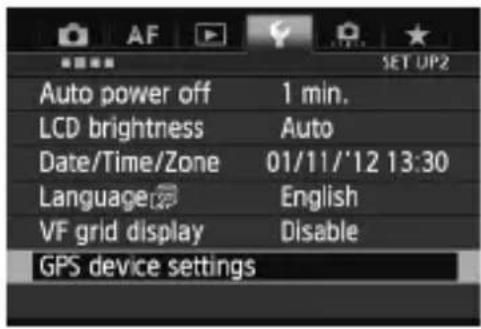
Before use, check whether your camera menu displays [GPS device settings].

text_image
Auto power off 1 min. LCD brightness Auto Date/Time/Zone 01/11/'12 13:30 Language English VF grid display Disable GPS device settingsExample of menu display
Cameras that display the settings
- The functions described in this manual are supported by the receiver. (With certain cameras, some functions cannot be used.)
Cameras that do not display the settings
- Geotagging images (and adding direction information) is not supported while shooting.
- Only the logging function (LOG> mode) is available.
EOS 5D Mark III and EOS 7D Users
If [GPS device settings] is not displayed on your EOS 5D Mark III or EOS 7D camera, update the camera firmware to a version compatible with the receiver. The menu item will be displayed after you update the firmware.
For details, contact a Canon Service Center.

- With the EOS 7D, you cannot append the shooting direction data to the images. (It cannot use the receiver's digital compass.)
- With certain cameras other than the EOS 7D, you also cannot append the shooting direction data to the images. (They cannot use the receiver's digital compass.) For details, refer to the camera's instruction manual or Canon Web site.
Geotagging Images and Adding the Shooting Direction
text_image
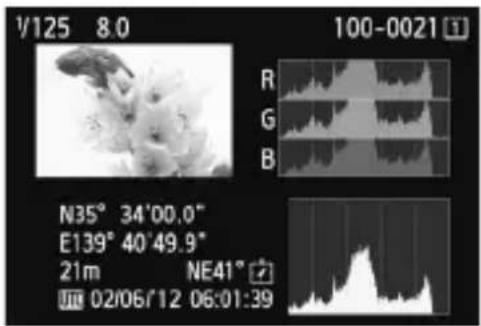
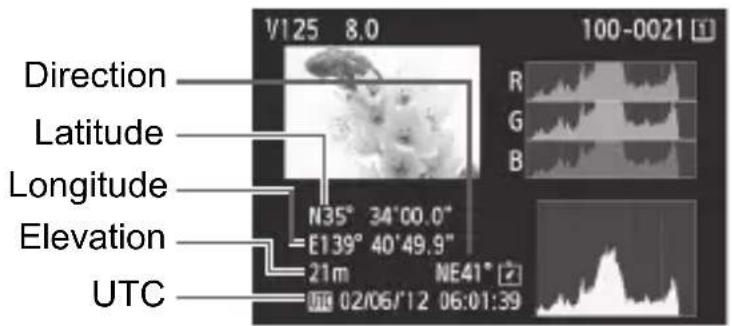
V125 8.0 100-0021 R G B N35° 34'00.0" E139° 40'49.9" 21m NE41° 02/06/12 06:01:39- Supported by cameras that display [GPS device settings] in the menu.
- Shots taken while the receiver is attached to the camera are geotagged, adding location information (latitude, longitude, elevation, and shooting time (UTC)) to images.
- Shooting locations of geotagged images can be viewed on a virtual map on a computer.
Images can also be tagged with the shooting direction using the receiver's digital compass (magnetic north standard).
Logging Routes Traveled with the Receiver
natural_image
Line drawing of a medical device attached to a cup, showing liquid level and tubing (no text or symbols)- In logging mode (p.18), the receiver keeps a record of location information along the route traveled. The route can be viewed on a virtual map.
- Logs can also be used to geotag images at a later time.
Setting the Camera Time
- Supported by cameras that display [GPS device settings] in the menu, except the EOS 7D.
- The camera time can be set using GPS signals. On the EOS-1D X, high-precision adjustment is performed with a margin of error of approx. ±0.02 second relative to UTC time, and on other cameras, the margin is approx. ±1 second.

- With the EOS 7D, you cannot append the shooting direction data to the images. (It cannot use the receiver's digital compass.)
- With certain cameras other than the EOS 7D, you also cannot append the shooting direction data to the images. (They cannot use the receiver's digital compass.) For details, refer to the camera's instruction manual or Canon Web site.
- Some traveling conditions, locations, or receiver settings may cause inaccurate location information to be added to images.
- You cannot use the cameras with the GP-E2 connected using the connecting cable if they do not support the communication with the connecting cable. Refer to the camera's instruction manual or Canon Web site for details.

Coordinated Universal Time, abbreviated UTC, is essentially the same as Greenwich Mean Time.
Item Checklist
natural_image
Line drawing of a portable electronic device with buttons and a label (no readable text or symbols)GP-E2 Storage case
natural_image
Simple line drawing of a rectangular object with a handle, resembling a stylized tool or device (no text or symbols)
natural_image
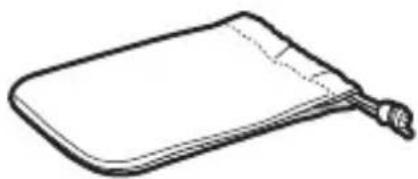
Line drawing of a closed bag with straps and side panels (no text or symbols)Carrying case
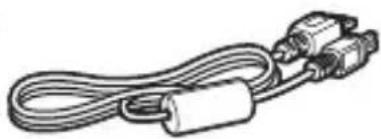
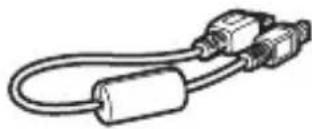
Connecting cables
natural_image
Line drawing of a cable with two connectors (no text or symbols)Approx. 25 cm / 9.8 in.

natural_image
Line drawing of a cable with two connectors (no text or symbols)Approx. 1.5 m / 4.9 ft.

Preliminary Notes (Read before use)
Regulation leaflet
Storage and Carrying Cases
Before using the storage case, insert the receiver in the carrying case to prevent scratches. The storage case also accommodates the connecting cables.
Connecting Cables
- Use the 25 cm / 9.8 in. or 1.5 m / 4.9 ft. connecting cable if your camera displays [GPS device settings] in the menu.
- Use the 25 cm / 9.8 in. cable to connect the receiver to the EOS 7D or other camera that does not support communication through the hot shoe. Also use this cable when attaching the receiver to the optional Accessory Bracket AB-E1 (p.30).
- Use the 1.5 m / 4.9 ft. cable when connecting the receiver to your camera while it is in the provided carrying case.

- With certain cameras, you cannot use the connection cable. For details, refer to the camera's instruction manual or Canon Web site.
- For cameras that do not support the communication through the hot shoe other than the EOS 7D, refer to the camera's instruction manual or Canon Web site for details.
Contents
Introduction.... 2
Features 3
Item Checklist.... 5
Conventions Used in this Manual.... 7
Nomenclature 8
Inserting the Battery 9
Attaching and Detaching the Receiver 10
Turning the Receiver On 11
Acquiring GPS Signals.... 13
Geotagging Images as You Shoot 16
Logging the Route Traveled.... 18
Setting the Positioning Interval.... 20
Using the Digital Compass.... 22
Setting Time from GPS on the Camera.... 26
GPS Precautions.... 27
GPS Log File Utility 28
Using a Bracket (Sold Separately) 30
Specifications 31
Safety Precautions 32
Conventions Used in this Manual
Meaning of Symbols

: Warning to prevent shooting problems.
: Supplemental information.
(p. ^** ): Reference page numbers for more information.
The icons and markings indicating the receiver's controls and settings used in the manual correspond to the icons and marking on the camera and on the receiver.
Basic Assumptions
- All operations in this manual assume that the power switches of both the camera and receiver are set to
. -
The EOS 5D Mark III is used as an example for illustrations and screens in this manual. Note that the screens displayed on your camera may differ, depending on the camera model used.
-
Windows is a trademark or registered trademark of Microsoft Corporation in the United States and other countries.
- macOS is a registered trademark of Apple Inc. in the United States and other countries.
- Google™, Google Maps™, and Google Earth™ are trademarks of Google Inc.
- All other corporate and brand names in this manual are trademarks or registered trademarks of their respective owners.
text_image
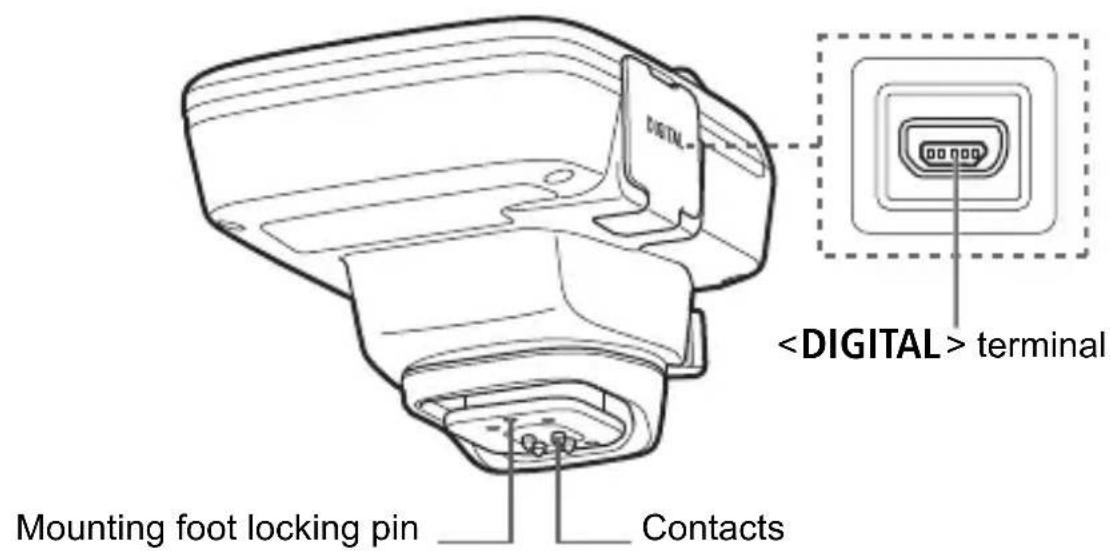
DIGITAL
text_image
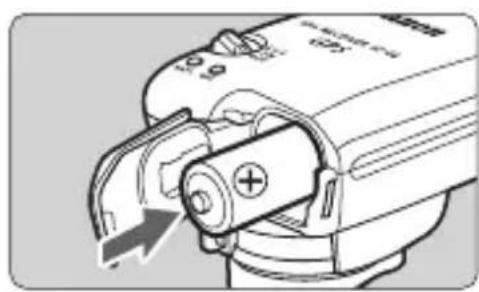
Signal acquisition indicatorInserting the Battery
Insert one AA/LR6 battery as follows.

text_image
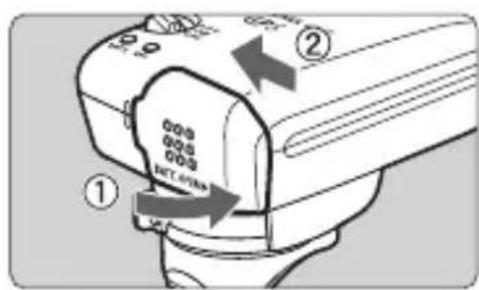
Diagram showing a device with labeled parts and directional arrows indicating motion or movement, including numbered annotations.1 Open the cover.
- Slide the battery compartment cover as shown by the arrows to open the cover.
natural_image
Diagram of a battery switch mechanism with an arrow indicating direction (no text or symbols present)Insert the battery.
- Insert the battery with the negative terminal first, all the way in.
text_image
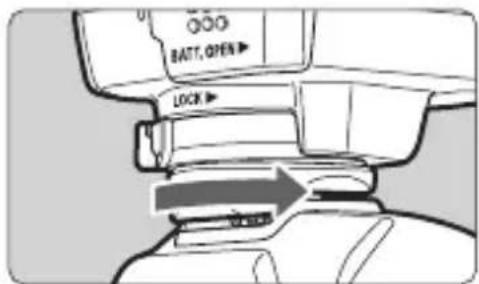
Diagram of a camera control panel with labeled parts and directional arrows indicating movement or operation.3 Close the cover.
- Close the cover and slide it as shown by the arrows.
Battery Life
The receiver can be used for about 39 hours under default settings with a new AA/LR6 alkaline battery (based on Canon testing standards). Battery life varies depending on the positioning interval for location information, as well as GPS signal conditions (p.21).

Using AA/LR6 batteries other than the alkaline type may cause improper battery contact due to the irregular shape of battery contacts.

NiMH and Li-ion AA/LR6 batteries can also be used.
Attaching and Detaching the Receiver
The receiver can either be attached directly to your camera or carried with you in the carrying case.

text_image
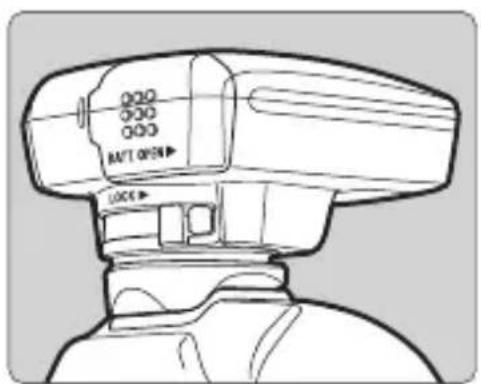
OOO BATT, OPEN ► LOCK ►1
Attach the receiver.
- Turn off the receiver.
- Insert the receiver's mounting foot fully into the hot shoe.
text_image
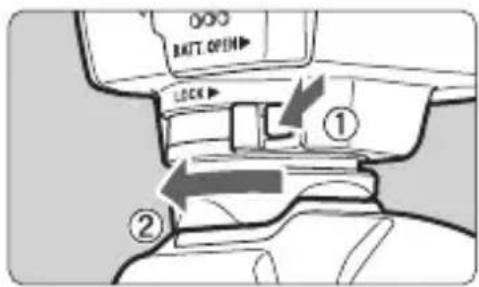
BATT, OPEN LOCK2
Secure the receiver.
- Slide the mounting foot locking lever to the right.
The locking lever will click into place.
text_image
AUTO BATT OPEN LOCK ① ②3
Detach the receiver.
- Turn off the receiver.
- While pressing the release button, slide the mounting foot locking lever to the left and detach the receiver from the camera.

● Always make sure to turn the receiver off before attaching or detaching it.
- Depending on the camera model, if you turn on/off the GP-E2 or connect/disconnect the interface cable during Live View shooting or movie shooting, Live View shooting or movie shooting may stop.
- Attaching the receiver directly to the camera will prevent you from using the camera's built-in flash or an external flash unit. To use flash, keep the receiver in the carrying case and connect it to the camera with the provided 1.5 m / 4.9 ft. cable, or attach the receiver to the Accessory Bracket AB-E1 (sold separately, p.30).
Turning the Receiver On

text_image
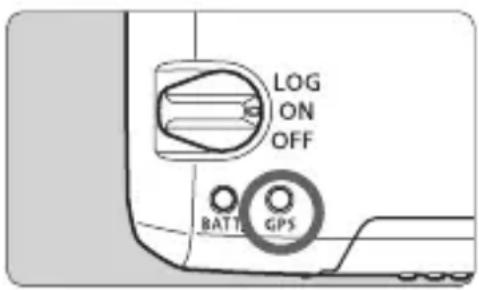
LOG ON OFF BATT. GPSChecking the battery level
Check the battery level on the
Slow blinking : Level OK
- Fast blinking : Little power left
- Off : Replace battery
Position
The receiver functions in this position only with EOS DIGITAL cameras that display [GPS device settings] in the menu.
- Shots taken while the receiver is attached to the camera are geotagged, adding location information (latitude, longitude, elevation, and UTC, Coordinated Universal Time) to images.
Images can also be tagged with the shooting direction, using the receiver's digital compass.
Position
- With the switch in this position, the receiver keeps a record of location information along the route traveled.
- The route can be viewed on a virtual map. Logs can also be used to geotag images at a later time.
- The images that can be geotagged after shooting with logging information are JPEG and RAW images (file extension: CR2) shot with EOS DIGITAL cameras.
- Movie files can also be geotagged this way at a later time, when using cameras that display [GPS device settings] in the menu.
- When the receiver is attached or connected to a camera that displays the [GPS device settings] menu item, the receiver will geotag images as you shoot, and periodically log the location information. Images can also be tagged with the shooting direction.

- With the EOS 7D, you cannot append the shooting direction data to the images. (It cannot use the receiver's digital compass.)
- With certain cameras other than the EOS 7D, you also cannot append the shooting direction data to the images. (They cannot use the receiver's digital compass.) For details, refer to the camera's instruction manual or Canon Web site.
Acquiring GPS Signals
To acquire GPS signals, bring the receiver outdoors where the sky is unobstructed and aim it up. Keep your hand or other objects off the top of the receiver.
text_image
LOG ON OFF BATT GPSTurn the power switch to
Fast blinking: Signal not acquired yet Slow blinking: Signal acquired

Signal acquisition (indicated by slow blinking) takes about 30 – 60 seconds under favorable conditions after you turn the receiver on.
Blinking after Acquisition
The receiver blinks every 3 seconds or every 6 seconds. In 6-second blinking mode, although it blinks every 6 seconds as needed to conserve battery power, the GPS functions are the same as usual 3-second blinking mode.
Camera Icon
When the receiver is attached or connected to a camera that displays the [GPS device settings] menu item, GPS signal status is also shown on the camera LCD panel or LCD monitor (p.15).
Blinking : Signal not acquired yet Constant : Signal acquired
* The

Places with Poor GPS Coverage
Location information may not be recorded, or inaccurate information may be recorded where GPS signal coverage is poor, such as in the following places.
- Indoors, underground, near buildings or in valleys, in tunnels or forests
- Near high-voltage power lines or mobile phones operating on the 1.5 GHz band
- When the receiver is inside a bag or suitcase
- When traveling through different environments
- Even in other places, GPS satellite movement may interfere with geotagging and cause missing or inaccurate location information. The information may also indicate that the camera has been used in a different location, even if you are shooting at the same place.
Appended Information
- When the receiver and the camera are connected with a cable, shots taken immediately after turning on the camera's power switch (or resuming use after auto power off) may not be geotagged. Similarly, directions may not be recorded correctly. Either wait a moment before shooting or, if your camera supports the communication through the hot shoe, attach the receiver to the hot shoe. When the receiver is attached to the hot shoe, do not connect the camera and receiver with a cable.
The EOS 7D does not support the communication through the hot shoe. - Certain cameras other than the EOS 7D also do not support the communication through the hot shoe. For details, refer to the camera's instruction manual or Canon Web site.
- With the EOS 7D, you cannot append the shooting direction data to the images. (It cannot use the receiver's digital compass.)
- With certain cameras other than the EOS 7D, you also cannot append the shooting direction data to the images. (They cannot use the receiver's digital compass.) For details, refer to the camera's instruction manual or Canon Web site.
- If mirror lockup is performed when the receiver is attached to the hot shoe, location information where the mirror was locked will be attached to the images. If mirror lockup is performed when the receiver is connected to the camera with a cable, shooting location will be attached to the images as location information. For convenience, the receiver can be left attached to the hot shoe.
Viewing GPS Information
Check GPS information as follows when the receiver is attached or connected to a camera that displays [GPS device settings] in the menu.

text_image
Auto power off 1 min. LCD brightness Auto Date/Time/Zone 01/11/'12 13:30 Language English VF grid display Disable GPS device settings1 Select [GPS device settings].
- On the EOS-1D X and other models that display the following screen, set [GPS device] to [Enable], and then select [GPS device settings].
![CANON GP-E2 - Select [GPS device settings]. - 1](/content/2026/06/1238670/images/67bc736aa22f1537b9b608c8aa78ed43e9fe895f8726add263e55e5f5a2a46b9.jpg)
text_image
GPS device settings GPS device Enable GPS device settings![CANON GP-E2 - Select [GPS device settings]. - 2](/content/2026/06/1238670/images/d6e2f837234eed9763c016dc186edebe02df89e5a15b6560532e04f90a7e8ce2.jpg)
text_image
GPS device settings Auto time setting Disable Position update timing Digital compass Enable GPS information display Calibrate digital compass MENU ↗Select [GPS information display].
Detailed GPS information is displayed.
![CANON GP-E2 - Select [GPS information display]. - 1](/content/2026/06/1238670/images/feca1f9c62719fb1b79e34ac2065e3a7f8808ef92e6c61c20d916d6bf6cfcec5.jpg)
text_image
North 0° N NW NE West 270° W E 35° East 90° S South 180°![CANON GP-E2 - Select [GPS information display]. - 2](/content/2026/06/1238670/images/a699dfac1c8d1decd07c77c8fad01891fc10eb58d25efc100941876695d566dc.jpg)
text_image
GPS information display Latitude N30°30'30.0" Longitude W30°30'30.0" Elevation 50m Direction NE 45° UTC 01/11/2012 13:30:30 Satellite reception 🔊 3D- In this sample screenshot, [Direction: NE 45°] indicates that the camera was facing 45° northeast.
[UTC] (Coordinated Universal Time) is essentially the same as Greenwich Mean Time.
The icon <_II> indicates signal conditions. When <3D> is displayed, elevation can also be recorded. However, elevation cannot be recorded when <2D> is displayed.
Geotagging Images as You Shoot
When the receiver is attached or connected to a camera that displays the [GPS device settings] menu item, images are geotagged as you shoot.
text_image
AUTO OPEN LOCK>- Simply shoot with the receiver attached to your camera. Images can also be tagged with the shooting direction.
Users of the EOS 7D or other camera that does not support the communication through the hot shoe

text_image
- Plug the end of the cable labeled
Geotagging Information
text_image
Direction Latitude Longitude Elevation UTC V125 8.0 100-0021 N35° 34'00.0" E139° 40'49.9" 21m NE41° 02/06/12 06:01:39
- With the EOS 7D, you cannot append the shooting direction data to the images. (It cannot use the receiver's digital compass.)
- With certain cameras other than the EOS 7D, you also cannot append the shooting direction data to the images. (They cannot use the receiver's digital compass.) For details, refer to the camera's instruction manual or Canon Web site.
- For movies, the location information for when you started movie shooting is recorded. Note that signal acquisition conditions are not recorded.

When using the receiver at the same time as an external or built-in flash, attach the receiver to the Accessory Bracket AB-E1 (sold separately, p.30).
Logging the Route Traveled
text_image
LOG ON OFF BATT. GPSSetting the power switch to

natural_image
Illustration of a hand holding a small object above a glass with liquid, no text or symbols presentWhen the receiver is attached or connected to a camera that displays the [GPS device settings] menu item, the receiver will geotag images as you shoot, and periodically log the location information. Images can also be tagged with the shooting direction.

- With the EOS 7D, you cannot append the shooting direction data to the images. (It cannot use the receiver's digital compass.)
- With certain cameras other than the EOS 7D, you also cannot append the shooting direction data to the images. (They cannot use the receiver's digital compass.) For details, refer to the camera's instruction manual or Canon Web site.
Location Information Logs
Location information is recorded at regular intervals along the route traveled with the receiver, as shown in the positioning interval table.
Daily logs (p.27) are saved on the receiver itself. The number of days for which you can store logs depends on the positioning interval you specify in [Position update timing] (p.20). Log files can be saved to a computer or converted to a KMZ file format with the EOS software GPS Log File Utility (p.28).
When the receiver's internal memory becomes full, the oldest log files are overwritten with new information, one by one.
Log File Capacity, by Positioning Interval
| Position Update Timing | Log Files (Approx.) | Position Update Timing | Log Files (Approx.) |
| Every second 4.5 | days Every 30 sec. | 128 days | |
| Every 5 sec. 23 | days Every minute 1 | 28 days | |
| Every 10 sec. 45 | days Every 2 min. 1 | 28 days | |
| Every 15 sec. 68 | days Every 5 min. 1 | 28 days |
* Capacity when logging eight hours per day

- When carrying the receiver in a bag or suitcase as you travel, make sure the receiver faces upward and nothing is on top of it.
- Set the camera time and date as accurately as possible. Also, on cameras that support time zones and daylight saving time, use appropriate settings for the shooting location.

- Logging also enables subsequent geotagging of JPEG and RAW images (file extension: CR2) shot with EOS DIGITAL cameras.
- Movie files can also be geotagged this way at a later time, when using cameras that display [GPS device settings] in the menu.
Setting the Positioning Interval
You can specify the positioning interval when the receiver is attached or connected to a camera that displays the [GPS device settings] menu item. Shorter positioning intervals yield more accurate location information for your images. However, this also consumes more battery power. Location information for cameras without this menu item are updated every 15 seconds (the update interval can be changed with the EOS software GPS Log File Utility (p.28).
text_image
Auto power off 1 min. LCD brightness Auto Date/Time/Zone 01/11/'12 13:30 Language English VF grid display Disable GPS device settings1 Select [GPS device settings].
- On the EOS-1D X and other models that display the following screen, set [GPS device] to [Enable], and then select [GPS device settings].
![CANON GP-E2 - Select [GPS device settings]. - 1](/content/2026/06/1238670/images/07835ee3ac338bba6b4ece061227a8fa83545c2d983051f02710bb190b415e1a.jpg)
text_image
GPS device settings GPS device Enable GPS device settings![CANON GP-E2 - Select [GPS device settings]. - 2](/content/2026/06/1238670/images/97ebb20d59c12e674ecdbed58a586e7167502b5b4d972c857b06d0733a20feb8.jpg)
text_image
GPS device settings Auto time setting Disable Position update timing Digital compass DisableSelect [Position update timing].
![CANON GP-E2 - Select [Position update timing]. - 1](/content/2026/06/1238670/images/dfab5ca64654ab74a0e1de2beff804f230c2772a848d8620b13d2a0e0d65120d.jpg)
text_image
Position update timing Every sec Every 30s Every 5s Every min Every 10s Every 2m Every 15s Every 5m3 Select the time.
Estimated Battery Life, by Positioning Interval
| Position Update Timing | Battery Life (Approx.) | Position Update Timing | Battery Life (Approx.) |
| Every second 10 | hours Every 30 sec. | 39 hours | |
| Every 5 sec. 27 | hours Every minute | 54 hours | |
| Every 10 sec. 37 | hours Every 2 min. | 63 hours | |
| Every 15 sec. 39 | hours Every 5 min. | 92 hours |
*With an AA/LR6 alkaline battery.
*At normal temperature (23°C / 73°F).
*Battery life will be shorter when signal conditions are unfavorable.
*The nature of GPS may cause some inconsistency between positioning intervals.
Using the Digital Compass
When the receiver is attached or connected to a camera that displays [GPS device settings] in the menu or mounted on a bracket (p.30), images are tagged with the direction the receiver is facing.
text_image
Auto power off 1 min. LCD brightness Auto Date/Time/Zone 01/11/'12 13:30 Language English VF grid display Disable GPS device settings1 Select [GPS device settings].
- On the EOS-1D X and other models that display the following screen, set [GPS device] to [Enable], and then select [GPS device settings].
![CANON GP-E2 - Select [GPS device settings]. - 1](/content/2026/06/1238670/images/7e09023d84d16b09072ebedd3055a7afa21aeeda143481184baca903e383c3b4.jpg)
text_image
GPS device settings GPS device Enable GPS device settings![CANON GP-E2 - Select [GPS device settings]. - 2](/content/2026/06/1238670/images/3e4b80f661e2a38b1b5ce32eaf570a378a33362f8fea47d86f5cf7480e3a32ac.jpg)
text_image
GPS device settings Digital compass Disable EnableEnable the digital compass.
- Select [Digital compass] and press
- Select [Enable] and press
Viewing the Compass When Shooting
You can see which direction the camera is facing as you shoot.
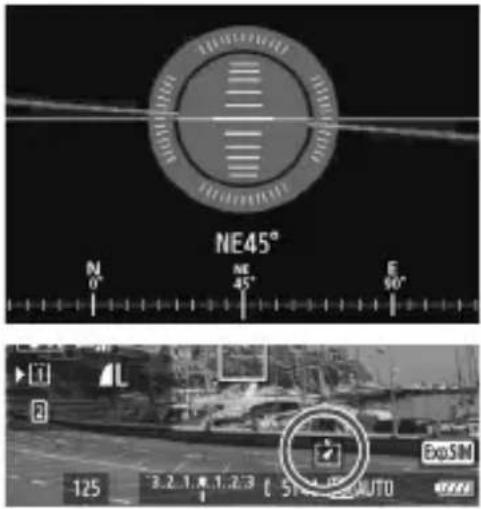
text_image
NE45° N 0° NE 45° E 90° ExSIM 125 3.2.1.8.1.2.3 0.5% AUTO- To view the compass, press the
button or button. - Cameras equipped with an electronic level will display the compass with the level.
- The compass is also displayed in Live View or movie shooting.

- With the EOS 7D, you cannot use the receiver's digital compass.
- With certain cameras other than the EOS 7D, you also cannot use the receiver's digital compass. For details, refer to the camera's instruction manual or Canon Web site.
Images will not be tagged with the correct shooting direction unless the camera and receiver are facing exactly the same direction.
The direction is not logged.
Calibrating the Digital Compass
Calibrate the digital compass at the shooting location. Also calibrate the compass if the direction shown as you shoot seems incorrect.

text_image
Auto power off 1 min. LCD brightness Auto Date/Time/Zone 01/11/'12 13:30 Language English VF grid display Disable GPS device settings1 Select [GPS device settings].
- On the EOS-1D X and other models that display the following screen, set [GPS device] to [Enable], and then select [GPS device settings].
![CANON GP-E2 - Select [GPS device settings]. - 1](/content/2026/06/1238670/images/d74c57a28aecf9ea842483e195024787207baa69736215951767fb2ac68fcdb0.jpg)
text_image
GPS device settings GPS device Enable GPS device settings![CANON GP-E2 - Select [GPS device settings]. - 2](/content/2026/06/1238670/images/0ab9e2ab9ceca15a6803594d93dd5861c883e75c82927e3b595a8053db1ce66b.jpg)
text_image
GPS device settings Digital compass Disable Enable MENU2 Set [Digital compass] to [Enable].
![CANON GP-E2 - Set [Digital compass] to [Enable]. - 1](/content/2026/06/1238670/images/bb0f40b044a0846e2f158e834d38dca158e0244b43c53f5a7dfa6e10e4aa5532.jpg)
text_image
GPS device settings Auto time setting Disable Position update timing Digital compass Enable GPS information display Calibrate digital compass3 Select [Calibrate digital compass].
- Press < SET> to prepare for calibration.
![CANON GP-E2 - Select [Calibrate digital compass]. - 1](/content/2026/06/1238670/images/55d6a36da97b6c518d474a6719c0f8379e2d3f974b2c923b67a7458155ddfe4a.jpg)
text_image
Calibrate digital compass + - + + Cancel- Move the camera as shown on the next page.
![CANON GP-E2 - Select [Calibrate digital compass]. - 2](/content/2026/06/1238670/images/eac39764154ee7abbed164188d4af639d150911f8b47ec48794803198f7329a8.jpg)
flowchart
graph TD
    A["1: Camera Setup"] --> B["2: Display"]
    B --> C["3: Equipment Setup"]
4 Move the camera.
① Wave the camera laterally in at least a 180^ arc.
② Wave the camera up and down in at least a 180^ arc.
③ Rotate the camera in at least a 180^ arc as it faces the same direction.
- Be careful not to drop the camera during calibration.
Steps①, ②, and ③ can be done in any order. Keep moving the camera until calibration is finished.
- If the compass is not calibrated after you do this, turn your body to the right or left and move the camera again.

text_image
Calibrate digital compass Digital compass calibration complete OK5 Finish calibration.
- A screen indicating completion is displayed when calibration is finished.
Although this screen may be displayed while you are still moving the camera in a direction of step 4 (①, ②, or ③), calibration has been finished successfully.

- For safety, remove the lens and other accessories before calibration.
- Calibration may not be possible under the following conditions because the digital compass uses geomagnetism: At high altitudes, near magnetic fields, in steel-structure buildings, or underground. Even if calibration is possible, the receiver may not be able to detect the shooting direction correctly.
Setting Time from GPS on the Camera
You can set the time from GPS when the receiver is attached or connected to a camera that displays the [GPS device settings] menu item (except on the EOS 7D). The EOS-1D X performs high-precision adjustment with a margin of error of approx. ±0.02 second relative to UTC time. With other cameras, the margin is approx. ±1 second.

text_image
Auto power off 1 min. LCD brightness Auto Date/Time/Zone 01/11/'12 13:30 Language English VF grid display Disable GPS device settings1 Select [GPS device settings].
- On the EOS-1D X and other models that display the following screen, set [GPS device] to [Enable], and then select [GPS device settings].
![CANON GP-E2 - Select [GPS device settings]. - 1](/content/2026/06/1238670/images/10cb651b823f3573bfaff753a724ceb80ad7029b689316db47bd37d77758b0e2.jpg)
text_image
GPS device settings GPS device Enable GPS device settings![CANON GP-E2 - Select [GPS device settings]. - 2](/content/2026/06/1238670/images/a97bb35fd620666f675de8fc3d372b0f3017c8c82a8c5647963fd54b07e63b84.jpg)
text_image
GPS device settings Auto time setting ► Auto update Disable Set now MENU ↕Select [Auto time setting].
- Select an option and press < > .
- [Auto update] updates the time after the camera and the receiver are turned on and a GPS signal is received.
![CANON GP-E2 - Select [Auto time setting]. - 1](/content/2026/06/1238670/images/ee159d6f0065202598fc89fccfb91a10d17aafc2b9f4b2acf8b3c536d3c05f36.jpg)
- If the GPS signal cannot be received from five or more satellites, time setting is not possible. [Set now] will be unavailable.
- Even if [Set now] is selected, auto time adjustment may not be possible, depending on the timing of GPS signal acquisition.
- When [Auto time setting] is set to [Auto update], the date and time cannot be set manually using [Date/Time/Zone] in the menu.
- If you prefer not to change the time (when using [Sync time between cameras] with WFT series, for example), select [Auto time setting: Disable].
GPS Precautions
Keep the following points in mind when using the receiver.
- In certain countries and regions, the use of GPS may be restricted. Therefore, be sure to use GPS in accordance with the laws and regulations of your country or region. Be particularly careful when using GPS outside your home country.
- Be careful about using GPS functions where the operation of electronic devices is restricted.
- Others may be able to locate or identify you by using location data in your geotagged pictures or movies. Be careful when sharing these still photos, movies, or GPS log files with others, as when posting them online where many others can view them.
- GPS signal reception may take longer after battery replacement, or when the power switch has been off for a prolonged period.
- Never leave the receiver near any equipment that generates a strong magnetic field, such as magnets or electric motors.
Log Files
One log file is created every 24 hours according to Coordinated Universal Time (UTC: Coordinated Universal Time). For this reason, depending on the time difference from UTC (essentially the same as Greenwich Mean Time) to the shooting location, only one log file may be created even if logging is active across two days. Similarly, two separate log files may be created even if logging is only active within one day.
GPS Log File Utility
Log files recorded with the GP-E2 can be saved to a computer or converted to a KMZ file format with the EOS software GPS Log File Utility.
Downloading and Installing
1 Download GPS Log File Utility.
- Connect to the Internet from a computer and access the following Canon Web site.
www.canon.com/icpd
- Download GPS Log File Utility.
• Decompress it on the computer.
For Windows: Click the displayed installer file to start the installer.
For macOS: A dmg file will be created and displayed. Follow the steps below to start the installer.
(1) Double-click the dmg file.
A drive icon and installer file will appear on the desktop. If the installer file does not appear, double-click the drive icon to display it.
(2) Double-click the installer file.
The installer starts.
2 Follow the on-screen instructions to install.
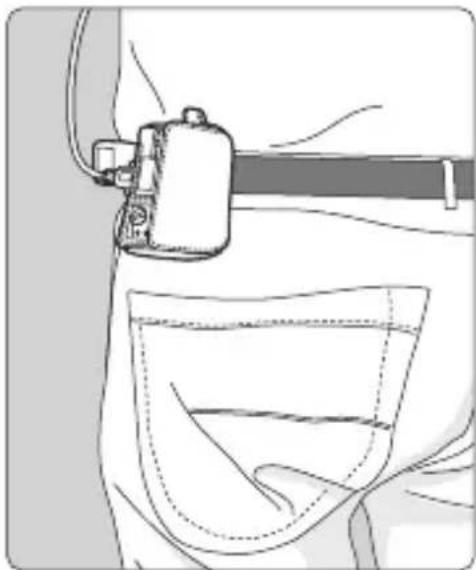
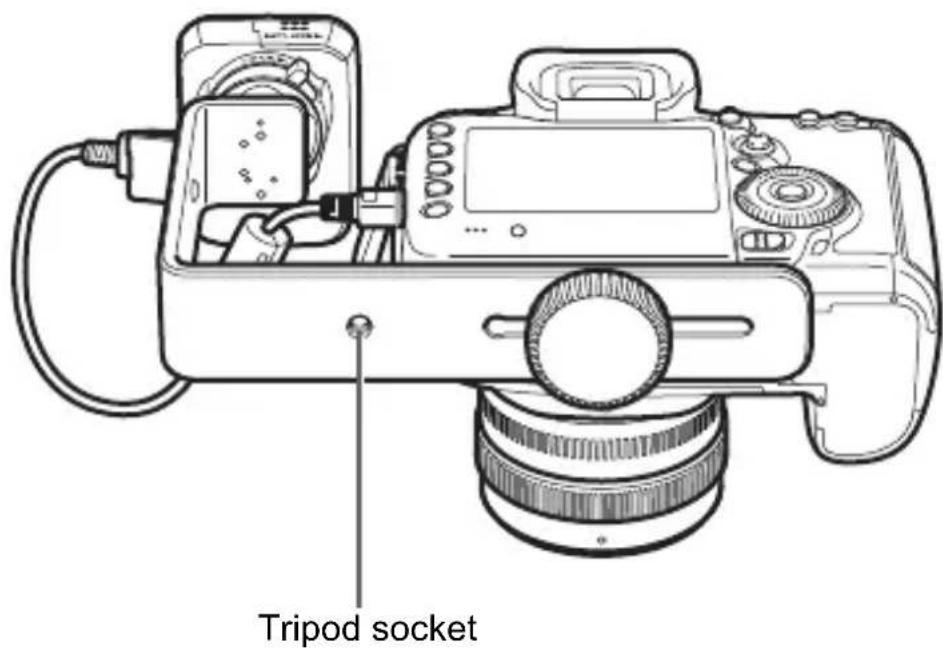
Using a Bracket (Sold Separately)
Attaching the Accessory Bracket AB-E1 (sold separately) enables you to use the receiver and an external or built-in flash at the same time. Attach the camera and receiver to the bracket as shown.
Keep the camera aligned with the bracket during attachment. Even a little misalignment will prevent accurate direction recording.
text_image
Tripod socket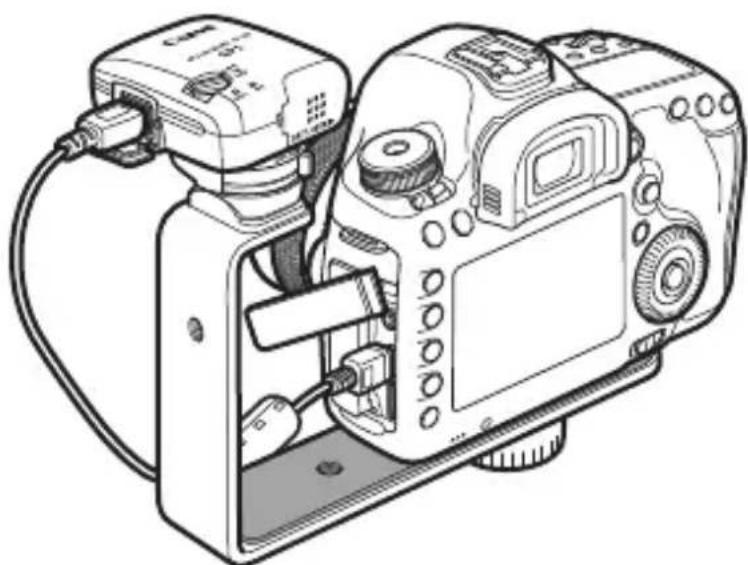
natural_image
Line drawing of a DSLR camera with attached cable and connector (no text or symbols)
With certain cameras, you cannot use the connection cable. For details, refer to the camera's instruction manual or Canon Web site.
Specifications
Compatible cameras EOS DIGITAL cameras
*Cameras with [GPS device settings] menu item: All features available
*Cameras without [GPS device settings] menu item:
Geotagging images Latitude, longitude, elevation, direction,
Coordinated Universal Time (UTC) and signal acquisition status
*GPS-compatible cameras allow images to be geotagged during shooting (cameras that cannot use the receiver's digital compass cannot tag the shooting direction)
Reception frequency 1575.42 MHz (L1 band)
Positioning interval 1, 5, 10, 15, or 30 seconds, or 1, 2, or 5 minutes
Logging mode NMEA-0183
One file per day, based on UTC
Time adjustment Camera time can be set from GPS time data
Digital compass Triaxial geomagnetic sensor and triaxial acceleration sensor used to calculate direction (some cameras do not support this function)
Interface Digital terminal for connecting a dedicated interface cable
Power supply One AA/LR6 alkaline battery
(NiMH and Li-ion batteries supported)
Dimensions Approx. 54.3 x 72.9 x 44.2 mm /
2.1 x 2.9 x 1.7 in. (W x H x D)
Weight Approx. 82 g / 2.89 oz.
*Excluding battery
Operating temperature 0°C to +40°C / 32°F to 104°F
Operating humidity 85% or less
● All information in this manual is based on Canon testing standards.
● Receiver specifications and appearance are subject to change without notice.
Safety Precautions
The following precautions are intended to prevent harm to you and others as well as damage to equipment. Become familiar with the precautions before using the receiver to ensure correct and safe operation.

Warning
Preventing Serious Injury or Death
- To prevent fire, excessive heat, chemical leakage, or explosion, follow these safety guidelines.
- Do not insert metallic objects between electrical contacts of the receiver, accessories, or connecting cables.
- Do not short-circuit, disassemble, modify, heat, solder, or burn batteries. Do not use or charge batteries that have swollen, or batteries not specified in this manual.
- Do not use batteries with the polarity (+/- ends) reversed.
- Keep batteries and accessories away from children. In case of accidental ingestion, consult a physician immediately. (Chemicals in batteries may harm the stomach and intestines.)
- When disposing of batteries, insulate the electrical contacts with tape to prevent contact with metallic objects or other batteries, which may cause fire or explosion.
- In case of excessive heat, smoke, or fumes, immediately remove the batteries, being careful to avoid burns. Continued use in this state may cause fire or burns.
- Do not operate the receiver while driving. This poses a risk of traffic accidents.
- If the receiver will not be used for an extended period, remove the battery to avoid damaging or soiling the unit.
- Do not use the receiver where there is flammable gas. There is a risk of explosion or fire.
- If the receiver is dropped and internal parts are exposed, do not touch the exposed parts. There is a risk of electrical shock.
- Do not disassemble or modify the receiver. High-voltage internal parts may cause electrical shock.
- Do not store the receiver in dusty or humid places. There is a risk of fire or electrical shock.
- Before using the receiver on board airplanes or in hospitals, make sure use is permitted. Electromagnetic waves emitted by the receiver may interfere with instrumentation or medical equipment.

Caution
Preventing Injury or Equipment Damage
- Do not leave the receiver inside a vehicle in hot weather or near a heat source. The receiver may become hot and cause burns if touched.
- Do not use the receiver when it is covered by or wrapped in a cloth. This may trap heat inside, posing a risk of case deformation or fire.
- Do not use paint thinner, benzene, or other organic solvents to clean the receiver. This poses a risk of fire and may be hazardous to your health.
- If you drop the receiver in water, or if water or metal objects get inside, immediately remove the batteries. This poses a risk of fire or electric shock.
If the unit malfunctions, becomes damaged, or requires repair, contact your dealer or a Canon Service Center.
Handling Precautions
Handle the receiver in accordance with “Handling Precautions: Camera Care” in the camera instruction manual.
Canon
The apparatus shall not be exposed to dripping or splashing.
Batteries shall not be exposed to excessive heat such as sunshine, fire or the like.
Dry batteries shall not be subjected to charging.
RÉCEPTEUR GPS
GP-E2
Français
Introduction
natural_image
Line drawing of a medical procedure with a clamp and cup (no text or symbols)natural_image
Line drawing of a handheld electronic device with a label and connector (no readable text or symbols)natural_image
Simple line drawing of a rectangular object with a handle and a small protrusion (no text or symbols)
natural_image
Line drawing of a closed bag with straps and straps (no text or symbols)Étui de transport
Câbles de raccordement

natural_image
Illustration of a U-shaped cable with two connectors (no text or symbols)natural_image
Coiled cable with connectors and connector port (no text or symbols visible)GPS Log File Utility 28
text_image
Diagram showing a device with labeled parts and directional arrows indicating motion or movement, including numbered annotations.natural_image
Diagram of a battery switch mechanism with an arrow indicating direction (no text or symbols present)2 Insérez la pile.
text_image
Diagram of a camera control panel with labeled buttons and directional arrows indicating movement or operationtext_image
LOG ON OFF BATT GPStext_image
LOG ON OFF BATT GPStext_image
LOG ON OFF BATT. GPSnatural_image
Line drawing of a hand holding a small object above a cup with liquid, no text or symbols presentflowchart
graph TD
    A["1: Camera Setup"] --> B["2: Display Setup"]
    B --> C["3: Display Setup with Cover"]
    C --> D["End"]
GPS Log File Utility
1 Téléchargez GPS Log File Utility.
natural_image
Line drawing of a DSLR camera with attached lens and cable (no text or symbols)natural_image
Line drawing of a DSLR camera with attached cable and connector (no text or symbols)
natural_image
Medical illustration showing a laparoscopic device attached to a cup with liquid, no text or symbols presentnatural_image
Line drawing of a handheld electronic device with a label and connector (no readable text or symbols)natural_image
Simple line drawing of a rectangular object with a handle and a looped tip, resembling a stylized tool or device (no text or symbols)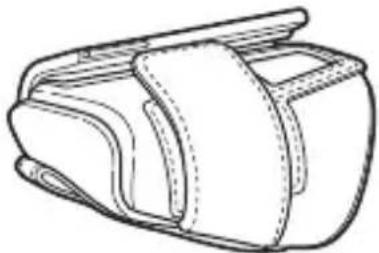
natural_image
Line drawing of a mechanical device with a clamped handle and internal components (no text or symbols)Tragetasche
Anschlusskabel

natural_image
Line drawing of a USB cable with two connectors (no text or symbols)ca. 25 cm

natural_image
Line drawing of a USB cable with connectors (no text or symbols)GPS Log File Utility 28
text_image
Diagram showing a device with labeled parts and directional arrows indicating motion or movement, including numbered annotations.natural_image
Close-up of a battery plug with a switch and power outlet, showing no text or symbolstext_image
BATT OPEN LOCK ① ②3
text_image
LOG ON OFF BATT. GPStext_image
LOG ON OFF BATT GPStext_image
LOG ON OFF BATT. GPSnatural_image
Illustration of a hand holding a small object above a cup with liquid, no text or symbols presentflowchart
graph TD
    A["Camera Setup"] --> B["Assembly"]
    B --> C["Product Release"]
    C --> D["Final Output"]
GPS Log File Utility
natural_image
Line drawing of a DSLR camera with attached lens and cable (no text or symbols)Stativanschluss

natural_image
Line drawing of a DSLR camera with attached cable and connector (no text or symbols)
natural_image
Line drawing of a medical procedure with a clamp and cup (no text or symbols)natural_image
Line drawing of a handheld electronic device with a label (no readable text or symbols)natural_image
Simple line drawing of a rectangular object with a handle, resembling a stylized pen or tool (no text or symbols)
natural_image
Line drawing of a closed bag with straps and handle (no text or symbols)natural_image
Line drawing of a USB cable with two connectors (no text or symbols)Circa 25 cm

natural_image
Illustration of a USB cable with two connectors (no text or symbols)Circa 1,5 m Scheda
GPS Log File Utility 28
Uso di una staffa (venduta separatamente) 30
text_image
Diagram of a device control panel with labeled parts and directional arrows indicating rotation or movement.natural_image
Close-up of a battery plug with a switch and battery symbol, no visible text or labelstext_image
Diagram of a device control panel with labeled buttons and directional arrows indicating process flowtext_image
LOG ON OFF BATT GPStext_image
LOG ON OFF JATT. GPSnatural_image
Line drawing of a hand holding a device above a cup filled with liquid, no text or symbols presentflowchart
graph TD
    A["Camera Setup"] --> B["Assembly"]
    B --> C["Assembly with Camera"]
    C --> D["Final Display"]
4 Muovere la fotocamera.
GPS Log File Utility
1 Scaricare GPS Log File Utility.
natural_image
Line drawing of a DSLR camera with internal components and cable (no text or symbols)
natural_image
Line drawing of a medical procedure with a clamp and cup (no text or symbols)natural_image
Line drawing of a portable electronic device with buttons and a label (no readable text or symbols)GP-E2

natural_image
Simple line drawing of a rectangular object with a handle, resembling a stylized pen or tool (no text or symbols)natural_image
Line drawing of a closed bag with straps and handle (no text or symbols)natural_image
Line drawing of a USB cable with two connectors (no text or symbols)Aprox. 25 cm / 9,8 pulg.

natural_image
Coiled cable with connectors and connector port (no text or symbols visible)Aprox. 1,5 m / 4,9 pies
Notas preliminares
(Leer antes del
uso)
GPS Log File Utility 28
text_image
Diagram of a device control panel with labeled parts and directional arrows indicating rotation or movement.1 Abra la tapa.
natural_image
Close-up of a battery plug with a switch and power outlet, showing internal components (no text or symbols visible)2 Inserte la pila.
text_image
Diagram of a device control panel with labeled buttons and directional arrows indicating process flow or movement3 Cierre la tapa.
text_image
LOG ON OFF BATT. GPStext_image
LOG ON OFF BATT GPStext_image
LOG ON OFF BATT. GPSnatural_image
Illustration of a hand holding a device above a glass with liquid, no text or symbols presentflowchart
graph TD
    A["Camera Setup"] --> B["Assembly"]
    B --> C["Product Release"]
    C --> D["Final Output"]
4 Mueva la cámara.
GPS Log File Utility
1 Descargue GPS Log File Utility.
natural_image
Line drawing of a DSLR camera with attached lens and cable (no text or symbols)Rosca de trípode

natural_image
Line drawing of a DSLR camera with attached cable and connector (no text or symbols)
natural_image
Medical illustration showing a laparoscopic device attached to a cup with liquid, no text or symbols presentnatural_image
Line drawing of a handheld electronic device with a label and ports (no readable text or symbols)GP-E2 Opbergzakje

natural_image
Simple line drawing of a rectangular object with a handle, resembling a stylized pen or tool (no text or symbols)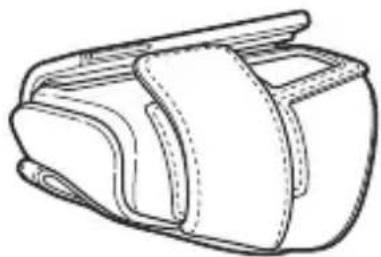
natural_image
Line drawing of a mechanical device with clamped ends and a handle (no text or symbols)Draaghoesje
Verbindingskabels
natural_image
Line drawing of a U-shaped cable with two connectors (no text or symbols)Ongeveer 25 cm

natural_image
Coiled cable with connectors and connector (no text or symbols visible)Ongeveer 1,5 m
GPS Log File Utility 28
text_image
Diagram showing a device with labeled parts and directional arrows indicating motion or movement.1 Open het deksel.
natural_image
Diagram of a battery switch mechanism with an arrow indicating direction (no text or symbols present)Plaats de batterij.
text_image
Diagram of a camera lens with labeled parts and directional arrows indicating motion or movement3 Sluit het deksel.
text_image
LOG ON OFF BATT GPSDe batterijlading controleren
natural_image
Line drawing of a mechanical device with no visible text or symbolstext_image
LOG ON OFF BATT. GPSnatural_image
Illustration of a hand holding a small object above a cup with liquid, no text or symbols presentflowchart
graph TD
    A["Camera Setup"] --> B["Assembly"]
    B --> C["Product Release"]
    C --> D["Final Output"]
4 Beweeg de camera.
GPS Log File Utility
1 Download GPS Log File Utility.
natural_image
Line drawing of a DSLR camera with attached cable and connector (no text or symbols)
EOS DIGITAL-camera's
natural_image
Line drawing of a medical procedure with a clamp and cup (no text or symbols)natural_image
Line drawing of a portable electronic device with a label and connectors (no readable text or symbols)GP-E2

natural_image
Simple line drawing of a rectangular object with a handle, resembling a stylized tool or device (no text or symbols)Футляр для хранения

natural_image
Line drawing of a leather jacket with straps and side panels (no text or symbols)natural_image
Line drawing of a U-shaped cable with two connectors (no text or symbols)Примерно 25 см
natural_image
Illustration of a cable with connectors and a connector plug (no text or symbols)Примерно 1,5 м
GPS Log File Utility 28
text_image
Diagram of a device with labeled parts and directional arrows indicating motion or movement1 Откройте крышку.
natural_image
Close-up of a battery plug with a switch and battery symbol (no text or labels visible)text_image
Diagram of a camera control panel with labeled parts and directional arrows indicating movement or operation.Закройте крышку.
text_image
LOG ON OFF BATT. GPStext_image
LOG ON OFF BATT GPStext_image
LOG ON OFF SATT. GPSnatural_image
Illustration of a hand holding a device above a glass with liquid, no text or symbols presentflowchart
graph TD
    A["1: Camera Setup"] --> B["2: Display Setup"]
    B --> C["3: Display Equipment"]
GPS Log File Utility
natural_image
Line drawing of a DSLR camera with attached lens and cable (no text or symbols)Штативное гнездо

natural_image
Line drawing of a DSLR camera with attached cable and connector (no text or symbols)
natural_image
Medical illustration showing a laparoscopic device attached to a cup with liquid, no text or symbols presentnatural_image
Line drawing of a handheld electronic device with a label (no readable text or symbols)GP-E2 存放包

natural_image
Simple line drawing of a rectangular object with a handle, resembling a stylus or tool (no text or symbols)
natural_image
Line drawing of a closed bag with straps and side panels (no text or symbols)便携包
连接线

natural_image
Line drawing of a USB cable with two connectors (no text or symbols)约25厘米
natural_image
Coiled cable with connectors and connector ends (no text or symbols visible)GPS Log File Utility 28
使用支架 (另售) 30
规格 31
安全注意事项 32
本说明书中使用的说明方法
符号的含义

:指示避免拍摄问题的警告。

:附加信息。
(第**页):提供更多信息的参考页码。
text_image
Diagram showing a device with labeled parts and directional arrows indicating motion or movement.1 打开仓盖。
- 按箭头所示滑动电池仓盖以打开仓盖。

natural_image
Diagram of a battery charging mechanism with an arrow indicating the process (no text or symbols present)2 插入电池。
text_image
Diagram of a camera lens with labeled parts and directional arrows indicating motion or movement3 关闭仓盖。
- 关闭仓盖并按箭头所示滑动。
电池寿命
text_image
LOG ON OFF BATT. GPS查看电池电量
通过
text_image
LOG ON OFF BATT GPStext_image
AUTO OPEN COGStext_image
LOG ON OFF SATT. GPSnatural_image
Illustration of a hand holding a device above a glass with liquid, no text or symbols presentflowchart
graph TD
    A["Camera Setup"] --> B["Assembly"]
    B --> C["Assembly with Camera"]
    C --> D["Final Display"]
4 移动相机。
https://www.canon.com.cn/supports/download/
natural_image
Line drawing of a DSLR camera with attached lens and cable (no text or symbols)三脚架接孔

natural_image
Line drawing of a DSLR camera with attached cable and connector (no text or symbols)30-2, Shimomaruko 3-chome, Ohta-ku, Tokyo 146-8501, Japan
CANON EUROPA N.V.
Bovenkerkerweg 59, 1185 XB Amstelveen, The Netherlands