
DV-1821 - DVD player AudioSonic - Free user manual and instructions
Find the device manual for free DV-1821 AudioSonic in PDF.

| Product type | Portable DVD player |
| Model | AudioSonic DV-1821 |
| Screen | 7-inch LCD |
| Compatible formats | DVD, VCD, CD, MP3, MPEG4, DIVX, JPG, CD-R, DVD-RW, Kodak Photo CD |
| Inputs | USB, SD/MMC |
| Outputs | Headphone jack, AV OUT (audio/video) |
| Power supply | DC 9-12 V via mains transformer or car adapter; rechargeable lithium battery |
| Battery life | Full charge in about 6 hours |
| Main functions | Disc playback, USB/SD card; file copy (MP3, MP4, AVI, JPEG) to USB/SD; zoom (2x,3x,4x); A-B repeat; track programming; parental control |
| Included accessories | Remote control, AV cable, transformer, car adapter, user manual |
| Maintenance and cleaning | Clean with a slightly damp cloth after turning off the power. For discs, gently wipe from the inside out with a soft cloth. Do not use chemicals. |
| Safety | Do not expose to water, moisture, heat sources or magnetic fields. Do not insert objects into openings. Do not disassemble. Use only in a ventilated environment. |
| Operating temperature | 5°C to 40°C |
| Battery charging temperature | 0°C to 45°C |
| Video resolution | Video output: 1 Vpp 75 Ω unbalanced |
| Audio frequency response | 20 Hz - 20 kHz |
| Signal-to-noise ratio | ≥ 85 dB |
| Laser | Semiconductor, wavelength 650 nm / 795 nm |
| Repairability | Entrust any repair to an authorized repairer. Do not disassemble yourself. Spare parts available from after-sales service. |
Frequently Asked Questions - DV-1821 AudioSonic
User questions about DV-1821 AudioSonic
0 question about this device. Answer the ones you know or ask your own.
Ask a new question about this device
Download the instructions for your DVD player in PDF format for free! Find your manual DV-1821 - AudioSonic and take your electronic device back in hand. On this page are published all the documents necessary for the use of your device. DV-1821 by AudioSonic.
USER MANUAL DV-1821 AudioSonic
natural_image
Black AudioSonic portable electronic device with a beach scene and a yellow kite flying over turquoise waves (no visible text or symbols on the device body)DV-1821

AudioSonic
Thanks for purchasing our Portable DVD player.
Before operating this player, please read this manual and retain it for future reference. This player is totally new Audio Video player with high quality picture and sound. This player has 7 Inch LCD display, easy to carry and also has latest electronic technology, suitable for hotel, office, car, home use.
FEATURES:
- 7 Inch display
- Earphone jack
- USB, SD/MMC slot
• Supports DVD, VCD, MPEG4, CD, MP3, CD-R, DVD-RW, JPG, DIVX, Kodak picture CD
• Power: DC 9-12V
ACCESSORIES:
- User manual
- Remote control
- AV cable
• Power adaptor - Car adaptor
IMPORTANT SAFETY INSTRUCTIONS
1. Deposition:
- Do not expose this product to water or moisture to avoid fire and electric shock.
- Do not expose this product to direct sunlight.
• Do not use this product near a heat source, magnetic field or dusty environment.
• Do not use this product on an unstable surface.
2. Installation:
• Please ensure you install the machine according to the user manual
3. Notes:
• Do not put anything into the holes in the machine.
• Do not pour any liquid on the machine to avoid fire and electric shock.
• Do not put heavy items on the machine.
- Make sure the machine has plenty of ventilation when in use. Do not cover the machine or power adaptor when in use. -Keep the machine away from fire.
- Do not open the any casing of the machine. Servicing is to be done by qualified personnel only.
- To clean the machine, ensure that the power is turned off. Use a slightly damp cloth to clean the outside of the machine if required.
4. Discs:
- Do not place the discs near any heat source, direct sunlight of high humidity areas.
- When not in use, store discs in their cases.
- Do not touch the disc surface; only hold them close to the edges.
• Ensure the disc is clean before use.
• Do not paste paper or stick any adhesive tape on the discs.
• To clean the disc, wipe the disc from inside to outside with a soft cloth. - Do not use gasoline, non-special disc cleaning agents or antistatic spray to clean discs.
REMOTE CONTROL
-
MENU
-
Power
3.Numbers
-
10+
-
DVD SETUP
-
UP/DOWN/LEFT/RIGHT
-
Audio button
-
FWD
-
REV
-
PLAY/PAUSE
-
Stop
-
Display
-
Mute
-
Repeat
-
A-B repeat
-
Search
-
Program
-
Angle
-
Zoom
-
VOL+
-
Confirm
-
VOL-
-
SUBTITLE/COPY
-
TITLE
-
PREV
-
NEXT
-
DVD/SDA/USB
-
STEP
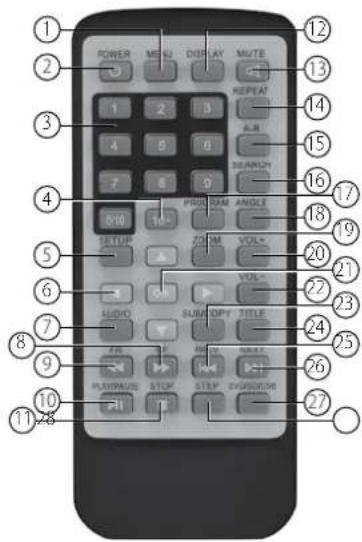
BUTTON FUNCTION
Note: Some buttons are featured only on the remote control. Some buttons are on the machine itself only. Some buttons are located on both the remote and the machine.
| Power Turn the unit on/off. | |
| DVD/SD/USB Press this button to play from DVD, card reader/USB. | |
| Setup | Press this button to enter the setup menu, press again to exit the set up menu. |
| Numbers For use to select chapter and song. | |
| UP/DOWN/LEFT/RIGHT | Press to enter the selected item, or to select an item. |
| Confirm / OK Press to move the cursor or to adjust numerical. | |
| MENU Press this button to return to the DVD disc title menu or PBC function. | |
| REPEAT Press this button to use the repeat mode. | |
| A-B | Press this button to view a selection of content. When the player is playing a disc, press this button to mark an A point, then press the button again to mark a B point. The player will them play the contents between point A and point B. Press the button again to cancel. Please note: Point A and Point B will need to be in the same movie or song playing. |
| Press this button to skip to previous chapter or track. | |
| Press this button to skip to the next chapter or track. | |
| Press this button to play or resume play from FWD, REW, SLOW. | |
| Press this button to pause. Press this button twice to stop play. | |
| Program | This button is used to program your favourite songs when playing a VCD or DVD disc. Press this button and then enter the number directly to start. |
| Press this button to play fast forward. The speed is 2X, 4X, 8X, 16X or 32X. | |
| Press this button to play backward. The speed is 2X, 4X, 8X, 16X or 32X. | |
| searchH | Press this button to select a certain title, chapter, track, title time, chapter time or tracking time to play by using the arrow buttons. |
| mute | Press this button to silence sound output. Press again to play sound output. |
| Vol +/- | Press Vol + to increase sound output. Press Vol - to reduce sound output. |
| auDio Audio: | Press to switch to other languages provided on a DVD disc. |
| title Press this | button to return to a DVD disc title menu or PBC function |
| Display Press t | this button to show or hide the playing disc info. |
| Zoom | Press this button to zoom on screen. The screen can be zoomed in on twice, three times or four times. Press the arrow buttons to move the zoomed screen. Please note, this function is only suitable when playing a DVD, VCD or MPEG4. |
| suB/copy | Subtitle: Press the SUBTITLE button repeatedly to turn on and change the subtitle language shown on screen. COPY: You can copy files such as MP3, MP4, AVI, JPEG to your USB/SD card when one is inserted. |
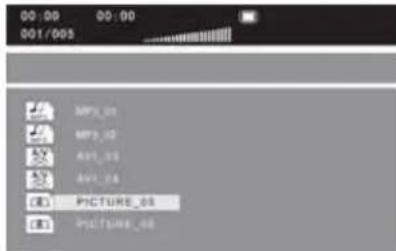
- When playing the above files, press the "SUB/COPY" button on the remote control. It will display the following dialog box:
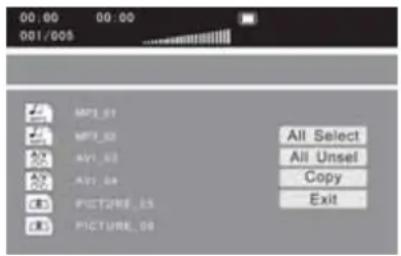
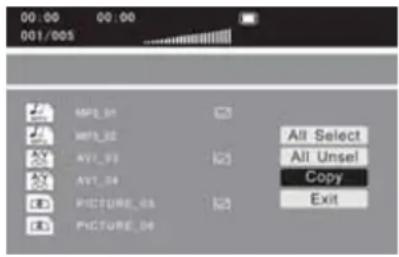
- As per your requirement, move the cursor by the direction buttons on the remote control to choose: ALL SELECT, ALL UNSEL, COPY and EXIT. You can also move the cursor to the file you want to copy. Press the OK button on the remote control and the selected files will be marked with a tick. Please see as follows:

AudioSonic
Instruction Manual
- Move the cursor to COPY item and press OK. It will then display USB 1 on the right side of the dialog box. It means the selected files will then copy to USB 1. Please see as follows:
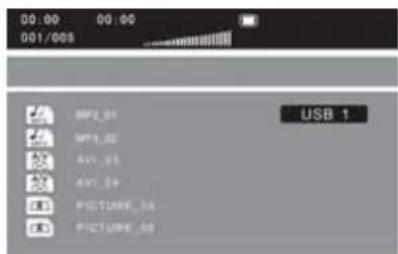
- Press the OK button and it will display the following dialog box. If you want to copy, please move the cursor to choose NEXT, if not choose BACK.

- After moving the cursor to NEXT, press the OK button and the system will start copying. If you want to cancel copying, please choose CANCEL. Please see as follows:
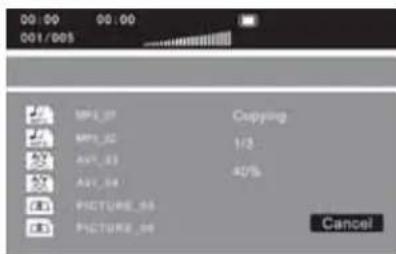
- When the copying is finished, the system will return to the previous status.
RECHARGE AND CONNECT
Recharge:
- The machine uses a rechargeable Li battery as it's direct power source. This kind of battery has a high energy density. Batteries such as these form a memory effect, it can be recharged at any time wether it has run out of power or not.
- Insert the power adaptor on one end of the local DC IN jack, and the other end into the mains socket to recharge. A full recharge on a completely flat battery takes about six hours.
- Note: Please switch off power on the machine when it is recharging. When the red indicator light is on, the battery is recharging. When the battery if completely re charged, this light will change to green.
Use and maintenance of batteries:
- Working temperature of 0 - 45 Degrees Celsius.
- Please unplug the power adaptor when not in use.
- It is normal for heat to be generated from the unit during playback. Please avoid excessive use of the unit.
Connect:
The machine has a local Audio/Video output jack (AV OUT). Therefore, the user can connect the machine to a TV and watch the audio and video playing through the TV. Please see the following image for the correct way to connect to a TV set.
SYSTEM SETUP
Menu operating:
- Press the SETUP button on the remote control or on the machine to enter the system setting manu.
- Press the LEFT/RIGHT arrow buttons to choose the setting page.
- Press the UP/DOWN arrow buttons to select the settings. Press CONFIRM, OK or LEFT/RIGHT to enter. Press the UP/DOWN arrow buttons to select the items and press CONFIRM or OK to confirm.
- Press the arrow buttons to set other settings.
- Press SET again to exit the settings menu.
Setting Page:
1. General Setting Page
There are six setting items in the General Setting Page: Angle, OSD, captions, screen saver, last memory or MP3 lyrics.
1.1 Angle Mark:
- Angle open: the screen will display the angle mark when playing a multi angle DVD disc.
• Angle close: the screen won't display the angle mark.
• Note: This function can only be used on multi angle discs.
1.2 Screen Display Language:
• To set up the screen display language
1.3 Hide the subtitle:
• ON: To display the hidden subtitle when playing the closed captioning
• OFF: Will not display the hidden subtitle
• Note: This function can only be used on discs with closed captions
1.4 Screen saver:
• ON: The screen will display the screen saver to protect the screen
• OFF: Turns off this functions
1.5 Last memory setting:
- ON: Every time the machine shuts down or stops playing a disc, the machine will play the final point of memory. Next time you open the machine and play the same disc, the system will playback from the memory.
• OFF: Turn off this function
1.6 MP3 lyrics
• ON: The screen will display MP3 lyrics
• OFF: Turn off this function
2. Speaker setup page:
- Down mix setup
- RIGHT/LEFT Channel: mix the 5.1 channel audio to the left/right channels and then output by the left and right speakers.
• Stereo: Mix the 5.1 channel audio to stereo and then output by left and right speakers
• Note: This function can only be used on AC-3, 5.1 channel format discs.
3. SPDIF setup (on devices with SPDIF)
3.1 SPDIF Output.
- SPDIF /CLOSE: No digital audio output, only analogue output.
- PCM (Pulse Control Modulation) - Two channel stereo in digital format - suitable for AV receivers capable of decoding audio output in PCM mode (check with your amplifier).
4. Dolby setup.
4.1 Dual mono.
• Stereo: Left/Right channels will output by Left/Right speakers
• Left Channel: Left/Right speaker output Left channel audio
• Right channel: Left/Right speaker output Right channel audio
• Mixed channel: Left/Right speakers output the Left/Right mixed audio
• Note: This function suits to Dolby AC-3 or Two channel discs.
4.2 Dynamic Range Compression:
• To listen to a disc at low volume, you can adjust the dynamic balance to reduce sound.
5. Video Setup:
5.1 Panel Quality: To setup the panel quality
5.2 Video Quality: To setup the video quality
6. The initial Set Page:
- You can choose this setting when the machine has no disc inside or is on STOP position.
6.1 Sound, subtitle and disc menu language.
This allows you to choose the default settings of the sound, subtitles and disc menu language. At the same time, you can choose the sound language by pressing SOUND. Note: If the disc does not include the above setting language, the disc will play it's default setting.
6.2 Age control.
The configuration settings of the machine allow the disc player to be set with a password to restrict use of the machine. The default password is 136900. Note: This function will only work with discs with an age control built in.
6.3 Password Setting.
6.4 Password Format.
You can turn the password setting function on or off. Note: You have to input the correct password to change the password setting. The default password is 136900.
6.5 Password.
You can re-set a new password. Note: The default password 136900 is still valid even after a new password has been set.
6.6 Default: You can return to the current settings to the original default.
Make sure you turn the machine off.
Play the disc:
A: Connect the power and ensure unit is turned on.
B: Press [] to open the disc tray and insert a disc.
C. Close the disc tray. The machine will read the disc automatically.
Play MP3/MPEG4 disc:
The content will be displayed on the screen after reading the MP3/MPEG4 disc.
- Press the UP/DOWN arrow keys to select the file or folder.
- Press OK or CONFIRM to enter the selected folder and display it's contents.
- Press OK or CONFIRM to play the selected file.
PLAY
Play the Kodak CD disc:
- Put the Kodak CD disc into the machine. The machine will play the disc automatically.
- Press [■] to display the disc contents manu.
- Press the UP/DOWN arrow keys to select one picture, then press CONFIRM or [▶]. The machine will play the disc from the selected picture.
- GOTO: Press this button and select a picture by numbers. The machine will play the disc from the selected picture.
[■] : Press this button one time to pause the disc, press this button again or press [ ] to play the disc.
[▶] : Press this button to play the disc or resume play.
REPEAT : Press this button to shift the repeat play format.
: Press this button to skip to the previous/next picture.
- The LEFT/RIGHT button on the remote control: Press the RIGHT button to turn the picture clockwise, press the LEFT button to turn the picture counter clockwise.
- ZOOM: Press this button to zoom in/zoom out/resume that picture size. The arrow keys will be used to move the picture when the picture is zoomed in.
Play USB and SD/MMC card:
Plug in a USB to USB interface. Press the DVD/USB/SD button, the machine will play that drive automatically.
Insert a SD/MMC card to the SD/MMC card interface. Press the DVD/USB/SD button, the machine will play the card driver automatically.
Play a DIVX disc:
DIVX is a film recording/video file format. They are DVD disc quality with a greater capacity. The format is AVI, for example:
| 1.5 hours file MPEG- | 12 Format DIVX Format |
| DVD(MPEG-2) About | 1.5-2GB About600-800MB |
| VCD(MPEG-I) About | 800MB-1 G About 200-300 MB |
Comparing MPEG-1, MPEG-2 and MPEG-4
| MPEG-1 MPEG-2 | MPEG-4 | ||
| Speed(kb/s) | 1380kb/s (352X288) | 6500kb/s | 880kb/s (720X576) |
| Video quality | GOOD | Excellent | Perfect |
| Hardware requirement | Low | Middle | High |
TECHNICAL SPECIFICATION
Support disc: DVD/VCD/CD/MP3/MPEG4/DIVX
Screen Size: 7 Inch
Frequency range: 20Hz-20KHz
Video Output: IVp-p75 Ohm Unbalanced
Audio Output: 1.4Vrms/10Kohm
Dynamic Range: ≥85db
Laser: semiconductor laser, wavelength: 650mm/795mm
Power supply: DC 9-12V
Power: 12W
Working temperature: 5-40 C
Battery: Li Battery
TROUBLE SHOOTING
Problem and Solution:
Associated with the maintenance staff, please follow the instructions to check the causes of the problem.
| Problem Cause Solution way | ||
| No Power | Power adapter is not securely connected to the machine of insert the power outlet | Insert the power adapter to the DCIN jack and the electrical outlet |
| No sound | Volume is transferred to the smallest | Press VOL+ to enlarge the sound |
| In the Mute statue | Press MUTE to recover the sound | |
| In the REW/FDW statue | Press PLAY or PLAY/PAUSE to recover the play | |
| Sound from the headphone | The sound will be from the speaker after pull the headphone | |
| Can't Play the disc | Disc upside down and back Put the disc proper | |
| Dirty Disc Clean the disc | ||
| Not compatible with the machine | Put the compatible disc | |
| Problem Cause Solution way | ||
| Failure of he Remote control | No point at the remote control receiver | Make the remote control to point at the receiver |
| The distance between remote control and the machine is too far | Keep the distance between remote control and the machine within 6 meters | |
| Remote control battery depletion | Change new batteries | |
| No batteries in the remote control | Fix the batteries | |
| The machine is unable to read from USB or card slot | Death | Shut down the electricity and reopen the machine |
| The inserted USB and Memory Card is not genuine | The machine is unable to support the non-genuine USB or memory card. The insertion of a non genuine USB or memory card can lead to no power to the unit.Please turn the machine off.The machine will return to normal after being restarted. | |
• ON: The screen will display MP3 lyrics

AudioSonic
Gebruiksaanwijzing
• OFF: Turn off this function
1.6MP3 songteksten
Alimentation: DC 9-12V
Puissance: 12W
Température
1.3 Ocultar as legendas:
UPPLADDNING OCH ANSLUTNING
Uppladdning:


- AudioSonic
- FEATURES:
- ACCESSORIES:
- IMPORTANT SAFETY INSTRUCTIONS
- Deposition:
- Installation:
- Notes:
- Discs:
- REMOTE CONTROL
- BUTTON FUNCTION
- RECHARGE AND CONNECT
- Recharge:
- Use and maintenance of batteries:
- Connect:
- SYSTEM SETUP
- Menu operating:
- Setting Page:
- General Setting Page
- Angle Mark:
- Screen Display Language:
- Hide the subtitle:
- Screen saver:
- Last memory setting:
- MP3 lyrics
- Speaker setup page:
- SPDIF setup (on devices with SPDIF)
- SPDIF Output.
- Dolby setup.
- Dual mono.
- Dynamic Range Compression:
- Video Setup:
- Panel Quality: To setup the panel quality
- Video Quality: To setup the video quality
- The initial Set Page:
- Sound, subtitle and disc menu language.
- Age control.
- Password Setting.
- Password Format.
- Password.
- Default: You can return to the current settings to the original default.
- Play the disc:
- Play MP3/MPEG4 disc:
- PLAY
- Play the Kodak CD disc:
- Play USB and SD/MMC card:
- Play a DIVX disc:
- TECHNICAL SPECIFICATION
- TROUBLE SHOOTING
- Problem and Solution:
- Gebruiksaanwijzing
- 1.6MP3 songteksten
- Ocultar as legendas:
- UPPLADDNING OCH ANSLUTNING
- Uppladdning:
Brand : AudioSonic
Model : DV-1821
Category : DVD player