
DV-1823 - DVD player AudioSonic - Free user manual and instructions
Find the device manual for free DV-1823 AudioSonic in PDF.

| Product Type | Portable DVD player with 7" LCD screen (16:9) and separate monitor |
| Brand | AudioSonic |
| Model | DV-1823 |
| Dimensions (W x D x H) | Main unit: 210 x 165 x 38 mm; Monitor: 210 x 165 x 38 mm (without brackets) |
| Weight | Main unit: 600 g; Monitor: 400 g |
| Power Supply | DC 9-12V, 1.5 A (110-240V AC adapter supplied) |
| Power Consumption | 10 W (main unit), 6 W (monitor) |
| Compatible Disc Formats | DVD, VCD, CD, MP3, JPG, MPEG-4, DivX |
| System Formats | PAL / NTSC |
| Main Functions | Play, pause, stop, fast forward/rewind, DVD menu, zoom, A-B repeat, search, angle, subtitles, multi-language audio, programming, information display |
| Outputs | 3.5 mm stereo headphone jack, 3.5 mm AV output, 12V DC power |
| Inputs | 12V DC power input, USB host port, SD/MMC/MS card reader (SDHC compatible) |
| Remote Control | Infrared with included CR2025 battery |
| Screen | 7 inch LCD (178 mm) 16:9 format |
| Laser | Class 1, semiconductor, wavelength 650/795 nm |
| Frequency Response | 20 Hz - 20 kHz |
| Video Output | 1 Vp-p / 75 ohms, unbalanced |
| Audio Signal-to-Noise Ratio | > 60 dB |
| Dynamic Range | > 85 dB |
| Operating Temperature | 5 - 40 °C |
| Care and Cleaning | Use a soft cloth slightly damp. Do not use chemical cleaners. Clean discs radially from inside out. |
| Safety | Class 1 laser product. Do not open or attempt to repair. Unplug by pulling the plug. Use in a ventilated and stable place. |
| Spare Parts and Repairability | No user-replaceable parts. Any unauthorized intervention voids the warranty. Contact the manufacturer or an authorized service center. |
| Box Contents | Main DVD player, LCD monitor, 2 headrest brackets, 2 headphones, 12V DC adapter, 110-240V transformer, power cable, audio/video cable, remote control, manual |
Frequently Asked Questions - DV-1823 AudioSonic
User questions about DV-1823 AudioSonic
0 question about this device. Answer the ones you know or ask your own.
Ask a new question about this device
Download the instructions for your DVD player in PDF format for free! Find your manual DV-1823 - AudioSonic and take your electronic device back in hand. On this page are published all the documents necessary for the use of your device. DV-1823 by AudioSonic.
USER MANUAL DV-1823 AudioSonic
natural_image
Two audio Sonic TV screens displaying a tropical beach scene with kites flying over turquoise water, no visible text or symbols on screens or background.DVD Player
MP3 - USB - SD Slot
DV-1823

AudioSonic
Instu
IMPORTANT SAFETY INSTRUCTIONS AND PRECAUTIONS
- Read all instructions carefully before use.
- Retain manuals for future reference.
- Use this product only in the manner described.
- Only use a water-dampened soft-cloth to clean the surface of this product.
- Use electronic devices in well ventilated areas & not exposed to excess vibration. Do not place discs near any heat source such as direct sunlight or areas or high humidity
• The following will damage this product: any liquid such as water or moisture, • Do not touch the readable area or the disc (underside). Always hold discs by the edges.
extreme heat, cold, humidity, dusty or sandy environments.
- Only place this device on stable surfaces and ensure that any attached cables are secure and will not cause the device to fall.
• There are no user serviceable parts in this product.
- Un-authorized attempts to dismantle or repair this product will void product warranty and may result in dangerous electric shock.
- Do not use this product if you are in control of dangerous machinery such as a motor vehicle.
- Remove any power or data cords by pulling them from the plug and not the cord. Using this device near other electronic devices may cause interference. W
- Do not open the drive door while disc is spinning.
- Ensure that the Portable Dual DVD player is installed in accordance to with the Instructions and illustrations provided in this manual.
- It is the responsibility of the driver of the vehicle to ensure that this product is incompliance with all Federal and State laws governing products of this type.
- Mounts this product with thought for other motorist too reduce the amount of distraction that they may provide to other road users.
CARE OF DISCS
Laser product symbol: located on the rear panel of the unit indicates that this player is a class 1 laser product; it uses only weak laser and no hazardous radiation outside of the unit
- Do not use adhesive tape on the disc.
e Do not use commercial cleaner liquids on the discs as they may cause damage.
- Do not leave discs in a vehicle that may be subject to strong direct sunlight as the heat build up in the vehicle may damage the discs even if stored in shaded areas.
- To clean the disc, always use a very soft damp cloth and wipe from the inside to the outside of the disc.
• Always return the disc to its enclosure when finished with.
WHAT'S IN THE BOX
• 1X Main DVD player with 7" 16:9 LCD display
• 1X LCD monitor with 7" 16:9 display
Installed Headrest mounts
• 2 X Headphones with 1.2m cables
• 1 X12VDC Power supply
• 1 X110-240VAC mains power adaptor
• 1X 1.5mtr power link cable
• 1X 1.5mtr audio/video link cable
• 1X Remote control (with battery)
• 1X User Manual (this document]
Please check the contents of the packaging carefully.

AudioSonic
Instruction Manual
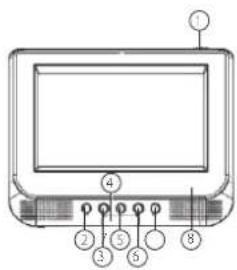
DVD PLAYER (MAIN UNIT)
- Main Power ON/OFF Switch
- Volume decrease button
- Volume increase button
- IR sensor
- Play/Pause Button
- Previous button
- Next Button
- LCD Display/Drive Access panel
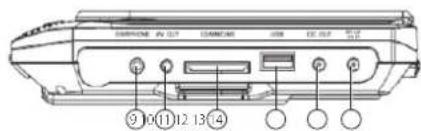
- 3.5mm Stereo headphone output
10.3.5mm AV link output - SD/MMC/MS Card slot (SDHC compatible)
- USB host port
- 12VDC Link output
- 12VDC input

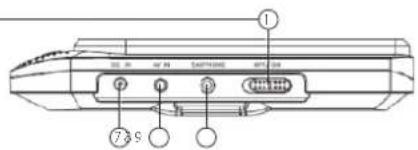
MONITOR
- Main Power ON/OFF Switch
- Volume decrease button
- Volume increase button
- Left Button
- Menu Button
- Right Button
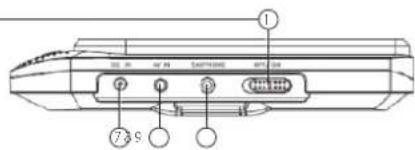
- 12VDC Link Cable input
- 3.5mm AV link input
- 3.5mm Stereo headphone output jack

INSTALLATION
Indoor Use
- Locate a spare mains outlet and turn it OFF.
• Plug the supplied AC adaptor in to the outlet, - Connect the other end to the 12VCD input socket.
• Turn the main outlet ON.
• Turn the main Power Switch on the Player to the ON position.
PLAYBACK
Connecting Headphones
- Plug the supplied headphones into the headphone socket on the DVD Player and the Monitor.
- Adjust the volume level on the player or the monitor before wearing the headsets.
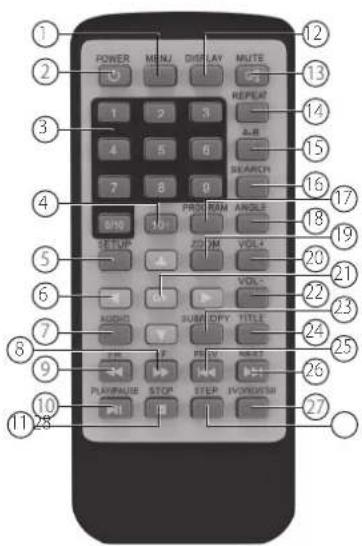
REMOTE CONTROL
- Menu
- Power
- Number Pad
- 10+
- DVD Setup
- Up/Down/Left/Right
- Audio
- Fast Forward
- Fast Rewind
- Play/Pause
- Stop
- Display
- Mute
- Repeat
- A-B Repeat
- Search
- Program
- Angle
- Zoom
- Volume +
- Confirm
- Volume -
- Subtitle
- Title
- Previous
- Next
- DVD/SD/USB
- Step
KEY FUNCTIONS
| ButtonAction | |
| Power Switches the player ON or OFF | |
| DVD/SD/USB | Press to cycle between DVD (Optical Disc), Card reader or USB drive. Use Up/Down/Left/Right button to navigate and the OK button select. |
| Setup Enter or Exit the setup menu. | |
| Number Pad | Use to enter an item in a menu or to enter a password. |
| OK (Confirm) | Press to select an option or validate a setting. |
| A-B Repeat | Used to select a portion of Video/Audio to repeat. |
| Previous | Press to skip to the previous chapter or track. |
| Next | Press to skip to the next chapter or track. |
| Play/Pause | Press to start playback or to pause playback. |
| Stop Press to stop playback. | |
| Program | This button is used to program the favourite songs or chapters when using VCD, Audio CD or DVD discs. |
| Fast Forward/Rewind | Use to Fast Forward or Rewind at Speeds of 2X, 4X, 8X, 16X and 32X normal playback speeds. |
| ButtonAction | |
| Mute | Mutes the Audio Output on the Player and the Monitor. |
| Volume +/- | These buttons are used to increase or decrease the Audio Output. |
| Audio | Select available audio language for the DVD. |
| DVD Title Return to Disc Main Menu. | |
| Display | Shows information about the current disc. |
| Zoom. | Enlarge the Image 2X ~ 4X the size of the original image. |
| Search | Select a title, chapter, track, title time or tracking Time. |
| Angle | Display the available angles for discs containing multi-angles. |
Note: Remove the plastic sheet before using the remote control.
Loading and Playing a Disc.
- After connecting power to the DVD Player, push the Power On/Off switch to the "on" position.
- Place a disc gently into the tray.
- You should hear and feel the disc snap firmly into place.
- Place a disc into the tray with the disc's label facing up.
-
Close the DVD cover until it clicks shut. The unit will now load disc and commence playback.
-
Stopping Play.
- Press the STOP ( ■) Button during play.
- Play/Pause.
- Press the Play/Pause (▶) button on the remote during play to pause playback. To resume. Press the Play/Pause (▶) button once again.
- Fast Forward/Fast Reverse
- Press Fast Forward or Fast Reverse to achieve the place you desired with speed adjustable during 2X, 4X, 8X, 16X, 32X times.
- Menu
- A DVD is divided into sections called titles and chapters. When you play a DVD, a root menu of the disc will appear on the screen of your DVD player or Monitor. The contents of the menu vary from disc to disc. Press MENU during playback to display the menu.
DISPLAY
Playing Time and Remaining Time
- During playback, press the "DISPLAY" button to display the current Title Number, the total Number of Title, The current Chapter Number, The total Number of Chapters, and the Playing elapsed Time for the title. The heading will disappear automatically after 3 seconds if DISPLAY button is not pressed.
- Press "DISPLAY" constantly to choose the options below in sequence. Title Elapsed: The elapsed time of the title.
Title Remain: The remaining time of the title.
Chapter Elapsed: The elapsed time of the chapter.
Chapter Remain: The remaining time of the chapter.
Display off: The DVD's time information will not be displayed.
Angle
During playback of a disc, press the "ANGLE" button to display the available angles for discs containing multi-angles, with the current angle number and the total number of angles displaying. Press "ANGLE" to select another angle, then press again to exit and return to the normal viewing angle. The angle display will disappear automatically if the "ANGLE" button is not pressed again within 3 seconds.
Note: Not all discs contain this feature.
Subtitle
During disc playback press "SUB" to select the subtitle language you desire, with the current Subtitle Language Number and the total Number of Subtitle Languages displayed. If there are multiple languages press "SUB" again to select another subtitle language. To turn subtitles OFF, press the "SUB" button until "Subtitle Off" is displayed. The Subtitle display will disappear automatically if the "SUB" button is not press again within 3 seconds.
Note: Some DVDs only allow access to this function through DVD Menu.
Audio
During playback press "AUDIO" to select the audio language you desire, with the current Audio Channel Number and the total number of Audio Channels displayed. Press "AUDIO" again to select another audio language. The audio display will disappear automatically if the "AUDIO" button is not pressed within 3 seconds.
Zoom
During playback press "ZOOM" to enlarge the picture by 2X, 3X or 4X with the current zoom multiple:

flowchart
graph LR
    A["Title Elapsed Title Remain Chapter Alapsed"] --> B["Display OFF"]
    B --> C["Chapter Remain"]
    C --> D["Next Step"]
A-B Repeat
A. During playback press a first time "A-B" to set the Starting Point A.
B. Press "A-B" a second time to set the Ending Point B and player will repeatedly play the part between Point A and Point B.
C. Press "A-B" a third time to cancel "A-B" repeat and resume normal playback.
D.

flowchart
graph LR
    A["1."] --> B["2."]
    B --> C["3."]
    C --> AD["AB REPEAT OFF"]
A-B Repeat Starting Point A-B Repeat Ending Point A-B Repeat Cancelled
1/ALL Repeat
During playback press "REPEAT" constantly to see the repeat mode as right.
Chapter: Repeat the current chapter.
Title: Repeat the current title.
All: Repeat all chapters and titles.
Off: Resume normal playback.


flowchart
graph LR
    A["Chapter"] --> B["Title"]
    B --> C["All"]
    C --> A
    A --> D["OFF"]
PLAYBACK MP3/MPEG-4 DISC
When a MP3/MPEG-4 disc is inserted into the unit, the menu screen appears automatically You can use the menu screen to select your desired folders and songs or the system plays the songs in the order they were burned onto the disc.
- Press the ▲ or button to choose a folder from the folder list.
- Press "OK" to select the highlighted folder. The songs available under the folder will be listed.
- Use ▲ or T button to choose a song from the list. Press "OK" to select and begin playback of the highlighted song.
- Use the button to move to the next song. Press the button to move to the beginning of the previous song.
- Press the button to select the current folder and press "OK" to confirm. Then you can back to the folder list.
Playback of DIVX content
The DIVX format is capable of holding high quality video and sound in a highly compressed file format. File types such as AVI are typically able to hold more data in a smaller file.
| 1.5 hours file MPEG-12 Format DIVX Format |
| DVD(MPEG-2) About 1.5-2GB About600-800MB |
| VCD(MPEG-1) About 800MB-1 G About 200-300 MB |
Comparing MPEG-1, MPEG-2 and MPEG-4
| MPEG-1 MPEG-2 MPEG-4 | |||
| Speed(kb/s) | 1380kb/s(352X288) | 6500kb/s | 880kb/s(720X576) |
| Video quality | GOOD | Excellent | Perfect |
| Hardware requirement | Low | Middle High | |
However depending on how the file was encoded, compatibility may still be and issue with certain types of DivX or MP4 type files.
We highly recommend that Files be tested and Trial & Error" be used to find the best compromise between quality and file size for encoded files.
Play USB and SD/MMC/MS Card
- Plug in the USB device noting correct orientation. Press [DVD/SD/USB], then choose USB to select the content.
- Insert a memory card to the SD/MMC/MS slot. Press [DVD/SD/USB] and select SD to play memory card.
SYSTEM SETUP
- Press "SETUP" on the remote to bring up the SYSTEM SETUP MENU.
- Press the ◄ or ▶ buttons to go to or return to the required settings page.
- When the required page is shown press the "OK" button to enter the page.
- Use the ▲ or buttons to navigate to the feature to be changed and then press the ▶ button to enter the submenu.
- Use the ▲ or buttons to select the submenu item and then press the "OK" button to confirm.
- Press the button to return to the previous menu or press the "SETUP" button to close the Setup Screen.
Note: Not all discs contain these features. Some features are disc dependent.
GENERAL SETUP PAGE
TV Display
- 4:3: When the player outputs signal to a normal monitor. Wide-screen images are shown on the screen. But with some parts cropped automatically.
- Normal / LB: Normal/LB: When the player outputs signal to a normal monitor, a normal picture is shown on the screen with a black strip at both the top and bottom of the screen.
- 16:9: Wide: When the player outputs signal to a wide screen monitor, a wide picture is shown on the full screen.
Angle Mark
- ON: The screen will show the angle mark icon. (If an angle option is available).
• OFF: The screen will not display the Angle Mark.
OSD Language
You can choose one out of several different languages as the OSD setup language
Captions
• ON: Captions are displayed. (If an captions available).
• OFF: The screen will not display captions.
Screen Saver
• ON: Enables screen saver.
• OFF: Disables screen saver (off).
Note: The DVD player will enter the Screen Saver mode after approximately five minutes if the same image remains on the screen.
Last Memory
- ON: The unit will return to the last position on the disc.
• OFF: The unit will not return to the last position on the disc.
AUDIO
Speaker Setup
Downmix
- LT/RT: RIGHT/LEFT Channel: Mixes a 5.1 Ch audio signal to 2 audio channels and then outputs to the left and right speakers.
- Stereo: Outputs a stereo signal to the left and right speakers.
DOLBY
Dual Mono
- Stereo: Left/Right channel audio will be played back by the Left/Right speakers.
• L-Mono: Playback of Left channel audio only.

AudioSonic
Instruction Manual
• R-Mono: Playback of Right channel audio only.
- Mix Mono: Both Left/Right channels are mixed to one mono channel.
Dynamic
Use this mode to level all sound channels to ensure even sound levels.
- Press The OK Button to enter.
- Use the or buttons to adjust the dynamic range as required.
- Press the OK Button aging to confirm the adjustment.
VIDEO
Adjust the image quality.
- Use the ▲ buttons to select the option to change and the press the "OK" button.
- Press the or buttons to adjust the setting and then press the "OK" button to confirm the changes.
Options are
- Sharpness.
- Brightness.
- Contrast.
PREFERENCES
The Preferences page cannot be accessed if a disc is in the player. Please remove any disc before accessing this page.
TV Type
Used for settings the Video format output if the player is connected to a display other than the Monitor Supplied. This requires the use of a cable that is not supplied with this product.
• PAL: Video output is PAL only.
- Multi: Video output is as per source material.
• NTSC: Video output is NTSC only.
Audio
Sets the default Audio language of DVDs played on this player.
Subtitle
Sets the default Language of the Subtitles of DVDs played on this play.
Disc Menu
Sets the default Language of the DVD Menu of DVDs played on this play.
NOTE: Audio, Subtitle and Disc Menu settings are subject the availability of your selection on the DVD.
Parental
Select the parental level you desire for disc with lock-out function or multiple rating levels. There are listed from the level (1 Kid Safe) to the highest level (8 Adult). The setting allows PLAYBACK to be restricted via password.
Note: This function will only work if the disc contains a parental control lockout.
Password
This function allows you to re-set a new password.
Note: You have to input the correct password to change the password setting. The default password is 136900
Default
Used to reset the player to Original Factory Defaults.
TROUBLESHOOTING
| Problem Possible Solution | |
| No sound or distorted sound? | Make sure your DVD is connected properly. Make sure all cables are securely inserted into the appropriate jacks.Make sure the Audio is not muted. |
| No Power | Ensure that power connection is firmly seated in plug and there is power to the power supply. |
| Can't advance through a movie? | You can't advance through the opening credits and warning information that appears at the beginning of movies because the disc is programmed to prohibit that action. |
| The icon() appears on the screen? | The feature or action cannot be completed at this time because:The disc's software restricts it.The disc's software doesn't support the feature (e.g., angles)The feature is not available at the moment.You've requested a title or chapter number that is out of range. |
| Picture Is distorted? | The disc might be damaged. Try another disc.It is normal for some distortion to appear during forward or reverse scan. |
| No forward or Reverse scan? | Some discs have sections that prohibit rapid scanning or title and chapter skip.If you try to skip through the warning Information and credits at the beginning of a movie, you won't be able to. This part of the movies often programmed to prohibit skipping through it. |
| Problem Possible Solution | |
| IR sensor Inoperative? | · Ensure that the batteries in the remote are fresh. · Ensure that the remote sensor eye is not obstructed. · Ensure that the infrared transmitter is affixed over the sensor eye of the component to be controlled. |
| Disc won't play? | · Insert a disc with the label side facing up. · Check the type of disc you put into disc tray. This DVD only plays digital video discs, audio CDs and MPs. |
| Play starts, but then stops immediately? | · The disc is dirty. Clean it. · Condensation has formed. Allow player to dry out. |
To Change the Remote Control Battery
- Open the Battery Door.
- Insert one CR2025 size battery.
- To use the remote control, point it at the remote sensor on the player.

AudioSonic
Instruction Manual
SPECIFICATIONS
DVD Player
Compatible Disc: DVD/VCD/CD/M P3/JPG/MPEG-4
Signal System: PAL/NTSC
Screen Size: 7 Inch (178MM)
Frequency Response: 20 Hz to 20 KHz
Video Output: 1 Vp-p/75 Ohm, Unbalanced
Audio S/N: Better than 60 dB
Dynamic range: Better than 85 dB
Laser: Semiconductor Laser, Wave Length: 650 nm/795 nm
Power source: DC 9-12V 1.5 amps
Power Consumption: 10W
Working temperature: 5-40°C
Weight: 600 grams. Without mount, disc or cables
Dimensions (LxWxH): 210mm X 1650mm X 380mm
Monitor
Colour System: PAL/NTSC
Screen Size: 7 Inch (178MM)
Power source: DC 9 - 12V
Power Consumption: 6W
Working temperature: 5-40°C
Weight: 400 grams. Without mount, disc or cables
Dimensions (LxWxH): 210mm X 1650mm X 380mm

MONITOR
INSTALLATIE
Gebruik binnenshuis

MONITEUR
INSTALLATION

MONITOR
INSTALLATION
Im Haus

MONITOR
INSTALACIÓN
Uso en interior
MONITOR
INSTALAÇÃO

EKRAN


Instr
INSTALACJA

MONITOR
INSTALLAZIONE
Utilizzo in casa

MONITOR
INSTALLATION
Inomhusanvändning


- DVD Player
- AudioSonic
- IMPORTANT SAFETY INSTRUCTIONS AND PRECAUTIONS
- CARE OF DISCS
- WHAT'S IN THE BOX
- DVD PLAYER (MAIN UNIT)
- MONITOR
- INSTALLATION
- Indoor Use
- PLAYBACK
- Connecting Headphones
- REMOTE CONTROL
- Loading and Playing a Disc.
- DISPLAY
- Playing Time and Remaining Time
- Angle
- Subtitle
- Audio
- Zoom
- A-B Repeat
- 1/ALL Repeat
- PLAYBACK MP3/MPEG-4 DISC
- Playback of DIVX content
- Play USB and SD/MMC/MS Card
- SYSTEM SETUP
- GENERAL SETUP PAGE
- TV Display
- Angle Mark
- OSD Language
- Captions
- Screen Saver
- Last Memory
- Speaker Setup
- DOLBY
- Dual Mono
- Dynamic
- VIDEO
- Adjust the image quality.
- Options are
- PREFERENCES
- TV Type
- Disc Menu
- Parental
- Password
- Default
- To Change the Remote Control Battery
- SPECIFICATIONS
- INSTALLATIE
- Gebruik binnenshuis
- MONITEUR
- Im Haus
- INSTALACIÓN
- Uso en interior
- INSTALAÇÃO
- EKRAN
- INSTALACJA
- INSTALLAZIONE
- Utilizzo in casa
- Inomhusanvändning
Brand : AudioSonic
Model : DV-1823
Category : DVD player