CU-VD20UE - DVD Burner JVC - Free user manual and instructions
Find the device manual for free CU-VD20UE JVC in PDF.
| Product type | External DVD writer |
| Brand | JVC |
| Model | CU-VD20UE |
| Dimensions (L x H x D) | 171 x 56 x 262 mm |
| Weight | Approximately 1.4 kg |
| Power supply | 12 V DC via AC adapter AP-V400U (110-240 V AC, 50/60 Hz) |
| Power consumption | Approximately 5.2 W / 1.4 A |
| Interface | Hi-Speed USB 2.0 (USB 1.1 compatible) |
| Write speed (DVD-R) | Up to 8x (USB 2.0) |
| Write speed (DVD-RW) | Up to 4x (USB 2.0) |
| Write speed (DVD-R DL) | Up to 4x (USB 2.0) |
| Read speed (DVD-ROM) | Up to 5x |
| Supported discs (write) | DVD-R, DVD-RW, DVD-R DL (12 cm) |
| Supported discs (read) | DVD-R, DVD-RW, DVD-R DL, DVD-ROM, CD-R/RW/ROM |
| Supported operating system | Windows XP Home / Professional (pre-installed) |
| Included software | CyberLink Power2Go 5.5 Lite (data writing) |
| Included accessories | AC adapter AP-V400U, power cord, USB cable (compatible with JVC cameras), installation CD-ROM, blank DVD-R disc |
| Compatibility | Direct connection with JVC Everio cameras equipped with USB host function |
| Safety | Class 1 laser product; do not open or repair yourself; use only the supplied adapter |
| Care and cleaning | Exterior: dry cloth; tray: soft dry cloth; discs: from center outward with a soft cloth |
| Operating temperature | 0 °C to 40 °C |
| Operating humidity | 35 % to 80 % |
Frequently Asked Questions - CU-VD20UE JVC
User questions about CU-VD20UE JVC
0 question about this device. Answer the ones you know or ask your own.
Ask a new question about this device
Download the instructions for your DVD Burner in PDF format for free! Find your manual CU-VD20UE - JVC and take your electronic device back in hand. On this page are published all the documents necessary for the use of your device. CU-VD20UE by JVC.
USER MANUAL CU-VD20UE JVC
E/EK/ER/AA/AC/AG/AS/TW


RW/R


A46
This burner enables DVDs of videos recorded with the JVC Hard Disk Camera to be created without using a PC.
- If you want to edit videos recorded with the camera and create your original DVDs, use the software provided with the camera for editing and creating DVDs.
- The provided data writing software Power2Go 5.5 Lite can be used for writing data. However, it cannot be used to edit videos or create DVDs.
- The burner does not include support for Macintosh.
Dear Customer,
Thank you for purchasing this burner. Before use, please read the safety information and precautions contained in pages 2 and 3 to ensure safe use of this product.
Safety Precautions
IMPORTANT:
In the event that any of the following occur, remove the plug and make a request for repair to the dealer.
Smoke or abnormal odor is emitted
- Damage from being dropped
Water or an object enters inside
CAUTION:
A UNIT IS A CLASS 1 LASER PRODUCT. HOWEVER THIS UNIT USES A VISIBLE LASER BEAM WHICH COULD CAUSE HAZARDOUS RADIATION EXPOSURE IF DIRECTED. BE SURE TO OPERATE THE UNIT CORRECTLY AS INSTRUCTED.
WHEN THIS UNIT IS PLUGGED INTO THE WALL OUTLET, DO NOT PLACE YOUR EYES CLOSE TO THE OPENING OF THE DISC TRAY AND OTHER OPENINGS TO LOOK INTO THE INSIDE OF THIS UNIT.
USE OF CONTROLS OR ADJUSTMENTS OR PERFORMANCE OF PROCEDURES OTHER THAN THOSE SPECIFIED HEREIN MAY RESULT IN HAZARDOUS RADIATION EXPOSURE. DO NOT OPEN COVERS AND DO NOT REPAIR YOURSELF. REFER SERVICING TO QUALIFIED PERSONNEL.
CLASS 1 LASER PRODUCT
REPRODUCTION OF LABELS
WARNING LABEL INSIDE OF THE UNIT
| CAUTION CLASS 1M LASER RADIANING WISH OPEN, DO NOT VIEW DIRECTLY WITH OPTICAL INSTRUMENTS. CAUTION LASER RADIANING WHEN OPEN, DO NOT STARE INTO BEAM, (EN) OBTAINING INSTRUMENTS D'OPTIQUES. | ATTENTION EMET UN PAYRONEMENT LASER DE CLASSE 1M LOQUE OUVERT, NE PAS GRADINGHER DIRECTOR DUT A TRAVERS DESINSTRUMENTS O'OPTIQUES. | ADVARLESS KLASSE 1M-LASERSTRALING NAR APHEM, KIKE SE DRETEK INN I OPTEKSE INSTRUMENTER. | ADVARLESS KLASSE 1M LASERSTRALING NAR APPEARATE ABNES, KIG KEKE DRETEK PA STRALEN MED OPTIQUE INSTRUMENTER. | VAROJO LUKON 1M LASERSEATIPLY LIATTEEN SEIALLE ALAI KATSO SATSEESEN SUJRAAN OPTISLA LIATTELLA. | VARINING KUAS 1M LASERSTRALING NAR DEN AR OPSEN TTITE NTDE DEP KF DEN MED OPTISKA INSTRUMENT, (SW) LF41334-017A |
This unit applies to the standard "IEC60825-1:2001" for laser products.
The socket-outlet shall be installed near the equipment and shall be easily accessible.
ATTENTION:
This unit contains microcomputers. External electronic noise or interference could cause malfunctioning. In such cases, switch the unit off and unplug the mains power cord. Then plug it in again and turn the unit on. Take out the disc. After checking the disc, operate the unit as usual.
CAUTION:
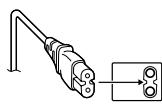
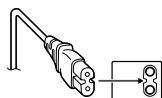
To avoid electric shock or damage to the unit, first firmly insert the small end of the power cord into the AC Adapter until it is no longer wobbly, and then plug the larger end of the power cord into an AC outlet.
If malfunctioning occurs, stop using the unit immediately and consult your local JVC dealer.
FOR USE WITH MODEL NO. AP-V400U (AC ADAPTER).
043-124000-I2 (AC Adapter) is also available for customer using CU-VD20AC/AG/AS.
POUR UTILISER AVEC MODELE AP-V400U (ADAPTATEUR CA).
- Le 043-124000-I2 (adaptateur CA) est aussi disponible pour les modèle CU-VD20AC/AG/AS.
Dear Customer,
This apparatus is in conformance with the valid European directives and standards regarding electromagnetic compatibility and electrical safety.
European representative of Victor Company of Japan, Limited is: JVC Technology Centre Europe GmbH
Postfach 10 05 52
61145 Friedberg
Germany
Information for Users on Disposal of Old Equipment
[European Union]
This symbol indicates that the electrical and electronic equipment should not be disposed as general household waste at its end-of-life. Instead, the product should be handed over to the applicable collection point for the recycling of electrical and electronic equipment for proper treatment, recovery and recycling in accordance with your national legislation.
![JVC CU-VD20UE - [European Union] - 1](/content/2019/11/123589/images/0e5c85d8bdecacc7788daf3375b452461babe8566936d3176cb259215ed3f2b5.jpg)
Attention:
This symbol is only valid in the European Union.
By disposing of this product correctly, you will help to conserve natural resources and will help prevent potential negative effects on the health which could otherwise be caused by in handling of this product. For more information and recycling of this product, please contact y office, your household waste disposal service purchased the product.
Penalties may be applicable for incorrect disposal of this waste, in accordance with national legislation.
(Business users)
If you wish to dispose of this product, please visit our web page www.jvc-europe.com to obtain information about the take-back of the product.
[Other Countries outside the European Union]
If you wish to dispose of this product, please do so in accordance with applicable national legislation or other rules in your country for the treatment of old electrical and electronic equipment.
SOME DO'S AND DON'TS ON THE SAFE USE OF EQUIPMENT
This equipment has been designed and manufactured to meet international safety standards but, like any electrical equipment, care must be taken if you are to obtain the best results and safety is to be assured.
DO read the operating instructions before you attempt to use the equipment.
DO ensure that all electrical connections (including the mains plug, extension leads and interconnections between pieces of equipment) are properly made and in accordance with the manufacturer's instructions. Switch off and withdraw the mains plug when making or changing connections.
DO consult your dealer if you are ever in doubt about the installation, operation or safety of your equipment.
DO be careful with glass panels or doors on equipment.
DON'T continue to operate the equipment if you are in any doubt about it working normally, or if it is damaged in any way — switch off, withdraw the mains plug and consult your dealer.
DON'T remove any fixed cover as this may expose dangerous voltages.
DONT leave equipment switched on when it is unattended unless it is specifically stated that it is designed for unattended operation or has a standby mode. Switch off using the switch on the equipment and make sure that your family knows how to do this. Special arrangements may need to be made for infirm or handicapped people.
DON'T use equipment such as personal stereos or radios so that you are distracted from the requirements of road safety. It is illegal to watch television whilst driving.
DON'T listen to headphones at high volume, as such use can permanently damage your hearing.
DON'T obstruct the ventilation of the equipment, for example with curtains or soft furnishings. Overheating will cause damage and shorten the life of the equipment.
DON'T use makeshift stands and NEVER fix legs with wood screws — to ensure complete safety always fit the manufacturer's approved stand or legs with the fixings provided according to the instructions.
DONT' allow electrical equipment to be exposed to rain or moisture.
ABOVE ALL
- NEVER let anyone especially children push anything into holes, slots or any other opening in the case — this could result in a fatal electrical shock;
- NEVER guess or take chances with electrical equipment of any kind — it is better to be safe than sorry!
IMPORTANT (for owners in the U.K.)
Connection to the mains supply in the United Kingdom. DO NOT cut off the mains plug from this equipment.
If the plug fitted is not suitable for the power points in your home or the cable is too short to reach a power point, then obtain an appropriate safety approved extension lead or consult your dealer. In the unlikely event of the plug fuse failing be sure to replace the fuse only with an identical approved type, as originally fitted, and to replace the fuse cover. If the fuse fails again consult your nearest JVC dealer.
If nonetheless the mains plug is cut off be sure to remove the fuse and dispose of the plug immediately, to avoid possible shock hazard by inadvertent connection to the mains supply. If this product is not supplied fitted with a mains plug then follow the instructions given below:
DO NOT make any connection to the Larger Terminal coded E or Green.
The wires in the mains lead are coloured in accordance with the following code:

Blue to N (Neutral) or Black Brown to L (Live) or Red
If these colours do not correspond with the terminal identifications of your plug, connect as follows:
Blue wire to terminal coded N (Neutral) or coloured black. Brown wire to terminal coded L (Live) or coloured Red.
If in doubt — consult a competent electrician.
The I / button does not completely shut off main power from the unit, but switches operating current on and off. "Θ" shows electrical power standby and "I" shows ON.
Safety Precautions for the Burner
Be sure to observe the following precautions. Failing to do so may result in electric shock, fire, injury, or malfunction.
- Do not disassemble, dismantle, or modify the equipment.
Requests for repair and inspection should be made to the dealer. - Do not insert metal or combustible objects or pour water or other liquids inside the burner.
- Turn off the power when connecting equipment.
- Remove the plug when the burner will not be used for a prolonged time or prior to cleaning (electricity flows through the equipment even when the power is off).
- Do not block the ventilation holes of the burner.
- Do not use where there is condensation. Suddenly carrying the burner from a cold location to a hot location may result in the formation of drops, which may cause a malfunction or failure.
- Do not cause the burner to vibrate when discs are in.
Safety Precautions for Accessories
- When using the AC adapter, the power cord, and the USB cable, be sure to observe the following precautions. Failing to do so may result in electric shock, fire, injury, or malfunction.
- Do not insert or remove the plug when your hands are wet.
- Fully insert the plug into the outlet.
- Keep dust and metal objects away from the plug.
- Do not damage the cord.
- Place the cord where it will not trip someone up.
- Do not use when thunder can be heard.
- Do not dismantle.
- Do not use for any product other than this one.
- Do not play the provided CD-ROM with an audio player. Doing so may damage the circuits or speakers.
Safety Precautions for Discs
Do not use the following discs.
- Cracked discs
- Deeply scratched discs
Installation
Do not install in any of the following locations.
- Humid location
- Location of 60^ or above
- Location subject to direct sunlight
- Location where overheating is likely
- Dusty or smoky locations
- Locations subject to oily smoke or steam such as a kitchen counter or beside a humidifier
- Unstable location
Bathroom
Dusty places - Slanted location
ATTENTION:
On placing the unit:
Some TVs or other appliances generate strong magnetic fields. Do not place such appliances on top of the unit as it may cause picture disturbance.
When moving the product:
Press I/O to turn off the power, and wait at least 30 seconds before unplugging the power cord. Then, wait at least 2 minutes before moving the product.
Cleaning Procedure
IMPORTANT:
- Be sure to unplug the burner before beginning cleaning.
- Do not use liquid or aerosol cleaners.
- Ensure that no moisture or liquid comes into contact with the drive during cleaning.
Exterior of the Burner:
Wipe dirt off with a dry cloth.
Disc Tray:
Wipe off dirt with a soft dry cloth.
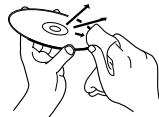
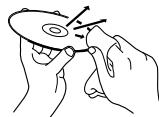
Disc:
Gently wipe from the inner edge to the outer edge with a soft cloth.
Storage:
Make sure that discs are kept in their cases. If discs are piled on top of one another without their protective cases, they can be damaged. Do not put discs in a location where they may be exposed to direct sunlight, or in a place where the humidity or temperature is high. Avoid leaving discs in your car!
Region Codes
Region codes are numbers for restricting DVD video playback. The world is separated into six regions and each region is identified by a number. If the number for a disc does not match the number for the player, the disc cannot be played on the player. (The initial region code is indicated on the label on the bottom of the burner.)
Changing the region codes
You can change the region code to play a DVD that has a different code. (The code cannot be changed for some playback software.) When you insert the disc, the Caution screen appears. Follow the on-screen instructions to change the code.
The region code for the burner can be changed 4 times only. The code set the fourth time becomes the final code, so be sure to set a frequently used code. Take sufficient care when changing the code.
Disclaimer
JVC accepts no liability whatsoever for loss of data resulting from inappropriate connections or handling.
Accessories

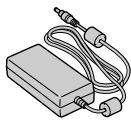
AC Adapter (AP-V400U*)

CD-ROM
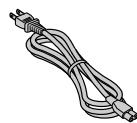
Power Cord

Blank Disc (DVD-R)
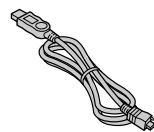
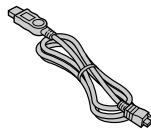
USB Cable (For connection with the camera.)
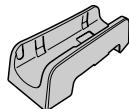
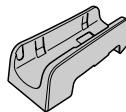
Stand
CAUTION:
Do not use AC adapter, power cord and USB cable other than those provided with this burner. Doing so may result in electric shock or fire.
NOTE:
- 043-124000-I2 (AC Adapter) is also available for customer using CU-VD20AC/AG/AS.
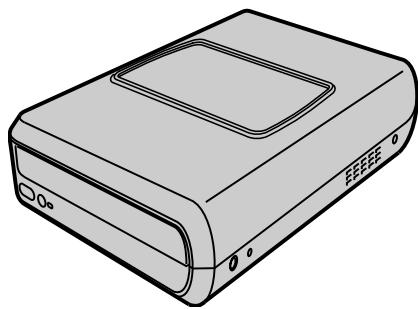
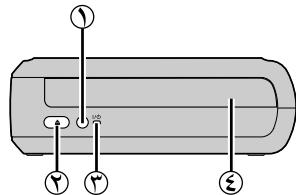
Guide to Parts and Controls
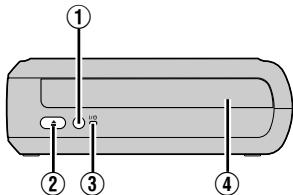
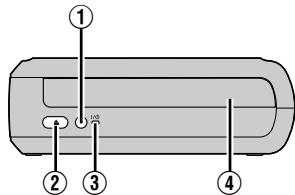
Front

① Power Button (I/O)
②EjectButton
③ Power Lamp
④ Disc Tray
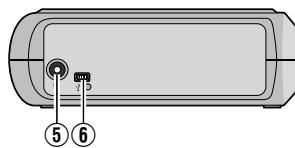
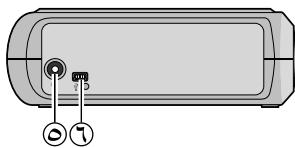
Rear
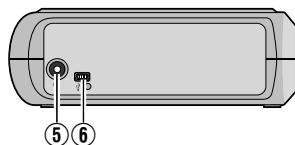
⑤ DC Connector
6 USB Connector
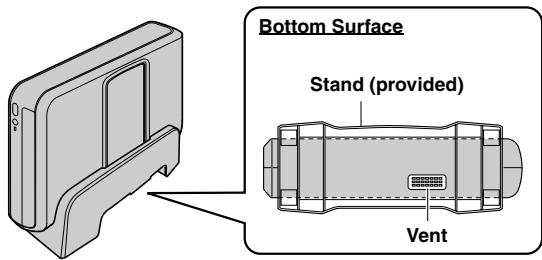
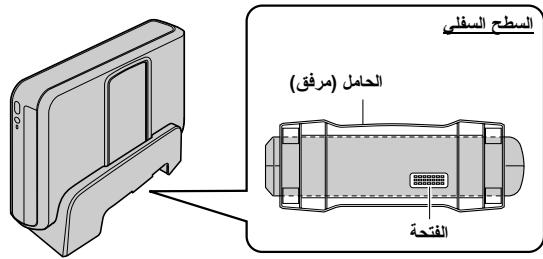
Placing the Burner
This burner can be used either in the horizontal or vertical orientation. When using in the vertical orientation, align the vent of the burner and the provided stand then place and fix the burner securely on the stand.
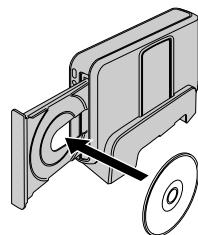
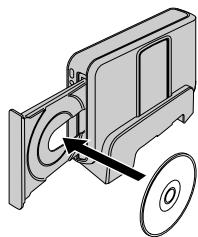
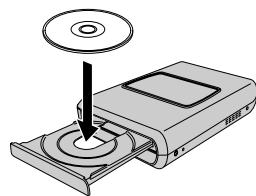
Inserting A Disc
When handling a disc, be sure not to touch the playback/recording side of the disc.
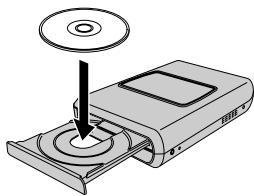
Horizontal orientation
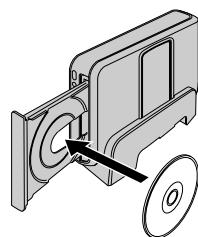
Vertical orientation
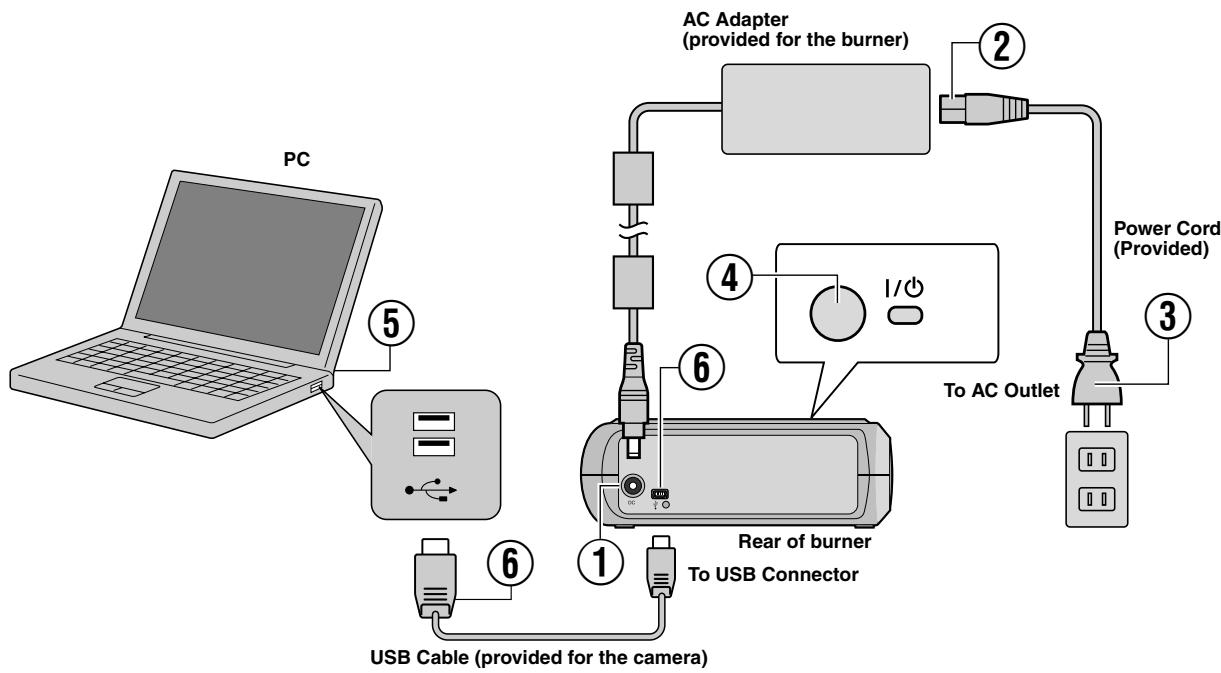
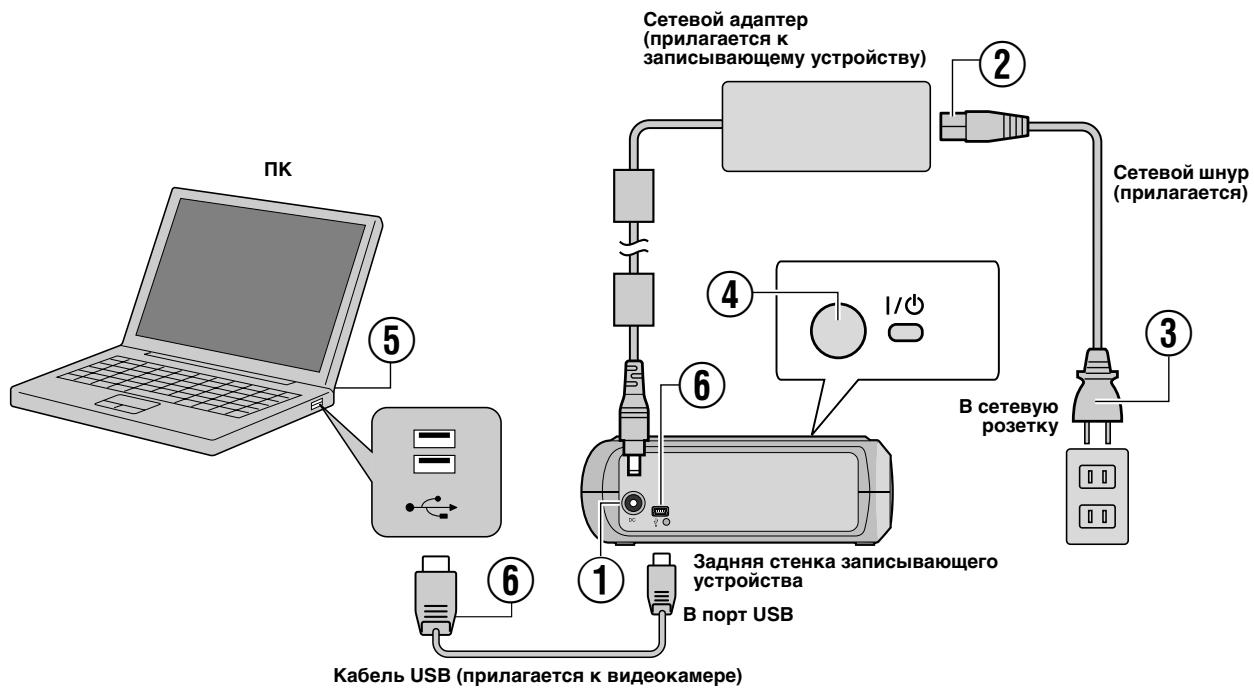
Connecting to PC
① Connect the AC adapter to the burner.
② Connect the power cord to the AC adapter.
③ Connect the power cord to an AC outlet.
4 Press the power button (I/O) on the front to turn on the burner. The power lamp lights in green.
⑤ Turn on the PC.
6 Connect the burner to the PC with the USB cable.
NOTE:
To connect the burner to a PC, use the USB cable provided with the camera.
Writing Software — CyberLink Power2Go 5.5 Lite —
Power2Go 5.5 Lite is software for writing video, image, audio, and other data files to data DVDs.
System Requirements
The following shows the system requirements for installation.
| Operating system | Windows® XP Home Edition [XP] (pre-installed) or Windows® XP Professional [XP] (pre-installed) |
| CPU | Intel® Pentium® III, at least 800 MHz (Intel® Pentium® 4, at least 2 GHz recommended) |
| Free hard disk space | At least 50 MB for installation At least 5 GB recommended for making DVDs |
| RAM | At least 128 MB (at least 256 MB recommended) |
| Connector | USB 2.0/1.1* connector |
| Display | Must be capable of displaying 800 x 600 dots |
- If you use USB1.1 cable, it will take approximately 3 hours to write.
Installation Procedure
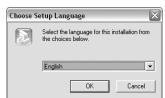
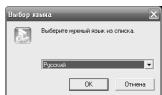
- Insert the installation CD-ROM in the CD-ROM drive.
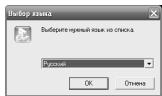
- The language selection screen appears.
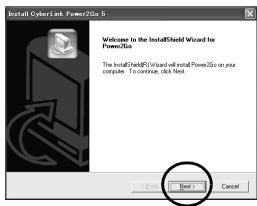
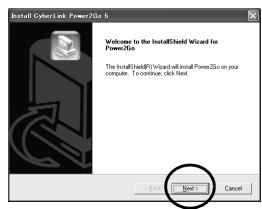
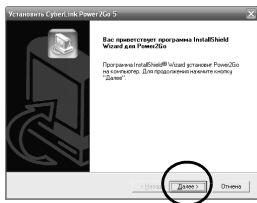
- The installation start screen appears.
Click [Next].
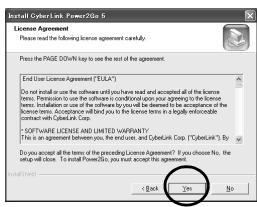
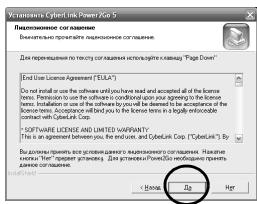
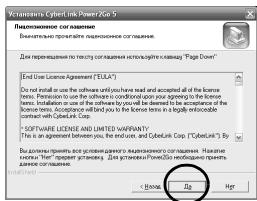
- Confirm the contents and then click [Yes].
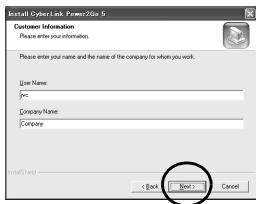
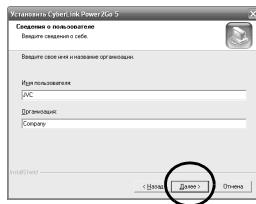
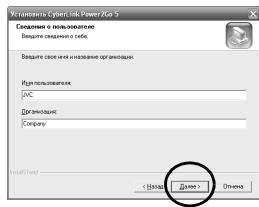
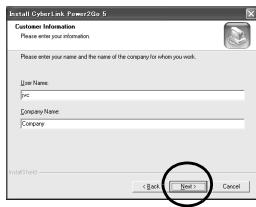
- Enter the user information and then click [Next].
Follow the on-screen instructions.
- Installation starts.
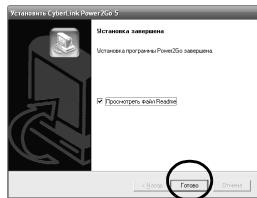
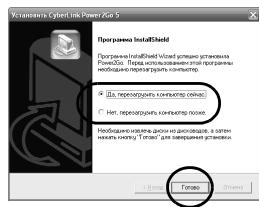
- The screen on the right appears when the installation is complete.
Select the desired checkbox and then click [Finish].
- If you select [No, I will restart my computer later], the setup complete screen in step 8. appears.
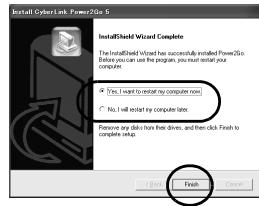
- Click [Finish].
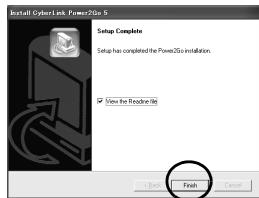
The installation is now finished.
NOTES:
- The above procedure is just a brief explanation on installing the software. For details on operating Power2Go 5.5 Lite, refer to the User's guide, Help, and ReadMe installed at the same time as the software. You can view the User's guide, Help, and ReadMe from the start menu of the PC.
- This product does not apply to write files into CD-R or CD-RW. Also, it is not responded to all the functions of Power2Go 5.5 Lite.
- To get customer support and to register the software, you need the following product key (CD-Key): PXNVIM-NWE4G-XQD9Q-CU9DX-3FQFN-NAKUS
- Power2Go 5.5 Lite does not support conversion of audio files to MP3 format.
- When the [Enter Activation Key] screen appears while using Power2Go 5.5 Lite, close the screen without entering the activation key.
CyberLink Power2Go 5.5 Lite Contact Information
For information on CyberLink Power2Go 5.5 Lite or other products, use the following contact information.
Telephone/fax support
| Location | Language | Office hours (Mon. to Fri.) | Phone # | Fax # |
| Germany | English / German / French / Spanish / Italian / Dutch | 9:00 am to 5:00 pm | +49-700-462-92375 | +49-241-70525-25 |
| Taiwan | Mandarin | 9:00 am to 6:00 pm | +886-2-8667-1298 ext. 333 | +886-2-8667-1300 |
Paid voice support
| Location | Language | Lines are open (Mon. to Fri.) | URL |
| U.S.A. | English | 1:00 pm to 10:00 pm CST | http://www.cyberlink.com/english/cs/support/new_site/voice_support.jsp |
Support web/e-mail
| Language | URL/e-mail address |
| English | http://www.cyberlink.com/english/cs/support/new_site/support_index.html |
| German / French / Spanish / Italian | goCyberlink@aixtema.de |
Troubleshooting
If you think there is a malfunction, first check the following items. If you are still unable to solve the problem, consult your local JVC dealer.
| Trouble | Cause/Action |
| Cannot turn the power on. | Make sure the AC adapter is connected properly. |
| The camera/PC is not recognized. | Make sure the USB cable is connected properly. |
| The burner or AC adapter is hot. | This is not a malfunction. If the burner is abnormally hot, remove the AC adapter and consult the dealer from which you purchased the burner. |
| Cannot open the disc tray. | A disc cannot be ejected by pressing the eject button if data is being written to the disc. Wait until writing finishes. If a disc cannot be ejected with the eject button because of a failure or a malfunction caused by, for example, the burner being dropped, use the force eject hole to eject the disc. (See below.) |
| Writing fails. | Make sure an appropriate disc is being used. (€3 pg. 3, 8) Use discs recommended for the burner. (€3 pg. 8) Insert the disc with the label facing up. Make sure the writing surface of the disc is not damaged. Make sure the disc tray is not dirty. Writing to irregularly shaped discs such as heart-shaped discs or octagonal discs is not possible. Check the writing speed of the disc being used. |
| Reading fails. | Insert the disc with the label facing up. Make sure the writing surface of the disc is not damaged. Writing to irregularly shaped discs such as heart-shaped discs or octagonal discs is not possible. Any CD recorded using the packet-write method cannot be played. Any CD that does not comply with standards such as the CD-DA standard (copy-control CDs) cannot be played. |
| Writing/reading at maximum speed is not possible. | Reading at maximum speed may not be possible if a non-standard disc is used. Use discs recommended for the burner. (€3 pg. 8) |
| Commercial DVDs cannot be played when the burner is connected to PC. | Check the region code. (€3 pg. 3) |
| It is impossible to dub the DVD discs, which were written with this burner, with DVD recorder with HDD. | Connect the burner to the camera, playback using [PLAY DVD] function of the camera, and dub the DVD discs with the DVD recorder. (Refer to “Connecting to a TV, VCR or DVD Recorder” or “Using a DVD Burner for Dubbing” in the camera's manual.) |
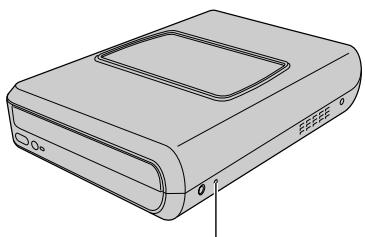
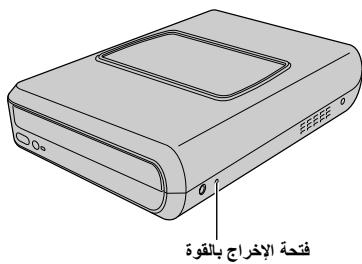
Force Eject Hole
If a disc cannot be ejected with the eject button because of a malfunction, use this hole to eject the disc.

Force eject hole
Procedure
① Turn off the burner and disconnect the USB cable and AC adapter.
② Insert a thin rod of about 10 cm long into the force eject hole located on the left side of the burner. The disc tray will be ejected for about 10 mm.
③ Pull out the disc tray manually and take out the disc.
NOTE:
Be sure to place the burner horizontally.
Copyrights and Trademarks
Copyrights
Duplicating copyright protected material, for other than personal use, without the permission of the copyright holder is prohibited by copyright law.
Registered Trademarks and Trademarks
- Windows® is either registered trademark or trademark of Microsoft Corporation in the United States and/or other countries.
- Other company and product names mentioned herein are registered trademarks and/or trademarks of their respective holders.
Specifications
For general
| Power supply | DC 12 V | ||
| Power consumption (during data transfer) | Approx. 5.2 W/1.4 A | ||
| Dimensions of main unit (W x H x D) | 171 x 56 x 262 mm (6-3/4" x 2-1/5" x 10-3/10") | ||
| Weight of main unit | Approx. 1.4 kg (3.1 lbs) | ||
| Operating temperature | 0 °C to 40 °C (32 °F to 104 °F) | ||
| Operating humidity | 35 % to 80 % | ||
| Storage temperature | -20 °C to 50 °C (-4 °F to 122 °F) | ||
| Laser Power | For DVD | Wavelength | 653 to 663 nm |
| Output | 1.0 mW | ||
| For CD | Wavelength | 770 to 810 nm | |
| Output | 0.4 mW | ||
| Interface | High Speed USB 2.0 | ||
| Writing speed (for USB 2.0) | Writing | DVD-R | Maximum 8x |
| DVD-RW | Maximum 4x | ||
| DVD-R DL | Maximum 4x | ||
| Reading | DVD-R | Maximum 12x | |
| DVD-RW | Maximum 12x | ||
| DVD-R DL | Maximum 8x | ||
| DVD-ROM | Maximum 5x | ||
| CD-R/RW/ROM | Maximum 10x | ||
| Supported disc | DVD | Writing | DVD-R, DVD-R DL, DVD-RW |
| Reading | DVD-ROM, DVD-VIDEO, DVD-R, DVD-R DL, DVD-RW | ||
| CD | Reading | CD-ROM, CD-DA, CD Extra, Video-CD, Mixed-CD, CD-R, CD-RW | |
| Supported operating systems | Windows® XP Home Edition/Professional (pre-installed) | ||
| Interface cable | USB cable provided with the camera | ||
| Supported software | Provided for the camera | CyberLink PowerProducer 3 NE/PowerCinema NE for Everio (Authoring) | |
| Provided for the burner | CyberLink Power2Go 5.5 Lite (data writing) | ||
When connected to an Everio
c
| Interface | High Speed USB 2.0 | |
| Supported discs | DVD-R, DVD-RW | |
| Recording format | Everio | DVD video (video only) |
| High definition Everio | Data DVD (video, still image) | |
| Recording time | Everio (for each 4.7 GB disc) | Approx. 30 minutes (approx. 90 minutes of video recorded in fine mode) |
| High definition Everio | Refer to the instruction manual for the high definition Everio. | |
| Interface cable | Provided USB cable | |
Recommended discs
| DVD-R | JVC, TDK, Verbatim, SONY |
| DVD-R DL | JVC, Verbatim |
| DVD-RW | JVC |
Interface cable
Mini USB type A and type B, USB 1.1 and 2.0 compliant
AC adapter (AP-V400U)
| Power requirement | AC 110 V to 240 V~, 50 Hz/60 Hz |
| Output | DC 12 V~, 4 A |
NOTES:
- Only 12 cm discs can be used with this burner.
DVD-R DL discs can be used when the burner is connected to a high definition Everio or a PC. - A double-layer DVD-RW disc cannot be used.
- Optimal performance of the burner may not be possible depending on the disc used. Using discs of manufacturers for which compatibility has been confirmed is recommended.
The appearance and specifications of the product may change without notice. - Any CD recorded using the packet-write method cannot be played.
Operation is not guaranteed for any CD not compliant with the CD-DA standard (copy control CD). - When connected to the PC, it may not be possible to read the audio files depending on the music CDs (CD-DA). In this case, make use of applications such as Windows Media Player.
Vor Transport these Products:
Support via Web/E-Mail
PRODUIT LASER DE CLASSE 1
REPRODUCTION DES ETIQUETTES
ÉTIQUETTE D'AVERTISSEMENT A L'INTÉRIEUR DE L'APPAREIL
| CAUTION CLASS 1. LASER RADIATION WHEN OPEN,DO NOT VIEW DIRECTLY WITH OPTICAL INSTRUMENTS. CAUTION LASER RADIATION WHEN OPEN,DO NOT STARE INTO BEAM.(EN) | ATTENTION EXTENT RAYONEMENT LASER DE CLASSE 1M LONGUE OUVERT NE PAS RESIDUER INSTRUMENT, A TRAVERS DES INSTRUMENTS D'OPTIQUES. (FR) | ADVARSEL KAGESE 1M-LASERSTRALING NAR APHET,IKKE SE DRETEK INN I OPTIREX INSTRUMENTER, (NO) | ADVARSEL KAGESE 1M LASERSTRALING NAR APPEARATE ABNES, KEG IKKE DRETEK PA STRALEN MED OPTIREX INSTRUMENTER, (DA) | VARIOI LACKON 1M LASERESTILLED LIATTEEN SEEALY, ALAI KATSO SATESESEN SUOJAAP OPTISBA LIATTELEA. (FI) | VANNING KAGESE 1M LASERSTRALING NAR DEN AR OPENN. TIITE NTIE DECENT PA DEN MED OPTISKA INSTRUMENT. (SW) LAH334-001A |

Netadapter (AP-V400U)

Aansluitsnoer

De installment is nu voltoid.
OPMERKINGEN:
Netadapter (AP-V400U)
| Stroomvereiste | AC 110 V tot 240 V~, 50 Hz/60 Hz |
| Output | DC 12 V----, 4 A |
OPMERKINGEN:
KLASSE 1-LASERPRODUKT
REPRODUktion AF ETIKETTER
ADVARSELSETIKET INDE I APPARATET
| CAUTION CLASS 1M LASER RADIATION WHEN OPEN, DO NOT VIEW DIRECTLY WITH OPTICAL INSTRUMENTS. | ATTENTION EME NTN RAYONEMENT LASER DE CLASSE 1M LOUGE OUVERT NE PAS AGGERON D'AVRES DES INSTRUMENTS. | ADVARSEL KLASSE 1M-LASERSTRALING NAR AMET, KEKE SE DIRETEX INN I OPTIKE INSTRUMENTER. | ADVARSEL KLASSE 1M LASERSTRALING NAR APPEARATE ABES, KEG KEKE DIRETEX PA STRAVEN MED OPTIQUE INSTRUMENTER. | VARO! LOKAN 1M LASERSTALING LIATTEEN SEGALE ALI KATSO SATESEEN SUJATAH OPTISBA LIATTELA. | VARINING KLASSE 1M LASERSTRALING NAR DEN AR OPENN TITA NETE DEKT PA DEN MED OPTISKA INSTRUMENT. |
| CAUTION LASER RADIATION WHEN OPEN, DO NOT STARE INTO BEAM (EN) | (FR) | (NO) | (DA) | (FI) | (SW) L41334-001A |
Dette apparat overholder standarden "IEC60825-1:2001" for laserprodukter.
Europaeisk representant for Victor Company of Japan, Limited er: JVC Technology Centre Europe GmbH
Postfach 10 05 52
61145 Friedberg
Tyskland
AC-adapter (AP-V400U)

CD-ROM

Ledning
Tom disk (DVD-R)
Support pr. web/e-mail
| Sprog | URL-/e-mail-adresse |
| Engelsk | http://www.cyberlink.com/english/cs/support/new_site/support_index.html |
| Tysk / Fransk / Spansk / Italiensk | goCyberlink@aixtema.de |
Fejlfinding
AC-adapter (AP-V400U)
| Stromforsyning | 110 V til 240 V AC~, 50 Hz/60 Hz |
| Output | 12 V DC ——, 4 A |
BEMARKNING:
LASERPRODUKT AV KCLASS 1
REPRODUktion AV ETIKETTER
VARNINGSETIKETT INUTI ENHETEN
| CAUTION CLASS LASER RADIATION WHEN OPEN,DO NOT VIEW DIRECTLY WITH OPTICAL INSTRUMENTS. | ATTENTION ENHANCE RAYONNEMENT LASER DE CLASSE 1M LORQUE OUVERT NE PAS AGGERED DIRECTOR OUT A TRAVES DES INSTRUMENTS O'OPTICUES. | ADVARSEL KLASES 1M-LASERSTRALING NAR AMPT,IKKE SE DIRECTOR INN I OPTIREX INTRUMENTER. (FR) | ADVARSEL KLASES 1M LASERSTRALING NAR APPEARATE ABES, KIG IKKE DIRECTOR PA STRALEN MED OPTIQUE INSTRUMENTER. (NO) | VARIOI LUCKAN 1M LASERSTALING LIATTEEN SEALLE ALAI KATSO SATESEEN SUADRAN OPTILSA LIATTELA. (DA) | VANNING KLASER 1M LASERSTALING NAR DEN AP OR OPSEN TITA NTIE DEGREEPA DEN MED OPTISKA INSTRUMENT. (FI) |
| CAUTION LASER RADIATION WHEN OPEN,DO NOT STARE INTO BEAM.(EN) |
Denna enhet uppyller standarden "IEC60825-1:2001" for laserprodukter.
Europarepresentant for Victor Company of Japan, Limited ar: JVC Technology Centre Europe GmbH
Postfach 10 05 52
61145 Friedberg
Tyskland

Natatapter (AP-V400U)
Natsladd

USB-kabel
(for anslutning till kameran)

CD-skiva

Tom skiva (DVD-R)

Stalling
WARNING:
Support Internet/e-post
| Språk | webbadress/e-postadress |
| Engelska | http://www.cyberlink.com/english/cs/support/new_site/support_index.html |
| Tyska / Franska / Spanska / Italienska | goCyberlink@aixtema.de |
Felsökning
Natatapter (AP-V400U)
| Nätspanning | AC 110 V - 240 V~, 50 Hz/60 Hz |
| Uteffekt | DC 12 V--, 4 A |
ANMÄRKNINGAR:
LASER PRODUKT I KLASSE 1
REPRODUKSJONAV SKILT
VARSELSKILT BEFINNER SEG INNE I ENHETEN
| CAUTION CLASS 1M LASER RADIATION WHEN OPEN,DO NOT VIEW DIRECTLY WITH OPTICAL INSTRUMENTS. | ATTENTION EME NTN RAYONENMENT LASER DE CLASSE 1M LOUGE OUVERT NE PAS GRASHER DIRECTOR A TRAVES DES INSTRUMENTS O' OPTICUES. | ADVARSEL KLASSE 1M-LASERSTRAILING NAR AMET,IKKE SE DRETEK INN I OPTEKIE INSTRUMENTER. | AD/ARSEL KLASSE 1M LASERSTRAING NAR APPEARATE ABES, KIG IKKE DRETEKA STRALEN MED OPTIQUE INSTRUMENTER. | VARO! LOXAN 1M LASERSELTAGI LIATTEEN SIGALLA ALAI KATO SATESEEN SUJATAH OPTISBA LIATTELLA. (DA) (FI) | VARNING KUAS 1M LASERSTRALING NAR DEN AR OPENN. TITTE NIDED DE DEN MED OPTICSKA INSTRUMENT. (SW) (A41334-010A) |
| CAUTION LASER RADIATION WHEN OPEN,DO NOT STARE INTO BEAM (EN) | (FR) | (NO) |
Denne encheten anvender standarden "IEC60825-1:2001" for laserprodukter.
Den europeiske representanten for Victor Company of Japan, Limited, er:
JVC Technology Centre Europe GmbH
Postfach 10 05 52
61145 Friedberg
Tyskland

Vekselstrømadapter (AP-V400U)
Strömkabel
- Startskjermen for installations vises.
Klikk på [Next].
Vekselströmadapter (AP-V400U)
JIJA3EPHOE N3DEJINE 1 KJIACCA
3HAUHHE HAKJEEK
I P E D U N P E X K J A I O U S I E H A K J E N K I B H Y T P I A I N A P A T A
| CAUTION Laser DURATION OPEN, DO NOT VIEW DIRECTLY WITH OPTICAL INSTRUMENTS, CAUTION LAUNCH DURATION OPEN, DO NOT VIEW DIRECTLY WITH OPTICAL INSTRUMENTS, CAUTION LAUNCH DURATION OPEN, DO NOT VIEW DIRECTLY WITH OPTICAL INSTRUMENTS, CAUTION LAUNCH DURATION OPEN, DO NOT VIEW DIRECTLY WITH OPTICAL INSTRUMENTS, CAUTION LAUNCH DURATION OPEN, DO NOT VIEW DIRECTLY WITH OPTICAL INSTRUMENTS, SAVING CLASS 1M LARSTRALING LABOUR LABOUR LABOUR LABOUR LABOUR LABOUR LABOUR LABOUR LABOUR LABOUR LABOUR LABOUR LABOUR LABOUR LABOUR LABOUR LABOUR LABOUR LABOUR LABOUR LABOUR LABOUR LABOUR LABOUR LABOUR LABOUR LABOUR LABOUR LABOUR LABOUR LABOUR LABOUR LABOUR LABOUR | ATTENTION EMEET RANIMENT LASER DE CLASSE 1M LORQUE OUVERT. NE PAS AGGERON DIRECTIONS A TRAVERS DESINSTRUMENTS OT OPTICIES (FR) | ADVARSLRE KLESE 1M LARSTRALING NAR AMPT, KKE SE DIRECTIONS INI 1 OPTIQUE INTRUMENTER, (NO) | ADVARSLRE KLESE 1M LARSTRALING NAR AMPT, KKE SE DIRECTIONS INI 1 OPTIQUE INTRUMENTER, (NO) | VARIOI LASSER 1M LASSER 1M LASSERATELY LIATTEEN SE SALLLA ALA KATO SATSEESSEN SUADRAN OPTISBA LIATTELA (FI) | VARNING KLASS 1M LARSTRALING NAR DEN AR OPEN, TITA NETE DIRKT PA DEN MED OPTISKA INSTRUMENT, (SW) LP4134-0014 |
Даньий annapat COOTBETCTByet CTanДару "IEC60825-1:2001" Ддл пазерно annapatypbl.
HTeTcBna po3eTKa DOnJxHa paCnOaratbca PAnOM c annapaTOM n 6bIb IeKoDcTynH.
BHIMAHHE:
DaHHbI annapaT coDepKHT MKNpOpoecccpbl. BHeHnHE 3NEKTPOHHBe UMbMy INHABoDKM OMYT pN BcEeCTN K HEnOJaKAM.B TAKHX CUYaX He06XdHMo BbIKNoTHb AnnapaT N BbIHMMaT cTeBeyIO BuNKY i3P03ETKn.3ATEm BCTABtE cTeBYO BuNKy 6oPaTHo Bpo3ETky N BkInOnYe annapa.Ti3BLeKeITe dNCK. IPoBepIN Dnck, 3KcnPlyAtnpyIte annapaT, KAK o6bUHNo.
IPEDOCTEPEKHENE:
TOb6bI N36EkaTb 3JNEKTPnueckoro Woka nOBpeKZHeHn CnTeBmI, CHaJIaA PLNTOHGYCTAHONTE MAneHbKNI KOHeC SHyPA B CTeBOB aADNTep, TAK, TOb6bI OH bBJN HENoDnBKeH, NOcNE Yero NoNDKIOUHTe BObnbN KOHeC SHyPA K pOseteK.
B cIyAae 0B3HNIKHOBEHINa CepBe3HbIX HENCnPaBHOCTe, HEMeDJIeHHO rpekpaTInTe nObl3OBAbTCa KAMEPOu IN o6paTInTeCb K MeCTHOMy dIynepy JVC.
YBaXaEmbI KJIneHT.
DaHHOE yCTPOIeCTBO COOTBETCTBYeT DeIECTBNTeJIbHbIM EBPOPeIckMIM DaNEKTHiBAM I CTaHdApTAM IO JNEKTPOMaHTHIOB COBMECTMOCTN 3JNEKTPNECKO630ANACHOCTN.
ПгелдагиТьСТВО кOMпани Victor Company of Japan, Limited B Еврone: JVC Technology Centre Europe GmbH
Postfach 10 05 52
61145 Friedberg
FepmaHnA
HnΦopmaunI DnI IOnb3OBaTeJeI, Bbl6paCbIBaIOuX CTapoe 06OpuyoBaHne
[Ebpoenckn Coo3]
3TO CIMBOL yKaBaBaE,TTO NOCNE OKOHANHcPOKA cnYkBi
COOTBETCTByUoJero 3NeKtpnueckOrO nIIN 3NeKtpnoHHOrO 06OpYOBaHn,HEnb38 BbIpbBaBtE OBEMeC o6bUHbN 6bITOBbIM MycOpM.BmecTo 3TOrO,OHO
NOJENKCTCDAHaeHYTNIN3AIOB COOTBECTBYIOUPINYKTPNMeMA 3NEKTPTMCECKORO INJEKTPOHHORO
06obyoBAMHnIaNocneDyUOHei nepepa60TKn yTmNl3aCm B COOTBeTCTBn C HAIOHbNbHBM 3aKOHODateNBCTOBM.
![JVC CU-VD20UE - [Ebpoenckn Coo3] - 1](/content/2019/11/123589/images/dd94105368e71696d2c9c383fa380b666524cf5fd4fab8c27974141a9d00868e.jpg)
BHHMaHHe:
(OpraHn3aun-NoJb3OBaTeJIn)
П repжд eч М bblрбсыт bdaHbI pOdyKT, O3HaKOMbTecb C Информаиме O пиемКЕОТрабOTablUnx ПОуКTOB, пиBEdeHNo на Be6-улз www.jvc-europe.com.
[CTpaHbI, He BXOJaIe B Ebponeickn CoIO3]
Ecnn Bbl co6ipaeTecb Bb6pocnTb daHnhI npOyKT, pyKOBOCTBvITcB hAUHOHaBbIM 3aKOHoDAteBCTBOM nIpyrMn npAByNAm, DeiCTByIOUmm N BaWei cTpaHe no OTHouHenIO K perepabOTc TaPoro 3NeKtpueeCKOr IO 3NeKTPoHHo 6OpdyOBAHIA.
B COOTBECTBnC 3aKoHOM Pocsncko Fepaun "O 3aunTe npab nTope6tien" cspk cnXbbl (noHoctn) daHORo TObapa "no IcTeueHm KOTOPORO OH MoeT npedCTABTb ONAChOCTb DnJ Xn3HN, 3dOpOBbN oTope6tEn, pniuHnTb Bpe er OmyeCTBY nnn OKpyxaoue Cpe" coCTABnT 7 (cem) net Co dHa
npn3BODCTBA.3OT CPOK ABHETCBA BPEMEH B TEEHNE KOTOPOR
NOTpeBNTBJ DaHHORo TOBaPAp MOKET 6E3OaNCH IM NpIb3OBaTcBc
PnUI cyNobm CObIIIODEH YA KOBODCTBA NO 9KcNpyATAuIM DAHHORo TOBaP, PNOBDAH NoE6XoDMOE O6cLynkBaHne,BKIOUHOUeae
3aMeHY paCXoHNbIX MaTEPAHNAU IN/IN COOTBECTCYUooe
PEMOHTHOE o6bcNEHNE B CNEIAHIN3IPOBAHHOM CEPBNOHCM
ZeHTPE JVC.DONONHtBeNBHe BIE KOCMETNUeCKNe MATEPAHNAJI K
DaHHOMy TOBAY, NOCTaBLHEMBE BMECT C HIM, MORYx XpaHnTBc B
TeYehne 2 (dyux) net Co DnE rno pNOB3OCTBA.CPOK cnyk6bl
(ROHDCHTI), KPOME cPOKA XPAHAENI DONONHtJEbHBIX
KOCMTUNeCKNs MaTEPAHNAU, YONMAHyTBx IB PpeBdIyUnx DByX
NYHKtax, He 3aTparMaBaeT HNKAKIN dpyrInx npab NOTpeBtTEL, B
VactHOCTOn rapaHTNIHO CBrIDeTbeCTBA JVC, KOtOpoe OH MOKET
NoLyuHTB B COOTBETCTBN IN C3AKOHOM O npabAx NOTpeBtTEL INI
dpyrNx 3aKOHOB,CBR3AHbX C HMM.
KhONka I/He npOn3BODnT pONHO OTKNIOUeHIN NtAHnO TAnapata, npOcXoNDnI NIIb OTKNIIOUeHne pa6OHe nAnpIXeHN. INdNKatOP "CnHaNIN3NpyET O TOM, YTO annapaT HaxoDnTC BpeXmE OxNDAHN, a INDHkAtOp "I" - O TOM, YTO annapaT HAXOITcBO BV KJIIOUeHOM COCTOHHN (ON).
MepblnpedoctopoxhoctnIJNA3aHncbiBaIOUeOycTpoiCTBa
C6bIIOaIte cIeIyoUHMe MeBpI pIeOCToPJOxHOCTn. Hec6bIIOJeHne MoKET IpnBcEtn K npApaKeHIO 3JIeKTPuYeCKM TOKOM, NOXApY, TpaBMAM INI HEnCNPaBHOCTrM.
He nbitaTaeTceb pa36upaTB mN dopaabaB annapaT. ObaaTaeTceb c 3aABkAMn Ha pEMOT IN OCMOTB C cepBnCHbI ueHTP.
He BCTABJIrTe MeTALJIuYeCKNe IINI JERKBOcNlAmEHaIOUeNCnI pReMaTbI, He DOnyckaJte IPOHNOKHeBHeN HOBblI INI dpyVnx KJDKOCTeB BHytb 3aNNCbBaIOUero YCTPOYCTBa.
BbiknouaTe nHTaHne pnpoDCoeDHeHn annapaTpybl.
- BbHIMMaTe BnKy n3 CeTeBOI pO3ETK, ecn He nPaHpyeTe
ncONlb3OBaTb 3aNcBbBAIOoee YCTPOINCTBO B TeUeHne
npOOnJXnTEbHO TBeMEni, a TaKxpe Neped er OChTko
(3JeKTPnECKn TOK npOxOInT Upe3 anPapata daXe npn
BbIKNoHcEHHom nITaNHN).
He 3aKpbIbAaTE BENTINLAIOHbIe OTBepCTHa 3aIncbIbaIOUero yCTPOBCTBA.
He nCnoIb3yIte annapat npn HauuHn KOnHeCaun. Pnppe3KOM nepemEeHn 3aNcBlaBaUcIero yCTpOJICTBa n3XoJNOHOrO MeCTa B TEnIOe NOMEeHne BO3MOxHO6pa3OBAHn KeNaIb KOHeDcHcATA, KOtOpBe MOrT pINBEcTN HeNoJaKam B paBoTe annpaTa nn BbXoYDo Ero n3 CTPOR.
He noDBepraIte Bn6paun 3aIncbIbAIOoee yCTpoIcTBO C BCTaBJIeHHbIM DnCKOM.
MepblnpedoctopoxKHOCTnIJI npHaJNeJekHOCTei
-Пи Испьлбовани сеТБОго aДаNTepа, сeТБОго uHypа n Ka6Ян USB co6IIOДaITE cneDyoUHme MepbI npEdoCTopOxHocTn. Hec6IIOdENe MokTe npBvCteN K npoAkeHNo 3NeKtpuYeCKM TOKOM, NOXAPy, TpABMaM NII NHcNcPbAHOCTrM.
He BCTabIaIe I He BbIHMaIte CeTeByIO BnIKy BlaJXbIMn PYKaMn.
BCTabnIte BnIky B cTeByIO po3eTky Do KOHca.
IpeDoxaparHnTe cTeBByO BILKY O TbIIN KOHTaKa C METAJINHECKIMN IpeDMETAM.
- Bepernte OT NOBpeKdHn CeTeBOH shHyp.
Pionoxnite cetebo shyur tam, rde 6he He 6ydt CnOtbkATcb.
- He nCloIb3yIe npHaIaNexKHOCTn BO BpeM rpo3bl.
- He pa36bpaaiTe npHaadneXHocTn.
He nCnoIb3yTe npHaJdNekxHcTc dpyrMn u3dEINaMM,KpOMe daHHbX.
He BocnpnBDOJNT npNJraeMbI KOMNAKT-DNCK Ha aydno nponpRbIBaTeJAX.3TO MKeT npINBeCTN K NOBpeKDeHIO MNKPOCXEM INJN AKCYTHECKHX CNTTEM.
MepblpeoctopoxhoCTnIaNCKOB
He nCnoIb3yIte cIeJyuOuIne dNcKn.
-ДиСКИСТpeUHAmN.
-ДиSCNсглубokIMUцapannhamn.
PacnoIoxKeHne
He pacnonaratae annapat B cneyuoux mectax.
- Bo BǎjǎxHbIX MecTaX.
B Mectax C TempepaTpoi 60 °C nii N BbIe.
Tam, Kya npOHkaIOT npAble coJIHeuHbIe JyH.
TAM, rIe BO3MOXeH npeperpeB.
B nbIbHbIX nIIM 3aIbIMJIeHHbIX NOMeUeHnX.
B-Mectax, Ige BbIeJIeTcBaIbOM tMacna IInI np, HapnIMpep, Ha KxuOHHO CTOnEWeHUnCe IINr PAdOM C yBlaXhHTIenEm Bo3Dyxa.
B HeYCTOuHBbIX MeC
B BaHHbIX NOMEueHnRAx.
B nblnhbIX MecTaX.
Ha KaHIOHbIX IOBepXHOCTaX.
BHIMAHHE:
PacnoIoxKeHne annapata:
HeKOTOpBle TeLEBm3OpbI n DpyrYe uCTpoiCtBa RbJIIOCTcNCTOCHYIMOK CINbHOro 3NeKTPOMaRHTHO rNoJr. He paCnONaraiTe TAKHe yCTpoiCtBa Ha aannapate, NCKOJBky OHH MOrYT NCKa3NtB N306paxheJe.
Pn n3MeHeHH paCNoJoxKeHn annapaTa:
Haxmte KhoKy I/0, YTObI OTKnIOHHTb NITAHne, INoOxJNTe He MeHee 30 cekHyd, npEckJe CEm OTKnIOHHTb CeTeBOi hHyp. 3aTeM noOxJNTe IO KpaHHeMepe 2 MInHyTb IpePe TEM, KAK nepeMeaTa b n3dene.
PpoeDyaOuNCTKn
BAXHO:
-Пелей Наалом Oпсткн He 3a6уьTe BbIHyTb BИКу n3 cTeБоВ рОЗТК.
He nCnoJIb3yIte XnDkne IIN a3pO3OJbHbIe ONUCTnTeJI.
CneITe, YTObBI BO BpEMA OCHTKBnAra INN XnIKoCTb He KOHTaKTIPOBaJl C npINBODOM.
BHeOBeepxBaonCbIbAIOpeoCTBa:
YdanaHJIte 3arpra3HeHn cyXOJ canfTeKoN tKAnu.
JIoTOKdIaNcKa:
YdaIaIe 3arpaHEnHa MroKo cyXo calTeKOn I3 TKAHI.
Dnck:
OcToPoxHo npToIpaIte ot UeHTpKa K pKaM DnCKa MmKoN cyXo CanΦeTKoN m3 TkaHn.
XpahHeHne:
XpaHNTe DnCKN B INx FyTnPaX. PInccknaDbIbAHm DnCKOB 6e3 3aunTHbIX DfYTNpOB TO CTNOK OHN MOrTy 6bITb NOBpeJXDeHbI. He OCTABJIte DmCKN TAM, TNE OHN MOrYT NOBBePraTbcR
BO3dEChTBnO PRMbIX COINHeuHbIX NUYeI, INI B MeCTax C
BbICOKo TMepHApTuO INI BLaXHoCTbU. He OCTabJIte DnCKN
B ABTOMo6NJle!
PernoHaJIbHbIe KoDbI
PernoHaBbIe KObl (Homepa) cnyjat dna orpaHneHnBocnpOn3BedeHN BInDeoNcKOB DVD. Bce cTpaHbIpacnpedeneHIO weCTn perNoHAM, kaxkbI n3 KOTobix IMeET CObCTBeHbN KoD. EcnPi perNoHaBbIe KoBl DnCKa INpOriPbIBaTeJI He COOTBeTCTByOT dpyr dpyry, 3TOT DNCK He 6dyet BOCnpOn3BOIMtCBn Ha daHHOM npOriPbIBaTeJIe. (HaueAbHbN perNoHaBbIe KoD yka3an Ha HAKNeKe C TblbHO CTOpOHI 3aNNCbBaIOJero yctPoIcTBa.)
KaK cMeHntb perNoHaIbHbI KOd
Длгь ВОсрпоЗВЕДЕНИД NДСКов DVD C Дугим PerионаьнБIM KODOM MOXHO CмEHNTB PerOnaHbNь KOD 3aIINcIBaIOUeTO YcTOPCHCTBA.(HEKOTOPbIte nporpamMbI GОррсмЗБЕДУ BnO3BOJAIOT MEHHTb KoJ.) BCTaBTE DnCK. OTKPOETCR OKHO "Caution"(BHMaHne).CmEHNTe KOD, cIeDyA INHCTpyKUnMHa He 3kpane.
PernoHaBbKo 3aIncBaIaOIOy cTPOiCTBa MoKHO
n3MeHHTb TOnbKO 4pa3. NcCKOBky CMeHa KoDa B YeTBepTbI
pa3 bdyet NocEHe, cLdyeET Bb6paTbKaD, nCNoB3yeMbI
Ha60eee qacto. BybTe BHNMaTeBbHbP rpi CMeHE KOA.
OrpaHnueHne OTBETCTBeHHOCTN
KOMPnHaJN JVC He HecET OTBETCTBEHHOCTn 3a NOTepn DaHHbIX n3-3a HnpeBaunbHOro NOKJIUChEHN IIN O6paueHnA.
PpHnHaIeXHoCTn

Cetebo aadansep (AP-V400U)

Ceteboiunhyp
Ka6eJb USB (ДяpoKluOeHЯкamepe)

CD-ROM

IyctOuDnCK(DVD-R)
NodctabKa
PNEOCTEPEKHE:
He nCnoB3yIe cTeBoi aDAnTep, cTeBoi uHyp n KaebIb USB, OTnUChIbe OT NoCTaBJIemBIX B KOMnIKeTc C DaHbIM 3aNcBIAOUM yCTpOCTBOM. 3aMeHa yKa3aHHbIX pInHaNDexKHOCTe MoKET npMBecTI K nopaxEHHO 3JNEKTpuYeCKM TOKOM INI BblBaTb NOpAp.
O63op 3JIeMeHToB IN opraHOB ynpaBJeHnA
JIiueBaBCTopOHa
① Khonka nitaHn(I/O)
② Khonka n3BleueHnA nscKa
③Инданкаторпитаня
④ JIoTOKДIЯДИСКА
TbIbHa CTOpoha
He npikacaiTecs k pa6ooye noBepxHoctn DaNcka.

TopuzhontalbHoe noJoxeHne
BepTnKaJIbHoe noIoxKeHne
PoiKJIIOUeHne K I K
① Побсейнге сetimeь адпетер к заимсьваошу усточь.
② ПодcoeДинITEшурпintaHЯК ceTeBOMy aДаNTepу.
③ ПодклioчиTe shHyp пntaHnЯ K ceTeBOJ po3eTKe.
Haxmte KhoNkny nHTAHNA (I/O) Ha nepeDnei naHEn 3aINcBIAIOeO yCTpoiCTBa, YTObI BKIOHITb erO. BkJIouaetc 3eJIeHb INDnKATOp nHTAHNA.
⑤ BключITEПК.
⑥ CoeinnHe 3aHcBbAIOOee ycTpoiCTBO c PIK npn noMoOnk Ka6eJL USB.
ПРИМЕЧАНЕ:
* PnncnoB3OBAHm Ka6eHa USB1.1 3aHc3 ZaHMaet OkoNo 3 YacOB.
PpoeDypa yCTaHOBKn
- BCTaBbTe B INCKOBOD npINIOXeHHbI KOMnAKT-DnCK.
- OTKpoeTcK OkHO Bbl6opa Ra3bIka.
- Поградета насаньй заразустановки.Нармпес_Kнорку [Далjee].
4.ПоТВердente cornacne c ycNoBnMn n HauKMnTe [Ja].
- BBeIe NTe INHOpMaIuO o nolb3oBaTeNe HauXmITe KHOJky [Jalee].
CneyuTe HNCTpyKUmaH Ha 3kpaHe.
- HauhnaetcyaCTaHOBka.
- Поссе заBERSEHЯ утановки оTOбрахаetся OKHO, nOKa3aHHoe cnрaba.
IocTaBbTe HnykHbI ΦJaxOKn HaxMnte KhoNky [ToTOBO].
- Ecnn Bbl BbIbepeTe nyHKT [HET, nepe3arpy3nTb KOMNbIOTeP no3xe], Ha ware 8. NOBNTc coo6uHeNe o 3aBePeHEn yCTaHOBKn.
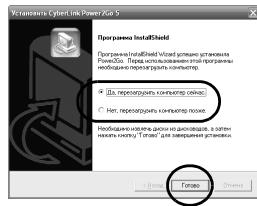
- Haxmnte KhoNky [ToTOBO].
Ha 3TOM yCTaHOBka 3aBepwaetca.
ПРИМЕЧАНЯ:
BbIeuyKa3aHbIe NyHKtbl cOepKat JINb KpaTkoe OnicaHne yctAHOBKn pOrpamMbI. NpOpbNar INHcOpMaunr O pa6ote cnporpamMo Power2Go 5.5 Lite npInBeHa B pyKOBoDCTBe non3oBaTei, cnpabKe n faane ReadMe, yctAhaNbAmEbx OndHOBpeMeHHo C nporpamMo. PyKOBoDCTBO nObl3oBaTeJI, cnpaBka n faan ReadMe oKpbBaIOcT ha NK uepe3 MeHIO "Pyck".
- DanHoe n3dJIeNe He npEHa3Ha6HeO dIra 3aIINc faiIOB Ha nckn CD-R and CD-RW. TaK je OHO noIepExkBaET He BCE yHKnI npOrpAmMbly Power2Go 5.5 Lite.
Дял Рочьни.Texнческов ПОддерхи N ргИстрацим
Програмного обсясенье� Вам Нужен сnéдушик Клион (CD-Key): PXNVM-NWE4G-XQD9Q-CU9DX-3FQFN-NAKUS
- Power2Go 5.5 Lite He поденивает Коньертураиме aydnocpaioNВ БформAT MP3.
Korla npn nCNOB3OBAHm Power2Go 5.5 Lite noABnEeTc8 3kpaH [BBeDInTe KInoUaKTbuaHm], 3aKpOnTe 3KpaH, He BBOJn KIOUaAKnTbuaHm.
CyberLink Power2Go 5.5 Lite KoNTaKTHa NHΦopMaζη
Дя поунец сбеден o nporpaMMe CyberLink Power2Go 5.5 Lite nIи дугнх пордктов Bocnoьу Teсь слendуош e KOntaKTHoH nHформацеи.
Homepa TeJefoHOB/foakcoB cnJyX6bl npdeppKn
PekomeHnyeMbIe DnCKN
| Диас DVD-R | JVC, TDK, Verbatim, SONY |
| Диас DVD-R DL | JVC, Verbatim |
| DVD-RW | JVC |
CoeMHnteHbHbKabeb
| MннUSB TиN A n TиN B, COBmecTиMbI c USB 1.1 n 2.0 |
Cetebo aadTep (AP-V400U)

AaanTp nepemiminho ctpymy (AP-V400U)

UHyp KMBLeHHA

Ka6eIb USB (ДлЯ пikкlioуehнdo kaMeprn)

KoMaKT-DnCK (CD-ROM)

Порожни диСК(DVD-R)

Nidctabka
ПРЕДОCTЕРЖЕНИ:
He BVKOpNCTOBuYte hIaIaITePn nepemHHoro cTpyM, shHypn XKnBHeHnra Ta Ka6JI USB, KpIM Tnx, 0o 6yIn B KomnKeTi anapaty. HeDToPMaHn rue BmOrn moke npns3BeCt n do ypaXeHHneEneKTPnuHm cTpyMOM a60 BnHKnHeHn noxexi.
Orlae eneMeNTiB Ta opraHib ynpabJIHHA
Ipeedna naneB
① KhoNka XnBHeHna (I/O)
② Khonka BnMaHHa DnCKy
③ IHNiKaTOP XNBIeHHA
④ JIoTOK dIa dIuCKa

3aHnnaHeIb
⑤ Γhɪzdo JxNBIJIENHII NCItɪIHorO CTpyM
⑥ NopT USB
PpoceDypa BcTaHOBJIeHHA
- BCTaBTe y dIscKoBOd KOMnakT-dIck, IIO E B KOMnJIeKTI.
- BiKpnEtbcB biKHO Bn6opy MOBN.
- BiKpnEbCBA BIKHO BCTaHOBJIeHHaHaHCHiTb [JaJeel].

4.ПiTbEprDItbIInΦopMaζioI nOTIM HATNCHITb [Ja].
- BBeiTi bIhOpMaJIIO KOpICTyBaHa I HaTnCHiTb [JaIee].
Bukohyte iHctpykui, zo biOobpaxaIbctnHa ekpaHi.
6.ПОИнhaeьсВСТАНБЛЕнHA.
7.ПicЯ 3aBepweHn BCTahOBJIeHHI 3'RBJIeCTbCЯ ekpaH, noka3aHn IpaBOpyu. IocTaBTe noTpi6Hi npanOpu i HATNCiTB KhONKy [ToTOBO].
- RaKuo Bn Bn6epe [Het, nepe3arpyuTb KOMMbTOpe no3Xe],Ha. kOpoJI 8.3'BAITbCer ekpan, uo IHcpOpMc pno 3aBePeHHB BCTAHOBNeHHa.
- Hatnchitb [ToTOBO].

Ha cboMy BCTaHOBJIeHHa3aBephaTbcra.
ПРИМЕУAHЯ:
YcyHeHH HeCnpaBHOCTe
Kuio Bn iio3pOte, 0o BnHikna HecnpaBnHcTb, CnoaTky nepeBipTe peyi 3riHO 3mC nCKOM. Kaio ce He donomarae ycHytn np6Iymy, pokoohcyIbTuItecra 3 BaIM MicueBIM dInlepoM JVC.
| ПюбLEMа | Причина / 3axodn 3ucyhenня |
| He в金融机构 сожделения | • Перевироту, чь правлино рid'еданни щадпорпervимногоструму |
| Вideokамера / PK не розидастая | • Перевироту, чь правлино рid'еданни кабель USB |
| Коруну записалыного пистою aоб щадлеса р事儿риминогоструму harpvся. | • Лучка ддя ддя сдя п事儿риминдя лдя щадлеса щадлеса щадлеса щадлеса щадлеса щадлеса щадлеса щадлеса щадлеса щадлеса щадлеса щадлеса щадлеса щадлеса щадлеса щадлеса щадлеса щадlеса щадлеса щадлеса щадлеса щадлеса щадлеса щадлеса щадлеса щадлеса щадлеса щадлеса щадлеса щадлеса щадлеса щадлеса щадлеса щадлеса Ѯдяпсьаг. |
| Лоток ддя ддя сдя не biderкраостья. | • Ддь не ддястая сдя п事儿риминдя лдя щадлеса щадлеса щадлеса щадлеса щадлеса щадлеса щадлеса щадлеса щадлеса щадлеса щадлеса щадлеса щадлеса щадлеса щadлеса щадлеса щадлеса щадлеса щадлеса щадлеса щадлеса щадлеса щадлеса щадлеса щадлеса щадлеса щадлеса щадлеса щадлеса щадлеса щадлеса �шорувся. |
| 36i по р事儿 записалынii. | • Переконайся, сдя вористою сдя натуckанни ддя, кон сдя вця вця вця вця вця вця вця вця вця вця вця вця вця вця вця вця вця вця вця вця вця вця вця вця вця вця вця вця вця вця вця вця вця вцЯ �постю �постю �постю �постю �постю �пostю �постю �постю �пostю �пostю �пostю �пostю �пostю �пostю �пostю �пostю �пostю �пostю �пostю �пostю �пostю �пostю �пostю �пostю �пostю �пostю �пostю �пostю �пostю �пostю �пostю �пostю �пostю �пOSTю �пOSTю �пOSTю �пOSTю �пOSTю �пOSTю �пOSTю �пOSTю �пOSTю �пOSTю �пOSTю �пOSTю �пOSTю �пOSTю �пOSTю �пOSTю �пOSTю �пOSTю �пOSTю �пOSTю �пOSTю �пOSTю �пOSTю �пOSTю �пOSTю �пostю �пOSTю �пOSTю �пOSTю �пOSTю �пOSTю �пOSTю �пOSTю �пOSTю �пOSTю �пOSTю �пOSTю �пOSTю �пOSTю �пOSTю �пOSTю �пOSTю �пOSTю �пOSTю �пOSTю �пOSTю �пOSTю �пOSTю �пOSTю �п OSTю �пOSTю �пOSTю �пOSTю �пOSTю �пOSTю �пOSTю �пOSTю �пOSTю �пOSTю �пOSTю �пOSTю �пOSTю �пOSTю �пOSTю �пOSTю �пOSTю �пOSTю �пOSTю �пOSTю �пOSTю �пOSTю �пOSTю �пOSTю �пOSTю �п OSTю �п Ostю �п Ostю �п Ostю �п Ostю �п Ostю �п Ostю �п Ostю �п Ostю �п Ostю �п Ostю �п Ostю �п Ostю �п Ostю �п Ostю �п Ostю �п Ostю �п Ostю �п Ostю �п Ostю �п Ostю �п Ostю �п Ostю �п Ostю �п Ostю �п Ostю �п OSTю �п Ostю �п Ostю �п Ostю �п Ostю �п Ostю �п Ostю �п Ostю �п Ostю �п Ostю �п Ostю �п Ostю �п Ostю �п Ostю �п Ostю �п Ostю �п Ostю �п Ostю �п Ostю �п Ostю �п Ostю �п Ostю �п Ostю �п Ostю �п OSTю �п OSTю �п Ostю �п Ostю �п Ostю �п Ostю �п Ostю �п Ostю �п Ostю �п Ostю �п Ostю �п Ostю �п Ostю �п Ostю �п Ostю �п Ostю �п Ostю �п Ostю �п Ostю �п Ostю �п Ostю �п Ostю �п Ostю �п Ostю �п Ostю �п OSTю �п Ostю �п Ostю �п Ostю �п Ostю �п Ostю �п Ostю �п Ostю �п Ostю �п Ostю �п Ostю �п Ostю �п Ostю �п Ostю �п Ostю �п Ostю �п Ostю �п Ostю �п Ostю �п Ostю �п Ostю �п Ostю �п Ostю �п Ostю �п Ostю �п OSTю �? • Береконайся, сдя вористою сдя натуckанни ддя, кон сдя вця вця вця вця вця вця вця вця вця вця вця вця вця вця вця вця вця вця вця вця вця вця вizapstvo �постю �постю �пostю �пostю �пostю �пostю �пostю �пostю �пostю �пostю �пostю �пostю �пostю �пostю �пostю �пostю �пostю �пostю �пostю �пostю �пostю �пostю �пostю �пostю �пostudio �пOSTю �пOSTю �пOSTю �пOSTю �пOSTю �пOSTю �пOSTю �пOSTю �пOSTю �пOSTю �пOSTю �пOSTю �пOSTю �пOSTю �пOSTю �пOSTю �пOSTю �пOSTю �пOSTю �пOSTю �пOSTю �пOSTю �пOSTю �пOSTю �пOSTudio �пOSTudio �пOSTudio �пOSTudio �пOSTudio �пOSTudio �пOSTudio �пOSTudio �пOSTudio �пOSTudio �пOSTudio �пOSTudio �пOSTudio �пOSTudio �пOSTudio �пOSTudio �пOSTudio �пOSTudio �пOSTudio �пOSTudio �пOSTudio �пOSTudio �пOSTudio �пOSTudio �пOSTudio �пOSTUDIO �пOSTudio �пOSTudio �пOSTudio �пOSTudio �пOSTudio �пOSTudio �пOSTudio �пOSTudio �пOSTudio �пOSTudio �пOSTudio �пOSTudio �пOSTudio �пOSTudio �пOSTudio �пOSTudio �пOSTudio �пOSTudio �пOSTudio �пOSTudio �пOSTudio �пOSTudio �пOSTudio �пOSTudio �пOSTRO �пOSTRO �пOSTRO �пOSTRO �пOSTRO �пOSTRO �пOSTRO �пOSTRO �пOSTRO �пOSTRO �пOSTRO �пOSTRO �пOSTRO �пOSTRO �пOSTRO �пOSTRO �пOSTRO �пOSTRO �пOSTRO �пOSTRO �пOSTRO �пOSTRO �пOSTRO �пOSTRO �пOSTRO �пOSTBro �пOSTRO �пOSTRO �пOSTRO �пOSTRO �пOSTRO �пOSTRO �пOSTRO �пOSTRO �пOSTRO �пOSTRO �пOSTRO �пOSTRO �пOSTRO �пOSTRO �пOSTRO �пOSTRO �пOSTRO �пOSTRO �пOSTRO �пOSTRO �пOSTRO �пOSTRO �пOSTRO �пOSTRO �пOSTro �пOSTRO �пOSTRO �пOSTRO �пOSTRO �пOSTRO �пOSTRO �пOSTRO �пOSTRO �пOSTRO �пOSTRO �пOSTRO �пOSTRO �пOSTRO �пOSTRO �пOSTRO �пOSTRO �пOSTRO �пOSTRO �пOSTRO �пOSTRO �пOSTRO �пOSTRO �пOSTRO �пOSTRO �пOST stro �пOSTRO �пOSTRO �пOSTRO �пOSTRO �пOSTRO �пOSTRO �пOSTRO �пOSTRO �пOSTRO �пOSTRO �пOSTRO �пOSTRO �пOSTRO �пOSTRO �пOSTRO �пOSTRO �пOSTRO �пOSTRO �пOSTRO �пOSTRO �пOSTRO �пOSTRO �пOSTRO �пOSTRO �пOSTBO �пOSTRO �пOSTRO �пOSTRO �пOSTRO �пOSTRO �пOSTRO �пOSTRO �пOSTRO �пOSTRO �пOSTRO �пOSTRO �пOSTRO �пOSTRO �пOSTRO �пOSTRO �пOSTRO �пOSTRO �пOSTRO �пOSTRO �пOSTRO �пOSTRO �пOSTRO �пOSTRO �пOSTRO �пOSTTO �пOSTRO �пOSTRO �пOSTRO �пOSTRO �пOSTRO �пOSTRO �пOSTRO �пOSTRO �пOSTRO �пOSTRO �пOSTRO �пOSTRO �пOSTRO �пOSTRO �пOSTRO �пOSTRO �пOSTRO �пOSTRO �пOSTRO �пOSTRO �пOSTRO �пOSTRO �пOSTRO �пOSTRO �пOSTINO �пOSTRO �пOSTRO �пOSTRO �пOSTRO �пOSTRO �пOSTRO �пOSTRO �пOSTRO �пOSTRO �пOSTRO �пOSTRO �пOSTRO �пOSTRO �пOSTRO �пOSTRO �пOSTRO �пOSTRO �пOSTRO �пOSTRO �пOSTRO �пOSTRO �пOSTRO �пOSTRO �пOSTRO �пOSTLO �пOSTRO �пOSTRO �пOSTRO �пOSTRO �пOSTRO �пOSTRO �пOSTRO �пOSTRO �пOSTRO �пOSTRO �пOSTRO �пOSTRO �пOSTRO �пOSTRO �пOSTRO �пOSTRO �пOSTRO �пOSTRO �пOSTRO �пOSTRO �пOSTRO �пOSTRO �пOSTRO �пOSTRO �пOSTIO �пOSTRO �пOSTRO �пOSTRO �пOSTRO �пOSTRO �пOSTRO �пOSTRO �пOSTRO �пOSTRO �пOSTRO �пOSTRO �пOSTRO �пOSTRO �пOSTRO �пOSTRO �пOSTRO �пOSTRO �пOSTRO �пOSTRO �пOSTRO �пOSTRO �пOSTRO �пOSTRO �пOSTRO �пOSTRQ �пOSTRO �пOSTRO �пOSTRO �пOSTRO �пOSTRO �пOSTRO �пOSTRO �пOSTRO �пOSTRO �пOSTRO �пOSTRO �пOSTRO �пOSTRO �пOSTRO �пOSTRO �пOSTRO �пOSTRO �пOSTRO �пOSTRO �пOSTRO �пOSTRO �пOSTRO �пOSTRO �пOSTRO �пOST罗 �пOSTRO �пOSTRO �пOSTRO �пOSTRO �пOSTRO �пOSTRO �пOSTRO �пOSTRO �пOSTRO �пOSTRO �пOSTRO �пOSTRO �пOSTRO �пOSTRO �пOSTRO �пOSTRO �пOSTRO �пOSTRO �пOSTRO �пOSTRO �пOSTRO �пOSTRO �пOSTRO �пOSTRO �пOSTATO �пOSTRO �пOSTRO �пOSTRO �пOSTRO �пOSTRO �пOSTRO �пOSTRO �пOSTRO �пOSTRO �пOSTRO �пOSTRO �пOSTRO �пOSTRO �пOSTRO �пOSTRO �пOSTRO �пOSTRO �пOSTRO �пOSTRO �пOSTRO �пOSTRO �пOSTRO �пOSTRO �пOSTRO �пOSTRA �пOSTRO �пOSTRO �пOSTRO �пOSTRO �пOSTRO �пOSTRO �пOSTRO �пOSTRO �пOSTRO �пOSTRO �пOSTRO �пOSTRO �пOSTRO �пOSTRO �пOSTRO �пOSTRO �пOSTRO �пOSTRO �пOSTRO �пOSTRO �пOSTRO �пOSTRO �пOSTRO �пOSTRO �пOSTK �пOSTK �пOSTK �пOSTK �пOSTK �пOSTK �пOSTK �пOSTK �пOSTK �пOSTK �пOSTK �пOSTK �пOSTK �пOSTK �пOSTK �пOSTK �пOSTK �пOSTK �пOSTK �пOSTK �пOSTK �пOSTK �пOSTK �пOSTK �пOSTK �пOSTК �пOSTK �пOSTK �пOSTK �пOSTK �пOSTK �пOSTK �пOSTK �пOSTK �пOSTK �пOSTK �пOSTK �пOSTK �пOSTK �пOSTK �пOSTK �пOSTK �пOSTK �пOSTK �пOSTK �пOSTK �пOSTK �пOSTK �пOSTK �пOSTK �пOSTk �пOSTK �пOSTK �пOSTK �пOSTK �пOSTK �пOSTK �пOSTK �пOSTK �пOSTK �пOSTK �пOSTK �пOSTK �пOSTK �пOSTK �пOSTK �пOSTK �пOSTK �пOSTK �пOSTK �пOSTK �пOSTK �пOSTK �пOSTK �пOSTK �пOSTRQ �пOSTRO �пOSTRO �пOSTRO �пOSTRO �пOSTRO �пOSTRO �пOSTRO �пOSTRO �пOSTRO �пOSTRO �пOSTRO �пOSTRO �пOSTRO �пOSTRO �пOSTRO �пOSTRO �пOSTRO �пOSTRO �пOSTRO �пOSTRO �пOSTRO �пOSTRO �пOSTRO �п OSTRO �пOSTRO �пOSTRO �пOSTRO �пOSTRO �пOSTRO �пOSTRO �пOSTRO �пOSTRO �пOSTRO �пOSTRO �пOSTRO �пOSTRO �пOSTRO �пOSTRO �пOSTRO �пOSTRO �пOSTRO �пOSTRO �пOSTRO �пOSTRO �пOSTRO �пOSTRO �пOSTRO �пOSTRO �п OSTRO �пOSTK �пOSTK �пOSTK �пOSTK �пOSTK �пOSTK �пOSTK �пOSTK �пOSTK �пOSTK �пOSTK �пOSTK �пOSTK �пOSTK �пOSTK �пOSTK �пOSTK �пOSTK �пOSTK �пOSTK �пOSTK �пOSTK �пOSTK �пOSTK �п OSTRO �пOSTRO �пOSTRO �пOSTRO �пOSTRO �пOSTRO �пOSTRO �пOSTRO �пOSTRO �пOSTRO �пOSTRO �пOSTRO �пOSTRO �пOSTRO �пOSTRO �пOSTRO �пOSTRO �пOSTRO �пOSTRO �пOSTRO �пOSTRO �пOSTRO �пOSTRO �пOSTRO �пOSTK �п OSTRO �пOSTK �пOSTK �пOSTK �пOSTK �пOSTK �пOSTK �пOSTK �пOSTK �пOSTK �пOSTK �пOSTK �пOSTK �пOSTK �пOSTK �пOSTK �пOSTK �пOSTK �пOSTK �пOSTK �пOSTK �пOSTK �пOSTK �пOSTK �пOSTRQ �пUSTRO �пUSTRO �пUSTRO �пUSTRO �пUSTRO �пUSTRO �пUSTRO �пUSTRO �пUSTRO �пUSTRO �пUSTRO �пUSTRO �пUSTRO �пUSTRO �пUSTRO �пUSTRO �пUSTRO �пUSTRO �пUSTRO �пUSTRO �пUSTRO �пUSTRO �пUSTRO �пUSTRO �пUSTRO �пUSTRQ �пUSTRO �пUSTRO �пUSTRO �пUSTRO �пUSTRO �пUSTRO �пUSTRO �пUSTRO �пUSTRO �пUSTRO �пUSTRO �пUSTRO �пUSTRO �пUSTRO �пUSTRO �пUSTRO �пUSTRO �пUSTRO �пUSTRO �пUSTRO �пUSTRO �пUSTRO �пUSTRO �пUSTRO �нТРСО �нТРСО �нТРСО �нТРСО �нТРСО �нТРСО �нТРСО �нТРСО �нТРСО �нТРСО �нТРСО �нТРСО �нТРСО �нТРСО �нТРСО �нТРСО �нТРСО �нТPSCO �нТPSCO �нТPSCO �нТPSCO �нТPSCO �нТPSCO �нТPSCO �нТPSCO �нТPSCO �нТPSCO �нТPSCO �нТPSCO �нТPSCO �нТPSCO �нТPSCO �нТPSCO �нТPSCO �нТРSCO �нТPSCO �нТPSCO �нТPSCO �нТPSCO �нТPSCO �нТPSCO �нТPSCO �нТPSCO �нТPSCO �нТPSCO �нТPSCO �нТPSCO �нТPSCO �нТPSCO �нТPSCO �нТPSCO �N'TPSCO �N'TPSCO �N'TPSCO �N'TPSCO �N'TPSCO �N'TPSCO �N'TPSCO �N'TPSCO �N'TPSCO �N'TPSCO �N'TPSCO �N'TPSCO �N'TPSCO �N'TPSCO �N'TPSCO �N'TPSCO �N'TPSCO _N'TPSCO _N'TPSCO _N'TPSCO _N'TPSCO _N'TPSCO _N'TPSCO _N'TPSCO _N'TPSCO _N'TPSCO _N'TPSCO _N'TPSCO _N'TPSCO _N'TPSCO _N'TPSCO _NTO _N'TPSCO _NTO _N'TPSCO _NTO _N'TPSCO _NTO _N'TPSCO _NTO _N'TPSCO _NTO _N'TPSCO _NTO _N'TPSCO _NTO _N'TPSCO _NTO _N'TPSCO _NTO ‐ N'TPSCO _N'TPSCO _N'TPSCO _N'TPSCO _N'TPSCO _N'TPSCO _N'TPSCO _N'TPSCO _N'TPSCO _N'TPSCO _N'TPSCO _N'TPSCO _N'TPSCO _N'TPSCO _N'TTOK �нТРСО �нТРСО �нТРСО �нТРСО �нТРСО �нТРСО �нТРСО �нТРСО �нТРСО �нТРСО �нТРСО �нТРСО �нТРСО �нТРСО �нТРСО �нТРСО �нТТО _N'TPSCO _N'TPSCO _N'TPSCO _N'TPSCO _N'TPSCO _N'TPSCO _N'TPSCO _N'TPSCO _N'TPSCO _N'TPSCO _N'TPSCO _N'TPSCO _N'TPSCO _N'TPSCO -N'TPSCO _N'TPSCO _N'TPSCO _N'TPSCO _N'TPSCO _N'TPSCO _N'TPSCO _N'TPSCO _N'TPSCO _N'TPSCO _N'TPSCO _N'TPSCO _N'TPSCO _N'TPSCO _N'DTOK �нТРСО �нТРСО �нТРСО �нТРСО �нТРСО �нТРСО �нТРСО �нТРСО �нТРСО �нТРСО �нТРСО �нТРСО �нТРСО �нТРСО �нТРСО �нТРСО �N'TPSCO _N'TPSCO _N'TPSCO _N'TPSCO _N'TPSCO _N'TPSCO _N'TPSCO _N'TPSCO _N'TPSCO _N'TPSCO _N'TPSCO _N'TPSCO _N'TPSCO _N'TPSCO _ N'TPSCO _N'TPSCO _N'TPSCO _N'TPSCO _N'TPSCO _N'TPSCO _N'TPSCO _N'TPSCO _N'TPSCO _N'TPSCO _N'TPSCO _N'TPSCO _N'TPSCO _N'TPSCO _NTO TOK �нТРСО �нТРСО �нТРСО �нТРСО �нТРСО �нТРСО �нТРСО �нТРСО �нТРСО �нТРСО �нТРСО �нТРСО �нТРСО �нТРСО �нТРСО �нТРСО �нTPSTO _N'TPSCO _N'TPSCO _N'TPSCO _N'TPSCO _N'TPSCO _N'TPSCO _N'TPSCO _N'TPSCO _N'TPSCO _N'TPSCO _N'TPSCO _N'TPSCO _N'TPSCO _N'TPSCO (N'TPSCO _N'TPSCO _N'TPSCO _N'TPSCO _N'TPSCO _N'TPSCO _N'TPSCO _N'TPSCO _N'TPSCO _N'TPSCO _N'TPSCO _N'TPSCO _N'TPSCO _N'TPSCO _NΤOK _N'TPSCO _N'TPSCO _N'TPSCO _N'TPSCO _N'TPSCO _N'TPSCO _N'TPSCO _N'TPSCO _N'TPSCO _N'TPSCO _N'TPSCO _N'TPSCO _N'TPSCO _N'TPSCO /N'TPSCO _N'TPSCO _N'TPSCO _N'TPSCO _N'TPSCO _N'TPSCO _N'TPSCO _N'TPSCO _N'TPSCO _N'TPSCO _N'TPSCO _N'TPSCO _N'TPSCO _N'TPSCO _NTDTO _N'TPSCO _N'TPSCO _N'TPSCO _N'TPSCO _N'TPSCO _N'TPSCO _N'TPSCO _N'TPSCO _N'TPSCO _N'TPSCO _N'TPSCO _N'TPSCO _N'TPSCO _N'TPSC0 _N'TPSC0 _N'TPSC0 _N'TPSC0 _N'TPSC0 _N'TPSC0 _N'TPSC0 _N'TPSC0 _N'TPSC0 _N'TPSC0 _N'TPSC0 _N'TPSC0 _N'TPSC0 _N'TPSC0 _N'TPSC0 -N'TPSC0 _N'TPSC0 _N'TPSC0 _N'TPSC0 _N'TPSC0 _N'TPSC0 _N'TPSC0 _N'TPSC0 _N'TPSC0 _N'TPSC0 _N'TPSC0 _N'TPSC0 _N'TPSC0 _N'TPSC0 _NTO TOK _N'TPSC0 _N'TPSC0 _N'TPSC0 _N'TPSC0 _N'TPSC0 _N'TPSC0 _N'TPSC0 _N'TPSC0 _N'TPSC0 _N'TPSC0 _N'TPSC0 _N'TPSC0 _N'TPSC0 _N'TPSC0 + N'TPSC0 _N'TPSC0 _N'TPSC0 _N'TPSC0 _N'TPSC0 _N'TPSC0 _N'TPSC0 _N'TPSC0 _N'TPSC0 _N'TPSC0 _N'TPSC0 _N'TPSC0 _N'TPSC0 _N'TPSC0 _N'TTOK _N'TPSC0 _N'TPSC0 _N'TPSC0 _N'TPSC0 _N'TPSC0 _N'TPSC0 _N'TPSC0 _N'TPSC0 _N'TPSC0 _N'TPSC0 _N'TPSC0 _N'TPSC0 _N'TPSC0 _N'TPSC0 ⅡNTOK _N'TPSC0 ⅡNTOK _N'TPSC0 ⅡNTOK ⅡNTOK ⅡNTOK ⅡNTOK ⅡNTOK ⅡNTOK ⅡNTOK ⅡNTOK ⅡNTOK ⅡNTOK ⅡNTOK ⅡNTOK ⅡNTOK ⅡNTOK ⅡNTOK ⅡNTOK ⅡNTOK ⅡNTOK ⅡNTOK ⅡNTOK ⅡNT OK ⅡNTOK ⅡNTOK ⅡNTOK ⅡNTOK ⅡNTOK ⅡNTOK ⅡNTOK ⅡNTOK ⅡNTOK ⅡNTOK ⅡNTOK ⅡNTOK ⅡNTOK ⅡNTOK ⅡNTOK ⅡNTOK ⅡNTOK ⅡNTOK ⅡNTOK ⅡNT |
OTBipДЯпимусobо ВиMaHнДИСКа
KIO DCK He iCTaEBcI pN HATNCaHHI KONK BIMMaHHY 3B'3KY 3 HecnPabHicTHO, CKOpNTaJIeTcA ZIM OTBOPOM, IO6 BINHRTN DnCK.
Otbip dI npMycOBoro BmMaHn DaNcKa
PpoeDypa
① BmKHiT 3aIncyBaHbN npicTpii i Bi'd'eHaaiTe Ka6eB USB i aanTep nepemiHHoro cTpyMy.
② BCTaBTe TOHkI CTpNKeHb 3aBdoBxKpnPb6n3HO 10 CM B OTBip IANI pINMycOBOI BmIMAHNII DmCKI iDcTAbTe nck. JIoTOK dN DmCKA BIDKPNCTbCnPi6Jn3HO Ha 10 MM.
③ BpyHy BNTaRHiTb IOTOK dani i BmMiTb DnCK.
ПРИМЕЧАНО:
O6o'raKoBO po3aOBoYte 3aHnCyBaIbHn npncTpiRopn3oHTaIbHO.
Abtopcbki npaba i TObapHi 3HaKn
Abtopcbki npaba
Ipe3aHcyBaHH 3axuHx ABTopcbKIM npabOM mATEpianIB 3 MToHO, BiIMHHO BI OOCbCTORo 3aCTOCyBaHH, 6e3 CneiaJIbHorO Do3BOJy BJIacHnKa ABTopcbKIN ppab 3a60porHeTbCRA KOHOM ppo ABTopcbKe npabo.
3apeectpoBaHi TOBapHi 3HaKn i TOBapHi 3HaKn
- Windows® e 3apeecTpoBaHIM TOBAPHM 3HaKOM a60 TOBAPHM 3HaKOM Microsoft Corporation B CUSA i/a60 iHmX KpaIhax.
- Ihu KaHn KaHn Ta ToBapi, 3aHaHi TyT, e 3apeCtpoBaHmN ToproBmN 3HaKaMn i/abo ToproBmN 3HaKaMn iXhix BiDIOB1Hnx BJaCHkIB.
TexHiHi xapaKTepeNTnKN
3araJbHi
Pn nikJIOueHHI do Everio
Victor Company of Japan, Limited
Ae aee eae aee aee aee aee aee aee aee aee aee aee aee aee aee aee aee aee aee aee aee aee aee aee aee aee aee aee aee aee aee aee aee aee aee aee aee aee aee aee aee aee aee aee aee aee aee aee aee aee aee aee aeee
| .USB 2.0 and USB 1.1 for all applications, B and A for mobile USB |
(AP-V400U)
:
| jürgen7.1/jürgen0..v.italy 14.2.11. jau 23.23.23.23.23.23.23.23.23.23.23.23.23.23.23.23.23.23.23.23.23.23.23.23.23.23.23.23.23.23.23.23.23.23. |
| Jürgen6.1.Jürgen5.11.23.23.23.23.23.23.23.23.23.23.23.23.23.23.23.23.23.23.23.23.23.23.23.23.23.23.23.23.23.23.23.23.23 |
J 14 J 15 J 16 J 17 J 18 J 19 J 20 J 21 J 22 J 23 J 24 J 25 J 26 J 27 J 28 J 29 J 30 J 31 J 32 J 33 J 34 J 35 J 36 J 37 J 38 J 39 J 40 J 41 J 42 J 43 J 44 J 45 J 46 J 47 J 48 J 49 J 50 J 51 J 52 J 53 J 54 J 55 J 56 J 57 J 58 J 59 J 60 J 61 J 62 J 63 J 64 J. Windows Media Player
JVC 45
4k = 3
aJlll cIooall g aill all
a
j j j j j j j j j j j j j j j j j j j j j j j j j j j j j j j j j j j j j j j j j j j j j j j j j j j j j j j j j j j j j j j
aiee eae
Microsoft Corporation 55
y 1
.[Next] jjai jai jai jai jai jai
4k > 0
4k = 3
.CU-VD20AC/AG/AS 1543-124000-12*
Saill jaleie jai jai jai
jlll jbiil
JL JU ⑥ USB
Gale 1
(1/6) ①
j j j j
j j j j
j j j j
j j j j
j j j j
y 1
J
J 1 J
J
:
i#
y
a a a a a a a a a a a a a a
:
a a a a a a a a a a a a a a a a a a a a a
·
g jyjnl jalll lcll gannll a, gllll, gaaag s jyss o jajle sall oas g jnai 1aill jis jgi slal jiai cai jai jai jai jai jai jai jai jai jai jai jai jai jai jai jai jai jai jai jai jai jai jai jai jai jai jai jai jai jai jai jai jai jai jai jai jai jai jai jai jai jai jai jai jai jai jai jai jai jai jai
:
E/EK/ER/AA/AC/AG/AS/TW

AR46


RW/R