
VC-H92/H92ETS - VCR SHARP - Free user manual and instructions
Find the device manual for free VC-H92/H92ETS SHARP in PDF.

| Product type | VHS Hi-Fi stereo VCR |
| Brand and model | SHARP VC-H92 / VC-H92ETS |
| Video formats | PAL (B/G, I, D/K), SECAM (B/G, D/K, K1), MESECAM (B/G, D/K, K1), NTSC 4.43 / NTSC 3.58 |
| NTSC playback on PAL TV | Yes, via NTSC → PAL CTV function |
| Dimensions (W × D × H) | 380 × 320.7 × 89.8 mm |
| Weight | 4.5 kg |
| Power supply | 110-240 V AC, 50/60 Hz, automatic |
| Power consumption | Approx. 22 W |
| Drum | Titanium coating |
| Video heads | Two rotating heads, helical scanning |
| Auto head cleaning | Yes, automatic upon cassette insertion or ejection |
| Intelligent functions | Automatic image control via artificial intelligence (A.I.) |
| Automatic alignment | Yes, with flashing display during alignment |
| Multilingual OSD display | English, Chinese, French, Spanish |
| Timer | 8 recordings over 365 days, with daily/weekly programming |
| Immediate/delayed recording timer | Yes, adjustable in 10-minute steps up to 24 h |
| DPSS search | Digital program search system (up to 19 indexes) |
| Child lock | Two locks: operation mode lock and power-on prohibition |
| Inputs/outputs | Antenna input, RF OUT, audio and video inputs/outputs (front and rear), camcorder input |
| Supplied accessories | Remote control, 2 R6 batteries, coaxial cable, audio cable, video cable, instruction manual |
| Operating temperature | 5°C to 40°C |
| Maintenance and cleaning | Automatic head cleaning; avoid condensation, dust and magnetic fields |
| Reparability | Contact a Sharp dealer or approved service center; do not open the casing |
Frequently Asked Questions - VC-H92/H92ETS SHARP
User questions about VC-H92/H92ETS SHARP
0 question about this device. Answer the ones you know or ask your own.
Ask a new question about this device
Download the instructions for your VCR in PDF format for free! Find your manual VC-H92/H92ETS - SHARP and take your electronic device back in hand. On this page are published all the documents necessary for the use of your device. VC-H92/H92ETS by SHARP.
USER MANUAL VC-H92/H92ETS SHARP
VHS Hi-Fi stereo sound
PAL(B/G,I,D/K)/SECAM (B/G, D/K·K1) MESECAM(B/G,D/K·K1)NTSC 4.43/NTSC 3.58(M) multi system
- Able to play back NTSC tapes onto a PAL system TV (see notes on page 19.)
- Equipped with a titanium coated drum
- Camcorder input terminal
A.I.(artificial intelligence) auto picture control system
Auto head cleaning system
- Auto tracking system
- Auto picture control system
- OSD(On Screen Display)/OSP(On Screen Programme) functions Choice of four languages (English, Chinese, French, and Spanish)
- VISS signal writing and erasing
Remote control with shuttle dial
Full loading system with instantaneous playback - DPSS (Digital Programme Search System)
- Two-way child-lock system
Full automatic playback function - 110-240V 50/60Hz automatic voltage supply selector
- Timer recording of up to 8 programmes over a 365-day period. (Every day or every week timer recording for a programme is possible.)
- 5-digit linear tape counter
- 48-position automatic voltage synthesized tuner
- Simple Recording Timer only needs setting of the recording start time and end time.
- Random Repeat playback
Voltage Supply :
The voltage supply of this VCR is AC110-240V, 50/60Hz.
Cassette tape:
This VCR uses VHs method standard video signals. Only video cassette tapes marked with VHs and VHs are usable with this VCR.
CONTENTS
BEFORE USING YOUR VCR
- IMPORTANT SAFEGUARDS AND PRECAUTIONS 2
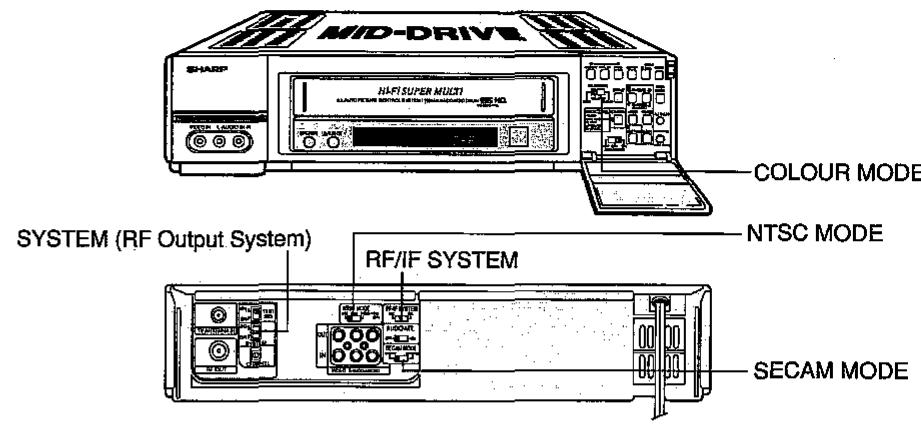
BROADCAST SYSTEMS/BEFORE USING YOUR VCR 3 - MAJOR COMPONENTS OF YOUR VCR 5
PREPARATIONS
- CONNECTIONS 6
ADJUSTING THE VIDEO CHANNEL 7 - REMOTE CONTROL 8
- INITIAL SETTING OF OSD (ON SCREEN DISPLAY) 9
- OSD SETTINGS SCREEN 11
- SETTING THE CHANNELS 13
- MODE OSD (ON SCREEN DISPLAY) 16
BASIC OPERATIONS
- PLAYBACK 17
FULL AUTO PLAY FUNCTION 19
HOW TO USE VISS AND VISS ERASE FUNCTIONS 20 - RECORDING A TV PROGRAMME 21
TIMER RECORDING
- TIMER RECORDING (OSP: ON SCREEN PROGRAMME) 23
CONFIRMING TIMER PROGRAMMES 25
CANCELLING TIMER PROGRAMMES 25
· SIMPLE RECORDING TIMER 26
SPECIAL FUNCTIONS
ZERO-BACK FUNCTION 27
DPSS (DIGITAL PROGRAMME SEARCH SYSTEM) 27
· RANDOM REPEAT 28
TWO-WAY CHILD-LOCK SYSTEM 28
MULTI-FUNCTION DISPLAY 29
- USING YOUR VCR WITH A VIDEO CAMERA 30
- EDITING FROM OTHER VIDEO EQUIPMENT 30
HELPFUL HINTS
BEFORE CALLING FOR SERVICE 31
· SPECIFICATIONS 32
ACCESSIONS
Make sure the following accessories were supplied with your VCR. If any are missing, please contact your nearest shop.
| Coaxial cable (75 ohm) | Wireless remote control with SHUTTLE Dial | Two AA batteries R6 (UM/SUM-3 or AA) | Audio cable | Video cable |
IMPORTANT SAFEGUARDS AND PRECAUTIONS
Caution
BEFORE OPERATING YOUR NEW VCR, PLEASE CAREFULLY READ THIS OPERATION MANUAL AND THEN SAVE IT FOR FUTURE REFERENCE, AS IT WILL BE USEFUL IF YOU HAVE ANY PROBLEMS OPERATING YOUR VCR IN THE FUTURE.
Location and Handling
- Air vents are provided in the VCR cabinet to prevent excessive temperatures inside the unit. Do not place your VCR in closed spaces, cover it, or otherwise block the vents.
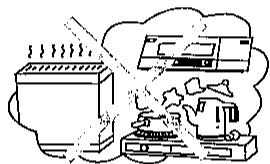
- Do not place the VCR in direct sunlight, or near heat sources.
- Keep the VCR and tapes away from strong magnetic objects.
- Do not insert or drop anything into the VCR through the air vents or cassette compartment as this could cause serious damage, possibly resulting in fire.
- Do not place any object containing water or other liquids on the VCR. In the event that liquid should enter the cabinet, unplug the VCR immediately and contact a retailer or service centre approved by Sharp at once.
- Do not remove the VCR cabinet. Touching parts inside the cabinet could result in electric shock and/or damage to the VCR. For service and adjustment inside the cabinet call a qualified dealer or service centre approved by Sharp.


Moisture Condensation
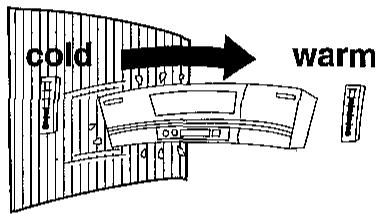
Rapid temperature changes and storage or operation in extremely high humidity environments may cause "dew" to condense inside the VCR cabinet. Dew can cause serious damage to your tapes and the video heads. Should dew form inside the unit, the DEW indicator will light and all normal VCR operations will be inoperable.
- As an extra measure of protection for the video heads, wait another 5 minutes after the DEW indicator goes out before using the VCR.
- The dew sensor may take a few minutes to detect moisture. Accordingly, when the VCR is first hooked up or when the power cord is plugged into the socket again, wait about 30 minutes and confirm that the DEW indicator has not lit before attempting to operate the unit.
Others
Audio-visual material may consist of copyrighted works which must not be recorded without the authority of the owner of the copyright. Please refer to the relevant laws in your country.
This VCR is not equipped with a mains power switch. Accordingly, nominal current to drive the clock is drawn at all times when the AC power cord is plugged into a wall socket. If the VCR is not to be used for an extended period, be sure to unplug the cord.
BROADCAST SYSTEMS/BEFORE USING YOUR VCR
1 Recording broadcasts/Tape playback for each of the modes of your VCR and each type of TV.
| Your TV System | Your VCR mode (Refer to table 5) | Recording a broadcast | Playing back a tape | |||||||||
| PAL B/G | PAL I | PAL-D/K | SECAM B/G | French SECAM L | SECAM D/K,K1 | NTSC (M) | PAL | MESECAM | SECAM (French SECAM Included) | NTSC | ||
| PAL-B/G | PAL-B/G | 0 | 0 | |||||||||
| PAL-I | PAL-I | 0 | 0 | |||||||||
| PAL-D/K | PAL-D/K | 0 | 0 | |||||||||
| SECAM-B/G | MESECAM-B/G | 0★ | 0 | |||||||||
| SECAM-B/G | 0 | 0 | ||||||||||
| SECAM-L | Δ | Δ | ||||||||||
| SECAM-D/K | Δ | Δ | ||||||||||
| SECAM-D/K -K1 | 0 | 0 | ||||||||||
| MESECAM-D/K | 0★ | 0 | ||||||||||
| NTSC 3.58(M) | NTSC 3.58 | 0 | 0 | |||||||||
| NTSC 4.43 | NTSC 4.43 | 0 | ||||||||||
- The table above indicates the colour television system you should use, as well as the setting for each switch, when using your VCR to record signals in each broadcasting system, or to play back tapes from each of the different colour systems. For example, when using a colour TV which uses a PAL-B/G system, if you select the PAL-B/G mode on your VCR (refer to table ⑤ for the setting of each switch), you will be able to record PAL-B/G broadcasts, and also play back PAL tapes.
- “ ” indicates that recording and playback are not possible unless you connect your TV to the VCR with the AUDIO IN/OUT and VIDEO IN/OUT terminals. Consequently, this mark indicates that you can only use a TV that is equipped with AUDIO IN/OUT and VIDEO IN/OUT terminals.
- "O" indicates that recording and playback are possible when you connect your TV to the VCR using either the AUDIO IN/OUT and VIDEO IN/OUT terminals or the RF OUT terminal.
- When recording a French SECAM-L broadcast, and when playing back a SECAM tape using a SECAM-L TV, connect your TV using the AUDIO IN/OUT and VIDEO IN/OUT terminals.
- “★” indicates that a SECAM signal is being recorded using the MESECAM system.
-
The following are definitions of each kind of tape:
-
PAL tapes: Commercially marketed PAL tapes, and tapes on which PAL-B/G, PAL-I, PAL-D/K (OIRT) broadcasts have been recorded.
-
SECAM tapes: Commercially marketed SECAM tapes (including those marketed in France), and tapes on which SECAM-B/G, SECAM-D/K, K1 (OIRT), and SECAM-L broadcasts have been recorded in the SECAM system.
-
MESECAM tapes: Tapes on which SECAM-B/G, SECAM-D/K, and K1 (OIRT) broadcasts have been recorded in the MESECAM system.
- NTSC tapes: Commercially marketed NTSC tapes and tapes on which NTSC-M broadcasts have been recorded.
A classification of colour systems and broadcasting systems/ Selection of recording speeds and speeds at which tapes can be played back.
| 1 | 2 | 3 | 4 | 5 | 6 | 7 | 8 | 9 | ||
| TV | Colour system | PAL | SECAM | NTSC | ||||||
| Broadcasting System | VHF:B UHF:G(H) | VHF:D UHF:K | VHF:-UHF:I | VHF:B UHF:G | VHF:D UHF:K, K1 | VHF:M UHF:M | - | |||
| VHS | VHS colour recording system | PAL | PAL | PAL | SECAM | MESECAM | SECAM | MESECAM | NTSC 3.58 | NTSC 4.43 |
| Picture and sound that can be recorded (Sound: Linear track) | SP/LP | SP/LP | SP/EP | |||||||
| Hi-Fi track sound recording | SP/LP | SP/LP | SP | |||||||
| Playback (Sound: Linear track) | SP/LP | SP/LP | SP/LP/EP | |||||||
| Playback (Sound: Hi-Fi track) | SP/LP | SP/LP | SP/LP/EP | |||||||
Switch settings when using your VCR to edit line input signals while playing back a tape with other equipment (VCRs, etc.).
| Your VCR Switch Position | ||||
| Playback equipment playback mode | Front (inside the door) | Rear | Channel posi- tion of your VCR | |
| COLOUR MODE | NTSC MODE | SECAM MODE | ||
| NTSC 3.58 | AUTO or NTSC | 3.58 | Any position | L1 (Rear)L2 (Front) |
| NTSC 4.43 | AUTO or NTSC | 4.43 | ||
| PAL | AUTO or PAL | Any position | ||
| SECAM | AUTO or MESECAM | SECAM | ||
| MESECAM | AUTO or MESECAM | MESECAM | ||
| NTSC → PAL CTV | AUTO or NTSC | NTSC → PAL CTV | Any position | |
- Editing by connecting other equipment to the VCR via AUDIO IN R/L and VIDEO IN terminals is called "line input editing". When using this procedure to edit, press the INPUT button to select the external input (L1: rear or L2: front).

4 The relationship between tapes to be played back, your VCR switch positions, and the colour TV you are using.
| Your VCR Switch Position | ||||||
| Tape to be played back | Connection of your colour TV and your VCR | Front (inside the door) | Rear | The colour TV system to which the VCR can be connected | ||
| COLOUR MODE | NTSC MODE | SECAM MODE | SYSTEM (RF Output System) | |||
| NTSC | RF | AUTO or NTSC | 3.58 | Any position | Any position | NTSC 3.58(M) |
| AV | ||||||
| NTSC | RF | AUTO or NTSC | 4.43 | Any position | I, B/G or D/K (Match to your colour TV) | NTSC 4.43 |
| AV | Any position | |||||
| NTSC | RF | AUTO or NTSC | NTSC→PAL CTV | Any position | I, B/G or D/K (Match to your colour TV) | PAL |
| AV | Any position | |||||
| PAL | RF | AUTO or PAL | Any position | Any position | I, B/G or D/K (Match to your colour TV) | PAL-I,B/G or D/K |
| AV | Any position | All PAL systems except PAL-M and PAL-N | ||||
| SECAM | RF | AUTO or MESECAM | SECAM | B/G or D/K (Match to your colour TV) | SECAM-B/G, D/K or K1 | |
| AV | Any position | All SECAM including SECAM-L | ||||
| MESECAM | RF | MESECAM | B/G or D/K (Match to your colour TV) | SECAM-B/G, D/K or K1 | ||
| AV | Any position | All SECAM including SECAM-L | ||||
- When you play back an NTSC tape on PAL TV, set the NTSC MODE switch on the rear of the VCR to the NTSC PAL CTV position.
- When playing back an NTSC tape, connect your VCR to either an NTSC or a multi-system TV. A picture can be obtained using a PAL TV, but please note the following points:
-
The playback image will shrink somewhat at the top and bottom. This does not indicate a problem with either the TV or the VCR.
-
If the television is not equipped with a V-HOLD control knob, the picture may roll, making it unviewable. However, if the TV is equipped with a V-HOLD knob, then it is possible to stop the rolling by adjusting the knob, making the picture viewable.
- RF indicates that the TV is connected to the VCR using the RF OUT terminal.
- AV indicates that the TV is connected to the VCR using the AUDIO IN/OUT andVIDEO IN/OUT terminals.
- When you play back a poorly recorded tape, set the COLOUR MODE switch to "NTSC", "PAL", or "SECAM" depending on the colour system of the tape (do not set it to "AUTO"). In the case of a MESECAM tape, set it to "SECAM".
Switch positions for recording TV broadcast signals withr your VCR.
| Region | Broadcasting system | Recording system | Front (inside the door) | Rear | ||
| COLOUR MODE | NTSC MODE | SECAM MODE | RF/IF SYSTEM | |||
| PAL-B/G | PAL recording | AUTO or PAL | Any position | Any position | B/G | |
| PAL-I | AUTO or PAL | Any position | Any position | I | ||
| PAL-D/K | AUTO or PAL | Any position | Any position | D/K | ||
| SECAM -B/G | MESECAM recording | AUTO or MESECAM | Any position | MESECAM SECAM | B/G | |
| SECAM recording | ||||||
| SECAM -D/K -K1 | MESECAM recording | Any position | MESECAM SECAM | D/K | ||
| SECAM recording | ||||||
| NTSC | NTSC recording | AUTO or NTSC | 3.58 | Any position | Any position | |
Using your VCR Auto System during Playback and Recording
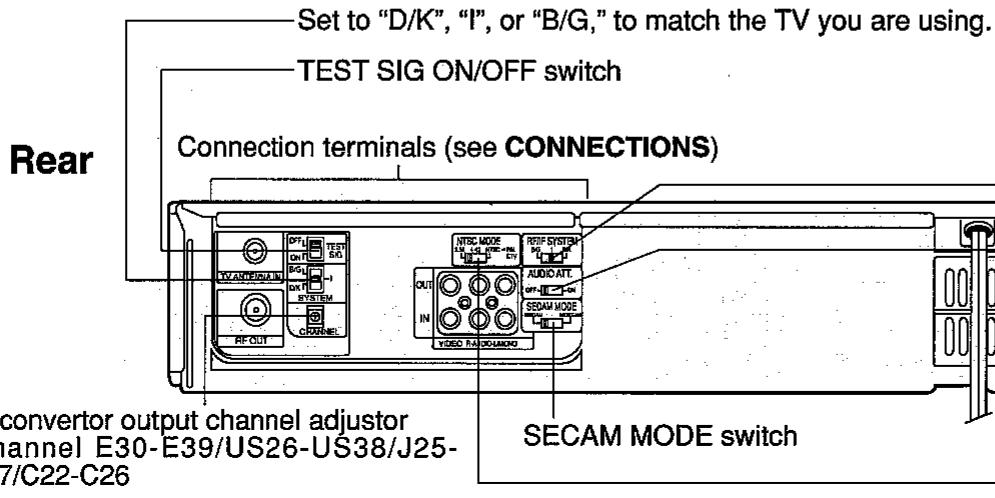
1 Set the NTSC MODE switch on the rear of the VCR either to "3.58", "4.43" or "NTSC PAL CTV" to match the TV being used.
When a broadcast system is SECAM, set the SECAM MODE switch on the rear of the VCR to SECAM if you want to record it in the SECAM system. If you want to record in the MESECAM system, set to MESECAM. Also, set the SECAM MODE switch to MESECAM if the tape being played back is recorded in MESECAM. Set the SECAM MODE switch to SECAM if the tape being played back is recorded in the SECAM system.
NOTE:
If you make a mistake in setting the position of the SECAM MODE switch, the tape which you recorded will not play back in colour when you play it back using another SECAM only or MESECAM only system.
After completing 1 and 2, set the COLOUR MODE switch to the AUTO position, and the VCR will automatically discriminate between "PAL", "NTSC" and "SECAM".
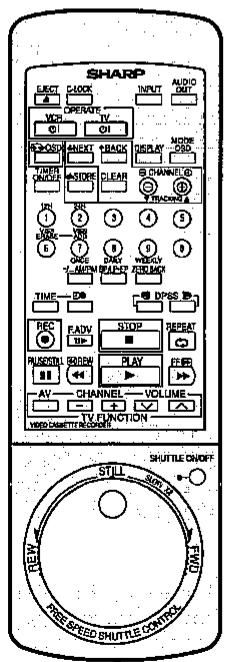
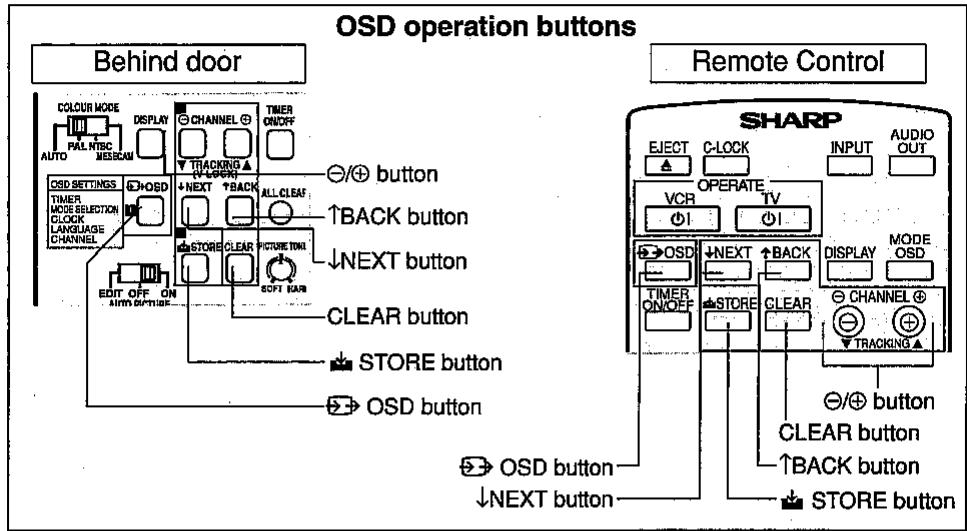
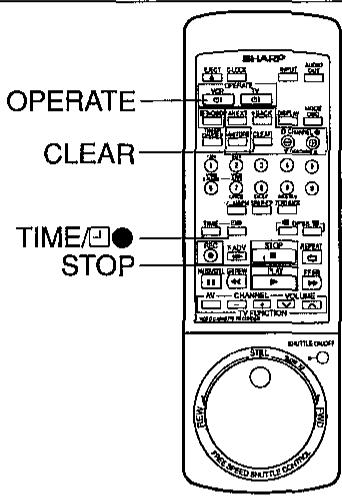
Remote Control

Fluorescent display
Setting confirmation display
It flashes for a few seconds when a button on the VCR is pressed or when signals are received from the Remote Control.
Opened door
Channel tuning buttons (see SETTING THE CHANNELS)
Tracking buttons (see PLAYBACK)
Operating buttons (see PLAYBACK/ RECORDING A TV PROGRAMME)
CHANNEL up/down buttons (select channels for viewing)
-Set in accordance with the broadcast signal received.
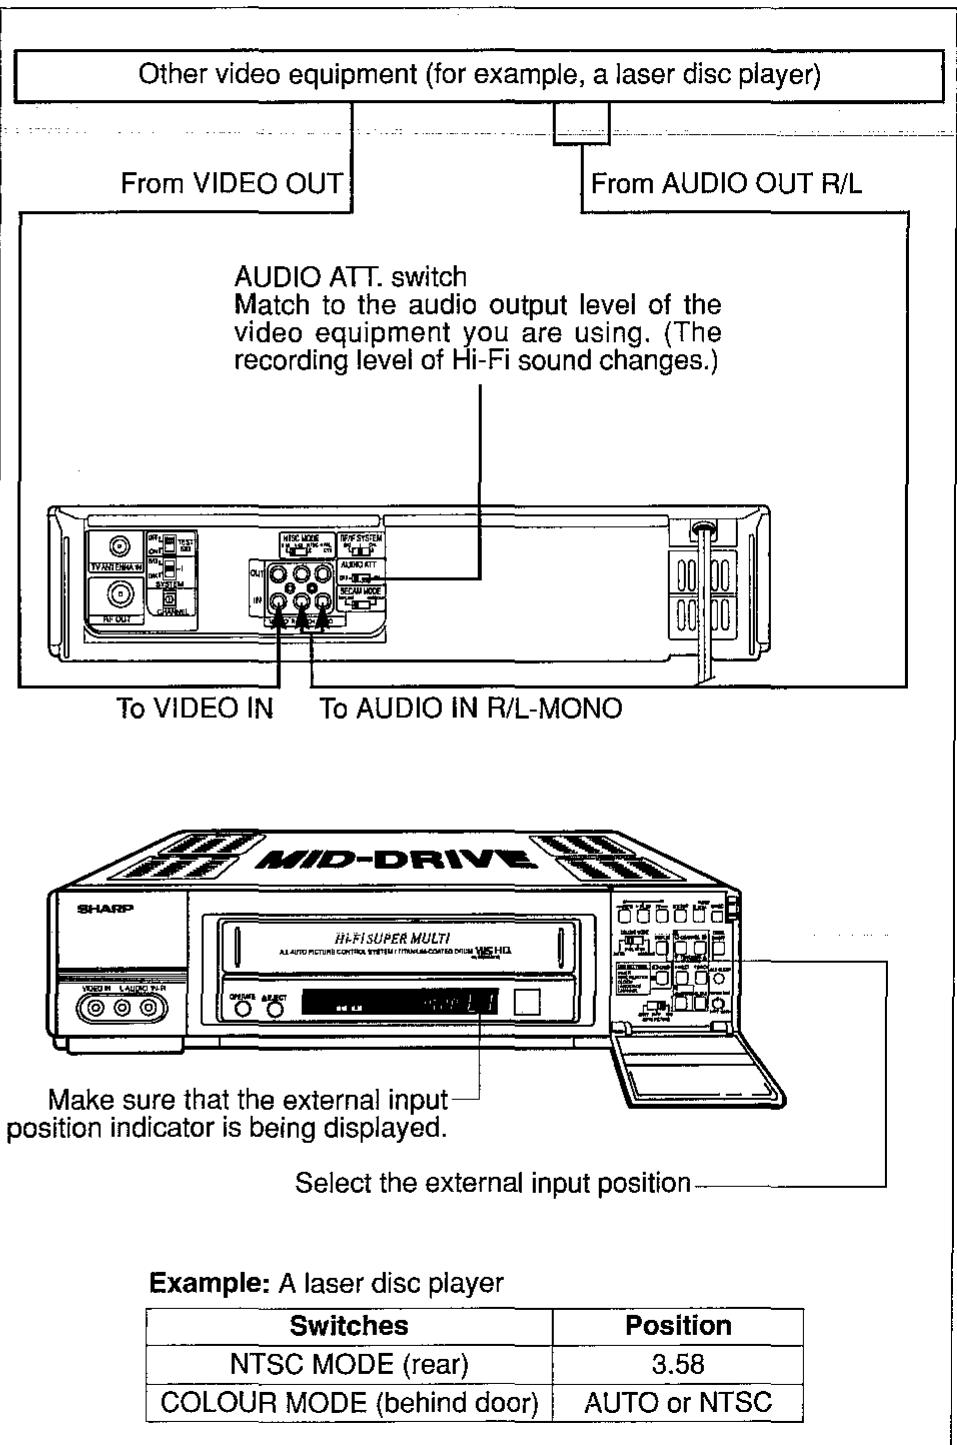
Audio Attenuator switch
(AUDIO ATT. ON/OFF)
See "EDITING FROM OTHERVIDEO EQUIPMENT"
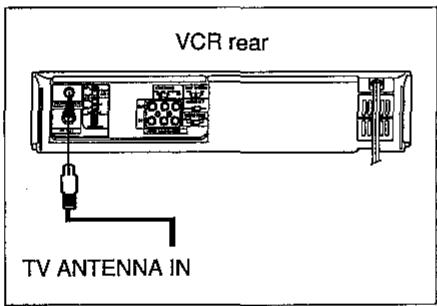
Connecting Aerial Cable to VCR
Disconnecting TV Cable
Disconnect the aerial cable from the back of your TV set.
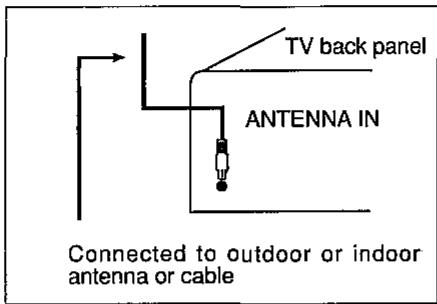
Connecting Antenna Cable to VCR
Connect the antenna cable to the TV ANTENNA IN terminal of your VCR.
Connecting VCR to TV
Connect the supplied coaxial cable to the RF OUT terminal of the VCR. Plug the other end into your TV's ANTENNA IN terminal.
NOTE:
When the connection is made using the RF OUT terminal, stereo or bilingual sound will not be output.

Connecting to a Stereo TV
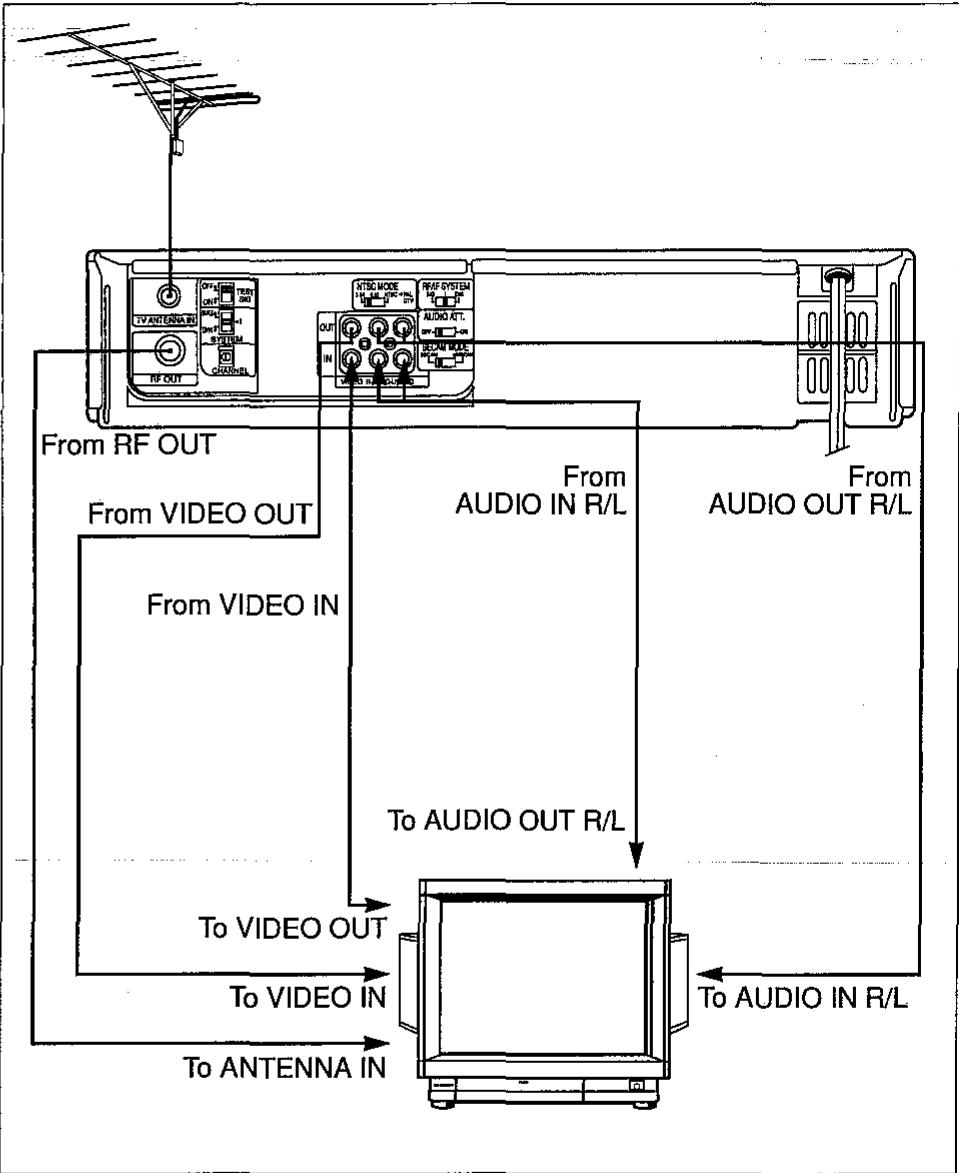
NOTES:
- Audio recorded in the EP mode in the NTSC system is not recorded on the Hi-Fi track, but on the linear track.
- If you simultaneously switch both the TV and the VCR to the AV mode after connecting as in the diagram above, the audio and video may be distorted. Accordingly, do not switch both to the AV mode simultaneously.
Connecting to TV and Audio Equipment
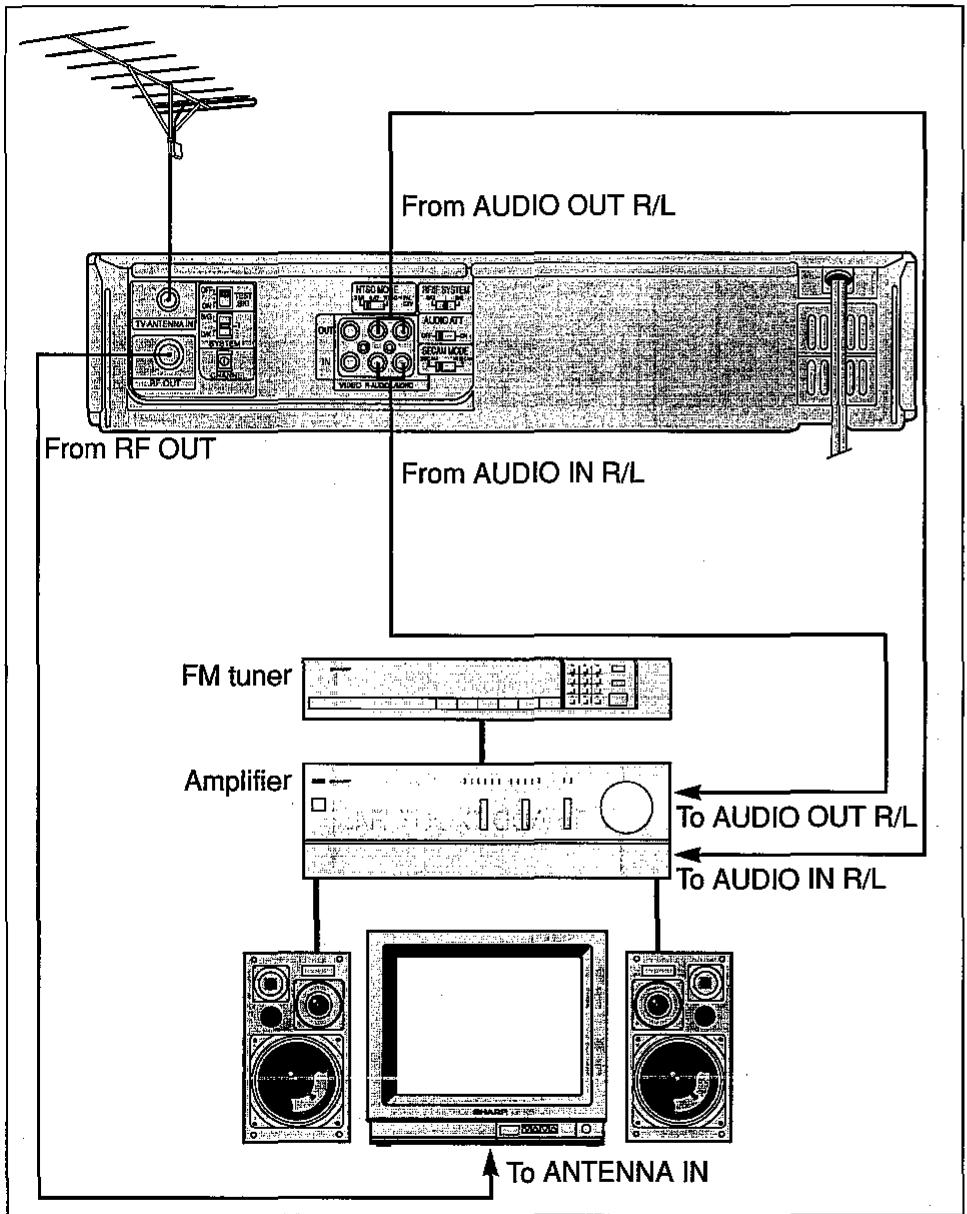
NOTES:
- Connect the power plug of the VCR last, after having first made sure that the connections are as shown in the diagram above.
- If the audio output from the audio equipment is mono, connect it to the L/MONO terminal. Then, audio will be output from both the AUDIO OUT R and L terminals.
To view the output of your VCR on the television screen, you must select an unused channel on your TV and tune it to the output of your VCR (The UHF tuner on the VC-H92 is set to channels E36·US34·J33 and between C24 and C25. The VC-H92ETS is set to channels E39·US38·J37 and C26).
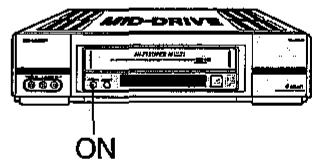
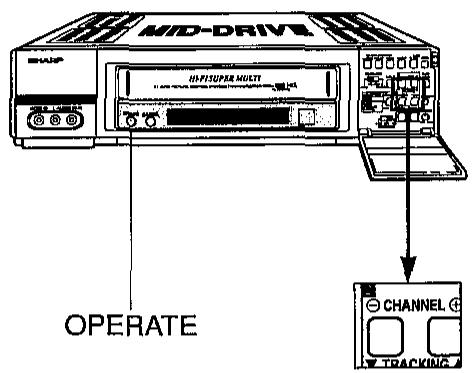
Select an unused channel on your TV and press the OPERATE button on the VCR to turn on the power.
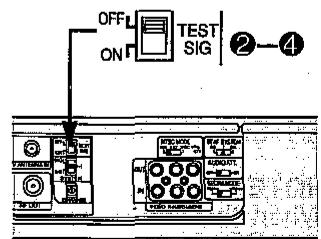
Set the TEST SIG switch to ON.
Adjust the tuning of the selected TV channel until the test pattern (two vertical bars) appears on the screen.
4 Set the TEST SIG switch to OFF.
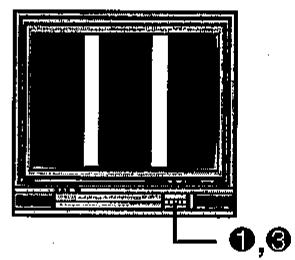
NOTE:
If interference of a beat pattern appears when the test pattern is displayed, use a small screwdriver to turn the RF convertor output channel adjustor to change the VCR output channel, and then retune your TV as above.
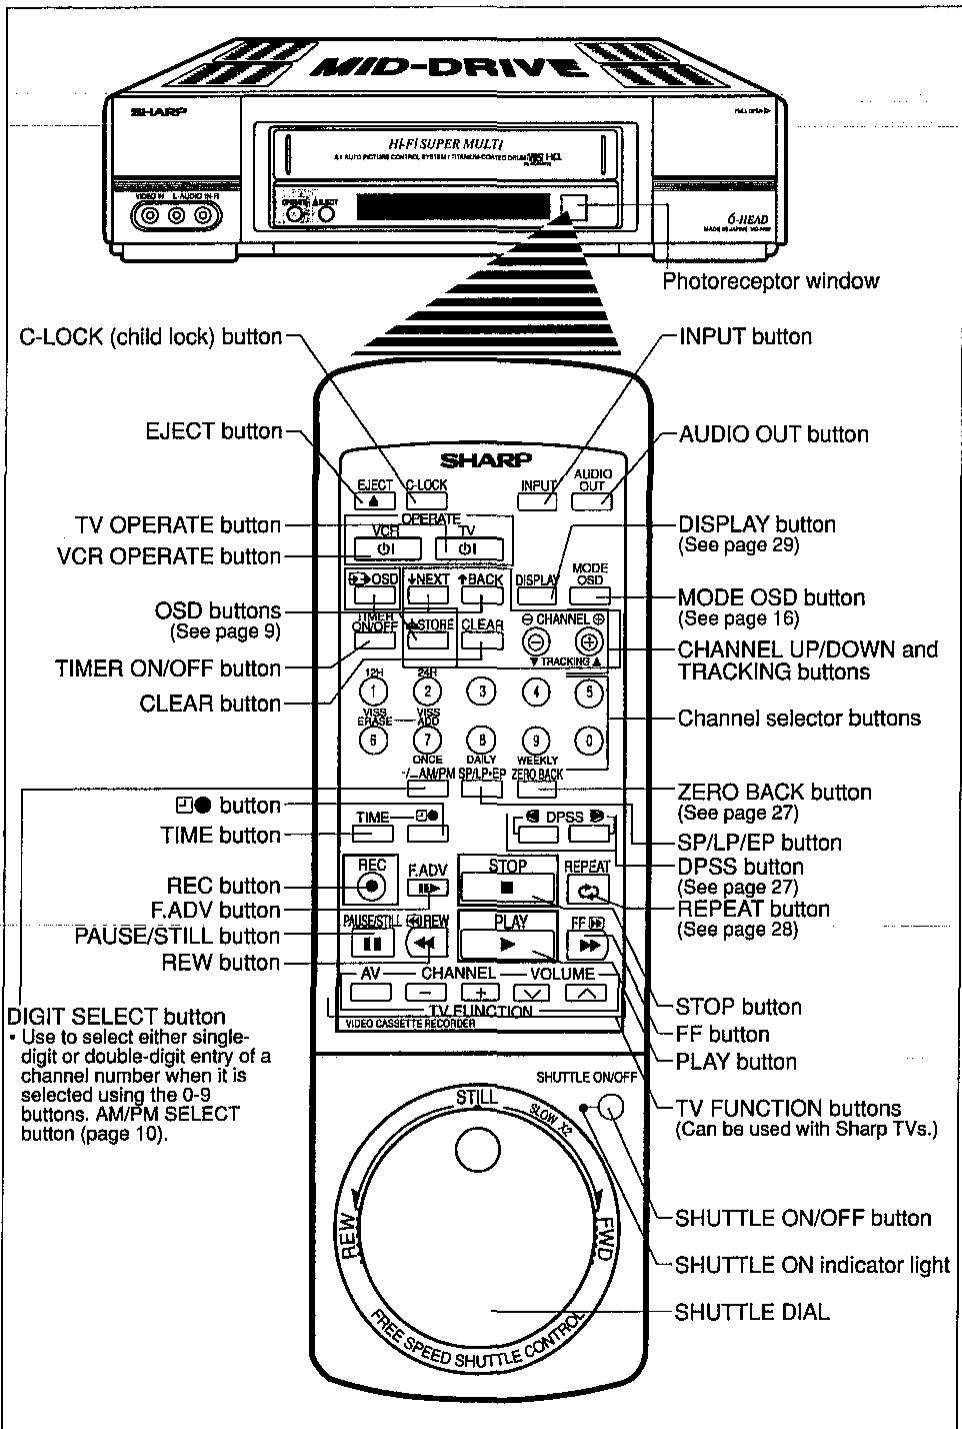
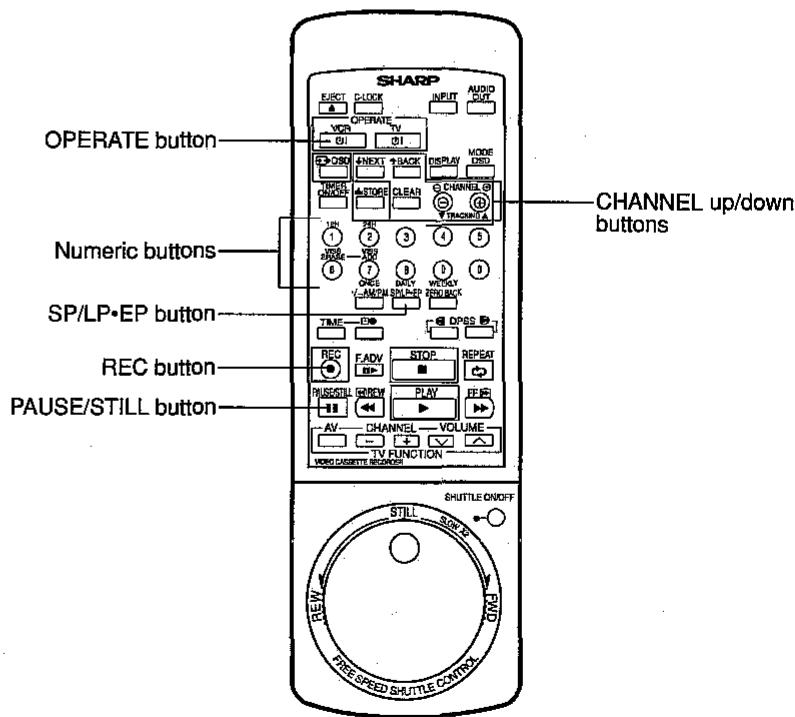
The remote control lets you operate your VCR at a distance. Just aim the top of the remote control at the photoreceptor window situated on the front panel of your VCR, then press buttons or rotate the shuttle dial.
Inserting the Batteries
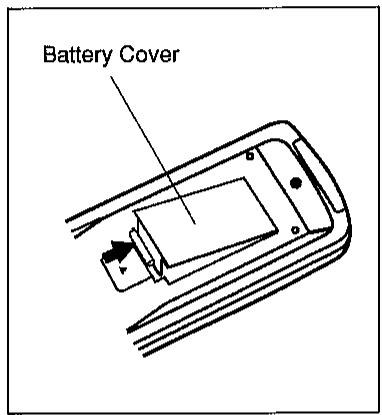
The remote control operates on two R6 (UM/SUM-3, AA) 1.5 volt batteries (included). If the remote control does not operate or fails to function normally, use new batteries, which can be purchased at electronics or camera stores.
1 Open the battery cover. (Remove any old batteries that may be in the remote control.)
Insert new batteries, matching their polarities (+) and (-) to the markings inside the remote control.
Replace the cover.
- You can set the clock or timer recordings by using the remote control.
Clock setting: See Setting the CLOCK (page 12).
Timer recording: See TIMER RECORDING (page 23).
NOTES:
- Do not subject the remote control to shock, water or excessive humidity.
- The remote control may not function if the VCR sensor is in direct sunlight or any other strong light. If so, move the VCR or alter the lighting.
- Incorrect use of batteries may cause them to leak or burst.
- Do not mix old and new batteries, or mix brands in use.
- Batteries are available in rechargeable and disposable configurations. Read the battery warnings and use the batteries properly.
- Remove the batteries if the remote control will not be operated for an extended period of time.
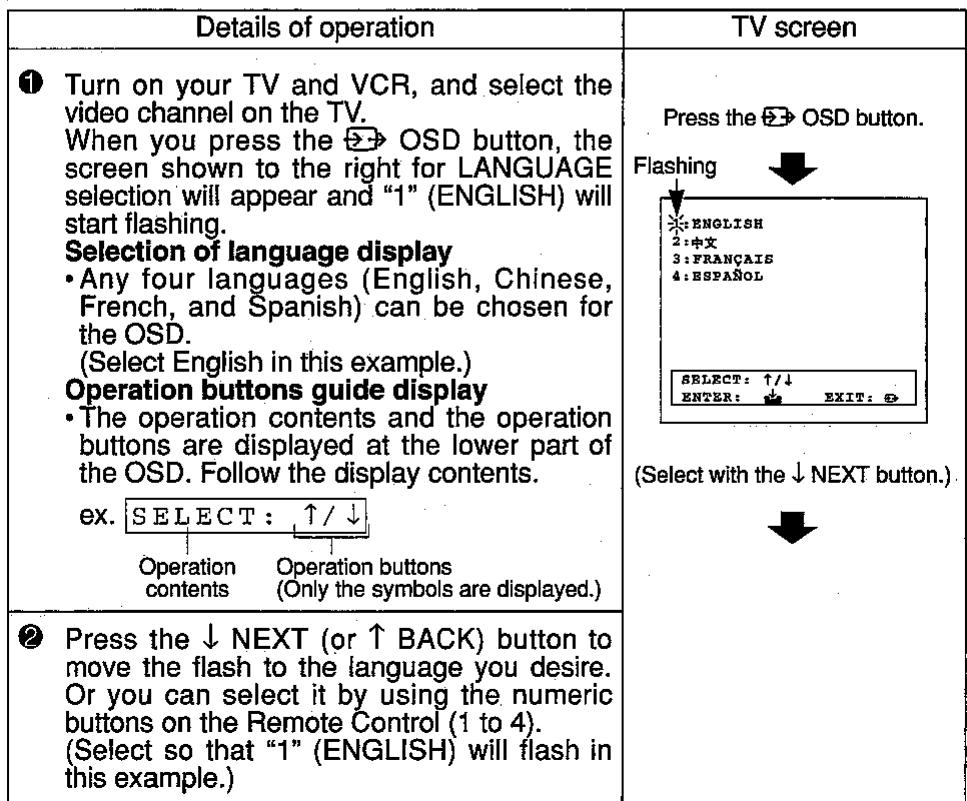
INITIAL SETTING OF OSD (ON SCREEN DISPLAY)
When you use the VCR for the first time or after a power outage of more than 20 minutes, the VCR will be automatically set to an initial setting mode in order to set the OSD display, selection of language, and present time. Perform the following procedure for initial setting.
| Details of operation | TV screen |
| When you press the STORE button, the English screen will be selected and the CLOCK setting screen will appear. After this, the messages on the OSD will be displayed in English. “24H”, which indicates 24-hour time, or the 12 hour am/pm indication, will begin to flash. | Press the STORE button. ↓ Flashing 24H/12H TIME 0:00 DAY/MONTH 1.01 YEAR '00 (Set by using the Θ/⊕ button.) |
| Setting the present time: In this example, set 10:28, August 5, 1994 (24-hour time). Setting 24-hour or 12-hour display. • Use the Θ/⊕ button to set. “24H”... 24-hour display “12H”... 12-hour AM/PM display (In this example, set “24H”) | |
| Press the ↓ NEXT button. “0:00” (time) will begin to flash. When you press the Θ/⊕ button, the “minute” digits will first change. As you keep pressing, the “hour” digits will begin to change. First set the “hour” digits and then set the “minute” digits. (Set the time to “10:28” in this example.) | Press the ↓ NEXT button. ↓ 24H/12H TIME -0:00- DAY/MONTH 1.01 YEAR '00 Select: ↑/↓ SET: -/+ ENTER: ↓ EXIT: SET by using the Θ/⊕ button. ↓ TIME -0:26- |
| Press the ↓ NEXT button and “1.01” (day and month) will start flashing. As you press the Θ/⊕ button, the “day” digits will first change. As you continue pressing, the “month” digits will start changing. First set the “day” digits and then set the “month” digits. (Set the date to “8.5” in this example.) | Press the ↓ NEXT button. ↓ 24H/12H TIME 10:28 DAY/MONTH -1.01 YEAR '00 Select: ↑/↓ SET: -/+ ENTER: ↓ EXIT: SET by using the Θ/⊕ button. ↓ DAY/MONTH -3:06- |
| Press the ↓ NEXT button and the "year" digits "00" will start flashing. Press the ⊙/ ⊕ button to set the "year" digits. (Set the year to "94" in this example.) | Press the ↓ NEXT button. 24H/12H 24H TIME 10:20 DAY/MONTH 5.08 YEAR 2006 SELECT: ↑/↓ SET: -/+ ENTER: ☐ EXIT: ☐ Set with the ⊙/ ⊕ buttons. YEAR 294- |
| Make sure that the present time, year, month, and day are all correctly set by checking the entire clock setting screen. Press the "STORE" button and the SETTINGS screen will appear. (Initial setting is completed.) NOTE: As soon as you press the STORE button, the clock will begin to operate. To set the time accurately, press the STORE button at the TV or radio time signal. | Press the STORE button. SETTINGS * TIMER 2:MODE SELECTION 3: CLOCK 4:LANGUAGE 5:CHANNEL SELECT: ↑/↓ ENTER: ☐ EXIT: ☐ Press the OSD button. The OSD screen is cleared. |
| Press the "OSD" button to clear the OSD screen. The initial setting is completed. |
Notes:
- The OSD screen will be automatically cleared when no button is pressed for more than 1 minute.
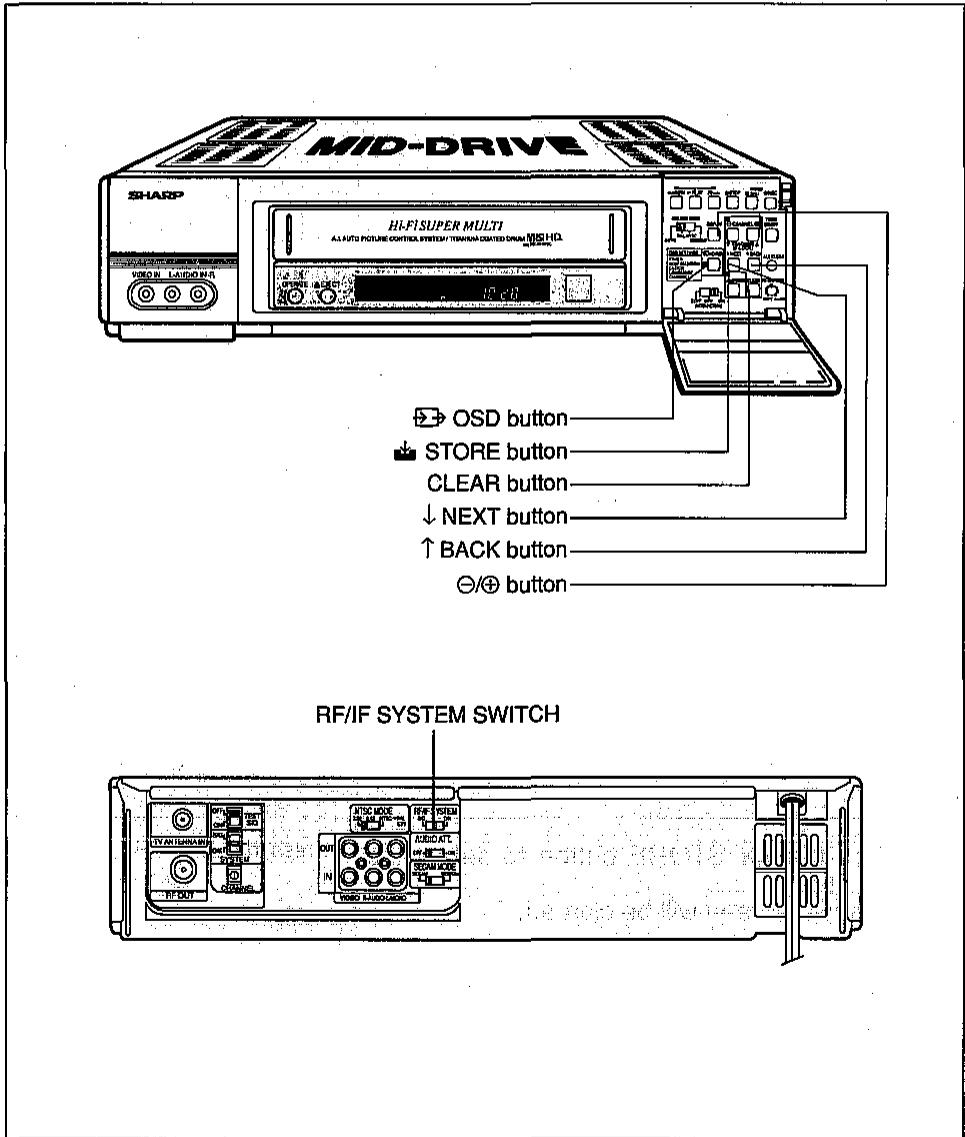
Setting the NTSC MODE switch
- Select the output system for the OSD Menu screen and Blue Back screen, using the NTSC MODE switch.
| NTSC MODE Switch Positioning | Colour System Output |
| 3.58 | NTSC System |
| 4.43 | PAL System |
| NTSC → PAL CTV | PAL System |
Notes:
-
When changing from a channel receiving PAL System to a channel receiving NTSC System (including external input "L1" and "L2"), or when performing the reverse operation, the characters on the OSD will become skewed for a few seconds. This does not incidate a malfunction.
-
The OSD will automatically select the appropriate system for the broadcast or playback signal.
Key to easy setting
- For settings that require operation of the / button as mentioned earlier in Steps 4 to 7, you can set them more easily by using the 10-key (0 to 9, - ) buttons on the remote control.
| Setting procedure | Details of operation | Buttons on the Remote Control |
| Step 1 | Setting of either "24H" or "12H" Example: 12-hour AM/PM display 24-hour display | →1 (12H) button →2 (24H) button |
| Steps 5 to 7 | Inputting numerals Example: Set the present time to 10:28 Example: Set the date to August 5th. Note: When the minute (Step 6), month (Step 6), or year (Step 7) has only one digit, put a 0 in front of the number when you input it. Example: Set the year to '94. | →"1", "0", "2", and "8" →"5", "0", and "8" →"9", "4" |
| Step 5 | Setting the 12-hour display mode Example: Set 11:08 p.m. 1) When you press the 7.. (AM/PM) button, the displays of "--AM" and "----PM" will alternately appear. (Set --PM in this example.) 2) Input numerals according to the above numeric input procedure. (Input "1", "1", "0", and "8" in this example.) | 24H/12H 12H TIME -12:00AM DAY/MONTH 1.01 YEAR '00 |
| SELECT: ↑/↓ SET: +/- ENTER: ↓ EXIT: ⋅ | ||
| Press the (7.. AM/PM) button. TIME -12:00AM Press buttons "1", "1", "0" and "8". TIME -11:08PM- |
OSD SETTINGS SCREEN
The following 5 items can be set by using the OSD.
1: TIMER ... Setting a timer recording (and checking it). See page 23 for the setting procedure.
2: MODE 'SELECTION ...VCR operating conditions are set according to the broadcast reception and tape playback conditions.
3: CLOCK ... Setting the present time.
4: LANGUAGE ... Selection of language to be used for the OSD
5: CHANNEL ... Setting the TV channels. See page 13 for setting procedure.
| Details of operation | TV screen |
| Setting the “MODE SELECTION”Turn on your TV set and VCR and select the video channel on the TV. When you press the “▷ OSD” button, the SETTINGS screen will appear and the “i” (TIMER) will begin to flash.= Reference =When you press the ▷ OSD button, the OSD screen will be cleared and the normal screen will be redisplayed.) | Press the ▷ OSD button. Flashing SETTINGS2:MODE SELECTION3: CLOCK4:LANGUAGE5: CHANNELSELECT: ↑/↓ENTER: EXIT: 0 |
| Press the ↓ NEXT button to move the flash to “2”(MODE SELECTION). | Select using the ↓ NEXT button.※: MODE SELECTION |
| When you press the ▷ STORE button, the BLUE BACK setting will be shown. AUTO on the third line will start flashing.Set either AUTO or OFF, using the ⊙/⊕ button, to match the TV reception quality or the playback quality of the tape.AUTO... Usually select AUTO.*A blue screen will appear when your VCR receives no TV signal.*A green screen will appear when a unrecorded tape is played back.OFF... Select OFF if the screen turns blue due to weak TV signal reception, or green due to playback of a poorly recorded tape. | Press the ▷ STORE button.BLUE BACK▶ABCDSELECT: ↑/↓ SET: -/+HISTORY: ☑ EXIT: 0(Select by using the ⊙/⊕ button.) |
| Details of operation | TV screen |
| Check the settings, and then press the STORE button. The settings are recorded and the OSD screen will be cleared. | Press the STORE button. The OSD screen is cleared. |
| Setting the CLOCK 1 Turn on your TV set and VCR and select the video channel on the TV. When you press the “OSD” button, the SETTINGS screen will appear and the “1” (TIMER) will begin to flash. = Reference = When you press the OSD button, the OSD screen will be cleared and the normal screen will be redisplayed. | Press the OSD button. Flashing SETTINGS 2:MODE SELECTION 3:CLK 4:LANGUAGE 5:CHANNEL SELECT: ↑/↓ ENTER: ↓ EXIT: 0 |
| 2 Press the ↓ NEXT button to move the flash to CLOCK. | Press the ↓ NEXT button. SETTINGS 1:TIMER 2:MODE SELECTION 3:CLK 4:LANGUAGE 5:CHANNEL SELECT: ↑/↓ ENTER: ↓ EXIT: 0 |
| 3 When you press the STORE button, the CLOCK setting screen will appear. Set according to Steps 4 to 7 for OSD initial settings on page 9. | Press the STORE button. See Steps 4 to 7 in INITIAL SETTING OF OSD (ON SCREEN DISPLAY) |
| 4 Press the STORE button to clear the OSD screen. | Press the STORE button. The OSD screen is cleared. |
| Details of operation | TV screen |
| Selection of language to be shown on the display. 1 Turn on your TV set and VCR and select the video channel on the TV. When you press the “OSD” button, the SETTINGS screen will appear and the “1” (TIMER) will begin to flash. = Reference = When you press the OSD button, the OSD screen will be cleared and the normal screen will be redisplayed. | Press the OSD button. Flashing SETTINGS 2: TIMER 3: MODE SELECTION 4: CLOCK 5: CHANNEL SELECT: ↑/↓ ENTER: EXIT: |
| 2 Press the ↓ NEXT button to move the flash to LANGUAGE. | Press the ↓ NEXT button. HETTINGS 1: TIMER 2: MODE SELECTION 3: CLOCK 4: LANGUAGE 5: CHANNEL SELECT: ↑/↓ ENTER: EXIT: |
| 3 When you press the ↓ STORE button, the LANGUAGE setting screen will appear. Press the ↓ NEXT button to move the flash to the number of the language you desire. | Press the ↓ STORE button. ENGLISH 2:中文 3:FRANÇAIS 4:ESPAÑOL SELECT: ↑/↓ ENTER: EXIT: |
| Press the ↓ NEXT button. | |
| 4 Press the ↓ STORE button to select the language. The OSD screen will be cleared. | Press the ↓ STORE button. The OSD screen is cleared. |
SETTING THE CHANNELS
Your VCR can receive VHF channels from 44.25MHz to 295.25MHz and UHF channels from 471.25MHz to 885.25MHz for TV broadcasts. It also has 48 channel positions and allows the setting to be made for the channel positions you desire.
When the reception is poor with poor picture, or when you want to change the setting of a channel position, reset the channels according to the following instructions:
VCRs are factory preset not to indicate the 0 and 13 to 46 channel positions.
| Details of operation | TV screen | ||
| Example: Setting TV channel UHF25 to channel position 20. | Set RF/IF SYSTEM switch. Press the Ⓞ OSD button. SETTING 米: TIMER 2:MODE SELECTION 3:CLOCK 4:LANGUAGE 5:CHANNEL SELECT: ↑/↓ ENTER: ← EXIT: ⊙ | ||
| Turn on your TV set and VCR and select the video channel on the TV. | |||
| Select the broadcast system used for areas where the RF/IF SYSTEM switch is necessary. (See the setting of the broadcast system/system switches.) | |||
| RF/IF SYSTEM | |||
| Ex. | Hong Kong | I | |
| China, former USSR | D/K | ||
| Singapore, Malaysia, and Thailand | B/G | ||
| When you press the Ⓞ OSD button, the SETTINGS screen will appear and “1” (TIMER) starts flashing. Press the ↓ NEXT button and move the flash to “5” (CHANNEL). | SETTING 1:TIMER 2:MODE SELECTION 3:CLK 4:LANGUAGE 5:CHANNEL SELECT: ↑/↓ ENTER: ← EXIT: ⊙ | ||
| When you press the ☑ STORE button, the CHANNEL setting screen will appear and “SKIP-0”(channel position number) will start flashing. Set the channel position number with the ⊙ button. (Set to 20 in this example.) | Press the ☐ STORE button. CHANNEL ☐ SKIP/6-TV TUNING SELECT: ↓/↑ SET: -/+ MEMORY: ← EXIT: ⊙ Set with the ⊙ buttons. CHANNEL SKIP/6 | ||
| Details of operation | TV screen | ||
| ⑤ As you press the ↓ NEXT button, the flash will move to - - - - - - TV TUNING. The indication on the right shows the following settings. Tuning band L: Low frequency High frequency | Press the ↓ NEXT button. CHANNEL SKIP-20 TV TUNING SELECT: ↑/↓ SET: +/-+ MEMORY: EXIT: B | ||
| Tuning indicator · If you hold down the ⊕ button for a few seconds, the SKIP display will disappear, the ■ part of the indicator will begin to flash, and channel selection will be automatically done. (As the indicator reaches the right end, the tuning band changes to L(VHF/ LOW), and then in turn changes to H(VHF-HIGH) and U(UHF). Continue this operation until the broadcast channel you desire appears. (Set channel 25.) Reference: 1) Press the ⊙ or ⊕ button for fine tuning. 2) A press of the ⊙ or ⊕ but- ton stops automatic chan- nel selection. When you wish to check whether channel UHF25 tuned in on your VCR is the channel you desire, select channel 25 with your TV tuner and compare the programmes. | Hold down the ⊕ button for a few seconds TV TUNING SELECT: ↑/↓ SET: +/-+ MEMORY: EXIT: B CHANNEL SKIP-20 TV TUNING SELECT: ↑/↓ SET: +/-+ MEMORY: EXIT: B | ||
| Details of operation | TV screen |
| ⑥ When you press the STORE button, the contents of the settings are memorized and the OSD screen is cleared. | Press the STORE button. The OSD screen is cleared. |
If you wish to continue channel position setting, press the NEXT button after step ⑤ above and move the flash to CHANNEL on the first line to set the desired channel position. Afterwards, follow steps ④ to ⑤ for further setting.
Skipping channels
If there are channel positions that are not preset, you can skip them with the following procedure.
| Details of operation | TV screen |
| Example: Skip channel position 12 | Press the ➔ OSD button. |
| ① Turn on your TV and VCR, and select the video channel on your TV. | SETTINGS TIMER 2:MODE SELECTION 3:CLK 4:LANGUAGE 5:CHANNEL |
| ② Press the ➔ OSD button. The SETTINGS screen will appear and “1” (TIMER) will begin to flash. | SELECT: ↑/↓ ENTER: ← → EXIT: ← |
| ③ Press the ↓ NEXT button to move the flash to 5 (CHANNEL). | Select with the ↓ NEXT button. |
| CHANNEL | |
| ④ Press the STORE button. The CHANNEL setting screen will appear and the channel position number will start flashing. | Press the STORE button. |
| CHANNEL TV TUNING L: | |
| ⑤ Set channel positions you wish to skip with the ⊙/⊕ buttons. (Set 12 in this example.) | SELECT: ↑/↓ SET: -/+ MEMORY: ← → EXIT: ← |
| Set with the ⊙/⊕ buttons. | |
| CHANNEL | |
| ⑥ Press the CLEAR button. “SKIP-12” will light, which indicates the channel will be skipped. | Press the CLEAR button. |
| ⑦ If you wish to set more channels to be skipped, repeat Steps ⑤ and ⑥. | CHANNEL |
| ⑧ Press the STORE button. The set contents will be memorized and the OSD screen will be cleared. | Press the STORE button. |
| The OSD screen is cleared |
Note:
Channel positions that were skipped cannot be selected with the CHANNEL
/ buttons, but can be selected by using the numeric buttons (0 to 9) on the remote control.
How to cancel channel skip
| Details of operation | TV screen |
| Example: Unskip the channel position 12 | Press the OSD button. |
| Turn on your TV and VCR, and select the video channel on your TV. | SETTINGS *: TIMER 2: MODE SELECTION 3: CLOCK 4: LANGUAGE 5: CHANNEL SELECT: ↑/↓ ENTER: EXIT: ON |
| Press the OSD button. The SETTINGS screen will appear and “1” (TIMER) will begin to flash. | |
| Press the ↓ NEXT button to move the flash to “5” (CHANNEL). | Select with the ↓ NEXT button. |
| CHANNEL | |
| Press the STORE button. The CHANNEL setting screen will appear and the channel position number will start flashing. | Press the STORE button. |
| CHANNEL TV TUNING L:- SELECT: ↑/↓ SET: +/-+ MEMORY: EXIT: ON | |
| Select the channel position you wish to unskip by using the Θ/⊕ buttons. (Set 12 in this example.) | Set with the Θ/⊕ buttons. |
| CHANNEL -BKIP-12 | |
| Press the CLEAR button. The channel position will be indicated as “12” (after “SKIP-” has been cleared), which indicates that the channel skip function has been canceled. | Press the CLEAR button. |
| CHANNEL 22 | |
| If you wish to unskip more channels, repeat Steps ⑤ and ⑥. | |
| Press the STORE button. The set contents will be memorized and the OSD screen will be cleared. | Press the STORE button. |
| The OSD screen is cleared |
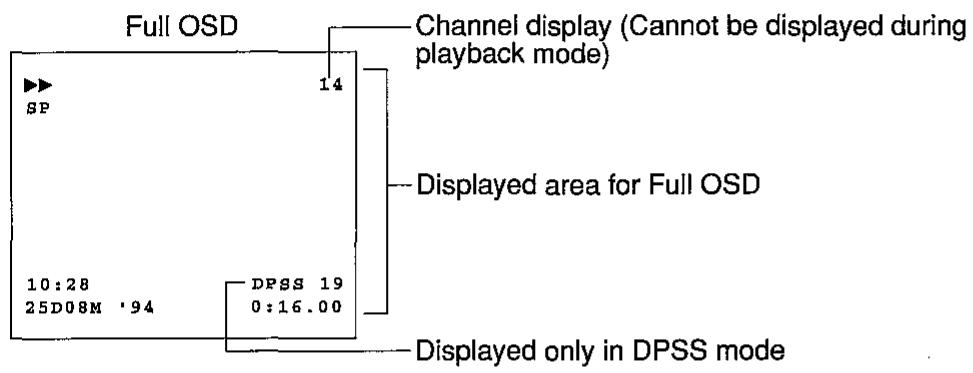
MODE OSD (ON-SCREEN-DISPLAY)
Each time the MODE OSD button is pressed, the display areas and contents change in the following way.

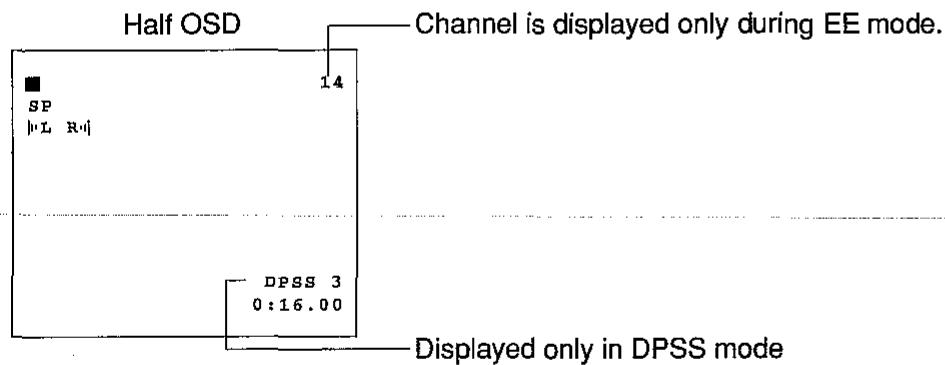
NOTE:
- In the AUTO mode, the changed items are displayed for about 3 seconds only.
- The OSD screen will not be displayed during Still Picture, Slow, Double Speed Playback, or Video Search.
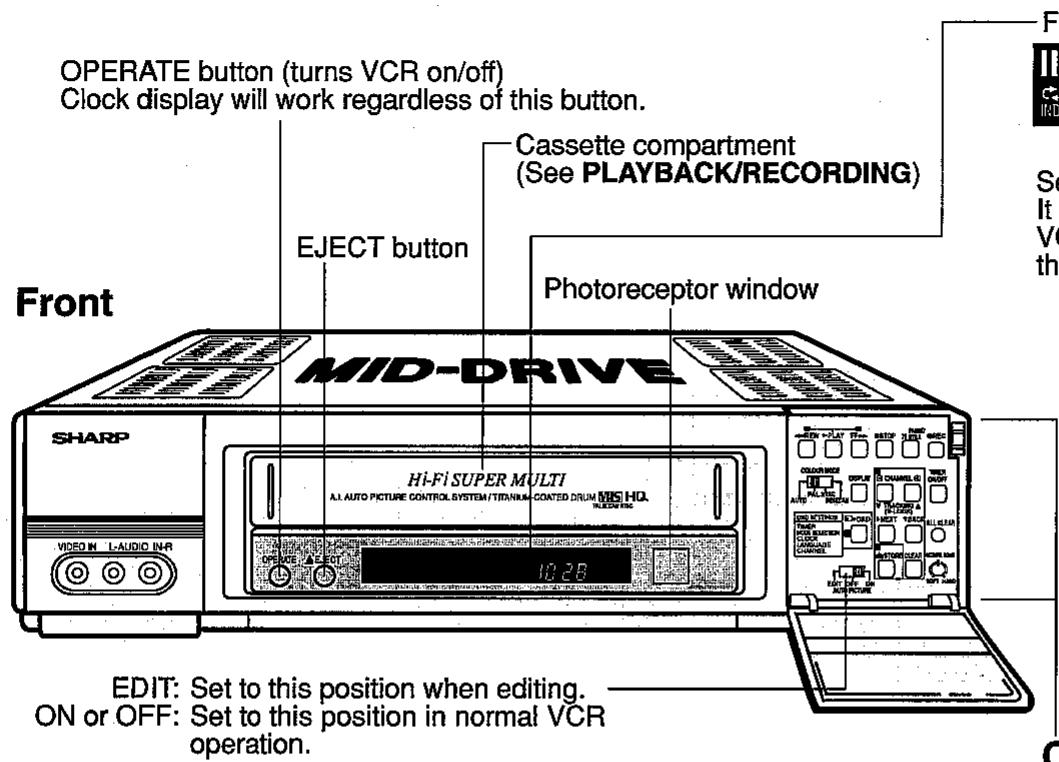
Inserting a Video Cassette
Insert the video cassette you wish to play into the cassette compartment. This will automatically turn the VCR power on.
The tape loading mechanism will remain inoperative unless the cassette is inserted properly into the cassette compartment. Do not force the cassette into the cassette compartment.
When the cassette is properly loaded into the VCR, the symbol “□” appears on the fluorescent multifunction display, with a square dot ■ shown on the TV screen. To eject the cassette from the VCR, press the EJECT button on the VCR or remote control.
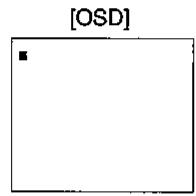
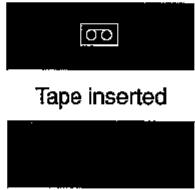
[Fluorescent display]
Empty
Playback
Turn your TV receiver ON and set it to the Video mode. Press the OPERATE switch on your VCR to turn it on.
Insert the cassette you wish to play into the cassette compartment and press the PLAY button (see FULL AUTO PLAY FUNCTION on page 19). The Auto Tracking feature starts functioning and the “▶” indicators on both the fluorescent multifunction display and the TV screen start flashing. When the Auto Tracking feature stops functioning, “▶” stops flashing to indicate that tracking is ON.
Auto Tracking feature is operating.

To stop playback, press the STOP button.
When the end of the tape is reached, the VCR automatically rewrites it to the beginning and ejects the cassette.


Quick Start with Full Loading Mechanism
This VCR features a full-loading mechanism for quick starts. The VCR enters Play or Rec. mode only a few seconds after the PLAY or REC button is pressed if the VCR is in Quick Start Standby mode. The Standby mode lasts 5 minutes after a cassette is inserted, or after the VCR exits Play or Rec. mode. In Quick Start Standby mode, the VCR enters Play or Rec. mode 5 seconds after the PLAY or REC button is pressed.
In Quick Start Standby mode, the VCR enters Play or Rec. mode 2 seconds after the PLAY or REC button is pressed.
Video Search
When you wish to quickly search for a particular portion of the video programme you are playing back, follow the steps described below:
To quickly search forward, press the FF button in Play mode; to quickly search backward, press the REW button in Play mode.

Forward Video Search

Reverse Video Search
To restore normal Play mode, press the PLAY button.
NOTES:
- In Video Search mode, the OSD (On-screen display) remains inactive.
Audio outputs are shut off. - A ▶ ▶ or ▽ indicator will appear on the fluorescent multifunction display.
- The screen may become distorted or blurred during Video Search. This does not indicate a problem with the unit.
Fast Forwarding and Rewinding
To advance or rewind the tape at much higher speed, first select Stop mode with the STOP button, then select Fast-Forward or Rewind mode with the FF or REW button. In these modes, no playback picture will appear on the screen).

Fast Foward

Rewind
Press the STOP button to stop a fast-forward or rewind operation.
Still Picture and Frame Advance
To freeze a particular scene in the video programme you are watching, press the PAUSE/STILL button in Play mode. The VCR will automatically return to the normal Play mode in about five minutes to prevent damage to the tape.

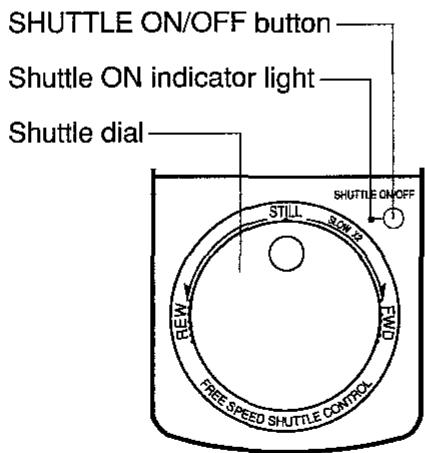
If the still picture is disturbed by a noise bar, clear it by activating the Shuttle mode with the SHUTTLE ON/OFF button, setting the shuttle dial to the SLOW position, and then pressing the TRACKING or button. When the noise bar has disappeared, press the SHUTTLE ON/OFF button again to deactivate Shuttle mode, and then press the PAUSE/ STILL button again.
If the still picture is disturbed by jittering, press the TRACKING or button until the picture stops shaking.
If you wish to view frame-advance pictures, press the F.ADV button on the remote control while the still picture is on the screen.
Press the PAUSE/STILL or PLAY button to return to normal Play mode.
NOTES:
- Still Picture and Shuttle Mode are not displayed on the OSD.
- No audio output will come out during Still Picture playback.
Playback Using the Shuttle Dial
When you wish to activate Shuttle mode, press the SHUTTLE ON/OFF button during playback.
The Shuttle dial lets you view the programme in any of the following play modes:
- Still Picture, Slow Motion (Low Speed), Slow Motion (High Speed), Normal Speed (No Audio), Double Speed, Forward Search (Low Speed), Forward Search (High Speed), Backward Search (Low Speed), and Backward Search (High Speed).
NOTES:
- The audio output will be left off while the Shuttle dial is operating in Shuttle mode.
- When the Shuttle dial is turned from the STILL to REW or from FWD to REW, a forward playback picture will momentarily appear on the screen, but this does not indicate a VCR malfunction.
- If an NTSC tape or a PAL or MESECAM tape recorded in LP mode is played back in Still Picture, Frame Advance, Slow Motion, Double Speed, or Video Search mode, the top of the picture will be distorted, but this does indicate a VCR malfunction.
- To save power, the VCR will automatically exit Shuttle mode if the Shuttle dial is not used for more than one minute.
A.I. Auto Picture Control
This VCR features an Auto Picture Control function that automatically adjusts playback pictures for the best possible picture.
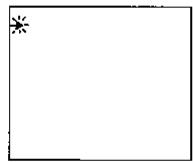
(I) Auto Tracking
The Auto Tracking mechanism automatically optimizes tracking during playback. It is activated in the following cases:
- Playback is started just after a tape is loaded.
- The TRACKING and buttons are simultaneously pressed during playback.
- The VCR enters a recorded section past a non-recorded space.
- A change in recording mode is encountered during playback (SP LP, SP EP, LP EP)
- The “ ” on both the fluorescent multifunction display and the TV screen will blink for a few seconds while the Auto Tracking mechanism is working.
- The Auto Head Tracking mechanism may not function on a tape recorded under poor conditions. In such a case, use the TRACKING / buttons to manually adjust the picture until there are as few noise bars as possible.
(II) Auto Picture Control
Playing back a high-quality tape with the AUTO PICTURE switch set to the ON position will provide playback pictures with even higher quality.

NOTE:
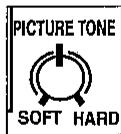
- Adjust the PICTURE TONE knob (situated behind the door) to your personal preference. Turning towards SOFT will soften the picture and decrease picture noise. Turning towards HARD will sharpen the picture but increase the picture noise.
This feature effectively suppresses video noise from noisy prerecorded video tapes to provide smooth playback pictures. To activate it, set the AUTO PICTURE switch on the VCR's concealed subpanel to the ON position.
(III) Auto Head Cleaning System
This VCR is equipped with an Auto Head Cleaning System which automatically cleans the heads whenever a video cassette is loaded or ejected.
Editing Enhancement Function
This function makes the picture on the dubbed tape closer to the original. To use this function, set the AUTO PICTURE switch to EDIT. After dubbing, reset the switch to ON or OFF.
Playing Back an NTSC Tape (NTSC PAL)
This VCR allows you to view NTSC-format tapes on your PAL-compatible TV receiver, as well as on an NTSC-compatible or multi-standard TV set.
NOTES:
It is advisable that this VCR be used, as a rule, with an NTSC-compatible TV set or with a multi-standard TV receiver with NTSC 3.58/4.43 compatibility. While the VCR is usable with a PAL-compatible TV receiver as well, please note the following restrictions:

- The vertical raster size is slightly smaller than normal. This is not a machine malfunction.
- If the PAL TV lacks a V-HOLD control, you cannot view NTSC video programmes because the vertical synchronization will remain "out." If your PAL TV has a V-HOLD control, you can enjoy NTSC videos by stabilizing the vertical sync. with the V-HOLD knob.
- Horizontal lines may appear on the screen when using special playback functions (Video Search, Still Screen, Slow Shuttle). Also, these horizontal lines may be accompanied by a loss of colour, depending on their position. Should this occur, colour can be restored by pressing the TRACKING or button while in Video Search or Slow mode.
- You cannot dub an NTSC video from this VCR onto another PAL-compatible VCR. If a tape created in this matter is played back on another PAL-compatible VCR, no picture will be displayed.
Playing Back a Tape with Hi-Fi Audio Tracks
This VCR can play back tapes with Hi-Fi audio tracks recorded in different TV standards and at different tape speeds.
| Hi-Fi audio compatibility | |||
| Tape speed | |||
| SP | LP | EP | |
| PAL | ○ | ○ | - |
| MESECAM | ○ | ○ | - |
| SECAM | ○ | ○ | - |
| NTSC | ○ | ○ | ○ |
- This VCR automatically discriminates between tapes recorded in different modes (SP, LP, EP).
- For the switch settings required to maintain compatibility with tapes recorded in different TV standards, see pages 3 and 4 of this manual.
NOTE:
Stereo and bilingual audio are available only at the AUDIO OUT jacks. The RF OUT jack yields only monaural audio.
Audio Mode Selection
AUDIO
OUT

The audio outputs at the AUDIO OUT R/L-MONO jacks are available in several different modes. The AUDIO OUT button on the remote control is used to make a selection from these modes in a cyclic sequence.
1) Normally the VCR should be placed in Hi-Fi mode, in which the indicators and are lit up on the fluorescent display and the OSD, and "l" L R "l" is displayed for some time on the TV screen.
In Hi-Fi mode the VCR can play tapes with stereo or bilingual audio (main channel from the left, and sub channel from the right).
2) Pressing the AUDIO OUT button the first time sends only the left-channel audio to both the AUDIO OUT R and L-MONO jacks.
3) Pressing the button a second time sends only the right-channel audio to both the AUDIO OUT R and L-MONO jacks.
4) Pressing it a third time sends the mono audio recorded on the linear track to both AUDIO OUT R and L-MONO jacks.
Pressing the AUDIO OUT button on the remote control selects one of four audio modes described above in a cyclic sequence.
NOTE:
- The VCR will automatically switch into mono mode from the linear audio track if the quality of the Hi-Fi audio tracks is too poor, or if the tracking is "out".
Adjusting Hi-Fi Audio Tracking
- Normally you can obtain the optimal sound automatically by using the auto tracking function.
- If the Hi-Fi audio is unstable (frequent dropouts, etc.) with a pre-recorded video or a tape recorded on another VCR or in NTSC SP mode, restore normal tracking while playing back the tape as described below:
Simultaneously press the TRACKING and buttons.
Press the TRACKING button repeatedly at short, equal intervals until the L and R indicators disappear from the fluorescent display and the OSD "L R" indicators disappear.
Press the TRACKING button in the same manner while counting the number of presses until L and R and the OSD "L R "l" indicators reappear, and then disappear again.
4 Press the TRACKING button again in the same manner half the number of times counted in step ⑥ above to obtain optimal tracking.
FULL AUTO PLAY FUNCTION
The convenient auto play feature lets you save some manual operation steps in tape playback.
When a cassette with its erasure prevention tab removed is loaded into the VCR, the deck automatically turns itself on and starts playback. When the end of the tape is reached, the VCR automatically rewinds the tape to the beginning and ejects it.
NOTE:
- When you wish to play a tape with its erasure prevention tab unremoved (or removed but covered up with tape), load the cassette (the VCR will automatically turn on), and press the PLAY button.
HOW TO USE VISS AND VISS ERASE FUNCTION
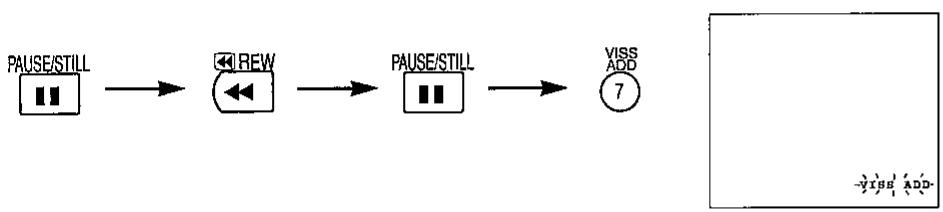
How to Use VISS ADD
Play back the tape, watch the picture and listen to the sound until you locate the place where you wish to add the VISS signal, then press the PAUSE/STILL button.
Press the REW button to perform a Reverse Video Search for about 1 second (approx. 3 to 4 seconds of playing time), then immediately press the PAUSE/STILL button to freeze the picture.
Press the VISS ADD button on the remote control. (The VCR will automatically exit the Still mode and begin playback.) About 2 seconds after playback commences, "VISS ADD" will begin flashing on the OSD. At this point, the VISS index signal is being registered.
When "VISS ADD" disappears from the OSD, registration of the VISS signal is complete.
NOTE:
- Each time the VISS ADD button is pressed, an index signal is added. Accordingly, press the button once only at each position.
- The VISS ADD function can not be used on cassettes which have the erasure prevention tab broken off, or on unrecorded portions of a tape.
- There will be no sound while the ADD function is operating. This does not indicate a malfunction.
- Do not press any other buttons while the ADD function is operating.
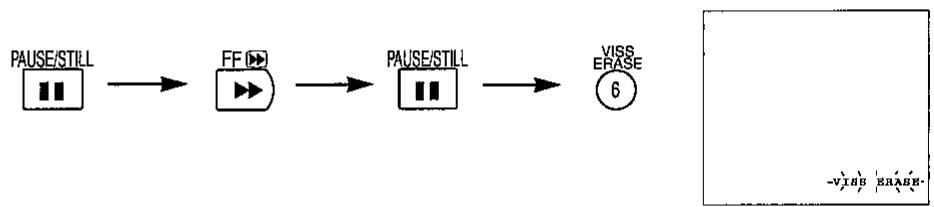
How to Use VISS ERASE
1 Find the location of the VISS signal you want to erase by using the DPSS function (see page 27).
At the tape position located in Step 1, press the PAUSE/STILL button to freeze the picture.
Press the FF button to carry out Forward Video Search for about 1 second (approx. 5 seconds of playing time), then immediately press the PAUSE/STILL button to freeze the picture.
Press the ⑥ VISS ERASE button on the remote control. The VCR will automatically change to Reverse Video Search mode and search for the VISS signal. (Approx. 7 seconds of playing time.) At this time, VISS ERASE will light up on the OSD.
Then, the VCR will automatically enter playback mode, and, after 4 to 5 seconds of playback, it will take about 10 seconds to erase the VISS signal. (During this time, VISS ERASE will flash on the OSD.)
- VISS ERASE will disappear from the OSD when VISS ERASE has been completed.
NOTE:
- Do not use the VISS ADD or ERASE functions in tape locations where there is a speed change (SP LP, LP EP) or a recording format change (PAL NTSC, PAL MESECAM, NTSC MESECAM, etc.) or at the beginning of the tape, as this may cause a disturbance in the playback picture.
- There will be no sound while the ERASE function is operating. This does not indicate a malfunction.
- Do not press any other buttons while the ERASE function is operating.
- The picture may be distorted during the VISS ADD or ERASE operation. This does not indicate a malfunction.
Cassette Erase Protection
A VHS or VHS cassette has a removable tab to prevent accidental erasure of recorded material. Removing the tab prevents recording. To record on a video cassette with the tab removed, place adhesive tape over the tab opening.
ERASURE PROTECTION TAB
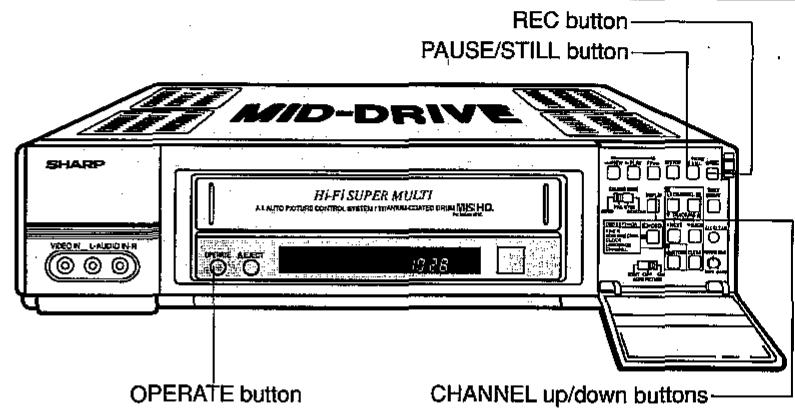
Recording a TV Programme
1 Turn on your TV and select the video channel.
Press the OPERATE button on the VCR to turn on the power.
Select one of the recording speeds: SP (standard play), LP (long play; does not work when the NTSC system is used) or EP (extended play; works only only when the NTSC system is used) by using the SP/LP-EP button on the remote control. ("SP", "LP", or "EP" lights on the display.)
Longest Recording Times by Recording Speeds and Types of Cassette Tapes
HI-FI Sound Recording Capability by Recording Speed and Tape Colour System
| Recording Speed Tape Colour System | SP | LP | EP |
| PAL | ○ | ○ | - |
| MESECAM | ○ | ○ | - |
| SECAM | ○ | ○ | - |
| NTSC | ○ | - | - |
4 Select the programme position you wish to record using the CHANNEL up/down buttons on the VCR or the remote control, or the numeric buttons (0-9) on the remote control.
Insert the cassette, making sure the erasure protection hole is covered. Press the REC button. (If the erasure protection hole is uncovered, the cassette will be ejected.) To pause while recording, press the PAUSE/STILL button. To resume recording, press the PAUSE/STILL button again. (The pause/still mode disengages automatically after about five minutes.)
NOTES:
- When you record from other equipment by using the video input terminal (VIDEO IN) and audio input terminal (AUDIO IN R/L-MONO) on the rear or the front of your VCR, select the external input position located between programme positions 47 and 0 by using the CHANNEL button on the remote control or inside the door of the VCR.
(When you select the external input position, "L1" (rear) or "L2" (front) will appear on the program position display.)
To Watch Another TV Programme While Recording
After steps 1 through 5 have been completed, select the TV programme you wish to view by using the television tuner.
At the end of the tape, your VCR will automatically stop recording, rewind the tape, and eject it.
NOTE:
- TV signals vary in different areas around the world. Set up your VCR correctly by referring to pages 3 and 4.
Selecting the input signal
Your VCR can record video and audio signals from a variety of sources. See the following table for details.
a) Tuner: Video and audio signals come from the VCR's tuner.
b) Simulcast: Set the VCR tuner to your preferred channel and press the IN-PUT button on the remote control three times to display "SIMUL" on the multifunction display. Video signals from the VCR channel will be recorded, while signals from the VCR's AUDIO IN rear terminal will be recorded on the Hi-Fi track.
c) External input: Input both video and audio signals from the external input terminal (VIDEO IN/AUDIO IN) by selecting the external input position on your VCR. Select it by pressing the INPUT button once to select "L1 (input from the rear)" or press it twice to select "L2 (input from the front)". Select L1/L2 between programme positions 47 and 0 with the channel up/down button (CHANNEL /
| Input mode | Indication | Signal recording | |||
| Video track | Normal track (sound) | Hi-Fi track | |||
| a) | Tuner | CH12 | Signals from the VCR tuner | ||
| b) | Simul- cast | CH SIMUL12 | Signals from the VCR tuner | Input signals from the AUDIO IN termi- nal of the VCR | |
| c) | External input 1 | L1 | Signals from the VI- DEO IN terminal on the rear of the VCR | Input signals from the AUDIO IN terminal on the rear of the VCR | |
| External input 2 | L2 | Signals from the VI- DEO IN terminal on the front of the VCR | Input signals from the AUDIO IN terminal on the front of the VCR | ||
Simulcast recording
Your VCR can record a TV programme and at the same time record sound from an external source (CD player, FM tuner, etc.). First, connect the external sound source to the AUDIO IN-terminal on the rear of the VCR, then set the VCR tuner to the channel you desire, and finally, press the INPUT button on the remote control to select SIMULCAST mode.
Now perform Step ③ and following for RECORDING A TV PROGRAMME.
Recording audio signals only
Your VCR can record Hi-Fi sound alone.
1 Connect a sound source (such as a CD player or FM tuner) to the AUDIO IN terminal on your VCR. (Connect nothing to the VIDEO IN terminal.)
2 Select the external input position (that is, L1 or L2).
Press the REC button.
TIMER RECORDING (OSP: ON SCREEN PROGRAMME)
Your VCR can be set to automatically record up to 8 programmes over a period of 365 days. Furthermore, it can record the a programme every day or on the same day of the week up to the capacity of the cassette.
| Details of operation | TV screen |
| Example: Programme timer 5 to record channel 8 on October 5, 1994 from 9:00 to 10:30 in the morning. The present time is 10:28 a.m., August 5, 1994. | |
| Load a cassette tape with its erasure protection tab still on. The power will automatically turn on. Make sure the VCR clock is correct. (For resetting, see Setting the CLOCK on page 12.) Turn your VCR on and select the video channel. | |
| Press the OSD button. The SETTINGS screen will appear and “1” (TIMER) will flash. | Press the OSD button. |
| Press the STORE button. The programme setting confirmation screen will appear and “i” (the timer programme number) will start flashing. • Move the flash to “5” with the Θ/⊕ buttons. | Press the STORE button. No. DATE START STOP CH SELECT: -/+ ERASE:CLEAR ENTER: ← EXIT: S Select with the Θ/⊕ buttons. ← |
| Details of operation | TV screen |
| Press the ↓ NEXT button. The TIMER SETTING screen for programme number 5 will appear and “5.08” (the day and month) will start flashing (the present date will be displayed automatically). · When you press the ⊙/⊕ button, the “day” digits will change. When you keep pressing, the “month” digits will begin to change. First set the “day” digits and then the “month” digits. (Set to the 5th of October in this example.) | Press the ↓ NEXT button. NO. 5 DAY/MONTH 5:30AM DAILY/WEEKLY START STOP CHANNEL SP/LP/EP SELECT: ↑/↓ GET: +/- MEMORY: ← EXIT: ← |
| Select with the ⊙/⊕ buttons. DAY/MONTH -5.12AM | |
| Press the ↓ NEXT button and move the flash to “ONCE”. · Pressing the ⊙/⊕ button will change the screen as follows. (Set to ONCE in this example.) | Press the ↓ NEXT button. NO. 5 DAY/MONTH 5:10 DAILY/WEEKLY START STOP CHANNEL SP/LP/EP SELECT: ↑/↓ GET: +/- MEMORY: ← EXIT: ← |
| ONCE……… →↑↓⊕ → DAILY……… →↑↓⊕ → WEEKLY……… → Same day of the week recording | Press the ↓ NEXT button. NO. 5 DAY/MONTH 5:10 DAILY/WEEKLY START STOP CHANNEL SP/LP/EP SELECT: ↑/↓ GET: +/- MEMORY: ← EXIT: ← |
| Press the ↓ NEXT button to move the flash to “10:28” (START time). (The present time will be displayed automatically.) · When you press the ⊙/⊕ button, the “minute” digits will change. When you keep pressing, the “hour” digits will begin to change. First set the “hour” digits and then “minute” digits. (Set to 9:00 in this example.) | Press the ↓ NEXT button. NO. 5 DAY/MONTH 5:10 DAILY/WEEKLY START STOP CHANNEL SP/LP/EP SELECT: ↑/↓ GET: +/- MEMORY: ← EXIT: ← |
| Select with the ⊙/⊕ buttons. START +5:00- | |
| Press the ↓ NEXT button. The flash will move to “9:00” (STOP time). (The START time will be automatically indicated.) • Press the ⊙/⊕ button to set as in START time setting. (Set to 10:30 in this example.) | Press the ↓ NEXT button. ↓ |
| No. 5 DAY/MONTH 5.10 DAILY/WEEKLY ONCE START 9:00 STOP -9:00 CHANNEL SP/LP/EP SELECT: ↑/↓ SET: +/- MEMORY: ← EXIT: ← | |
| Set by using the ⊕ button. ↓ STOP -20:30- | |
| Press the ↓ NEXT button. The flash will move to “00” (CHANNEL). • Press the ⊙/⊕ button to set the channel. (Set to 0, 8 in this example). NOTES: • When you record from other audiovisual equipment or perform simulcast recording, press the INPUT button on the remote control to set the flash to the input you desire. INPUT "L1" (Rear external input) INPUT "L2" (Front external input) | Press the ↓ NEXT button. ↓ No. 5 DAY/MONTH 5.10 DAILY/WEEKLY ONCE START 9:00 STOP 10:30 CHANNEL -00 SP/LP/EP SELECT: ↑/↓ SET: +/- MEMORY: ← EXIT: ← |
| Set by using the ⊙/⊕ button. ↓ CHANNEL -06- | |
| Press the ↓ NEXT button. The flash will move to “SP” (tape speed). • Set the tape speed with the ⊙/⊕ button. (Set to SP in this example.) | Press the ↓ NEXT button. ↓ |
| No. 5 DAY/MONTH 5.10 DAILY/WEEKLY ONCE START 9:00 STOP 10:30 CHANNEL 08 SP/LP/HP 未 | |
| SELECT: ↑/↓ SET: +/- MEMORY: ← EXIT: ← |
| Details of operation | TV screen |
| Make sure the set programme is correct and then press the STORE button. The screen will change to the programme confirmation screen. | Press the STORE button. NO. DATE START STOP CH 5.10 9:00 10:30 89P SELECT: -/+ BRAGE:CLEAR ENTER: ↓ EXIT: 5 |
| To set other timer programmes, repeat Steps 5 to 12. | |
| Pressing the OSD button will clear the OSD screen. | Press the OSD button. The OSD screen is cleared |
| To set the timer recording, press the TIMER ON/OFF button. Make sure the TIMER lights on the fluorescent multifunction display. | VCR display 1028 |
Key to easy setting
If you use the numeric buttons (0 to 9 and % buttons) on the remote control, you can set the timer programme more easily. For setting, see Key to easy setting on page 10.
NOTES:
- If the video cassette runs out before recording all the programmes, your VCR will stop, eject the cassette, and shut off automatically.
- If power is interrupted for more than 20 minutes (power failure, etc.), all timer settings will be cancelled.
- If the TIMER ON/OFF button is pressed when there is no cassette loaded, "TIMER" flashes for 5 seconds, indicating that timer recording is not possible.
- If the TIMER ON/OFF button is pressed while a cassette with an uncovered erasure protection hole is loaded, "TIMER" flashes and the cassette is ejected.
- When "TIMER" is lit, regular VCR operation, clock setting and setting/cancelling/ confirming timer positions are not possible. For regular VCR operation, clock setting and setting/cancelling/confirming timer positions, press the TIMER ON/OFF button to disengage the timer ("TIMER" disappears), and then turn on your VCR.
- During timer recording, the timer cannot be set or checked.
- To terminate timer recording, press the STOP button during timer recording.
- If no buttons are pressed within one minute while setting a timer programme, the mode automatically returns to the previous mode.
- If the same time is input for the start time and the stop time, the timer setting will be cancelled.
CONFIRMING TIMER PROGRAMMES
You can see a list of all timer programmes that are already set on the OSD screen.
| Details of operation | TV screen |
| ① Turn on your TV and VCR and select the video channel on the TV. | |
| ② Press the OSD button. The SETTINGS screen will appear and “1” (TIMER) will flash. | Press the OSD button. ↓ SETTINS ★: TIMER 2: MODE SELECTION 3: CLOCK 4: LANGUAGE 5: CHANNEL SELECT: ↑/↓ ENTER: ↓ EXIT: ↓ |
| ③ Press the STORE button. The screen for confirming programmes that have been set will appear and “1” (the programme number) will start flashing. • Check the information displayed. | Press the STORE button. ↓ No. DATE START STOP CH 5.10 9:00 10:30 8SP SELECT: -/+ ERASE:CLEAR ENTER: + EXIT: |
| ④ Pressing the OSD button will clear the screen. | Press the OSD button. ↓ The OSD screen is cleared |
CANCELLING TIMER PROGRAMMES
Perform the following procedure to cancel timer programmes that have already been set.
| Details of operation | TV screen |
| Turn on your TV and VCR and select the video channel on the TV. | |
| Press the OSD button. The SETTINGS screen will appear and "1" (TIMER) will flash. | Press the OSD button. |
| SETTINS 米: TIMER 2: MODE SELECTION 3: CLOCK 4: LANGUAGE 5: CHANNEL SELECT: ↑/↓ ENTER: ↓ EXIT: □ | |
| Press the STORE button. The screen for confirming timer recording programmes that have been set will appear, and "1" (the programme number) will start flashing. • Select the programme number you wish to cancel with the ⊙/ ⊙ buttons. (Cancel No. 5 in this example.) | Press the STORE button. No. DATE START STOP CH 5.10 9:00 10:30 8SP SELECT: -/+ ERASE: CLEAR ENTER: ↓ EXIT: □ Set by using the ⊙/ ⊙ button. 弹 5.10 9:00 10:30 8SP |
| Double-check that it is the programme you wish to cancel, and press the CLEAR button. It will be cleared on the screen. | Press the CLEAR button. 弹 |
| Press the OSD button. The OSD screen will be cleared. | Press the OSD button. The OSD screen is cleared |
There are two ways to use this Simple Recording Timer for your convenience.
- Immediate recording:
Convenient when having an unexpected visitor or telephone call. - Delayed recording:
Convenient when leaving the house or going to bed.
Immediate Recording
Example: Present time: 10:28 (morning)
Ending time: 11:30 (morning), Channel position: 2
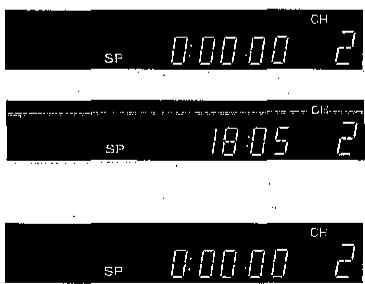
| Details of operation | Multifunction display |
| 1 Select the channel position to be recorded. | CH 0:15:12 2 |
| 2 Press the button to start recording and set the desired ending time. • Each time the button is pressed, the ending time is postponed by 10 minutes. • Press the ⊕ or ⊙ button to adjust the minutes if necessary. | CH 11:30 2 |
NOTES:
- Press the STOP button to terminate recording.
- Immediate recording can begin only in the stop mode. During normal recording, the button and the or button can be used to set the ending (finish) time.
Delayed Recording
| Example: Present time: 10:28 (morning) Starting time: 10:40, Ending time: 11:30 (morning) Channel position: 2 | |
| Details of operation | Multifunction display |
| 1 Select the channel position to be recorded. | CH [FR] SP 0 15 12 2 |
| 2 Press the TIME button to set the starting time. • Setting the time within a 24-hour period in 10-minute intervals is possible. • Press the ⊕ or ⊙ button to adjust the minutes if necessary. | [FR] SP -10 40 CH [FR] SP -11 30 CH [FR] SP -11 30 |
| 3 Press the ☐ button to set the ending time. • Each time the button is pressed, the ending time is postponed by 10 minutes. • Press the ⊕ or ⊙ button to adjust the minutes if necessary. | [FR] SP -11 30 CH [FR] SP -11 30 |
| 4 Press the OPERATE button to turn off the power. | [FR] 10 28 |
NOTES:
- After the Simple Recording Timer is set, the channel position cannot be changed.
- To confirm the starting time and the ending time, first press the OPERATE button to turn on the power. Then press the TIME button to confirm the starting time and press the l button to confirm the ending time. Press the OPERATE button to turn off the power.
- To clear the Simple Recording Timer setting during setting, press the CLEAR button on the remote control. To clear after setting, turn on the power, press the TIME button to select Simple Recording Timer mode, and then press the CLEAR button.
- The Simple Recording Timer cannot be set if the timer has been preset ("TIMER" indicator on the display is lit). If this is the case, cancel the timer stand-by mode by pressing the TIMER ON/OFF button, turn on the power and then proceed with setting of the Simple Recording Timer.
ZERO-BACK FUNCTION SPECIAL FUNCTIONS
The Zero Back function rewrites (or fast forwards) the tape to the position previously set to "0:00.CO" on the counter.
Press the ZERO BACK button on the remote control. The VCR automatically detects the direction of the "0:00.00" position and fast forwards (or rewinds) the tape.
When the tape reaches the "0:00.00" position, the tape automatically stops.
NOTE:
The zero-back function does not operate during recording. The function works during the playback, stop, fast forward, rewind and video search modes.
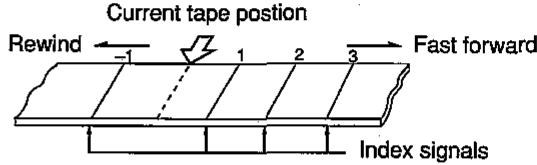
DPSS (DIGITAL PROGRAMME SEARCH SYSTEM)
With this feature you can quickly locate a desired section of the tape. The DPSS feature makes use of index signals to search for a specified tape segment and begin playback automatically.
Index Signal
- The index signal is automatically recorded on the tape at the start of ordinary recording, Simple Recording Timer and ordinary timer recording. It may also be input by pressing the REC button during recording.
- You can write in a VISS signal during playback by using the VISS ADD function. (See page 20, How to Use VISS ADD and How to Use VISS ERASE.)
| Details of operation | TV screen |
| Example: Begin playback of the third programme after the current one. (The third programme's index signal is used to find the start.) | (Press the DPSS ➔ or ← button.) |
| Load a tape containing index signals into the VCR. | |
| Select the index number of the desired programme using the DPSS ➔ or ← button on the remote control. With each press of the button the number changes. One of 19 programmes can be selected in either direction. ➔: fast forward, ←: rewind (In this example, press ➔ three times.) | DPSS 3 (Blank means plus - means minus) |
| Search starts immediately after you release the button. (When a signal is located, the displayed number decreases.) | indication |
| When the selected index signal-encoded section is found, playback begins automatically. |
NOTES:
- DPSS may not function properly if the index signals are too close together (within 5 minutes of each other).
- DPSS can be cancelled by pressing the PLAY, STOP, REC, FF or REW button.
- If the tape reaches its end or is rewound completely before locating the desired index signal, DPSS is cancelled.
- DPSS may not function for damaged or worn tapes.
- The DPSS function cannot be used with tapes that contain no index signals.
- The starting point of a programme may vary slightly.
- DPSS does not operate during the slow, still, record, timer stand-by, and timer recording modes, or when there is no cassette loaded.
RANDOM REPEAT
The Random Repeat mode allows you to play back the desired video programme or scene repeatedly any number of times.
| Details of operation | Multifunction display |
| To activate Random Repeat mode, press the REPEAT button on the remote control at the beginning of the section to repeat. The repeat symbol on the multifunction display will start blinking. | Press the按钮 PALL 0:15:13 0:15:13 |
| Press the REPEAT button again at the end of the section to repeat. The repeat symbol will stop blinking. | Press the按钮 PALL 0:15:50 0:15:50 |
| The VCR repeats the specified section indefinitely until the STOP button is pressed. |
- Random Repeat mode will be cancelled if you press the STOP button during the Random Repeat mode.
Beginning
End

Press REPEAT button.
Press REPEAT button again.
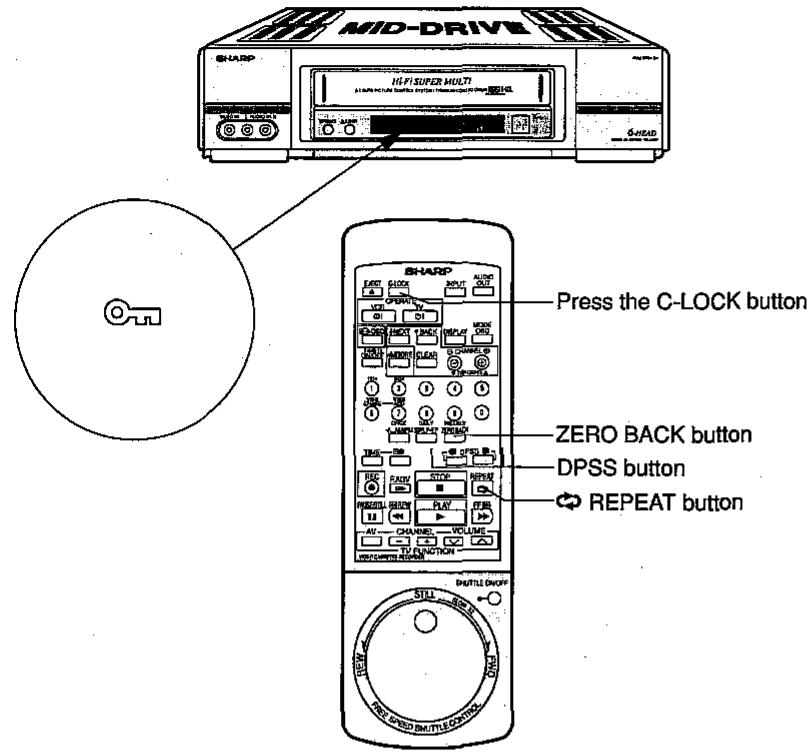
Operation Lock-Up Feature
- The C-LOCK button on the remote control, when pressed in the power-on state, locks the VCR's operating mode. This lock-up state remains effective until the button is pressed a second time.
Exception:
Slide switches remain effective after Child Lock mode is activated.
Power Off Lock
- When you wish to lock the VCR in the power-off state, press the C-LOCK button on the remote control after switching the VCR off. The VCR will remain off even when its power switch is pressed.
| Details of operation | Multifunction display |
| Example: Activating child lock during playback: | Press and hold the @ button |
| 1 Press and hold the C-LOCK button on the remote control for about 2 seconds, and the key symbol @ on the multifunction display will start blinking. | SP |
| 2 The key symbol @ stops blinking, indicating that child lock is activated. | SP |
| 3 Once child lock is activated, the VCR will maintain Play mode when any button other than the C-LOCK button is pressed. | Press and hold the @ button |
| To clear child lock, use either of the following methods: • Press and hold the C-LOCK button on the remote control for about 2 seconds. The key symbol @ on the multifunction display will start blinking, then go off. • Press the ALL CLEAR button on the VCR's concealed subpanel (this method should not be used too frequently). | SP |
NOTES:
- If the VCR's ALL CLEAR button is used to clear child lock, the real-time clock, timer, and OSD memories will also be cleared.
- If the VCR is unplugged from its outlet, the child lock will remain effective for as long as the battery backup is effective (20 minutes minimum). To clear child lock, use one of the two methods described above.
MULTI-FUNCTION DISPLAY

Operation mode indicator
| Mode | Indication |
| Cassette tape loaded | OO |
| Wind (FF) | ▶▶ |
| Rewind | ▲▲ |
| Playback, double speed playback | ▶ |
| Forward video search | ▶▶ |
| Reverse video search | ▲▲ |
| Mode | Indication |
| Slow playback | ▲ |
| Still/Frame advance | II / III▲ |
| Record | ▲ REC |
| REC Pause | II REC |
Dew indicator
| Mode | Indication |
| Dew inside | JE W |
Using the linear tape counter
Tape movement can be shown in hours, minutes, and seconds with the 5-digit display. Changing of the display, and counter clearing are performed with the remote control.
Counter display
Press the OPERATE button to turn on the power. (The tape counter is displayed.)
Press the DISPLAY button on the remote control or the VCR. (The present time is displayed.)
Press the DISPLAY button again. (The tape counter is displayed.)
Clearing the counter
Make sure the counter is displayed on the fluorescent multifunction display, then press the CLEAR button on the VCR or the remote control. "0:00.00" will appear on the display.
NOTE:
- When a tape is completely rewound, the counter will reset to "0:00.00."
- To reset the linear tape counter to "0:00.00", press the CLEAR button while the linear tape counter is displayed.
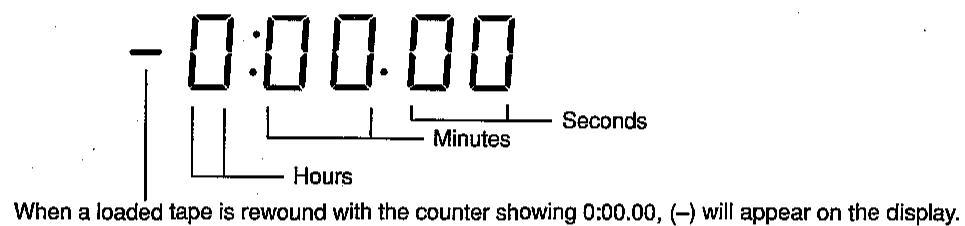
The position of the tape when the tape is loaded.

- When a tape that is not completely rewound to the start is loaded and rewound, the linear tape counter will indicate “-”.
- When a unrecorded tape or unrecorded part of a tape is played back, the counter numbers will not change.
Counter display during timer recording
The display during Simple Recording Timer recording and timer recording shows the time when recording will end. This display will change as follows when the DISPLAY button is pressed.
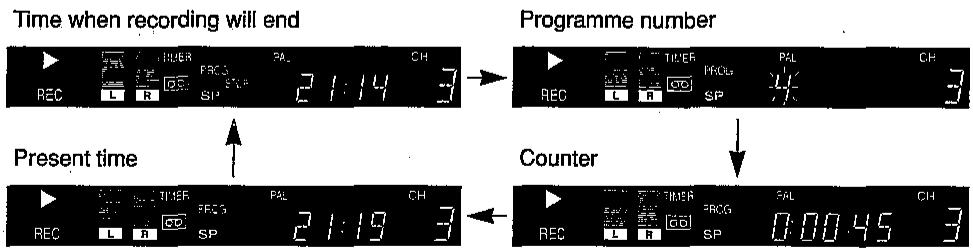
NOTE:
The programme number will not appear during Simple Recording Timer recording. "□" will flash instead of "TIMER" on the display during Simple Recording Timer recording.
USING YOUR VCR WITH A VIDEO CAMERA
You can also use your VCR with a video camera. The connection diagram below is only a guideline. Refer to your video camera operation manual for precise connection information.

EDITING FROM OTHER VIDEO EQUIPMENT
The following problems do not always denote a broken VCR. Therefore, perform the checks described below before calling for service.
| Problem | Suggested Solution |
| ·No power. LED indicator does not light. ·Tape cannot be ejected. | ·Make sure the AC power cord is properly plugged into the wall socket and the AC power cord socket on the rear of the VCR. ·Check the AC outlet, fuse or circuit breaker. ·Turn on power. ·Press the TIMER ON/OFF button to disengage the timer. |
| ·VCR does not operate even if LED indicator is lit. | ·Dew inside. Wait until the DEW indicator goes out. ·Press the EJECT button several times. ·Safety device in VCR is functioning. Unplug VCR and plug in again after about one minute. |
| ·VCR does not record. | ·Cassette erasure protection tab has been removed. Use a different cassette or place adhesive tape over the tab opening. ·Check if a cassette is loaded. |
| ·Cassette is automatically ejected when pressing REC, ☐● or TIMER ON/OFF button. | ·Cassette erasure protection tab has been removed. Use a different cassette or place adhesive tape over the tab opening. |
| ·No colour or poor TV picture during normal viewing. | ·Make sure all the cables are correctly connected. ·Make sure the VCR power cord is properly plugged in. ·Set the COLOUR MODE, NTSC MODE, SECAM MODE and SYSTEM switches to match the broadcast system and TV. (Refer to pages 3 and 4.) |
| ·Snowy picture appears on TV during playback. | ·Press the TRACKING buttons or try a different cassette. ·The heads may be contaminated with condensed moisture or magnetic coating from the video tape. (If this is the case, the heads need to be cleaned. Ask the retailer or a Sharp approved service centre.) This VCR has a built-in full auto head cleaning mechanism, however, there are some environments in which head cleaning can not be carried out completely. |
| ·No tape movement. | ·Make sure the VCR is not in pause/still mode. ·Make sure the tape has not reached the beginning or end. |
| Problem | Suggested Solution |
| ·No picture appears or colour is not correct dur ing playback. | ·Make sure the TV is set to the same channel as the VCR radio frequency converter output chan- nel adjuster (CHANNEL).·Check all connecting cables.·Set the COLOUR MODE, NTSC MODE,SECAM MODE and SYSTEM switches to match the tape and TV. (Refer to pages 3 and 4.) |
| ·Cassette cannot be load- ed. | ·Make sure there is no other cassette inside.·Make sure the cassette is correctly positioned and then reinsert. |
| ·Picture does not change even though CHANNEL up/down buttons are pressed. | ·Make sure the VCR is not in the timer setting or clock setting mode. |
| ·The multifunction display does not operate properly. | ·Press the ALL CLEAR button and set the clock again. Set the timer again if necessary. |
| ·No operation when any button is pressed. | ·Make sure that the Child-Proof Lock is not engaged. |
| ·Selected programme pos-sition does not appear. | ·The channel may have been set to be skipped. Cancel the skip setting for that channel. |
| ·No colour appears during video search and the like. | ·When a tape is recorded in the LP mode in the SECAM or MESECAM system, the picture is discoloured during video search, still and similar modes. However, this does not indicate a malfunction. |
| ·Picture is skewed. | ·If a tape is recorded in the LP mode (regardless of whether it is a SECAM, MESECAM or PAL tape), the picture is skewed during video search. However, this does not indicate a malfunction. |
Format: VHS PAL/SECAM/NTSC standard
Video recording system: Two rotary head helical scan system, VHS, Hi-Fi
Video signal:
PAL: PAL System-B/G (Playback/Recording)
PAL: PAL System-I (Playback/Recording)
PAL: PAL System-D/K (Playback/Recording)
SECAM: SECAM/MESECAM System B/G, D/K·K1
(Playback/Recording)
NTSC: NTSC4.43 (Playback/Recording)
NTSC: NTSC System M (NTSC 3.58) (Playback/Recording)
Recording/playing time: 480 minutes max. with E-240 tape (PAL/ MESECAM)
480 minutes max. with T-160 tape (NTSC)
Tape width: 12.7mm
Tape speed: PAL/SECAM/MESECAM
23.39mm/sec (SP) 11.70mm/sec (LP)
NTSC
33.35mm/sec (SP) 16.68mm/sec (LP: Playback
only), 11.12mm/sec (EP: Playback only for Hi-Fi)
Antenna: 75 ohm unbalanced
Receiving channel: VHF: E2-E12 UHF: E21-E69
European CATV: S1-S20
VHF: US2-US13 UHF: US14-US83
CATV: A-5 to A-1, A-W
VHF-Band: 44.25MHz-295.25MHz (44.25-111MHz when
V-LO is displayed/111-295.25MHz when V-HI is
displayed)
UHF-Band: 471.25MHz-885.25MHz
RF converter output signal: E30-E39 (adjustable). VC-H92: Preset to channel E36 (VC-H92ETS: Preset to E39).
US26-US38(adjustable).VC-H92: Preset to channel US34 (VC-H92ETS: Preset to US38).
J25-J37 (adjustable). VC-H92: Preset to channel J33 (VC-H92ETS: Preset to J37).
C22-C26 (adjustable). VC-H92: Preset between C24-C25 (VC-H92ETS: Preset to C26).
Power requirement: AC110-240V, 50/60Hz
Power consumption: Approx. 22W
Operating temperature: 5^ to 40^
Storage temperature: -20^ to 60^
Weight: 4.5kg
Dimensions: 380mm(W) × 320.7mm(D) × 89.8mm(H)
Video input: 1.0Vp-p, 75ohm
Video output: 1.0Vp-p, 75ohm
Audio input: Phonojack: -8dBs/-4dBs (approx.), switchable, 47
kohm
Audio output: Phonojack: -8dBs, 1kohm
Supplied accessories: 75 ohm coaxial cable, operation manual, remote
control unit, R6 (AA, UM/SUM-3) battery × 2 , audio
cable × 1 video cable × 1
PARTICULARITES
ANNULATION D'UNE PROGRAMMATION
m = 311
中
A
13/14
13/14
A

13/14
13/14
13/14
A
中
再生モーネドにSHUTTLE ON/OFF求たなを押てシャトルONモーネドといたします。(拉丁が点灯状態)
27shutulduyayu回tfofofofofofofofofofofofofofofofofofofofofofofofofofofofofofofofofofofofofofofofofofofofofofofofofofofofofofofofofofofofofofofofofofofofofofo

EDIT OFF ON AUTO PICTURE
乙注意:
113> 醫半孕之(次)興
① AD = BD = 2 AB = AC = 2
(NTSC)33.35mm/sec (S P) 16.68mm/sec (L P:再生の可能)
11.12mm/sec (EP:Hi-Fi音声は再生のみ可能)
75Ω不均衡
受信徳ル:VHF:E2-E12 UHF:E21-E69
[ \exists -\text{一口} \text{口} \text{CATV}: S1 \sim S20 ]
VHF:US2-US13 UHF:US14-US83
(CATV:A-5~A-1、A~W)
VHF:J1-J12 UHF:J13~J62
VHF:C1-C12 UHF:C13~C57
NICAM方式:NICAM-I
VHFpanD:44.25MHz-295.25MHz(V-LO:44.25\~111MHz/V-HI:111\~
295.25MHz)
UHFVIND:471.25MHz-885.25MHz
2100: 196- V rnnip, 5r4f
1100: -vrrn/-rnn(mn),nirn,A3
2157
111111:
$$ 1 8 \times 7 9: \quad \cdot v _ {\lambda} \circledast (\sigma \circ \sigma) \times \lambda^ {\prime} \cdot \lambda_ {h} \circledast (\sigma \circ \sigma) \times v ^ {\prime} b \vee \circledast (1 8 2 7) $$
$$ 1 5 ^ {\circ} C: \quad 0 ^ {\circ} 3 5 ^ {\circ} $$
$$ r r r r r r r r r r r r r r r r r r r r r r r r r r r r r r r r r r r r r r r r r r r r r r r r r r r r r r r r r r $$
$$ r r \dot {r} _ {2} = r g _ {\text {什 么 做}}: \quad 0. 0 1 f \cdot 3. 0 $$
$$ \left| \begin{array}{l l} \end{array} \right| = \left| \begin{array}{l l} \end{array} \right| $$
$$ \left. \right.\left. \right.\left. \right.\left. \right.\left. \right.\left.\left.\left.\left.\left.\left.\left.\left.\left.\left.\left.\left.\left.\left.\left.\left.\left.\left.\left.\left.\left.\left.\left.\left.\left.\left.\left.\left.\left.\right.\right.\right.\right.\right.\right.\right.\right.\right.\right.\right.\right.\right.\right.\right.\right.\right.\right.\right.\right.\right.\right.\right.\right.\right.\right.\right.\right.\right. $$
$$ 1 5 7 \div 2 = 2 \dots 1 5 7 \dots 1 5 7 \dots 1 5 7 \dots 1 5 7 \dots 1 5 7 \dots 1 5 7 \dots 1 5 7 \dots 1 5 7 \dots 1 5 7 \dots 1 5 7 \dots 1 5 7 \dots 1 5 7 \dots 1 5 7 \dots 0. $$
$$ \alpha \lambda^ {\prime} \wedge 3 \overline {{\alpha}} \overline {{\gamma}} \overline {{\gamma}} \overline {{\gamma}} - \alpha^ {\prime} \circ \gamma \gamma \overline {{\gamma}} \overline {{\gamma}} $$
$$ \because \bar {a} ^ {\prime} = \bar {b} ^ {\prime} = 1 5 ^ {\prime \prime} =: \quad o a ^ {\prime} 3 3 o r t e r e - o b a o b a o r t e r e c (o a ^ {\prime} 3 3 - 1 1 1 o r t e r e c o n n s c e n s s) - 1 5 ^ {\prime} (O T - A) o r t e r e / 1 1 1 - o b a o b a o r t e r e c o n n s c e n s c e n s ? - 1 5 ^ {\prime} (H - A) o r t e r e / 2 $$
$$ \left. \right.\left. \right.\left. \right.\left. \right.\left. \right.\left.\left.\left.\left.\left.\left.\left.\left.\left.\left.\left.\left.\left.\left.\left.\left.\left.\left.\left.\left.\left.\left.\left.\left.\left.\left.\left.\left.\left.\right.\right.\right.\right.\right.\right.\right.\right.\right.\right.\right.\right.\right.\right.\right.\right.\right.\right.\right.\right.\right.\right.\right.\right.\right.\right.\right.\right.\right. $$
$$ \left. \right.\left. \right.\left. \right.\left. \right.\left. \right.\left. \right.\left. \right.\left. \right.\left. \right.\left. \right.\left. \right.\left. \right.\left. \right.\left. \right.\left. \right.\left. \right.\left. \right.\left. \right.\left. \right.\left. \right.\left. \right.\left. \right.\left. \right.\left. \right.\left. \right.\left. \right.\left. \right.\left. \right.\left.\left.\left.\left.\left.\left. \text {H A} : = ^ {\prime} = ^ {\prime} = ^ {\prime} = ^ {\prime} = ^ {\prime} = ^ {\prime} = ^ {\prime} = ^ {\prime} = ^ {\prime} = ^ {\prime} = ^ {\prime} = ^ {\prime} = ^ {\prime} = ^ {\prime} = ^ {\prime} = ^ {\prime} = ^ {\prime} = ^ {\prime} = ^ {\prime} = ^ {\prime} = ^ {\prime} \right) : = ^ {\prime} = ^ {\prime} = ^ {\prime} = ^ {\prime} = ^ {\prime} = ^ {\prime} = ^ {\prime} = ^ {\prime} = ^ {\prime} = ^ {\prime} = ^ {\prime} = ^ {\prime} = ^ {\prime} = ^ {\prime} = ^ {\prime} = ^ {\prime} = ^ {\prime} = ^ {\prime} = ^ {\prime} = ^ {\alpha} \right) : = ^ {\prime} = ^ {\prime} = ^ {\prime} = ^ {\prime} = ^ {\prime} = ^ {\prime} = ^ {\prime} = ^ {\prime} = ^ {\prime} = ^ {\prime} = ^ {\prime} = ^ {\prime} = ^ {\prime} = ^ {\prime} = ^ {\prime} = ^ {\prime} = ^ {\prime} = ^ {\prime} = ^ {\prime}\right)\right]\right]\right] $$
$$ \left. \right.\left. \right.\left. \right.\left. \right.\left. \right.\left. \right.\left. \right.\left. \right.\left. \right.\left. \right.\left. \right.\left. \right.\left. \right.\left. \right.\left. \right.\left. \right.\left. \right.\left. \right.\left. \right.\left. \right.\left. \right.\left. \right.\left. \right.\left. \right.\left. \right.\left. \right.\left. \right.\left. \right.\left. \right.\left. \right.\left. \right.\left. \right.\left. \right.\left. \right. \text {的} ^ {\prime} = 1 - 1 - 1 - 1 - 1 - 1 - 1 - 1 - 1 - 1 - 1 - 1 - 1 - 1 - 1 - 1 - 1 - 1 - 1 - 1 - 1 - 1 - 1 - 1 - 1 - 1 - 1 - 1 - 1 - 1 - 1 - 1 - 1 - 1 - $$
$$ \left. \right.\left. \right.\left. \right.\left. \right.\left. \right.\left. \right.\left. \right.\left. \right.\left. \right.\left. \right.\left. \right.\left. \right.\left. \right.\left. \right.\left. \right.\left. \right.\left. \right.\left. \right.\left. \right.\left. \right.\left. \right.\left. \right.\left.\left.\left.\left.\left.\left.\left.\left.\left.\left.\left.\left. \text {I I} ^ {\prime} = 1 ^ {\prime} + 1 ^ {\prime} + 1 ^ {\prime} + 1 ^ {\prime} + 1 ^ {\prime} + 1 ^ {\prime} + 1 ^ {\prime} + 1 ^ {\prime} + 1 ^ {\prime} + 1 ^ {\prime} + 1 ^ {\prime} + 1 ^ {\prime} + 1 ^ {\prime} + 1 ^ {\prime} + 1 ^ {\prime} + 0 ^ {\prime} + 1 ^ {\prime} + 1 ^ {\prime} + 1 ^ {\prime} + 1 ^ {\prime} + 1 ^ {\prime} + 1 ^ {\prime} + 1 ^ {\prime} + 1 ^ {\prime} + 1 ^ {\prime} + 1 ^ {\prime} + 1 ^ {\prime} + 1 ^ {\prime} + 1 ^ {\prime} + 1 ^ {2} - 1 ^ {2} + 1 ^ {2} + 1 ^ {2} + 1 ^ {2} + 1 ^ {2} + 1 ^ {2} + 1 ^ {2} + 1 ^ {2} + 1 ^ {2} + 1 ^ {2} + 1 ^ {2} + 1 ^ {2} + 1 ^ {2} + 1 ^ {2} + 1 ^ {2} + 0 ^ {2} + 0 ^ {2} + 0 ^ {2} + 0 ^ {2} + 0 ^ {2} + 0 ^ {2} + 0 ^ {2} + 0 ^ {2} + 0 ^ {2} + 0 ^ {2} + 0 ^ {2} + 0 ^ {2} + 0 ^ {2} + 0 ^ {2} + 0 ^ {\prime}\right) - \right. - \right. - \right. - \right. - \right. - \right. - \right. - \right. - \right. - \right. - \right. - $$
$$ \left| \int_ {0} ^ {\pi} \cos^ {2} \frac {1}{x} \right| = 0 \text {人} \left| \int_ {0} ^ {\pi} \sin^ {2} \frac {1}{x} \right| < 0 $$
$$ \frac {1}{2} \left(\frac {1}{2} - \frac {1}{2}\right) \frac {1}{2} \left(\frac {1}{2} - \frac {1}{2}\right) \frac {1}{2} \left(\frac {1}{2} - \frac {1}{2}\right) \frac {1}{2} \left(\frac {1}{2} - \frac {1}{2}\right) $$
$$ b \lambda^ {\prime} \lambda \lambda^ {\prime} / q _ {1 2} ^ {2} (\text {o v e r s e g m a} _ {d S}) \cdot \Lambda^ {\prime} \backslash \backslash \backslash / q _ {1 2} ^ {2} (\text {o v e r s e g m a} _ {d T}) $$
$$ \mathrm {m} ^ {\prime} \mathrm {m} _ {2} \mathrm {m} _ {1} \mathrm {m} _ {0} \mathrm {m} _ {3}: \quad \mathrm {m} _ {1} / \mathrm {m} _ {2} \mathrm {m} _ {3} / \mathrm {m} _ {0} \mathrm {m} _ {1} $$
$$ \because \angle A B D = 1 8 0 ^ {\circ} $$
$$ \cdot V 3 \text {r e g} _ {2} ^ {\prime} S T E L E O ^ {-} \rightarrow \text {T r a p} _ {2} ^ {-} = \cdot L i (1) ^ {n} $$
$$ \because \sqrt {3} \text {r e g u l a r} \sqrt {1 5 0} - 3. 5 (\sqrt {1 7} - 3. 5) $$
$$ \left(\mathcal {C} ^ {2} \mathcal {E} ^ {3} \mathcal {M} ^ {n} \mathcal {S} ^ {3}\right): \quad \left(\mathcal {C} ^ {1} \mathcal {E} ^ {5} \mathcal {M} ^ {n} \mathcal {S} ^ {3} - 1 ^ {\prime} \left(\mathcal {C} ^ {2} \mathcal {E} ^ {3} \mathcal {M} ^ {n} \mathcal {S} ^ {3} \nu_ {0} ^ {\prime}\right)\right) (\mathcal {C}) $$
$$ 1 7 \sum^ {m} m ^ {2} n ^ {3}: \quad 1 7 0 ^ {2} 1 7 \sum^ {m} m ^ {2} a _ {3} ^ {2} 3 (1 7 0) $$
$$ m _ {1} = \frac {\pi}{2} \sqrt {m _ {1} m _ {2}} + \frac {\pi}{2} \sqrt {m _ {1} ^ {2} - m _ {2} ^ {2}} - \frac {\pi^ {2}}{2} + \frac {\pi}{2} \sqrt {m _ {1} ^ {2} + m _ {2} ^ {2}} + \frac {\pi^ {2}}{2} \sqrt {m _ {1} ^ {2} + m _ {2} ^ {2}} + \frac {\pi^ {2}}{2} \sqrt {m _ {1} ^ {2} + m _ {2} ^ {2}} $$
$$ \eta \eta : \quad \eta \eta^ {1} \eta \eta - r \bar {\sigma} / S _ {r} (1) \eta \bar {\sigma} \eta \eta \eta \eta \eta / 1 0 ^ {- \mathrm {i} \pi}) $$
$$ \therefore \quad \text {i n} = \text {i n} - \text {i n} ^ {2} (\text {i n} \text {i n} + \text {i n} ^ {2} / \text {i n} - \text {i n}) $$
$$ \therefore \quad \text {i} \pi : \quad \text {i} \pi \text {i} - \frac {\pi^ {2}}{3} / \frac {\pi^ {2}}{3} (1 0 0 8 1 0 0 8 8 / 1 5 0 0 7) $$
$$ 1 4 7 ^ {2} \times 1 4 7 ^ {2} = $$
$$ \begin{array}{l} \mathrm {r e n} ^ {\mathrm {d}} \text {m o d i n} \left(\mathrm {f r i c t} _ {1}\right): \quad \mathrm {r e n} ^ {\mathrm {d}} \text {m o d i n} 2 \mathrm {f r i c t} ^ {\mathrm {d}} \text {m o d i n} \mathrm {c o m p} _ {1} \text {c o m p} _ {2}, \text {f r i c t} _ {1} ^ {\mathrm {m}}, \quad \mathrm {f r i c t} _ {1} ^ {\mathrm {m}} \equiv H A ^ {\mathrm {o r d}} \eta^ {\mathrm {s}} \eta^ {\mathrm {s}} H - H \ \left(\text {i} \pi^ {\prime} \text {i} \pi^ {\prime} \text {i} \pi^ {\prime}\right): \quad \text {i} \pi^ {\prime} \text {i} ^ {\prime \prime} \exists H A \pi^ {\prime} \text {i} ^ {\prime} \pi^ {\prime} / \text {i} ^ {\prime} \text {i} ^ {\prime} / / \text {i} ^ {\prime} \text {i} ^ {\prime} \text {i} ^ {\prime} \ \end{array} $$
:cll 100000000000000000000000000000000000000000000000000000000000
J
1 21143
2114 3 RE C 4 3
L R
A L A
A L A
A L A
A L A
A L A
A L A
A L A
A L A
A L A
Jll Jllll
TIMER" 100

(.).
[55] 110193171824000000000000000000000
()
| 1 + u1 - u| = | 1 + u| - u| 1 - u|
111111111111111111111111111111111111
IIOIINN NNNN NNNN NNNN NNNN NNNN NNNN NNNN NNNN NNNN NNNN NNNN NNNN NNNN NNNN NNNN NNNN NNNN NNNN NNNN NNNN NNNN NNNN NNNN NNNN NNNN NNNN NNNN NNNN NNNN NNNN NNNN NNNN NNNN NNN
mnnn nnnn nnnn nnnn nnnn nnnn nnnn
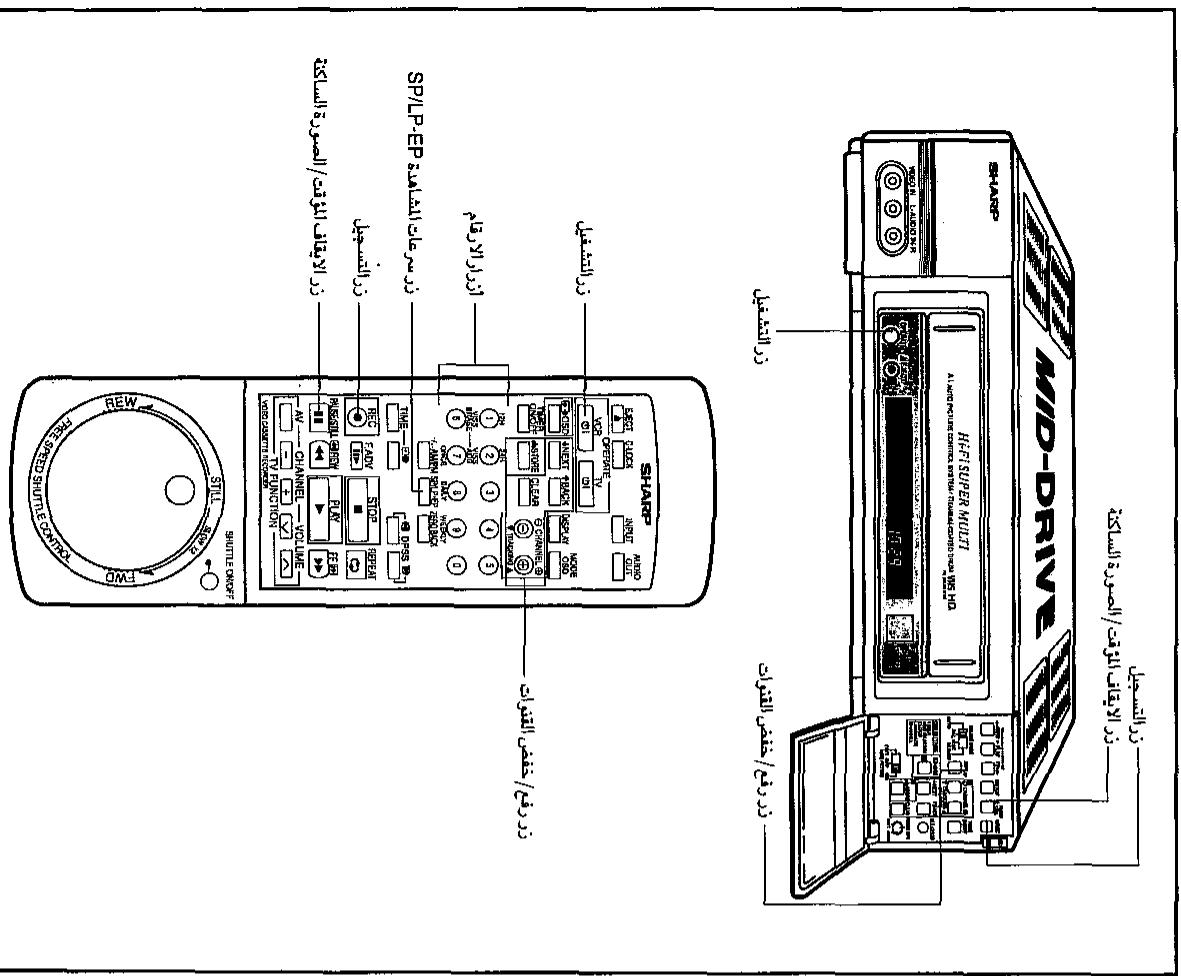
= = 35
yI -J/111111111111111111111111111111111111111 000000000000000000000000000000000000000000000000000000000000000000000000000000
:la
()
PAUSE/STILL 1
aill/ 1y j bai, jlll.
LJIJIJIJIJIJIJIJIJIJIJIJIJIJIJIJIJIJIJIJIJIJIJIJIJIJIJIJIJIJIJIJIJIJIJIJIJIJIJIJIJIJIJIJIJIJIJIJIJIJIJIJIJIJIJIJIJIJIJIJIJIJIJIJIJIJIJIJIJIJIJIJIJIJIJIJIJIJIJIJIJIJIJIJIJIJIJIJIJIJIJIJIJIJIJIJIJIJIJIJIJ
10-9 10
JCHANNEL 1/2
12x - 1 = 32x + 5
abjol jgl pliig jy hlll aer HFi gIglaaag J
. VCR 1 SP/LP,EP jNTSC (LTSP) (NTSC
1
i j 1
a
1. WIS 1. WIS 1.
aalll
1 2
A 1111111111111111111111111111
0 1


1 1111111111111111111111111111111111111111111
4 1
1 1
SSIA
- 12),fimr 1
Vd 1000000000000000000000000000000000000000000000000000000000000000000

S
SSIA 100000000000000000000000000000000000000000000000000000000000000000000000000000000000
1 11111111111111111111111111111111
1 1
1
1 111111111111111111111111111111111
SSIA
196
1
n 111111111111111111111111111111111111
15 Loo H
rnnnne nnnnne nnnnne nnnnne nnnnne nnnnne nnnnne nnnnne nnnnne nnnnne nnnnne nnnnne nnnnne nnnnne nnnnne nnnnne nnnnne nnnnne nnnnne nnnnne nnnnne nnnnne nnnnne nnnnne nnnnne nnnnne
| 1234567890 | O | O | O |
| m-sy | O | O | - |
| m-m-sy | O | O | - |
| ηη | O | O | - |
| dS | dI | dE | |
| m-sy/sy/sy/sy/sy/sy/sy/sy/sy/sy/sy/sy/sy/sy/sy/sy/sy/sy/sy/sy/sy/sy/sy/sy/sy/sy/sy/sy/sy/sy/sy/sy/sy/sy/sy/sy/sy/sy/sy/sy/sy/sy/sy/sy/sy/sy/sy/sy/sy/sy/sy | |||
| sIεεεεεεεεεεεεεεεεεεεεεεεεεεεεεεεεεεεεεεεεεεεεεεεεεεεεεεεεεεεεεεεεεεεεεεεεεεεεεεεεεεεεεεεεεεεεεεεεεεεε | |||
170
r
1
1
H
- 证明: - ba + b = - dc + d
H
HVaD 111111111111111111111111111111111
-
H
HOH
0SUN 1111111111111111111111111111111
ONOW-7HJNO O1NVA
3) 2 2 2 2 2 2 2 2 2 2 2 2 2 2 2 2 2 2 2 2 2 2 2 2 2 2 2 2 2 2 2 2 2 2 2 2 2 2 2 2 2 2 2 2 2 2 2 2 2 2 0
KONOW-7HJNO O1NVA
1) KONOW-7HJNO O1NVA
1) KONOW-7HJNO O1NVA
1) KONOW-7HJNO O1NVA
(1)

水
HVaDfF, F 10000000000000000000000000000000000000000000000000000000000000
HVaiknEgIn the 000000000000000000000000000000000000000000000000000000000
15n 10000000000000000000000000000000000000000000000000000000000000
17
()
1)F 2007-1H H 3007-1H 4007-1H

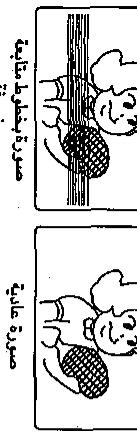
m : x = 1 或 3x + 4y + 1 = 0
(A.I.)
Lgulagjglssuoloooohyouhuyhuyhuyhuyhuyhuyhuyhuyhuyhuyhuyhuyhuyhuyhuyhuyhuyhuyhuyhuyhuyhuyhuyhuyhuyhuyhuyhuyhuyhuyhuyhuyhuyhuyhuyhuyhuyhuyhuyhuyhuy
zixiao 8.1.10.2020 8.1.10.2021
LALIIL 111111111111111111111111111111111111111111
J 1
EPilshlllill +IPilshllllllEPilshlll
Jauuunnnn nn nnnnnnnnnnnnnnnnnnnnnnnnnnnnnnnnnnnnnnnnnnnnnnnnnnnnnnnnnnnnnnnnnnnnnnnnnnnnnnnnnnnnnnnnnnnnnnnnnnnnnnnnnnnnnnnnnnn
Jyj 1
1
8

y
PAUSE/STILL 1
aJbYI pssg ssllsall
15 15
PAUSE/STILL 1
aJbYI pssg ssllsall
1
EDIT 100 AUTO PICTURE 450000000000000000000000000000000000000000000000000000000000
aalaa aalaa aalaa aalaa aalaa aalaa
PLAY sLALI JPAUSE/STILL 1/
1
F.ADV 1
J 131
PAUSE/STILL
SHUTTLE ON/OFF
a 1
J 1
m = 311
i


15
H 1

grrn ngnn nnnrnnn nnne
11111111111111111111111
201 201 201 201 201 201 201 201 201 201 201 201 201 201 201 201 201 201 201 201 201 201 201 201 201 201
1 1
12/12

[001111111111111]

mnnn 1 nnnnnnnnnnnnnnnnnnnnnnnnnnnnnnnnnnnnnnnnnnnnnnnnnnnnnnnnnnnnnnnnnnnnnnnnnnnnnnnnnnnnnnn
1 1111111111111111111111111111111
1 + u1 - 1 = ( 1 + u) u1 < 1 = u
H
2001 111111111111111111111111111111
A
H
1
f
- 3
- 1
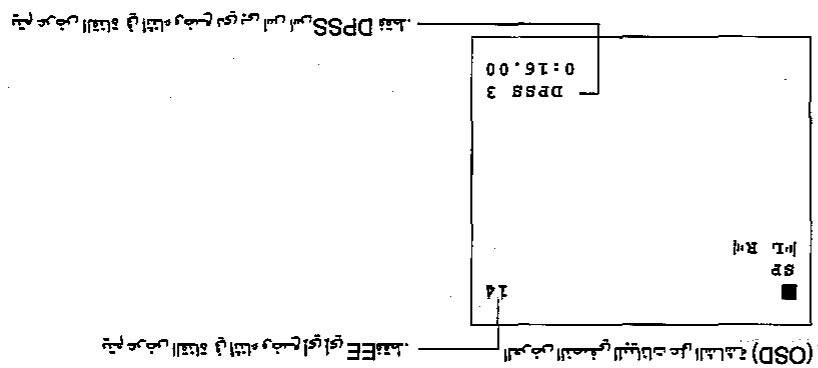
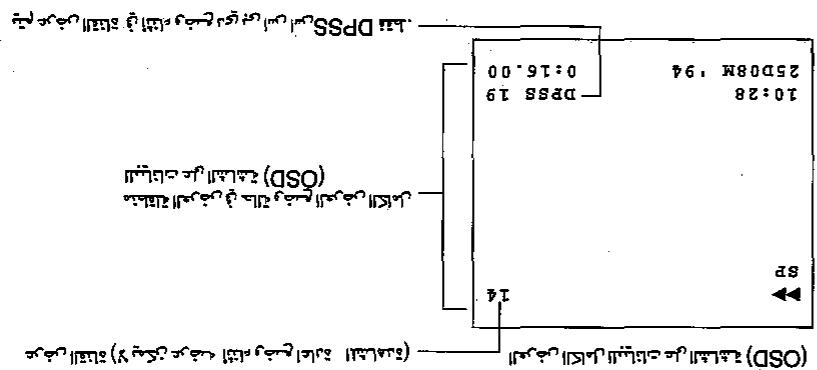

(20
()()()
rnnnne nnnnne nnnnne nnnnne nnnnne nnnnne nnnnne nnnnne nnnnne nnnnne nnnnne nnnnne nnnnne nnnnne nnnnne nnnnne nnnnne nnnnne nnnnne nnnnne nnnnne nnnnne nnnnne nnnnne nnnnne nnnnne
| SOS VILLAGE OF THE SOKS | SOS VILLAGE OF THE SOKS |
| 10 |
1
1
| OSO SOLVER | |
1
10.28, August 3), (ii) 2, 2004, 17, 19, 20, 21, 22, 23, 24, 25, 26, 27, 28, 29, 30, 31, 32, 33, 34, 35, 36, 37, 38, 39, 40, 41, 42, 43, 44, 45, 46, 47, 48, 49, 50, 51, 52, 53, 54, 55, 56, 57, 58, 59, 60, 61, 62, 63, 64, 65, 66, 67, 68, 69, 70, 71, 72, 73, 74, 75, 76, 77, 78, 79,
S OBC = S ABC + S_ BOC
S_ OBC = 12 · BO · CD = 12 × 2t × 5
24H
12H
(24H' pki Jo bai Jilii J)
.00"JJJJJJJJJJJJJJJJ
J 1
pRbBd 2 1 1 1 1 1 1 1 1 1 1 1 1 1 1 1 1 1
J 1
(J10:28):YAA
101"
S APQ = S AQP + S_ PQR
3 1 1 1 1 1 1 1 1 1 1 1 1 1
1
12.3 8.5A/0"Jc (gill b)
(·JG)
| الإستعمال الحرفية | الإستعمال الحرفية | |
| STORE الإستعمال الحرفية | STORE الإستعمال الحرفية | |
| 24H/12H TIME DAY/MONTH YEAR | CLOCK DATE 0:00 1.01 '00 24H/12H TIME DAY/MONTH YEAR | "24H" "24H" "24H" "24H" "24H" "24H" "24H" "24H" "24H" "24H" "24H" "24H" "24H" "24H" "24H" "24H" "24H" "24H" "24H" "24H" "24H” "24H" "24H" "24H" "24H" "24H" "24H" "24H" "24H" "24H" "24H" "24H" "24H" "24H" "24H" "24H" "24H" "24H" "24H" "24H" "24H") "24H" "24H" "24H" "24H" "24H" "24H" "24H" "24H" "24H" "24H" "24H" "24H" "24H" "24H" "24H" "24H" "24H" "24H" "24H" "24H) "24H" "24H" "24H" "24H" "24H" "24H" "24H" "24H" "24H" "24H" "24H" "24H" "24H" "24H" "24H" "24H" "24H" "24H" "24H" "24H") |
| (°/⊕) | 10:28, August 5,) 1992, مسالم عل,(ملاوي, ملاوي, ملاوي, ملاوي, ملاوي, ملاوي, ملاوي, ملاوي, ملاوي, ملاوي, ملاوي, ملاوي, ملاوي, ملاوي, ملاوي, ملاوي, ملاوي, ملاوي, ملاوي, ملاوي, ملاوي, ملاوي, ملاوي, ملاوي, ملاوي, ملاوي, mلاوي, ملاوي, mلاوي, mلاوي, mلاوي, mلاوي, mلاوي, mلاوي, mلاوي, mلاوي, mلاوي, mلاوي, mلاوي, mلاوي, mلاوي, mلاوي, mلاوي, mلاوي, mلاوي, mلاوي, mلاوي, mلاوي, mلاوي, mلاوي, mلا inflamm,(الله,-)/(الله,-)/(الله,-)/(الله,-)/(الله,-)/(الله,-)/(الله,-)/(الله,-)/(الله,-)/(الله,-)/(الله,-)/(الله,-)/(الله,-)/(الله,-)/(الله,-)/(الله,-)/(الله,-)/(الله,-)/(الله,-)/(الله,-)/(الله,-)/ (الله,-)/(الله,-)/(الله,-)/(الله,-)/(الله,-)/(الله,-)/(الله,-)/(الله,-)/(الله,-)/(الله,-)/(الله,-)/(الله,-)/(الله,-)/(الله,-)/(الله,-)/(الله,-)/(الله,-)/(الله,-)/(الله,-)/(الله,-)/ (°/⊕) | |
| NEXT ↓↓ ↓↓ 24H/12H TIME DAY/MONTH YEAR | (°/⊕) "0:00" NEXT ↓↓ ↓↓ (°/⊕) "0:00" NEXT ↓↓ ↓↓ (°/⊕) "0:00" NEXT ↓↓ ↓↓ (°/⊕) "0:00" NEXT ↓↓ ↓↓ (°/⊕) "0:00" NEXT ↓↓ ↓↓ (°/⊕) "0:00" NEXT ↓↓ ↓↓ (°/⊕) "0:00" NEXT ↓↓↓↓ (°/⊕) "0:00" NEXT ↓↓ ↓↓ (°/⊕) "0:00" NEXT ↓↓ ↓↓ (°/⊕) "0:00" NEXT ↓↓ ↓↓ (°/⊕) "0:00" NEXT ↓↓ ↓↓ (°/⊕) "0:00" NEXT ↓↓ ↓↓ (°/⊕) "0:00" NEXT ↑↑ ↓↓ ↓↓ ↓↓ ↓↓ ↓↓ ↓↓ ↓↓ ↓↓ ↓↓ ↓↓ ↓↓ ↓↓ ↓↓ ↓↓ ↓↓ ↓↓ ↓↓ ↓↓ ↓↓ ↓↓ ↓↓ ↓↓ ↓↓ ↓↓ ↓↓ ↓↓ ↓↓ ↓↓ ↓↓ ↓↓ ↓↓ ↓↓ ↓↓ ↓↓ ↓↓ ↓↓ ↓↓ ↓↓ ↓↓ ↓↓ ↓↓ ↓↓ ↓↓ ↓↓ ↓↓ ↓↓ ↓↓ ↓↓ ↓↓ ↓↓ ↓ | |
| NEXT ↓↓ ↓↓ 24H/12H TIME DAY/MONTH YEAR | (°/⊕) "1:01" NEXT ↓↓ ↓↓ (°/⊕) "1:01" NEXT ↓↓ ↓↓ (°/⊕) "1:01" NEXT ↓↓ ↓↓ (°/⊕) "1:01" NEXT ↓↓ ↓↓ (°/⊕) "1:01" NEXT ↓↓ ↓↓ (°/⊕) "1:01" NEXT ↓↓ ↓↓ (°/⊕) "1:01" NEXT ↓↓↓ ↓↓ ↓ ↓ ↓ ↓ ↓ ↓ ↓ ↓ ↓ ↓ ↓ ↓ ↓ ↓ ↓ ↓ ↓ ↓ ↓ ↓ ↓ ↓ ↓ ↓ ↓ ↓ ↓ ↓ ↓ ↓ ↓ ↓ ↓ ↓ ↓ ↓ ↓ ↓ ↓ ↓ ↓ ↓ ↓ ↓ ↓ ↓ ↓ ↓ ↓ ↓ ↓ ↓ ↓ ↓ ↓ ↓ ↓ ↓ ↓ ↓ ↓ ↓ ↓ ↓ ↓ ↓ ↓ ↓ ↓ ↓ ↓ ↓ ↓ ↓ ↓ ↓ ↓ ↓ ↓ ↓ ↓ ↓ ↓ ↓ ↓ ↓ ↓ ↓ ↓ ↓ ↓ ↓ ↓ ↓ ↓ ↓ ↓ ↓ ↓ ↓ | |
| (°/⊕) "8.5 A/o" NEXT ↓↓ ↓↓ (°/⊕) "8.5 A/o" NEXT ↓↓ ↓↓ (°/⊕) "8.5 A/o" NEXT ↓↓ ↓↓ (°/⊕) "8.5 A/o" NEXT ↓↓ ↓↓ (°/⊕) "8.5 A/o" NEXT ↓↓ ↓↓ (°/⊕) "8.5 A/o" NEXT ↓↓ ↓↓ (°/⊕) "8.5A/o" NEXT ↓↓ ↓↓ (°/⊕) "8.5A/o" NEXT ↓↓ ↓↓ (°/⊕) "8.5A/o" NEXT ↓↓ ↓↓ (°/⊕) "8.5A/o" NEXT ↓↓ ↓↓ (°/⊕) "8.5A/o" NEXT ↓↓ ↓↓ (°/⊕) "8.5A/o" NEXT ↓↓ ↓↓ (℃/℉) "8.5 A/o" NEXT ↓↓ ↓↓ (℃/℉) "8.5 A/o" NEXT ↓↓ ↓↓ (℃/℉) "8.5 A/o" NEXT ↓↓ ↓↓ (℃/℉) "8.5 A/o" NEXT ↓↓ ↓↓ (℃/℉) "8.5 A/o" NEXT ↓↓ ↓↓ (℃/℉) "8.5 A/o" NEXT ↓↓ ↓↓ (△/△) "8.5 A/o" NEXT ↓↓ ↓↓ (△/△) "8.5 A/o" NEXT ↓↓ ↓↓ (△/△) "8.5 A/o" NEXT ↓↓ ↓↓ (△/△) "8.5 A/o" NEXT ↓↓ ↓↓ (△/△) "8.5 A/o" NEXT ↓↓ ↓↓ (△/△) "8.5 A/o" NEXT \( \downarrow \downarrow \downarrow \downarrow \downarrow \downarrow \downarrow \downarrow \downarrow \downarrow \downarrow \downarrow \downarrow \downarrow \downarrow \downarrow \downarrow \downarrow \downarrow \downarrow \downarrow \downarrow \downarrow \downarrow \downarrow \downarrow \downarrow \downarrow \downarrow \downarrow \downarrow \downarrow \downarrow \downarrow\) |
a a a a a a a a a a a a a a a a a a a a a a a
SK 11111111111111111111111111111111
11111111111111111111111111111111111111

1160mp 18 1666666
2 11111111111111111111111111111111111111111
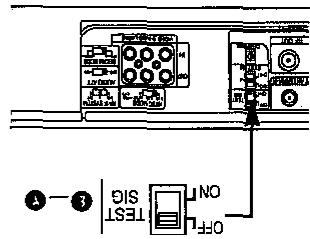
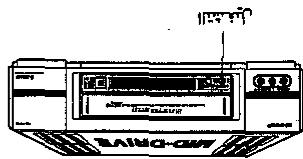
1
12 113
(20 )
1
NO
HOA
1
1

-150 165 5 17 S L26H-OA 111111111 663 111111111 86SN 111111111 280)
26H-OA 111111111 4963 111111111 86SN 111111111
26H-OA 111111111 4963 111111111 86SN 11111111
HOAN 5 5 5 HN 5 HN 5 HN
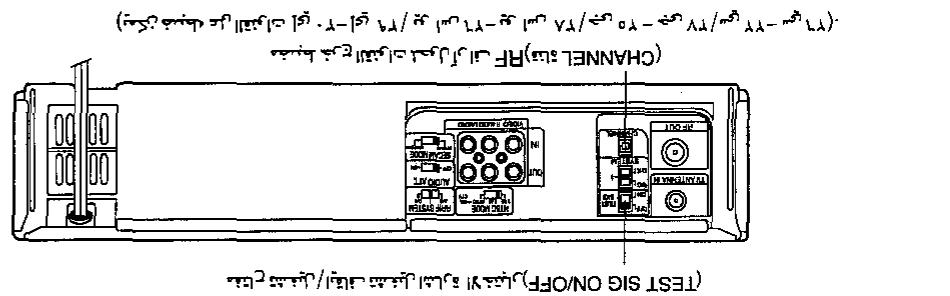
H
100
1
M
rnnnN NNNNEHN
H
rnnnne nnnnne nnnnne nnnnne nnnnne nnnnne nnnnne nnnnne nnnnne nnnnne nnnnne nnnnne nnnnne nnnnne nnnnne nnnnne nnnnne nnnnne nnnnne nnnnne nnnnne nnnnne nnnnne nnnnne nnnnne nnnnne
H
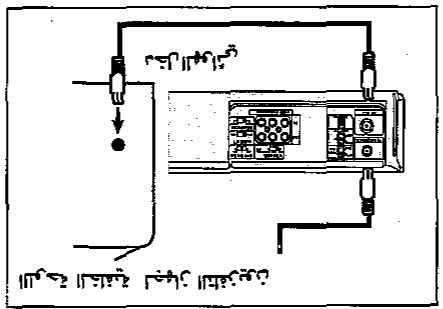
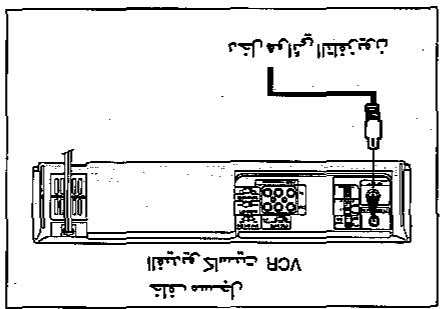
H
rnnn nnnn
A
107 5n 1045 5n 5n
A
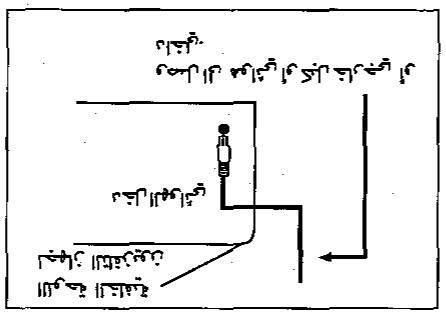
1r2/11A
()
10
H 1
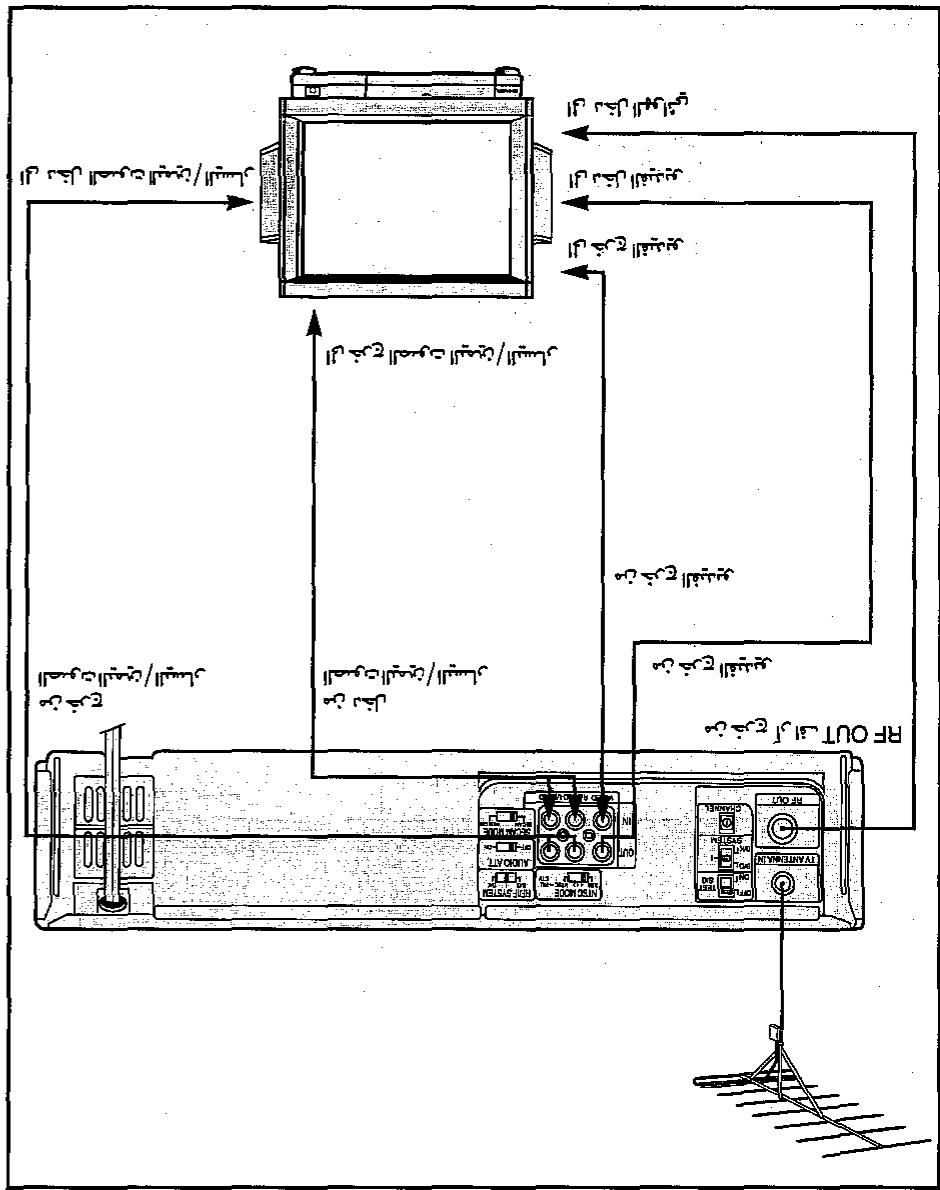
111111111111111111
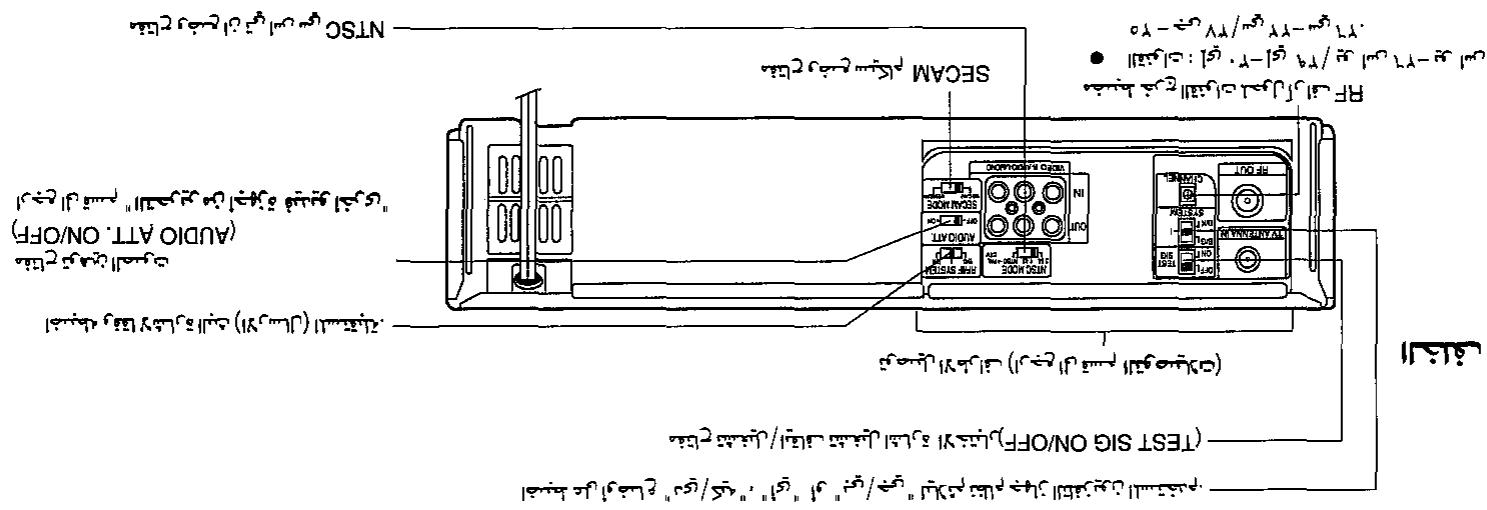


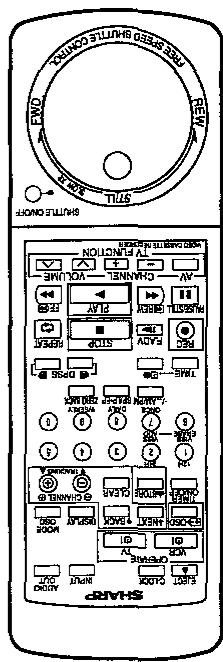
6
mnnn nnnn nn nnnn nnnn nnnn nnnn nnnn nnnn nnnn
1
HO
m 1
0SINrRnrrnrnnrnnnne nnnnne nnne
7d
5 10000000000000000000000000000000000000000000000
- 10000000000000000000000000000000000000000000
| WVCSSE | A | WVCSSE | ||||
| B | WVCSSE | (KD'π)π(π)π/20 | WVCSSE | |||
| WCSSE | A | WCSSE | ||||
| B | WCSSE | (KD'π)π(π)π/20 | WCSSE | |||
| Vd | A | WCSSE | ||||
| B | WCSSE | (KD'π)π(π)π/20 | WCSSE | |||
| OSLN | A | ALOTd←OSLN | Vd | |||
| B | ||||||
| OSLN | A | |||||
| B | ||||||
| OSLN | A | |||||
| B | ||||||
| OSLN | A | |||||
| B |
2018-2019-2020-2021
m
3 1

mWvEeS.
snnnne nnnnne nnne nnnnne nnnnne nnnnne nnnnne nnnnne nnnnne nnnnne nnnnne nnnnne nnnnne nnnnne nnnnne nnnnne nnnnne nnnnne nnnnne nnnnne nnnnne nnnnne nnnnne nnnnne nnnnne nnnnne nnnnne nnnnne nnnnee
10000000000000000000000000000000000000
1
mnnnnaaennnne
WwO WwO WwO WwO WwO WwO WwO WwO WwO WwO WwO WwO WwO WwO WwO WwO WwO WwO WwO WwO WwO WwO WwO WwO WwO WwO WwO WwO WwO WwO WwO WwO WwO
1
18073Voo'o'oo'oo'oo'oo'oo'oo'oo'oo'oo'oo'oo'oo'oo'oo'oo'oo'oo'oo'oo'oo'oo'oo'oo'oo'oo'oo'oo'oo'oo'oo'oo'oo'oo'oo'oo'oo'oo'oo'oo'oo'oo'oo'oo'oo'oo'oo'oo'oo'oo'oo'
1
1
H
| OSLN | V0' L B9' | |||||
| K-WGWS | WVS | |||||
| WWS | ||||||
| B/B-WS | WVS | |||||
| WWS | ||||||
| K/D-Vd | ||||||
| H/Vd | ||||||
| B/B-Vd | ||||||
| K/√m | ||||||
HOA
OVA) 1
OSLN. "n74d"
- 1
1NO 2
-
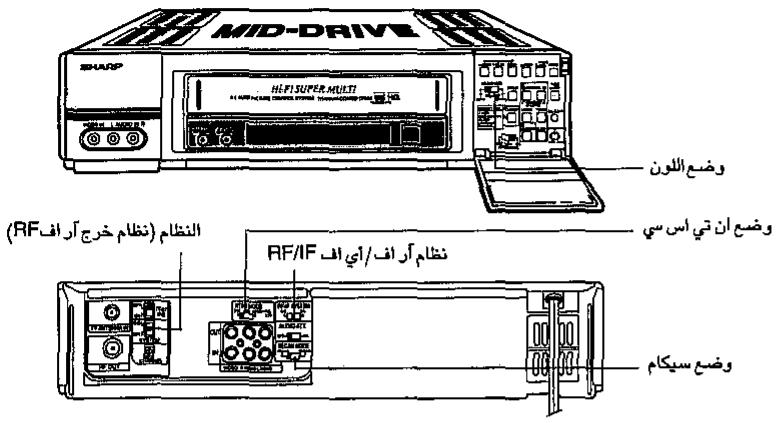
aayuauuulalueleceugjuaaillculejulai/ juuylabg jgllyt aui
| A | A | V | T | 0 | E | T | T | 1 | ||
| NTSC | SECAM | PAL | Jablalp# | TV | ||||||
| - | VHF:M | VHF:D | VHF:B | VHF:- | VHF:D | VHF:B | Jablalp# | |||
| UHF:M | UHF:K, K1 | UHF:G | UHF:I | UHF:K | UHF:G(H) | |||||
| NTSC 4.43 | NTSC 3.58 | MESECAM | SECAM | MESECAM | SECAM | PAL | PAL | PAL | JaVHF J#i#i#i#i#i#i#i#i#i#i#i#i#i#i#i#i#i#i#i#i#i#i#i#i#i#i#i#i#i#i#i#i#i#i#i#i#i#i#i#i#i#i#i#i#i#i#i#i#i#i# | Jablalp# |
| SP/LP | SP/LP | SP/LP | Lajalp# | VHS | ||||||
| SP | SP/LP | SP/LP | JaIglaJ#aJ#aJ#aJ#aJ#aJ#aJ#aJ#aJ#aJ#aJ#aJ#aJ#aJ#aJ#aJ#aJ#aJ#aJ#aJ#aJ#aJ#aJ#aJ#aJ#aJ#aJ#aJ#aJ#aJ#aJ#aJ#aJ#aJ#a | Jablalp# | ||||||
| SP/LP/EP | SP/LP | SP/LP | JaIglaJ#aJ#aJ#aJ#aJ#aJ#aJ#aJ#aJ#aJ#aJ#aJ#aJ#aJ#aJ#aJ#aJ#aJ#aJ#aJ#aJ#aJ#aJ#aJ#aJ#aJ#aJ# a#d#d#d#d#d#d#d#d#d#d#d#d#d#d#d#d#d#d#d#d#d#d#d#d#d#d#d#d#d#d#d#d#d#d#d#d#d#d#d#d#d#d#d#d#d#d#d#d#d#d# d#d#d#d#d#d#d#d#d#d#d#d#d#d#d#d#d#d#d#d#d#d#d#d#d#d#d#d#d#d#d#d#d#d#d#d#d#d#d#d#d#d#d#d#d#d#d#d#d#d# | |||||||
| SP/LP/EP | SP/LP | SP/LP | JaIglaJ#aJ#aJ#aJ#aJ#aJ#aJ#aJ#aJ#aJ#aJ#aJ#aJ#aJ#aJ#aJ#aJ#aJ#aJ#aJ#aJ#aJ#aJ#aJ# a#d#d#d#d#d#d#d#d#d#d#d#d#d# d#d#d#d#d#d#d#d#d#d#d#d#d#d#d#d#d#d#d#d#d#d#d#d#d#d#d#d#d#d#d#d#d#d#d#d# d#d#d#d#d#d#d#d#d#d#d#d#d#d# d#d#d#d#d#d#d#d#d#d#d#d#d#d#d#d#d#d#d#d#d#d#d#d#d#d#d#d#d#d#d#d#d#d#d#d# | |||||||
aee aee eae ae VCR cws g y wll jwne aee aee aee aee (e e e e e e e e e e e
m = 311 ;
SHA
mnnn nnnn nnne nnnn nnnn nnnn nnnn nnnn nnnn nnnn nnnn nnnn nnnn nnnn nnnn nnnn nnnn nnnn nnnn nnnn nnnn nnnn nnnn nnnn nnnn nnnn nnnn nnnn nnnn nnnn nnnn nnnn nnnn nnnn nnnn nnnn nnnn
mnrnrrnre 111
10
11
(1) an = 1 - bn = 2( 3n + 1) ( 3n + 2)
-
1 1
F
-
(SSd)
Fer
SSIA
-
-
(V)
-1f-fg 62
103 103 103 103 103 103 103 103 103 103 103 103 103 103 103 103 103 103 103 103 103 103 103 103 103 103
- 1
SHA
南国国
#
H
·
115
-
6
- 1590 1942 1982
1 - 1
m = 311
·
64
y
- S木弟形 COBD = S COD + S BDO = S BOC +
- ·
·
m : x = 1 或 3x + 4y + 1 = 0
Kieipirimpiinrnnnss H
H
-
srrnssrnnnns
170^

nrrnrnnrnnn
OH
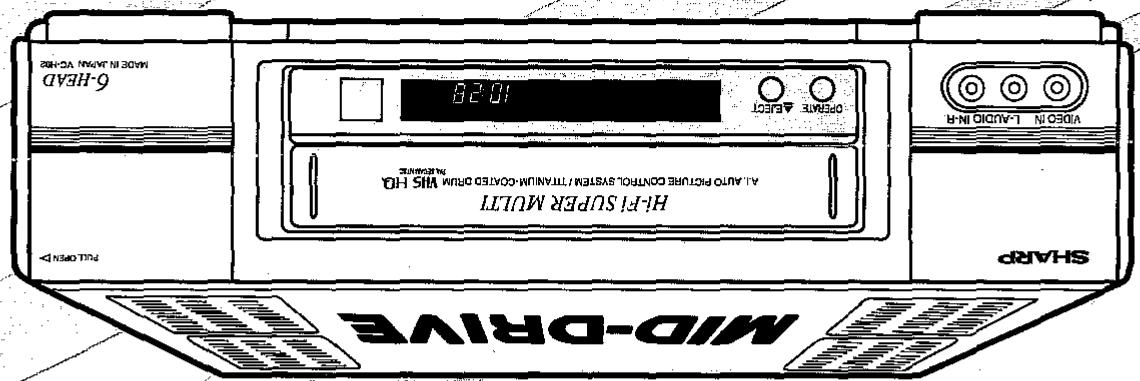
1
1
SNN WEN

m^2 - 4e = ^22 + ^22
[A = \left{ {{4k} - 1 \mid k \in {N}^{x}}\right} ]
向西区 由9 才不
S⊥EX6H-O
co
26H-3O
dRvHS
- CONTENTS
- BEFORE USING YOUR VCR
- PREPARATIONS
- BASIC OPERATIONS
- TIMER RECORDING
- SPECIAL FUNCTIONS
- HELPFUL HINTS
- ACCESSIONS
- IMPORTANT SAFEGUARDS AND PRECAUTIONS
- Caution
- Location and Handling
- Moisture Condensation
- Others
- BROADCAST SYSTEMS/BEFORE USING YOUR VCR
- Using your VCR Auto System during Playback and Recording
- NOTE:
- Opened door
- Connecting Aerial Cable to VCR
- Disconnecting TV Cable
- Connecting Antenna Cable to VCR
- Connecting VCR to TV
- Connecting to a Stereo TV
- NOTES:
- Connecting to TV and Audio Equipment
- Inserting the Batteries
- INITIAL SETTING OF OSD (ON SCREEN DISPLAY)
- Setting the NTSC MODE switch
- Key to easy setting
- OSD SETTINGS SCREEN
- SETTING THE CHANNELS
- Skipping channels
- How to cancel channel skip
- MODE OSD (ON-SCREEN-DISPLAY)
- Inserting a Video Cassette
- Playback
- Quick Start with Full Loading Mechanism
- Video Search
- Fast Forwarding and Rewinding
- Still Picture and Frame Advance
- Playback Using the Shuttle Dial
- A.I. Auto Picture Control
- Auto Tracking
- (II) Auto Picture Control
- (III) Auto Head Cleaning System
- Editing Enhancement Function
- Playing Back an NTSC Tape (NTSC → PAL)
- Playing Back a Tape with Hi-Fi Audio Tracks
- Audio Mode Selection
- Adjusting Hi-Fi Audio Tracking
- FULL AUTO PLAY FUNCTION
- HOW TO USE VISS AND VISS ERASE FUNCTION
- How to Use VISS ADD
- How to Use VISS ERASE
- Cassette Erase Protection
- Recording a TV Programme
- To Watch Another TV Programme While Recording
- Selecting the input signal
- Simulcast recording
- Recording audio signals only
- TIMER RECORDING (OSP: ON SCREEN PROGRAMME)
- CONFIRMING TIMER PROGRAMMES
- CANCELLING TIMER PROGRAMMES
- Immediate Recording
- Delayed Recording
- ZERO-BACK FUNCTION SPECIAL FUNCTIONS
- DPSS (DIGITAL PROGRAMME SEARCH SYSTEM)
- Index Signal
- RANDOM REPEAT
- Exception:
- MULTI-FUNCTION DISPLAY
- Using the linear tape counter
- Counter display
- Clearing the counter
- Counter display during timer recording
- USING YOUR VCR WITH A VIDEO CAMERA
- EDITING FROM OTHER VIDEO EQUIPMENT
- PARTICULARITES
- ANNULATION D'UNE PROGRAMMATION
- 乙注意:
- | 1 + u1 - u| = | 1 + u| - u| 1 - u|
- = BPPC = 35
- :la
- i j 1
- WIS 1. WIS 1.
- 196
- 1
- 11111111111111111111111111111111111111
- m = 311 ;
- (V)
- 南国国
- #
- 6
- m = 311
- ·
- y
- m : x = 1 或 3x + 4y + 1 = 0
- srrnssrnnnns
- 170^ °
Brand : SHARP
Model : VC-H92/H92ETS
Category : VCR