
VC-MH770SM - VCR SHARP - Free user manual and instructions
Find the device manual for free VC-MH770SM SHARP in PDF.
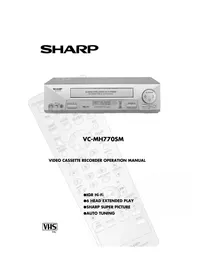


| Product Type | VHS VCR |
| Model | VC-MH770SM |
| Brand | Sharp |
| Video System | PAL / SECAM / NTSC |
| Recording Format | VHS (SP, LP, EP) |
| Dimensions (WxHxD) | 430 x 95 x 320 mm |
| Weight | 4.5 kg |
| Power Supply | 220-240V AC, 50 Hz |
| Power Consumption | 20 W (typical) |
| Video Heads | 4-head helical scan |
| Tuner Channels | 99 channels (PAL/SECAM) |
| Timer Recording | Up to 8 programs within 1 year |
| Audio Features | Hi-Fi stereo, mono linear track |
| Inputs | RF antenna, composite (RCA), S-Video |
| Outputs | RF modulator, composite (RCA), S-Video |
| Remote Control | Infrared remote included |
| Playback Features | Search, still frame, slow motion, index search |
| Maintenance | Clean video heads with dry cleaning cassette every 6 months |
| Safety Features | Auto power-off after 30 minutes inactivity, child lock, surge protection |
| Spare Parts Availability | Belts, heads, remotes available from authorized dealers |
| Reparability | Designed for service; schematic and service manual available |
| General Information | VCR with built-in tuner and timer, top-loading mechanism |
Frequently Asked Questions - VC-MH770SM SHARP
User questions about VC-MH770SM SHARP
0 question about this device. Answer the ones you know or ask your own.
Ask a new question about this device
Download the instructions for your VCR in PDF format for free! Find your manual VC-MH770SM - SHARP and take your electronic device back in hand. On this page are published all the documents necessary for the use of your device. VC-MH770SM by SHARP.
USER MANUAL VC-MH770SM SHARP
Thank you for buying this SHARP VCR. Given proper care it will provide years of entertainment for the whole family. Please read this operation manual carefully before attempting to operate the VCR.
Copyright
● Audio-visual material may consist of copyrighted works which must not be recorded without the authority of the owner of the copyright. Please refer to the relevant laws in your Country. - No part of this publication may be reproduced, stored or transmitted in any form without prior permission from SHARP Electronics (UK) Limited.
THIS MANUAL COVERS A RANGE OF MODELS.
ALL OF THE FEATURES MENTIONED MAY NOT NECESSARILY APPLY TO YOUR VCR.

REMOTE CONTROL
VCR FRONT PANEL/REMOTE CONTROL EQUIVALENT FUNCTIONS
If you prefer, or if remote control batteries fail, you will need to use the VCR front panel controls. The only differences in function are shown below:
| FUNCTIONOSD | OPERATION WITHREMOTE CONTROL | OPERATION WITHVCR FRONT PANEL |
| Moving UP/DOWN menuMoving LEFT/RIGHT menu | [▲/▼] -buttons[◄/►] -buttons | CHANNEL ▼/▲ buttons.PressFAST FORWARD/REWIND |
CONTENTS
BEFORE USING YOUR VCR
Important notes on your VCR 2
Unpacking the accessories....3
INSTALLING YOUR VCR
Connecting the cables 4
Tuning the TV into the VCR....5
Auto installation....6
BASIC OPERATION
Scart lead connection (not supplied) 7
Important notes on your VCR and video tapes 7
How to playback a video tape....7
How to playback a video tape 8
Sharp Super Picture 8
Pausing and slow motion....8
Fast forwarding/rewinding a video tape....9
Immediate recording....10
Tape speed selection.... 10
How to set a delayed recording 11
Checking, changing and cancelling a recording 13
ADVANCED OPERATION
Audio and your VCR 14
Playback of a video tape 16
Checking the amount of tape remaining 16
Playing back a video tape repeatedly 16
LCD Display 17
Tape counter and zero back 17
Searching the video tape 18
Skip searching the video tape 18
Digital programme search system (DPSS).... 18
Recording from other equipment 19
Colour 20
Blue mute 20
SPECIAL FEATURES ON YOUR VCR
Child lock....21
Decoder switching operation....21
CUSTOMISED INSTALLATION
Manually tuning a channel....22
Broadcast and CATV channels 23
Manually sorting channels....24
Sorting the channels into your preferred order.... 24
Deleting channels.... 25
Changing the on-screen display language.... 26
Manually setting the clock....26
MORE INFORMATION ABOUT YOUR VCR
VCR digital display 27
Selecting the output from the VCR 27
On-screen display....28
Specifications....29
Troubleshooting 30
VCR reset 32
IMPORTANT NOTES ON YOUR VCR
IDEAL VCR LOCATION
PLACE THE VCR..
- ... on a flat level surface away from radiators or other heat sources and out of direct sunlight. • ... and video tapes away from magnetic sources such as speakers or microwave ovens. • ... at least 8" (20cm) away from the TV. • ... away from curtains, carpets or other materials and allow ventilation space around the VCR.
DO NOT...
• ... block the air-vent openings. • ... expose the VCR to excessive dust, mechanical vibration or shock. - ... place any heavy object or liquid on top of the VCR. If liquid drops inside the VCR unplug immediately and contact your SHARP dealer. Do not use the VCR. - ... insert or drop anything into the tape compartment or through the air-vents, as this could result in serious damage, fire or an electric shock.
POWER SOCKETS
- To avoid overheating or even fire, insert the plug correctly into the socket.
DO NOT...
• ... overload power sockets, this may cause a fire or electric shock. • ... pull the power cord to disconnect the plug from the mains. • ... bind the power cords together. - This VCR is not equipped with a mains power switch. Accordingly, nominal current to drive the clock is drawn at all times when the AC power cord is plugged into a wall socket. If the VCR is not to be used for an extended period be sure to unplug the cord.

CHECK ALL THESE ACCESSORIES ARE SUPPLIED WITH YOUR VCR. CONTACT YOUR DEALER IF ANY ARE MISSING.


(TYPE AA/R6/UM3) BATTERIES (X2)
for the remote control unit.

RF CONNECTION CABLE
connects the VCR to the TV.

Battery cover
To fit the batteries into the remote control
Remove the battery cover on the back of the remote control.
Fit the batteries: ⊖ to ⊖ and ⊕ to ⊕ terminals.
Place the battery cover back into position.

Remote Control
- Remote Control must be pointed towards the VCR to operate.
- Do not expose to liquid or shock.
- May not function if the VCR is in direct sunlight or any other strong light.
- Replace both alkaline batteries (type AA/R6/UM3) if the remote control fails.
- Remove the batteries and keep in a safe place if you do not plan to use the VCR for several months.
- Remove and dispose of flat batteries safely and promptly.
- Incorrect use of batteries may cause them to leak or burst.
CONNECTING THE CABLES
![graph TD A["AERIAL OR CATV CABLE"] -->|1| B["Connect your existing aerial cable to the AERIAL IN socket on your VCR."] B -->|2| C["Connect your TV to the VCR using the supplied RF Connection Cable, i.e., connect the VCR RF-OUT socket to the TV AERIAL IN socket."] C -->|3| D["Connect the VCR to the m…](/content/2026/06/1291623/images/02a87020a6b6dee2fbf9554bb8d99c234168354b948d9059861b25f348d6006a.jpg)
√ The VCR is correctly connected.
TUNING THE TV INTO THE VCR
This model automatically tunes the TV channels for your area, then using Teletext information sorts the TV channels into a standard order and sets the clock. If the VCR has not previously been tuned-in, instructions will be given on screen to guide you through this procedure.
- Ensure your VCR is still in the STANDBY mode.
- Switch on the TV. Select an unused channel on your TV for your VCR (there may be a dedicated video channel refer to your TV operation manual).
- Press STOP. The VCR will search and display the ideal RF channel.
• If you are connected via a scart lead, go to step 5.
Example:
CAUTION:
- If the clear button is pressed at this point it will not allow the TV to be tuned to the VCR. Refer to RF through ON/OFF below.
- Tune the selected channel on your TV (refer to your TV manual) until the menu screen appears.
- Press SET to store the RF channel setting and continue with the installation.

If the above screen does not appear, follow the procedure RESET THE VCR
NOTE:
- If you have a preferred channel, the RF channel can be set manually (21-69) after Step 3 using (▲/▼) keys.
RF THROUGH ON/OFF:
- If you wish to connect your VCR to the TV with only a scart lead, the RF Output on your VCR can be turned OFF and ON at Point 3 by pressing the CLEAR button then continuing with the installation. This will help minimise interference.
The TV is tuned to the VCR.
AUTO INSTALLATION
- Press (▲/▼) to select your language and press SET to confirm.
- Press (▲/▼) to select your country and press SET to confirm.
- Ensure your AERIAL/SCART cable is connected to your VCR and then press SET to confirm.
6.
LANGUAGE
ENGLISH SVENSKA DEUTSCH NEDERLANDS FRANÇAIS DANSK ITALIANO NORSK ESPAÑOL SUOMI
▲▼◀▶ : CHANGE SET : ENTER
MENU:
Auto installation may take a few minutes.
On completion the MOVE menu will appear showing the preset channel order. By pressing the
MODE OSD button, the VCR will change to a blue background. This may help you see which channels your VCR has tuned in. Press MENU to exit.
If the clock is not automatically set, the clock screen will appear, refer to MANUALLY
SETTING THE CLOCK.
If you wish to customise the channel order refer to MANUALLY SORTING CHANNELS.
Refer to the CUSTOMISED INSTALLATION chapter if
- Your VCR could not tune automatically - due to for example poor reception.
- You wish to re-arrange the channel order.
- You wish to change the time on the clock or if the VCR could not set the time.

All the programmes should now be correctly tuned in and the clock set.
SCART LEAD CONNECTION (NOT SUPPLIED)
A scart lead can be connected at any time. It is recommended to connect your TV and VCR in this way as it will provide improved picture and sound quality. Please refer to the connection diagram on page 4.
IMPORTANT NOTES ON YOUR VCR AND VIDEO TAPES
VIDEO TAPES
- If you use only good quality video tapes, generally it will not be necessary to clean the video heads.
- If poor quality tapes are used, or if a tape is loaded after changing VCR location, oxide from the tape may "clog" the video heads. This will cause the playback picture to be "snowy", or even disappear.
- To remove minor contamination run a video tape in visual search mode. If this fails, you will need to have the heads cleaned by a SHARP Service Facility. Please note, if cleaning is necessary it is not covered by the guarantee.
- Use video tapes which carry the marks VHS SECAMPAL
Condensation forms in the VCR when it is moved out of or into a warm place. If you try to playback or record, the video tape and VCR may be damaged. Turn the VCR on and wait for about two hours until the VCR reaches room temperature before operating.
PLAYBACK
- Switch on your TV and select the video channel.
- Carefully push a pre-recorded video tape into the tape compartment. This will switch the VCR on.
- If the record-protection tab has been removed, the VCR will start playback as soon as the video tape has been loaded.
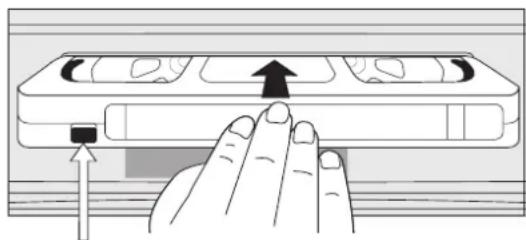
Record protection tab
- To start playback, press
PLAY/X2 (▶) once.
- For double speed playback (without sound), press PLAY/X2 (▶) again.
- To revert to normal playback, press PLAY/X2 (▶) again.
- To stop the video tape, press STOP(■). • To eject the tape press ▲ EJECT on the VCR.
SHARP SUPER PICTURE
SHARP SUPER PICTURE should enhance the picture quality during playback. It is normally set to ON. To turn SHARP SUPER PICTURE on or off press SUPER P. on the VCR front panel.
PICTURE DISTURBANCE DURING PLAYBACK
This VCR has an automatic tracking system which reduces picture disturbance when you start to playback a video tape. When auto-tracking is in operation — washes on the on-screen display. If the picture still has disturbance you may need to manually track the video tape:
During PLAYBACK of a video tape.
- Press CHANNEL ▲ or ▼ to position picture interference off the TV screen. (Manual Tracking)
- Press CHANNEL ▲ and ▼ buttons together to start Auto Tracking.
PAUSING AND SLOW MOTION
- Press PLAY/X2 (▶) to start the video tape playing.
- To pause the video tape, press PAUSE/STILL (II).
• To minimise jitter whilst in pause mode press CHANNEL ▲ or ▼.
- Press PLAY/X2 (▶) to resume playback.
- To playback in slow motion (without sound) press ▶ SLOW on the remote control. Slow motion speed can be adjusted using the ⊖ or ⊕ buttons next to the ▶ SLOW button. Picture disturbance can be improved by using the CHANNEL K or L during slow motion playback.
- Press PLAY/X2 (▶) to resume playback.
NOTES:
- When using SLOW MOTION function some mechanical noise may be heard.
- There will be picture interference and possibly a change to black and white picture using Pause and Slow functions.
- PAUSE mode will disengage after about 5 minutes.
- Press STOP (■) to stop the video tape.
- Press FAST FORWARD (▶) / REWIND (◀◀) on the remote control or on the VCR front panel.
- To stop fast forward/rewind, press STOP (■).
FORWARD/REVERSE VISUAL SEARCH
- During playback for continuous search mode, press FAST FORWARD (▶▶) / REWIND (◀◀) on the remote control, or on the VCR front panel.
- To decrease the speed, press FAST FORWARD (▶▶) / REWIND (◀◀) on the remote control or VCR front panel again.
- Press PLAY/X2 (▶) to resume playback.
NOTE:
- There will be picture interference and possibly a change to black and white picture using Visual Fast Forward/Rewind functions.
IMMEDIATE RECORDING
SELECTION OF A CHANNEL
Select the channel by using the number buttons on the remote control, or select the next/previous channel by pressing CHANNEL (▲ or ▼).
To change between single digit and 2-digit channel numbers, press AM/PM 1/II.
For example, for channel 24, press AM/PM then press 2 4.
TAPE SPEED SELECTION
Your VCR has three tape speeds: SP (Standard Play), LP (Long Play) and EP (Extended Play). Press the TAPE SPEED button on the remote control to select the desired setting.
It is recommended that EP recordings are only played back on the VCR on which they were originally recorded.
| Cassette | Recording |
| Length | Time |
| E-240 | In Minutes |
SP 240
LP 480
EP 720
You can record the channel you are watching or a different channel.
- Insert a video tape into your VCR.
- Select the channel you wish to record on the VCR.
- To start recording, press REC (●).
- To pause during recording, press PAUSE/STILL (II).
- To continue recording, press REC (●).
- To stop recording, press STOP (■) once.
SIMPLE TIMED RECORDING:
- To specify a stop time, press REC (●).
- Each additional press of REC (●) will delay the stop time by 10 minutes.
- To stop recording at any time, press STOP (■) once.
STOP 15:30
NOTES:
- If the tape ends before the recording is complete, the VCR will stop recording, rewind, eject the tape, and place the VCR into Standby mode. Or, if the VCR is in timer record mode, it will just eject the tape and place the VCR in Standby/timer mode.
- If the VCR ejects the video tape when you press [record], it means the record protection tab has been removed.
HOW TO SET A DELAYED RECORDING
You can make a maximum of eight delayed recordings up to a year in advance.
The example shown is for 24-hour clock operation. 12-hour clock operation can be selected from the manual clock setting menu.
12-hour clock am/pm can be selected using the AM/PM button on the remote control.
- If [TIMER] appears on the VCR display, press TIMER ON/OFF before starting.
- Check that the clock is displaying the correct time.
SETTING A RECORDING
For example: Recording a programme on channel 3 from 21:05 to 22:30 on July 9th.
- Press STOP (■) to switch on the VCR.
- Press MENU.
- Press (▲/▼) to select TIMER. Press SET to confirm.
- The position which is initially highlighted is the next available timer record entry. Press SET to confirm this.
- The display will automatically show today's date.
Either: If this is the date you wish to make the recording on, press SET to confirm this.
Or: enter the recording date using the (▲ / ▼) or the NUMBER BUTTONS. Enter two digits for the day, then two for the month. For example for July 9th, press 0 9 (9th), then 0 7 (July).
- Then press SET to confirm.
- If you want to make additional recordings at the same time each day or week, use (▲/▼) or select D (daily) or W (weekly). Then press SET to confirm.
- Enter the channel using the (▲/▼) or the NUMBER BUTTONS. For example to record a programme on channel 3, press 0 3. Then press SET to confirm.
MENU SCREEN

- Enter the start time using the (▲/▼) or the NUMBER BUTTONS hours first then minutes (when entering less than 10 minutes add a '0' before the number), for example for 21:05 start, press 2 1 0 5. Then press SET to confirm.
- Enter the stop time, for example for 22:30 stop, press 2 2 3 0.
- If you wish to change the RECORDING SPEED, use the (◀/▶) to highlight SP. Press (▲/▼) to select standard play (SP), long play (LP) or extended play (EP), as required.
- Press SET to confirm.
- The MENU now shows all the timer settings you have entered. If you wish to make additional timer recordings, repeat this procedure.
- When you have completed entering timer settings, press MENU to remove the menu from the TV screen.
- Press TIMER ON/OFF once to place the VCR in TIMER STAND-BY mode. This will be shown on the display.


- If it flashes, a video tape has not been inserted into the VCR.
- If the video tape is ejected when the VCR tries to record, the record protection tab has been removed.
- During recording, press STOP (■) to cancel the recording. If there are further recordings to be made, the VCR will return to TIMER STANDBY.
HOW TO SET A DELAYED RECORDING
CHECKING, CHANGING AND CANCELLING A RECORDING
CHECKING A RECORDING
- If in TIMER STANDBY mode, press TIMER ON/OFF to exit.
- Press STOP to switch on the VCR.
- Press MENU.
- Press (▲/▼) to select TIMER. Press SET to confirm.
- All the delayed recordings in the VCR's memory will be shown.
- You can check the settings and change or cancel them.
CHANGING A RECORDING
- Follow steps 1 to 4 of CHECKING A RECORDING.
- If you wish to change a delayed recording, press (▲/▼) to highlight the recording, then press SET.
- Press (◀/▶) to highlight the setting to be changed and correct it by using the (▲/▼) or the NUMBER BUTTONS.
- When all corrections are complete press SET, then press MENU.
- Follow steps 1 to 4 of CHECKING A RECORDING.
- If you wish to cancel a delayed recording, press (▲/▼) to highlight the recording to be cancelled, then press CLEAR.
- Press MENU.
NOTE:
- If there are some programmes to be recorded, do not forget to press TIMER ON/OFF button to return the VCR to TIMER STAND-BY mode.


Stereo sound is possible from this VCR if you have a stereo TV connected to the VCR with a scart lead, or audio equipment connected with audio phono leads. The VCR is normally set so that stereo sound is possible. The sound output from the VCR is controlled by the
AUDIO OUT button on the remote control. If you wish to change the sound output you can use the AUDIO OUT button as follows:
- Press AUDIO OUT once. The LEFT audio channel will be sent to BOTH speakers. L will appear on the VCR display.
- Press AUDIO OUT twice. The RIGHT audio channel will be sent to BOTH speakers. R will appear on the VCR display.
- Press AUDIO OUT three times. The MONO track will be sent to BOTH speakers. L and R will disappear from the VCR display.
- Pressing AUDIO OUT a fourth time, normal Hi-Fi stereo sound will be heard. L and R will appear on the VCR display.
IGR Hi-Fi STEREO SOUND
Your VCR can receive and record IGR sound. The VCR is normally set so that IGR sound is possible if it is present on the receiving signal, otherwise the VCR will automatically switch to receive the mono signal.
NOTES:
- If the tape being played back does not carry sound recorded on Hi-Fi tracks, L and R will not appear on the display.
- If the sound contains 'crackling' or 'popping' noises the sound quality may be improved by adjusting the tracking using CHANNEL ▲/▼.
- If the poor quality is for a long period the VCR will automatically select the mono track and the sound will be in mono.
- Not all TV transmitters provide IGR sound. In this case the VCR automatically switches to receive the mono signal.
AUDIO AND YOUR VCR
CONNECTING TO AUDIO EQUIPMENT
The diagram below shows how to connect your VCR to audio equipment. When connected in this way stereo sound is possible from the speakers.

CHECKING THE AMOUNT OF TAPE REMAINING
When you load a video tape into the VCR it can calculate approximately the amount of video tape remaining in hours and minutes. This is useful in determining whether or not there is sufficient tape left to make a recording.
When a video tape is playing, the amount of tape remaining is calculated for you automatically.
To display the amount of video tape remaining:
- Load the video tape into the VCR
- Press DISPLAY on the remote control as many times as necessary until "R" appears on the VCR display. The tape will wind forward and then return to its original position. The tape remaining will be shown on the VCR display in hours and minutes.
For example:
In Standard Play, 1 hour 23 minutes is left on the tape:
In Long Play, 2 hours 46 minutes is left on the tape:
In Extended Play, 4 hours 9 minutes is left on the tape:

NOTES:
- Do not interrupt the tape remaining calculation.
- If less than 5 minutes of tape remains the display will flash.
You can set your VCR to automatically rewind at the end of playing a video tape and replay the entire tape again. REPEAT will appear on the on-screen display when selected.
To use this feature:
- Press MENU to display the main menu on the screen.
- Press (▲/▼) to select MODE.
- Press SET.
- Press (▲/▼) to select REPEAT.
- Press (◀/▶) to select ON.
- Press SET.
- Press MENU to return to normal screen.
MODE MENU SCREEN
TIME OF DAY
Shows current time of day, if the clock is set. Press the DISPLAY button until the time of day appears. For example, 21:20 appears:

CHANNEL STATUS
Shows the current VCR channel preset. Press the DISPLAY button until the channel number appears, for example:

TAPE COUNTER AND ZERO BACK
Tape counter measures the current position of the video tape in real time. ZERO BACK uses the tape counter to determine a specific point on a tape you may wish to return to.
- Press the DISPLAY button until tape counter appears, for example:
- To identify the current position on a video tape press the CLEAR button and the tape counter will appear:


When you wish to return to this position on the video tape, press ZERO BACK. The tape will rewind/advance to this point.
NOTE:
- The tape counter will only operate on recorded sections of tape.
DISPLAY BRIGHTNESS
The LCD display brightness can be changed to suit the ambient lighting in the room. Switch on the VCR (ensure the menu screen is not on) then press and hold the DISPLAY button for approximately 2 seconds. This will reduce the brightness of the VCR display. Repeat the process to change the display back to the previous setting.
SEARCHING THE VIDEO TAPE
SKIP SEARCHING THE VIDEO TAPE
You can search the tape in 30 second time intervals. To do this follow the procedure below:
- Press PLAY/X2 (▶) to start the video tape playing.
- Press SKIP SEARCH on the remote control. The number of times you press SKIP SEARCH determines the forward search time.
• After searching, normal playback will resume automatically.
1 press = 30 seconds.
2 presses = 1 minute.
3 presses = 1 minute 30 seconds.
4 presses = 2 minutes.
DIGITAL PROGRAMME SEARCH SYSTEM (DPSS)
Your VCR records a marker signal on the tape at the start of each recording. These signals can be used later to locate the starting point of a recording.
Press DPSS to locate a previous programme or the next programme.
For example:
- Load the video tape into the VCR.
- Press DPSS ▶ three times. DPSS 3 will appear on the on-screen display, and the VCR will fast forward to locate the third recording after the current one.
- Press DPSS ◀ once, DPSS -1 will appear on the on-screen display and the VCR will rewind to locate the beginning of the current recording.

- To cancel the search before it has finished, press STOP (■) or PLAY/X2 (▶).
NOTES:
• Recordings must be longer than 3 minutes. • The starting point of playback may vary. - This feature will only work with video tapes recorded on a VCR with the DPSS feature.
RECORDING FROM OTHER EQUIPMENT
You can record video and audio signals from various sources, for example a camcorder, onto a video tape using your VCR.
For example, recording from a camcorder connected to LINE 2 IN/DECODER on your VCR:
Optional SCART connection (not supplied).
Mono/Stereo Camcorder
- Load tape into the VCR.
- Press INPUT SELECT on the remote control until the VCR display shows L2.
- If you wish to record from a source connected to LINE 1 IN/OUT, select L1.
- If you wish to record from a source connected with audio phono leads to the sockets on the front of the VCR and S-VIDEO connection lead, select L3.
- Press REC to start the recording.


Input Select

LINE IN 3
VIDEO .....L..AUDIO..R
NOTES:
- There are many different ways of connecting external equipment to your VCR. Please refer to your equipment operation manuals for further information.
COLOUR
If the VCR is playing poor quality recording, the picture may turn black and white. Selecting PAL/MESECAM may improve this (depending on the recording), although coloured speckles may appear on black and white recordings.
- Press MENU to display the main menu on the screen.
- Press (▲/▼) to select MODE.
- Press SET.
- Press (▲/▼) to select COLOUR.
- Press (◀/▶) to select AUTO/PAL or MESECAM.
- Press SET and then MENU to return to the normal screen.
MODE MENU SCREEN

BLUE MUTE
The TV screen will be blue if a TV channel with no signal is selected, an unrecorded section of tape is played, or the quality of the recording on the tape is poor. Select OFF to disable this feature.
- Follow steps 1 to 3 from COLOUR.
- Press (▲/▼) to select BLUE MUTE.
- Press (◀/▶) to select OFF.
- Press SET and then MENU to return to the normal screen.
CHILD LOCK
You can lock your VCR with this feature. It will work even when the VCR is in standby, preventing children from operating the VCR.
TO ENGAGE CHILD LOCK
Press and hold 📄 on the remote control for about 2 seconds.
flashes and then remains lit on the VCR display confirming that CHILD LOCK has been activated.
Regardless of what other operating buttons are touched, the VCR will continue to operate in its present mode. If CHILD LOCK is activated during playback, once the tape reaches its end, the VCR will automatically rewind the tape, eject it, and turn the power off.
TO DISENGAGE CHILD LOCK
Press and hold ① about 2 seconds.
starts flashing and then disappears. CHILD LOCK is disengaged.
NOTES:
- If you attempt to change modes by pressing another button while CHILD LOCK is on, the refrigerator will flash on the VCR display.
- If power is interrupted for more than 1 minute (due to power failure etc), CHILD LOCK may disengage.
DECODER SWITCHING OPERATION
If you connect a separate decoder to the VCR connected to L2 as previously shown, you will need to set the decoder function to ON in order to record the descrambled signal and/or watch it on your TV. Now, when the VCR receives a scrambled signal it is output via LINE 2 terminal to the decoder. The decoder then outputs the descrambled signal back to LINE 2 terminal and the signal can be recorded. The VCR outputs the descrambled signal to your TV through the LINE1 terminal and you can watch the descrambled picture.
When making recordings using a separate decoder connected as shown remember to leave the decoder function ON.
If you connect a decoder unit to the VCR, the decoder unit provides a switching signal which will automatically allow your TV to display the descrambled signal routed through the VCR. To use this feature make sure that the VCR is connected to both TV and decoder unit by SCART leads. Then:
- Press STANDBY to place the VCR in Stand-by mode, OR
- Press [TV/VCR] on the remote control to place the VCR in 'VCR mode', 'VCR' will appear on the display.
If you switch the decoder function ON when connected to a decoder unit as shown, you will NOT be able to watch the descrambled picture in TV mode or in VCR mode.
MANUALLY TUNING A CHANNEL
Normally it will not be necessary to tune in a broadcast channel manually except in unusual circumstances such as poor signal.
Ensure the video channel is selected on the TV.
- Press MENU.
- Press (▲/▼) to select SET UP. Press SET to confirm.
- CHANNEL PRESET will be highlighted. Press SET.
- Press (▲/▼) to select CHANNEL.
- Press () to select CH or CC. This will determine whether off air (CH) or cable (CC) is tuned first. Note that both off air and cable will be tuned regardless of setting.
- Press (◀/▶) to start tuning in either direction. Tuning will stop when a channel is received. If it is not the desired channel, press (◀/▶) to continue tuning.
- Press (▲/▼) to select FINE TUNING. Press and hold (◄/►) until the sharpest colour picture is obtained.
IMPORTANT NOTE:
- If you connect an independent decoder, you must press (▲/▼) to select DECODER, then select (◄/►) to turn the decoder function ON.
- Press (▲/▼) to select SKIP. The SKIP function determines whether the channel can be selected when using the CHANNEL (▲/▼) instead of the NUMBER BUTTONS. Press (◀/▶) to select ON or OFF for this option.
- Press SET to confirm.
- Press MENU to leave this function.


BROADCAST AND CATV CHANNELS
| Station Real Station RealSignals Channel Signals ChannelNumbers Numbers | |||||
| V 5/DHF | 2/A • CH3/B • CH4 CH:04 C• CH:05 S24 ▲ CH:786/3 •CH:06 S25 ▲CH:078 CH:08 A9/G • CH:09 T10/H •CH:10CH:1111/H1 •CH:1112/H2 •CH:12CH:12S11CH:13 | ▲ CH:75▲ CH:76•/S03/S23 ▲CH:79C5M1/S1 CC:01VMS/S2: M10/S10U1/S11: U10/S20S21: S40S41 | CH:77CH:80CC:02: CC:10CC:11: CC:20CC:21: CC:40CC:41 | ||
| UHF | 2122: :6869 | CH:21CH:22: :CH:68CH:69 | |||
• Available in Italy ▲ Available in Switzerland
NOTES:
- The VCR has 84 programmable channel positions, each of which can be set to any of the broadcast and CATV channels shown in the table. If you select CC on the menu, cable will be tuned first. Note that both cable and non-cable will be tuned regardless of the setting.
MANUALLY SORTING CHANNELS
SORTING THE CHANNELS INTO YOUR PREFERRED ORDER
You can change the order of the channels with the following procedure.
- Press MENU.
- Press (▲/▼) to select SET UP. Press SET to confirm.
- Press (▲/▼) to select CHANNEL SORT. Press SET to confirm.
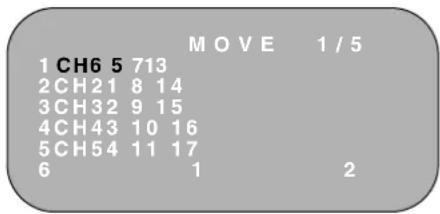
- The MOVE position will be highlighted. Press SET to confirm.
- Press (▲/▼/◄/►) to highlight the channel to be moved. Press SET to confirm.
- Press (▲/▼/◄/►) to highlight the new position for the channel. Press SET to confirm.
- If any more channels are to be moved, repeat procedure from step 5.
- When all the channels are in your preferred order, press CLEAR to return to the CHANNEL SORT menu or press MENU to return to a normal screen.
- MENU SCREEN
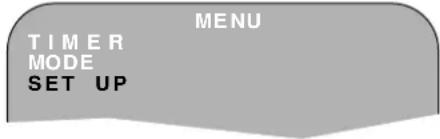

NOTE:
If, when moving channels the picture becomes unclear and the on-screen display is unreadable, the MODE OSD button can be used to toggle between a blue background and the normal picture.
The blue background will be shown until either another channel is selected or the MODE OSD button is pressed again.
MANUALLY SORTING CHANNELS
DELETING CHANNELS
If there is a channel you wish to delete from the VCR memory you can follow the procedure below.
- Press MENU.
- Press (▲/▼) to select SET UP. Press SET to confirm.
- Press (▲/▼) to select CHANNEL SORT. Press SET to confirm.
- Press (▲/▼) to select CANCEL. Press SET to confirm.
- Press (▲/▼/◄/►) to highlight the channel to be cancelled.
- Press SET twice to cancel the channel.
- When all the channels you wish have been cancelled, press CLEAR to return to the CHANNEL SORT menu or press MENU to return to a normal screen.
MENU SCREEN 2.


NOTE:
If, when deleting channels, the picture becomes unclear and the on-screen display is unreadable, the MODE OSD button can be used to toggle between a blue background and the normal picture.
The blue background will be shown until either another channel is selected or the MODE OSD button is pressed again.
CUSTOMISED INSTALLATION
CHANGING THE ON-SCREEN DISPLAY LANGUAGE
Changing the language used by the on-screen display will not change the operation of the VCR or make it suitable for any other broadcast standard.
- Press MENU.
- Press (▲/▼) to select SET UP. If the display is not in a language you can understand, this is the fourth option from the top. Press SET to confirm.
- Press (▲/▼) to select LANGUAGE (the last option).
- Then press SET to confirm.
- Press (▲/▼/◄/►) to select your language. Then press SET to confirm. Press MENU to return to a normal screen.
MANUALLY SETTING THE CLOCK
- Press MENU. Press (▲/▼) to select SET UP. Press SET to confirm.
- Press (▲/▼) to select CLOCK. Press SET to confirm.
- Press (▲/▼) to select either 12 or 24 hour clock.
- Press (◀/▶) to select TIME. Enter the time using the NUMBER BUTTONS or (▲/▼). If the minutes are less than 10, enter the leading 0. If using the 12 hour clock enter AM or PM by pressing on the remote control.
- Press (◀/▶) to select DATE. Enter the date using the NUMBER BUTTONS or (▲/▼). For example, for 1st April enter 01 04.
- Press (◀/▶) to select YEAR. Enter the last two digits of the year using the NUMBER BUTTONS or (▲/▼). For example, for 2002 enter 02. For the year 2003 enter 03.
NOTE:
- You will need to update the clock for daylight saving.


VCR DIGITAL DISPLAY

- TIMER indicator.
- VCR MODE indicators.
- VIDEO TAPE indicator.
- RECORD indicator.
- AUDIO OUTPUT indicators.
- CHILD LOCK indicator.
- TAPE SPEED indicators.
- DECODER indicator.
- VIDEO PROGRAMMING SYSTEM/PROGRAMME DELIVERY CONTROL indicator.
- CLOCK, TAPE COUNTER, TAPE STATUS AND CHANNEL INPUT STATUS indicator.
NOTE:
- Some models do not have all the features shown, therefore, they will not appear on the display.
SELECTING THE OUTPUT FROM THE VCR
If your VCR is connected to your TV with a scart lead, when you start to play a video tape the VCR will automatically switch its output so that the playback picture is shown on the TV. In this case 'VCR' will appear on the VCR display.
You can manually override this by pressing [TV/VCR] on the remote control. Now the TV broadcast channel will be seen on the TV screen and 'VCR' will disappear from the VCR display.
- Pressing [TV/VCR] again will return the TV picture to the playback picture.
ON-SCREEN DISPLAY
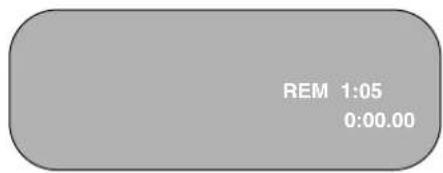
All the information you need on the VCR status will be summarised on the on-screen display. If you are recording, playing back a tape or watching a broadcast on the video channel you can call up three standard on-screen displays. The display can be selected by pressing the MODE OSD button on the remote control, 1,2,3 or 4 times.
- AUTO, the current mode and channel number will be displayed for 3 seconds when an operation or number button is pressed.
- FULL., all the active features will also be shown on screen.
1.

2.
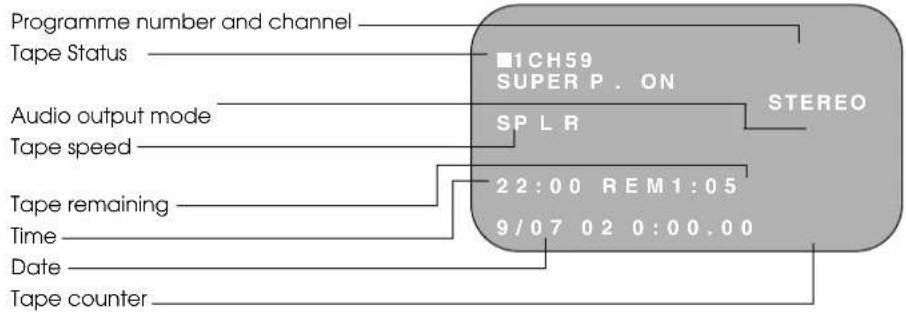
- COUNTER, this display will show the tape counter and amount of tape remaining.
- DISPLAY OFF, this will remove the display from the screen.
3.
NOTES:
- The default time and date will not be displayed if the clock has not been set. • The VCR will return to display 1. each time it is switched on.
- If you are recording from this VCR to another, make sure you remove the display from the screen otherwise it will be recorded.
SPECIFICATIONS
Format: VHS PAL standard
Number of heads: 6
Video signal system: PAL/MESECAM colour or monochrome signal:
625 lines
Hi-Fi audio recording system:
Deep layer recording system conforming to stereo Hi-Fi VHS standard.
Maximum playing time: 240
min. with E-240 video cassette in Standard Play (SP) mode.
480 min. with E-240 video cassette in Long Play (LP) mode.
720 min. with E-240 video cassette in Extended Play (EP) mode.
Tape width: 12.7 mm
Tape speed: 23.39 mm/s Standard Play (SP)
11.70 mm/s Long Play (LP)
7.8 mm/s Extended Play (EP)
Antenna: 75 Ω unbalanced
Reception channels: VHF channel 2-12 + S1-S41, UHF channel 21-69
RF output signal: UHF channel 21-69
Power requirement: AC 230V, 50 Hz
Power consumption: 17 W approx. (Standby 2.5 W)
Operating temperature: 5 °C to 40 °C
Storage temperature: -20 °C to 55 °C
Video input: 1.0 Vp-p, 75 Ω
Video output: 1.0 Vp-p, 75 Ω
Audio input:
Line1&2: -3.8 dBs, 10 kΩ; Line 3: -3.8 dBs, 47kΩ
Audio output:
Line1&2: -3.8 dBs, 1kΩ; Audio Out: -3.8 dBs, 1kΩ
Hi-Fi audio:
Dynamic range: ~ 90 dBs typ. (SP);
Frequency response: 20 Hz - 20 kHz;
Wow and flutter: < 0.005% Wrm (JIS A)
Dimensions: 360(W) x 289(D) x 93(H) mm
Weight:
3.2 kg (approx.)
Supplied accessories:
75 Ω RF Connection cable, operation manual,
remote control, AA/R6/UM3 battery (x2)
- Specifications are subject to change without notice as part of our policy of continuous improvement.
- No liability is accepted for any inaccuracies or omissions in this publication, although every possible care has been taken to make it complete and as accurate as possible.
TROUBLESHOOTING
| AREA PROBLEM POSSIBLE CAUSE/CURE | ||
| INSTALLATION TV will not tune in to the VCR. | · Check all the cables are correctly connected.· Check your TV manual for correct tuning of your TV. | |
| Auto Installation screen does not appear when the VCR is switched on OR Auto Installation is not complete. | ||
| POWER | Display is not working. | · Make sure the power cord is plugged in.· Make sure the wall socket has power (plug another appliance in). |
| VCR will not operate -☐ appears in VCR display. | · Press the TIMER ON/OFF button to disengage timer. | |
| VCR will not respond to any commands. | · Check CHILD LOCK is not engaged.· Safety device operating: unplug VCR for 2 hours. | |
| PLAYBACK | No picture appears. | · Make sure the TV is set to the video channel.· Check all connecting cables. |
| Playback picture is snowy. | · Adjust the tracking using CHANNEL▲/▼ buttons.· Try another tape.· The video heads may have been contaminated - refer to a SHARP Service Facility. | |
| Playback recording does not playback in stereo. | · Ensure the VCR is connected to a stereo TV and SCART lead.· Programme may not carry stereo. | |
| RECORDING | Tape is automatically ejected when pressing REC (●) or TIMER ON/OFF buttons. | · The record-protection tab has been removed. |
TROUBLESHOOTING
| AREA PROBLEM POSSIBLE CAUSE/CURE | ||
| REMOTECONTROL | The VCR can not be operated by remote control | • Remote control is too far away from the main unit.• Point the remote control at the VCR.• Batteries are flat - replace both.• Batteries have not been inserted correctly.• VCR is positioned in strong light. |
| TAPETRANSPORT/MECHANISM | Tape can not be loaded. | • Make sure there is no other tape in the VCR.• Make sure you are loading the tape correctly. |
| Rewind is not possible. | • Make sure the taoe is not at the start. | |
| OTHERPROBLEMS | Picture does not change even though CHANNEL▲/▼ buttons are pressed. | • Make sure the VCR is not in Timer or Menu mode. |
| Desired channel position can not be selected. | • The channel position has been set to be skipped. Cancel the SKIP mode for that channel. | |
| No colour or poor TV picture on normal viewing. | • Make sure all the cables are connected properly.• Make sure the VCR power cord is properly plugged in. | |
| Not possible to view picture or playback through RF-OUT. | • Make sure the RF OUTPUT has not been switched off. (Refer to note on “RF THROUGH ON/OFF” in the “TUNING THE TV TO THE VCR” section of the manual.) | |
| Desired channel has interference. | • Possible weak signal strength, the same channel with a better signal strength may have been tuned in on another VCR preset channel. Example;VCR preset 1 = ZDF andVCR preset 14 = ZDF(Refer to Manually Sorting Channels section to move the channel to your desired position.)• TV aerial may need adjusting. | |
| No picture appears. | • Make sure the TV is on the video channel.• Check all connecting cables. | |
VCR RESET
- Press the STOP button on the front of the VCR.
- Press and hold MENU and the CHANNEL DOWN ▼ button together for 10 seconds.
VCR RESET IS NOW COMPLETE
Please continue with your previous procedure.
RF CHANNEL TUNING
If you have a preferred RF output channel, this can be set manually (21-69) by following the procedure below:
- Press the STANDBY button.
- Press and hold the MENU button on the VCR front panel for 3 seconds.
- Wait for a flashing channel number to appear on the VCR display.
- The channel number can now be changed by using the CHANNEL (▲/▼) buttons.
- Press the SET button to store.
- Your TV will now require tuning to the new channel.
(White text with blue background)

RF THROUGH ON/OFF:
If you wish to connect your VCR to the TV with only a scart lead, the RF Output on your VCR can be turned OFF and ON by pressing the CLEAR button then the SET button on the remote control at point 3 of the "RF CHANNEL TUNING" above. This will help minimise interference.
GB This equipment complies with the requirements of Directives 89/336/EEC and 73/23/EEC as amended by 93/68/EEC.
- COPYRIGHT
- THIS MANUAL COVERS A RANGE OF MODELS
- VCR FRONT PANEL/REMOTE CONTROL EQUIVALENT FUNCTIONS
- CONTENTS
- BEFORE USING YOUR VCR
- INSTALLING YOUR VCR
- BASIC OPERATION
- ADVANCED OPERATION
- SPECIAL FEATURES ON YOUR VCR
- CUSTOMISED INSTALLATION
- MORE INFORMATION ABOUT YOUR VCR
- IMPORTANT NOTES ON YOUR VCR
- IDEAL VCR LOCATION
- PLACE THE VCR
- DO NOT
- POWER SOCKETS
- (TYPE AA/R6/UM3) BATTERIES (X2)
- RF CONNECTION CABLE
- TO FIT THE BATTERIES INTO THE REMOTE CONTROL
- REMOTE CONTROL
- CONNECTING THE CABLES
- TUNING THE TV INTO THE VCR
- CAUTION
- NOTE
- RF THROUGH ON/OFF
- AUTO INSTALLATION
- SETTING THE CLOCK
- SCART LEAD CONNECTION (NOT SUPPLIED)
- IMPORTANT NOTES ON YOUR VCR AND VIDEO TAPES
- VIDEO TAPES
- PLAYBACK
- SHARP SUPER PICTURE
- PICTURE DISTURBANCE DURING PLAYBACK
- PAUSING AND SLOW MOTION
- NOTES
- FORWARD/REVERSE VISUAL SEARCH
- IMMEDIATE RECORDING
- SELECTION OF A CHANNEL
- TAPE SPEED SELECTION
- SIMPLE TIMED RECORDING
- HOW TO SET A DELAYED RECORDING
- SETTING A RECORDING
- CHECKING, CHANGING AND CANCELLING A RECORDING
- CHECKING A RECORDING
- CHANGING A RECORDING
- IGR HI-FI STEREO SOUND
- AUDIO AND YOUR VCR
- CONNECTING TO AUDIO EQUIPMENT
- CHECKING THE AMOUNT OF TAPE REMAINING
- TIME OF DAY
- CHANNEL STATUS
- TAPE COUNTER AND ZERO BACK
- DISPLAY BRIGHTNESS
- SEARCHING THE VIDEO TAPE
- SKIP SEARCHING THE VIDEO TAPE
- DIGITAL PROGRAMME SEARCH SYSTEM (DPSS)
- RECORDING FROM OTHER EQUIPMENT
- COLOUR
- MODE MENU SCREEN
- BLUE MUTE
- CHILD LOCK
- TO ENGAGE CHILD LOCK
- TO DISENGAGE CHILD LOCK
- DECODER SWITCHING OPERATION
- MANUALLY TUNING A CHANNEL
- IMPORTANT NOTE
- BROADCAST AND CATV CHANNELS
- MANUALLY SORTING CHANNELS
- SORTING THE CHANNELS INTO YOUR PREFERRED ORDER
- DELETING CHANNELS
- CHANGING THE ON-SCREEN DISPLAY LANGUAGE
- MANUALLY SETTING THE CLOCK
- VCR DIGITAL DISPLAY
- SELECTING THE OUTPUT FROM THE VCR
- ON-SCREEN DISPLAY
- SPECIFICATIONS
- TROUBLESHOOTING
- VCR RESET
- RF CHANNEL TUNING
Brand : SHARP
Model : VC-MH770SM
Category : VCR