
ESS1890C - Sander RYOBI - Free user manual and instructions
Find the device manual for free ESS1890C RYOBI in PDF.
User questions about ESS1890C RYOBI
0 question about this device. Answer the ones you know or ask your own.
Ask a new question about this device
Download the instructions for your Sander in PDF format for free! Find your manual ESS1890C - RYOBI and take your electronic device back in hand. On this page are published all the documents necessary for the use of your device. ESS1890C by RYOBI.
USER MANUAL ESS1890C RYOBI
natural_image
Line drawings of two RY0BI industrial machines on base platforms (no text or symbols)回CE
natural_image
Line drawing of a hand using a computer to clean or install a hard drive component (no text or symbols)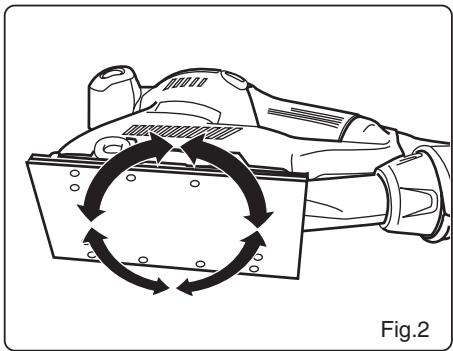
natural_image
Diagram of a robotic arm with circular motion arrows indicating rotational movement (no text or symbols)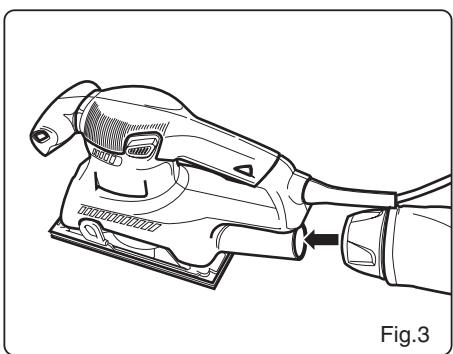
natural_image
Line drawing of a hand using a power tool to lift a motor, labeled Fig.3 (no text or symbols on the diagram itself)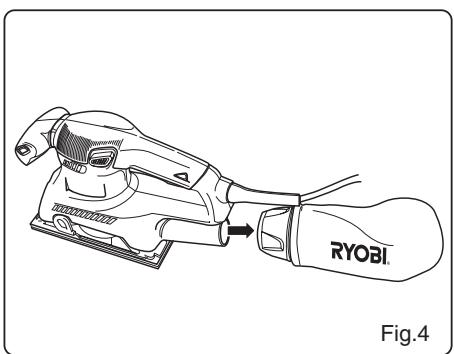
natural_image
Line drawing of a power tool labeled 'RYOBI' with a hand extending to it, showing no text or symbols beyond the label.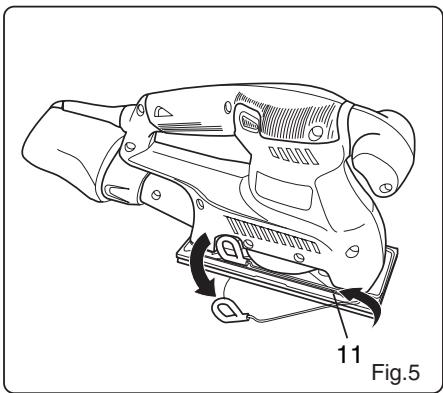
natural_image
Technical line drawing of a mechanical device with labeled parts and directional arrows (no text or symbols beyond labels)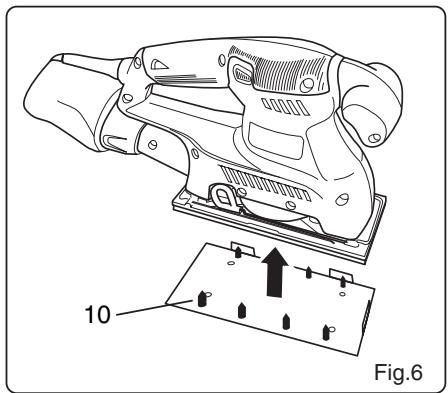
natural_image
Technical line drawing of a mechanical device with an inset showing a component labeled '10' (no text or symbols on the device itself)| Attention ! | Il est indispensable que vous lisiez les instructions contenues dans ce manuel avant le montage et la mise en service de l'appareil. |
| Important! | It is essential that you read the instructions in this manual before mounting and operating this machine. |
| Achtung! | Bitte lesen Sie unbedingt vor Montage und Inbetriebnahme die Hinweise dieser Bedienungsanleitung. |
| ¡Atención! | Es imprescindible que lea las instrucciones de este manual antes del montaje y de la puesta en servicio. |
| Attenzione! | Prima di procedere al montaggio e alla messa in funzione, è indispensabile leggere attentamente le istruzioni del presente manuale. |
| Atenção! | É indispensável ler as instruções deste manual antes de montar e pôr em serviço. |
| Let op ! | Het is absoluut noodzakelijk vóór montage en inbedrijfstelling de aanwijzingen in deze handleiding te lezen. |
| Observera! | Det är nödvändigt att läsa instruktionerna i denna bruksanvisning före montering och driftsättning. |
| OBS! | Denne brugsanvisning skal læses igennem inden montering og ibrugtagning. |
| Advarsel! | Vennligst les instruksjonene i denne bruksanvisningen før du monterer og tar i bruk maskinen. |
| Huomio! | On ehdottoman välttämätöntä lukea tässä käyttöohjeessa annetut ohjeet ennen asennusta ja käyttöönottoa. |
| Προσοχή! | Eïvai απαραίτητο να διαβάσετε τις συστάσεις των οδηγιών αυτών πριν τη συναρμολόγηση και τη θέση σε λειτουργία |
| Figyelem! | Feltétlenül fontos, hogy a jelen használati útmutatóban foglalt előírásokat az összeszerelés és az üzembe helyezés ellőt elolvassa! |
| Dûležité upozornění! | Před montáží nářadí a uvedením do provozu je nutné si přečíst následující pokyny. |
| Внимание! | Перед сборкой и запуском инструмента необходимо прочесть инструкции из настоящего руководства. |
| Atentie! | Este indispensabil sā citiți instrucțiunile conținute în acest mod de utilizare încainte de montaj și de punerea în funcțiune. |
| Uwaga! | Przed montowaniem i uruchomieniem, koniecznie musicie się Państwo zapoznać z zaleceniami zawartymi w niniejszym sposobie użycia. |
| Pomembno! | Zelo pomembno je, da pred namestitvijo in prvo uporabo te naprave preberete navodila v tem priročniku. |
| Upozorenje! | Važno je da upute u ovom Korisničkom priručniku pročitate prije postavljanja i uporabe ovog alata. |
| Dikkat! | Montajdan ve aletin kullanımına başlamadan bu kılavuzda bulunan talimatları okumanız gerekmektedir. |
Sous réserve de modifications techniques / Subject to technical modifications / Technische Änderungen vorbehalten / Bajo reserva de modificaciones técnicas / Con riserva di eventuali modifiche tecniche / Com reserva de modificações técnicas / Technische wijzigingen voorbehouden / Med förbehåll för tekniska ändringar / Med forbehold for tekniske ændringer / Med forbehold om tekniske endringer / Tekniset muutokset varataan / Υπό την επιφύλαξη τεχνικών τροποποήσεων / A műszaki módosítás jogát fenntartjuk / Změny technických údajů vyhrazeny / Могут быть внесены технические изменения / Sub rezerva modificațiilor tehnice / Z zastrzeženiem modyfikacji technicznych / Tehnične spremembe dopuščene Podložno tehničkim promjenama / Teknik düzeltmeler hakkı saklıdır
Français

IMPORTANT LISEZ LES CONSIGNES DE SÉCURITÉ.
CARACTÉRISTIQUES PRODUIT
READ THESE SAFETY INSTRUCTIONS.
Before using the 1/3 SHEET SANDER, please read the manual carefully, especially the safety instructions. Keep this manual for future reference.
GENERAL SAFETY RULES

WARNING
Read all instructions. Failure to follow all instructions listed below may result in electric shock, fire and/or serious injury. The term "power tool" in all of the warnings listed below refers to your mains operated (corded) power tool or battery operated (cordless) power tool.

SAFETY ALERT SYMBOL. Indicates caution or warning. May be used in conjunction with other symbols or pictures.

WARNING: Failure to obey a safety warning can result in serious injury to yourself or to others. Always follow the safety precautions to reduce the risk of fire, electric shock and personal injury.

WARNING: Do not attempt to operate this tool until you have read thoroughly and understood completely safety rules, etc. contained in this manual. Failure to comply can result in accidents involving fire, electric shock or serious personal injury. Save owners manual and review frequently for continuing safe operation and instructing others who may use this tool.

The operation of any tool can result in foreign objects being thrown into your eyes, which can result in severe eye damage. Before beginning power tool operation, always wear safety goggles or safety glasses with side shields and
a full face shield when needed. We recommend Wide Vision Safety Mask for use over eyeglasses or standard safety glasses with side shields.
WORK AREA
- Keep work area clean and well lit. Cluttered and dark areas invite accidents.
- Do not operate power tools in explosive atmospheres, such as in the presence of flammable liquids, gases, or dust. Power tools create sparks which may ignite the dust or fumes.
- Keep children and bystanders away while operating a power tool. Distractions can cause you to lose control.
ELECTRICAL SAFETY
■ Power tool plugs must match the outlet. Never modify the plug in any way. Do not use any adapter plugs with earthed (grounded) power tools. Unmodified plugs and matching outlets will reduce risk of electric shock.
■ Avoid body contact with earthed or grounded surfaces such as pipes, radiators, ranges and refrigerators. There is an increased risk of electric shock if your body is earthed or grounded.
- Do not expose power tools to rain or wet conditions. Water entering a power tool will increase the risk of electric shock.
- Do not abuse the cord. Never use the cord for carrying, pulling or unplugging the power tool. Keep cord away from heat, oil, sharp edges or moving parts. Damaged or entangled cords increase the risk of electric shock.
■ When operating a power tool outdoors, use an extension cord suitable for outdoor use. Use of a cord suitable for outdoor use reduces the risk of electric shock.
PERSONAL SAFETY
■ Stay alert, watch what you are doing and use common sense when operating a power tool. Do not use a power tool while you are tired or under the influence of drugs, alcohol or medication. A moment of inattention while operating power tools may result in serious personal injury.
■ Use safety equipment. Always wear eye protection. Safety equipment such as dust mask, non-skid safety shoes, hard hat, or hearing protection used for appropriate conditions will reduce personal injuries.
- Avoid accidental starting. Ensure the switch is in the off position before plugging in. Carrying power tools with your finger on the switch or plugging in power tools that have the switch on invites accidents.
■ Remove any adjusting key or wrench before turning the power tool on. A wrench or a key left attached to a rotating part of the power tool may result in personal injury.
■ Do not overreach. Keep proper footing and balance at all times. This enables better control of the power tool in unexpected situations.
English
GENERAL SAFETY RULES
■ Dress properly. Do not wear loose clothing or jewellery. Keep your hair, clothing and gloves away from moving parts. Loose clothes, jewellery or long hair can be caught in moving parts.
If devices are provided for the connection of dust extraction and collection facilities, ensure these are connected and properly used. Use of these devices can reduce dust related hazards.
POWER TOOL USE AND CARE
- Do not force the power tool. Use the correct power tool for your application. The correct power tool will do the job better and safer at the rate for which it was designed.
- Do not use the power tool if the switch does not turn it on and off. Any power tool that can not be controlled with the switch is dangerous and must be repaired.
■ Disconnect the plug from the power source before making any adjustments, changing accessories, or storing power tools. Such preventive safety measures reduce the risk of starting the power tool accidentally.
■ Store idle power tools out of the reach of children and do not allow persons unfamiliar with the power tool or these instructions to operate the power tool. Power tools are dangerous in the hands of untrained users.
- Maintain power tools. Check for misalignment or bindling of moving parts, breakage of parts and any other condition that may affect the power tools operation. If damaged, have the power tool repaired before use. Many accidents are caused by poorly maintained power tools.
- Keep cutting tools sharp and clean. Properly maintained cutting tools with sharp cutting edges are less likely to bind and are easier to control.
■ Use the power tool, accessories and tool bits etc., in accordance with these instructions and in the manner intended for the particular type of power tool, taking into account the working conditions and the work to be performed. Use of the power tool for operations different from intended could result in a hazardous situation.
SERVICE
■ Have your power tool serviced by a qualified repair person using only identical replacement parts. This will ensure that the safety of the power tool is maintained.
- Check damaged parts. Before further use of the tool, a guard or other part that is damaged should be carefully checked to determine that it will operate properly and perform its intended function. Check for alignment of moving parts, free running of moving parts, breakage of parts, mounting and any other part that is damaged should be properly repaired or replaced by an authorized service center unless otherwise indicated in this instruction manual. Have defective switches replaced by an authorized service facility. Do not use the tool if the switch does not turn it on and off.
SPECIFIC SAFETY INSTRUCTIONS FOR SANDERS
■ Always wear safety goggles and a dust mask when sanding, especially sanding over-head.
■ The machine is not suitable for wet sanding.
- Do not use sanding paper larger than needed. Extra paper extending beyond the sanding pad can also cause serious lacerations.
■ The dust bag shall be equipped with the tool. And it shall be emptied frequently. To connect dust bag, insert the adapter of dust bag to the dust-collection opening on the rear end of the sander.

WARNING
Do not throw sanding dust on an open fire because materials in fine particle form may be explosive.

WARNING
A suitable breathing respirator must be worn while sanding lead paint, some woods and metal to avoid breathing the harmful/toxic dust or air.
SPECIFICATION
| ESS-1890 | ESS-2590V | |
| Input | 230 V ~ 50 Hz | 230 V ~ 50 Hz |
| Wattage | 180 W | 250 W |
| No load speed | 12000 OPM | 6000-12000 OPM |
| Orbital diameter | 1.6 mm | 1.6 mm |
APPLICATIONS
Use only for the purposes listed below:
■ Sanding on wood surfaces.
■ Removing rust from and sanding steel surfaces.
■ Sanding plastics.
English
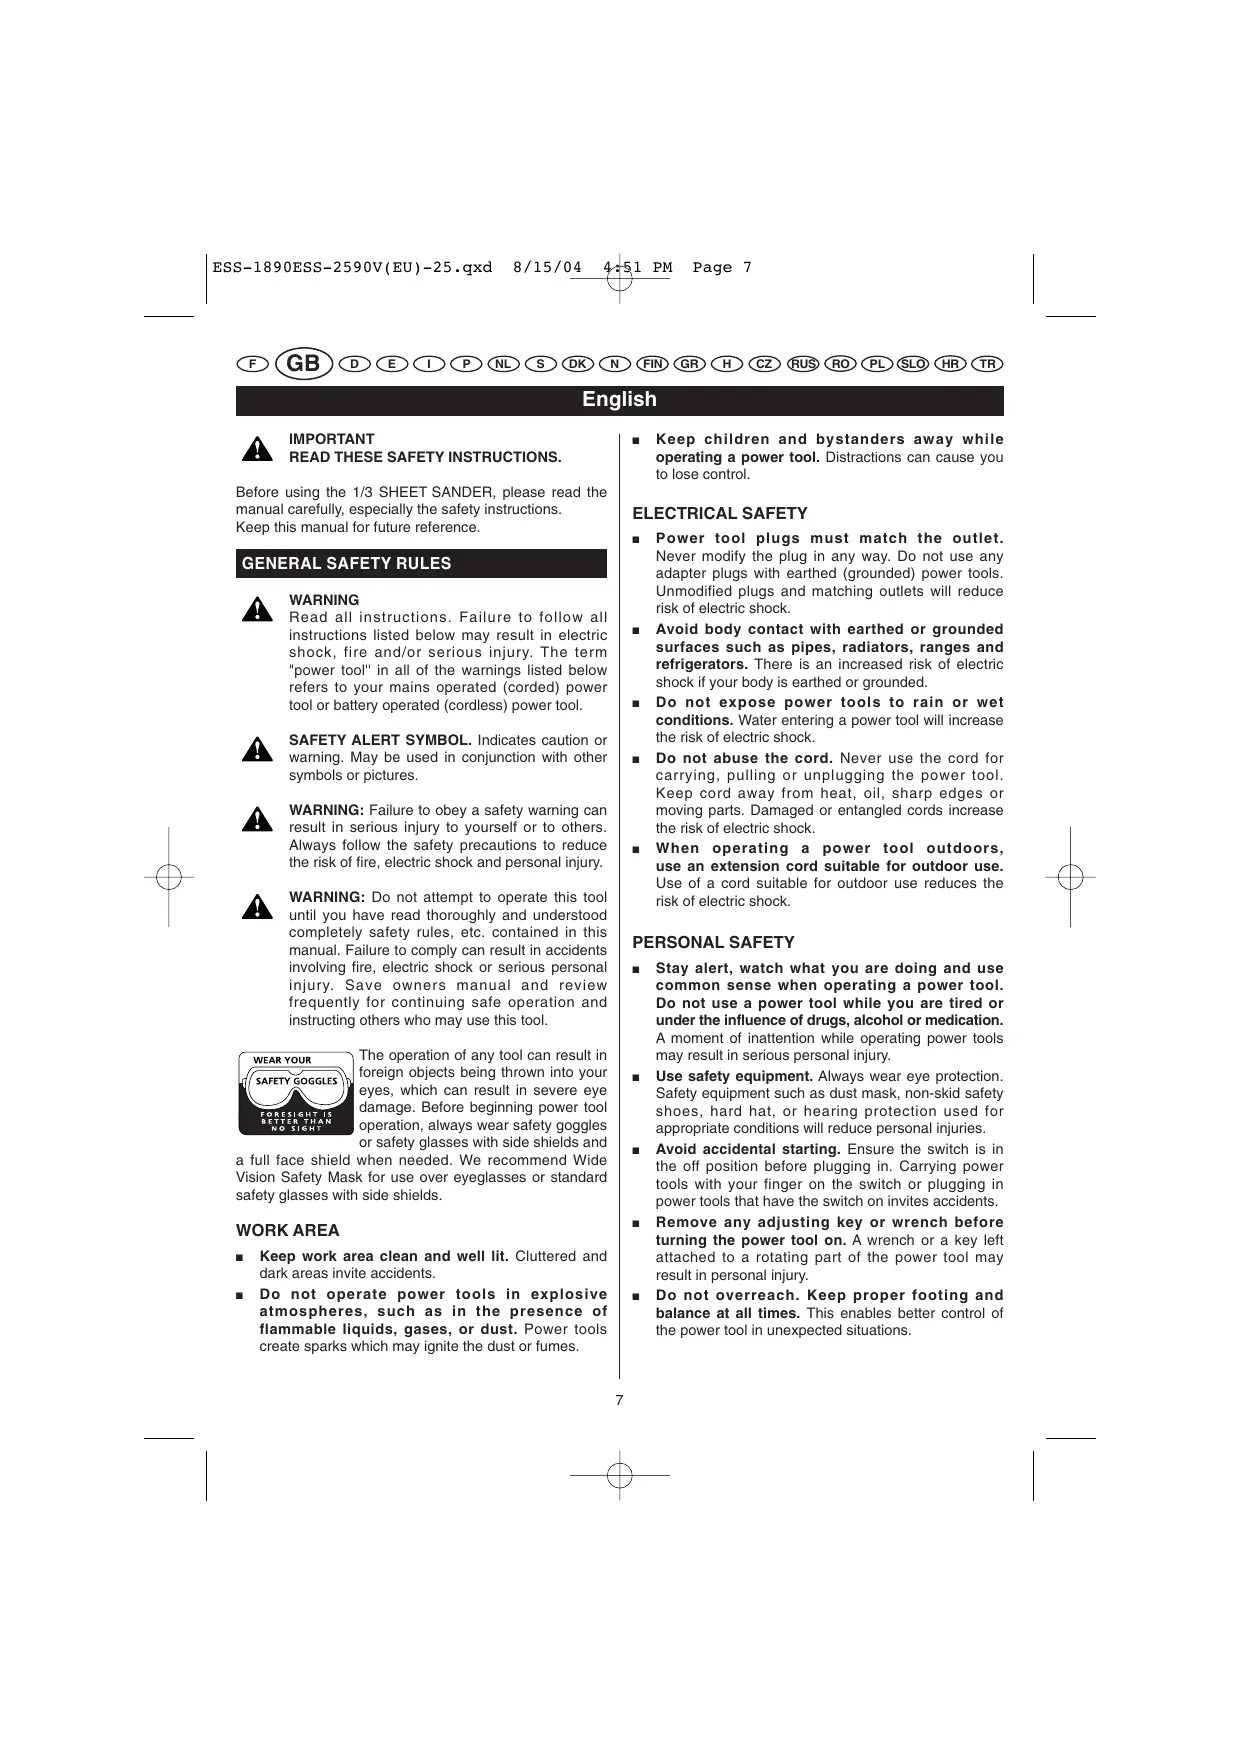
DESCRIPTION
- Variation speed control
- "ON/OFF" switch trigger
- Power cord guard
- Dust bag assembly
- Sanding pad
- Paper clamp
- Live tool indicator
- Puncher
- Sandpaper
- Base
- Non-adhesive sandpaper
FEATURES
Your sander is suitable for sanding with coarse, medium, and fine grit sandpaper. It will produce a fine scratch free finish when used to sand with the grain on wood surfaces. It has been designed so that flush corner sanding on three sides of the sander is possible.
Your sander has a comfortable palm grip handle that provides maximum one-hand comfort, and reduces operator fatigue during continuous sanding operations.
Your sander also has a built in dust collection that collects dust through punched holes in the sandpaper and cushion (Fig. 5).
Before attempting to use your sander, familiarize yourself with all operating features and safety requirements.
SWITCH (1)
ELECTRONIC SPEED CONTROL
The electronic speed control allows the operator to adjust speed to meet varity sanding material from tough heavy grained timber to delicate veneer.
This tool is equipped with a simple switch control. To turn the sander "ON", slide the switch to the left.
Slide the switch to the right to turn the sander "OFF".

WARNING
Do not allow familiarity with your sander to make you careless. Remember, a careless fraction of a second is sufficient to inflict severe injury.
OPERATION

WARNING
Your sander should never be connected to power supply when you are assembling parts, making adjustments, assembling or replacing sandpaper, cleaning, or when not in use. Disconnecting sander will prevent accidental starting that could cause serious personal injury.
INSTALLING NON-ADHESIVE SANDPAPER (Fig. 5)
Inspect sandpaper before installing. DO NOT use broken or defective sandpaper.
■ Unplug your sander.

WARNING
Failure to unplug your sander could result in accidental starting causing possible serious personal injury.
■ If replacing sandpaper, remove old sandpaper. To remove paper, release paper clamp by lifting up on lever, and disengaging it from the tab, and allowing the lever to lower.
■ Insert end of new 1/3 sheet sandpaper approximately 1/2 in. (12.7 mm) under the paper clamp.
Note: 1/2 in. (12.7 mm) clamping of sandpaper is necessary for multi-sheet stacking of paper.
■ Lift up on lever and lock into place. Apply downward pressure to conform sandpaper to plate.
- Wrap sandpaper around cushion. Lift lever on opposite end of sander and insert loose end of sandpaper under paper clamp. Fit sandpaper tight against cushion.
■ Lift up on lever and lock into place.
■ Multiple sheets of sandpaper can be installed at one time for convenience.
ATTACHING ADHESIVE (HOOK & LOOP) SANDPAPER
■ Unplug the sander.
■ Align holes in hook and loop type sanding paper with holes in pad, then carefully press fuzzy side of sanding paper against pad as tightly as possible.
Note: Hook and loop type sanding papers can be reused for the life of the sanding abrasive. It is recommended that you keep the sanding paper backing pad clean to provide for best adhesion. Clean occasionally by brushing lightly with a small brush.
English
OPERATION
PAPER PUNCH (Fig. 6)
A paper punch template has been supplied with your sander for aligning and punching holes in sandpaper. The punched holes must align with the holes in the sander cushion.
■ Install sandpaper on your sander.
■ Align sander cushion over the paper punch.
■ Push down on sander
SANDPAPER SELECTION
Selecting the correct size grit and type sandpaper is an extremely important step in achieving a high quality sanded finish. Aluminum oxide, silicon carbide, and other synthetic abrasives are best for power sanding. Natural abrasives, such as flint and garnet are too soft for economical use in power sanding.
In general, coarse grit will remove the most material and finer grit will produce the best finish in all sanding operations. The condition of the surface to be sanded will determine which grit will do the job. If the surface is rough, start with a coarse grit and sand until the surface is uniform. Medium grit may then be used to remove scratches left by the coarser grit and finer grit used for finishing of the surface. Always continue sanding with each grit until surface is uniform.
Note: DO NOT use sander without sandpaper. Doing so will damage the cushion.
PREPARING FOR OPERATION

CAUTION
Be careful not to let your hand completely cover air vents.
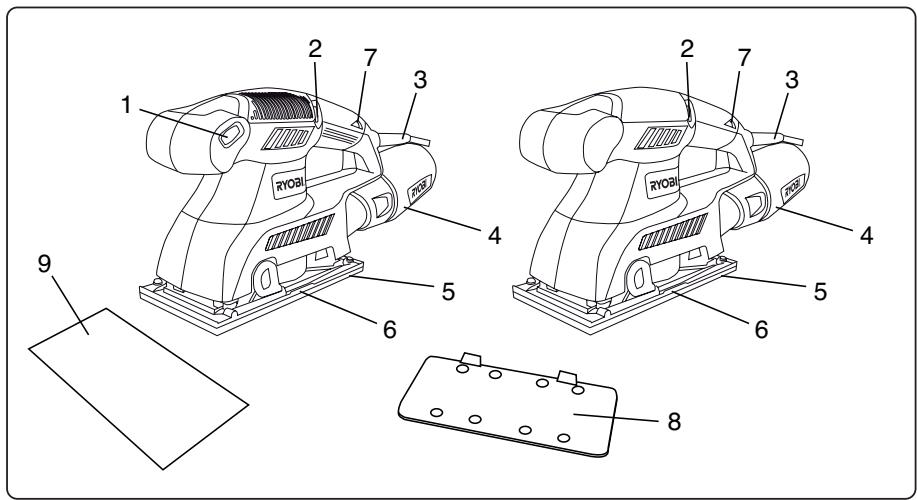
SANDING (Fig. 1)

WARNING
Unsecured work could be thrown towards the operator causing injury.
Hold your sander in front and away from you, keeping it clear of the workpiece. Start your sander by pressing the switch button to "ON" position and letting the motor build to its maximum speed. Gradually lower your sander on the work with a slight forward movement. Move it slowly using forward and backward strokes.
DO NOT FORCE. The weight of the unit supplies adequate pressure, so let the sandpaper and sander do the work. Applying additional pressure only slows the motor, rapidly wears sandpaper and greatly reduces sander speed.
Excessive pressure will overload the motor causing possible damage from motor overheating and can result in inferior work.
Any finish or resin on wood may soften from the frictional heat. Do not allow sanding on one spot too long as the sander's rapid action may remove too much material, making the surface uneven.

WARNING
Do not wear loose clothing or jewelry when operating sander. They could get caught in moving parts causing serious injury. Keep head away from sander and sanding area. Hair could be drawn into sander causing serious injury.
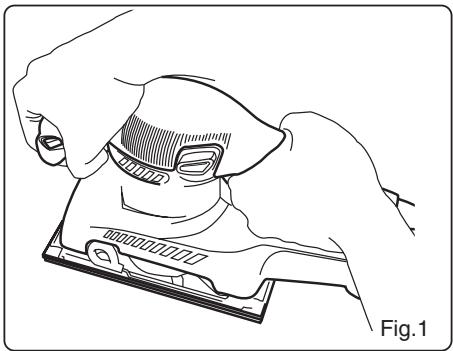
ORBITAL MOTION (Fig. 2)
Orbital motion is ideal for fast cutting action when removing old finishes, smoothing rough wood, cutting stock down to required dimensions, or for finishing surfaces to be painted. The sandpaper moves in tiny circles at a very high speed, allowing the sander to move easily.

WARNING
Collected sanding dust from sanding surface coatings such as polyurethanes, linseed oil, etc. can self-ignite in your sander dust bag or elsewhere and cause fire. To reduce the risk of fire always empty your dust bag frequently while sanding and never store or leave a sander without totally emptying its dust bag. Also follow the recommendations of the coatings manufacturers.
USING THE DUST BAG ASSEMBLY
The dust bag assembly provides a dust collection system for the sander. Sanding dust is drawn up through the holes of the sanding disc and collected in the dust bag during sanding.
TO ATTACH THE DUST BAG ASSEMBLY (Fig. 3)
Follow these directions to attach the dust bag assembly.
■ Unplug the sander.

WARNING
Failure to unplug the tool could result in accidental starting causing possible serious injury.
■ Slide the dust bag assembly onto the blower exhaust on the sander using a slight twisting motion.
English
OPERATION
TO EMPTY THE DUST BAG ASSEMBLY (Fig. 4)
For more efficient operation, empty the dust bag when it is no more than half full. This will permit the air to flow through the bag better. Always empty and clean the dust bag thoroughly upon completion of a sanding operation and before placing the sander in storage.
To empty dust bag:
■ Unplug your sander.

WARNING
Failure to unplug your sander could result in accidental starting causing possible serious personal injury.
■ Remove the dust bag assembly from the sander.
■ Remove the dust bag from the frame.
■ Shake out the dust.
■ Replace the dust bag on the frame.
■ Replace the dust bag assembly on the sander.
LIVE TOOL INDICATOR
This tool features a live tool indicator (7) which illuminates as soon as the tool is connected to the supply. This warns the user that the tool is connected and will operate when the switch is pressed.
ENVIRONMENTAL PROTECTION

Do not dispose of in general household waste. Instead, dispose of in an environmentally friendly way. Contact your local recycling centre ou council for advise. Ryobi takes the care of the environment very seriously.
Deutsch

WICHTIG
ELEKTRONISCHE SNELHEIDSREGELAAR
T∅MMING AF ST∅VPOSEN (Fig. 4)
BRUK OG VEDLIKEHOLD AV VERKT∅Y MED LEDNING
TUOTTEEN TEKNISET TIEDOT
SZLIFOWANIE (Rys. 1)

OSTRZEŻENIE
UPORABA SESTAVA LOVILCA PRAHU
GARANTIE - CONDITIONS
All Ryobi products are guaranteed against manufacturing defects and defective parts for a period of twenty four (24) months from the date stated on the original invoice drawn up by the retailer and given to the end user. Deterioration caused by normal wear and tear, unauthorised or improper use or maintenance, or overload are excluded from this guarantee as are accessories such as battery packs, light bulbs, blades, fittings, bags, etc. In the event of malfunction during the warranty period, please take the NON-DISMANTLED product, along with the proof of purchase, to your retailer or nearest Authorised Ryobi Service Centre.
This warranty in no way affects your legal rights concerning defective products.

GARANTIE - BEDINGUNGEN
DÉCLARATION DE CONFORMITÉ
Directive "machines" (98/37/CE)
Directive “basse tension” (73/23/CEE) et ses modifications (93/98/EEC)
DECLARATION OF CONFORMITY
We declare under our sole responsibility that this product is in conformity with the following standards or standardized documents.
Applicable EC Directives
EC Machinery Directive (98/37/EC)
EC Low Voltage directive (73/23/EEC) with amendments (93/98/EEC)
EC Directive of electromagnetic Compatibility (89/336/EEC) with amendments
Applicable Harmonized Standard: EN55014-1/A2:2002; EN55014-2/A1:2001; EN61000-3-2:2000; EN61000-3-3/A1:2001; EN60745-2-4:2003; EN60745-1:2003 + A1:2003; EN50366:2003.
D
Directive "maşini" (98/37/CEE)
Machine: SHEET SANDER
| Name of company:Address: | Ryobi Technologies S.A.S.Immeuble Le Grand RoissyZ.A. du Gué35, rue de Guivry B. P.577990 LE MESNIL AMELOTFRANCETel.: +33-1-60 94 69 70Fax: +33-1-60 94 69 79 |
| Name of company:Address: | Ryobi Technologies (UK) Ltd.MEDINA HOUSEFIELD HOUSE LANEMARLOWBUCKS, SL71TBUNITED KINGDOMTel.: +44-1628-894400Fax: +44-1628-894401 |
| Name of company:Address: | Ryobi Technologies GmbHITTERPARK 4D-40724 HILDENGERMANYTel: +49-2103-29580Fax: +49-2103-2958544 |
Type: ESS-1890/ESS-2590V
CE 09.08.2006
| Name/Title: | Mark PearsonManaging Director |
Signature:

| Name/Title: | Walter Martin EichingerGeneral Manager |
Signature:


- Français
- IMPORTANT LISEZ LES CONSIGNES DE SÉCURITÉ.
- READ THESE SAFETY INSTRUCTIONS.
- GENERAL SAFETY RULES
- WARNING
- WORK AREA
- ELECTRICAL SAFETY
- PERSONAL SAFETY
- English
- POWER TOOL USE AND CARE
- SERVICE
- SPECIFIC SAFETY INSTRUCTIONS FOR SANDERS
- APPLICATIONS
- DESCRIPTION
- FEATURES
- SWITCH (1)
- ELECTRONIC SPEED CONTROL
- OPERATION
- INSTALLING NON-ADHESIVE SANDPAPER (Fig. 5)
- ATTACHING ADHESIVE (HOOK & LOOP) SANDPAPER
- PAPER PUNCH (Fig. 6)
- SANDPAPER SELECTION
- PREPARING FOR OPERATION
- CAUTION
- SANDING (Fig. 1)
- ORBITAL MOTION (Fig. 2)
- USING THE DUST BAG ASSEMBLY
- TO ATTACH THE DUST BAG ASSEMBLY (Fig. 3)
- TO EMPTY THE DUST BAG ASSEMBLY (Fig. 4)
- LIVE TOOL INDICATOR
- ENVIRONMENTAL PROTECTION
- Deutsch
- WICHTIG
- ELEKTRONISCHE SNELHEIDSREGELAAR
- T∅MMING AF ST∅VPOSEN (Fig. 4)
- BRUK OG VEDLIKEHOLD AV VERKT∅Y MED LEDNING
- SZLIFOWANIE (Rys. 1)
- OSTRZEŻENIE
- UPORABA SESTAVA LOVILCA PRAHU
- GARANTIE - CONDITIONS
- GARANTIE - BEDINGUNGEN
- DÉCLARATION DE CONFORMITÉ
- DECLARATION OF CONFORMITY
- D
Brand : RYOBI
Model : ESS1890C
Category : Sander