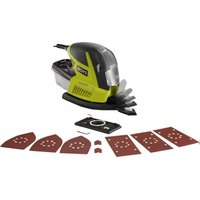
EMS180RG - Sander RYOBI - Free user manual and instructions
Find the device manual for free EMS180RG RYOBI in PDF.


| Product Type | Multi-pad sander (detail and sheet) |
| Brand | RYOBI |
| Model | EMS180RG |
| Voltage | 240 V, 50 Hz |
| Power | 180 W |
| No-Load Speed | 6,000 - 12,000 min⁻¹ |
| Pad Size (Triangular) | 168 x 100 mm |
| Pad Size (1/3 Sheet) | 185 x 92 mm |
| Weight | 1.4 kg |
| Orbital Action | Circular oscillating motion for fine finish |
| Dust Collection | Attachable dust collection box |
| Variable Speed Control | Yes, electronic control selector |
| Base Pad Attachment | Hook and loop (velcro) for quick change |
| Interchangeable Pads | Triangular detail pad and 1/3 sheet pad included |
| Live Tool Indicator | Illuminates when connected to power |
| Finger Pad | Foldable for detail sanding |
| Paper Clamp | For non-adhesive sandpaper |
| Safety Features | Double insulated, safety goggles and dust mask recommended |
| Maintenance | Clean sanding sheets with rubber block; empty dust box frequently |
| Spare Parts | Sanding sheets (hook & loop and non-adhesive), dust bag, hex key |
| Certification | Regulatory Compliance Mark (RCM) |
Frequently Asked Questions - EMS180RG RYOBI
User questions about EMS180RG RYOBI
0 question about this device. Answer the ones you know or ask your own.
Ask a new question about this device
Download the instructions for your Sander in PDF format for free! Find your manual EMS180RG - RYOBI and take your electronic device back in hand. On this page are published all the documents necessary for the use of your device. EMS180RG by RYOBI.
USER MANUAL EMS180RG RYOBI
DESCRIPTION
- On/off switch
- Dust collection box
- Variable speed control selector
- Live tool indicator
- Triangular detail pad
- Sheet pad
- Triangular detail sanding sheet
-
Non-adhesive sandpaper
-
Quick change hook and loop pad
- Cover
- Finger pad
- Lock
- Hex key
- Paper clamp
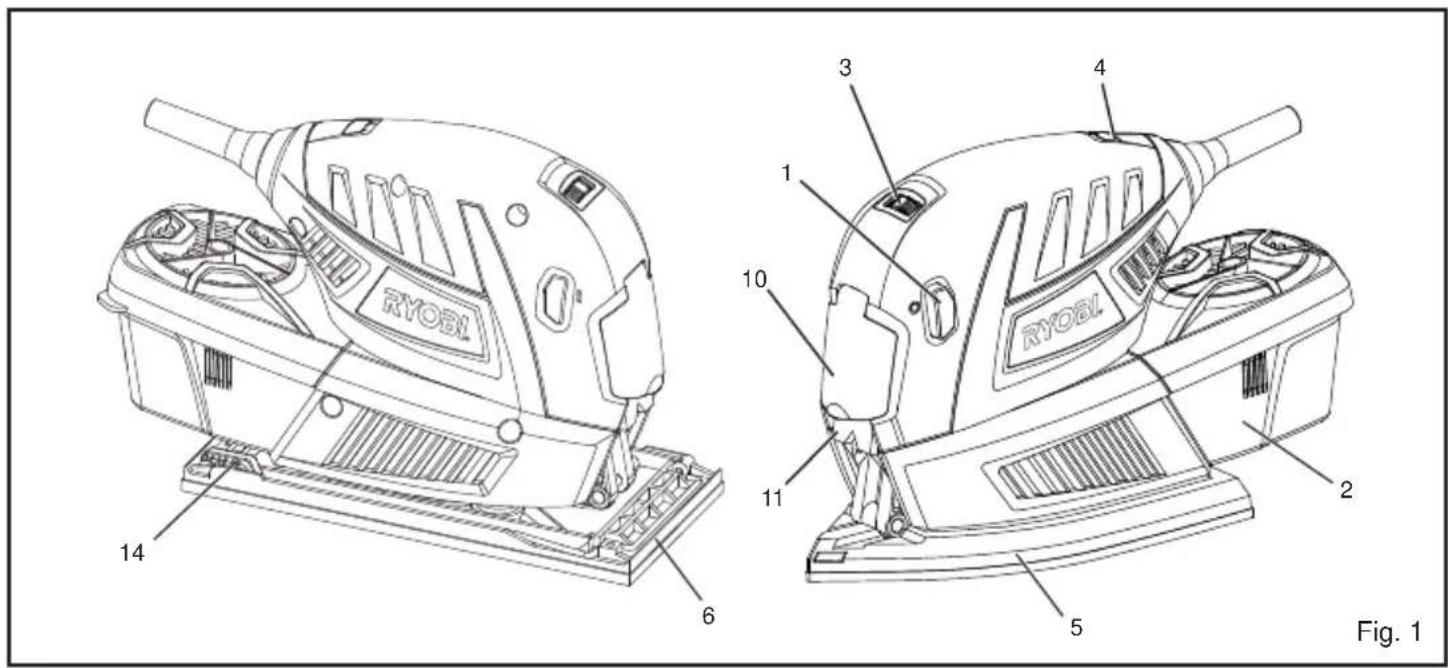
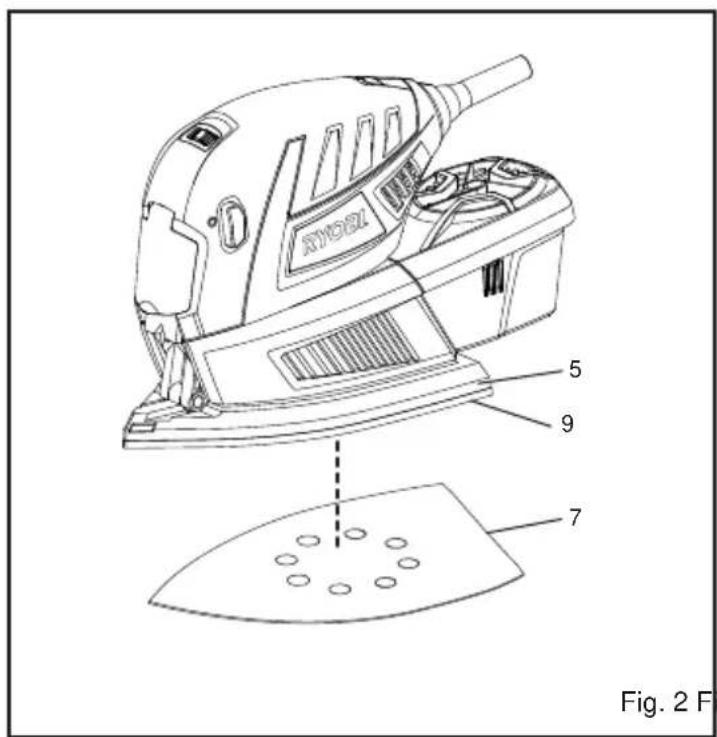
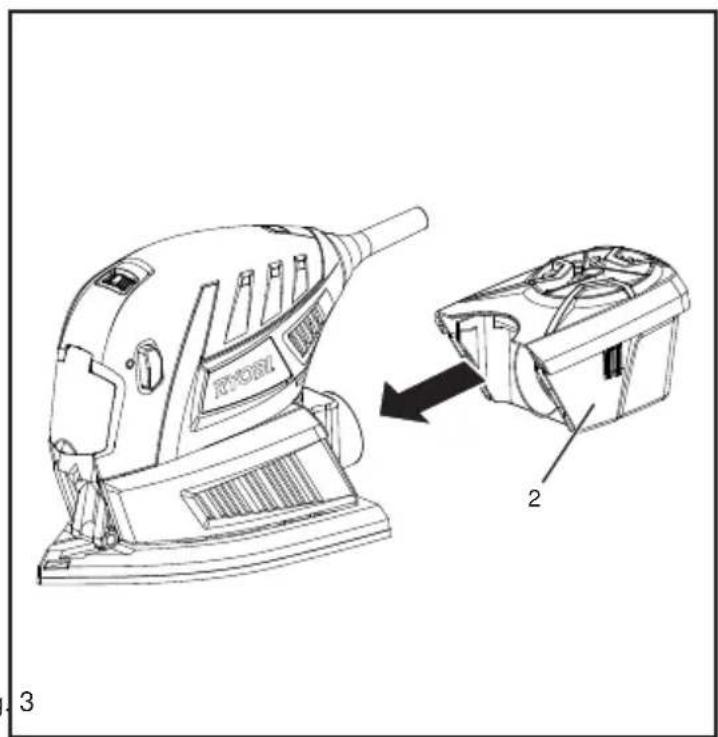
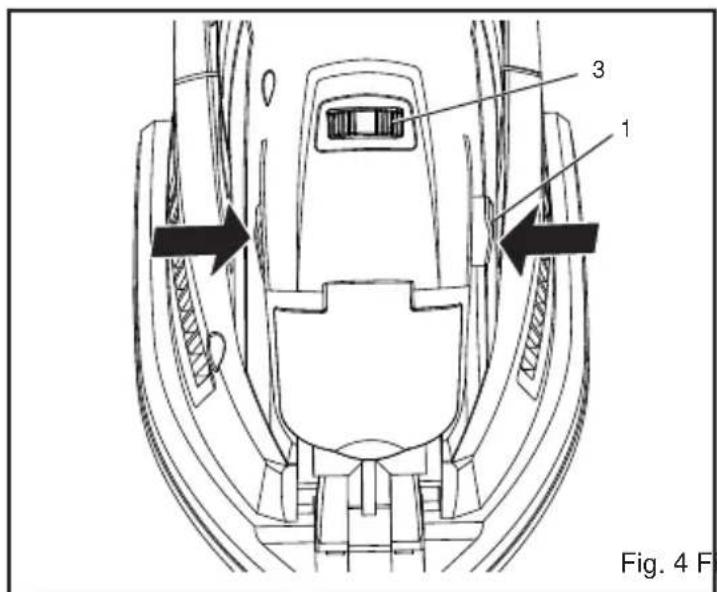
Fig. 4 Fig
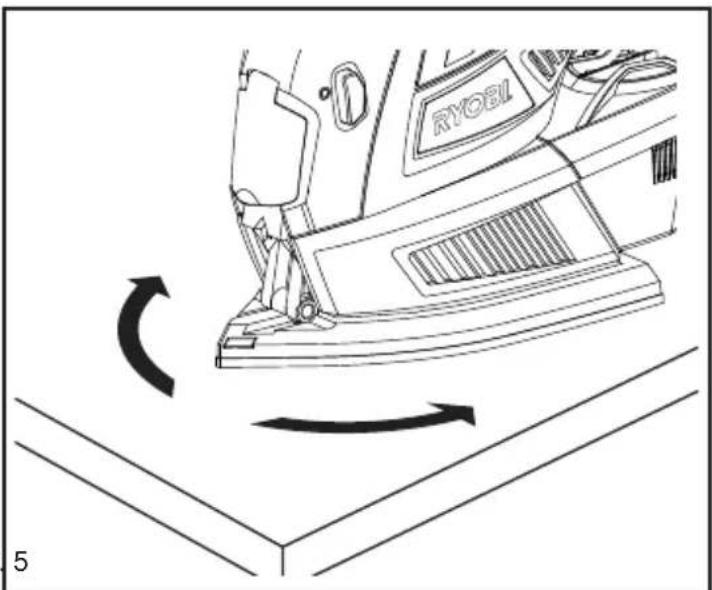
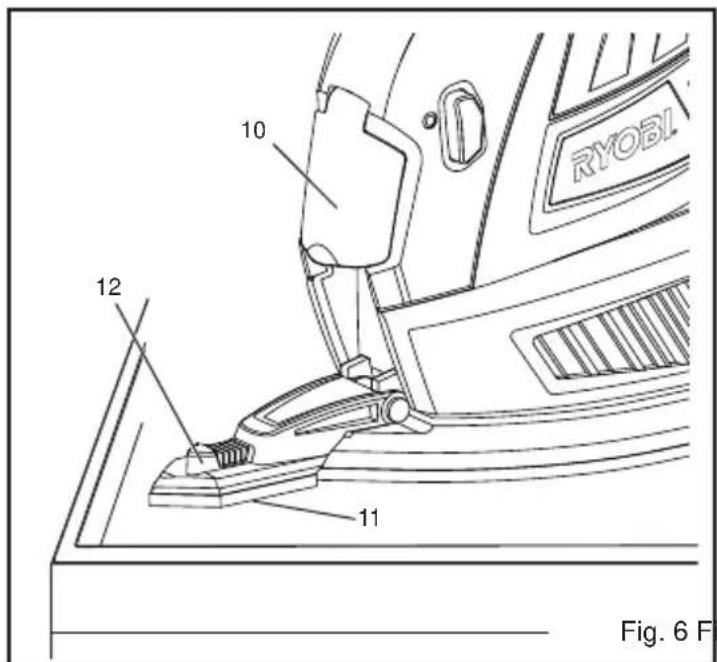
Fig. 6 Fig
Important!
It is essential that you read the instructions in this manual before operating this machine.
Subject to technical modifications.
GENERAL POWER TOOL SAFETY WARNINGS
WARNING
Read all safety warnings and all instructions. Failure to follow the warnings and instructions may result in electric shock, fire and/or serious injury.
Save all warnings and instructions for future reference.
The term “power tool” in the warnings refers to your mains-operated (corded) power tool or battery-operated (cordless) power tool.
1. WORK AREA SAFETY
a. Keep work area clean and well lit. Cluttered or dark areas invite accidents.
b. Do not operate power tools in explosive atmospheres, such as in the presence of flammable liquids, gases, or dust. Power tools create sparks which may ignite the dust or fumes.
c. Keep children and bystanders away while operating a power tool. Distractions can cause you to lose control.
2. ELECTRICAL SAFETY
a. Power tool plugs must match the outlet. Never modify the plug in any way. Do not use any adaptor plugs with earthed (grounded) power tools. Unmodified plugs and matching outlets will reduce risk of electric shock.
b. Avoid body contact with earthed or grounded surfaces such as pipes, radiators, ranges and refrigerators. There is an increased risk of electric shock if your body is earthed or grounded.
c. Do not expose power tools to rain or wet conditions. Water entering a power tool will increase the risk of electric shock.
d. Do not abuse the cord. Never use the cord for carrying, pulling or unplugging the power tool. Keep cord away from heat, oil, sharp edges or moving parts. Damaged or entangled cords increase the risk of electric shock.
e. When operating a power tool outdoors, use an extension cord suitable for outdoor use. Use of a cord suitable for outdoor use reduces the risk of electric shock.
f. If operating power tools in a damp location is unavoidable, use a residual current device (RCD) protected supply. Use of an RCD reduces the risk of electric shock.
3. PERSONAL SAFETY
a. Stay alert, watch what you are doing and use common sense when operating a power tool. Do not use a power tool while you are tired or under the influence of drugs, alcohol or medication. A moment of inattention while
operating power tools may result in serious personal injury.
b. Use personal protective equipment. Always wear eye protection. Protective equipment such as dust mask, non-skid safety shoes, hard hat, or hearing protection used for appropriate conditions will reduce personal injuries.
c. Prevent unintentional starting. Ensure the switch is in the off-position before connecting to power source and/or battery pack, picking up or carrying the tool. Carrying power tools with your fin-nger on the switch or energising power tools that have the switch on invites accidents.
d. Remove any adjusting key or wrench before turning the power tool on. A wrench or a key left attached to a rotating part of the power tool may result in personal injury.
e. Do not overreach. Keep proper footing and balance at all times. This enables better control of the power tool in unexpected situations.
f. Dress properly. Do not wear loose clothing or jewellery. Keep your hair, clothing and gloves away from moving parts. Loose clothes, jewellery or long hair can be caught in moving parts.
g. If devices are provided for the connection of dust extraction and collection facilities, ensure these are connected and properly used. Use of dust collection can reduce dust-related hazards.
4. POWER TOOL USE AND CARE
a. Do not force the power tool. Use the correct power tool for your application. The correct power tool will do the job better and safer at the rate for which it was designed.
b. Do not use the power tool if the switch does not turn it on and off. Any power tool that can not be controlled with the switch is dangerous and must be repaired.
c. Disconnect the plug from the power source and/or the battery pack from the power tool before making any adjustments, changing accessories, or storing power tools. Such preventive safety measures reduce the risk of starting the power tool accidentally.
d. Store idle power tools out of the reach of children and do not allow persons unfamiliar with the power tool or these instructions to operate the power tool. Power tools are dangerous in the hands of untrained users.
e. Maintain power tools. Check for misalignment or binding of moving parts, breakage of parts and any other condition that may affect the power tools operation. If damaged, have the power tool repaired before use. Many accidents are caused by poorly maintained power tools.
f. Keep cutting tools sharp and clean. Properly maintained cutting tools with sharp cutting edges are less likely to bind and are easier to control.
g. Use the power tool, accessories and tool bits etc., in accordance with these instructions and in the manner intended for the particular type of power tool, taking into account the working conditions and the work to be performed. Use of the power tool for operations different from intended could result in a hazardous situation.
5. SERVICE
a. Have your power tool serviced by a qualified repair person using only identical replacement parts. This will ensure that the safety of the power tool is maintained.
SPECIFIC SAFETY INSTRUCTIONS FOR SANDERS
■ Always wear safety goggles and a dust mask when sanding, especially sanding over-head.
■ The product is not suitable for wet sanding.
■ Do not use sanding paper larger than needed. Extra paper extending beyond the sanding pad can also cause serious lacerations.
■ The dust bag shall be equipped with the product. It should be emptied frequently. To connect a dust bag, insert the adaptor of dust bag to the dust-collection opening on the rear end of the sander.

WARNING
Do not throw sanding dust on an open fire because materials in fi ne particle form may be explosive.

WARNING
A suitable breathing respirator must be worn while sanding lead paint, some wood and metal to avoid breathing the harmful/toxic dust or air.
Additional safety instructions

WARNING
The product is not intended for use by persons (including children) with reduced physical, sensory or mental capabilities, or lack of experience and knowledge, unless they have been given supervision or instruction concerning use of the product by a person responsible for their safety.
Children should be supervised to ensure that they do not play with the product.
- Keep children and visitors away. Visitors should wear safety glasses and be kept a safe distance from work area. Do not let visitors contact tool or extension cord.
It is recommended that this tool always be supplied via a residual current device with a rated residual current of 30mA or less.
SPECIFICATIONS
Voltage 240 V 50 Hz

Power 180 W
Orbital per minute 6000-12000 min
-1
Pad size
Triangular pad 168 x 100 mm
1/3 sheet pad 185 x 92 mm
Weight 1.4 kg
FEATURES
KNOW YOUR MULTI-PAD SANDER
See Figure 1.
Your sander is suitable for sanding with coarse, medium and fine grit sandpaper. It will produce a fine, scratch-free fi nish when used to sand with the grain on wood surfaces. It has been designed so that fi ush corner sanding on three sides of the sander is possible.
Your sander has a comfortable palm grip handle that provides maximum one-hand comfort and reduces operator fatigue during continuous sanding operations.
Before using this product, familiarize yourself with all operating features and safety requirements. However, do not let familiarity with the tool make you careless.
SWITCH
This tool is equipped with a simple switch control located near the front of the motor housing.
EXCHANGEABLE HOOK AND LOOP BASE PADS
This sander includes 2 base pads which are interchangeable for different applications.
■ Triangular detail pad for detail sanding.
■ 1/3 sheet pad for sanding large areas.
The hook and loop design allows for quick change of sanding sheets and different pads. It also enables you to easily clean and reuse them.
CIRCULAR SANDING ACTION
The oscillating action of your sander produces very quick, small circular motion of the sanding pad. The motion is ideal for producing a fine finished grain.
DUST COLLECTION BOX
The dust collection box attaches to the sander and keeps dust to a minimum.
VARIABLE SPEED CONTROL
See Figure 4.
Your sander has advanced electronic features, designed to assist you in getting the maximum use from your sander. By making proper speed selections, your sander can be adjusted to specific sanding needs.
The variable speed control allows the sander to develop a no-load speed that can be adjusted from 6,000 to 12,000 min -1 . The variable speed control selector is conveniently located on the front of the sander.
The electronic feature of your sander introduces the fl exibility of adjusting the motor speed to required job conditions. An electronic speed control module senses the load applied to the motor and increases or decreases motor voltage to compensate for and maintain desired RPM. Speed can be set according to the sanding purpose or the surface of the workpiece you will be using. Increase speed for rough surfaces or for quick removal of stock and decrease speed for smaller, delicate sanding applications.
ASSEMBLY
WARNING
The tool should never be connected to a power supply when you are assembling parts, making adjustments, cleaning, performing maintenance, or when the tool is not in use. Disconnecting the tool will prevent accidental starting that could cause serious injury.
SANDPAPER SELECTION
Selecting the correct size, grit and type of sand paper is an extremely important step in achieving a high quality sanded fi nish. Aluminum oxide, silicon carbide, and other synthetic abrasives are best for power sanding. Natural abrasives, such as fi int and garnet are too soft for economical use in power sanding.
In general, coarse grit will remove the most material and finer grit will produce the best finish in all sanding operations. The condition of the surface to be sanded will determine which grit will do the job. If the surface is rough, start with a coarse grit and sand until the surface is uniform. Medium grit may then be used to remove scratches left by the coarser grit and finer grit used for nishing of the surface. Always continue sanding with each grit until surface is uniform.
WARNING
Do not use sander without sandpaper; doing so will damage the cushion.
Sheet/pad recommended use
80-grit sanding sheet Coarse sanding
120-grit sanding sheet Light sanding
150-grit sanding sheet Light sanding
ATTACHING HOOK AND LOOP SANDING DISCS
See Figure 2.
- Unplug the sander.
- Align holes in hook and loop type sanding disc with holes in pad, then carefully press fuzzy side of sanding disc against pad as tightly as possible.
NOTE: Hook and loop type sanding discs can be reused for the life of the sanding abrasive. It is recommended that you keep the sanding disc backing pad clean to provide for best adhesion. Clean occasionally by brushing lightly with a small brush.
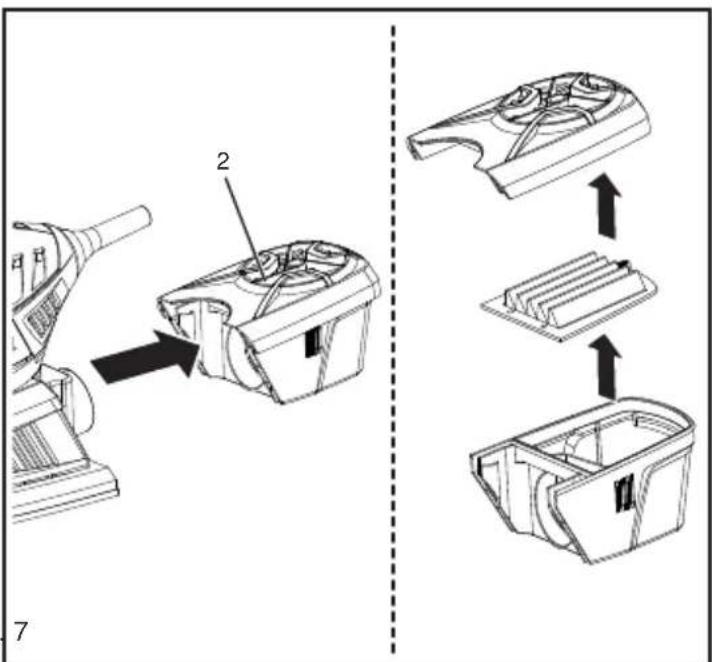
ATTACHING THE DUST COLLECTION BOX
See Figure 3.
The dust collection box provides a dust collection system for the sander. Sanding dust is drawn up through the holes of the sanding disc and collected in the dust collection box during sanding.
- Unplug the sander.
- Using a slight twisting motion, firmly slide the dust collection box assembly in the blower exhaust on the sander.
WARNING
Exercise caution when using this tool. Careless actions, for even a fraction of a second, can result in serious personal injury.
INTENDED USE
You may use the sander for the purposes listed below:
• sanding on wood surfaces
- removing rust from and sanding steel surfaces
• polishing and scrubbing porcelain and metal
CAUTION
Keep the cord away from the sanding pad and position the cord so that it will not be caught on lumber, tools, or other objects during sanding.
WARNING
Always wear safety goggles or safety glasses with side shields when operating this tool. Failure to do so could result in dust, shavings, or loose particles being thrown into your eyes, resulting in possible serious injury.
OPERATION
TURNING THE SANDER ON/OFF
See Figure 4.
■ Turn on the sander: Push the on/off switch to the left.
■ Turn off the sander: Push the on/off switch to the
right.
- Secure the workpiece to prevent it from moving under the sander.
WARNING
Unsecured workpieces could be thrown towards the operator, causing injury.
WARNING
Keep your head away from the sander and the sanding area. Your hair could be drawn into the sander causing serious injury.
- Place the sander on the workpiece so that all of the sanding disc surface is in contact with the workpiece.
CAUTION
Avoid damaging the motor from overheating, be careful not to let your hand cover the air vents.
- Turn on the sander and move it slowly over the workpiece.
NOTE: Hold the sander in front and away from you, keeping it clear of the workpiece. Start sander and let the motor build to its maximum speed, then gradually lower the sander onto the workpiece. Move the sander slowly across the workpiece using small circular motions.
Do not force. The weight of the unit supplies adequate pressure, so let the sanding disc and sander do the work. Applying additional pressure only slows the motor, rapidly wears sanding disc and greatly reduces sander speed. Excessive pressure will overload the motor causing possible damage from motor overheating and can result in inferior work. Any finish or resin on wood may soften from the frictional heat.
Do not allow sanding on one spot too long as the sander's rapid action may remove too much material, making the surface uneven.
Extended periods of sanding may tend to overheat the motor. If this occurs, turn sander off and wait until sanding disc comes to a complete stop, unplug the sander, then remove it from workpiece. Allow the tool to cool down.
CORNERS AND CREVICES
See Figure 6.
■ For detail sanding such as corners and crevices, use the tip of the sanding pad with small back and forth motions.
For more efficient operation, empty the dust collection box when it is no more than half full. This will permit the air to flow through the dust collection box better. Always empty and clean the dust collection box thoroughly upon completion of a sanding operation and before placing the sander in storage.
WARNING
Collected sanding dust from sanding surface coatings such as polyurethanes, linseed oil, etc., can self-ignite in your sander dust collection box or elsewhere and cause fire. To reduce the risk of fire always empty your dust collection box frequently (10-15 minutes) while sanding and never store or leave a sander without totally emptying its dust collection box. Also follow the recommendations of the coatings manufacturers.
- Unplug the sander.
WARNING
Failure to unplug the tool could result in accidental starting causing possible serious injury.
- Remove the dust collection box from the sander.
- Shake out the dust.
- Reattach the dust collection box to the sander.
NOTE: For a more thorough cleaning of the dust collection box, remove dust collection box from frame and shake out dust. Replace dust collection box over frame then install dust collection box assembly on sander.
CHANGING THE BASE PADS (1/3 SHEET AND TRIANGULAR PAD)
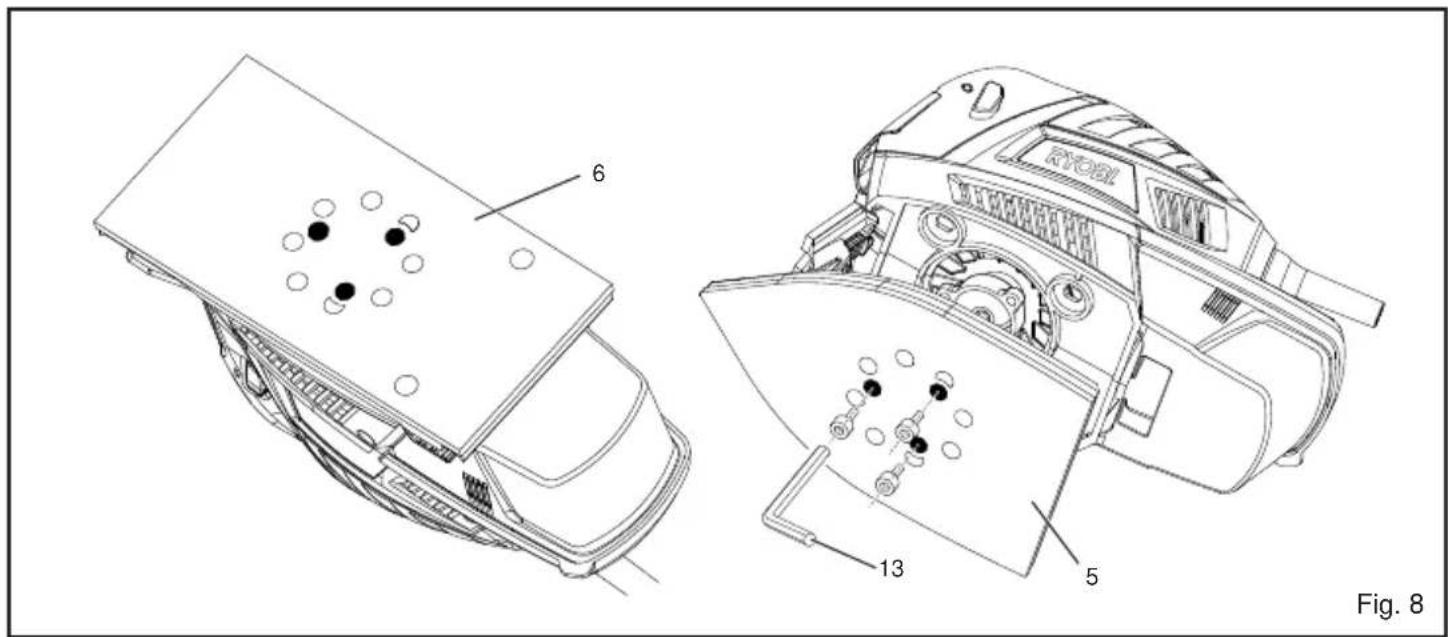
See Figure 8.
- For safety, ensure your sander is unplugged.
- Remove the sanding sheet from the base. Remove the allen screws on the base, using the hex key provided.
- Once all 3 screws have been removed, remove the base.
- When fi tting the new base, place the base up to the sander and insert the fi rst screw (do not tighten).
- Insert the remaining 2 screws, then tighten all 3 screws. Tighten up the allen screws opposite to each other.
NOTE: Do not over tighten.
Place the desired sanding paper on to the base and continue to work.
CAUTION
Remove the sanding sheet when not in use to prevent warping.
INSTALLING SANDPAPER
Inspect sandpaper before installing. Do not use if broken or defective.
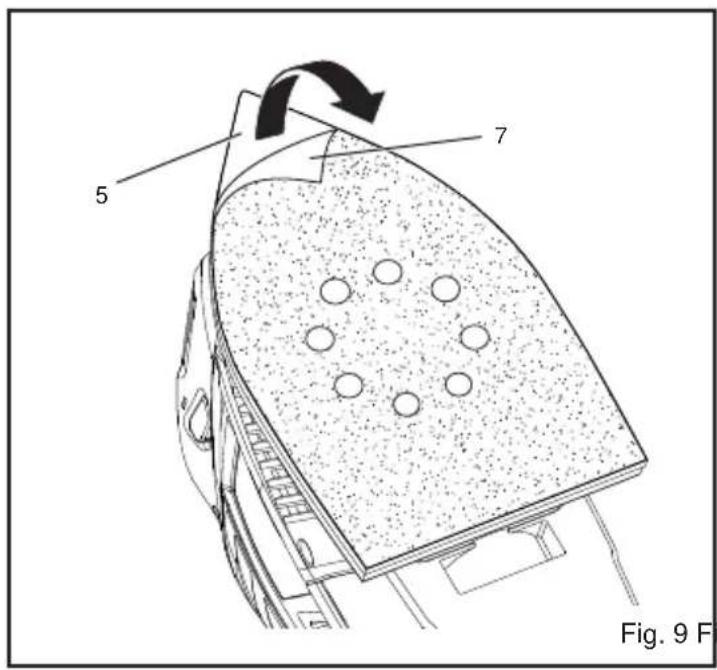
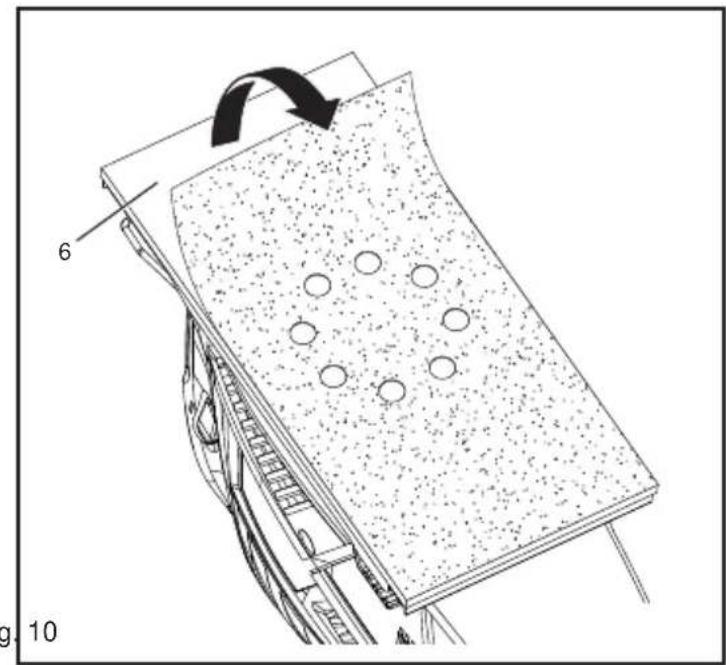
INSTALLING ADHESIVE (HOOK AND LOOP) SANDPAPER - FOR ALL BASE PADS
See Figure 9 and 10.
- Unplug the sander.
- Align holes in hook and loop type sanding disc with holes in pad, then carefully press fuzzy side of sanding disc against pad as tightly as possible.
NOTE: Hook and loop type sanding discs can be reused for the life of the sanding abrasive. It is recommended that you keep the sanding disc backing pad clean to provide for best adhesion. Clean occasionally by brushing lightly with a small brush.
WARNING
Failure to unplug the tool could result in accidental starting causing possible serious injury.
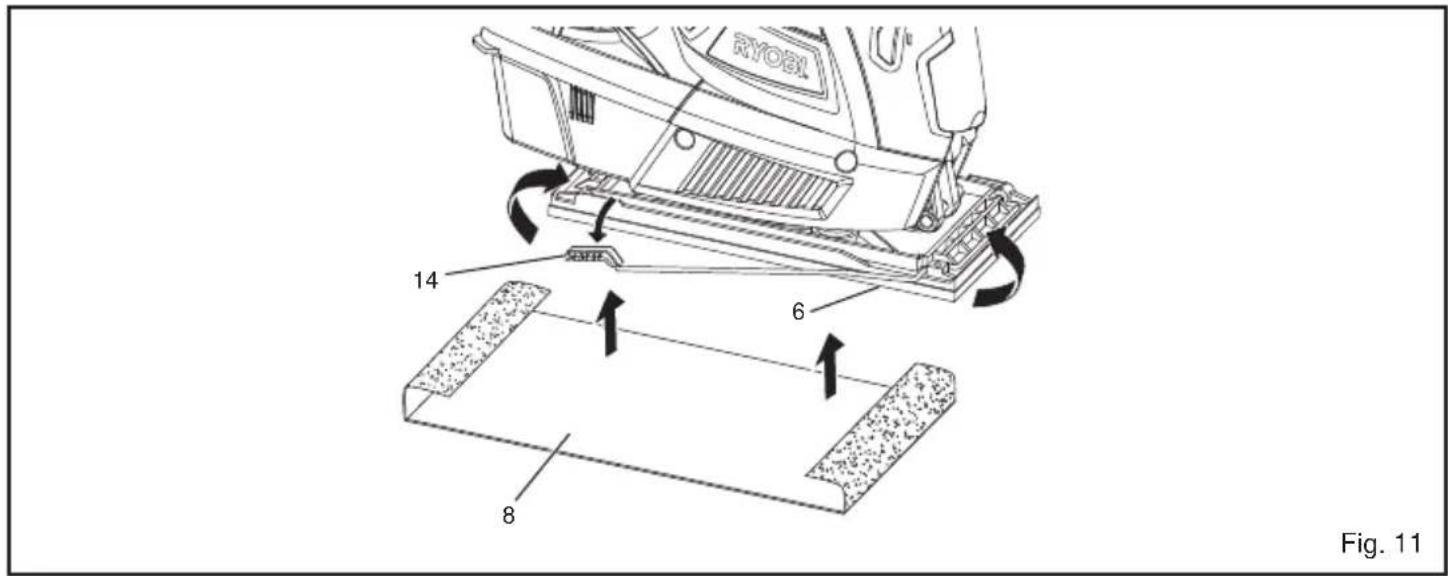
INSTALLING NON-ADHESIVE SANDPAPER - 1/3 SHEET PAD ONLY
See Figure 11.
- Unplug the sander.
- Release the paper clamp. Remove used sandpaper, if any.
- Insert the new sandpaper under the paper clamp.
- Clamp the sandpaper in place.
ORBITAL MOTION
Orbital motion is ideal for fast cutting action when removing old fi nishes, smoothing rough wood, cutting stock down to required dimensions or for fi nishing surfaces to be painted. The sandpaper moves in tiny circles at a very high speed, allowing the sander to move easily.
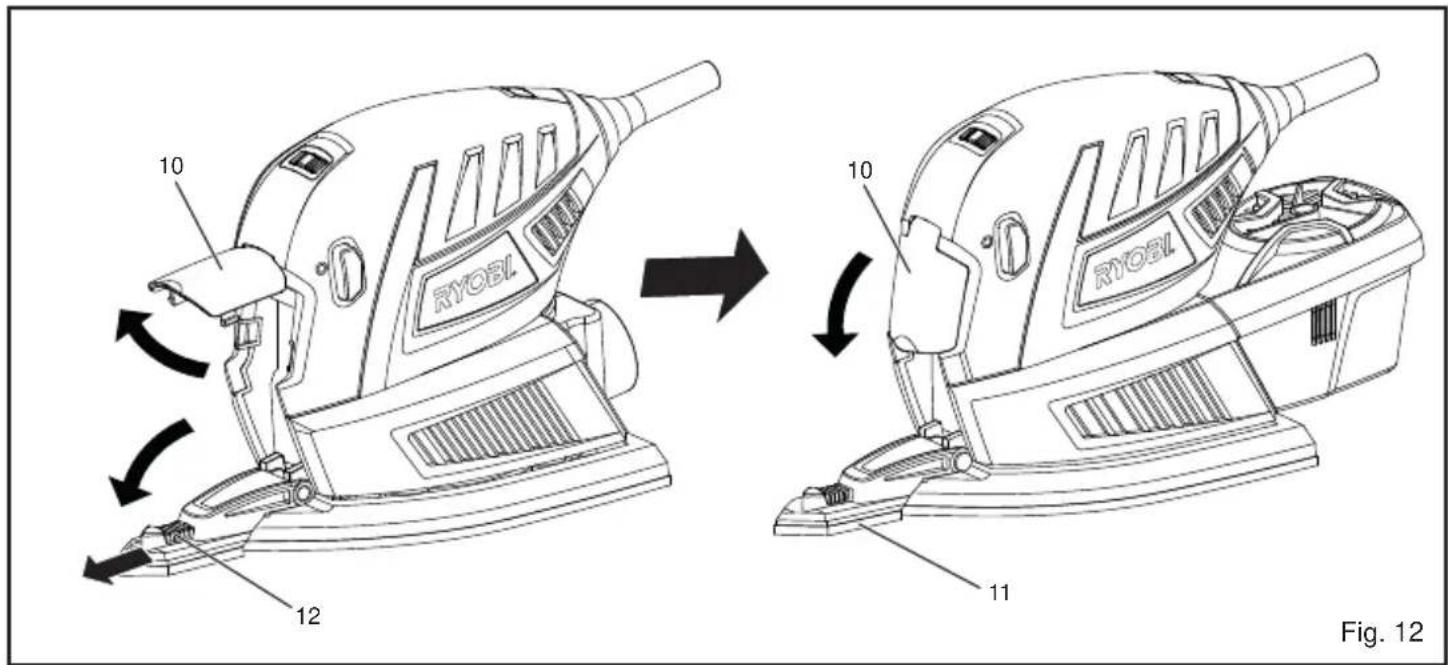
USING THE FINGER PAD
See Figure 12.
- Open the finger pad cover.
- Lower the finger pad and lock it in place.
- Close the finger pad cover.
LIVE TOOL INDICATOR
This tool features a live tool indicator which illuminates as soon as the tool is connected to the supply. This warns the user that the tool is connected and will operate when the switch is pressed.
MAINTENANCE
WARNING
The tool should never be connected to a power supply when you are assembling parts, making adjustments, cleaning, performing maintenance, or when the tool is not in use. Disconnecting the tool will prevent accidental starting that could cause serious injury.
WARNING
When servicing use only identical Ryobi replacement parts. Use of any other parts may create a hazard or cause product damage.
GENERAL
Avoid using solvents when cleaning plastic parts. Most plastics are susceptible to various types of commercial solvents and may be damaged by their use. Use clean cloths to remove dirt, carbon dust, etc.
WARNING
Do not at any time let brake fl uids, gasoline, petroleum-based products, penetrating oils, etc., come in contact with plastic parts. They contain chemicals that can damage, weaken or destroy plastic.
Electric tools used on fi berglass material, wallboard, spackling compounds, or plaster are subject to accelerated wear and possible premature failure because the fi berglass chips and grindings are highly abrasive to bearings, brushes, commutators, etc. Consequently, we do not recommend using this tool for extended work on these types of materials. However, if you do work with any of these materials, it is extremely important to clean the tool using compressed air.
WARNING
Always wear safety goggles or safety glasses with side shields during power tool operation or when blowing dust. If operation is dusty, also wear a dust mask.
LUBRICATION
All of the bearings in this tool are lubricated with a sufficient amount of high grade lubricant for the life of the unit under normal operating conditions. Therefore, no further lubrication is required.
CLEANING THE SANDING SHEETS
The sanding sheets that came with your sander are made to be re-used. Therefore, it is important that they be cleaned periodically to remove sanding residue and foreign material that can accumulate over time.
One of the ways to clean sanding sheets is to rub the sheets with a hard rubber block. You can also use the clean rubber sole of a shoe.
WARNING
Always remove scrubbing or sanding pad from sander before cleaning. Failure to do so could cause serious personal injury.
SYMBOL

Safety alert
V Volts
Hz Hertz
\~ Alternating current
Watts
no No-load speed
min -1 Revolutions or reciprocations per minute

Regulatory Compliance Mark (RCM). Product meets applicable regulatory requirements.

Double insulation

Wear ear protection

Wear eye protection

Please read the instructions carefully before starting the machine.
Waste electrical products should not be disposed of with household waste. Please recycle where facilities exist. Check with your Local Authority or retailer for recycling advice.
Techtronic Industries (Australia) Pty. Ltd.
Level 1,660 Doncaster Road
Doncaster, VIC 3108, Australia
Techtronic Industries New Zealand Ltd.
18-26 Amelia Earhart Avenue
Mangere, Auckland 2022, New Zealand


- DESCRIPTION
- IMPORTANT
- GENERAL POWER TOOL SAFETY WARNINGS
- WARNING
- WORK AREA SAFETY
- ELECTRICAL SAFETY
- PERSONAL SAFETY
- POWER TOOL USE AND CARE
- SERVICE
- SPECIFIC SAFETY INSTRUCTIONS FOR SANDERS
- ADDITIONAL SAFETY INSTRUCTIONS
- SPECIFICATIONS
- FEATURES
- KNOW YOUR MULTI-PAD SANDER
- SEE FIGURE 1
- SWITCH
- EXCHANGEABLE HOOK AND LOOP BASE PADS
- CIRCULAR SANDING ACTION
- DUST COLLECTION BOX
- VARIABLE SPEED CONTROL
- ASSEMBLY
- SANDPAPER SELECTION
- SHEET/PAD RECOMMENDED USE
- ATTACHING HOOK AND LOOP SANDING DISCS
- SEE FIGURE 2
- ATTACHING THE DUST COLLECTION BOX
- SEE FIGURE 3
- INTENDED USE
- CAUTION
- OPERATION
- TURNING THE SANDER ON/OFF
- CORNERS AND CREVICES
- CHANGING THE BASE PADS (1/3 SHEET AND TRIANGULAR PAD)
- INSTALLING SANDPAPER
- INSTALLING ADHESIVE (HOOK AND LOOP) SANDPAPER - FOR ALL BASE PADS
- INSTALLING NON-ADHESIVE SANDPAPER - 1/3 SHEET PAD ONLY
- ORBITAL MOTION
- USING THE FINGER PAD
- LIVE TOOL INDICATOR
- MAINTENANCE
- GENERAL
- LUBRICATION
- CLEANING THE SANDING SHEETS
- SYMBOL
Brand : RYOBI
Model : EMS180RG
Category : Sander