One+ R18BP - Sander RYOBI - Free user manual and instructions
Find the device manual for free One+ R18BP RYOBI in PDF.


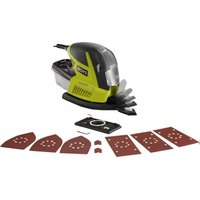
| Product Type | Cordless Random Orbital Sander |
| Model | One+ R18BP |
| Brand | RYOBI |
| Battery Platform | RYOBI One+ 18V |
| Power Source | 18V Lithium-Ion Battery (Not Included) |
| Orbit Diameter | 1/8 inch (3.2 mm) |
| Pad Size | 5 inches (127 mm) |
| No-Load Speed | 12,000 OPM |
| Dust Collection | Microfilter dust bag or vacuum adapter |
| Dimensions (L x W x H) | Approx. 12.2 x 5.0 x 5.5 inches (310 x 127 x 140 mm) |
| Weight (without battery) | 2.6 lbs (1.2 kg) |
| Weight (with battery) | Approx. 3.4 lbs (1.5 kg) |
| Key Features | Variable speed trigger, lock-on button, rubber overmold grip, hook-and-loop pad |
| Maintenance | Clean dust ports regularly; replace pad if worn |
| Safety Features | Battery ejection button, trigger lock-off, dust-sealed switch |
| Spare Parts Available | Backing pad, dust bag, hook-and-loop discs |
| Repairability | User-serviceable parts: pad, dust bag; motor service by authorized center |
| General Information | Part of RYOBI One+ system; compatible with all RYOBI 18V One+ batteries and chargers |
Frequently Asked Questions - One+ R18BP RYOBI
User questions about One+ R18BP RYOBI
0 question about this device. Answer the ones you know or ask your own.
Ask a new question about this device
Download the instructions for your Sander in PDF format for free! Find your manual One+ R18BP - RYOBI and take your electronic device back in hand. On this page are published all the documents necessary for the use of your device. One+ R18BP by RYOBI.
USER MANUAL One+ R18BP RYOBI
18 VOLT BUFFER/POLISHER
R18BP
Important!
It is essential that you read the instructions in this manual before operating this machine.
Subject to technical modifications.
Fig. 1
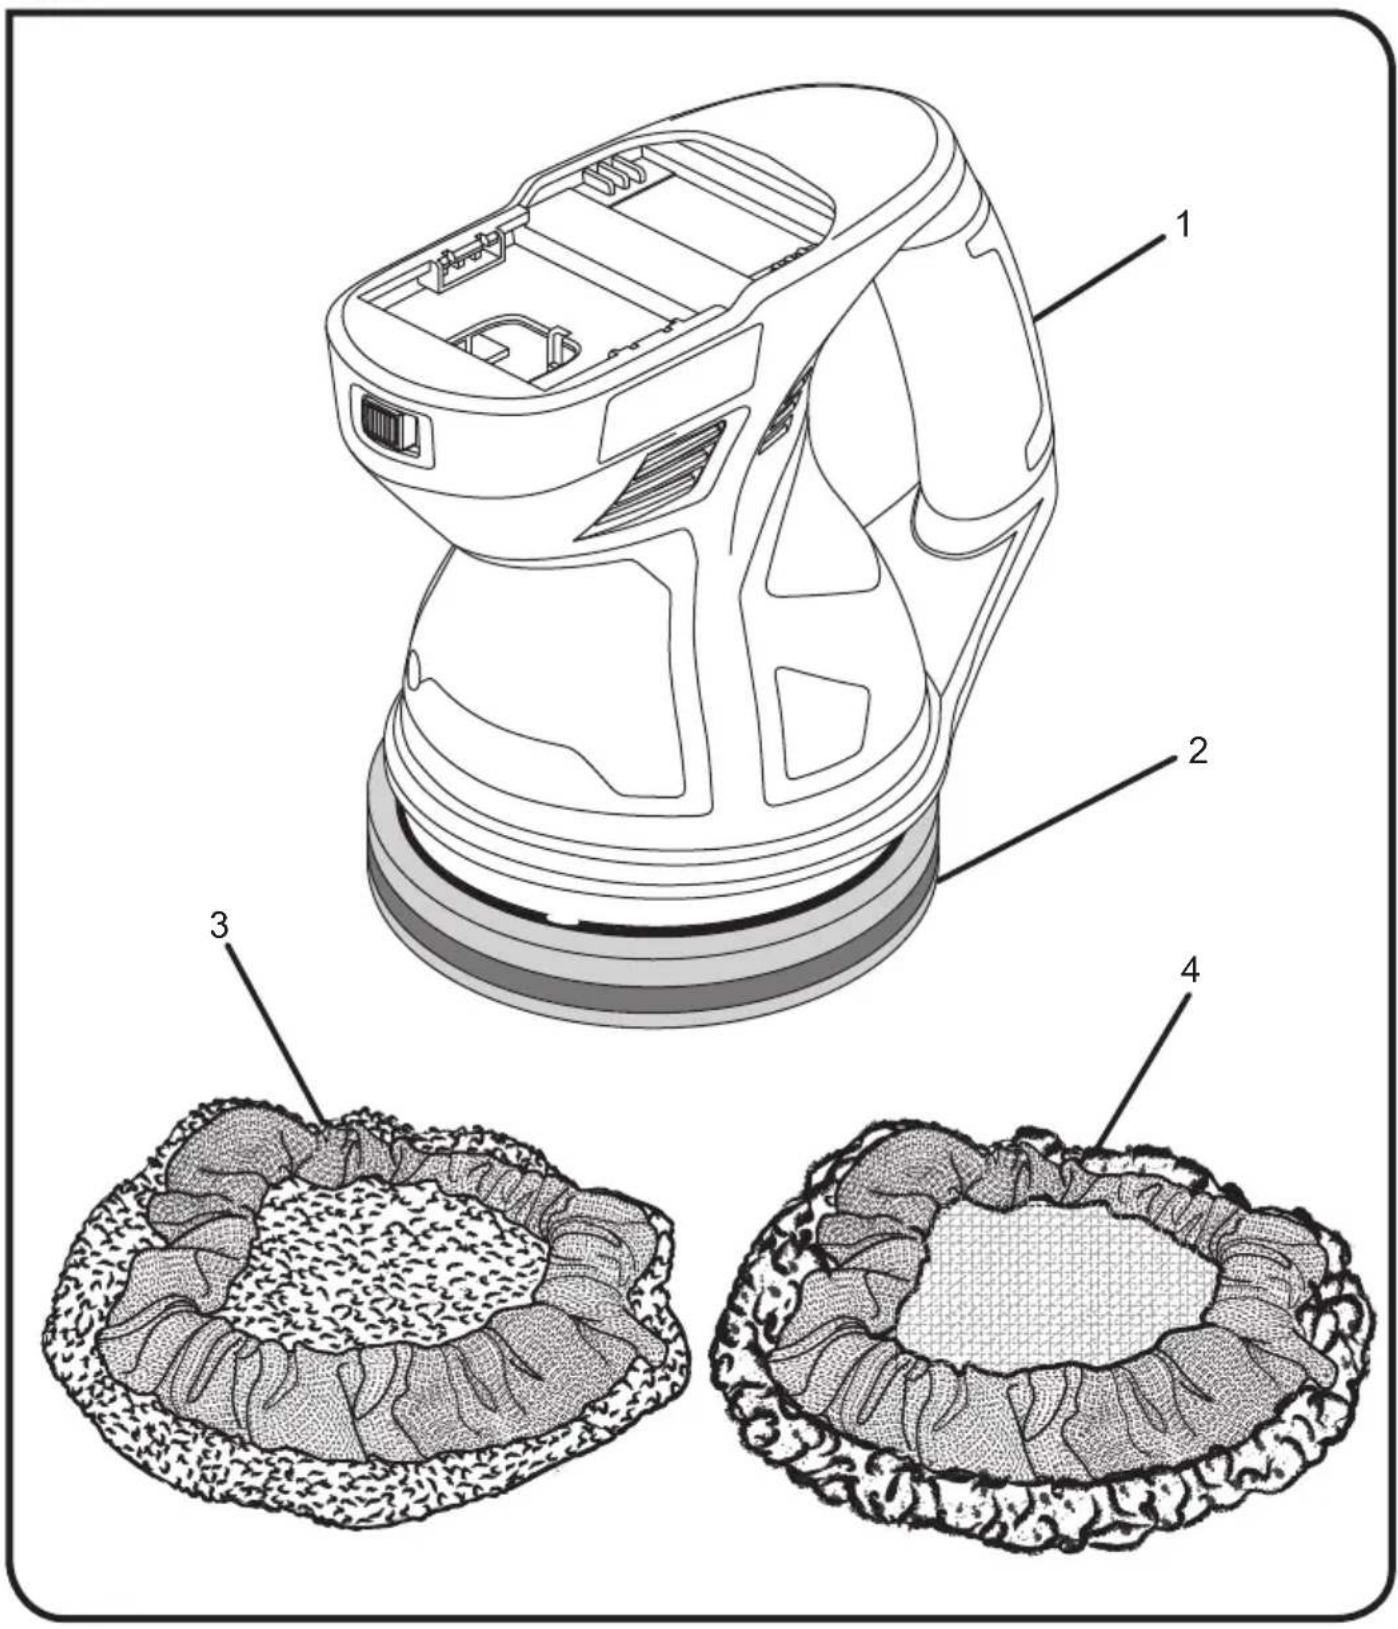
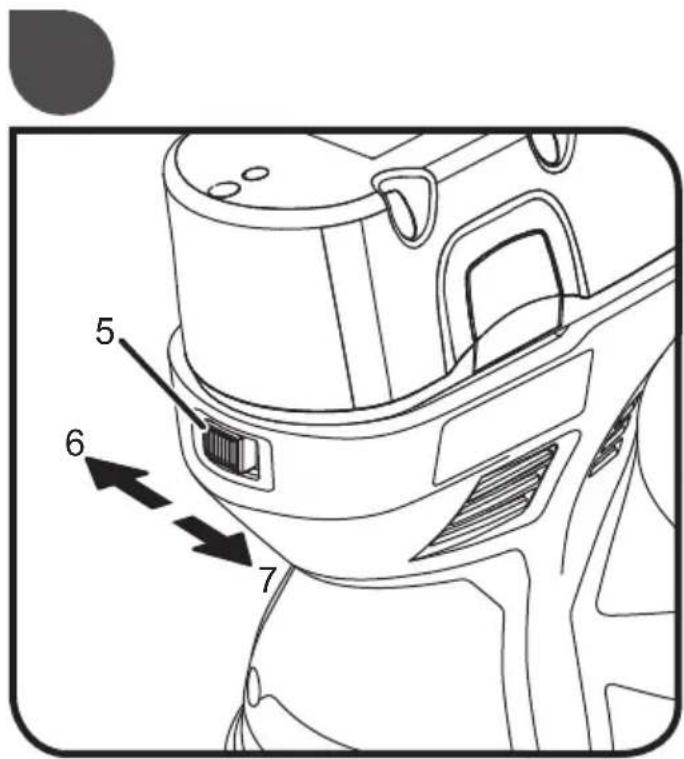
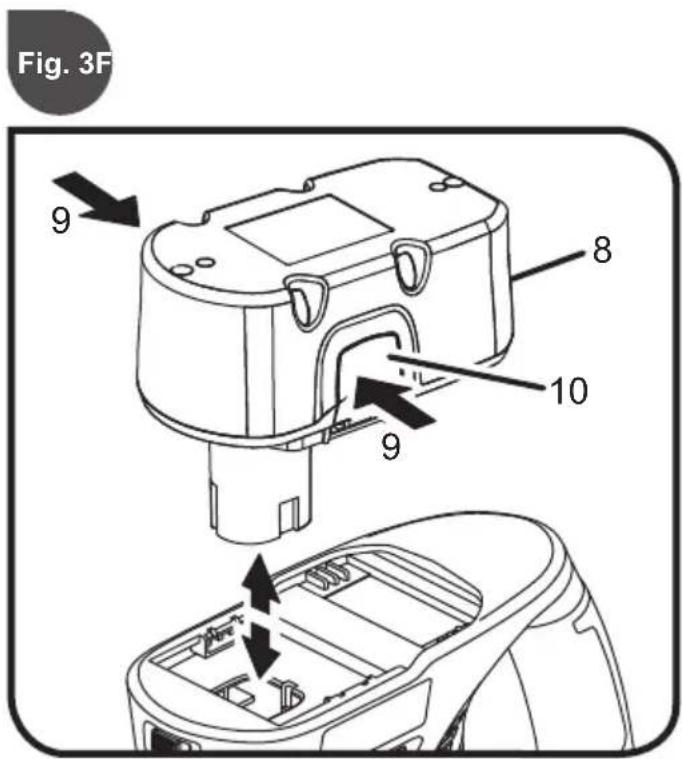
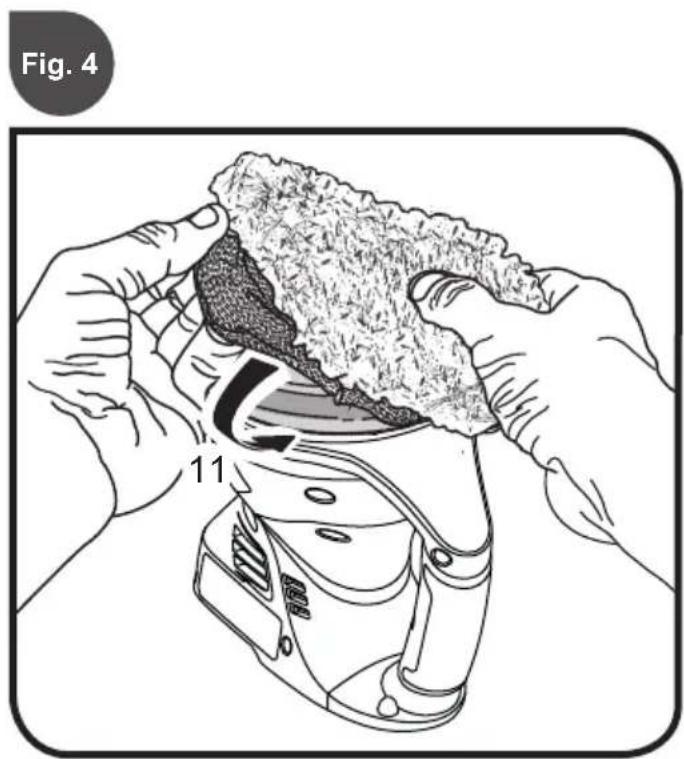
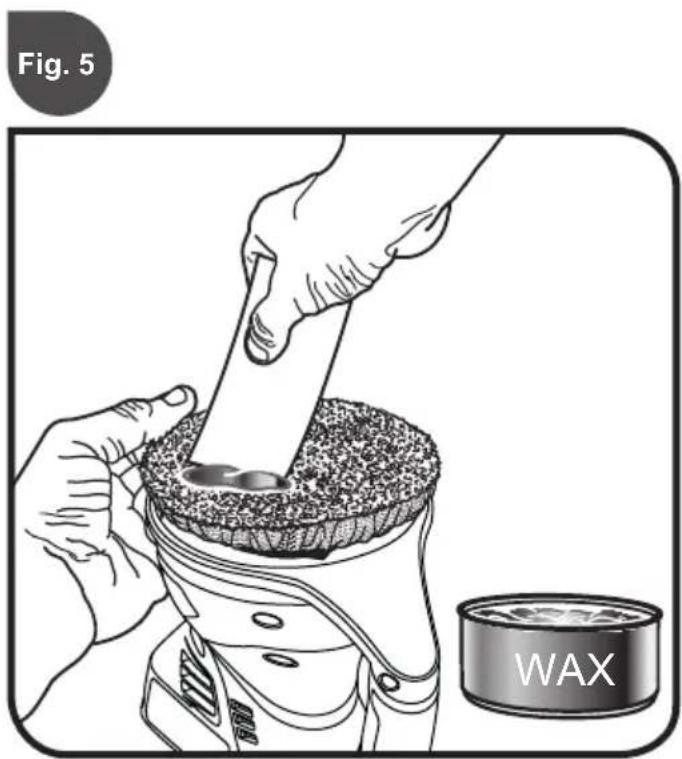

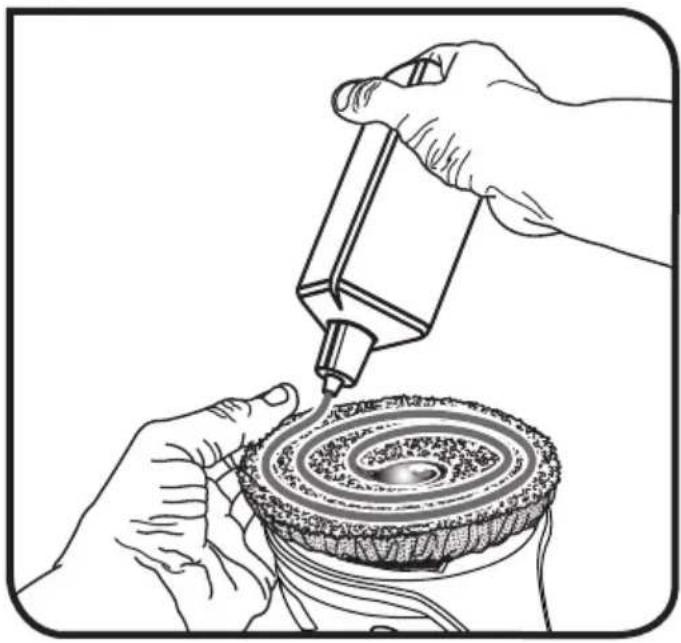
Fig. 7F
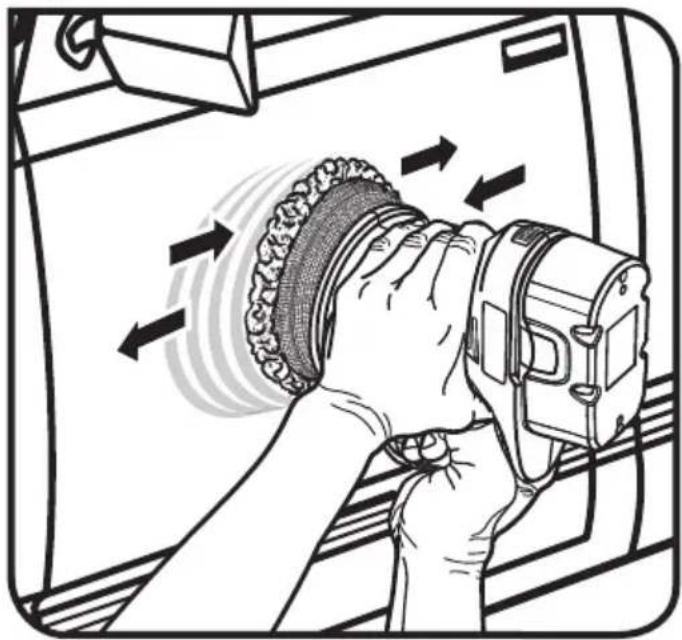
Fig. 8
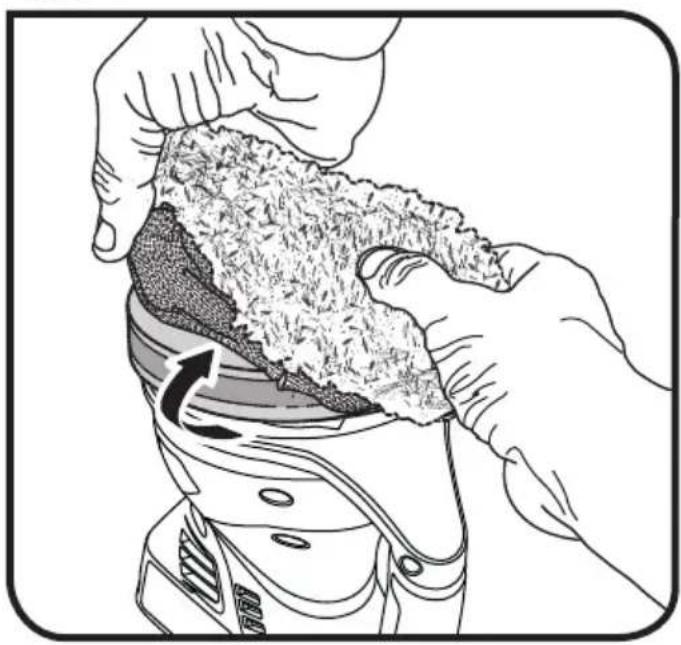
GENERAL POWER TOOL SAFETY WARNINGS
WARNING
Read all safety warnings and all instructions. Failure to follow the warnings and instructions may result in electric shock, fire and/or serious injury.
Save all warnings and instructions for future reference.
The term “power tool” in the warnings refers to your mains-operated (corded) power tool or battery-operated (cordless) power tool.
1) WORK AREA SAFETY
a) Keep work area clean and well lit. Cluttered or dark areas invite accidents.
b) Do not operate power tools in explosive atmospheres, such as in the presence of flammable liquids, gases or dust. Power tools create sparks which may ignite the dust or fumes.
c) Keep children and bystanders away while operating a power tool. Distractions can cause you to lose control.
2) ELECTRICAL SAFETY
a) Power tool plugs must match the outlet. Never modify the plug in any way. Do not use any adapter plugs with earthed (grounded) power tools. Unmodified plugs and matching outlets will reduce risk of electric shock.
b) Avoid body contact with earthed or grounded surfaces, such as pipes, radiators, ranges and refrigerators. There is an increased risk of electric shock if your body is earthed or grounded.
c) Do not expose power tools to rain or wet conditions. Water entering a power tool will increase the risk of electric shock.
d) Do not abuse the cord. Never use the cord for carrying, pulling or unplugging the power tool. Keep cord away from heat, oil, sharp edges or moving parts. Damaged or entangled cords increase the risk of electric shock.
e) When operating a power tool outdoors, use an extension cord suitable for outdoor use. Use of a cord suitable for outdoor use reduces the risk of electric shock.
f) If operating a power tool in a damp location is unavoidable, use a residual current device (RCD) protected supply. Use of an RCD reduces the risk of electric shock.
3) PERSONAL SAFETY
a) Stay alert, watch what you are doing and use common sense when operating a power
tool. Do not use a power tool while you are tired or under the influence of drugs, alcohol or medication. A moment of inattention while operating power tools may result in serious personal injury.
b) Use personal protective equipment. Always wear eye protection. Protective equipment such as dust mask, non-skid safety shoes, hard hat or hearing protection used for appropriate conditions will reduce personal injuries.
c) Prevent unintentional starting. Ensure the switch is in the off-position before connecting to power source and/or battery pack, picking up or carrying the tool. Carrying power tools with your finger on the switch or energising power tools that have the switch on invites accidents.
d) Remove any adjusting key or wrench before turning the power tool on. A wrench or a key left attached to a rotating part of the power tool may result in personal injury.
e) Do not overreach. Keep proper footing and balance at all times. This enables better control of the power tool in unexpected situations.
f) Dress properly. Do not wear loose clothing or jewellery. Keep your hair, clothing and gloves away from moving parts. Loose clothes, jewellery or long hair can be caught in moving parts.
g) If devices are provided for the connection of dust extraction and collection facilities, ensure these are connected and properly used. Use of dust collection can reduce dust-related hazards.
4) POWER TOOL USE AND CARE
a) Do not force the power tool. Use the correct power tool for your application. The correct power tool will do the job better and safer at the rate for which it was designed.
b) Do not use the power tool if the switch does not turn it on and off. Any power tool that cannot be controlled with the switch is dangerous and must be repaired.
c) Disconnect the plug from the power source and/or the battery pack from the power tool before making any adjustments, changing accessories or storing power tools. Such preventive safety measures reduce the risk of starting the power tool accidentally.
d) Store idle power tools out of the reach of children and do not allow persons unfamiliar with the power tool or these instructions to operate the power tool. Power tools are dangerous in the hands of untrained users.
e) Maintain power tools. Check for misalignment or binding of moving parts, breakage of parts and any other condition that may affect the power tool's operation. If damaged, have the
power tool repaired before use. Many accidents are caused by poorly maintained power tools.
f) Keep cutting tools sharp and clean. Properly maintained cutting tools with sharp cutting edges are less likely to bind and are easier to control.
g) Use the power tool, accessories and tool bits etc, in accordance with these instructions, taking into account the working conditions and the work to be performed. Use of the power tool for operations different from those intended could result in a hazardous situation.
5) BATTERY TOOL USE AND CARE
a) Recharge only with the charger specified by the manufacturer. A charger that is suitable for one type of battery pack may create a risk of fire when used with another battery pack.
b) Use power tools only with specifically designated battery packs. Use of any other battery packs may create a risk of injury and fire.
c) When battery pack is not in use, keep it away from other metal objects, like paper clips, coins, keys, nails, screws, or other small metal objects that can make a connection from one terminal to another. Shorting the battery terminals together may cause burns or a fire.
d) Under abusive conditions, liquid may be ejected from the battery; avoid contact. If contact accidentally occurs, flush with water. If liquid contacts eyes, additionally seek medical help. Liquid ejected from the battery may cause irritation or burns.
6) SERVICE
a) Have your power tool serviced by a qualified repair person using only identical replacement parts. This will ensure that the safety of the power tool is maintained.
BUFFER/POLISHER SAFETY RULES
WARNING
The product is not intended for use by persons (including children) with reduced physical, sensory or mental capabilities, or lack of experience and knowledge, unless they have been given supervision or instruction concerning use of the product by a person responsible for their safety.
Children should be supervised to ensure that they do not play with the product.
- Hold power tool by insulated gripping surfaces, when performing an operation where the cutting tool may contact hidden wiring. Cutting tool contacting a "live" wire may make exposed metal parts
of the power tool "live" and could give the operator an electric shock.
- Know your power tool. Read operator's manual carefully. Learn its applications and limitations, as well as the specific potential hazards related to this power tool. Following this rule will reduce the risk of electric shock, fire, or serious injury.
■ Always wear eye protection with side shields marked to comply with ANSI Z87.1 when assembling parts, operating the tool, or performing maintenance. Following this rule will reduce the risk of serious personal injury.
■ Protect your lungs. Wear a face or dust mask if the operation is dusty. Following this rule will reduce the risk of serious personal injury.
■ Protect your hearing. Wear hearing protection during extended periods of operation. Following this rule will reduce the risk of serious personal injury.
■ Battery tools do not have to be plugged into an electrical outlet; therefore, they are always in operating condition. Be aware of possible hazards when not using your battery tool or when changing accessories. Following this rule will reduce the risk of electric shock, fire, or serious personal injury. - Do not place battery tools or their batteries near fire or heat. This will reduce the risk of explosion and possibly injury.
- Do not crush, drop or damage battery pack. Do not use a battery pack or charger that has been dropped or received a sharp blow. A damaged battery is subject to explosion. Properly dispose of a dropped or damaged battery immediately.
■ Batteries can explode in the presence of a source of ignition, such as a pilot light. To reduce the risk of serious personal injury, never use any cordless product in the presence of open flame. An exploded battery can propel debris and chemicals. If exposed, flush with water immediately.
■ Do not charge battery tool in a damp or wet location. Following this rule will reduce the risk of electric shock.
■ For best results, your battery tool should be charged in a location where the temperature is more than 10° C but less than 38° C. To reduce the risk of serious personal injury, do not store outside or in vehicles.
■ Under extreme usage or temperature conditions, battery leakage may occur. If liquid comes in contact with your skin, wash immediately with soap and water. If liquid gets into your eyes, flush them with clean water for at least 10 minutes, then seek immediate medical attention. Following this rule will reduce the risk of serious personal injury.
■ Save these instructions. Refer to them frequently and use them to instruct others who may use this tool. If you loan someone this tool, loan them these instructions
also.
TRANSPORTING LITHIUM BATTERIES
Transport the battery in accordance with local and national provisions and regulations.
Follow all special requirements on packaging and labelling when transporting batteries by a third party. Ensure that no batteries can come in contact with other batteries or conductive materials while in transport by protecting exposed connectors with insulating, non-conductive caps or tape. Do not transport batteries that are cracked or leaking. Check with the forwarding company for further advice.
INTENDED USE
Use the product for the purposes listed below:
■ Polishing and buffing cars, boats, recreational vehicles, personal watercraft, motorcycles, hardwood floors, and large furniture
DESCRIPTION
- Handle
- Rotating base
- Application bonnet
- Buffing/polishing bonnet
- On / off switch
- On (I)
- Off (O)
- Battery pack
- Depress latches to release battery pack
- Latches
- Pull polishing bonnet edges over pad to install
ASSEMBLY
WARNING
Do not use this product if it is not completely assembled or if any parts appear to be missing or damaged. Use of a product that is not properly and completely assembled or with damaged or missing parts could result in serious personal injury.
WARNING
Do not attempt to modify this product or create accessories not recommended for use with this product. Any such alteration or modification is misuse and could result in a hazardous condition leading to possible serious personal injury.
If any parts are damaged or missing, please call your service centre for assistance.
OPERATION
WARNING
Do not allow familiarity with products to make you careless. Remember that a careless fraction of a second is sufficient to inflict severe injury.
WARNING
Always remove battery pack from the tool when you are assembling parts, making adjustments, cleaning, or when not in use. Removing battery pack will prevent accidental starting that could cause serious personal injury.
WARNING
Always wear eye protection with side shields marked to comply with ANSI Z87.1. Failure to do so could result in objects being thrown into your eyes, resulting in possible serious injury.
TURNING THE BUFFER/POLISHER ON/OFF
See Figure 2.
■ To start the buffer/polisher, place the power switch in the ON (1) position.
■ To stop the buffer/polisher, place the power switch in the OFF (O) position.
The tool's rotating base moves in random orbital motion. The orbit diameter is 10 mm (3/8").
WARNING
Battery tools are always in operating condition. Therefore, switch should always be in the OFF (O) position when not in use or carrying at your side, when installing or removing the battery pack, and when installing or removing accessories.
INSTALLING/REMOVING BATTERY PACK
See Figure 3.
■ To install: Make sure the power switch is in the OFF (O) position.
■ Place the battery pack in the tool.
■ Make sure the latches on each side of the battery pack snap in place and the battery pack is secured in the tool before beginning operation.
■ To remove: Turn the switch off and depress the latches.
PREPARING THE SURFACE
For best results, the surface should be clean and dry. Most high-gloss surfaces can be cleaned with a mild soap and
water solution. For removal of stubborn dirt such as road tar, grease, and bug stains, you can use a mild ammonia solution such as that used in glass cleaners. Before using any cleaning product, check the label for recommended applications and follow the directions for use.
Never apply cleaner directly onto surface to be polished. Apply to a clean cloth then use the cloth to clean the surface. Do not use any type of abrasive cleanser as it may damage or scratch the surface.
INSTALLING/REMOVING APPLICATION BONNET
See Figure 4.
The reusable application bonnet is made of 100% terry cloth and is used to apply polish to the painted surface.
■ To install: Place the power switch in the OFF (O) position.
■ Remove battery pack from the tool.
- Slip application bonnet edges over the top of the foam pad.
■ To remove: pull bonnet edges over and off pad.
APPLYING POLISH TO THE APPLICATION BONNET
Most polishes are either in paste or liquid form. Before using any polish, read all directions on appropriate applications and proper use.
Applying paste polish
See Figure 5.
Use a putty knife or other flat, blunt object to apply approximately one rounded teaspoon of paste onto the bonnet. Evenly spread the paste over the entire surface of the bonnet.
Do not apply paste directly to the surface being polished.
Applying liquid polish
See Figure 6.
Apply a small circle of liquid (about the size of a half-dollar) around the center of the bonnet, followed by two more rings, each slightly larger than the previous one. After the first application, the bonnet will not absorb as much polish. Apply two rings of polish to the bonnet for subsequent applications, using half of the initial quantity.
WARNING
To prevent loss of control and possible serious personal injury, always operate the tool with both hands, keeping one hand on the handle.
APPLYING POLISH TO SURFACE
See Figure 7.
While holding the buffer/polisher firmly against the surface, slide the ON/OFF switch to the ON position (to the left). Always start and stop the polisher on or against the surface
being polished.
Begin by polishing larger flat surfaces, such as the hood, trunk and roof. Use a broad sweeping motion in a crisscross pattern. Do not press down on the surface with the polisher. Let the orbital action of the pad and bonnet do the work.
Once flat surfaces have been covered, polish curved surfaces such as car doors and quarter panels. Use small circular motions.
After applying polish to the entire surface, turn buffer/polisher off. Wait until the pad stops rotating before lifting the buffer/polisher from the surface.
For hard-to-reach areas, such as the underside of bumpers or side mirrors, apply polish by hand.
CHANGING TO BUFFING/POLISHING BONNET
See Figure 8.
WARNING
Check polishing bonnets before each use. Make sure they are clean and free from any loose particles or foreign objects that may be embedded in the bonnet. Failure to do so could cause these particles or objects to be thrown from the tool, resulting in possible serious injury.
The reusable buffing/polishing bonnet is made of synthetic tufted material and is used to buff and polish painted surfaces.
Remove the battery pack from the buffer/polisher and remove the application bonnet by loosening the drawstring and slipping the bonnet off the pad. Replace with buffing/polishing bonnet, attaching it the same way as the application bonnet.
Buff the surface in the same order as it was polished, starting with large flat surfaces and ending with hard-to reach areas. Use the same motion as for polishing, a broad sweeping criss-cross pattern on large flat areas and small circular motions on all other areas. Remember to let the tool do the work.
MAINTENANCE
WARNING
When servicing, use only identical replacement parts. Use of any other part may create a hazard or cause product damage.
GENERAL MAINTENANCE
Avoid using solvents when cleaning plastic parts. Most plastics are susceptible to damage from various types of commercial solvents and may be damaged by their use. Use clean cloths to remove dirt, dust, oil, grease, etc.
APPLICATION AND BUFFING/POLISHING BONNETS
Both the application and buffing/polishing bonnets are reusable. For maximum life and performance, hand wash after use and allow them to air dry. If needed, the bonnets can be machine washed in cold water with a small amount of detergent, then machine dried using low heat.
FOAM PAD
It is important that the pad retain its original shape and dimensions. Allow it to dry completely after each use. Make sure to remove the bonnets, wash them, and store separately. Polisher should be stored with the pad facing up in order to extend pad life and retain its shape. Be careful not to use too much polish at one time. If the pad becomes saturated, it will not last as long.
BATTERY PACK PREPARATION FOR RECYCLING
WARNING
Upon removal, cover the battery pack's terminals with heavy-duty adhesive tape. Do not attempt to destroy or disassemble battery pack or remove any of its components. Batteries must be recycled or disposed of properly. Also, never touch both terminals with metal objects and/or body parts as short circuit may result. Keep away from children. Failure to comply with these warnings could result in fire and/or serious injury.
ENVIRONMENTAL PROTECTION
Recycle raw materials instead of disposing of as waste. The machine, accessories and packaging should be sorted for environmental-friendly recycling.
SYMBOLS

Safety alert

No-load speed

Read operator's manual
Waste electrical products should not be disposed of with household waste. Please recycle where facilities exist. Check with your local authority or retailer for recycling advice.
PRODUCT SPECIFICATIONS
| Voltage 18 V | --- |
| Buffing pad size 152 mm (6") | |
| Orbit diameter 10 mm (3/8") | |
| No-load speed 4,000 min | -1 |
BATTERY AND CHARGER
| Model Compatible battery pack(not included) | Compatible charger(not included) | |
| Lithium-Ion RB18L13 | BCS618G | |
| RB18L15 | ||
| RB18L26 | ||
| RB18L40 | ||
| Nickel Cadmium | RB18N15 ACR1800G | BCS618G |
| BCL14181H | ||
| BCL14183H | ||
| BCL1418IV* | ||
* for vehicles with 12V DC outlets

Techtronic Industries (Australia) Pty. Ltd.
Level 1, 660 Doncaster Road
Doncaster, VIC 3108, Australia
Techtronic Industries New Zealand Ltd.
18-26 Amelia Earhart Avenue
Mangere, Auckland 2022, New Zealand


- 18 VOLT BUFFER/POLISHER
- IMPORTANT
- GENERAL POWER TOOL SAFETY WARNINGS
- WARNING
- SAVE ALL WARNINGS AND INSTRUCTIONS FOR FUTURE REFERENCE
- WORK AREA SAFETY
- ELECTRICAL SAFETY
- PERSONAL SAFETY
- POWER TOOL USE AND CARE
- BATTERY TOOL USE AND CARE
- SERVICE
- BUFFER/POLISHER SAFETY RULES
- TRANSPORTING LITHIUM BATTERIES
- INTENDED USE
- DESCRIPTION
- ASSEMBLY
- OPERATION
- TURNING THE BUFFER/POLISHER ON/OFF
- INSTALLING/REMOVING BATTERY PACK
- PREPARING THE SURFACE
- INSTALLING/REMOVING APPLICATION BONNET
- APPLYING POLISH TO THE APPLICATION BONNET
- APPLYING PASTE POLISH
- APPLYING LIQUID POLISH
- APPLYING POLISH TO SURFACE
- CHANGING TO BUFFING/POLISHING BONNET
- MAINTENANCE
- GENERAL MAINTENANCE
- APPLICATION AND BUFFING/POLISHING BONNETS
- FOAM PAD
- BATTERY PACK PREPARATION FOR RECYCLING
- ENVIRONMENTAL PROTECTION
- SYMBOLS
Brand : RYOBI
Model : One+ R18BP
Category : Sander