
SBX-300 - Bluetooth speaker PIONEER - Free user manual and instructions
Find the device manual for free SBX-300 PIONEER in PDF.
| Product Type | Soundbar with integrated subwoofer |
| Brand | PIONEER |
| Model | SBX-300 |
| Dimensions (W x H x D) without feet | 900 mm × 86 mm (front) × 121 mm |
| Dimensions (W x H x D) with feet | 900 mm × 106 mm (front) × 121 mm |
| Net weight | 4.3 kg |
| Power supply | AC 100 V to 240 V, 50 Hz/60 Hz |
| Power consumption | 36 W (standby < 0.5 W) |
| Maximum output power | 130 W (front: 2×30 W, subwoofer: 2×35 W) |
| Bluetooth version | Ver. 2.1 + EDR |
| Supported Bluetooth profiles | A2DP |
| Bluetooth PIN code | 0000 |
| Audio inputs | 2× optical, 1× coaxial, 1× analog (3.5 mm mini-jack) |
| Sound functions | Surround, Night mode, automatic level control, dialogue enhancement, sound delay adjustment (Lip Sync) |
| Phase correction technology | PHASE CONTROL (always active) |
| Operating temperature | 5 °C to 35 °C |
| Operating humidity | 85 % maximum |
| Wall mounting | Possible (screws not supplied) |
| Remote control | Yes (CR2025 battery included) |
| Supplied accessories | Remote control, IR cable, optical audio cable (1.5 m), power cord, height adjustment feet |
Frequently Asked Questions - SBX-300 PIONEER
User questions about SBX-300 PIONEER
0 question about this device. Answer the ones you know or ask your own.
Ask a new question about this device
Download the instructions for your Bluetooth speaker in PDF format for free! Find your manual SBX-300 - PIONEER and take your electronic device back in hand. On this page are published all the documents necessary for the use of your device. SBX-300 by PIONEER.
USER MANUAL SBX-300 PIONEER
Discover the benefits of registering your product online at http://www.pioneer.co.uk (or http://www.pioneer.eu)
O3HaKoMbTeBc npEnMyuIeCTBaMn perNtpaunB INHTepHET
Safety Information
Thank you for buying this Pioneer product.
Please read through these operating instructions so you will know how to operate your model properly.
After you have finished reading the instructions, put them away in a safe place for future reference.
CAUTION
TO PREVENT THE RISK OF ELECTRIC SHOCK, DO NOT REMOVE COVER (OR BACK). NO USER-SERVICEABLE PARTS INSIDE. REFER SERVICING TO QUALIFIED SERVICE PERSONNEL.
D3-4-2-1-1_B1_En
WARNING
This equipment is not waterproof. To prevent a fire or shock hazard, do not place any container filled with liquid near this equipment (such as a vase or flower pot) or expose it to dripping, splashing, rain or moisture.
D3-4-2-1-3_A1_En
WARNING
To prevent a fire hazard, do not place any naked flame sources (such as a lighted candle) on the equipment.
D3-4-2-1-7a_A1_En
VENTILATION CAUTION
When installing the unit, leave space of at least 10cm at the sides and top.
Furthermore, to facilitate good heat dissipation, make sure there is a little distance between the other devices.
When installing the unit in a rack or the like, leave space of at least 10cm at the top, rear, and sides. Internal heat buildup may cause a fire.
WARNING
Slots and openings in the cabinet are provided for ventilation to ensure reliable operation of the product, and to protect it from overheating. To prevent fire hazard, the openings should never be blocked or covered with items (such as newspapers, table-cloths, curtains) or by operating the equipment on thick carpet or a bed.
D3-4-2-1-7b*A1_EN
Operating Environment
Operating environment temperature and humidity: +5^ to +35^ (+41^ to +95^) less than 85% RH (cooling vents not blocked)
Do not install this unit in a poorly ventilated area, or in locations exposed to high humidity or direct sunlight (or strong artificial light)
D3-4-2-1-7c*A1En
CAUTION
The OSTANDBY/ON switch on this unit will not completely shut off all power from the AC outlet. Since the power cord serves as the main disconnect device for the unit, you will need to unplug it from the AC outlet to shut down all power. Therefore, make sure the unit has been installed so that the power cord can be easily unplugged from the AC outlet in case of an accident. To avoid fire hazard, the power cord should also be unplugged from the AC outlet when left unused for a long period of time (for example, when on vacation).
D3-4-2-2-2a*A1_EN
This product is for general household purposes. Any failure due to use for other than household purposes (such as long-term use for business purposes in a restaurant or use in a car or ship) and which requires repair will be charged for even during the warranty period.
K041_A1_En
POWER-CORD CAUTION
Handle the power cord by the plug. Do not pull out the plug by tugging the cord and never touch the power cord when your hands are wet as this could cause a short circuit or electric shock. Do not place the unit, a piece of furniture, etc., on the power cord, or pinch the cord. Never make a knot in the cord or tie it with other cords. The power cords should be routed such that they are not likely to be stepped on. A damaged power cord can cause a fire or give you an electrical shock. Check the power cord once in a while. When you find it damaged, ask your nearest PIONEER authorized service center or your dealer for a replacement.
S002*A1En
Information for users on collection and disposal of old equipment and used batteries
(Symbol for equipment)

(Symbol examples) for batteries
Pb
These symbols on the products, packaging, and/or accompanying documents mean that used electrical and electronic products and batteries should not be mixed with general household waste.
For proper treatment, recovery and recycling of old products and used batteries, please take them to applicable collection points in accordance with your national legislation.
By disposing of these products and batteries correctly, you will help to save valuable resources and prevent any potential negative effects on human health and the environment which could otherwise arise from inappropriate waste handling.
For more information about collection and recycling of old products and batteries, please contact your local municipality, your waste disposal service or the point of sale where you purchased the items.
These symbols are only valid in the European Union.
For countries outside the European Union:
If you wish to discard these items, please contact your local authorities or dealer and ask for the correct method of disposal.
K058a_A1_En
Radio wave caution
This unit uses a 2.4 GHz radio wave frequency, which is a band used by other wireless systems (Microwave ovens and Cordless phones, etc.). In this event noise appears in your television image, there is the possibility this unit (including products supported by this unit) is causing signal interference with the antenna input connector of your television, video, satellite tuner, etc. In this event, increase the distance between the antenna input connector and this unit (including products supported by this unit).
- Pioneer is not responsible for any malfunction of the compatible Pioneer product due to communication error/ malfunctions associated with your network connection and/or your connected equipment. Please contact your Internet service provider or network device manufacturer.
- A separate contract with/payment to an Internet service provider is required to use the Internet.
Table of Contents
1 Before you start
5 Introduction
5 - Supplied accessories
5 - Before using the remote control
5 - Replacing the remote control battery
6 - Operating range of remote control
6 - Remote control
7 - Rear panel
8 -Front panel
2 Installing and Connecting the Unit
9 Installing the Unit
9 - Installing the unit in front of a TV
9 - Mounting the unit to a wall
10 Connecting to Your TV
11 Connections with external device
3 Operations
12 Outputting the sound of a device connected to the unit
12Enjoying the surround function
12 Listening to sound at nighttime
12 Automatically equalize volume level differences during playback
12 Making dialog in movies and vocals in music easy to hear
13 Adjusting the sound delay time (LIP SYNC (AUDIO SYNC))
13 Switching the power to standby mode automatically (Auto Power Off)
13Enjoying music on Bluetooth devices
13 - Listening to music on Bluetooth devices
4 Other Functions
15 PHASE CONTROL technology
16 IR Repeater Function
16 - When the TV remote control does not work (when the unit is installed in front of the TV)
16 - Connecting the supplied IR cable
17 Controlling the unit with the TV remote control
17 - Clearing the learning function
17 Restoring all settings to the default settings
18 Unit indicator operation
19 - MUTE
19 - STATUS
19 -LIPSYNC(AUDIOSYNC)
5 Other Information and Troubleshooting
20 Troubleshooting
20 -Sound
20 - Others
21 - Trademarks and licenses
21 Radio wave caution
22 - Scope of operation
22 - Radio wave reflections
22 - Precautions regarding connections to products supported by this unit
6 Appendix
23 Specifications
23 -Unit
24 - Speakers
25 Maintenance
25 - Handling the unit
Chapter 1
Before you start
Introduction
Supplied accessories
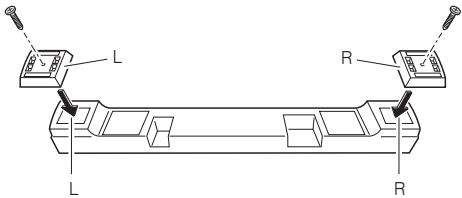
- Height adjustment foot × 2 (L, R)
- Foot attachment screws × 2
Remote control x 1 - IR cable x 1
Optical digital audio cable x 1 (1.5 m)
Power cord
Warranty - Operating Instructions (this manual)
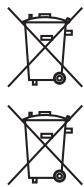
Before using the remote control
The battery comes pre-inserted in the remote control. Pull out the insulation sheet before using the remote control.
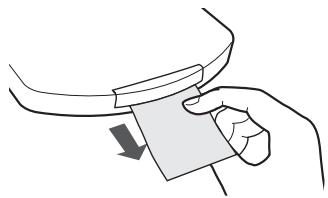
Replacing the remote control battery
- Pull out the battery holder while pressing the tab.
- Insert the lithium battery (CR2025 x1) correctly.
Insert the battery in the holder so that the + side is facing up.
3. Close the battery holder.
Close securely (a click should be heard).
The battery included with the unit have been provided to allow you to check product operation and may not last long.

Warning
- Do not use or store the battery in direct sunlight or other excessively hot place, such as inside a car or near a heater. This can cause the battery to leak, overheat, explode or catch fire. It can also reduce the life or performance of the battery.
Incorrect replacement of the lithium battery may result in an explosion. Only replace the battery with a battery that is the same or an equivalent type. - The battery may have different voltages, even if they look similar. Do not use different kinds of the battery together.
- Do not heat the battery, disassemble them, or throw them into flames or water.

Caution
- When disposing of used the battery, please comply with governmental regulations or environmental public institution's rules that apply in your country/area.
- To prevent leakage of battery fluid, remove the battery if you do not plan to use the remote control for a long period of time (1 month or more). If the fluid should leak, wipe it carefully off the inside of the case, then insert new battery. If a battery should leak and the fluid should get on your skin, flush it off with large quantities of water.
- To prevent an accident, store the battery out of the reach of infants and young children. If accidentally swallowed, contact a doctor immediately.
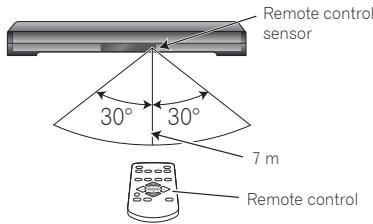
Operating range of remote control
The remote control may not work properly if:
- There are obstacles between the remote control and the unit's remote sensor.
- Direct sunlight or fluorescent light is shining onto the remote sensor.
- The unit is located near a device that is emitting infrared rays.
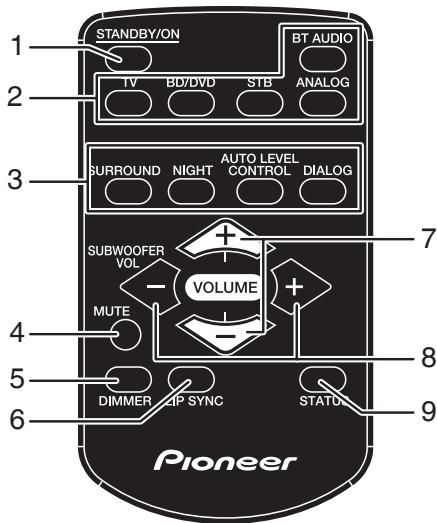
Remote control
1 STANDBY/ON
Turns the power of the unit on/off (standby mode).
2 Input Selection Buttons
Switches the input of the unit.
3 Sound setting buttons SURROUND
Turns on/off the surround function.
NIGHT
Turns on/off the night function.
AUTO LEVEL CONTROL
Turns on/off the auto level control function.
DIALOG
Turns the dialog function on/off.
- The unit is operated simultaneously with another infrared remote control unit.
- When the IR repeater function (page 16) or learning function (page 17) is used to operate TV remote control, the operating range will differ depending on the performance of the TV remote control. (The operating range may be reduced.)
4 MUTE
Temporarily mutes the sound. Press again to restore the original volume.
5 DIMMER
Changes the brightness of the indicators on the front panel of the unit in three steps.
6 LIP SYNC (AUDIO SYNC)
Adjusts the lip sync function.
7 VOLUME
Adjusts the overall volume including the subwoofer volume.
8 SUBWOOFER VOL
Adjusts the subwoofer (bass sound) volume.
9 STATUS
Allows you to confirm the status of various settings.
Rear panel
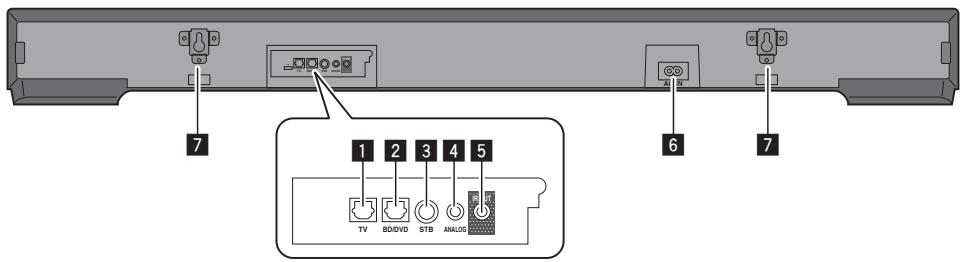
Optical digital audio input 1 terminal (page 10)
Connect a TV or other device with an optical digital audio output.
2 Optical digital audio input 2 terminal (page 11)
Connect a BD, DVD, or CD player or other device with an optical digital audio output.
Coaxial digital audio input terminal (page 11)
Connect a satellite broadcast tuner or other device with a coaxial digital audio output.
4 Analog audio input terminal (page 10)
Connect a TV, portable audio player, or other device with an analog audio output.
5 IR OUT terminal (page 16)
Connect the supplied IR Cable when the TV remote control does not work.
6 AC IN terminal
Be sure to connect this last.
7 Wall mounting fittings (page 9)
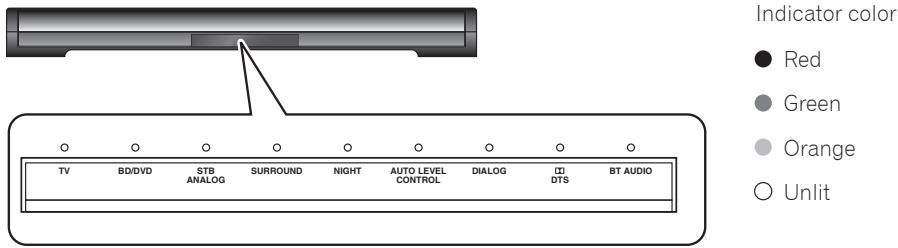
Front panel
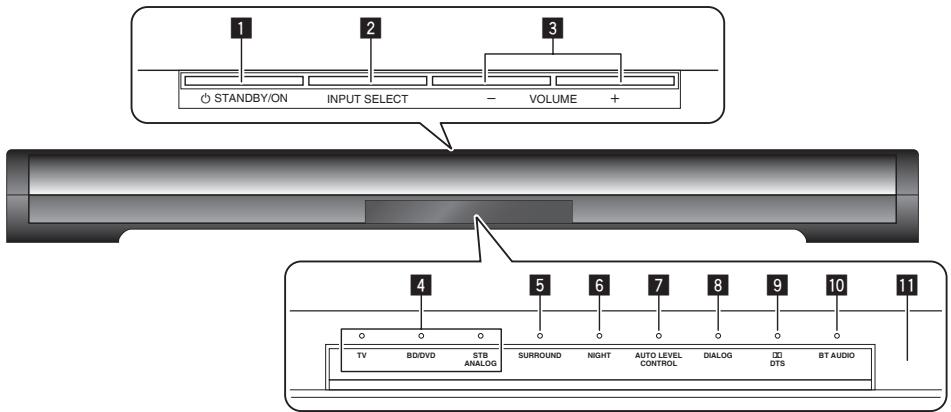
1 OSTANDBY/ON
Turns the power of the unit on/off (standby mode).
2 INPUT SELECT
Switches the input.
3 VOLUME + / -
Adjusts the volume.
4 Input selection indicators
The indicator corresponding to the selected input is lit.
Green: TV, BD/DVD, STB
Orange: ANALOG
5 SURROUND indicator
Lit when the surround is on.
6 NIGHT indicator
Lit when the night function is on.
7 AUTO LEVEL CONTROL indicator
Lit when the auto level control function is on.
8 DIALOG indicator
Lit when the dialog function is on.
9 D/DTS indicator
LIT when any of the following audio formats is input.
Green: Dolby Digital
Red: DTS
Off: PCM
10 BT AUDIO indicator
Lit when connected with a Bluetooth device.
Flashes when not connected with a Bluetooth device.
Quick flashing: Pairing mode
Slow flashing: Connection standby mode
Remote control sensor
Chapter 2
Installing and Connecting the Unit
Before connecting the unit or changing the connections, be sure to turn off the power and disconnect the power cord from the outlet. Also, make sure you have finished connecting all cables before connecting the power cord to the wall outlet.
Installing the Unit
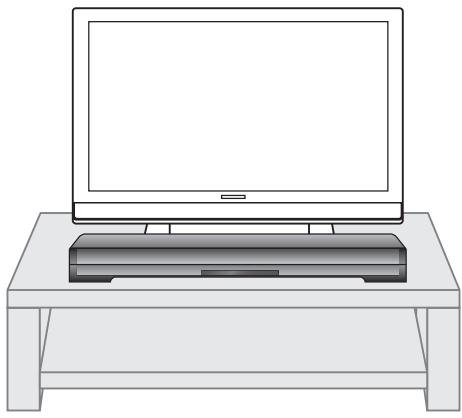
Installing the unit in front of a TV
1 Install the unit away from the TV so that the rear of the unit does not scratch the TV.
Caution
- Do not install the unit in an unstable place such as on an unsteady stand or tilted surface. The unit may fall or tip over, resulting in injury.
- The unit is not magnetically shielded and so should be used away from a cathode ray tube (CRT) TV or monitor. Also, do not place devices that are easily influenced by magnetism (magnetic cards, watches, video tapes, etc.) near the unit.

Note
-
When the unit interferes with the stand or other parts of the TV.
-
Attach the height adjustment feet and adjust the height.
-
When the TV remote control does not work well.
Install the unit away from the TV.
- Use the IR repeater function (page 16).
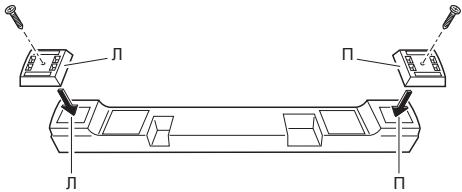
Attach the height adjustment feet
- If the unit interferes with the stand or other parts of the TV, you can adjust the height of the unit.
- Match each of the left sides and right sides of the unit and height adjustment feet and then secure the height adjustment feet with the supplied screws.

Cautions on attaching the height adjustment feet
- To prevent suffocation caused by accidental swallowing or an injury or other accident, be sure to carry out the work in a place that is out of the reach of infants and young children.
- To prevent damage to the product, choose a level place and carry out the work on a soft surface such as a carpet while taking care not to over tighten the mounting screws.
Mounting the unit to a wall
You can use the wall mounting fittings on the rear of the unit to mount the unit to a wall.
Cautions on mounting
The unit is heavy so there is a risk that its weight could cause the screws to work loose or the wall material to fail to support it, resulting in the unit falling. Make sure that the wall you intend to mount the unit to is strong enough to support it. Do not mount the unit to a plywood or soft surface wall.
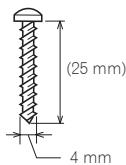
Mounting screws are not supplied. Use screws suitable for the wall material and capable of supporting the weight of the unit.
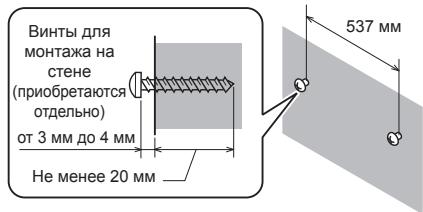
1 Obtain commercially available screws that fit the holes of the wall mounting fittings on the rear of the unit.
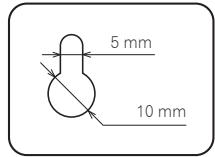
Hole of wall mounting fitting
2 Screw the screws into the wall.
- Screw in the screws until they are sticking out of the wall by 3mm to 4mm .
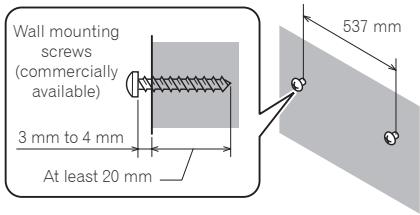
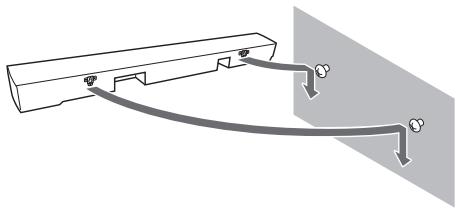
3 Hang the unit on the screws by the holes of the wall mounting fittings on the rear of the unit.
- Align the holes of the wall mounting fittings on the rear of the unit and the screws and then hang the unit on both screws at the same time.


Caution
- When the unit is mounted to a wall, there is a risk of it dropping, falling, etc. due to the weight or mounting method. Take sufficient care not to cause an accident.
- Select a location for installation/mounting with sufficient strength to withstand the weight. If you are unsure of the strength or anything else, consult with a professional.
-
Pioneer is not responsible for any accidents or damage that result from improper installation/ mounting, incorrect use, modification, disaster, etc.
-
Do not hang from the unit. Pay special attention to children. The unit may fall and break, resulting in injury.
- Do not connect or disconnect the cables while the unit is mounted to a wall. Install the cables in such a way that a foot or other object cannot get caught in them.
Connecting to Your TV
Connect the unit and TV with the supplied optical digital audio cable.
To enable hearing of the TV audio with the unit, connect the supplied optical digital audio cable.
For a TV that only has an analog audio output terminal, connect the audio output of the TV and the analog terminal of the unit with a commercially available audio cable.
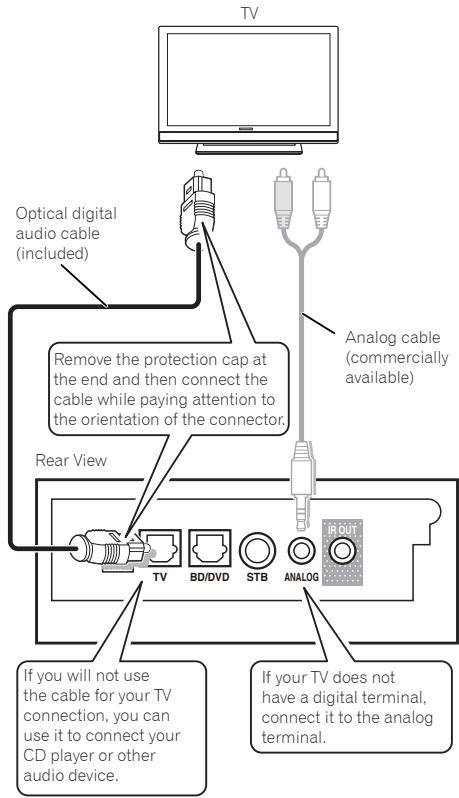

Note
- Some TVs have settings for digital audio output. For details, see the operating instructions for your TV.
- Set audio output from the built-in speakers of the TV to OFF. If this cannot be set, set the TV volume to the minimum level.
Connections with external device
You can connect a playback device (BD, DVD, or CD player) with an optical digital audio output or a satellite broadcast tuner or other device with a coaxial digital audio output to the unit to enjoy the sound of that device.
Rear of unit
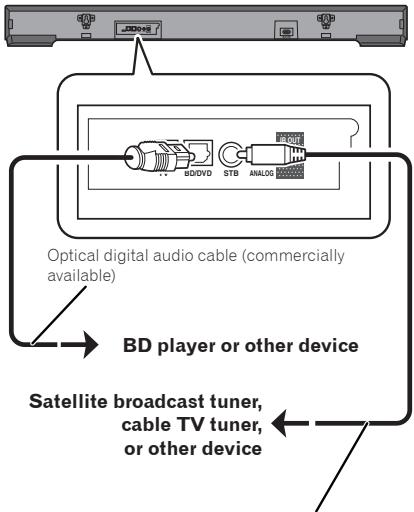
Digital audio pin cable (commercially available)

Note
- An optical digital audio cable with a square plug can be connected to this unit.
- When an MPEG2-AAC (digital broadcast) signal is input to a digital audio input terminal, sound not be output.
If sound is not output, switch the audio output of the device connected to the digital audio input terminal to PCM.
For the switching procedure, refer to the operating instructions for the connected device.
- Some connected devices have settings for the digital audio output. For details, see the operating instructions for the specific playback device.
Chapter 3
Operations
Outputting the sound of a device connected to the unit
The following describes the procedure up until listening to the sound of a device connected to the unit.
1 Turn on the power of the connected device.
2 Press STANDBY/ON or STANDBY/ON on the remote control to turn on the power of the unit.
3 Press INPUT SELECT or an input selection button on the remote control.
Switch to the input you wish to play and then start playback on the connected device.
4 Press the VOLUME to adjust the volume.
To temporarily mute the sound, press the MUTE. Press the button again or adjust the volume to cancel mute.

Caution
- When the unit is connected to a TV, set the volume to the minimum level or mute the sound. Also, if the TV speaker sound can be turned off in the settings menu of the TV, set it to OFF.
Enjoying the surround function
Turn on the surround function to enjoy sound that has the realism of a live performance.
The default setting is OFF.
1 Press SURROUND to turn on the surround function.
When this is turned on, the SURROUND indicator lights green.
Listening to sound at nighttime
This mode is suited to enjoying movies and other content with a low volume level at nighttime.
The default setting is OFF.
1 Press NIGHT to turn on the night function.
When this is turned on, the NIGHT indicator lights green.
Automatically equalize volume level differences during playback
The unit automatically equalizes volume level differences between tracks when playing music in stereo from a portable digital audio player and other sources.
The default setting is OFF.
1 Press AUTO LEVEL CONTROL to turn on the auto level control function.
When this is turned on, the AUTO LEVEL CONTROL indicator lights green.
Making dialog in movies and vocals in music easy to hear
This enhances the clarity of dialog in movies and vocals in music.
The default setting is OFF.
1 Press DIALOG to turn on the dialog function.
When this is turned on, the DIALOG indicator lights green.
Adjusting the sound delay time (LIP SYNC (AUDIO SYNC))
Adjust the sound delay time to sync the sound with the images.
The default setting is 0.
1 Press LIP SYNC for at least 3 seconds
The unit enters lip sync adjustment mode.
2 Press VOLUME + / - to adjust the delay time (press ^+ to increase the delay time).
The indicator lighting state varies depending on the setting value.
For the indicator operation, refer to Unit indicator operation (page 18).
3 Press LIP SYNC to end lip sync adjustment mode.
Switching the power to standby mode automatically (Auto Power Off)
The unit can be automatically switched to standby mode when there is no signal and 30 minutes elapses without any operation being performed.
The default setting is ON.
1 Press STANDBY/ON on the unit to turn off the power.
2 Press STANDBY/ON for at least 3 seconds while pressing VOLUME - on the unit.
When this is turned on, the D/DTS indicator lights green.
Perform the same operation again to turn the function off.
Enjoying music on Bluetooth® devices
Music on Bluetooth devices such as the following can be enjoyed wirelessly with the unit.
- Bluetooth devices: Cell phone
- Bluetooth devices: Digital music player
Devices without Bluetooth function: Digital music player + Bluetooth audio transmitter (commercially available)
Listening to music on Bluetooth devices
Pairing the unit and the Bluetooth device (initial registration)
Pairing is required to enjoy the music on a Bluetooth device with the unit. Perform pairing the first time you use a Bluetooth device or when the pairing data has been deleted from the Bluetooth device.
Before starting the pairing operation, check that the Bluetooth function on the Bluetooth device is turned on. For details, refer to the operating instructions for the Bluetooth device. Once the pairing operation is performed, it does not need to be performed again.
1 Press the BT AUDIO.
The BT AUDIO indicator flashes.
2 Perform the pairing operation on the Bluetooth device.
- When you search for the unit from the Bluetooth device, depending on the type of Bluetooth device, a list of connection (waiting) devices may be shown on the display of the Bluetooth device (the name shown for this unit on the display will be [SBX-300]).
- With Bluetooth version 2.0 or lower, a PIN code needs to be entered.
- The PIN code of the unit is fixed to 0000.
3 The BT AUDIO indicator lights. Check that pairing between the unit and Bluetooth device was successful.
The reception range between the Bluetooth device and unit is up to 10m . (This value is for use in an open space. The reception range may vary depending on whether walls or other structures are present.)

Note
- The pairing method may vary depending on the type of Bluetooth device.
- When 5 minutes elapse in pairing mode, the unit enters connection standby mode. To perform pairing again, press BT AUDIO on the remote control.
4 Play music using your Bluetooth device.
For details on the playback procedure, see the operating instructions for your Bluetooth device.

Note
- The unit does not support the AVRCP function.
- The unit does not support the Mono Headset Profile (Hands Free Profile).
- Bluetooth devices cannot be controlled by the unit.
Only one Bluetooth device can be connected to the unit at one time. Connection with multiple devices is not possible. - The Bluetooth function may not be able to be used depending on the type of Bluetooth device (to play a Bluetooth device with the unit, the Bluetooth device needs to support the A2DP profile).
- The BT AUDIO indicator flashes when there is no Bluetooth connection.
- The audio may sound choppy if signals from other devices interfere with the connection.
- The Bluetooth connection will be lost if a malfunction occurs due to the effect of a device that operates in the same frequency, such as a medical device, microwave, or wireless LAN device.
- If communication is cut off because of objects between the Bluetooth device and the unit, the Bluetooth connection will be lost.
- Large distances between the Bluetooth device and the unit will result in poorer sound quality, and the connection will be cut off if the distance between the Bluetooth device and the unit exceeds the operating range.
- If the power of the unit is turned off, the connection with the Bluetooth device will be disconnected.
- The sound retriever function* is always on.
- A function that corrects music data compressed at a high rate to enable playback with better sound quality.
Chapter 4
Other Functions
PHASE CONTROL technology
PHASE CONTROL technology is used with this unit.
During multi-channel playback in a typical home theater, the LFE (Low Frequency Effects) signals and low-pitched components contained in various channels are routed to the subwoofer or other optimum speaker. However, in principle, this routing process results in a frequency where the phase is shifted (group delay), leading to problems where the low-frequency sounds only arrive delayed or low-pitched sounds cancel each other out due to interference with other channels. The PHASE CONTROL technology in the unit is used to recreate powerful low-pitched sounds that are faithful to the original sounds.
The phase indicates the time relationship between two sound waves. Two sounds waves are said to be "in phase" if their peaks match up with each other, and the phases are said to be "out of phase" if their peaks do not match up.
When the PHASE CONTROL technology is used, it can provide the following effects when the sound source is played back.
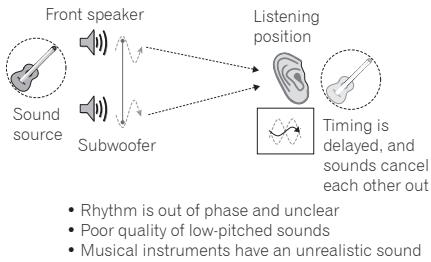
No PHASE CONTROL technology
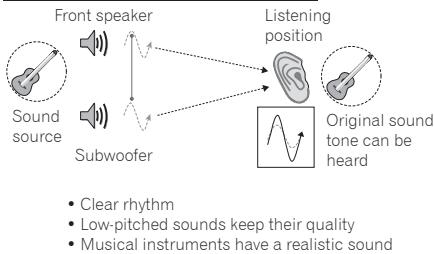
With PHASE CONTROL technology

Note
- The PHASE CONTROL technology is always activated.

Phase Control technology is a trademark assigned to products that provide matching of the phase characteristics from recording to playback based on the PHASE CONTROL technology concept developed by PIONEER.
IR Repeater Function
When the TV remote control does not work (when the unit is installed in front of the TV)
When the unit is installed in front of the TV, the unit may block the remote control sensor on the TV so that operation by the TV remote control no longer works. When this happens, try testing if the TV remote control works using the two methods below.
Method 1: Move the position of the unit forward or backward or to the right or left, or adjust its height.
Method 2: Connect the supplied IR cable.
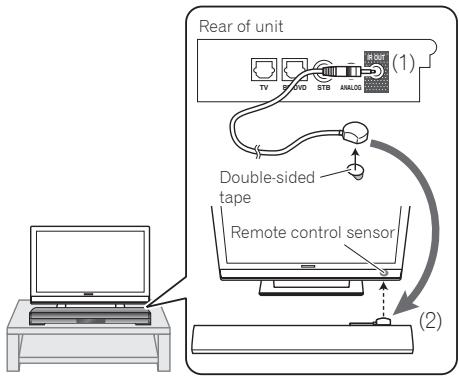
Connecting the supplied IR cable
If the TV remote control does not work even after changing the position of the unit, use the supplied IR cable.
1 Connecting the supplied IR cable.
2 Affix the IR cable to the rear panel of the unit.
- Position the transmitter so that it is aligned with the TV remote control sensor.
- Use the TV remote control within the reception range of the remote control sensor of the unit.
- Peel off the backing on one side of the supplied double-sided tape and attach the tape to the IR cable, and then peel off the backing on the other side and attach the IR cable to the unit.

Caution
- Check that the TV cannot be operated with the remote control of the TV before connecting IR cable. If it is connected when operation is possible, the signal output directly from the remote control of the TV and the signal output via the unit will interfere with each other.

Note
- For details about the location of the TV remote control sensor, see the operating instructions for your TV.
- Select an installation location that best matches your usage environment.
- Carefully wipe off any dust or objects at the affixing location.
- This may not work for certain types of TVs. In this case, try changing the installation position of the unit.
- The IR repeater function is enabled even when the power of the unit is off (standby mode).
Controlling the unit with the TV remote control
The unit can learn TV remote control operation to enable operation of the unit with the TV remote control (learning function).
The following three functions can be operated with the TV remote control.
Volume down
Volume up
Power on/off (standby mode)

Note
- This function may not be supported depending on the TV remote control. If it is not supported, use the remote control supplied with the unit.
1 Turn off the TV.
2 Press STANDBY/ON on the unit to turn off the power.
3 Press VOLUME - for at least 3 seconds while pressing VOLUME + on the unit.
The indicators flash green and the unit enters remote learning setting mode.
4 Press the button below corresponding to the function to learn.
| Function to learn | Button on unit | Indicator that flashes green |
| Volume down | VOLUME - | ○ BD/DVD |
| Volume up | VOLUME + | ○ STB ANALOG |
| Switch between power on and standby | ◎STANDBY/ON | ○ TV |
5 Press the TV remote control button corresponding to the function to learn while pointing the remote control sensor toward the unit until the indicators change from flashing green to lit.
- If learning fails, the indicators light red. The procedure automatically returns to step 4 so perform the operation again.
- If 10 seconds elapse with the indicators flashing, the procedure automatically returns to step 4.
6 Repeat steps 4 and 5 to enable the unit to learn all three functions.
7 Press VOLUME - for at least 3 seconds while pressing VOLUME + on the unit to end remote control learning mode.
When all of the indicators turn off, release your fingers from VOLUME + and VOLUME - The unit enters standby mode.

Caution
- If learning failed, perform the operation again while the power of the TV is off. The light from the TV screen may affect remote control learning.
- If the same operation is performed with a different TV remote control (or different buttons) after learning, the old functions will be overwritten with the new ones.
- If you use the remote control when the power states of the unit and TV are opposite after the unit has learned the TV power button, the function will not work properly. In this case, press STANDBY/ON on the unit so that the power states of the unit and TV become the same before using the remote control.
-
The TV remote control signals may be received by and operate both the TV and the unit. Set one of the following.
-
Set audio output from the built-in speakers of the TV to OFF.
- Set the TV volume to the minimum level.
Clearing the learning function
1 Press INPUT SELECT for at least 3 seconds in learning mode.
The indicators flash red and the learning function is cleared.
Restoring all settings to the default settings
1 Press STANDBY/ON for at least 3 seconds while pressing INPUT SELECT on the unit when the power of the unit is on.
All indicators light red and the default settings are restored.

Caution
The learned TV remote control operations are also cleared.
Unit indicator operation
The indicators on the unit appear as follows depending on the state when each operation is performed.
Volume
- When VOLUME + is pressed, the indicators light orange sequentially.
- When VOLUME - is pressed, the indicators turn off sequentially.
- When the maximum value is reached, the D/DTS indicator lights red.

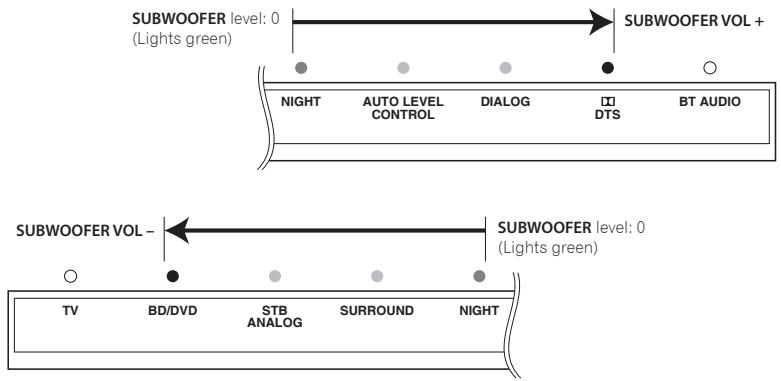
Sub Woofer Volume
- When SUBWOOFER VOL +/- is pressed, the indicators light orange sequentially.
- When the maximum value is reached, the D/DTS indicator lights red.
- When the minimum value is reached, the BD/DVD indicator lights red.
MUTE
- When MUTE is pressed, the indicators flash orange.

STATUS
- When STATUS is pressed, the on/off statuses of various settings are indicated by the indicators (when a setting is on, the corresponding indicator is lit green).
When learning function is set

LIP SYNC (AUDIO SYNC)
- The TV and BD/DVD indicators are always lit green.
- When the VOLUME +/- are pressed, the STB/ANALOG to DIALOG indicators light orange or turn off to indicate the lip sync delay time.
- When the maximum value is reached, the DIALOG indicator lights red.

Chapter 5
Other Information and Troubleshooting
Troubleshooting
Incorrect operation is often mistaken for trouble or malfunction. If you think that there is something wrong with this component, check the points below. Sometimes the trouble may lie in another component. Inspect the other components and electrical appliances being used. If the trouble cannot be rectified even after checking the points below, ask your nearest Pioneer authorized service center or your dealer to carry out repair work.
Sound
| Problem | Check | Remedy |
| • No sound is output. • Sound is not output properly. | Are the cables properly connected? | • Connect the cable properly according to the connected devices (page 11). • Insert the cable firmly and all the way in. • If there is any dirt on the connection plug and terminal, wipe it off. |
| Is the audio cable damaged? | If the cable is damaged, replace it with a new one. | |
| Are the connected components properly set? | Refer to the operating instructions of the connected components and then check, for example, the volume, input, and speaker settings. |
Others
| Problem | Check | Remedy |
| Power does not turned on. | Is the power cord properly connected? | Plug the power cord securely into the power outlet. Unplug the power cord, wait several seconds, then plug the power cord back in. |
| The unit's power turns off automatically. | If Auto Power Off is set, the unit's power automatically turns off. Check the Auto Power Off setting (page 13). | |
| The unit cannot be operated. | Unplug the power cord, wait several seconds, then plug the power cord back in. | |
| Cannot be operated with the remote control. | Are you operating the remote control from a point too far away from the unit? | Operate from within 7 m of the remote control sensor. |
| Is the battery dead? | Replace the battery (page 5). | |
| Settings I have made have been cleared. | • Have you disconnected the power cord while the unit's power was on? • Has there been a power failure? | Wait for at least 10 seconds after the unit display disappears and then make sure you press the OSTANDBY/ON on the unit or the power button on the remote control before disconnecting the power cord. Be particularly careful when the power cord is connected to the AC outlet on another device because the unit turns off in conjunction with the device. |
| I want to adjust the brightness of the indicators. | Press the DIMMER on the remote and select the desired display brightness. | |
| The input selection indicators are flashing red. | Before use, unplug the power cord, wait several seconds, then plug the power cord back in. If the problem is not resolved, contact the Pioneer Customer Support Center. | |
| The unit becomes hot during use. | The temperature of the unit cabinet may increase slightly during use depending on the operating environment. This is not an indication of a malfunction so you can continue using the unit without worrying. |
Trademarks and licenses

DOLBY
DIGITAL
Manufactured under license from Dolby Laboratories. Dolby and the double-D symbol are trademarks of Dolby Laboratories.

dtst
Digital Surround
Manufactured under license under U.S. Patent Nos: 5,956,674; 5,974,380; 6,487,535 & other U.S. and worldwide patents issued & pending. DTS, the Symbol, & DTS and the Symbol together are registered trademarks & DTS Digital Surround and the DTS logos are trademarks of DTS, Inc. Product includes software. © DTS, Inc. All Rights Reserved.

Bluetooth®
The Bluetooth® word mark and logos are registered trademarks owned by Bluetooth SIG, Inc. and any use of such marks by PIONEER CORPORATION is under license. Other trademarks and trade names are those of their respective owners.
Radio wave caution
This unit uses a 2.4 GHz radio wave frequency, which is a band used by other wireless systems (see list below). To prevent noise or interrupted communication, do not use this unit nearby such devices, or make sure these devices are switched off during use.
- Cordless phones
- Cordless facsimiles
- Microwave ovens
- Wireless LAN devices (IEEE802.11b/g)
- Wireless AV equipment
- Wireless controllers for game systems
- Microwave-based health aids
- Some baby monitors
- Other, less common, equipment that may operate on the same frequency:
- Anti-theft systems
- Amateur radio stations (HAM)
- Warehouse logistic management systems
- Discrimination systems for train or emergency vehicles

Note
- In the event noise appears in your television image, there is the possibility that a Bluetooth wireless technology enabled device or this unit (including products supported by this unit) are causing signal interference with the antenna input connector of your television, video, satellite tuner, etc. In this event, increase the distance between the antenna input connector and the Bluetooth wireless technology enabled device or this unit (including products supported by this unit).
- If there is something obstructing the path between this unit (including devices supported by this unit) and the device equipped with Bluetooth wireless technology (such as a metal door, concrete wall, or insulation containing tinfoil), you may need to change the location of your system to prevent signal noise and interruptions.
Scope of operation
Use of this unit is limited to home use.
(Transmission distances may be reduced depending on communication environment).
In the following locations, poor condition or inability to receive radio waves may cause the audio to be interrupted or stopped:
- In reinforced concrete buildings or steel framed or iron-framed buildings.
Near large metallic furniture. - In a crowd of people or near a building or obstacle.
- In a location exposed to the magnetic field, static electricity or radio wave interference from radio communication equipment using the same frequency band (2.4 GHz) as this unit, such as a 2.4 GHz wireless LAN device (IEEE802.11b/g) or microwave oven.
- If you live in a heavily populated residential area (apartment, townhouse, etc.) and if your neighbor's microwave is placed near your system, you may experience radio wave interference. If this occurs, move your unit to a different place. When the microwave is not in use, there will be no radio wave interference.
Radio wave reflections
The radio waves received by this unit include the radio wave coming directly from the device equipped with Bluetooth wireless technology (direct wave) and waves coming from various directions due to reflections by walls, furniture and building (reflected waves). The reflected waves (due to obstacles and reflecting objects) further produce a variety of reflected waves as well as variation in reception condition depending on locations. If the audio cannot be received properly due to this phenomenon, try moving the location of the device equipped with Bluetooth wireless technology a little.
Also note that audio may be interrupted due to the reflected waves when a person crosses or approaches the space between this unit and the device equipped with Bluetooth wireless technology.
Precautions regarding connections to products supported by this unit
- Complete connections for all devices supported by this unit, including all audio cords and power cables before connecting them to this unit.
After completing connections to this unit, check the audio and power cables to confirm that they not twisted together. - When disconnecting this unit, confirm that you have sufficient working space in the surrounding area.
- When changing connections of audio or other cables for products supported by this unit, confirm that you have sufficient working space in the surrounding area.
Chapter 6
Appendix
Specifications
Unit
| General | |
| Power requirements | AC 100 V to 240 V, 50 Hz/60 Hz |
| Power consumption | 36 W |
| In Standby mode | Less than 0.5 W |
| Dimensions (W × H × D) | Without the height adjustment feet attached: 900 mm × 86 mm (front) × 121 mm * Height at rear: 70 mm With the height adjustment feet attached: 900 mm × 106 mm (front) × 121 mm * Height at rear: 90 mm |
| Net Weight | 4.3 kg |
| Operating temperature | 5 °C to 35 °C |
| Operating humidity | 85 % or less |
| Inputs/Outputs | |
| DIGITAL IN (OPTICAL) | Optical jack x2 |
| Coaxial digital input | RCA terminal x1 |
| Analog input | 3.5-mm stereo mini jack x1 |
| IR OUT | 2.5-mm mini jack x1 |
| Amplifier | |
| Practical maximum output | |
| Total | 130 W |
| Front | 30 W + 30 W (10 % THD, 4 Ω) |
| Subwoofer | 35 W + 35 W (10 % THD, 4 Ω) |
| Bluetooth | |
| Version | Ver.2.1 + EDR |
| Transmission output | Class 2 |
| Supported profile | A2DP |
| PIN code | 0000 |
Speakers
| Front | |
| Type | Closed box type |
| Speakers | 6.6 cm (cone type) |
| Impedance Rated | 4 Ω |
| Playback frequency band | 100 Hz to 20 kHz |
| Subwoofer | |
| Type | Bass reflex type |
| Speakers | 7.7 cm (cone type) × 2 |
| Impedance Rated | 4 Ω |
| Playback frequency band | 45 Hz to 2 kHz |
- Design and specifications are subject to change without notice.
- All other product names, technology names, and company names contained in this document are trademarks or registered trademarks of PIONEER or their respective companies.
Maintenance
Handling the unit
When shipping the unit
Please save the original shipping carton and packing materials. If you need to ship the unit, for maximum protection, re-pack the unit as it was originally packed at the factory.
Keeping the exterior surfaces clean
- Do not use volatile liquids such as insecticide spray near the unit.
- Wiping with strong pressure may damage the surface.
- Do not leave rubber or plastic products in contact with the unit for a long period of time.
Place of installation
- Do not place this unit on top of a TV or color monitor. Also install it away from cassette decks and other devices easily affected by magnetic forces.
Avoid the following locations:
- Places exposed to direct sunlight
- Humid or poorly ventilated places
- Extremely hot places
- Places exposed to vibrations
- Places in which there is much dust or cigarette smoke
- Places exposed to soot, steam or heat (kitchens, etc.)
Do not place objects on this unit
Do not place any objects on top of this unit.
Do not obstruct the ventilation holes.
Do not use this unit on shaggy rugs, beds, sofas, etc., or wrapped in cloth, etc. Doing so will prevent the heat from dispersing, leading to damage.
Do not expose to heat.
Do not place this unit on top of an amplifier or other component that generates heat. When rack mounting it, to avoid the heat given off by the amplifier or other audio component, place it on a shelf below the amplifier.
About condensation
If this unit is moved suddenly from a cold place into a warm room (in winter, for example) or if the temperature in the room in which this unit is installed rises suddenly due to heater operation, etc., water droplets (condensation) may form inside (on operating parts and the lens). When condensation is present, this unit will not operate properly and playback is not possible. Let this unit stand at room temperature for 1 or 2 hours with the power turned on (the time depends on the extent of condensation). The water droplets will dissipate and playback will become possible. Condensation can also occur in the summer if this unit is directly exposed to the air flow from an air-conditioner. If this happens, move this unit to a different place.
Cleaning the this unit
- Unplug the power cord from the power outlet when cleaning this unit.
- Clean this unit using a soft cloth.
- For tough dirt, apply some neutral detergent diluted in 5 to 6 parts water to a soft cloth, wring out thoroughly, wipe off the dirt, and then wipe again with a soft, dry cloth.
- Alcohol, thinner, benzene, insecticides, etc., could cause the print or paint to peel off. Also, leaving rubber or vinyl products in contact with this unit for long periods of time could mar the cabinet.
- When using chemical-impregnated wipes, etc., read the cautions included with the wipes carefully.
WAARSCHUWING BETREFFENDE DE VENTILATIE
WAARSCHUWING NETSNOER
Brandt wanner surround is ingeschakeld.
6 NIGHT-indicator
B cnyaae noaBleHnaNCKaKeHn Ha n3o6paKHeHN Ha TeLeBn3Ope, cyueCTbyeT Bo3MOXHOCTb TOrO, yTO daHHoe yCTpoiCTBO (BKlIOUaHn3eJnI, NOdepKNaemble daHHbIM YcTPOCTBOM) CO3daOT INTEppepeHcNUCnHAnOB C BXOHBIM pa3bEmOM aHTehHbI TeLeBn3Opa, BnDEoEKN, cNYTHNKOBOR TO HOpepa N. I.
B TakOM cnyuae yBeiHbTe pacCToHnHe MEXy BXOHyBIM rHe3DOM aHTeHHbI N daHHbIM annapaTOM (BKJIOUay n3dEIny, noDpeKINBa-Emble daHHbIM annapaTOM).
Pioneer He Hecet OTBeTCTBHeHOctn 3a IIObIe c6oN Ha COBMecTUMbIX N3DeJIyX PioneerI no npUHHe OUIbok/C6oE CB83n, C8Ba3AHbIX C NOKJIIOUcHHeM K CeTn I/ INIIN IOKJIIOUcHbIM O6OpUdOBaHNEM. IOnkanyIcTa, C8xJITecb C npObaIepOM INHTepHET ycnyr nIIN pON3BOIDTeIeM CETeBOrO yCTpOJCTBa.
ДяИСПОЛБЗOBAHИУ INHTEPHET Tpe6byTc COCTABNTb OTdJIbHbI KOHTpaKT/ npOu3BecTN OJIaTy npObaIdepU INHTepHET ycIyTu.
Table of Contents
1 Ipeed nauanom pa60tbi
5 BvendeHne
5 -Долнгельные писнособени, NOCTaJIЯБмIEВ KOMПЛКTE
5 -Ipeed nCpOJIb3OBAHnEM npJIbTa DnCTaHcIOHOHOrO ynpabHeHHA
5 -3aMeHa 6aTapeKn B PyIbTe IINCTaHcIOHHO ynpabHeHH
6 -PaDnyc DeiCTBnIyNbTa IINCTaHcIOHOrO ynpabJIeHHN
6 -IyIbT dIcTaHcUHOHOrO ynpaBHeHHa
7 -3aHnaHa
8 -IpeednnaHnB
2 UcTaHOBKa nIpoKJIIOUeHne yCTpOJCTBa
9 YctahOBka yCTpoNCTBa
9 - Uctanobka uctpoiCTBa piepei TepeBn3OpOM
9 MoHTax yCTpoCTBa Ha CTHe
10 PoiKlnOueHne K TeJeBn3Opy
11 PoiKJIoueHne BHeuHnx yCTpoiCTB
3 YnpaBJIeHne yCTpOJCTBOM
12 BocnpoIm3BeJeHne 3Byka npKluOeHHoro yctpoiCTBa
12 06bemHbI 3ByK
12 HactpoiKa 3Byka Ira HoHOrO BpeMeHH
12 AToMaTnueckoe BbpaBnBaHnepa3hByx npOBHeI rPOMKoCTN BO BpEmra BOCpOn3BeDeHnA
12 Повьшени YeTkoCTn 3ByaHnR roLoCa BФЛbMax N My3byKaJIbHbIX DOpOxKax
13 CnHxpoHnHaZauny aayNo- n BvIeOIoTOKOB (LIP SYNC (AUDIO SYNC))
13 ABTomatueckoe BKJIOUeHne pexima OxuJaHHa (abTomatueckoe BbIKJIOUeHne PITAHnI
13 Bocnpoun3BeDHeHne My3bIKn C yCTpoiCtB Bluetooth
13 - BocIpOn3BedeHne My3bIKc yctpoiCTB Bluetooth
4 PpOyneFynKcnn
15 PHASE CONTROL technology
16 ΦункцИУК NOВТОРИТЕЯ
16 -EcnHne pa6oTaet npIbI nCTaHnOHHoro ynpaBHeHnTeLeBn3Opa (npuYCTaHOBKe yctpoiCTBa nepeD TeLeBn3Opom)
16 -ПодклioченIE IR-ka6ья,BXoДяцeroВ KOMПЛeКТ NOCTaBKN
17 YnpaBHeHne yCTpoIcTBOM C nOmoIbIO npIbTa Dy TeneBn3opa
17 -YdaJIeHHe Ha3HaueHHbIX yHKcIIN
17 Bo3BpaT BceX HacTpoE K HacTpoiKaM no yMOJIuaHIO
18 Pa6oTa HnDnKaTOpOB yCTpoNCTBa
19 - MUTE
19 - STATUS
19 -LIPSYNC(AUDIOSYNC)
5 Ipoue cBeedenu uyctpaHene HncnpaBHOCTei
20 Bo3MoKbIe HeIcnpaBHOCTn cNoCo6bIx yctpaHeHn
20 -3ByK
20 -Дугген Heисправно
21 -ToproblesMapknIinH3nn
21 PpeoocpexeHne no paIOBOJHaM
22 - Pamkn DeiCTBn
22 -OtpaxKeHpaIOBOH
22 -Меры петедосторожнoctи,касошпес coeINHeHn c annapaTaMn,poДeржИBaembIMn daHbIM yCTpoICTBOM
6 PpniloxkHeHne
23 TexHueecknXeXapAKeTepNCtNk
23 -yctpoiCTBO
24 -HnHaMnKn
25 Texnueckoe 06cnykBaHne
25 -O6paueHnE cYcTpoNCTBOM
Pazden1
7 KpenJIeHnIa MoHTaxa Ha cTeHe (cTp. 9)
PepednnaheIb

1 STANDBY/ON
BkIIOUHeHn I BbIKIOUHeHne (pepexoB peKIM OxNdaHn) nITaHn yCTpoiCTBa.
2 INPUT SELECT
IpeeknoueHneBxOda.
3 VOLUME + / -
Perynipobka ypOBHr rPOMKocTn.
4 INdikaTopbI Bb6opa BxoDa
TopIT INHДИКaTOp, COOTBETCTBYUOuN Bbl6paHHOMy BXOу.
3eHeh: TV, BD/DVD, STB
OpaHkeBbI: ANALOG
5 INdikatop SURROUND
TOpNT, KOrDa BkIIOUeHa ΦyHKuNIA ObemHOrO 3Byka.
6 INdikatop NIGHT
Tognt, KOrda BkIIOueH HOHyo peXIM.
7 INHdkaTop AUTO LEVEL CONTROL
Tognt, KOrda BklnOeHaФyHKUaABTomatueeCKOROBbpaBnBaHnRpOMKoCTN.
8 INdkaTop DIALOG
TOpNT, KOrJa BkJIouHeHa yHKnIa NOBblSeHnYeTKoCTn DnaJIoROB.
9 INdikKaTOp D/DTS
TOpNT,ecnHa BxOe pInHmMaetcraNHaI OndHOrO n3 CneDyUoJnx fOpMaTOB.
3eIeHbI: Dolby Digital
KpaChbDTS
BbIKJ: PCM
10 INdkaTop BT AUDIO
Tognt,ecnIIOdkluoyeHO yctpoiCTBO Bluetooth.
Miraet, ecn coeDHeHne c yCTpOCTBOM Bluetooth npepBaHo.
Uactoe MuraHne: pexm peinctpaunn PeKoe MuraHne: pexm OxuaHn npokluohn
11 CeHcOp dIcTahCUNOHnOу npaBJIeHnA
Pa3dien 2
YcTaHOBKa I N OndKJIoucheHne YcTpoIcTBa
Ipeep nooknouhenem yctpoiCTBa nnn
n3MeHHeNEM CoeHNHeHn y6eNTecb, YTO
nTahne BblkIOUeHO N Ka6eJIb NtAHn
OTcoEHNHcN OT po3ETKn. TaKKe, peep
nooknouhenem Ka6eJIb N pOaTeKc,
y6eNTecb, YTO BCE Ka6eJIu NoDcoEHNHeHbI.
yctahobka yctpoiCTBa

YCTaHOBka yCTpoiCTBa nepeD TeLeBu3OpOM
1 YctaHaBnBaIte yCtpoiCTBO TaKIM 06p30M, YTO6bI MExdy yCtpoiCTBOM IN TeJeBn3OpOM OCTaBAJcR 3a3Op IN 3aHJa PAnHeJIy yCtpoiCTBa He MoRna NoUcaPanaTb 3kpaH.

IpeoocTepeXeHne
He yctahabnBaIte yctpoIcTB Ha neyctoYHBOI INI hAKIOHNHO NOBEPXHOCTN. YcTPOCTBO MOxET ynactb IINI nepeBepHyTbcr, YTO MOxET CtaTb npuHNOH TpABMbI.
- UcTpoIcTBo He OcHaSeHrMaHHTbIM 3KpaHOM, nO3TOMy He nCnOJIb3yIe erO B6NI3n 3NeKtPOnHOnyeBbIX npNbOpOB, TeNEbIN3OpOB IN MOHITOpOB. TaKxHe Ye cTaHabJIBaIte NoBNI3OCTn OT UcTpoIcTBa OB6KeTbI, HA KOTopbIE MOKET HerATNBHO BO3DeJCTBOBaT MaHHTHoe N3NJyuEHe (MaHHTHbIe KApTb, BnDEOKaccTeIи T.I.).

PpimueaHne
- EcIn yctahOBke ycTpoiCtBa MeIaet NoCTabka nII npyrue qactn TeIeBn3opa.
- YctaHOBInTe HOKKNДЯpeRyINpOBKn BbICOTbI NOTpeRyINpyIte BbICOTy.
- Ecnn npnybT nCtahuOnHoro ynpabHeHH TeJeBn3Opa He pa6oTaet DoJxHbIM 6pb3OM.
- YctaHOBInTe yCtpoiCTBO dAJIbIe OTeLEBn3Opa.
- BocnoIb3yItecb IK nobTopnteem (cTp. 16).

YctaHOBka HOXeK dIypeRynIpOBKn BblCOTbl
- Ecni yctaHOBKe ycTpoiCTBa MeIaET POndCTaBka IINI dpyrIne qactN TeIeBn3Opa, MOKHO OTpeRyIIpOBAbTB BbICOTy ycTPOIcTBA.
- YctaHOBnTe HOKKn IJN peryNJnPOBKn BbICOTbI C npaBOH N C JeBOH CTOpOHbI YcTPOHCTBa N 3aФNKcPnyTe IN NpNJraEIMbIM BNHTAMN.

Mepbl npedoctopoxhoctn npn yctaHOBKe HOXek dIpeRynpOBKn BbICOTbl
BoBpemyycTaHOBKmHOKeK praHMeNoJdOJIKHObbMaHehKIXDeTei,POKcIbKyCyUeCTByETPCKnPOrnAteBaHnMeIKINpeMMeTob,TpaMbInDpyrNMeCHAcCTbXcYuaeB.
- YTObI He NOBpeiNb I3dEJIne, pa6Ota DoJnxHa npBOIoNTbCn Ha POBn H MArKo NOBePXHOCTN, HAnPmEp, Ha KOBpe. TaKke cJeDITE 3a Tem, YTObI BnHTbI He BoJIIn nepetaryTbI.
2 BBepHnTe BnHTbI BCTeHy.
BnHTbI DOnXKhbI BbICTyNaTb N3 CTHebl npImepHO Ha OT 3 MM Do 4 MM.
3 ПовсьтЕ yctpoиCTBO Ha BnHTbI C NOMOцью MOHTaXhblx KpeNJIeHnHa 3aJHNe CTopoHc yctpoiCTBa.
- CoBmecTnTe OTBepCTnKpeIneHn Ha 3aDneC tOPOHe yCTpoiCTBa C BInHTaMn NOBecBte yCTpoiCTBO OJHOBpeMeHHo Ha 06a BInHTa.

PpeoocTepeKHeHne
- Pπr moHTaxe yCTpojCTBa ha CTHe cyuIeCTbYe T pCK nAeHn I. n. 33-a T JkEeTcYCTpoCTBa IIN nCtOc6Ba MOHTa. PπpMtTe Heo6xOJMbIe Mepbl npeDontBpaueHn TaKx CnyaeB.
Bb6epnte moTtacka yuactok ctehbl, doCTaTOH npOHybI, YTObI bIDepKAtb BEc yctPOiCTBa. EcnIy BcEcbc COMHeHHa OHOTcTeHbIO pOCHoCTn MATEpMaJIa CTEHbl IIN DpyTHx O6CToTBeCTB, 06paTIeTcB 3a NOMUbHO K cneuaJIaNCTy.
KOMNAHNA PIONEER HE HECET OTBETCTBEHNOCTN 3A JIO6bIe HecACTNbIe CNUyAn, Bbl3BaHNbIe HENpaBUNbHOY UCTAHOBKO/MoHTaKOM.
He TANHIE YCTPOICTBO BHN3.CNEINTE 3a DEbMn. UCTPOICTBO MOKET yNACTb IN CNOMAITcB,HTO MOKET CTATb PnHHON TpABMbI.
BoBpemMOHTaKaHaCTeHyHeN0KJIIOUaHTe NcOTKIOuAte HNKAKMe Ka6EiPi.PIpOKnIbIaBtE Ka6EiPiTAKIM O6pa3OM,HTObI B HIX HeIb3r 6blno 3aNYtATbcN.
Ecnn CnHnA nIΦpOBO R BcUaHnM MPEG2-AAC PnHnMaTeCn HnΦpOBoA yAuNobXoD,3ByK BocPnpO3BODITbc He 6yDeT.
Ecnn 3ByK He BOCPON3BOOHTCn,NEpeKNIoHITe ayuOBbXOD nOkJIIOHeHHOY yCTPOIcTBA Ha cnFpOBov ayuOBXOD PCM.
Phase Control technology is a tool to control the topographic map, including the use of a 3D DEMO, KOTOPBIE, OBCON, and XAPAKTepin. The 3D DEMO has been used in the field of monitoring the topographic map.
ФункцяИК ПОВТOPИТЕЛ
Ecn He pa6oTaET npIbT dntaHcnoHoro ynpaBHeHna TeLeBu3Opa (pni ycTaHOBKe yctpoiCTBa nepei TeLeBu3Opom)
Ecnn yctpoiCTBO yctaHOJIeNo nepeI TeNEBn3OpOM, OHO MOKeT 3aRopaxNBaTb DaTnK dNCTaHcHOnHOrO ynpabNeHH, n ynpabHeHne c NOMOu bIO npbTa DY TeNEBn3Opa MOKeT OKa3aTbCra HeBO3MOXhBIM. B 3tOM cIyae peKoMeHdYetc npOBepNTb, pa6ToaET IIN pynbT dy TEeBn3Opa, oHmM n3 CLeNyUoXnxCnocobOB.
Cnoc6 1: Iepemecntte yctpoictBO BnpeD, Ha3aD, BVEBO nII INBpAO, nIOTperpynpuTe erO BbICOTy.
Cnoco6 2: IopKnIooHte IR-ka6eJb, BxOJaunB KOMnJIeKT NocTabKn.
Повкlioуени IR-ka6еля, BXODЯшeroВКOMплков NOCTaBKN
Ecni npIbT Ny TeIeBn3opa He paobotaet daKe nocIe nepemeueHn ycTroYCTBa, noKnIOHTe IR-ka6eJIb, BXoJaIuN B KOMIIeKTI NOCTaBKN.
1 PookJIuOHeHne IR-ka6eJIa, BxOJaIeRo BV KOMJIeKTe NocTaBKn.
2 3akpenite IK ka6eIb Ha 3aHne IanaJIy yCTpoIcTba.
Bo3MOxHbIe HeINcnpaBHOCTn IN cNoCo6blnx yCTpaHeHna
3aactyio HnnpabnIbna pa6oTa OunboHno npinHmaeTc 3a HeNoIaKn IINn HncnPabHocTn. Ecnn Bbl CHTaete, YTO KAKOJ-NIOBO KOMNOHEN THeNCpabAH, N3yUIne INHOpMaUIO, npeCTabneHHyo Hnke. B HeKOTopbIX CnyaXn HenoIaKa MoKet 6bITb Ha Dpyrom KOMNOHETe. IpoBepbTe DpyrNe KOMNOHtB, a TaKxE NcNOb3yEmble 3NEKtpOnpni6Opbl. Ecnn HeBO3MOxHO yctpaHnTB HeNCpabHocTb PocIe N3yuEHn IINHOpMaUHN Hnke, opaTntEcB B 6nXkaIuN ABTOPn3OBaHHbI cepBnchbl ueTp Pioneer nn K dInlepy dI pyPobedeHn peMOnTa.
3Byk
He pa3meuaTe daHHoe yctpoiCTBO CBEPXHa TENEBn3OpE NIIu CBeTHOM MOHTope. TaKke yCTaHabNBAIte pecNBep DaJIbIe OT KACCetThbIX MaHHTofoHOB INHbIX yCTpoiCTB, Ha KOToPbIE MOKET NOBIMrTb MaHHTHOE NOJE.
N36eraIte cIeJeUoIx MeCt:
- MecTa, noDbEpbraeMbIe npRmOMy COJIHeHOMY CBETy
- CbipbIe nnn nnoxo BeHTnnpyemble Mecta
- MecTa co CnIuKOM BbICOKO TeMnepaTpyoN
- Mecta, Podbepraembte BnbaqnaM
- MecTa c 6oJIbUIM coepeJxAHnEm nbIIN nIN CNrApetHOrO dbIMA
- MecTa, noDBePraeMbIe BO3deIcTBIO caKn, napa nn Tena (kyxHn n T.n.)
He pa3meuane ppeMeTbHa
yctpoinCTBe
He pa3meuTe KaKeI-Jn6o IpeMtebHa yctpoCTBe Cbepyx.
He 3aKpbIbaiTe BeHTnlaZuOHhble OTBepCTn.
HeNcONb3yTe DaHHeoe yCtpoCTBO Ha BOpCNbIX KOBpax, KPOBATx, INBaHax N T.Д. ИЛЗaBepHybIM B TkaHb N T.Д. ΘTO MOKET NOMeIaTh paccenBaHnIO TeJIa, YTO MOKET npINBeCTN K NOJOMKe.
He noDBeRpaTe peCnBep BO3dEiCTBnIO Tena.
He pa3meuai Te yctpoCTBO cBepxHa ycuiTene nn dpyrom KOMnOHeHTe,
THeHepuHoueM TeHIO. Ipn yCTaHOBKe B CToIky, UTo6bI n36EkaTb Bo3dEiCTBnYaTeIIa, OTBOIMoTO OT yCINNTeJI NII IN HNOy aYdNOKOMNoHEnTA, yCTaHaBnBaItepeCBep Ha PONKHy HNXe ycINITeJI.
OKoHdEhcauN
ПрибьICTPOMперemeшениданногуctpoiCTBAиXOJODHOROMeCTAВTeNIOPEnomeшени(Hanpimep,3IMO)Илpi npRpe3KOM NOBbIeSHEN IOD BO3dEChTBnEMpaBOTbI OOBpReBaTeJIYI.T.II.TempeATpybI B NOMeSHEN, B KOTOPOM yCTaHOBIIeHOyCTPOICTBO,BHYTpN yCTPOICTBA(Ha pa6OuIXDEtaJAXI ININ3E)MOYrO bpa30BbIBaTbcSsKaIIINBOdy(KOHDeHCAsa).Ppi HAnIHyCNOHDeHCaUIN DaHHOE yCTPOICTBO He6byet paobotabHadNeJaUIMObpa3OM,IBOcPON3BeDeHne 6byET HeBO3MOxHO.OCTABbTe yCTPOICTBO pni KOMHaTHoHTEMpepatye Ha1 IIn2 Yaca cBKNUHEnHBIM\PITAHmE(BPem73aBvCnTOT CTeNEH NOKDeHCAsa).KanIIBOdyICnAPRTc, INBOcPOn3BeDeHne CTAHETBO3MOxHbM.KOHDeHCaUIM MoKET TAKKeOBpa30BbIBaTbcRAJeTOM,EcNIyUCTPOICTBOOTKpbITo BO3dEChTBNUnpMByNXNOTOKOBBO3dyxaOT KOHNIOHepaBO3dyxa.EcIn3TO pOn3OoiDet,прЕмсTeTdeHNOe yCTPOICTBO B DpyroE MeCTO.
UcTka yctpoCTBa
-Пелед Tem Кампостунь К очирке Данноуства,OTCOeINHITe Kabeль ПИТаю OT pO3etkn.
-ДячNTКДанHOrOуCTpoIcTBA INCNoJIb3yIteMЯrkYIO TkaHb.
Длпрллшел nbIи CMOHTe MЯгкуTO TKAhb HEKOTOpbIM KONIчecTBOM HeIITpaIbHORO MOUcero CpeICTBa, pa36abJIeHNHO 5do 6 YaCTMn BOdI, TuaTeIbHO BByKMITE TKAHB, COPTNE PbJbN 3aTEM BbITpNIte NOBepxHOCtB MЯTKOi, cyXoT TkaHbIO.
CnnpT, pactBopnteNb, 6eH3nH, INHcEKNiDbl N.T.I. MOrTy Bbl3BaTb paccnaBaanHe NeaTu HnKpaCKn. TaKke n36eRaIte IAnTeJIbHorO KOHTaKTa pe3INHOBix INN BHNIOBbIX n3DeNl C DaHHbIM yCTpOJCTBOM, TAK KAK 3TO MOKeT NCNOPTNb KOpNyc.
-ПиИСПОЛБЗOBAHМУЧСТЯЦХТКАЕн,CMOЧЕНьIX XIMPEAKТВамИ N.T.I.,BHIMaTeJIbHO ПЮчТИТЕ ИНСТРУКЦМ NO IXПпIMeHENIO.
Declaration of Conformity with regard to the R&TTE Directive 1999/5/EC
Manufacturer:
PIONEER CORPORATION
1-1, Shin-ogura, Saiwai-ku,
Kawasaki-shi, Kanagawa
212-0031, Japan
EU Representative's:
Pioneer Europe NV
Haven 1087, Keetberglaan 1,
9120 Melsele, Belgium
http://www.pioneer.eu
C E
English:
Hereby, Pioneer, declares that this SBX-300 is in compliance with the essential requirements and other relevant provisions of Directive 1999/5/EC.
Suomi:
Con la presente Pioneer dichiara che"This is the best way to get a good idea of what you can do in this area. It's not enough to have a few people in each area, but it's enough to have a few people in each area and a few people in each area.
Espanol:
CepnHbI HOMeP
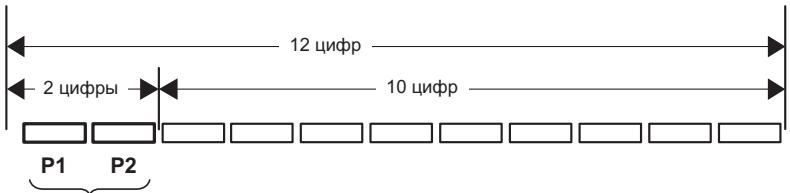
Data n3roTOBHeHnOBOpyDoBaHn
P1-Toq n3rotobnneHn
| Год | 2001 | 2002 | 2003 | 2004 | 2005 | 2006 | 2007 | 2008 | 2009 | 2010 |
| Симboл | A | B | C | D | E | F | G | H | I | J |
| Год | 2011 | 2012 | 2013 | 2014 | 2015 | 2016 | 2017 | 2018 | 2019 | 2020 |
| Симбolem | К | L | M | N | О | P | Q | R | S | T |
P2-Mecu n3roTOBnEHH
| Мессяц | 1 | 2 | 3 | 4 | 5 | 6 | 7 | 8 | 9 | 10 | 11 | 12 |
| Символ | A | B | C | D | E | F | G | H | I | J | K | L |
D3-7-10-7_A1_Ru
© 2013 PIONEER CORPORATION. All rights reserved.
HmnpTeP: OOO "IHOHEP PUC"
125040, Pocnra, r. MockBa, yn. PpaBbl, d.26 TeI.: +7(495) 956-89-01
PIONEER ELECTRONICS (USA) INC.
P.O. BOX 1540, Long Beach, California 90801-1540, U.S.A. TEL: (800) 421-1404
PIONEER ELECTRONICS OF CANADA, INC.
340 Ferrier Street, Unit 2, Markham, Ontario L3R 2Z5, Canada TEL: 1-877-283-5901, 905-479-4411
PIONEER EUROPE NV
Haven 1087, Keetbergraan 1, B-9120 Melsele, Belgium TEL: 03/570.05.11
PIONEER ELECTRONICS ASIACENTRE PTE. LTD.
253 Alexandra Road, #04-01, Singapore 159936 TEL: 65-6472-7555
PIONEER ELECTRONICS AUSTRALIA PTY. LTD.
5 Arco Lane, Heatherton, Victoria, 3202, Australia, TEL: (03) 9586-6300
PIONEER ELECTRONICS DE MEXICO S.A. DE C.V.
Blvd.Manuel Avila Camacho 138 10 piso Col.Lomas de Chapultepec, Mexico, D.F. 11000 TEL: 55-9178-4270
K002*B5Ru
CenahoB Ktae