USER MANUAL SBX-N500 PIONEER
For customers in Europe:
Discover the benefits of registering your product online at
http://www.pioneer.co.uk (or http://www.pioneer.eu)
Download an electronic version of this manual from our website.
Thank you for buying this Pioneer product.
Please read through these operating instructions so you will know how to operate your model properly.
After you have finished reading the instructions, put them away in a safe place for future reference.
CAUTION
TO PREVENT THE RISK OF ELECTRIC SHOCK, DO NOT REMOVE COVER (OR BACK). NO USER-SERVICEABLE PARTS INSIDE. REFER SERVICING TO QUALIFIED SERVICE PERSONNEL.
D3-4-2-1-1_B1_En
WARNING
This equipment is not waterproof. To prevent a fire or shock hazard, do not place any container filled with liquid near this equipment (such as a vase or flower pot) or expose it to dripping, splashing, rain or moisture.
D3-4-2-1-3_A1_En
WARNING
To prevent a fire hazard, do not place any naked flame sources (such as a lighted candle) on the equipment.
D3-4-2-1-7a_A1_En
VENTILATION CAUTION
When installing this unit, leave space of at least 10cm at the sides (including when mounting to a wall) and at the top of the AV Speaker Bar. For the wireless subwoofer (SBX-N700 only), leave a space of at least 10 cm from the wall.
Furthermore, to facilitate good heat dissipation, make sure there is a little distance between the other devices. When installing the unit in a rack or the like, leave space of at least 10cm at the top, rear, and sides. Internal heat buildup may cause a fire.
WARNING
Slots and openings in the cabinet are provided for ventilation to ensure reliable operation of the product, and to protect it from overheating. To prevent fire hazard, the openings should never be blocked or covered with items (such as newspapers, table-cloths, curtains) or by operating the equipment on thick carpet or a bed.
D3-4-2-1-7b*A1En
Operating Environment
Operating environment temperature and humidity: +5^ to +35^ (+41^ to +95^) ; less than 85% RH (cooling vents not blocked)
Do not install this unit in a poorly ventilated area, or in locations exposed to high humidity or direct sunlight (or strong artificial light)
D3-4-2-1-7c*A1_EN
CAUTION
The 品 STANDBY/ON switch on this unit will not completely shut off all power from the AC outlet. Since the power cord serves as the main disconnect device for the unit, you will need to unplug it from the AC outlet to shut down all power. Therefore, make sure the unit has been installed so that the power cord can be easily unplugged from the AC outlet in case of an accident. To avoid fire hazard, the power cord should also be unplugged from the AC outlet when left unused for a long period of time (for example, when on vacation).
D3-4-2-2-2a*A1_EN
This product is for general household purposes. Any failure due to use for other than household purposes (such as long-term use for business purposes in a restaurant or use in a car or ship) and which requires repair will be charged for even during the warranty period.
K041_A1_En
POWER-CORD CAUTION
Handle the power cord by the plug. Do not pull out the plug by tugging the cord and never touch the power cord when your hands are wet as this could cause a short circuit or electric shock. Do not place the unit, a piece of furniture, etc., on the power cord, or pinch the cord. Never make a knot in the cord or tie it with other cords. The power cords should be routed such that they are not likely to be stepped on. A damaged power cord can cause a fire or give you an electrical shock. Check the power cord once in a while. When you find it damaged, ask your nearest PIONEER authorized service center or your dealer for a replacement.
S002*A1En
Notice to users in Singapore
This product complies with IDA standards.
Complies with
IDA Standards
DB03074
[European model only]
(Symbol for equipment)
(Symbol examples) for batteries


Pb
These symbols on the products, packaging, and/or accompanying documents mean that used electrical and electronic products and batteries should not be mixed with general household waste.
For proper treatment, recovery and recycling of old products and used batteries, please take them to applicable collection points in accordance with your national legislation.
By disposing of these products and batteries correctly, you will help to save valuable resources and prevent any potential negative effects on human health and the environment which could otherwise arise from inappropriate waste handling.
For more information about collection and recycling of old products and batteries, please contact your local municipality, your waste disposal service or the point of sale where you purchased the items.
These symbols are only valid in the European Union.
For countries outside the European Union:
If you wish to discard these items, please contact your local authorities or dealer and ask for the correct method of disposal.
K058a_A1_En
For Wireless product European Union Notice
CE PIONEER hereby declares that this/ these product(s) is/are in compliance with the essential requirements and other relevant provisions of Directive 1999/5/ EC,2004/108/EC,2006/95/EC and 2009/125/EC.
RF Radiation Exposure Statement
This equipment should be installed and operated with minimum distance 20 cm between the radiator and your body.
WARNING
Changes or modifications not expressly approved by the party responsible for compliance could void the user's authority to operate the equipment.
NOTE: THE MANUFACTURER IS NOT RESPONSIBLE FOR ANY RADIO OR TV INTERFERENCE CAUSED BY UNAUTHORIZED MODIFICATIONS TO THIS EQUIPMENT. SUCH MODIFICATIONS COULD VOID THE USER'S AUTHORITY TO OPERATE THE EQUIPMENT.
Important Notice for TV colour system
The colour system of this AV Speaker Bar differs according to currently playing video contents.
For example, when the AV Speaker Bar plays the video contents recorded in the NTSC colour system, the image is output as an NTSC signal. Only the multi system colour TV can receive all signals output from the AV Speaker Bar.
- If you have a PAL colour system TV, you will see just distorted images when using video contents or video contents recorded in NTSC.
- The multi system colour TV changes the colour system automatically according to input signals. In case that the colour system is not changed automatically, turn it off and then on to see normal images on screen.
Table of Contents
1 Before you start
6 Introduction
6 - Supplied accessories
7 - Putting the batteries in the remote control
7 - Software update
7 - About operation of this unit from a mobile device
8 - Playable files
11 - Trademarks and licenses
13 Remote control
14 Front panel
15 Rear panel
15 Wireless Subwoofer (SBX-N700 only)
2 Connecting
16 Installing the AV Speaker Bar
16 - Mounting the AV Speaker Bar to a Wall
18 - Installing the Wireless Subwoofer (SBX-N700 Only)
19 Connecting to Your TV
20 Connections with external device
20 - PORTABLE IN connection
20 - OPTICAL IN connection
21 Connecting to your Home Network
21 - Wired network connection
22 - Wireless network connection
22 - Wireless network setup
24 - WPS setup (Wi-Fi Protected Setup)
26 USB device connection
26 - About USB devices
26 - Connecting the USB device
3 Basic operations
27 Outputting the TV Sound from the Unit
27 Playback Files on a USB Device
27 Playback from Media Server
27 - About Media Server
28 - About Files on the Network
28 - About network playback
29 -Playback files on the network
30 Playing Files on a USB Device or Media Server
30 - Forward and reverse scanning
30 - Skipping content
30 -Playing in slow motion
30 - Step forward and step reverse
30 Playback functions
31 Using the TOOLS menu
31 - Playing repeatedly (Repeat Play)
31 - Playing a selected section repeatedly (A-B Repeat)
32 - Playing specified range of chapter (file) in random order
32 - Switching the subtitles
32 - Switching the audio
32 - Playing photos as slideshows
32 - Switch Play Mode
33 Use the unit's Wi-Fi DirectTM/MiracastTM functions
33 - Display the Wi-Fi Direct/Miracast mode screen
34 - Connect using mobile device's Wi-Fi Direct function
34 -Playback photos, music and video files from a mobile device
34 - Connecting by Miracast
35 Connect to device not compatible with Wi-Fi Direct/Miracast
35 Connect using WPS (Wi-Fi Protected Setup)
36 - Change SSID and password
36EnjoyingYouTube
37Enjoying music on Bluetooth devices
37 - Enjoy listening to music wirelessly from a Bluetooth device
38 Powering on the unit with the Bluetooth device
38 - How to turn on Bluetooth Standby Mode
38 Listening to Sound Played by the Unit with a Bluetooth Receiver (BT Transmitter)
38 - Pairing the unit and the Bluetooth device (initial registration)
39 - Listening to the audio of the unit with a Bluetooth receiver
39 - Disabling the BT Transmitter function
40 Sound
41 PHASE CONTROL technology
42 IR Repeater Function
42 - When the TV remote control does not work (when the AV Speaker Bar is installed in front of the TV)
42 - Relaying TV remote control signals (Using the IR repeater function)
42 - Connecting the supplied IR cable
4 Control with HDMI function
44 Connecting to a TV that supports the Control with HDMI function
44 Setting the Control with HDMI function
45 -Operation during linkage
45 Notes on Control with HDMI function
5 Advanced settings
46 Changing the settings
46 - Operating the initial setup screen
52 - Pairing a wireless subwoofer with the unit (SBX-N700 only)
52 - Software updating
53 - Restoring all the settings to the factory default settings
6 Troubleshooting
54 - Picture
54 -Sound
55 -Playback
55 - Control with HDMI function
56 - Network
57 - Wireless LAN
59 - Bluetooth
59 - Others
7 Appendix
61 Specifications
63 Maintenance
63 - Handling the unit
63 Important Information Relating to Network Services
Chapter 1
Before you start
Introduction
Supplied accessories
| Height adjustment foot x2 (L, R) |
| δ δ |
| Wall mounting template x1 |
| Foot attachment screws for AV Speaker Bar x2 | IR cable x1 |
| Wall mounting cushion x2 | AAA dry battery x2 |
| Remote control x1 | Optical digital audio cable x1 (1.5 m) |
| Power cord for AV Speaker Bar |

Power cord for wireless subwoofer (SBX-N700 only)
Warranty
- Easy Setup Guide
- Software License Notice
- Operating Instructions (this manual)
WARNING
Store small parts out of the reach of children and infants. If accidentally swallowed, contact a doctor immediately.
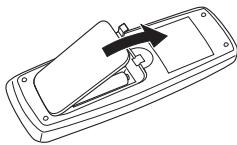
Putting the batteries in the remote control
1. Open the rear cover.
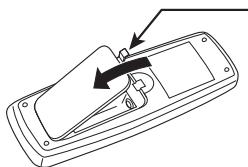
Place a finger on the tab and then pull up in the direction of the arrow.
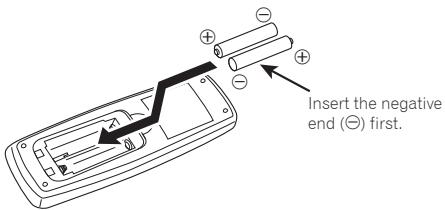
2. Insert the supplied dry batteries (AAA x 2).
Insert the batteries as indicated by the marks in the battery compartment.
3. Close the rear cover.
Close securely (a click should be heard).
WARNING
- Do not use or store batteries in direct sunlight or other excessively hot place, such as inside a car or near a heater. This can cause batteries to leak, overheat, explode or catch fire. It can also reduce the life or performance of batteries.
Caution
- Do not use any batteries other than the ones specified. Also, do not use a new battery together with an old one.
- When loading the batteries into the remote control, set them in the proper direction, as indicated by the polarity marks ( and ).
- Do not heat batteries, disassemble them, or throw them into flames or water.
- Batteries may have different voltages, even if they look similar. Do not use different kinds of batteries together.
- To prevent leakage of battery fluid, remove the
batteries if you do not plan to use the remote control for a long period of time (1 month or more). If the fluid should leak, wipe it carefully off the inside of the case, then insert new batteries. If a battery should leak and the fluid should get on your skin, flush it off with large quantities of water.
- When disposing of used batteries, please comply with governmental regulations or environmental public institution's rules that apply in your country/area.
- When inserting the batteries, make sure not to damage the springs on the battery's (-) terminals. This can cause batteries to leak or overheat.
Software update
Product information on this unit is provided on the Pioneer website. Check this website for update and service information on your unit.
IN Europe:
http://www.pioneer.eu/
IN U.K.:
http://www.pioneer.eu/
http://www.pioneer.co.uk/
IN Russia:
http://www.pioneer.eu/
http://www.pioneer-rus.ru/
IN Hong Kong:
http://www.pioneerhongkong.com.hk/
IN Singapore:
http://www.pioneer.com.sg/
IN Australia:
http://www.pioneer.com.au/
About operation of this unit from a mobile device
The unit can be controlled from a mobile device by installing the ControlApp onto the mobile device.
For details, see the product information on the Pioneer website.
This special application may be changed or discontinued without notice.
Playable files
You can play video, image, and audio files on USB devices or the devices on the network to which the unit is connected via LAN.
Real RMVB (Only for ASEAN model)

Real RMVB logo is a trademark or a registered trademark of RealNetworks, Inc.
DivX Plus HD
DivX Certified® to play DivX® and DivX Plus™ HD (H.264/MKV) video up to 1080p HD including premium content.
ABOUT DIVX VIDEO: DivX® is a digital video format created by DivX, LLC, a subsidiary of Rovi Corporation. This is an official DivX Certified device that plays DivX video. Visit divx.com for more information and software tools to convert your files into DivX videos.
ABOUT DIVX VIDEO-ON-DEMAND: This DivX Certified® device must be registered in order to play purchased DivX Video-on-Demand (VOD) movies. To obtain your registration code, locate the DivX VOD section in your device setup menu. Go to vod.divx.com for more information on how to complete your registration.

DivX®, DivX Certified®, DivX Plus™ HD and associated logos are trademarks of Rovi Corporation or its subsidiaries and are used under license.
! Note
-
This DivX® Certified device must be registered in order to play DivX Video-on-Demand (VOD) content. First generate the DivX VOD registration code for your device and submit it during the registration process. Important: DivX VOD content is protected by a DivX DRM (Digital Rights Management) system that restricts playback to registered DivX Certified devices. If you try to play DivX VOD content not authorized for your device, the message Authorization Error will be displayed and your content will not be played. Learn more at www.divx.com/vod.
-
This unit's DivX VOD registration code can be checked at [Initial Setup] [Playback] [DivX® VOD DRM] Registration Code (page 48).
- The number of views is restricted for some DivX VOD files. When such files are played on this unit, the remaining number of views is displayed. Files for which the remaining number of views has reached 0 cannot be played (This DivX® rental has expired is displayed). Files for which the number of views is not restricted can be played as many times as you like (the remaining number of views is not displayed).
About video, audio, and image files and folders
Audio and image files can be played on this unit when the folders on the USB device are created as described below.
Example of folder structure:
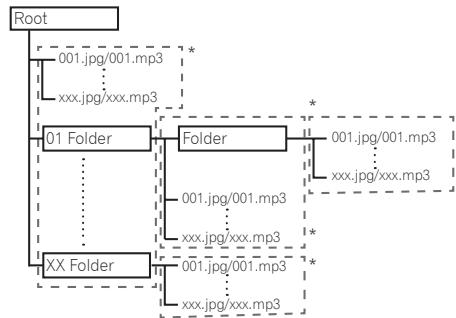
- The number of folders and files within a single folder (including the root directory) is limited to a maximum of 256. Also, keep the number of folder layers to a maximum of 5.
! Note
- The file and folder names displayed on this player may differ from those displayed on a computer.
Table of Playable Files
| Playable files(Extensions) | Playable media | File specifications |
| USB devices1 | Network |
| MP3(.mp3) | ✓ | ✓ | Sampling frequencies: Up to 48 kHzBit rate: Up to 320 kbpsAudio type: MPEG-1 Audio Layer 3 |
| WMA*2(.wma) | ✓ | ✓ | Sampling frequencies: Up to 48 kHzBit rate: Up to 192 kbpsAudio type: WMA version 9 |
| AAC*3(.m4a) | ✓ | ✓ | Sampling frequencies: Up to 96 kHzBit rate: Up to 192 kbpsAudio type: MPEG4-AAC |
| WAV(.wav) | ✓ | ✓ | Sampling frequencies: Up to 192 kHzQuantization bitrate: 16 bit, 24 bitChannel: 2ch |
| FLAC(.flac) | ✓ | X | Sampling frequencies: Up to 192 kHzQuantization bitrate: 16 bit, 24 bitChannel: Multi channel |
| Monkey's Audio(.ape) | ✓ | ✓ | Sampling frequencies: Up to 192 kHzQuantization bitrate: 16 bitChannel: 2ch |
| JPEG(.jpg/.jpeg) | ✓ | ✓ | Maximum resolution: 4000 x 3000 pixels |
| PNG(.png) | ✓ | ✓ | Maximum resolution: 2048 x 1024 pixelAnimated PNG files are not supported. |
| GIF(.gif) | ✓ | ✓ | Maximum resolution: 2048 x 1024 pixelAnimated GIF files are not supported.Rotate is not supported. |
| DivX(.avi/.divx/.mkv) | ✓ | ✓ | Supported versions: Through DivX® PLUS HDMaximum resolution:Up to 1920 x 1080 (DivX® PLUS HD)Up to 1280 x 720 (MKV) |
| MP4(.mp4) | ✓ | ✓ | Maximum resolution: Up to 1920 x 1080Video: MPEG4, MPEG-4 AVC (level 4.1)Audio: AAC, MP3 |
| WMV(.wmv) | ✓ | ✓ | Maximum resolution: Up to 1280 x 720Video: WMV9, WMV9AP (VC-1)Audio: WMA |
| AVI(.avi) | ✓ | ✓ | Maximum resolution: Up to 1920 x 1080Video: MPEG4Audio: MP3, AAC |
| 3GP(.3gp) | ✓ | ✓ | Video: H.263, MPEG4, H.264Audio: MPEG-4 AAC |
| FLV(.flv) | ✓ | ✓ | Video: Sorenson H.263 (FLV1), VP6 (FLV4), H.264Audio: MP3, AAC |
| RMVB*4 (.rm/.rmvb) | ✓ | × | Maximum resolution: Up to 1280 x 720
Video: RealVideo®
Audio: RealAudio®, AAC |
- This unit supports FAT16, FAT32 and NTFS file systems.
- WMA Pro, WMA Losless and WMA Voice are not supported.
- Apple lossless encoding is not supported.
- Only for ASEAN model.

Note
- Depending on the file structure, server capacity and network environment, it may not be possible to play certain files, even for files indicated on the table of playable files above.
- When using wireless LAN, depending on the environment (radiowave interference) during sending/receiving of a large volume of data such as HD quality image files and WAV 192 kHz/24 bit high quality audio files, images and sound may be interrupted during playback.
- Files protected by DRM (Digital Rights Management) cannot be played (not including DivX VOD files).
- AVCHD contents cannot be played via LAN.
Trademarks and licenses
HOMI
The terms HDMI and HDMI High-Definition Multimedia Interface, and the HDMI Logo are trademarks or registered trademarks of HDMI Licensing, LLC in the United States and other countries.

DOLBY
DIGITAL
Manufactured under license from Dolby Laboratories. Dolby and the double-D symbol are trademarks of Dolby Laboratories.

dtts
Digital Surround
Manufactured under license under U.S. Patent Nos: 5,956,674; 5,974,380; 6,487,535 & other U.S. and worldwide patents issued & pending. DTS, the Symbol, & DTS and the Symbol together are registered trademarks & DTS Digital Surround and the DTS logos are trademarks of DTS, Inc. Product includes software. © DTS, Inc. All Rights Reserved.

dlna
CERTIFIED
DLNA®, the DLNA Logo and DLNA CERTIFIED® are trademarks, service marks, or certification marks of the Digital Living Network Alliance.

CERTIFIED
The Wi-Fi CERTIFIED Logo is a certification mark of the Wi-Fi Alliance.
Wi-Fi, Wi-Fi Protected Setup, Wi-Fi Direct, Miracast, WPA, WPA2 are marks of the Wi-Fi Alliance.

The Wi-Fi Protected Setup Identifier Mark is a mark of the Wi-Fi Alliance.
x.v.Color
x.v.Color
"x.v.Color", x.v.Color and x.v.Color are trademarks of Sony Corporation.

YouTube™ is a trademark of Google Inc.
This product includes technology owned by Microsoft Corporation and cannot be used or distributed without a license from Microsoft Licensing, Inc.
This item incorporates copyright protection technology that is protected by U.S. patents and other intellectual property rights of Rovi Corporation.
Reverse engineering and disassembly are prohibited.
Do not connect the unit through a VCR. Video signals fed through VCRs may be affected by copyright protection systems and the picture will be distorted on the television.

Bluetooth®
The Bluetooth® word mark and logos are registered trademarks owned by Bluetooth SIG, Inc. and any use of such marks by PIONEER CORPORATION is under license. Other trademarks and trade names are those of their respective owners.

HD
DivX®, DivX Certified®, DivX Plus™ HD and associated logos are trademarks of Rovi Corporation or its subsidiaries and are used under license.

Real RMVB logo is a trademark or a registered trademark of RealNetworks, Inc.
(Only for ASEAN model)
Remote control
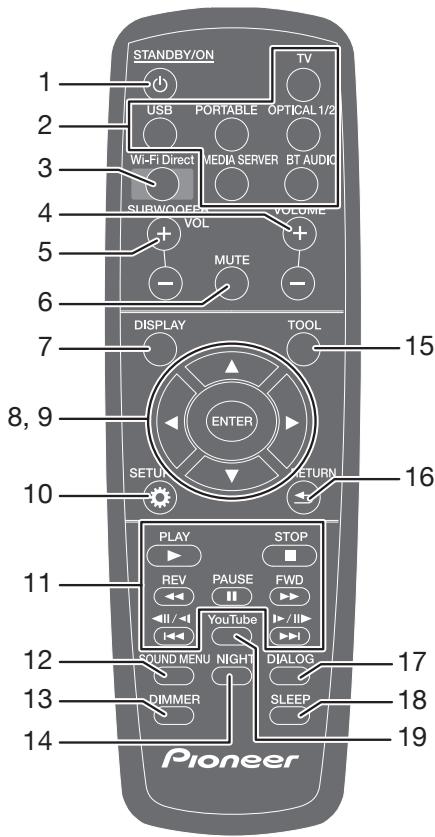
1 STANDBY/ON
Turns the power of the unit on/off.
2 Input Selection Buttons (page 27)
Switches the input of the unit.
3 Wi-Fi Direct (page 33)
Displays the Wi-Fi Direct/Miracast mode screen.
4 VOLUME
Adjusts the volume of the speakers.
5 SUBWOOFER VOL
Adjusts the volume of the subwoofer speaker.
6 MUTE
Temporarily mutes the sound.
7 DISPLAY
Switches the screen display.
8 △/▼/△
Used to select items and change settings.
Also moves the cursor.
9 ENTER
Used to execute the selected item, confirm a changed setting, etc.
10 SETUP
Displays/closes the settings screen.
11 Operation Buttons (page 27)
▶ PLAY
STOP
REV
II PAUSE
FWD
111/
111/11
12 SOUND MENU (page 40)
Switches to the sound settings.
13 DIMMER
Each press changes the brightness of the unit's display window and each indicator.
14 NIGHT (page 40)
Turns on/off the night function.
15 TOOL (page 31)
Switches the TOOLS menu.
16 RETURN
Returns to the previous screen.
17 DIALOG (page 40)
Turns the dialog function on/off.
18 SLEEP
Sets a period of time after which the unit switches off.
19 YouTube (page 36)
Displays the YouTube screen.
Front panel
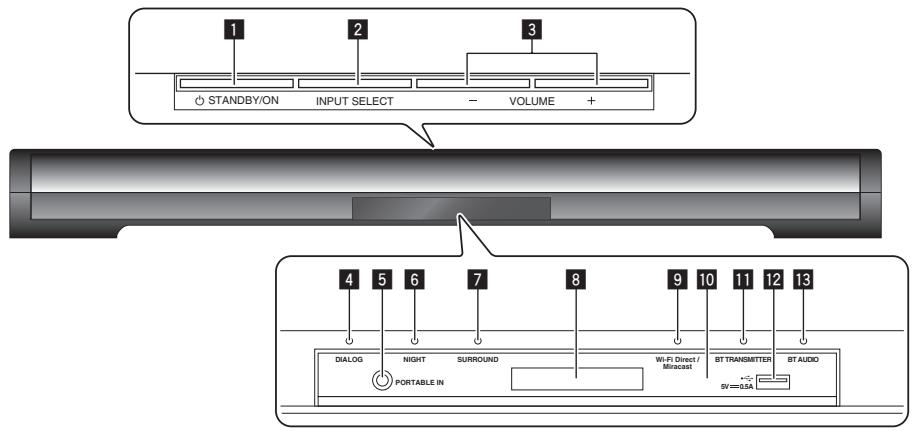
1 STANDBY/ON
Turns the power of the unit on/off (standby mode).
If the power does not turn off, operation will become possible if you press the
STANDBY/ON button for more than 5 seconds to reboot the unit.
Switches the input.
3 VOLUME + / -
Adjusts the volume.
4 DIALOG indicator
Lit when the dialog function is on.
5 PORTABLE IN terminal (page 20) (3.5-mm stereo mini plug)
6 NIGHT indicator
Lit when the night function is on.
7 SURROUND indicator
Lit when the surround is on.
8 Display window
Displays the input mode, unit function status, etc.
9 Wi-Fi Direct/Miracast indicator
Lit when connected by Wi-Fi Direct or Miracast.
Flashes when waiting to connect.
Remote control sensor
Point the remote control to this, then operate it within approximately 7m . The unit may have trouble capturing remote control signals if there is a fluorescent light nearby. If this happens, move the unit away from the fluorescent light.
11 BT TRANSMITTER indicator (page 38)
Lit when connected with a Bluetooth receiver.
Flashes when waiting to connect.
USB port terminal (page 26)
BT AUDIO indicator
Lit when connected with a Bluetooth transmitter.
Flashes when waiting to connect.
Rear panel
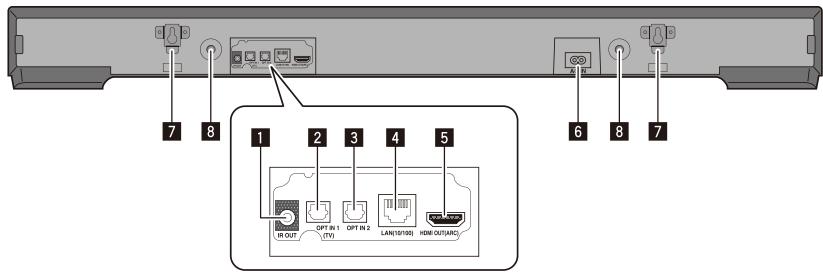
IR OUT terminal
Optical digital audio input 1 terminal (page 20)
Optical digital audio input 2 terminal (page 20)
4 LAN (10/100) port
5 HDMI OUT (ARC) terminal (page 19)
Connect a TV.
6 AC IN terminal
Be sure to connect this last.
7 Wall mounting fittings
8 Internal IR repeater lens
Wireless Subwoofer (SBX-N700 only)
1 RESET button
Starts pairing of the AV Speaker Bar and wireless subwoofer.
Use this button when no sound is output from the wireless subwoofer. (page 52)
2 STANDBY indicator
Flashes red during pairing of the AV
Speaker Bar and wireless subwoofer.
It turns off when pairing is complete.
When the power of the AV Speaker Bar is turned off, this indicator lights red and the AV Speaker Bar switches to standby mode
3 CONNECTindicator
Lights blue when pairing of the AV Speaker Bar and wireless subwoofer is complete.
4 AC IN terminal
Connect this first.
Chapter 2 Connecting
Before connecting the unit or changing the connections, be sure to turn off the power and disconnect the power cord from the outlet. Also, make sure you have finished connecting all of the power cords before connecting to the wall outlet.
Installing the AV Speaker Bar
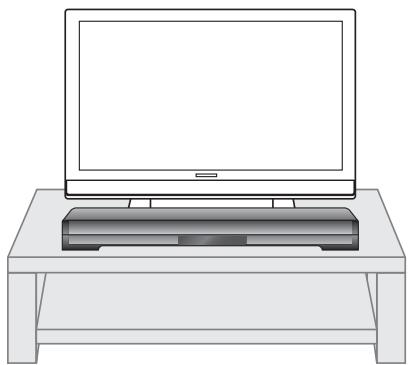
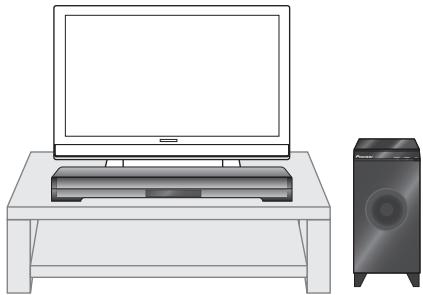
Cautions on installing the AV Speaker Bar in front of a TV
If the AV Speaker Bar is connected in front of a TV, the TV may not be able to be operated with the remote control of the TV. In that case, move the AV Speaker Bar away from the TV if possible.
If operation is not possible with the remote control of the TV, set [Initial Setup] [Option] [IR Out] to [On] (page 42).
Caution
- Check that the TV cannot be operated with the remote control of the TV before setting [IR Out] to [On]. If it is set to [On] when operation is possible, the signal output directly from the remote control of the TV and the signal output via the unit will interfere with each other.
Caution
- Do not install the AV Speaker Bar in an unstable place such as on an unsteady stand or tilted surface. It may fall off or tip over, resulting in injury.
- The AV Speaker Bar is not magnetically shielded and so should be used away from a cathode ray tube (CRT) TV or monitor. Also, do not place devices that are easily influenced by magnetism (magnetic cards, watches, video tapes, etc.) near the AV Speaker Bar.
Attaching the Height Adjustment Feet
If you wish to adjust the height of the AV Speaker Bar attach the supplied height adjustment feet.
Caution
- When performing the height adjustment feet attachment work, be sufficiently careful when handling the parts because there is a risk of accidental swallowing, suffocation, and injury.
- Choose a level place that is out of the reach of small children and carry out the work on a soft surface such as a carpet.
Take care not to over tighten the mounting screws.
- Match each of the left sides and right sides of the AV Speaker Bar and feet.
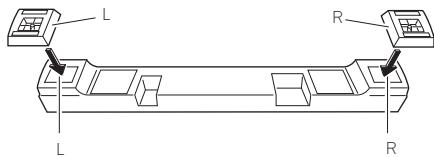
1. Secure the feet to the AV Speaker Bar with the supplied screws.
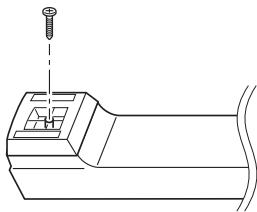
Mounting the AV Speaker Bar to a Wall
The AV Speaker Bar has mounting holes for attaching it to a wall.
Cautions on mounting
The AV Speaker Bar is heavy so there is a risk that its weight could cause the screws to work loose or the wall material to fail to support it, resulting in the AV Speaker Bar falling. Make sure that the wall you intend to mount the AV Speaker Bar to is strong enough to support it. Do not mount the unit to a plywood or soft surface wall.
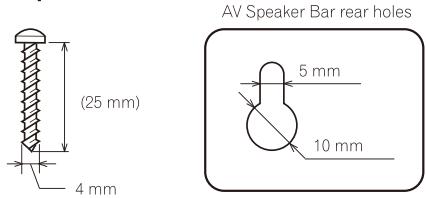
Mounting screws are not supplied. Use screws suitable for the wall material and capable of supporting the weight of the AV Speaker Bar.
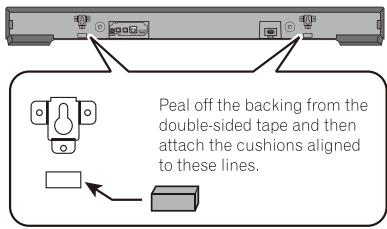
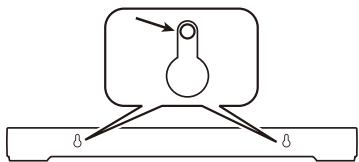
- Peel off the backing of the double-sided tape on the supplied cushions and attach the cushions aligned to the lines on the rear of the AV Speaker Bar.
Rear of unit
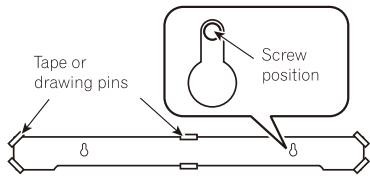
- Attach the supplied wall mounting template to the wall and then mark the screw positions.

Caution
When using a template, make sure there is no slack. If there is any slack when the hole positions are determined, the unit may not be able to be mounted.
- Obtain commercially available screws that fit the holes on the rear of the AV Speaker Bar.
-
Screw the screws into the wall.
-
Screw in the screws until they are sticking out of the wall by 3mm to 4mm .
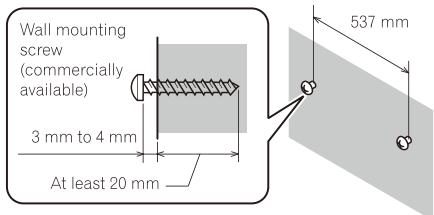
-
Place the wall mounting template on the top of the AV Speaker Bar.
-
The marks (left and right) printed on the template serve as a rough guide for the screw positions.
- The AV Speaker Bar will be easy to mount if you use the marks as a rough guide when hanging it on the screws.
-
Hang the AV Speaker Bar on the screws by the holes at the rear.
-
Align the AV Speaker Bar rear holes and the screws and then hang the AV Speaker Bar on both screws at the same time.


Caution
- Make sure the unit is firmly secured before letting go of it.
- When the AV Speaker Bar is mounted to a wall, there is a risk of it dropping, falling, etc. due to the weight or mounting method. Take sufficient care not to cause an accident.
- Select a location for installation/mounting with sufficient strength to withstand the weight. If you are unsure of the strength or anything else, consult with a professional.
- Pioneer is not responsible for any accidents or damage that result from improper installation/ mounting, incorrect use, modification, disaster, etc.
- Do not hang from the unit. Pay special attention to children. The unit may fall and break, resulting in injury.
- Do not connect or disconnect the cables while the unit is mounted to a wall. Install the cables in such a way that a foot or other object cannot get caught in them.
- The screws for mounting to a wall are not supplied. Use screws suitable for the strength and materials of the posts or wall.
- Run the cables down the wall in such a way that a foot cannot be caught on them.
Installing the Wireless Subwoofer (SBX-N700 Only)

Caution
- Do not stand or sit on the subwoofer. Pay special attention to children. The subwoofer may tip over and break, resulting in injury.
- Do not place an object on the subwoofer. The subwoofer may become imbalanced and fall over or the object may fall resulting in injury.

Note
-
Sound may become intermittent or stop being output due to the signal state during use but this is not an indication of a malfunction. Try changing the position or orientation of the AV Speaker Bar or wireless subwoofer.
-
The AV Speaker Bar and wireless subwoofer can be used at a distance of up to approximately 10m from each other. This distance differs depending on the operating environment and operation at the distance of 10m is not guaranteed.
- The reception state may become unstable if the AV Speaker Bar and wireless subwoofer are too close to each other. In such a case, use the AV Speaker Bar and wireless subwoofer at least 1 m apart from each other.
- If there is an obstruction (metal door, concrete wall, insulation with aluminum foil, etc.) between the AV Speaker Bar and wireless subwoofer, the signal may be blocked and sound may not be output. In this case, install the AV Speaker Bar and wireless subwoofer where there is a clear line of sight between them.
- The audio from the wireless subwoofer may sound out of sync depending on the positional relationship between the listening point, AV Speaker Bar, and wireless subwoofer. In that case, adjust the settings to match your environment from [Speaker Setup] in the unit settings. (page 50)
Connecting to Your TV
Connect the unit to your TV using an HDMI cable (commercially available).
ARC (Audio Return Channel): This is a function that enables output of the TV audio from the speakers of the unit by connecting only the HDMI cable.
When connecting to a TV that is not ARC compatible, you will be unable to hear the TV audio from the unit if the HDMI cable only is connected to the TV. To enable hearing of the TV audio with the unit, connect the supplied optical digital audio cable.
-
Connecting the unit with an HDMI cable to Pioneer TVs that support the Control with HDMI function or enables linked operation with these devices. For details, see "Control with HDMI function" (page 44).
-
Connect the HDMI output terminal on the unit to the HDMI input terminal.
The connection method differs depending on whether your TV is ARC compatible.
- If your TV is ARC compatible, you can connect using the HDMI cable only. Connect the cable to the ARC compatible HDMI input terminal on your TV (the HDMI terminal indicated by "ARC").
- If your TV is not ARC compatible, an optical digital cable must also be connected in addition to the HDMI cable.
The settings of the unit need to be changed depending on the connection between your TV and the unit. For details, see "Setting the Control with HDMI function" on page 44.

Note
- Set the input mode of the TV to the HDMI with the unit connected (for the setting procedure, see the operating instructions for your TV).
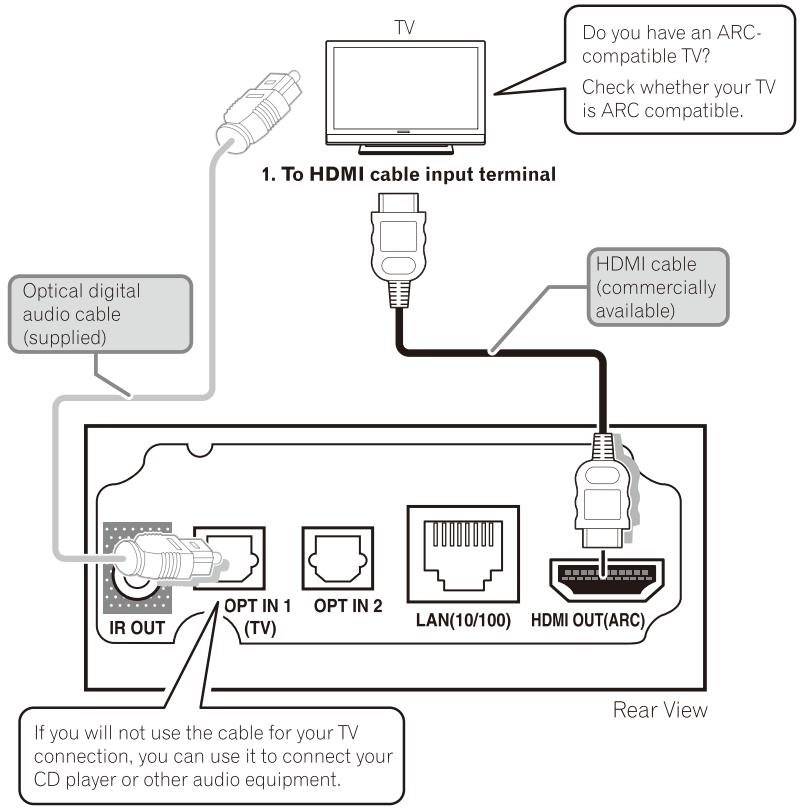

Note
- Some TVs have settings for ARC and digital audio output. For details, see the operating instructions for your TV.
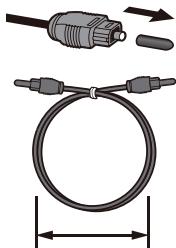
- Protection caps are attached to the ends of the supplied optical digital cable. Remove the caps before connecting the cable.
- Do not bend the optical digital cable at an acute angle. When storing the cable, make sure there is a diameter of 15cm .
- When connecting the optical digital cable, check that the orientation of the terminal is correct and firmly insert it all the way in. Forcing the insertion of the terminal
when it is incorrectly oriented may cause the terminal to
become deformed or the shutter to not be able to be closed when the cable is disconnected.
At least 15cm
Connections with external device
PORTABLE IN connection
You can enjoy the sound from your portable audio player through the speakers of this system.
Connect the headphones (or line out) terminal of the portable audio player into the PORTABLE IN socket of this unit. To listen to the sound of a device connected to [PORTABLE IN], press PORTABLE on the remote control.
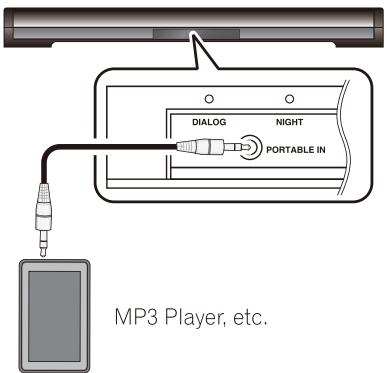

Caution
- When inserting the PORTABLE IN terminal, support the top of the unit with your hand to prevent it from moving.
OPTICAL IN CONNECTION
You can enjoy the sound from your component with a digital optical connection through the speakers of this system.
To listen to the sound of a device connected to an optical digital audio input terminal, press OPTICAL 1/2 and select [Optical IN-1] or [Optical IN-2].
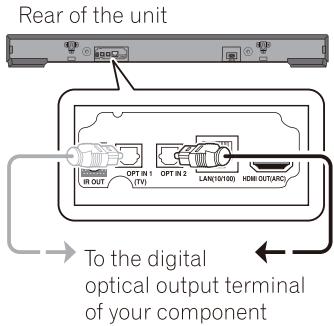

Note
- An optical digital audio cable with a square plug can be connected to this unit.
- Some connected devices have settings for digital audio output. For details, see the operating instructions for the specific playback device.
- When an MPEG2-AAC (digital broadcast) signal is input to an optical digital audio input terminal, sound may not be output. If sound is not output, switch the audio output of the device connected to the optical digital audio input terminal to PCM. For the switching procedure, refer to the operating instructions for the connected device.
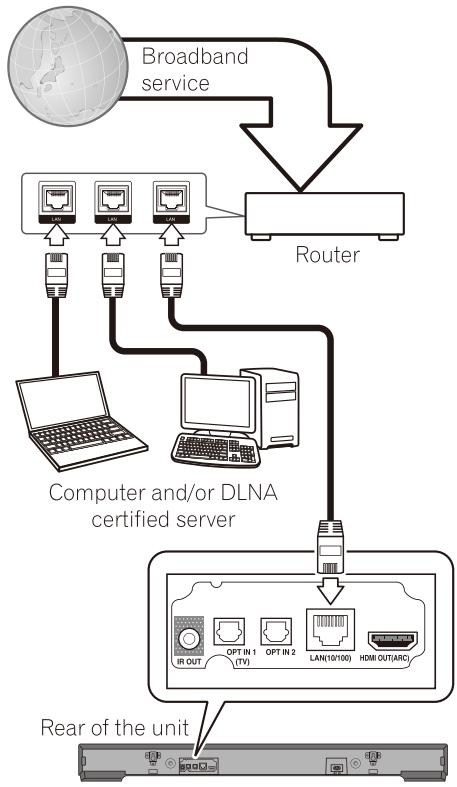
Connecting to your Home Network
This unit can be connected to a local area network (LAN) via the LAN port on the rear panel or the internal wireless module.
Wired network connection
Using a wired network provides the best performance, because the attached devices connect directly to the network and are not subject to radio frequency interference.
Please refer to the documentation for your network device for further instructions.
Connect the unit's LAN port to the corresponding port on your Modem or Router using a commercially available LAN or Ethernet cable.

Note
- To connect to the Internet, a separate subscription with an Internet service provider is required.
- When plugging or unplugging the LAN cable, hold the plug portion of the cable. When unplugging, do not pull on the LAN cable but unplug while pressing down on the lock.
- Do not connect a modular phone cable to the LAN port.
- Since there are various connection configurations, please follow the specifications of your telecommunication carrier or internet service provider.
- If you want to access content from computers or DLNA servers, this unit must be connected to the same local area network with them via a router.
Wireless network connection
Another connection option is to use an Access Point or a wireless router. The network configuration and connection method may vary depending on the equipment in use and the network environment.
This unit is equipped with an IEEE 802.11n (Dual band, 2.4 GHz/5 GHz band) wireless module, which also supports the 802.11a/b/g standards. For the best wireless performance, we recommend using a IEEE 802.11n certified Wi-Fi network (access point or wireless router).
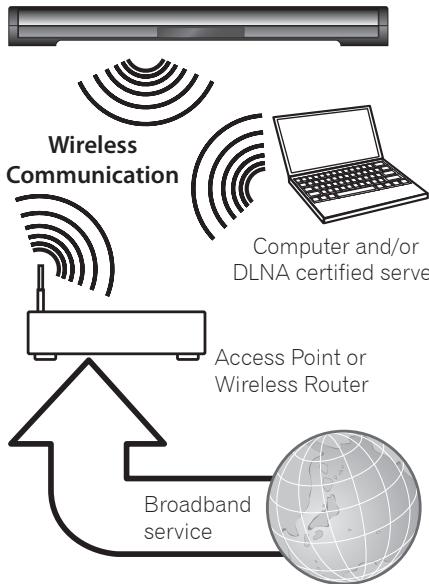
Refer to the setup instructions supplied with your access point or wireless router for detailed connection steps and network settings.
For best performance, a direct wired connection from this unit to your home network's router or cable/DSL modem is always the best option. If you do chose to use the wireless option, note that performance can sometimes be affected by other electronic devices in the home.
Wireless network setup
For the wireless network connection, the unit needs to be set up for network communication. This adjustment can be done from the [Initial Setup] menu. Adjust the [NETWORK] setting as follow. Setting up the access point or the wireless router is required before connecting the unit to the network.
Preparation
Before setting the wireless network, you need to:
The Initial Setup screen is displayed.
Select [Network] [Interface] [Wireless] and press ENTER.
- Select [Network] [Wireless Setting] [Next Screen] and press ENTER.
- Select [Yes] and press ENTER to continue. The new connection settings reset the current network settings.
- [Wireless Setting] menu is displayed.
Use / to select [Scan].
- Then select [Next] using the / and press ENTER.
- The unit scans the all available access points or wireless routers within range and display them as a list. Use / to select an access point or wireless router on the list, and then press ENTER.
If you have security on your access point or wireless router, verify that the WEP or WPA key that was entered into the unit matches the router's information exactly. You need to input the security code as necessary.
How to enter the security code
① Select the security code section using / / and press ENTER to start the software keyboard.
② Use / / to select characters and items, and then press ENTER to input.
③ Select [abc], [ABC], or [@#$] using ▲/▼/ ▲/▶ to switch to lower case characters, upper case characters, or symbols.
④ Finish entering the security code by selecting [Enter] using / / / and pressing ENTER.
- Select [Next] using / / and press ENTER. If it connects success, it will display connection success and IP is obtained.
- Pressing ENTER ends [Wireless Setting].
! Note
- WEP security mode generally have 4 keys available on an access point or wireless router's setting. If your access point or wireless router use WEP security, enter the security code of the key "No.1" to connect on your home network.
- An Access Point is a device that allows you to connect to your home network wirelessly.
[Scan] - The unit scans the all available access points or wireless routers within range and display them as a list.
[Manual] - Your access point may not be broadcasting its access point name (SSID). Check your router settings through your computer and either set your router to broadcast SSID, or manually enter the access point name (SSID) in [Manual].
[Auto] - If your access point or wireless router that supports the Push Button Configuration method, select this option and press Push Button on your access point or wireless router within 120 counts. You do not need to know the access point name (SSID) and security code of your access point or wireless router.
! Note
- If there is no DHCP server on the network and you want to set the IP address manually, Please refer to "Setting the IP address". (page 50)
WPS setup (Wi-Fi Protected Setup)
WPS connection setting
WPS is abbreviation of Wi-Fi Protected Setup. A standard established by the Wi-Fi Alliance industry group for a function allowing settings related to interconnection of WPS compatible wireless LAN devices and encryption to be made with simple operations.
This unit supports push-button configuration and PIN code configuration.
Connection settings are made automatically simply by pressing the WPS buttons on the WPS compatible wireless LAN device. This is the simplest way of making the settings, and is possible when the WPS compatible wireless LAN device is equipped with WPS button.
Connection settings are made by inputting the 8-digit PIN code shown on the main display to the access point to which you selected. Follow the instructions shown in Connecting using PIN code configuration on the right.
When performing wireless settings set [Initial Setup] [Network] [Interface] to [Wireless].
- Press SETUP.
The Initial Setup screen is displayed.
- Select [Network] [Wireless Setting] [Next Screen] and press ENTER.
A confirmation screen is displayed.
- Use / to select [Yes], then press ENTER.
The Wireless Setting screen is displayed.
- Use / to select [Auto], then press ENTER.
The WPS (Wi-Fi Protected Setup) screen is displayed.
- Use / to switch between [PBC] or [PIN] screens.
When connecting using PBC go to step 6.
When connecting using PIN go to step 7.
- When connecting using PBC (Push Button), on the [PBC] screen use to select NEXT, then press ENTER.
Then press the WPS button on the access point within 120 seconds. If it connects success, it will display connection success and IP is obtained. Go to step 9.
- When connecting using PIN confirm the PIN Code on the [PIN] screen. Use cursor to select [NEXT], then press ENTER.
- Enter into the access point the PIN Code that you confirmed in step 7 above.
The PIN Code input method differs depending on the LAN device used. For details, consult the operating instructions accompanying your LAN device. If it connects success, it will display connection success and IP is obtained. Go to step 9.
- Pressing ENTER ends [Wireless Setting].
Notes on Network Connection:
- Many network connection problems during setup can often be fixed by re-setting the router or modem. After connecting the unit to the home network, quickly power off and/or disconnect the power cord of the home network router or cable modem. Then power on and/or connect the power cord again.
- Depending on the internet service provider (ISP), the number of devices that can receive internet service may be limited by the applicable terms of service. For details, contact your ISP.
- Our company is not responsible for any malfunction of the unit and/or the internet connection feature due to communication errors/malfunctions associated with your broadband internet connection, or other connected equipment.
- Some internet contents may require a higher bandwidth connection.
- Even if the unit is properly connected and configured, some internet contents may not operate properly because of internet congestion, the quality or bandwidth of your internet service, or problems at the provider of the content.
- Some internet connection operations may not be possible due to certain restrictions set by the Internet service provider (ISP) supplying your broadband Internet connection.
- Any fees charged by an ISP including, without limitation, connection charges are your responsibility.
- A 10 Base-T or 100 Base-TX LAN port is required for wired connection to this unit. If your internet service does not allow for such a connection, you will not be able to connect the unit.
-
You must use a Router to use xDSL service.
-
xDSL modem is required to use xDSL service and a cable modem is required to use cable modem service. Depending on the access method of and subscriber agreement with your ISP, you may not be able to use the internet connection feature contained in this unit or you may be limited to the number of devices you can connect at the same time. (If your ISP limits subscription to one device, this unit may not be allowed to connect when a computer is already connected.)
- The use of a "Router" may not be allowed or its usage may be limited depending on the policies and restrictions of your ISP. For details, contact your ISP directly.
- The wireless network operates at 2.4 GHz radio frequencies that are also used by other household devices such as cordless telephone, microwave oven, and can be affected by interference from them.
- Turn off all unused network equipment in your local home network. Some devices may generate network traffic.
- For the purpose of the better transmission, placing the unit from the access point as close as possible.
- In some instances, placing the access point or wireless router at least 0.45m above the floor may improve the reception.
- Move closer to the access point if possible or re-orient the unit so there is nothing between it and the access point.
- The reception quality over wireless depends on many factors such as type of the access point, distance between the unit and access point, and the location of the unit.
- Set your access point or wireless router to Infrastructure mode. Ad-hoc mode is not supported.
USB device connection
You can play movies, music, and photos stored on a USB device connected to this unit.
About USB devices
The USB devices that can be connected to the unit are as shown below.
- USB 2.0-compatible USB flash drive (capacity of 1 GB or greater, 2 GB or greater recommended) or HDD (capacity 2 TB or less)
- File system: FAT16, FAT32 or NTFS

Note
Devices formatted with a file system other than the above cannot be used.
- USB devices may not be recognized if they contain multiple partitions.
- Some USB devices may not operate with this unit.
Operation of USB devices is not guaranteed.
Connecting the USB device

Caution
- Be sure to turn the unit's power off before connecting or disconnecting USB devices.
- When using an external hard disk as the external storage device, be sure to turn on the hard disk's power before turning on the unit's power.
- If the USB device is write-protected, be sure to disable the write-protection.
- When connecting the USB cable, hold onto the plug, set the plug in the proper direction for the port and insert it horizontally.
- Placing excessive loads on the plug may result in poor contact, making it impossible to write data on the USB device.
- When a USB device is connected and the unit's power is turned on, do not unplug the power cord.
This unit can play movie, music and photo files contained in the USB device.
- Insert a USB device to the USB port terminal until it fits into place.
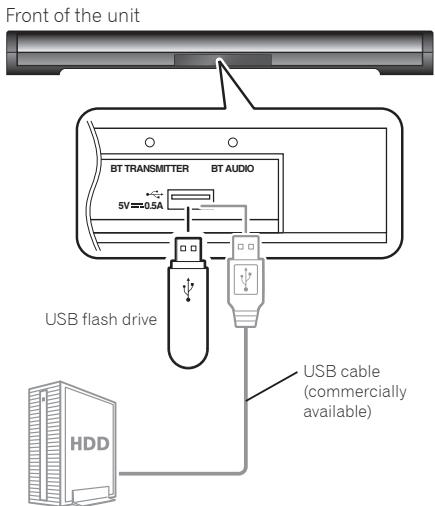
Hard disk, etc.

Caution
- When inserting the USB terminal, support the top of the unit with your hand to prevent it from moving.

Note
- This unit does not support a USB hub.
- Use a USB cable with a length of 2 meters or less.
Chapter 3
Basic operations
Outputting the TV Sound from the Unit
The following describes the procedure up until listening to the sound of a TV connected to the unit.

Caution
- When the unit is connected to an ARC compatible TV, press SETUP to display [Initial Setup] and then set [HDMI] → [Control] to [On] and [HDMI] → [TV Input] to [TV(ARC)].
- When a TV that is not compatible with ARC is connected to the optical digital audio input 1 terminal of the unit with an optical digital audio cable (supplied), press SETUP to display [Initial Setup] and then set [HDMI] [TV Input] to [Optical IN-1].
- The video signal output of the unit is set to 50 fps ("PAL") in the factory default state.
You can change the video signal output to 60 fps ("NTSC") to match your TV.
If the video of the unit is not displayed because the video signal system differs, perform the following operation to change the setting.
① Hold down SLEEP on the remote control until "PAL" (or "NTSC") appears in the display window of the AV Speaker Bar.
② When "PAL" (or "NTSC") appears, press or on the remote control to change the setting.
③ Check that the video of the unit is displayed on the TV.
- If the settings of the unit are initialized to the factory default state, this setting returns to 50 fps ("PAL").
-
This function is for ASEAN model only.
-
Turn on the power of the TV.
- Press STANDBY/ON to turn on the power of the unit.
- Press TV on the remote control to switch the input of the unit to the TV.
- Select the channel you want to watch on the TV.
-
Press VOLUME and SUBWOOFER VOL to adjust the volume.
-
To temporarily mute the sound, press MUTE. Press the button again or adjust the volume to cancel mute.
-
To adjust just the volume of the bass sound, use SUBWOOFER VOL.
Playback Files on a USB Device
- Turn on the power of the TV.
- Press STANDBY/ON to turn on the power of the unit.
- Press USB.
- Select [Photo], [Music], [Video], or [AVCHD].
Use / to select an item and then press ENTER.
- Select a file and then play it.
Use / to select a file and then press ENTER.
- To pause playback, press II PAUSE during playback.
- To stop playback, press STOP during playback.
- If the file you want to play is in a folder, select that folder and then press ENTER to display the files in the folder.
A media server allows you to view a list of folders and files stored on devices on the network that are connected to the unit via the LAN (Media Server). The following shows the devices for which playback is possible from Media Server. Also refer to page 9.
Devices for which playback is possible
Devices on the network that are connected to the unit via the LAN (devices with a media server function compliant with DLNA 1.0 or DLNA 1.5)

Note
- Playback may not be possible in some cases even for files in formats supported by the unit.
About Files on the Network
The input sources that can be played from Media Server are as shown below.
- Files on the network servers (on the computers or components connected to the unit via LAN interface.)

Note
-
The Media Server allows you to play files on media servers connected to the same Local Area Network (LAN) as the unit.
The following files are allowed to be played from Media Server:
-
Computers running Microsoft Windows Vista or XP with Windows Media Player 11 installed
- Computers running Microsoft Windows 7 with Windows Media Player 12 installed
DLNA-compatible digital media servers (on computers or other components)
Files stored in a computer or DMS (Digital Media Server) as described above can be played by Digital Media Player (DMP). The unit supports the use of such DMP.
- Files stored in a computer or DMS (Digital Media Server) as described above can be played via command from an external Digital Media Controller (DMC). Devices controlled by this DMC to play files are called DMRs (Digital Media Renderers). This unit supports this DMR function. The user-friendly name of the unit is SBX-N500/N700. When in the DMR mode, such operations as playing and stopping files can be performed from the external controller.
- To play back audio files stored on components on the network, you must turn on the DHCP server function of your router. In case your router does not have the built-in DHCP server function, it is necessary to set up the network manually. Otherwise, you cannot play back files stored on components on the network. See page 50.
About network playback
The network playback function of this unit uses the following technologies:
See Windows Media Player 11/Windows Media Player 12 above for more on this.
DLNA

dlna
CERTIFIED
DLNA CERTIFIED® Audio Player
The Digital Living Network Alliance (DLNA) is a cross-industry organization of consumer electronics, computing industry and mobile device companies. Digital Living provides consumers with easy sharing of digital media through a wired or wireless network in the home.
The DLNA certification logo makes it easy to find products that comply with the DLNA Interoperability Guidelines. This unit complies with DLNA Interoperability Guidelines v1.5. When a computer running DLNA server software or a DLNA compatible device is connected to this unit, some setting changes of software or other devices may be required. Please refer to the operating instructions for the software or device for more information.
DLNA®, the DLNA Logo and DLNA CERTIFIED® are trademarks, service marks, or certification marks of the Digital Living Network Alliance.
Content playable over a network
- Even when encoded in a compatible format, some files may not play correctly.
- Some functions may not be supported depending on the server type or version used.
- Supported file formats vary by server. As such, files not supported by your server are not displayed on this unit. For more information check with the manufacturer of your server.
Disclaimer for Third Party Content
Access to content provided by third parties requires a high speed Internet connection and may also require account registration and a paid subscription.
Third party content services may be changed, suspended, interrupted, or discontinued at any time without notice, and Pioneer disclaims any liability in connection with such occurrences.
Pioneer does not represent or warrant that content services will continue to be provided or available for a particular period of time, and any such warranty, express or implied, is disclaimed.
About playback behavior over a network
- Playback may stall when the computer is switched off or any media files stored on it are deleted while playing content.
- If there are problems within the network environment (heavy network traffic, etc.) content may not be displayed or played properly (playback may be interrupted or stalled). For best performance, a 10BASE-T/100BASE-TX connection between the unit and the computer is recommended.
- If several clients are playing simultaneously, as the case may be, playback is interrupted or stalled.
- Depending on the security software installed on a connected computer and the setting of such software, network connection may be blocked.
Pioneer is not responsible for any malfunction of the unit and/or the Media Server features due to communication errors/malfunctions associated with your network connection
and/or your computer, or other connected equipment. Please contact your computer manufacturer or Internet service provider.
Windows Media is either a registered trademark or trademark of Microsoft Corporation in the United States and/or other countries.
This product includes technology owned by Microsoft Corporation and cannot be used or distributed without a license from Microsoft Licensing, Inc.
Microsoft, Windows and Windows Vista are either registered trademarks or trademarks of Microsoft Corporation in the United States and/or other countries.
Playback files on the network
- Turn on the power of the TV.
- Press STANDBY/ON to turn on the power of the unit.
- Press MEDIA SERVER to display the Media Server.
- Select the server which contains the file you want to play.
- Select from [Photo]/[Music]/[Video]. Use / to select, then press ENTER.
- Select the file you want to play. Use / to select, then press ENTER.
! Note
- If you are unable to display the servers on the Media Server screen, select [DLNA Search] and press ENTER.
Forward and reverse scanning
During playback, press REV or FWD.
- The scanning speed switches each time the button is pressed. The speed steps depend on the file (the speed is displayed on the TV screen).
To resume normal playback
Press PLAY.
Skipping content
During playback, press or
- When is pressed, the playback skips ahead to the beginning of the next chapter/file.
- When is pressed while a video or audio file is playing, the playback skips back to the beginning of the currently playing chapter/file. Press twice to skip back to the beginning of the previous chapter/file.
- When is pressed while an image file is playing, playback returns to the previous file.
Playing in slow motion
While playback is paused, press and hold / or || / | .
- The speed switches each time the button is pressed (the speed is displayed on the TV screen).
To resume normal playback
Press PLAY.
Step forward and step reverse
While playback is paused, press / or / .
- The picture moves a step forward or reverse each time the button is pressed.
To resume normal playback
Press PLAY.
Playback functions
The functions that can be used differ according to the type of file. In some cases, some of the functions cannot be used. Check the usable functions on the table below.
| \(Function^1\) | File type |
| Video file | Image file | Audio file |
| Forward and reverse scanning2 | \(\checkmark^3\) | X | \(\checkmark^4\) |
| Skipping content | ✓ | ✓ | ✓ |
| Slow motion \(play^{2,5}\) | \(\checkmark^6\) | X | X |
| Step forward and step \(reverse^2\) | \(\checkmark^7\) | X | X |
| A-B Repeat \(play^2\) | ✓ | X | X |
| Repeat Play | ✓ | ✓ | ✓ |
| Subtitle | ✓ | X | X |
| Audio | ✓ | X | X |
| File information | ✓ | ✓ | ✓ |
- Some functions may not work for some files, even if indicated [√] on the table.
- For some files, normal playback resumes automatically when the chapter switches.
- No sound is produced during forward and reverse scanning.
- Sound is produced during forward and reverse scanning.
- No sound is output during slow motion playback.
- Reverse slow motion playback is not possible.
- Reverse step playback is not possible.
Various functions can be called out according to the unit's operating status.
Press TOOL during playback.
2. Select and set the item.
Use / to select, then press ENTER.

Note
- Items that cannot be changed are displayed in gray. The items that can be selected depend on the unit's status.
To change the setting of the selected item
Use / to change.
Press TOOL.
| Item | Description |
| Mode | Switch the play mode (page 32). |
| Repeat | Switch the repeat mode. |
| Audio | Switch the audio. |
| Subtitle | Switch the subtitle language. |
| Subtitle Style | Switch the subtitle style. |
| Bitrate | Display the bitrate of the audio/video. |
| A-B Repeat | Play a selected section repeatedly. |
| Ins Search | Skip forward 30 seconds. |
| Ins Replay | Skip backward 10 seconds. |
| Slide Show | Switch the playback speed while playing the picture slide show. |
| Transition | Change the style of the slide show while playing the picture slide show. |
Playing repeatedly (Repeat Play)
Use this procedure to play the currently playing chapter or file repeatedly.
- To switch to this mode, select [Repeat] from the TOOLS menu during playback. Select either [Repeat One] or [Repeat All].
To cancel Repeat Play
Select [Repeat] from the TOOLS menu, and set to [Repeat Off].

Note
- Repeat Play is canceled in the following cases:
- When you search outside the repeat range.
- When you start other Repeat Play or Random Play.
Playing a selected section repeatedly (A-B Repeat)
A selected section within a file is played back repeatedly.
- Press TOOL during playback.
The TOOLS menu screen appears.
- Select [A-B Repeat] in the TOOLS menu at the point where A-B repeat playback will start, and press ENTER.
[A-] is displayed on the TV screen.
- Select [A-B Repeat] in the TOOLS menu at the point where A-B repeat playback will end, and press ENTER.
[A-B] is displayed on the TV screen, and A-B repeat playback is started.
To cancel A-B Repeat play
Select [A-B Repeat] in the TOOLS menu during A-B repeat playback, and press ENTER.
Playing specified range of chapter (file) in random order
You can select from 2 types of random playback.
- Select [Mode].
Use / to select, then press ENTER.
- Select the playing mode.
Use / to select, then press ENTER.
Random play
The specified range of chapter (file) is played in random order. The same item may be played consecutively.
Shuffle play
The specified range of chapter (file) is played in random order. Each item is played once.
Switching the subtitles
For files on which multiple subtitles are recorded, the subtitles can be switched during playback.
- The subtitles can be switched by selecting [Subtitle] from the TOOLS menu.
Turning the subtitles off
Select [Subtitle] from the TOOLS menu to switch the setting to Off.
Switching the audio
For files on which multiple audio streams/ channels are recorded, audio streams/ channels can be switched during playback.
- The audio can be switched by selecting [Audio] from the TOOLS menu.
Playing photos as slideshows
This function plays the photos, switching them automatically.
Rotating/inverting photos
When a slideshow is playing or paused, the display switches as shown below when the /
/ are pressed.
Rotates 90^ clockwise
Rotates 90^ counterclockwise
Flips vertically
: Flips horizontally
About Slideshow
A display of the files in the folder switches automatically.
! Note
Depending on the connected device and its status, it may take some time for playback to start, switching between screens, or for other operations.
- Some files cannot be played back using this function.
- Some files have limitations on their playback count.
Switch Play Mode
Playback range can be selected from within a folder, or within the selected USB device.
- Press SETUP while stopped.
The Initial Setup screen is displayed.
- Select and confirm [Playback] [Play Mode] [All Play] or [Folder Play].
Use / to select, then press ENTER.
- Folder Play: Playback files from the selected folder.
- All Play: Playback all files on the selected USB device.
Caution
Use the unit's Wi-Fi Direct™/Miracast™ functions
Wi-Fi Direct and Miracast are functions for connecting your mobile devices to the unit without using a wireless LAN router.
Miracast is a function that allows you to display the videos on a mobile device as is on a large screen TV.
Wi-Fi Direct is a function that allows you to play back photo, music, and video files stored on a mobile device with the unit by installing a DLNA compliant application on your mobile device.

Note
- You can only connect one mobile device to the unit at a time with this function. If you want to connect a different mobile device, you will first need to disconnect the one that is currently connected.
While connected via Wi-Fi Direct or Miracast, you will be unable to use the unit's internet connection.
- While connected via Wi-Fi Direct, you will be unable to change sound settings.
- If the power to the unit is turned OFF (Standby) then this function will be terminated, and network settings will be returned to what they were before using this function.
- In order to use this function your mobile device must meet Wi-Fi specifications.
- The unit does not support mobile device control using a specialist application.
Display the Wi-Fi Direct/ Miracast mode screen
- Turn on the power of the TV.
- Press STANDBY/ON to turn on the power of the unit.
-
Press Wi-Fi Direct to display the Wi-Fi Direct/Miracast mode screen.
-
Settings to connect the unit and mobile devices will be started from this screen.
Closing this screen will terminate the Wi-Fi Direct/Miracast connection.
Connect using mobile device's Wi-Fi Direct function
You can connect using a Wi-Fi Direct function, if your mobile device has one.
Press Wi-Fi Direct to display the Wi-Fi Direct/ Miracast mode screen.
- Turn on the Wi-Fi Direct setting on your mobile device.
- Select the device name "DIRECT-xxSB" for the unit appearing on the TV screen from the list displayed on your mobile device.
The "xx" indicates the identification character for the device.
Caution
- If the unit's device name "DIRECT-xxSB" is not displayed on the mobile device or a connection is not possible, resolve the problem by doing one of the following.
- Press an input selection button, and then press Wi-Fi Direct, and perform the procedure again from the Wi-Fi Direct/Miracast mode screen.
- Use to select [Refresh], then press ENTER.
! Note
- Please see the manual for your mobile device for details on how to operate it.
- When connected using the Wi-Fi Direct function of a mobile device, the DLNA application to be used must also be compatible with a Wi-Fi Direct connection.
Playback photos, music and video files from a mobile device
Send photos, music and video files from a mobile device to the unit.
! Note
- Please see the manual for your mobile device for details on how to operate it.
- Depending on the mobile device you are using, you may need to first install software before you can send photos, music and video files.
Connecting by Miracast
You can connect to your mobile device if it has the Miracast function.
Press Wi-Fi Direct to display the Wi-Fi Direct/ Miracast mode screen.
- Turn on the Miracast setting on your mobile device.
A list of the devices that can be connected to the mobile device is displayed on the mobile device screen.
- Select the device name "DIRECT-xxSB" for the unit appearing on the TV screen from the list displayed on your mobile device.
The "xx" indicates the identification character for the device.
Caution
-
If the unit's device name "DIRECT-xxSB" is not displayed on the mobile device or a connection is not possible, resolve the problem by doing one of the following.
-
Press an input selection button, and then press Wi-Fi Direct, and perform the procedure again from the Wi-Fi Direct/Miracast mode screen.
- Use to select [Refresh], then press ENTER.
! Note
- Please see the manual for your mobile device for details on how to operate it.
Connect to device not compatible with Wi-Fi Direct/ Miracast
Press Wi-Fi Direct to display the Wi-Fi Direct/ Miracast mode screen, and select [Next].
- Under the "Wi-Fi Network Settings" on your mobile device, select the device name "DIRECT-xxSB" for this unit as displayed on the TV screen.
The "xx" shown here stands for the unit's identification code.

Caution
-
If the name of the unit "DIRECT-xxSB" does not appear on your mobile device, press an input selection button on the remote control and then Wi-Fi Direct and perform the controls again from the Wi-Fi Direct/Miracast Mode Screen.
-
Enter the password for the unit as shown on the TV screen into your mobile device.
The connection is then complete.

Note
- Please see the manual for your mobile device for details on how to operate it.
Connect using WPS (Wi-Fi Protected Setup)
You can connect using WPS if your mobile device supports it.
Press Wi-Fi Direct to display the Wi-Fi Direct/ Miracast mode screen, and select [Next].
- Use / to select [WPS], then press ENTER.
The WPS (Push Button Configuration) screen will be displayed.
- Use / to select [Next], then press ENTER.
- Turn on the WPS setting on your mobile device within 2 minutes.
If the connection is successful then [Connection Success] will be displayed on the TV screen.

Note
- Please see the manual for your mobile device for details on how to operate it.
Change SSID and password
Change the SSID and password used to connect the unit and a mobile device.
- Press STANDBY/ON and the power to the unit will come on.
- Press Wi-Fi Direct to display the Wi-Fi Direct/Miracast mode screen.
- Use / to select [Refresh], then press ENTER.
SSID and password will be changed. The connection between the unit and mobile device will be terminated. After the connection is terminated, when using the unit's Wi-Fi Direct/Miracast function again you will also need to set up the connection again.

Caution
- All connection settings that have been setup for mobile devices will be removed.
- The SSID and password will not change until an update (Refresh) is performed. You should periodically perform an update (Refresh) for security reasons.
Enjoying YouTube
About YouTube
- This unit supports the YouTube Leanback service. The YouTube Leanback service is only available in English for now.
YouTube videos for mobile phones cannot be played.
Some YouTube videos cannot be played.

Caution
You must connect the unit to the Internet beforehand. See Connecting to your Home Network on page 21 for the details.
- Display YouTube screen.
Press YouTube.
- Select video and playback.
Use / / to select, then press ENTER. Press STOP to stop playback. Playback of image will stop.

Note
- Depending on the Internet connection environment, it may not be possible to play web contents properly.
- To access to web contents, this unit requires a broadband Internet connection. A contract with an Internet provider is required for a broadband Internet connection.
- Access to content provided by third parties requires a high speed Internet connection and may also require account registration and a paid subscription. Third party content services may be changed, suspended, interrupted, or discontinued at any time without notice, and Pioneer disclaims any liability in connection with such occurrences.
Pioneer does not represent or warrant that content services will continue to be provided or available for a particular period of time, and any such warranty, express or implied, is disclaimed.
Enjoying music on Bluetooth® devices
Enjoy listening to music wirelessly from a Bluetooth device
- Bluetooth devices: Mobile phone
- Bluetooth devices: Digital music player
Devices without Bluetooth function: Digital music player + Bluetooth audio transmitter (commercially available). The Bluetooth wireless technology enabled device must support A2DP profiles.
Pairing the unit and the Bluetooth device (initial registration)
Before starting the pairing operation, check that the Bluetooth function on the Bluetooth device is turned on. For details, see the operating instructions for your Bluetooth device. Once the pairing operation is performed, it does not need to be performed again.
1. Press BT AUDIO.
First, "BT AUDIO" appears in the display window of the unit and then "READY" is displayed.
When searching for the unit from the Bluetooth device, some types of Bluetooth devices may show a list of compatible devices on the display of the Bluetooth device. The unit name displayed for pairing is SBX-N500/N700.
3. Enter the PIN code.
The PIN code that can be set for the unit is 0000, 1234, or 8888 (the default setting is 0000).
If the pairing between the unit and the Bluetooth device is successful, "SINK" appears in the display window of the unit.

Note
- The pairing method may vary depending on the type of Bluetooth device.
4. Play music using your Bluetooth device
For details on the playback procedure, see the operating instructions for your Bluetooth device.
The following operations can be performed using the remote control of the unit.
| Button | Operation |
| ▶PLAY | Starts playback. |
| ■PAUSE | Pauses playback. |
| ■STOP | Stops playback. |
| ▶PREV | Moves to the start of the file. Pressing twice moves to the start of the previous file. |
| ▶NEXT | Moves to the start of the next file. |
| ← | The file rewrites while this button is pressed. |
| ▶ | The file fast-forwards while this button is pressed. |
- To perform operation using the remote control of the unit, the Bluetooth device must support the Profile: AVRCP.
- Operations performed by Bluetooth devices may vary for different devices.
- Remote control operation cannot be guaranteed for all Bluetooth devices.

Note
- When a Bluetooth connection is not established, the display window of the unit shows "READY".
Powering on the unit with the Bluetooth device
If you set Bluetooth Standby Mode to On, you can connect from a paired Bluetooth device when the unit is in standby mode.
When the connection is complete, the unit will power on automatically and enter the state for listening to the music on the Bluetooth device.
How to turn on Bluetooth Standby Mode
- Press SETUP.
The SETUP screen is displayed.
- Set [Bluetooth] [Bluetooth Standby Mode] to [On].
Listening to Sound Played by the Unit with a Bluetooth Receiver (BT Transmitter)
You can listen to the sound played by the unit with a Bluetooth receiver (speakers or headphones).
Bluetooth devices: Bluetooth speaker
Bluetooth devices: Bluetooth headphone
Devices without Bluetooth function: Speaker + Bluetooth audio receiver (commercially available)
The Bluetooth wireless technology enabled device must support A2DP profiles.
Pairing the unit and the Bluetooth device (initial registration)
When connecting with a Bluetooth receiver, register the device by pairing. The pairing information of only one device can be registered. If you want to connect with another device, register by pairing again.
- Press SETUP.
The Initial Setup screen is displayed.
- Set [Bluetooth] [BT Transmitter] to [On].
BT TRANSMITTER Indicator flashes.
- Select [Bluetooth] [Bluetooth Device Search] [Next Screen].
- Set the Bluetooth device to pairing mode.
For how to set pairing mode, see the operating instructions for your Bluetooth device.
- Select [Search] and press ENTER.
A list of the found devices is displayed. If the search operation does not complete after at least 1 minute, press [Cancel] and check whether the Bluetooth device is in pairing mode. Then perform the operation again.
- Select the Bluetooth device to pair and press ENTER.
- When the connection is completed, the BT TRANSMITTER Indicator lights.
This completes the pairing procedure.
Listening to the audio of the unit with a Bluetooth receiver
1. Switch a paired Bluetooth receiver to the connection standby state.
For how to switch to the connection standby state, see the operating instructions for your Bluetooth device.
2. Turn the power of the unit on.
The unit connects to the Bluetooth receiver automatically and the audio of the unit is played from the Bluetooth receiver. However, if BT Audio is selected, you will not be able to listen to sound with the Bluetooth receiver.
! Note
- Control the volume and sound quality of the unit and the Bluetooth receiver from each of the devices.
- The audio played from the Bluetooth receiver will have a delay when compared to the audio from the unit.
Disabling the BT Transmitter function
1. Press SETUP.
The Initial Setup screen is displayed.
2. Set [Bluetooth] [BT Transmitter] to [Off].
! Note
- The unit does not support the Mono Headset Profile (Hands Free Profile).
- Only one Bluetooth device can be connected to the unit at one time. Connection with multiple devices is not possible.
- The Bluetooth function may not be available for certain Bluetooth device types.
- The audio may sound choppy if signals from other devices interfere with the connection.
- The B/teeth connection will be lost if a malfunction occurs due to the effect of a device that operates in the same frequency, such as a medical device, microwave, or wireless LAN device.
Even if the unit is within 10 meters of the Bluetooth device, a connection may not be established if objects are in between.
- If communication is cut off because of objects between the Bluetooth device and the unit, the Bluetooth connection will be lost.
Large distances between the Bluetooth device and
the unit will result in poorer sound quality, and the connection will be cut off if the distance between the Bluetooth device and the unit exceeds the operating range.
- The connection with the Bluetooth device will be cut off when the power for the unit is turned off or when the distance from the Bluetooth device exceeds 10 meters.
Sound
Press SOUND MENU on the remote control to display the sound select menu on the TV screen.
Use / / to make a selection, then press ENTER.
Press SOUND MENU to exit the Sound Menu.

Note
- When YouTube is selected, the Sound menu cannot be displayed. Switch to other input source and then switch SOUND.
- When file is stopped, the Sound menu cannot be displayed. Switch SOUND when file is being played.
- In Options, the factory default settings are indicated in bold.
| Setting | Options | Explanation |
| Surround | Off | Has the effect of creating a sound space. |
| On | |
| Sound Retriever | Off | A WMA, MP3 or AAC file is played with high sound quality. This is only valid for files with the extension ".wma", ".mp3" or ".m4a". |
| Low | The effect depends on the file. Try different settings, and choose the one providing the best effect. |
| High | |
| Equalizer | Add a variety of effects to the output sound. Select a mode that suits your personal tastes. |
| Off | |
| Gaming | This mode is suited to video games. |
| Movie | This mode is suited to movies. |
| Music | This mode is suited to music. |
| Night | Off | This mode is suited to enjoying movies and other content with a low volume level at nighttime. |
| On | |
| Dialog | Off | This enhances the clarity of dialog in movies and vocals in music. |
| On | |
| Audio Sync (Lip Sync) | Adjust the delay between image and sound. Use </▶ to adjust. |
PHASE CONTROL technology
The unit uses PHASE CONTROL technology.
During multi-channel playback in a typical home theater, the LFE (Low Frequency Effects) signals and low-pitched components contained in various channels are routed to the subwoofer or other optimum speaker. However, in principle, this routing process results in a frequency where the phase is shifted (group delay), leading to problems where the low-frequency sounds only arrive delayed or low-pitched sounds cancel each other out due to interference with other channels. The PHASE CONTROL technology in the unit is used to recreate powerful low-pitched sounds that are faithful to the original sounds.
The phase indicates the time relationship between two sound waves. Two sounds waves are said to be "in phase" if their peaks match up with each other, and the phases are said to be "out of phase" if their peaks do not match up.
When the PHASE CONTROL technology is used, it can provide the following effects when the sound source is played back.
No PHASE CONTROL technology
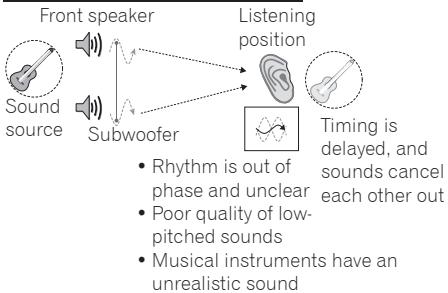
With PHASE CONTROL technology
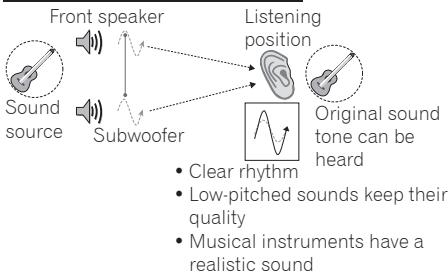

Note
- If the speaker distance is not set correctly, the proper effect of the PHASE CONTROL technology will not be obtained.
- The PHASE CONTROL technology is always activated.

PHASE CONTROL technology is a trademark assigned to products that provide matching of the phase characteristics from recording to playback based on the PHASE CONTROL technology concept developed by Pioneer.
IR Repeater Function
When the TV remote control does not work (when the AV Speaker Bar is installed in front of the TV)
When the AV Speaker Bar is installed in front of the TV, the AV Speaker Bar may block the remote control sensor on the TV so that operation by the TV remote control no longer works. When this happens, try testing if the TV remote control works using the three methods below.
Method 1: Move the position of the AV Speaker Bar forward or backward or to the right or left, or adjust its height
Method 2: Use the IR Repeater function
Method 3: Connect the supplied IR cable
Relaying TV remote control signals (Using the IR repeater function)
Diagram of IR repeater operation
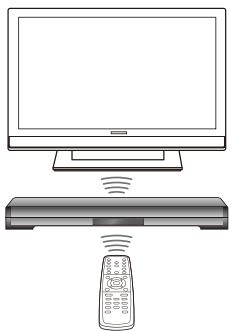
If you cannot control your TV using the TV remote control, the remote control signals can be relayed by the AV Speaker Bar to enable remote control operation. The remote control signals are relayed even when the AV Speaker Bar is turned off.
To use the IR repeater function, select [Initial Setup] [Options] set [IR Out] to [On].
Caution
- Check that the TV cannot be operated with the remote control of the TV before setting [IR Out] to [On]. If it is set to [On] when operation is possible, the signal output directly from the remote control of the TV and the signal output via the AV Speaker Bar will interfere with each other.
- If the AV Speaker Bar is installed in a location where the TV remote control sensor is not blocked, be sure to always set to [Off].
- This may not work for certain types of TVs. In this case, try changing the installation location of the AV Speaker Bar.
Connecting the supplied IR cable
The IR repeater function may not work depending on how the AV Speaker Bar is installed and the position of the TV remote control sensor. In this case, use the supplied IR cable.
- Connect the supplied IR cable.
-
Affix the IR cable to the rear panel of the unit.
-
Position the transmitter so that it is aligned with the TV remote control sensor.
- Use the TV remote control correctly within the reception range of the remote control sensor of the unit.
- Peel off the backing, and affix it to the unit.
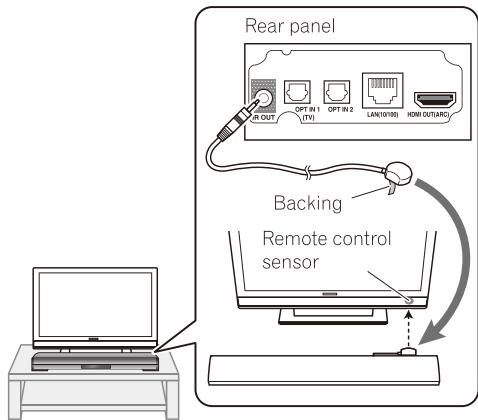
- Select [Initial Setup] [Options] [IR Out Setting] [External].
! Note
- For details about the location of the TV remote control sensor, see the operating instructions for your TV.
- Select an installation location that best matches your usage environment.
- Carefully wipe off any dust or objects at the affixing location.
- This may not work for certain types of TVs. In this case, try changing the installation position of the unit.
Chapter 4 Control with HDMI function
Linked operation is possible by connecting the unit to a TV that supports the Control with HDMI function.
The following linked operations are possible by connecting the unit using an HDMI cable to a TV that supports the Control with HDMI function.
Volume adjustment and muting of the unit from the TV
- Linking power with TV
Automatic input switching
Automatic input switching of the unit based on switching of the TV input
TV automatic input switching based on input switching of the unit

Note
- On certain Pioneer TVs, the Control with HDMI function appears as "KURO LINK".
- Linked operation cannot be guaranteed for TVs other than Pioneer TVs that support the Control with HDMI function.
- To use the Control with HDMI function, connect a High Speed HDMI®/™ cable. The Control with HDMI function may not work properly with other types of HDMI cables.
- For the specific operation and setup procedures, see also the operating instructions for your TV.
Connecting to a TV that supports the Control with HDMI function
A TV that supports the Control with HDMI function can be connected to the unit for enabling linked operation. Connect using a High Speed HDMI®/™ cable. For the connection procedure, see "Connecting to Your TV" (page 19). When the connection is completed, perform the procedure in "Setting the Control with HDMI function" (page 44).
If your TV supports ARC (Audio Return Channel), audio from the TV can be input to the unit over the HDMI cable. If your TV is not compatible with ARC, set [TV Input] to [Optical IN-1] and connect a separate optical digital audio cable (page 44).

Note
- To ensure maximum performance of the Control with HDMI function of the unit, connect the TV that supports the Control with HDMI function directly to the unit.
- The audio of the unit may be interrupted by operation of the TV or another connected device.
Setting the Control with HDMI function
This shows how to set the Control with HDMI function of the unit. If connecting to a TV that supports the Control with HDMI function and ARC, the settings of the unit do not need to be changed.
Besides the settings for the unit, settings are also required for the TV supporting the Control with HDMI function that is connected to the unit. For details, see the operating instructions for your TV.
- Press SETUP while stopped.
The Initial Setup screen is displayed.
-
Use / to select [HDMI], and press ENTER.
-
Use / to select [Control], and press ENTER.
-
On
This enables the Control with HDMI function. (Default setting)
This disables the Control with HDMI function and disables linked operation.
-
Use / to select [HDMI Standby Mode], and press ENTER.
-
On
The Control with HDMI function can be used even when the unit is in standby mode.
The Control with HDMI function cannot be used when the unit is in standby mode. (Default setting)
- Use / to select [TV Input], and press ENTER.
TV(ARC)
Audio from the TV is input via HDMI. (Default setting)
Optical IN-1
To input audio from the TV, select the input connected to the TV by the optical digital audio cable.
- Press RETURN to exit.
Operation during linkage
Linked operation is performed as shown below for TVs supporting the Control with HDMI function that are connected to the unit.
-
Theater mode
-
If you use the menu screen of your TV with Control with HDMI function to set so that audio is output from the unit, you can set to Theater mode.
- When Theater mode is set, it is canceled by turning off the unit. Then, when the TV menu screen is used to set so that the audio is output from the unit, the power for the unit is turned on, and Theater mode is activated again. (However, this happens only when HDMI Standby mode is turned on.)
-
When Theater mode is set, if the menu screen of your TV is used to set so that audio is output from the TV, Theater mode will be canceled.
-
Linking power with TV
-
When the TV power is set to standby mode, the power for the unit is also set to standby mode.
Automatic input switching
- When the input source for the TV is switched, the input source for the unit is also switched at the same time.
-
Linked operation continues even if the input source for the unit is set to a source other than TV.
-
Auto select function
-
If USB, Media Server, Wi-Fi Direct, or YouTube of the unit is pressed, the TV input switches automatically, and video from the unit is displayed on the TV.
Notes on Control with HDMI function
- When a TV supporting the Control with HDMI function is connected to the unit and Theater mode is set using the TV remote control, the input source of the unit is switched automatically whenever the TV input source is switched, and audio is output from the unit. During this usage, the audio from the TV is muted. If the TV does not support ARC (Audio Return Channel), connect using an optical digital audio cable (page 19).
- Connect the TV directly to the unit. Malfunctions can occur if the TV is connected to a device other than the unit, such as an amplifier or AV converter (HDMI switch), before connecting to the unit.
Chapter 5
Advanced settings
Changing the settings
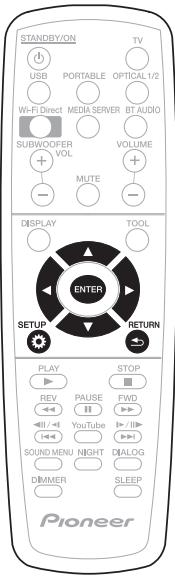

Note
- The items that can be selected depend on the unit's status.
- In Options, the factory default settings are indicated in bold.
| Setting | Options | Explanation | |
| Display Setting | TV Screen | 16:9 Full | Select this when connecting to a wide (16:9) TV. |
| 16:9 Normal | Select this when connected to a wide (16:9) TV. 4:3 pictures are displayed with vertical black bars along the sides. |
| 4:3 Pan&Scan | Select this when connecting to a 4:3 screen TV and playing a 16:9 video. The video will be played with the left and right sides of the image cut off to display on the 4:3 screen. |
| 4:3 Letterbox | Select this when connecting to a 4:3 screen TV and playing a 16:9 video. The video will be played with black bands at the top and bottom. |
| Video Adjust | Standard | Choose the video output mode. |
| Vivid | |
| Cinema | |
| Custom | The quality of the playback picture can be adjusted according to the TV you are using (page 50). |
| Noise Reduction | 0 | Choose the level of noise reduction. |
| 1 | |
| 2 | |
| 3 | |
| Net Contents Mode | Off | Select this to automatically correct compressed video files on the network or a USB device and play them with a more natural picture quality. |
| On | |
Operating the initial setup screen
- When playback is stopped, display the Initial Setup screen.
Press SETUP.
- Select the item and change the setting.
Use / / to select, then press ENTER.
Closing the Initial Setup screen
Press SETUP or RETURN.
| Setting | Options | Explanation |
| Audio Output | DRC (Dynamic Range Control) | Off | Select this to output audio signals without using the DRC function. |
| On | Select this to adjust the range between the loudest and softest sounds (dynamic range) for playback at average volume. Use this when it is hard to hear dialog or when watching movies at midnight. |
| · This affects such audio signals as Dolby Digital. · Depending on the file, the effect may be weak. |
| Dual Mono | 1CH | When multiple audio signals are input to TV (ARC) or an optical input, the main audio is selected. |
| 2CH | When multiple audio signals are input to TV (ARC) or an optical input, the sub audio is selected. |
| 1CH+2CH | When multiple audio signals are input to TV (ARC) or an optical input, the main audio and sub audio are selected. |
| Speaker Setup (SBX-N700 only) | Adjust the Delay (distance from viewers) of the speakers. Please see "Adjust speaker settings" for more details (page 50). |
| Subwoofer Setup (SBX-N700 only) | Wireless | Select this to use the wireless subwoofer. |
| Built in | Select this to use the built-in subwoofer. |
| HDMI | Color Space | RGB | Select this to output the video signals as RGB signals. Choose this if the colors seem too faint and the black seems too bright. |
| YCbCr | Select this to output the video signals as YCbCr 4:4:4 signals. |
| YCbCr 422 | Select this to output the video signals as YCbCr 4:2:2 signals. |
| Full RGB | Select this to output the video signals as RGB signals. Choose this if the colors seem too dense and all the dark colors are displayed in a uniform black. |
| Resolution | Auto | Select this to choose the resolution of the video signals output from the HDMI OUT terminal automatically. |
| 480I/576I | Output the video signals from the HDMI OUT terminal with the selected resolution. |
| 480P/576P |
| 720P |
| 1080I |
| 1080P |
| HDMI Audio Out | Bitstream | Select this to output HDMI audio signals directly. |
| PCM | Select this to output HDMI audio signals converted to PCM audio signals. |
| Off | Select this when you do not want to output the audio signal from the HDMI output terminal. |
| HDMI Deep Color | 30bits | Select this when outputting the video signals with 30-bit color. |
| 36bits | Select this when outputting the video signals with 36-bit color. |
| Off | Select this when outputting the video signals with normal 24-bit color. |
| When [30bits] or [36bits] is selected, set the color space to a setting other than YCbCr 422. |
| HDMI 1080P 24Hz | On | Select this when Resolution is set to Auto or 1080P and outputting 1080p/24 video signals to a TV compatible with 1080p/24. |
| Off | Select this when Resolution is set to 1080P and outputting 1080p/60 video signals to a TV compatible with 1080p/60. |
| Control | On | Select this to control the unit with the remote control of a TV connected with an HDMI cable or the HDMI audio return channel (ARC). Also refer to "Control with HDMI function" (page 44). |
| Off | Select this to not control the unit with the remote control of a TV connected with an HDMI cable. |
| HDMI Standby Mode | On | The Control with HDMI function can be used even when the unit is in standby mode. |
| Off | The Control with HDMI function cannot be used when the unit is in standby mode. |
| Setting | Options | Explanation |
| HDMI | TV Input | TV(ARC) | Select this to input the audio of a TV compatible with HDMI audio return channel (ARC) via HDMI. Also set [Control] to [On]. This also enables the input to be switched to [TV(ARC)] when TV on the remote control is pressed. |
| Optical IN-1 | Select this to input the audio of a TV to the OPT IN 1 terminal with an optical digital audio cable. This also enables the input to be switched to [Optical IN-1] when TV on the remote control is pressed. |
| Network | IP Address Setting | Select this to set the IP address of the unit and DNS server. (page 50) |
| Proxy Server | Only set the proxy server if so instructed by your Internet service provider. (page 51) |
| Information | Displays the values of the MAC address, IP address, subnet mask, default gateway, DNS server (primary) and DNS server (secondary). (page 51) |
| Connection Test | Select this to test the network connection. (page 51) |
| Internet Connection | Enable | Select this when connecting to the Internet. |
| Disable | Select this when not connecting to the Internet. |
| DLNA | Enable | Select this when connecting to DLNA server. |
| Disable | Select this when not connecting to DLNA server. |
| Application Standby Mode | On | The functions of a dedicated application (ControlApp) installed on a mobile device can be used even when the unit is in standby mode. |
| Off | The functions of a dedicated application (ControlApp) installed on a mobile device cannot be used when the unit is in standby mode. |
| Interface | Ethernet | Select when using a LAN cable to connect to the network. |
| Wireless | Select when connecting wirelessly to the network. |
| Wireless Setting | Perform settings for a wireless network connection (page 22). |
| Language | OSD | available languages | Choose a language for the on-screen displays from the listed languages. (page 51) |
| Playback | DivX® VOD DRM | Registration Code | Displays the unit's registration code required to play DivX VOD files. |
| Internet Setting | Permitted | YouTube can be watched without entering the password. |
| Partial Permitted | The password must be entered to watch YouTube. |
| Prohibited | YouTube can not be watched. |
| Play Mode | Folder Play | Playback files from the selected folder. |
| All Play | Playback all files on the selected USB device. |
| Bluetooth | Change PIN code | 0000 | Sets the PIN code to 0000. |
| 1234 | Sets the PIN code to 1234. |
| 8888 | Sets the PIN code to 8888. |
| BT Transmitter | On | Select this to use the unit as a Bluetooth transmitter. (page 38) |
| Off | Select this to use the unit as a Bluetooth receiver. |
| Bluetooth Device Search | Search for devices that can be connected. Select a device and connect to it. (page 38) |
| Bluetooth Standby Mode | On | Select this to switch Bluetooth to the connection standby state even when the unit is in standby mode. (page 38) |
| Off | The Bluetooth device function cannot be used when the unit is in standby mode. |
| Security | Change Password | Register the password for canceling the lock for viewing YouTube. (page 51). The default password is "0000". |
| Setting | Options | Explanation |
| Options | Screen Saver | Off | The screen saver is not activated. |
| 1 min | The screen saver will be activated if no operation has been performed for more than one minute/two minutes/three minutes. Operating the remote control can deactivate the screen saver. |
| 2 min |
| 3 min |
| Auto Power Off | Off | Select this if you do not want the power to turn off automatically. This is the default setting for ASEAN model only. |
| 10 min | The power will be automatically turned off if no operation has been performed for more than 10 minutes/20 minutes/30 minutes. |
| 20 min |
| 30 min |
| IR Out | On | Select this to use the IR repeater function. |
| Off | Select this to not use the IR repeater function. |
| IR Out Setting | Internal | Select this to use the internal IR repeater. |
| External | Select this to use an IR repeater connected with the supplied IR cable. |
| Update | USB Storage | Select the method of software updating. (page 52) |
| Network | |
| Load Default | Restore the settings to the factory default. |
| System Information | Check the system version number. |
Adjusting the video
- Select and set [Display Setting] [Video Adjust] [Custom].
Use / to select, then press ENTER.
- Select the item and change the setting.
Use / to select the item, then use / to change the setting. Once the setting is completed, press RETURN to close the settings screen.
| Item | Description |
| Brightness | Select this to adjust the TV screen's brightness. |
| Saturation | Select this to adjust the TV screen's saturation. |
| Hue | Select this to adjust the color (green and red) balance of the TV screen. |
| Contrast | Select this to adjust the TV screen's contrast. |
| Sharpness | Choose the level of sharpness. |
| CTI (Color Transient Improvement) | Provides images with clearer color contours. |
Adjust speaker settings
Set the distances from the listening position to the speakers.
- Select and set [Audio Output] [Speaker Setup] [Next Screen].
- Use / to select the speaker you want to set and press ENTER.
- Use cursor / to adjust the setting, then press ENTER.
Setting the IP address
- Select and set [Network] [IP Address Setting] [Next Screen].
Use / to select, then press ENTER.
- Set IP address.
Use / / to set the IP address of the unit or DNS server, then press ENTER.
On - The unit's IP address is obtained automatically. Select this when using a broadband router or broadband modem that has a DHCP (Dynamic Host Configuration Protocol) server function. This unit's IP address will automatically be allocated from the DHCP server.
Off - The unit's IP address must be set manually. When configuring the [IP Address], [Subnet Mask], [Default Gateway], and [DNS] settings, press ENTER to launch the software keyboard, use the / / / to select a character or item, and press ENTER to input the selection. Select [OK] and press ENTER to apply all of the settings.
! Note
- For information on the DHCP server function, refer to the operating instructions for the network device.
- You may need to contact your Internet service provider or network administrator when inputting the IP address manually.
Setting the proxy server
Only set the proxy server if so instructed by your Internet service provider.
- Select and set [Network] [Proxy Server] [Next Screen].
Use / to select, then press ENTER.
- Select and set [Use] or [Not use] at [Proxy Server].
Use to change, then press .
- Use - Select this when using a proxy server.
- Not use - Select this when not using a proxy server.
If you have selected [Use], proceed to step 3.
- Select and set Server Select Method.
Use to change, then press .
- IP Address - Input the IP address.
-
Server Name - Input the server name.
-
Input [IP Address] or [Server Name]. If you selected [IP Address] in step 3, press ENTER to launch the software keyboard, use / / / to select a number, and press ENTER to input the selection.
If you selected [Server Name] in step 3, press ENTER to launch the software keyboard, use / / to select a character or item, and press ENTER to input the selection.
- Input Port Number.
Use to select [Port Number] and then press ENTER to launch the software keyboard, use / / to select a number, and press ENTER to input the selection.
- Select [OK] and press ENTER to apply all of the settings.
Displaying the network settings
Select and set [Network] [Information] [Next Screen].
Use / to select, then press ENTER.
The MAC address, IP address, subnet mask, default gateway and DNS server (primary and secondary) settings are displayed.
When [Auto Set IP Adress] is set to [On], the values obtained automatically are displayed.
! Note
- "0.0.0.0" is displayed when each IP address has not been set.
Testing the network connection
Select and set [Network] [Connection Test] [Start].
Use / to select, then press ENTER. [Network is OK.] is displayed once the test is completed. If any other message is displayed, check the connections and/or settings (pages 21 and 48).
Changing to other language at language setting
1. Select and set Language.
Use / to select, then press ENTER.
- Select and set [OSD].
Use / to select, then press ENTER.
- Select and set the desired language.
Use / to select, then press ENTER.
Registering or Changing the password
Use this procedure to register or change the code number required for the [Internet Setting] settings.
- Select and set [Security] [Change Password] [Next Screen].
Use / to select, then press ENTER.
- Input the password.
Press ENTER to launch the software keyboard, use the / / to select a four digit number, and press ENTER to input the selection. Select [OK] and press ENTER to confirm the password.
- The default password is "0.0.0.0".
Press ENTER to launch the software keyboard, use / / / to select a four digit number, and press ENTER to input the selection. Select [OK] and press ENTER to confirm the password.
- To change the password, input the previously registered password, then input the new password.
! Note
We recommend making a note of the password.
- If you have forgotten the password, reset the unit to the factory default setting, then register the password again (page 53).
- This unit might ask you to enter a password when you change the password.
- If you reset this unit, your password is simultaneously changed to the default setting.
Returning the resolution setting to the default setting
If you select a resolution that is not supported by your TV, videos may become unable to be displayed on the TV.
Return the resolution setting to the default setting.
- Press STANDBY/ON on the unit to turn off the power of the unit.
Press STANDBY/ON on the unit again to turn the power on.
- Press PORTABLE on the remote control to switch the input of the unit to portable.
- Press and hold DISPLAY on the remote control for at least 5 seconds.
The display window shows [RESOLUTI].
- Press ENTER while [RESOLUTI] is displayed.
When initialization is completed, [OK] is displayed.
- Press STANDBY/ON on the unit to turn off the power of the unit.
Pairing a wireless subwoofer with the unit (SBX-N700 only)
When sound is not output from the wireless subwoofer, pair the wireless subwoofer with the unit.
Furthermore, sound may no longer be output after you update the software of the unit or
restore the settings of the unit to the default settings. In that case as well, perform pairing.
- Press STANDBY/ON on the unit to turn off the power of the unit.
Press STANDBY/ON on the unit again to turn the power on.
- Press PORTABLE on the remote control to switch the input of the unit to portable.
- Press and hold RESET on the subwoofer for at least 3 seconds.
The STANDBY indicator on the wireless subwoofer flashes red.
- Press and hold PLAY on the remote control for at least 3 seconds.
[SW PAIR] is displayed on the unit's display window and pairing starts.
Once pairing is completed, [PASSED] is displayed on the unit's display window and the CONNECT indicator on the wireless subwoofer lights blue.
If pairing failed, [FAILED] is displayed on the unit's display window. Repeat steps 1-4.
Software updating
The unit's software can be updated using one of the methods shown below.
- Connecting to the Internet.
- Using a USB flash drive.
Product information on this unit is provided on the Pioneer website. Check the website shown on page 7 for update and service information on your unit.
Caution
- Do not unplug the power cord or remove the USB flash drive during software updating. Also, do not reboot by pressing STANDBY/ON for 5 seconds or longer. Otherwise, the updating will be aborted and malfunction may occur with the unit.
There are two processes for software updating, downloading and updating. Both processes may take a certain period of time.
- Other operations are defeated during software updating. Furthermore, updating process cannot be canceled.
Updating connecting to the Internet
- Connect to the Internet.
- When playback is stopped, display the Initial Setup screen.
Press SETUP.
- Select and set [Options] [Update] [Network] Start.
Use / / to select, then press ENTER.
- Updating starts.
Press ENTER.
- Software updating may take a certain period of time.
- When updating is completed, the unit restarts automatically.
Updating using a USB flash drive

Note
- When an update file is provided on the Pioneer website, use your computer to download it onto a USB flash drive. Carefully read the instructions on downloading update files provided on the Pioneer website.
- Store the update file in the root directory of the USB flash drive. Do not store it within a folder.
- Do not put any files other than the update file on the USB flash drive.
-
The unit supports USB flash drive formatted in FAT32/FAT16/NTFS. When formatting a USB flash drive on your computer, do so with the settings below.
-
File system: FAT32
-
Allocation unit size: Default allocation size
-
Only store the most recent update file on the USB flash drive.
-
Do not use a USB extension cable to connect a USB flash drive to the unit. Using a USB extension cable may prevent the unit from performing correctly.
-
Plug in the USB flash drive on which the update file is stored.
- When playback is stopped, display the Initial Setup screen.
Press SETUP.
-
Select and set [Options] [Update] [USB Storage] Start.
Use / / to select, then press ENTER.
-
Updating starts.
Press ENTER.
- Software updating may take a certain period of time.
- When updating is completed, the unit restarts automatically.
Restoring all the settings to the factory default settings
- Check that the unit's power is turned on.
- When playback is stopped, display the Initial Setup screen.
Press SETUP.
- Select and set [Options] [Load Default] [Next Screen].
Use / to select, then press ENTER.
- Select and set [OK].
Use to select, then press ENTER.
- Press STANDBY/ON to turn off the power.
- Press STANDBY/ON to turn on the power.
Chapter 6
Troubleshooting
Incorrect operation is often mistaken for trouble or malfunction. If you think that there is something wrong with this component, check the points below. Sometimes the trouble may lie in another component. Inspect the other components and electrical appliances being used. If the trouble cannot be rectified even after checking the points below, ask your nearest Pioneer authorized service center or your dealer to carry out repair work.
Picture
| Problem | Check | Remedy |
| No picture is displayed or the picture is not displayed properly. | Is the HDMI cable properly connected? | • Connect the cable properly according to the connected devices (page 19).
• Disconnect the HDMI cable, then reinsert it firmly and all the way in. |
| Is the HDMI cable damaged? | If the cable is damaged, replace it with a new one. |
| Is the input setting on the connected TV right? | Read the operating instructions for the connected TV and switch to the proper input. |
| Is the output video resolution properly set? | • Switch [Resolution] of the unit to a resolution at which video can be output (page 47).
• Returning the resolution to the default setting may resolve the problem. Try restoring the default setting. (page 53) |
| Is the unit connected with an HDMI cable other than a High Speed HDMI®/™ Cable (with a Standard HDMI®/™ cable)? | Connect to the TV using a High Speed HDMI®/™ Cable. |
| Is a DVI device connected? | The picture may not be displayed properly if a DVI device is connected. |
| Is [Color Space] properly set? | Change the [Color Space] setting (page 47). |
| • Picture is stretched.
• Picture is cropped.
• Aspect ratio cannot be switched. | Is the TV's aspect ratio properly set? | Read the operating instructions for the TV and set the TV's aspect ratio properly. |
| Is [TV Screen] properly set? | Set [TV Screen] properly (page 46). |
| When video signals with a resolution of 1080/50i, 1080/50p, 720/50p, 1080/24p, 1080/60i, 1080/60p or 720/60p are being output from the HDMI OUT terminal, they may be output with an aspect ratio of 16:9 even if [TV Screen] is set to [4:3 Pan & Scan] (page 46). |
| Picture is interrupted. | | The picture may be interrupted when the resolution of the recorded video signal switches. Change the [Resolution] settings to select other than [Auto] (page 47). |
Sound
| Problem | Check | Remedy |
| • No sound is output.
• Sound is not output properly. | • Is the file played back in slow motion?
• Is the file played back in fast forward or fast reverse? | No sound is output during slow motion play and forward and reverse scanning. |
| Are the cables properly connected? | • Connect the cable properly according to the connected devices (page 19).
• Insert the cable firmly and all the way in.
• Wipe off any dirt from the connection plugs and terminals.
• When connecting to a TV that is not ARC compatible, you will not be able to listen to the TV audio with the unit if the TV is connected with only an HDMI cable. Also perform the optical digital audio cable connection described in “Connecting to Your TV” on page 19. |
| Is the audio cable damaged? | If the cable is damaged, replace it with a new one. |
| Is [Audio Output] properly set? | Set [Audio Output] properly, according to the connected device (page 47). |
| Are the connected components properly set? | Read the operating instructions for the connected components and check the volume, input, etc. |
| No sound is output from the wireless subwoofer. (SBX-N700 only) | Is the CONNECT indicator of the wireless subwoofer lit blue? | ·When the audio signal being played has no bass component, no sound will come from the subwoofer.
·Adjust the settings to match your environment from [Speaker Setup] of [Audio Output]. (page 47)
·Check whether the subwoofer setting of [Initial Setup] on the unit is set to wireless. (page 47)
·Check whether the unit and wireless subwoofer are paired. (page 52)
·Sound may become intermittent or stop being output due to the signal state during use but this is not an indication of a malfunction. Try changing the position or orientation of the AV Speaker Bar or wireless subwoofer.
·The AV Speaker Bar and wireless subwoofer can be used at a distance of up to approximately 10 m from each other. This distance differs depending on the operating environment and operation at the distance of 10 m is not guaranteed.
·The reception state may become unstable if the AV Speaker Bar and wireless subwoofer are too close to each other. In such a case, use the AV Speaker Bar and wireless subwoofer at least 1 m apart from each other.
·If there is an obstruction (metal door, concrete wall, insulation with aluminum foil, etc.) between the AV Speaker Bar and wireless subwoofer, the signal may be blocked and sound may not be output. In this case, install the AV Speaker Bar and wireless subwoofer where there is a clear line of sight between them. |
| Is the wireless subwoofer installed in the correct position? | Check whether there is a problem with the installation position. (page 18) |
| The audio from the AV Speaker Bar and the audio from the wireless subwoofer sound out of sync. (SBX-N700 only) | Did you adjust the speaker settings to appropriate settings? | Set the distances from the listening position to the speakers. (page 50) |
Playback
| Problem | Check | Remedy |
| Picture freezes and the front panel and remote control buttons stop working. | | • Press STOP to stop playback, then restart playback.
• If the playback cannot be stopped, press STANDBY/ON on the unit's front panel to turn off the power, then turn the power back on.
• Press STANDBY/ON on the unit for more than 5 seconds. The unit reboots, and the operation becomes possible. |
| (■) is displayed in file names, etc. | | The characters that cannot be displayed on this unit are displayed in (■). |
Control with HDMI function
| Problem | Check | Remedy |
| Control with HDMI function does not work. | Is the HDMI cable properly connected? | To use the Control function, connect the TV to the HDMI OUT terminal (page 19). |
| Is the HDMI cable you are using a High Speed HDMI®/TM Cable? | Use a High Speed HDMI®/TM Cable. The Control with HDMI function may not work properly if an HDMI cable other than a High Speed HDMI®/TM Cable is used. |
| Does the connected device support the Control with HDMI function? | • The Control with HDMI function will not work with devices of other brands that do not support the Control with HDMI function, even when connected using an HDMI cable.
• The Control with HDMI function will not work if devices that do not support the Control with HDMI function are connected between the Control-compatible device and the unit.
• Even when connected to a Pioneer product compatible with the Control with HDMI function, some of the functions may not work. Also refer to the operating instructions for the connected device. |
| Is [Control] set to [On] on the connected device? | Set [Control] to [On] on the connected device. The Control with HDMI function operates when [Control] is set to [On] for all devices connected to the HDMI OUT terminal.Once connections and settings of all the devices are finished, be sure to check that the unit's picture is output to the TV. (Also, check after changing the connected devices and connecting and/or disconnecting HDMI cables.) If the unit's picture is not being output to the TV, the Control with HDMI function may not work properly.For details, refer to the operating instructions of the connected device. |
| Sound of the TV connected via HDMI cannot be heard with the unit. | | ·When the TV is compatible with audio return channel (ARC): On the unit, set [Control] to [On] and then set [TV input] to [TV(ARC)] to switch the TV input (page 48).Check that the ARC setting on the TV is on.·When the TV is not compatible with audio return channel (ARC): The sound of the TV cannot be listened to via HDMI.Set [TV Input] to [Optical IN-1] and connect a separate optical digital audio cable (page 20). |
Network
| Problem | Check | Remedy |
| Software updating is slow. | | Depending on the Internet connection and other conditions, some time may be required to update the software. |
| Cannot connect to the network. | | • Insert the LAN cable firmly all the way in. (page 21)
• Do not connect with a modular cable.
Use a LAN cable with the LAN (10/100) terminal.
• Check whether the power of the Ethernet hub (router with hub function) or modem is on.
• Check whether the Ethernet hub (router with hub function) or modem is connected properly.
• Check the network settings. |
| A message other than "Networks is OK." is displayed when [Connection Test] is performed. | Is "Network is FAILED." displayed? | • Check that this unit and the Ethernet hub (or router with a hub functionality) are properly connected.
• If the IP address is obtained using the DHCP server function, check the setting is correct at the [Information] (page 48). For details on the DHCP server function, see the operating instructions for the Ethernet hub (or router with a hub functionality).
• Set the IP address manually.
• Check the operation and settings of the DHCP server function of the Ethernet hub (or router with hub functionality). For details on the DHCP server function, see the operating instructions for the Ethernet hub (or router with a hub functionality).
• If this unit has been set manually, reset the IP address of this unit or other components. |
| Is the Ethernet hub (or router with a hub functionality) operating properly? | • Check the settings and operation the Ethernet hub (or router with a hub functionality). For details, see the operating instructions for the Ethernet hub.
• Reboot the Ethernet hub (or router with a hub functionality). |
| Cannot access to the component or computer connected via network. | Is Internet security software currently installed in the connected component? | There are cases where a component with Internet security software installed cannot be accessed. |
| Did you turn on the power of the device on the network while the unit (network AV Speaker Bar) was in a powered on state? | Switch on the audio component on the network before switching on this unit. |
| Is the component connected to the network properly set? | If the client is automatically authorized, you need to enter the corresponding information again. Check whether the connection status is set to "Do not authorize". |
| Playback does not start. | Is the power of the connected component off or the connection disconnected? | Check whether the component is properly connected to this unit or the power supply. |
| The computer is not properly operated. | Is the corresponding IP address properly set? | Switch on the built-in DHCP server function of your router, or set up the network manually according to your network environment. |
| Is the IP address being automatically configured? | The automatic configuration process takes time. Please wait. |
| The audio/video files stored on components on the network, such as a computer, cannot be played back. | Is Windows Media Player 11, Windows Media Player 12, or DLNA-compatible digital media servers currently installed on your computer? | Install Windows Media Player 11, Windows Media Player 12, or DLNA-compatible digital media servers on your computer. |
| Are the audio files recorded in MP3, WAV (LPCM only), MPEG-4AAC, or WMA format? | Play back audio files recorded in MP3, WAV (LPCM only), MPEG-4 AAC, or WMA. Note that some audio files recorded in these formats may not be played back on this unit. |
| Are you attempting to play back an MPEG-4 AAC file on Windows Media Player 11? | Audio files recorded in MPEG-4 AAC cannot be played back on Windows Media Player 11. Try using another server. Refer to the operation manual supplied with your server. |
| The component connected to the network is not properly operated. | Is the device connected to the network in the standby state or sleep mode? | Try restarting the device connected to the network if necessary. |
| Is file sharing permitted on the component connected to the network? | Try changing the settings for the component connected to the network. |
| Has the folder stored on the component connected to the network been deleted or damaged? | Check the folder stored on the component connected to the network. |
| Are network connections restricted on the component connected to the network? | Check the computer's network settings, security settings, etc. |
| Cannot access Windows Media Player 11 or Windows Media Player 12. | In case of Windows Media Player 11: You are currently logged onto the domain through your computer with Windows XP or Windows Vista installed. In case of Windows Media Player 12: You are currently logged onto the domain through your computer with Windows 7 installed. | Instead of logging onto the domain, log onto the local machine. |
| Audio/Video playback is undesirably stopped or disturbed. | Was the audio or video file that is currently playing recorded in a format that can be played with the unit? | • Check whether the audio file was recorded in a format supported by this unit.
• Check whether the folder has been damaged or corrupted. Even audio files listed as playable on this unit may sometimes not be played back or displayed. |
| Is the LAN cable disconnected? | Connect the LAN cable properly. |
| Is there heavy traffic on the network with the Internet being accessed on the same network?. | Use 100BASE-TX to access the components on the network. |
| Is there a connection routed through a wireless LAN on the same network? | • There may be a shortage of bandwidth on the 2.4 GHz band used by the wireless LAN. Make wired LAN connections not routed through a wireless LAN.
• Install away from any devices emitting electromagnetic waves on the 2.4 GHz band (microwave ovens, game consoles, etc.). If this does not solve the problem, stop using other devices that emit electromagnetic waves. |
Wireless LAN
| Problem | Check | Remedy |
| Network cannot be accessed via wireless LAN. | Are the unit and wireless LAN router etc. too far apart, or is there an obstacle between them? | Improve the wireless LAN environment by taking steps such as moving the unit and wireless LAN router etc. closer together. |
| Is a microwave oven or other device generating electromagnetic waves near the wireless LAN environment? | Use the unit in a place away from microwave ovens or others device generating electromagnetic waves.Avoid using devices generating electromagnetic waves as much as possible when using the unit with a wireless LAN. |
| Are multiple wireless devices connected to the wireless LAN router? | When connecting multiple wireless devices, their IP addresses must be changed. |
| Are the connection settings between the unit and the wireless LAN router etc. set up correctly? | If the connection settings between the unit and the wireless LAN router etc. are not set up correctly, connection settings much be performed in order to connect the unit and the wireless LAN router etc. |
| Do the IP address settings for the unit and the wireless LAN router etc. (including DHCP settings) match? | Check the IP address settings of the unit and the wireless LAN router etc. (including the DHCP setting). If the unit's DHCP setting is on, turn the unit's power off, then turn the power back on. Check that the IP address of the unit matches the settings of the wireless LAN router etc. If the unit's DHCP setting is off, set an IP address matching the network of the wireless LAN router etc. For example, if the wireless LAN router's IP address is "192.168.1.1", set the unit's IP address to "192.168.1.XXX" (*1), the subnet mask to "255.255.255.0", and the gateway and DNS to "192.168.1.1". (*1) Set the "XXX" in "192.168.1.XXX" to a number between 2 and 248 that is not assigned to other devices. |
| Is the access point set to conceal the SSID? | In this case, the SSID may not be displayed on the access point list screen. If not, set the SSID etc. by setting the wireless LAN settings on the receiver manually. |
| Do the access point's security settings use WEP 152-bit length code key or shared key authentication? | The unit does not support WEP 152-bit length code key or shared key authentication. |
| Cannot connect with the Wi-Fi Direct/Miracast function. | Is the Wi-Fi Direct/Miracast Mode screen displayed on the TV or is READY displayed on the unit's display window? | Press Wi-Fi Direct on the remote control to switch to Wi-Fi Direct/ Miracast Mode. |
| Check the SSID and password in the Wi-Fi Direct/Miracast Mode screen. | If an update was performed in the Wi-Fi Direct Mode screen or the unit was restored to the default settings, the SSID and password will have changed. Enter the newly set SSID and password on the mobile device. |
| Is the mobile device compliant with Wi-Fi Direct or Miracast? | Only mobile devices that are compliant with Wi-Fi Direct or Miracast are supported. Ask the manufacturer of the corresponding device whether the mobile device is compliant with Wi-Fi Direct or Miracast. |
| • Press an input selection button to close the Wi-Fi Direct/Miracast Mode screen. Press Wi-Fi Direct again to display the Wi-Fi Direct/ Miracast Mode screen and then perform the operation. • Select [Refresh] on the Wi-Fi Direct/Miracast Mode screen and then try connecting again. |
| There is a connection on the mobile device but the mobile device video is not displayed on the TV (Miracast function). | Is the mobile device compliant with Miracast? | Only mobile devices that are compliant with Miracast are supported. Ask the manufacturer of the corresponding device whether the mobile device is compliant with Miracast. |
| The audio or video is interrupted (distorted) when using DRM, Wi-Fi Direct, or Miracast. | Is there a microwave oven or other device that generates electromagnetic waves near the unit? | Improve the wireless LAN environment by taking steps such as moving the unit and mobile devices etc. closer together. |
| Are the mobile device and unit far away from each other or is there an object between them? | Use the unit in a place away from microwave ovens or others device generating electromagnetic waves. Avoid using devices generating electromagnetic waves as much as possible when using the unit with a wireless LAN. |
| When using wireless LAN, Wi-Fi Direct or Miracast, depending on the environment (radiowave interference) during sending/receiving of a large volume of data such as HD quality image files and WAV 192 kHz/24 bit high quality audio files, images and sound may be interrupted during playback. |
Bluetooth
| Problem | Check | Remedy |
| The Bluetooth wireless technology device cannot be connected. | Are objects that emit electromagnetic waves in the 2.4 GHz band (microwave oven, wireless LAN device or Bluetooth wireless technology apparatus) near the unit? | If such as an object is near the unit, set the unit far from it. Or, stop using the object emitting the electromagnetic waves. |
| Is the Bluetooth wireless technology device too far from the unit or are obstructions set between the Bluetooth wireless technology device and the unit? | Set the Bluetooth wireless technology device and the unit so that the distance between them is within 10 m* and no obstructions exist between them.* The line-of-sight transmission distance is an estimate. Actual transmission distances supported may differ depending on surrounding condition. |
| Is the Bluetooth wireless technology device set to the communication mode supporting the Bluetooth wireless technology? | Check the setting of the Bluetooth wireless technology device. |
| Is pairing correct? Was the pairing setting deleted from this unit or Bluetooth wireless technology device? | Reset the pairing. |
| Does a Bluetooth wireless technology device support A2DP profile? | Check that the profile is correct. |
| The Bluetooth wireless technology device cannot be operated using the remote control of the unit. | | • To perform operation using the remote control of the unit, the Bluetooth device must support the Profile: AVRCP.• Operations performed by Bluetooth devices may vary for different devices.• Remote control operation cannot be guaranteed for all Bluetooth devices.For details, see page 37. |
| Cannot operate the unit from a Bluetooth receiver connected from the unit when there is BT Transmitter connection. | | Operation from a receiver is not possible because the BT Transmitter function of the unit is not compatible with AVRCP. |
Others
| Problem | Check | Remedy |
| Power does not turned on. | Is the power cord properly connected? | Plug the power cord securely into the power outlet.
Unplug the power cord, wait several seconds, then plug the power cord back in. |
| The unit's power turns off automatically. | Is [Auto Power Off] set to [10 min/20 min/30 min]? | If [Auto Power Off] is set to [10 min/20 min/30 min], the unit's power automatically turns off if no operation is performed for the set amount of time (page 49). |
| Is [Control] set to [On]? | The unit's power may turn off together with the power of the TV connected to the HDMI OUT terminal. If you do not want the unit's power to turn off when the TV's power is turned off, set [Control] to [Off] (page 47).
Note: If [Control] is set to [Off], sound will not be output from TV(ARC). |
| The unit's power turns on automatically. | Is [Control] set to [On]? | The unit's power may turn on together with the power of the TV connected to the HDMI OUT terminal. If you do not want the unit's power to turn on when the TV's power is turned on, set [Control] to [Off] (page 47).
Note: If [Control] is set to [Off], sound will not be output from TV(ARC). |
| Cannot be operated with the remote control. | Are you operating the remote control from a point too far away from the unit? | Operate from within 7 m of the remote control sensor. |
| Are the batteries dead? | Replace the batteries (page 7). |
| Settings I have made have been cleared. | ·Have you disconnected the power cord while the unit's power was on?
·Has there been a power failure? | Always press ☑ STANDBY/ON on the unit's front panel or ☑ STANDBY/ON on the remote control, check that POWER OFF has turned off from the unit's front panel display and wait for more than 10 seconds before disconnecting the power cord. Be particularly careful when the power cord is connected to the AC outlet on another device because the unit turns off in conjunction with the device. |
| USB (external storage) device does not work with this unit properly. | Is the USB device properly connected? | ·Turn the unit's power off, then turn the power back on.
·Turn the unit's power off, then reconnect the external storage device (page 26). |
| Is the USB device connected via an extension cable? | Do not use an extension cable. The unit may not work properly with it. |
| Is the external storage device connected to the USB port terminal via a memory card reader or USB hub? | External storage device may not work if connected to the USB port terminal via a memory card reader or USB hub. |
| Does the external storage device contain multiple partitions? | External storage devices may not be recognized if they contain multiple partitions. |
| Is the external storage device write-protected? | Turn the unit's power off, then disable the write-protection. |
| Is the external storage device's file system FAT16, FAT32 or NTFS? | Only external storage devices with a FAT16, FAT32 or NTFS file system can be used. |
| Some external storage devices may not operate. |
| Display window is dark. | | Press DIMMER on the remote and select the desired display brightness. |
| "OC ERROR" is displayed on the unit's display window. | | Unplug the unit and contact the Pioneer Customer Support Center. |
| The CONNECT indicator of the wireless subwoofer is flashing. (SBX-N700 only) | | Unplug the unit and contact the Pioneer Customer Support Center. |
Chapter 7
Appendix
Specifications
| General |
| Power requirements | AC 110 V to 240 V, 50 Hz/60 Hz (ASEAN model)
AC 220 V to 240 V, 50 Hz/60 Hz (Other models) |
| Power consumption | AV Speaker Bar (same for SBX-N700/SBX-N500) 45 W
(In Standby mode: Less than 0.5 W)
Wireless subwoofer (SBX-N700 only) 32 W
(In Standby mode: Less than 0.5 W) |
| Dimensions (W x H x D) | Without the height-adjustment feet attached:
900 mm x 86 mm (front) x 121 mm
* Height at rear: 70 mm
With the height-adjustment feet attached:
900 mm x 106 mm (front) x 121 mm
* Height at rear: 90 mm |
| Net Weight | 4.4 kg |
| Operating temperature | 5 °C to 35 °C |
| Operating humidity | 5 % to 85 % |
| USB bus power | DC 5V = 500 mA |
| Inputs/Outputs |
| HDMI/OUT (video/audio) | 19 pin (HDMI®/™ Connector) |
| DIGITAL IN (OPTICAL) | Optical jack x 2 (44.1 kHz, 48 kHz, 96 kHz sampling) |
| PORTABLE IN | 3.5 mm stereo jack |
| BT AUDIO | Complies with the A2DP standard (Class 2) |
| USB | 4 pin A Type x 1 |
| Amplifier |
| Rated power output (RMS) 10% |
| Total | 220 W (SBX-N700SB+ SBX-N700SW)
140 W (SBX-N500) |
| AV Speaker Bar (same for SBX-N700SB/SBX-N500) | Front: 35 W+35 W (L+R 2-channel simultaneous drive)/4 Ω
Subwoofer: 35 W+35 W (2-channel simultaneous drive)/4 Ω |
| Wireless subwoofer (SBX-N700 only) | 150 W/4 Ω |
| System |
| Signal system | Standard PAL(50 fps)/NTSC(60 fps) color TV system |
| LAN port | Ethernet jack×1, 10BASE-T/100BASE-TX |
| IR repeater output | 3.5 mm stereo jack |
| Wireless LAN |
| Compliant standards | IEEE 802.11a/b/g/n |
| Security | WEP, WPA, WPA2 |
| Frequency | 2,412 GHz to 2,472 GHz, 5,180 GHz to 5,320 GHz (ASEAN model)
2,412 GHz to 2,472 GHz, 5,745 GHz to 5,825 GHz (Other models) |
| Channels | Channel 1 to 13, 149 to 165 (ASEAN model)
Channel 1 to 13, 36 to 64 (Other models) |
| Data rate*
*These are the theoretical maximum values for the wireless standards, and they do not indicate the actual transfer rate. | 802.11n: Max. 300 Mbps
802.11g: 54, 48, 36, 24, 18, 12, 9, 6 Mbps (auto-sensing)
802.11b: 11, 5.5, 2, 1 Mbps (auto-sensing)
802.11a: Max. 54 Mbps |
| Speakers |
| • Front (left/right) |
| Type | Closed box type | Impedance Rated | 4 Ω |
| Speakers | 6.6 cm (cone type)× 1 | Playback frequency band | 100 Hz to 20 kHz |
| • Built-in subwoofer (left/right) |
| Type | Bass reflex type | Impedance Rated | 4 Ω |
| Speakers | 7.7 cm (cone type)× 1 | Playback frequency band | 45 Hz to 2 kHz |
| • Wireless subwoofer (SBX-N700SW only) |
| Type | Bass reflex floor type | Playback frequency band | 30 Hz to 1.5 kHz |
| Speakers | 16.5 cm (cone type)× 1 | Net Dimensions (W × H × D) | 200 mm×415 mm (including feet)×271 mm |
| Impedance Rated | 4 Ω | Net Weight | 6.7 kg |
- Design and specifications are subject to change without notice.
- All other product names, technology names, and company names contained in this document are trademarks or registered trademarks of PIONEER or their respective companies.
Maintenance
Handling the unit
When shipping the unit
Please save the original shipping carton and packing materials. If you need to ship the unit, for maximum protection, re-pack the unit as it was originally packed at the factory.
Keeping the exterior surfaces clean
- Do not use volatile liquids such as insecticide spray near the unit.
- Wiping with strong pressure may damage the surface.
- Do not leave rubber or plastic products in contact with the unit for a long period of time.
Cleaning the unit
To clean the unit, use a soft, dry cloth. If the surfaces are extremely dirty, use a soft cloth lightly moistened with a mild detergent solution. Do not use strong solvents such as alcohol, benzine, or thinner, as these might damage the surface of the unit.
About SBX-N700

Note
- When submitting the unit for repairs, please submit both the unit and subwoofer because operation of the entire system will need to be checked even in the case of a partial failure.
All information, data, documents, communications, downloads, files, text, images, photographs, graphics, videos, webcasts, publications, tools, resources, software, code, programs, applets, widgets, applications, products and other content ("Content") and all services and offerings ("Services") provided or made available by or through any third party (each a "Service Provider") is the sole responsibility of the Service Provider from whom it originated.
The availability of and access to Content and Services furnished by the Service Provider through the PIONEER Device are subject to change at any time, without prior notice, including, but not limited to the suspension, removal or cessation of all or any part of the Content or Services.
Should you have any inquiry or problem related to the Content or Services, you may refer to the Service Provider's website for the most up-to-date information. PIONEER is neither responsible nor liable for customer service related to the Content and Services. Any question or request for service relating to the Content or Services should be made directly to the respective Content and Service Providers.
Please note that PIONEER is not responsible for any Content or Services provided by the Service Provider or any changes to, removal of, or cessation of such Content or Services and does not warrant or guaranty the availability of or access to such Content or Services.
Manufacturer:
PIONEER CORPORATION
1-1, Shin-ogura, Saiwai-ku, Kawasaki-shi, Kanagawa 212-0031, Japan
EU Representative's:
Pioneer Europe NV
Haven 1087, Keetberglaan 1, 9120 Melsele, Belgium
http://www.pioneer.eu

Indoor use only
[+] SBX-N700, SBX-N500
English:
Hereby, Pioneer, declares that this [^*] is in compliance with the essential requirements and other relevant provisions of Directive 1999/5/EC.
Suomi:
Please refer to our website for information regarding software updates and service to this product.
U.K.
http://www.pioneer.co.uk/uk/content/support/support/upgrade.html
http://www.pioneer.eu/support
Australia, New Zealand and other Oceania area
http://www.pioneer.com.au
Hong Kong
Pioneer (HK) Limited - Customer Service Center
Unit 2, 17/F, Vanta Industrial Centre, 21-33 Tai Lin Pai Road, Kwai Chung, Hong Kong
(852) 3583 3288
https://www.pioneerhongkong.com.hk
Singapore
Pioneer Electronics AsiaCentre Pte Ltd
253 Alexandra Road (Komoco Building)#04-01, Lobby 2 Singapore 159936
(65) 6472-7555
http://www.pioneer.com.sg/firmwaredownload
Malaysia
Pioneer Technology (Malaysia) Sdn Bhd
16th Floor, Menara Uni. Asia, 1008, Jalan Sultan Ismail 50250, Kuala Lumpur, Malaysia
(03) 2697-2920
http://www.pioneer.com.sg/firmwaredownload
Thailand
Pioneer Electronics (Thailand) CO.,LTD
91/1 Floor 1&7 Chaiyo Building, Rama 9 Road, Huaykwang District Bangkok 10320, Thailand
(662) 6439-444
http://www.pioneer.com.sg/firmwaredownload
Taiwan
Pioneer High Fidelity Taiwan Co. Ltd
13th Floor, No.44, Chung Shan North Road, Sec.2 Taipei, Taiwan
(886 2) 2521-3166
http://www.pioneer-twn.com.tw
Indonesia
PT. Adab Alam Electronic
Jl. K.H. Zainul Arifin No. 13A Jakarta-Pusat Indonesia
(21) 6331-924
http://www.pioneer.com.sg/firmwaredownload

72-PSB700-ENGB1
© 2013 PIONEER CORPORATION.
All rights reserved.
PIONEER CORPORATION
1-1, Shin-ogura, Saiwai-ku, Kawasaki-shi, Kanagawa 212-0031, Japan
PIONEER ELECTRONICS (USA) INC.
P.O. BOX 1540, Long Beach, California 90801-1540, U.S.A. TEL: (800) 421-1404
PIONEER ELECTRONICS OF CANADA, INC.
340 Ferrier Street, Unit 2, Markham, Ontario L3R 2Z5, Canada TEL: 1-877-283-5901, 905-479-4411
PIONEER EUROPE NV
Haven 1087, Keetberlaan 1, B-9120 Melsele, Belgium TEL: 03/570.05.11
PIONEER ELECTRONICS ASIACENTRE PTE. LTD.
253 Alexandra Road, #04-01, Singapore 159936 TEL: 65-6472-7555
PIONEER ELECTRONICS AUSTRALIA PTY. LTD.
5 Arco Lane, Heatherton, Victoria, 3202, Australia, TEL: (03) 9586-6300
PIONEER ELECTRONICS DE MEXICO S.A. DE C.V.
Blvd.Manuel Avila Camacho 138 10 piso Col.Lomas de Chapultepec, Mexico, D.F. 11000 TEL: 55-9178-4270
K002*B5En