PD-10-K - CD Player PIONEER - Free user manual and instructions
Find the device manual for free PD-10-K PIONEER in PDF.
| Product type | CD/SACD player |
| Brand | Pioneer |
| Model | PD-10-K |
| Dimensions (W x H x D) | 435 mm x 128 mm x 329 mm |
| Weight | 5.2 kg |
| Power supply | AC 220–240 V, 50/60 Hz |
| Power consumption | 20 W (operation), 0.45 W (standby) |
| Compatible disc formats | CD, SACD (2 channels), CD-R/RW (CD-DA, MP3, WMA), DSD (DSF on DVD-R/RW) |
| Audio file formats | MP3, WMA (on CD-R/RW and USB), DSD (DSF) |
| Playback functions | Normal, repeat (track/disc), random, programmed (24 tracks), direct search, fast forward/backward, skip |
| Advanced audio functions | Sound Retriever (compression compensation), Pure Audio (high-fidelity mode, disables digital output) |
| Audio outputs | Analog RCA stereo, optical digital (Toslink), coaxial digital (RCA) |
| Remote control | Yes, included (AAA batteries supplied) |
| Front USB port | Audio file playback (USB drives) – FAT16/FAT32, no hub |
| Display | Digital screen (track number, time, playback mode) |
| Brightness dimming | Yes, 3 levels |
| Auto power off | After 30 minutes of inactivity (except iPod mode) |
| Operating temperature | +5°C to +35°C |
| Operating humidity | 5% to 85% (no condensation) |
| Included accessories | Remote control, AAA batteries (x2), RCA audio cable, power cord, warranty card, instruction manual |
| Safety | Class 1 laser product, do not open, avoid water and open flames, allow ventilation space (10 cm) |
| Maintenance | Clean with a soft dry cloth; do not use alcohol, thinner, or chemical products |
| Repairability | No user-serviceable parts – refer to qualified service personnel |
Frequently Asked Questions - PD-10-K PIONEER
User questions about PD-10-K PIONEER
0 question about this device. Answer the ones you know or ask your own.
Ask a new question about this device
Download the instructions for your CD Player in PDF format for free! Find your manual PD-10-K - PIONEER and take your electronic device back in hand. On this page are published all the documents necessary for the use of your device. PD-10-K by PIONEER.
USER MANUAL PD-10-K PIONEER
Thank you for buying this Pioneer product.
Please read through these operating instructions so you will know how to operate your model properly. After you have finished reading the instructions, put them away in a safe place for future reference..
IMPORTANT

The lightning flash with arrowhead symbol, within an equilateral triangle, is intended to alert the user to the presence of uninsulated "dangerous voltage" within the product's enclosure that may be of sufficient magnitude to constitute a risk of electric shock to persons.
CAUTION
RISK OF ELECTRIC SHOCK DO NOT OPEN
CAUTION:
TO PREVENT THE RISK OF ELECTRIC SHOCK,DO NOT REMOVE COVER (OR BACK).NO USER-SERVICEABLE PARTS INSIDE.REFER SERVICING TO QUALIFIED SERVICE PERSONNEL.

The exclamation point within an equilateral triangle is intended to alert the user to the presence of important operating and maintenance (servicing) instructions in the literature accompanying the appliance.
D3-4-2-1-1_A1_En
European model only
Information for users on collection and disposal of old equipment and used batteries
(Symbol for equipment)

Symbol examples) for batteries


Pb
These symbols on the products, packaging, and/or accompanying documents mean that used electrical and electronic products and batteries should not be mixed with general household waste.
For proper treatment, recovery and recycling of old products and used batteries, please take them to applicable collection points in accordance with your national legislation.
By disposing of these products and batteries correctly, you will help to save valuable resources and prevent any potential negative effects on human health and the environment which could otherwise arise from inappropriate waste handling.
For more information about collection and recycling of old products and batteries, please contact your local municipality, your waste disposal service or the point of sale where you purchased the items.
These symbols are only valid in the European Union.
For countries outside the European Union:
If you wish to discard these items, please contact your local authorities or dealer and ask for the correct method of disposal.
K058a_A1_En
WARNING
This equipment is not waterproof. To prevent a fire or shock hazard, do not place any container filled with liquid near this equipment (such as a vase or flower pot) or expose it to dripping, splashing, rain or moisture.
D3-4-2-1-3_A1_En
WARNING
Before plugging in for the first time, read the following section carefully.
The voltage of the available power supply differs according to country or region. Be sure that the power supply voltage of the area where this unit will be used meets the required voltage (e.g., 230 V or 120 V) written on the rear panel.
D3-4-2-1-4*A1En
WARNING
To prevent a fire hazard, do not place any naked flame sources (such as a lighted candle) on the equipment.
D3-4-2-1-7a_A1_En
VENTILATION CAUTION
When installing this unit, make sure to leave space around the unit for ventilation to improve heat radiation (at least 10cm at top, 10cm at rear, and 10cm at each side).
WARNING
Slots and openings in the cabinet are provided for ventilation to ensure reliable operation of the product, and to protect it from overheating. To prevent fire hazard, the openings should never be blocked or covered with items (such as newspapers, table-cloths, curtains) or by operating the equipment on thick carpet or a bed.
D3-4-2-1-7b*A1En
Operating Environment
Operating environment temperature and humidity: +5^ to +35^ (+41^ to +95^) ; less than 85% RH (cooling vents not blocked)
Do not install this unit in a poorly ventilated area, or in locations exposed to high humidity or direct sunlight (or strong artificial light)
D3-4-2-1-7c*A1En
If the AC plug of this unit does not match the AC outlet you want to use, the plug must be removed and appropriate one fitted. Replacement and mounting of an AC plug on the power supply cord of this unit should be performed only by qualified service personnel. If connected to an AC outlet, the cut-off plug can cause severe electrical shock. Make sure it is properly disposed of after removal. The equipment should be disconnected by removing the mains plug from the wall socket when left unused for a long period of time (for example, when on vacation).
D3-4-2-2-1a_A1_En
CAUTION
The O/I STANDBY/ON switch on this unit will not completely shut off all power from the AC outlet. Since the power cord serves as the main disconnect device for the unit, you will need to unplug it from the AC outlet to shut down all power. Therefore, make sure the unit has been installed so that the power cord can be easily unplugged from the AC outlet in case of an accident. To avoid fire hazard, the power cord should also be unplugged from the AC outlet when left unused for a long period of time (for example, when on vacation).
D3-4-2-2-2a*A1_EN
This product is for general household purposes. Any failure due to use for other than household purposes (such as long-term use for business purposes in a restaurant or use in a car or ship) and which requires repair will be charged for even during the warranty period.
K041_A1_En
POWER-CORD CAUTION
Handle the power cord by the plug. Do not pull out the plug by tugging the cord and never touch the power cord when your hands are wet as this could cause a short circuit or electric shock. Do not place the unit, a piece of furniture, etc., on the power cord, or pinch the cord. Never make a knot in the cord or tie it with other cords. The power cords should be routed such that they are not likely to be stepped on. A damaged power cord can cause a fire or give you an electrical shock. Check the power cord once in a while. When you find it damaged, ask your nearest PIONEER authorized service center or your dealer for a replacement.
S002*A1En
CAUTION
This product is a class 1 laser product classified under the Safety of laser products, IEC 60825-1:2007.

D58-5-2-2a_A1_En
Contents
01 Before you start
Disc/content format playback compatibility. 4
What's in the box. 4
Loading the batteries in the remote control. 4
Using the remote control. 4
02 Connecting up
Analog audio output connections 5
Digital audio output connections. 5
Using centralized control with other Pioneer components (PD-30 only) 5
Plugging in 5
03 Controls and displays
Remote control 6
Rear panel. 6
Front panel 7
Front panel display 7
04 Playback
Playing discs 8
Set the power to Standby. 8
Fast forward/Fast reverse 8
Skip function 8
Direct search
(designate a specific track for playback).8
Repeat playback 8
Random playback 8
Programmed playback (Play tracks in a predetermined order) 8
View disc data. 8
iPod/iPhone/iPad playback
(PD-30 only). 9
Confirm what iPod/iphone/iPad models are supported .9
Playing your iPod/iPhone/iPad 9
Playing files stored on USB storage devices .10
05 Using advanced functions
Playing with high-fidelity sound 11
Sound Retriever. 11
Pure Audio 11
Changing the playback area (layer)
of an SACD/CD 11
Adjusting overall display illumination 11
Auto power down (automatically sets power to standby). 11
Playback functions 11
06 Additional information
Playable disc 12
Playable file formats 12
Cautions on use. 13
Troubleshooting. 14
Specifications 15
Chapter 1:
Before you start
Disc/content format playback compatibility
Discs playable on this player are as shown below.
- SACD (Super Audio CD)* (2-channel area only)
CD -
DSD disc
-
"Super Audio CD" is a registered trademark.

Note
- This unit does not permit playback of the multi-channel areas of SACD discs.
- This unit's DIGITAL OUT terminals do not output sound from SACD and DSD discs, nor from iPod/ iPhone/iPad devices.
- When a disc is loaded, turning on the power will not cause playback to automatically start. As a result, timed playback is not possible even if the unit is connected to a timer.
About DualDisc playback
A DualDisc is a new two-sided disc, one side of which contains DVD content video, audio, etc. while the other side contains non-DVD content such as digital audio material. The non-DVD, audio side of the disc is not compliant with the CD Audio specification and therefore may not play. For more detailed information on the DualDisc specification, please refer to the disc manufacturer or disc retailer.
Discs that cannot be played
DVD-Video
DVD-Audio
CD-G
Video CD
- DTS CD
It is possible that some discs other than the ones listed above may not be playable either.
What's in the box
Please confirm that the following accessories are in the box when you open it.
Remote control x1
AAA/IEC R03 dry cell batteries x2
RCA audio cable (red/white plugs) x1
Power cord
Warranty card
- Operating instructions (This document)

Note
- Illustrations featured in the Operating Instructions may have been modified or simplified for ease of explanation, and may therefore differ from the actual product appearance.
The illustrations used here are mainly of the PD-30.
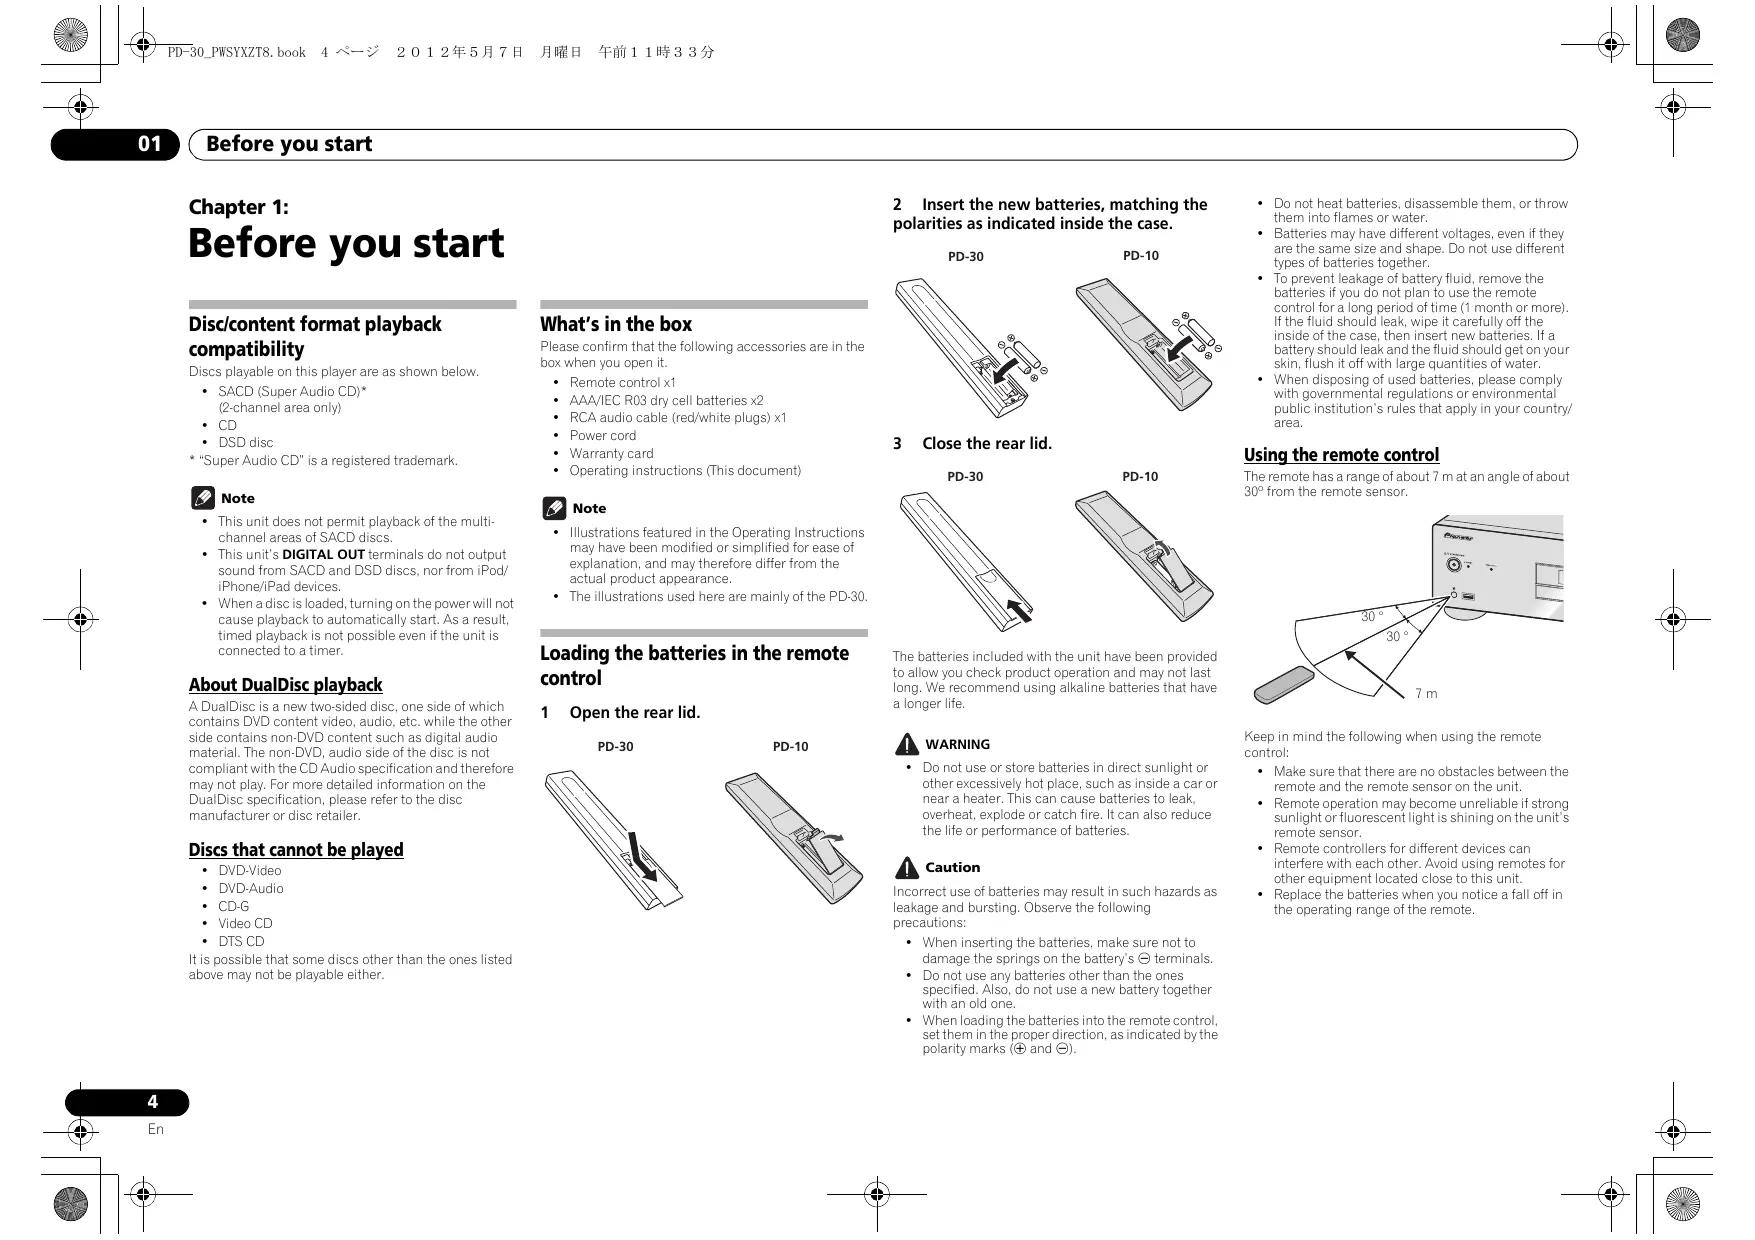
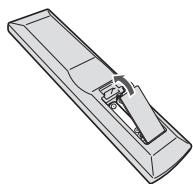
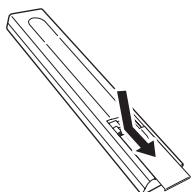
Loading the batteries in the remote control
1 Open the rear lid.

PD-30
PD-10
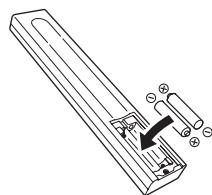
2 Insert the new batteries, matching the polarities as indicated inside the case.
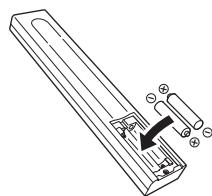
PD-30
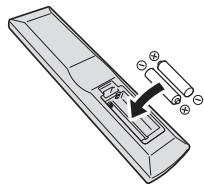
PD-10
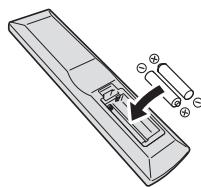
3 Close the rear lid.
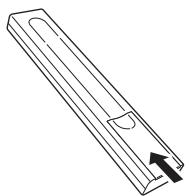
PD-30
PD-10
The batteries included with the unit have been provided to allow you check product operation and may not last long. We recommend using alkaline batteries that have a longer life.

WARNING
- Do not use or store batteries in direct sunlight or other excessively hot place, such as inside a car or near a heater. This can cause batteries to leak, overheat, explode or catch fire. It can also reduce the life or performance of batteries.

Caution
Incorrect use of batteries may result in such hazards as leakage and bursting. Observe the following precautions:
- When inserting the batteries, make sure not to damage the springs on the battery's terminals.
- Do not use any batteries other than the ones specified. Also, do not use a new battery together with an old one.
-
When loading the batteries into the remote control, set them in the proper direction, as indicated by the polarity marks (⊕ and ⊙).
-
Do not heat batteries, disassemble them, or throw them into flames or water.
- Batteries may have different voltages, even if they are the same size and shape. Do not use different types of batteries together.
- To prevent leakage of battery fluid, remove the batteries if you do not plan to use the remote control for a long period of time (1 month or more). If the fluid should leak, wipe it carefully off the inside of the case, then insert new batteries. If a battery should leak and the fluid should get on your skin, flush it off with large quantities of water.
- When disposing of used batteries, please comply with governmental regulations or environmental public institution's rules that apply in your country/area.
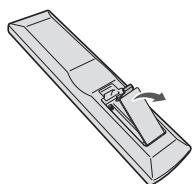
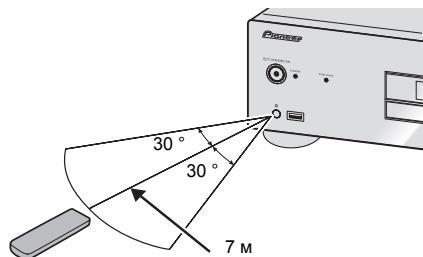
Using the remote control
The remote has a range of about 7m at an angle of about 30^ from the remote sensor.
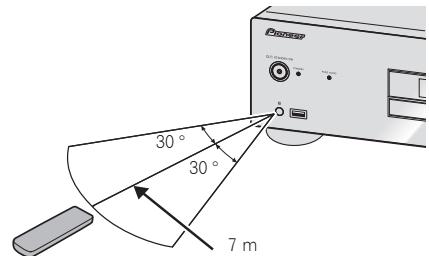
Keep in mind the following when using the remote control:
- Make sure that there are no obstacles between the remote and the remote sensor on the unit.
Remote operation may become unreliable if strong sunlight or fluorescent light is shining on the unit's remote sensor. - Remote controllers for different devices can interfere with each other. Avoid using remotes for other equipment located close to this unit.
- Replace the batteries when you notice a fall off in the operating range of the remote.
Chapter 2:
Connecting up

Caution
- Before making or changing the connections, switch off the power and disconnect the power cord from the AC outlet.
- Connect the power cord after all the connections between devices have been completed.
Analog audio output connections
By connecting this unit's analog audio output to the analog audio input of an amplifier, you can use the amplifier to enjoy analog audio produced from this unit.
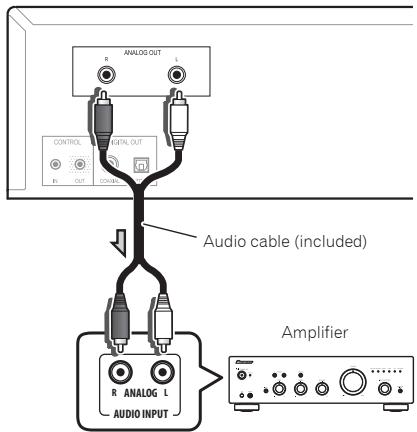
PD-30's rear panel
Digital audio output connections
If desired, the digital audio output from this unit can be connected to an AV amplifier or digital recording device (CD recorder, MD, etc.).
- This unit's DIGITAL OUT terminals do not output sound from SACD and DSD discs, nor from iPod/ iPhone/iPad devices.
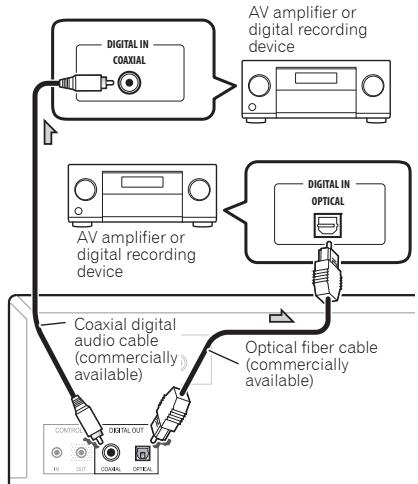
PD-30's rear panel

Important
Care in the handling of optical fiber cables
- Do not allow optical fiber cables to be bent at sharp angles. When storing optical fiber cables, roll in coils of at least 15cm diameter.
- When connecting optical fiber cables, align the connectors correctly and insert fully. If the orientation of the cable connector is incorrect and excessive force is applied in the attempt to fasten the connector, the connector may be deformed, preventing the shutter from closing when the cable is removed.

Note
- For digital audio output, CDs played on this unit must produce linear PCM signals with a sampling rate up to 44.1kHz and quantitative bits up to 16 bits (some discs may not be playable depending on the connected component and environment). For information about other files, see page 12.
Using centralized control with other Pioneer components (PD-30 only)
This unit and other Pioneer components equipped with CONTROL IN/OUT jacks can be controlled with a single remote control by aiming the remote toward the signal receptor on the AV amplifier or other component. This also allows remote control of components not equipped with a remote sensor, or installed in places where the component's remote sensor cannot be accessed.
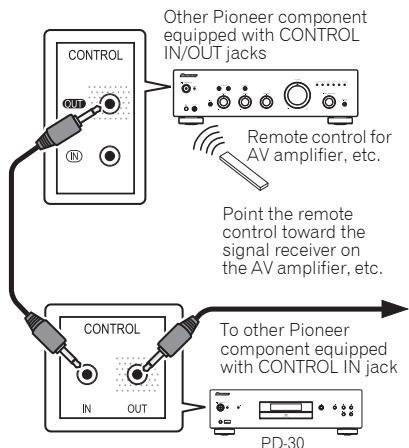

Note
- For connections use a commercially available monaural miniplug cord (without resistor).
- When connecting the CONTROL IN/OUT jacks, commercially available audio cords must also be used to make analog connections. Merely connecting the CONTROL IN/OUT jacks alone will not allow proper system control.
- When a control cord is connected to the PD-30's CONTROL IN jack, the unit cannot be controlled by pointing the remote control at the PD-30 (the remote sensor is automatically disabled).
Plugging in

Important
- If it is necessary to detach the power cord, first be sure to press the O/I STANDBY/ON button on the front panel of the unit so the PD-30 is turned OFF or the PD-10 is in standby mode before detaching the cord.
- Confirm that the [-OFF-] indicator is not lighted in the main unit's front panel display before disconnecting the power cord. If the power cord is disconnected while the [-OFF-] indicator is still lighted, the unit's settings may revert to factory defaults.
- When going on a trip or otherwise not using the unit for an extended period, always disconnect the power cord from its outlet.

Caution
- Do not use any power cord other than the one supplied with this unit.
- Do not use the supplied power cord for any purpose other than that described below.
After you've finished making all connections, plug the unit into an AC outlet.
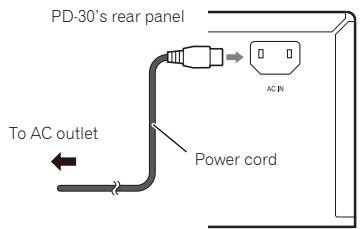
1 Plug the supplied power cord into the AC IN socket on the rear of the unit.
2 Plug the other end into AC outlet.
Chapter 3:
Controls and displays
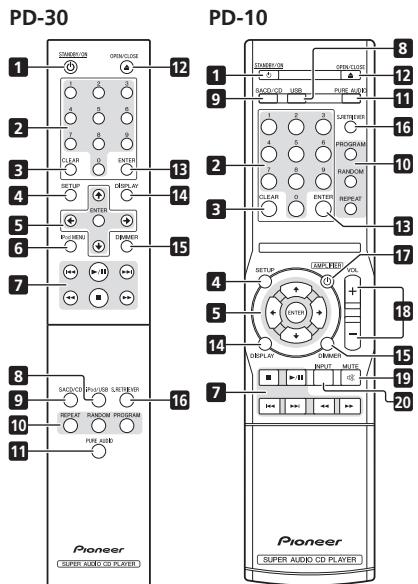
Remote control
1 STANDBY/ON
Switches the amplifier between standby and on.
2 Number buttons
Use these buttons when you wish to specify a certain track for playback. Use the number buttons to select the track, then press ENTER to confirm the selection.
3 CLEAR
Press to clear the contents set for programmed playback (page 8).
4 SETUP
Use to set the auto power down function (page 11).
5 / / /
Use these to select items, change settings and move the cursor.
ENTER
Use this to implement the selected item or enter a setting that you have changed.
6 iPod MENU (PD-30 only)
Use when operating the iPod/iPhone/iPad menu.
7
Press to return to the beginning of the currently playing track. Press twice to return to the beginning of the previous track.
11
Press to start playback. During playback, pause/ unpause playback.
#
Press during playback to skip ahead to the beginning of the next track.
#
Press to perform fast reverse on the currently playing track. If the button is pressed again during fast reverse, the reversing speed changes in four steps.
#
Press to stop playback.
#
Press to perform fast forward on the currently playing track. If the button is pressed again during fast forward, the fast forward speed will change in four steps.
8 iPod/USB (PD-30) USB (PD-10)
Press to switch the unit's input to iPod or USB (page 9,10).
9 SACD/CD
Press to switch the unit's input to SACD/CD. In the case of hybrid SACD discs, if this button is pressed when playback is stopped, the disc's playback area changes (page 11).
10 REPEAT
Press to initiate repeat play (page 8).
RANDOM
Press to initiate random play (page 8).
PROGRAM
Press to initiate programmed playback (page 8).
11 PURE AUDIO
Press this button to activate the Pure Audio mode. In this mode, audio playback is performed with greatest fidelity to the original sounds (page 11).
12 ▲ OPEN/CLOSE
Press to open and close the disc tray (page 8).
13 ENTER
Use this to implement the selected item or enter a setting that you have changed.
14 DISPLAY
Press to display various data about the disc, including elapsed playing time and remaining playing time (page 8).
15 DIMMER
Press to change the illumination levels for the main unit's front panel display and indicators (page 11).
16 S.RETRIEVER
Press to alternate between sound retriever function settings(page 11).
17 念 AMPLIFIER (PD-10 only)
Press to switch the power between ON and STANDBY on a Pioneer AV amplifier.
18 VOLUME + / - (PD-10 only)
Press these buttons to adjust the sound volume of a Pioneer AV amplifier.
19 MUTE (PD-10 only)
Press to mute the sound on a Pioneer AV amplifier. Press again to cancel the muting function.
20 INPUT (PD-10 only)
Press to switch the input on a Pioneer AV amplifier.
Rear panel
See page 5 for details regarding connections.
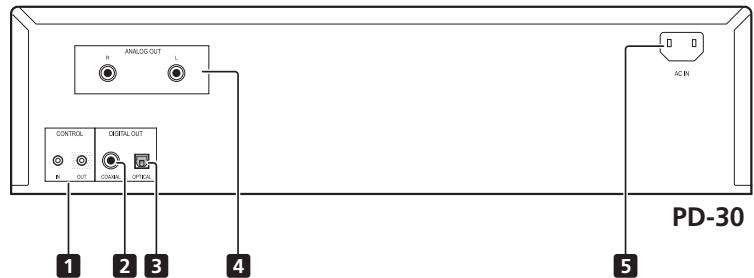
1 CONTROL IN/OUT jack (PD-30 only)
2 DIGITAL OUT (COAXIAL) terminal
3 DIGITAL OUT (OPTICAL) terminal
4 ANALOG OUT terminals
5 AC IN jack
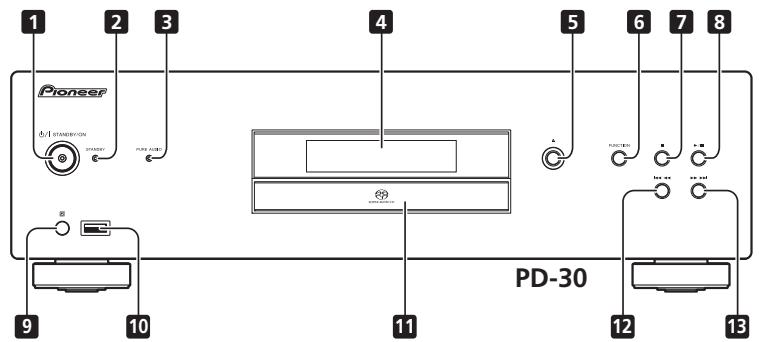
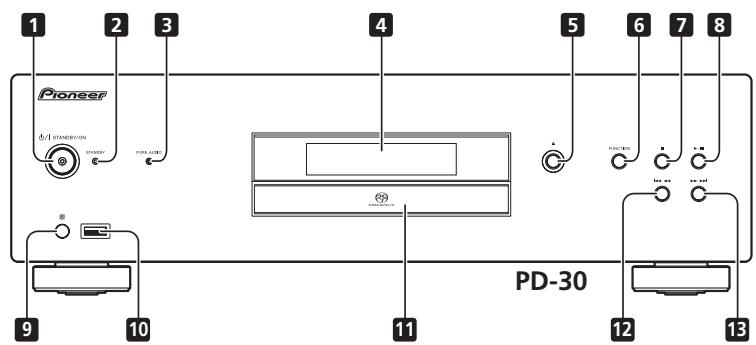
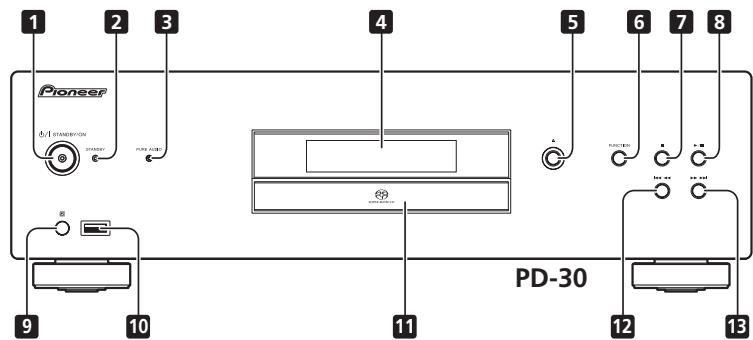
Front panel
1 1STANDBY/ON
When power is turned on, the power indicator in the center of the button will light.
- On the PD-30 model, this switches the amplifier between off and on.
To turn power ON, press the button until it remains in the depressed position. - On the PD-10 model, this switches the amplifier between standby and on.
2 STANDBY indicator
Lights when power is in the STANDBY mode.
3 PURE AUDIO indicator
Lights when Pure Audio function is ON (page 11).
4 Front panel display
(See the following description.)

Press to open and close the disc tray (page 8).
6 FUNCTION
Use to change the input source. The source changes as below.
DISC iPod*1/USB Return to the beginning
Undisplayed).
*1 PD-30 only

Press to stop playback.
8 /11
Press to start playback. During playback, pause/ unpause playback.
9 Remote sensor
Receives the signals from the remote control (page 4).
10 iPod/USB port (PD-30) USB port (PD-10)
Use to connect your Apple iPod/iPhone/iPad (page 9) or connect a USB device (page 10).
11 Disc tray (page 8)

Press to return to the beginning of the currently playing track. Press twice to return to the beginning of the previous track. When the button is held depressed, the currently playing track will be reversed at fast speed.
- When pressed again during fast reverse, the speed of fast reverse will change in four steps.

Press to advance to the beginning of the next track.
When the button is held depressed, the currently playing track will be forwarded at fast speed.
- When pressed again during fast forward, the speed of fast forward will change in four steps.
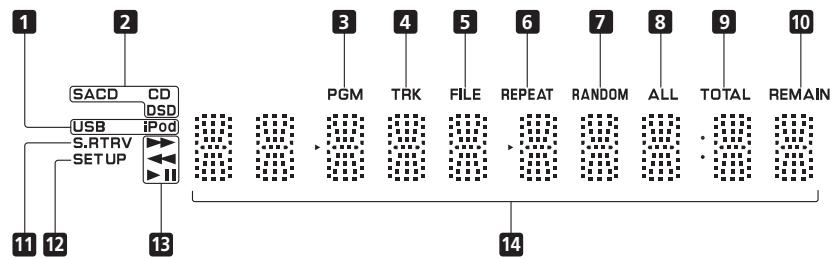
Front panel display
1 USB/iPod
Lights during playback of USB flash memory or iPod/ iPhone/iPad.
2 SACD/CD/DSD
The indicator lights corresponding to the currently playing disc type.
3 PGM
Lights during programmed playback (page 8).
4 TRK
Lights when displaying the track number together with either the elapsed playing time or remaining playing time.
5 FILE
Lights when a file name is displayed.
6 REPEAT
Lights during repeat playback (page 8).
7 RANDOM
Lights during random playback (page 8).
8 ALL
Lights during disc-repeat playback (page 8).
9 TOTAL
Lights when the disc's remaining playing time is displayed.
10 REMAIN
Lights when displaying the remaining playing time for track or disc.
11 S.RTRV
Lights when the sound retriever function is ON (page 11).
12 SET UP
Lights when setting the auto power-down function (page 11).

Lights during fast forward.

Lights during fast reverse.

Lights during playback.

Lights during pause mode.
14 Character display
Chapter 4:
Playback
The functions that can be used differ according to the type of disc and file. In some cases, some of the functions cannot be used. See Playback functions on page 11.
Playing discs
1 Press the front panel's /I STANDBY/ON button to turn power ON to the unit.
- With the PD-30, turn on the power by pressing the POWER button in until it remains at the depressed position.
Side view of front panel
2 Press the button to open the disc tray and set the disc in place.
- Set the disc with the imprinted side facing up.
3 Press the / button to begin playback.
- To pause playback, press the button.
- To stop playback, press the button.

Note
Steps 2 and 3 can be performed via the remote control in the same way as for the main unit's front panel controls.
Set the power to Standby
Remove any disc loaded before setting the power switch to STANDBY mode.
Press the remote control's STANDBY/ON button.
The next time you wish to turn on the power, press the remote control's STANDBYON button.
- In the case of the PD-30, pressing the front panel / I STANDBY/ON button sets the unit to power OFF, not STANDBY mode. To turn on the power again, press the front panel's / I STANDBY/ON button.

Note
- If the power cord is disconnected when the unit is in the standby mode the unit will turn off, but when the cord is then reconnected, the unit will not automatically turn on. After reconnecting the power cord, press the remote control's
STANDBY/ON button to turn the power on.


Fast forward/Fast reverse
During playback, press the
or button.
Each time the button is pressed the forward or reverse speed is changed
- To return to the normal play function, press the
/ button.
Skip function
During playback, press the
or 口 button.
Playback will skip ahead or backwards the number of tracks corresponding to the times the is pressed.


button
1
:
ACK
m = 311 ;
9
the
- 实验原理
ENTER
()
Direct search (designate a specific track for playback)
Using the number buttons, input the desired track number,
then press the ENTER button to selection.
Even if the ENTER button is not pressed, playback will begin automatically after a 5-second interval (this does not apply to programmed playback).
ENTER
ENTER
()
Repeat playback
Repeat play can be performed for the currently playing single track, or for all tracks on the entire disc.
During playback, press the REPEAT button.
REPEAT

- Repeat play will begin, and the [REPEAT] indicator will light on the unit's front panel display. Press the button again to alternate the type of repeat play between single-track repeat and disc (all-track) repeat as follows:
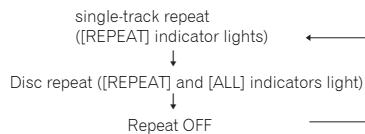

Note
- The repeat play function is canceled when disc playback is stopped.
Random playback
All tracks on the disc are selected and played in random order, until each track has been played once.
During playback, press the RANDOM button.
Random playback starts, and the [RANDOM] lights in the main unit's front panel display.
RANDOM


Note
- Random playback continues until the disc stops, or until the RANDOM button is pressed once again.
- The random playback function cannot be used simultaneously with programmed playback.
- If the button is pressed during random playback, play skips ahead to the next randomly selected track. If the button is pressed, playback returns to the beginning of the currently playing track and starts again.
Programmed playback (Play tracks in a predetermined order)
This function allows you to program up to 24 tracks for playback in the order selected.
1 From the stop mode, press the PROGRAM button.
The [PGM] indicator will light in the unit's front panel display.
2 Use the number buttons to number of the desired track, followed by the ENTER button.
PROGRAM

Example: To select track 15, press the 1 and 5 buttons, then press ENTER. In the event you make a mistake, press the CLEAR button.
ENTER

3 Repeat step 2 to input the numbers of all desired tracks.
4 Press the / button.
Playback will begin in the order the tracks have been programmed. If you wish to add other tracks, repeat steps 1 and 2.


Note
- If the CLEAR button is pressed when the disc is stopped, all programmed tracks will be cancelled.
- To clear programmed tracks, from the stop mode, press the PROGRAM button followed by the CLEAR button. The programmed tracks will be cancelled, beginning with the last one programmed.
A "pause" cannot be programmed. - The contents of programmed playback (all-track repeat) can be repeated. Just press the REPEAT button after beginning programmed playback (see at left).
- Single-track repeat cannot be performed during programmed playback.
- Random playback cannot be used during programmed playback.
- If the button is pressed during programmed playback, play will jump ahead to begin playback of the next programmed track.
After playback has stopped, to begin the same programmed playback again, press the PROGRAM button, followed by the button.
View disc data
During playback, press the DISPLAY button
DISPLAY

Various data, including elapsed and remaining playing times will be displayed.
Depending on the disc, pressing the DISPLAY button multiple times will cause the display to cycle through different data contents.

Note
- Displays file name (first 8 characters) when playing AAC files (PD-30 only), WMA/MP3 files, or files on DSD discs. Depending on the characters used, however, the display may not be entirely correct.
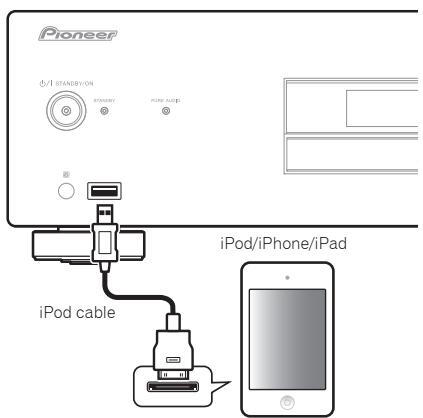
iPod/iPhone/iPad playback (PD-30 only)
Merely by connecting your iPod/iPhone/iPad to this unit, you can enjoy high-quality sound from your iPod/iPhone/ iPad.
Confirm what iPod/iPhone/iPad models are supported
The iPod/iPhone/iPad playable on this unit are shown below.
| iPod/iPhone/iPad | Audio | Control |
| iPod nano 2/3/4/5/6G | ✓ | ✓ |
| iPod touch 1/2/3/4G | ✓ | ✓ |
| iPhone | ✓ | ✓ |
| iPhone 3G/3GS | ✓ | ✓ |
| iPhone 4/4S | ✓ | ✓ |
| iPad | ✓ | ✓ |
| iPad 2 | ✓ | ✓ |
- This system has been developed and tested for the software version of iPod/iPhone/iPad indicated on the website of Pioneer.
- Installing software versions other than indicated on the website of Pioneer to your iPod/iPhone/iPad may result in incompatibility with this system.

Note
- Pioneer does not guarantee that this unit plays iPod/iPhone/iPad models other than the ones specified.
- Some functions may be restricted depending on the model or software version.
- iPod/iPhone/iPad is licensed for reproduction of non-copyrighted materials or materials the user is legally permitted to reproduce.
- Features such as the equalizer cannot be controlled using this system, and we recommend switching the equalizer off before connecting.
- Pioneer cannot under any circumstances accept responsibility for any direct or indirect loss arising from any inconvenience or loss of recorded material resulting from iPod/iPhone/iPad failure.
- For detailed instructions on using the iPod/iPhone/iPad, please refer to the manual supplied with the iPod/iPhone/iPad.
Playing your iPod/iPhone/iPad
1 Press iPod/USB on the remote control to select iPod as the input source.
Press the remote control's iPod/USB button.
- You can also perform the same operation by pressing the FUNCTION on the front panel repeatedly.
2 Connect your iPod/iPhone/iPad.
Connect your iPod/iPhone/iPad to the USB port on the unit's front panel. Use the iPod cable supplied with your iPod/iPhone/iPad for the connection.
- For the cable connection, also refer to the operating instructions for your iPod/iPhone/iPad.
iPod/USB
The following operations are possible for iPod/iPhone/ iPad.
| Button | What it does |
| ▶/II | Starts playback. During playback, pause/unpause playback. |
| ■ | Pauses playback. |
| I← | Press to skip to the start of the current file, then previous files. |
| ← | Hold depressed for fast reverse. |
| ▶I | Press to skip to the next file. |
| ▶ | Hold depressed for fast forward. |
| RANDOM | The currently selected iPod/iPhone/iPad files are played back in random order (shuffle play). |
| REPEAT | The currently selected iPod/iPhone/iPad files are played back repeatedly.1 |
| iPod MENU | Use when operating the iPod/iPhone/iPad menu. |
| ↑/↓/ENTER | Use to perform iPod/iPhone/iPad menu operations. |
1 Each time you press REPEAT the repeat modes changes as below.
Repeat 1 Repeat all Normal playback
Repeat 1: Repeats a file currently played back.
Repeat all:Repeats all files.

Important
If this unit cannot play your iPod/iPhone/iPad, perform the following troubleshooting checks:
- Check whether the iPod/iPhone/iPad is supported by this unit.
- Reconnect the iPod/iPhone/iPad to the unit. If this doesn't seem to work, try resetting your iPod/ iPhone/iPad.
- Check the iPod/iPhone/iPad software is supported by this unit.
If the iPod/iPhone/iPad cannot be operated, check the following items:
- Is the iPod/iPhone/iPad connected correctly? Reconnect the iPod/iPhone/iPad to the unit.
- Is the iPod/iPhone/iPad experiencing a hangup? Try resetting the iPod/iPhone/iPad, and reconnect it to the unit.

Note
- iPod/iPhone/iPad recharging occurs whenever an iPod/iPhone/iPad is connected to this unit. (Recharging is enabled only when the unit's power is turned ON.) (does not apply when pure audio function is ON)
- When input is switched from iPod to another function, the iPod/iPhone/iPad's playback will be stopped automatically.
Playing files stored on USB storage devices
1 Press USB on the remote control to select USB as the input source.
iPod/USB

Press the remote control's iPod/USB button (PD-30) or press the remote control's USB button (PD-10).
USB
- You can also perform the same operation by pressing the FUNCTION on the front panel repeatedly.
2 Connect the USB storage device.
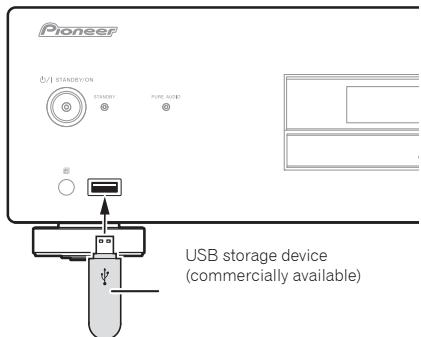
3 Press the / button to begin playback.
To pause playback, press the button.
- To stop playback, press the button.
You can perform the following operations. Note that some buttons are not available for operation depending on the category currently being played back.
| Button | What it does |
| ▶/II | Starts playback. During playback, pause/unpause playback. |
| ■ | Stops playback. |
| I←↓ | Press to skip to the start of the current file, then previous files. |
| ←↓ | Press for fast reverse. Each time button is pressed, reverse speed changes in four steps. |
| ▶↑ | Press to skip to the next file. |
| ▶> | Press for fast forward. Each time button is pressed, forward speed changes in four steps. |
| RANDOM | The currently selected files are played back in random order (shuffle play). |
| REPEAT | The currently selected files are played repeatedly.1 |
1 Each time you press REPEAT the repeat modes changes as below.
Repeat 1 Repeat all Normal playback
Repeat 1: Repeats a file currently played back.
Repeat all: Repeats all files.
When the auto power down function is set to ON, and input is set for USB memory playback, if playback from the USB memory device stops for 30 minutes without other operation being performed, the power will automatically switch to standby.

Note
This unit may not recognize the USB storage device, play files or supply power to the USB storage device. For details, see Additional information on page 12.
- Pioneer does not guarantee that any file recorded on a USB storage device will play or that power will be supplied to a USB storage device. Also note that Pioneer will accept no responsibility whatsoever for loss of files on USB storage devices caused by connection to this unit.
- This unit does not support use of a USB hub.
Chapter 5: Using advanced functions
The functions that can be used differ according to the type of disc and file. In some cases, some of the functions cannot be used. See Playback functions on the right column.
Playing with high-fidelity sound
Sound Retriever
When compressed sound signals are decompressed for playback, some parts experience dropouts. By setting the sound retriever function to ON, compensation is added for those losses, thus producing richer, more sumptuous sound.
Press the S.RETRIEVER button.
S.RETRIEVER

Each time the button is pressed, the function will change as follows: S.RTRV: OFF S.RTRV: LOW S.RTRV: HI Returns to original status
- The sound retriever function is disabled when the pure audio function is ON.
Pure Audio
This function disables digital audio output and plays analog audio with high fidelity. When set to ON, the display shows no indicators. The factory default condition is OFF.
Press the PURE AUDIO button.
PURE AUDIO

Press again to turn the function OFF.
- When this function is set to ON and the main unit's input is switched to SACD/CD, the PURE AUDIO indicator will light on the front panel. During disc playback, the front panel display turns OFF.
- When the PURE AUDIO indicator is lighted, any iPod/iPhone/iPad connected to the main unit will not be recharged.
Changing the playback area (layer) of an SACD/CD
Hybrid SACD discs are composed of two layers, an SACD layer, and CD layer, allowing you to select which layer you wish to play.
1 Press the SACD/CD button.
SACD/CD
Input changes to SACD/CD.

2 In the stop mode, press the SACD/CD button.
Each time the button is pressed, the playback alternates between the CD area and SACD 2 channel area.

Note
- This unit does not support SACD multi-channel areas.
Adjusting overall display illumination
This unit is equipped with a dimmer function to allow the display illumination to be adjusted in three levels, responding to differing levels of ambient lighting. The factory default is the brightest setting.
Press the DIMMER button.
DIMMER
Each time the button is pressed it the brightness cycles through the three levels.
- The dimmer setting cannot be changed when a disc is playing with the pure audio function ON (see at left).
- The brightness of the STANDBY indicator does not change.
Auto power down (automatically sets power to standby)
This function automatically switches the unit to standby mode if no signal or switch operation is detected for 30 minutes.
1 Press the SET UP button.
SETUP
2 Change the setting and confirm.

Use the / button to set the function ON or OFF as desired, then press the ENTER button to confirm.


ENTER


Note
- This function is disabled when iPod input is selected.
Playback functions
The functions that can be used differ according to the type of disc and file. In some cases, some of the functions cannot be used. Check the usable functions on the table below.
| \(Function^1\) | Disc/file type | |||
| SACD | CD-DA\(\text{CD-R}/\text{-RW}^2\) | WMA MP3 \(\text{AAC}^3\) | \(\text{DSD}^4\) | |
| Fast forward/Fast reverse | ✓ | ✓ | ✓ | ✓ |
| Skip function | ✓ | ✓ | ✓ | ✓ |
| Direct search (designate a specific track for playback) | ✓ | ✓ | - | - |
| Repeat playback | ✓ | ✓ | ✓ | ✓ |
| Random playback | ✓ | ✓ | ✓ | ✓ |
| Programmed playback (Play tracks in a predetermined order) | ✓ | ✓ | - | - |
| View disc data | ✓ | ✓ | ✓ | ✓ |
| Sound Retriever | - | - | ✓ | - |
| Pure Audio | ✓ | ✓ | \(\sqrt[6]{5}\) | ✓ |
| SACD/CD | \(\sqrt[6]{6}\) | - | - | - |
1 Some functions may not work for some discs or files, even if indicated [✓] on the table.
2 Also see Playback of CD-R/CD-RW discs on page 12
3 - AAC files can be played back only on the PD-30.
- Also see Playable file formats on page 12.
4 Also see Playing DSD discs on page 12.
5 This function is enabled only during playback of files recorded on disc.
6 Hybrid SACD discs only.
Chapter 6:
Additional information
Playable disc
Playback of CD-R/CD-RW discs
- This unit can play CD-R/CD-RW discs recorded with CD music format, or audio data in WMA and MP3 format. However, some discs may not be playable, or may generate noise or distorted sound.
This unit is for playback only. It cannot record data on CD-R/CD-RW discs. - CD-R/CD-RW discs which have not be finalized cannot be played on this unit. For details, consult the operating instructions for your disc recorder.
Playing DSD discs
This unit can play DSD disc files recorded in the DSF file format.
Playable files
- Recorded discs: DVD-R/-RW
File Extension: .dsf - Folder name: DSD DISC
- Capacity: maximum 4 GB per file
Audio: 2-channel
Sampling frequency: 2.8224 MHz
Example of folder composition
The order of file/folder playback is not alphabetical, but depends on the order in which they were recorded to the disc.
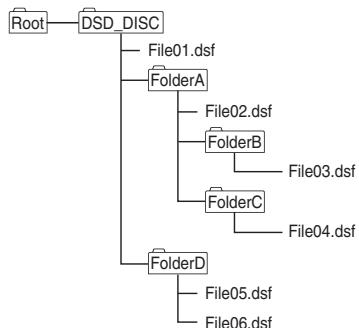
- A single folder can hold a maximum of 150 files.
- A single disc can hold a maximum of 200 folders.
Each folder should have no more than 8 levels. - File names using Japanese language fonts and certain other symbol fonts may not be displayed correctly.
- Any files other than those of DSF format will be ignored.
Caution
Some files may not be playable.
- Discs holding large numbers of files and folders may require substantial time to begin playback. In this case, you can move the desired files directly to the DSD_DISC folder, or limit the number of files to 20 or less.
Operations during playback
The following operations cannot be performed during playback of a DSD disc:
- Direct search
- Playback of disc files other than DSF type
Display
When the unit is in the stop mode when playing a DSD disc, the unit will display the indicator [DSD DISC]. During playback, pressing the DISPLAY button will cause the display to cycle through the following information each time the button is pressed:
Number of the track and its elapsed playing time
Name of file
Playable file formats
Playing audio files
This unit supports the following file formats.
Note that some file formats are not available for playback although they are listed as playable file formats.
- If an attempt is made to play files with unsupported formats, the sound may be intermittent or be accompanied by noise. In such cases, confirm that the file format is compatible with this unit.
- Music files subjected to Digital Rights Management controls cannot be played. DRM (Digital Rights Management) copy protection is a technology designed to protect copyrights. To prevent illegal copying DRM restricts playback to the disc recorder or computer originally used to record the music. For details, consult the operating instructions and help files for the device or application used during the original recording.
| Category | Extension | Stream | ||
| MP31 | .mp3 | MPEG-1/2 Audio Layer-3 | Sampling frequency | 8 kHz to 48 kHz |
| Quantization bitrate | 16 bit | |||
| Channel | 2 ch | |||
| Bitrate | 8 kbps to 320 kbps | |||
| WMA | .wma | WMA2/7/8/9 | Sampling frequency | 22.05 kHz to 48 kHz |
| Quantization bitrate | 16 bit | |||
| Channel | 2 ch | |||
| Bitrate | 32 kbps to 192 kbps |
Category Extension Stream
| AAC2 | .m4a | MPEG-4 AAC LC MPEG-4 HE AAC (AAC Plus v1/2) | Sampling frequency | 8 kHz to 48 kHz |
| Quantizat ion bitrate | 16 bit | |||
| Channel | 2 ch | |||
| Bitrate | 8 kbps to 320 kbps |
- "MPEG Layer-3 audio decoding technology licensed from Fraunhofer IIS and Thomson multimedia."
- PD-30 only.

Caution
- It may not be possible to play all CD-R/CD-RW discs recorded on a CD recorder or computer, due to characteristics of the disc, disc scratches or soiling, or soiling or condensation on the player's laser lens.
- Disks recorded on a computer may not be playable on this unit due to application settings or computer environment. Be sure to record your discs using the proper format (for details consult the marketer of your application).
- Discs recorded in packet write format cannot be played on this unit.
- CD-R/CD-RW discs that have not be finalized cannot be played on this unit.
WMA file playback
- Please use discs recorded to compatibility with CD-ROM file systems (ISO9660 level 1 and 2), and those compatible with extended format (Joliet, Romeo).
- This unit does not support discs recorded with Variable Bit Rate (VBR) or lossless encoding.
- This unit does not support multi-session discs.
- A total maximum of 648 folders and tracks can be recognized and played. Of that number, a maximum of 299 may be folders. However, depending on the folder composition, not all folders and tracks can be recognized and played.
- When using WMA files, be sure they have been encoded using applications verified and recognized by Microsoft Corporation. If unrecognized applications are used, improper operation may result.
MP3 file playback
Please use discs recorded to compatibility with CD-ROM file systems (ISO9660 level 1 and 2), and those compatible with extended format (Joliet, Romeo).
- This unit does not support Variable Bit Rate (VBR); (even if files are playable, the times shown in the front panel display will be incorrect due to the change in bitrate, thus changing faster or slower than the correct time values.)
- This unit does not support multi-session discs.
- A total maximum of 648 folders and tracks can be recognized and played. Of that number, a maximum of 299 may be folders. However, depending on the folder composition, not all folders and tracks can be recognized and played.
- For optimum sound quality, bit rates of 128 kbps or higher are recommended for recordings.
MPEG-4 AAC file playback
- AAC is an acronym for "Advanced Audio Coding," the basic format for audio compression technology used in MPEG-2 and MPEG-4.
- This unit supports the playback of AAC files with the extension ".m4a," as encoded by iTunes®. However, playback may not be possible in the case of files copy protected by DRM, and depending on the iTunes encoding version.
- iTunes is a trademark of Apple Inc., registered in the U.S. and other countries.
Cautions on use
Moving the player
When moving this unit to a new location, always perform the following procedure first: Remove any disc loaded and close the disc tray. Press the unit's / I STANDBY/ON button so that the [-OFF-] appears in the front panel display, then wait ten seconds before disconnecting the power cord. Damage or malfunctions may result if the unit is moved with a disc loaded in the tray.
Place of installation
Select a stable place near the TV and AV system to which the unit is connected.
Do not place the player on top of a TV or color monitor. Keep it away from cassette decks or other components easily affected by magnetism.
Avoid the following types of places:
Places exposed to direct sunlight
- Humid or poorly ventilated places
- Extremely hot or cold places
- Places subject to vibration
Places in which there is much dust or cigarette smoke - Places exposed to soot, steam or heat (in kitchens, etc.)
Do not mount the unit on a sofa or other object or material with absorbent qualities, since sound quality may be adversely affected.
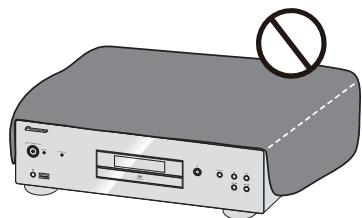
Do not place objects on top
Do not place objects on top of the player.
Keep away from heat
Do not place the player on top of an amplifier or other device generating heat. When installing in a rack, to avoid the heat generated by the amplifier and other devices, place it on a shelf below the amplifier whenever possible.
Turn the power off when not using the player
Depending on the conditions of the TV broadcast signals, striped patterns may appear on the screen when the TV is turned on while the player's power is turned on. This is not a malfunction with the player or TV. If this happens, turn the player's power off. In the same way, noise may be heard in the sound of a radio.
Condensation
If the player is moved suddenly from a cold place into a warm room (in winter, for example) or if the temperature in the room in which the player is installed rises suddenly due to a heater, etc., water droplets (condensation) may form inside (on operating parts and the lens). When condensation is present, the player will not operate properly and playback is not possible. Let the player stand at room temperature for 1 or 2 hours with the power turned on (the time depends on the extent of condensation). The water droplets will dissipate and playback will become possible.
Condensation can also occur in the summer if the player is exposed to the direct wind from an air-conditioner. If this happens, move the player to a different place.
Cleaning the player
Normally, wipe the player with a soft cloth. For tough dirt, apply some neutral detergent diluted in 5 to 6 parts water to a soft cloth, wring out thoroughly, wipe off the dirt, then wipe again with a dry cloth.
Note that getting alcohol, thinner, benzene or insecticide on the player could cause the print and coating to peel off. Also, avoid leaving rubber or vinyl products in contact with the player for long periods of time, as this could damage the cabinet.
When using chemical-impregnated wipes, etc., read the wipe's cautions carefully.
Unplug the power cord from the power outlet when cleaning the player.
Caution for when the unit is installed in a rack with a glass door
Do not press the OPEN/CLOSE on the remote control to open the disc tray while the glass door is closed. The door will hamper the movement of the disc tray, and the unit could be damaged.
Cleaning the pickup lens
The player's lens should not become dirty in normal use, but if for some reason it should malfunction due to dust or dirt, consult your nearest Pioneer authorized service center. Although lens cleaners for players are commercially available, we advise against using them since some may damage the lens.
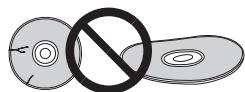
Handling discs
Do not use damaged (cracked or warped) discs.
Do not scratch the disc's signal surface or let it get dirty.
Do not load more than one disc into the player at a time.
Do not glue paper or put stickers onto the disc, or use a pencil, ball-point pen or other sharp-tipped writing instrument. These could all damage the disc.

Storing discs
Always store discs in their cases, and place the cases vertically, avoiding places exposed to high temperatures or humidity, direct sunlight or extremely low temperatures.
Be sure to read the cautions included with the disc.
Cleaning discs
It may not be possible to play the disc if there are fingerprints or dust on it. In this case, using a cleaning cloth, etc., to wipe the disc gently from the center toward the outer edge. Do not use a dirty cleaning cloth.
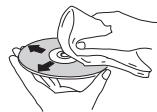
Do not use benzene, thinner or other volatile chemicals. Also do not use record spray or antistatic agents.
For tough dirt, apply some water to a soft cloth, wring out thoroughly, wipe off the dirt, then wipe off the moisture with a dry cloth.
Specially shaped discs
Specially shaped discs (heart-shaped, hexagonal, etc.) cannot be used on this player. Never use such discs, as they will damage the player.

Condensation on discs
If the disc is moved suddenly from a cold place into a warm room (in winter, for example), water droplets (condensation) may form on the disc surface. Discs will not play properly if there is condensation on them. Carefully wipe off the water droplets from the disc surface before using the disc.
Troubleshooting
Incorrect operations are often mistaken for trouble and malfunctions. If you think that there is something wrong with this component, check the points below. Sometimes the trouble may lie in another component. Investigate the other components and electrical appliances being used. If the trouble cannot be rectified even after exercising the checks listed below, ask your nearest Pioneer authorized service center or your dealer to carry out repair work.
- If the unit does not operate normally due to external effects such as static electricity disconnect the power plug from the outlet and insert again to return to normal operating conditions.
| Problem | Remedy |
| The disc won't play or is automatically ejected after loading. | Make sure the disc is loaded with the label side face-up and aligned properly in the disc tray guide (page 8).Make sure the disc is free from dirt and dust and is not damaged (page 13).Condensation inside the player: Allow time for condensation to evaporate. Avoid using the player near an air-conditioning unit (page 13).The disc tray will open if an unsupported disc type is loaded (page 4). |
| Cannot play CD-R/RW discs. | Some CD-R/RW discs recorded on a computer cannot be played. |
| Cannot play files in WMA/MP3 or AAC format (PD-30 only). | The following types of files cannot be played:- Files with DRM copy protection- Recorded discs not in compliance with ISO9660 format- Files not recorded with sampling frequency of 44.1 kHz- WMA files recorded with variable bit rate (VBR) or lossless encoding. |
| Cannot operate the remote control. | Replace the battery (page 4).Operate within 7 m, 30° of the remote sensor on the front panel (page 4).Remove the obstacle or operate from another position.Avoid exposing the remote sensor on the front panel to direct light.Is the control cord for one component connected improperly? Confirm correct connections (page 5). |
| Settings are erased. | If the power cord is forcibly disconnected or a power failure occurs while the unit's power is ON, previously entered settings may be deleted. To disconnect the power cord, first press the remote control's STANDBY/ON button, then wait until the [-OFF-] goes out in the front panel display; only then disconnect the cord. Particular care should be taken when the unit's power cord is connected to an outlet on another component, since turning off the power to the other component may simultaneously disconnect power to this unit. Whenever possible, connect this unit's power cord directly to a wall outlet. |
| No audio, or audio is distorted. | Check that all interconnects are firmly inserted (page 5).Check that the plugs and terminals are free of dirt, oxide, etc. and clean if necessary.Also check the cable for damageCHECK that the disc is not damaged, and free from dust and dirt.Is the unit set to "pause"? Press the ➔ button.Verify your amplifier/receiver's settings (volume, input function, speaker settings, etc.).Make sure the player's output is not connected to the amplifier's phono (turntable) inputs. |
| Noticeable difference in SACD and CD volume. | This is due to differences in the audio format and is not a malfunction. |
| Between tracks of an SACD disc, the main unit's display indicates [---]. | This display may occur depending on the disc. |
| Problem | Remedy |
| The analog audio is OK, but there appears to be no digital audio signal. | ·Make sure that Pure Audio feature is switched off (page 11).·Audio from SACD and DSD discs, as well as iPod cannot be output in digital form.Use the ANALOG OUT terminals for such media (page 5). |
| USB storage device is not recognized. | ·Connect the device securely (all the way in) (page 10).·This unit does not support USB hubs. Connect the USB storage device directly.·Some USB storage devices may not be recognized properly. Turn the power off then back on.·This unit only supports USB mass storage class devices.·Only the FAT16 and FAT32 file systems are supported. Other file systems (ex. FAT, NTFS, etc.) are not supported.·This device does not support the use of external hard disc drives. |
| A USB storage device is connected and displayed, but the audio files stored on the USB storage device cannot be played back. | ·Copyrighted audio files stored on a USB storage device cannot be played back. Attempting to import music data from a CD, etc., to a computer may cause the invocation of copy protection, depending on the settings.·See the list of file formats that can be played back on this unit. |
| Much time is required to recognize the USB storage device. | ·Some time may be required to load the data when large capacity USB storage devices are connected (this could take several minutes). |
| Power is not supplied to the USB storage device. | ·When the pure audio function is set to ON, power is not supplied to USB ports (page 11).·Does an error message appear in the front panel display? (page 7)·Turn the power off then back on (page 8).·Turn the power off, then disconnect and reconnect the USB storage device (page 10).·Press FUNCTION to switch to the other mode, then switch again to the USB mode. (When the input is switched back to USB) (page 7). |
| Music files are played back even though they're not recorded in the USB storage device. | ·Confirm whether any hidden files are recorded on the device. Hidden files will be played. |
| Cannot operate the iPod/iPhone/iPad. | ·Make sure the iPod/iPhone/iPad is connected correctly (refer to iPod/iPhone/iPad playback (PD-30 only) on page 9). Also, try disconnecting the iPod/iPhone/iPad then reconnecting it.·Confirm that the connected iPod/iPhone/iPad is a model supported by this unit (page 9).·If the iPod/iPhone/iPad is experiencing a hangup, try resetting the iPod/iPhone/iPad, and reconnect it to the unit. |
| Power is not supplied to the iPod/iPhone/iPad. | ·When the pure audio function is set to ON, power is not supplied to USB ports (page 9).·Does an error message appear in the front panel display? Turn the power off, then disconnect and reconnect the iPod/iPhone/iPad. |
| Sound not produced from iPod/iPhone/iPad. | ·Is sound being produced from the speaker of the iPod/iPhone/iPad? Disconnect power to the unit, then turn on again. After setting for iPod input, connect the iPod/iPhone/iPad.·Audio is not output from the DIGITAL OUT terminals. |
Specifications
General
System. Super Audio CD player
Power requirements. . . .AC 220 V to 240 V, 50 Hz/60 Hz
Power consumption
PD-30 37 W
PD-10 20 W
Power consumption (standby) 0.45 W
Weight
PD-30 5.6 kg
PD-10 5.2 kg
Dimensions
4.435mm W × 128mm H × 329mm D
Operating temperature +5^ to +35^
Operating humidity 5% to 85%
(no condensation)
Audio output (1 stereo pair)
Output level. During audio output
200 mVrms (1 kHz, -20 dB)
Number of channels 2
Jacks. RCA
Digital audio characteristics
Frequency response
CD. 2 Hz to 20 kHz
SACD 2 Hz to 50 kHz
S/N ratio
CD. 117 dB
SACD 117 dB
Dynamic range
CD. 100 dB
SACD 108 dB
Total harmonic distortion:
CD. 0.0022 %
SACD .0.0020%
Wow and flutter . Limit of measurement
(± 0.001% W. PEAK) or lower
Digital output
Optical digital output. Optical digital terminal
Coaxial digital output. RCA terminal
Accessories
RCA audio cable (red/white plugs) 1
Remote control. 1
AAA/IEC R03 dry cell batteries 2
Power cord
Warranty card (European model only)
Operating Instructions (This document)

Note
- Specifications and the design are subject to possible modifications without notice, due to improvements.
Corporation and product names mentioned herein are trademarks or registered trademarks of the respective corporations.
8 iPod/USB (PD-30) USB (PD-10)
18 VOLUME + / - (PD-10 quintement)
1 CONTROL IN/OUT prise (PD-30 uniqueness)
2 DIGITAL OUT (COAXIAL) borne
3 DIGITAL OUT (OPTICAL) borne
4 ANALOG OUT bornes
5 AC IN pris
Panneau avant
1 /STANDBY/ON
10 iPod/USB port (PD-30) USB port (PD-10)
| iPod/iPhone/iPad | Audio | Commande |
| iPod nano 2/3/4/5/6G | ✓ | ✓ |
| iPod touch 1/2/3/4G | ✓ | ✓ |
| iPhone | ✓ | ✓ |
| iPhone 3G/3GS | ✓ | ✓ |
| iPhone 4/4S | ✓ | ✓ |
| iPad | ✓ | ✓ |
| iPad 2 | ✓ | ✓ |
200 mVrms (1 kHz, -20 dB)
Nombre de voies 2
Prise RCA
8 iPod/USB (PD-30) USB (PD-10)
10 iPod/USB-Port (PD-30) USB-Port (PD-10)
| iPod/iPhone/iPad | Audio | Steuerung |
| iPod nano 2/3/4/5/6G | ✓ | ✓ |
| iPod touch 1/2/3/4G | ✓ | ✓ |
| iPhone | ✓ | ✓ |
| iPhone 3G/3GS | ✓ | ✓ |
| iPhone 4/4S | ✓ | ✓ |
| iPad | ✓ | ✓ |
| iPad 2 | ✓ | ✓ |
© 2012 PIONEER CORPORATION.
8 iPod/USB (PD-30) USB (PD-10)
| iPod/iPhone/iPad | Audio | Control |
| iPod nano 2/3/4/5/6G | ✓ | ✓ |
| iPod touch 1/2/3/4G | ✓ | ✓ |
| iPhone | ✓ | ✓ |
| iPhone 3G/3GS | ✓ | ✓ |
| iPhone 4/4S | ✓ | ✓ |
| iPad | ✓ | ✓ |
| iPad 2 | ✓ | ✓ |
© 2012 PIONEER CORPORATION.
WAARSCHUWING NETSNOER
KLASSE 1 LASERPRODUCT
D58-5-2-2a A1 NI
Inhoud
01 Voordat u begint
8 iPod/USB (PD-30) USB (PD-10)
18 VOLUME + / - (alleen PD-10)
20 INPUT (alleen PD-10)
| iPod/iPhone/iPad | Audio | Besturing |
| iPod nano 2/3/4/5/6G | ✓ | ✓ |
| iPod touch 1/2/3/4G | ✓ | ✓ |
| iPhone | ✓ | ✓ |
| iPhone 3G/3GS | ✓ | ✓ |
| iPhone 4/4S | ✓ | ✓ |
| iPad | ✓ | ✓ |
| iPad 2 | ✓ | ✓ |
200 mVrms (1 kHz, -20 dB)
Aantal kanalen 2
© 2012 PIONEER CORPORATION.
8 iPod/USB (PD-30) USB (PD-10)
10 Puerto iPod/USB (PD-30) USB Puerto (PD-10)
| iPod/iPhone/iPad | Audio | Control |
| iPod nano 2/3/4/5/6G | ✓ | ✓ |
| iPod touch 1/2/3/4G | ✓ | ✓ |
| iPhone | ✓ | ✓ |
| iPhone 3G/3GS | ✓ | ✓ |
| iPhone 4/4S | ✓ | ✓ |
| iPad | ✓ | ✓ |
| iPad 2 | ✓ | ✓ |
- España, Italia, México, Chile, Colombia, México, México, México, México, México, México, México, México, México, México, México, México, México, México, México, México, México, México, México, México, México, México, México, México, México, México, México, México, México, México, México, México, México, México, México, México, México, México, México, México, México, México, México, México, México, México, México, México, México, México, Mexico, México, Mexico, Mexico, Mexico, Mexico, Mexico, Mexico, Mexico, Mexico, Mexico, Mexico, Mexico, Mexico, Mexico, Mexico, Mexico, Mexico, Mexico, Mexico, Mexico, Mexico, Mexico, Mexico, Mexico, Mexico, Mexico, Mexico, Mexico, Mexico, Mexico, Mexico, Mexico, Mexico, Mexico, Mexico, Mexico, Mexico, Mexico, Mexico, Mexico, Mexico, Mexico, Mexico, Mexico, Mexico, Mexico, Mexico, Mexico, Mexico, Mexico, Mexico,Mexico ,Mexico ,Mexico ,Mexico ,Mexico ,Mexico ,Mexico ,Mexico ,Mexico ,Mexico ,Mexico ,Mexico ,Mexico ,Mexico ,Mexico ,Mexico ,Mexico ,Mexico ,Mexico ,Mexico ,Mexico ,Mexico ,Mexico ,Mexico ,Mexico ,Mexico ,Mexico ,Mexico ,Mexico ,Mexico ,Mexico ,Mexico ,Mexico ,Mexico ,Mexico ,Mexico ,Mexico ,Mexico ,Mexico ,Mexico ,Mexico ,Mexico ,Mexico ,Mexico ,Mexico ,Mexico ,Mexico ,Mexico ,Mexico ,Mexico ,Mexico .
-Estaunidad solamente se debeutilizar para
reproducir.No podegrabatodos endiscos CD-R/ CD-RW. - Los discos CD-R/CD-RW que no se han cerrado no se pueda reproducir en estaunities. Para Obtener detalles, consulte las instrucciones de funciona bajo su grabadora de discos.
IPOBETPnBaEMOM NOMEUeHIN INB MecTe C BbICOKO IBAJXHOCTbIO,OTKpbITOM IJIpyMORO COJIHeHORO CBETA (INN CNJIbHORO NCKYCCTBeHORO CBeta).
D3-4-2-1-7c*A1_Ru
Ecni BnIka shHpa nHTaHna I3JeNna He COOTBeTCTByET NMeIOUeCJNeKTPropo3eTKe, BnIKy CJIeDyET 3aMeHNTb Ha NOxOJaUyIO K PO3eTke.
3aMeHa n yCTaHOBka BnIKn DoJNKhbl IpON3BOAnTbCRA TOIbKO KBaINΦuNIpOBAHHbIM TEXHNKOM.
OTcoeHHeHHa OT Ka6eBn BUNka, NOKJIIOHeHHa K pO3eTke, MOKeT BbI3BaTb TJaKeJIoE NOPaKeHne 3JIeKtpuYeCKIM TOKOM. IocNe ydaJIeHHa BUNk yTInuN3npyTe ee DoJXhblm o6pa3OM.
O6opydoBaHne cIeJyET OTKIIOHaTb OT 3JeKTPoCeTn, n3BNEkAra Bnky Ka6eJNAITAHNIA N3 po3EtKN, ecnno Hc6ydtncnOJIb3OBAtcbcRA TeHeHne DOJrTOBpeMeHH (HaNPmEp, ecn Bbl ye3kaete B OTnyck).
D3-4-2-2-1a_A1_Ru
BHIMAHNE
BbIKHouateIb O/ISTANDBY/ON daHHoro yCTpoiCTBa He NOJIHOCTbIO OTKIIIOUaET erO OT 3JIeKTPocETn. YTO6bl IONHOCTbIO OTKIIIOuHTb NITAHNE yCTPOIcTBA, BbITAUNITE BNJKy Ka6eJN NITAHNIN3 3JIeKTPoP03eTKN. PO3TOMY yCTPOIcTB O CJIeDyET YCTaHABINBaT TaK, YTO6bl BNJKy Ka6eJN NITAHNIMOJHO bblNO JERKO BbITaUNTIb IN3 PO3ETKN B Upe3BbUaHbIX O6CTOARTEbBax. Bo n36EkaHne IOjKapa CJIeDyET IN3BNeKaTaB BNJKy Ka6eJN NITAHNIN3 PO3ETKN, ecNI yCTPOIcTB O He 6yDet NcIOnb3OBaTbcB TEHeHne DOnrTO BPeMeHN (HaNPmep,ecNI Bblye3KaTe BOTnyCK).
D3-4-2-2-2a* A1_Ru
(TOJIbKO IJIa MoJeIIN PD-30)....5
IoiKJIIOHeHne 5
03 OpraHbI ynpabJIeHn I nHdNkaCmN
IyIbT Iy. 6
3aHnHaHeJIb. 6
IpeHnHaHeJIb 7
Bocpon3BeJeHHe C BbICOKOBepHOCTbO 3ByaHn..11
Sound Retriever 11
Pure Audio 11
H3MeHeHHe 30HbI BOCIpOn3BeHeHHa (cIOA) SACD/CD...11
PeryIINPOBka o6iuee npKocTH nHcIIiee 11
ABTOMATHueckoe BILKIOUeHEne (ABTOMATHueckn IEPeXoI B PekmO KxuHaJINa) .11
11
06 DOnOHnHTeNbHaI INHΦOpMaun
BocipOn3BOIDMbIe INCKH. 12
BocipnoH3BOIDMbIe fOpMaTbI daJIIOB 12
MepbI IpeIOCTOpOxHOCTH IIpn HcIIb3OBaHHI .13
YcTpaHHe HEnoJaIOK 14
TexHHueckHe xapaKTepeHCTKNH. 15
DnCKN, BOCIpON3BedeHne KOToPbIX
HEBO3MOXHO
DVD-Video
DVD-Audio
CD-G
Video CD
DTSCD
Bo3MOKHO, HeKOTOpBIE DpyrHe NcckH, KpOme IpeyuNCJIeHHbIX BbIe, TAKKe He 6yDyT BOCPOn3BOIDHTbC.
KomnJIeKtaun
OTKPOIte ynakOKy u y6eJIITecb, noKaJIYiIcTa, YTO Hei haoXIOITc.
- NylbT Dy x1
Cyxhe6aTaapeiKNAAA/IEC R03x2
AynokabcRCA(ckpaHIM6bimpa3bemamx1
Ka6eJIb IHTaHnI - TapaHTHbIy TaIOH
- HNCTpyKUH NIO 3KcIIyatauHH (3OT DOKymeHT)

Приимechанинe
PcHcYHKn, INpHbOIMMbIe B "PyKOBoDCTBE IIO KcIKUYaTauHHM, MOrY I3MeHnTbC HIN YIpyoAHTbcS IJIyIPOIIaTHNIOHcHENH NIO3OTMyOTJInuATcbSOT BHEIHHeR BOHaIpoJyTKa.
I\PiHbOuHMHe pChyHKn OTHoEcTc rJIaBbMm 6opba3OM K MODEJN PD-30.
YcTaHOBka 6aTapeek B nyIbT Dy
1 OTkpoIte 3aHIOIO KpbIiKy.
PD-30

PD-10
2 BCTaBbTe HOBbIe 6aTapeKn C co6JIIODeHHeM NOJIpaHOCtN, KaK yKa3aHO BHyTpN 6aTapeHoro OTCeKa.
PD-30
PD-10
3 3akpoTe 3aHIOIO KpbIiKy.

PD-30

PD-10
BatapekhN, PIIJIaIaeMaBb KOMJIIEKeK Y cTPOHCTBY, peJIHaIaHHeBn IJI pIOBePck pa6ObTIy cTPOHCTBa H cPoK Hx CJUk6b MoKet OKa3aTbce HnePOJOJKTHeJIbHM. Mbl peKOMeHyE mCNOJI3oBAt bIeIOUHHe BatapeKhN, 6oiJIaIOuHMn 6oiJIbHMn cKomOp JcUk6b.

BHIMAHNE
He HcHIOJIb3yIte H He xpaHHTe 6aTapeiKnHa IpRmOM coJIHcEHOM CBeTy HnB M cTeac T IOBbIIeHHoH TeMIIepatpyO, HapIMPeR AB VtOMoBUnE HnI BO3Je 6aTapeH OTOnJIeHNH. To MoKeT IpnBcTe N I pOteKe J 6aTapeiKn, ee IpePepBy, MHKPoB3pbBy HnI K Bo3rOpAHnHO. To MoKeT TakKke CokPaTHb cpoK cnJxboI aTapeiKn.
IpndynpexdneHn
HenpaBILbHOe HcNOIb3ObaHHe 0aTapeek MoKET pINbECTN K TAKHM OIIaChbIM YBaJIeHNbKM, KaYteuKa H MHKpOB3pIB. IIpIepKJBHaiTeBc lIeDyUOHHP neoDctopToKHXOHeTJ
YCTaHbJIbIbIaBbIaBbIaBbIbIaBbIbIaBbIbIbIbIbIbIbIbIbIbIbIbIbIbIbIbIbIbIbIbIbIbIbIbIbIbIbIbIbIbIbIbIbIbIbIbIbIbIbIbIbIbIbIbIbIbIbIbIbIbIb
He nolb3yIte 6aTapeIKH npyrHX TINOB, KpOme yka3AHbIX. He nolb3yIte HOble 6aTapeIKH co ctaPBIMH.
IPIIyctAHOBOKe BATEAEEK B IYNJIb IV CO6BIOJAEI POIIIPHOCTB C BOBTETCBTHO 3HAKAMHI (H H)
He onyckaIre HarpeBa 6atapee, He pa3bpaIte Hx, he b6pcaIte B orOhy Hn Hody.
BatapeiH Moryr H Mertb pa3HOe HnapJKeHHe, LaJece cHn OH NHEoO hNtAkoBbe pa3mebpHn oFpMy. He HIOJIb3yIe COBMeTcH ObaTePAHKn pa3HO rTOIIHa.
Bo 136b6aHHe IPOTEKHN KHNKOCTH N3 6aTapeek H3BJIeKHe IH N3 IIyIbA YD, eCJb HE CoBHpaTebc NIOJIb3OBATcB NM IPOLOJIKHeBHO BPEm (cBbHIe 1 Meecua). EcJIIN POIEKa BCE Je IPOIm3OIIHa, TtAUJIbHO IPOrTIHe BHTyPHeNCHOT 6aTapeHHORO OTCEKA IpeEY UCTAHOBKOH HOBJX 6aTapeek. EcJIIN BbTEKIIH N3 6aTapeek KHNKOCTB NIOJIaHa HauIy KOJy, IpOMOIte 3TO MecTO 6OJIbIHM KOJIHyeCTBOM BOJb.
- PnH yTHIN3aIHH HcIOJIb3OBAHbIX6 batapei CJeDyIte 3AKoIOHdAteJIbHbIM AKTAM HII IO6UIH NpABHnAM IIO OXpAHe OKpyKaJIoH cpeB, KOTOpBE pIHMeHNMBI B BAIIe CTpaHE NIIPErHOHE.
IcnoJIb3OBAHHe nylbTa ductaHNoHHoro
UnpaBJeHna
Пил.TИСТАЦИННОУПИРБЛЕNHМЕETДАЛБИСТЧ ДелCTВИЗNOLOVI7M,пгТOMOTOKЛОHENHOTANIPBAJIENHA НдатчнEКДJOЖINРБЕSHПATB'90.
8 iPod/USB (PD-30) USB (PD-10)
Haukmiete IIPEKJIIOENHbXoJaYcTPOBCTBa H aIPOD hIIUS (ctp.9,10).
9 SACD/CD
HakmHTe IINIpeKJIIOUChENH BxOJa yCTpoiCTBa HA SACD/ CD.EcJIN HcNIOJIb3yIOETc NII6pHIbHE NIKs SACD, INPn HAKaTIN DAHNHOI KHONIKB PekHMe cTONI NImMeHertc 30Ha BocINPOH3BeHEnI DnCKA (ctp.11).
10 REPEAT
HauKMHTe IJIb KLIIOUeHHa peKHMa NOBTOPHORO BOCINPOHN3BeDEHHa (ctp. 8).
RANDOM
Hajmte JIbB KJIIOUeHINpeKHMa BOCIIPOH3BeEHHBA CJIyauHOM IopJke (ctp.8).
PROGRAM
Hajmhte JIg BkIIOueHHpeKHMa BocIpOH3BeJeHHn IIO npOrpAmME (ctp.8).
11 PURE AUDIO
HauKmHTe DAHNHO KhoNkY DnB KBNOCHENI peKHMa Pure Audio.B daHHompeKHMe 3ByK BOCIIPOH3BODHTCc camoi BbKOckToTuOHCTIO HxCdONHOrO 3ByAUYHnr (ctp.1).
12 △ OPEN/CLOSE
HauKMMTE, YTO6bI OTKpbTb HJI3 3aKpbTb IOTOK JIIA DHCKA (ctp. 8).
13 ENTER
ПиMHeHHe BbIpaHHOrO IyHKTa HIN BBOJ N3MeHHeHHo HactpoiKN.
14 DISPLAY
HaKMMTEIaIOTO6paKeHenHpa3IHNUHOHNHfOpMaUNIO HnCKE, BkJIOnaBbPemHCTeKIIeH eOCTABIIeecBpEmBOcIPOIN3BeDEHenH(ctp.8).
15 DIMMER
HnKMMTEIJI H3MNEHNNY UPOBHNOCBEIIENHIN CBEENHHNHNHdkatopOB NapeiHeN IaehINIgABHOYcTPOHCTBA (ctp.11).
16 S.RETRIEVER
HaxKMHTe IJIa H3MeHeHHI IapametpoB fyuKcHn Sound Retreiver (ctp. 11).
17 AMPLIFIER (ToIbKO dIy MoIeIi PD-10)
HauKMHTTE JIJI PEKJIQUCHENHI PEKHMOB BKJIOCHENHI OJKHADHAI AH Y-VCINTJETE KOMAHINH PioneerE.
18 VOLUME + / - (Tolbko Дя модал PD-10)
PeryJInpObKa yOpBnI rPOMKoCTN AV-yCHJIHTeJI KOMIIaHNN Pioneer.
19 MUTE (ToIbko IЯ MoeJIu PD-10)
OTKJIIOUeHHe 3Byka AV-ychJIHTeJIa KOMIIaHHN Pioneer. HaKMHTe IOBTOHPo IIA BKJIIOUeHHe 3Byka.
20 INPUT (ToIbKO IaI MaOeJI NPD-10)
HauKMHTe JIJIpeKJIIOueHHBXOJa AV-ycHInTeJIOMKAnHHN Pioneer.
3aHnaHeJb
Iopno6hoe oHncaHne IOpKIOUeHem cM. Ha cTp. 5.

1 Pa3bEM CONTROL IN/OUT (ToJbKO dIa moDei PD-30)
2 Pa3bem DIGITAL OUT (COAXIAL)
3 Pa3bEM DIGITAL OUT (OPTICAL)
4 Pa3beMbI ANALOG OUT
5 Pa3beM AC IN
PepednnaheIb
1 1STANDBY/ON
ПИЗКИLOUEHINПТАнHA 3AragoаетсИнДИКATOP ПИТАнBA CBHTPE KHOKNI.
B MoleiPiD-30 BKJIOHaetcH BbKJIOHaetcY cYNJIHTJIb.
Дявкluоевнаптайная Наимай Te ДанHyо Кногу, ПОКа OHA He OCTaHETcB HаЖатOM COCTOHH.
BMOdeJIINPD-10yCNJIHTeJIbBKJIHOaETcHJINIpePExOJNTBpeKHMOKHJaHHA.
2 INDnKaTOp STANDBY
3aropaetcBpekme STANDBY.
3 ИнданkaTop PURE AUDIO
3aropaetc npn BkIIOueHHH fHyKuHN Pure Audio (ctp. 11).
4 DnCnnei nepeDnei naHei
(Cm.cJeDyIOuIee oINHcaHne.)
5 ▲
HakMMTE, qTO6bM OTKpbTb HIN 3aKpTb JIOK DJIH NCKA (ctp. 8).
6 FUNCTION
IEpeKJHcHHe HCTOHNHKA BxHOHIO CRTHAIA. HCTOHNKH CTRHAAI IepeKJIHAcHOTCRJyOHUM 6bAp30M.
DISC iPod*1/USB Bo3BpaT B haqano (he oTo6paKaaetcra).
^*1 TOJbKO JII Ma MoJeJIH PD-30
7
HaKMHTe IIA OCTaHOBA BOCIIPOH3BeDEHHA.
8 /II
HaKmHnTJe 3aIyCkA BoCnPb3BeDHeHn.BoBpEma BocPiOn3BcEHeHHI IpeKJIIOHeHne H3 peKHMa BocPiOn3BcEHeHHI BpeKM\Pay3bIbOpatHO.
9 DaTnK npIbTa DnCTaHcNoHHoro ynpabJeHn
IIpHem cRHaIOB NJIbTa DY (cTp.4).
10 Pa3bem iPod/USB (PD-30) pa3bem USB (PD-10)
3AgoaepaeTcPiHOTo6paKeHHN OCTaOHueOcB PBeMHN BOCPOIN3BDEHnH NcHa.
10 REMAIN
3AqopaertaeIprnOthop6bajeHHN octaoherocR BPemEHN BOCIPON3BDEHNN 3AHNCH HJIN DHCJA.
11 S.RTRV
3aIopaeTcI pR BkIIOueHEnH yHKnHn Sound Retreiver (ctp. 11).
12 SETUP
3aropaetc npn hactpoike fynkuiHH ABTOMATHueckoro BVKJIIOUeHHIINHTAHII (ctp. 11).
13
3AgoaetcBpeKHMe yCKOpEHNOI pAmoI NPERMOTKN.

3AgoPaeTcB PekHMe yckOpEHHo 6b4thO INPEMOTK.

3aropaetc npn Bocpon3BeHeHH.

3aropaetcBpeKHMnIay3bl.
14 CnMbOJIbHbI dIcπIeI
TnaBa4:
Bocnpon3VeJeHne
HcnoIb3OBAHne FyHKnIa 3aBnCHT OTHIIa Dnka NfaiHa. B HekOTOpby cIyuaXe HekOTOpBe FyHKnIH HeDcToYPiHb. Cm. pa3deI FyHKnIa 6ocnpou3e0eDeHna strp.11.
Bocnpon3BeDHeNue DnCKOB
1 Haxmnte Ha nepedne nahanen KhoNky
//STANDBY/ONДь ВКПЮЧЕНИУСТРОИСТВА.
STANDBY/ON
I\Pn HCIOJIbOBAHNMOJeHIN PD-30 BJKUONHTIINHANHKAHMNA KHOINKY POWER HA yCTPOHCTBE, IOKA OHa HE OCTAHETCB HAKATOMIOJIOJEKHHN. BnC6OKy HA nepeHHIOHnaHEB

2 HaxMMTe KONky ▲, YTO6bl OTKpbITb JOTOK
ДИЙ ДИСКАУCTAHOBITEВЕДИСК.
-ДиСКУCTaHaBJIbHаIte3THKeTkoBВePx.

3 HaxMMte KhoNkY ⅡДЯЗУSCA BOCPON3BVEDEH.N.

-ДяВрemeHHORO OCTaHOBA HAXMITE KHOIIKy >/I
ДИА ВОЗБОВЛЕНИЙСВОППОИЗБЕДЕНИЙ HAZKMITE KHOПКИ.Y.

Примочанe
- Onpaapani 2 H 3 MoKHO BbIOIOJIaTb C IIyIbTa IV TAKHM JKe o6p3Am, Kac c IpeJeHne IaHeJIn ynpabJIeHHr IJIaBOHO YcTOPOCTBa.
IpehexoBpexumOxndaHna
IpepeKIOOeHHeM BpeKM OKHdaHn H3BIEKeHTe H3 IOTka 3aRpyKeHHb IIHCK.
HaxmTe KhONky STANDBY/ON Ha npIbTe D.
JaKe,ecJIH KHOIIKA ENTER He HauKHaMaetcR, BOcPONB3BcEHeNHe HAeTaeCTaB cTo MATOMaYeCKn Yepe3 5CeKYIbI (3TO He OTHoCHTcK pekHMy IpoPramMOTO BOCpONB3BcEHH).

IOBTOHoe BocnpOn3BeHeNe
PekHMIOBTOPHORO BOCIPNO3BEdENHINPMHEHM K TeKyuIeBOCPOH3BOJHM0 3aIHNC HJIHKoBCEM3aIHcM HAJHCKE.
BoBpemBocnpon3BeDenHn Haxmnte KhoNky REPEAT (Tobtop).
REPEAT

3aIyUcKaTcIIOBTOrHoe BOCIIPOH3BeDEHHe, a HaIINiJIeNE IepdIeN IaHEnIYCTPOIHCTBA 3aIgOPaTeC HIIhIKAtOp [REPEAT].HaKmHTe DaHHyIO KHOInky IOBTOrHO JIry IImMeHEnRTHI NIObTOPHorO BOCIIPOH3BeDEHn (OJHOI 3aIHCHN HIN BCERo DnCKA):
IOBTOPHOE BOCIPPOH3BEDEHHe OJHOJ 3aHHN (3aHopaTeC HnIHKAATOP [REPEAT])
IOBTOPHOE BOCIPPOH3BEDEHHe HJCKA (3aHOPaHTcR HnIHKAATOPb [REPEAT] INALL)]
OTKIOUOHeHne peKHMa IOBTOPHOBOCIPPOH3BEDEHnI

PpimueaHne
-Функши IOBTOPHTORO BOCIOH3BEDEHIN OTMENETCJ NIOCTE OCTOBHANO BOCIOH3BEDEHIN DHCK.
PexHM BOCpON3BeHnB B CnyuHOM nopdke
Bae3HnHnDaBOPONBHODaTBCbUyauHOMnpaJKe, noka He6ydet BOPOPN3BDAEHaKcKaDaa3HNbC.
BoBpemBocnpn3BeDHeNnaHaxmnteKhONkyRANDOM.
RANDOM
3ayncaetae pekHm BOCPONB3EJENH B cIyauHOM HOpAJIke H naHcIIee IpeNHeI paHeJIH 3aogeraHnHHKATOP [RANDOM].

PnmueyaHne
PEKOM BGNQPINB3EDEHIN B CLYUAHOM DO octAHOBKH DINGKA HIN IOBTOPHO HAKMIXTE KHOINKY RANDOM.
Функ仙女BOCIPONH3BDEHINB CJIyauHOM NOPJKe MOKET HClIOIb3OBaTbC8OBMcTHO CpeKHMMOPIporpAMMHOBOCIPONH3BDEHIN
EclnBpeKHMBCoPON3BcEHHBNCLyauHOMIPOJKe HauKHaemctc KhoNtKa▶,BOCpON3BcOHTTCsClJeUHua 3aHbC, Bbl6paHHB CbuayHOMIOJIePiHNaKAtHN KhoNk▶TeKuYaa 3aHbCBoCPOIN3BcOHTTCc HauHaA.
Bocnpon3BedeHne no nporpamme (Bocnpon3BedeHne 3aInceB 3aDaHHom
noprake)
Даннану БУКИПОЕ ПОЗВЛМЕТ ВБРАТ,ДO 24ЗИНСЕД LAHINCHON BSEDEHINBA JAZHANOHN HOMJIPEK
1 B pexnme "Cto" haxmnte KhoNky PROGRAM.
PROGRAM

HaNnCIIepe nepeJIHneIeIaIgApTaTcR IHHKATOP [PGM].
2 C nomooubio unpoBbIX KHONOK BBODInTe HOMep HUxH0N 3aINcN HauKMnTe KHONKY ENTER.

ПиМер:Чтбы Вьбрат b3aHcB 15,нжмгte KhoIGNI I n 5, a 3aTeM NaЖмгte KhoIGNY ENTER. ECSIn Bb OINHcBb PnH BBOde, Haxmгte KhoIGNY CLEAR.
ENTER

3 NOBTOPHTe onepaunio 2 nBBA Bcex HxhHbIX 3aHncei.
4 Haxmnte KhoNky /II.
BocpoH3BeJeHHe NaHHaTeC B InpAJIke BBeJEHnBXI pII npORpAMMPOBaHHN 3aHnCeI EcHb BYXOTHTeIO6aBHIT dpTyHc 3aHHn, NObTOrHte OeapAHn 1 n2


Примеанne
EcnHnKaTb KHOINKY CLEAR npn octaHOBIIeHHOM NtCKE, Bce 3aIporpamMPOBaAHbIe 3aIHCH OTMeHHOTcN.
JIaONCTKN 3aIporpAMMPOBAHbIX 3aIIcH B peKHeMe "CToTn" HAKMMte KHOJIY PROGRAM 3aTeM KHOIIky CLEAR. 3aIporpAMMPOBAHbIe 3aIIHNc OTmeHKnOTc, aBOcPiOnB3EJIeHne HauHInaeTc cIOcJIeHNe 3aIporpAMPBOAHH 3aIIHNc.
"Piay3a" He nporpammmhpyeTc8
Bocipno3BcEHeHne 3aIporpAMMPOBaAHbIX 3aINHcEe MOKHO IOBTOPIb. IIOCTO HAKMITE KHOINKY REPEAT IIOcJIe 3aIpyKa IporpAMMHORO BOCIPNO3BcEHeHn (cm. pnc. cJIeBA).
B- Pekhime Bocipoin3BcEJIeHHIO NpIporPAMMe NTOBOPHTH BOCIPIN3BcEJIeHHIO dJHOr3AHHIC
ФУКИПО ВОСЮПОНЗБЕДЕНЯВ СЛУЧАМОПЕК
ФЕКHMЕ ПОГРAMENTHOrO ВОСЮПОНЗБЕДЕНЯ
HICIOJI3OBATB HIEJI3A.
-Пин Нжатин Khoин >В ржени PMORpAMMHorO BOCINPOH3BEdENHH 3aYnCkaTcB CBOPINOH3BEdENHe cIeDyUIOJIe 3aNpORpAMMPOBAHNOH 3aHNH.
IocseOCTaHOBKHBOCINPOHN3BeDEHNNIJINIOBTOPHORO BOCINPOHN3BeHNNI INoIPrAmMbIHaKMMITE KHOIIKKY PROGRAM.A 3ATEM KHOIIKP I
PpOCMOTnHOpMaunn DnCKa
- Bo Bpemr Bocnpn3BedeHnna Haxmnte KhoNky DISPLAY.
DISPLAY

To6paabaetc paaaHnaa HnHpOpaaHn, BkNoohay TckHeiuee H octabraeeceBpeWMBBoC0POn3BedeHH.
B 3aBnCHMOCTH O NTcNOJIb3yEMOJ HJNcKa, Ipn MHOTOKPAthOM HataKTHIN KHONKI DISPLAY YHKLIueCKH OTO6baeTcA p31IHHaA HHfOpmaIIa.

PpIMeUHne
OTo6paKeHHe MHeHH qHaJIa (IepBbE 8 CHMBIOBJ) IIIN BCPOHIN3BcENHH qAioH B cOpMaTax AAC (TOJIbKO IJRA MOJIEN PD-30), WMA/MP3 IIIN AaHJABHO HA DSDHDCKAX. OJAnHK, B 3aBHCMOCTN t HAIIOHOJIbHO KIOHOBKN HCIOJIb3yEMORo Ha6pOa CHMBIOBJ, OTo6paKeHHe MoKET 6blt HCKAeHNHM.
Bocnpo3BeJeHne c iPod/iPhone/iPad (Tolbko Jnla Moedn PD-30)
IPOCTbIMIOKJIHOUHEmiPod/iPhone/iPadKJAHHOMY yCTPOHBYBMIOJMEOTIOUYHTBbICOKOKaHECTBEHNHO 3BUNaC bAuaero iPod/iPhone/iPad
IopdepkXbAeMbIe MoDJIi iPod/iPhone/iPad
CnHcok iPod/iPhone/iPad,Booicpno3BaeHHe C kOTOpbX IOCTyoHN HA DAHOM yctPOBCTBE pPbHEDe HNKe.
| iPod/iPhone/iPad | Адно | Услвенье |
| iPod nano 2/3/4/5/6G | ✓ | ✓ |
| iPod touch 1/2/3/4G | ✓ | ✓ |
| iPhone | ✓ | ✓ |
| iPhone 3G/3GS | ✓ | ✓ |
| iPhone 4/4S | ✓ | ✓ |
| iPad | ✓ | ✓ |
| iPad 2 | ✓ | ✓ |
Даннaya симета рамбоготаи и поровера вся Версанурогаммого об揪оченьяй iPod/Phone/IPad,уksakанно на Webсайт CREКANHIN Pioneer.
- YctahOBka Ha iPod/iPhone/iPad dpyTHx BepChn nporPamMHOrO obecneueHn, Kpome Yka3aHNo Ha Be6-caIte KOMIIaHH NpIeer, MoKet OKa3aTbC HecOBMeCTHMc c DAnHO CHCTEMoI.

Приимechанинe
KomiHnHja Pioneer He rapaHTnHYeT BOCIpyOH3BeJHe HAnHHbM yctOJIcTBOM c I Pod/iPhone/iPad pyrTHx MoJIeJIe, KOPME YK3aAHbIX.
IcnoJIb3OBaHHe HeKOTOpBx yHyKIIIM MoKet 6bITb ORpAHyHeHHM B3A8BCHMOCTN OTo MDoJI HIN BEpCHN IporpAMMHOrO 6oCneHeHH.
iPod/iPhone/iPad JIINH3NPOBANJIA BOCIPNO3BDEHNNA MATEPHAOBJ,HE 3aIIHNHeHHbX ABTOPCKHM IIPAOM HIN MATEPHAOBJ,pa3peHHeHHbX JIABBOCPNO3BDEHNNA HA3OKOHHHX OCHOBAHHHX.
YipabJIeHHe TaKHMf yHKUHMM, KAK KBaJIaI3ep, HeIOCTyIHO INP hCNOII3ObAHHH DAHNHO YcTPOHCTBA, IIO3OTMY MBI PEKOMHeJyEM OTKIOHTb KBaJIaI3ep HpeJI IOJIKIOUHeHMe YcTPOHCTBA.
KOMIJIAHIA PIONEER HN pIN KAKHX 6OBCTOAE15CTBX H EHCET OTBETCTBENHOCTb 3a IIOBOI IIPIAIMOI HII KOCBEHNH yUIEpB vE3yIbTate HEOCTATKOB HII NIOPER 3aIINCAHHx MATEPHAIIOB NO pINHnue C6oB iPod/iPhone/iPad.
3a NOIPO6bMIMN HCTPyrKINMMIIO HcNOIb3OBAHnIO iPod/iPhone/iPad o6paaiitcB kykoBOCTBy danHOrO iPod/iPhone/iPad.
Bocnpoun3BedeHne c iPod/iPhone/iPad
1 HaxmTe KhONky iPod/USB ha nyIbTe Dy Ira BbI6opa iPod B KaueCTBe MCTOuHnka BXoDHorO CnHaHa.
HaKMITE KHOIIky iPod/USB Ha IIyIbTe IY.
TOE je MOKHO cIeJIaTH, NaHKMHA KHOHNKY FUNCTION HApepeHnei NaHEINJ.
2 PoioknlouTe iPod/iPhone/iPad.
EcnH yctpoIbTO he BOCNPOIN3BOJNT 3aNNH iPod/iPhone/ iPad,ipnpOBeTIe cJIyUOJIoo
-Пдлгжбякьетаи Длианнй iPod/Phone/iPad
ДаннHMу yctrodbTOM.
- IpeenokIIOHnTE iPod/iPhone/iPad k yctpoiCTby.
EcnI 3TO He nOmoaTe, nOpno8yTe c60pocHTb BAI s iPod/iPhone/iPad.
IIOJIePDKHBAeTcJH IIOI DAHHOPO iPod/Iphone/IPad DAHBMyUCYTOPBCTOBM.
EeJi iPod/iPhone/iPad he pa6oTaert, npOBepbTe cIeJeUooee:
Bocnpon3BODnMbIe NcKn
Bocnpoun3BeDeHne DnCKOB CD-R/CD-RW
JaHnHoe yctroBtBO 3OBaIeBt BocIpOn3BOIHTb IINCKH CD-R/CD-RW, HA KOTOpbIX 3aIIHcAma My3bKa B φOpMaTe CD HIn aYdIOAnDIIbHe B φOpMAtX WMA i MP3. OJnako, HeKOTOpbIe IIcKn MOryt He BOCIpOn3BOIHTbcI HIn BOICIpOn3BOIHTbcS C IIIyMaMH HIn HCkAsKeHHMm 3Byka.
ДанhoeуctpoIbIeH3aHneHOToJIbKOДИВOCIOPOH3BcHEnO.OHNeIHO3BOJIeTbIIOJIHHTb3ANHbHaNcKbCD-RD-RW.
HeHHaIIH3HpOBAHbIe DnCKrCD-R/CD-RW HeJIb3B BocPONIB3cEHTNa DAHNOM yCTPOBCTBE.3a IIOp6HOH NfOpMaIeOcbpaIaTecb KpykoDCTBY IO HcNOJIb3OBAHnBOBaIeTOyPToCBtBa 3aIINH Na HNck.
He yctahabJIHbaiTe IIeep Ha TeJIeBn3Op HIN IeBTHoH MOHHTop. YcTahabJIHbaiTe Ha paCtOToHHN OT KACCtEHxM MaHHToFOHOH NdpYTHX uCTpOHCTb C MaHHTHbIM H3IyUeHHEM.
H36eRaIte yctaHOBky B cJIeJyIOuINX MeCTax:
Mecta,onoiaaohneIOIeCTBHe pRbHX coJIHEuHbIXyuei
CbIpbIE HIN IIOXO IIPOBETPHBaEMbIE MeCTa
- Upe3MepHO HarpTeBIE HIN XOJIOHbIe MeCTa
MecTa,IOBBePKeHHbIe Bn6paHn
CnIbHO 3aIIbJIeHHbIe HIN IpOkypeHHbIe MeCTa
- Mecta, raje pncytctbyet KOHOT, nap h blycokary temepatypa (kyxhns n. T.I.).
He pAmeeuaIe IaHnOoe YcypoICTBO Na IbHaBe NIIpyrOM IpEmeTe c abocOpHyIOUIM KpBtHEm, TAK KaK qAyeCTBO 3ByAnuM MoKet 3ZHuNTIEbHO YXJUINITCB.
He pa3meaainTe KaKne-Jn6o npedMeTbHa BepxHne naneJIn
He pameiie Kae kane-Jh6o peimetb naepehen naneHn neepea.
ObeperaTe OTOB3eCTBnTennla
He pa3meaai Te Iieep Ha BepxHne IaneHJe yChIHTeJIy HII dpyTHX yctPOTHB, bIeJIeHOIIH XTeIIIO. IIpyCTAHOBKE BO BcTOEHNOIIOke BO H36EkaHNe BO3JeCTBHn TEIIJI, BbIJeJEMOHOY CUnHTeJIM He IpyTHM yCTPOHTCBAMi, IIpyBO3MOKHOCTH, IOMecHTteIpieep Ha IIOKIy HNKe yCHlHTeJIa.
OTKJIIOUaIte nHTaHHe,ecn nJeeP He
NCNOJb3yETc8
B 3aBHcHMOCTh OT yCIOBHy 3HpHNO TpAHCJIINH TB-CHTHIAOB, eJCN BKIOUeH IIIEep, HBr KIOUeHHI TEJIeBH3Opa HA eEO 3KPAHe Mpy OT OTObApKahtb6 IIOLOb6. 3To He BIIBETCS HEnCIPABHOCTb IOIIePa HNI TEJIeBH3Opa. B 3TOM CIyuee BbIKOHHTe IIIEep. IIpi paIHOHpHEme TaKKe MOKet NcKAcATb6 3BYK.
KoHdEhcat
IIpn BHe3aHbHOM IppeMeeHH HIIeepa I3 XOLOHOrO MecTa B TEIIIOe OMOeHHe (HaIHPmep, 3HMoi IINPi p6bCTPOM BOHbHIe TEmIEATpyb R BIOHEJIeP, IIpHHPmep, IINp PAoBeO oBorpeBaTeJI) BHyTPn IIeepa (Ha paOohx DeTALIX N dAHTNcY THeHH NCKa) MOyrt o6pa0BATc MeJILKANI BOJI (KOHdEcat). IIpn 66pa0BAHOB KOHNHCATA IIeep He CMoKet P aobotatb HaJIeKeaJIIMM 6pa3OM HBOICIpON3BEDEHe CTAHOBHCT HeBO3MOKHebl. BMJIepeKHTe IIeep nn KOMHAnOH TMePTApE T BeTEHNE1-2 Yacob SO BKLIOHcHOM COCTOHHH (BpeMe BVIIePckHBHNA 3ABHCNT OT KOJIInueCTBA KOHNcHcATA). KaJIeBLK BoIb PaCCeHbAHOTc H BOICIpON3BEDEHe CTAOBHOTc BO3MOKBHM.
Takke, 06pa3OBAHHe KOHJDECaTa BO3MOJHO JIeTOM, cJIH IIeep IOJIeBpeAETc IIPMOMy BO3JIeCTBnO HOTOKA BO3YxA OTHOIINIOHepa. B 3OM cIJyae yCTahOBHTe IIeep B dpyrom MeCe.
Ounstka nIeepa
Obchyu NIOeep DoctatoOno IpoTepeB MraKoI TpIKoI.
JydaJIeHn CIIbIbIX 3aqrP3HeNMO ChmOteMgKyo
TpIKYB v PactBoPe HeHrpaIbHO MOIOIeO cpeCTBa V BoDE (5-6 cachTeB BOIDHa NOhY uCht b MOIOeO cpeCTBA),
TIaTeJIbHO OTOKeMHTE, IpOPrHte rP3b, 3aTEM cyXOH TpIKNo ydJIaJIte OCTABHIIOc BIAJIy.
HcnoJIb3OBAAHnC nIHPa, pactBoprrEJra, 6e3HHa HIN HHcKTHIIHdPn O6paHHeHH C IIeepOM MoKet IpiHBCTN IbpeKJHEnHO Hn IIeHNc HIOKpBTnA. TaKHe, J DoNYCKaJIte IPOIOJIKHTeJIbHOro COIPIKKOCHOBENH eHIHOBBx HIN BHNIOBbX H3eJIH C IIeepOM, TAK KaK 3TO MoKet IpiHBCTN K IOBpeKJHEnHO EOR KOpNYCA.
IpeJI HcNoJIb3ObaHHeM caJI@TeK I T.II, pIOJIHTAHHHX XHMKaTAMH, BHMaTEJbHO O3HaKOMbTeCb c Yka3aHHMn IIO pImHeEHIIHO.
PII ONUCTKTE IIEePAOTKIOHuaTe Ka6eJIb IITAHNAOT CetBOEPO3ETKH.
MepblnpedoctopoxhoCTn npu yctaHOBKe YCTPOIcTBa Ha NOKy CO CTKJIHHOIN DBePceH
He NaKHMaiTe KNOHky ▲ OPEN/CLOSE Ha IyIbTe Iy, HeTO6bI OTKpbTb ITOK IIOI DnCKa, ECLIN IDBpeu3 akpBtta. IDBepua NmoeMaet nepemeMeHHIO IOTKa H yctpoiCtBO MOKeT JIOJIYHTB IOBPeKJdEHNI.
OuNTKa DaTUnKa YTeHnA DnCKa
DaTtHKn TtEHN Hncka PInp HonpMaIIbHoi 3KcIlyaatauHH He
JIoJIkeh 3ArpIe3HHTCb, OJHaKO, cEIN IO KAKM-1JIbO
PfIyHnAaXapKeTepCHN KOBcPOnOH3BeJeHH yUdIATc8
H3-a CkOJIeHNe IbIi NII HnI rP3H, o6paTHTeCb B
6JIiKaHmN OoHnuaHbN bIeNTP oC5jxKbHnn
KOMIaHnPiNoneer. XOTa OHCTHeI JIraIePOB
IOCTUYHb B IpoJaZMe, MlCOBeyEm Bo3DepKaTc3r OTH
HCIOJIb3OBAHnA, TAK KAC OHM MOYr IOBpeITb DaTtHKn
TtEHnEi.
06paueHne c dnckamn
He nCIOH.3yIte NOBpeJKeHNHe (TpeCHyBnHE IHN NOKOP6JIENHbE) DnCKH.
HeIOnyckaiTeIaapanHnHa paOoey cTropone IncsKa IIIN ee 3arp3HNHeN.
He yctanabJIbIaBte BIIeep OJIOHOBPemEHNO 6OJIbIe OJHOIINCKA.
He NaJIeHbAte Ha NcK 6Mya My Hn CTNKebpI, He HcNoII3yIte KaPAnDaiu, IIapHKOBYu pyKy Hn IpyrOi HIIyIHHCTpymEt C3aOCTpeHHbIM KOHcOM. 3TO MoKET NOpeDITb Dnck.

XpaHeHne DnCKOB
XpaHHTNCKBnOHNHbHOyNAKOBKe,ynAKOBky nIbckampanaHTe BepTNkBaHo,IN36aeHTe MecT cIOBbHHNOH TeMeHPaTyPOHINbJIAxHOCTbIO, oBepeaHTe OT pIMBXoCIIeHbIX JUyeH INI OH OeHb HIN3KHX TEmEPaTpy.
IIpOHTITBE CIEIpeDyIpEeKJEdHnO tHOCHTeJIbHO O6paHHeHHC ZdHKnO.
OuNTKa DnCKOB
IaHbNcMOyT HE BOCIPNOBDOHTCbI3-3a HAIJINHn HA HIX OTeueATKOB PAJIbEe HIN IIINII. B TAKHN CUYAax, C NMOIOHIO POTHPOCHN IOPTPOKHO IPOPTREI DHCK OT ΜEENTPA K BHEIWEME KPYAO.He NOJIb3yIeBc 3qrp3AHENOH O6tRPOUHOr TpIKNo.
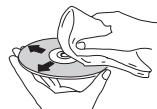
HeNoIb3yIeTc6 6b3HOM, PactOBtRETeHM IpyTMMI
JIeTuYHMN XMHKAtAMn. TaKke, He NoIb3yIeTc cIIpeem
IaIJIaTcTHIOH NIIH ANHTCTAHTUeCKHMN IpenapatAMn.
IaI yuaJIeHN HcIbHbX 3aqr43HennH cIeKAr cMOuHTte
BOIoM MArkyo TpRkKy, TuAteJIbHO OTOxKMITE, IIpoTprHc
rpg3h, tate CMyOH TpRknO yUdJIaH cNtKa bLIaYi
DnCKNOCO60fOpMbI
Iotppe6JIaemMa MoHIOCTb
PD-30 37 Br
PD-10 20 Br
IITpe6JIaEma MoIOHOCbBpeXHMoKHaHHa.0,45BT
Bec
PD-30 5,6 kT
PD-10 5,2K
Pa3MepbI
435 MM (III) x 128 MM (B) x 329 MM (Γ)
Pa6oay tempepatya . ot + 5^ no +35^
Pa6OuaBIAJXHOCTb 0T 5 % IO 85 %
(6e3 06pa3OBAHnKOHdeHcata)
Aydno BbIXoD (1 cTepeo npapa)
BbIXoJHOyPoBeHb. ayIHO BbIXOJa
200 mB (1 kΓι, -20 dB)
KoJIHueCTBO KaHaIOB 2
Pa3beM. RCA
XapakTepeNCTnKu nHΦpOBoA yDnO
YacToTHbIy DnHaNa3OH
CD 2TIO 20K
SACD. 2IIO50KII
COOTHOIIeHNE "CHrHaJI-IIIyM
CD 117
SACD. 117
HnHaMHueckn DnHaIa3OH
CD 100πB
SACD. 108 nB
Cymmaphe rapMOHueckne HcKaKeHHa:
CD 0,0022 %
SACD. 0,0020%
Ko3ΦΦHnIeHT DeToHaIHH .IpeJI H3MepenHnI
(± 0.001% BT, INKOBOE3HaueHHe) HIN HNKe
UΦpOBoB BbIXoA
IufobooOITnueckn BbIXoD
Pa3bem HnfoOBoro OITNueckoro CnHaJa
IufoBoi Koakchaihbi BbIXo.. Pa3bEm RCA
PpHaadJeXHOCTN
Aydnoka6eIb RCA (pa3beMbI KpaChnI/6eJIbI) 1
IyIbT IY 1
Cyxhe 6atapeiAAA/IEC R03.2
Ka6eJIb IHTaHH
TapaANTHnBt TaIOH (TOJIbKO MOeJIb DIA EBPOIIbI)
HHeTpkyuH NIO 3KcNlIyatauH (3TOT DOKymeHT)

PpmeaHne
Bc83Hc nocToHHbmyuIyHHeHmI3eJIINeroTexHHueckXeKxapTeepHCTHKn H KOCHpTyKMIHNMOYrT HMeHTb63 npEbpArHbTeJbHOrO yBeDMJIeHN.
IcnoJIb3OBAHHHIE 3Decb HAHMeHOBAHHKOMIIaHHN HpyIKyTOB YBJIHOTC8 TOPOBbIMN 3HaKaAMn IJIN 3apeHCTpHPoBAHbIMM TOPOBbIMN 3HaKaAMN COOTBTCTBvOHX KOMIIaHHN.
PIONEER CORPORATION, 2012.
Bce npaba 3aunuiehbl.
Discover the benefits of registering your product online at http://www.pioneer.co.uk (or http://www.pioneer.eu).
PIONEER ELECTRONICS (USA) INC.
P.O. BOX 1540, Long Beach, California 90801-1540, U.S.A. TEL: (800) 421-1404
PIONEER ELECTRONICS OF CANADA, INC.
340 Ferrier Street, Unit 2, Markham, Ontario L3R 2Z5, Canada TEL: 1-877-283-5901, 905-479-4411
PIONEER EUROPE NV
Haven 1087, Keetberglaan 1, B-9120 Melsele, Belgium TEL: 03/570.05.11
PIONEER ELECTRONICS ASIACENTRE PTE. LTD.
253 Alexandra Road, #04-01, Singapore 159936 TEL: 65-6472-7555
PIONEER ELECTRONICS AUSTRALIA PTY. LTD.
5 Arco Lane, Heatherton, Victoria, 3202, Australia, TEL: (03) 9586-6300
PIONEER ELECTRONICS DE MEXICO S.A. DE C.V.
Blvd.Manuel Avila Camacho 138 10 piso Col.Lomas de Chapultepec, Mexico, D.F. 11000 TEL: 55-9178-4270
K002_B4_Ru
© 2012 PIONEER CORPORATION.
All rights reserved.
© 2012 PIONEER CORPORATION.