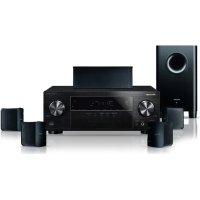
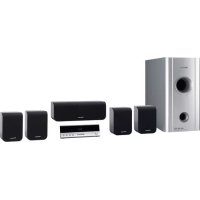
HTP-SLH600 - Home theater audio system PIONEER - Free user manual and instructions
Find the device manual for free HTP-SLH600 PIONEER in PDF.
| Product Type | Home cinema audio system with satellite speakers and subwoofer |
| Brand | PIONEER |
| Model | HTP-SLH600 |
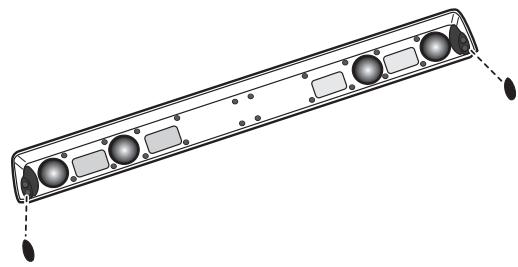
| Center speaker (S-HV600B) | Closed type, 2-way, woofer 5.7 cm x 3 cm (Dual side) x 4, 2 cm dome tweeter x 4 |
| Center speaker dimensions (W x H x D) | 900 mm x 66 mm x 93 mm |
| Center speaker weight | 1.7 kg |
| Center speaker impedance | 8 Ω |
| Front speakers (S-HV500-LR) | Closed type, 2-way, woofer 5.7 cm x 3 cm (Dual side) x 2, 2 cm dome tweeter x 2 |
| Front speakers dimensions (horizontal) | 207 mm x 100 mm x 100 mm |
| Front speakers dimensions (vertical) | 100 mm x 225 mm x 100 mm |
| Front speaker weight | 0.4 kg (each) |
| Front speakers impedance | 8 Ω |
| Subwoofer (S-SLW500) | Bookshelf type, bass-reflex, 16 cm cone |
| Subwoofer dimensions (horizontal) | 435 mm x 121 mm x 360 mm |
| Subwoofer dimensions (vertical) | 108.5 mm x 435 mm x 360 mm |
| Subwoofer weight | 4.5 kg |
| Subwoofer impedance | 4 Ω |
| Maximum input power (each speaker) | 100 W |
| Frequency response (center) | 130 Hz – 32 kHz |
| Frequency response (front) | 170 Hz – 32 kHz |
| Frequency response (subwoofer) | 35 Hz – 2.0 kHz |
| Sensitivity (center/front) | 76 dB (total 82 dB) |
| Sensitivity (subwoofer) | 78 dB |
| Protection function | Automatic speaker regression to avoid overloads |
| Maintenance | Clean with a dry or slightly damp cloth (diluted neutral detergent). Do not use chemical products. |
| Safety | Do not install on unstable surface; maintain a minimum distance of 10 cm from walls; do not use with unsuitable amplifiers. |
| Supplied accessories | Speaker cords, anti-slip pads, brackets, screws, gasket, warranty card, instruction manual |
Frequently Asked Questions - HTP-SLH600 PIONEER
User questions about HTP-SLH600 PIONEER
0 question about this device. Answer the ones you know or ask your own.
Ask a new question about this device
Download the instructions for your Home theater audio system in PDF format for free! Find your manual HTP-SLH600 - PIONEER and take your electronic device back in hand. On this page are published all the documents necessary for the use of your device. HTP-SLH600 by PIONEER.
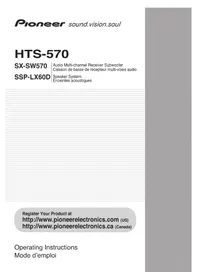
USER MANUAL HTP-SLH600 PIONEER
Thank you for buying this Pioneer product.
Please read through these operating instructions so you will know how to operate your model properly. After you have finished reading the instructions, put them away in a safe place for future reference.
Before you start
S-HV600B/S-HV500-LR
- This speaker system has an impedance of 8 , and should be connected only to an amplifier designed with a load impedance of 8 (the amplifier's speaker output connector should clearly be labeled "8 ").
In order to prevent damage to the speaker system resulting from input overload, please observe the following precautions:
- Do not supply power to the speaker system in excess of the maximum permissible input.
- When using a graphic equalizer to emphasize loud sounds in the high-frequency range, do not use excessive amplifier volume.
- Do not try to force a low-powered amplifier to produce loud volumes of sound (the amplifier's harmonic distortion will be increased, and you may damage the speaker).
Caution: installation
- Do not place the speaker on an unstable surface, as doing so may cause the speaker to fall and cause damage or bodily injury.
- Switch off and unplug your AV equipment and consult the instructions when connecting up components. Make sure you use the correct connecting cables.
- If you intend to install the speakers on a wall, first confirm that the wall is capable of supporting the weight of the speaker systems (S-HV600B: 1.7 kg, S-HV500-LR: 0.4 kg). If you are uncertain about the load-bearing capacity of the wall, consult a building specialist. Installing the speakers on an insecure wall is extremely dangerous, since the speakers could fall, leading to grave personal injury.
- After mounting, confirm the safety of the installation. Make periodic safety checks thereafter as well to confirm that the speakers continue to be mounted securely.
Caution: in use
- Do not use the speaker to output distorted sound for long periods of time. This can result in damages to the speaker and poses a potential fire hazard.
- Do not place heavy or large objects on top of the speaker. Doing so could provoke the speaker to fall, causing damages or bodily injury.
- Do not connect these speakers to devices other than an AV amplifier or other audio component, since malfunctions could result.
- This product incorporates autoregression technology to protect the speakers. If the speakers stop emitting noise when receiving too large a signal, turn the volume down on the amp and wait a few seconds. The protection feature disables itself automatically.
S-SLW500
- This product is a passive subwoofer, and must be combined with the VSX-S300 or other audio device provided with a built-in subwoofer amplifier.
- This speaker system has an impedance of 4 , and should be connected only to an amplifier designed with a load impedance of 4 (the amplifier's speaker output connector should clearly be labeled "4 ").
In order to prevent damage to the speaker system resulting from input overload, please observe the following precautions:
- Do not supply power to the speaker system in excess of the maximum permissible input.
- When using a graphic equalizer to emphasize loud sounds in the high-frequency range, do not use excessive amplifier volume.
- Do not try to force a low-powered amplifier to produce loud volumes of sound (the amplifier's harmonic distortion will be increased, and you may damage the speaker).
Caution: installation
- Do not place the speaker on an unstable surface, as doing so may cause the speaker to fall and cause damage or bodily injury.
- Switch off and unplug your AV equipment and consult the instructions when connecting up components. Make sure you use the correct connecting cables.
- Do not attach these speakers to the wall or ceiling, as they may cause injury in the event of a fall.
- Do not install your speakers overhead on the ceiling or wall.
Caution: in use
- Do not use the speaker to output distorted sound for long periods of time. This can result in damages to the speaker and poses a potential fire hazard.
- Do not place heavy or large objects on top of the speaker. Doing so could provoke the speaker to fall, causing damages or bodily injury.
- Do not sit or stand on the speaker, or let children play on the speaker. Doing so could provoke the speaker to fall, causing damages or bodily injury.
- The speaker system grill cannot be removed. Do not try to forcibly remove it since doing so may damage the grille.
Pioneer is not responsible for any accidents or damage that result from improper installation, misuse or modification of the product, or natural disasters.
Cleaning the speaker cabinet
With normal use, wiping with a dry cloth should be sufficient to keep the cabinet clean. If necessary, clean with a cloth dipped in a neutral cleanser diluted five or six times with water, and wrung out well. Do not use furniture wax or cleansers.
Never use thinners, benzine, insecticide sprays or other chemicals on or near this unit since these will corrode the surfaces.
What's in the box
S-HV600B
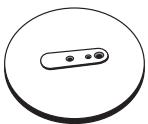
- Bracket x 2
Non-skid pads x 2
Wire stays x 4 - Warranty card x 1 (European model only)
- Operating instructions (this document)
S-HV500-LR
- Base x 2
- Stand arm x 2
- Bracket x 2
- Screw (Bind head) x 2
- Screw (Flat head) x 4
- Hexagonal nut x 2
- Seal x 2
- Warranty card × 1 (European model only)
- Operating instructions (this document)
S-SLW500
- Speaker cord (3 m) x 1
Non-skid pads x 4 - Seal x 4
- Warranty card x 1 (European model only)
Features
Sound is produced from both sides (grille net) of the speaker.
- This speaker features full sound directed in every direction. In contrast to ordinary speakers, the orientation shown below is the "front." To enjoy optimum sound quality, orient the speaker so that this "front" side is pointed toward your listening position.
S-HV500-LR: Horizontal orientation
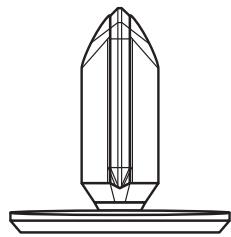
S-HV500-LR: Vertical orientation

Assembly
S-HV600B
1 Apply the non-skid pad to the bottom surface of the leg.
S-HV500-LR
Horizontal orientation
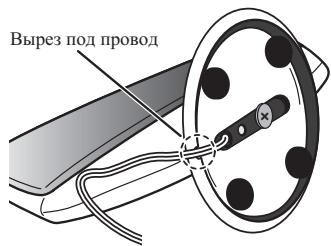
1 Pass the speaker cord through the hole in the base.

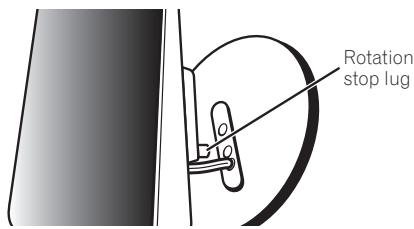
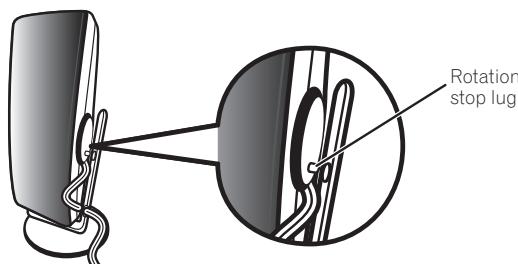
2 Align the rotation stop lug with the hole in the base.
3 Fasten the speaker to the base use the horizontal mounting screw from the back side of the base.
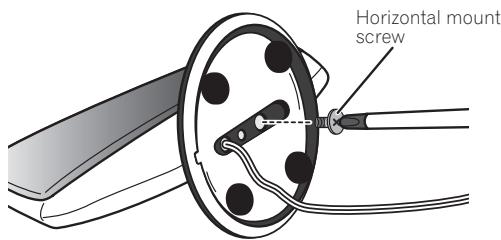
4 Set the speaker so that the speaker cord passes through the groove in the base.
Vertical orientation
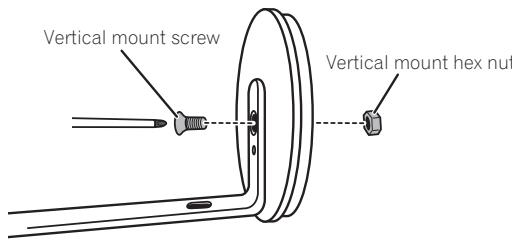
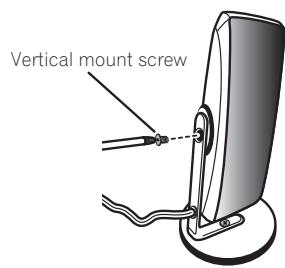
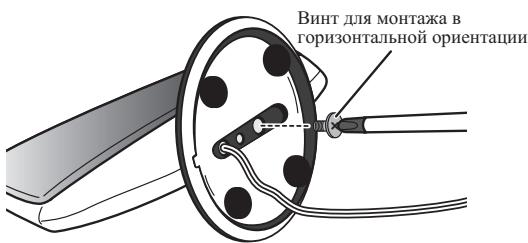
1 Align the vertical mounting stay with the hole in the base.
2 Fasten the vertical mount stay to the base using the vertical mount bolt and hex nut. Be sure the hex nut fits into the hexagonal groove in the bottom of the base.
3 Pass the speaker cord through the vertical mount satay hole.
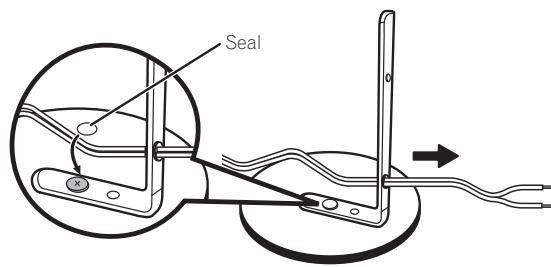
4 Align the speaker's rotation stop lug with the hole in the vertical stay.
5 Fasten the speaker to the vertical stay, using the vertical mount screw.
S-SLW500
Installing the subwoofer
The subwoofer can be mounted in either vertical or horizontal orientation. The factory default is horizontal orientation.
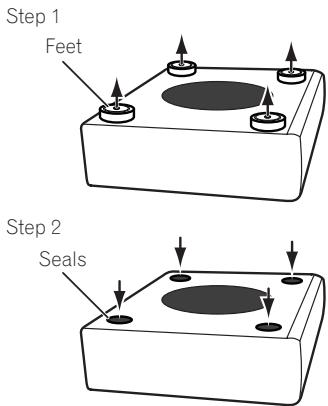
For vertical orientation installation
1 The feet are attached with Phillips screws; use a Phillips screwdriver to remove them.
2 Apply the accessory seals to the place the feet were located to hide the screw holes.
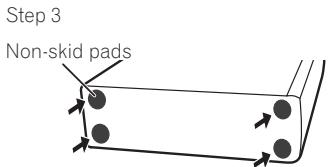
3 Apply the non-skid pads to the four corners of the surface where the subwoofer is to be mounted. Note that the non-skid pads may not be fully effective on all surfaces, so do not install in slippery locations.

CAUTION
- Do not attempt to perform these procedures while tilting the unit at an angle. Lay the unit on its side on soft cloth or other material that will not scar the unit.
Installation
Mounting location
Installation example: For both S-HV600B and S-SLW500

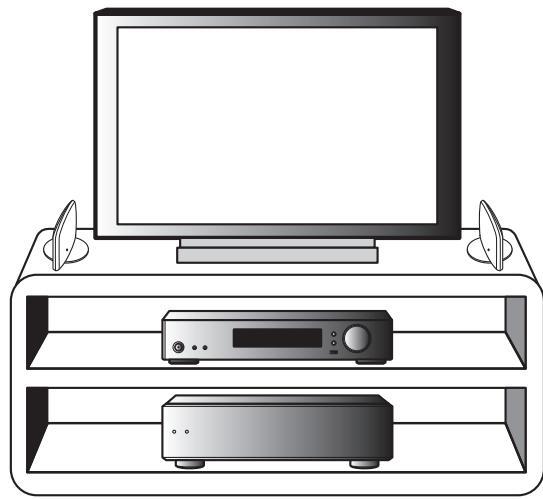
Installation example: For both S-HV500-LR and S-SLW500
S-HV600B
- Sounds played through speaker systems are easily affected in subtle ways by the conditions in the listening space.
- This speaker system does not feature a magnetically shielded design. As a result, color distortion may occur if the speaker is placed near a conventional CRT television. In this event, move the speaker farther away from the television. In addition, devices easily affected by magnetism (magnetic media cards, wrist-watches, video tapes, etc.) should not be placed near this speaker.
- If the room has a lot of reverberation, we recommend hanging heavy fabric on the walls, and/or putting a carpet on the floor to damp the sound. For best results, cover walls completely.

CAUTION
- Mounting the speakers in an unstable location is extremely dangerous and should not be attempted.
- Do not install the speakers on top of a television set or other unstable location. The speakers may fall, causing damage or personal injury.
S-HV500-LR
- Sounds played through speaker systems are easily affected in subtle ways by the conditions in the listening space.
- Can be mounted vertically or horizontally.
- When using a thin-profile television, place the speakers to the sides of the television, separated from the television by 5cm or more.
- When using a CRT television, separate the speakers from the television by 10cm . Since these speakers are designed for low-magnetic-flux leakage, some color smearing may be experienced depending on the installation conditions. In this case, turn off the power to the television and wait for 15 minutes to 30 minutes. If color smearing continues, separate the speaker systems farther from the television.
- If the room has a lot of reverberation, we recommend hanging heavy fabric on the walls, and/or putting a carpet on the floor to damp the sound. For best results, cover walls completely.

CAUTION
- Mounting the speakers in an unstable location is extremely dangerous and should not be attempted.
- Do not install the speakers on top of a television set or other unstable location. The speakers may fall, causing damage or personal injury.
S-SLW500
- The subwoofer reproduces ultra-low sounds in monaural, using the fact that the human ear has little directional sensitivity to sounds in the low frequencies. As a result, the subwoofer can be located in a variety of places, but if placed too distant, the linkage between sounds of the subwoofer and other speakers may seem unnatural. The intensity of the sound from the subwoofer can be adjusted by changing the distance from the wall.
- Front speakers installed to the right and left should be separated by about 1.8m to 2.7m distance. They should be installed at equal distances from the television, and at equal heights from the floor.
- Optional speaker stands can be purchased to facilitate optimal mounting of the surround speakers at or slightly above the listener's ear height.
- The surround effect will be diminished if the surround speakers are mounted at extreme distances from the listener's position.
- The subwoofer is not magnetically shielded and so should not be placed near a TV or monitor, as the interaction of magnetic materials can cause distortion of the colors on your TV screen. Devices easily affected by magnetism (magnetic media cards, wrist-watches, video tapes, etc.) should not be placed near the subwoofer.

CAUTION
- When installing the speaker system on a TV rack or AV rack, the rack or other audio components may vibrate due to vibrations generated by the speaker. Caution should be taken to assure that the rack shelves or other components do not shift positions due to the vibration.
-
Do not place disc media (DVD, CD) players on top of the subwoofer since sound skipping may occur due to vibration.
-
When installing, allow at least 10cm space between the rear of the unit and any wall; when installing vertically, also allow at least 10cm space between the unit's left side and any wall. If insufficient distance is taken, the unit may display inadequate performance, or may malfunction.
- Since the speaker system is heavy, installation in unstable locations is extremely dangerous and should not be attempted. A falling speaker may cause damage or personal injury.
Wall mounting the speakers (S-HV600B/S-HV500-LR)
Before mounting
- Remember that the speaker system is heavy and that its weight could cause the screws to work loose, or the wall material to fail to support it, resulting in the speaker falling. Make sure that the wall you intend to mount the speakers on is strong enough to support them. Do not mount on plywood or soft surface walls.
- Mounting screws are not supplied. Use screws suitable for the wall material and support the weight of the speaker.

CAUTION
If you are unsure of the qualities and strength of the wall, consult a professional for advice.
- Pioneer is not responsible for any accidents or damage that result from improper installation.
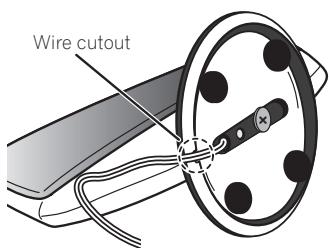
S-HV600B
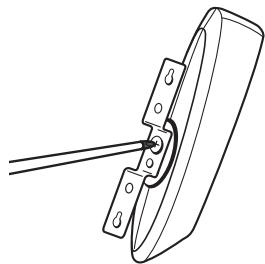
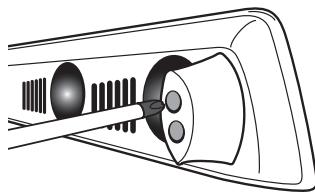
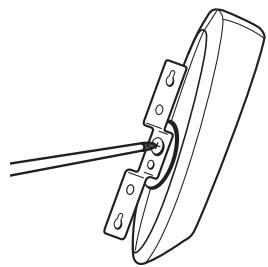
1 Use a Phillips screwdriver to remove the two screws holding the stands to the speaker.
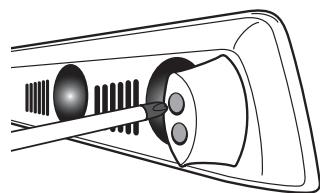
2 Using the two screws removed in step 1, fasten the wall mounting fixtures to the speaker.
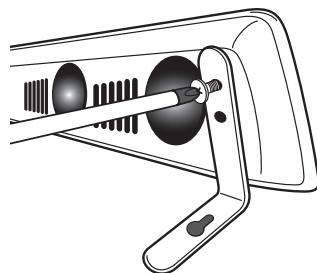
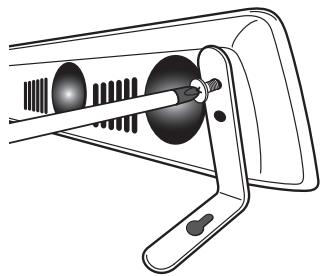
3 Affix the supplied wire stays to the top of the unit as shown and collect the cable there.

4 Mount on wall.
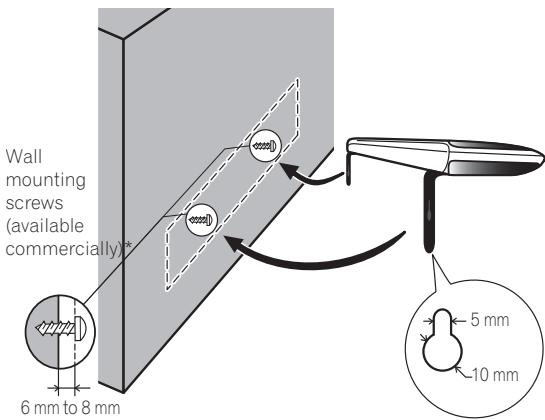
- Wall mounting screws are not included. Purchase appropriate screws taking into consideration the type of wall and the weight of the speaker system.
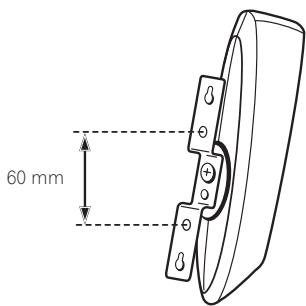
Open two holes in the wall 818mm apart.

S-HV500-LR
Wall mounting
To mount the unit on a wall, first use the vertical-installation screw to fasten the wall-mount brackets to the unit, then fasten the bracket to the wall.
When mounting the unit on a wall, confirm that the wall construction is of a type that allows the mounting screws (available commercially) to tighten fully and hold the speaker securely.
A wall made from weak material or of insufficient strength will be unable to support the weight of the speaker, potentially resulting in the speaker's falling.
Open two holes in the wall 95mm apart.
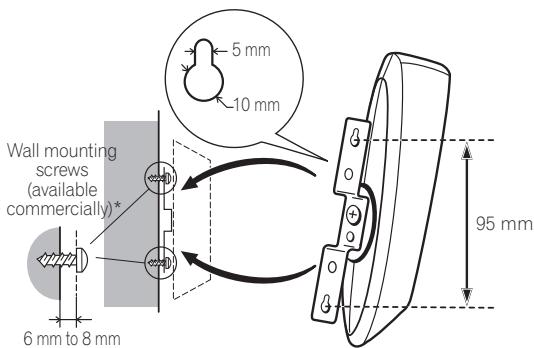
- Wall mounting screws are not included. Purchase appropriate screws taking into consideration the type of wall and the weight of the speaker system.

CAUTION
- When mounting the unit on a wall, unit weight and mounting methods may result in the danger of tipping or falling. Be very careful to prevent accidents.
- During installation, take care to confirm that the location chosen is fully able to support the weight of the unit. If you are uncertain about the strength of the wall, consult a building specialist.
- Pioneer takes no responsibility for damage or injury resulting from faulty or improper installation, modification of the unit, or natural disasters.
When mounting the unit on speaker stand
Use the accessory bracket when mounting the unit on any speaker stand or base other than those provided.
Use M5 screws for installation. Mounting screws are not provided. Follow the instructions accompanying your selected speaker stand or base.
Connection
Connecting the cord
S-HV600B/S-HV500-LR
1 Switch off the power to your amplifier.
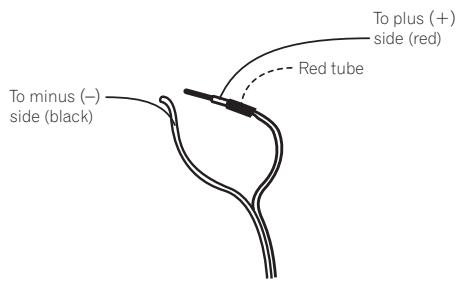
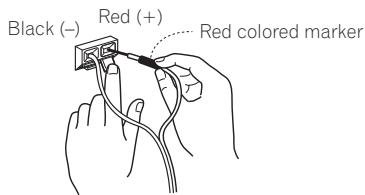
- Connect the wire with the colored marker to the red (+) terminal; the plain wire to the black (-) terminal.
2 Connect the other ends of the cords to the amp's speaker output terminals (for more details, refer to your amp instruction manual).
S-SLW500
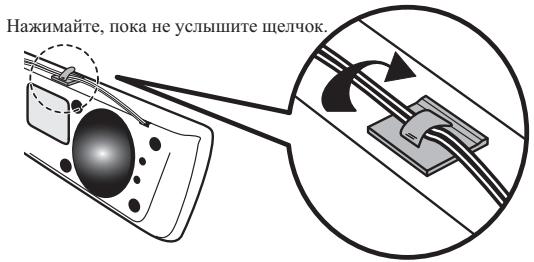
1 Attach one end of the supplied speaker cord to the rear of the each speaker.
- Connect the wire with the colored marker to the red (+) terminal; the plain wire to the black (-) terminal. Press down the spring-loaded tab and insert the wire, as shown below. Release the tab to secure the wire.
2 Connect the other ends of the cords to the amp's speaker output terminals (for more details, refer to your amp instruction manual).

CAUTION
- These speaker terminals carry HAZARDOUS LIVE voltage. To prevent the risk of electric shock when connecting or disconnecting the speaker cords, disconnect the power cord before touching any uninsulated parts.
- After connecting the plugs, pull lightly on the cords to make sure that the ends of the cords are securely connected to the terminals. Poor connections can create noise and interruptions in the sound.
- If the cords' wires happen to be pushed out of the terminals, allowing the wires to come into contact with each other, it places an excessive additional load on the receiver. This may cause the amp to stop functioning, and may even damage the receiver.
- When using a set of speakers connected to an receiver, you won't be able to obtain the normal stereo effect if the polarity (+, -) of one of the speakers (left or right) is reversed.
Operation (S-HV600B/S-HV500-LR)
Since the S-HV600B/S-HV500-LR are designed as compact satellite speakers, it is recommended that they be used in combination with a sub-woofer to provide full base sound. In this case, set your amplifier (receiver) speaker setting to "small" and the crossover frequency to 200Hz .
Specifications
S-HV600B
Enclosure Closed type
Configuration 2-Way
Woofer/Tweeter
.5.7 cm x 3 cm (Double sided) x 4pcs / 2 cm Dome type x 4pcs
Impedance 8Ω
Frequency range. 130 Hz to 32 kHz
Sensitivity 76 dB (Total 82 dB*)
Maximum input power. 100 W
Crossover frequency. 1.5 kHz
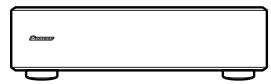
Exterior dimensions . 900 (W) mm x 66 (H) mm x 93 (D) mm
Weight 1.7 kg
Supplied accessories
Bracket 2
Non-skid pads. 2
Wire stays 4
Warranty card (European model only) 1
Operating instructions (this document)
S-HV500-LR
Enclosure Closed type
Configuration 2-way
Woofer/Tweeter .5.7 cm x 3 cm (Double sided) x 2pcs / 2 cm Dome type x 2pcs
Impedance 8Ω
Frequency range. 170 Hz to 32 kHz
Sensitivity .76 dB (Total 82 dB*)
Maximum input power. 100 W
Crossover frequency. 1.5 kHz
Exterior dimensions
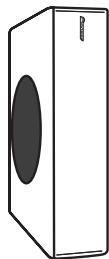
Horizontal orientation . . . 207 (W) mm x 100 (H) mm x 100 (D) mm
Vertical orientation. . . . . . 100 (W) mm x 225 (H) mm x 100 (D) mm
Weight. 0.4 kg
Supplied accessories
Base 2
Stand arm 2
Bracket. 2
Screw (Bind head) 2
Screw (Flat head) 4
Hexagonal nut. 2
Seal 2
Warranty card (European model only) 1
Operating instructions (this document)
S-SLW500
Enclosure Bass-reflex bookshelf type
Configuration 16 cm cone
Impedance 4Ω
Frequency range. 35 Hz to 2.0 kHz
Sensitivity 78 dB
Maximum input power. 100 W
Exterior dimensions
Horizontal orientation . . . 435 (W) mm x 121 (H) mm x 360 (D) mm
Vertical orientation. . . . . 108.5 (W) mm x 435 (H) mm x 360 (D) mm
Weight. 4.5 kg
Supplied accessories
Speaker cord (3 m) 1
Non-skid pads. 4
Seal 4
Warranty card (European model only) 1

Note
- The S-HV500-LR is shipped with two speaker systems per package.
-
Specifications and design subject to possible modification without notice, due to improvements.
-
Since these speakers produce sound from both sides, the output is doubled. Sound volume is equivalent to 82 dB with ordinary speakers.
© 2011 PIONEER CORPORATION.
All rights reserved.

If you want to dispose this product, do not mix it with general household waste. There is a separate collection system for used electronic products in accordance with legislation that requires proper treatment, recovery and recycling.
Private households in the member states of the EU, in Switzerland and Norway may return their used electronic products free of charge to designated collection facilities or to a retailer (if you purchase a similar new one).
For countries not mentioned above, please contact your local authorities for the correct method of disposal.
By doing so you will ensure that your disposed product undergoes the necessary treatment, recovery and recycling and thus prevent potential negative effects on the environment and human health.
K058b_A1_En
Avant de commencer
S-HV600B/S-HV500-LR
Precautions: Installation
Précautions: Installation
S-HV500-LR: Orientation vertical

Assemblage
S-HV600B
Avant I'installation
© 2011 PIONEER CORPORATION.
.207 (L) mm x 100 (A) mm x 100 (P) mm
Orientamento verticale . . . .100 (L) mm x 225 (A) mm x 100 (P) mm
Peso. 0,4 kg
.435 (L) mm × 121 (A) mm × 360 (P) mm
© 2011 PIONEER CORPORATION.
© 2011 PIONEER CORPORATION.
Orientation vertical
© 2011 PIONEER CORPORATION.
Operação (S-HV600B/S-HV500-LR)
© 2011 PIONEER CORPORATION.
© 2011 PIONEER CORPORATION.
Kopiering forbjuden.
© 2011 af PIONEER CORPORATION.
S-HV500-LR: Vertical stilling
Montering
S-HV600B
I vertical stilling. 100 (B) mm x 225 (H) mm x 100 (D) mm
Vekt .0,4 kg
Medfolgende utstyr
Bunnskive 2
Stativarm 2
Beslag 2
Skrue (krysshode). 2
Skrue (flat hode) 4
Sekskantmutter 2
Forseglingsskive 2
Garantikort (kun europeiske modeller) 1
Bruksanvising (dette dokumentet)
S-SLW500
Kammer. Bassrefleks beregnet for bokhylle
© 2011 PIONEER CORPORATION.
Alle rettigheter reservert.
Modell for Europa

Hvis du onsker Å kaste dette produktet, mä du ikke blande det med vanlig hushholdningsavfall. Det finnes et separat innsamlingssystem for bruke elektronikkprodukter, som i henhold til lovivningen krever korrekt spezialbehandling, gjenbruk og gjenvinning.
© 2011 PIONEER CORPORATION.
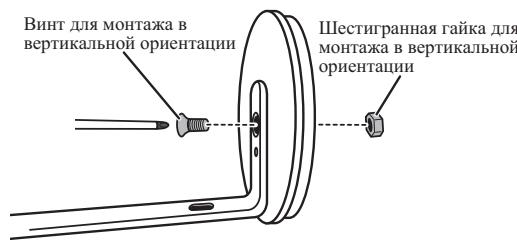
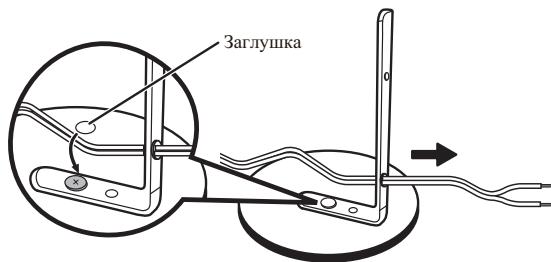
3 PnKpEnTe KOLOHky K OCHOBaHIO C NOMOsbIO KpeNExHOro BnHTa DnI MOHTaxa B ROpN3OHaJIbHOI OPneHTaun C o6paTHo CTOpHOI OCHOBaHry.
4 YctaHOBInTe KOLOHky TaKIM O6pa3OM, YTo6bl KOLOHOuHyb KAbel npOweJ Upe3 na3 B OCHOBAHN.
BepTKaJIbHaOpneTaun
1 CoBmecHTte cToKy dIa BepTnKaJIbHOro MOHTaxa C OTBepCTHeM BOCHOBAHIN.
2 PnKpEnIte cToKy dIy BePtnKaIbHorO MOHTaxa K OCHOBAHNIO C NOMOuBHO BVNTA dN MOHTaxa B BePtnKaIbHOI opNEtauCN I WeCTNRpaHNOI raKN. O63aTeIbHO NOcADNTe 6eCTNRpaHNY IOky B WcETnyroIbHyIO BbIeMKy B DHIune OCHOBAHN.
3 PpOpyCTHe KOLOHOuHbI Ka6eJIb YpeE 3OTBepCTne B CToIKe DnI BEPTNkAJIbHOrO MOHTaXa.
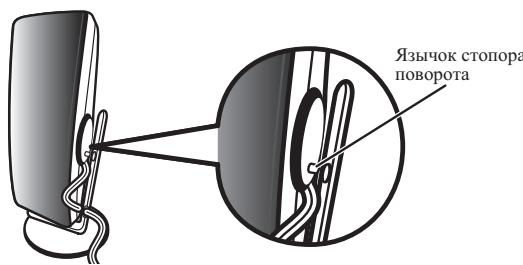
4 CoBmecHTte 3bIyOK CTOnopa NOBOpota KOJIOHKn C OTBepCTnEM B BePTNkaJIbHOH CTOnKe.
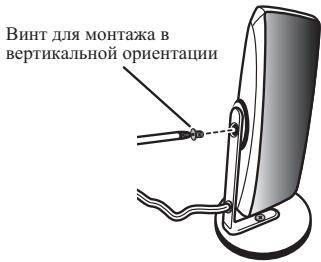
5 HaTeXHo npKpeNte KOJOnHky K BeptnKaIbHOI CToiKe C NOMOsbIO BINTa DnI BeptnKaIbHOrO MOHTaxa.
S-SLW500
YcTaHOBka ca6Bypepa
Ca6ByΦep MOKHO CMOHTHPOBaTb KaK B VeTrHKaJIbHO, TaK H roPn3OHTaJIbHOI opHeNTaIIHH. 3aBOJcKa KOnΦHrpyaIIHH IpeIIIOJIaIaER MoHTaK B rOpN3OHTaJIbHOI opHeNTaIIHH.
Ipeed BbINOJIHeHnEM MOHTaKa
IOMHHTE, YTO aKcYtuecka ChCTeMa HmEET 3HaHTeJIbHbI BEc. IOn ee TAgKecTb BnHTb MOryT ocJa6BeT, a MATEpHaI cTeHb He bIepeKATb HApTy3KH, YTO MOKeT pPiBcETN K PaIeHINo KOJIOHNK. Y6eIHTecb B Tom, YTO cTeHa, Ha KOTOpO IIaIHHpyETc MoTHIPOBaTb KOJIOHNK, HMeET IOCTaTOHyIO IpOuHOCTb, YTO6bl YdePkaTb IH. He MOHTpyIte Ha fAhePbIbx cTeHax INI cTeHax C MAnKHM NOKpbITHEm.
KpeIeKbIe BnHTbIe He IpiHJIaIaIOTc. HcIOJIb3yIte BnHTbI, COOTBeTCTByIOIIHe MaTePHaJIy CTeHbI H cIOco6HbIe BblEprKHNBaT BEc KOJIOHKn.

BHIMAHHE
- Ecln BbI He yBpeHb I XapakTeprhCTkax H necuie Cnoc6Hoctn CTeHb, OpaatHTecb 3a KOHCyIbTaIaHeN K cneHaJIHCTy.
KOMIIaHnI Pioneer He Hecet OTBcETBeHHocTb 3a KaKHe-JIb6o HecactThbE cIyuaH HJIN y6bITKN, Bb3BaHHbIe HJIN IOHeceHHbIe BCJIeCTBHe HEnaJIeKaJIeYcTaHOBKn.
S-HV600B
1 C NOMOJIbU KpeCTOO6pa3HOI OTBepTKI OTBnHTnte IBa BnHTa, KOtOpblIMN CToiKN KpeTcR K KOJIOHKe.
2 C NOMOJIbIO DByX BnHTOB, CHrTbIX B WARE 1, NaIeXHO npIkpENITE KpEnExHbIe yCTpoIcTBa K KOJOnHKe.
3 Pnpkpene npilaraembIe B KOMnJIeKeTe nocTaBKn depKaeTIN npOBONK N BepxHeu cactN KOLOHKn, KaK noka3Ho, IN pponyctnteYepe3 Hnx KaBeJb.
4 YctaHOBnTe Ha CTeHy.
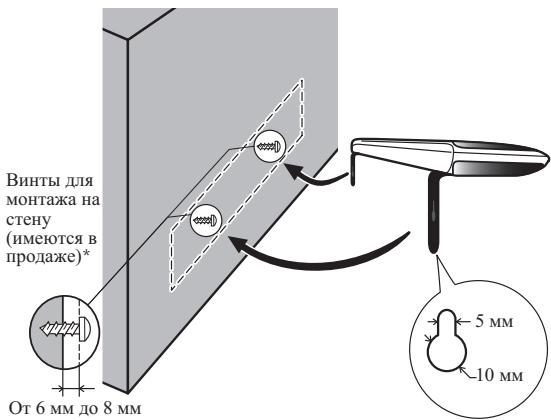
* BnHtIa I MOHTaKa H a CTeHy He IpnHJIaIaOTcH. IIpnHObPeTHe COOTBeTCTBIOUII HnHTb, IIpHHRA VB BHMaHHe TTH cTeHb I BE AkyCTHueckO CNTeMbI.
IIpocBepIInTe IBa OTBepCTHn B cTeHe Ha pacctOaHHn 818 MM dpyr ot npyra.

S-HV500-LR
MOHTAX Ha CTeHy
UTo6bI yCTaHOBHT bKOIOHky HA cTeHy, cHaayala C NOMOUIBO BHNTa IJI BERTKIAJIbHOJ yCTaHOBKn HAdEKeHNO pINKpeTINE TKEPEKHIe cKO6bI dMO JTOHa Ka HcTeHy K KOIOHke, a 3aTeM HaJeKHO 3aKpeTIne KpeEKeHyo cKO6y K cTeHe.
1 BbIKIOUHTe NHTaHne ycINNTeJIa.
PIONEER CORPORATION, 2011.
Bce npaba 3aunneHbI.
http://www.pioneer.co.uk
http://www.pioneer.fr
http://www.pioneer.de
http://www.pioneer.it
http://www.pioneer.nl
http://www.pioneer.be
http://www.pioneer.es
http://www.pioneer.pt
http://www.pioneer.se
http://www.pioneer.dk
http://www.pioneer.no
http://www.pioneer.fi
http://www.pioneer-rus.ru
http://www.pioneer.eu
© 2011 PIONEER CORPORATION.
All rights reserved.
© 2011 PIONEER CORPORATION.
PIONEER CORPORATION, 2011.
Bce npaba 3aunueneHbI.
PIONEER CORPORATION
1-1, Shin-ogura, Saiwai-ku, Kawasaki-shi, Kanagawa 212-0031, Japan
Kopnpaun PaonHp
1-1, CnH-Orpya, CaBai-ky, r. KabacKn, npefekkTypa Kaharaba, 212-0031, JnoHna
HmnpTeP: OOO "TNOHEP PUC"
125040, Pocca, r. MockBa, yI. IpaBbl, d.26 TeI.: +7(495) 956-89-01
PIONEER ELECTRONICS (USA) INC.
P.O. BOX 1540, Long Beach, California 90801-1540, U.S.A. TEL: (800) 421-1404
PIONEER ELECTRONICS OF CANADA, INC.
340 Ferrier Street, Unit 2, Markham, Ontario L3R 2Z5, Canada TEL: 1-877-283-5901, 905-479-4411
PIONEER EUROPE NV
Haven 1087, Keetberglaan 1, B-9120 Melsele, Belgium TEL: 03/570.05.11
PIONEER ELECTRONICS ASIACENTRE PTE. LTD.
253 Alexandra Road, #04-01, Singapore 159936 TEL: 65-6472-7555
PIONEER ELECTRONICS AUSTRALIA PTY. LTD.
5 Arco Lane, Heatherton, Victoria, 3202, Australia, TEL: (03) 9586-6300
PIONEER ELECTRONICS DE MEXICO S.A. DE C.V.
Blvd.Manuel Avila Camacho 138 10 piso Col.Lomas de Chapultepec, Mexico, D.F. 11000 TEL: 55-9178-4270
K002_B4_Ru