PD-D9-J - CD Player PIONEER - Free user manual and instructions
Find the device manual for free PD-D9-J PIONEER in PDF.

| Product Type | Super Audio CD Player |
| Brand | Pioneer |
| Model | PD-D9-J |
| Weight | 11.0 kg |
| Power Supply | 220 V to 240 V AC, 50/60 Hz |
| Standby Power Consumption | 0.4 W |
| Frequency Response (SACD) | 4 Hz to 50 kHz |
| Frequency Response (CD) | 4 Hz to 20 kHz |
| Signal-to-Noise Ratio (CD) | 115 dB |
| Signal-to-Noise Ratio (SACD) | 110 dB |
| Dynamic Range (CD) | 100 dB |
| Dynamic Range (SACD) | 110 dB |
| Total Harmonic Distortion (CD) | 0.002 % |
| Total Harmonic Distortion (SACD) | 0.003 % |
| Compatible Disc Formats | CD Audio, CD-R, CD-RW, Super Audio CD, MP3, WMA |
| Main Functions | Legato Link Pro, Pure Audio, programmed playback, repeat, random, display dimmer, SACD setup |
| Care and Cleaning | Clean discs with a soft dry cloth from the center outward. Exterior: dry or slightly damp cloth. Optics: refer to a professional. |
| Safety | Do not open the casing, avoid exposure to water and naked flames, follow ventilation instructions (at least 5 cm free space on top, 10 cm at rear, 5 cm on sides), unplug if not used for an extended period. |
| Spare Parts and Repairability | Refer all servicing to qualified personnel. No user-serviceable parts inside. |
| General Information | Operating temperature: +5 °C to +35 °C, humidity: 5% to 85% (without condensation). Included accessories: remote control, CR2025 lithium battery, stereo RCA audio cable, SR control cable, power cord, instruction manual, warranty card. |
Frequently Asked Questions - PD-D9-J PIONEER
User questions about PD-D9-J PIONEER
0 question about this device. Answer the ones you know or ask your own.
Ask a new question about this device
Download the instructions for your CD Player in PDF format for free! Find your manual PD-D9-J - PIONEER and take your electronic device back in hand. On this page are published all the documents necessary for the use of your device. PD-D9-J by PIONEER.
USER MANUAL PD-D9-J PIONEER
The lightning flash with arrowhead symbol, within an equilateral triangle, is intended to alert the user to the presence of uninsulated "dangerous voltage" within the product's enclosure that may be of sufficient magnitude to constitute a risk of electric shock to persons.
CAUTION
RISK OF ELECTRIC SHOCK DO NOT OPEN
CAUTION:
TO PREVENT THE RISK OF ELECTRIC SHOCK, DO NOT REMOVE COVER (OR BACK). NO USER-SERVICEABLE PARTS INSIDE. REFER SERVICING TO QUALIFIED SERVICE PERSONNEL.

The exclamation point within an equilateral triangle is intended to alert the user to the presence of important operating and maintenance (servicing) instructions in the literature accompanying the appliance.
D3-4-2-1-1_En-A
CAUTION
This product is a class 1 laser product, but this product contains a laser diode higher than Class 1. To ensure continued safety, do not remove any covers or attempt to gain access to the inside of the product. Refer all servicing to qualified personnel. The following caution label appears on your unit. Location: rear of the unit
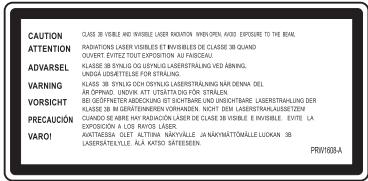
CLASS 1 LASER PRODUCT
D3-4-2-1-8_B_En
WARNING
This equipment is not waterproof. To prevent a fire or shock hazard, do not place any container filled with liquid near this equipment (such as a vase or flower pot) or expose it to dripping, splashing, rain or moisture. D3-4-2-1-3_A_En
WARNING
To prevent a fire hazard, do not place any naked flame sources (such as a lighted candle) on the equipment. D3-4-2-1-7a_A_En
Operating Environment
Operating environment temperature and humidity: +5 °C to +35 °C (+41 °F to +95 °F); less than 85 %RH (cooling vents not blocked)
Do not install this unit in a poorly ventilated area, or in locations exposed to high humidity or direct sunlight (or strong artificial light) D3-4-2-1-7c_A_En
This product complies with the Low Voltage Directive 2006/95/EC and EMC Directive 2004/108/EC.
D3-4-2-1-9a_A_En
VENTILATION CAUTION
When installing this unit, make sure to leave space around the unit for ventilation to improve heat radiation (at least 5 cm at top, 10 cm at rear, and 5 cm at each side).
WARNING
Slots and openings in the cabinet are provided for ventilation to ensure reliable operation of the product, and to protect it from overheating. To prevent fire hazard, the openings should never be blocked or covered with items (such as newspapers, table-cloths, curtains) or by operating the equipment on thick carpet or a bed. D3-4-2-1-7b_A_En
CAUTION
The POWER switch on this unit will not completely shut off all power from the AC outlet. Since the power cord serves as the main disconnect device for the unit, you will need to unplug it from the AC outlet to shut down all power. Therefore, make sure the unit has been installed so that the power cord can be easily unplugged from the AC outlet in case of an accident. To avoid fire hazard, the power cord should also be unplugged from the AC outlet when left unused for a long period of time (for example, when on vacation). D3-4-2-2-2a_A_En
WARNING
Before plugging in for the first time, read the following section carefully.
The voltage of the available power supply differs according to country or region. Be sure that the power supply voltage of the area where this unit will be used meets the required voltage (e.g., 230 V or 120 V) written on the rear panel. D3-4-2-1-4_A_En
If the AC plug of this unit does not match the AC outlet you want to use, the plug must be removed and appropriate one fitted. Replacement and mounting of an AC plug on the power supply cord of this unit should be performed only by qualified service personnel. If connected to an AC outlet, the cut-off plug can cause severe electrical shock. Make sure it is properly disposed of after removal. The equipment should be disconnected by removing the mains plug from the wall socket when left unused for a long period of time (for example, when on vacation). D3-4-2-2-1a_A_En
This product is for general household purposes. Any failure due to use for other than household purposes (such as long-term use for business purposes in a restaurant or use in a car or ship) and which requires repair will be charged for even during the warranty period. K041_En
POWER-CORD CAUTION
Handle the power cord by the plug. Do not pull out the plug by tugging the cord and never touch the power cord when your hands are wet as this could cause a short circuit or electric shock. Do not place the unit, a piece of furniture, etc., on the power cord, or pinch the cord. Never make a knot in the cord or tie it with other cords. The power cords should be routed such that they are not likely to be stepped on. A damaged power cord can cause a fire or give you an electrical shock. Check the power cord once in a while. When you find it damaged, ask your nearest PIONEER authorized service center or your dealer for a replacement. S002_En
Replacement and mounting of an AC plug on the power supply cord of this unit should be performed only by qualified service personnel.
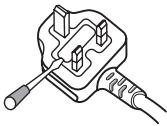
IMPORTANT: THE MOULDED PLUG
This appliance is supplied with a moulded three pin mains plug for your safety and convenience. A 10 amp fuse is fitted in this plug. Should the fuse need to be replaced, please ensure that the replacement fuse has a rating of 10 amps and that it is approved by ASTA or BSI to BS1362.
Check for the ASTA mark 📂 or the BSI mark 🌐 on the body of the fuse.
If the plug contains a removable fuse cover, you must ensure that it is refitted when the fuse is replaced. If you lose the fuse cover the plug must not be used until a replacement cover is obtained. A replacement fuse cover can be obtained from your local dealer.
If the fitted moulded plug is unsuitable for your socket outlet, then the fuse shall be removed and the plug cut off and disposed of safely. There is a danger of severe electrical shock if the cut off plug is inserted into any 13 amp socket.
If a new plug is to be fitted, please observe the wiring code as shown below. If in any doubt, please consult a qualified electrician.
IMPORTANT: The wires in this mains lead are coloured in accordance with the following code:
As the colours of the wires in the mains lead of this appliance may not correspond with the coloured markings identifying the terminals in your plug, proceed as follows;
The wire which is coloured BLUE must be connected to the terminal which is marked with the letter N or coloured BLACK.
The wire which is coloured BROWN must be connected to the terminal which is marked with the letter L or coloured RED.
How to replace the fuse: Open the fuse compartment with a screwdriver and replace the fuse.
natural_image
Line drawing of a plug with a screwdriver inserted, showing internal components (no text or symbols)D3-4-2-1-2-2_B_En

If you want to dispose this product, do not mix it with general household waste. There is a separate collection system for used electronic products in accordance with legislation that requires proper treatment, recovery and recycling.
Private households in the member states of the EU, in Switzerland and Norway may return their used electronic products free of charge to designated collection facilities or to a retailer (if you purchase a similar new one).
For countries not mentioned above, please contact your local authorities for the correct method of disposal.
By doing so you will ensure that your disposed product undergoes the necessary treatment, recovery and recycling and thus prevent potential negative effects on the environment and human health. K05
Thank you for buying this Pioneer product.
Please read through these operating instructions so that you will know how to operate your model properly. After you have finished reading the instructions, put them in a safe place for future reference.
Contents
01 Before you start
Features.... 5
What's in the box 6
Disc/content format playback compatibility 7
02 Connecting up
Connecting to an amplifier.... 8
Using the remote sensor of another Pioneer component....8
Plugging in 9
03 Controls and displays
Front panel.... 10
Remote control 11
Display.... 11
04 Getting started
Switching on....12
Playing discs....12
Other playback features .....13
05 Other settings and features
Listening to Pure Audio....14
Using the SACD Setup .....14
Using Legato Link Pro....14
Dimming the display....14
Displaying disc information.....14
06 Additional information
Hints on installation .....15
Taking care of your player and discs .....15
Troubleshooting 17
Glossary 18
Specifications 18
Chapter 1
Before you start
Features
• Quick response power supply circuit
The superior power supply circuit adopted by this unit achieves vastly improved response by employing ‘no feedback’ circuitry and low impedance parallel main capacitors characteristically used in professional audio monitoring.
- Low jitter clock
This unit provides extremely stable, low jitter clock streams through the use of an integrated circuit with a high performance oscillator.
• Legato Link Conversion Pro and Hi-Bit
Pioneer's unique Legato Link Conversion system restores high-frequency dynamics lost in the digital recording process, to fully reproduce all the shading and detail of the original musical performance. This results in a minimum amount of phase shift across the entire hearable audio spectrum.
• Twin D/A converter 192 kHz/24-bit
The on-board Twin Wolfson 192 kHz/24-bit DAC means that this player is fully capable of delivering exceptional sound quality in terms of dynamic range, low-level resolution and high-frequency detail.
• Pure Audio listening
The Pure Audio feature allows you to listen to analog audio sources with the digital outputs disabled, and the front panel display switched off.
• Fine-tuned to world-class standards
With the cooperation of the world-class studio engineers at AIR Studios, this player has been AIR Studios certified.

What's in the box
Please confirm that the following accessories are in the box when you open it.
- Remote control
• Lithium battery (CR2025)
• RCA/phono stereo audio cable - SR control cable
- Power cable
- Operating instructions
- Warranty card
Inserting the battery
Insert the lithium battery (CR2025) into the remote control as shown below. The battery supplied with this unit is stored in the battery casing (see step 3 below). When you notice a decrease in the operating range, replace the battery in the same manner.
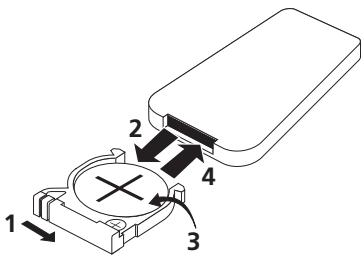
1 Push the release tab to the right to open the battery casing.
2 Pull out the battery casing.
3 Remove the battery from the casing.
If you're doing this for the first time, remove the protective seal from the battery supplied with the system before re-inserting it.
4 Place a new battery in the casing.
Make sure the ⊕ side of the battery is facing up when you place it in the space provided.

Caution
When using lithium batteries, please observe the following:
- There is danger of explosion if the battery is incorrectly replaced. Make sure to replace only with the same or equivalent type recommended by the manufacturer.
- Dispose of used battery cells immediately after replacement. Keep away from children.
- If swallowed, please contact a doctor immediately.
- Lithium batteries may present a fire or chemical burn hazard if misused. Do not disassemble, heat above 100 °C, or incinerate.
- Remove the battery if the unit isn't going to be used for a month or more.
- When disposing of used batteries, please comply with governmental regulations or environmental public instruction's rules that apply in your country or area.
- Do not use or store batteries in direct sunlight or other excessively hot place, such as inside a car or near a heater. This can cause batteries to leak, overheat, explode or catch fire. It can also reduce the life or performance of batteries.
Disc/content format playback compatibility
This player is compatible with a wide range of audio disc types and media formats. Playable discs will generally feature one of the following logos on the disc and/or disc packaging. Note however that some disc types, such as recordable CDs, may be in an unplayable format — see the Disc compatibility table below for further compatibility information.
Please also note that recordable discs cannot be recorded using this player.

Audio CD

CD-R

CD-RW

SUPER AUDIO CD
Super Audio CD
Disc compatibility table
| Media | Compatible formats |
| CD-R/-RW | CD-Audio, ISO 9660 CD-ROM* *ISO 9660 Level 1 or 2 compliant. CD physical format: Mode1, Mode2 XA Form1. Romeo and Joliet file systems are both compatible.Multi-session playback: NoUnfinalized disc playback: No |
| Compressed audio | MPEG-1 Audio Layer 3 (MP3), Windows Media Audio (WMA)Sampling rates: 44.1 kHzBit-rates: Any (128 kbps or higher recommended)VBR (variable bit rate) playback: NoWMA lossless encoding: NoDRM (Digital Rights Management) compatible: Yes (DRM-protected audio files will not play in this player.)File extensions: .mp3, .wma (these must be used for the player to recognize MP3/WMA files)File structure (may differ): Up to 299 folders on a disc; up to 648 folders and files (combined) within each folder |
Media
Compatible formats
PC-created disc
- Discs recorded using a PC may not be playable due to the setting of the software used to create the disc. In these instances, check the software manual or disc boxes for more on compatibility.
• Discs recorded in packet write mode are not compatible.
About WMA
This player can playback Windows Media Audio content.
WMA is an acronym for Windows Media Audio and refers to an audio compression technology developed by Microsoft Corporation. WMA content can be encoded by using Windows Media® Player version 7.7.1, Windows Media® Player for Windows® XP, or Windows Media® Player 9 series.
Windows Media is either a registered trademark or trademark of Microsoft Corporation in the United States and/or other countries.
This product includes technology owned by Microsoft Corporation and cannot be used or distributed without a license from Microsoft Licensing, Inc.
About DualDisc playback
A DualDisc is a new two-sided disc, one side of which contains DVD content video, audio, etc. while the other side contains non-DVD content such as digital audio material. The non-DVD, audio side of the disc is not compliant with the CD Audio specification and therefore may not play. For more detailed information on the DualDisc specification, please refer to the disc manufacturer or disc retailer.
Chapter 2
Connecting up
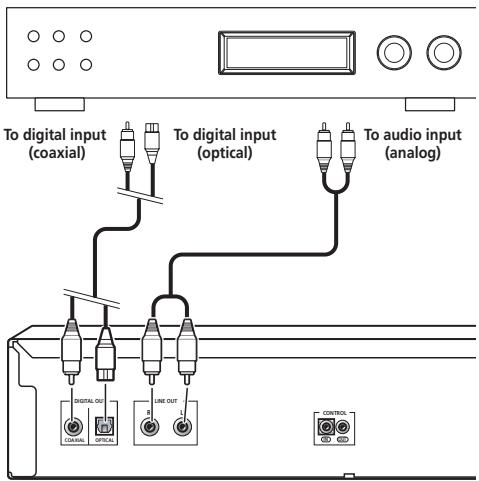
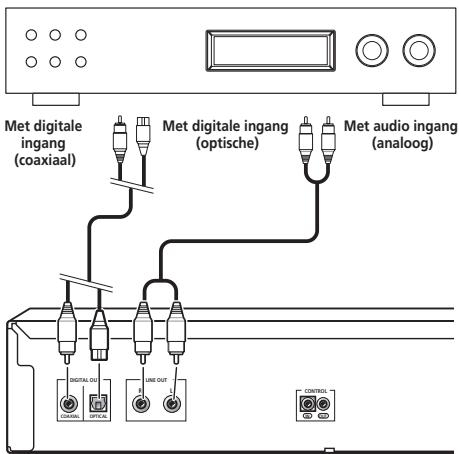
Connecting to an amplifier
You can connect this player to your amplifier or receiver using the analog outputs or one of the digital outputs.
If you connect using one of the digital outputs, you should also connect the 2 channel analog outputs for compatibility with all discs.
1 Connect the analog LINE OUT jacks on this player to a set of analog audio inputs on your amplifier.
Amplifier or receiver
This player
2 Connect one of the digital outputs to the corresponding digital input on your amplifier.
For an optical connection, use an optical cable (not supplied) to connect the OPTICAL
DIGITAL OUT jack to an optical input on your amplifier.
For a coaxial connection, use a coaxial cable (not supplied) to connect the COAXIAL DIGITAL OUT jack to a coaxial input on your amplifier.
- Note that SACD audio is not output through these jacks, so this connection should be in addition to, rather than instead of, an analog connection.
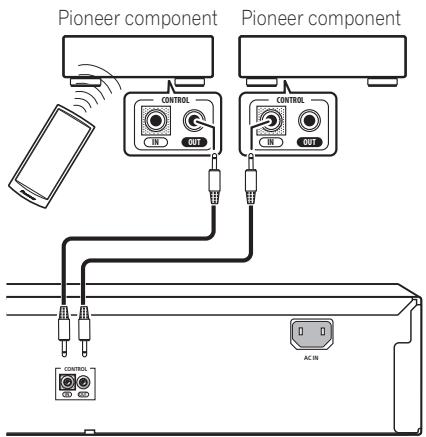
Using the remote sensor of another Pioneer component
Many Pioneer components have SR CONTROL jacks which can be used to link components together. This allows you to use the remote sensor of just one component, which is useful if you want to put several components out of view (for example, in a closed shelf space). When you use a remote control, the control signal is passed along the chain to the appropriate component. ^1
- Note that if you use this feature, make sure that you also have at least one set of analog audio jacks connected to another component for grounding purposes.
1 Decide which component you want to use the remote sensor of.
When you want to control any component in the chain, this is the remote sensor at which you'll point the corresponding remote control.

1 If you have connected a remote control to the CONTROL IN jack (using a mini-plug cable), you won't be able to control this unit using the remote sensor.
2 Connect the CONTROL OUT jack of that component to the CONTROL IN jack of another Pioneer component.
Use a cable with a mono mini-plug on each end for the connection.
This player
3 Continue the chain in the same way for as many components as you have.
Plugging in
Make sure to complete all connections before connecting to an AC outlet.
- Connect the AC power cord to the AC IN inlet on the rear panel of the player, then plug into a power outlet.
Chapter 3
Controls and displays
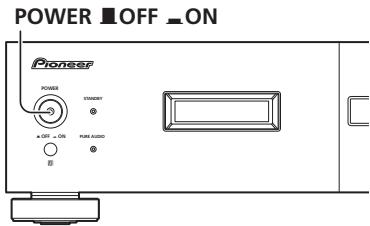
Front panel
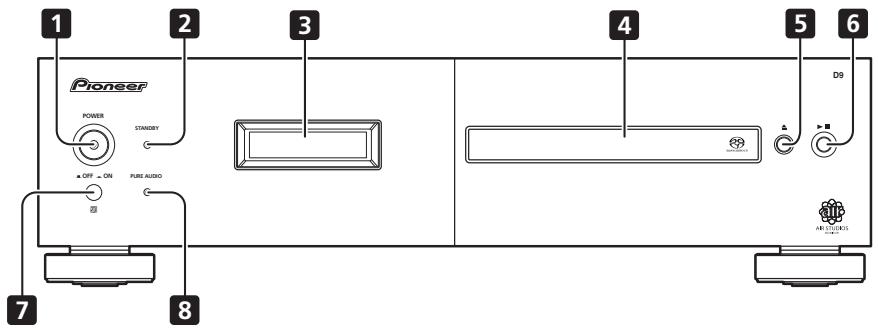
1 POWER ■OFF ■ON (page 12) ^1
2 STANDBY indicator
3 Display (page 11)
4 Disc tray
5 ▲ (page 12)
6 ▶/■ (page 12)
7 Remote sensor
8 PURE AUDIO indicator (page 14)
Note
When the unit is in the standby mode, if the power is turned off by pressing the main unit's POWER button, the power will not turn on if the button is pressed again. To turn on the power in this case, press either the remote control unit's ⏻ button or a different button (other than the POWER button) on the main unit.
- When the unit is in the standby mode, if the power is turned off by unplugging the power cord, the power will not turn merely by reconnecting the power cord. To turn on the power in this case, reconnect the power cord and then press either the remote control unit's ⏻ button or a different button (other than the POWER button) on the main unit.
Remote control
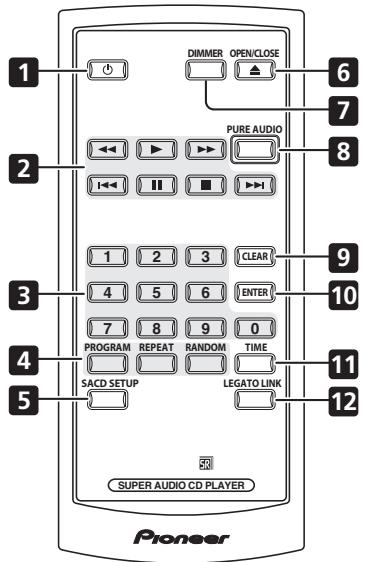
1 Ⓧ (page 12)
2 Playback controls (page 12)
3 Number buttons (page 12)
4 PROGRAM (page 13)
REPEAT (page 13)
RANDOM (page 13)
5 SACD SETUP (page 14)
6 ▲ OPEN/CLOSE (page 12)
7 DIMMER (page 14)
8 PURE AUDIO (page 14)
9 CLEAR
10 ENTER
11 TIME (page 14)
12 LEGATO LINK (page 14)
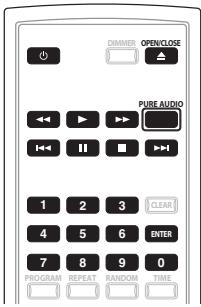
Using the remote control
Keep in mind the following when using the remote control:
- Make sure that there are no obstacles between the remote and the remote sensor on the unit.
- The remote has a range of about 7 m at an angle of about 30° from the remote sensor.
- Remote operation may become unreliable if strong sunlight or fluorescent light is shining on the unit's remote sensor.
- Remote controllers for different devices can interfere with each other. Avoid using remotes for other equipment located close to this unit.
- Replace the batteries when you notice a fall off in the operating range of the remote.
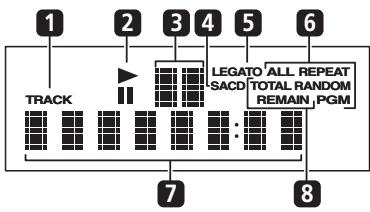
Display
flowchart
graph TD
    A["1 TRACK"] --> B["2"]
    B --> C["3 LEGATO ALL REPEAT SACD"]
    C --> D["4 TOTAL RANDOM REMAIN, PGM"]
    D --> E["5"]
    E --> F["6"]
    F --> G["7"]
    G --> H["8"]
1 TRACK – Lights when the track number is indicated.
2 ▶/II – Light during playback/when paused.
3 Scan display – Shows the scan speed.
4 SACD – Lights during SACD playback.
5 LEGATO – Lights when Legato Link Pro is switched on (page 14).
6 (ALL) REPEAT/RANDOM/PGM – Light to indicate the playback mode (page 13).
7 Character display
8 TOTAL/REMAIN – Indicate the disc/track information currently displayed (page 14).
Chapter 4
Getting started
Switching on
After making sure that everything is connected properly and that the player is plugged in, push the POWER button into the ON position to switch the player on.
- Press ⏻ on the remote to switch the unit into standby.
Playing discs
The basic playback controls for playing CDs, SACDs, and MP3/WMA discs are covered here. Further functions are detailed in Other playback features on page 13.
1 If the player isn't already on, press POWER to switch it on.
2 Press ▲ (OPEN/CLOSE) to open the disc tray.
3 Load a disc.
Load a disc with the label side facing up, using the disc tray guide to align the disc. Once properly seated, press ▲ to close the disc tray.

natural_image
Illustration of a hand using a circular tool to press or install a mechanical component (no text or symbols visible)4 Press ▶ (play) to start playback.
Basic playback controls
The table below shows the basic controls for playing discs.
| Button | What it does |
| ▶ | Starts playback. |
| II | Pauses a disc that's playing, or restarts a paused disc. |
| ▶/■ (front panel only) | Starts playback/stops a disc that's playing.• While depressing ▶/■, press ▲ (front panel only). Counting from the first track on the disc, playback will begin from the track number corresponding to the number of times ▲ is pressed. |
| ■ | Stops playback. |
| ◀◀ | Press to start fast reverse scanning. Press ▶ (play) to resume normal playback. |
| ▶▶ | Press to start fast forward scanning. Press ▶ (play) to resume normal playback. |
| I◀◀ | Skips to the start of the current track, then to previous tracks. |
| ▶▶I | Skips to the next track. |
| Numbers (not available with MP3/ WMA data discs) | Use to enter a track number. Press ENTER to select.• If the disc is stopped, playback starts from the selected track.• If the disc is playing, playback jumps to the start of the selected track. |

FAQ
- Why can't I hear SACD audio through the digital outputs?
SACD audio is only available through the analog outputs. This is not a malfunction.
Other playback features
The following features allow you to customize the playback order. Note that these features are not available with data discs (containing WMA/MP3 files).
Using repeat play
There are two repeat play options available during playback.
- During playback, press REPEAT to select a repeat play mode.
Select between 1-track repeat (REPEAT lights in the display), all repeat (ALL REPEAT lights in the display), or repeat off.
- It's also possible to use ‘all’ repeat play together with program play (see Creating a program list below).
Using random play
Use the random play feature to play tracks at random. You can set the random play option when a disc is playing or stopped. ^1
- Press RANDOM to start random play. Random play remains in effect (RANDOM shows in the display) until you press ■ (or RANDOM again) to cancel.

Tip
- Use the following controls during random play:
| Button | What it does |
| ▶▶I | Selects a new track at random. |
| ◀◀ | Returns to the beginning of the current track. |
Creating a program list
This feature lets you program the play order of tracks on a disc. ^2
1 While stopped, press PROGRAM.
2 Use the number buttons and ENTER to select a track for the current step in the program list.
If you accidentally enter the wrong track, press CLEAR to delete it.
3 Repeat step 2 to build up a program list. A program list can contain up to 24 tracks.
4 To play the program list, press ▶ (play).
Program play remains active (PGM shows in the display) until you stop playback (press
▶ (play) after ■ (stop) to start normal playback).
- Press PROGRAM then ▶ (play) to restart program play.
- To add more tracks to the program list, repeat steps 1 and 2.
- When the disc is stopped, press PROGRAM then CLEAR to erase one track at a time (from the end of the list), or simply press CLEAR to erase all tracks.
Note
1 You can't use random play together with program play.
2 You can't program pauses, or use program play together with random or 1-track repeat play.
Chapter 5
Other settings and features
Listening to Pure Audio
This unit has been specially designed to provide you the truest possible reproduction of recorded audio. When the Pure Audio feature is selected, the front panel display is switched off and the digital outputs are disabled, leaving you with the pure sound source.
- Press PURE AUDIO to switch Pure Audio listening on or off.
The PURE AUDIO indicator on the front panel lights to indicate Pure Audio listening is on.
Using the SACD Setup
Hybrid SACD discs include a conventional CD layer along with the high-resolution SACD layer, so it is necessary to indicate to the player which layer you want to listen to. Use the SACD Setup to do this. ^1
- When the disc is stopped, press SACD SETUP to switch between the CD area and the SACD area of a hybrid disc.
Using Legato Link Pro
For as great as CDs sound, the digital recording process clips off important musical shadings and nuances above 20 kHz. These signals contain important clues about musical texture and shape that define a live musical event. Pioneer's Legato Link Pro Conversion system uses psychoacoustic processing to restore missing high frequency dynamics to fully recapture all the shading and detail of the original performance.
- Press LEGATO LINK to switch Legato Link Pro Conversion on or off.
The LEGATO lights in the display to indicate Legato Link Pro Conversion is on.
Dimming the display
You can choose one of three brightness settings for the front panel display.
- Press DIMMER to switch between brightness settings for the display.
Select between light, dark or backlight off.
Displaying disc information
Various track information, such as the elapsed and remaining playing time can be displayed while a disc is playing. ^2
- To switch the information displayed, press TIME repeatedly.
Note
1 Note that this player is not compatible with multichannel SACD discs.
2 With data discs, MP3/WMA filenames are displayed (up to eight characters). Note that some characters may not display correctly.
Chapter 6 Additional information
Hints on installation
We want you to enjoy using this product for years to come, so please use the following guidelines when choosing a suitable location:
Do...
- Use in a well-ventilated room.
- Place on a solid, flat, level surface, such as a table, shelf or stereo rack.
Don't...
- Use in a place exposed to high temperatures or humidity, including near radiators and other heat-generating appliances.
- Place on a window sill or a place where the player will be exposed to direct sunlight.
- Use in an excessively dusty or damp environment.
- Place directly on top of an amplifier, or other component in your stereo system that becomes hot in use.
- Use near a television or monitor as you may experience interference — especially if the television uses an indoor antenna.
- Use in a kitchen or other room where the player may be exposed to smoke or steam.
- Use on a thick rug or carpet, or cover with cloth — this may prevent proper cooling of the unit.
- Place on an unstable surface, or one that is not large enough to support all four of the unit's feet.
Taking care of your player and discs
General
Hold discs by the edge or by the center hole and edge.
When you're not using a disc, return it to its case and store upright. Avoid leaving discs in excessively cold, humid, or hot environments (including under direct sunlight).
Don't glue paper or put stickers on to discs. Do not use a pencil, ball-point pen or other sharp-tipped writing instrument to write on the disc.

Don't use self-adhesive disc labels on discs as these can cause the disc to warp slightly during playback causing distortion in the sound.
Damaged and shaped discs
Do not use cracked, chipped, warped, or otherwise damaged discs as they may damage the player.
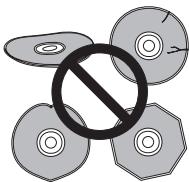
natural_image
Symbolic illustration of four circular objects with a central circle containing a crossed-out arrow (no text or labels)This player is designed to be used only with conventional, fully circular discs. Do not use shaped discs. Pioneer disclaims all liability arising in connection with the use of shaped discs.
Cleaning discs
Fingerprints and dust on discs can affect playback performance. Clean using a soft, dry cloth, wiping the disc lightly from the center to the outside edge as shown below.

natural_image
Illustration of hands holding a CD or DVD with a cloth, showing motion arrows (no text or symbols)If necessary, use a cloth soaked in alcohol, or a commercially available CD/DVD cleaning kit to clean a disc more thoroughly. Never use benzine, thinner or other cleaning agents, including products designed for cleaning vinyl records.
Cleaning the unit's exterior
Unplug the unit before cleaning.
Use a dry cloth to wipe off dust and dirt. If the surfaces are very dirty, wipe with a soft cloth dipped in some neutral cleanser diluted five or six times with water and wrung out well, then wipe again with a dry cloth.
Do not use furniture wax or cleaners. Never use thinners, benzine or insecticide sprays or other chemicals on or near this unit.
If you use a chemical-impregnated cleaning cloth, read the instructions carefully before use. These cloths may leave smear marks on half-mirror finish surfaces; if this happens, finish with a dry cloth.
Cleaning the pickup lens
The player's lens should not become dirty in normal use, but if for some reason it should malfunction due to dust or dirt, consult your nearest Pioneer-authorized service center. We do not recommend using commercially available lens cleaners for CD players.
Condensation
Condensation may form inside the player if it is brought into a warm room from outside, or if the temperature of the room rises quickly. Although the condensation won't damage the player, it may temporarily impair its performance. Leave it to adjust to the warmer temperature for about an hour before switching on.
Moving the player
If you need to move the player, first switch the unit into standby (press ⏻ on the remote), then unplug the power cable. Never lift or move the unit during playback — discs rotate at a high speed and may be damaged.
Troubleshooting
Incorrect operation is often mistaken for trouble or malfunction. If you think that there is something wrong with this component, check the points below. Sometimes the trouble may lie in another component. Inspect the other components and electrical appliances being used. If the trouble cannot be rectified after checking the items below, ask your nearest Pioneer authorized service center or your dealer to carry out repair work.
| Problem | Remedy |
| The disc won’t play or is automatically ejected after loading. | Make sure the disc is free from dirt and dust and is not damaged (page 15).CheckDisc/content format playback compatibility on page 7 to confirm that the disc is compatible with this player.Make sure the disc is loaded with the label side face-up and aligned properly in the disc tray guide.Condensation inside the player: Allow time for condensation to evaporate. Avoid using the player near an air-conditioning unit. |
| The remote control doesn’t seem to work. | The remote control is too far from the player, or the angle with the remote sensor is too wide: Use the remote within its operating range (page 11).If you’re trying to switch on using the remote control, make sure the front panelPOWERbutton is switched on first.The battery is exhausted: Replace the lithium battery (page 6). |
| No audio, or audio is distorted. | Check that the disc is not damaged, and free from dust and dirt (page 15).Check that all interconnects are firmly inserted.Check that the plugs and terminals are free of dirt, oxide, etc. and clean if necessary. Also check the cable for damage.Make sure the player’s output is not connected to the amplifier’s phono (turntable) inputs.Check your amplifier/receiver’s settings (volume, input function, speaker settings, etc.). |
| The analog audio is OK, but there appears to be no digital audio signal. | Make sure that Pure Audio feature is switched off (page 14).SACDs do not output digital audio. The signal is heard through the player’s analog audio outputs. |
| Noticeable difference in SACD and CD volume. | This is due to differences in the audio format and is not a malfunction. |
| Cannot play multichannel audio. | This player is not compatible with multichannel audio. |
| Settings are erased. | If you have switched the unit off (using the front panelPOWERbutton) for more than 30 days, all settings will be erased. |

Note
- Static electricity or other external influences may cause malfunctioning of this unit. In this case, unplug the power cord and then plug back in. This will usually reset the unit for proper operation. If this does not correct the problem, please consult your nearest Pioneer service center.
Glossary
| Analog audio | Direct representation of sound by an electrical signal. See also Digital audio. |
| Digital audio | Indirect representation of sound using numbers. See also Sampling frequency and Analog audio. |
| DRM | DRM (digital rights management) copy protection is a technology designed to prevent unauthorized copying by restricting playback, etc. of compressed audio files on devices other than the PC (or other recording equipment) used to record it. For detailed information, please see the instruction manuals or help files that came with your PC and/or software. |
| File extension | A tag added to the end of a filename to indicate the type of file. For example, “.mp3” indicates an MP3 file. |
| ISO 9660 format | International standard for the volume and file structure of CD-ROM discs. |
| MP3 | MP3 (MPEG1 audio layer 3) is a compressed stereo audio file format. Files are recognized by their file extension “.mp3”. |
| PCM (Pulse Code Modulation) | Digital audio encoding system found on CDs. Good quality, but requires a lot of data compared to compressed audio formats. See also Digital audio. |
| Sampling frequency | The rate at which sound is measured to be turned into digital audio data. The higher the rate, the better the sound quality. CD is 44.1 kHz; DVD can be up to 96 kHz. See also Digital audio. |
| WMA | See About WMA on page 7. |
| Super Audio CD (SACD) | Super Audio CD is a high quality audio disc format that can accommodate high sampling rate stereo and multi-channel audio, as well as conventional CD audio all on the same disc. |
Specifications
General
| System | Super Audio CD player |
| Power requirements | |
| AC 220 V to 240 V, 50 Hz/60 Hz | |
| Power consumption | 22 W |
| Power consumption (standby) | 0.4 W |
| Weight | 11.0 kg |
| Dimensions | |
| 420 mm (W) x 113 mm (H) x 340 mm (D) | |
| Operating temperature | +5 °C to +35 °C |
| Operating humidity | 5 % to 85 %(no condensation) |
Audio output (1 stereo pair)
| Output level | During audio output |
| 200 mVrms (1 kHz, -20 dB) | |
| Number of channels | 2 |
| Jacks | RCA |
Digital audio characteristics
| Frequency response . . . 4 Hz to 50 kHz (SACD) | |
| 4 Hz to 20 kHz (CD) | |
| S/N ratio: | |
| CD | 115 dB |
| SACD | 110 dB |
| Dynamic range: | |
| CD | 100 dB |
| SACD | 110 dB |
| Total harmonic distortion: | |
| CD | 0.002 % |
| SACD | 0.003 % |
| Wow and flutter | Limit of measurement(±0.001 % W. PEAK) or lower |
Digital output
| Coaxial digital output. | RCA jack |
| Optical digital output. | Optical digital jack |
Accessories
| Remote control | 1 |
| Lithium battery (CR2025) | 1 |
| RCA/phono stereo audio cable. | 1 |
| SR control cable. | 1 |
| Power cable | 1 |
Warranty card
Operating Instructions
The specifications and design of this product are subject to change without notice, due to improvement.
Published by Pioneer Corporation.
Copyright © 2007 Pioneer Corporation.
All rights reserved.
IMPORTANT

CAUTION CLASS 3B VISIBLE AND INVISIBLE LASER RADIATION WHEN OPEN, AVOID EXPOSURE TO THE BEAM.
ATTENTION RADIATIONS LASER VISIBLES ET INVISIBLES DE CLASSE 3B QUAND
OUVERT. ÉVITEZ TOUT EXPOSITION AU FAISCEAU
ADVARSEL KLASSE 3B SYNLIG OG USYNLIG LASERSTRÅLING VED ÅBNING.
UNDUA UDSSETTEELSE FOR STRALING.
WARNING KLASS 3B SYNLIG DCH OSYNLIG LASERS THALNING NAR DENNA DEL JÄR ÖDPUAD, UNDVK ATT LTSÄTTA GIC FÖR STRÅLEN
CLASS 1 LASER PRODUCT
D3-4-2-1-8_B_Fr
AVERTISSEMENT
natural_image
Illustration of a hand using a circular tool to press or install a mechanical component (no text or symbols visible)natural_image
Symbolic illustration of a crossed-out circle with a diagonal line and circular elements, no text or labels present.natural_image
Illustration of hands holding a CD or DVD with a cloth, no text or symbols presentConsommation....22 W
.....420 mm (L) x 113 mm (H) x 340 mm (P)
200 mVeff. (1 kHz, -20 dB)
Nombre de voies 2
Prise RCA
Publication de Pioneer Corporation.
© 2007 Pioneer Corporation.
CLASS 1 LASER PRODUCT
D3-4-2-1-8_B_Ge
WARNUNG
natural_image
Illustration of a hand using a circular tool to press or install a mechanical component (no text or symbols visible)natural_image
Symbolic illustration of a crossed-out circle with a diagonal line and four circular components (no text or labels)natural_image
Illustration of hands holding a CD or DVD with a cloth, no text or symbols presentCLASS 1 LASER PRODUCT
D3-4-2-1-8_B_Du
WAARSCHUWING
WAARSCHUWING NETSNOER
natural_image
Simple line drawing of a trash bin with a circular wheel and diagonal X mark (no text or symbols)
D3-4-2-4-2_Du

Versterker of receiver
Deze speler
natural_image
Illustration of a hand using a circular tool to press or install a mechanical component (no text or symbols visible)natural_image
Symbolic illustration of a crossed-out circle with a diagonal line and four circular shapes, no text or labels present.natural_image
Illustration of hands performing a medical procedure on a CD or DVD disc (no text or symbols present)200 mVrms (1 kHz, -20 dB)
Aantal kanalen 2
Copyright © 2007 Pioneer Corporation.
CLASS 3B VISIBLE AND INVISIBLE LASER RADIATION WHEN OPEN, AVOID EXPOSURE TO THE BEAMIL
RADIATIONS LASER VISIBLES ET INVISIBLES DE CLASSE 38 QUAND
OUVERT. ÉVITEZ TOUT EXPOSITION AU FAISCEAU.
KLASSE 3B SYN LIG OG USYN LIG LASERSTRÅLING VED ÅBNING
UNDSA DOSAETTELSE FOR STRALINS.
KLASS 3B SYNLIG OCH OSYNLIG LASERSTRALNING NAR DENNA DEL 12. ÖRGNATG: LINDVIL ATT UTOÄTTA BIG FÖR, OTDÜLEN
CLASS 1 LASER PRODUCT
D3-4-2-1-8_B_lt
ATTENZIONE
natural_image
Illustration of a hand using a tool to press or install a circular component (no text or symbols visible)natural_image
Symbolic illustration of a crossed-out circle with a diagonal line and four circular shapes, no text or labels present.natural_image
Illustration of hands holding a CD or DVD disc with arrows indicating motion (no text or symbols)Rapporto S/N: CD....115 dB SACD....110 dB
Gamma dinamica: CD....100 dB SACD....110 dB
Distorsione armonica totale: CD....0,002 % SACD....0,003 %
CLASS 3B VISIBLE AND INVISIBLE LASER RADIATION WHEN OPEN, AVOID EXPOSURE TO THE BEAM.
ATTENTION
RADIATIONS LASER VISIBLES ET INVISIBLES DE CLASSE 3B QUAND
(五) 计算式
OUVERT. EVITEE TOU EX-COMEN ASTRAIDELAS WALORTE BHAJAR DE USUALIS LABRISTRAIUS
ADVARSEL
LENGA UDS/ETTE SE FOR STRALING
WARNING
Klass 3B. SYN LIG OCH OSYN LIG LASERSTRÅLNING NÅR DENNA DEL
2.1.1 2017年
ÄR ÖPPNAD. UNDVIK ATT UTSÄTTA DIG FÖR STRÅLEN.
VORSICHT
CLASS 1 LASER PRODUCT
D3-4-2-1-8_B_Sp
ADVERTENCIA
natural_image
Illustration of a hand pressing down on a circular mechanical component (no text or symbols visible)natural_image
Symbolic illustration of a crossed-out circle with a diagonal line and four circular shapes, no text or labels present.natural_image
Illustration of hands holding a CD or DVD with a cloth, no text or symbols presenthttp://www.pioneer.co.uk
http://www.pioneer.fr
http://www.pioneer.de
http://www.pioneer.nl - http://www.pioneer.be
http://www.pioneer.it
http://www.pioneer.es
http://www.pioneer.eu
Published by Pioneer Corporation.
Copyright © 2007 Pioneer Corporation.
All rights reserved.
Publication de Pioneer Corporation.
© 2007 Pioneer Corporation.
PIONEER ELECTRONICS (USA) INC.
P.O. BOX 1540, Long Beach, California 90810-1540, U.S.A. TEL: (800) 421-1404
PIONEER ELECTRONICS OF CANADA, INC.
300 Allstate Parkway, Markham, Ontario L3R 0P2, Canada TEL: 1-877-283-5901, 905-479-4411
PIONEER EUROPE NV
Haven 1087, Keetberglaan 1, B-9120 Melsele, Belgium TEL: 03/570.05.11
PIONEER ELECTRONICS ASIACENTRE PTE. LTD.
253 Alexandra Road, #04-01, Singapore 159936 TEL: 65-6472-7555
PIONEER ELECTRONICS AUSTRALIA PTY. LTD.
178-184 Boundary Road, Braeside, Victoria 3195, Australia, TEL: (03) 9586-6300
PIONEER ELECTRONICS DE MEXICO S.A. DE C.V.
Blvd.Manuel Avila Camacho 138 10 piso Col.Lomas de Chapultepec, Mexico,D.F. 11000 TEL: 55-9178-4270
K002_B_En