
DEH-1300MP - Car stereo PIONEER - Free user manual and instructions
Find the device manual for free DEH-1300MP PIONEER in PDF.

| Product type | Car stereo with CD/MP3/WMA player |
| Brand | PIONEER |
| Model | DEH-1300MP |
| Power supply | 14.4 V DC (10.8 to 15.1 V acceptable) |
| Maximum current consumption | 10.0 A |
| Continuous power output | 22 W × 4 (50 Hz to 15,000 Hz, 5% THD, 4 Ω) |
| Load impedance | 4 Ω to 8 Ω |
| FM frequency range | 87.5 - 108.0 MHz |
| MW frequency range | 531 - 1602 kHz |
| LW frequency range | 153 - 281 kHz |
| Supported audio formats | CD, CD-R, CD-RW, MP3, WMA, WAV |
| RDS functions | AF, TA, TP, PTY |
| Auxiliary input | 3.5 mm stereo jack |
| Equalizer | 3-band (Bass, Mid, Treble) with presets (including CUSTOM) |
| Loudness correction | Yes (LOUD) |
| Playback repeat | Track (TRK), folder (FLD), all (DSC) |
| Random play | Yes (RDM) and folder random (FRDM) |
| Power saving function | Yes (SAVE) |
| Laser class | Class 1 (IEC 60825-1:2007) |
| CD care recommendation | Clean with a soft cloth from the center outward |
Frequently Asked Questions - DEH-1300MP PIONEER
User questions about DEH-1300MP PIONEER
0 question about this device. Answer the ones you know or ask your own.
Ask a new question about this device
Download the instructions for your Car stereo in PDF format for free! Find your manual DEH-1300MP - PIONEER and take your electronic device back in hand. On this page are published all the documents necessary for the use of your device. DEH-1300MP by PIONEER.
USER MANUAL DEH-1300MP PIONEER
REPRODUCTOR DE CD CON RECEPTOR RDS
CD RDS-EMPFÄNGER
CD RDS-ONTVANGER
CD RDS ПРИЕМнК
DEH-1320MP
DEH-1300MP
Owner's Manual
Mode d'emploi
Thank you for purchasing this PIONEER product.
To ensure proper use, please read through this manual before using this product. It is especially important that you read and observe
WARNINGs and CAUTIONs in this manual.
Please keep the manual in a safe and accessible place for future reference.

13/14
If you want to dispose this product, do not mix it with general household waste. There is a separate collection system for used electronic products in accordance with legislation that requires proper treatment, recovery and recycling.
Private households in the member states of the EU, in Switzerland and Norway may return their used electronic products free of charge to designated collection facilities or to a retailer (if you purchase a similar new one).
For countries not mentioned above, please contact your local authorities for the correct method of disposal.
By doing so you will ensure that your disposed product undergoes the necessary treatment, recovery and recycling and thus prevent potential negative effects on the environment and human health.
In case of trouble
Should this product fail to operate properly, please contact your dealer or nearest authorized Pioneer Service Station.
About this unit
The tuner frequencies on this unit are allocated for use in Western Europe, Asia, the
Middle East, Africa and Oceania. Use in other areas may result in poor reception. The RDS (radio data system) function only operates in areas with broadcasting RDS signals for FM stations.
CAUTION
This product is a class 1 laser product classified under the Safety of laser products, IEC 60825-1:2007, and contains a class 1M laser module. To ensure continued safety, do not remove any covers or attempt to gain access to the inside of the product. Refer all servicing to qualified personnel.
CLASS 1 LASER PRODUCT
CAUTIONCLASS 1M INVISIBLE LASER RADIATION WHEN OPEN,DO NOT VIEW DIRECTLY WITH OPTICAL INSTRUMENTS.

CAUTION
- Do not allow this unit to come into contact with liquids. Electrical shock could result. Also, damage to this unit, smoke, and overheating could result from contact with liquids.
The Pioneer CarStereo-Pass is for use only in Germany.
Always keep the volume low enough to hear outside sounds. - Avoid exposure to moisture.
- If the battery is disconnected or discharged, any preset memory will be erased.
Operating this unit
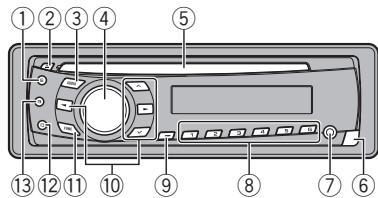
Head unit
| Button | Button | ||
| ① | E (EQ/LOUD) | ⑧ | 1 to 6 |
| ② | ▲ (eject) | ⑨ | TA/AF |
| ③ | AUDIO | ⑩ | ▲/▼/▲/▲ |
| ④ | SRC/OFF | ⑪ | FUNC |
| ⑤ | Disc loading slot | ⑫ | D (DISP/SCRL) |
| ⑥ | Detach button | ⑬ | B (BAND/ESC) |
| ⑦ | AUX input jack (3.5 mm stereo jack) | ||

Display indication

| Indicator | State | |
| ① | Main dis-play section | • Tuner: band and frequency • RDS: program service name, PTY information and other literal information • Built-in CD player: elapsed playback time and text information |
| ② | Preset number/track number | • The track number or preset number. • If a track number 100 or more is selected, ▷ on the left of the track number indicator will light. |
| Indicator | State | |
| ③ | AF | AF (alternative frequencies search) function is on. |
| ④ | TP | A TP station is tuned in. |
| ⑤ | TA | TA function is on. |
| ⑥ | MP3/WMA | The type of the currently playing file. |
| ⑦ | RPT | Repeat play is turned on. |
| ⑧ | LOUD | Loudness is on. |
| ⑨ | CD(stereo) | Receiving the stereo broadcasting. |
| ⑩ | LOC | Local seek tuning is on. |

Basic Operations
Important
- Handle gently when removing or attaching the front panel.
- Avoid subjecting the front panel to excessive shock.
- Keep the front panel out of direct sunlight and high temperatures.
- To avoid damage to the device or vehicle interior, remove any cables and devices attached to the front panel before detaching it.
Operating this unit
Removing the front panel to protect your unit from theft
1 Press the detach button to release the front panel.
Push the front panel upward and pull it toward you.
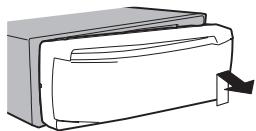
3 Always keep the detached front panel in a protection device such as a protection case.
Re-attaching the front panel
Slide the front panel to the left. Make sure to insert the tabs on the left side of the head unit into the slots on the front panel.
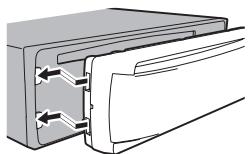
Press the right side of the front panel until it is firmly seated.
If you cannot attach the front panel to the head unit successfully, make sure that you are placing the front panel onto the head unit correctly. Forcing the front panel into place may result in damage to the front panel or head unit.
Turning the unit on
1 Press SRC/OFF to turn the unit on.
Turning the unit off
1 Press SRC/OFF and hold until the unit turns off.
Selecting a source
1 Press SRC/OFF to cycle through the sources listed below:
TUNER (tuner)CD (built-in CD player)AUX (AUX)
Adjusting the volume
Turn SRC/OFF to adjust volume.

CAUTION
For safety reasons, park your vehicle when removing the front panel.
Note
When this unit's blue/white lead is connected to the vehicle's auto-antenna relay control terminal, the vehicle's antenna extends when this unit's source is turned on. To retract the antenna, turn the source off.
Menu operations identical for function settings/album adjustments/initial settings
Returning to the ordinary display
Canceling the initial setting menu
1 Press B (BAND/ESC).
You can also cancel initial settings by holding down SRC/OFF until the unit turns off.

Tuner
Basic Operations
Selecting a band
Press B (BAND/ESC) until the desired band (F1 F2 for FM or MW/LW) is displayed.
Manual tuning (step by step)
1 Pressor
Seeking
1 Press and hold or , and then release.
You can cancel seek tuning by briefly pressing or
While pressing and holding or , you can skip stations. Seek tuning starts as soon as you release or .
Storing and recalling stations for each band
- When you find a station that you want to store in memory, press one of the preset tuning buttons (1 to 6) and hold until the preset number stops flashing.
Stored radio station frequency can be recalled by pressing the preset tuning button.
Press or to recall radio station frequencies.
Operating this unit
Switching the RDS display
RDS (radio data system) contains digital information that helps search for the radio stations.
Press D (DISP/SCRL).
Program service name—PTY information—Frequency
- PTY information and the frequency appear on the display for eight seconds.
PTY list
NEWS (News), AFFAIRS (Current affairs), INFO (Information), SPORT (Sports), WEATHER (Weather), FINANCE (Finance), POP MUS (Popular music), ROCK MUS (Rock music), EASY MUS (Easy listening), OTH MUS (Other music), JAZZ (Jazz), COUNTRY (Country music), NAT MUS (National music), OLDIES (Oldies music), FOLK MUS (Folk music), L.Class (Light classical), CLASSIC (Classical), EDUCATE (Education), DRAMA (Drama), CULTURE (Culture), SCIENCE (Science), VARIORED (Varied), CHILDREN (Children's), SOCIAL (Social affairs), RELIGION (Religion), PHONE IN (Phone in), TOURING (Travel), LEISURE (Leisure), DOCUMENT (Documentaries)
Selecting alternative frequencies
When the tuner cannot get a good reception, the unit automatically searches for a different station in the same network.
- Press and hold TA/AF to turn AF on or off.
Using PI Seek
If the tuner cannot find a suitable station, or the reception status deteriorates, the unit automatically searches for a different station with the same programming. During the search, PI SEEK is displayed and sound is muted.
Using Auto PI Seek for preset stations
When preset stations cannot be recalled, as when travelling long distances, the unit can be set to perform PI Seek during preset recall.
- The default setting for Auto PI Seek is off. Refer to A-PI (auto PI seek) on page 8.
Receiving traffic announcements
Regardless of the source you are listening to, you can receive traffic announcements automatically with TA (traffic announcement standby).
1 Tune in to a TP or enhanced other network's TP station.
2 Press TA/AF to turn traffic announcement standby on or off.
3 Turn SRC/OFF to adjust the TA volume when a traffic announcement begins.
The newly set volume is stored in the memory and will be recalled for subsequent traffic announcements.
4 Press TA/AF while a traffic announcement is being received to cancel the announcement.
The tuner returns to the original source but remains in the standby mode until TA/AF is pressed again.
Function settings
- Press FUNC to select the function.
After selecting, perform the following procedures to set the function.
- If MW/LW band is selected, only BSM or LOCAL is available.
BSM (best stations memory)
BSM (best stations memory) automatically stores the six strongest stations in the order of their signal strength.
Storing broadcast frequencies with BSM may replace broadcast frequencies you have saved using 1 to 6.
Press to turn BSM on.
The six strongest broadcast frequencies are stored in the order of their signal strength.
To cancel the storage process, press .
REG (regional)
When AF is used, the regional function limits the selection of stations to those broadcasting regional programs.
Press or to turn the regional function on or off.
LOCAL (local seek tuning)
Operating this unit
Local seek tuning lets you tune in to only those radio stations with sufficiently strong signals for good reception.
Press or to turn local seek tuning on or off.
Press or to set the sensitivity. FM:LOCAL1-LOCAL2-LOCAL3-LOCAL4 MW/LW:LOCAL1-LOCAL2
The highest level setting allows reception of only the strongest stations, while lower levels allow the reception of weaker stations.
TA (traffic announcement standby)
Press or to turn traffic announcement stand-by on or off.
AF (alternative frequencies search)
Press or to turn AF on or off.

CD
Basic Operations
Playing a CD/CD-R/CD-RW
1 Insert the disc into the disc loading slot with the label side up.
Ejecting a CD/CD-R/RD-RW
Press
Selecting a folder
Press or
Selecting a track
Pressor
Fast forwarding or reversing
Press and hold or. When playing compressed audio, there is no sound during fast forward or reverse.
Switching between compressed audio and CD-DA
Press B (BAND/ESC).
Displaying text information
Selecting the desired text information
Press D (DISP/SCRL).
Scrolling the text information to the left
Press and hold D (DISP/SCRL).
Notes
Depending on the version of iTunes used to write MP3 files to a disc or media file types, incompatible text stored within an audio file may be displayed incorrectly.
Text information items that can be changed depend on the media.
Function settings
- Press FUNC to select the function.
After selecting, perform the following procedures to set the function.
RPT (repeat play)
1 Press or to select the repeat range.
DSC - Repeat all tracks
TRK - Repeat the current track
FLD - Repeat the current folder
RDM (random play)
Press or to turn random play on or off.
When random play is on, RDM appears in the display.
If you turn random play on during folder repeat,
FRDM appears in the display.
SCAN (scan play)
Scan play searches for a song within the selected repeat range.
Press to turn scan play on.
If you turn scan play on during FLD, FSCN appears in the display.
2 When you find the desired track press to turn scan play off.
If the display has automatically returned to the playback display, select SCAN again by pressing FUNC.
After scanning of a disc (folder) is finished, normal playback of the tracks begins.
PAUSE (pause)
Press or to pause or resume.
SRTRV (sound retriever)
Automatically enhances compressed audio and restores rich sound.
Press or to select your favorite setting.
OFF(off)—1—2
1 is effective for low compression rates, and 2 is
effective for high compression rates.
Operating this unit
FF/REV (fast forward/reverse)
You can switch the search method between fast forward/reverse and searching every 10 tracks. Selecting ROUGH enables you to search every 10 tracks.
1 Press to select ROUGH.
FF/REV - Fast forward and reverse
ROUGH - Searching every 10 tracks To select FF/REV, press
Press B(BAND/ESC) to return to the playback display.
3 Press and hold or to search every 10 tracks on a disc (folder).
If the rest of track number is less than 10, press
and hold or recalls the first (last) one.
SLA (source level adjustment)
SLA (Source Level Adjustment) lets you adjust the volume level of each source to prevent radical changes in volume when switching between sources.
- When selecting FM as the source, you cannot switch to SLA.
- Settings are based on the FM volume level, which remains unchanged.
- The MW/LW volume level can also be adjusted with this function.
Press or to adjust the source volume. Adjustment range: SLA +4 to SLA -4

Audio Adjustments
Audio Adjustments
- Press AUDIO to select the audio function.
After selecting, perform the following procedures to set the audio function.
FAD (fader/balance adjustment)
Press or to adjust fader (front/rear speaker balance).
Press or to adjust the balance (left/right speaker balance).
BASS/MID/TREBLE (equalizer adjustment)
- Adjusted equalizer curve settings are stored in CUSTOM.
Press or to adjust the level.
Adjustment range: +6 to -6
LOUD (loudness)
Loudness compensates for deficiencies in the low- and high-frequency ranges at low volume.
Press or to turn loudness on or off.
Press or to select the desired setting. LOW (low)-HI (high)
- You can also turn loudness on or off by pressing and holding E (EQ/LOUD).
Using the equalizer
- Press E (EQ/LOUD) to select the equalizer.
DYNAMIC—VOCAL—NATURAL—CUSTOM FLAT—POWERFUL
- CUSTOM allows you to create a customized setting.
Operating this unit
Other Functions

Important
SAVE (power saving) is cancelled if the vehicle battery is disconnected and will need to be turned back on once the battery is reconnected. When SAVE (power saving) is off, depending on connection methods, the unit may continue to draw power from the battery if your vehicle's ignition switch doesn't have an ACC (accessory position).
Adjusting initial settings
1 Press SRC/OFF and hold until the unit turns off.
2 Press SRC/OFF and hold until function name appears in the display.
3 Press FUNC to select the initial setting. After selecting, perform the following procedures to set the initial setting.
FM (FM tuning step)
Normally, the FM tuning step employed by seek tuning is 50kHz . When AF or TA is on, the tuning step automatically changes to 100kHz . It may be preferable to set the tuning step to 50kHz when AF is on.
- The tuning step remains at 50kHz during manual tuning.
Press or to select the FM tuning step. 50 (50 kHz)—100 (100 kHz)
A-PI (auto PI seek)
The unit can automatically search for a different station with the same programming, even during preset recall.
1 Press or to turn Auto PI seek on or off.
AUX (auxiliary input)
Activate this setting when using an auxiliary device connected to this unit.
Press or to turn auxiliary setting on or off.
SAVE (power saving)
Switching this function on enables you to reduce the consumption of battery power.
- Turning on the source is the only operation allowed when this function is on.
Press or to turn the power save on or off.
TITLE (multi language)
This unit can display the text information of a compressed audio file even if they are embedded in a Western European or Russian language.
- If the embedded language and the selected language setting are not the same, text information may not be displayed properly.
Some characters may not be displayed properly.
Press or to select the language. EUR (European)RUS (Russian)
Using an AUX source
1 Insert the stereo mini plug into the AUX input jack.
2 Press SRC/OFF to select AUX as the source.
- AUX cannot be selected unless the auxiliary setting is turned on. For more details, refer to AUX (auxiliary input) on this page.
Sound muting
Sound is muted automatically when:
- A call is made or received using a cell phone connected to this unit.
Voice guidance is output from a connected Pioneer navigation unit.
The sound is turned off, MUTE is displayed and no audio adjustments, except volume control, are possible. Operation returns to normal when the phone connection or the voice guidance is ended.
Installation
Connections
Important
- When installing this unit in a vehicle without an ACC (accessory) position on the ignition switch, failure to connect the red cable to the terminal that detects operation of the ignition key may result in battery drain.

ACC position

No ACC position
— Vehicles with a 12-volt battery and negative grounding.
— Speakers with 50 W (output value) and 4 ohm to 8 ohm (impedance value).
- Use of this unit in conditions other than the following could result in fire or malfunction.
- To prevent a short-circuit, overheating or malfunction, be sure to follow the directions below.
- Disconnect the negative terminal of the battery before installation.
- Secure the wiring with cable clamps or adhesive tape. Wrap adhesive tape around wiring that comes into contact with metal parts to protect the wiring.
- Place all cables away from moving parts, such as the gear shift and seat rails.
- Place all cables away from hot places, such as near the heater outlet.
- Do not connect the yellow cable to the battery by passing it through the hole to the engine compartment.
Cover any disconnected cable connectors with insulating tape. - Do not shorten any cables.
- Never cut the insulation of the power cable of this unit in order to share the power with other devices. The current capacity of the cable is limited.
Use a fuse of the rating prescribed. -
Never wire the negative speaker cable directly to ground.
-
Never band together negative cables of multiple speakers.
-
When this unit is on, control signals are sent through the blue/white cable. Connect this cable to the system remote control of an external power amp or the vehicle's auto-antenna relay control terminal (max. 300 mA 12 V DC). If the vehicle is equipped with a glass antenna, connect it to the antenna booster power supply terminal.
- Never connect the blue/white cable to the power terminal of an external power amp. Also, never connect it to the power terminal of the auto antenna. Doing so may result in battery drain or a malfunction.
- The black cable is ground. Ground cables for this unit and other equipment (especially, high-current products such as power amps) must be wired separately. If they are not, an accidental detachment may result in a fire or malfunction.
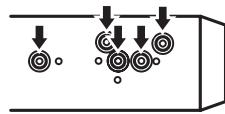
This unit
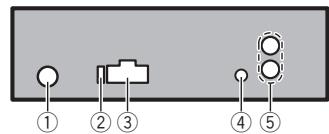
① Antenna input
② Fuse(10A)
③ Power cord input
④ Wired remote input Hard-wired remote control adaptor can be connected (sold separately).
⑤ Rear output
Installation
Power cord
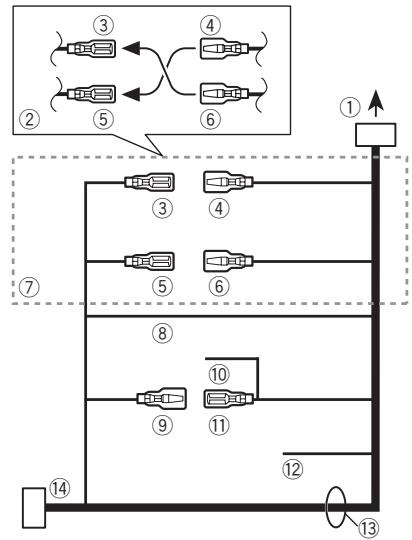
① To power cord input
② Depending on the kind of vehicle, the function of ③ and ⑤ may be different. In this case, be sure to connect ④ to ⑤ and ⑥ to ③.
③ Yellow Back-up (or accessory)
④ Yellow Connect to the constant 12 V supply terminal.
⑤ Red Accessory (or back-up)
⑥ Red Connect to terminal controlled by ignition switch (12 V DC).
⑦ Connect leads of the same color to each other.
⑧ Black (chassis ground) Connect to a clean, paint-free metal location.
9 Blue/white The pin position of the ISO connector will differ depending on the type of vehicle. Connect 9 and 11 when Pin 5 is an antenna control type. In another type of vehicle, never connect 9 and 11.
Blue/white Connect to system control terminal of the power amp (max. 300mA12VDC)
11 Blue/white
Connect to auto-antenna relay control terminal (max. 300 mA 12 V DC).
Yellow/black
If you use an equipment with Mute function, wire this lead to the Audio Mute lead on that equipment. If not, keep the Audio Mute lead free of any connections.
⑬ Speaker leads
White: Front left
White/black: Front left
Gray: Front right
Gray/black: Front right
Green: Rear left
Green/black:Rear left
Violet: Rear right
Violet/black: Rear right
ISO connector
In some vehicles, the ISO connector may be divided into two. In this case, be sure to connect to both connectors.
Power amp (sold separately)
Perform these connections when using the optional amplifier.
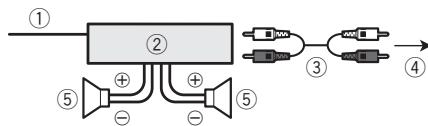
① System remote control Connect to Blue/white
② Power amp (sold separately)
③ Connect with RCA cables (sold separately)
④ To Rear output
⑤ Rear speaker
Installation
Important
- Check all connections and systems before final installation.
- Do not use unauthorized parts as this may cause malfunctions.
Installation
- Consult your dealer if installation requires drilling of holes or other modifications to the vehicle.
- Do not install this unit where:
it may interfere with operation of the vehicle.
it may cause injury to a passenger as a result of a sudden stop.
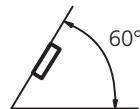
- The semiconductor laser will be damaged if it overheats. Install this unit away from hot places such as near the heater outlet.
Optimum performance is obtained when the unit is installed at an angle of less than 60^
DIN front/rear mount
This unit can be properly installed using either front-mount or rear-mount installation.
DIN Front-mount
1 Insert the mounting sleeve into the dashboard.
For installation in shallow spaces, use the supplied mounting sleeve. If there is enough space, use the mounting sleeve that came with the vehicle.
- Use commercially available parts when installing.
2 Secure the mounting sleeve by using a screwdriver to bend the metal tabs (90^) into place.
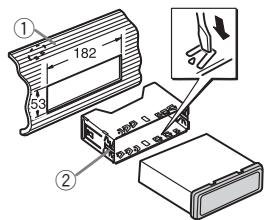
① Dashboard
② Mounting sleeve
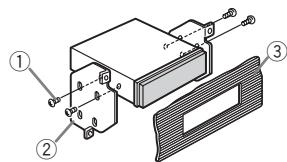
3 Install the unit as illustrated.
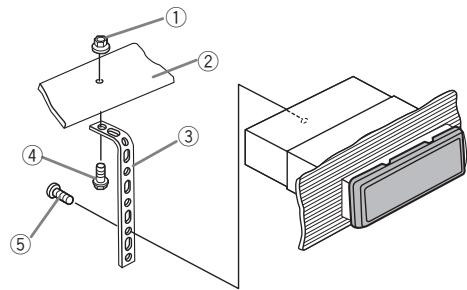
① Nut
② Firewall or metal support
③ Metal strap
④ Screw
⑤ Screw (M4 × 8)
- Make sure that the unit is installed securely in place. An unstable installation may cause skipping or other malfunctions.
DIN Rear-mount
1 Determine the appropriate position where the holes on the bracket and the side of the unit match.
2 Tighten two screws on each side.
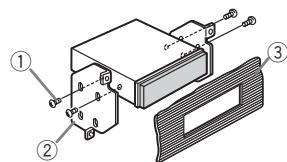
① Tapping screw (5 mm × 8 mm)
② Mounting bracket
③ Dashboard or console
Installation
Removing the unit
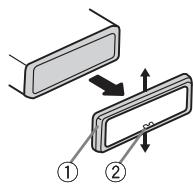
1 Remove the trim ring.
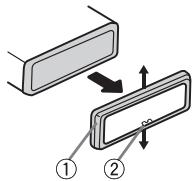
① Trim ring
② Notched tab
-
Releasing the front panel allows easier access to the trim ring.
-
When reattaching the trim ring, point the side with the notched tab down.
2 Insert the supplied extraction keys into both sides of the unit until they click into place.
3 Pull the unit out of the dashboard.
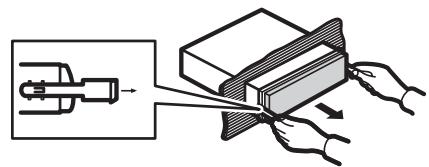
Removing and re-attaching the front panel
You can remove the front panel to protect your unit from theft.
Press the detach button and push the front panel upward and pull it toward you.
For details, refer to Removing the front panel to protect your unit from theft and Re-attaching the front panel on page 4.
Additional Information
Troubleshooting
| Symptom | Cause | Action |
| The display automatically returns to the ordinary display. | You did not perform any operation within about 30 seconds. | Perform operation again. |
| The repeat play range changes unexpectedly. | Depending on the repeat play range, the selected range may change when selecting another folder or track, or when fast for- warding/rever- sing. | Select the repeat play range again. |
| A subfolder is not played back. | Sub folders can- not be played when FLD (folder repeat) is se- lected. | Select another re- peat play range. |
| NO XXXX ap- pears when a display is chan- ged (NO T-TTL, for example). | There is no text information em- bedded. | Switch the display or play another track/file. |
| The unit is mal- functioning. There is inter- ference. | You are using a device, such as a cellular phone, that transmits electric waves near the unit. | Move electrical de- vices that may be causing the inter- ference away from the unit. |

Error messages
When you contact your dealer or your nearest Pioneer Service Center, be sure to note the error message.
| Message | Cause | Action |
| ERROR-11, 12, 17, 30 | The disc is dirty. | Clean the disc. |
| The disc is scratched. | Replace the disc. |
| Message | Cause | Action |
| ERROR-10, 11, 12, 15, 17, 30, A0 | There is an elec-trical or mech-anical error. | Turn the ignition switch OFF and back ON, or switch to a different source, then back to the CD player. |
| ERROR-15 | The inserted disc is blank | Replace the disc. |
| ERROR-23 | Unsupported CD format | Replace the disc. |
| FRMTREAD | Sometimes there is a delay be-tween the start of playback and when you start to hear any sound. | Wait until the mes-sage disappears and you hear sound. |
| NO AUDIO | The inserted disc does not contain any playable files. | Replace the disc. |
| PROTECT | All the files on the inserted disc are embedded with DRM. | Replace the disc. |
| SKIPPED | The inserted disc contains DRM protected WMA files. | Replace the disc. |

Handling guideline
Discs and player
Use only discs featuring either of following two logos.

DIGITAL AUDIO

TEXT
DIGITAL AUDIO
GITAL AUDIO
Use 12-cm disc. Do not use 8-cm disc or an adapter for 8-cm disc.
Additional Information
Use only conventional, fully circular discs. Do not use shaped discs.


Do not insert anything other than a CD into the CD loading slot.
Do not use cracked, chipped, warped, or otherwise damaged discs as they may damage the player.
Unfinalized CD-R/CD-RW disc playback is not possible.
Do not touch the recorded surface of the discs.
Store discs in their cases when not in use.
Avoid leaving discs in excessively hot environments including under direct sunlight.
Do not attach labels, write on or apply chemicals to the surface of the discs.
To clean a CD, wipe the disc with a soft cloth outward from the center.
Condensation may temporarily impair the player's performance. Leave it to adjust to the warmer temperature for about one hour. Also, wipe any damp discs with a soft cloth.
Playback of discs may not be possible because of disc characteristics, disc format, recorded application, playback environment, storage conditions, and so on.
Road shocks may interrupt disc playback.
DualDiscs
DualDiscs are two-sided discs that have a recordable CD for audio on one side and a recordable DVD for video on the other.
Since the CD side of DualDiscs is not physically compatible with the general CD standard, it may not be possible to play the CD side with this unit.
Frequent loading and ejecting of a DualDisc may result in scratches on the disc. Serious scratches can lead to playback problems on this unit. In some cases, a DualDisc may become stuck in the disc loading slot and will not eject. To prevent this, we recommend you refrain from using DualDisc with this unit. Please refer to the information from the disc manufacturer for more detailed information about DualDiscs.

Compressed audio compatibility
WMA
File extension: .wma
Bit rate: 48 kbps to 320 kbps (CBR), 48 kbps to 384 kbps (VBR)
Sampling frequency: 32kHz to 48kHz
Windows Media Audio Professional, Lossless, Voice/ DRM Stream/Stream with video: No
MP3
File extension:.mp3
Bit rate: 8 kbps to 320 kbps (CBR), VBR
Sampling frequency: 8kHz to 48kHz (32, 44.1, 48 kHz for emphasis)
Compatible ID3 tag version: 1.0, 1.1, 2.2, 2.3, 2.4 (ID3 tag Version 2.x is given priority over Version 1.x.)
M3u playlist: No
MP3i (MP3 interactive), mp3 PRO: No
WAV
File extension:.wav
Quantization bits: 8 and 16 (LPCM), 4 (MS ADPCM)
Sampling frequency: 16 kHz to 48 kHz (LPCM), 22.05 kHz and 44.1 kHz (MS ADPCM)
Supplemental information
Only the first 32 characters can be displayed as a file name (including the file extension) or a folder name.
Russian text to be displayed on this unit should be encoded with the following character sets:
- Unicode (UTF-8, UTF-16)
- Character sets other than Unicode that are used in a Windows environment and are set to Russian in the multi-language setting
This unit may not operate correctly depending on the application used to encode WMA files.
There may be a slight delay when starting playback of audio files embedded with image data.
Additional Information
Disc
| Playable folder hierarchy: up to eight tiers (A practical hierarchy is less than two tiers.) |
Playable folders: up to 99
Playable files: up to 999
File system: ISO 9660 Level 1 and 2, Romeo, Joliet
Multi-session playback: Yes
Packet write data transfer: No
Regardless of the length of blank section between the songs of the original recording, compressed audio discs play with a short pause between songs.

| D: C | D: C | D: C | D: C | D: C |
| P: P | C: C | T: T | y: y | φ: φ |
| x: x | u: u | y: y | u: u, u | i: b |
| f: b| | b: b | j: Θ | h: h0 | η: r |

D:Display C:Character
Copyright and trademark
iTunes
Apple and iTunes are trademarks of Apple Inc., registered in the U.S. and other countries.
Sequence of audio files
The user cannot assign folder numbers and specify playback sequences with this unit.
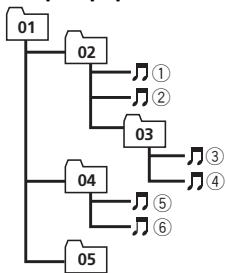
Example of a hierarchy
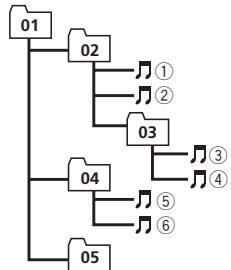
Level 1 Level 2 Level 3 Level 4
Folder
Compressed
audio file
01 to 05: Folder
number
① to ⑥: Playback
sequence
Disc
- Folder selection sequence or other operation may differ depending on the encoding or writing software.
Russian character chart
| D: C | D: C | D: C | D: C | D: C |
| A: A | B: B | B: B | F: F | J: J |
| E: E, E | J: JX | J: 3 | H: H, J | K: K |
| A: JI | H: M | H: H | J: O | J: JI |
MP3
Supply of this product only conveys a license for private, non-commercial use and does not convey a license nor imply any right to use this product in any commercial (i.e. revenue-generating) real time broadcasting (terrestrial, satellite, cable and/or any other media), broadcasting/Streaming via internet, intranets and/or other networks or in other electronic content distribution systems, such as pay-audio or audio-on-demand applications. An independent license for such use is required. For details, please visit
http://www.mp3licensing.com.
WMA
Windows Media and the Windows logo are trademarks or registered trademarks of Microsoft Corporation in the United States and/or other countries.
This product includes technology owned by Microsoft Corporation and cannot be used or distributed without a license from Microsoft Licensing, Inc.
Specifications
General
Power source 14.4 V DC (10.8 V to 15.1 V
allowable)
Additional Information
Grounding system Negative type
Maximum current consumption
10.0A
Dimensions (W× H× D)
DIN
Chassis 178 mm × 50 mm × 165
mm
Nose 188 mm × 58 mm × 17 mm
D
Chassis 178 mm × 50 mm × 165
mm
Nose 170 mm × 46 mm × 17 mm
Weight 1.3 kg
Audio
Maximum power output .50 W x 4
Continuous power output ... 22W× 4 (50 Hz to 15 000
Hz, 5% THD, 4 load, both
channels driven)
Load impedance 4Ω (4Ω to 8Ω allowable)
Preout maximum output level
2.0V
Tone controls:
Bass
Frequency 100 Hz
Gain 12 dB
Mid
Frequency 1 kHz
Gain 12 dB
Treble
Frequency 10 kHz
Gain 12 dB
CD player
System Compact disc audio system
Useable discs Compact disc
Signal-to-noise ratio 94 dB (1 kHz) (IEC-A net
work)
Number of channels 2 (stereo)
WMA decoding format .Ver. 7, 7.1, 8, 9, 10, 11, 12
(2ch audio)
(Windows Media Player)
MP3 decoding format ...... MPEG-1 & 2 Audio Layer 3
WAV signal format ......... Linear PCM & MS ADPCM
FM tuner
Frequency range 87.5 MHz to 108.0 MHz
Usable sensitivity 11 dBf (0.7 V/75 Ω, mono,
S/N: 30 dB)
Signal-to-noise ratio 72 dB (IEC-A network)
MWtuner
Frequency range 531 kHz to 1602 kHz
Usable sensitivity 25 V (S/N: 20 dB)
Signal-to-noise ratio 62 dB (IEC-A network)
LWTuner
Frequency range 153 kHz to 281 kHz
Usable sensitivity 28 V (S/N: 20 dB)
Signal-to-noise ratio 62 dB (IEC-A network)
Note
Specifications and the design are subject to modifications without notice.
Avant de commencer
SRTRV (sound retriever)
DYNAMIC—VOCAL—NATURAL—CUSTOM FLAT—POWERFUL
ERROR-11, 12, 17, 30
Nettoyez le disque.
ERROR-10, 11, 12, 15, 17, 30, A0
Lecture multi-session: Oui
Estensione file: .wma
Velocità in bit: da 48 kbps a 320 kbps (CBR), da 48 kbps a 384 kbps (VBR)
Estensione file:.mp3
Extension file: .wav
file audio compression
Consumo massimo 10,0 A
Dimensioni (L × A × P): DIN
Telaio 178 mm × 50 mm × 165 mm
Pannello anteriore
188mm×58mm×17mm
D
Telaio 178 mm × 50 mm × 165 mm
Pannello anteriore
170 mm × 46 mm × 17 mm
Peso 1,3 kg
Audio
Ver. 7, 7.1, 8, 9, 10, 11, 12 (2 canali audio) (Windows Media Player)
- Pulse D (DISP/SCRL).
1 Pulse B (BAND/ESC)
DYNAMIC—VOCAL—NATURAL—CUSTOM FLAT—POWERFUL
Ver. 7, 7.1, 8, 9, 10, 11, 12
.audio 2 canales)
(Windows Media Player)
Formato de decodificacion MP3
MPEG-1 & 2 Audio Layer 3
Formato de senal WAV ....... PCM lineal & MS ADPCM
Sintonizador de FM
DYNAMIC—VOCAL—NATURAL—CUSTOM FLAT—POWERFUL
| D: C | D: C | D: C | D: C | D: C |
| A: A | B: B | B: B | F: F | J: J |
| E: E, E | J: J | J: 3 | H: H, H | K: K |
| A: JI | M: M | H: H | J: O | J: J |
(Windows Media Player)

m = 311 ;
KLASSE 1 LASERPRODUCT
VOORZICTHIG-ONZICTBARE LASERSTRALING KLASSE 1M. INDIEN OPEN NIET RECHSTREKES BEJKKEN MET OPTISCHE INSTRUMENTEN.

LET OP
SRTRV (sound retriever)
MP3i (MP3 interactive), mp3 PRO: Nee
WAV
(Windows Media Player)
MP3-decoderingsformaat ... MPEG-1 & 2 Audio Layer 3
WAV-signaalformaat ......... Lineaire PCM & MS ADPCM
FM-tuner
Frequentiebereik 87,5 tot 108,0 MHz
Bruikbare gevoeligheid 11 dBf (0,7 V/75 Ω, mono, S/R: 30 dB)
Signaal-tot-ruisverhouding 72 dB (IEC-A-network)
MW-tuner
Frequentiebereik 531 kHz tot 1602 kHz
JI3EPHbI IPODyKT KIACC 1
BHIMAHNE-HEBNIIMOE JIA3EPHOI3NJYUHNE KINACCA 1M, PIPN OTPKbIToTN KPBJlKKE 3ANPUEAETC4 CMOTPETB B JIA3EPHbI YIYOK HEPE3 OITNUECKHE NIP6OBpbl.
OCHOBHO ① cekTop DnCnpe
TIOHEP: Duaana3OH n Yactota
RDS:Ha3BaHne npOrpaMMbl, PTY-UNΦopMaζηι έnpOaTeKCTOBa INΦopMaζηι
BCTpoeHHbI npOgPbIbATEnb KOMNAKT-DiCKOB:BPEM,IPO-WeJee C Hauana BocpOn3-BeDEHn, N TeKCTOBaI INΦOpMaζη
Homep npedapnTeBHOH NaCTPOKn/Homep DOpOKn
HOpemDoropoxKnIINHOMep npedbapntelbHOHactpoKN.
- Ecnn Bb6paHaDopoxKa c HomepOMOT100nBbIe, C IeBOI CTOpHOHINDAKATopa Homepa DopoxKb 6ydet OTO6paxatbca CNMBON
1 Haxmnte u yedejxmbaTe KhoNky SRC/OFF, noka yctpoiCTBO He BbIKHOnITc.
Bb6op nctouhka cnHana
1 HaKMMTe SRC/OFF, TTo6bI nepe6paTb NCTOCHNc cnHana, nepeuCnJIeHNbIe HNKe: TUNER (TIOHeP)-CD (BCTpoEHHHI pOnrTpBa-TeNb KOMNaKT-DINCKOB)—AUX (BCNOMoRatEnbHOyeCTBO (AUX))
PeryJInpOBKa rPOMKoCTn
CoxpaHeHne N Bbl3OB n3 PnMaTn paAnocTaHcN dJa KaXdOro DnAna3OHa
- Ytob CoxpaHnTB B namTn HuxHyo paHIOCTaHcIIO, HaxMITE ONDy I3 KHOJOK npEdBapNTbHOH HAcTPOIKN (c 1 no 6) uyePknBaHTe ee, NOKA HOMep npEdBapNTbHOH HAcTPOIKN He NpeKpATNT MIRaTB. CoXpaHeHHyU yactOTy paHIOCTaHcIM MOxHO Bbl3BaTB HaxKaTneM KHONKn npEdBapNTbHOH HAcTPOIKN.
Дя Вьзова чacterот радиocтанци НжмITE AIII N
IpeekloueHne peKIma RDS dinCnJe
RDS (paɪnɒbɛsætænlbəhæcnsætema npepa-ynnHΦopmauŋ) npepaetζnΦpɔbyu nHΦopmaúno, oBnεrγaʊzuyo nOnck paɪnɒctaún.
- Haxmnte D (DISP/SCRL).
Ha3BaHne nporpamMbI—HnΦopMaZna PTY —Yactota
Ha dincpiee Ha BOCEm cekyHd nOABNTc HΦopmaunpy PTY uactota.
Cnncok PTY
NEWS (HOBOCTN), AFFAIRS (Tekyuzaa HNΦopMaUZNA), INFO (HNFOPMaUZNA), SPORT (CnOPT), WEATHER (no-roJa), FINANCE (ФИнансы), POP MUS (ПОн-Музьka), ROCK MUS (POK-My3bika), EASY MUS (ЛERKаЯ Музьka), OTH MUS (Почи Ma3bikalbHbe Jauhby), JAZZ (ДжаЗ), COUNTRY (KaHTpn), NAT MUS (HAJOHahlbHаЯ Музьka), OLDIES (ЗлOTЯ КОЛLEКИА), FOLK MUS (HapOnHaЯ My3bika), L.CLASS (Еркая КлAccsuecka Ma3bika), CLASSIC (КлAccsuecka Ma3bika), EDUCATE (ОБразовateNBie nporpamMbI), DRAMA (Юстанови), CULTURE (КУltType), SCIENCE (Hayka), VARIOVED (pa3hoe), CHILDREN (ДeТСКЕnporpamMbI), SOCIAL (CouaJIbHbe BONpoCbI), RELIGION (РелINIO3Hbe nporpamMbI), PHONE IN (TOKsooy), TOURING (nyTeWeeCTBna), LEISURE (OTdIx), DOCUMENT (ДOKумentальнibe nporpamMbI)
Bb6op aIbTepHaTHBbIX qaCTOT
Ecnn KaueCTBO npneMa Hn3Koe, ycTpoiCTBO aBTOMaTnueeCKN BbINoJHNT NOnCK dpyroI CTaHcnn B TOJ Xe CETn.
HaxMMTe uYdepxuBaHTe KNONkTy/AF, yTO6bI BKIOHTb INN BbIKIOHTb cyHKcIHO AF.
IcnoJIb3OBAHHe yHKnH NOnCK PI (no ndeHTnΦKaTOpY nporpaMMbl)
Ecnnnoxoadyuyo ctaunuHaHTn He ydaetc nn KaueCTBO npneMa yxyduaeTcay,ycTPOINCTBO ABTOMATueckn BbIOnHIT NOCKdpYrO CTaunco CXoHDNo pIporpAMMO.BovBpMaONsCA OTo6paKaetcPI SEEK n npnIyuaeTc3ByK.
YnpaBHeHne daHHbIM yCTpoIcTBOM
NcnoIb3ObaHne aBtOMaTHueCKOro noncka PI (no ndeHTnΦkaTOpy nporpaMMbl) dI pynpedBaPHTeJbHO HaCTpoEHbIX cTahCmI
EcnHe ydaeTcBb3bBaT npedBapntbHo HacTpoEHHbIe cTaHcHn, HanpIMep, BO BpeM Noe3dkn Ha daJIbHee pacCToHHe, ycTPOCTBO MOxHO HAcTPOITb Ha BbINOJIHHeHne NOnCKa PI (no ndHTnΦkaTopy nporpaMMbl) BO BpeM BblOBA npedBapntbHo HAcTpoKN.
AF (NONCK aIbTePHaTnBbIX YaCTOT)
1 HaxMMTE KHOJIKY ▲ mIIN V, YTO6bl BKJIIOHcHTb mIIN BbIKIIIOHTb cyHKUIO AF.

CD
OchOBhble onepaun
Bocnpo3BeJeHne CD/CD-R/CD-RW
1 BCTaBtE DnCK B UeJIb DnIg 3aRpy3Kn DnCKa MapKnpoBaHNoI CTopoHOI BBepX.
IzhneHneIeNcKa CD/CD-R/RW
1 HaxmTeA.
Bb6op panki
1 HaxmTe KhoNkY a nnV.
Bb6op dopokk
1 HaxmTe KhoNkY nnn
Yckopenhaj nepemotka Bnepeid nn Ha3a
1 HaKmTe n ydepKbBaIe KKnKy Ann ▲PnBocpO3BeDHN CkAaTbX aayinOpAanOB 3ByK He BOCpON3BDoNTC, eJN BKNIOHya YcKepeHNa nepeMOTKa Bnepe NnHa3d.
IpekeJIIOUeHne MeKJy CKaTbIMn ayDnOpaJIaMn IuCKOM CD-DA
1 HaKMTe B (BAND/ESC).
OTo6paXeHne TeKCTOBoHnHΦopMaun
Bb60 TeKCTOBoI INHOpMaun
1 HaXmTe D (DISP/SCRL).
ПразктукаTekстовинформuaци Влево
1 HaxmTe u ydepxmbaTe D (DISP/SCRL).
Приимechаня
B 3aBnCmOcTn OT Bercnn iTunes, nCnoIb3oBaanHOn dIy 3aIncn faiNob MP3 Ha IINCK, INIOT TnPa MeDnaFaa TeKCTOBaY INHOpMaunr HecOBMeCTMOrO fOpMaTa, 3aIncanHaB aayNofAaIne, MoKeT OTo6paXaTbcra HeKOppeKTHO.
Bo3MOxHOCtB BHeCEHnI3MeHEnB TeKCTOByIO INΦOpMaζIHO 3aBnCnT O TnPa HocnTeŋ.
HactpoRkaФyHKcN
Haxmnte KhoNky FUNC, YTo6bI Bbl-6paTb cyHKunHO.
3aTeM BbIOnHnTe CNe dyUoJne DeIeCTBna, TTO6bl NODTBepDnTb HAcTpoKy.
RPT (NoBTOHHe BOCnpon3BeJeHne)
1 Haxmnte KhONkY nIIN▶, YTO6bI Bb6paTb DnA- nA3OH NOBTOPO HOBCPON3BeHnI.
DSC-Повторhoe BOCPON3BedeHne BCEx DopoKek
TRK-IOBTOPEKUeIdoPOJKN
FLD-IOBTop Tekyuien nann
RDM (Bocnpoun3BeDHe B npoun3BOHn NocJeDoBaTeJIbHOCTn)
1 Haxmnte A nnn V, TTObbl BkHIOHTb NnN Bbl- KTHOHTb FyHKtio NpOn3BOJbHO BOcPOn3Be-DeHH.
Korda Bocnpo3BeDeHne B npO3BbONHOncIeOBaTeNbHOCTN BKNIOHe,Ha DCnJIeNE POJABTReT CDRM.
Ecnin BKIOHHTB BOCPNO3BDEHBNBPOH NOCELOBATEBNOCTB PEXKIMNE NOBTOPA nanKn,Ha DCNPIEE NOBNTCn INDOKAUNFRDM.
SCAN (ckaHpyuuee Bocpon3BedeHne)
B pexime ckaHIOPOBaHnBa bIIOIOHReTcnoNCK KOMno3NIuN B pIeTeJax BbI6paHnHO dHaana3OHa nobTOBPHORO BOCNPON3BeDEHn.
1 HaKMMTe A, YTO6bI BKJIIOHTb cKaHpyIOUeB OBCPON3BEDeHHe.
Ecnin BKIIOHHTb cKaHNpyUOeB BOCPON3BeDEHne B pexKIMe FLD,Ha DCnIeNee NPOBJIaTc HADINCB FSCN.
2 HaxMITE▼ДЯ ВьКИЧЕHЯ CKaHnpyUOJIeBOCIPpon3BEdENHЯ, KOrДa Bы HаДTe HxKHyDopoxkky.
Ecnn Dncnnn EANOMTNeCKM BepHyIcB B pexkm BocpnOn3BeDenn, Bb6peHte FyHKnIO SCAN cHOBA, HaxkMma KNKny FUNC.
Iocne 3aBepeHnE cKaHnpOBaHnA DnCKa (panKn) CHoBa NaHcTcO obHyHoe BocPOn3Be-DeHHe NDOPOXeK.
PAUSE (nay3a)
1 HaxMnte KhoNkY ▲ mIn▼, YTO6bI BKIOUoytB nay3y mIn BO3O6HOBnTB BOCpON3BeDHeHne.
SRTRV (sound retriever, texhonoTn ppeo6pa3ObA Hn 3Byka)
UnpaBJeHne DaHHbIM yCTpoiCTBOM
ABOTMATUNHECKN yUYUHAET KAECTBO 3Byka CzKAtbIX ayDIOFOAIIOB I BOCCTAHABINBAET NIONHTOY 3ByuHIN.
Haxmte KhONky ▲nIn▼, YTO6bI Bbl6paTb HxK-HyIO HAcTpoIKy.
OFF(BbIKI)一1—2
HactpoKJa 1e4fkeTnBHaIraIpaIIOB C Hn3KoC CTeneHbO cKaTnA, a HactpoKJa 2 -IraI paIIOB C bICbKOc TcTeHbO cKaTnA.
FF/REV (yckopenhna nepemotka BnepeHa3a)
Mozho BbIbpaTb OINH n3 cIeIyUOxN cIocO6OB no- nCKa: yckOpEHnYIO nepeMOTky BVepeI/Haazd N oIocK kajdo10-n10-dopokk. BbIbOP ROUG hONBOBReT oOcIeCTBnB pONC kAJoD 10-n dopokk.
1 Haxmnte ,yTo6bI Bbl6paTb ROUGH.
FF/REV-YcKOpEHnHaI nepeMoTKa BpePei Ha3aI
PereylnpOBKn npaMeTpOB 3Byka
PergunpoBn npaMeTPOB 3Byka
- HaxMMTe KhoNky AUDIO, TTo6bl Bbl-6paTb ayDnOphiHKcHIO.
3aTeM BbIOnHnTE CNeDyUOuNE DeiCTBnY, YTO6bl NODTBePdNtB HAcTpOky aynoofyHK- cnn.
FAD (perynipobka ypOBnCnHaJa/6aHaHcA)
1 Haxmnte KhONky △nIN▼, YTO6bI OTpeyHnpoBaTb ypoBeH cnHaana (6aNaHC nepeDnHex n 3a-DnHex rPOMKOROBOpTeJIe).
2 Haximamae KhoiKn 一 _ 一 TTO6bI OTpeYnipoBatoB 6aanaC (6aanaHc IeBOrO n npaboro rpoMko-roBOpntene).
BASS/MID/TREBLE (peruynpobka 3kbaiaa3epa)
- Otperyu npobaaHbIe HacTpoKn KpNbOa3KbAan3epa coxpaHqOTcB CUSTOM.
1 Haxmnte KhoNky ▲nI▼, YTO6bl OtperynpoBaTb yOpeHb.
DYNAMIC—VOCAL—NATURAL—CUSTOM FLAT—POWERFUL
CUSTOM NO3BOJRAET CO3aTb CO6CTBeHHyIO HAcTPOIKy.
Дугnev Функцин

Baxkho
SAVE (pexim 3heprocbepexehn) OTKluohaeTc npi OTCOeHHeHn AKKyMylTOpHoi 6aTape n aBTOMo6NJ; npi NOcEOHHeHn 6bTape n er0 notpe6byTe BkIouHt b CHOa. Ppi BbIKIOueH HOM peXIMe SAVE (pexim 3heprocbepexehn) BO3MOxHO, YTO, B 3aBNCIMoCTn OT MeToDa nODKIIouHn, yCTPOJCTBO 6yDet NTpe6nTb 3hePnHO aKKyMylTOpA, eCNI 3aMOK 3axnraHn aBTOMo6NJ He IMeET NpOKeHn ACC.
N3MeHeHHe NaHaJIbHbIX HaCTpoEK
1 HaKmTe n ydepxnBaIe KhONky SRC/OFF, noka ycTpoiCtBO He BbIKIOuHTcra.
2 HaxmTe udepKuBaIte KhoNky SRC/OFF, noka Ha dncJIee He noBHTca Ha3BaHne fYHKcII.
3 HaxMMTe FUNCДЯ BBIBopa HauaJIb-HoH HAcTPOJKN.
3aTeM BbIOnHInTe CNeyUOuNe DeIcTBnI, UTo6bl IoTBePdntb BblOp HauJaBHOH NaCTPOkN.
⑤ BbIXoI 3aHHeRo KaHaHa
UHyp nHTaHHa

1 K rhe3dy uHypa nITaan
② B3aBcIMoCTnOTtIaABTOMo6JIpyHKUIN ③ N ⑤ MOrYTOJHuaTbCBA TOMcIyUae CJeDyET NOKJIIOHTb ④ K ⑤ N ⑥ K ③
③ KeTbI
Pe3epBnbl pa3bem (uIN pa3bem DOnOpHInTeIbHOrO o6opyDobAHn)
④ JeJIbIy
2 3aTaNHTe NO DBA BnHTa C KaXDoI CTOpHbI.
① Camohape3aOuBnHT(5MM×8MM)
② MoHTaXHaJa paMaKa
③ Пиборна панель полконсль
Демонох устpoиста
1 CHHmnte paMky.
YCTpaHenne HEnCnPaBHOCTeI
TOnuKINOTHEPOBBOHCTeI DOpOrnMOrYBb3BaTbIpePbIBaHMe BOCpON3BeDcHnA DnCKa.
ДиСКИ ФормаТa DualDisc (ДвОйнBLEДИСКИ)
Windows Media Audio Professional, Lossless, Voice/ DRM Stream/Stream c podepkKoB Video: He pod-depknBaetc
DOnoJIHnTeJIbHaЯ HhΦopMaця
MP3
Pacuipene: .mp3
CkopocTb nepeaun daHbIx:OT8KbIT/cdo320 KbIT/c (noCToHHa),nepeMeHHa
Yactota DnckpeTnau: oT 8 KTu do 48 KTu (32, 44,1,48KTu nIKOBa)
CObMeCTmMaB BercnA terOB ID3:1.0,1.1,2.2,2.3, 2.4 (TeN ID3 Bercn 2.x mHeOT npHOpNT TpeD Bercnei 1.x.)
Cnckn Bocpon3BeHnM3u: He noDepKnBaHcTcR
MP3i (INTEpakTnBbI MP3), mp3 PRO: He noDnepKJBBAIOCTC
WAV
Pacunepne:wav
Pazpndocb KBaHTobHn816(LPCM),4(MS ADPCM)
Yactota DnckpeTn3aun: oT 16 KfU do 48 KfU (LPCM), 22,05 KfU n 44,1 KfU (MS ADPCM)
DononHntelbna HOpMaun
B kaueCTBe Na3BaHnIe PaiJa NII nnKIN MOnYT OTo6paKaTaBC TOJIbKO nepBbIe 32 CmBONA (BKNIOyApaCusnPHeJe)
JNTOO6bApKHeHINB DAnHOM UCTPOnCTBe KOiNPOBkA pyCCKOrTo KTeCTa DoJIKHAA COOTBECTBOBaTb CNeIyU-UMHnAbOpAM CmBNOB:
- IOHnKoI (UTF-8, UTF-16)
OTNIHbIe OTOHnKOJaHa6OpbI CmB0JOB,NC-ONb3yIOUneCeB CpeDe Windows,ДЯKOTopbIX BRAKOBOH HAcTPOKe 3aDaH yCCKN RA3IK
3To ycTpoIcTBo MOKet HeBepHO BocnpoN3BOOHTbHeKOTOpbIe faaiIbI φopMATA WMA B 3aBNCIMOCtOn OT pInIOXKeHNI, INCIOJIb3OBaHHbIX DIIA INX 3aINCI.
Пин haнале BocnpoinBedeHn uydnOphiJnoB, co-depkauxn n3o6paKeHnЯ, moKet npOn3oTn He-6bonbuaa 3aedpckka.
Anck
KoJIneCTBO BOCPON3BODIMbIX paIIOB: He 6OJee 999
Фаиноовая сисема:ISO9660уровь 1и2, Romeo,Joliet
Bocnpoun3BeDeHne HeckoIbKx CecCn: npDepKnBaETc
TaketbIyΦopmat 3aHcN: He nOndepKJBBaETc
He3aBnCIMMo OT npoDOnKmTeBbHocTn Na3bl MekyD KOMN03UZMnB IN3HaJcAhlbHoI 3aINCS, pRi BOCpON03BeDEHMn DNCOB CO cKaMByuMn AyuNOopaJnAMn MekyDk KOMPON3UZMnMn 6dyt KOPOTKne Na3bl.

IocneIOBaTeJIbHOCtB BOCnpon3BeDeHnaydnofoaJIOB
Пользователов может ha3начать Homepa nanok И yctaHaBnBaTb NOcJIeДOBaTeNb-HOCTb BOCpON3BeDEHnC NOMOuI duHNO-ro yctpoIcTba.
Ppimepnepapxnn
YpOBeHb1 YpOBeHb2 YpOBeHb3 YpOBeHb4
:Nanka
J: CkaTbayuDn-0ofoaui
OT 01 p05. Homed nank
OT①do⑥:Piocne-OBATenbHOCTb
Bocipon3BeDHeH
Dnck
OTHOWeHHe CnHnA/Um...94 D5 (1 KU) (cTeB IEC-A)
YinCIO KaHaoB 2 (CTepeo)
ΦopMaTДeKOДирOBaHЯФaIIOB WMA
Bercnn 7, 7.1, 8, 9, 10, 11
(Windows Media Player)
ΦopMaT DeKoDnPoBaHnaФaIIOB MP3
MPEG-1 n 2 Audio Layer 3
Φopmat CnHana WAV ......... Linear PCM u MS ADPCM
FM-TIOHEP
ДианаэончacrOT ...ot 87,5Mgdo108,O Mg
Pone3nayBCTbnteHbOcTb
11ДБΦ(0,7МKВ/75Ω,
MOHO, OTHOJIeHHe CNrHaJI/
zhym:30B)
OTHOSeHne CnHn/7ym .... 72 d (cetb IEC-A)
MW-TioHep
25MKB (OTHOSEHNE CnR-
han/zhym:20d6)
OTHOSeHne CnHn/7uM ...62 d (cTeB IEC-A)
LW-TIOHEP
Дианэзн част...OT 153do281KfU
Pone3nayBCTbnteHbOcTb
28MKB (OTHOWeHne CnR-
haJ/zhym:20d6)
OTHOSeHne CnHn/7uM ...62 d (cTeB IEC-A)
Пгимейанne:
B COOTBETCTBmO Co CTbEe 53aKaHa PocCnckoΦeepaunu “O 3auNTe npab notpe6nte nei nocTahOBneHem npabntelbCTBa
Pocncko Fepaun N 720 ot 16.06.97
KOMPNAHNA Pioneer Europe NV orobapnBaet cIeDyUoIcI npckCnyk6bI n3denn, oΦn-uaJIbHO nOCTaBJIeMbIX Ha poccnckn pbIHOK.
AByTOMo6nIbHaJ3JeKToHnKa:6 neT DpyrIe N3dEIna (HayuHnKn, MmKpOfoHbI n T.n.):5 neT
PpmeaHn
XapaKTepeNtKNI KOHCTpyKUma MOyT 6bITb N3MeHeHbI 6e3 npedBapuTeNbHO yBeDoMJIeHnA.
-Данhoe yctpoiCTBO npoI3BedeHO TaHnAHe.
http://www.pioneer.eu
Visit www.pioneer.co.uk (or www.pioneer.eu) to register your product.
Visitez www.pioneer.fr (ou www.pioneer.eu) pour enregistrer votre apparéil.
Si prega di visitare il site www.pioneer.it (o www.pioneer.eu) per registrar il prodotto.
Visite www.pioneer.es (o www.pioneer.eu) para registrar su produit.
Zum Registrieren Ihrés Produktes besuchen Sieitte www.pioneer.de (oder www.pioneer.eu).
Bezoek www.pioneer.nl (of www.pioneer.eu) om uw product te registrareren.
Посетитewe www.pioneer-rus.ru (ини www.pioneer.eu)對於пгостраць пообравеного Вами Истения.
Pioneer CarStereo-Pass
Please fill out immediately after purchase.
HmnpTep OOO "THOHEP PYC"
125040, Pocca, r. MochBa, yI. IpaBbl, d.26
TeN.: +7(495) 956-89-01
PIONEER ELECTRONICS (USA) INC.
P.O. Box 1540, Long Beach, California 90801-1540, U.S.A.
TEL: (800) 421-1404
PIONEER EUROPE NV
Haven 1087, Keetberglaan 1, B-9120 Melsele, Belgium/Belgique
TEL: (0) 3/570.05.11
PIONEER ELECTRONICS ASIACENTRE PTE. LTD.
253 Alexandra Road, #04-01, Singapore 159936
TEL: 65-6472-7555
PIONEER ELECTRONICS AUSTRALIA PTY. LTD.
178-184 Boundary Road, Braeside, Victoria 3195, Australia
TEL: (03) 9586-6300
PIONEER ELECTRONICS OF CANADA, INC.
300 Allstate Parkway, Markham, Ontario L3R 0P2, Canada
TEL: 1-877-283-5901
TEL: 905-479-4411
PIONEER ELECTRONICS DE MEXICO, S.A. de C.V.
Blvd. Manuel Avila Camacho 138 10 piso
Col.Lomas de Chapultepec, Mexico, D.F. 11000
TEL: 55-9178-4270
先锋股份有限公司
總公司:台北市中山北路二段44號13樓
電話:(02)2521-3588
先鋒電子(香港)有限公司
香港九龍尖沙嘴海港域世界商業中心
9樓901-6室
電話:(0852)2848-6488