
SB-30 - External Flash NIKON - Free user manual and instructions
Find the device manual for free SB-30 NIKON in PDF.
User questions about SB-30 NIKON
0 question about this device. Answer the ones you know or ask your own.
Ask a new question about this device
Download the instructions for your External Flash in PDF format for free! Find your manual SB-30 - NIKON and take your electronic device back in hand. On this page are published all the documents necessary for the use of your device. SB-30 by NIKON.
USER MANUAL SB-30 NIKON
Thank you for purchasing the Nikon Speedlight SB-30.
The SB-30 is a compact, light, and versatile Speedlight having a guide number of 16/52 (at 28mm angle of coverage, ISO 100, m/ft, 20^ / 68^ ). Available flash shooting modes are TTL auto flash, Non-TTL auto flash, and Manual flash. Wireless multiple flash operation is also possible.
Major features of the SB-30
- The SB-30 is useful as a handy flash unit to perform TTL auto, Non-TTL auto, and Manual flash, when used with Nikon SLRs cameras not having a built-in Speedlight.
- The SB-30 is suitable as a slave flash unit in wireless or wired multiple flash operation when used in combination with the COOLPIX or Nikon SLRs cameras having a built-in Speedlight.
- Close-up flash photography using with the flash head tilted down is possible without detaching the Speedlight from the camera. Wireless multiple flash operation using the SB-30 as an Infrared remote commander is also possible to control the firing of other slave flash unit(s).
To get the most out of your Speedlight, please read this and your camera instruction manual thoroughly before use.
- Because the SB-30 features the same TTL flash operations as those of the SB-22s, refer to those items in the flash photography section of your camera instruction manual corresponding to SB-22s, if the SB-30 is not listed.
(p.xx) indicates the reference page.
Tips on using the Speedlight
- Take test shots before shooting important occasions like weddings or graduations.
- The Nikon Speedlight SB-30's performance has been optimized for use with Nikon cameras/ accessories and lenses. Camera/accessories made by other manufacturers may not meet Nikon's criteria for specifications, and nonconforming cameras/accessories could damage the SB-30's components. Nikon cannot guarantee the SB-30's performance when used with non-Nikon products.
Note
- The Nikon N90s, N90, N70, N60, N55, N50, N8008, N8008s, PRONEA 6i, N6006, N6000, N5005, N4004, and N4004s are sold exclusively in the U.S.A.
- The Nikon N80-Series and N65-Series are sold exclusively in the U.S.A. and Central and South America.
- The Nikon N2020 and N2000 are sold exclusively in the U.S.A and Canada.
Warning
- Batteries shall not be exposed to excessive heat such as sunshine, fire or the like.
- Dry batteries shall not be subjected to charging.
- Do not expose the SB-30 to water as this may result in electric shock or cause the unit to catch on fire.
Contents
Preparation
Foreword 1
Tips on using the Speedlight 2
Speedlight parts. 4
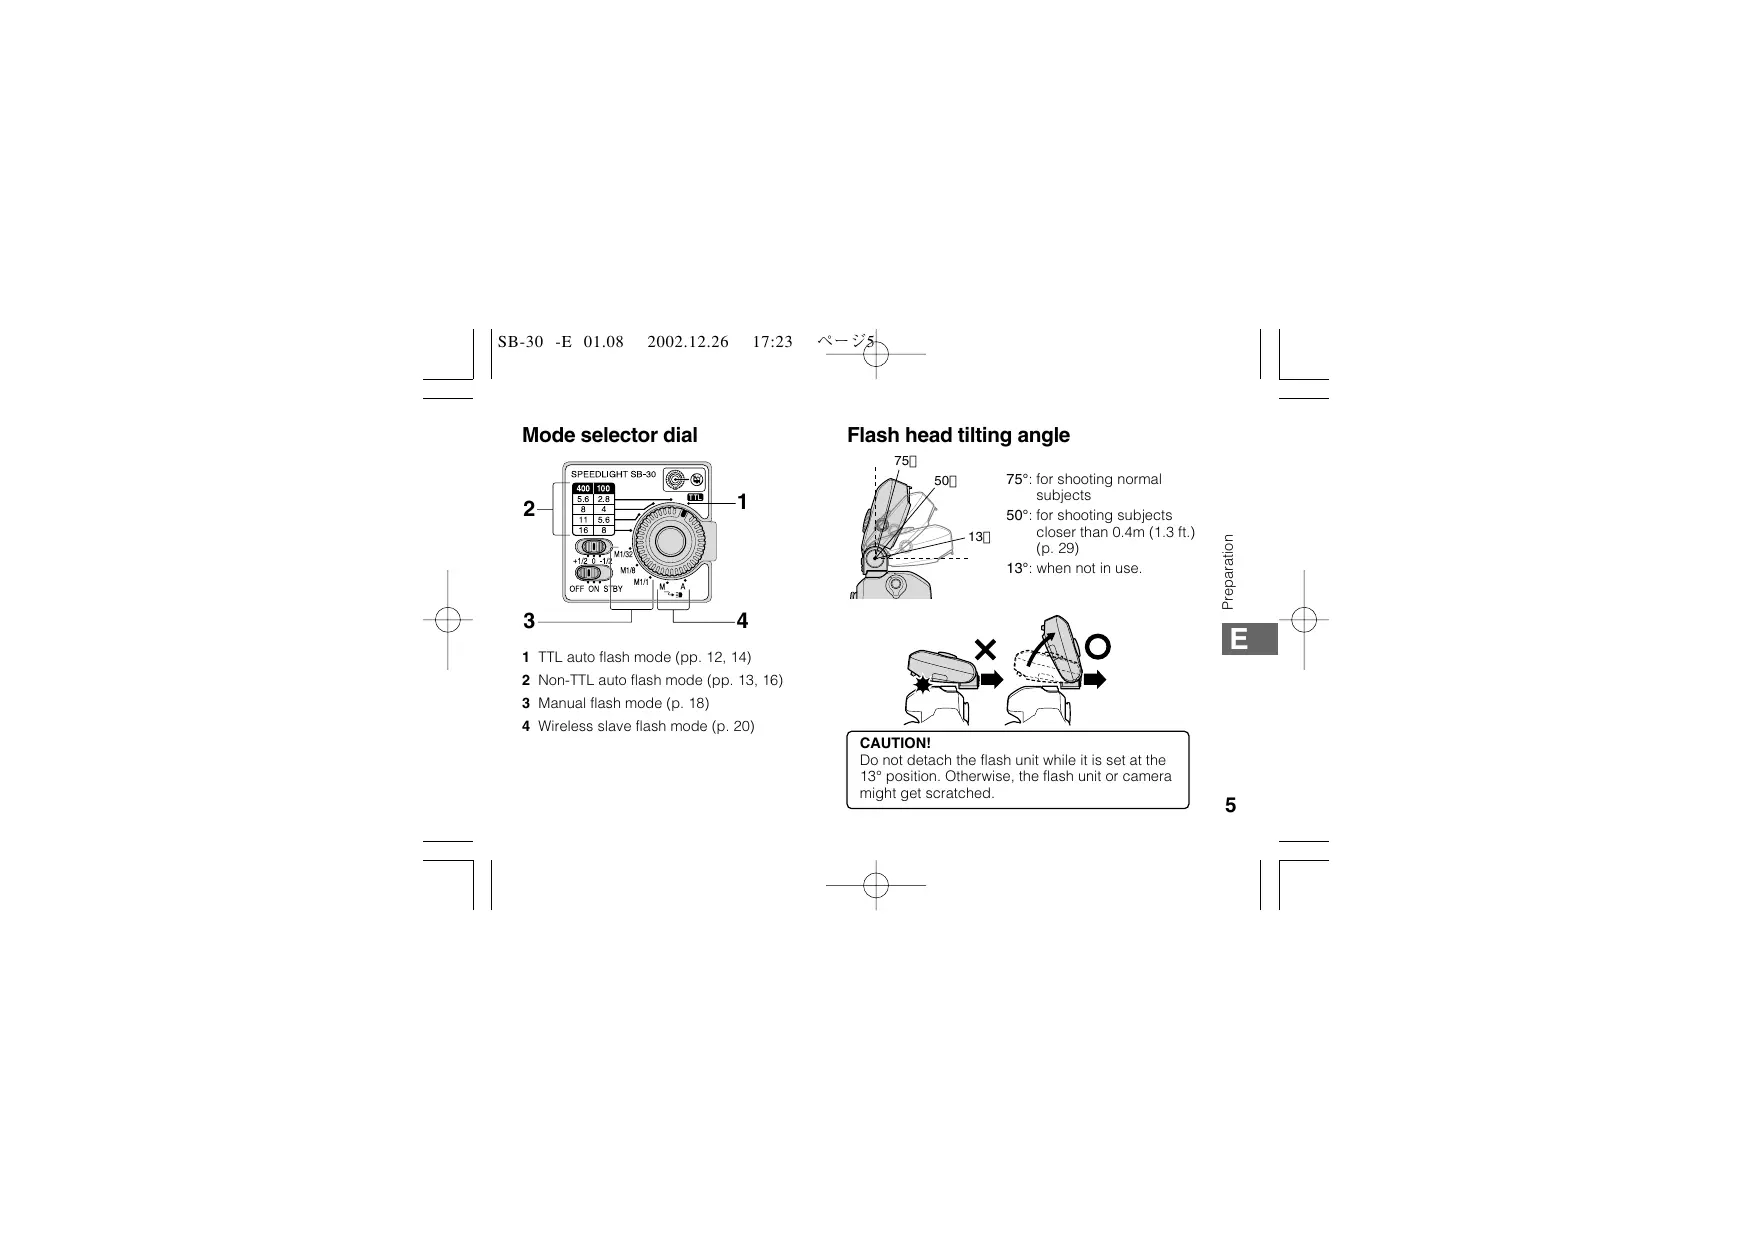
Mode selector dial 5
Flash head tilting angle. 5
Installing the battery. 6
Turning the power ON/OFF and the Standby function .......7
Attachment to the accessory shoe .9
Usable cameras and available flash modes.....10
Using the SB-30 with SLRs cameras
As a handy Speedlight
Auto flash modes 12
TTL auto flash mode. 12
Non-TTL auto flash mode 13
Manual flash mode. 18
Illuminating a distant subject using the SB-30 and cameras such as the COOLPIX
Wireless slave flash shooting. 20
Shooting a distant subject using the SB-30 in conjunction with cameras such as the COOLPIX that have a built-in Speedlight 22
Shooting a subject when the SB-30 is placed away from the camera. 24
Softening the shadows cast on the wall by the master flash unit or lightening the background. 26
Multiple flash operation using the SB-30 as an infrared remote commander. 27
Multiple flash shooting using cords 27
Advanced operation
Close-up flash operation from approx. 0.3 to 1m (1 to 3.3 ft.) with the built-in wide-flash adapter ....28
Exposure compensation 30
Reference information
Optional accessories 31
Troubleshooting 32
Tips on Speedlight care and Notes on batteries.....33
Specifications 34
Speedlight parts
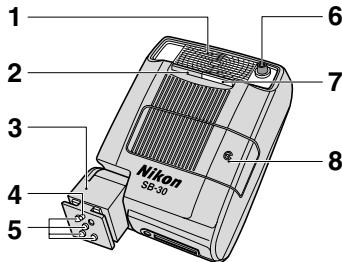
1 Flash head
2 Infrared filter (p. 27)
3 Mounting foot
4 Mount pin
5 Hot-shoe contacts
6 Light sensor window for Non-TTL auto flash (p. 13)
7 Built-in wide-flash adapter (p.28)
8 Battery chamber lid
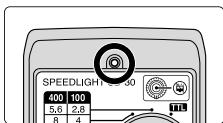
9 Ready-light (pp. 7, 13)
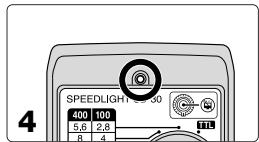
10 Exposure compensation switch (p. 30)
11 Power switch (p. 7)
12 Mode selector dial (p. 5)
13 Light sensor window for wireless slave flash (pp. 20-26)
14 Standby resume button (p. 8)/Slave flash firing cancel button (p. 23)
15 Mounting foot lock lever (p. 9)
Supplied accessories
Soft Case SS-30
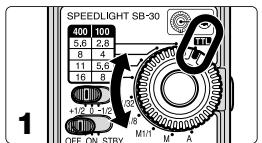
Mode selector dial
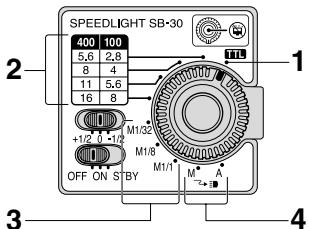
1 TTL auto flash mode (pp. 12, 14)
2 Non-TTL auto flash mode (pp. 13, 16)
3 Manual flash mode (p. 18)
4 Wireless slave flash mode (p. 20)
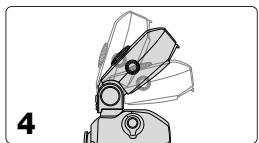
Flash head tilting angle
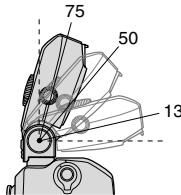
75^ : for shooting normal subjects
50^ for shooting subjects closer than 0.4m (1.3 ft.) (p.29)
13^ : when not in use.
CAUTION!
Do not detach the flash unit while it is set at the 13^ position. Otherwise, the flash unit or camera might get scratched.
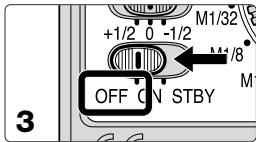
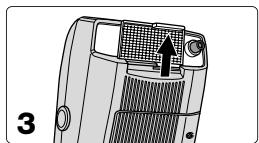
Installing the battery
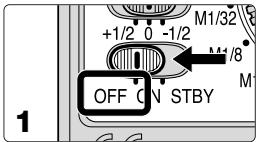
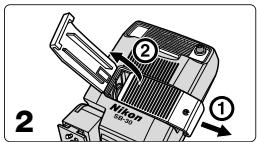
1 Set the SB-30's power switch to the OFF position.
2 Open the battery chamber lid as indicated by the arrows.
3 Install the battery following the + and - marks as shown. Then close the battery chamber lid by sliding it into place while pressing down.
- Install one 3V lithium battery (CR123A or DL123A). Do not use the other types of batteries.
- When replacing the battery, be sure to set the power switch to the OFF position. If the battery is replaced while the power switch is set to the ON or STBY (standby) position, the Speedlight may fire accidentally or the power may not turn on correctly. In this case, set the SB-30's power switch to the OFF position once, then set it back to the ON or STBY position. (p. 7)
Battery performance
- When using a fresh battery, the number of flashes when the SB-30 fires at M1/1 output is approx. 250 times.
- With a fresh battery, the recycling time after the SB-30 fires at M1/1 output is approx. 4 seconds.
- Replace the battery, if the ready-light takes more than 30 seconds to light up when the unit first turned on or after firing the unit.
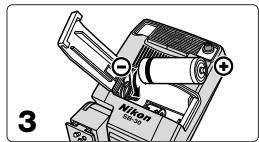
Turning the power ON/OFF and the Standby function
1 Set the SB-30's power switch to the ON or STBY position.
- When set to the STBY position the Standby function is activated. (p. 8)
- The Standby function does not work with COOLPIX digital cameras having no hot-shoe contacts. In this case, set the SB-30 to the ON position.
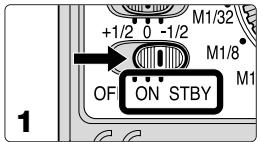
2 Make sure the ready-light comes on.
- When the ready-light lights up, the SB-30 is fully recycled and ready to fire.
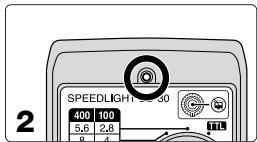
3 Set the SB-30's power switch to the OFF position when not in use.
- Be sure to set the SB-30's power switch to the OFF position when not in use to conserve battery power.
Conserving battery power using the Standby function
- If the SB-30's power switch is set to the STBY position, the Standby function is activated only when the Mode selector dial is set to either TTL auto, Non-TTL auto, or Manual flash mode.
- If the SB-30 and the camera are not used for approx. 40 seconds, the Standby function activates and automatically turns the SB-30 off to conserve battery power. This is called the standby state.
- The Standby function does not work if the Mode selector dial is set to the Wireless slave flash mode. Take care that the power remains on and is consuming.
To turn the SB-30 on again after it enters in the standby state, you can:
- Press the Standby resume button/Slave flash firing cancel button.
- Lightly press the shutter release button on a camera that is compatible with the TTL auto flash mode.
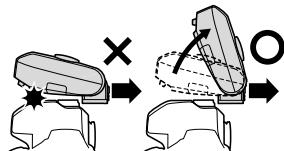
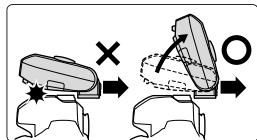
Attachment to the accessory shoe
Attaching and detaching the Speedlight
Slide the SB-30's mounting foot ① into the camera's accessory shoe, then turn the lock lever ② in the direction of the arrow to lock the unit.
- When the SB-30 is attached to an accessory shoe not equipped with a mount pin hole to prevent accidental detachment, take care that the SB-30 does not fall off.
- When detaching the SB-30, set the flash head tilting angle to 75^ or 50^ , turn the lock lever 90^ in the opposite direction to unlock the unit, then pull the Speedlight off.

Note on attaching the SB-30 to cameras that have a built-in Speedlight
When the SB-30 is attached to the camera's accessory shoe, do not pop-up the camera's built-in Speedlight. Otherwise, only one of the Speedlights will fire. However, this is not a malfunction.
Usable cameras and available flash modes
Available flash modes with film-based SLRs cameras
:Recommended flash mode :Usable flash mode X:Not usable -: Not applicable
| Camera type and model | Connection to the camera | Mode selector dial settings | |||||
| TTL auto | Non-TTL auto | Manual | Wireless (M) | Wireless (A) | |||
| Without a built-in flash | Cameras compatible with the TTL auto flash mode: | Accessory shoe | © (p. 14) | ○ | ○ | - | - |
| F5, F4-Series, F100, F90X/N90s, F90-Series/N90, F-801s/N8008s, F-801/N8008, F-601M/N6000, F-501/N2020, F-301/N2000, FM3A, FA, FE2, FG, F3-Series*1 | |||||||
| Cameras incompatible with the TTL auto flash mode: | Accessory shoe | × | © (p. 16) | ○ | - | - | |
| F2*2, FM2, New FM2, FE, FG20, EM, FM10, FE10 | |||||||
| With a built-in flash | Cameras with an accessory shoe: | Accessory shoe | © (p. 14) | ○ | ○ | - | - |
| F80-Series/N80-Series*4, F70-Series/N70*4, F65-Series/N65-Series, F60-Series/N60, F55/N55*3, F50-Series/N50, F-601/N6006, F-401x/N5005, F-401s/N4004s, F-401/N4004, Pronea 600i/6i | Wireless | - | - | - | © (p. 21) | © (p. 21) | |
| Cameras without an accessory shoe: | Wireless | - | - | - | © (p. 21) | © (p. 21) | |
| Pronea S | |||||||
1 Optional TTL Flash Unit Coupler AS-17 is required.
^ 2 Optional TTL Flash Unit Coupler AS-1 is required.
3 TTL auto flash is not possible when the SB-30 is mounted on the accessory shoe. Set the flash mode to the Non-TTL auto.
*4 Set the camera's exposure mode to Manual when the built-in Speedlight is used as a master flash unit.
Available flash modes with digital cameras
:Recommended flash mode : Usable flash mode X: Not usable -: Not applicable
| Camera type and model | Connection to the camera | Mode selector dial settings | ||||
| TTL auto | Non-TTL auto | Manual | Wireless (M) | Wireless (A) | ||
| D1-Series*1, D100 | Accessory shoe | × | ◎ (p .16) | ○ | - | - |
| COOLPIX 5000/5700 | Accessory shoe | ◎ (p .14) | ○ | ○ | - | - |
| COOLPIX 900/910/950/990/995/4500 | Cord*2*3 | ◎ (p .14) | ○ | ○ | - | - |
| Wireless*4 | - | - | - | ◎ (p .21) | ◎ (p .21) | |
| COOLPIX*5 700/775/800/880/885/2000/2500/3500/4300 | Wireless*4 | - | - | - | × | ◎ (p .21) |
| COOLPIX 100/300/600*6/5000*7/5700 | Wireless*4 | - | - | - | ◎ (p .21) | ◎ (p .21) |
1 The D-TTL auto flash mode is not possible with the SB-30.
*2 Except the COOLPIX 900
3 Use of the Multi-Flash Bracket Unit SK-E900 is recommended.
*4 Use of the Bracket Set SK-9 is recommended.
*5 The built-in flash fires one preliminary flash before actually firing to produce the correct flash output.
*6 A dedicated Speedlight for the COOLPIX 600 is required.
*7 At the "Auto with red-eye reduction" setting, the Wireless (M) mode is not possible. Use the Wireless (A) mode instead.
Using the SB-30 with SLRs cameras
As a handy Speedlight
Auto flash modes
Two auto flash modes are available with the SB-30: TTL auto flash and Non-TTL auto flash
TTL auto flash mode
This mode is possible with SLRs cameras compatible with TTL auto flash. At the instant the shutter is released and the SB-30 starts firing, the camera's built-in TTL auto flash sensor measures the flash illumination through-the-lens that is reflected back from the subject and adjusts the SB-30's flash output, providing the correct exposure.
For usable cameras, refer to "Usable cameras and available flash modes" (p. 10).
Available TTL auto flash modes such as Multi-Sensor Balanced Fill-Flash, Matrix Balanced Fill-Flash, Center-Weighted Fill-Flash/Spot Fill-Flash, or Standard TTL flash vary, depending on the cameras and lenses in use. For details, refer to your camera's instruction manual.
- 3D Multi-Sensor Balanced Fill-Flash is not possible, because the SB-30 does not fire a series of preflashes (Monitor Preflash).
- The D-TTL auto flash mode is not possible with the SB-30.
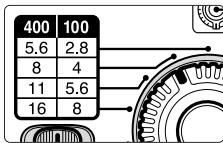
Non-TTL auto flash mode
This mode is possible with all Nikon SLRs cameras including Digital SLRs. At the instant the shutter is released and the SB-30 starts firing, the SB-30's built-in light sensor for Non-TTL auto flash measures the flash illumination that is reflected back from the subject, automatically controlling the SB-30's flash output to provide the correct exposure. Therefore, auto flash shooting is possible with cameras incompatible with TTL auto flash. A choice of four shooting apertures is available: f/2.8, f/4, f/5.6, and f/8 at ISO 100, and f/5.6, f/8, f/11, and f/16 at ISO 400.
Insufficient flash light warning indication in auto flash modes
When the flash has fired at its maximum output and underexposure may have occurred, the ready-light blinks for approx. 1.5 sec. To compensate, use a wider aperture or move closer to the subject and reshoot.
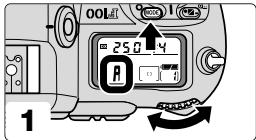
Taking flash pictures in the TTL auto flash mode
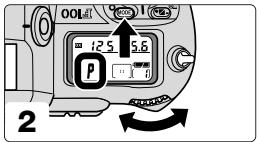
1 Set the SB-30's Mode selector dial to.
2 Set the camera's exposure mode, metering system, sync mode, shutter speed, etc.
- The ready-light inside the camera's viewfinder blinks to warn you that the setting on the camera is not correct and TTL auto flash is not possible. In this case, make sure the camera settings are correct.
3 Check the aperture and flash shooting distance range.
- Make sure the main subject is within this range by referring to the table "Determining the aperture and flash shooting distance range" (p. 15).
- If the camera's exposure mode is set to Aperture-Priority Auto (A) or Manual (M), set one of the appropriate apertures obtained from the table on the camera.
4 Make sure the SB-30's ready-light is on, then shoot.
Refer to page 13 if the ready-light inside the camera's viewfinder blinks after shooting.
Determining the aperture and flash shooting distance range (m/ft.)
| ISO sensitivity | Flash shooting distance range (m/ft.) | |||||||
| 25 | 50 | 100 | 200 | 400 | 800 | No wide-flash adapter in place | With wide-flash adapter in place | |
| - | f/1.4 | f/2 | f/2.8 | f/4 | f/5.6 | 1-8/3.3-26 | 0.7-5/3.3-16 | |
| Non-TL auto flash | f/1.4 | f/2 | f/2.8 | f/4 | f/5.6 | f/8 | 0.7-5.6/2.3-18 | 0.5-3.5/1.6-11 |
| f/2 | f/2.8 | f/4 | f/5.6 | f/8 | f/11 | 0.6-4/2-13 | 0.3-2.5/1-8.2 | |
| f/2.8 | f/4 | f/5.6 | f/8 | f/11 | f/16 | 0.6-2.8/2-9.1 | 0.3-1.7/1-5.5 | |
| f/4 | f/5.6 | f/8 | f/11 | f/16 | f/22 | 0.6-2/2-6.5 | 0.3-1.2/1-3.9 | |
| f/5.6 | f/8 | f/11 | f/16 | f/22 | f/32 | 0.6-1.4/2-4.5 | 0.3-0.8/1-2.6 | |
| f/8 | f/11 | f/16 | f/22 | f/32 | - | 0.6-1/2-3.2 | 0.3-0.6/1-1.9 | |
- At an ISO sensitivity of 100 (200), the available shooting apertures in the Non-TTL auto flash mode are: f/2.8, f/4, f/5.6, and f/8 (f/4, f/5.6, f/8, and f/11)
- At an ISO sensitivity of 100 (400), the available shooting apertures in the TTL auto flash mode are: f/2 to f/16 (f/4 to f/32).
- Use of the built-in wide-flash adapter is recommended when shooting subjects closer than approx. 1m (3.3 ft.) (p. 28)
- Set the flash head at the 50^ position when shooting subjects closer than approx. 0.4m (1.3 ft.) (p. 5).
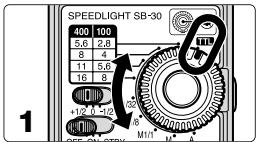
Taking flash pictures in the Non-TTL auto flash mode

1 Set the camera's exposure mode, sync mode, shutter speed, etc.
- The ready-light inside the camera's viewfinder blinks to warn you that the shutter speed is not correctly set with cameras FM3A, New FM2, and FE. In this case, make sure the camera settings are correct.
2 Determine the correct aperture to match the shooting distance range by referring to the table "Determining the aperture and flash shooting distance range" (p. 15). Set the same aperture on the SB-30's Mode selector dial.
- For the available apertures, refer to the table "Determining the aperture and flash shooting distance range." (p. 15)
3 Set the same aperture on the camera or lens as set on the SB-30.
- Otherwise, the correct exposure cannot be obtained.
- When using a zoom lens having a variable aperture, refer to "Variable apertures after zooming in or out" (p. 17) before setting the aperture.
4 Make sure the SB-30's ready-light is on, then shoot.
Refer to page 13 if the ready-light inside the camera's viewfinder blinks after shooting.
Variable apertures after zooming in or out
- With zoom lenses having a variable aperture, take note of the following before setting the aperture on the SB-30.
- For details, refer to your camera and lens instruction manuals.
Reading the aperture on the camera's LCD panel or in the viewfinder
- Lock the lens aperture at its minimum, and after composing the picture by zooming in or out, read the aperture appearing on the camera's LCD panel or in the viewfinder.
Reading the aperture using the scale on the lens
- After zooming in or out to select the appropriate composition, read the aperture in the following way:
At wideangle zoom settings, read the aperture value at the green index (or line).
At telephoto settings, read the aperture value at the yellow index (or dot).
At intermediate settings, read the aperture value between the two indexes.
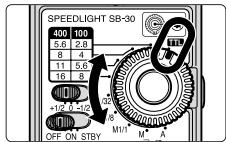
Manual flash mode
The SB-30's flash output level can be set manually at M1/1, M1/8, or M1/32. In the Manual mode, you must determine the correct exposure by calculation using a combination of the guide number, shooting distance, and lens aperture.
- If the camera's exposure mode is set to other than Aperture-Priority Auto (A) or Manual (M), the shutter may not be released, depending on the cameras in use.
Guide number (m/ft.) and ISO sensitivity
| ISO sensitivity | 25 | 50 | 100 | 200 | 400 | 800 | 1600 | |
| Flash output level | M1/1 | 8/26 | 11/36 | 16/52 | 22/72 | 32/105 | 45/148 | 64/210 |
| M1/8 | 2.8/9 | 4/13 | 5.6/18 | 8/26 | 11/36 | 16/52 | 22/72 | |
| M1/32 | 1.4/4.6 | 2/6.6 | 2.8/9.2 | 4/13 | 5.6/18 | 8/26 | 11/36 | |
| Flash output level (with wide-flash adapter in place) | M1/1 | 5/16 | 7.1/23 | 10/33 | 14/46 | 20/66 | 28/92 | 40/131 |
| M1/8 | 1.8/5.9 | 2.5/8.2 | 3.5/11 | 5/16 | 7.1/23 | 10/33 | 14/46 | |
| M1/32 | 0.9/3 | 1.3/4.3 | 1.8/5.9 | 2.5/8.2 | 3.5/11 | 5/16 | 7.1/23 | |
- To obtain the correct exposure, use the following equations to determine the aperture and guide number to match the flash shooting distance.
$$ f / s t o p (a p e r t u r e) = G u i d e n u m b e r (G N) \div S h o o t i n g d i s t a n c e (m / f t) $$
$$ \text {G u i d e n u m b e r (G N)} = \text {A p e r t u r e} \times \text {S h o o t i n g d i s t a n c e (m / f t)} $$
For example, when shooting a subject at a distance of 2.5m (8.2 ft), at an ISO sensitivity of 400 and a lens aperture of f/2.8:
$$ \text {G u i d e n u m b e r} = 2. 8 \times 2. 5 = 7 (\text {i n m e t e r s}) \text {o r} 2. 8 \times 8. 2 = \text {a p p r o x .} 2 3 (\text {i n f e e t}). $$
Therefore M1/8 is the correct flash output level with the wide-flash adapter in place.
- Likewise, when shooting a subject at a distance of 4m (13 ft.), at an ISO sensitivity of 400 and M1/1 flash output level without using the wide-flash adapter:
$$ f / \text {s t o p} = 3 2 \div 4 = 8 (\text {i n m e t e r s}) \text {o r} 1 0 5 \div 1 3 = \text {a p p r o x .} 8 (\text {i n f e e t}). \text {T h e r e f o r e ,} f / 8 \text {i s t h e c o r r e c t l e n e s g a p e r t u r e}. $$
Taking flash pictures in the Manual flash mode
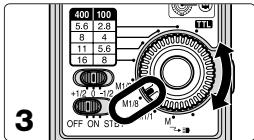

1 Set the camera's exposure mode, sync mode, shutter speed, etc.
2 Determine the aperture and flash output level to match the flash shooting distance.
- The guide number varies as shown in the guide number table on page 18, depending on the flash output level with and without the wide-flash adapter in place.
3 Set the aperture on the camera or lens and the flash output level on the SB-30.
4 Make sure the SB-30's ready-light is on, then shoot.
- In the Manual flash mode, no warning ready-light blinks to indicate that the light may have been insufficient for correct exposure after shooting.
Illuminating a distant subject using the SB-30 and cameras such as the COOLPIX
Wireless slave flash shooting
In this section, the SB-30 is used as a slave flash unit that starts and stops firing in sync with the master Speedlight mounted on the camera or the camera's built-in Speedlight. With the SB-30, the following types of wireless slave flash shooting can be performed.
- The Standby function does not work if the Mode selector dial is set to the Wireless slave flash mode. Take care that the power remains on and is consuming.
Shooting a distant subject using cameras such as the COOLPIX that have a built-in Speedlight (P. 22)
By placing the camera and the SB-30 side-by-side to fire the SB-30 in sync with the built-in Speedlight, you can illuminate a distant subject, creating a picture not possible when using the built-in flash by itself.
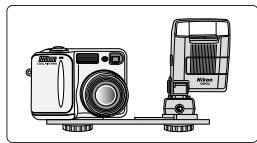
Using the SB-30 as a slave flash unit placed away from the camera (p. 24)
In multiple flash, when the SB-30 is used away from the camera, you can create more natural-looking pictures with sufficient illumination throughout the picture.
Softening shadows cast on the wall by the master flash unit or lightening the background (p. 26)
By using the SB-30 at full (M1/1) output, you can eliminate unattractive shadows or lighten the background to create more natural-looking pictures.
Multiple flash operation using the infrared remote commander (p. 27)
With the built-in infrared filter in place, the SB-30 operates as an infrared remote commander to trigger other slave flash units.
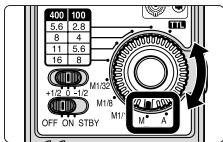
Two methods of wireless slave flash shooting
Wireless slave flash can be performed in two ways by setting the Mode selector dial:
(1) Auto wireless slave flash (A) mode:
- The SB-30 starts and stops firing in sync with the master Speedlight.
- The maximum shooting distance of the SB-30's light sensor is approx. 5m (16 ft.).
(2) Manual wireless slave flash (M) mode:
- The SB-30 only fires at M1/1 output in sync with the master Speedlight.
- The maximum shooting distance of the SB-30's light sensor is approx. 40m (131 ft.).
Notes
- Position the slave flash unit (SB-30) so that light from the master flash unit can reach the light sensor of the slave flash unit. This is particularly important when taking pictures while holding a slave flash unit in your hand.
- The correct exposure cannot be obtained if the master Speedlight fires a series of preflashes (Monitor Preflash). Cancel the Monitor Preflash of the master flash unit using the methods described below. This is necessary except for the one preliminary flash firing of the COOLPIX that does not affect the correct exposure.
| F80-Series/N80-Series, F70-Series/N70 | Set the camera's exposure mode to Manual (M) |
| F5, F100, F90X/N90s, F90-Series/N90 | Cancel the Monitor Preflash of the Speedlight mounted on the camera. |
| D1-Series | Set the flash mode of the Speedlight mounted on the camera to Non-TTL auto or Manual flash. |
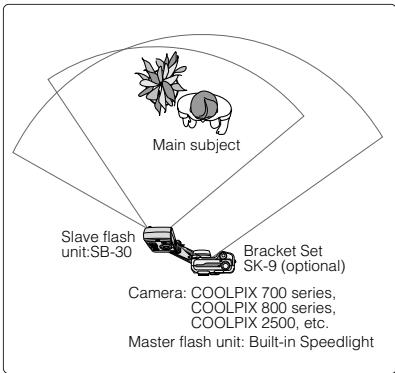
Shooting a distant subject using the SB-30 in conjunction with cameras such as the COOLPIX that have a built-in Speedlight
By placing the camera and SB-30 side-by-side to fire the SB-30 in sync with the built-in Speedlight, you can illuminate a distant subject, creating pictures not possible when using the built-in Speedlight alone. Set the SB-30's Mode selector dial to the Wireless slave flash (A) mode to perform auto flash.
- The COOLPIX 900, COOLPIX 700 series, COOLPIX 800 series and COOLPIX 2500 cameras that fire one preliminary flash are usable.
- With the Pronea S that has no accessory shoe or the F55/N55, which has a hot shoe but no TTL auto flash function, the SB-30 can still perform TTL auto flash.
- When attaching the SB-30 to cameras such as COOLPIX 700 series, COOLPIX 800 series, using the optional Bracket Set SK-9, refer to the SK-9 instruction manual.
Taking flash pictures with the COOLPIX
1 Make the necessary settings on the camera as with a normal Speedlight.
2 Set the SB-30's Mode selector dial to Wireless slave flash (A).
- In wireless slave flash shooting, exposure compensation using the SB-30's Exposure compensation switch is not possible. In this case, make exposure compensation on the camera.
3 Check the aperture and flash shooting distance, then shoot.
- Press the Standby resume button/Slave flash firing cancel button to avoid accidental firing in sync with other Speedlights. The SB-30 will not fire, while this button is pressed.
Taking flash pictures using film-based SLRs cameras
1 Set the master Speedlight, either the built-in Speedlight or one mounted on the camera, to fire.
- Be sure to cancel the master flash unit's Monitor Preflash (p. 21).
2 Use the SB-30 as the slave flash unit and set it to the Wireless slave flash (A) mode.
- In wireless slave flash shooting, exposure compensation using the SB-30's Exposure compensation switch is not possible. In this case, make exposure compensation on the camera.
3 Check the aperture and flash shooting distance, then shoot.
- Press the Standby resume button/Slave flash firing cancel button to avoid accidental firing in sync with other Speedlights. The SB-30 will not fire, while this button is pressed.
Shooting a subject when the SB-30 is placed away from the camera
When the SB-30 is placed away from the camera to perform multiple flash, you can take more natural-looking pictures with sufficient illumination. Set the SB-30's Mode selector dial to Wireless saline flash (A) to perform wireless multiple flash operation in the TTL auto or Non-TTL auto flash mode.
- The COOLPIX 900, COOLPIX 700 series, COOLPIX 800 series and COOLPIX 2500 cameras that fire one preliminary flash are usable.
- Speedlights such as the SB-30, SB-80DX, SB-50DX, etc. that feature a wireless multiple flash function can be used as the slave flash unit. Also, any other Speedlight compatible with TTL auto flash, when mounted on the optional Wireless Slave Flash Controller SU-4, is usable.
- In the wireless slave flash (A) mode, the maximum shooting distance of the SB-30's light sensor is approx. 5m (16 ft.).
- Position the slave flash unit so that light from the master flash unit only reaches the light sensor of the slave flash unit. If too much light from other slave flash units enters the light sensor of the slave flash unit directly or indirectly, correct operation may not be possible
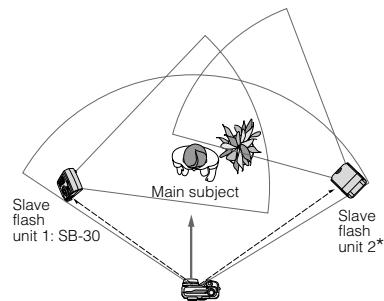
Camera: All Nikon SLRs and Digital cameras. Master flash unit: Built-in Speedlight or Speed mounted on the camera
- Any Speedlight compatible with TTL auto flash when mounted on the optional Wireless Slave Flash Controller SU-4.
Taking flash pictures
1 Make the necessary settings on the camera as with a normal Speedlight.
2 Set the SB-30's Mode selector dial to Wireless slave flash (A).
- In wireless slave flash shooting, exposure compensation using the SB-30's Exposure compensation switch is not possible. In this case, make exposure compensation on the camera.
3 Set the master Speedlight's flash mode to TTL auto flash.
- Be sure to cancel the master Speedlight's Monitor Preflash (p. 21).
- If Monitor Preflash cannot be canceled, set the flash mode to other than the TTL auto flash mode.
- The D-TTL auto flash mode is not possible with the SB-30. With Digital SLRs cameras, set the flash mode to Non-TTL auto flash or Auto Aperture flash.
4 Check the aperture and flash shooting distance, then shoot.
Softening the shadows cast on the wall by the master flash unit or lightening the background
Set the SB-30's Mode selector dial to Wireless slave flash (M), and the Speedlight will fire at M1/1 output, allowing you to eliminate shadows or lighten the background for creating more natural-looking pictures.
- The maximum shooting distance of the master Speedlight's light sensor is approx. 40m (131 ft.).
Taking flash pictures
1 Use the SB-30 as the slave flash unit and set it to the Wireless slave flash (M) mode.
2 Determine the correct exposure using the flash-to-subject distance and aperture set on the camera or lens, then shoot.
Refer to "Manual flash mode" on page 18.
- To eliminate shadows such as those cast on the wall, use a lens aperture that makes the illumination on the wall overexposed by the equivalent of at least +2 stops.
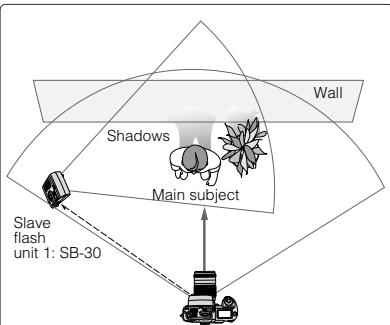
Camera: All SLRs cameras
Master flash unit: Speedlight mounted on the camera or the camera's built-in Speedlight.
Multiple flash operation using the SB-30 as an infrared remote commander
With the built-in infrared filter in place, you can use the SB-30 as an infrared remote commander to perform wireless multiple flash, using slave flash units only to illuminate the subject without the use of a master flash unit.
- Set the flash mode to TTL auto flash; Non-TTL auto flash is not recommended.
- The infrared filter can be used together with the wide-flash adapter.
- Even though light leaks from both sides of the infrared filter, this will not affect the correct exposure.
- Without using the infrared filter, the master flash unit works as a normal flash unit and the subject is also illuminated by this flash unit.

- Any Speedlight compatible with TTL auto flash when mounted on the optional Wireless Slave Flash Controller SU-4.
Multiple flash shooting using cords
Like other Speedlights compatible with the TTL auto flash mode, the SB-30 can perform TTL multiple flash using optional TTL Remote Cords SC-17/SC-24, TTL Multi-Flash Sync Cords SC-18/SC-19, or the TTL Multi-Flash Adapter AS-10. For details, refer to your camera or accessory instruction manuals or brochures.
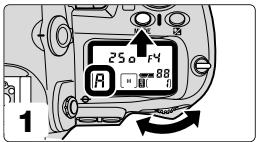
Close-up flash operation from approx. 0.3 to 1m (1 to 3.3 ft.) with the built-in wide-flash adapter
With the SB-30 attached to the camera's accessory shoe, close-up flash shooting can be performed.
- Be sure to use the built-in wide-flash adapter when taking close-up flash photographs.
- Vignetting may occur in close-up flash shooting when using a large diameter lens, lens hood, etc.
1 Set the SB-30's Mode selector dial to
- With cameras incompatible with the TTL auto flash mode, set the dial to the Non-TTL auto flash or Manual flash mode.
2 Set the camera's exposure mode, metering system, sync mode, shutter speed, etc.
- The ready-light in the camera's viewfinder blinks to warn you that the settings on the camera are not correct and TTL auto flash is not possible. In this case, check the camera's settings.
3 Set the wide-flash adapter in place by pulling it up.
- Take care that the black infrared filter does not obscure the front of the flash adapter.
4 When taking close-ups where the subject is less than approx. 0.4m (1.3 ft.), tilt the flash head down.
- Tilt the flash head down to 50^ when taking a subject closer than 0.4m (1.3 ft.) to illuminate the subject sufficiently.
5 Use the table "Determining the aperture and flash shooting distance range (m/ft.)" (p. 15) to determine the proper aperture, and set the same aperture on the camera.
- In the Non-TTL auto flash mode, set the same aperture on the SB-30's Mode selector dial as well.
6 Check that the SB-30's ready-light is on, then shoot.
Refer to page 13, if the ready-light inside the camera's viewfinder blinks after shooting.
Built-in wide-flash adapter
- The wide-flash adapter can also be used in other than close-up flash shooting.
- The angle of coverage of the SB-30 matches a 28mm lens. The built-in wide-flash adapter increases the angle to match a 17mm lens. The guide number decreases from 16/52 to 10/33 (ISO 100, m/ft)
- When using a 17mm lens with the built-in wide-flash adapter in place, the distance between the camera and subject becomes increasingly pronounced from the center of the frame to the periphery, so the peripheral area might not be sufficiently illuminated in certain cases.
Exposure compensation
Adjusting the SB-30's flash output is possible by using the Exposure compensation switch when the Mode selector dial is set to Non-TTL auto, M1/32, or M1/8.
Set the Exposure compensation switch to +1/2 position to make the main subject brighter, or to -1/2 to make the subject darker.
With COOLPIX cameras, you can adjust the flash output by checking the brightness of the images on the monitor, then reshoot.
Exposure compensation switch

+1/2 0 -1/2
+1/2: Increases the flash output by +1 / 2 EV to make the subject brighter
0: No compensation. Set the switch to zero (0) when no exposure compensation is desired.
-1/2: Decreases the flash output by -1 / 2 EV to make the subject darker
- Making exposure compensation using the switch is not possible, if the Mode selector dial is set to the TTL auto flash, M1/1, or Wireless slave mode.
Optional accessories
Bracket Set SK-9
The SK-9 allows COOLPIX (COOLPIX 700 series, 800 series, and 900 series) or SLR cameras and the SB-30 to be positioned side-by-side. This Bracket Set includes the Bracket SK-9, TTL Multi-Flash Adapter AS-18, and Sync Cord SC-25 for connecting COOLPIX 900 series cameras except the COOLPIX 900 to the AS-18.
Multi-Flash Bracket Unit SK-E900/Multi-Flash Adapter AS-E900
The SB-30 can be used as a slave flash unit with Nikon COOLPIX 900 series cameras by attaching the COOLPIX to Multi-Flash Bracket Unit SK-E900 and connecting the SB-30 to the multi-flash terminal of the COOLPIX using the Multi-Flash Adapter AS-E900.
One AS-E900 Multi-Flash Adapter is included with the SK-E900.
Troubleshooting
Use the following chart to determine the cause of the problem before you take your Speedlight to a Nikon service center for repair.
| Problem | Possible cause | Reference/remedy |
| The ready-light does not light up. | The battery is replaced while the power switch is set to ON or the STBY position. | Installing the battery (p. 6) |
| The battery is not correctly installed. | Installing the battery (p. 6) | |
| Battery power is weak. | Installing the battery (p. 6) | |
| The standby function is activated and operating. | Turning the power ON/OFF and the Standby function (p. 7) | |
| The battery terminals or SB-30's battery contacts are dirty. | Clean the terminals or contacts. | |
| The ready-light blinks for approx. 1.5 sec. after firing. | The shooting distance is out of the available flash shooting distance range. | Determining the aperture and flash shooting distance range (m/ft.) (p. 15) |
| The ready-light takes a long time to light up. | Battery power is weak. | Installing the battery (p. 6) |
| The battery generates heat due to continuous firing. | Wait until the SB-30 cools off. | |
| The shutter cannot be released, although the ready-light comes on. | The Mode selector dial is set to Non-TTL auto or Manual, and camera's exposure mode is set to Programmed Auto or Shutter-Priority Auto. | Non-TTL auto flash mode (p. 16) Manual flash mode (p. 18) |
Tips on Speedlight care and Notes on batteries
Cleaning
- Use a blower brush to remove dirt and dust from the SB-30 and clean it with a soft, clean cloth. After using the SB-30 near saltwater, wipe the SB-30 with a soft, clean cloth slightly moistened with plain water to remove salt, and then dry it using a dry cloth.
Storage
- Store the SB-30 in a cool, dry place to prevent malfunctions, due to high humidity, as well as the growth of mold or mildew.
- Keep the SB-30 away from chemicals such as camphor or naphthalene.
- Do not use or leave the SB-30 in locations subject to high temperatures such as those encountered near a heater or stove, as this may cause damage to the unit.
- When not using the SB-30 for more than two weeks, be sure to remove the battery before storage to prevent malfunction due to battery leakage.
- Take the SB-30 out about once a month, insert the battery, and fire the unit several times to reform the capacitor.
Operating location
- An extreme temperature change can cause condensation inside the SB-30. When taking the SB-30 to a very hot place from a very cold place or vice versa, place it inside an airtight container such as plastic bag.
inside for a while, then expose the SB-30 gradually to the outside temperature.
- Avoid exposing the SB-30 to strong magnetism or radio waves from TVs or high-voltage power transmission towers, as this may cause it to malfunction.
While the SB-30's flash mode is set to wireless slave flash, the flash unit may accidentally fire in locations containing flickering fluorescent lights.
Install one 3V lithium battery (CR123A or DL123A).
- Replace the battery in advance or carry extra batteries with you when photographing important events.
- Use a dry cloth to clean the battery terminals if they become soiled by perspiration or oils from your hand. Dirty contacts may cause a bad connection.
Use a fresh battery at low temperatures
- The SB-30 may not work correctly when using an exhausted battery at low temperatures.
- Battery power tends to weaken as the temperature drops, resulting in slower recycling times and reduced number of flashes. Battery power may recover when the temperature returns to normal.
- Use a fresh battery, or keep spare batteries warm and use them when the temperature becomes low.
Specifications
Electronic construction
Automatic Insulated Gate Bipolar Transistor (IGBT) and series circuitry
Battery
One 3V lithium battery (CR123A or DL123A)
Guide number (ISO 100, m/ft.)
16/52 at 28mm angle of coverage (without wide-flash adapter)
10/33 at 17mm angle of coverage (with wide-flash adapter in place)
Angle of coverage
Covers the picture angle of 28mm lens (without wide-flash adapter)
Covers the picture angle of 17mm lens (with wide-flash adapter in place)
Power switch
Three positions provided: OFF/ON/STBY
ON/STBY position: Power is turned on.
STBY position: the SB-30 automatically turns itself off to conserve battery when flash unit is not used for approx. 40 sec.
Recycling times and number of flashes
Minimum recycling time: Approx. 4 sec. (when fired at M1/1 output using a fresh battery)
No. of flashes: Approx. 250 times (when fired at M1/1 output using a fresh battery)
Mode selector dial
Four positions provided: TTL auto flash, Non-TTL auto flash (4 steps), Manual flash (3 steps), Wireless slave flash (A or M)
Ready-light
Lights up when SB-30 is recycled and ready to fire. Blinks when flash fires at its maximum output, indicating light may have been insufficient (in TTL auto flash, Non-TTL auto flash modes) The ready-light inside the camera's viewfinder blinks when the camera settings are not correct in TTL auto flash mode.
Standby resume button/Slave flash firing cancel button
Turns SB-30 on again after it enters standby state.
Prevents SB-30 from firing accidentally in slave flash operation.
Flash duration
1/2800 sec. at M1/1 output
Dimensions (W x H x D)
Approx. 58.5 × 83.5 × 36 mm ( 2.3 × 3.3 × 1.4 in. )
Weight (without battery)
Approx. 92g (3.2 oz.)
All performance data and specifications are applicable when a fresh battery is used at normal temperatures (20^ / 68^)
Specifications and design are subject to change without notice.
Vorwort
Interruptor principal
No reproduction in any form of this manual, in whole or in part (except for brief quotation in critical articles or reviews), may be made without written authorization from NIKON CORPORATION.