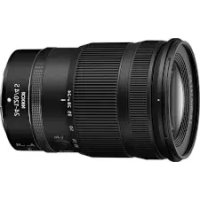
AF-S DX NIKKOR 18-200MM F-3.5-5.6G ED VR II - Camera lens NIKON - Free user manual and instructions
Find the device manual for free AF-S DX NIKKOR 18-200MM F-3.5-5.6G ED VR II NIKON in PDF.
User questions about AF-S DX NIKKOR 18-200MM F-3.5-5.6G ED VR II NIKON
0 question about this device. Answer the ones you know or ask your own.
Ask a new question about this device
Download the instructions for your Camera lens in PDF format for free! Find your manual AF-S DX NIKKOR 18-200MM F-3.5-5.6G ED VR II - NIKON and take your electronic device back in hand. On this page are published all the documents necessary for the use of your device. AF-S DX NIKKOR 18-200MM F-3.5-5.6G ED VR II by NIKON.
USER MANUAL AF-S DX NIKKOR 18-200MM F-3.5-5.6G ED VR II NIKON
Touching the internal parts of the camera or lens could result in injury. Repairs should be performed only by qualified technicians. Should the camera or lens break open as the result of a fall or other accident, take the product to a Nikon-authorized service representative for inspection after unplugging the product and/or removing the battery.
Turn off immediately in the event of malfunction
Should you notice smoke or an unusual smell coming from the camera or lens, remove the battery immediately, taking care to avoid burns. Continued operation could result in injury.
After removing or disconnecting the power source, take the product to a Nikon-authorized service representative for inspection.
Do not use the camera or lens in the presence of flammable gas
Operating electronic equipment in the presence of flammable gas could result in an explosion or fire.
Do not look at the sun through the lens or viewfinder
Viewing the sun or other strong light sources through the lens or viewfinder could cause permanent visual impairment.
Keep out of reach of children
Particular care should be taken to prevent infants from putting the batteries or other small parts into their mouths.
Observe the following precautions when handling the camera and lens
- Keep the camera and lens unit dry. Failure to do so could result in fire or electric shock.
- Do not handle or touch the camera or lens unit with wet hands. Failure to do so could result in electric shock.
- When shooting with back-lighting, do not point the lens at the sun or allow sunlight to pass directly down the lens as this may cause the camera to overheat and possibly cause a fire.
- When the lens will not be used for an extended period of time, attach both front and rear lens caps and store the lens away from direct sunlight. Failure to do so could result in a fire, as the lens may focus sunlight onto a flammable object.
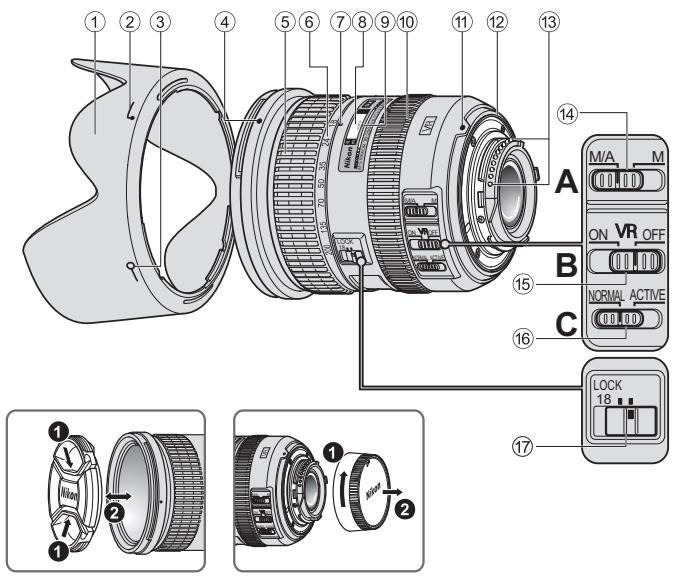
■ Nomenclature
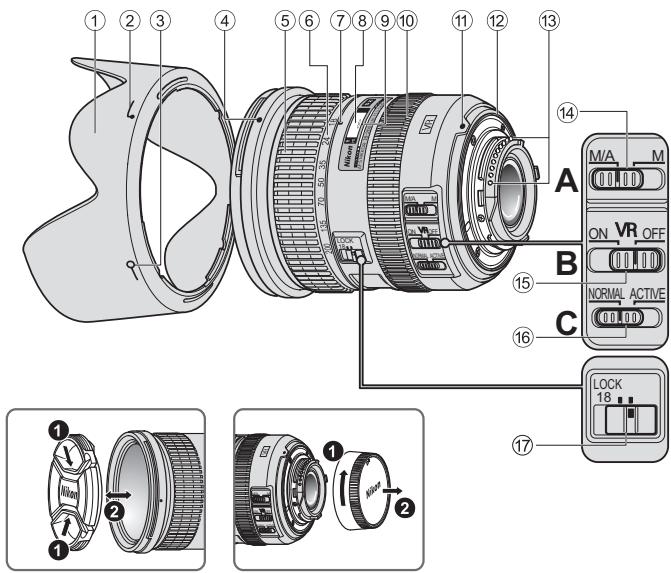
① Lens hood (P. 18)
(2) Lens hood attachment index (P. 18)
③ Lens hood setting index (P. 18)
Lens hood mounting index (P. 18)
⑤ Zoom ring (P.15)
⑥ Focal length scale (P. 15)
⑦ Focal length index
⑧ Distance scale
⑨ Distance index line
10 Focus ring (P. 15)
⑪ Mounting index
Lens mount rubber gasket (P. 19)
CPU contacts (P. 19)
14 Focus mode switch (P. 15)
Vibration reduction ON/OFF switch (P. 16)
Vibration reduction mode switch (P. 16)
⑰ Zoom lock switch ( ) : reference page
En
Thank you for purchasing the AF-S DX NIKKOR 18-200mm f/3.5-5.6G ED VR II lens. DX NIKKOR lenses are specially designed for use with Nikon digital-SLR (Nikon DX format) cameras, such as the D300-series and D90. When mounted on Nikon DX format cameras, the lens picture angle is equivalent to approximately 1.5× the focal length in 35mm format. Before using this lens, please read these instructions and refer to your camera's User's Manual.
Major features
- By enabling vibration reduction (VRII), slower shutter speeds (approximately four stops) can be used, thus increasing the range of usable shutter speeds and zoom positions, particularly when hand-holding the camera. (Based on results achieved under Nikon measurement conditions. The effects of vibration reduction may vary according to shooting conditions and use.)
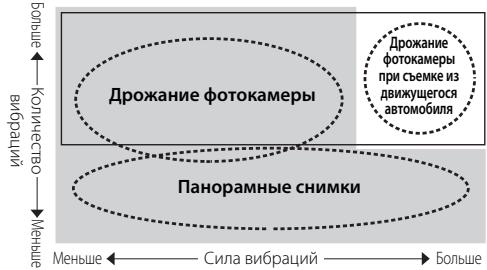
- It is possible to switch between NORMAL mode, which reduces effects of camera shake under normal shooting conditions, and ACTIVE mode, which reduces effects of more noticeable camera shake such as that which occurs when taking pictures from a moving vehicle.
In NORMAL mode, the camera automatically distinguishes camera shake from panning motion to reduce the effects of camera shake with horizontal or vertical panning.
- Superior optical performance and rendering characteristics are maximized with the use of three aspherical lens elements and two extra-low dispersion (ED) glass elements, which ensure correction of chromatic aberration. In addition, the rounded aperture produces soft and pleasing blur characteristics in portions of pictures that are out-of-focus.
Focusing, zooming, and depth of field
Before focusing, rotate the zoom ring (5) to adjust the focal length until the desired composition is framed. If your camera has a depth-of-field preview (stop-down) button or lever, depth of field can be previewed through the camera viewfinder.
- This lens is equipped with the Nikon Internal Focusing (IF) system. As the shooting distance decreases, the focal length also decreases.
- The distance scale does not indicate the precise distance between the subject and the camera. Values are approximate and should be used only as a general guide. When shooting distant landscapes, depth of field may influence operation so that the camera may focus at a position that is closer than infinity.
- When the zoom lock switch 17 is set to LOCK position at the focal length of 18mm , the zoom ring is locked. When carrying the camera, lock the zoom ring to prevent the lens from extending due to its own weight.
Setting the aperture
Use the camera to adjust the aperture setting.
Variable maximum apertures
Zooming the lens from 18mm to 200mm decreases the maximum aperture by 1^1 / 3 stop.
However, there is no need to adjust the aperture setting to achieve correct exposures because the camera automatically compensates for this variable.
Focusing (Fig. A)
Set your camera's focus mode selector according to the chart below:
| Camera focus mode | Lens' focus mode switch | |
| M/A | M | |
| AF (A/S/C) | Autofocus with manual override | Manual focus (Focus assist is available.) |
| MF | Manual focus (Focus assist is available.) | |
For more information on camera focus modes, refer to your camera's User's Manual.
Autofocus with manual override (M/A mode)
1 Set the lens focus mode switch 14 to M/A.
2) Autofocus is enabled, but autofocus operation can be overridden by rotating the separate focus ring 10 while pressing the shutter-release button halfway, or by pressing the AF-ON button on the camera body of cameras so equipped.
3 Press the shutter-release button halfway or the AFON button once again to cancel manual focus and resume autofocus.
Getting good results with autofocus
Refer to "Notes on using wide- or super wide-angle AF NIKKOR lenses" (P. 21).
■ Vibration reduction mode (VRII) Basic concept behind vibration reduction

Set the vibration reduction mode switch to NORMAL.
Set the vibration reduction mode switch to ACTIVE.
| When taking pictures | Set the vibration reduction mode switch to either NORMAL or ACTIVE. |
| When taking panning shots | Set the vibration reduction mode switch to NORMAL. |
| When taking pictures from a moving vehicle | Set the vibration reduction mode switch to ACTIVE. |
Setting the vibration reduction ON/OFF switch (Fig. B)
ON: The effects of camera shake are reduced while the shutter-release button is pressed halfway and also at the instant the shutter is released. Because vibration is reduced in the viewfinder, auto/manual focusing and exact framing of the subject are easier.
OFF: The effects of camera shake are not reduced.
Setting the vibration reduction mode switch (Fig. C)
Set the vibration reduction ON/OFF switch to ON and choose a vibration reduction mode with the vibration reduction mode switch.
NORMAL: The vibration reduction mechanism primarily reduces the effects of camera shake. The effects of camera shake are also reduced with horizontal and vertical panning.
ACTIVE: The vibration reduction mechanism reduces the effects of camera shake, such as that which occurs when taking pictures from a moving vehicle, whether it be normal or more intense camera shake. In this mode, camera shake is not automatically distinguished from panning motion.
Notes on using vibration reduction
After pressing the shutter-release button halfway, wait until the image in the viewfinder stabilizes before pressing the shutter-release button the rest of the way down.
- Due to the characteristics of the vibration reduction mechanism, the image in the viewfinder may be blurred after the shutter is released. This is not a malfunction.
- When taking panning shots, be sure to set the vibration reduction mode switch to NORMAL. If the camera is panned in a wide arc, compensation for camera shake in the panning direction is not performed. For example, only the effects of vertical camera shake is reduced with horizontal panning.
- Do not turn the camera off or remove the lens from the camera while vibration reduction is operating. Failure to observe this note could result in the lens sounding and feeling as if an internal component is loose or broken when it is shaken. This is not a malfunction. Turn the camera on again to correct this.
- With cameras featuring a built-in flash, vibration reduction does not function while the built-in flash is charging.
- With autofocus cameras featuring an AF-ON button, vibration reduction does not function even when the AF-ON button is pressed.
- When the camera is mounted on a tripod, set the vibration reduction ON/OFF switch ⑮ to OFF. However, set the switch to ON when using a tripod without securing the tripod head, or when using a monopod.
The built-in flash and vignetting
- The built-in flash cannot be used over distances of less than 0.6m (2.0 ft.).
- To prevent vignetting, do not use the lens hood.
- Vignetting is the darkening of the corners around the image that occurs when light emitted by the flash is obstructed by the lens hood, or by the lens barrel depending upon the focal length or shooting distance.
| Cameras | Supported focal length/Shooting distance |
| D300-series/D200/D100 | ·18mm/1 m (3.3 ft.) or greater ·24mm or longer/No restriction |
| D90/D80 | ·24mm and 35mm/1 m (3.3 ft.) or greater ·50mm or longer/No restriction |
| D70-series/D5000/D3000/D60/D50/D40-series | ·24mm/1 m (3.3 ft.) or greater ·35mm or longer/No restriction |
The built-in flash on the D100 has an angle of coverage suited to focal lengths of 20mm and greater. Vignetting occurs at a focal length of 18mm.
Using the lens hood
The lens hood blocks light rays that have harmful effects on pictures. It also helps to protect the glass surface of the lens.
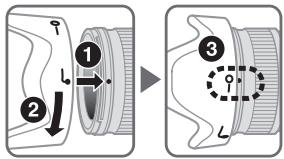
Attaching the hood
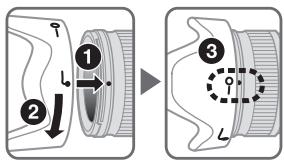
Be sure that the lens hood mounting index () is aligned with the lens hood setting index (-o) 3.
- To facilitate attachment or removal of the hood, hold it by the lens hood attachment index ( ) rather than its outer edge.
- If the lens hood is not correctly attached, vignetting may occur.
- The lens can be stored with the lens hood attached in the reverse position.
Lens care
- Be careful not to allow the CPU contacts ③ to become dirty or damaged.
- If the lens mount rubber gasket 12 is damaged, be sure to visit the nearest Nikon-authorized service representative for repair.
- Clean lens surfaces with a blower brush. To remove dirt and smudges, use a soft, clean cotton cloth or lens tissue moistened with ethanol (alcohol) or lens cleaner. Wipe in a circular motion from the center to the outer edge, taking care not to leave traces or touch other parts of the lens.
- Never use organic solvent such as thinner or benzene to clean the lens, as this could cause damage, result in a fire, or cause health problems.
- NC filters are available to protect the front lens element. The lens hood also helps to protect the front of the lens.
- When storing the lens in its flexible lens pouch, attach both the front and rear lens caps.
-
When the lens is mounted on a camera, do not pick up or hold the camera and lens by the lens hood.
-
When the lens will not be used for an extended period of time, store it in a cool, dry place to prevent mold and rust. Be sure to store the lens away from direct sunlight or chemicals such as camphor or naphthalene.
-
Do not get water on the lens or drop it in water as this will cause it to rust and malfunction.
- Reinforced plastic is used for certain parts of the lens. To avoid damage, never leave the lens in an excessively hot place.
Standard accessories
- 72mm snap-on Front Lens Cap LC-72
Rear Lens Cap LF-1
Bayonet Hood HB-35 - Flexible Lens Pouch CL-1018
■ Optional accessory
- 72mm screw-on filters
Specifications
Type of lens: G-type AF-S DX Zoom-NIKKOR lens with built-in CPU and Nikon bayonet mount (specially designed for use with Nikon digital-SLR—Nikon DX format—cameras)
Focal length: 18mm-200mm
Maximum f/3.5-5.6 aperture:
Lens 16 elements in 12 groups construction: (3 aspherical lens and 2 ED lens elements)
Picture angle: 76^ - 8^
Focal length 18,24,35,50,70,135,200mm scale:
Distance Output to camera information:
Zoom control: Manually via separate zoom ring
Focusing: Nikon Internal Focusing (IF) system, autofocus using a Silent Wave Motor, manually via separate focus ring
Vibration Lens-shift method using voice coil reduction: motors (VCMs)
Shooting Graduated in meters and feet from distance scale: 0.5 m (3 ft) to infinity ()
Closest focusing 0.5m (1.6 ft.) at all zoom settings distance:
No. of diaphragm 7 pcs. (rounded) blades:
Diaphragm: Fully automatic
Aperture range: f/3.5 to f/22 (at 18mm), f/5.6 to f/36 (at 200mm)
Exposure Via full-aperture method measurement:
Attachment size: 72mm (P = 0.75mm)
Dimensions: Approximately 77mm (dia.) × 96.5 mm (extension from the camera's lens-mounting flange)
Weight: Approximately 565g (19.9 oz)
Specifications and designs are subject to change without notice or obligation on the part of the manufacturer.
Notes on using wide- or super wide-angle AF NIKKOR lenses
In the following situations, autofocus may not perform as expected when shooting with wide- or super wide-angle AF NIKKOR lenses.
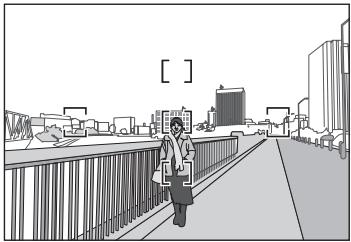
A person standing in front of a distant background
E A field filled with flowers
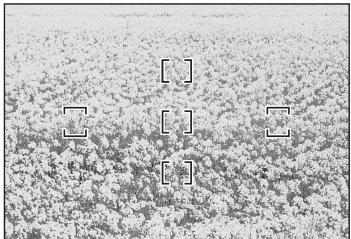
1. When the main subject in the focus brackets is relatively small
When a person standing in front of a distant background is positioned within the focus brackets, as shown in Fig. D, the background may be in focus, while the subject is out of focus.
2. When the main subject is a finely patterned subject or scene
When the subject is finely patterned or of low contrast, such as a field filled with flowers, as shown in Fig. E, focus may be difficult to acquire using autofocus.
Responses to these types of situations
(1) Focus on a different subject located at the same distance from the camera, apply focus lock, recompose, and shoot.
(2) Set the camera's focus mode to manual focus and focus manually on the subject.
Refer to "Getting Good Results with Autofocus" in the camera's User's Manual.
ACHTUNG
Keinesfalls zerlegen.
18,24,35,50,70,135,200mm
Forvara utom rackhall for barn
18, 24, 35, 50, 70, 135, 200mm
Avstandsinformation:
Visasikamerahuset
Zoomkontroll:
He pa36npaunTe foToKamepy
Прикосовенке BВHтейним сдостягамотокамрьиnp обектахпс Клочуеництабим dokhenpnobodntbca tolbko Kbaanuipinoportahnmbm cneuaiaihtam.Всчуанnotpobpeckdnka koprnyca fotokampeby и npobektina в розытate naedяни дурого ponocsectbna tOKIOJUte cteBEOI bLOK pITANHIN N/INN nBNEkete 6aTaTeO nOCTabTe nI3dne nI pyoBepkn B aBTOPI3OBaHHbcebpCepBNCbI ueHr Nikon.
B clyae HeNCpabHoctn HemeDHeHNO BbIKIOHTe foToKaemepy
PnIPOBJIeHIN DbMa INI NHeObHyORo 3aNaXa, IcXoJyIeO rN3
OTOKAMEpBn IINI O6BeKtMbA, HEmEJIeHNHO 3bVbekIne 6batapei,
CTapARcB He OIOYcTbN OxOGROB. PIOIoJIeJeHne paObToBc
ycTpoIcTBOM MoKET pINBecTe K NOJIyEHeHIO TpaBM.
PiocNe IIBVceHEn BbATEApEN IOTKIOnHeyH NcTOHnKa
IIITAHNIA DOCTABBe TE IaDeIeNEI pInpOBepKn B 6bnKaihni
ABTOPI3OBaHHb CEbpCnHb ceHTp KOMPaHNI Nikon.
He noIb3yITeCb foToKApEmoI nnObBeKTINBOM npn HAIuN B BO3dyXe IeTkoBOcPImaMeHryIOUxxCra0AB
Pa6Ota C 3eNkTPOHNBIM O6OpyDObaHmE M pI INaIuINB VBO3dyXe IerKOBOCPnIAMEHAnxCRA3OB MOKeT pIINBcCTN K B3bByI INI NOKApY.
He cmotpnte ha coJIHcpe uepe3 06bekTbNnBnBIOUCKaTeIb
ECNI CMOTPetb AONCHUE INN DpyrNIE NCTOCHINIK RPOKOFCBeta Upe3 ObekTIN INN BUNDOCKaTeB, TO 3TO MOKeTBJBb3at HeOB6PATTMOE YXUdHEnHe 3ePNH.
XpaHNTe B HeNoCTyNHom DnIaTeTMeCTe
PIMMTE Oc6be MebpI pnpEOCTOPPOXHOCTO WIO36EJAHNE nonaHbA 6atapn E npdyfnx HoeBbIynx npdeMTOB detEM B POT.
Co6IIOaIte CneJeUOuIe MePbI PpeIOctOpOKHocTn BO BpEm 3KcIIpyataun FOToKApMebpI NObEKeTINBa
He npnyckaTe NopadaHn BObl Ha FOtOKaMEpy n ObbEKnB. HecobnoJeHneTOro Tpe6ObaHn MoKet npVBeCTn K nojApy nnnpoAKeHHNo 3eNtPruYCKEMT KOMTK.
He PnkracaiTecb K ToTOKAMe HIN O6bKtINy MOKpbIMnypKaMn.HecO6JIIOHEne 3TOrO Tpe6oBaHnA MOJET pNIBECTN K nopArjEHNIO 3NeKTPIueckmTOKOM.
- Пи Сьемпс с Задим OCBE ueHem He HappaBЯite Oобektн В солп,请а.TК ДОуСКУТЕТ NOПАДИСCOJIHEUHO CBETA B OobektN, TAK KAK 3TO MOKETPINBECTN K pepeperby fOToKAMeRbI N ee BO3rOpAHIO.
ECNIIOBbKTHB He 6ydt NcIOnb3ObTaBcB TceHHe NdITeHBOHO BVPMeHN, PnIKPENITE nepeDHIIOU 3aIDHO KpbIuKN ObEeKTHBa Hc OetabJIte ObEeKTHN IOJ pNIMMbIMC cONHuehMbIM NyuAM. HecO6JIOpHeH ETOrO YcIbOIBM MoKeT pINBeCTN K BO3rOpAHIO, NocOKIbky ObEeKTHM MoKeT cQkYCpOBaTb COJIHeHbIe LyuHa NaKOM-JNo BoIeKOBcPNaMeHraIoUcEMc npdeMeTe.
KOMNOHeHTbl
①Бленьда(ctp.68)
② MeTka KpeIeHnIa 6JIeHdbI (CTp. 68)
③ MeTka Φɪκcaɪn 6JIeHdI (CTp. 68)
④ YctaHOBOUHЯ MEtKa 6JIeHDbI (CTp. 68)
⑤ Kolbuto 3ymmnpoBaHnA (CTp.65)
⑥ Μικαλα φοκύχοτορο paccθόηνα (ctp. 65)
⑦ MeTkaΦokychoRopacCToHnIa
⑧ ΜΚαλa paçCTÖHŋ
⑨Деленецpacstordnna
⑩ФokycnpoBOVHoeKoIbO(cTp.65)
(1) YCTaHOBOUHaMaMeTKa
12 Pe3HIOBbI yNJIoTHNTeIb KpeJIeHnO6BeKtNbA (ctp.69)
⑬ KOHTaKtbl MmKpOnpoueccoppa (CTp. 69)
14пеклочаел ржимовфokycupовkn(ст.65)
15 PepeKluOaTeNb PoIaBLeHnBa Bn6paun ON/OFF (cTp. 66)
16пеклочаель ржима
побавлиая Вибраци (ст. 66)
⑰ПepeknIouaTeNb6IoknIpOBKn 3yMMnPoBaHna ( ):cnpaBoUHaNCTpaHnua
Ru
BlaIaOpIaM 3a pIno6peTeHne o6eKtNbA AF-S DX NIKKOR 18-200MM f/3,5-5,6G ED VR II. O6eKtNbbl cepnn DX NIKKOR pa3pa6OtaHbI cIeuaIaNbHO IJN IcNoIb3OBaHnC IuΦpOBbIMn 3epKaIbHbIMn φOTokAmePamN Nikon (φopMaT Nikon DX), HapIpMep, c φOTokAmePamn cepm D300 n D90. PInu IcNoIb3OBaHnC φOTokAmePamn φopMaTa Nikon DX yroI n3o6paJenHn O6eKtNbA eKBBaIaHentH φOKyChOMy pacCTOHaHIO npi6IIN3ntbHo 1,5X B φOpMaTe 35MM. Do INCIOJIb3OBaHn ETOI O6eKtNbA O3HaKOMbTEcB C daHHbIMn INHCTpyKUmaHm N IpOouTaiTe PykoobOcmBo noIb3OBaMeIa.
OCHOBHbIe BO3MOXHOCTN
-ПривКИLOUECHENФИКСИ ПОДАВLENHЯ ВИБРAZHI (VRII)MOЖно ИСПОЛБЗОВATь 6ОЛЕЕ ДИЛТЕНБИЕ ВИДЕРЖКIN(прибИЗТЕНБИО Ha TPIСТУЧЕN), TEM CAMbIM yBEJIUVHBAД YIINA3OH 3HAчEHи ВИБDEPЖКИЗUMa (OCOБEHNO ПИ рунйс CBEMke). (ОСHOBaHO Nape3yЛьТаTX, ПОЛΥECHнBX 吴CLOBIXN 3MЕРEHNYKOMPAHNI Nikon. Pe3YlbTаТы ПОДАВLENHЯ ВИБРAZHI MOryT 3ABVCETb OT CITUYAUNI N yCLOBIV CBEMKn.)
Можно Истольбовыт реким NORMAL, кOTOPь mEmhbuaetФФКТДрОЖANHФOTOKaMepblпprO obiunbIX yCIOBnIXxBcEMKN,aTakke pekim ACTIVE, KOTOBpIMeMHbuaetФФKET6OonezamETHoro dPOKaHNHФOTOKaMepbl,HanPmEp,prnCbemKe n3 DBNkUyEroCArTomo6nIb. B pexime NORMALФOTOKaMepa ABTomatueckn OTINuayETДрОЖANHHeФOTOKaMepblOT npemaeeHIN KaMepblprn NaHOpAMnpOBAHIN,6NaRODApYemy UMeHBuaeTC3ФФKTДрОЖANHФOTOKaMepblprn FOnPi3OHaJIbHOM INI BepTNIKAJIbHOM NaHOpAMnpOBAHIN.
- BlaoropaI NcOJIb3OBAHnIO TpEM acEpeHueckIM IINH3AM INDyM 3eNEMeHTaM CO CBEXHN3KO INCnepcneE (ED),KOTOpBIE o6ecneuBaIOT KOPReKUIO xpOMaTHueckO A6eppauu, yUyuaIOTcN IpeBOxCoNDHbI OINTueckNe XapAKeTncTIKN I BO3MOXHOCTNIpepaDu. Kpome TORO, CkpyrIeHHaJ DAΦpMa MOb6ceuHbAet 60lee KpacNBbIe MHRKne I HeCHbIe OueptAHnTex UaTee CHmKa, KOtOpBie HaxoJITcB HBe fokyca.
Фокуровka,Зумирobани Г ly6nha pe3ko n3o6paixaemoro npoctpaHCTBa
NepedokyckpOBKIOBNEOBHNTKEONLIOOYMMPOBOAHNI 5IINHACPTOKIKO
OKCHOTOPACSTOHNI,NOKA He bEydtocDnTHNYTpeSyEBMAOMIOHOKBKA KADPA.
EcnIOTOKAMPEO6OBPDOBANA KHOKONI INI pSHaFOAM
PnpEBAPHTBbHORO nPOCMTORA rJHybHNbPe3KOuN3oBPAXaEMORO
npocTaHCTBA,TO rJHybHNpe3KOuN3oBPAXaEMORoPocTaPHCTBA
MOKHO npOBePTbUcEHPE3 BIDOMCKATJIb fOtOKAmePB).
- ΘTOT oBéKTHB OOBpyOanB CHTeMoI BHYTppeHnei fokcnpoBKn (IF) Nikon. Ipo Mepe mYhBseHnia paCCTORHnBa cBemKn TAKKe YmEhBaaTc FOKyCHOe paCtOHNHe.
Ikkana paccTOnHHa HEpTaKaTe TOHOrO paCtTnHMA MEKdy OBeKToM I nΦokAmpeo.3hEnyuePi6mImTeBHeNbHu INx CNeDyET IcNtlo3obat ToIbKIO DaJI OBuOpy RyoKOBTOCTBa.Ipr cSbeMeK dyaneHbIX Pei3A3Jey 3hNeHaeI rYb6HnIpe3KO hO6PbAeMOrTO pOcTpaHCTBa MOKET IOBnIBy Ta ha BoTyO ΦOkAMpeBakTI KAKIM O6Pa3OM, OTHO cOfCKyUpyTeCHa 60one 8nKIM oBeKt, a He aBe6KeOHuOCTb.
EcnpeKIOUaTeB 6NOKIPOBKm 3yMMIPOBAHnI 17 yCTAHOBNT B NOJOKHEMLOCKPfO KOKYCHOM PAcCTOHN18MM, KOJIbO 3yMMIPOBAHnB6yET3abOKIPOBAnHO. PnI nepeHOCKe FOKAMPEBLOKIKPYTEKOLBJQyMMOPABnA, YTObIbObEKTM HBe BvBnTACJIOINBNIHnEMC0CBCTBEHNO BEca.
YctaHOBka DnaΦparMbI
Ha foToKampe moXHo HaCTpOnTb npaMeTpbl daΦpaFmbl.
I3MeHeHne 3NaeHnMaKcMaJbHOJdHaΦparMbI
Pn3yMMNpOBAHmO6bekTnBa C 18MM Do 200MM MakCImMabHn DAa4paMaYMehbuaeTc Ha 1/3 eDinHnUcbI. OAnkO npri TmOT He Tpe6yetcra PeryInpObTaB napAmeTpIaHaPamBMy IaJIOCTHeHnPiABINbHOKcnONuH, TAK KAc foTOkAmepa BByIOHNReT ABOMATNUeCKyO KOMIEHCAUIO 3ToI NpeMeHNOH.
ΦokycnupOBka (pnc.A)
UcTaHOBInTe celenKTop peKIMa oKOpCnOBKn KaMepbI B COOTBETCTBm C HnKeepnBedeHHo Ta6nuee.
Pexm nOaBHeNn Bn6paun (VRII) OchOBHOe noHrTne nOaBHeHn Bn6paun
UctaHOBITepeKJIIOuChaTeIbpeKIMaIOaBLeHINBA6paunBnOJKeHne NORMAL.
UctaHOBNTepeKJIouateJIpeJIMaIIOaBHeHnBA6paunBnOJKeHneACTIVE.
BCTpoEHnHa Bcblka Ha D100 nmeet yron nokpbltna, noDxOaIaI pI 3NaueHem FOKyCHO rpaCtOHHN20MM nn60Je. 3AeKET BInbHeTIpOBaHHn PpOxCoIIT np3NaueHem FOKyCHO paCtOHHN 18MM.
Icnojb3OBAHne 6nHeNDbI
BleHnDa 6NoKInpyET CBeTObIe LyuN, KOTOpbIe yUxDiHaOT n3o6paJekHe. OHa TaKKe NOMOraEt 3aunITb CTekJIaHHyIO nobEpxHOCTb ObBeKTINBa.
PpncoeHnHeHne 6NeHdbI
- y6eNTecb,HTO UCTaHOBOUHnA MetKa 6IeHdbI (·) COBnadaet C MeTKoI ΦKcaunn 6JIeHdbI (-0)
Дяобileчehиу yctaHOBKn IIN CHTNY 6IeHdbI DejkTe ee B Oblactm MeTKn KpeJIeHry 6IeHdbI (),a He 3a BHeSHIOJ KpOMKy.
- HenpabunbnaHay yctaHOBka 6JIeHdbI MoKet PnBecTNI K BInHbETNPOBaHNIO.
- 06bekTnB TAKKe MoKHO xpaHNTb, npNKpePnB K Hemy 6JIeHy o6paTHo CTOpOHoN.
YxOa3a06bekTnBOM
He donyckaIte nonadaHnra grp3n Ha KOHTakTbMnKpOnpoceccopa ⑬ nii nn NOBpeJdeHn.
Bcnyae nobpekeHnpe3INHOBO yIIOHTHeJI KpeIeHnOObbEKTnBa 12 o6paTntecb K abTopn3OBaHHOMy cepBnCHomy ceHTpy Nikon nII B cepBnCHbI cHTp IJI pOBeHnA peMOHa.
- BbIOpJIHnTe OUChTky NOBepXHOCTN oBeKtNbA npOyBaHnEM Bo3dYxOM.ДЯ ydaJIeHnR rpaIи nI pTeH nCNOJb3yIte MRTKYo, YcHTyO XIoJIaTObMyJaxHnAR TKaHb IINI pOTIOPOHyTO KHaB dIЯ OBeKtNbA, CMOeHHyIO tAHONOM (aIKoRToE) IINI JxNkIOCTbIO IINI cHTKn IINH. IpOTnPaIe KpyrObIMn DmIXeHHnMOn OTcHTPa K KpAIM, CTpaIcB He OCTaJIbTcNEOIB IINI dOtpaNBAbCS Do dpyrIx qacteN oBeKtNbA.
- Hɪnkɔrədæ He nCpOJIb3yIe OpraHnueckne paCTBOpnten Iʌn 6eH3oJ IŋA uCtKn 0bEktɪBa, TAK KAK 3To Moket npVBecT N eRIO NOBpeXeHnIO, NOxapy Iʌn pɒbIeMaM CO 3DopOBbEM.
Дязцьпгпpe徳нлИЗыоьeктВаMoЖи
Испьзовыт HeITpaIbHbIe CBETOФИьТрbl.БлЕнда
обeктВаТakkeпOMORAETЗцьптбпpe徳юлИЗу
обeктВа.
- Пихранени обектва в мягков чеше следуетпиркренипегдюи 3аддюк Крьшки обектва.
- He noДинмайт e n He hOcHte OБьektNbI NII NΦOTOKaMepy,ДерЖась 3a рпИКрЕпENHуI K OБьektNbY bIeHny.
EcnIOnObekTINB He 6ydtNcONb3ObaTbcB TceHHe nnITeHBO BpeMeHN, XpaHInTe erO B cyXOM, npoxlaHOM MeCTe IJnI pReOTBaueHnna Obpa3OBaHnra Rn6ka nnn Koppo3nn. HnKOrJa He octABTne ObekTINb NOd BO3JeCTBnEM PnMByx COJIHehBx Lyuey Ne IOndBeprAte erO BO3JeCTBnIO XmIKaTob, HapPIMep KaΦapHbIX nII NaHafTanHOBIX CpeCTB.
Избэрелпonaадин haObseктВ BODы n He 6pocaite erO B Ody, TAK KAK 3TO MOKeT CTaTb npuHNOI BO3HKNHOBHeNpyKabUHHb IIN HeCnPabHOCTN.
B HeKOTOpbix qactx ObekETnBa NcOnIb3yETc nlaCTNKOBbl MaTePnA INoBbIeHHO IpOuHOctN.ДЯ npEDoTbpaUeHnIOBpeJdeHnI HNKOrJa He OcTabJIne obkeTINB M MeTAX C NObblSeHHo TEMpePaTypoi.
CtanhapThbIe npHnAdJeXHoCTN
-Переднaya Крblшka объektва LC-72 диаметром 72mm
- 3aɪnɪə 3aɪntɪhə Kpɪsɪka oʊbɛktɪba LF-1
- BileHda c 6aioHeTHbIM KpeJIeHnem HB-35
MЯrkni yexonДяообъektiva CL-1018
DOnonHnteIbHa npuHaJIeXHoCTb
BvHnHuBaIOuNecAfNbTpblDnaMeTpom72MM
TexHnueckne xapaKrepncnKn
TnO6bekTna:
ObbeKTHB C peneMeHbIM fokycbHM
paCCTaONHEM AF-S DX NIKKORTuNa G
CO BCTPOeHHBMMMKpOPIoCEccPOM
n 6aIohTeHOH ONpABov NIK
(p3pa6oTana cneuaJIbNo dJa
ncIObn3OBAHn C nIΦpoBbMI
ΦotokamepamN Nikon SLR φopmata
Nikon DX)
Φokychoe pacCTOJHHe:
18MM-200MM
MaKcUmabHna DaΦparma:
f/3,5-5,6
Ontnuecka cxema:
16 3nementobB 12 rpynnax (3acpemueeckne IINH3bln 2 n3nementaED)
YrOI 3peHnIa:
76°-8°
山kanaΦokychoro paCCTOHHNIA:
18,24,35,50,70,135,200MM
HΦopMaIaOpaCToAHIN:
IpepeaetcBΦoTOKaMepy
UnpaBHeHne 3yMMnPOBaHHeM:
PuyHoe C nOMOzbu CneUnaJIbHOro KOLbza 3yMMnPOBaHIN
ΦokycnpobKa:
CnCTema BHytpenHHei FokycuPOBKn (IF) Nikon, abToDokcynPOBka C nCNoJIb3OBAHmE bEcUHMHO BOJIOBOrO pIbNOJa, puNHaF fokycuPOBKa C nOMoUbIO tDeJIbHOrO KOJIbza fokycuPOBKn
PoiabLeHne Bn6paun:
MeTod nepemeseHHnIHH3 nOMOsubo 3JIeKTPoDBnIgATEneC IINHeHNO b6MOtKoV (VCM)
Ukana paCCTOAnHcBmKN:
MeTOOM C NOJIHOCTbIO OTKpbITOn dHaqparMoI
UctaHOBOUHbI pa3Mep:
72MM (P = 0,75MM)
Pa3Mepbl:
18,24,35,50,70,135,200mm
Informace o vzdalenosti:
18, 24, 35, 50, 70, 135, 200mm
Información o vzdialenosti:
Prenos do fotoaparatu
Ovládanie transfokátora:
- I'ienzepnNikonnabuKoJF)SisTeIiJiJiJiJiJiJiJiJiJiJiJiJiJiJiJiJiJiJiJiJiJiJiJiJiJiJiJiJiJiJiJiJiJiJiJiJiJiJiJiJiJiJiJiJiJiJiJiJiJiJi
- 裕利格策用法,即在前的范式和卡那拉的卡的弗里尼德默默默默默默默默默默默默默默默默默默默默默默默默默默默默默默默默默默默默默默默默默默默默默默默默默默默默默默默默默默默默默默默默默默默默默默默默默默默默默默默默默默默默默默默默默默默默默默默默默默默默
- 推進從18mm出處到高規定步驟的封鎖制度
- 前進將為18mm出處到高規定步驟的封鎖制度
- 推進將為18mm出處到高規定步驟的封鎖制度
■ 杜丽莲 尔格哈尼
卡耶拉来,正常使用。
■大同望高,热衷做主厨
18, 24, 35, 50, 70, 135, 200mm
丛R
卡露
吾主:
緖電の応応を通過共享通
未置主置:
No reproduction in any form of this manual, in whole or in part (except for brief quotation in critical articles or reviews), may be made without written authorization from NIKON CORPORATION.