
BGS52200 - Vacuum without a bag BOSCH - Free user manual and instructions
Find the device manual for free BGS52200 BOSCH in PDF.
Download the instructions for your Vacuum without a bag in PDF format for free! Find your manual BGS52200 - BOSCH and take your electronic device back in hand. On this page are published all the documents necessary for the use of your device. BGS52200 by BOSCH.
USER MANUAL BGS52200 BOSCH
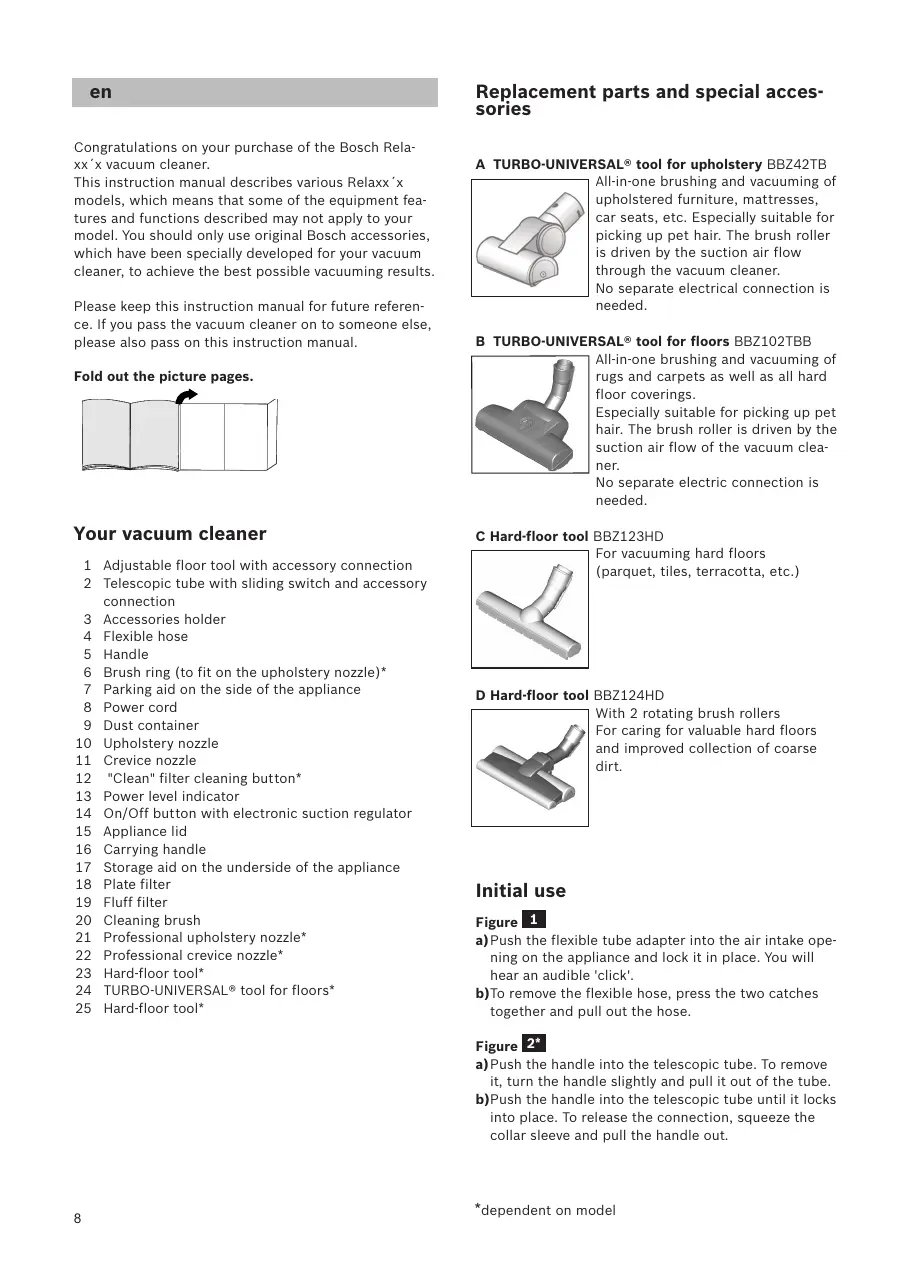
Congratulations on your purchase of the Bosch Relaxx´x vacuum cleaner. This instruction manual describes various Relaxx´x models, which means that some of the equipment features and functions described may not apply to your model. You should only use original Bosch accessories, which have been specially developed for your vacuum cleaner, to achieve the best possible vacuuming results. Please keep this instruction manual for future reference. If you pass the vacuum cleaner on to someone else, please also pass on this instruction manual. Fold out the picture pages. Your vacuum cleaner 1 Adjustable floor tool with accessory connection 2 Telescopic tube with sliding switch and accessory connection 3 Accessories holder 4 Flexible hose 5 Handle 6 Brush ring (to fit on the upholstery nozzle)* 7 Parking aid on the side of the appliance 8 Power cord 9 Dust container 10 Upholstery nozzle 11 Crevice nozzle 12 "Clean" filter cleaning button* 13 Power level indicator 14 On/Off button with electronic suction regulator 15 Appliance lid 16 Carrying handle 17 Storage aid on the underside of the appliance 18 Plate filter 19 Fluff filter 20 Cleaning brush 21 Professional upholstery nozzle* 22 Professional crevice nozzle* 23 Hard-floor tool* 24 TURBO-UNIVERSAL® tool for floors* 25 Hard-floor tool* Replacement parts and special accessories A TURBO-UNIVERSAL® tool for upholstery BBZ42TB All-in-one brushing and vacuuming of upholstered furniture, mattresses, car seats, etc. Especially suitable for picking up pet hair. The brush roller is driven by the suction air flow through the vacuum cleaner. No separate electrical connection is needed. B TURBO-UNIVERSAL® tool for floors BBZ102TBB All-in-one brushing and vacuuming of rugs and carpets as well as all hard floor coverings. Especially suitable for picking up pet hair. The brush roller is driven by the suction air flow of the vacuum cleaner. No separate electric connection is needed. C Hard-floor tool BBZ123HD For vacuuming hard floors (parquet, tiles, terracotta, etc.) D Hard-floor tool BBZ124HD With 2 rotating brush rollers For caring for valuable hard floors and improved collection of coarse dirt. Initial use Figure 1 a)Push the flexible tube adapter into the air intake opening on the appliance and lock it in place. You will hear an audible 'click'. b)To remove the flexible hose, press the two catches together and pull out the hose. Figure 2* a)Push the handle into the telescopic tube. To remove it, turn the handle slightly and pull it out of the tube. b)Push the handle into the telescopic tube until it locks into place. To release the connection, squeeze the collar sleeve and pull the handle out.
*dependent on model Figure 3* a)Insert the telescopic tube into the connecting piece of the floor tool. To release the connection, turn the tube slightly and pull it out of the floor tool. b)Push the telescopic tube into the connecting piece of the floor tool until it locks in place. To release the connection, press on the locking collar and pull out the telescopic tube. Figure 4 ● Unlock the telescopic tube by moving the sliding switch in the direction of the arrow and adjust to the desired length. The slide resistance on carpet is at its lowest when the telescopic tube has been completely pulled out. Figure 5 a)Place the accessories holder in the required position on the telescopic tube. b)Use some pressure to insert the upholstery nozzle with brush ring and the crevice nozzle into the accessories holder from above or below. Figure 6 ● Holding the power cord by the plug, pull out to the required length and insert the plug into the mains socket. Figure 7 ● To switch the vacuum cleaner on or off, press the ON/OFF button. Figure 8 Controlling the suction level The required suction level can be set to any level by turning the control knob. Low power range For vacuuming delicate materials, such as delicate upholstery, curtains, etc. Medium power range For daily vacuuming of floors which are only slightly dirty. High power range For vacuuming durable floor coverings, hard floors and heavy deposits of dirt. Vacuuming Caution ! Floor tools are subject to a certain amount of wear, depending on the type of hard floors you have (e.g. rough, rustic tiles). Therefore, you must check the underside of the floor tool at regular intervals. Worn undersides of floor tools may have sharp edges that can damage sensitive hard floors, such as parquet or linoleum. The manufacturer does not accept any responsibility for damage caused by worn floor tools. Figure 9 Set the adjustable floor tool: Rugs and carpets
If you are vacuuming up larger particles, make sure that you vacuum them up successively and carefully to ensure that the vacuum channels of the floor tool do not become blocked. If necessary, you should raise the nozzle in order to better vacuum up the dirt particles. Figure 10* Vacuuming with accessories Attach the nozzles to the suction pipe or hand grip as required: a)Crevice nozzle for vacuuming crevices and corners, etc. b)Upholstery nozzle for vacuuming upholstered furniture, curtains, etc. c) Upholstery nozzle with fixed brush ring for vacuuming window frames, cupboards, profiles, etc. After use, reinsert the crevice nozzle and upholstery nozzle into the accessories holder. d)Professional crevice nozzle Extra-long crevice nozzle for cleaning crevices, corners and narrow spaces, e.g. in a car. e)Professional upholstery nozzle For gently and thoroughly cleaning upholstered furniture, curtains, etc. To clean the professional upholstery nozzle, simply vacuum it using the handle. f) Hard-floor tool for vacuuming hard floor coverings (tiles, parquet flooring, etc.) Figure 11* Cleaning the hard-floor tool a)Vacuum from below to clean the tool. b)Use scissors to cut through threads and hairs wound round the rollers, then vacuum them up. Figure 12 You can use the parking aid on the side of the vacuum cleaner if you wish to stop vacuuming for a short time. ● After switching off the appliance, slide the hook on the floor tool into the parking aid. Figure 13 When vacuuming stairs, the appliance must be positioned at the bottom of the stairs. If it does not reach far enough, the appliance can also be carried using the carrying handle. When your work is finished Figure 14 ● Switch off the appliance. ● Pull out the mains plug. ● Briefly pull the power cord and release. (The power cord retracts automatically). *dependent on model
Figure 15 ● Unlock the telescopic tube by moving the sliding switch in the direction of the arrow and slide one tube into the other. Figure 16 To store the appliance, use the storage aid on the underside. a) Stand the appliance up by the handle. b)Slide the hook on the floor tool into the storage aid. Emptying the dust container Figure 17 In order to achieve good vacuuming results, the dust container should be emptied after every use or, at the latest, when dust or dirt has visibly collected on the fluff filter or when dust at one point in the container has reached the height of the marking. When emptying the dust container, always check how dirty the fluff filter is and, if necessary, clean it as detailed in the "Cleaning the fluff filter" instructions. Figure
Figure 18 a)Open the appliance lid by pulling the locking tab. b)Use the handle to remove the dust container from the appliance. Figure 19 a)Release the filter unit of the dust container by pressing the release button. b)Take the filter unit out of the dust container and empty the dust container. Figure 20 a)Insert the filter unit into the dust container, making sure it is correctly seated. The arrow on the filter cover must point in the direction of the locking tab. b)Press on the container lid until you hear it click into place. c) When reinserting the dust container into the appliance, make sure it is correctly seated. Close the appliance lid until the locking tab clicks into place again. ! Caution If you notice any resistance when closing the lid, check that the filter is complete and that the filter and dust container are correctly seated. Filter care Cleaning the plate filter Your appliance is equipped with a "Sensor Control" Function. Figure 21* + Figure 23* . This function constantly monitors whether your vacuum cleaner is reaching its optimum power level. The indicator light lets you know when you need to clean the plate filter, so that the vacuum cleaner can reach its optimum power level once more.
Vacuum cleaner with “RotationClean” function Figure 21* The indicator lights up blue when the appliance is working at its optimum level. Once the indicator turns red and flashes, the plate filter must be cleaned. The appliance is automatically adjusted back to the lowest power setting. Figure 22* ● Switch the appliance off in order to clean the plate filter. the filter can only be cleaned if the applian! Caution: ce is switched off. ● Open the appliance lid by pulling the locking tab. ● To clean the plate filter, turn the knob at least three turns through 180°. You can also clean the filter if the suction is becoming less powerful, even if the indicator has not lit up. We recommend that you clean the plate filter each time before emptying the dust container. It must be cleaned at the latest when the “Sensor Control” indicator lights up. If the indicator flashes three times in quick succession, even though the plate filter is clean, this is probably due to a dirty fluff filter or a blockage. In this case, the appliance automatically adjusts to the lowest power setting and the indicator lights up red permanently. ● Switch the appliance off, empty the dust container and clean the fluff filter according to the instructions in "Cleaning the fluff filter". Figure 26 Vacuum cleaner with “SelfClean” function Figure 23* The indicator lights up blue when the appliance is working at its optimum level. Once the indicator turns red and flashes, the appliance switches off automatically Filter cleaning is activated and performed by the integrated cleaning motor. If the appliance cleans three times in quick succession, this is probably due to a dirty fluff filter or a blockage. In this case, the appliance automatically adjusts to the lowest power setting and the indicator lights up red. ● Switch the appliance off, empty the dust container and clean the fluff filter according to the instructions in "Cleaning the fluff filter". Figure 26 Figure 24* If required, you can also activate the cleaning procedure manually by pressing the "Clean" filter cleaning button when the appliance is switched on. If suction power is reducing, you can also clean the filter even if the indicator has not lit up. We recommend that you clean the plate filter each time before emptying the dust container. *dependent on model Figure 25 If the plate filter is particularly dirty, the dirt can also be washed off. a)Turn the bottom part of the filter unit anticlockwise as far as it will go. Take the plate filter out of the filter unit. b)Wash the plate filter under running water. c) When it has dried completely, insert the plate filter into the filter unit and lock the bottom part by turning it clockwise. Under normal circumstances, and when vacuuming normal household dust, the plate filter does not need to be removed or cleaned manually in order to achieve the vacuum cleaner's optimum power level. ! Caution: do not brush the plate filter. ● For simple cleaning without water, simply tap the filter around the edge of the cap. ● For more thorough cleaning, rinse the filter from the outside with water, and allow it to dry completely before using it in the vacuum cleaner again. Cleaning the fluff filter The fluff filter should be cleaned at regular intervals in order to ensure optimum operation of the vacuum cleaner. Figure 26 ● Open the appliance lid and remove the dust container from the appliance. Figure 18 a)Take the filter unit out of the dust container. b) Clean the fluff filter. ● It is usually sufficient to lightly shake or tap out the filter housing when the dust container is emptied to dislodge any particles of dirt. ● If this is not sufficient, you can use the brush which is supplied with the appliance or a dry cloth to remove dirt particles from the surface. ● If you want to wash the fluff filter, you must first remove the plate filter from the filter unit. The plate filter must only be reinserted into the filter unit after the fluff filter has completely dried. Cleaning the motor protection filter The motor protection filter should be cleaned regularly by knocking out the dirt and rinsing. To ensure that the vacuum cleaner is working at its optimum power level, the exhaust filter should be replaced after 1 year. The filtering action of the filter remains intact, even if the filter surface becomes discoloured. Cleaning the HEPA filter Figure 28* ● Open the appliance lid and remove the dust container. Figure 18 a)Use the locking tab to open the side flap. b)Pull the two locking tabs to unlock the filter unit with HEPA filter and remove it from the appliance. c) Tap out the filter unit and rinse it under running water. d)Only reinsert the filter unit into the appliance after it has dried completely and ensure that it audibly clicks into place. e)Close the side flap until you hear the locking tab click into place again. f) Insert the dust container into the appliance and close the appliance lid. Cleaning the micro filter Figure 29* ● Open the appliance lid and remove the dust container. Figure 18 a)Use the locking tab to open the side flap. b)Pull the two locking tabs to unlock the filter unit with foam filter and micro filter and remove it from the appliance. c) Remove the foam filter and micro filter from the filter frame. d)Foam filter and micro filter and rinse it under running water. e)Do not re-insert the foam filter and the micro filter into the filter frame until it has dried completely f) Insert the filter unit in the appliance and ensure that the locking tabs audibly click into place. g)Close the side flap until you hear the locking tab click into place. h)Insert the dust container into the appliance and close the appliance lid. Cleaning instructions Figure 27 a)Open the appliance lid and remove the motor protection filter. b)Clean the motor protection filter by tapping out the dirt. If it is very dirty, the motor protection filter should be rinsed. Then allow the filter to dry completely. c) After cleaning the motor protection filter, reinsert it into the appliance and close the appliance lid. Cleaning the exhaust filter The exhaust filter is designed so that it does not need to be replaced, provided the appliance is used as intended in the household. Always switch off the vacuum cleaner and disconnect the power cord from the mains before cleaning the vacuum cleaner. The vacuum cleaner and plastic accessories can be cleaned with an ordinary plastic cleaner. do not use a scourer, glass-cleaning agent ! Caution: or multipurpose cleaning product. Never immerse the vacuum cleaner in water. Subject to technical modifications. *dependent on model
AU Australia BSH Home Appliances Pty. Ltd. 7-9 Arco Lane HEATHERTON, Victoria 3202 Tel.: 1300 368 339 Fax: 1300 306 818 valid only in AUS mailto:bshau-as@bshg.com www.bosch-home.com.au BA Bosna i Hercegovina, Bosnia-Herzegovina "HIGH" d.o.o. Gradaþaþka 29b 71000 Sarajewo Info-Line: 061 100 905 Fax: 033 213 513 mailto:delicnanda@hotmail.com FR France BSH Electroménager S.A.S. 50 rue Ardoin – BP 47 93401 SAINT-OUEN cedex Service interventions à domicile:
Service Consommateurs: 0 892 698 010 (0,34 € TTC/mn) mailto:soa-bosch-conso@bshg.com Service Pièces Détachées et Accessoires: 0 892 698 009 (0,34 € TTC/mn) www.bosch-home.fr GB Great Britain BSH Home Appliances Ltd. Grand Union House Old Wolverton Road Wolverton Milton Keynes MK12 5PT To arrange an engineer visit, to order spare parts and accessories or for product advice please visit www.bosch-home.co.uk or call Tel.: 0844 892 8979* *Calls from a BT landline will be charged at up to 3 pence per minute. A call set-up fee of up to 6 pence may apply. IE Republic of Ireland BSH Home Appliances Ltd. Unit F4, Ballymount Drive Ballymount Industrial Estate Walkinstown Dublin 12 Service Requests, Spares and Accessories Tel.: 01450 2655 Fax: 01450 2520 www.bosch-home.cu.uk IL Israel, ʬʠʸʹʩ C/S/B Home Appliance Ltd. Uliel Building 2, Hamelacha St. Industrial Park North 71293 Lod Tel.: 08 9777 222 Fax: 08 9777 245 mailto:csb-serv@zahav.net.il IN India, BhƗrat, ȡȡ
BSH Customer Service Front Office Shop No.4, Everest Grande, Opp. Shanti Nagar Bus Stop, Mahakali Caves Road, Andheri East Mumbai 400 093 IS Iceland Smith & Norland hf. Noatuni 4 105 Reykjavik Tel.: 0520 3000 Fax: 0520 3011 www.sminor.is NZ New Zealand BSH Home Appliances Ltd. Unit F 2, 4 Orbit Drive Mairangi BAY Auckland 0632 Tel.: 09 477 0492 Fax: 09 477 2647 mailto:bshnz-cs@bshg.com www.bosch-home.co.nz
"This appliance is labelled in accordance with the European directive 2002/96/EG concerning waste electrical and electronic equipment – WEEE. The directive provides the framework for the return and recycling of used appliances as applicable throughout the EU." GB Conditions of guarantee For this appliance the guarantee conditions as set out by our representatives in the country of sale apply. Details regarding same may be obtained from the dealer from whom the appliance was purchased. For claims under guarantee the sales receipt must be produced.