ZME9021EE - Oven Zelmer - Free user manual and instructions
Find the device manual for free ZME9021EE Zelmer in PDF.


| Product type | Built-in electric oven |
| Brand | Zelmer |
| Model | ZME9021EE |
| Dimensions (H x W x D) | 595 x 595 x 550 mm |
| Weight | Approx. 35 kg |
| Power supply | 230 V / 50 Hz / 3.0 kW |
| Energy class | A |
| Oven modes | Conventional, Conventional with fan, Grill, MaxiGrill, MaxiGrill with fan, Turbo, Lower heater, Lower heater with Thermaflow, Grill and lower heater |
| Control type | Electronic display with push buttons and rotary knobs |
| Display | Digital clock with timer and programming functions |
| Inner lamp | Yes, replaceable (300°C resistant) |
| Grill element | Yes, with folding feature for cleaning |
| Fan | Yes, removable back panel for cleaning |
| Supporting frames | Telescopic (type ZME9021EE) |
| Accessories | Grate, roasting tin, grill screen, baking tin (optional) |
| Door | Removable, hardened glass, hinges on bottom |
| Cleaning | Removable door, removable supporting frames, fold-down grill element; do not use steam or abrasive cleaners |
| Safety features | Automatic shutdown after programmed time, child supervision warning, overheat protection |
| Warranty | Standard manufacturer warranty |
Frequently Asked Questions - ZME9021EE Zelmer
User questions about ZME9021EE Zelmer
0 question about this device. Answer the ones you know or ask your own.
Ask a new question about this device
Download the instructions for your Oven in PDF format for free! Find your manual ZME9021EE - Zelmer and take your electronic device back in hand. On this page are published all the documents necessary for the use of your device. ZME9021EE by Zelmer.
USER MANUAL ZME9021EE Zelmer
natural_image
Front view of a modern kitchen oven with digital display and control knobs (no visible text or symbols)natural_image
Exterior view of a modern kitchen oven with digital display and control knobs (no visible text or symbols)Typ ZME9031ED

natural_image
Exterior view of a modern stainless steel oven with control knobs and a visible door (no text or symbols on the main body)
INSTRUKCJA UŻYTKOWANIA
Built-in electric oven Type ZME9011EE; ZME9021EE; ZME9031ED 66-73
1 Panel kontrolny
Typ ZME9021EE
Typ ZME9031ED

Funkcje piekarnika
natural_image
Close-up of a hand inserting a button into a device panel (no visible text or symbols)
natural_image
Illustration of a hand opening a door into an oven (no text or symbols visible)natural_image
Close-up of a hand adjusting a circular fan or vent with a switch, no visible text or symbols
natural_image
Close-up of a hand adjusting a circular vent on a wall-mounted device (no visible text or symbols)natural_image
Close-up of a hand pressing a button on a car air conditioner panel (no visible text or symbols)natural_image
Close-up of a hand pressing down on a car's side panel, no visible text or symbolsnatural_image
Close-up of architectural or mechanical components with curved and layered surfaces (no visible text or symbols)natural_image
Close-up of a gloved hand holding a circular mechanical component (no visible text or symbols)Typ ZME9021EE

Typ ZME9031ED

Funkce trouby
□ – Trouba je vypnutá
- Normální použití
natural_image
Close-up of a hand inserting a button into a device panel (no visible text or symbols)
natural_image
Hand inserting a door into an oven (no text or symbols visible)natural_image
Close-up of a hand using a tool to adjust or install a fan-shaped device (no visible text or symbols)
natural_image
Close-up of a hand adjusting a circular vent on a device (no visible text or symbols)MYTÍ VNĚJŠÍCH STĚN TROUBY A PŘÍSLUŠENSTVÍ
natural_image
Close-up of a hand pressing a small piece of paper on a train track (no text or symbols visible)natural_image
Close-up of a mechanical component with curved and layered surfaces (no visible text or symbols)natural_image
Close-up of a gloved hand holding a circular mechanical component (no visible text or symbols)Řešení problémů
Trouba nefunguje
Typ ZME9021EE

Typ ZME9031ED

Funkcie rúry
③ Odkrúťte držiak blokády Ⓐ a vysuňte ploché panele

natural_image
Close-up of a hand inserting a button into a device panel (no visible text or symbols)
natural_image
Hand inserting a door into an oven (no text or symbols visible)natural_image
Close-up of a hand using a tool to adjust or install a fan-shaped device (no visible text or symbols)
natural_image
Close-up of a person installing or adjusting a circular panel with visible internal structure (no text or symbols)natural_image
Close-up of a hand pressing a button on a car air vent (no visible text or symbols)UMÝVANIE VONKAJŠÍCH STIEN RÚRY A PRÍDAVNÝCH ZARIADENÍ
natural_image
Close-up of a hand pressing down on a train window with a letter 'E' on the door (no text or symbols beyond the label)natural_image
Abstract grayscale illustration of layered geometric shapes (no text or symbols)Ak chcete zložit' dvere naspät', postupujte opačne
VÝMENA ŽIAROVKY VO VNÚTRI RÚRY
natural_image
Close-up of a gloved hand holding a circular mechanical component (no visible text or symbols)Riešenie problémov
Rúra nepracuje
1 Vezérlöpanel
2 Szabályozógombok
ZME9021EE tipus

ZME9031ED típus

A sütő funkciói
natural_image
Close-up of a hand inserting a button into a device (no visible text or symbols)
natural_image
Hand inserting a component into an oven (no text or symbols visible)natural_image
Close-up of a hand adjusting a circular fan component with a tool, no visible text or symbols
natural_image
Close-up of a hand adjusting a circular vent on a device casing (no visible text or symbols)natural_image
Illustration of a hand pressing down on a car air conditioner panel with a circular label marked 'A' (no text or symbols on the diagram itself)natural_image
Close-up of a hand pressing a button on a train track (no visible text or symbols)natural_image
Close-up of a mechanical component with curved and layered surfaces (no visible text or symbols)natural_image
Close-up of a gloved hand holding a circular mechanical component (no visible text or symbols)Problémamegoldás
A sütö nem működik
1 Panoul de comanzi
2 Butoanele de control
Tip ZME9021EE

Tip ZME9031ED

natural_image
Close-up of a hand inserting a button into a device panel (no visible text or symbols)
natural_image
Interior view of a microwave oven with a hand inserting a tray into the door (no text or symbols visible)natural_image
Close-up of a hand adjusting a circular fan or vent with a screwdriver, no visible text or symbols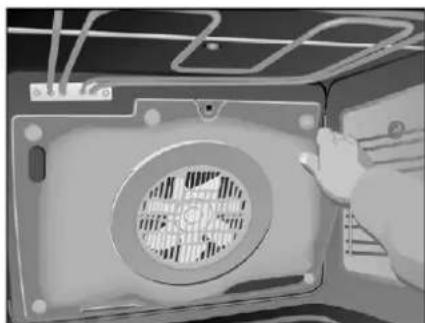
natural_image
Close-up of a hand adjusting a wall-mounted air conditioner cover (no text or symbols visible)natural_image
Illustration of a hand pressing down on a car air vent with a circular symbol labeled 'A' (no text or symbols present)CURĂTAREA PERETILOR EXTERIORI AI CUPTORULUI ȘI A ACCESORIILOR
natural_image
Close-up of a hand pressing a small piece of paper on a car wheel (no visible text or symbols)natural_image
Close-up of mechanical components or structural elements, possibly a bracket or frame, with no visible text or symbols.natural_image
Close-up of a gloved hand holding a circular mechanical component (no visible text or symbols)Rezolvarea problemolor
Тип ZME9021EE

Тип ZME9031ED

Функции духовки
-Духовка выключена
- Традиционная
natural_image
Close-up of a hand pressing down on a device panel with a circular button and dotted line (no visible text or symbols)
natural_image
Illustration of a hand inserting a door into an oven (no text or symbols visible)natural_image
Close-up of a hand adjusting a circular fan component with a label D (no visible text or symbols)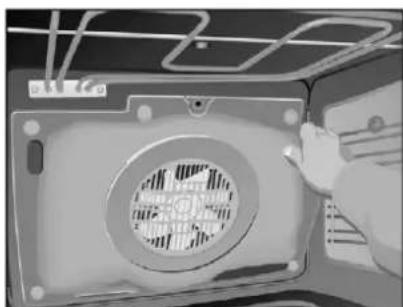
natural_image
Close-up of a mechanical component with a circular vent and internal blades (no visible text or symbols)natural_image
Illustration of a hand pressing down on a car air conditioner panel with a circular label marked 'A' (no text or symbols on the diagram itself)natural_image
Close-up of a hand pressing down on a mechanical component, no visible text or symbolsnatural_image
Close-up of architectural or mechanical components with curved and layered surfaces (no visible text or symbols)natural_image
Close-up of a gloved hand holding a circular mechanical component (no visible text or symbols)Решение проблем
Духовка не работает
1 Контролен панел
Тип ZME9021EE
Тип ZME9031ED

Функции на фурната
natural_image
Close-up of a mechanical component with curved and layered surfaces (no visible text or symbols)natural_image
Close-up of a gloved hand holding a circular mechanical component (no visible text or symbols)Тип ZME9021EE
Тип ZME9031ED
Функції духовки

Духовка вимкнена

- Традиційна
natural_image
Close-up of a gloved hand inserting a button into a device panel (no visible text or symbols)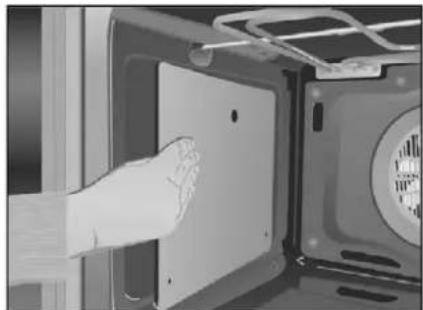
natural_image
Hand inserting a door into an oven (no text or symbols visible)natural_image
Close-up of a hand adjusting a circular fan or vent on a mechanical component (no visible text or symbols)
natural_image
Close-up of a hand adjusting a circular vent on a mechanical component (no visible text or symbols)natural_image
Illustration of a hand pressing down on a car air vent with a circular symbol labeled 'A' (no text or symbols present)natural_image
Close-up of a hand pressing down on a mechanical component, no visible text or symbolsnatural_image
Close-up of a mechanical component with curved and layered surfaces (no visible text or symbols)natural_image
Close-up of a gloved hand holding a circular mechanical component (no visible text or symbols)Вирішення проблем
Духовка не працює
Safety instructions 66
Construction and design....66
Control panel 67
Operating the oven 67
Technical data 67
Installation 67
Power supply 68
Using the oven 68
Cleaning and maintenance 69
Problem solving 70
Tips and tables 71
Ecology – keeping it green ....73
Safety instructions
Read the following instruction manual. It contains important guidelines how to safely install, use and maintain the oven.
Keep the instruction manual in safety for future reference.
The device should only be plugged to a power supply (alternating current only) with a safety pin, according to the voltage provided on the rating plate of the device.
Improper connection of the cord may result in an electric shock.
After installing the device, the plug should be in an easily accessible position.
When using the oven for the first time, there is a possibility for an acrid smoke to come out of the device. This is a one-time reaction caused by heating of the binding agent used for insulation panels around the oven.
It is nothing out of the ordinary – you should just wait until the smoke is gone before you put any dish inside the oven.
Do not let any children come near the oven when it is hot, and especially when the grill function is on.
Make sure the device is off, before trying to exchange the light bulb to avoid electrocution.
WARNING: Accessible elements may become hot. Do not let children play anywhere near the oven.
This appliance is not intended for use by persons (including children) with reduced physical, sensory or mental capabilities, or lack of experience and knowledge, unless they have been given supervision or instruction concerning use of the appliance by a person responsible for their safety.
Children should be supervised to ensure that they do not play with the appliance.
The appliance is not intended to be operated by means of an external timer or separate remote-control system.
If the non-detachable part of the cord is damaged, it should be replaced by the producer or at a proper service point or by a qualified person in order to avoid any hazards.
The appliance can only be repaired by qualified service personnel. Improper servicing may cause a serious hazard to the user. In case of defects please contact a qualified service center.
Installation and repairs of the oven may be done only by an entitled installer, and only according to the instructions of the producer.
The device is designed for household use. It may be only used for preparing dishes, any other purposes are forbidden.
- Only use the oven when it is installed within kitchen units.
Do not let children play with the device.
Do not use coarse cleaning agents or sharp metal tools to clean the glass door, as it may result in scratches or even cracks.
Do not use steam for cleaning purposes.
The oven may only used according to its purpose – preparing dishes. Any other use, e.g. for heating is wrong, and thus may be hazardous. The producer bears no responsibility for any damages resulting from improper or careless use of the oven
Do not pull the cable to take the plug out of the socket.
☐ no not put containers or food on the floor of the oven. Always use the trays and grids.
Do not touch the oven with wet or moistened hands or feet.
Using extension cables or other types of adapters is not recommended.
any installation, maintenance and other works may only be carried out when the oven is disconnected from the power supply.
During use the oven is hot. We advise caution when touching any elements inside the oven, as they will be hot.
Use protective gloves if you need to work inside the hot oven.
Do not spill water on the floor of the oven while it is working as this could damage the enamel.
Open the door of the oven carefully, in order to avoid burning with hot steam coming from the inside.
Power cable conductors must have nominal section of minimum 3 x 1.5 mm.
you do not follow the guidelines above, the producer cannot guarantee you safety when using the oven. The disconnecting system should be installed on the inseparable cables in accordance to regulations on cables.
Before using the device be sure to read the entire manual.
Construction and design

1 Control panel
2 Control button
3 Oven seal
4 Grill elements
5 Chrome supporting frame (telescopic for ZME9011EE, ZME9021EE types)
6 Grate
7 Roasting tin
8 Hinges
9 Door
10 Air holes
11 Built-in fastening
12 Grill screen
13 Smoke outlet
14 Lamp
15 Back panel
16 Fan
17 Baking tin (*)
18 Side panel
19 Hardened glass
(*) optional
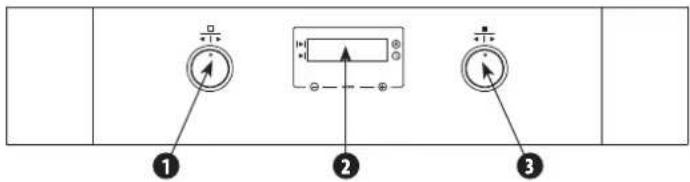
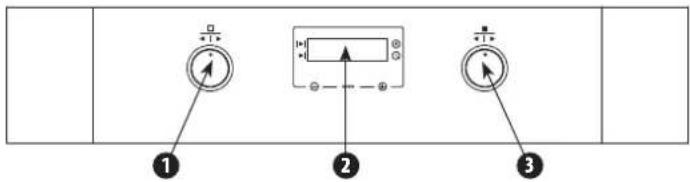
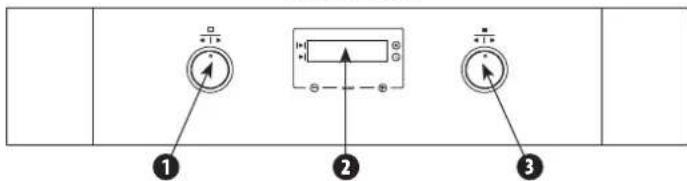
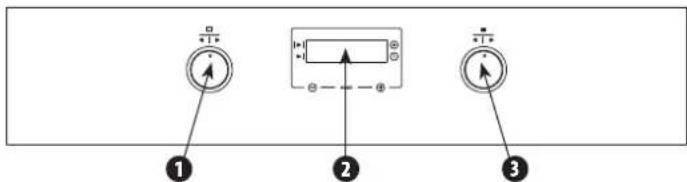
Control panel
1 Function selection unit
2 Electronic display unit
3 Temperature selection unit
Type ZME9011EE

Type ZME9021EE

Type ZME9031ED

Oven modes
□ - Switch off oven
- Conventional
Used for baking cakes, when the heat should be distributed evenly to guarantee fluffiness.
- Conventional with fan
Best for preparing meat and baking cakes. The fan distributes air evenly inside the oven.
- Grill
For preparing dishes with browned surface. This way only the surface is browned without the whole dish being overdone. The function is ideal for steaks, ribs, fish or pieces of toast.
- MaxiGrill
More power gives you the ability to grill larger dishes in even shorter time.
- Maxi Grill with fan
Designed to evenly grill and brown any dish. Especially useful for large portions of food, such as poultry or game dishes. The dish should be placed on the grate with a tin beneath to collect all the gravy and grease.
ATTENTION! When using Grill, Maxi Grill and Maxi Grill with fan, the door of the oven must be closed.
- Turbo
The fan distributes the heat produced by the heater in the back of the oven. In this mode it is easy to prepare dishes on two different levels of the oven.
The mode is also used to defreeze products – you only need to select the appropriate temperature.
- Lower heater
Only the bottom of the oven is heated up. The mode is designed to warm dishes up, bake cakes and similar activities.
- Lower heater with Thermafl ow
The heat is distributed from the bottom of the oven. The mode is ideal for baking fruit or jam-filled cakes, as they need to be heated from the bottom. It is always necessary to preheat the.
- Grill and lower heater
Handy when Trilling meat, may be adjusted to dish size.
ATTENTION! The control lamp stays on in each of the above modes.
Technical data
The technical parameters are given on the rating plate of our product.
The oven is an A-class device, equipped with a connection cable with a conductor and a protective contact plug.
The dishwasher fulfi lls all the binding standards.
The dishwasher is designed in conformity with the directives:
The Low Voltage Directive (LVD) - 2006/95/EC.
The Electromagnetic Compatibility (EMC) Directive - 2004/108/EC.
The product is marked with the CE Marking on its rating plate.
Installation
The following information is addressed to a qualified installer responsible for the installation and connection of the device. If you install the oven by yourself, the producer cannot be held responsible for any possible damages.
Place the oven in a spot designed for it in the kitchen unit – underneath the kitchen top or in a vertical unit. Secure the oven in the spot with screws using the two securing holes in the casing. In order to find the installation holes open the oven door and look inside.
For proper air flow, pay attention to appropriate measurements and distances given below.
ATTENTION:
in order to unpack the oven pull the flap situated at the bottom part of the box and move it. To lift the device use the side handles, not the oven door ones.
The alcove in the kitchen unit should be of appropriate size (see the picture below), with minimum depth of 580 mm (see Fig. 1 i rys. 2).
order to install a multi-functional oven, the back of the unit, seen as the darker area in the Fig. 3 may not have any elements sticking out (such as reinforcements, pipes, sockets, etc.).
The glue used for fixing plastic veneers in kitchen units should endure 85°C.
1

2

3

ATTENTION! The producer cannot be held responsible for any damages that occur due to improper installation or misuse of the oven.
After connecting the oven, you should:
① Put the oven into the unit paying attention not to block the cable or place it on the top of the oven.
② Secure the oven to the casing by four screws provided in the set driver into the holes which can be seen when the door is open.
③ Check whether the walls of the oven are separated from the casing and if there is at least 2mm from the elements of the units situated in the vicinity of the oven.
Power supply
The person responsible for the connection of the power supply should check whether:
The voltage of the power supply corresponds to the requirements given on the rating plate.
Wiring corresponds to maximum power given on the rating plate.
The connection diagram is proper to what is shown on the figure below.
The connection is grounded according to the appropriate regulations.
The connection is done by using a multi-pole switch appropriate to the load. The distance between the contacts must be at least 3 mm, to allow disconnection in case of danger or during light bulb cleaning/changing. In any case the grounding cable should not pass through the switch.
After connecting the power, all electric elements should be checked to determine whether they are properly working.

Using the oven
SETTING THE TIME
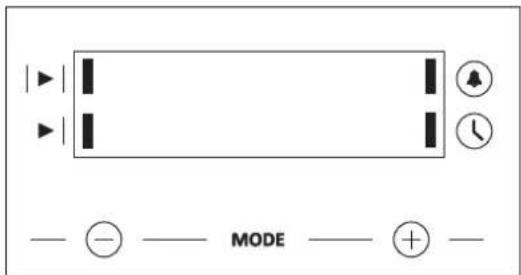
After plugging the oven in, you will see 12:00 and a light flashing over the symbol 📋.
By pushing buttons + and you may set the right time. After the time is saved, the light will automatically go off.
OVERRIDE
After time setting, the oven is ready to use. You should select oven temperature and mode.
In order to turn the oven off, set the controls to ☐.

PROGRAMMING THE CLOCK MODE
Warning mode: the mode products a warning sound in a given time.
Grilling time: the mode enables programming the oven to work for a given time, after which it will automatically turn itself off.
Grilling time end: the mode enables you to establish a precise time, when the oven will automatically turn itself off.
Duration time and automatic shutdown: this mode combines work duration with exact time when the oven will automatically turn itself off. You can define automatically the beginning and end of work of the oven.
Clock lamp: clock lamp may be turned off, when the oven is not used.
WARNING MODES
① Press the MODE button until the light above the symbol starts flashing.
② Select the hour, when the sound signal will be heard by pressing the and buttons.
③ The light will stay turned on, indicating the alarm has been programmed.
④ At the end of programmed time, an alarm will be set off and a light will flash.
⑤ Push any button to turn the alarm off, and return the oven to displaying the current time.
GRILLING TIME
① Push the MODE button until the indicator above the | ▶ | symbol starts flashing.
② Select duration time by pushing the and buttons.
③ The flashing indicator will light up, informing you the oven will turn off automatically.
④ The clock will return to showing the current time.
⑤ Select oven temperature and mode.
⑥ When the given time passes, the oven will turn off, alarm signal will go off, and the indicator will start flashing.
⑦ Push any button to turn the alarm off. The oven will turn on again.
⑧ In order to turn off the oven, place the settings in the position.
GRILLING TIME END
① Push the MODE button until the indicator above the ▶ symbol starts flashing.
② Select the time, when the oven needs to start working by pressing the and buttons.
③ The flashing indicator will light up, informing you the oven will turn off automatically.
④ The clock will return to showing the current time.
⑤ Select oven temperature and mode.
⑥ When the given time passes, the oven will turn off, alarm signal will go off, and the indicator will start flashing.
⑦ Push any button to turn the alarm off. The oven will turn on again.
⑧ In order to turn off the oven, place the settings in the position.
DURATION TIME AND AUTOMATIC SHUTDOWN
① Push the MODE button until the indicator above the | ▶ | symbol starts flashing.
② Select duration time by pushing the and buttons.
③ You will see next that the indicator is no longer flashing, and is lit up.
④ Push the MODE button until the indicator above the ▶ symbol starts flashing.
⑤ Select the time, when the oven needs to start working by pressing the and buttons.
⑥ You will see next that the indicator is no longer flashing, and is lit up.
⑦ Select oven mode and temperature.
⑧ The oven will remain turned on and the indicators above the ▶ | and | ▶ | symbols will be lit.
The oven has been successfully programmed.
⑨ When the time comes, the oven will start working for the programmed amount of time.
⑩ When the programmed duration ends, the oven will automatically turn off, the alarm will go off and the indicator above the ▶ symbol will start flashing.
⑪ Push any button to turn the alarm off. The oven will turn on again.
⑫ In order to turn off the oven, place the settings in the position.
ATTENTION! Pushing the MODE button results in the appearance of programming
symbol on the display unit. It may be changed by the + and buttons. After selecting a given mode, an indicator above a given symbol will lit up. In case of a power failure, all modes will be erased. The appropriate time should be set again, and the clock should be reprogrammed.
In order to turn the clock lap on, press simultaneously both buttons – after a few seconds the clock display will turn off.
In order to turn it on again, push any button – the current time will be displayed.
The mode may be used, when the clock displays the current time and no other mode is programmed (no symbol is lit up).
Cleaning and maintenance
Wipe the oven with water and a little of dishwashing liquid. Dry with a soft cloth.
Caustic and abrasive agents are not suitable. If any such substances meet the front of the oven, they should be immediately washed off with water.
ATTENTION! Minor differences in the coloring of the oven front are caused by use of different materials, such as plastics, glass and metal.
Ovens with stainless steel fronts – Remove immediately any stains caused by stone, fat, flower or egg white. Use stainless steel care agents. Before using an agent on the surface, try it first on a smaller are that is not visible.
Ovens with aluminum fronts – Use a mild windowpane detergent. Wipe the surface with vertical moves, adding no pressure to the movement by using a windowpane or microfiber cloth. Aggressive cleaning agents, coarse sponges and cloths are not suitable for the task.
WARNING! In order to clean the oven, it should be turned off and cold. Due to safety reasons it is not advisable to clean the oven with steam or by using high pressure. Aggressive cleaning agents, coarse sponges and cloths are not suitable for the task.
ATTENTION! Do not use any scrapers, coarse sponges or abrasive agents.
Never use steam or high-pressured sprays to clean the oven.
Never use abrasive agents, scourers or sharp objects to clean the oven door.
Stainless steel or enameled surfaces need to be cleaned with warm water with soap or a special quality product. It is not advisable to use abrasive cleaning agents, as they can damage the surface and the design of the oven. It is important to clean the oven after each use. Melted grease accumulates on the walls of the oven during cooking. It may cause an unpleasant smell in the future or may even affect the dishes in the oven. Use hot water with detergent to clean the oven. Remember to rinse it thoroughly after washing.
The stainless steel gridiron should be cleaned with detergents and metal scrapers. Glass surfaces, such as the oven door and heating chamber may be cleaned only, if they are cold. Any damages caused by negligence and ignoring the above rules are not covered by the guarantee.
REMOVING SUPPORTING FRAMES AND FLAT PANEL FRAMES
① Remove all items from the inside of the oven.
② Remove the supporting frames B by releasing the lock handle C.

③ Unscrew the lock handle Ⓐ and pull out the fl at panels.

natural_image
Close-up of a hand pressing down on a device panel with a circular button and dotted line (no visible text or symbols)
natural_image
Illustration of a hand inserting a device into an oven (no text or symbols visible)④ In order to remove the back panel, unscrew bolt D

natural_image
Close-up of a hand adjusting a circular fan or vent on a mechanical component (no visible text or symbols)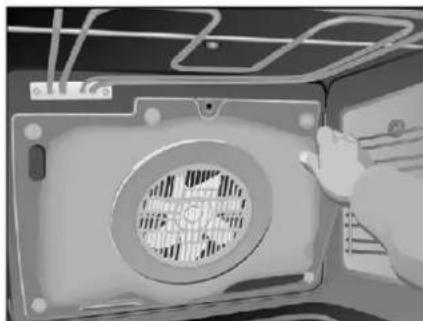
natural_image
Close-up of a mechanical component with a circular vent and mounting holes (no visible text or symbols)⑤ In order to assembler the oven back together, reverse the above activities.
ATTENTION! For safety reasons, it is forbidden to turn the oven on without the back panel covering the fan.
In order to clean the upper part of the oven:
Wait until the oven cools off.
Turn bolt A and lower the grill element as low as possible.
After cleaning the upper part of the oven, return the element to its original position.
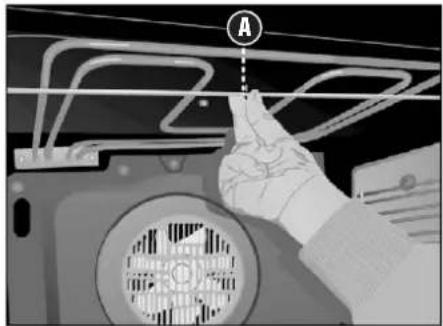
CLEANING OVEN OUTER WALLS AND ACCESSORIES
Outer areas of the oven and its accessories should be cleaned with warm water with an added dishwashing liquid or a mild detergent.
ATTENTION! It is not advisable to use abrasive cleaning agents, as they can damage the surface and the design of the oven. Stainless metal surfaces should be cleaned carefully only with a sponge or a cloth to avoid scratching the surface.
ATTENTION! While washing the outer surfaces, do not try to remove the control panel, as it can only be done, when the casing of the oven is taken off.
CLEANING OVEN DOORS
Depending on oven type, you can remove the door to facilitate the clearing process. In order to do it, you must:
① Open the door wide.
② Turn both clamps to the limit or place small needles into holes
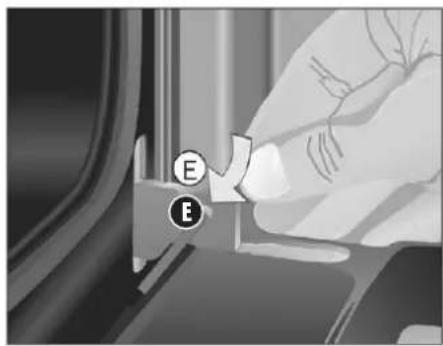
③ Close the door until it shifts to both clamps.
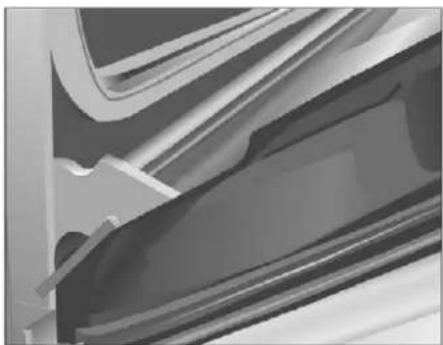
natural_image
Close-up of architectural or mechanical components with curved and layered surfaces (no visible text or symbols)④ Grab the door on both sides. Pull the door until they unhinge completely

In order to put the door back in its place, you should reverse the above actions.
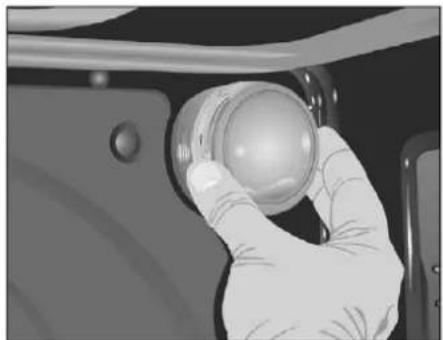
CHANGING THE LIGHT BULB
ATTENTION! Before changing the light bulb, you must unplug the oven from the power supply.
Unscrew the guard at the base of the lamp.
●change the light bulb and put the guard back on.
The light bulb should withstand temperatures up to 300°C.
natural_image
Close-up of a gloved hand holding a circular mechanical component (no visible text or symbols)Problem solving
The oven is not working:
Check whether the oven is plugged in.
- check fuses and limiter in your wiring.
Make sure which clock mode is on (override or programming).
Check set mode and temperature.
The inner lamp is not working:
change the light bulb.
Check if it was properly installed according to this instruction manual.
Heat indicator is not working:
●elect temperature.
Select mode.
The indicator should be on, only if the oven is heating up to a selected working temperature.
Smoke is coming out of the oven:
is possible when using the oven for the first time.
The oven should be cleaned once in a while.
Reduce the amount of grease or oil on the tin.
Do not use higher temperature ranges than given in the mode tables of this instruction manual.
The dishes are undercooked:
Use the mode tables of the oven to determine the right the appropriate combination of dishes, modes and temperatures.
ATTENTION! If despite the above tips, the problem persists, you should contact our Authorized Service Center.
Tips and tables
| STARTERS WEIGHT OVEN LEVEL OVEN MODE TEMP. TIME CONTAINER | ||||||
| Baked rice | 0,35 1 | 180-200 45-50 | Shallow, heatproof dish | |||
| 170-190 35-40 | ||||||
| Pasty | 1,5 | 3 | 170-190 45-50 | Tin | ||
| 2 | 160-180 30-35 | |||||
| Vegetable Pastry | 1 | 2 | 190-210 35-40 | Shallow dish | ||
| 170-190 30-35 | ||||||
| Vegetable Pie | 1,5 2 | 190-210 55-60 | Shallow dish | |||
| 170-190 45-50 | ||||||
| 170-190 50-55 | ||||||
| Baked potatoes | 1 | 3 | 180-200 60-65 | Tin | ||
| 180-200 50-55 | ||||||
| Pizza | 0,65 | 3 | 190-210 20-25 | Ruszt | ||
| 2 | 170-190 15-20 | |||||
| Quiche | 1,5 2 | 180-200 45-50 | Form for Quiche | |||
| 160-180 45-50 | ||||||
| Stuffed tomatoes | 0,75 | 3 170-190 10-15 | Tin | |||
| 2 | 160-180 10-15 | |||||
| FISH WEIGHT OVEN LEVEL OVEN MODE TEMP. TIME CONTAINER | ||||||
| Red bream | 1,5 3 | 180-200 30-35 | Tin | |||
| 170-190 25-30 | ||||||
| Salted dorado | 1 | 3 | 190-210 25-30 | Tin | ||
| 180-200 25-30 | ||||||
| Fish pastry | 1 | 2 | 190-210 30-35 | Gratin dish | ||
| 180-200 30-35 | ||||||
| Sole | 1 | 3 | 170-190 15-20 | Tin | ||
| 160-180 10-15 | ||||||
| Sea-bass | 1 | 3 | 190-210 20-25 | Tin | ||
| 180-200 15-20 | ||||||
| Hake | 1,5 3 | 190-210 25-30 | Tin | |||
| 180-200 20-25 | ||||||
| 180-200 20-25 | ||||||
| Salmon wrapped in greased paper | 1 | 3 | 180-200 20-25 | Tin | ||
| 170-190 15-20 | ||||||
| Trout | 1 | 2 | 190-210 20-25 | Tin | ||
| 180-200 15-20 | ||||||
| MEAT WEIGHT OVEN LEVEL OVEN MODE TEMP. TIME CONTAINER | ||||||
| Suckling pig | 2 | 3 | 190-210 75-85 | Tin | ||
| 170-190 65-75 | ||||||
| 180-200 80-85 | ||||||
| Rabbit | 1,5 3 | 180-200 60-65 | Tin | |||
| 160-180 45-50 | ||||||
| 170-190 45-50 | ||||||
| Lamb | 1,5 3 | 190-210 50-55 | Tin | |||
| 170-190 45-50 | ||||||
| 180-200 50-55 | ||||||
| Roast | 1,5 3 | 170-190 35-40 | Gratin dish | |||
| 160-180 30-35 | ||||||
| 170-190 30-35 | ||||||
| Salted pork loin | 1 | 3 | 170-190 40-45 | Tin | ||
| 160-180 30-35 | ||||||
| 170-190 30-35 | ||||||
| Chicken | 1,5 3 | 190-210 50-55 | Tin | |||
| 170-190 45-50 | ||||||
| Roast beef | 1 | 3 | 190-210 35-40 | Tin | ||
| 170-190 30-35 | ||||||
| 180-200 35-40 | ||||||
| Beef steak | 1 | 3 | 180-200 35-40 | Tin | ||
| 160-180 30-35 | ||||||
| CAKES & DESSERTS WEIGHT OVEN LEVEL OVEN MODE TEMP. TIME CONTAINER | ||||||
| Sponge cake | 0,5 2 | 170-190 35-40 | Cake tin | |||
| 160-180 30-35 | ||||||
| Cake roll | 0,3 3 | 170-190 10-15 | Tin | |||
| 160-180 10-15 | ||||||
| Flan | 0,5 | 1 | 160-170 60-65 | Bread tin | ||
| 2 | 160-170 55-60 | |||||
| Cookies | 0,5 3 | 160-180 20-25 | Tin | |||
| 150-170 15-20 | ||||||
| Vol-au-vent | 0,25 3 | 170-190 15-20 | Tin | |||
| 170-180 15-20 | ||||||
| Cupcakes | 0,5 2 | 160-180 25-30 | Tin | |||
| 150-170 25-30 | ||||||
| Baked apples | 1 | 3 | 180-200 35-40 | Tin | ||
| 170-190 30-35 | ||||||
| Baked bananas | 0,5 3 | 170-190 15-20 | Gratin dish | |||
| 170-190 10-15 | ||||||
| French pastry | 0,25 2 | 180-200 20-25 | Tin | |||
| 170-190 20-25 | ||||||
| Plum tarts | 0,5 2 | 170-190 60-65 | Cake tin | |||
| 160-180 50-55 | ||||||
| Apple pies | 1 | 2 | 170-190 50-55 | Tin | ||
| 160-180 45-50 | ||||||
| Cheese cakes | 1 | 2 | 180-200 45-50 | Cake tin | ||
| 170-190 35-40 | ||||||
Ecology – keeping it green
Everyone may contribute to saving the environment. It is neither hard nor expensive. All you need to do is:
Hand over the cardboard box for recycling.
When throwing polyethylene (PE) bags out, make sure to use plastic waste containers.
Hand over the used device to a waste disposal center, as it may contain elements hazardous to the environment.

Do not throw out the device together with the rest of the waste!!!
Packaging materials may be hazardous for children!
Please visit a recycling point to dispose of the packaging or the device. The power cable should be cut off and the door lock destroyed.
The cardboard box is produced from recycled paper and should be handed over for recycling.
By making sure the product was properly removed, you help to prevent any negative effects that may be hazardous to the environment or human health caused by improper waste management of the product.
For further information on recycling of our product, please contact your local government or waste disposal company.
The manufacturer/importer does not accept any liability for any damages resulting from unintended use or improper handling.
The manufacturer/importer reserves his rights to modify the product any time in order to adjust it to law regulations, norms, directives, or due to construction, trade, aesthetic or other reasons, without notifying in advance.
- Funkcje piekarnika
- Funkce trouby
- MYTÍ VNĚJŠÍCH STĚN TROUBY A PŘÍSLUŠENSTVÍ
- Řešení problémů
- Trouba nefunguje
- Funkcie rúry
- UMÝVANIE VONKAJŠÍCH STIEN RÚRY A PRÍDAVNÝCH ZARIADENÍ
- VÝMENA ŽIAROVKY VO VNÚTRI RÚRY
- Riešenie problémov
- Rúra nepracuje
- A sütő funkciói
- Problémamegoldás
- A sütö nem működik
- CURĂTAREA PERETILOR EXTERIORI AI CUPTORULUI ȘI A ACCESORIILOR
- Rezolvarea problemolor
- Функции духовки
- Решение проблем
- Духовка не работает
- Функции на фурната
- Функції духовки
- Вирішення проблем
- Духовка не працює
- Safety instructions
- Construction and design
- Control panel
- Oven modes
- Technical data
- Installation
- ATTENTION:
- 3
- ATTENTION! The producer cannot be held responsible for any damages that occur due to improper installation or misuse of the oven.
- Power supply
- Using the oven
- SETTING THE TIME
- OVERRIDE
- PROGRAMMING THE CLOCK MODE
- WARNING MODES
- GRILLING TIME
- GRILLING TIME END
- DURATION TIME AND AUTOMATIC SHUTDOWN
- Cleaning and maintenance
- REMOVING SUPPORTING FRAMES AND FLAT PANEL FRAMES
- CLEANING OVEN OUTER WALLS AND ACCESSORIES
- CLEANING OVEN DOORS
- CHANGING THE LIGHT BULB
- Problem solving
- Ecology – keeping it green
- Do not throw out the device together with the rest of the waste!!!
Brand : Zelmer
Model : ZME9021EE
Category : Oven