BOT68MXD - Built-in oven THOMSON - Free user manual and instructions
Find the device manual for free BOT68MXD THOMSON in PDF.
| Product type | Built-in oven |
| Brand | THOMSON |
| Model | BOT68MXD |
| Control type | Touch with digital programmer |
| Cooking functions | Convection, Combined heat, Eco, Pulse grill, Keep warm, Defrost, Bread |
| Automatic function | Easy Cook with 12 preset dishes |
| Programmer | Immediate cooking, programmed (immediate or delayed start), independent timer |
| Temperature ranges | Convection: 35°C – 235°C; Combined heat: 35°C – 275°C; Eco: 35°C – 275°C; Pulse grill: 180°C – 230°C; Keep warm: 35°C – 100°C; Defrost: 30°C – 50°C; Bread: 35°C – 275°C |
| Number of levels | Multiple (indicated in the programmer) |
| Supplied accessories | 2 safety grids with handle, 1 grid for 45 mm dish, 1 grid for 20 mm dish, drip tray |
| Child safety | Key lock |
| Indicators | Temperature rise, lock, timer, duration and end of cooking |
| Heating type | Upper, lower and bottom heating elements, with air stirring fan |
| Sound level | Audible beeps for validation, end of cooking and timer |
| Manual | PDF format, 60 pages, available in French |
Frequently Asked Questions - BOT68MXD THOMSON
User questions about BOT68MXD THOMSON
0 question about this device. Answer the ones you know or ask your own.
Ask a new question about this device
Download the instructions for your Built-in oven in PDF format for free! Find your manual BOT68MXD - THOMSON and take your electronic device back in hand. On this page are published all the documents necessary for the use of your device. BOT68MXD by THOMSON.
USER MANUAL BOT68MXD THOMSON
FR 2 / UTILISATION DE VOTRE APPAREIL
• UTILISATION DE LA FONCTION MINUTERIE

2 / UTILISATION DE VOTRE APPAREIL
FR
• LA FONCTION "EASY COOK"
You have just acquired a THOMSON oven and we would like to thank you.
Our research teams have created this new generation of appliances for you. Their quality, appearance, functions and technological advances make them exceptional products, showcases of our unique know-how.
Your new THOMSON oven will blend harmoniously into your kitchen and perfectly combine cooking performance and ease of use. We wanted to offer you a product of excellence.
In the line of THOMSON products, you will also find a wide range of microwave ovens, steamers, hobs, ventilation hoods, dishwashers, washing machines, laundry dryers, refrigerators and freezers, all of which can be built in and coordinated with your new THOMSON oven.
Of course, in an ongoing effort to better satisfy your demands with regard to our products, our after-sales service department is at your disposal and ready to listen in order to respond to all of your questions and suggestions.
THOMSON
As part of our commitment to constantly improving our products, we reserve the right to make changes to them based on advances to their technical, functional and/or aesthetic properties.
Important: Before instal
Before installing and using your appliance, please read this Installation and Usage Guide carefully, as it will allow you to quickly familiarise yourself with its operation.
TABLE OF CONTENTS
EN
1 / DESCRIPTION OF YOUR APPLIANCE
- Introduction to your oven 4
- Accessories 5
- Introduction to the programmer 6
- Introduction to the selection buttons ____ 7
2 / USING YOUR APPLIANCE
- Using the programmer
- How to set the time ____ 8
- Immediate cooking ____ 9
- Programmed cooking - Immediate start ____ 10 - Delayed start ____ 11
- Using the timer function 12
- Personalising the recommended temperature ____ 13
- Locking the controls 13
- “EASY COOK.” Function - Immediate start ____ 14 - Delayed start ____ 15
3 / GUIDE TO EASY COOK FUNCTIONS 16
4 / OVEN COOKING MODES 18
5 / NOTES 20
EN 1 / DESCRIPTION OF YOUR APPLIANCE
• INTRODUCTION TO YOUR OVEN
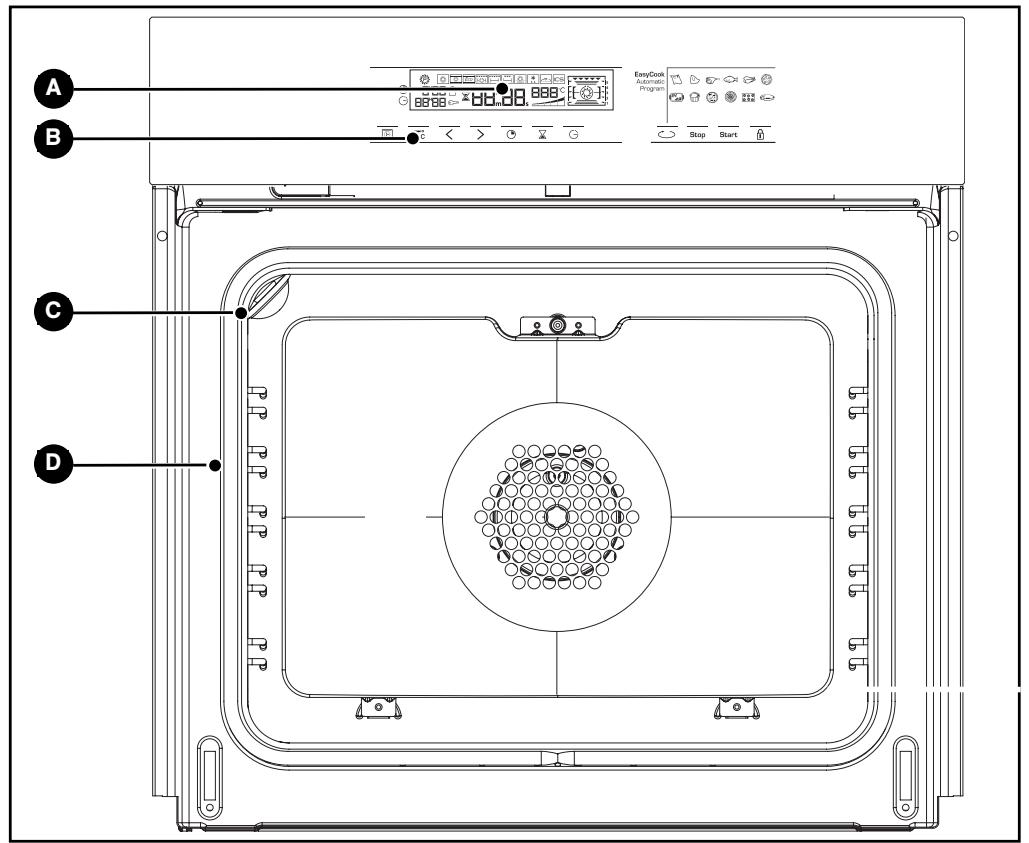
A Programmer
D Wire shelf supports
B Control buttons
C Lamp
1 / DESCRIPTION OF YOUR APPLIANCE
EN
- Accessories
Your appliance is equipped with 2 safety grids with handles and 2 baking trays, 20 and 45 millimetres high.
EN 1 / DESCRIPTION OF YOUR APPLIANCE
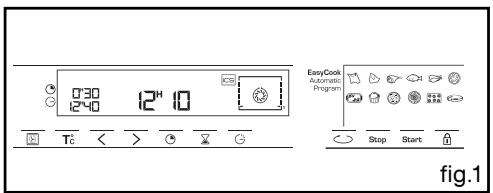
• INTRODUCTION TO THE PROGRAMMER
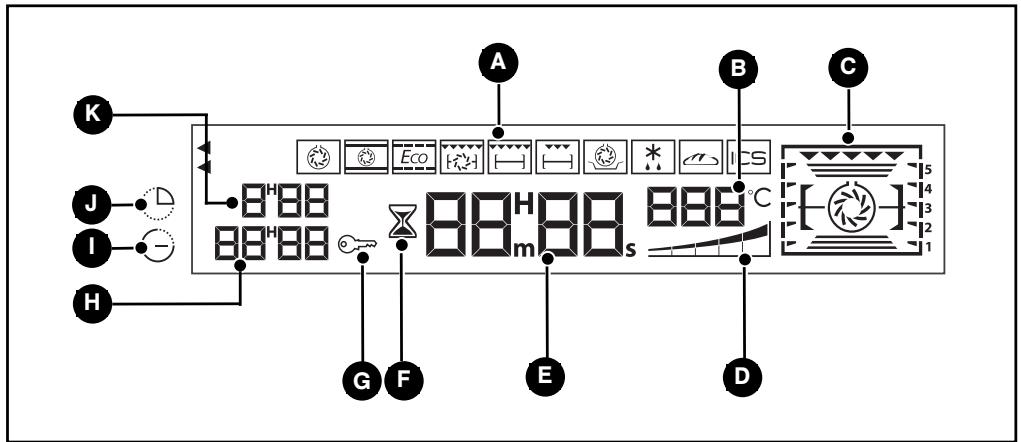
A Cooking modes display
B Oven temperature display
C Shelf support indicator and selected cooking mode indicator.
D Temperature rise indicator
E Clock or timer display
F Timer indicator
G Control panel lock indicator (child safety device).
H Cooking end time display
Cooking end time indicator
J Cooking time indicator
K Cooking time display
1 / DESCRIPTION OF YOUR APPLIANCE
EN
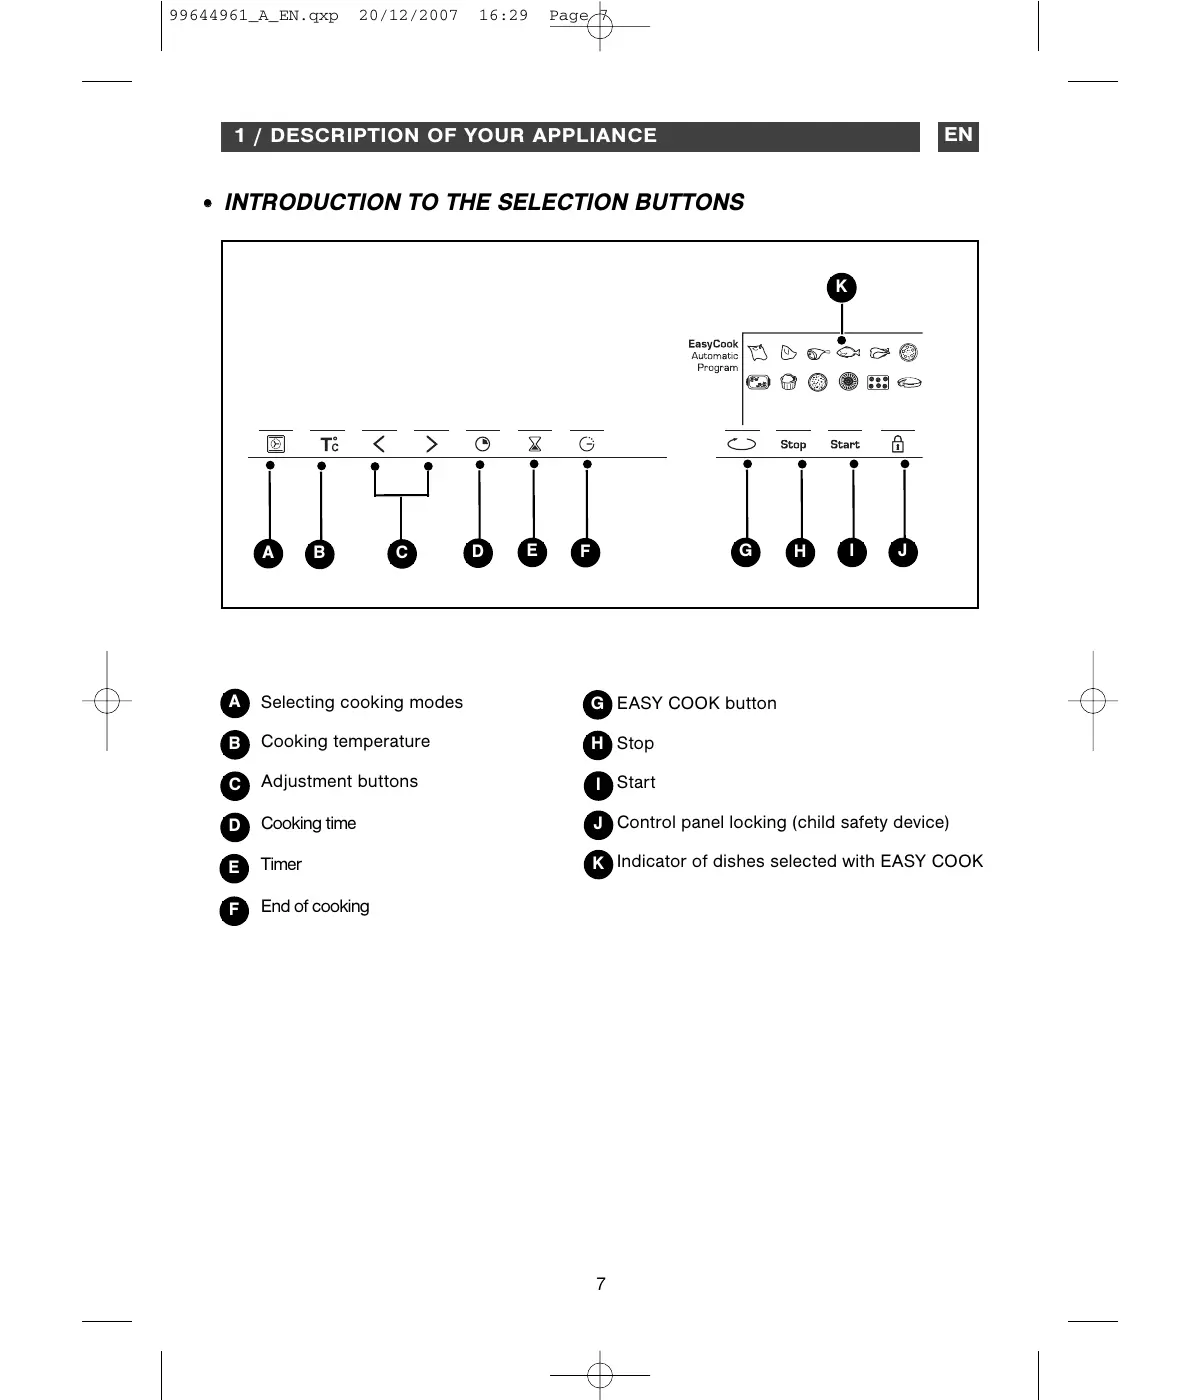
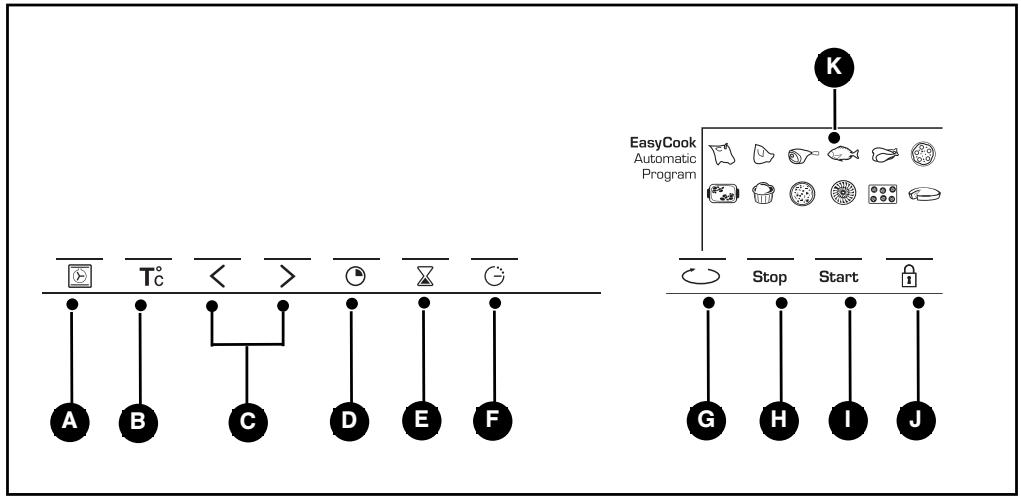
- INTRODUCTION TO THE SELECTION BUTTONS
flowchart
graph TD
    A["A"] --> Tc["Tc"]
    B["B"] --> Tc
    C["C"] --> Tc
    D["D"] --> Tc
    E["E"] --> Tc
    F["F"] --> Tc
    K["K"] --> EasyCook["EasyCook Automatic Program"]
    EasyCook --> Stop["Stop"]
    EasyCook --> Start["Start"]
    Stop --> G["G"]
    Stop --> H["H"]
    Stop --> I["I"]
    Stop --> J["J"]
A Selecting cooking modes
B Cooking temperature
Adjustment buttons
D Cooking time
E Timer
F End of cooking
G EASY COOK button
H Stop
I Start
J Control panel locking (child safety device)
K Indicator of dishes selected with EASY COOK
EN 2 / USING YOUR APPLIANCE
• USING THE PROGRAMMER
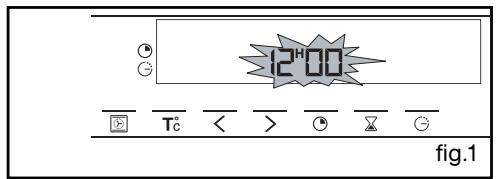
• How to set the time
- When plugged in
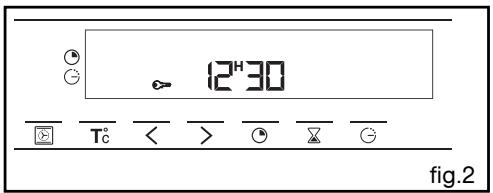
The displays flashes 12:00 (fig.1).
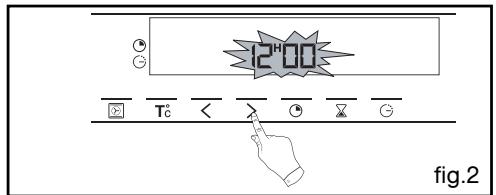
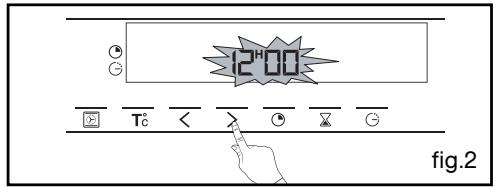
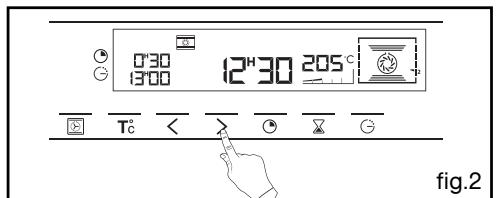
Set the time by pressing the < or > buttons (holding your finger on the button allows you to scroll through the numbers rapidly) (fig.2).
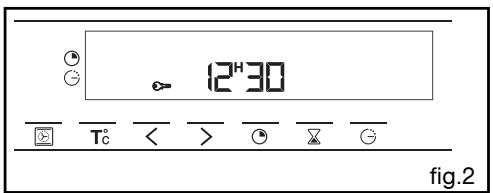
Example: 12:30
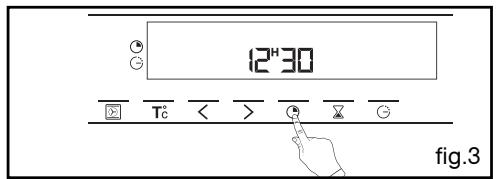
Press the ⏻ button to confirm. The display stops flashing (fig.3).
- To set the time on the clock
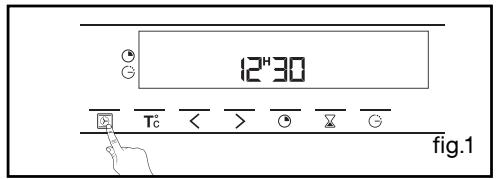
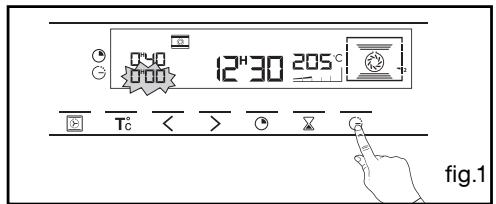
Press and hold the “☐” button for a few seconds until the display is flashing (fig.1), then release.
Audible beeps indicate that it is now possible to set the time.
Adjust the clock setting with the < and > buttons (fig.2).
Press the Ⓓ button to confirm.

Warning
If there is no confirmation from the “clock” button, the time is recorded automatically after a few seconds.
2 / USING YOUR APPLIANCE
EN
- Immediate cooking
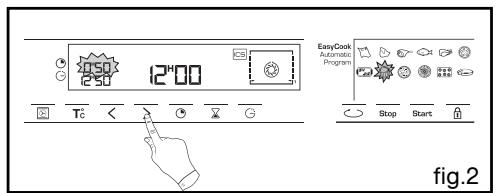
– The programmer should display only the time. It should not be flashing.
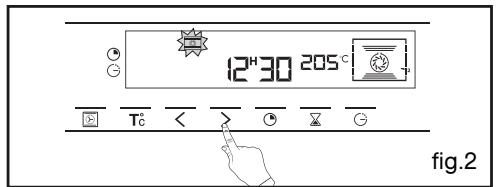
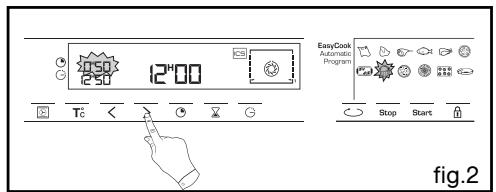
Press the 📊 button (fig.1) then select your cooking programme using < or > (fig.2).
Example: ➞ shelf support 2 recommended.
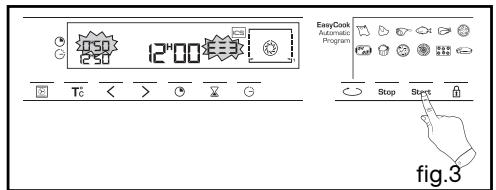
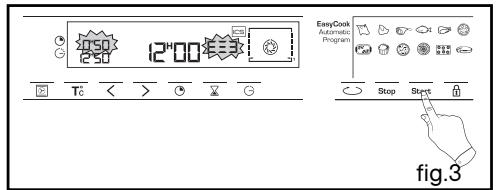
- Confirm with the button "Start" (fig.3).
The indicator for cooking programme and recommended temperature freeze. The shelf support indicator and the working elements appear.
The oven begins heating.
Place your dish in the oven based on the recommendation shown in the display.
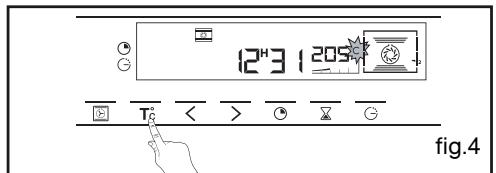
Your oven recommends the optimal temperature for the chosen cooking mode.
Hower, you can still adjust the temperature by pressing the "T°C" button under the display (fig.4).
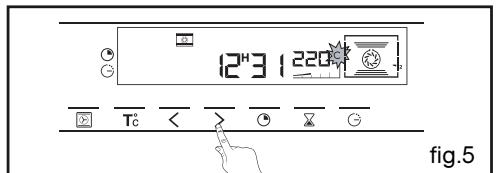
The “°C” flashes in the display to indicate that you can adjust the temperature by pressing the < or > buttons (fig.5).
Example: → set to 220°C.
- Confirm with the "Start" button.
The temperature rise indicator indicates the temperature increase in the oven.
A series of beeps will sound when the oven reaches the selected temperature.
To stop cooking, press and hold the "Stop" button for a few seconds.
flowchart
graph TD
    A["Start"] --> B["Stop"]
    B --> C["Stop"]
    C --> D["Stop"]
    D --> E["Stop"]
    E --> F["Stop"]
    F --> G["Stop"]
    G --> H["Stop"]
    H --> I["Stop"]
    I --> J["Stop"]
    J --> K["Stop"]
    K --> L["Stop"]
    L --> M["Stop"]
    M --> N["Stop"]
    N --> O["Stop"]
    O --> P["Stop"]
    P --> Q["Stop"]
    Q --> R["Stop"]
    R --> S["Stop"]
    S --> T["Stop"]
    T --> U["Stop"]
    U --> V["Stop"]
    V --> W["Stop"]
    W --> X["Stop"]
    X --> Y["Stop"]
    Y --> Z["Stop"]
    Z --> AA["Stop"]
    AA --> AB["Stop"]
    AB --> AC["Stop"]
    AC --> AD["Stop"]
    AD --> AE["Stop"]
    AE --> AF["Stop"]
    AF --> AG["Stop"]
    AG --> AH["Stop"]
    AH --> AI["Stop"]
    AI --> AJ["Stop"]
    AJ --> AK["Stop"]
    AK --> AL["Stop"]
    AL --> AM["Stop"]
    AM --> AN["Stop"]
    AN --> AO["Stop"]
    AO --> AP["Stop"]
    AP --> AQ["Stop"]
    AQ --> AR["Stop"]
    AR --> AS["Stop"]
    AS --> AT["Stop"]
    AT --> AU["Stop"]
    AU --> AV["Stop"]
    AV --> AW["Stop"]
    AW --> AX["Stop"]
    AX --> AY["Stop"]
Warning
After a cooking cycle, the cooling fan continues to operate for a period of time in order to guarantee optimal oven reliability.
Warning
All types of cooking are done with the door closed.
EN 2 / USING YOUR APPLIANCE
• PROGRAMMED COOKING
- Cooking with immediate start and programmed duration
- Select the desired cooking mode and adjust the temperature (see paragraph: immediate cooking).
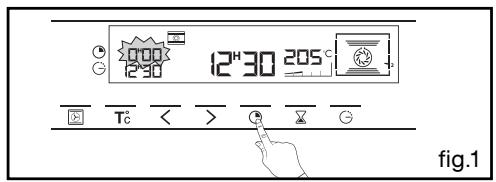
- Press the ⏻ button until the cooking time indicator starts to flash ⏻.
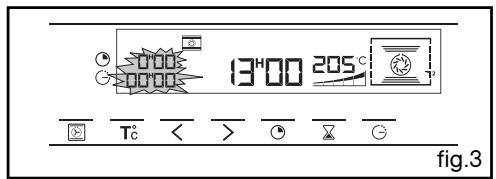
The display flashes 0:00 to indicate that you can now adjust the setting (fig.1).
- Press the < or > buttons to set the desired time.
Example: 30 mins cooking time (fig.2).
The cooking time is recorded automatically after several seconds or alternatively, confirm by pressing the "Start" button.
The cooking time display stops flashing.
The countdown of the cooking time begins immediately after it has been set.
After these three steps, the oven heats up:
A series of beeps will sound when the oven reaches the selected temperature.
At the end of cooking (end of programmed time),
- the oven turns off;
- the cooking time indicator and 00:00 both flash (fig.3),
- a series of beeps sounds for a few minutes.
The beeping can be stopped by pressing "Stop".
2 / USING YOUR APPLIANCE
EN
• PROGRAMMED COOKING
- Cooking with delayed start and chosen cooking end time
Proceed as with programmed cooking.
- Press the ⏻ button until the cooking end time indicator starts to flash ⏻.
The display flashes to indicate that you can now adjust the setting (fig.1).
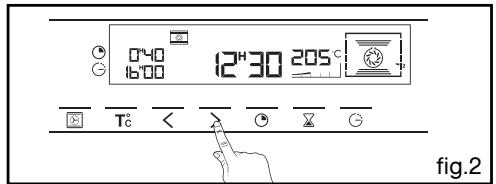
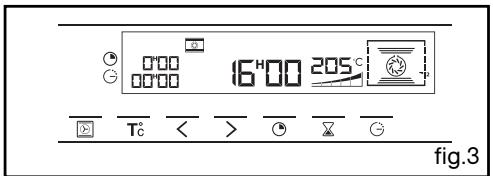
- Press the < or > button to set the desired cooking end time. Example: end of cooking at 16:00 (fig.2).
The cooking end time is recorded automatically after a few seconds or alternatively, valide by pressing the "Start" button.
The cooking end time display stops flashing.
After these 3 steps, the oven heating is delayed so that cooking ends at 16:00.
At the end of cooking (end of programmed time),
- the oven turns off,
- the cooking time indicator and 0:00 both flash (fig.3),
- a series of beeps sounds for a few minutes. The beeping can be stopped by pressing "Stop".
The display returns to the time of day.
In the case of programmed cooking cycles, the cavity lights up until cooking begins, and remains lit until cooking is finished.
EN 2 / USING YOUR APPLIANCE
• USING THE TIMER FUNCTION
- Your oven's programmer can be used as an independent timer that allows you to count down a time without operating the oven.
In this case, the timer display has priority over the clock display.
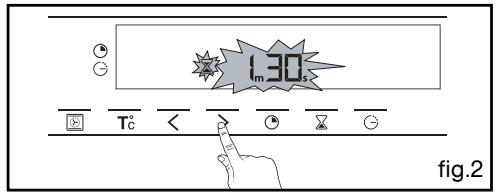
- Press the ☒ button (fig.1).
The ☒ time symbol and 0m00s flash in the display.
- Adjust the chosen time by pressing the < or > buttons (fig.2).
- Press the “☒” button to confirm, or wait for a few seconds.
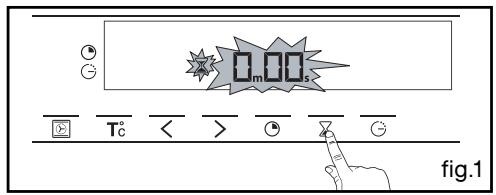
The display stops flashing after a few seconds and the timer starts working, counting down the time in seconds.
Once the time has expired, the timer emits a series of beeps to notify you.
The beeping can be stopped by pressing "Stop".
The display returns to the time of day.
Warning
It is possible to change or cancel the timer at any time.
2 / USING YOUR APPLIANCE
EN
• PERSONALISING THE RECOMMENDED TEMPERATURE
Select the cooking function.
- Press Start.
If you wish to customise the recommended temperature:
- Press the °C button until the temperature display begins flashing.
- Press the < or > button until the desired temperature appears.
- Press Start to confirm.
You have the option of preventing access to the oven controls by taking the following steps:
when the oven is off press the ⏻ button for a few seconds (fig.1),
a "key" appears in the display -> access to your controls is locked (fig.2).
To unlock access, press on the ⏻ button for a few seconds.
The oven controls are once again accessible.
flowchart
graph TD
    A["EasyCook Automatic Program"] --> B["STOP"]
    A --> C["START"]
    B --> D["Hand icon"]
    C --> E["Hand icon"]
Warning You canno
You cannot lock the oven if you have programmed a cooking cycle.
EN 2 / USING YOUR APPLIANCE
- "EASY COOK" FUNCTION
The EASY COOK function will completely simplify cooking for you because the oven will automatically calculate all the cooking parameters (temperature, cooking time, cooking mode) based on the selected dish thanks to its electronic sensors located in the oven that constantly measure the moisture level and temperature variations.
OPERATING THE EASY COOK FUNCTION:
This cooking mode takes place in two phases:
1) a data search phase during which the oven begins heating and determines the ideal cooking time. This phase lasts between 5 and 40 minutes depending on the dish.
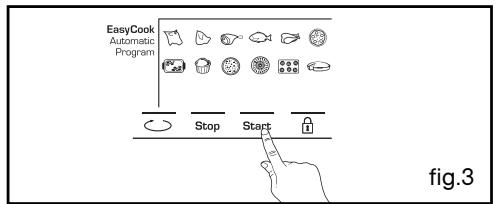
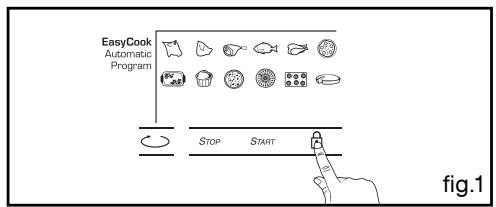
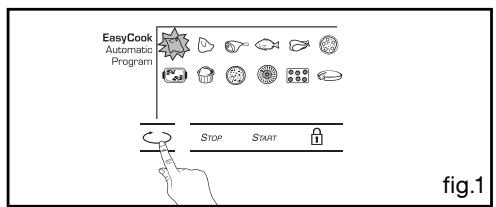
- Press the "EASY COOK" button (fig.1).
The overn offers a choice of 12 dishes:
- Press the < or > button to select your dish (fig.2).
Example: Soufflés

- Roast beef
- Pork roast
· Lamb - Fish
- Chicken
- Pizza
- Stuffed vegetables
- Soufflés
- Savoury tarts
· Pies - Small biscuits
- Cakes
One you have selected your dish, slide it into the oven at the shelf support requested.
- Confirm by pressing the Start button to start cooking (fig.3).
2 / USING YOUR APPLIANCE
EN
- "EASY COOK" FUNCTION
N.B.: No preheating is required to use the EASY COOK function. Cooking ABSOLUTELY must begin in a cool oven. It is useful to wait for your oven to cool down completely before starting a second cooking programme, if not, it will start beeping to indicate that the oven is hot.
IMPORTANT: Do not open the door during this phase or you may disturb the recording of data.
This data search phase is symbolised by rotating arrows.
2) a second cooking phase: The oven has determined the time required and displays it, along with the cooking end time. The remaining cooking time indicated takes into account the cooking time from the first phase. You can now open the door (e.g. to baste a roast).
- The oven turns itself off when the cooking time has ended.
DELAYED START FUNCTION:
To program a delayed start,
- Press the ⏻ button until the indicator starts flashing ⏻ and change the hour for the cooking end time.
PLEASE NOTE: If you want to programme a subsequent EASY COOK cooking cycle, wait until the oven has cooled completely. However, you can use the "Manual" function even if the oven is hot.
EN 3 / GUIDE TO EASY COOK FUNCTIONS
 | Roast Beef | • Roast beef (prepared rare) ▲ Place the roast on the grid using the grid + drip tray assembly. You can turn it over when the cooking time becomes fixed. |
 | Roast Pork | • Pork roasts - Loin - Tenderloi |
 | Lamb | • Leg of 1kg to 2,5kg ▲ Place the roast on the grid using the grid + drip tray assembly. You can turn it over when the cooking time becomes fixed. |
 | Fish | • Whole fish (sea bream, pollock, trout, mackerel, etc.) • Roasted fish |
 | Chicken | • Chickens weighing 1 to 1.7 kg • Duck, guinea fowl, etc. |
 | Pizza | • Fresh store-bought pizza • Ready-to-use pizza dough • Home-made pizza dough • Frozen pizza |
 | Vegetables stuffed | • Tomatoes, stuffed peppers & vegetables • Lasagna (fresh or frozen) • Shepherd's pie, brandade, etc. |
 | Soufflé | • Use a tall mould with straight edges and a diameter of 21cm. |
 | Tarts (savoury) | • Fresh quiches • Frozen quiches • Frozen mini-pastry |
 | Tarts (sweet) | • Fresh tarts • Frozen tarts |
 | Small Biscuits | • Small individual pastries: cookies, croissants, buns, fruit bread in a mould, croque-monsieur. |
 | Cakes | • Home-style cakes: sweet or savoury loaves, pound cake. • Ready-to-mix batters in packets. |
3 / GUIDE TO EASY COOK FUNCTIONS
EN
• Take the roast out of the refrigerator at least one hour before starting the cooking programme:
- If you prefer meat rare; if you prefer it well done, opt for a traditional cooking function.
- Trim away as much fat as possible: it causes smoke.
- At the end of cooking, allow the meat to sit for 7 to 10 minutes wrapped in a sheet of aluminium foil before carving.
• Take the roast out of the refrigerator at least one hour before starting the cooking programme: the colder the meat is, the closer it will be to the end of cooking.
- Use an earthenware dish. Add one to two tablespoons of water.
- At the end of cooking, allow the meat to sit for 7 to 10 minutes wrapped in a sheet of aluminium foil before carving. Add salt when cooking is finished.
• Take the meat out of the refrigerator at least one hour before starting the cooking programme:
- Select a leg that is round and plump rather than long and lean.
- Wrap the meat in aluminium and let it sit after cooking.
- Use this function only for whole fish cooked with herbs and white wine. (Grilled fish or papillote preparations require that the oven be preheated.)
- Cooking in a dish: Opt for earthenware dishes to avoid splattering.
- Pierce the skin of poultry to avoid splattering.
- Place it on the grid for a crispy crust (you can place a sheet of parchment paper between the grid and the pizza to protect the oven from cheese drippings).
- Place the pizza on the baking tray for a soft crust.
- Properly adjust the dimensions of the dish to the quantity of food to be cooked to avoid juices spilling over.
- Butter the mould and do not touch the inside with your fingers or the soufflé will not rise.
- Use a non-stick aluminium mould: the crust will be crispy on the bottom.
- Remove the tray from frozen quiches before placing them on the grid.
- Use a non-stick aluminium mould:
- The crust will be crispy on the bottom.
- Small individual cakes made on a pastry tray and placed on the grid.
puff pastry must be cooked on "CAKES" to achieve good results.
- Cakes made in a cake mould, round, square... and always placed on the grid. It is possible to place two cake moulds side by side.

EN 4 / OVEN COOKING MODES


CIRCULATING HEAT
(recommended temperature 180°C min 35°C max 235°C)
- Cooking controlled by the heating element located at the back of the oven and by the fan.
- Rapid temperature increase: Some dishes can be placed in the oven while it is still cold.
- Recommended for keeping white meat, fish and vegetables moist.
For cooking multiple items on up to.3 levels.

COMBINED HEAT
(recommended temperature 205^ C min 35^ C max 275^ C)
- Cooking controlled by the upper and lower heating elements and by the fans.
- Three combined sources of heat: a lot of heat from the bottom, a little circulating heat and a bit from the grill.
- Recommended for quiches, pies, wet fruit tarts, placed preferable on an earthenware dish.


ECO
(recommended temperature 200^ C min 35^ C max 275^ C)
- Cooking controlled by the upper and lower heating elements.
- This position allows for energy savings while preserving the quality of the cooking.
- The ECO position is used for energy label performance.
- All types of cooking are done without preheating.

FAN GRILL
(recommended temperature 200°C min 180°C max 230°C)
- Cooking controlled, alternately, by the upper element and by the fan.
- Preheating is unnecessary. Roasts and poultry are juicy and crispy all over.
- Slide the drip tray onto the bottom shelf support.

KEEPING THINGS WARM
(recommended temperature 80^ C min 35^ C max 100^ C)
- This position allows you to keep your dishes hot by occasional heating from the bottom of the oven along with the fan.
- Recommended for letting dough rise for bread, brioche, kugelhopf...without exceeding 40°C (plate warming, defrosting).
(recommended temperature 30^ C min 30^ C max 50^ C)
- Dishes are defrosted by a limited amount of heat and the fan.
- Ideal for delicate dishes (fruit tart, custard pie, etc).
- Meat, buns, etc, are defrosted at 50°C (meat should be placed under the grill with a dish underneath to catch drips from the defrosting which are not edible).

BREAD
(recommended temperature 205°C min 35°C max 275°C)
- Cooking sequence recommended for baking bread.
- After preheating, place the ball of dough on the pasty dish - 2nd shelf.
- Do not forget to place a ramekin of water on the bottom to get a crispy, shiny crust.
EN 5/ NOTES
99644961 12/07
THOMSON
Achtung Bei progra
OBER- UND UNTERHITZE (ECO)
(empfohlene Temperatur 200°C, mindestens 35°C, maximal 275°C)