
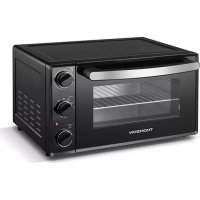
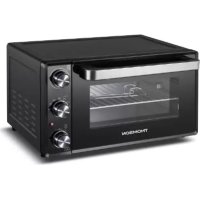
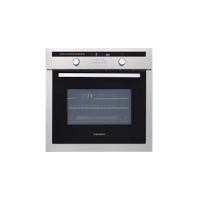
TMFP72BXFOUR - Built-in oven THOMSON - Free user manual and instructions
Find the device manual for free TMFP72BXFOUR THOMSON in PDF.
| Product type | Built-in oven |
| Brand | THOMSON |
| Model | TMFP72BX |
| External dimensions (W x D x H) | 595 x 546 x 596 mm |
| Built-in compartment dimensions (W x D x H) | 560 x 590 x 550 mm |
| Net weight | 37.8 kg |
| Capacity | 72 liters |
| Power supply | 220-240 V ~ 50-60 Hz |
| Maximum power | 3.2 kW |
| Energy class | A+ |
| Energy consumption (conventional mode) | 0.96 kWh/cycle |
| Energy consumption (fan-assisted) | 0.65 kWh/cycle |
| Cooking modes | Traditional, Convection, ECO, Traditional + fan, Radiant heat, Double grill + fan, Double grill, Pizza, Bottom heat, Defrost, Fermentation |
| Cleaning | Pyrolytic (self-cleaning) |
| Special functions | Timer, Child lock, Sabbath mode, Demonstration mode, Rapid preheat, End time setting |
| Included accessories | Metal rack, Baking tray |
| Interior lighting | Halogen lamp 25 W |
| Repairability | After-sales service: Darty (0 978 970 970) or Vanden Borre (+32 2 334 00 00) |
| Manufacturing | People's Republic of China |
Frequently Asked Questions - TMFP72BXFOUR THOMSON
User questions about TMFP72BXFOUR THOMSON
0 question about this device. Answer the ones you know or ask your own.
Ask a new question about this device
Download the instructions for your Built-in oven in PDF format for free! Find your manual TMFP72BXFOUR - THOMSON and take your electronic device back in hand. On this page are published all the documents necessary for the use of your device. TMFP72BXFOUR by THOMSON.
USER MANUAL TMFP72BXFOUR THOMSON
Hotline Darty France
IMPORTANT SAFETY INSTRUCTIONS 2
PRODUCT OVERVIEW 8
ACCESSORIES 10
Using the Accessories 10
Inserting the Accessories. 10
HEATING MODE 12
INSTALLATION 14
ELECTRICAL CONNECTION 17
BEFORE USING THE OVEN. 17
Setting the Time. 18
OPERATION 18
Cooking by setting the heating mode, temperature and duration. 18
Quick preheat. 19
Setting end time. 19
Timer 20
Childproof lock 20
Demo mode 20
Sabbath mode. 21
Interior lighting 21
ENERGY EFFICIENT USE 22
TIPS AND TRICKS 22
TYPICAL RECIPES 24
CLEANING AND MAINTENANCE 27
TROUBLESHOOTING 32
SPECIFICATIONS 34
DISPOSAL 35
PLEASE READ THE FOLLOWING SAFETY WARNINGS AND THE INSTRUCTIONS CAREFULLY BEFORE USING THE APPLIANCE AND KEEP FOR FUTURE REFERENCE.
WARNING
- This appliance is intended for domestic household use only and should not be used for any other purpose or in any other application, such as for non-domestic use or in a commercial environment.
- This appliance can be used by children ages from 8 years and above and persons with reduced physical, sensory or mental capabilities or lack of experience and knowledge if they have been given supervision or instruction concerning use of the appliance in a safe way and understand the hazards involved.
Children shall not play with the appliance.
Cleaning and user maintenance shall not be made by children without supervision.
- If the supply cord is damaged, it must be replaced by the manufacturer, its service agent or similarly qualified persons in order to avoid a hazard.
- The temperature of accessible surfaces may be high when the appliance is operating.
- During use the appliance becomes hot. Care should be taken to avoid touching heating elements inside the oven.
WARNING: The appliance and its accessible parts become hot during use. Care should be taken to avoid touching heating elements. Children less than 8 years of age shall be kept away unless continuously supervised. - Do not use harsh abrasive cleaners or sharp metal scrapers to clean the oven door glass since they can
scratch the surface which may result in shattering of the glass.
These surfaces can get hot.
- Excessive spillage must be removed before cleaning.
- Under such conditions, the surfaces may get hotter than usual and children should be kept away.
- Place the tray and wire rack at the same level on both sides, make sure they are in a horizontal and stable position.
- A steam cleaner is not to be used.
- WARNING: Ensure that the appliance is switched off before replacing the lamp to avoid the possibility of electric shock.
- The lamp inside the product is used for lighting of the product. This lamp is not suitable for household room illumination.
- The appliance must not be installed behind a decorative door in order to avoid overheating.
- The plug must be remained easily accessible after installation of the appliance.
- Regarding the instructions for all necessary spaces with dimensions, the method of fixing and how the appliance is to be fixed to its support, refer to the section "INSTALLATION".
- The means for disconnection must be incorporated in the fixed wiring in accordance with the wiring rules.
- The appliance shall be installed in accordance with national wiring regulations NF C 15-100.
-
Regarding the detailed instructions for the safe use of the appliance, the precautions during user maintenance and bulb replacement, refer to the sections "OPERATION" and "CLEANING AND MAINTENANCE".
-
Regarding the method of fixing and cables connection, refer to the section "ELECTRICAL CONNECTION".
- After each cooking cycle, the cooling fan will continue to run for a while to ensure quick cooling and safe operation of the oven.
- The door should preferably be closed in all cooking modes.
- Do not hang any cloth or garment to the handle of the oven.
- Do not line the oven's cavity with aluminium foil for easier cleaning: The oven may overheat and the enamel coating of the cavity may be damaged.
- The fixed wiring insulation must be protected, for example, by insulating sleeping having an appropriate temperature rating.
Only use this appliance indoors. The appliance must only be used for the preparation of food and drink. The appliance must be supervised during operation.
Always slide accessories into the cavity correctly.
Risk of electric shock!
- Incorrect repairs are dangerous. Repairs may only be carried out and damaged power cables replaced by one of our trained after-sales technicians. If the appliance is defective, unplug the appliance from the mains socket or switch off the circuit breaker in the fuse box.
- The cable insulation on electrical appliances may melt when touching hot parts of the appliance. Never bring electrical appliance cables into contact with hot parts of the appliance.
- Do not use any high-pressure cleaners or steam cleaners, which can result in an electric shock.
- A defective appliance may cause electric shock. Never switch on a defective appliance. Unplug the appliance from the mains socket or switch off the circuit breaker in the fuse box.
Risk of fire!
- Combustible items stored in the cavity may catch fire. Never store combustible items in the cavity. Never open the appliance door if there is smoke inside. Switch off the appliance and unplug it from the mains socket.
- A draught is created when the appliance door is opened. Greaseproof paper may come into contact with the heating element and catch fire. Do not place greaseproof paper loosely over accessories during preheating. Always weight down the greaseproof paper with a dish or a baking tin. Only cover the surface required with greaseproof paper. Greaseproof paper must not protrude over the accessories.
Risk of injury!
- Scratched glass in the appliance door may develop into a crack. Do not use a glass scraper, sharp or abrasive cleaning aids or detergents.
- The hinges on the appliance door move when opening and closing the door, and you may be trapped. Keep your hands away from the hinges.
Risk of burns!
- The appliance becomes very hot. Never touch the interior surfaces of the appliance or the heating elements.
- Always allow the appliance to cool down.
- Keep children at a safe distance.
- Accessories and ovenware become very hot. Always use oven gloves to remove accessories or ovenware from the cavity.
- Alcoholic vapors may catch fire in the hot cooking compartment. Never prepare food containing large
quantities of drinks with high alcohol content. Only use small quantities of drinks with high alcohol content. Open the appliance door with care.
Risk of scalding!
- The accessible parts become hot during operation. Never touch the hot parts. Keep children at a safe distance.
- When you open the appliance door, hot steam can escape. Steam may not be visible, depending on its temperature. When opening, do not stand too close to the appliance. Open the appliance door carefully. Keep children away.
- Water in a hot cavity may create hot steam. Never pour water into the hot cavity.
Hazard due to magnetism!
Permanent magnets are used in the control panel or in the control elements. They may affect electronic implants, e.g., heart pacemakers or insulin pumps. Wearers of electronic implants must stay at least 10 cm away from the control panel.
Causes of Damage
- Accessories, foil, greaseproof paper or ovenware on the cavity floor: do not place accessories on the cavity floor. Do not cover the cavity floor with any sort of foil or greaseproof paper. Do not place ovenware on the cavity floor if a temperature of over 50^ has been set. This will cause heat to accumulate. The enamel will be damaged.
- Aluminium foil: Aluminium foil in the cavity must not come into contact with the door glass. This could cause permanent discoloration of the door glass.
- Silicone pans: Do not use any silicone pans, or any mats,
covers or accessories that contain silicone. The oven sensor may be damaged.
- Water in a hot cooking compartment: do not pour water into the cavity when it is hot. This will cause steam. The temperature change can cause damage to the enamel.
- Moisture in the cavity: Over an extended period of time, moisture in the cavity may lead to corrosion. Allow the appliance to dry after use. Do not keep moist food in the closed cavity for extended periods of time. Do not store food in the cavity.
- Cooling with the appliance door open: Following operation at high temperatures, only allow the appliance to cool down with the door closed. Do not trap anything in the appliance door. Even if the door is only left open a crack, the front of nearby furniture may become damaged over time. Only leave the appliance to dry with the door open if a lot of moisture was produced while the oven was operating.
- Fruit juice: when baking particularly juicy fruit pies, do not pack the baking tray too generously. Fruit juice dripping from the baking tray leaves stains that cannot be removed. If possible, use the deeper universal pan.
- Extremely dirty seal: If the seal is very dirty, the appliance door will no longer close properly during operation. The fronts of adjacent units could be damaged. Always keep the seal clean.
- Appliance door as a seat, shelf or worktop: Do not sit on the appliance door or place or hang anything on it. Do not place any cookware or accessories on the appliance door.
- Inserting accessories: depending on the appliance model, accessories can scratch the door panel when closing the appliance door. Always insert the accessories into the cavity as far as they will go.
- Carrying the appliance: do not carry or hold the
appliance by the door handle. The door handle cannot support the weight of the appliance and could break.
- If you use the residual heat of the switched off oven to keep food warm, a high moisture content inside the cavity can occur. This may lead to condensation and can cause corrosion damage of your appliance. Avoid condensation by opening the door or use "Defrost" mode.
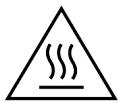
PRODUCT OVERVIEW
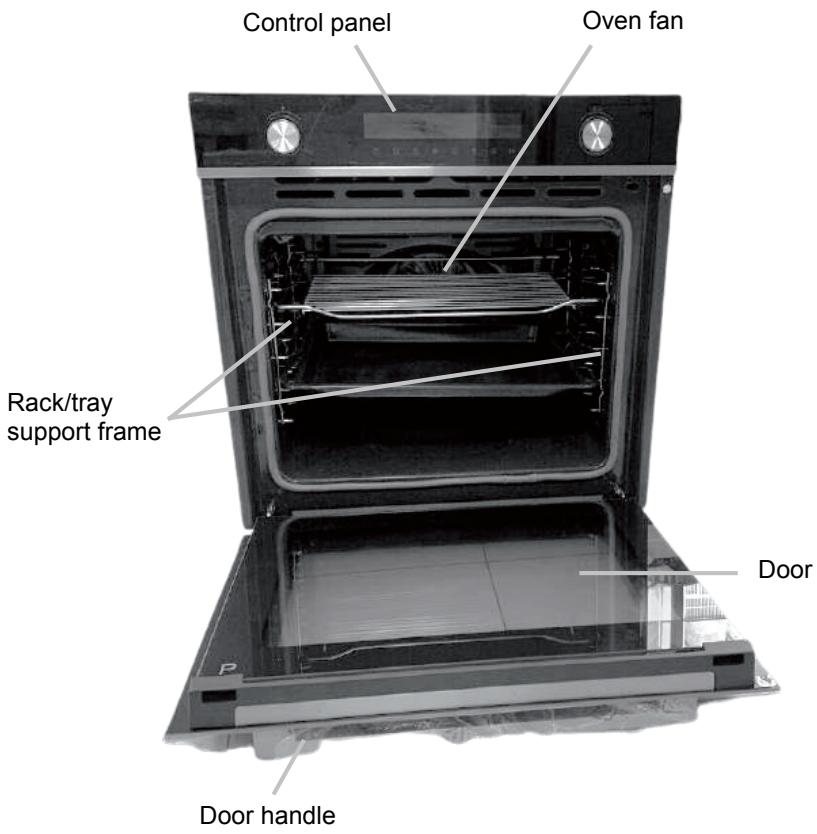
Control Panel
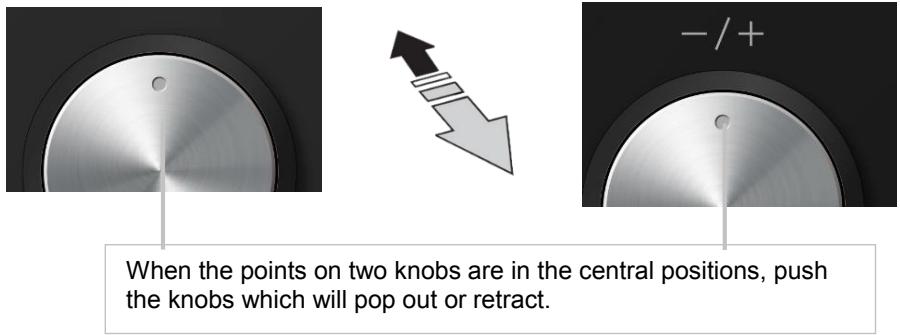
The two knobs are retractable.
Before using the knobs, you need to push buttons to make them pop out.
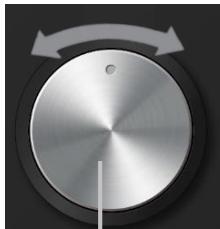
Turn this function knob to change heating mode.
When the knobs pop out, turn them to select the desired function or setting.
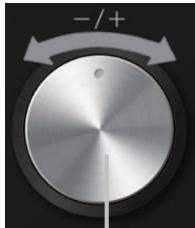
Turn this knob to Change the adjustment values shown in the display.
Touch buttons
| Cancel | Cancelling the operation |
| Timer / Child-Proof Lock | Use timer function/use child-proof lock by pressing and holding this button for 3s. |
| End time | Set an end time to the cooking duration. |
| Quick preheat | Use this to have a quick preheat. |
| Duration & Clock Setting | Set a duration time then select function & set clock in standby mode. |
| Temperature Setting | Press to set temperature. |
| Lamp ON / OFF | Switch on and off the lamp. |
| Start / Pause | Start and pause the cooking process. |
ACCESSIONS
Using the Accessories
| Wire rack For ovenware, cake tins and ovenproof dishes. For roasts and grilled food. | |
| Baking tray For tray bakes and small baked products. It can be used to catch dripping fat when you are grilling directly on the wire rack. |
Only use original accessories. They are specially adapted for your oven.
NOTE : The accessories may deform when they become hot. This does not affect their function. Once they have cooled down again, they regain their original shape.
Inserting the Accessories
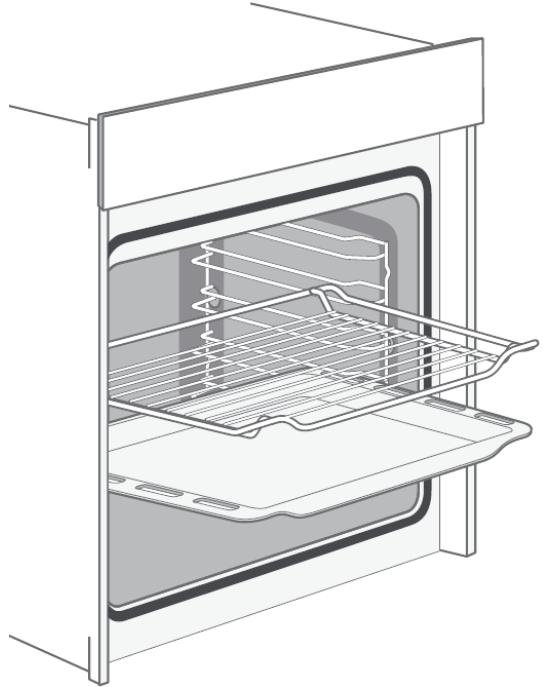
The cavity has five shelf positions. The shelf positions are counted from the bottom up. The accessories can be pulled out approximately halfway without tipping.
NOTES :
Ensure that you always insert the accessories into the cavity the right way round. Always insert the accessories fully into the cavity so that they do not touch the oven door.
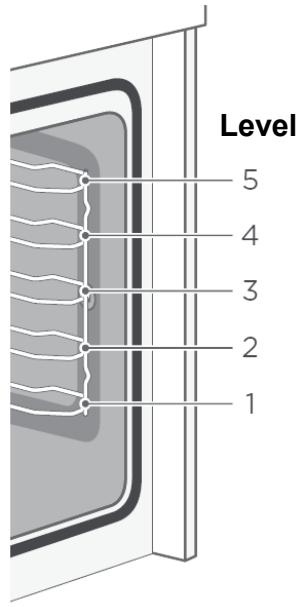
Tilt protection (Locking function)
The accessories can be approximately pulled halfway out until they lock in place. The locking function prevents accessories from tilting with the gravity of food and accessories themselves while they get pulled out. The accessories should be inserted into cavity correctly for the tilt protection to work properly.
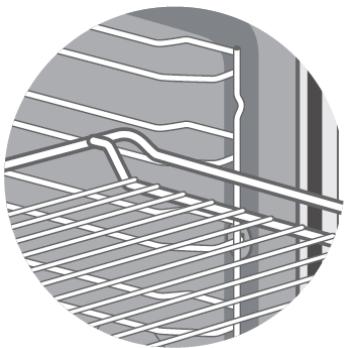
When inserting the wire rack, ensure the wire rack is onto the right facing direction.
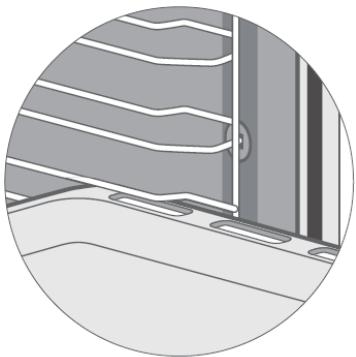
When inserting the baking tray, ensure the baking tray is onto the right facing direction.
Your oven has various heating modes which make your oven easier to use.
To enable you to find the correct heating mode for your dish, please refer to the below table.
| Heating Mode | Temperature | Use | |
| Conventional | 30℃~250℃ | For traditional baking and roasting on one level. Especially suitable for cakes with moist toppings. | |
| Convection | 50℃~250℃ | For baking and roasting on one or more levels. Heat comes from the ring heater surrounding the fan evenly. | |
| eco | ECO | 140℃~240℃ | For energy-saving cooking |
| Conventional +Fan | 50℃~250℃ | For baking and roasting on one or more levels. The fan distributes the heat from the heating elements evenly around the cavity. | |
| Radiant Heat | 150℃~250℃ | For grilling small amounts of food and for browning food. Please put the food in the center part under the grill heating element. | |
| Double Grill + Fan | 50℃~250℃ | For grilling flat items and for browning food. The fan distributes the heat evenly around the cavity. | |
| Double Grill | 150℃~250℃ | For grilling flat items and for browning food | |
| Pizza | 50℃~250℃ | For pizza and dishes which need a lot of heat from underneath. The bottom heater and ring heater will work. | |
| Bottom Heat | 30℃~220℃ | For adding extra browning to the bases of pizzas, pies, and pastries. Heating comes from the bottom heater. | |
| * | Defrost | - | For gently defrosting frozen food |
| Fermentation | 30℃~45℃ | For making yeast dough and sour dough to culture yogurt. | |
| Additional function | Temperature | Use | |
| Pyrolytic Self-cleaning | Not adjustable | To heat up to a very high temperature. Residues will burn. | |
NOTE :
Due to an optimum evenness of heat distribution inside the cavity under the
"Convection" heating mode, the fan will work at certain times of the heating process, to guarantee the best possible performance.
Caution :
- If you open the oven door during an on-going operation, the operation will not be paused. Please be especially careful with the risk of burns.
- Do not cover the ventilation slots. Otherwise, the appliance may overheat. To make the oven cool down more quickly after the operation, the cooling fan may continue to run for a period afterwards.
Cooling fan
The cooling fan switches on and off as required. The hot air escapes above the door.
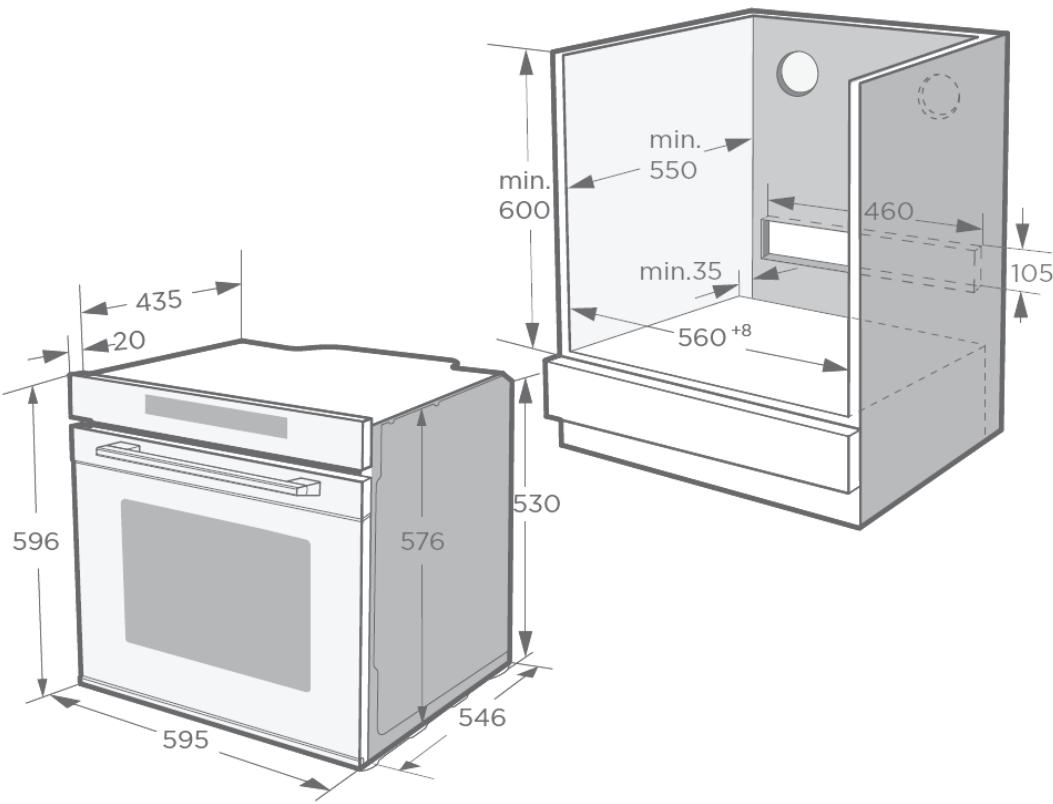
Installation dimensions (measurements in mm)
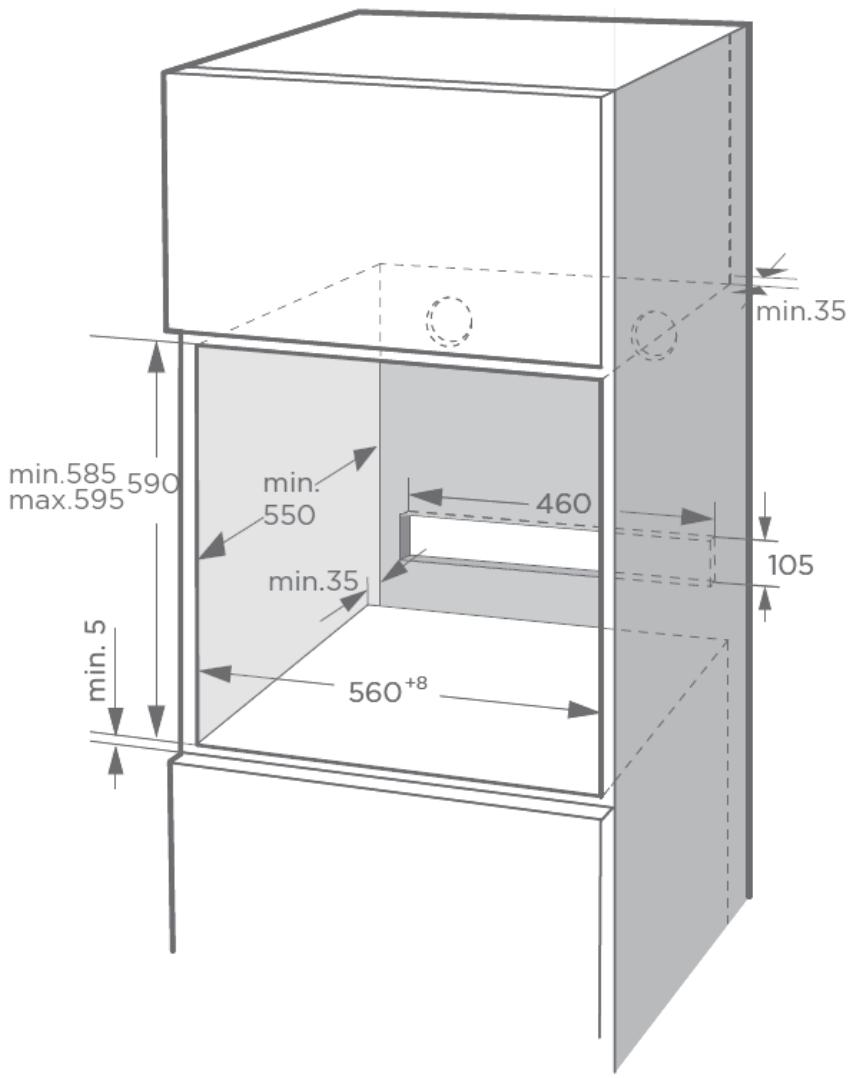
To operate this appliance safe, please be sure that it has been installed to a professional standard respecting the installation instructions. Damages occur because of incorrect installation are not within the warranty.
During installation, please wear protective gloves to prevent yourself from getting cut by sharp edges.
Check the appliance if there is any damage before installation and do not connect the appliance if the appliance is damaged.
Before turning on the appliance, please remove all the packaging materials and adhesive film from the appliance.
It is necessary to have the plug accessible or incorporate a switch in the fixed wiring, in order to disconnect the appliance from the supply after installation when necessary.
Warning: The appliance must not be installed behind a decorative door in order to avoid overheating.
Mounting the oven in the cabinet

- Carefully push the oven into the cabinet, making sure that it is in the centre.
- Insert the bushings into the holes on the oven front.
- Secure the oven to the cabinet using the screws.
CAUTION: Do not over tighten the screws to avoid damage to the oven housing. Use a screwdriver only! - Cover the bushings with the covers.
Electrical connections must only be performed by a qualified and authorised electrician.
The brown wire must be connected to the terminal marked L.
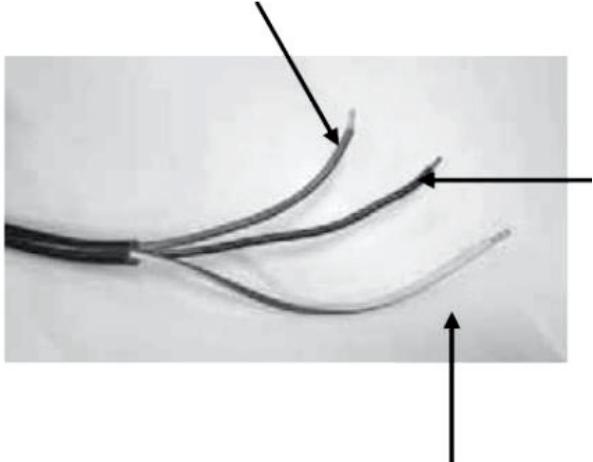
The blue wire must be connected to the terminal marked N.
The green and yellow wire must be connected to the terminal marked E or the
earth Symbol 1
Before using the oven to prepare food for the first time, you must clean the cavity and accessories.
- Remove all stickers, surface protection foils and transport protection parts.
- Remove all accessories from the cavity.
- Clean the accessories thoroughly with warm soapy water and a dish cloth or soft brush.
- Ensure that the cavity does not contain any leftover packaging, such as polystyrene pellets or wooden piece which may cause risk of fire.
- Wipe the smooth surfaces in the cavity and the door with a soft, wet cloth.
- To remove the new-appliance smell, heat up the appliance when empty and with the oven door closed.
- Keep the kitchen highly ventilated while the appliance is heating up for the first time. Keep children and pets out of the kitchen during this time. Close the door to the adjacent rooms.
- Adjust the settings indicated. You can find out how to set the heating mode and the temperature in the next section OPERATION.
| Settings | |
| Heating mode | |
| Time | 2h |
After the oven has cooled down:
- Clean the smooth surfaces in the cavity and the door with warm soapy water and a dish cloth.
- Dry all surfaces.
Setting the Time
Before the oven can be used, the time should be set.
- After the oven has been electrically connected, touch
- You can set time of day in hours by turning the right knob.
- Touch again.
- You can set time in minutes by turning the right knob.
- Touch to finish the setting.
NOTE : The clock has a 24-hour display.
OPERATION
Cooking by setting the heating mode, temperature and duration
- After the oven has been electrically connected, turn the oven-function knob to select the desired heating mode.
- Touch and then turn the selection knob to set cooking temperature.
- Touch and then turn the selection knob to set cooking duration time up to 9 hours.
- Touch to start cooking.
- During the cooking process, you can touch to cancel or to pause.
Change during the cooking process
When your oven is working, you can change the heating mode and temperature setting by turning the function or selection knob.
After the change, if there is no other action after 6 seconds, the oven will heat as what you changed.
If you want change cooking duration time in the cooking process, touch and then turn the selection knob.
After the change, if there no other action after 6 seconds the oven will heat as what you
changed. During the cooking process with a finish time setting, you can't do any change.
When you want to cancel the cooking process, please touch
NOTE : Changing modes/temperature/rest cooking time may have some negative influences for the result of cooking, it is recommended not to do so unless you are well experienced on cooking.
Cancelling the operation
Touch to enter the waiting state.
Caution!
After the oven is switched off, it becomes very hot especially inside the cavity. Never touch the interior surfaces of the oven or the heating elements. Use oven gloves to remove accessories or ovenware from the cavity and allow the oven to cool down. Keep children at a safe distance at the same time to avoid the injury of burns.

Quick preheat
You can use this function to quickly heat up your oven.
To use this function, turn the function knob to select a heating mode, and then touch

. The display will show the quick preheat symbol.
This function is not available for the ECO 電 , Defrost 電 and Fermentation heating modes.

Setting end time
For example, when you set end time is 10 o'clock, and cooking duration time is 1 hour, the oven will heat up at 9 o'clock, and finish at 10 o'clock.
- Complete the clock setting.
- Touch and then set the hour digits by turning the right knob.
- Touch 2 and then set the minute digits by turning the right knob.
- Touch to confirm the setting.
- Turn the left knob to select the desired heating mode.
- Touch and then turn the right knob to set cooking temperature.
-
Touch and then turn the right knob to set cooking duration time up to 9 hours.
-
Touch
This function is not available for the Defrost modes.

and Fermentation

heating

Timer
You can use timer function by touch 0. When the set time has elapsed, the oven will beep.
- Touch and the hour digits will flash on the display.
- Turn the right knob to set the hours.
- Touch again and the minute digits will flash on the display.
- Turn the right knob to set the minutes.
- Touch to confirm the setting.
You can set the timer before and during cooking process, but when you are selecting heating mode and temperature, it is not available.

Childproof lock
Your oven has a childproof lock so that children cannot switch it on accidentally or change any settings.
When you touch and hold for 3 seconds, childproof lock is activated. The lock symbol will be displayed.
Touch and hold for 3 seconds again, the oven is unlocked. The lock symbol will disappear from the display.
You can activate or deactivate childproof lock when the oven is working or not.
Demo mode
This mode enables the oven to be demonstrated without heating up.
-
In standby mode, touch and hold to enter the demonstration mode.
-
The display will show "OFF".
-
Turn the right knob until the display shows "ON" to activate the demonstration mode.
To deactivate this mode, touch and hold until the display shows "ON". Turn the right knob until the display shows "OFF".
Sabbath mode
This mode is designed for religious faiths that observe a 'no work' requirement on the Sabbath.
While your oven is in Sabbath mode, the oven will remain in Sabbath mode until the
cooking time is 0, or touch to return to the standby mode.
-
In standby mode, touch and hold for 3 seconds to enter Sabbath mode.
-
The display will show "5A8".
-
Turn the right knob to adjust the cooking time.
The time adjustment range is 24 80 hours.
- Touch III.
NOTES :
- During the Sabbath mode, only the On/Off button is valid, and all other buttons are invalid.
- During the Sabbath mode, the lamp cannot be switch on. When the oven door is opened, the lamp will not turn on.

Interior lighting
When you open the oven door, the interior lighting switches on.
You can touch to activate or deactivate the internal lighting.
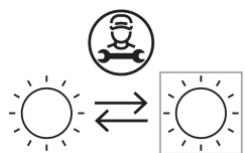
Replaceable light source by a professional
This product contains a light source of energy efficiency class G.
- Remove all accessories, which are not necessary during the cooking & baking process.
- Do not open the door during the cooking & baking process.
- If you open the door during cooking & baking, switch the mode to "Lamp" (Without change the temperature setting).
- Decrease the temperature setting in not fan assisted modes to 50^ at 5min to 10min before end of cooking & baking time. So you can use the cavity heat to complete the process.
- Use ECO heating mode _eq , whenever possible. You can reduce the temperature by 20^ to 30^
- You can cook and bake using ECO heating mode on more than one level at the same time.
- If it is not possible to cook and bake different dishes at the same time, you can heat one after the other to use the preheat status of the oven.
- Do not preheat the empty oven, if it is not required. If necessary, put the food into the oven immediately after reaching the temperature.
- Do not use reflective foil, like aluminium foil to cover the cavity floor.
- Use the timer and or a temperature probe whenever possible.
- Use dark mat finish and light weighted baking moulds and containers. Try not to use heavy accessories with shiny surfaces, like stainless steel or aluminium.
TIPS AND TRICKS
| You want to cook your own recipe | Try to use settings of similar recipes first and optimize the cooking process due to the result. |
| Is the cake baked ready? | Put a wooden stick inside the cake about 10 minutes before the given baking time is reached. If there is no raw dough at the stick after pulling out, the cake is ready. |
| The cake loses massive volume during cooling down after baking. | Try to lower the temperature setting by 10°C and double check the food preparing instructions regarding the mechanical handling of the dough. |
| The height of the cake is in the middle much higher than at the outer ring. | Do not grease the outer ring of the spring form. |
| The cake is too brown at the top. | Use a lower shelf level and / or use a lower set temperature (this may lead to a longer cooking time). |
| The cake is too dry. | Use a 10°C higher set temperature (this may lead to a shorter cooking time). |
| The food is good looking but the humidity inside is too high. | Use a 10°C lower set temperature (this may lead to a longer cooking time) and double check the recipe. |
| The browning is uneven. | Use a 10°C lower set temperature (this may lead to a longer cooking time). Use the convectional heating mode on one level. |
| The cake is less browned on the bottom. | Choose a lower shelf level. |
| Baking on more than one level at the same time : One shelf is darker than the other. | Use a fan assisted mode for baking at more than one level and take out the trays individually when ready. It is not necessary that all trays are ready at the same time. |
| Condensing water during baking | Steam is part of baking and cooking and moves normally out of the oven together with the cooling air flow. This steam may condense at different surfaces at the oven or near to the oven and build water droplets. This is a physical process and cannot be avoided completely. |
| Which kind of baking ware can be used? | Every heat resistant baking ware can be used. It is recommended not to use aluminium in direct contact with food, especially when it is sour.Please ensure a good fitting between container and lid. |
| How to use the grill function? | Preheat the oven for 5 minutes and place the food in the level given by this manual.Close the oven door when you use any grilling mode.Do not use the oven when the door is open, except for loading / removing / checking the food. |
| How to keep clean the oven during grilling ? | Use the tray filled with 2L water at level one. Nearly all fluids drip down from the food placed on the rack will be captured by the tray. |
| The heating element in all grilling modes are switching on and off over the time. | It is a normal operation and depends on the temperature setting. |
| How to calculate the oven settings, when the weight of a roast is not given by a recipe? | Choose the settings next to the roast weight and change the time slightly.Use a meat probe if possible to detect the temperature inside the meat.Place the head of the meat probe carefully in the meat,due to the manufacturer instructions.Make sure that the head of the probe is placed in the middle of the biggest part of the meat, but not in the near of a bone or hole. |
| What happens if a fluid is poured to a food in the oven during the baking or cooking process? | The fluid will boil, and steam will arise as a normal physical process.Please be careful because the steam is hot. See also “Condensing water during baking” for more information.If the fluid contains alcohol, the boiling process will be quicker and can lead to flames in the cavity. Make sure that the oven door is closed during such kind of process. Please control the baking or cooking process carefully. Open the door very gentle and only if necessary. |
| Conventional + Fan | Conventional | Convection | ||||
| CAKE | Accessory/ Cookware | Shelf position | Heating Mode | Tempera-ture | Pre-heat | Cooking time (min) |
| Sponge cake, simple | Cake tin | 2 | 170°C | No | 50 | |
| Sponge cake, simple | Cake tin | 1 | 140°C | No | 70 | |
| Sponge cake with fruits | Round cake tin | 1 | 150°C | No | 50 | |
| Sponge cake with fruits | Baking tray | 1 | 140°C | No | 70 | |
| Raisins brioche muffins (Yeast cake) | Muffin tray | 2 | 220°C | Yes 19 min | 11 | |
| Muffins | Muffin tray | 1 | 160°C | Yes 8 min 30 sec | 30 | |
| Muffins | Muffin tray | 1 | 150°C | Yes 8 min 30 sec | 30 | |
| Apple yeast cake | Baking tray | 1 | 160°C | Yes 10 min | 42 min 30 sec | |
| Water sponge cake (6 Eggs) | Springform cake tin | 1 | 160°C | Yes 9 min 30 sec | 41 min | |
| Water sponge cake (4 Eggs) | Springform cake tin | 1 | 160°C | Yes 9 min | 26 min | |
| Water sponge cake | Springform cake tin | 1 | 160°C | No | 35 | |
| Apple yeast cake | Baking tray | 2 | 150°C | Yes 8 min | 42 | |
| Hefezopf (Callah) | Baking tray | 2 | 150°C | No | 40 | |
| Small cakes 20 | Baking tray | 2 | 150°C | No | 36 | |
| Small cakes 40 | Baking tray | 2+4 | 150°C | Yes 10 min | 34 | |
| Butter yeast cake | Baking tray | 2 | 150°C | Yes 8 min | 30 | |
| Shortbread | Baking tray | 2 | 170°C | Yes 8 min | 13 | |
| Shortbread, 2 trays | Baking tray | 2+4 | 160°C | Yes 8 min | 12 | |
| Vanilla cookies | Baking tray | 2 | 160°C | Yes 8 min | 10 | |
| Vanilla cookies | Baking tray | 2+4 | 150°C | Yes 8 min | 14 | |
| BREAD | Accessory/ Cookware | Shelf position | Heating Mode | Tempera-ture | Pre-heat | Cooking time (min) |
| White bread (1kg flour) | Cake tin | 1 | 170°C | Yes 9 min 20 sec | 50 | |
| White bread (1kg flour) | Cake tin | 1 | 170°C | Yes 12 min | 45 | |
| Fresh pizza (thin) | Baking tray | 2 | 170°C | Yes 9 min 30 sec | 21 | |
| Fresh pizza (thick) | Baking tray | 2 | 170°C | Yes 10 min | 45 | |
| Fresh pizza (thick) | Baking tray | 2 | 170°C | Yes 8 min | 41 | |
| Bread | Baking tray | 1 | 190°C | Yes 9 min | 30 | |
| MEAT | Accessory/ Cookware | Shelf position | Heating Mode | Temperature | Cooking time (min) |
| Beef tender loin 1,6 kg | Baking tray | 2 | 180°C | 55 | |
| Meatloaf 1 kg meat | Baking tray | 1 | 180°C | 75 | |
| Chicken 1 kg | Baking tray | 2: Rack 1: Tray | 180°C | 50 | |
| Fish 2,5 kg | Baking tray | 2 | 170°C | 70 | |
| Ribs Tomahawk | Baking tray | 3 | 120°C | 85 | |
| Pork roast of the neck 1,2 kg | Baking tray | 1 | 160°C | 82 | |
| Chicken 1,7 kg | Baking tray | 2: Rack 1: Tray | 180°C | 78 |

Double grill with fan
TEST FOOD ACCORDING TO EN 60350-1
| RECIPCE | Accessory/ Cookware | Shelf position | Heating Mode | Tempera-ture | Pre-heat | Cooking time (min) |
| Sponge cake | Springform cake tin, diameter 26 cm | 1 | 170°C | No | 30 – 35 | |
| Sponge cake | Springform cake tin, diameter 26 cm | 1 | 160°C | No | 30 – 35 | |
| Small cake | 1 baking tray | 2 | 150°C | Yes | 30 – 40 | |
| Small cake | 1 baking tray | 2 | 150°C | Yes | 40 – 50 | |
| Small cake | 1 baking trays | 2+4 | 150°C | Yes | 30 – 35 | |
| Cheese cake | Springform cake tin, diameter 26 cm | 1 | 150°C | No | 70 – 80 | |
| Apple pie | Springform cake tin, diameter 20 cm | 1 | 170°C | No | 80 – 85 | |
| Apple pie | Springform cake tin, diameter 20 cm | 1 | 160°C | No | 70 – 80 | |
| Bread | 1 baking tray | 1 | 210°C | Yes | 30 – 35 | |
| Bread | 1 baking tray | 1 | 190°C | Yes | 30 – 35 | |
| Toast | Rack | 5 | Max | Yes 5 min | 6 – 8 | |
| Chicken | Rack & tray | 2: Rack 1: Tray | 180°C | Yes | 75 – 80 |
- In chicken recipe, begin with the backside on top and turn the Chicken after 30 min. to the top side.
- Use a dark, frosted mould and place it on the rack.
- Take out the trays at the moment, when the food is ready, even when it is not at the end of the given baking time.
- Choose the lower temperature and check after the shortest time given in the table.
- If using the tray to capture fluids dripping from the food placed on the rack during any grilling mode, the tray should be set to level 1 and filled with some water.
- The burger patties should be turned around after 2/3 of the time.
COOKING BY ECO MODE
ECO mode is heat by bottom and ring heater, with this mode you can save energy during cooking.
| RECIPCE | Accessory/ Cookware | Shelf position | Temperature | Time (min) | Pre-heat |
| Challah | 1 baking tray | 1 | 180°C | 40 – 50 | No |
| Pork Roast | 1 baking tray | 1 | 200°C | 80 – 85 | No |
| Clafouti Cherry Cake | Round cake tin | 1 | 200°C | 55 – 60 | No |
| Beef Roast 1.3kg | 1 baking tray | 1 | 200°C | 80 – 85 | No |
| Brownies | Rack and glass plate | 1 | 180°C | 55 – 60 | No |
| Potato Gratin | Rack and round plate | 1 | 180°C | 65 – 70 | No |
| Lasangne | Rack and glass plate | 1 | 180°C | 75 – 80 | No |
| Cheese Cake | Springform cake tin, diameter 20 cm | 1 | 160°C | 80 – 90 | No |
ENERGY EFFICIENCY ACCORDING TO EN 60350-1
Please note the following information:
- The measurement is carried out in the "ECO" mode to determine the data regarding the forced air mode and the label-class.
- The measurement is carried out in the "Conventional" mode to determine the data regarding the conventional mode.
- During the measurement only the necessary accessory is in the cavity. All other parts have to be removed.
- The oven is installed as described in the installation guide and placed in the middle of the cabinet.
- It is necessary for the measurement to close the door like in the household, even when the cable disturbs the sealing function of the gasket during the measurement.
To make sure that there are no negative effects regarding the disturbed sealing due to the energy data, it is necessary to close the door carefully during the measurement. It is may be required to use a tool to guarantee the sealing of the gasket like in the household, where no cable disturbs the sealing function.
CLEANING AND MAINTENANCE
Turn the oven off and remove the power plug from the mains socket before cleaning.

Risk of electric shock!
Penetrating moisture may cause an electric shock. Do not use any high-pressure cleaners or steam cleaners.

Risk of burns!
Never clean the appliance immediately after switching off. Let the appliance cool down.
To ensure that the different surfaces are not damaged by using the wrong cleaning agent, observe the information in the table. Do not use
- sharp or abrasive cleaning agents,
- metal or glass scrapers to clean the glass in the oven door,
metal or glass scrapers to clean the door seal, - hard scouring pads and sponges,
- cleaning agents with high concentrations of alcohol.
Wash new sponge cloths thoroughly before use.
Allow all surfaces to dry thoroughly before using the
appliance again.
| Area | Cleaning |
| Stainless steel front | Hot soapy water : Clean with a dish cloth and then dry with a soft cloth. Remove flecks of limescale, grease, starch and albumin (e.g. egg white) immediately. Corrosion can form under such flecks. Do not use glass cleaners or metal or glass scrapers for cleaning. |
| Plastic front | Hot soapy water : Clean with a dish cloth and then dry with a soft cloth. Do not use glass cleaners or metal or glass scrapers for cleaning. |
| Door panels | Glass cleaner : Clean with a dish cloth and then dry with a soft cloth. Do not use a glass scraper. |
| Door handle | Hot soapy water: Clean with a dish cloth and then dry with a soft cloth. If descaler comes into contact with the door handle, wipe it off immediately. Otherwise, any stains will not be able to be removed. |
| Door seal | Hot soapy water: Clean with a dish cloth. Do not scour. |
| Cooking compartment | Hot soapy water or a vinegar solution : Clean with a dish cloth and dry with a soft cloth. If the oven is very dirty: Do not use oven spray or other aggressive oven cleaners or abrasive materials. Scouring pads, rough sponges and pan cleaners are also unsuitable. These items scratch the surface. Allow the interior surfaces to dry thoroughly. |
| Accessories | Hot soapy water : Soak and clean with a dish cloth or brush. If there are heavy deposits of dirt, use a stainless-steel scouring pad. |
Notes :
- Slight differences in colour on the front of the appliance are caused by the use of different materials, such as glass, plastic and metal.
- Shadows on the door panels, which look like streaks, are caused by reflections made by the interior lighting.
Enamel is baked on at very high temperatures. This can cause some slight color variation. This is normal and does not affect operation. The edges of thin trays cannot be completely enameled. As a result, these edges can be rough. This does not impair the anti-corrosion protection.
Always keep the appliance clean and remove dirt immediately so that stubborn deposits of dirt do not build up.
Tips
- Clean the cooking compartment after each use. This will ensure that dirt cannot be baked on.
- Always remove flecks of lime scale, grease, starch and albumin (e.g. egg white) immediately.
- Remove flecks of food with sugar content immediately, if possible, when the fleck is still warm.
- Use suitable ovenware for roasting, e.g. a roasting dish.
Pyrolytic self-cleaning function
Your oven is equipped with "Pyrolytic Self-cleaning" mode.
You can use this mode to clean the cooking compartment
effortlessly.
The cooking compartment is heated up to a very high temperature. Residues from roasting, grilling and baking will burn. In this mode, the temperature and operating time cannot be adjusted.
NOTE :
For your safety, the oven door is locked and cannot be opened until the temperature reduces to a section which is relatively safe. The interior lighting remains off during cleaning.
WARNING
Risk of burns !
The cooking compartment becomes extremely hot during the pyrolytic self-cleaning mode. Never open the oven door. Allow the oven to cool down. Keep children, disabled and old people without self-care ability away from the oven.
Risk of harm to health!
In the pyrolytic self-cleaning mode, the cooking compartment heats up to a very high temperature so that remnants left over from roasting, grilling, baking and so on will burn off. This process releases vapors, which can irritate the mucous membranes. While the cleaning function is running, keep the kitchen well ventilated. Do not remain in the room for long periods. Keep children and pets away from the oven.
Before starting the pyrolytic mode
Caution!
-
Remove accessories and cookware from the cooking compartment before running the pyrolytic mode. No excess spillage allowed to be retained in the cavity.
-
A large number of food remnants, fat and meat juices may catch fire when pyrolytic mode is in progress. Before you start the cleaning function, always remove the food residues and remnants from the cooking compartment.
- Clean the inside of the appliance door and along the edges of the cooking compartment in the area around the seal. Do not scrub or remove the seal.
Risk of fire!
- The appliance will become very hot on the outside during pyrolytic mode. Never hang combustible objects, e.g. tea towels, on the door handle. Do not place anything against the front of the oven. Keep children away from the oven.
- If the door seal is damaged, a large amount of heat will be generated around the door. Do not scrub or remove the seal. Never operate the oven if the seal is damaged or missing.
Setting pyrolytic self-cleaning mode
- Turn the function knob until the display show the symbol
-
Touch to start cleaning. The default cleaning time is 2 hours (2:00).
-
The oven door will automatically lock and cannot be opened.
-
Once cleaning starts, you cannot change any setting expect pausing and stopping.
-
When the cleaning process is finished, the oven will beep.
- Once the cooking compartment has cooled down, use a damp cloth to wipe off the ash that has been left behind in the cooking compartment and around the oven door.
NOTES :
- During the pyrolytic mode, the frame inside the oven may discolour. This is normal and does not affect performance. The discolouration can be removed with the help of stainless-steel cleaning agent.
- Bad soiling may cause white deposits to remain on the enamel surfaces. These are residues from the food and are harmless. It does not affect performance. You can remove these residues using lemon juice or other kinds of cleaning agents if needed.
TROUBLESHOOTING
| Problem | Possible Cause | Possible Solution |
| The appliance does not work. | Faulty fuse. | Check the circuit breaker in the fuse box. |
| Power cut | Check whether the kitchen light or other kitchen appliances are working. | |
| Knobs have fallen out of the support in the control panel. | Knobs have been accidentally disengaged. | Knobs can be removed. Simply place knobs back in their support in the control panel and push them in so that they engage and can be turned as usual. |
| Knobs can no longer be turned easily. | There is dirt under knobs. | Knobs can be removed. To disengage knobs, simply remove them from the support. Alternatively, press on the outer edge of knobs so that they tip and can be picked up easily. Carefully clean the knobs using a cloth and soapy water. Dry with a soft cloth. Do not use any sharp or abrasive materials. Do not soak or clean in the dishwasher. Do not remove knobs too often so that the support remains stable. |
| Fan does not work all the time in the mode: “Fan Heating”. | This is a normal operation due to the best possible heat distribution and best possible performance of the oven. | |
| After a cooking process a noise can be heard and air flow near the control panel can be observed. | The cooling fan is still working, to prevent high moisture conditions in the cavity and cool down the oven for your convenience. The cooling fan will switch off automatically. | |
| The food is not sufficient cooked in the time given by the recipe. | A temperature different from the recipe is used. Double check the temperature. The ingredient quantities are different from the recipe. Double check the recipe. | |
| Uneven browning | The temperature setting is too high, or the shelf level could be optimized. Double check the recipe and settings. The surface finish /colour / material of the baking ware are not the best choice for the selected oven heating mode. When use radiant heat, such as “Conventional” heating mode, use matte finished, dark coloured and light weighted ovenware. | |
| The lamp doesn’t turn on | The lamp needs to be replaced. | |
Warning - Risk of electric shock!
Incorrect repairs are dangerous. Repairs may only be carried out and damaged power cables replaced by one of our trained after-sales technicians. If the appliance is defective, unplug the appliance from the mains socket or switch off the circuit breaker in the fuse box. Contact the after-sales service.
Replacing the lamp on the corner of the cavity
If the cavity lamp fails, it must be replaced.
When handling the halogen lamp, use a dry cloth. This will increase the service life of the lamp.
Risk of electric shock!
When replacing the lamp, the lamp socket contacts are live. Before replacing the lamp, unplug the appliance from the mains socket or switch off the circuit breaker in the fuse box.
Risk of burns!
The appliance becomes very hot. Never touch the interior surfaces of the appliance or the heating elements. Always allow the appliance to cool down. Keep children at a safe distance.
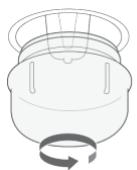
- Place a towel in the cold cavity to prevent damage.
- Turn the glass cover anticlockwise to remove it.
- Pull out the lamp - do not turn it.
- Assemble a new lamp.
- Assemble the glass cover back in.
Lamp specifications :25 watt, 230 V halogen lamps
If the glass cover of the halogen lamp is damaged, it must be replaced.
| Information for domestic ovens | |||
| Symbol | Value | Unit | |
| Model identification | TMFP72BX | ||
| Type of oven | Electric oven | ||
| Mass of the appliance | M | 37,8 | kg |
| Number of cavities | 1 | ||
| Heat source per cavity (electricity or gas) | Electricity | ||
| Volume per cavity | V | 72 | l |
| Energy consumption (electricity) required to heat a standardised load in a cavity of an electric heated oven during a cycle in conventional mode per cavity (electric final energy) | EClectric cavity | 0,96(at) | kWh/cycle |
| Energy consumption required to heat a standardised load in a cavity of an electric heated oven during a cycle in fan-forced mode per cavity (electric final energy) | EClectric cavity | 0,65(at) | kWh/cycle |
| Energy Efficiency Index per cavity | EEIcavity | Conventional(at): 112,9Fan-forced(at):76,5 | |
| Rating / Supply voltage and frequency | 220-240V~ 50-60Hz | ||
| Max power | 3,2 kW | ||
| Oven lamp power | 25 W | ||
| Top heating element (W) | 900 W | ||
| Grill heating element (W) | 1300 W | ||
| Convection heating element (W) | 1800 W | ||
| Convection motor (W) | 34 W | ||
| Cooling fan (W) | 37 W | ||
| Cleaning (Enamel/catalytic/Pyrolytic) | Pyrolytic | ||
| Net weight (approx.) kg | 37,8 kg | ||
| Outside dimensions (W*D*H) | 595 * 546 * 596 mm | ||
| Cabinet/furniture cut-out sizes (W*D*H) | 560 * 590 * 550 mm | ||
| Energy Class (letter for the sticker) * | A+ | ||
| Usable volume (litres) | 72 L | ||
| Size : (Small/Medium/Large) | Large | ||
| Made in | PRC | ||
- Energy class: A^+++ D ( A^+++ = economical) D = less economical) Thomson and the Thomson logo are trademarks of Technicolor (S.A.) or its affiliates and are used under license by Fnac Darty (S.A.).
As a responsible retailer we care about the environment. As such we urge you to follow the correct disposal procedure for the appliance and packaging materials. This will help conserve natural resources and ensure that it is recycled in a manner that protects health and the environment.
You must dispose of this appliance and its packaging according to local laws and regulations. Because this appliance contains electronic components, the appliance and its accessories must be disposed of separately from household waste when the appliance reaches its end of life.
Contact your local authority to learn about disposal and recycling.
The appliance should be taken to your local collection point for recycling. Some collection points accept appliance free of charge.
We apologize for any inconvenience caused by minor inconsistencies in these instructions, which may occur as a result of product improvement and development.
EU Declaration of Conformity
Product Description:
The object of the declaration described above is in conformity with the relevant Union harmonisation legislation:

- Hotline Darty France
- PLEASE READ THE FOLLOWING SAFETY WARNINGS AND THE INSTRUCTIONS CAREFULLY BEFORE USING THE APPLIANCE AND KEEP FOR FUTURE REFERENCE.
- WARNING
- Risk of electric shock!
- Risk of fire!
- Risk of injury!
- Risk of burns!
- Risk of scalding!
- Hazard due to magnetism!
- Causes of Damage
- PRODUCT OVERVIEW
- Touch buttons
- ACCESSIONS
- Using the Accessories
- Inserting the Accessories
- NOTES :
- Tilt protection (Locking function)
- NOTE :
- Caution :
- Cooling fan
- Mounting the oven in the cabinet
- After the oven has cooled down:
- Setting the Time
- OPERATION
- Cooking by setting the heating mode, temperature and duration
- Change during the cooking process
- Cancelling the operation
- Caution!
- Quick preheat
- Setting end time
- Timer
- Childproof lock
- Demo mode
- Sabbath mode
- Interior lighting
- TIPS AND TRICKS
- Double grill with fan
- COOKING BY ECO MODE
- ENERGY EFFICIENCY ACCORDING TO EN 60350-1
- CLEANING AND MAINTENANCE
- Tips
- Pyrolytic self-cleaning function
- Risk of burns !
- Risk of harm to health!
- Before starting the pyrolytic mode
- Setting pyrolytic self-cleaning mode
- Warning - Risk of electric shock!
- Replacing the lamp on the corner of the cavity
Brand : THOMSON
Model : TMFP72BXFOUR
Category : Built-in oven