
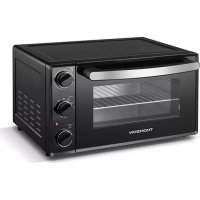
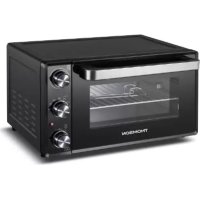
MFC701IXFOUR - Built-in oven THOMSON - Free user manual and instructions
Find the device manual for free MFC701IXFOUR THOMSON in PDF.
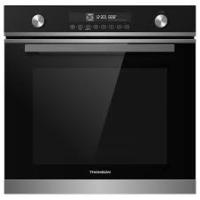
| Product type | Built-in oven |
| Brand | THOMSON |
| Model | MFC701IXFOUR |
| Capacity | 70 L |
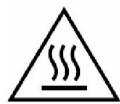
| External dimensions (W x D x H) | 595 x 575 x 595 mm |
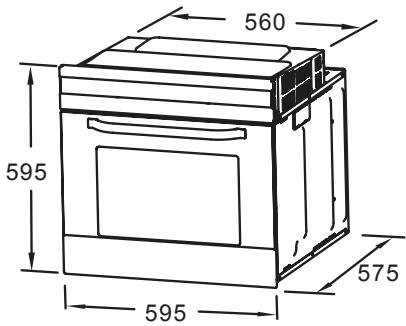
| Built-in compartment dimensions | 606 x 570 x 600 mm |
| Net weight | 31.2 kg |
| Power supply | 220-240 V ~ 50/60 Hz |
| Maximum power | 3 kW |
| Energy class | A |
| Energy consumption (natural convection) | 0.99 kWh/cycle |
| Energy consumption (fan forced) | 0.79 kWh/cycle |
| Cooking functions | Lighting, Defrost, Bottom Heat, Convection, Fan Forced Convection, Radiant Grill, Double Grill, Double Grill with Fan, Hot Air |
| Special function | Energy Saving |
| Grill types | Radiant Grill, Double Grill, Double Grill with Fan |
| Safety features | Child Lock, Automatic Shut-off |
| Cleaning type | Catalytic (catalytic enamel) |
| Interior lighting | Bulb 25 W, G9, 300°C (replaceable by a professional) |
| Included accessories | Oven rack, drip tray, side rails |
| After-sales service | Darty After-Sales Service 0 978 970 970 (France), Vanden Borre +32 2 334 00 00 (Belgium), Fnac 0 969 324 334 (France) |
Frequently Asked Questions - MFC701IXFOUR THOMSON
User questions about MFC701IXFOUR THOMSON
0 question about this device. Answer the ones you know or ask your own.
Ask a new question about this device
Download the instructions for your Built-in oven in PDF format for free! Find your manual MFC701IXFOUR - THOMSON and take your electronic device back in hand. On this page are published all the documents necessary for the use of your device. MFC701IXFOUR by THOMSON.
USER MANUAL MFC701IXFOUR THOMSON
Hotline Darty France
IMPORTANT SAFETY INSTRUCTIONS 5
INSTALLATION 5
ELECTRICAL CONNECTION 6
DESCRIPTION OF THE OVEN 7
OPERATION 9
Setting the Clock 10
Cooking 10
Setting the Reminder 11
Cooking Time Reservation Function 11
Child Safety Lock Function 12
Energy Saving Function 13
CLEANING AND MAINTENANCE. 13
TECHNICAL DATA SHEET 14
DISPOSAL. 15
PLEASE READ THE FOLLOWING INSTRUCTIONS CAREFULLY BEFORE USING THE APPLIANCE AND KEEP FOR FUTURE REFERENCE.
WARNING
This appliance is intended to be used in household and similar applications such as:
- staff kitchen areas in shops, offices and other working environments;
-farm houses; - by clients in hotels, motels and other residential type environments;
- bed and breakfast type environments.
This appliance can be used by children aged from 8 years and above and persons with reduced physical, sensory or mental capabilities or lack of experience and knowledge if they have been given supervision or instruction concerning use of the appliance in a safe way and understand the hazards involved. Children shall not play with the appliance. Cleaning and user maintenance shall not be made by children without supervision.
If the supply cord is damaged, it must be replaced by the manufacturer, its service agent or similarly qualified persons in order to avoid a hazard.
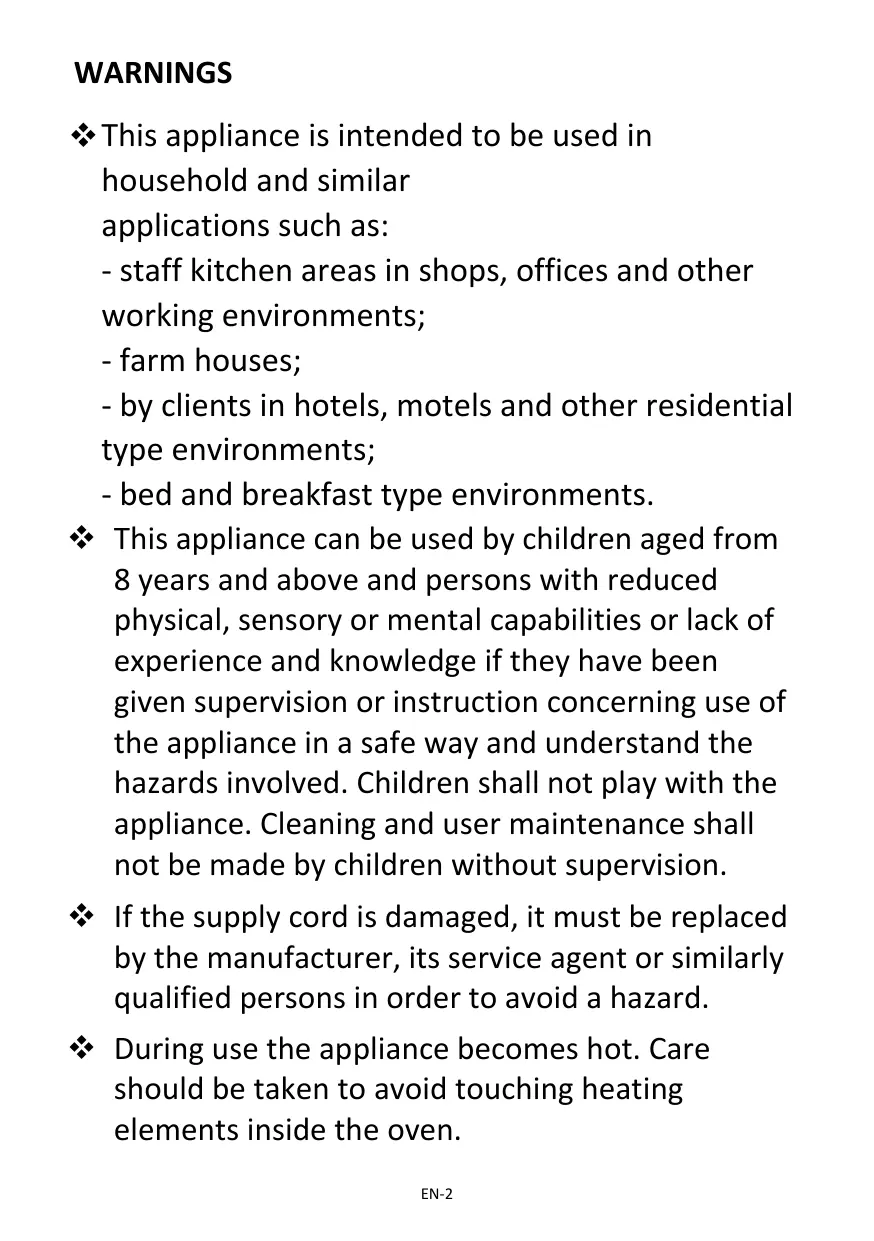
During use the appliance becomes hot. Care should be taken to avoid touching heating elements inside the oven.
WARNING: The appliance and its accessible parts become hot during use. Care should be taken to avoid touching heating elements. Children less than 8 years of age shall be kept away unless continuously supervised.
Do not use harsh abrasive cleaners or sharp metal scrapers to clean the oven door glass since they can scratch the surface which may result in shattering of the glass.
Place the pan and wire rack at the same level on both sides, make sure they are in a horizontal and stable position.
A steam cleaner is not to be used.
The temperature of accessible surfaces may be high when the appliance is operating.
The appliance must not be installed behind a decorative door in order to avoid overheating.
The means for disconnection must be incorporated in the fixed wiring in accordance with the wiring rules.
The appliance shall be installed in accordance with national wiring regulations NF C 15-100.
Regarding the instructions for the all necessary spaces with dimensions, the method of fixing and how the appliance is to be fixed to its support, refer to the section "INSTALLATION".
Regarding the detailed instructions for the safe use of the appliance, the precautions during user maintenance and bulb replacement, refer to the sections "Operation" and "CLEANING and Maintenance".
Regarding the method of fixing and cables connection, refer to the section "ELECTRICAL CONNECTION".
After each cooking cycle, the cooling fan will continue to run for a while to ensure quick cooling and safe operation of the oven.
The door should preferably be closed in all cooking modes.
Do not hang any cloth or garment to the handle of the oven.
Do not line the oven's cavity with aluminium foil for easier cleaning: The oven may overheat and the enamel coating of the cavity may be damaged.
WARNING: Ensure that the appliance is switched off before replacing the lamp to avoid the possibility of electric shock.
WARNING: Accessible parts may become hot during use.
Young children should be kept away.
Regarding the instructions for the method of the correct installation of the shelves, refer to the section "Oven accessories".
The lamp inside the product is used for lighting of the product. This lamp is not suitable for household room illumination.
The appliance is not intended to be operated by means of an external timer or separate remote-control system.
These surfaces can get hot.
IMPORTANT SAFETY INSTRUCTIONS
The oven must be properly installed and grounded by a qualified technician. We will not be responsible for any damage that might be caused by failure to comply with these instructions.
Do not wear loose or hanging garments when using the oven. They could ignite if they touch a hot heating element and this may lead to the risk of burning yourself.
Do not store flammable materials on or near the oven. This may cause a fire hazard
Maintenance and repair work must be made only by authorized service technicians.
It is dangerous to alter or modify the specifications of the appliance in any way.
Do not try to lift or move the appliance by pulling the door handle.
While the oven door is open, do not let children climb on the door or sit on it.
Always use oven gloves to remove and replace food in the oven.
Make sure the control knobs are always in off position when the appliance is not used.
INSTALLATION
The diagram below determines the correct dimensions to install the oven in a cabinet. This oven can also be installed as an under counter oven.
The walls surrounding the oven must be made of heat-resistant material. Both the veneered plastic and the adhesive used must be resistant to temperatures of 120^ in order to prevent unsticking and deformation.
The attached dimensions are in mm.
Installation Steps
- Please make cabinets based on the data of "Cabinet diagram".
- Before installation, please check whether the power socket is grounded and the cabinet size meets the installation requirements.
- Install the machine at the designated location in the kitchen and install it in an upright cabinet.
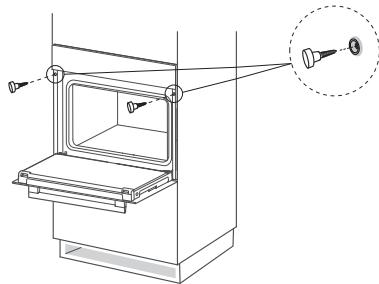
- Open the furnace door, determine the two installation holes on the frame, and fix the machine at the installation position with the screws provided with the product.
Schematic diagram of cabinet fixing
ELECTRICAL CONNECTION
Electrical connections must only be performed by a qualified and authorised electrician.
The brown wire must be connected to the terminal marked L.
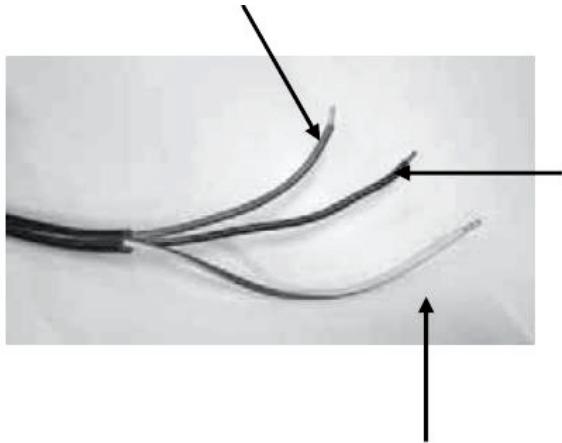
The blue wire must be connected to the terminal marked N.
The green and yellow wire must be connected to the terminal marked E or the earth symbol .
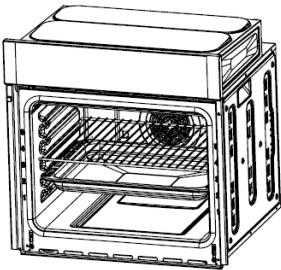
DESCRIPTION OF THE OVEN
Control panel
The oven is designed with two push-pull control knobs. These knobs can be completely pushed inside the control panel when you do not operate the oven.
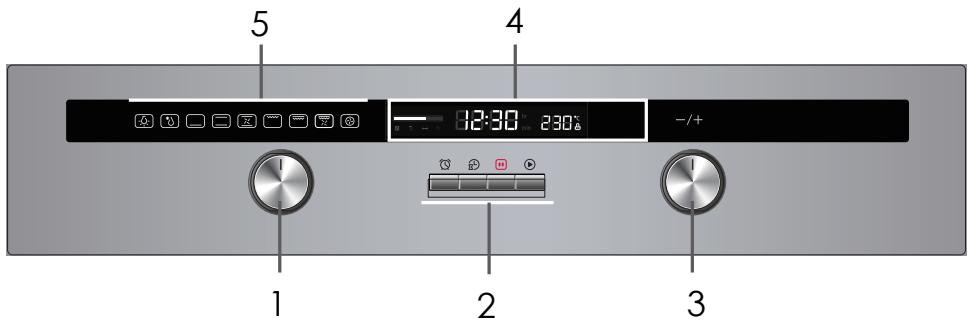
- Function control knob
- 4 Buttons:

Remind

Clock time

Pause/stop

Start
- Thermostat control knob
-
Display
-
Function indicator lights
| Function indicator lights | Description |
| Oven lampThis function allows the oven lamp to be on without any cooking function. (except ECO function) | |
| DefrostingThis function circulates room temperature air around the food. | |
| Bottom heatThis function is ideal for casseroles, curries and any slow cooking. The temperature can be set in the range of 60-120°C and the default temperature is 60°C. | |
| ConvectionThis function is ideal for single traditional roasting. The oven needs to be preheated to the required temperature. Best cooking results can be achieved by placing food in the middle of the oven. The temperature can be set in the range of 50-250°C and the default temperature is 220°C. | |
| Convection with fanThis function uses top and bottom heating elements with a fan to circulate the air and is ideal for grilling or roasting large pieces of meat. The temperature can be set in the range of 50-250°C and the default temperature is 220°C. | |
| Radiant grillThe function uses part of the top elements and is ideal for grilling small quantities of food. The temperature can be set in the range of 180-240°C and the default temperature is 210°C. | |
| Dual grillThis function uses all of the top elements and is ideal for grilling large quantities of food. The temperature can be set in the range of 180-240°C and the default temperature is 210°C. | |
| Dual grill with fanThis function uses all of the top elements while the fan allows heat to circulate around the food. It is ideal for grilling large quantities of food. The temperature can be set in the range of 180-240°C and the default temperature is 210°C. | |
| ConvectionWhen this function is selected, the fan automatically turns on to improve air circulation and creates an even heat for cooking. The temperature can be set in the range of 50-240°C and the default temperature is 180°C. | |
| This function ensures energy savings during cooking. |
Oven accessories
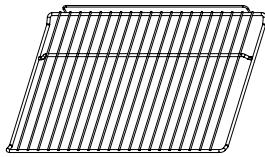
Wire shelf:
for dishes and items for roasting and grilling
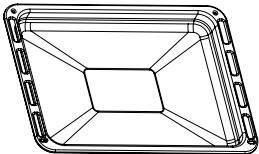
Pan:
for cooking large quantities of food such as moist cakes, pastries, frozen food etc. or for collecting fat/spillage and meat juices
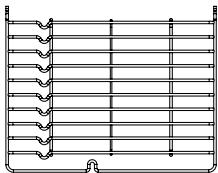
Shelf support rail (2):
The shelf support rails on the left and right sides inside the oven can be removed for cleaning. Wire shelf and pan can be rested in the desired position between two runners.
Push the wire shelf / pan between the guide bars of the shelf support rails in the oven, and push it to the end.
In case the wire shelf and the pan are inserted together, lay the wire shelf over the pan.
OPERATION
Before operating the oven, use a slightly damp cloth to carefully wipe the inner cavity wall. Clean the wire shelf and pan in warm soapy water before using. Rinse and dry thoroughly.
After connecting the oven to the power source, you will hear a beep and the display will show "0:00".
Setting the Clock
The clock is set on a 24-hour cycle.
- Press _i=1^n L_i^L . The hour digit will flash.
-
Turn the thermostat control knob to set the correct hour.
-
Press to confirm and then the minute digits will flash.
- Turn the thermostat control knob to set the correct minutes.
- Press _i=1^n to confirm. ":" will flash on the display.
Cooking
- Turn the function knob to select the desired function.
- The corresponding function indicator light will illuminate.
- Turn the thermostat knob to select the desired temperature.
-
NOTE: You cannot adjust the temperature in oven lamp and defrosting functions.
-
Press to start cooking.
-
The display will show the progress bar, the selected temperature. The defalut cooking time (9 hours) will flash on the display.
- The progress bar will show progress by decreasing the progress blocks in this bar.
-
During cooking, you can check the clock time by pressing ^L . The clock time will be displayed for about 3 seconds and then the display will return to the current state.
-
During cooking, you can adjust the cooking time and temperature by turning the
function and thermostat knob respectively. Press to confirm.
- NOTE: You cannot set the cooking time in the oven lamp function.
- The default and maximum cooking time is 9 hours (9:00).
- If you do not confirm the setting within 3 seconds after adjusting the cooking time and temperature, the oven will revert back to the previous cooking time and temperature to continue cooking.
-
When turning the function knob to adjust the cooking time, the cooking time will be increased by 1 minute for the initial 30 minutes, and then increased by 5 minutes up to 9 hours.
-
When the cooking is finished, the oven buzzer will sound five times.
To interrupt cooking, press Press to resume. You can stop cooking at any time by pressing twice.
Setting the Reminder
This function will help to remind you to start cooking in a certain time from 0:01 to 9:59.
This function can be set only when the oven is in the standby state.
- Press

-
The reminder symbol will appear and the hour digit will flash on the display.
-
Turn the thermostat knob to set the hour digit (The hour digit should be within 0-9).
-
Press

to confirm. The minute digits will flash.
-
Turn the thermostat knob to set the minute digits (The minute digits should be within 0-59).
-
Press

to confirm.
-
":" will flash. The time will count down.
-
After the time back to the zero hour, the oven buzzer will sound for 10 times and the symbol will disappear from the display to remind you to start cooking.
NOTE: You can cancel the reminder during setting by pressing . After the reminder has been set, you can cancel it by pressing twice. The reminder symbol will disappear from the display.
Cooking Time Reservation Function
This function allows you to set the time when you want to start cooking and you can also to set the desired cooking time.
To use this function, first set the clock (see the section "Setting the Clock").
- Press _i = 1^nL . The hour digit will flash.
- Turn the thermostat knob to set the desired hour(s).
- Press to confirm. The minute digits will flash.
- Turn the thermostat knob to set the desired minutes.
- Turn the function knob to select the desired function.

-
Press
-
Turn the function and thermostat knobs to set the desired cooking time and temperature respectively.
-
Press to finish setting.
-
The display will show the clock time and the reservation symbol.
To check the reservation time, press ^L . After about 3 seconds, the display will return to show the clock time. -
When the set reservation time has been reached, you will hear a beep and the oven will automatically start cooking.
-
The reservation symbol will disappear from the display.
NOTE:
- This reservation function is not available for the oven lamp, defrost and reminder functions.
During the status of reservation, press to check the set cooking time and
temperautre for the selected cooking function. Press again to cancel the
reservation function or press to return to the reservation status.
Child Safety Lock Function
- To lock the buttons and knobs : press 📁 and 📁 simultaneously for about 3 seconds, there will be a long "beeping" sound and the lock indicator light " 📁 " will be illuminated.
Except the button, all other buttons and knobs are locked. NOTE: During working mode, the oven is locked. If you want to stop cooking, you can press the button directly (no need to cancel the child lock). - To unlock the buttons and knobs, press and simultaneously for about 3 seconds, there will be a long beeping sound indicating the child-lock is released. The lock indicator light " " will disappear from the display.
Energy Saving Function
The following information will help you to use the oven in an ecological way, and to save energy
- To activate this function, in standby state press and hold for approximately 3 seconds. If there is no operation within 10 minutes, the display will turn off.
- To deactivate this function, press any button or turn the control knob. The display will turn on again.
CLEANING AND MAINTENANCE
Switch off and disconnect the appliance from the power supply and allow it to cool completely before cleaning.
Cleaning the outer surface
Clean the outside of the appliance with a slightly damp cloth Dry it thoroughly. Never use abrasive or chemical cleaning agents.
Cleaning the inside of the oven (after each use)
Wipe the inside of the oven using a household detergent. Wipe clean with a slightly damp cloth and dry thoroughly.
Cleaning removable accessories
Wash all the removal accessories in warm soapy water. Rinse and dry them thoroughly before use.
Replacing the oven light bulb
WARNING: Ensure that the appliance is disconnected from the power supply before replacing the lamp to avoid the possibility of electric shock.
The bulb is located inside the oven on the back wall.
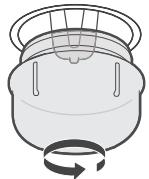
- Rotate the lamp cover to remove
- Unscrew and replace the bulb with a new one suitable for high temperatures (300^) with the followings: specification 230V, G9, 25W.
- Twist the lamp cover back on.
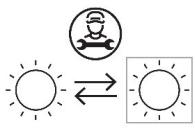
Replaceable light source by a professional
This product contains a light source of energy efficiency class G.
TECHNICAL DATA SHEET
Below is the sheet of domestic oven according to EU regulation No. 66/2014.
| Model identification | TMFC70IX |
| Type of oven | Built-in electric oven |
| Mass of the appliance (M) | 31.2 kg |
| Number of cavities | 1 |
| Heat source per cavity (electricity or gas) | Electricity |
| Volume per cavity (V) | 70L |
| Energy consumption (electricity) required to heat a standardized load in a cavity of an electric heated oven during a cycle in convectional mode per cavity (electric final energy) (EClectric cavity) | 0.99 kWh/cycle |
| Energy consumption required to heat a standardized load in a cavity of an electric heated oven during a cycle in fan-forced mode per cavity (electric final energy) (EClectric cavity) | 0.79 kWh/cycle |
| Energy Efficiency Index per cavity (EEIcavity) | 94 |
| Ecodesign requirements according to EU regulation No. 66/2014 | ||||
| Item | Value | Stage 1 | Stage 2 | Stage 3 |
| EEIcavity | 94 | 1 year after enter into force <146 | 3 years after entry into force <121 | 5 years after entry into force <96 |
| Rating / Supply Voltage and frequency | 220-240 V~50 Hz - 60 Hz |
| Max power | 3 kW |
| Oven lamp power | 25 W |
| Top heating element (W) | 950 W |
| Grill heating element (W) | 2000 W |
| Convection heating element (W) | 2000 W |
| Convection motor (W) | 19 W |
| Cooling fan (W) | 13 W |
| Cleaning (Enamel/catalytic/Pyrolytic) | Catalytic |
| Net Weight kg | 31.2 kg |
| Outside dimensions (W*D*H) | 595*575*595 mm |
| Cabinet/furniture cut-out sizes (W*D*H) | 606*570*600 mm |
| Energy Class (letter for the sticker) * | A |
| Usable volume (litres) | 70L |
| Size : (Small/Medium/Large) | Large |
| Made in | PRC |
- Energy class: A+++. D (A++=economical D=less economical)
The test is performed in compliance with the requirements of EN60350-1:2016.
Thomson and the Thomson logo are trademarks of Technicolor (S.A.) or its affiliates and are used under license by Fnac Darty (S.A.).
DISPOSAL
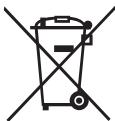
As a responsible retailer we care about the environment.
As such we urge you to follow the correct disposal procedure for the appliance and packaging materials. This will help conserve natural resources and ensure that it is recycled in a manner that protects health and the environment.
You must dispose of this appliance and its packaging according to local laws and regulations.
Because this appliance contains electronic components, the appliance and its accessories must be disposed of separately from household waste when the appliance reaches its end of life.
Contact your local authority to learn about disposal and recycling.
The appliance should be taken to your local collection point for recycling. Some collection points accept appliance free of charge.
We apologise for any inconvenience caused by minor inconsistencies in these instructions, which may occur as a result of product improvement and development.
EU Declaration of Conformity
Product Description:
The object of the declaration described above is in conformity with the relevant Union harmonisation legislation:


- Hotline Darty France
- WARNING
- These surfaces can get hot.
- IMPORTANT SAFETY INSTRUCTIONS
- INSTALLATION
- Installation Steps
- ELECTRICAL CONNECTION
- DESCRIPTION OF THE OVEN
- Control panel
- Oven accessories
- OPERATION
- Setting the Clock
- Cooking
- Setting the Reminder
- Cooking Time Reservation Function
- NOTE:
- Child Safety Lock Function
- Energy Saving Function
- CLEANING AND MAINTENANCE
- Cleaning the outer surface
- Cleaning the inside of the oven (after each use)
- Cleaning removable accessories
- Replacing the oven light bulb
- Replaceable light source by a professional
- TECHNICAL DATA SHEET
- DISPOSAL
Brand : THOMSON
Model : MFC701IXFOUR
Category : Built-in oven