
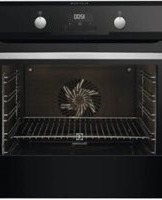
X69453MV02 - Built-in oven AEG - Free user manual and instructions
Find the device manual for free X69453MV02 AEG in PDF.



| Product Type | Built-in extractor hood |
| Brand | AEG |
| Model | X69453MV02 |
| Power supply | 220-240 V, frequency 50/60 Hz |
| Motor power | 200 W (estimated) |
| Number of speeds | 3 speeds + intensive speed |
| Intensive speed | 5 minutes, automatic return to previous speed |
| Lighting | Integrated LED |
| Filter type | Washable metal grease filter + activated carbon filter (optional) |
| Grease filter | Dishwasher safe, every 2 months |
| Charcoal filter | Not washable, replace every 4 months |
| Control | Touch electronic control |
| Delayed shut-off function | 15 minutes |
| Key lock | Yes (key B for 5 seconds) |
| Filter saturation alarm | Yes, LED indicating metal filter saturation (100h) and carbon filter (200h) |
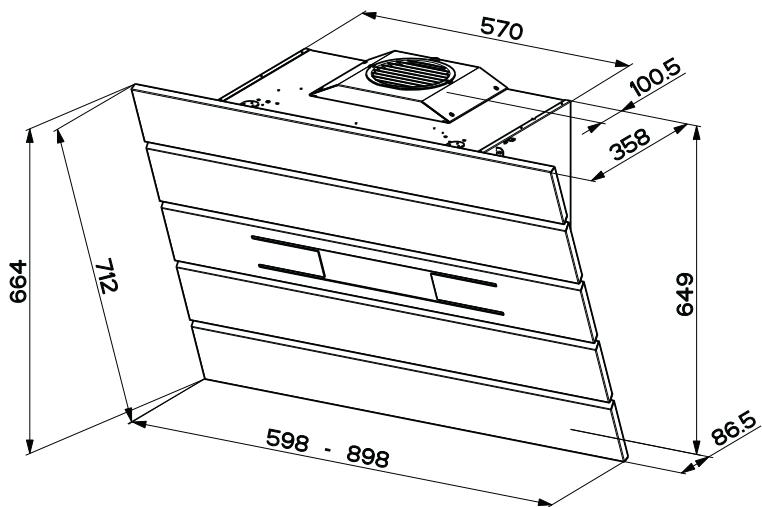
| Air outlet diameter | 150 mm or 120 mm (with reducer) |
| Installation | Built-in, ducted or recirculating version |
| Minimum distance from hob | 650 mm |
| Material | Metal (hood body) |
| Maintenance | External cleaning with damp cloth and neutral detergent |
Frequently Asked Questions - X69453MV02 AEG
User questions about X69453MV02 AEG
0 question about this device. Answer the ones you know or ask your own.
Ask a new question about this device
Download the instructions for your Built-in oven in PDF format for free! Find your manual X69453MV02 - AEG and take your electronic device back in hand. On this page are published all the documents necessary for the use of your device. X69453MV02 by AEG.
USER MANUAL X69453MV02 AEG
Thank you for choosing this AEG product. We have created it to give you impeccable performance for many years, with innovative technologies that help make life simpler – features you might not find on ordinary appliances. Please spend a few minutes reading to get the very best from it.
ACCESSORIES AND CONSUMABLES
In the AEG webshop, you'll find everything you need to keep all your AEG appliances looking spotless and working perfectly. Along with a wide range of accessories designed and built to the high quality standards you would expect, from specialist cookware to cutlery baskets, from bottle holders to delicate laundry bags...

Visit the webshop at: www.aeg-electrolux.com/shop
EN - RECOMMENDATIONS AND SUGGESTIONS - The Instructions for Use apply to several versions of this appliance. Accordingly, you may find descriptions of individual features that do not apply to your specific appliance. The manufacturer will not be held liable for any damages resulting from incorrect or improper installation. The minimum safety distance between the cooker top and the extractor hood is 650 mm. Check that the mains voltage corresponds to that indicated on the rating plate fixed to the inside of the hood. For Class I appliances, check that the domestic power supply guarantees adequate earthing. Connect the extractor to the exhaust flue through a pipe of minimum diameter 120 mm. The route of the flue must be as short as possible. Do not connect the extractor hood to exhaust ducts carrying combustion fumes (boilers, fireplaces, etc.). If the extractor is used in conjunction with non electrical appliances (e.g. gas burning appliances), a sufficient degree of aeration must be guaranteed in the room in order to prevent the backflow of exhaust gas. The kitchen must have an opening communicating directly with the open air in order to guarantee the entry of clean air. The extractor hood has been designed exclusively for domestic use to eliminate kitchen smells. Never use the hood for purposes other than for which it has been designed. Never leave high naked flames under the hood when it is in operation. Adjust the flame intensity to direct it onto the bottom of the pan only, making sure that it does not engulf the sides. Deep fat fryers must be continuously monitored during use: overheated oil can burst into flames. Do not flambé under the range hood; risk of fire. This appliance is not intended for use by persons (including children) with reduced physical, sensory or mental capabilities, or lack of experience and knowledge, unless they have been given supervision or instruction concerning use of the appliance by a person responsible for their safety. Children should be supervised to ensure that they do not play with the appliance. Switch off or unplug the appliance from the mains supply before carrying out any maintenance work. Clean and/or replace the Filters after the specified time period (Fire hazard). Grease filters: The filters must be cleaned every 2 months of operation, or more frequently for particularly heavy usage, and can be washed in a dishwasher. Activated charcoal filter: These filters are not washable and cannot be regenerated, and must be replaced approximately every 4 months of operation, or more frequently with heavy usage. Clean the hood using a damp cloth and a neutral liquid detergent. The symbol on the product or on its packaging indicates that this product may not be treated as household waste. Instead it shall be handed over to the applicable collection point for the recycling of electrical and electronic equipment. By ensuring this product is disposed of correctly, you will help prevent potential negative consequences for the environment and human health, which could otherwise be caused by inappropriate waste handling of this product. For more detailed information about recycling of this product, please contact your local city office, your household waste disposal service or the shop where you purchased the product.
Connect the hood to the mains through a two-pole switch having a contact gap of at least 3 mm
Warning: Before installing the Hood, remove the protective films (white and transparent).
CHARACTERISTICS
Dimensions
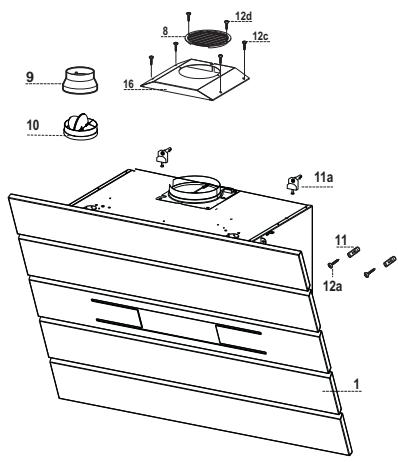
Components
Ref. Q.ty Product Components
1 1 Hood Body, complete with: Controls, Light, Blower, Filters 8 1 Directional Air Outlet grille 9 1 Reducer Flange Ø 150-120 mm 10 1 Dumper 16 1 Filter cover
Ref. Q.ty Installation Components
11 2 Wall Plugs 11a 2 Wall Plugs SB 12/10 12a 2 Screws 4.2 x 44.4 12c 4 Screws 2.9 x 6.5 12d 2 Screws 2.9 x 9.5
Q.ty Documentation
1 Instruction Manual
INSTALLATION
Wall drilling and bracket fixing
As a first step, proceed with the following drawings:
- a vertical line up to the ceiling or up to the upper limit, at the centre of the area in which the hood is to be fitted;
- a horizontal line at a minimum 1004 mm above the cooker top.
- Mark a point (1) on the horizontal line, 247 mm to the right of the vertical reference line.
- Repeat this operation on the other side, checking that the two marks are levelled.
- Mark a reference point (2) as indicated at 210 mm from the vertical reference line and 482 mm above the cooker top.
- Repeat this operation on the other side, checking that the two marks are levelled.
- Drill at the marked points (1), using a 12 mm drill bit.
- Drill at the marked points (2) using an 8 mm drill bit.
- Insert the bracket plugs 11a into the holes (1) and tighten the screws.
- Insert plug 11 into holes (2).
To install a decorative chimney (optional)
- Place bracket 7.2.1 on the wall, about 1-2 mm from the ceiling or from the upper limit, aligning the centre (notch) with the vertical reference line.
- Mark the wall at the centres of the bracket holes.
- Place the bracket 7.2.1 on the wall at X mm below the first bracket (X = height of the upper chimney section), aligning the centre (notch) with the vertical line.
- Mark the wall at the centres of the bracket holes.
- Drill 8 mm holes at all the marked centre points.
- Insert the wall plugs 11 in the holes. Fix the brackets using the 12a screws (4.2 x 44.4) supplied with the hood.
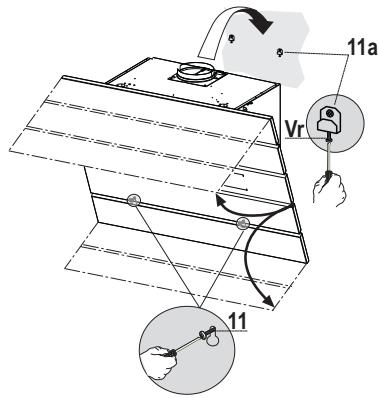
FITTING THE HOOD BODY
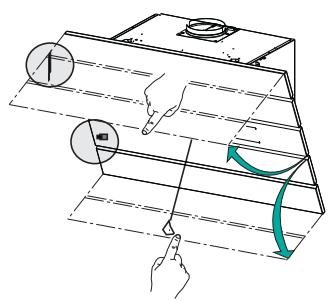
- Open the top suction panel and fasten it to the hood body on the left using the pin, so that it does not close again.
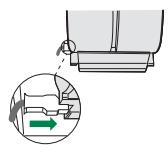
- Unlock the lower suction panel by removing the fixing pin on the left, and open it.
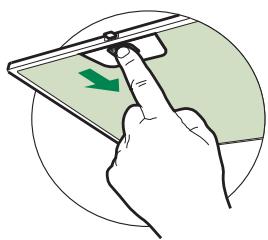
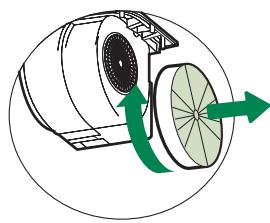
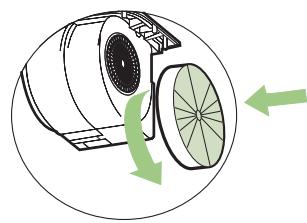
- Remove the Metal grease filters using the handles provided.
- Adjust the two screws Vr in the brackets 11a, so that they are at the start of their travel.
- Hook the hood body to the two brackets 11a.
- From the inside of the hood body, turn screws Vr to level the hood body itself.
- Fasten the safety screws 11.
- Close the suction panels.
CONNECTIONS
DUCTED VERSION AIR EXHAUST SYSTEM
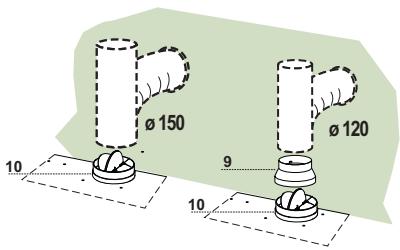
When installing the ducted version, connect the hood to the chimney using either a flexible or rigid pipe of 150 or 120 mm diameter, the choice of which is left to the installer.
To install a 150 pipe
To install the damper 10, fix the pipe in position using sufficient pipe clamps (not supplied).
To install a 0 120 pipe
- To install a 0 120 mm air exhaust connection, insert the reducer flange 9 on the dumper 10. Fix the pipe in position using sufficient pipe clamps (not supplied).
- Remove any activated charcoal filters.
RECIRCULATION VERSION AIR OUTLET
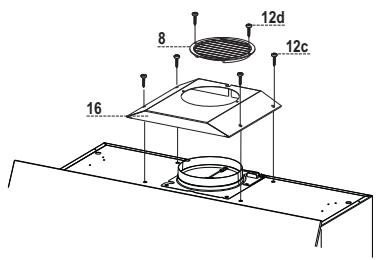
- Screw the filter cover onto the air outlet, using four screws 12c (2.9 x 12.5). Fix the directional grille 8 on the recirculation air outlet using the 2 screws 12d (2,9 x 9,5) provided.
ELECTRICAL CONNECTION
- Connect the hood to the mains through a two-pole switch having a contact gap of at least 3 mm.
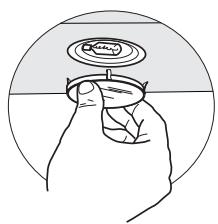
- Remove the grease filters (see paragraph Maintenance) being sure that the connector of the feeding cable is correctly inserted in the socket placed on the side of the fan.
USE

| Button | Function | Led |
| A | Turns the Lighting System on and off. If pressed and held for 5 seconds with the hood turned off and no alarm, do: Enables the Activated Charcoal Filter Alarm. Disables the Activated Charcoal Filter Alarm. | On or Off 2 Flashes Led buttom H 1 Flash Led buttom H |
| B | Turns the Motor on and off. Enables Keyboard Lock mode if pressed and held for 5 seconds. It is disabled by pressing the button for 5 seconds. | On or Off All the Leds flash twice and during Keyboard Lock the Leds light up in sequence. All the Leds flash once. |
| C | Activates speed one. | On. |
| D | Activates speed two. | On. |
| E | Activates speed three. | On. |
| F | Activates intensive speed from any other speed, including motor off. This speed is timed to run for 5 minutes, after which the system will return to the speed that was previously set. Suitable to deal with se-vere cooking fumes. It is deactivated by pressing the button or turning the motor off. | On. |
| G | Activates delayed automatic shutdown of the motor and the lighting system after 15 minutes. Suitable to complete the elimination of residual odours, it is deactivated by press-ing the button of turning the motor off. If pressed and held for 5 seconds with the hood and lightturned off and no alarm, do: Enables the Remote control. Disables the Remote control. | On. 2 Flashes Led buttom C + B 1 Flash Led buttom C + B |
| H | Performs a Reset of the Filter saturation alarm when the button is pressed for ap-proximately 2 seconds with the hood turned off. | After 100 hours operation the Led lights up continuously to indicate saturation of the Metal Grease Filters. After 200 hours operation the Led flashes to indicate saturation of the Activated Charcoal Filters. |
FOR PERFECT RESULTS
ACCESSORIES AND CONSUMABLES
Ref. Installation parts
11 2 Plugs 11a 2 Plugs SB 12/10 12a 2 Screws 4.2 x 44.4 12c 4 Screws 2.9 x 9.5 12d 2 Screws 2.9 x 9.5
Documentation
FOR PERFECT RESULTS
- ACCESSORIES AND CONSUMABLES
- CHARACTERISTICS
- DIMENSIONS
- COMPONENTS
- REF. Q.TY PRODUCT COMPONENTS
- REF. Q.TY INSTALLATION COMPONENTS
- Q.TY DOCUMENTATION
- INSTALLATION
- TO INSTALL A DECORATIVE CHIMNEY (OPTIONAL)
- FITTING THE HOOD BODY
- CONNECTIONS
- DUCTED VERSION AIR EXHAUST SYSTEM
- TO INSTALL A 150 PIPE
- TO INSTALL A 0 120 PIPE
- RECIRCULATION VERSION AIR OUTLET
- ELECTRICAL CONNECTION
- USE
- FOR PERFECT RESULTS
- REF. INSTALLATION PARTS
- DOCUMENTATION
Brand : AEG
Model : X69453MV02
Category : Built-in oven