
920-529 - Action Camera Marquant - Free user manual and instructions
Find the device manual for free 920-529 Marquant in PDF.


| Product Type | Action Camera |
| Model | 920-529 |
| Brand | Marquant |
| Dimensions | 61 x 42 x 30 mm |
| Weight | 60 g |
| Power Source | Built-in Li-Ion battery, 3.7 V, 900 mAh |
| Display | 2.0" LCD |
| Image Sensor | 5 MP CMOS |
| Photo Resolution | 12 MP (4000x3000), 10 MP (3648x2736), 8 MP (3264x2448), 5 MP (2560x1920) |
| Video Resolution | FHD (1920x1080/30fps), HD (1280x720/30fps), HD (1280x720/60fps) |
| Storage Media | Micro-SD up to 32 GB (Class 4 or higher required) |
| Connectivity | MicroUSB 2.0, Micro HDMI, WiFi |
| Protection Rating | IPX8 |
| Battery Life | Approx. 90 minutes |
| Function Modes | Video recording, Car mode, Photographing, Playback |
| Car Mode | Records 3-minute segments; overwrites oldest when full |
| File Format | JPEG, H.264 |
| System Requirements | Windows XP/Vista/7/8/10, Mac OS X 10.8 or higher |
| Webcam Mode | PC-CAM (no driver needed for Windows XP SP3+) |
| App Compatibility | Ismart DV (Android/iOS) |
| Maintenance | Store in clean, dry place; clean lens with optical cloth; do not touch lens with fingers |
Frequently Asked Questions - 920-529 Marquant
User questions about 920-529 Marquant
0 question about this device. Answer the ones you know or ask your own.
Ask a new question about this device
Download the instructions for your Action Camera in PDF format for free! Find your manual 920-529 - Marquant and take your electronic device back in hand. On this page are published all the documents necessary for the use of your device. 920-529 by Marquant.
USER MANUAL 920-529 Marquant
natural_image
Exterior view of a Marquant WiFi camera module (no text or symbols on body)SE Bruksanvisning för actionkamera
NO Bruksanvisning for actionkamera
PL Instrukcja obsługi kamery sportowej
EN Operating instructions for action camera
SE - Bruksanvisning i original
EN - Operating instructions (Translation of the original instructions)
Jula reserves the right to make changes. In the event of problems, please contact our service department.
www.jula.com
Tillverkare/ Produsent / Produenci/ Manufacturer
Jula AB, Box 363, 532 24 SKARA
Importör/ Importør/ Importer/ Importer
Care for the environment!
Must not be discarded with household waste! This product contains electrical or electronic components that should be recycled. Leave the product for recycling at the designated station e.g. the local authority's recycling station.
SVENSKA....5
SÄKERHETSANVISNINGAR....5
TEKNISKA DATA....6
BESKRIVNING 7
HANDHAVANDE 7
Inställningar....11
SAFETY INSTRUCTIONS....41
TECHNICAL DATA 42
DESCRIPTION 43
USE 44
Settings 47
Connecting to a computer 49
Apps ....50
MAINTENANCE ....52
SÄKERHETSANVISNINGAR
natural_image
Diagram showing a laptop connected to an electronic device via cable, with a small screen displaying '9' visible (no text or symbols on the device itself)natural_image
Diagram of a computer monitor showing two labeled ports (no text or symbols present)Systemmeny

- Display
- OPP
- Modusvelger
- NED
- Menyknapp/strømbryter

BRUK
Lade batteriet
natural_image
Diagram showing a device connected to a laptop via cable, with no visible text or symbols.Meny for fotograferingsmodus
Systemmeny
Koble til HDTV

VEDLIKEHOLD
OBSŁUGA
Naładuj akumulator.
Podłączenie do HDTV
PODŁĄCZANIE DO KOMPUTERA
Przenoszenie plików

KONSERWACJA
Read the user instructions carefully before use.
Save them for future reference.
FCC compliance
The product complies with part 15 of FCC regulations. Usage is subject to the following conditions.
– The product must not cause harmful interference.
- The product must withstand the interference it is exposed to, including interference that could cause unwanted functionality.
WARNING: Never modify the product in any way. The manufacturer cannot accept liability for any damage caused by unauthorised modifications.
NOTE: This equipment has been tested and complies with the limit values for Class B digital appliances, according to part 15 of the FCC regulations. These limit values are designed to provide sufficient protection against harmful interference when installed in the home. The equipment generates, uses and can emit radio frequency energy, and if not installed and used according to the instructions could cause interference to radio communication. Interference can occur in separate installations. If the equipment produces harmful interference to radio or television reception (which can be checked by switching the equipment on and off), we recommend that users attempt to rectify interference in one of the following ways:
• Realign or move the receiver antenna.
- Increase the gap between the equipment and the receiver.
- Connect the equipment to an output in another circuit than the one the receiver is connected to.
- Contact your dealer or a qualified radio/television technician for assistance.
- The equipment complies with FCC limit values for exposure to radiation in an uncontrolled environment. The equipment must be installed and used with a gap of at least 20 cm between the radiator and the body.
- Do not expose the memory card to stress in the form of bending, pressure or shock.
- Do not expose the memory card to powerful electromagnetic or magnetic fields, such as near speakers or television receivers.
- Do not expose the memory card to intense heat or cold.
- Keep memory cards clean and do not expose them to water or any other liquid. A memory card that has become wet can be dried with a soft cloth.
- Do not use a memory card from another camera without formatting it first.
- Do not use a memory card that has been formatted in another camera or card reader.
- Data on the memory card can be damaged if the memory card is used incorrectly, or if the power supply is disconnected, or the memory card is removed during recording, deletion, formatting or reading.
- Back up important data on another medium, i.e. hard disk or CD.
TECHNICAL DATA
| Dimensions 61 x 42 x 30 mm | |
| Connection MicroUSB (2.0), HDMI micro, WiFi | |
| Weight 60 g | |
| Protection rating IPX8 | |
| Battery life 90 min | |
| Battery technique Li-Ion | |
| Image sensor 5 MP, CMOS | |
| Function modes Recording, car mode, photographing, playback | |
| Display 2.0" LCD | |
| Photo resolution 12 MP (4000 x 3000) | |
| 10 MP (3648 X 2736) | |
| 8 MP (3264 X 2448) | |
| 5 MP (2560 X 1920) | |
| Video resolution | FHD (1920 x 1080/30 fps) |
| HD (1280 x 720/30 fps) | |
| HD (1280 x 720/60 fps) | |
| Storage media | Micro-SD (up to 32 GB) |
| File format JPEG, H.264 | |
| Car mode | 2 s/10 s |
| USB port USB 2.0/3.0 | |
| Battery | 3.7 V 900 mAh Li-Ion |
| Energy saving settings | 1 min/3 min/5 min/Off |
System requirements
| Operating system | Windows XP/Vista/7/8, Mac 10.8 |
| PCCAM | Microsoft Windows XP (SP3), Vista, 7, 8 Mac OS X ver.: 10.8.0 or higher |
| MSDC | Microsoft Windows 2000, XP, Vista, 7, 8 Mac OS X ver.: 10.0.0 or higher |
| Processor | Intel Pentium 1 GHz, or higher or equivalent processor |
| Internal memory | Min 1 GB |
| Audio card and graphics card | The audio and graphics cards must be compatible with DirectX 8, or later |
| CD player | 4x or faster |
| Hard disk | Min 2 GB free space |
| Other | One port for USB 1.1 or USB 2.0 |
DESCRIPTION
- Status indicator (blue)
- Shutter button
- Speaker
- Charging indicator (red)
- Card slot (Micro SD)
- Micro USB port
- Micro HDMI port
- IR receiver
- Lens

- Display
- UP
- Mode selector
- DOWN
- Menu button/power switch

USE
Charge the battery
- Connect the switched off camera to a computer (or USB charger) to charge the battery.

natural_image
Diagram showing a device connected to a laptop displaying a screen with a cartoon character (no text or symbols present)- The charging indicator will go on during charging and go off when fully charged. The battery is normally fully charged after about hours.
Using the memory card
NOTE:
• Us a high speed memory card class 4, or higher.
- New memory cards and memory cards that contain data from other cameras, or data that the camera does not recognise, must be formatted before they are used.
- The memory card gets hot during use. This is quite normal.
- Memory card capacity decreases over time. Replace the memory card if this happens.
- Store the memory card in its case when not in use.
-
Disconnect the power supply to the camera before inserting or removing the memory card.
-
The camera does not have a built-in memory. Insert a memory card before use. The camera will not work without a formatted memory card. Insert the memory card according to the instructions by the card slot. Carefully press the end of the memory card to feed in the card.

Starting and switching off
Starting
Press the power switch for three seconds. The display lights up and the camera switches on.
Switching off
Press the power switch for three seconds to switch off the camera.
- Automatic power off; the camera switches off automatically to save battery after some time in standby mode. The standard setting is three minutes.
- Switching off with discharged battery; when the battery is discharged ☑ is shown on the display. When the symbol for discharged battery is shown on the display the camera switches off automatically.
Status lights
- The status light goes on when the camera is in use.
- The charging indicator goes on in switched off mode when the battery is charging.
Function modes
The camera has four function modes. After switching on, press the mode selector button to switch between the following modes:
- Video recording
- Car mode (each film sequence is three minutes long).
- Photographing (still).
-Playback.
Setting the functions
- When the camera is switched on the video recording mode is enabled. Press the shutter button to start recording, press again to stop recording.
- Switch to car mode by pressing the mode selector button. Press the shutter button to start recording, press again to stop recording.
- Switch to photographing mode by pressing the mode selector button. Press the shutter button to take a picture.
Photographing mode
- Photographing mode
- Battery status
- Self-timer mode
- Resolution
- Photo quality
- Available number of photos
![1—P 2—[green rectangle] 3 4 5 6 5m 230](/content/2026/05/1071744/images/ca553060e8d5d3f6414476f9ad639c12b4d34160e32a829cdf9297969b1989af.jpg)
Recording mode
NOTE:
- For HD or FHD video a high speed memory card class 4, or higher is required.
-
The display switches off during recording to save the battery. Enable the display by pressing one of the buttons on the camera.
-
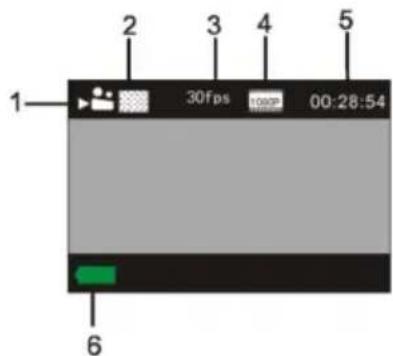
Recording mode
- Video quality
- Number of photos
- Video resolution
- Available recording time
- Battery status
Car mode
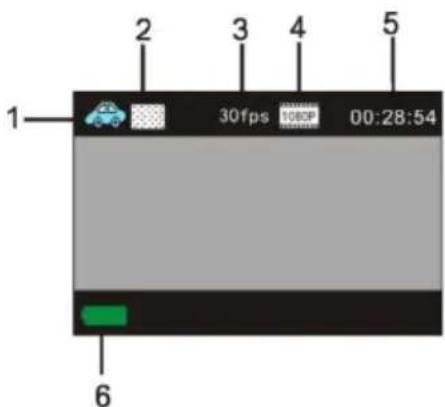
Press the shutter button once during preview display to start recording. The recoding is saved every three minutes, after which the next recording sequence starts. When the memory card is full the oldest video sequence is deleted to make room for the next.
- Car mode
- Video quality
- Number of photos
- Video resolution
- Available recording time
- Battery status
Playback mode
- Start the camera and press the mode selector button to enable playback mode or select CAR/VIDEO/JPG with the UP/DOWN buttons and press the shutter button to enable preview.
- Press the mode selector button to enable playback mode to browse among photos and films or to play recorded video films.
• Use the UP/DOWN buttons to go to previous/next photo/video. - Play film: Press the shutter button to start/pause video playback, fast wind with the UP/DOWN buttons and press the power switch to stop the playback.

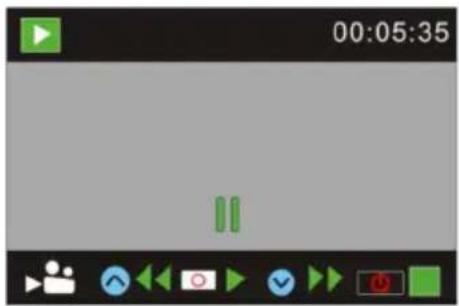
Playback of video file Video pause mode
SETTINGS
Menu display
In photo, recording, car or playback mode:
- Press the power switch to open the menu and highlight unwanted items with the UP/DOWN buttons.
- Press the shutter button to open the submenus. Highlighted items are shown with blue background.

Menu recording/car mode


Menu photographing mode
System menu
- Open the menu by pressing the power switch.
- Press the mode selector button to switch to the settings menu.
- Highlight unwanted items with the UP/DOWN buttons and press the shutter button to open
the submenus.
-
Highlight unwanted items in the submenus with the UP/DOWN buttons and press the shutter button to confirm.
-
Go back to the main menu and press the power switch to exit.


Setting the date and time
- Open the menu by pressing the power switch.
- Press the mode selector button to switch to the settings menu and press the shutter button to confirm.
- Press the DOWN button to highlight the item Date and time, and press the shutter button to open the settings window.

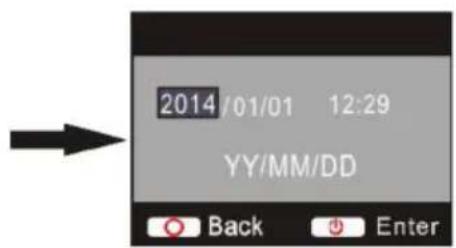
- In the settings window, press the mode selector button to select the item to be changed and change the value with the UP/DOWN buttons.
- Press the shutter button to confirm or the power switch to stop and ignore the changes.
- Press the power switch to exit the settings mode.
Playback mode
- In playback mode, press the power switch to open the menu for playback and highlight unwanted items with the UP/DOWN buttons.
- Press the shutter button to open the submenus.
-
Highlight unwanted items in the submenus with the UP/DOWN buttons and press the shutter button to confirm.
-
Go back to the main menu and press the mode selection button to exit.
Connection to HDTV

NOTE: Stop recording and disconnect WiFi before connecting or disconnecting the HDMI cable.
- Connect the camera to HDTV with a HDMI cable (sold separately).
- To transfer images and audio to a HDTV for playback, connect the COM end of the HDMI cable to the camera and the other end to the HD input on the HDTV as shown below.
- When the camera has been correctly connected to the HDTV the same image shown on the camera display will be shown on the HDTV.

flowchart
graph TD
    A["Camera"] --> B["Switch"]
    C["Camera"] --> D["Switch"]
    B --> E["Monitor Display"]
    D --> E
    style A fill:#f9f,stroke:#333
    style C fill:#f9f,stroke:#333
    style E fill:#ccf,stroke:#333
CONNECTING TO A COMPUTER
Transfer files
NOTE: Do not disconnect the USB cable when a transfer is in progress and do not remove the memory card when the USB cable is connected – risk of loss of data.
- When the camera is connected to a computer it is shown as an external unit in My computer. Photo and video files can be found in the folder DCIM\CAR, JPG, VIDEO on the external unit.
- Open the folder to copy files to the computer's hard disk.
Webcam mode
NOTE: No drive routine is needed for webcam mode (PC-CAM mode) in Windows XP (SP3) and higher.
- In U disk mode (MSDC mode), press the shutter button to switch to webcam mode (PC-CAM). The display shows PCCAM.
- The webcam can be started from the software. Press the power switch to return to U disk mode (MSDC mode).
APPS
Installation of apps
- Search for Ismart DV on Google Play (for Android) to find the app and install as instructed.
- Search for Ismart DV in APP Store (for iOS) to find the app and install as instructed.
Android app
- Install the app lsmart DV in a smartphone or tablet. When the installation is completed the icon 📁 is shown on the display.
- Insert the memory card and start the camera. The WiFi icon is shown on the display. Enable WiFi by pressing the shutter button for about three seconds. The display shows Waiting for WiFi connection and the status indicator flashes. The WiFi icon is shown on the display.
- Enable WiFi on your smartphone or tablet and search for wireless AP signal DV555SA and connect it to the camera. The camera shows Connected successfully. When the connection is completed the display goes off after about 15 seconds and the WiFi indicator does not flash when you press the start button to enable the display. The display shows WiFi Connection Ready and disables WiFi immediately. NOTE: The first time you connect to the camera you must enter the password 1234567890.


-
Click on the icon in the app list in your smartphone or tablet to open it. This allows you to preview the image from the camera on the phone or tablet and to do some processing.
-
Video resolution
- White balance
- Settings (opens installation menu)
- Enable playback mode
- Shutter button
- Photographing mode
- Recording mode
- Icon for WiFi connection
- Battery indicator

iOS app
- Install the app lsmart DV in an iOS phone or tablet. When the installation is completed the icon is shown on the display.
- Enable WiFi on your iOS phone or tablet and search for wireless AP signal DV555SA and connect it to the camera. The camera shows Connected successfully.
-
Click on the icon in the app list in your iOS phone or tablet to open it. This allows you to preview the image from the camera on the phone or tablet and to do some processing.
-
Battery indicator
- Video resolution
- White balance
- Settings (opens installation menu)
- Enable playback mode
- Shutter button
- Photographing mode
- Recording mode

MAINTENANCE
• Store the product in a clean, dry place.
- Protect the lens and display from scratches.
- Clean the lens by blowing off dust and carefully wiping the lens with a cleaning cloth for optical equipment. Only use detergent intended for cameras. Do not use solvents.
- Do not touch the lens with your fingers.
- Care for the environment!
- SVENSKA....5
- SÄKERHETSANVISNINGAR....5
- TEKNISKA DATA....6
- BESKRIVNING 7
- HANDHAVANDE 7
- Inställningar....11
- SAFETY INSTRUCTIONS....41
- TECHNICAL DATA 42
- DESCRIPTION 43
- USE 44
- Settings 47
- Connecting to a computer 49
- Apps ....50
- MAINTENANCE ....52
- SÄKERHETSANVISNINGAR
- Systemmeny
- BRUK
- Lade batteriet
- Koble til HDTV
- VEDLIKEHOLD
- OBSŁUGA
- Naładuj akumulator.
- Podłączenie do HDTV
- PODŁĄCZANIE DO KOMPUTERA
- Przenoszenie plików
- KONSERWACJA
- Read the user instructions carefully before use.
- FCC compliance
- DESCRIPTION
- USE
- Charge the battery
- Using the memory card
- NOTE:
- Starting and switching off
- Starting
- Switching off
- Status lights
- Function modes
- Setting the functions
- Photographing mode
- Recording mode
- Car mode
- Playback mode
- SETTINGS
- Menu display
- System menu
- Setting the date and time
- Connection to HDTV
- NOTE: Stop recording and disconnect WiFi before connecting or disconnecting the HDMI cable.
- CONNECTING TO A COMPUTER
- Transfer files
- Webcam mode
- APPS
- Installation of apps
- Android app
- iOS app
- MAINTENANCE
Brand : Marquant
Model : 920-529
Category : Action Camera