
921-006 - Action Camera Marquant - Free user manual and instructions
Find the device manual for free 921-006 Marquant in PDF.

| Product Type | Action Camera / Dash Cam |
| Dimensions (L x W x H) | 67 x 48 x 29 mm |
| Weight | 46.5 g |
| Power Supply | Built-in 3.7V rechargeable lithium battery |
| Image Sensor | 1.3 MP CMOS |
| Lens | F3.1, f=9.3 mm |
| Digital Zoom | 4x |
| Display | 2-inch touch screen |
| Image Resolution | 5M (2592x1944), 3M (2048x1536), 1M (1280x1024) |
| Video Resolution | VGA (640x480 @60fps), 720P (1280x720 @30fps) |
| Storage Media | SD card up to 32 GB (not included) |
| USB | USB 2.0 |
| File Format (Image) | JPEG |
| File Format (Video) | AVI |
| White Balance | Automatic |
| Exposure | Automatic |
| Shutter | Electronic |
| Continuous Recording | Yes, with cyclic overwrite (5-minute segments) |
| Waterproof Case | Included (submersible for short periods) |
| System Requirements | Windows 2000/XP/Vista/7, USB port |
Frequently Asked Questions - 921-006 Marquant
User questions about 921-006 Marquant
0 question about this device. Answer the ones you know or ask your own.
Ask a new question about this device
Download the instructions for your Action Camera in PDF format for free! Find your manual 921-006 - Marquant and take your electronic device back in hand. On this page are published all the documents necessary for the use of your device. 921-006 by Marquant.
USER MANUAL 921-006 Marquant
User Instructions for Digital Camera
921-006

SV Bruksanvisning i original
NO Bruksanvisning i original
EN Operating instructions in original
SVENSKA 4
Safety instructions 28
Technical data 28
Description....29
System requirements....29
Overview 29
Use 30
Recharging the built-in lithium battery 30
Using memory cards 30
Power On/Off 30
Mode selector 31
Status light 31
Video recording mode.... 31
Photographing mode 32
Continuous mode....32
Playback mode 33
Press 33
Video playback: 34
Deleting files: 34
Connecting to a computer.... 34
SÄKERHETSANVISNINGAR
natural_image
Top-down view of a car head with a labeled component (7), no visible text or symbols on the body itself.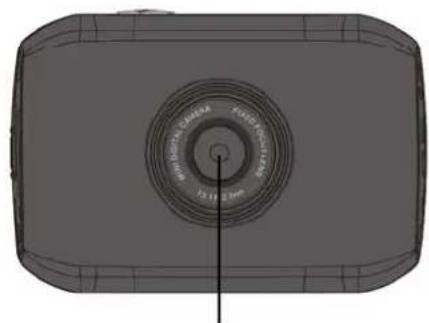
natural_image
Top-down technical drawing of a rectangular device with a circular top and central hole, showing internal structure (no text or symbols)(8)
natural_image
3D CAD model of a rectangular electronic device with internal components and mounting holes (no text or symbols)(9)
natural_image
Diagram of a device rear panel showing internal components including a USB port and a CD40 connector (no text or symbols beyond labels)natural_image
Diagram of a car rear panel with labeled component (7), no text or symbols present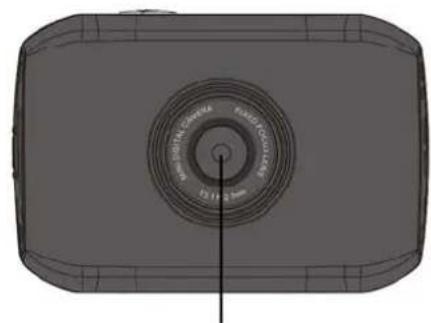
natural_image
3D rendered diagram of a rectangular device with a circular top and central spiral pattern (no text or symbols)(8)
natural_image
3D CAD model of a rectangular electronic component with internal channels and mounting points, labeled (5) and (1), no readable text or symbols beyond annotations.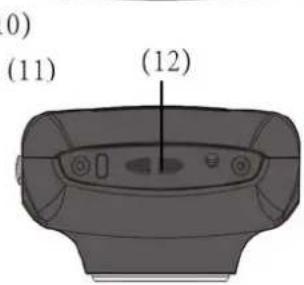
(9)
- SD-kort
- Nullstilling
- USB-port
- Strømbryter
- Mikrofon
- Lukkerknapp
- Funksjonsvelger:
- Fotografering
- Videoinnspilling
-
Trafikkoverväkingsmodus
-
Objektiv
- LCD-skjerm
- Indikatorlampe for drift
- Indikatorlampe for lading
- Feste for håndleddsrem
BRUK
natural_image
Top-down view of a device rear panel showing internal components (no text or symbols visible)5M (2592x1944), 3M (2048x1536), 1M (1280x1024)
Rozdzielczość wideo
VGA: 640x480 (60 klatek/sekundę), 720P: 1280x720 (30 klatek/sekundę)
Balans bieli
Automatyczny
Naświetlanie:
Automatyczne
Format pliku
Obraz
AVI
Wideo
JPEG
Nośnik pamięci
natural_image
Top-down view of a car head with visible sensor and control buttons (no text or symbols)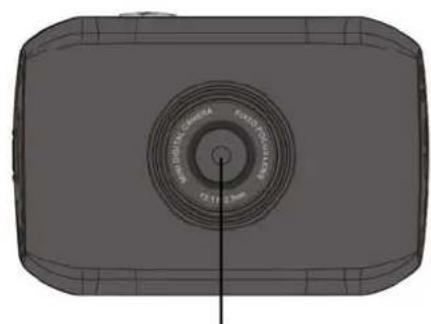
natural_image
3D rendered diagram of a rectangular device with a circular top and central axis line (no text or symbols)(8)

natural_image
3D CAD model of a rectangular mechanical component with internal channels and mounting holes (no text or symbols)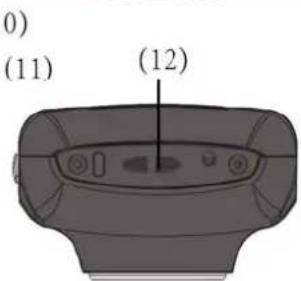
(9)
natural_image
Top-down view of a device rear panel showing internal components including a USB port and a CD40 logo (no text or symbols beyond branding)Read these instructions before use and save them for future reference.
- Do not expose the camera to direct sunlight and do not point the lens at the sun. This could damage the image sensor.
- Protect the camera from water and sand when you are on the beach or near water. The penetration of water, sand, dust or salt into the camera can damage it.
- Protect the camera from dust and chemicals. Store the camera in a dry, cool and well-ventilated area. Do not expose the camera to high temperatures, moisture or dust – risk of material damage.
- Charge the camera batteries at regular intervals during prolonged storage. Check that the camera is in good working order before using it.
- Clean the casing and lens with a soft, dry and clean cloth when necessary. Carefully blow off any sand from the casing and lens. Do not wipe off sand with a cloth, this can scratch the casing or lens.
- Cleaning: Blow off any sand and dust first. Wipe carefully with a cleaning cloth specially intended for camera lenses. A detergent specially intended for cameras can be used if necessary. Do not use organic solvents.
- Do not touch the lens with your fingers.
- Back up any data on the memory card if this is the first time it is being used in the video camera. Format the memory card afterwards.
- The external SD and MMC cards contain sensitive electronic components. Data can be lost or damaged as a result of:
- Using the memory card incorrectly.
- Breaking, dropping or exposing the memory card to heavy knocks.
- Exposing the memory card to high temperatures, moisture or direct sunlight.
- Exposing the memory card to static electricity or electromagnetic fields.
- Removing the memory card or switching off the power when the camera or computer is processing it (i.e. during reading, printing or formatting).
- Touching the metal contacts on the memory card with your fingers or a metal object.
- The memory card reaching the end of its useful life (replace the memory card regularly).
TECHNICAL DATA
Image sensor 1.3 million pixels (CMOS)
Function mode Video recording, photographing,
continuous mode, removable drive, web camera
Camera lens F3.1 f=9.3 mm
Digital zoom 4x
Shutter Electronic
LCD display 2" touch screen
Image resolution 5M (2592x1944), 3M (2048x1536), 1M
(1280×1024)
Video resolution VGA: 640x480 (60 frames/second), 720P:
1280x720 (30 frames/second)
White balance Automatic
Exposure: Automatic
| File format | |
| Image | AVI |
| Video | JPEG |
Storage media SD card (up to 32 GB) (built-in flash
memory not included)
USB USB 2.0
Power supply Built-in 3.7 V rechargeable lithium battery
Size (length x width x height) 67 x 48 x 29 mm
Weight approx. 46.5 g
DESCRIPTION
- Compact and handy size.
- Circuit card with high performance for HD video, good reproduction of moving subjects, video recording even in poor light and support for AVI video format.
• Video recording in VGA mode (640 x 480) or HD (1280 x 720).
• Photographing with 5, 3 or 1 megapixel resolution.
• Watermark function for time and date. The time and date can be shown continuously for video recording. - Compatible with USB 2.0.
- Compatible with SD cards up to 32 GB.
• Cyclic recording, where old film sequences are replaced by new for continuous monitoring. - Playback via video output or direct in camera. You can check video recordings directly on the display with the camera fitted in a vehicle, or play them back on a television or computer.
System requirements
| System requirements | |
| Operating system Microsoft Windows 2000, XP, Vista, 7 | |
| Processor | Intel Pentium III 800 MHz, or higher or equivalent processor |
| RAM Minimum 512 MB | |
| Audio card and graphics card | The audio and graphics cards must be compatible with DirectX 8, or later |
| CD player 4x or faster | |
| Hard disk Minimum of 500 MB | free space |
| Miscellaneous One USB port for USB 1.1 or USB 2.0 | |
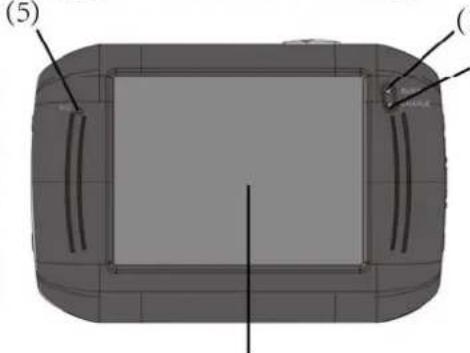
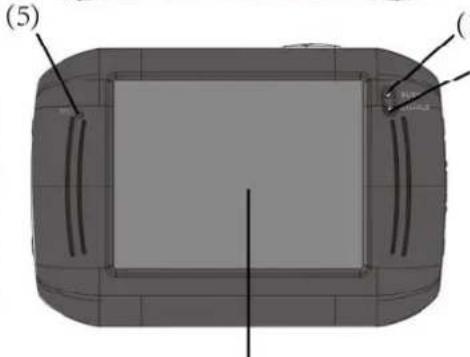
Overview
natural_image
Diagram of a device casing with labeled part (7), showing internal components without any text or symbols.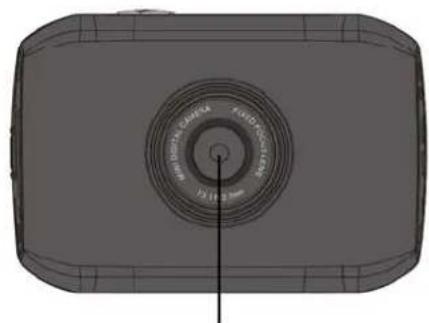
natural_image
3D wireframe model of a rectangular device with a circular top and central dial (no text or symbols)(8)
natural_image
3D CAD model of a rectangular electronic device with internal components and mounting holes (no text or symbols)(9)
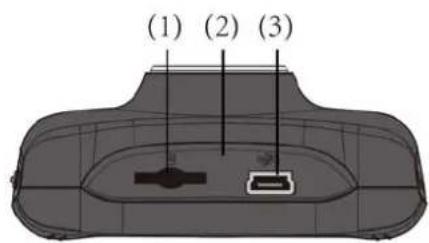
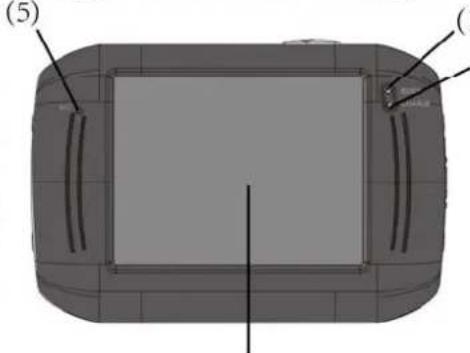
- SD card
- Reset
- USB port
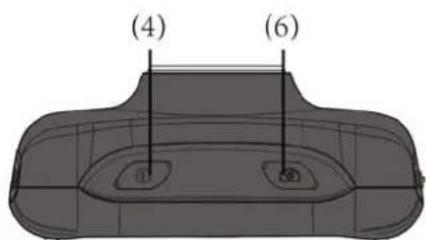
- Power switch
- Microphone
- Shutter button
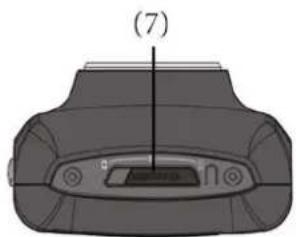
- Mode selector:
- Photographing
- Video recording
- Continuous mode
- Photographing
- Video recording
-
Continuous mode
-
Lens
-
LCD display
-
Power status light
-
Charging status light
-
Fastener for wrist strap
USE
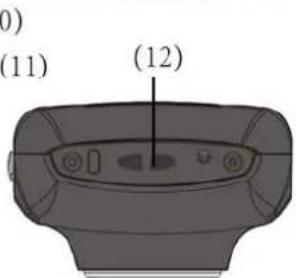
Recharging the built-in lithium battery
Using memory cards
- Slide the SD card into the memory card slot.
- Remove the memory card by carefully pushing it in so that it springs out.

natural_image
Top-down view of a device rear panel showing internal components including a USB port and CD40 connector (no text or symbols beyond labels)NOTE: The camera does not have a built-in memory. Always insert a memory card before use.
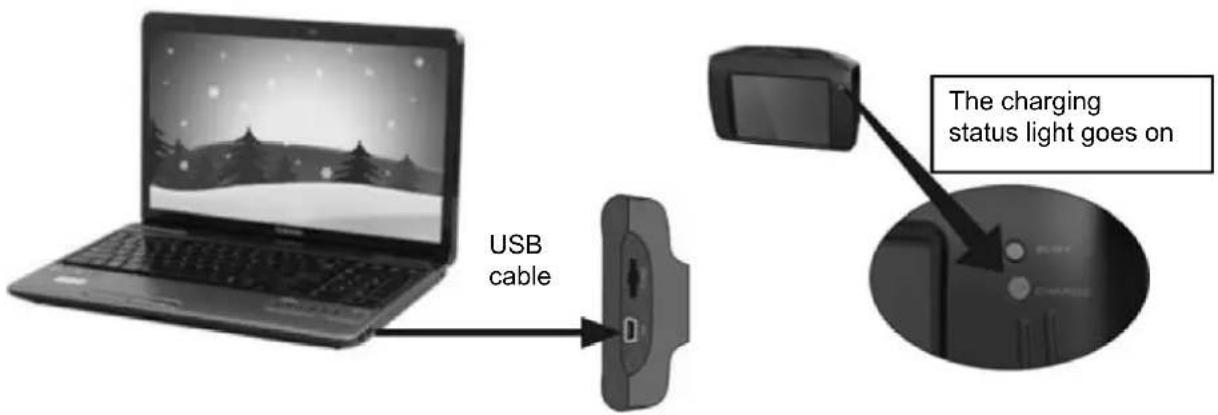
Power On/Off
- Switching on: Press the POWER button for three seconds. The display lights up and the camera switches on.
- Switching off: Press the POWER button when you are not using the camera. The camera switches off.
Automatic power OFF: When the camera has not been used for some time it will switch off automatically to save power. The standard setting for automatic power OFF is 5 minutes.
- Power Off with low battery: An icon is shown on the LCD display when the battery level gets low. Recharge the battery in good time. The camera switches off automatically when the icon starts flashing red.
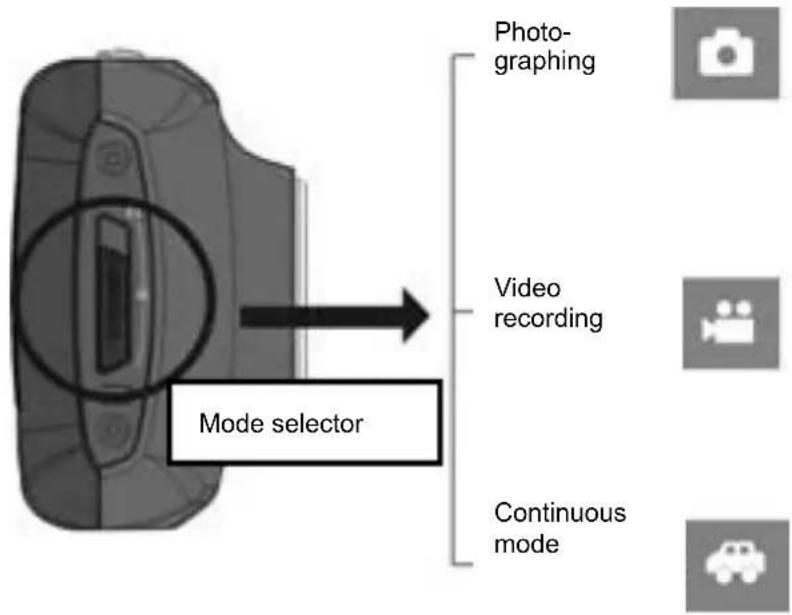
Mode selector
There are three modes on the camera: photographing, video recording and recording in continuous mode (mounted in vehicle).
- You use the mode selector to select the mode after switching on the camera.
• In photography mode you can take photos.
• In video recording mode you can record a video. - In continuous mode you can record a monitoring film continuously (each film sequence is five minutes long).
Status light
Power status: this light goes on when the camera is working (e.g. during video recording, photographing, display power off).
Charging status: this light goes on when the battery is charging.
Video recording mode
Set the mode selector to video recording and press the shutter button, or in the middle of the preview display on the touch screen, to start video recording. Press the shutter button again to stop filming. The recording switches off automatically when the memory card is full, or if the battery goes flat while you are filming.
- 00:12:18: The timer shows that there are still 12 minutes and 18 seconds left to continue recording.
• The mode icon shows that the camera is in video recording mode.
• : Resolution. Press this icon to switch between 720P and VGA.
• Shows that the memory card is inserted.
• : Digital zoom icon. Press to zoom in.
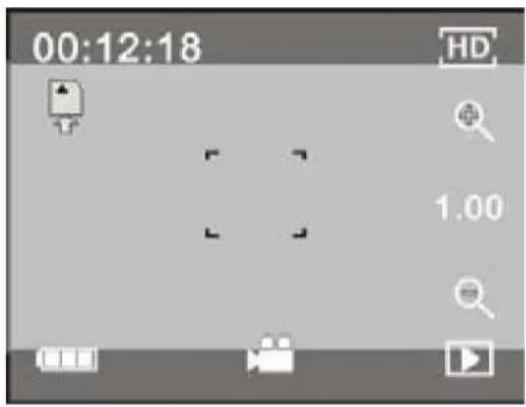
• : Digital zoom icon. Press to zoom out.
• : Shutter button on the display. Press to take photo or start filming.
• □: The battery icon shows the battery status.
• : Shows the digital zoom enlargement.
• : Press this icon to switch to playback mode.
• SET: Click this icon to set the date and time, finished setting and press Shutter key to confirm.
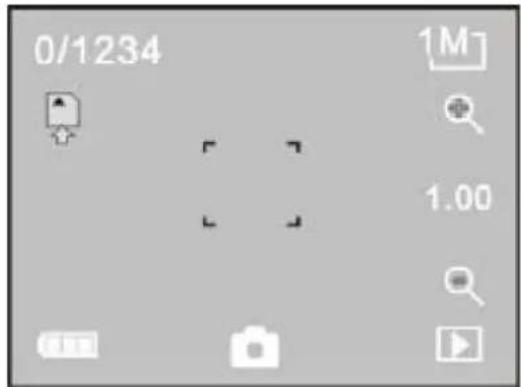
Photographing mode
Set the mode selector to photographing and press the shutter button, or in the middle of the preview display on the touch screen, to take a picture.
- 0/1234: The counter shows the number of pictures taken and the remaining number that can be taken.
• The mode icon shows that the camera is in photographing mode.
• : Resolution. Press this icon to switch between 1/3/5 megapixels.
• : Shows that the memory card is inserted.
• : Digital zoom icon. Press to zoom in.
• : Digital zoom icon. Press to zoom out.
• : Shutter button on the display. Press to take photo or start filming.
• ☐: The battery icon shows the battery status.
• Shows the digital zoom enlargement.
• Press this icon to switch to playback mode.
- SET: Click this icon to set the date and time, finished setting and press Shutter key to confirm.
Continuous mode
Set the mode selector to continuous mode and press the shutter button, or in the middle of the preview display on the touch screen, to start recording. The recoding is saved every five minutes, after which the next recording sequence starts. When the memory card is full the oldest video sequence is deleted to make room for the next, and the cycle continues.
• 00:12:18 The timer shows that there are still 12 minutes and 18 seconds left to continue recording.
• The mode icon shows that the camera is in continuous mode.
• : Resolution. Press this icon to switch between 1/3/5 megapixels.
• Shows that the memory card is inserted.
• : Digital zoom icon. Press to zoom in.
• : Digital zoom icon. Press to zoom out.
• Shutter button on the display. Press to take photo or start filming.
• ☐: The battery icon shows the battery status.
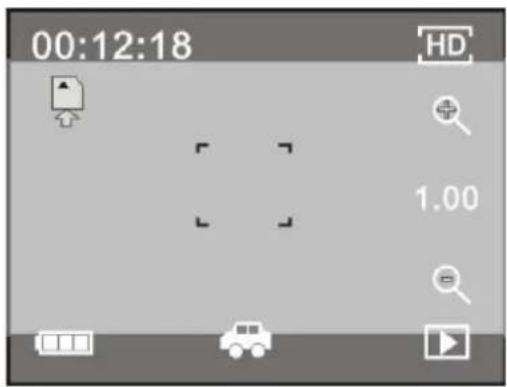
• : Shows the digital zoom enlargement.
• Press this icon to switch to playback mode.
• SET: Click this icon to set the date and time, finished setting and press Shutter key to confirm.
NOTE: The display switches off automatically during recording to save power. Touch the POWER button to switch on the display and see the image.
Playback mode
Press the playback icon in preview mode (D) in the bottom right corner of the display to switch to playback mode:
Press
• AVI: Indicates that the file is an AVI video file.
- Indicts that there is one file in the folder/one file in total.
- Name of the folder (e.g. I:\DCIM\100MEDIA where I: is the unit character for the removable drive).
• : Press to select next file.
• Press to select previous file.
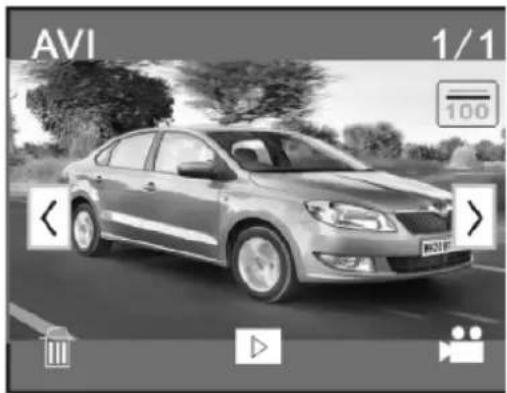
• : Press to confirm deletion of the image file.
• Press to play the video file.
• : Press to return to photographing/recording mode.
Video playback:
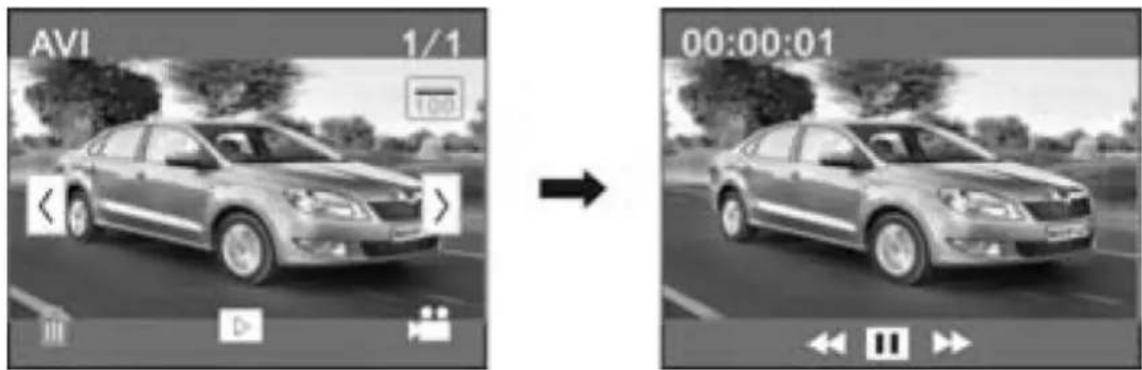
Press ☐ to pause playback, press ➤ to play faster, and press ◀ to play more slowly.
Deleting files:
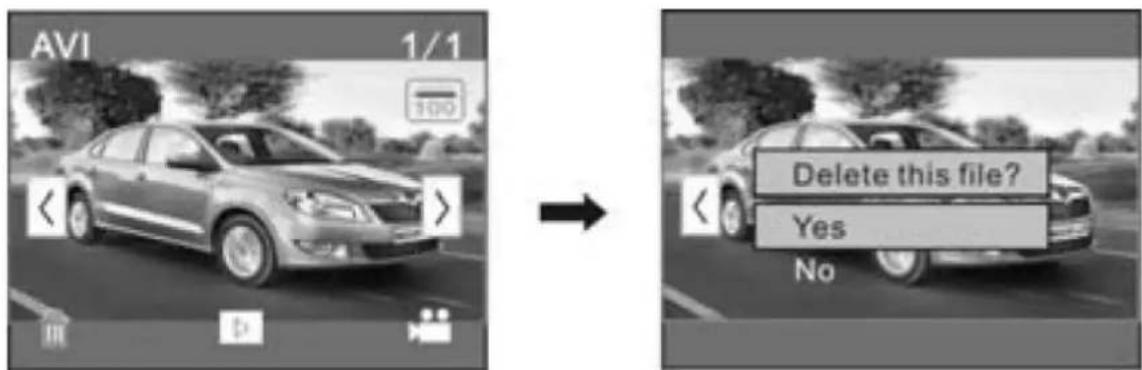
Press YES to delete the file immediately. Press NO to cancel the deletion.
Connecting to a computer
The camera has a Plug & Play function. Connect to a computer with the USB cable and switch on the camera. The camera now functions as a removable drive.
An icon for the removable drive is shown in Explorer for My Computer. The photos/videos are saved in the folder I:\DCIM\100MEDIA on the removable drive (where I is the unit character for the removable drive). Files recorded in continuous mode are saved in I:\DCIM\RECORDER.
NOTE: If the removable drive is used in Windows 2000 or later versions of Windows, no drive routine needs to installed.
Waterproof Case Using Notice
- Before sealing the waterproof case, keep the camera housing's rubber seal clean, a single hair or grain of sand can cause a leak. You can test by closing the case without inserting the camera. Submerse the case completely in water for about a minute. Remove the case from the water, dry off its exterior with a towel, then open the case. If the entire interior is dry, the case is safe for use under water.
- Remember to put the Mode Switch in your desired recording position before inserting the camera in the waterproof case. There is no external button for the Mode Switch.
- After every use in salt water you will need to rinse the outside of the housing with non-salt water and dry. Not doing this can eventually cause corrosion of the hinge pin and salt buildup in the seal, which can cause failure.
- To clean the seal, rinse in fresh water and shake dry (drying with a cloth may cause lint to compromise the seal). Re-install the seal into the grooves in the backdoor of the housing.
Jula reserves the right to make changes. In the event of problems, please contact our service department.
www.jula.com

Care for the environment!
Must not be discarded with household waste! This product contains electrical or electronic components that should be recycled.
Leave the product for recycling at the designated station e.g. the local authority's recycling station.
- SVENSKA 4
- SÄKERHETSANVISNINGAR
- BRUK
- Read these instructions before use and save them for future reference.
- TECHNICAL DATA
- DESCRIPTION
- System requirements
- Overview
- USE
- Recharging the built-in lithium battery
- Using memory cards
- Power On/Off
- Mode selector
- Status light
- Video recording mode
- Photographing mode
- Continuous mode
- Playback mode
- Press
- Video playback:
- Deleting files:
- Connecting to a computer
- Waterproof Case Using Notice
- Care for the environment!
Brand : Marquant
Model : 921-006
Category : Action Camera