
002-195 - Action Camera Marquant - Free user manual and instructions
Find the device manual for free 002-195 Marquant in PDF.


| Product Type | Action Camera |
| Brand | Marquant |
| Model | 002-195 |
| Dimensions (approx.) | 6 x 4 x 3 cm |
| Weight (approx.) | 80 g |
| Power Source | Rechargeable Li-ion battery |
| Video Resolution | 1080p Full HD |
| Photo Resolution | 12 MP |
| Lens Angle | 120° wide-angle |
| Waterproof (with housing) | Up to 30 meters |
| Display | 1.5 inch LCD |
| Connectivity | USB, micro HDMI |
| Storage | microSD card up to 32 GB |
| Main Features | Time-lapse, burst mode, image stabilization |
| Cleaning | Wipe with dry cloth |
| Safety | Use only approved accessories |
| Spare Parts | Battery, cables, mounts available |
| Repairability | Not user-serviceable; contact support |
| Warranty | 2 years |
Frequently Asked Questions - 002-195 Marquant
User questions about 002-195 Marquant
0 question about this device. Answer the ones you know or ask your own.
Ask a new question about this device
Download the instructions for your Action Camera in PDF format for free! Find your manual 002-195 - Marquant and take your electronic device back in hand. On this page are published all the documents necessary for the use of your device. 002-195 by Marquant.
USER MANUAL 002-195 Marquant
natural_image
Black Ultra HD 4K device with circular lens and power button (no text or symbols on body)
SE ACTIONKAMERA
Operating instructions (Translation of the original instructions) Important! Read the user instructions carefully before use. Save them for future reference.
Värna om miljön!
Care for the environment!
Must not be discarded with household waste! This product contains electrical or electronic components that should be recycled. Leave the product for recycling at the designated station e.g. the local authority's recycling station.
Jula reserves the right to make changes. In the event of problems, please contact our service department.
www.jula.com
Tillverkare/ Produsent/ Producenci/ Manufacturer
Jula AB, Box 363, 532 24 SKARA
Distributör/ Distributør/ Dystrybutor/ Distributor
Jula Poland Sp. z o.o., ul.
2
The image is too blurry to recognize any text content.

natural_image
Line drawing of a device with a button and arrow indicator (no text or symbols)4

natural_image
Diagram of a computer monitor showing internal components including an RJ8 port, USB drive, and USB port (no text or symbols present)5



natural_image
Computer window interface displaying a gear icon on a black background (no text or symbols)


14

15

16
17
18

SÄKERHETSANVISNINGAR
- Never modify the product in any way. The manufacturer assumes no liability for damage that arises as a result of unauthorised modifications.
- Do not expose memory cards to loads in the form of bending, pressure or impacts.
- Do not expose memory cards to powerful electromagnetic or magnetic fields, such as close to loudspeakers or TV receivers.
- Do not expose memory cards to extreme heat or cold.
- Keep memory cards clean and do not expose them to water or other liquids.
- Do not use a memory card from another camera without formatting it first.
- Do not use a memory card that has been formatted in another camera or card reader.
• Data on the memory card can be damaged if the
memory card is used incorrectly and if the power supply is disconnected or the memory card is removed during recording, deleting, formatting or reading.
- Back up important data on another medium, such as a hard drive or CD.
- Before using, check that the camera is free from damage.
• Repairs must only be carried out by qualified service personnel. - Protect the lens and display from dust, sand and chemicals.
- Do not touch the lens with your fingers.
- Protect the camera from knocks and blows.
- Do not store the camera in direct sunlight.
- New memory cards and cards containing data from other cameras or data that the camera does not recognise, must be formatted before being used. The memory card can be
formatted in the camera.
- Disconnect the power supply to the camera before the memory card is inserted or removed.
• Memory cards deteriorate with time. Replace the memory card if this occurs. - Do not expose memory cards to bending, pressure or impacts.
- Do not expose memory cards to powerful electromagnetic or magnetic fields, such as close to loudspeakers or TV receivers.
- Do not expose memory cards to extreme heat or cold.
- Keep memory cards clean and do not expose them to water or other liquids.
- Store the memory card in its case when not in use.
- The memory card becomes warm when in use. This is completely normal.
- Do not use a memory card that has been formatted in another camera or card reader.
- Data on memory cards can be damaged if:
– The memory card is used incorrectly.
- The power supply is disconnected or the memory card is removed during recording, deleting, formatting or reading.
TECHNICAL SPECIFICATIONS
| Functions | |
| Video recording, car camera, | |
| still images, playback | |
| Resolution, still images | |
| 16 MP (4,608 x 3,456) | |
| 12 MP (4,000 x 3,000) | |
| 8 MP (3,264 x 2,448) | |
| 5 MP (2,560 x 1,920) | |
| 2 MP (1,600 x 1,200) | |
| Resolution, video | |
| 4K (3,840 x 2,160, 30 fps) | |
| 2.7K (2,560 x 1,440, 30 fps) | |
| FHD (1,920 x 1,080, 60 fps) | |
| FHD (1,920 x 1,080, 30 fps) | |
| HD (1,280 x 720, 60 fps) | |
| HD (1,280 x 720, 30 fps) | |
| HD (1,280 x 720, 120 fps) | |
| File format | JPEG/H.264 (MOV) |
| Display | 2" LCD |
| Storage media | Micro SD max. 64 GB |
| Recording time | Max. 29 minutes |
| Connections | USB 2.0/HDMI |
| Battery | 3.7 V Li-Ion, 900 mAh, 3.33 Wh |
| Dimensions | 61 x 41 x 30 mm |
| Weight incl. battery | 60 g |
System requirements
Operating system
Windows XP/Vista/7/8
OS X 10.8
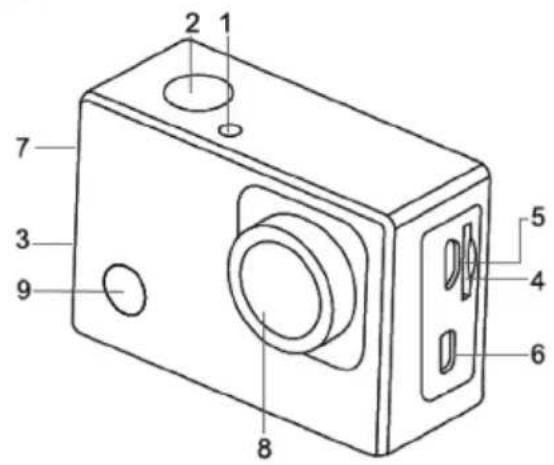
DESCRIPTION
- Indicator lamp
- Shutter button
- Speaker for audio signals
- Slot for Micro SD card
- Micro USB port
- Micro HDMI port
- UP/DOWN
- Lens
- Power switch/mode selector
FIG. 1
OPERATION
Installing the battery
- Open the battery cover
FIG. 2
- Insert the battery. Make sure that the contact strip is facing the right direction.
FIG. 3
- Close the flap.
Charging the battery
- Charge the battery when it starts to become discharged. Check that the charging voltage corresponds to the rated voltage on the type plate.
- Connect the switched off camera to a USB port to charge the battery, e.g. a computer or a USB charger. The charge indicator comes on during charging and goes out when charging is complete. The battery is normally fully charged after approximately 4 hours.
NOTE:
The battery can only be charged when the camera is switched off.
Memory card
The camera has no built-in memory, rather it needs a memory card (not included) in order to work. Insert a formatted memory card prior to use. Carefully press the end of the memory card to remove the card from the camera.
FIG. 4
NOTE:
For 4K, HD or FHD video, a high-speed memory card is required. We recommend a class 10 card.
Starting and stopping
- Starting: Press and hold the switch for 3 seconds. The screen comes on and the camera starts.
- Switching off: Press and hold the switch for 3 seconds when the camera is in standby mode.
- Automatic switching off: The camera switches off automatically to save the battery after a period of time in standby mode. The standard setting is 3 minutes. The time delay can be adapted by the user.
- Switching off when battery is discharged: When the battery is discharged, appears on the display. Charge the battery in time. When the discharged battery indicator 📋 appears in the display, the camera switches off automatically.
Function modes
The camera has four function modes:
• Video recording – For recording video.
• Photography – For taking still photographs.
EN
- Motion mode – For motion-activated recording.
- Playback – For showing photographs/recorded video.
When the camera starts, the recording mode is active.
- Press the shutter button to start recording, press again to stop recording.
- Press the mode selector button to switch to photography mode.
- Press the mode selector button to switch to motion mode.
- Press the shutter button to start recording, press again to stop recording.
Function indicator
The function indicator comes on either when the camera is in operation or when the battery is being charged with the camera switched off.
Display modes in event of photography/recording
Photography mode
- Photography mode
- Resolution
- Available photographs
- Micro SD card
- WiFi
- Battery
- Date and time
FIG. 5
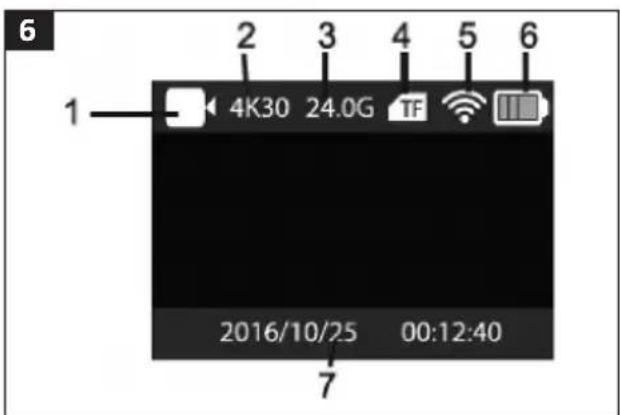
Recording mode
- Recording mode
- Resolution and number of frames per second
-
Available storage space
-
Micro SD card
- WiFi
- Battery
- Date and time
FIG. 6
Motion mode
- Motion mode
- Resolution and number of frames per second
- Available storage space
- Micro SD card
- WiFi
- Battery
- Date and time
FIG. 7
Playback mode
- Start the camera and press the mode selector button to activate playback mode, or select photography or video using the UP/DOWN buttons and then press the shutter button to activate preview.
FIG. 8
- Press the mode selector button to activate playback mode in order to browse through the photographs and films or to play recorded videos.
- Press the shutter button to start/pause video playback, fast forward/rewind with the UP/DOWN buttons and press the power switch to stop playback.
MENU SETTINGS
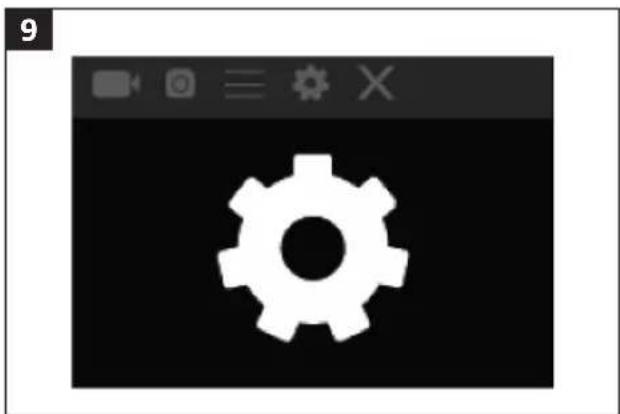
Menu display
Press the mode selector button until the options are displayed, then select the option to configure recording or photography.
FIG. 9
Menu for photography and recording
FIG. 10
FIG. 11
Menu for system configuration
- Press the power switch to open the menu and press the mode selector button to switch to the settings menu.
FIG. 12
-
Press the UP/DOWN buttons to select the menu and press the shutter button to open the sub-menu.
-
Select the desired item in the sub-menu using the UP/DOWN buttons, then press the shutter button to confirm.
-
Go back to the main menu and select X to finish.
Setting date and time
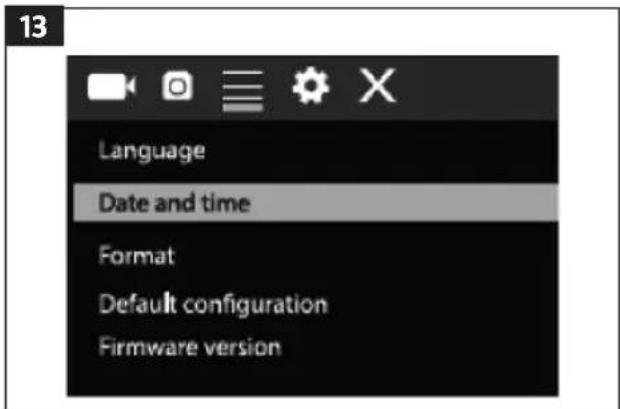
- Open the menu by pressing the mode selector button.
FIG. 13
-
Press the mode selector button again to switch to the settings menu, then press the shutter button to confirm.
-
Press the UP/DOWN buttons to select the Date and time item, then press the shutter button to open the settings window.
FIG. 14
-
In the settings window, press the mode selector button to select the item that is to be changed, then change the value with the UP/DOWN buttons.
-
Press the shutter button to confirm or press the power switch to finish and reject the changes.
-
Press the power switch to end the settings mode.
Settings for delayed recording
- Open the settings menu and select photograph settings.
FIG. 15
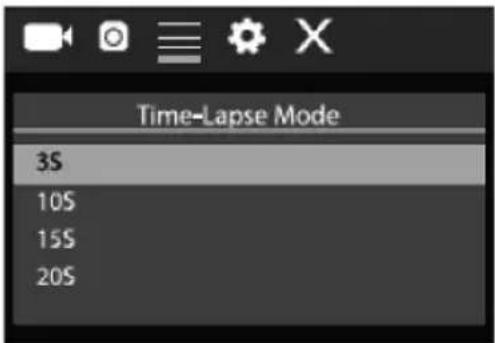
- Open the Time-Lapse mode menu and set the desired time between photographs. In PAL-DV, 24 images are required for 1 second of film, while HD mode requires 30 images.
FIG. 16
-
In order to configure the resolution of the photographs, go back to the previous menu and open the Resolution menu.
-
To start taking photographs, go to photograph mode, aim the camera and press the shutter button.
-
When the desired pictures have been taken, import them into a video editing program. Different programs require different operation – see the programs manual. The names of the photograph files may need to be changed in order for the software to identify them correctly.
NOTE:
To achieve the best results, the camera should not be moved during time-lapse recording.
CONNECTING TO HDTV
- In order to transfer images and sound to an HDTV for playback, connect one end of the HDMI cable (not included) to the camera and the other end to the HD input on the HDTV.
- When the camera has been correctly connected to the HDTV, the same image that is shown on the display also appears on the HDTV.
NOTE:
Stop ongoing recording and disconnect the WiFi before connecting or disconnecting the HDMI cable.
CONNECTING TO COMPUTER
When the camera is connected to a computer, it appears as an external device in My Computer. Photograph and video files can be found in the DCIM\CAR, JPG, VIDEO folder in the external device. Open the folder to copy files to the computer's hard drive.
NOTE:
Do not disconnect the USB cable while transferring files and do not remove the memory card when the USB cable is connected – risk of loss of data.
Webcam mode
No drivers are required for webcam mode (PCCAM mode) in Windows XP (SP3) or higher.
- In U-disk mode (MSDC mode), press the shutter button to switch to webcam mode (PCCAM). The display shows PCCAM.
- The webcam can be started from the software. Press the switch to go back to U-disk mode (MSDC mode).
APPs
- Search for XDV in Google Play (for Android) to find the app and install it in accordance with the instructions.
- Search for XDV in APP Store (for iOS) to find the app and install it in accordance with the instructions.
Android app
-
Install the XDV app on your smartphone or tablet. When installation is complete,
the neon appears in the display. -
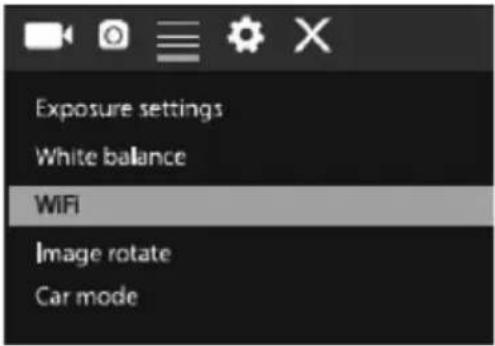
Insert the memory card and start the camera. Open the menu and activate WiFi.
FIG. 17
- Activate WiFi on your smartphone or tablet, search for the wireless AP signal X10000_XXXX and connect it to the camera. The cameras displays Connected successfully.
FIG. 18
NOTE:
The first time the camera is connected, the password 66666666 must be specified.
-
Click on the 📄 in the app list on your smartphone or tablet to open it. In this way, the image from the camera can be previewed on your smartphone or tablet and some processing can be performed. The interface is shown in the figure above to the right.
-
Three options are shown in the app's main menu: video recording, photography and motion mode. At the bottom there are a further three options – Main display, Gallery and Options.
-
In Options mode, the camera's preliminary settings for recording are configured.
iOS app
-
Install the XDV app on your smartphone or tablet. When installation is complete, the icon appears in the display.
-
Activate WiFi on your iOS phone or tablet, search for the wireless AP signal X10000_XXXX and connect it to the camera. The cameras displays Connected successfully.
-
Click on the iOS in the app list on your iOS phone or tablet to open it. In this way, the image from the camera can be previewed on your smartphone or tablet and some processing can be performed.
MAINTENANCE
- Store the product in clean, dry location.
- Protect the lens and the display against scratches.
- Clean the lens by blowing away dust and then carefully wiping the lens with a cleaning cloth intended for optical equipment. Only use cleaning solution intended for camera lenses. Do not use solvents.
- Do not touch the lens with your fingers.
- Protect the lens and the display against scratches.
- SE ACTIONKAMERA
- SÄKERHETSANVISNINGAR
- System requirements
- DESCRIPTION
- OPERATION
- Installing the battery
- Charging the battery
- NOTE:
- Memory card
- 4
- Starting and stopping
- Function modes
- EN
- Function indicator
- Display modes in event of photography/recording
- Photography mode
- 5
- Recording mode
- 6
- Motion mode
- 7
- Playback mode
- 8
- MENU SETTINGS
- Menu display
- Menu for photography and recording
- Menu for system configuration
- Setting date and time
- Settings for delayed recording
- CONNECTING TO HDTV
- CONNECTING TO COMPUTER
- Webcam mode
- APPs
- Android app
- 17
- 18
- iOS app
- MAINTENANCE
Brand : Marquant
Model : 002-195
Category : Action Camera