
MX-ZX1800 - Blender PANASONIC - Free user manual and instructions
Find the device manual for free MX-ZX1800 PANASONIC in PDF.

| Product type | Blender |
| Brand | Panasonic |
| Model | MX-ZX1800 |
| Dimensions (L × W × H) | 22.8 × 24.0 × 44.7 cm |
| Weight | 6.1 kg |
| Power supply | 230 - 240 V ~ 50 Hz |
| Power consumption | 1200 - 1300 W |
| Maximum capacity | 1800 mL |
| Speed control | 10 speeds |
| Automatic functions | Juice, Smoothie, Puree, Soup, Grind, Sorbet |
| Manual mode | Yes, with speed adjustment and pulse |
| Duty cycle | 9 minutes max, then rest 10 minutes |
| Acoustic noise | 91 dB(A) |
| Power cord length | 1.9 m |
| Safety | Safety lock, protective circuit breaker, automatic stop |
| Jug material | Glass or plastic (not specified) |
| Maintenance and cleaning | Hand wash or dishwasher for some parts (see manual) |
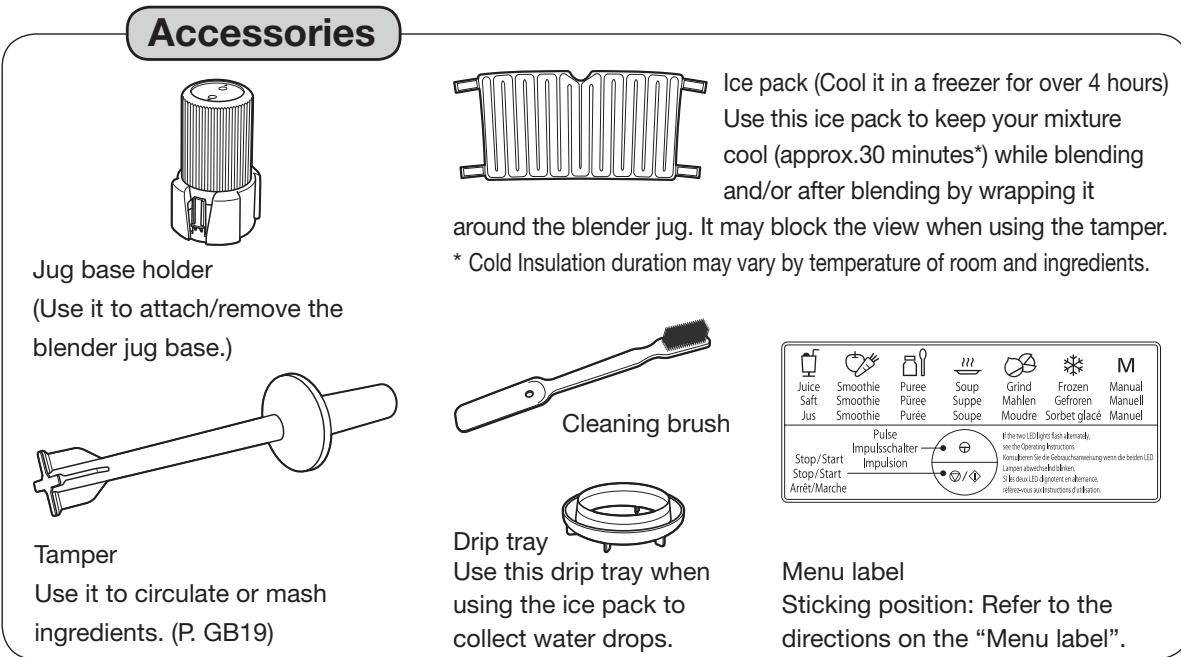
| Included accessories | Ice block, drip tray, handy tool, cleaning brush, base support |
| Spare parts available | Jug gasket (VE28B2461), lid gasket (VE22B2461K0), ice block (VU03E246) |
| Intended use | Household only |
| Maximum ingredient temperature | 40 °C (do not pour hot ingredients) |
Frequently Asked Questions - MX-ZX1800 PANASONIC
User questions about MX-ZX1800 PANASONIC
0 question about this device. Answer the ones you know or ask your own.
Ask a new question about this device
Download the instructions for your Blender in PDF format for free! Find your manual MX-ZX1800 - PANASONIC and take your electronic device back in hand. On this page are published all the documents necessary for the use of your device. MX-ZX1800 by PANASONIC.
USER MANUAL MX-ZX1800 PANASONIC
Operating Instructions
Bedienungsanleitung
Mode d'emploi
Gebruiksaanwijzing
Representative in EU :
Panasonic Marketing Europe GmbH
Panasonic Testing Center
Winsbergring 15, 22525 Hamburg, Germany
Panasonic Taiwan Co., Ltd.
http://www.panasonic.com
Printed in China
© Panasonic Taiwan Co., Ltd. 2016
VE50G246
MX0716E0
XE
Contents
Safety Precautions . GB3
Important Information
Parts Names and Handling Instructions GB12
Safety Lock . GB13
Before Use - Disassembly and Assembly - GB14
Guide of Menus and Functions for Auto Menus
How to Use Auto Menus
Guide of Quantity and Functions for Manual Mode GB20
How to Use Manual Mode GB21
How to Clean . GB22
Troubleshooting
Circuit Breaker Protection
Replacement Parts. GB25
Specifications GB25
Thank you for purchasing the Panasonic product.
- This product is intended for household use only.
- Please read these instructions carefully to use the product correctly and safely.
- Before using this product please give your special attention to "Safety Precautions" (Page GB3-10).
- Please keep this Operating Instructions for future use.

This symbol on the product indicates "Make sure you read the Operating Instruction carefully before using".
Safety Precautions
Please make sure to
follow these instructions.
In order to prevent accidents or injuries to the user, other people, and damage to property, please follow the instructions below.
The following charts indicate the degree of damage caused by wrong operation.
WARNING: Indicates potential hazard that could result in serious injury or death.
CAUTION: Indicates potential hazard that could result in minor injury or property damage.
The symbols are classified and explained as follows.

This symbol indicates prohibition.

This symbol indicates requirement that must be followed.

WARNING
To prevent electric shock, fire due to short circuit, burns or serious injury.

- Do not damage the mains lead or mains plug.
Following actions are strictly prohibited. Modifying, touching on to or placing near heating elements, bending,
twisting, pulling along, pulling over sharp edges, putting heavy objects on top, bundling the mains lead and carrying the appliance by the mains lead.
Safety Precautions
Please make sure to follow these instructions.

WARNING

- Do not use the appliance if the mains lead or mains plug is damaged or the mains plug is loosely connected to the household mains socket.
If the mains lead is damaged, it must be replaced by the manufacturer, its service agent or similarly qualified person in order to avoid a hazard.
-
Do not plug or unplug the mains plug with wet hands.
-
Always ensure that hands are dry before handling the mains plug or switching on the appliance.

- Make sure the voltage indicated on the label of the appliance is the same as your local supply.
Also avoid plugging other devices into the same household mains socket to prevent electrical overheating. However, if you are connecting a number of mains plugs, make sure the total wattage does not exceed the rated wattage of the household mains socket.
Insert the mains plug firmly.
(Otherwise it may cause electric shock and fire due to heat that may be generated around the mains plug.)

WARNING

- Dust off the mains plug regularly.
(Dust and moisture build-up on the mains plug may cause insufficient insulation, which may cause a fire.) Unplug the mains plug, and wipe with a dry cloth.
- Keep the mains lead out of reach of children. Do not let the mains lead hang over the edge of the table or worktop.

-
Do not immerse the motor housing in water or splash it with water.
-
Do not disassemble, repair or modify this appliance.
Consult the place of purchase or a Panasonic service center.
- Do not allow infants and children to play with packaging material.
(It may cause suffocation.)
- Do not set the soup menu incorrectly. Contents may overheat if over-blended.
Overheating may cause burns if not handled with care.

Always keep children away from the appliance.
- Children do not realise dangers that are likely to occur due to improper use of appliances.
Safety Precautions
Please make sure to follow these instructions.

WARNING

- Discontinue using the appliance immediately and unplug in the unlikely event that this appliance stops working properly.
(It may cause smoking, fire, electric shock or burns.) e.g. for abnormal occurrences or breaking down
- The mains plug and the mains lead become abnormally hot.
- The mains lead is damaged or the appliance power fails.
- The main body is deformed, has visible damage or is abnormally hot.
- There is abnormal turning noise while in use.
- There is unpleasant smell.
-
There is another abnormality or failure. (It may cause electric shock or electrical leakage.)
Unplug the appliance immediately and consult the place of purchase or a Panasonic service center for inspection or repair. -
Be careful if hot liquid is poured into blender as it can be ejected out of the appliance due to a sudden steaming.
Take care of soup becoming hot during blending.
- Do not leave the appliance unattended when in use.

WARNING

- This appliance shall not be used by children. Keep the appliance and its cord out of reach of children. Appliances can be used by persons with reduced physical, sensory or mental capabilities or lack of experience and knowledge if they have been given supervision or instruction concerning use of the appliance in a safe way and if they understand the hazards involved. Children shall not play with the appliance. (It may cause burns, injury or electric shock.)

CAUTION
To prevent electric shock, smoke, fire, burns, injury or property damage.

-
Do not use the appliance for any purpose other than those described in these instructions.
-
Panasonic will not accept any liability if the appliance is subject to improper use, or failure to comply with these instructions.
Safety Precautions
Please make sure to follow these instructions.

CAUTION

-
Do not use the appliance in the following locations.
-
On uneven surfaces, on carpets or table cloths etc.
- Places where it may be splashed with water or near a heat source.
(It may cause electric shock or electrical leakage.)
- Near any open water such as bathtubs, sinks, or other containers.
(It may cause electric shock or electrical leakage.)
- Near a wall or furniture.
(It may cause discolouration or deformation.)
- Do not insert any object in the gaps.
- Especially metal objects such as pins or wires.
- Do not hold the appliance by the mains lead.
- Do not replace any parts of the appliance with parts other than genuine spare parts for this appliance.
- Do not operate the appliance continuously for more than 9 minutes. Rest 10 minutes after 9 minutes operation.
- Do not put your fingers or utensils such as spoons or forks into the blender jug while the appliance is operating.
Always disconnect the appliance from the supply if it is left unattended and before assembling, disassembling or cleaning.

CAUTION

- Do not leave the appliance unattended when in use. Turn the appliance off when not in use. The appliance may overheat otherwise.
- Do not place the hot ingredients (over 40^ C ) into the blender jug.
- Do not operate the appliance without the lid in place correctly.
- Do not open the lid or disassemble the blender jug during operation.
- Do not exceed maximum quantity of ingredients in the blender jug. (P. GB16, 20)
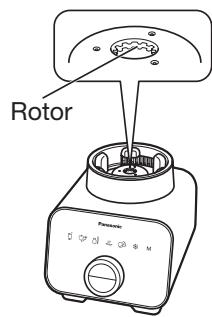
- Do not touch the rotor immediately after use, which may be hot.
- Do not put your hand in the blender jug when taking mixture out. Use a rubber scraper or spatula to take them out.

Make sure to hold the mains plug when unplugging it. Never pull on the mains lead.
- Place the appliance on a firm, dry, clean flat heatproof worktop.
- Beware not to trip over or get caught in the mains lead while in use.
Safety Precautions
Please make sure to follow these instructions.

CAUTION

- Switch off the appliance and disconnect from supply before changing attachment or approaching parts that move in use.
- Care should be taken when handling the sharp cutting blades, emptying the blender jug and during cleaning.
- Open the lid or remove the blender jug from the motor housing after the blade is completely stopped.
Important Information
- Do not place the blender jug on any heat sources or in a microwave.
- Do not drop the appliance to avoid damaging the appliance.
- Do not use the appliance outdoors.
- Do not wrap the mains lead around the motor housing.
- Make sure attachments are set firmly in position.
- Make sure to clean the appliance after every use.
- Do not operate the appliance without ingredients.
- Do not store liquid in the blender jug.
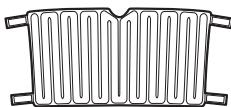
- Do not use the ice pack inside the blender jug. The ice pack is intended for use external to the blender. (P. GB12)
- Do not use if damaged.
- Do not allow children or pets to play with the ice pack.
- Do not ingest the contents of the ice pack.
- Do not use in a microwave, wash in a dishwasher, or expose to very hot water.
- Store the ice pack in a cool place or in freezer.
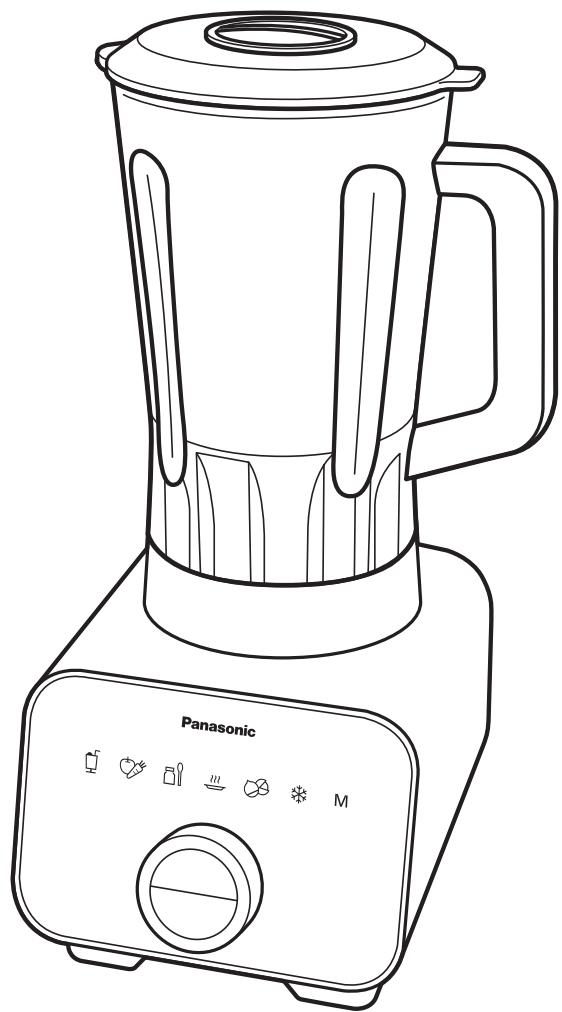
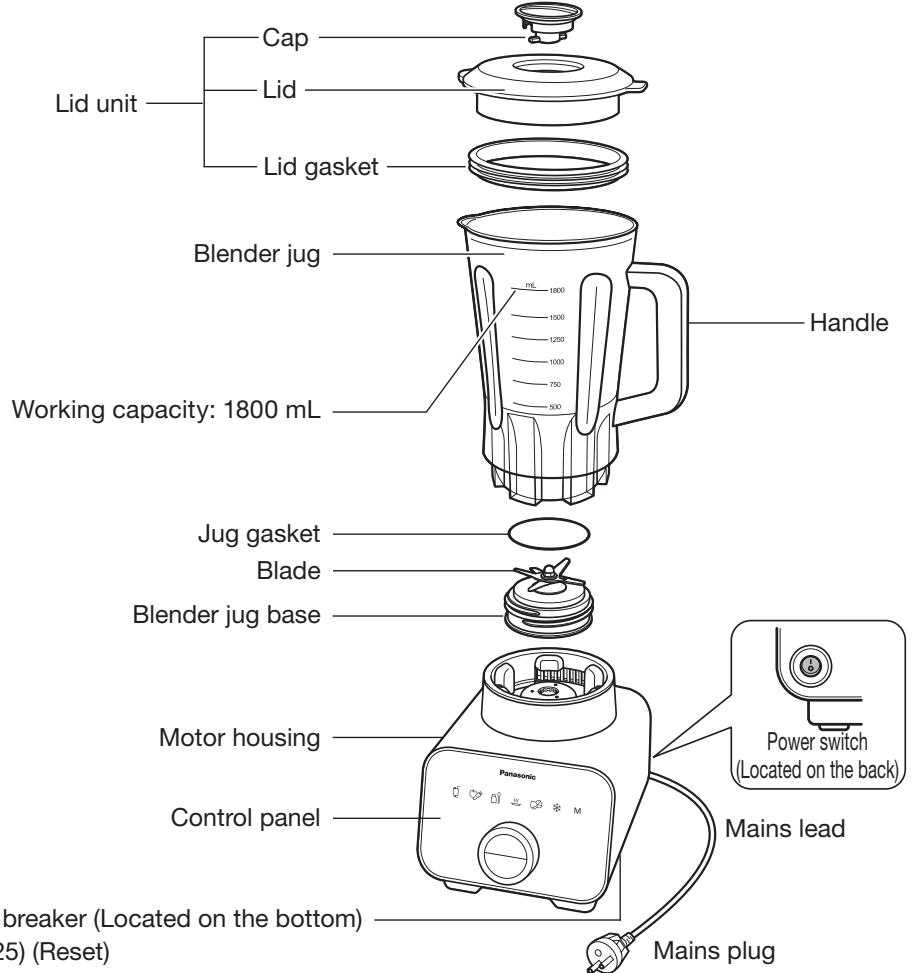
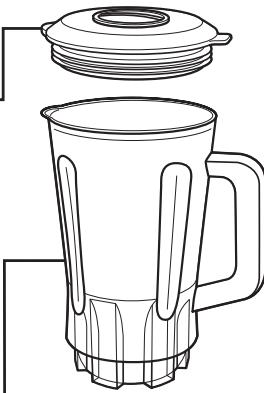
Parts Names and Handling Instructions
■ Wash all the detachable parts before using the appliance for the first time or when you have not used it for a while. (P. GB22)

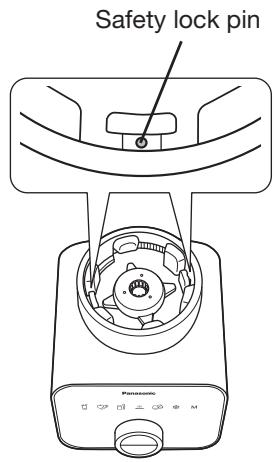
Safety Lock
A safety interlock system was designed to prevent the motor from turning on without the blender jug, or the blender jug is not properly engaged or is tilted during use.
Do not defeat the safety pins in any way. Doing so will cause the motor to turn on, possibly causing personal injury.
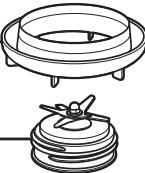
Before Use - Disassembly and Assembly -
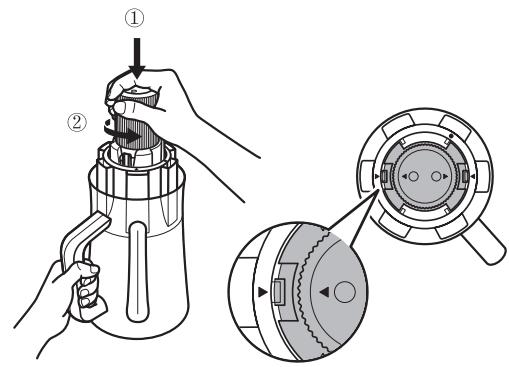
Disassembly and assembly of the blender jug base
1 Attach the jug base holder while aligning the marks on the blender jug base and jug base holder. Then turn it anticlockwise firmly.
Pull out the jug base holder.
- Do not press tabs on the jug base holder to avoid the blender jug base falling.
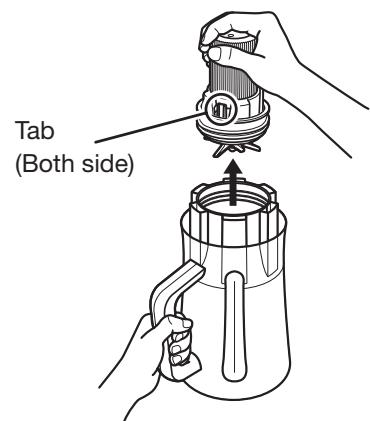
3 Press tabs on the jug base holder to release the blender jug base from it.
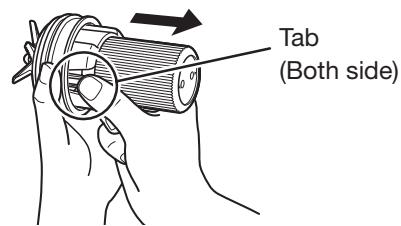
Note
Pay attention when handling the blender jug base. Blades are sharp.
- If the gasket is not attached to blender jug and/or the blender jug base is not attached firmly onto the blender jug, liquid may leak out.
1 Attach the jug gasket into the groove on the bottom of the blender jug.
(Failure to install the jug gasket completely into the groove may lead to leaking liquids.)

2 Attach the jug base holder while aligning the mark on the blender jug base and jug base holder, then press the jug base holder until you hear a click sound.
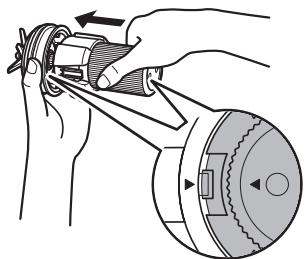
3 Insert the blender jug base into the blender jug after aligning, then turn the jug base holder clockwise until it stops turning. (The “O” mark on the blender jug base will align with the line on the blender jug.)
4 Press tabs to remove the jug base holder.

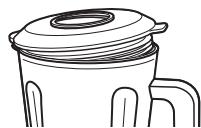
Disassembly and assembly of the lid unit
Pull up the tab to open the lid.
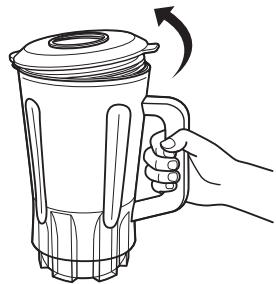
2 Turn the cap anticlockwise and pull up to remove it.
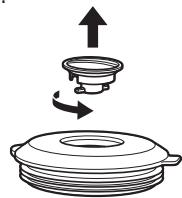
Note
- When you force open the lid unit, be careful not to let any liquid splash. Additionally, take caution with the emerging steam, especially when blending hot liquids.
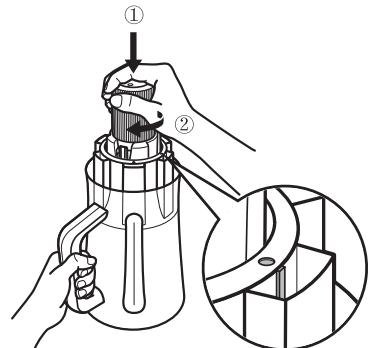
1 Attach the lid gasket properly onto the lid groove, align the lid with the mark on the cap. Then turn the cap clockwise until the mark on the lid aligns well with the = portion on the cap and you hear a click sound. (If the lid gasket is not properly installed, liquid may leak through the lid.)
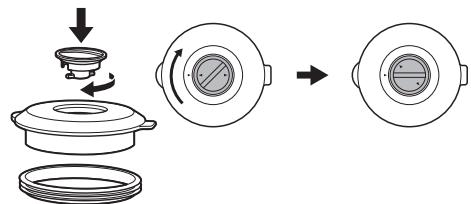
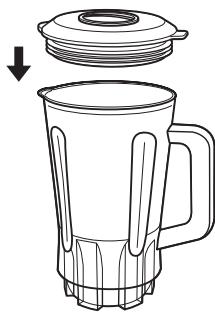
2 Place the lid unit on the blender jug and press down.
Note
Make sure the lid unit is attached firmly. Correct Incorrect
- When the tamper is not in use, make sure to attach the cap while blending.
- When using the "Frozen" menu selection, insert the tamper from the lid opening instead of attaching the cap.
Assembly of the ice pack and drip tray
Use the ice pack tape strips to secure the ice pack over and under the blender jug handle with the label facing the outer side of the pack.
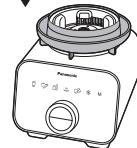
Set the drip tray onto the motor housing and push it down completely.
Note
When removing the drip tray after blending, beware of water spillage.

Guide of Menus and Functions for Auto Menus
■ Auto menus selections are programmed speeds and durations which vary individually and stop automatically.
| Menu | Quantity(serving for 4) | Auto menu | Additional blending(Use manual mode) | Remarks | |
| Initial setting | Adjusting time | Speed | |||
| JuiceJ juice with a tasty and smooth texture. | 1200 mL | 3 bars (1 min 30 s) | 1-5 bars(Recommendation)Soft ingredients:1 barHard ingredients:5 bars | Start from 1 barand graduallyincrease to 9bars. | ·When placing ingredients into the blender jug,place liquids first then place remaining ingredients.This will ensure that ingredients are uniformly mixed. |
| SmoothieMake thick smoothies with less liquid than juice. | 800 mL | 3 bars (1 min.) | 1-5 bars(Recommendation)Ingredients with a lot of liquid: 1 barIngredients withless liquid: 5 bars | Start from 1 barand graduallyincrease to 9bars. | ·When placing ingredients into the blender jug,place liquids first.·When using ingredients with less water content, theblade will be idle. In that case, add liquid or use the tamper to circulate. |
| PureeMake a smooth puree to use for cooking. | 400 g | 3 bars (1 min 10 s) | 1-5 bars(Recommendation)Ingredients with a lot of liquid: 1 barIngredients withless liquid: 5 bars | Start from 1 barand graduallyincrease to 9bars. | ·Use the tamper to help circulate when using ingredientswith lower water contents such as boiled spinach,pumpkin or sweet potatoes. If additional water isadded with such ingredients, it is easy to form a puree.·If the tamper does not reach ingredients, addingredients. |
| SoupMake smooth soup while warming up to 60 - 90 °C.NoteTemperature may elevate when blending soup recipes. | 1000 mL | 8 bars (7 min 40 s) | Adjust the speedaccording to thetemperature of thesoup before pouringinto the blender jug:·40 °C soup: 6 barso·30 °C soup: 7 barso·20 °C soup: 8 barso·10 °C soup: 9 barso·5 °C soup: 10 bars | Start from 1 barand graduallyincrease to 9bars. | ·When blending soups, temperature of the blenderjug will increase. Be careful when removing theblender jug and taking out the mixture.·Ingredients that cannot be eaten raw such aspotatoes, beans, onions, meat and fish, should bepre-cooked before blending.·When using starchy ingredients such as potatoes,pumpkin, beans with starch, oatmeal or rice, lowerthe time setting by one bar.·Make sure the time setting is correct.·Keep an eye on the blender while in use. |
| GrindGrind ingredients to a fine powder. | 100 g | 2 bars (15 s) | 1-3 barss(Recommendation)Soft ingredients:1 barHard ingredients:3 bars | 8 bars with thepulse key (Pressa few times) | ·Make sure the blender jug is completely dry beforeadding ingredients.·When nuts are blended too long, they may becomebuttered.·Before additional blending, scrape off the nuts fromthe inner side of the blender jug. |
| FrozenMake a smooth dessert from frozen fruit only. | 400 g | 3 bars (1 min 35 s) | 1-4 barss(Recommendation)Partially thawed:1-2 barssFrozen:3-4 bars | Start from 1 barand graduallyincrease to 9bars. | ·When freezing ingredients, spread them out flat sothat they do not touch each other.·Thaw frozen ingredients at room temperature until afork can penetrate to their centers.Mash the ingredients with the tamper duringblending. Hold the lid to avoid moving or tilting.It is easy to mash fruit that is partially thawed. |
How to Use Auto Menus
Preparation ① Attach the blender jug and blender jug base. (P. GB14-15)
(2) Prepare ingredients and put them in the blender jug. (P. GB17)
(Put liquid first)
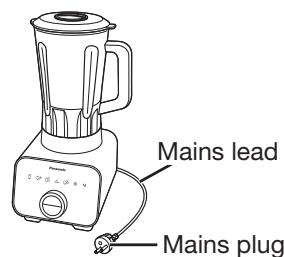
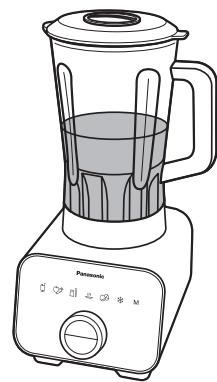
1 Set the blender jug onto the motor housing. Then plug in and turn the switch on.
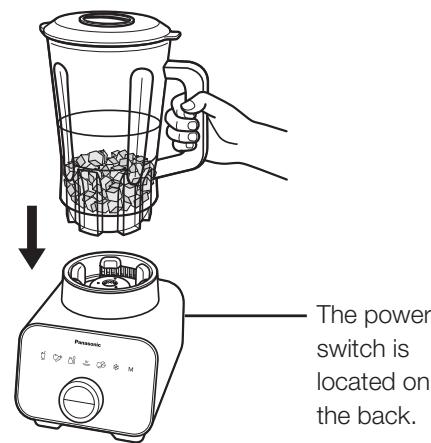
- Make sure the blender jug base and lid unit are attached firmly. (P. GB14-15)
When using the "frozen" menu selection, insert the tamper from the lid opening instead of attaching the cap. - Make sure the blender jug is set onto the motor housing correctly, otherwise keys cannot be activated.
- When you wish to use the ice pack, refer to page GB15 for assembly.
2 Select menu and press “ 1 ” to start.
- Press on the illustration to choose a menu selection.
(Figure 1: Control panel when choosing menu selection)
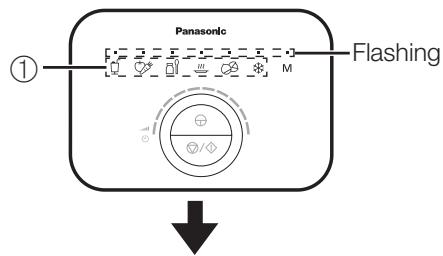
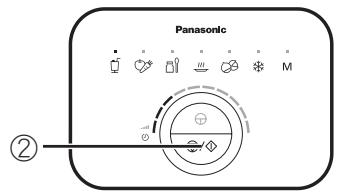
(e.g.: Juice is selected.)
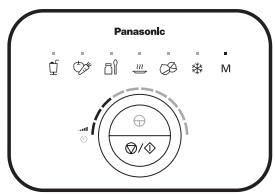
- When there is no action for 10 seconds after menu selection is chosen, indicators will return to previous menu selection. (Figure 1)
- The blending time is shown by bars and will decrease until the blending process is complete.
- If you wish to adjust the blending time, turn the dial to the left or right to respectively make the time shorter or longer before pressing “◇” key. (P. GB16)
- Auto menus will stop automatically but if you need to stop during a process, press “ ”.
- When you need to use the tamper during blending, follow the instructions on page GB19.
3 After you hear beep sounds for completion, wait until the blade stops completely and remove the blender jug. Check texture and consistency of the mixture.
When you need additional blending, re-set the blender jug and use manual mode on page GB21 for additional blending.
- Beware of splashing liquid when you open the lid unit vigorously.
-
Pour out mixture from the blender jug or take out from the blender jug by using a rubber scraper or spatula. Do not put your hands in the blender jug.
After using, turn off the power switch on the back and unplug. -
If the blender stops halfway while blending, circuit breaker protection is activated. Follow the instructions on page GB23 and GB24 to release it.
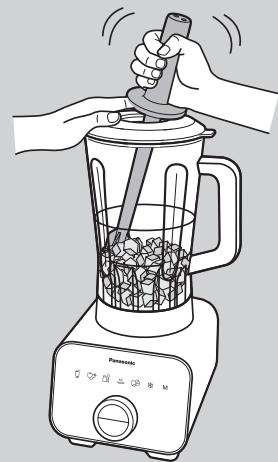
■ Use the tamper when ingredients are not circulating or if you need to mash the ingredients during blending. (e.g. blending large quantity of leafy vegetables, blending ingredients low liquid contents, or using "Frozen" menu selection.)
① Press "Frozen". (e.g.: When using the "Frozen" menu selection.)
② Open the cap by turning anticlockwise after blade is completely stopped.
- Make sure the lid is pushed in firmly.
③ Insert the tamper through the lid opening and press “ ”.
- Do not insert any other utensils. Only use the tamper provided.
④ Move the tamper to circulate or mash ingredients evenly.
- Pushing the tamper straight down may not circulate ingredients. If necessary, move the tamper toward the sides of the blender jug.
- Hold the lid while using the tamper.
Note
- Insert tamper or add ingredients within 10 seconds after “ ” is pressed. Otherwise, menu selection will be canceled.
- When the tamper is used to press and hold down sticky ingredients, like bananas, the circuit breaker may be triggered (P. GB25).
Guide of Quantity and Functions for Manual Mode
| DIY recipe | Quantity (min - max) | Tip for blending | |
| Drinks | Juice | 300 - 1800 mL | ① Press the pulse key 3 to 5 times with speed turned to 8 bars. ② Move the speed down to 5 bars and blend until solids are not visible. ③ Move the speed up to 9 bars gradually and blend until smooth. |
| Smoothie | 400 - 1800 mL | ||
| Pastes | Puree | 300 - 500 g | Start blending with speed turned to 1 bar and move up to 9 bars gradually while checking blending condition. For ingredients with less water content, add some water to make processing easier. |
| Peanuts butter | 300 - 500 g | ① Start blending with speed turned to 1 bar and move up to 9 bars ② Gradually blend while mashing with the tamper until oily (approx. 30-60 seconds). ③ Move the speed down to 7 bars and blend until smooth. | |
| Soup | Soup | 250 - 1000 mL | Start blending with speed turned to 1 bar and move up to 9 bars gradually while checking blending condition. Keep an eye on the blender while in use. |
| Crushes | Nuts | 50 - 150 g | Press the pulse key a few times with short duration with speed turned to 8 bars. |
| Carrots | 50 - 100 g | ① Cut into 2-3 cm cubes. ② Press the pulse key 2 to 4 times with speed turned to 8 bars. | |
| Parmesan cheese | 50 - 200 g | ① Cut into 2-3 cm cubes. ② Press the pulse key 6 to 15 times with speed turned to 8 bars. | |
| Ice cubes | 100 - 150 g | ① Press the pulse key 3 to 4 times with speed turned to 8 bars. ② Blend with speed turned to 9 bars for 5 to 10 seconds. | |
| Frozen Dish | Frozen | 400 - 600 g | ① Press the pulse key 2 to 3 times with speed turned to 8 bars. ② Blend with speed turned to 1 bar and move up to 9 bars gradually while checking blending condition. ③ Move the speed down to 7 bars when ingredients are mashed and blend until smooth. |
Note
- When blending under or over 4 servings, refer to the above table.
- When starting to blend hard ingredients with speed turned to 1 bar, the blade may be stop rotating. In this case, increase the speed, or take the ingredients out of the blender jug and put them back in again.
- Texture and consistency of the ingredients might vary depend on ingredients and/or quantity of mixture.
- Adjust blending time while checking condition of the mixture.
- When you blend frozen fruit with seeds, it may influence the texture.
- Use the tamper when ingredients are not circulating or if you need to mash the ingredients during blending (P. GB19).
How to Use Manual Mode
Preparation ① Attach the blender jug and blender jug base. (P. GB14-15)
(2) Prepare ingredients and put them in the blender jug. (P. GB17) (Add liquid first)
③ Close the lid unit and set the blender jug onto the motor housing. (P. GB18)
④ Plug in and turn the switch on.
1 Select manual mode and adjust speed by turning the dial. Then press “ ” to start.
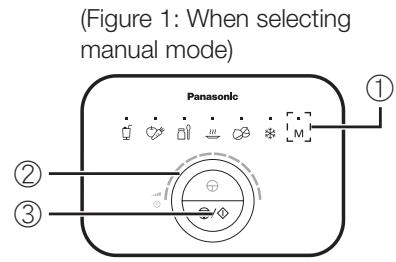
- When there is no action after manual mode is selected for 10 seconds, indicators will return to previous menu selection.
- Blending speed is shown by bars that light up above the rotary dial. Refer to blending speed on page GB20.
- When you need to use the tamper during blending, refer to page GB19.
- When you need to change the speed during blending, turn the dial gradually.
- When you wish to use the ice pack, refer to page GB15 for assembly.
Press “ ” when blending is completed. Remove the blender jug from the motor housing and check condition of the mixture after blade is stopped rotating completely.
The blender will stop automatically approximately 9 minutes 40 seconds after starting blending.
- Pour out mixture from the blender jug or take out by using a rubber scraper or spatula in the blender jug. Do not put your hands in the blender jug.
-
After using, turn off the power switch on the back and unplug.
-
If the blender stops halfway while blending, circuit breaker protection is activated. Follow the instructions on page GB23 and GB24 to release it.
You can make mashed potato with your blender!
-
Potato: 300 g
-
Milk: 60 mL
-
Fresh cream: 20~mL
Salt: dash
Pepper: dash
-
Nutmeg: dash
-
Unsalted butter: 30 g
(1) Peel potatoes and cut it into 3 cm cubs. Put cut potatoes and salt into a pan, then boil them.
(2) After potatoes are softened, discard hot water and extract water from potatoes over the heat.
(3) Put milk, fresh cream and unsalted butter into other pan and warm them up.
(4) Put (2) and (3) into the blender jug and add nutmeg, salt and pepper.
Start with speed turned to 1 bar and move up to 6 bars gradually for 1 minute.
- Blend potatoes while they are still warm (not over 40^ ), as it is easier to blend.
How to Clean
Unplug before cleaning.
Clean the product before your first use and after each use.
■ Do not clean the blender before it cools down.
Remove any demountable parts before cleaning.
Some discoloration may occur upon usage but it does not affect usage.
Note
- Do not use benzine, thinner, alcohol, bleach, polishing powder, metal brushes or nylon brushes, otherwise the surface will be damaged.
- Do not wash the motor housing and blender jug base in a dishwasher.
- Do not clean the appliance with a pointed object such as a toothpick or pin.
Cap/Lid/Lid gasket
Wash with diluted dish soap (neutral) and a soft sponge.
Then rinse thoroughly with water and dry well.
- Disassemble the lid gasket.
* Dishwasher safe
Blender jug/Jug gasket/Drip tray
Wash with diluted dish soap (neutral) and a soft sponge. Then rinse thoroughly with water and dry well.
- Before cleaning, be sure to take out the jug gasket (it might be lost during the cleaning process). * Dishwasher sa
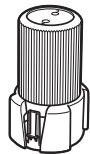
Blender jug base
Wash with diluted dish soap (neutral) and a soft sponge. Then rinse thoroughly with water and dry well.
Note
Pay attention when handling the blender jug base. Blade is sharp. * NOT dishwasher safe
Tamper/Jug base holder
- Wash with diluted dish soap (neutral) and a soft sponge.
- Then rinse thoroughly with water and dry well.
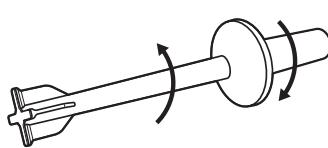
Assemble/Disassemble the tamper by referring to the above figure.
- Dishwasher safe
Parts that can be washed in a dishwater
- Remove any residue from the part before putting it into the dishwash
- High temperature may damage the parts, so please keep the parts away from any heat radiating devices, or lower their temperature.

Motor housing/Ice pack
Wipe with a well-wrung cloth.
Note
After the ice pack is clean and dry, keep it in the refrigerator for next use.
- NOT dishwasher safe
Troubleshooting
Please check following points before arranging for service.
Problem
The appliance does not turn on.
No auto menu can be selected.
Even though the power is on, the appliance does not start blending.
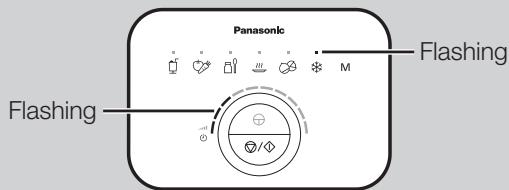
Chosen menu selection is cancelled. (All menu's indicators are flashing.)
Time on the auto menus can adjust only part of the way.
The appliance stops during blending.
Cause and Action
- The mains plug is not in the household mains socket. Insert the plug down to the root.
The power switch is not turned on. Turn on the power switch that is located on the back.
The circuit breaker protection was triggered. Press the reset button on the bottom of the motor housing (P. GB25).
The blender jug is not set correctly. Re-set blender jug correctly. (P. GB18)
- Manual mode or an auto menu selection is chosen during blending. Select an auto menu selection or manual mode after motor is stopped.
- Buttons are pressed while wearing gloves. Press the buttons with a bare hand.
The button was pressed with a wet hand. Dry your hand and press the button again.
- Button not pressed. Be sure to press on the illustration of the button.
The blender jug is not set correctly. Re-set blender jug correctly.
An auto menu selection or manual mode is not selected. Select an auto menu selection or manual mode.
The ingredients are jammed. Take out ingredients from the blender jug and put them back in.
- The stop/start key is not pressed within 10 seconds after menu selection is chosen.
Menu selection is cancelled after 10 seconds of inactivity for the prevention of a motor operation malfunction. Select an auto menu selection or manual mode again and press "☑" within 10 seconds.
Maximum and minimum blending time is set for each menu and varies. Adjust the time to be in the each menu selection's range. (P. GB16)
The circuit breaker protection is activated.
- Too many ingredients
- Blending hard ingredients
Abnormal noise or vibration
Release the circuit breaker protection. (P. GB25)
Using sticky ingredients
Add liquid.
Maximum operating time (approximately 9 minutes 40 seconds) is exceeded. Turn off the power and resume after 10 minutes of rest.
- The safety lock is activated due to tilt blender jug when using the tamper. Re-start and hold the lid while using the tamper.
Troubleshooting
Please check following points before arranging for service.
Problem
Cause and Action
Mixture in the blender jug is leaking.
The blender jug base is attached loosely.
→ Tight the blender jug base up firmly onto the blender jug. (P. GB14)
The gasket of the lid or blender jug is not attached correctly.
Attach the gasket correctly. (P. GB14)
The gasket of the lid or blender jug is damaged.
Replace the gasket. (P. GB25)
There is abnormal noise or vibration.
- Too much ingredients in the blender jug.
Stop the appliance and reduce the ingredients.
The blender jug base is attached loosely.
Tight the blender jug base up firmly onto the blender jug. (P. GB14)
The blade is spinning.
- Too much ice cubs or frozen fruit.
Turn off the appliance and after the blade is completely stopped, insert the tamper to circulate. (P. GB19)
Quantity of the liquid is low.
Add liquid.
The texture and consistency of the mixture did not turn out well.
- When you are blending quantity of less or over 4 servings, texture and consistency may not turn well on auto menus.
Try using the manual mode. (P. GB20-21)
The and indicators are flashing alternately.
This is a malfunction.
Contact an authorized Panasonic service center for check and repair.
The and indicators are flashing alternately.
The overloading protection is activated.
- Too many ingredients
Using hard ingredients - Selected speed is too low for ingredients
Turn off the appliance and wait 10 minutes before next use. - There is a possibility of failure if it is re-used immediately. When re-using the appliance, allow the blade to rotate freely by reducing the amount of ingredients or by increasing the speed.
The appliance stops during blending and and M are flashing alternately.
- This indicates that the motor temperature is overheating. Please stop using the appliance and wait until the temperature goes down. (When the appliance enters standby mode as in GB18 Figure 1, the temperature has gone back to normal.)
The appliance stops during blending, and the and M indicators are flashing alternately.
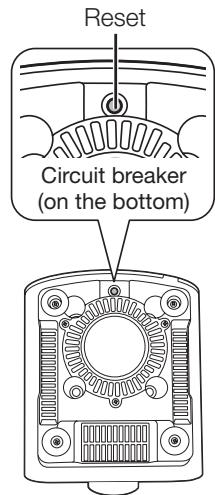
Circuit Breaker Protection
In case of overload, the circuit breaker will be triggered, and the blender will automatically stop running. You can take the following steps to disable the protection.
- Remove the blender jug from the motor housing, and reduce the ingredients to less than the half capacity.
- Turn the motor housing over, and press the reset button on its bottom.
- Replace the blender jug, and after auto menu or manual mode setting,
press " " to blend again.
Replacement Parts
Replacement parts are available at your dealer or Service Center.
| Part name | Part number |
| Jug gasket | VE28B2461 |
| Lid gasket | VE22B2461K0 |
| Ice pack | VU03E246 |
Specifications
| MX-ZX1800 | |
| Power supply | 230 - 240 V ~ 50 Hz |
| Power consumption | 1200 - 1300 W |
| Speed control | 10 speed control |
| Operation rating | Continuous operation (Repeat the cycle of 9 min ON and then 10 min OFF) |
| Working capacity | 1800 mL |
| Dimensions (W × D × H) (approx.) | 22.8 × 24.0 × 44.7 cm |
| Mass (approx.) | 6.1 kg |
| Length of the mains lead (approx.) | 1.9 m |
| Airborne Acoustical Noise | 91 (dB (A) ref 1 pW) |
Disposal of Old Equipment
Only for European Union and countries with recycling systems
This symbol on the products, packaging, and/or accompanying documents means that used electrical and electronic products must not be mixed with general household waste.
For proper treatment, recovery and recycling of old products, please take them to applicable collection points in accordance with your national legislation.
By disposing of them correctly, you will help to save valuable resources and prevent any potential negative effects on human health and the environment.
For more information about collection and recycling, please contact your local municipality.
Penalties may be applicable for incorrect disposal of this waste, in accordance with national legislation.
Memo
parpadean alternatively.
La proteccion de se
- Benyt违法犯罪, alcoholism, alcoholism-related disorder, alcoholism-related disorder, alcoholism-related disorder, alcoholism-related disorder, alcoholism-related disorder, alcoholism-related disorder, alcoholism-related disorder, alcoholism-related disorder, alcoholism-related disorder, alcoholism-related disorder, alcoholism-related disorder, alcoholism-related disorder, alcoholism-related disorder, alcoholism-related disorder, alcoholism-related disorder, alcoholism-related disorder, alcoholism-related disorder, alcoholism-related disorder, alcoholism-related disorder, alcoholism-related disorder, alcoholism-related disorders, alcoholism-related disorders, alcoholism-related disorders, alcoholism-related disorders, alcoholism-related disorders, alcoholism-related disorders, alcoholism-related disorders, alcoholism-related disorders, alcoholism-related disorders, alcoholism-related disorders, alcoholism-related disorders, alcoholism-related disorders, alcoholism-related disorders, alcoholism-related disorders, alcoholism-related disorders, alcoholism-related disorders, alcoholism-related disorders, alcoholism-related disorders, alcoholism-related disorders, alcoholism-related disorders, alcoholism-related Disorders
- Undgå maskinopvask af motorhuset og beholderfoden.
- Undgå at rengore apparatet med en spids genstand sāsom en tandstikker aller en näl.
Spatel/Blenderglas holder
Apparatet stopper under blending.
Arsg og handling
- Contents
- Safety Precautions
- WARNING
- CAUTION
- Important Information
- Parts Names and Handling Instructions
- Safety Lock
- Before Use - Disassembly and Assembly -
- Disassembly and assembly of the blender jug base
- Note
- Disassembly and assembly of the lid unit
- Assembly of the ice pack and drip tray
- Guide of Menus and Functions for Auto Menus
- How to Use Auto Menus
- Set the blender jug onto the motor housing. Then plug in and turn the switch on.
- Select menu and press “ 1 ” to start.
- After you hear beep sounds for completion, wait until the blade stops completely and remove the blender jug. Check texture and consistency of the mixture.
- Guide of Quantity and Functions for Manual Mode
- How to Use Manual Mode
- Select manual mode and adjust speed by turning the dial. Then press “ ” to start.
- Press “ ” when blending is completed. Remove the blender jug from the motor housing and check condition of the mixture after blade is stopped rotating completely.
- You can make mashed potato with your blender!
- How to Clean
- Cap/Lid/Lid gasket
- Blender jug/Jug gasket/Drip tray
- Blender jug base
- Tamper/Jug base holder
- Motor housing/Ice pack
- Troubleshooting
- Problem
- Cause and Action
- Circuit Breaker Protection
- Replacement Parts
- Specifications
- Disposal of Old Equipment
- Only for European Union and countries with recycling systems
- Memo
- Spatel/Blenderglas holder
- Arsg og handling
Brand : PANASONIC
Model : MX-ZX1800
Category : Blender