
LE48M4S9 - Television HITACHI - Free user manual and instructions
Find the device manual for free LE48M4S9 HITACHI in PDF.

| Product Type | LED Television |
| Screen Size | 48 inches (diagonal) |
| Resolution | 1920 x 1080 (Full HD) |
| Display Technology | LED LCD |
| Dimensions (with stand) | 109.2 x 71.1 x 25.4 cm (43.0 x 28.0 x 10.0 inches) |
| Weight (with stand) | 12.5 kg (27.6 lbs) |
| Power Consumption (typ.) | 80 W |
| Standby Power | < 0.5 W |
| Inputs | 3x HDMI, 1x USB, 1x RF, 1x Composite, 1x Component |
| Outputs | 1x Digital Optical Audio, 1x Headphone Jack |
| Tuner | DVB-T/T2/C (terrestrial/cable) |
| Smart TV | No (basic TV function) |
| Energy Class | A (EU) |
| VESA Mount | 200 x 200 mm |
| Remote Control | IR remote included |
| Cleaning | Wipe screen and body with a soft, dry cloth. Do not use abrasive cleaners. |
| Safety | Do not expose to moisture. Ensure proper ventilation. Avoid placing near heat sources. |
| Spare Parts | Remote control, stand base, screws. Contact authorized service center for repairs. |
Frequently Asked Questions - LE48M4S9 HITACHI
User questions about LE48M4S9 HITACHI
0 question about this device. Answer the ones you know or ask your own.
Ask a new question about this device
Download the instructions for your Television in PDF format for free! Find your manual LE48M4S9 - HITACHI and take your electronic device back in hand. On this page are published all the documents necessary for the use of your device. LE48M4S9 by HITACHI.
USER MANUAL LE48M4S9 HITACHI
48" Class (47.61" Diagonal)
Serial No.
CONGRATULATIONS
Thank you for purchasing this Hitachi product. Please read these instructions carefully.
For additional assistance please call Toll Free 800.HITACHI (800.448.2244) or visit our website at www.hitachi.us/tv. Keep this Owner's Guide for future reference.
Record the model name and serial number of your LCD Television for future reference. This information is located on the back of the television.
TABLE OF CONTENTS
2-6 IMPORTANT SAFETY INSTRUCTIONS
7 HOW TO ATTACH / REMOVE THE STAND
8-12 FIRST TIME USE
14-18 TV OPERATION
19-21 RECEPTION DISTURBANCES
22 SPECIFICATIONS
24 LIMITED WARRANTY


The lightning flash with arrowhead symbol, within an equilateral triangle is intended to alert the user to the presence of uninsulated dangerous voltage within the product's enclosure that may be of sufficient magnitude to constitute a risk of electric shock.

The exclamation point within an equilateral triangle is intended to alert the user to the presence of important operating and maintenance (servicing) instructions in the literature accompanying the appliance.
WARNING: TO PREVENT FIRE OR SHOCK HAZARD, DO NOT EXPOSE THIS APPLIANCE TO RAIN OR MOISTURE. TO PREVENT THE SPREAD OF FIRE, KEEP CANDLES OR OPEN FLAMES AWAY FROM THIS PRODUCT AT ALL TIMES.
CAUTION: TO PREVENT ELECTRIC SHOCK, DO NOT USE THIS TELEVISION'S AC PLUG WITH AN EXTENSION CORD, RECEPTACLE OR OTHER OUTLET UNLESS THE BLADES CAN BE FULLY INSERTED TO PREVENT BLADE EXPOSURE
LEAD NOTICE
This product contains lead. Dispose of this product in accordance with applicable environmental laws. For product recycling and disposal information, contact your local government agency or www.eRecycle.org (in California), the Electronic Industries Alliance at www.ecyclingcentral.com (in the U.S.) or the Electronic Product Stewardship Canada at www.epsc.ca (in Canada).

This equipment is a Class II or double insulated electrical appliance. It has been designed in such a way that it does not require a safety connection to electrical earth.
WARNING: This equipment has been tested and found to comply with the limits for a Class B digital device, pursuant to Part 15 of the FCC Rules. These limits are designed to provide reasonable protection against harmful interference in a residential installation. This equipment generates, uses and can radiate radio frequency energy and, if not installed and used in accordance with the instructions, may cause harmful interference to radio communications. However, there is no guarantee that interference will not occur in a particular installation. If this equipment does cause harmful interference to radio or television reception, which can be determined by turning the equipment off and on, the user is encouraged to try to correct the interference by one or more of the following measures:
- Reorient or relocate the receiving antenna.
- Increase the separation between the equipment and receiver.
- Connect the equipment to an outlet on a circuit different from that to which the receiver is connected.
Consult the dealer or an experienced radio/TV technician for help.
CAUTION: Changes or modifications not expressly approved by the party responsible for compliance with the FCC Rules could void the user's authority to operate this equipment.
This Television receiver will display television closed captioning, (con), in accordance with FCC rules.
Location of the required Marking
The rating sheet and the safety caution are on the rear of the unit.

natural_image
Architectural line drawing of a room layout with furniture and windows (no text or symbols)Declaration of Conformity
This device complies with part 15 of the FCC Rules. Operation is subject to the following two conditions:
(1) This device may not cause harmful interference and (2) This device must accept any interference received, including interference that may cause undesired operation.
For questions regarding this declaration, contact:
Hitachi America, Ltd.
2420 Fenton Street, Suite 200
Chula Vista, CA 91914-3556
ATTN: Customer Relations
IMPORTANT SAFETY INSTRUCTIONS
1) Read these instructions.
2) Keep these instructions.
3) Heed all warnings.
4) Follow all instructions.
5) Do not use this apparatus near water.
6) Clean only with dry cloth.
7) Do not block any ventilation openings. Install in accordance with the manufacturer's instructions.
8) Do not install near any heat sources such as radiators, heat registers, stoves, or other apparatus (including amplifiers) that produce heat.
9) Do not defeat the safety purpose of the polarized or grounding-type plug. A polarized plug has two blades with one wider than the other. A grounding type plug has two blades and a third grounding prong. The wide blade or the third prong are provided for your safety. If the provided plug does not fit into your outlet, consult an electrician for replacement of the obsolete outlet.
10) Protect the power cord from being walked on or pinched particularly at plugs, convenience receptacles, and the point where they exit from the apparatus.
11) Only use attachments/accessories specified by the manufacturer.
12) Use only with cart, stand, tripod, bracket, or table specified by the manufacturer, or sold with the apparatus. When a cart is used, use caution when moving the cart/apparatus combination to avoid injury from tip-over.
13) Unplug this apparatus during lightning storms or when unused for long periods of time.
14) Refer all servicing to qualified service personnel. Servicing is required when the apparatus has been damaged in any way, such as power-supply cord or plug is damaged, liquid has been spilled or objects have fallen into the apparatus, the apparatus has been exposed to rain or moisture, does not operate normally, or has been dropped.
15) Apparatus should not be exposed to dripping or splashing, and objects filled with liquids, such as vases, should not be placed on the apparatus.
16) An outside antenna system should not be located in the vicinity of overhead power lines or other electric light or power circuits, or where it can fall into such power lines or circuits. When installing an outside antenna system, extreme care should be taken to keep from touching such power lines or circuits, as contact with them might be fatal.
17) Do not overload wall outlets and extension cords, as this can result in a risk of fire or electric shock.
18) Do not push objects through any openings in this unit, as they may touch dangerous voltage points or short out parts that could result in fire or electric shock. Never spill or spray any type of liquid into the unit.
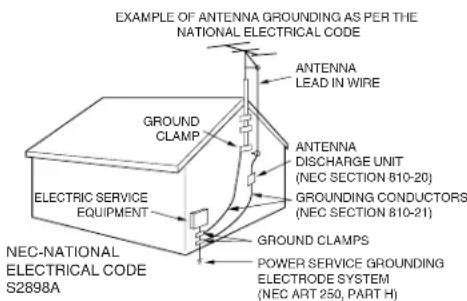
19) If an outside antenna or cable system is connected to the unit, be sure the antenna or cable system is grounded to provide some protection against voltage surges and built-up static charges, Section 810 of the National Electrical Code, ANSI/NFPA 70, provides information with respect to proper grounding of the mast and supporting structure, grounding of the lead-in wire to an antenna discharge unit, size of grounding conductors, location of antenna discharge unit, connection to grounding electrodes, and requirements for the grounding electrode.
20) When replacement parts are required, be sure the service technician uses replacement parts specified by the manufacturer or those that have the same characteristics as the original part.
Unauthorized substitutions may result in fire, electric shock or other hazards.
21) Upon completion of any service or repairs to this unit, ask the service technician to perform safety checks to determine that the unit is in proper operating condition.
22) When you connect the product to other equipment, turn off the power and unplug all of the equipment from the wall outlet. Failure to do so may cause an electric shock and serious personal injury. Read the owner's manual of the other equipment carefully and follow the instructions when making any connections.

S3125A
IMPORTANT SAFETY INSTRUCTIONS (continued)
23) Do not allow the product to output distorted sound for an extended period of time. It may cause speaker overheating and fire.
24) This reminder is provided to call the cable TV system installer's attention to Article 820-40 of the NEC that provides guidelines for proper grounding and, in particular, specifies that the cable ground shall be connected to the grounding system of the building, as close to the point of cable entry as practical.
25) This apparatus shall be connected to a mains socket outlet with a protective earthing connection.
26) The mains plug is used as the disconnect and shall remain readily operable.
CONDENSATION
Moisture will form in the operating section of the unit if the unit is brought from cool surroundings into a warm room or if the temperature of the room rises suddenly. When this happens, unit's performance will be impaired. To prevent this, let the unit stand in its new surroundings for about an hour before switching it on, or make sure that the room temperature rises gradually.
Condensation may also form during the summer if the unit is exposed to the breeze from an air conditioner. In such cases, change the location of the unit.
HOW TO HANDLE THE LCD PANEL
- Do not press hard or jolt the LCD panel. It may cause the LCD panel glass to break and injury may occur.
- If the LCD panel is broken, make absolutely sure that you do not touch the liquid in the panel. This may cause skin inflammation. If the liquid gets in your mouth, immediately gargle and consult with your doctor. Also, if the liquid gets in your eyes or touches your skin, consult with your doctor after rinsing for at least 15 minutes or longer in clean water.
Possible Adverse Effects on LCD Panel: If a fixed (non-moving) pattern remains on the LCD Panel for long periods of time, the image can become permanently engrained in the LCD Panel and cause subtle but permanent ghost images. This type of damage is NOT COVERED BY YOUR WARRANTY. Never leave your LCD Panel on for long periods of time while it is displaying the following formats or images:
- Fixed Images, such as stock tickers, video game patterns, TV station logos, and websites.
- Special Formats that do not use the entire screen. For example, viewing letterbox style (16:9) media on a normal (4:3) display (black bars at top and bottom of screen); or viewing normal style (4:3) media on a widescreen (16:9) display (black bars on left and right sides of screen).
The following symptoms are not signs of malfunction but technical limitation. Therefore we disclaim any responsibility for these symptoms.
- LCD Panels are manufactured using an extremely high level of precision technology, however sometimes parts of the screen may be missing picture elements or have luminous spots.
This is not a sign of a malfunction. - Do not install the LCD Panel near electronic equipment that produces electromagnetic waves. Some equipment placed too near this unit may cause interference.
- Effect on infrared devices – There may be interference while using infrared devices such as infrared cordless headphones.
Power source
This television is designed to operate on 120 volts 60 Hz, AC current. Insert the power cord into a 120 volts 60 Hz outlet.
To prevent electric shock, do not use the television's (AC) plug with an extension cord, receptacle, or other outlet unless the blades can be fully inserted to prevent blade exposure.
Never connect the television to 50 Hz, direct current, or anything other than the specified voltage.
Warning
To reduce the risk of fire or electric shock, do not expose this apparatus to rain or moisture.
Caution
Never remove the back cover of the television as this can expose you to very high voltages and other hazards. If the television does not operate properly, unplug the television and call your authorized dealer or service center.
Adjust only those controls that are covered in the instructions, as improper changes or modifications not expressly approved by Hitachi could void the user's warranty.
CHILD SAFETY NOTICE
CHILD SAFETY:
It Makes A Difference How and Where You Use Your Flat Panel Display
Congratulations on your purchase!
As you enjoy your new product, please keep these safety tips on mind:
natural_image
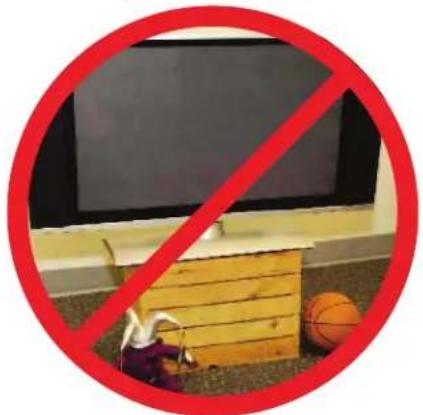
Prohibition sign showing a red circle with a blackboard and a basketball on a wooden crate (no text or symbols)HITACHI CARES!
- The consumer electronics industry is committed to making home entertainment enjoyable and safe.
- Please note the American Academy of Pediatrics discourages television viewing for children younger than two years of age.
- The home theater entertainment experience is a growing trend and larger flat displays are popular purchases. However, flat panel displays are not always supported on the proper stands or installed according to the manufacturer's recommendations.
- Flat Panel displays that are inappropriately situated on dresser, bookcases, shelves, desks, speakers, chest or carts may fall over and cause injury.
TUNE INTO SAFETY
- One size does NOT fit all. Follow the manufacturer's recommendations for the safe installation and use of your flat panel display.
- Carefully read and understand all enclosed instructions for proper use of this product.
- Don't allow children to climb on or play with furniture and television sets.
- Don't place flat panel displays on furniture that can easily be used as steps, such as a chest of drawers.
- Remember that children can become excited while watching a program, especially on a "larger than life" flat panel display. Care should be taken to place or install the display where it cannot be pushed, pulled over, or knocked down.
- Care should be taken to route all cords and cables connected to the flat panel display so that they cannot be pulled or grabbed by curious children.
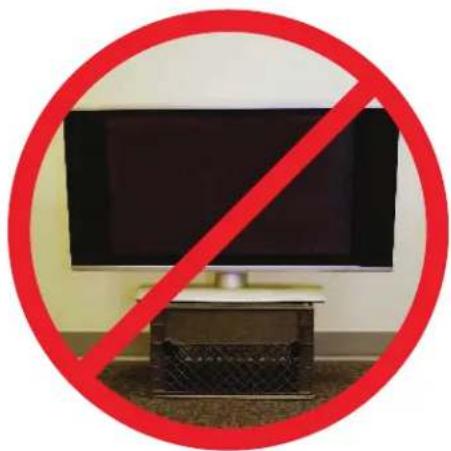
WALL MOUNTING: IF YOU DECIDE TO WALL MOUNT YOUR FLAT PANEL DISPLAY, ALWAYS:
- Use a mount that has been recommended by the display manufacturer and/or listed by an independent laboratory (such as UL, CSA, ETL).
- Follow all instructions supplied by the display and wall mount manufacturers.
- If you have any doubts about your ability to safely install your flat panel display, contact your retailer about professional installation.
• Make sure that the wall where you are mounting the display is appropriate. - Some wall mounts are not designed to be mounted to walls with steel studs or old cinder block construction.
• If you are unsure, contact a professional installer. - A minimum of two people are required for installation. Flat panel displays can be heavy.
natural_image
Prohibition symbol showing a black monitor inside a red circle, with no text or symbols present.
CEA
www.CE.org/safety
SAFETY PRECAUTIONS
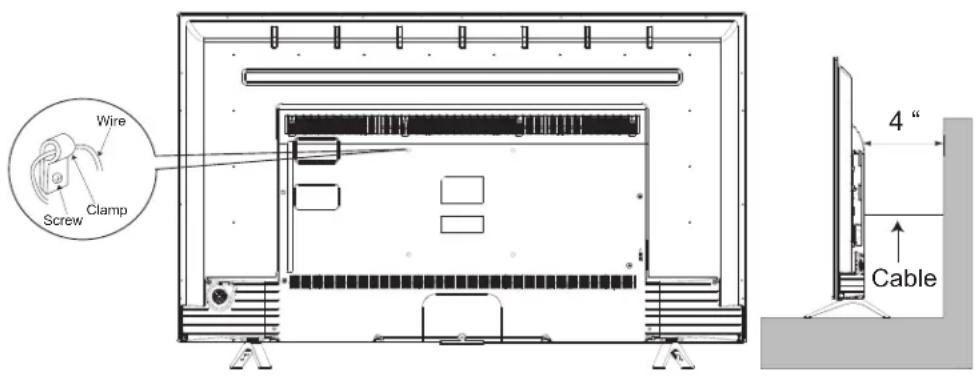
The unit emits heat when in operation. Do not place any covers or blankets on the unit, this may cause overheating. Do not block ventilation holes, or set up near radiators. Do not place in direct sunlight. When placing on a shelf leave 4 inches (10 cm) free space around the entire unit.

Notes when mounting the TV on a wall
If the unit is to be mounted on the wall, contact the retailer where you purchased the TV for advice, and have the equipment professionally installed. Incomplete or improper installation may cause injury to you, and/or damage to the TV.
The screws ISO M6 thread type should be used. The insertion length must be within 15-29 mm.
If the insertion length is less than 15 mm the weight can not be maintained.
If the insertion length is more than 29 mm a space is created between the (Insertion Length) = (Screw Length) - (Washers Thickness) - (Mounting Bracket Thickness)
Securing to a Wall
1 Use metallic wire, screw and clamp (not provided) on the rear of the TV as shown below.
2 Keep the TV 4 inches away from the wall, except when mounted using the wall mount bracket, and secure to the wall as shown below:
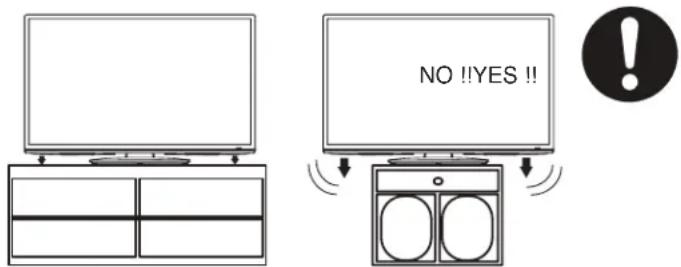
NOTICE FOR TV CABINET
If the unit is placed on a cabinet smaller than the length of the unit, it could result in instability and the unit may tumble over, making a risk of personal, possibly fatal injury. Also, this would seriously damage the product. Accordingly, Hitachi accepts no responsibility or liability for any injuries or property damage resulting from the improper installation.
EN 6
How to attach the stand
NOTE:
• Assure the AC cord is not connected to an AC outlet.
- Before beginning this process, make sure that you have a clean, safe, and cushioned space to work at to avoid any damage to the unit.
- Do not touch or press the LCD screen, the glass might break under pressure.
1 Carefully place the TV screen face-down on a clean, cushioned surface.
2 Insert and secure the stands (R and L) with 2 screws (supplied) each side as shown in Figure 1.
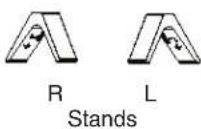
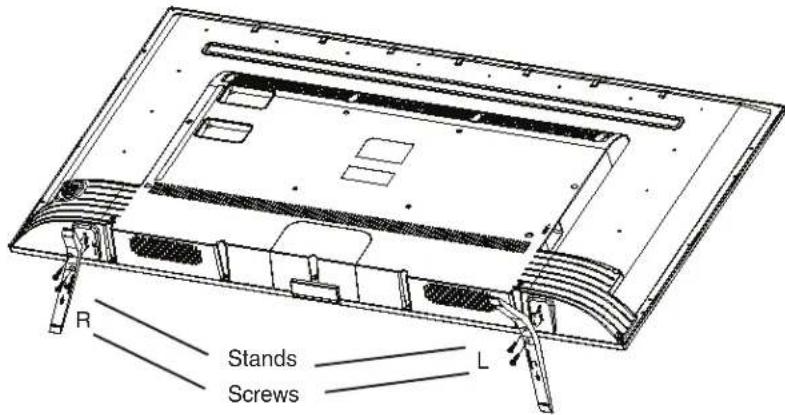
Figure 1
- Be sure to follow the above instructions. Insufficient tightening or incorrect installation of the stand will not support your TV correctly, and could result in damage or injury from tip-over.
How to remove the stand
When you transport this product, remove the stand and pack it flat against the back of the unit in the carton. To remove the stand, perform the above steps in reverse order.
When you mount the TV on the wall, remove both stands (R and L). To disconnect the stand remove the screws from the bottom of TV.
Contents
Chapter 1: Introduction
Precautions....2
IMPORTANT SAFETY INSTRUCTIONS....3
CHILD SAFETY NOTICE....5
SAFETY PRECAUTIONS 6
How to attach the stand 7
How to remove the stand 7
Location of controls....9
Remote Control Functions 10
Important Note 11
Network Connection 11
Battery Precautions 12
Connection Power....12
Antenna connections 13
Cable TV connections....13
Chapter 2: TV Operation
Menu Display 14
Initial Setup 14
Source 14
Menu Operation....15
Channel setup....15
Video Menu 15
Audio Menu 16
Time Setup 16
Setup Menu 16
Lock Menu....17
Multimedia 17
Featured APPs....18
Chapter 3: Addition Information
Problem & Solutions 19
Reception disturbances....20
Troubleshooting 21
Specifications 22
LIMITED WARRANTY 24
Chapter 1
Introduction
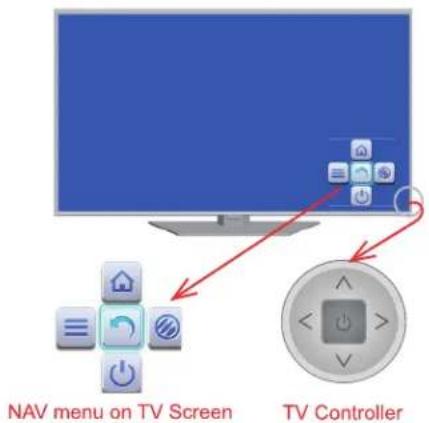
TV Control Keys
The TV control keys (located at the rear, right side of the TV) are multi-function buttons that help navigate or operate the TV without a remote control.
- ⏻ POWER / OK / Return button
A. Press to power ON the TV from Standby mode.
B. When the TV is ON:
- Press to display the NAV (navigation) OSD (On-screen Display).
- Press to select OK.
-
Press and hold for more than 2 seconds to RETURN or exit.
-
▲/▼
A. Press to change the channel.
B. Press to up / down in NAV OSD.
- ◀/▶
A. Press to change the volume level.
B. Press to left / right in NAV OSD.
Inputs / Outputs
LAN →

Digital Audio Out

HDMI 1/2/3
COMPONENT / AV IN /VIDEO Pb & - Pr & -


AV &COMPONENT AUDIO IN [L - ] [R - ]
AUDIO OUT R → L →
AIR/CABLE →
USB →
LAN (RJ45)
This input can be used to connect to an external modem or network access equipment.
Digital Audio Out
This output can be used to connect a compatible digital audio receiver.
HDMI1/HDMI2/HDMI3
The HDMI inputs receive digital audio and video from an HDMI device.
AV (VIDEO) / Component (YPBPR) IN
This input is used to connect a range of equipment such as BD players, DVD players, or satellite receivers to the AV or Component input. To use the AV input connect the devices video output to the TV's Y/Video input. To use the Component input connect the device's output to the TV's Y/Video, P_B , P_R input. NOTE: The AV and Component input is a shared input. You can only use the AV input or Component input; they cannot be used simultaneously.
AUDIO IN (AV, Component, and PC)
The AUDIO IN (L & R) input is a shared input. Use RCA audio cables to connect the audio output for the AV, Component or PC input to the TV.
AUDIO OUT
Use an RCA audio cable to connect your TV to a compatible audio receiver.
AIR/CABLE IN
This input is used to connect to an external antenna (AIR) or to a cable (CABLE) output.
USB
This input can be used to connect a USB device.
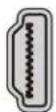
Remote control
| Press to turn the TV's power on/off. | |
| (MUTE) Reduces the TV's volumes to its minimum level. Press again to restore the volume. | |
| Tuner | Select “Air” or “Cable”. |
| CC | Press to set Closed Caption to “CC Off”, “CC On Mute” or “CC On”. |
| MTS | Press to change the audio language. |
| 0-9 | (Numeric buttons) Use to enter channel numbers, letters, or symbols. |
| Use to enter a digital channel with a sub-channel. Enter the main channel, then press the dot (●), enter the sub-channel, and then press OK to confirm your entry. | |
| Return to the previous channel in TV mode. | |
| SOURCE | Calls the input source selection menu. |
| MENU | Press to call the main menu OSD or press to return to the previous menu. |
| ▲/▼/◄/► | (Cursor Up/Down/Left/Right buttons) Use to navigate and select menu functions. |
| ZOOM -/+ | Press to call the ASPECT selection OSD. |
| OK | Press to confirm or select functions for the On-Screen menu. |
| EXIT | Press to exit the On-Screen menu. |
| INFO | Press to display information about the TV status. |
| VOL +/- | (Volume UP/DOWN) Increase or decrease the TV's volume. |
| CH +/- | Press to change the channel of the TV. |
| Smart TV | Press to call the Smart TV homepage. |
| YouTube | Press to go to the YouTube homepage. |
| NETFLIX | Press to go to the NETFLIX homepage. |
| Color buttons | (Red / Green / Yellow / Blue) Special function buttons. |
| P.MODE | Press to call the Picture Mode on-screen display menu. |
| S.MODE | Press to call the Sound Mode on-screen display menu. |
| SLEEP | Repeatedly press to set the sleep timer from 10 to 90 minuets. To cancel the sleep timer, press SLEEP until “Off” appears. |
| GUIDE | Press to display the electric program guide. |
| FREEZE | Freeze On/Off. |
| @ | Press to go to the browser's homepage. |
| FAV | Press to access the Favorite Channel list. |
| USB | Press to go to the Multimedia page. |
| (Previous) Press to select the previous chapter | |
| (Stop) Press to stop viewing. | |
| (Play/Pause) Press to start, pause or resume viewing. | |
| (Next) Press to select the next chapter. |
Important Note
Manufactured under license from Dolby Laboratories. Dolby and the double-D symbol are trademarks of Dolby Laboratories.
The terms HDMI and HDMI High-Definition Multimedia Interface, and the HDMI Logo are trademarks or registered trademarks of HDMI Licensing LLC in the United States and other countries.
Internet features require an active internet connection and may require a content subscription or Pay-Per-View fee.
Netflix is a registered trademark of Netflix, Inc.. Netflix is available in certain countries and requires a paid subscription. More information at www.Netflix.com
Opera, Opera Software, Opera Devices, and the "O" logo are trademarks of Opera Software ASA.
YouTube™ is a trademark of Google Inc.
Picasa™ is a trademark of Google Inc.
Twitter is a registered trademark of Twitter, Inc.
Facebook is a trademark of Facebook.
Connected TV Apps Powered by TCL.
All other trademarks are the property of their respective owners.
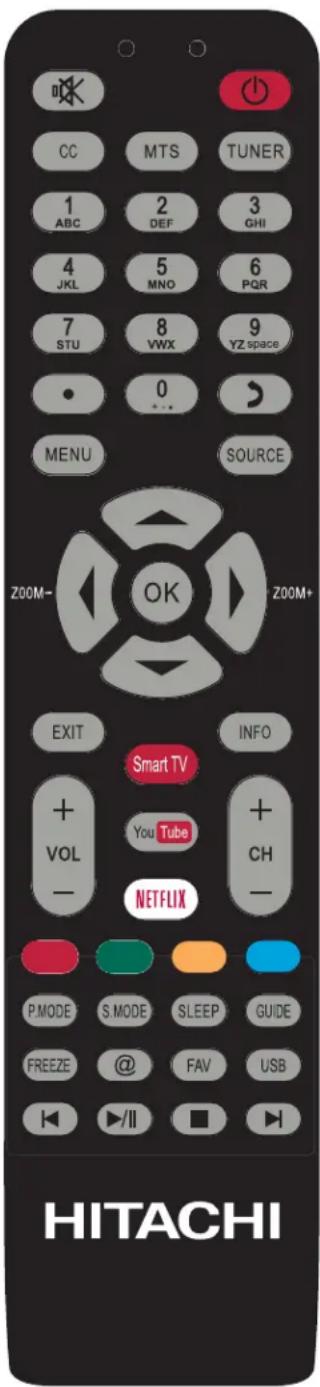
Network Connection
To access the Internet from this TV, you must separately subscribe to high speed broadband Internet service with your Internet Service Provider.
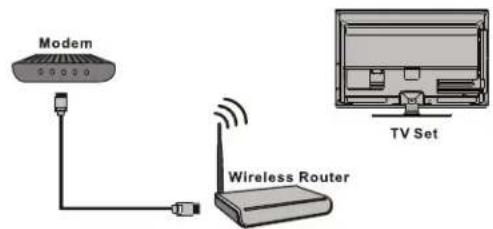
Your TV is internet-ready and can be connected to your home network in two ways:
- Wired, using the LAN (RJ45) input located on the back of the TV.
- Wireless, using a router capable of broadcasting a high-speed wireless signal.
Caution:
This wireless appliance complies with FCC radiation limits set forth for an uncontrolled environment. Install and operate with a minimum of 8 inches between it and your body.
Connecting to a wired network
To connect to a wired network:
-
Ensure you have:
-
An Ethernet cable long enough to reach your TV.
-
A router or modem with an available Ethernet port.
• A high speed internet connection. -
Connect your Ethernet cable to the router or modem and to the LAN port on the back of the TV.
-
Use the Network menu to configure the TV.
Connecting to a wireless network
To connect to a wireless network:
-
Ensure you have:
-
A router broadcasting a high-speed wireless signal.
• A high-speed internet connection. -
Use the Network menu to configure the TV.
flowchart
graph TD
    A["Router"] -->|Ethernet Port on the back panel| B["Modem"]
    B --> C["Internet"]
    B --> D["TV Set"]
    style A fill:#f9f,stroke:#333
    style B fill:#ccf,stroke:#333
    style C fill:#cfc,stroke:#333
    style D fill:#fcc,stroke:#333
BATTERY PRECAUTIONS
These precautions should be followed when using batteries.
- Use only the size and type of batteries specified.
- Be sure to follow the correct polarity when installing the batteries as indicated in the battery compartment. Reversed batteries may cause damage to the device.
- Do not mix different types of batteries together (e.g. Alkaline, Carbon-zinc or Rechargeable) or old batteries with fresh ones.
- If the device is not to be used for a long period of time, remove the batteries to prevent damage or injury from possible battery leakage.
- Do not try to recharge batteries not intended to be recharged; they can overheat and rupture. (Follow battery manufacturer's directions.)
- Please use caution when inserting batteries to avoid battery damage. If the spring terminal in the remote control remains in contact with a side of a damaged battery it can cause a short circuit. Never use damaged batteries as they can become very hot and are dangerous.
Before using the remote control, batteries must first be installed.
Use two “AAA” size batteries. The batteries may last approximately one year depending on how much the remote control is used. For best performance, it is recommended that batteries should be replaced on a yearly basis or when the remote operation becomes erratic. Do not mix old and new batteries or batteries of different types.
WARNING: The batteries (battery pack or batteries installed) shall not be exposed to excessive heat such as sunshine, fire or the like.
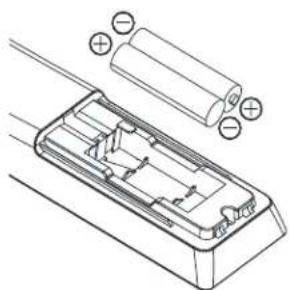
HOW TO INSTALL BATTERIES
-
Open the battery compartment cover.
-
Install two "AAA" batteries (supplied).
natural_image
Technical line drawing of a battery pack with external components and polarity indicators (no text or symbols)- Replace the battery compartment cover.
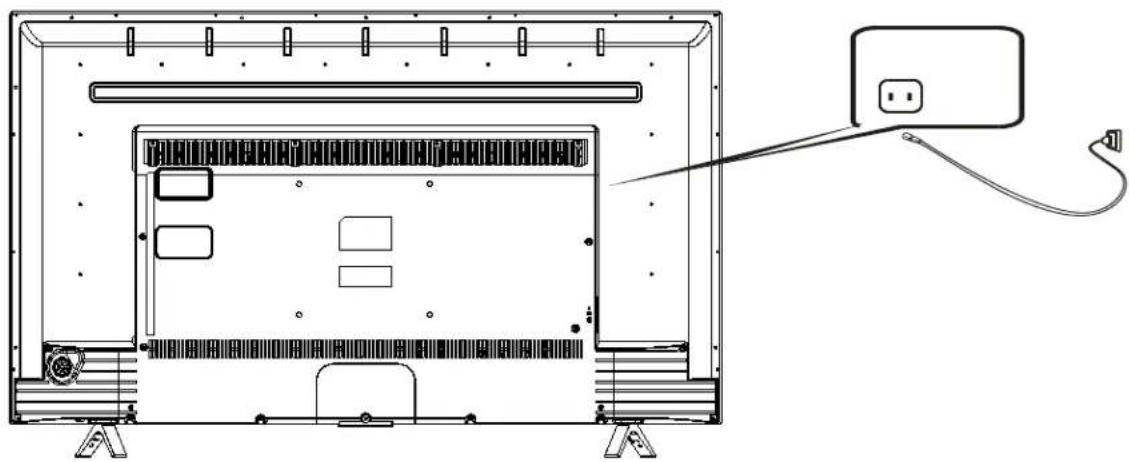
CONNECTING POWER
First connect the AC cord to the television, then connect the other end to an AC outlet
natural_image
Technical line drawing of a TV rack with an attached cable and a separate outlet (no text or symbols)EN 12
Antenna connections
If you are using an indoor or outdoor antenna, follow the instructions below that correspond to your antenna system. If you are using a Cable TV service, see Cable TV connections.
Combination VHF/UHF Antenna (Single 75 ohm cable)
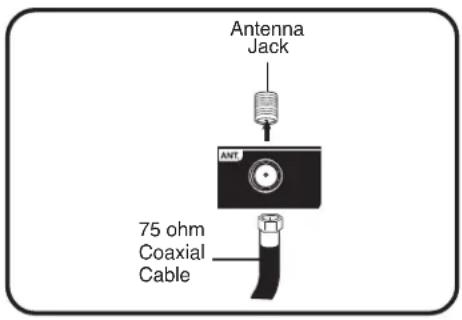
Connect the 75 ohm cable from the combination VHF/UHF antenna to the Antenna Jack.
Cable TV connections
This TV has an extended tuning range and can tune most cable channels without using a Cable TV Converter box. Some cable companies offer “premium pay channels” where the signal is scrambled. Descrambling these signals for normal viewing requires the use of a descrambler device which is generally provided by the Cable TV company.
For subscribers to basic Cable TV service
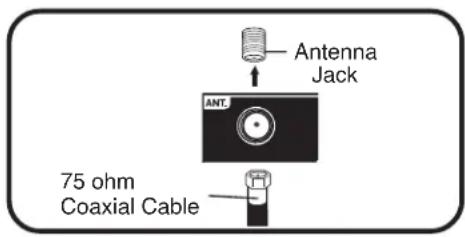
For basic Cable TV service not requiring a Converter/Descrambler box, connect the 75 ohm Coaxial Cable directly to the Antenna Jack on the back of the TV.
For subscribers to scrambled Cable TV service
If you subscribe to a Cable TV service which requires the use of a Converter/Descrambler box, connect the incoming 75 ohm Coaxial Cable to the Converter/Descrambler box. Using another 75 ohm Coaxial Cable, connect the output jack of the Converter/Descrambler box to the Antenna Jack on the TV. Follow the connections shown below. Set the TV to the output channel of the Converter/Descrambler box (usually channel 3 or 4) and use the Converter/Descrambler box to select channels.

flowchart
graph LR
    A["Incoming 75 ohm Cable TV Cable"] --> B["Converter/Descrambler"]
    B --> C["75 ohm Cable to TV"]
    C --> D["Antenna Jack"]
For subscribers to unscrambled Cable TV service with scrambled premium channels
If you subscribe to a Cable TV service in which basic channels are unscrambled and premium channels require the use of a Converter/Descrambler box, you may wish to use a signal Splitter and an A/B Switch box (available from the Cable TV company or an electronics supply store). Follow the connections shown below. With the switch in the "B" position, you can directly tune any non-scrambled channels on your TV. With the switch in the "A" position, tune your TV to the output of the Converter/Descrambler box (usually channel 3 or 4) and use the Converter/Descrambler box to tune scrambled channels.

flowchart
graph LR
    A["Incoming 75 ohm Cable TV Cable"] --> B["Splitter"]
    B --> C["Converter/Descrambler"]
    C --> D["A/B Switch"]
    D --> E["75 ohm Cable to TV"]
    E --> F["Antenna Jack"]
Chapter 2
TV Operation
Menu Display
Figures and illustrations below are provided for reference only and may differ from actual product appearance.
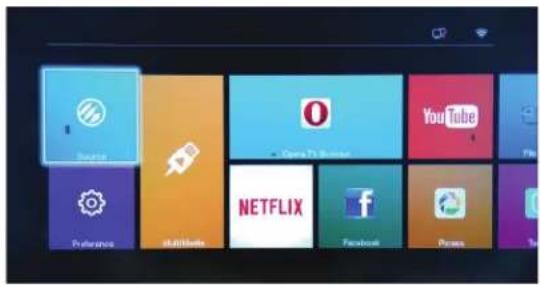
Figure 1
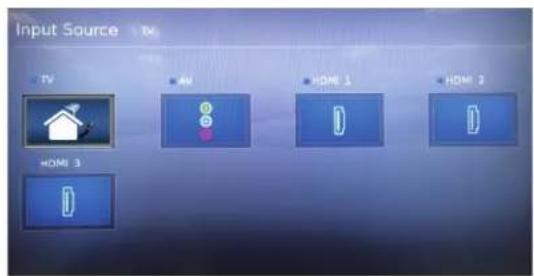
Figure 2
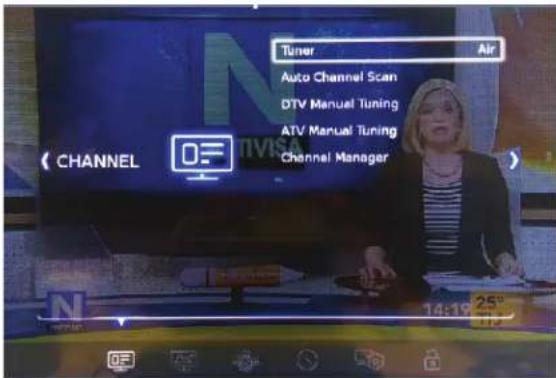
Figure 3
Initial Setup
The Setup Wizard appears the first time you turn on the TV, and assists you to specify the Air/Cable setting, and program your channels automatically. IMPORTANT: Make sure you are connected to an antenna or cable TV system.
- To turn on the TV, press (It may take approx. 10 seconds for a picture to appear on screen.) The Initial Setup Wizard begins.
- Press ◀to select your language, then select go to next step to confirm your "Time Zone" and "Daylight Saving" setting. Then "Go to next step".
- Press ◆to select "Air" or "Cable" then select "Go to next step".
- Press ◀to select Scan and then select "Go to next step" to start the channel search function. All available TV channels will be stored. This operation takes a few minutes. Auto Channel Scan will begin. After the scan is completed, a TV channel will appear on the screen.
- Depending on the reception condition, it may take up to 30 minutes to complete scanning channels. Please allow the process to complete without interruption.
Note: During the setup, you can follow the navigation help available at the bottom of the screen.
Source
Includes TV, Component, AV, HDMI1, HDMI2 and HDMI3 (see Figure 2). Press ▲ to select the input source, then press OK to confirm your choice.
Menu Operation
The main menu contains six submenus, which are CHANNEL, VIDEO, AUDIO, TIME, SETUP and LOCK(see Figure 3).
- CHANNEL
Press MENU to display the main menu and select CHANNEL, then press OK to confirm. The Channels options are as follows:
Tuner
Press OK to select Air or Cable.
Auto Channel Scan
- Select CHANNEL > Auto Channel Scan and press OK to enter.
- Press ▲to select Scan all channels, Digital channels only, or Analog channels only, then press OK to start the channel scan.
- The serach process may take a few minutes. During the process, you can press MENU or EXIT to stop the channel scan.
- After the channel scan, channels are arranged in a preset order.
Note: The default password is "0000". If you have set the password to a personal setting and have forgotten it, you can use "7777", which is the master password to override the existing password.
DTV Manual Tuning
This feature allows you to scan and add digital channels manually (by channel number).
- Select CHANNEL > DTV Manual Tuning and then press OK to enter.
- Press ◀to select a channel number.
- Press OK to start the channel scan, if the channel is found it will automatically be added to the channel list in the Channel Manager.
- Press MENU to return or EXIT to close the menu.
ATV Manual Tuning
This feature allows you scan and add analog channels manually (by channel number).
- Select CHANNEL > ATV Manual Tuning, then press OK to enter.
- Press◀ to select a channel number.
Note: Use the Fine-Tune function to fine tune the channel if the picture is not clear.
- Press the RED button on the remote control to save the channel to the channel list.
- Press MENU to return or press EXIT to close the menu.
Channel Manager
- Select CHANNEL > Channel Manager and press OK to enter.
- Press ▶to select a channel. Press FAV on the remote control to set or delete the selected channel as a favourite channel.
- Press the RED button on the remote control to save the channel to the channel list in the Channel Manager.
- Press MENU to return or press EXIT to close the menu.
•VIDEO
The Video menu allows you to adjust the picture settings according to your preference. Press MENU and select VIDEO, then press OK to confirm. The Video options are as follows:
Picture Mode
Press OK to enter the Picture Mode menu. Then press◀/▶ to select your desired picture mode (Dynamic, Standard, Movie, or Custom).
Color Temperature
Use this feature to adjust the color temperature of the picture. Press OK to enter the menu and then press ▲/▼ to select:
Cool: For a less intense color with more blue.
Standard: For a more natural color.
Warm: For a more warm color with more red.
Aspect Ratio
Press OK to enter the Aspect Ratio menu. Press ▲to▼ select a desired aspect ratio (Auto, Normal, Wide, and Full).
Note: Depending on the signal source, some aspect ratios may not be available.
Noise Reduction
The Noise Reduction function automatically reduces conspicuous noise in the picture without degrading picture quality. Set Noise Reduction to Off if you see individual blocks in the picture.
MPEG Noise Reduction
The MPEG NR (Noise Reduction) function automatically reduces block noise in the picture without degrading picture quality.
Dynamic Contrast
Use this feature to change the black level automatically according to the brightness of an image. The black level will become dark in a dark scene.
• AUDIO
Press MENU and select AUDIO, then press OK to confirm.
The AUDIO options are as follows:
Sound Mode
Press OK to enter the Sound Mode menu. Then press ◀/▶ to select your desired Sound mode (Standard, News, Movie, Sports, or Custom).
Balance
Use this feature to adjust the left and right sound channel volume.
Perfect Volume
Volume level is adjusted automatically to lower volume of loud scenes and to raise volume of quieter scenes. (Off / On)
Digital Output
Press OK to toggle between Auto and PCM.
Audio Language
Choose from the list of languages available for the program you're watching. The language chosen becomes your preferred language for all digital channels until you turn the TV off. If the language chosen is not being broadcasted with a program, the TV plays the default language for the program.
Note: The Default Audio Language option is only for available digital channels.
MTS/SAP
The multi-channel TV sound (MTS) feature provides high-fidelity stereo sound. MTS also can transmit a second audio program (SAP) containing a second language or other audio information. Press ▲to select MONO, STEREO, or SAP.
• TIME
This menu allows you to set the Time, Sleep Timer, Time Zone, Daylight Savings setting, and Auto TV Off setting.
Time Mode
When the feature is set to Auto, this feature allows the TV to get the date and time automatically from a digital channel. When the feature is set to Manual, you will need to set the date and time yourself.
Note: When set to Auto the Date and Time options will not be available.
Clock
Select Time and press OK to enter the menu. Press ▲/▼ to select and set Date, Month, Year, Hour, and Minute. After setting the date and time press MENU to save your settings and return to previous menu.
Sleep Timer
Use ▲to▼select Off, 10Min, 20Min, 30Min, 60Min and 90Min.
Time Zone
Use ▲to select the local zone (Newfoundland, Atlantic, Eastern...).
Daylight Saving
Press OK to toggle between On, Off and Auto.
Auto TV Off
The TV will automatically switch to standby according to the settings you set. Options include Off, Once, and Daily at a time set by the user.
- SETUP
Press MENU to display the main menu and select SETUP. Then press OK to confirm. The Setup option are as follows:
Menu Language
Press OK to enter the Menu Language menu and use ▲/▼ to choose English or Español.
TV Location
Press OK to enter the TV Location menu and use ▲to choose Home or Store.
Closed Captions
Many programs are encoded with closed captioning information, which allows you to display the audio portion of a program as text on the TV screen.
Note: Closed captioning is not available on all channels at all times. Only specific programs are encoded with closed captioning information.
- CC Mode: Press OK to enter the Closed Captions menu and use ▲to choose CC Off, CC On, or CC on Mute.
- CC Off: No captioning information displayed.
- CC On: Captioning information is on and will be displayed if available.
- CC on Mute: Displays captioning information, when available when the TV's sound is muted.
- Analog Captions: Select the analog captions service type.
• Digital Captions: Select the digital captions service type.
Reset
Press OK to select Reset. Then use the numeric buttons on the remote control to enter the password which will unlock the reset menu. Use cursor left, on the remote control, to select Yes to restore all settings to the factory defaults. User cursor right, on the remote control, to select No and return to the previous menu.
Note: The default password is "0000". If you have set the password to a personal setting and have forgotten it, you can use "7777", which is the master password to override the existing password.
Network
Your TV supports both Wired and Wireless connections to access the Internet.
- Wired
Configuration: Press ◀to select between Manual or Auto.
Manual: In Manual mode, you will need to enter your IP Address, Subnet Mask, Default Gateway, and DNS settings.
Auto: In Auto mode, your TV will automatically detect and set the IP Address, Subnet Mask, Default Gateway, and DNS settings. Note: The LAN/Ethernet cable must be connected to the TV's LAN port.
MAC Address: Press OK to display the MAC address of the TV set.
- Wireless
Press OK to enter the Wireless menu and use ◀to tune wireless On or Off.
Base Station: Press OK to display the available wireless connections. It may take a few seconds for the TV to complete its search for available Wi-Fi connections. For some Wi-Fi connections you may need to input the Wi-Fi connection's password. Select Password and press OK, then press cursor right on the remote control to display the keyboard OSD and enter the password.
MAC Address: Press OK to display the MAC address of the TV set.
HDMI-CEC
This feature enables the TV to turn on/off or automatically go to standby when connected to a HDMI CEC enabled device.
Software Update
Press Menu to display the main menu, and select Setup > Software Update: Use ▲# the remote control and select USB Update or Network Update.
Software Version: Press OK to display the current software version of your TV.
USB Update: Use this feature to update your TV's software using a USB disk. The software upgrade version must be copied to a USB disk prior to doing the update.
Note: Do not POWER Off when updating.
: Avoid any operations with your remote control when SW updating.
: Please be patient for the software update to finish before proceeding.
Netflix Setting Use this feature and choose Netflix Deactivation to deactivate the TV from the current Netflix account.
- LOCK
This menu allows you to change the user password and enable and set the Parental Control settings.
Lock
Press OK to select Locks. Then use the numeric buttons on the remote control to enter the password which will unlock the Locks menu.
Note: The default password is "0000". If you have set the password to a personal setting and have forgotten it, you can use "7777", which is the master password to override the existing password.
Parental Control: Press OK to select On or Off.
Change Password: This option allows you to change the password. Press OK and use the numeric buttons to enter the old password, and then your new password. Re-enter the new password to confirm.
US Rating: Press OK to select TV or Movie.
Canada Rating: Press OK to select Canada English or Canada French.
Region 5: Press OK to set the Region 5 table in your TV.
Reset Region 5: Press OK and select YES to reset the Region 5 table or No to return to the previous menu.
- Multimedia (USB)
To use the Multimedia feature, install a USB storage device, containing the multimedia content, into the USB input of the TV.
- My Picture:
-
Select Multimedia > My Picture and press OK to confirm. Select a disk, and then press ▲ to browse the picture thumbnails, and press OK to confirm.
-
To switch to the previous or next picture during the slideshow press ▲on the remote control.
-
Press MENU to show the control menu. Press◀/▶ to select buttons on the control menu, and press OK to confirm. The control menu includes Play/Pause, Previous, Next, Rotate, Zoom, Picture, Mode and ▶.
-
To exit and return to the previous menu, press on the control menu.
Featured APPs
- Opera TV Browser: Opera TV browser is a TV browser specially developed by Opera for smart TVs. After clicking the icon to enter the browser home page, you can input a URL to browse a web page. You can also add your favourite websites on the home page.
- Netflix: With Netflix, you can instantly stream thousands of your favourite TV shows and movies right to your TV set.
- Facebook: TV client of Facebook social networking application. After clicking the icon and entering the application, users can browser contents and communicate online via the TV.
- YouTube: The world's largest video sharing site. After you click the icon and enter the site, you can view a variety of videos.
- Picasa: Picasa is a software for you to search, edit and manage photos.
- File Share: By connecting the TV and a device (computer, smart phone, tablet, etc.) to the same local network, you can enjoy the music, videos and pictures shared by the device on the TV.
- Twitter: Twitter is a social networking site and micro-blogging tool. Via TV Twitter client, you can interact with friends by posting, updating blogs and following other blogs.
- Opera TV Store: A one-stop shop for optimized web apps that viewers want to use.
- Wireless Display: Mirror compatible smartphone, tablet, or computer displays to the TV through your Wi-Fi network.
Note: Please see page 11 for important note about APPs.
Chapter 3 Problem & Solutions
Addition Information
1. Failed to connect to network
- Check if your TV is connected to the network.
- Power Off and On your TV.
- Consult your internet service provider to confirm if access of your router is supported. Refer to the operation manual of your router, and activate its DHCP function after linking the network to your TV.
- Make sure your TV is connected to the router. Check the router function using your PC. Check to confirm the name of the router is correct in the TV menu.
2. Videos do not play smoothly.
- Online videos:
a. Examine your network bandwidth, which need to be over 1Mbps for online videos, and 2Mbps for high definition movies and video programs. We recommend a 2Mbps (or higher) network bandwidth and network service provided by a major network operator.
b. Local peak hour of internet may affect the bandwidth.
c. Check if several computer work together on the same network at your house, with certain computers downloading, or seeing an online video.
d. Make sure your TV is connected to the router. If the router is connected and powered on, try to change to a router and network line, and use your PC to test the connection.
3. USB hard drives are not recognized when multiple hard drives are connected.
- We recommend inserting only one hard disk, at a time use a low power consumption mobile hard disk.
4. There are no distinct changes of TV interface after SW updating.
- Most software updates do not change the on-screen display.
5. What should i do if the TV lost power during the SW update process?
- SW Update using a USB: Do not remove the USB from the TV. Leave it inserted and restart your TV to continue the SW update. SW update using the network: Restart your TV and check if it is functioning correctly.
6. No USB device detected after accessing Multimedia with a USB device connected
- Your USB device may be damaged or not compatible.
Reception disturbances

natural_image
Black-and-white photo of three people posing together (no visible text or symbols)IGNITION NOISE:
Black spots or horizontal streaks may appear, picture may flutter or drift. Usually caused by interference from automobile ignition systems, neon lamps, electrical drills, and other electrical appliances.

natural_image
Black-and-white photo of three people smiling together, no visible text or symbolsGHOSTS:
Ghosts are caused by the television signal following two paths. One is the direct path and the other is reflected from tall buildings, hills or some other objects. Changing the direction or position of the antenna may improve reception. Ghosting may also be caused by defects in the antenna system such as unshielded leads or connecting several sets to the same antenna without using multiple antenna couplers.

natural_image
Black-and-white photo of three people posing together (no visible text or symbols)SNOW:
If your receiver is located in the fringe area of a television station where the signal is weak, your picture may be marred by the appearance of small dots. When the signal is extremely weak, it may be necessary to install a special antenna to improve the picture.
natural_image
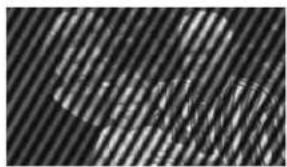
Abstract pattern of diagonal striped lines with a faint circular highlight (no text or symbols)RADIO FREQUENCY INTERFERENCE:
The interference produces moving ripples or diagonal streaks, and in some cases, causes loss of contrast in the picture.
- Keep the television away from Radio.
- Adjust Radio antennas in order for the television not to receive interference.
- The antenna cable of Radio should be kept away from the television.
- Use a coaxial cable for antenna.
- You can check if this television influences Radio receivers by turning off all other equipment other than the television. If you find a problem receiving Radio when using the television, check the instructions mentioned above.

natural_image
Black-and-white photo of three people outdoors, no visible text or symbolsBLOCK NOISE or FREEZE (DIGITAL INPUT):
Fuzzy blocks may appear in some area or the whole area of the screen. This is usually caused by interference from automobile ignition systems, neon lamps, electrical drills, ghosting of the image and lost or weak receiving signals.
NOTE:
- The TV set can generate sound distortion in external devices such as a radio. Please separate radio equipment from the TV set to a considerable distance.
Troubleshooting
Use the following checklist for troubleshooting if you have problems with your TV. Consult your local dealer or service outlet if problems persist. Be sure all connections are properly made when using with other units.
| SYMPTOMS | POSSIBLE SOLUTIONS |
| TV does not operate. | Make sure the power cord is plugged in.Try another AC outlet.Power is off, check fuse or circuit breaker.Unplug unit for an hour, then plug it back in. |
| Poor sound or no sound. | Station or Cable TV experiencing problems, tune to another station.Check sound adjustments (Volume or Mute).Check for sources of possible interference.Check for audio language setting. |
| Poor picture or no picture. | Station or Cable TV experiencing problems, tune to another station.Make sure channels are set into memory.Check antenna or Cable TV connections, adjust antenna.Check for sources of possible interference.Check picture control adjustments. |
| Poor reception on some channels. | Station or Cable TV experiencing problems, tune to another station.Make sure channels are set into memory.Station is weak, adjust antenna to receive desired station.Check for sources of possible interference. |
| Poor color or no color. | Station or Cable TV experiencing problems, tune to another station.Make sure channels are set into memory.Check picture control adjustments.Check antenna or Cable TV connections, adjust antenna.Check for sources of possible interference. |
| Picture wobbles or drifts. | Station or Cable TV experiencing problems, tune to another station.Make sure channels are set into memory.Cable TV company is scrambling signal.Adjust antenna. |
| SYMPTOMS POSSIBLE SOLUTIONS | |
| Digital broadcasting screen problem. | Check digital signal strength. |
| No CATV reception. | Check all Cable TV connections.Set Source menu option to the Cable mode.Station or Cable TV system problems, try another station. |
| Horizontal or diagonal bars on screen. | Check antenna connections, adjust or redirect antenna.Check for sources of possible interference. |
| No reception above channel 13. | Make sure the appropriate Source (Air or Cable) has been selected.If using antenna, check UHF antenna connections. |
| No Remote operation. | Batteries are weak, dead or inserted incorrectly.Remote is out of range, move closer to TV (within 15 feet).Make sure Remote is aimed at sensor.Confirm there are no obstructions between the Remote and the TV.Make sure the power cord is plugged in. |
| TV shuts off. | Sleep Timer is set.Power interrupted. |
| Closed Caption is not activated. | TV station experiencing problems or program tuned is not closed captioned. Try another channel.Check Cable TV connection or VHF/UHF antenna, reposition or rotate antenna.Set Closed Caption Decoder in the menu. |
| TV is not shown in your language. | Select proper language in the menu options. |
If the problem cannot be solved with the suggested procedures, contact 800.HITACHI
(800.448.2244). For your safety, never try to repair the product yourself.
Specifications
| Model LE48M4S9 | |
| Panel size | 48" class / 47.61" Diagonal (1209.4 mm) |
| Display method Transmission TFT color LCD panel | |
| Number of Pixels 1920 (H) × 1080 (V) | |
| Broadcasting system US system MATSC standard (8VSB), QAM | |
| Receiving channels VHF 2-13UHF 14-69CATV 14-36 (A)-(W)37-59 (AA)-(WW)60-85 (AAA)-(ZZZ)86-94 (86)-(94)95-99 (A-5)-(A-1)100-135 (100)-(135)01 (4A) | |
| Tuner type Frequency synthesized | |
| Inputs Video: 1.0 V (p-p),75 ohmsAudio: 2Vrms Max.HDMI: HDMI compliant (type A connector)HDCP compliantE-EDID compliantSuggested scan rates: 480i, 480p, 720p, 1080i, 1080pHDMI Audio: 2-channel PCM32/44.1/48 kHz sampling frequency16/20/24 bits per sampleAntenna: VHF/UHF In 75 ohms coaxialLAN 10BASE-T/100BASE-TX | |
| Wi-Fi | Frequency 2.4GHz ~ 2.5GHzType 802.11b/g/nSecurity Type WPA2 |
| Outputs | Audio: 0.2 V (p-p), 75 ohms terminatedDigital audio: 0.2 V (p-p), 75 ohms terminated |
| Speakers | Integrated speakers (Bottom side) |
| Audio output power | 8.0W + 8.0W (THD 7%) |
| Power supply | AC 110 ~ 240V, 60Hz |
| Power consumption | Operation: 110WStandby: ≤0.5W |
| Weight | 10.0kg (22.1 lbs) |
| Dimensions | Width: 1090.8mm (43")Height: 683.0mm (26 15/16")Depth:222.0 mm (8 3/4") |
| Operating temperature 5°C - 40°C | |
| Operating humidity | Less than 80% RH |
| Accessories | Remote controlAC codeBatteries (AAA) × 2Stand x 2 (R, L), Stand Screws x 4Owner's GuideQuick Start Guide |
- Designs and specifications are subject to change without notice.
- For information on our other products, please visit our website at www.hitachi.us
800.HITACHI
(800.448.2244)
Monday \~ Friday 9:00 am - 6:00 pm EST
www.hitachi.us/tv

Sincere - Prompt - Efficient
HITACHI Inspire the Next
HITACHI AMERICA, LTD., DIGITAL MEDIA DIVISION
HITACHI has made every effort to assure you enjoy trouble free operation from your Hitachi product. Should you require service assistance with OPERATIONAL, HOOK UP, TECHNICAL ASSISTANCE OR WARRANTY SERVICE SUPPORT, please contact one of our knowledgeable Customer Service Advocates at 800.HITACHI (800.448.2244).
Please be prepared to submit proof of purchase and/or delivery receipts to your 800.HITACHI Customer Service Representative. Warranty coverage will be provided in accordance with the provisions of your Limited Warranty (see the Limited Warranty page in this operating guide).
customerservice.ce@hal.hitachi.com
HITACHI Inspire the Next
Congratulations on your purchase of a new Hitachi display product.
LIMITED WARRANTY:
Hitachi America Ltd., warrants this product in accordance with the terms and conditions applicable to the products identified below:
Conditions of Hitachi Limited Warranty: This Hitachi display product (the "Product") is warranted to be free from defects in materials and workmanship beginning on the date of purchase by the original owner and continuing for the duration of the applicable time periods specified below. If the Product is found to be defective, Hitachi will repair or replace (at Hitachi's option) defective parts at no charge, subject to the conditions of this Limited Warranty. If the original owner rejects, refuses or otherwise does not accept Hitachi's offer to repair or replace such defective parts under this Limited Warranty, this Limited Warranty shall be void and of no further force or effect. This Limited Warranty extends to the original owner only and is not transferable, and such owner must provide a dated sales receipt for the Product to qualify for parts or service under this Limited Warranty. The original owner must notify Hitachi of a defect claim by calling 800-HITACHI during the applicable Limited Warranty period for this Limited Warranty to be effective. This Limited Warranty is valid only in the U.S.A., Canada and Puerto Rico.
Hitachi Product: LCD Flat Panel Televisions PARTS : The Limited Warranty period for parts is 1 year from the date of original purchase. During the Limited Warranty period for parts, Hitachi will replace defective parts with new or rebuilt parts (at Hitachi's option) at no charge for such parts. Any replacement part will be warranted for the remainder of the original warranty period applicable to the part replaced. LABOR : The Limited Warranty period for labor is 1 year from the date of original purchase. During the Limited Warranty period for labor, Hitachi will repair or replace (at Hitachi's option) defective parts without charge for labor. SERVICE LOCATION : In-home warranty service, which includes either in-home repair or free pick-up and delivery (at Hitachi's option), applies to all Hitachi products except: (i) 43-inch and smaller LCD Flat Panel Televisions; (ii) Products located outside the U.S.A., Canada or Puerto Rico; (iii) Products located more than seventy-five (75) driving miles from Hitachi's nearest Authorized Service Facility. If the foregoing clauses (i), (ii), (iii) apply, then the Product owner will be responsible for bringing/delivering the Product to a Hitachi Authorized Service Facility and, following warranty service, retrieving the Product from such Authorized Service Facility.
IMPORTANT: Before using or installing your Product, please complete this form and attach your sales receipt and retain them for your records. This will help facilitate proper warranty coverage.
MODEL NO. SERIAL NO.
DEALER NAME DATE OF PURCHASE
DEALER ADDRESS
CITY STATE / PROVINCE
Warranty Limitations. THIS HITACHI LIMITED WARRANTY DOES NOT COVER: A. Any Product that has been modified or repaired in a manner not previously authorized by Hitachi in writing. B. Any Product, whose serial number has been removed, altered, replaced, defaced or rendered illegible. C. Any defect, malfunction, or failure caused by or resulting from improper or unauthorized service, maintenance or repair. D. Damage resulting from abuse, misuse, mishandling, neglect or damage caused by exposure to hostile operating environments such as areas containing dust and/or smoke. E. Damage caused by power surges, accidents, natural disasters or any other events or circumstances outside Hitachi's control. F. Any Product used in any manner inconsistent with the acceptable set-up, usage, safety or installation configurations identified in the Product's Operating Guide. G. Any Product used for purposes or applications, or subjected to operating conditions, other than those identified as acceptable in the Product's Operating Guide. H. Product repairs (including any product whose case has been opened), or part replacements provided or installed, by any person other than an Authorized Hitachi Service Facility Representative. I. Improper uncrating, set-up or installation or any misadjustments caused by user-operated controls. J. Any labor or costs associated with removing the Product from a custom cabinet or other specialized product installation that impedes direct and immediate removal of the Product from the owner's premises (must be arranged and paid by the owner). K. Product cabinets, cabinet parts, knobs, batteries, accessories, or any third party's branded hardware or peripheral devices, including any software incorporated therein, whether or not included within the Product's original packaging. L. Product screens that have been cleaned by any method other than as specified in the Product's Operating Guide. M. Normal usage, degraded brightness caused by backlight aging and/or cell defects or ordinary wear and tear, including, without limitation, scratches or marks on the Product's screen, cabinet or the appearance of bright or dark screen pixels. N. Any Product returned for service that is damaged due to improper packaging, mishandling or shipping. (IMPORTANT: When shipping any Product to a Hitachi Authorized Service Facility, Product owner must package it securely in the original shipping container or its equivalent to prevent damage. The Product must be returned with the shipping charges prepaid and proof of purchases included in the shipping container. Failure to properly package such product during such shipment will void all warranties.) O. Any Product purchased or serviced outside the U.S.A., Canada and Puerto Rico. P. Any Product that has been used for commercial purposes.
NO PERSON, AGENT, DISTRIBUTOR, DEALER, SERVICE FACILITY, OR COMPANY IS AUTHORIZED TO CHANGE, MODIFY OR AMEND THE TERMS OF THIS LIMITED WARRANTY IN ANY MANNER WHATSOEVER. EXCEPT AS PROVIDED IN THIS LIMITED WARRANTY, HITACHI MAKES NO EXPRESS WARRANTY REGARDING THIS HITACHI PRODUCT. FURTHER, ALL IMPLIED WARRANTIES RELATING TO ANY PORTION OF THIS PRODUCT, INCLUDING ANY WARRANTY OF MERCHANTABILITY OR FITNESS FOR A PARTICULAR PURPOSE, ARE LIMITED TO THE DURATION SPECIFIED UNDER THIS LIMITED WARRANTY. HITACHI SHALL NOT BE LIABLE TO THE PURCHASER OR TO ANY OTHER PERSON FOR ANY INCIDENTAL OR CONSEQUENTIAL DAMAGES OR LOSS OF PROFIT OR PRODUCT RESULTING FROM ANY DEFECT IN, OR MALFUNCTION OR FAILURE OF, THIS HITACHI PRODUCT. BECAUSE SOME JURISDICTIONS DO NOT ALLOW LIMITATIONS ON HOW LONG AN IMPLIED WARRANTY LASTS, OR THE EXCLUSION OF INCIDENTAL OR CONSEQUENTIAL DAMAGES, THE ABOVE LIMITATIONS MAY NOT APPLY TO YOU. THIS LIMITED WARRANTY CONFERS SPECIFIC LEGAL RIGHTS, INCLUDING CERTAIN OTHER RIGHTS THAT MAY VARY DEPENDING ON YOUR JURISDICTION. THIS LIMITED WARRANTY SHALL BE GOVERNED BY AND CONSTRUED IN ACCORDANCE WITH THE LAWS OF THE JURISDIICATION OF THE PRODUCT OWNER'S RESIDENCE.
LIMITED WARRANTY
This Limited Warranty offered by Hitachi America, Ltd., Digital Media Division ("Hitachi") and implemented through Warranty Support LATAM, SA de CV, warrants this Product against failure due to manufacturing defects and covers parts, components, and labor for a period of 12 months from the original date of purchase under the following conditions:
HOUSEHOLD
This Limited Warranty is the only guarantee for this Product, and covers residential use only.
COVERAGE
At the discretion of Hitachi, Hitachi will repair, replace, or refund the purchase price of the Product should the Product fail due to a manufacturing defect during the 12 month period following the date of original purchase.
Any repairs performed under this Limited Warranty may be completed using either new or refurbished parts. After the warranty period expires, Hitachi assumes no responsibility for any costs incurred for repairs.
For customer service and to validate this warranty call the toll-free phone number:
01-800-288-2600
TO OBTAIN WARRANTY SERVICE
To obtain warranty service, you must first call our customer service center at 01-800-288-2600 for information on how to obtain warranty service. If the Product qualifies for in-warranty repairs, the product shall be repaired within a period not exceeding thirty (30 days). Hitachi reserves the right to choose the means to provide Service. Hitachi requires that you provide this Limited Warranty sealed by the establishment that sold you the Product along with the original invoice, or a copy of the original invoice.
THIS LIMITED WARRANTY NOT VALID IF:
- The Product has been used under conditions other than normal or when used for commercial purposes.
- The Product has not been operated in accordance with the instruction manual that accompanies it.
- The Product has been altered or repaired by persons not authorized by Hitachi.
- The Product has physical damage caused by the consumer or by natural disasters.
- The Product has been damaged by an electrical surge.
- The Product has been improperly installed.
Unless otherwise provided for by law, this Limited Warranty sets forth the complete expression of the Limited Warranty provided on this Product by Hitachi.
Model: ____ Product: ____ Brand : HITACHI Serial No. : ____
Purchase Date : ____
Warranty Support LATAM, S.A. de C.V., Calle Nubes #412, Colonia Jardines del Moral, Leon, GTO C.P. 37160. TEL. (55) 4774-1310.
PRECAUCIÓN
RIESGO DE DESCARGA ELECTRICA NO ABRIR

AVISO: PARA REDUCIR EL RIESGO DE DESCARGA ELECTRICA, NO RETIRE LA CUBIERTA (O POSTERIOR). EN EL INTERIOR DEL APARATO NO HAY COMPONENTE ALGUNO QUE PRECISE SERVICIO DE MANTENIMIENTO A CARGO DEL USUARIO. SOLICITE CUALQUIER OPERACION DE MANTENIMIENTO A PERSONAL DE SERVICIO CALIFICADO.
natural_image
Architectural floor plan showing room layout and structural elements (no text or labels)2420 Fenton Street, Suite 200
Chula Vista, CA 91914-3556
ATTN: Customer Relations
natural_image
Prohibition symbol with a red circle and a toy, featuring a basketball on a wooden crate and a blackboard (no text or symbols)HITACHI SE PREOCUPA!
natural_image
Prohibition symbol showing a black monitor inside a red circle, with a gray box and no text or symbols on the monitor or background.MONTAJE SOBRE PARED: SI USTED DECIDE MONTAR SU PANTALLA DE PANEL DELGADOSOBRE LA PARED, SIEMPRE:
Control remoto....10
Nota importante 11
Conexión de red 11
PRECAUCIONES PARA LAS PILAS
CÓMO INSTALAR LAS PILAS
natural_image
Technical line drawing of a battery pack with external components and polarity indicators (no text or symbols)natural_image
Technical line drawing of a TV rack with an attached cable and indicator lights (no text or symbols)natural_image
Black-and-white photo of three people posing together (no visible text or symbols)RUIDO DE ENCENDIDO:
natural_image
Black-and-white photo of three people smiling together (no text or symbols visible)IMÁGENES FANTASMAS:
natural_image
Black-and-white photo of three people posing together (no visible text or symbols)NIEVE:
natural_image
Abstract pattern of diagonal striped lines with a faint circular highlight (no text or symbols)natural_image
Black-and-white photo of three people outdoors, no visible text or symbolsIMAGEN DIGITALIZADA O CUADRICULADA (ENTRADA DIGITAL):
Sincere - Prompt - Efficient
HITACHI
Inspire the Next
HITACHI AMERICA, LTD., DIGITAL MEDIA DIVISION
Customer Service Support
P.O. Box 99652
Troy, MI 48099
GARANTIA LIMITADA
- LEAD NOTICE
- Declaration of Conformity
- IMPORTANT SAFETY INSTRUCTIONS
- IMPORTANT SAFETY INSTRUCTIONS (continued)
- CONDENSATION
- HOW TO HANDLE THE LCD PANEL
- Power source
- Warning
- Caution
- CHILD SAFETY NOTICE
- CHILD SAFETY:
- HITACHI CARES!
- TUNE INTO SAFETY
- WALL MOUNTING: IF YOU DECIDE TO WALL MOUNT YOUR FLAT PANEL DISPLAY, ALWAYS:
- SAFETY PRECAUTIONS
- Notes when mounting the TV on a wall
- Securing to a Wall
- NOTICE FOR TV CABINET
- How to attach the stand
- NOTE:
- How to remove the stand
- Contents
- Chapter 1: Introduction
- Chapter 2: TV Operation
- Chapter 3: Addition Information
- Chapter 1
- Introduction
- TV Control Keys
- Inputs / Outputs
- Important Note
- Network Connection
- Connecting to a wired network
- Connecting to a wireless network
- BATTERY PRECAUTIONS
- HOW TO INSTALL BATTERIES
- CONNECTING POWER
- Antenna connections
- Cable TV connections
- For subscribers to scrambled Cable TV service
- For subscribers to unscrambled Cable TV service with scrambled premium channels
- Chapter 2
- TV Operation
- Menu Display
- Initial Setup
- Source
- Menu Operation
- - CHANNEL
- Tuner
- Auto Channel Scan
- DTV Manual Tuning
- ATV Manual Tuning
- Channel Manager
- •VIDEO
- Picture Mode
- Color Temperature
- Aspect Ratio
- Noise Reduction
- MPEG Noise Reduction
- Dynamic Contrast
- • AUDIO
- Sound Mode
- Balance
- Perfect Volume
- Digital Output
- Audio Language
- MTS/SAP
- • TIME
- Time Mode
- Clock
- Sleep Timer
- Time Zone
- Daylight Saving
- Auto TV Off
- - SETUP
- Menu Language
- TV Location
- Closed Captions
- Reset
- Network
- - Wired
- - Wireless
- HDMI-CEC
- Software Update
- - LOCK
- Lock
- - Multimedia (USB)
- - My Picture:
- Featured APPs
- Chapter 3 Problem & Solutions
- Addition Information
- Failed to connect to network
- Videos do not play smoothly.
- USB hard drives are not recognized when multiple hard drives are connected.
- There are no distinct changes of TV interface after SW updating.
- What should i do if the TV lost power during the SW update process?
- No USB device detected after accessing Multimedia with a USB device connected
- Reception disturbances
- IGNITION NOISE:
- GHOSTS:
- SNOW:
- RADIO FREQUENCY INTERFERENCE:
- BLOCK NOISE or FREEZE (DIGITAL INPUT):
- Troubleshooting
- 800.HITACHI
- (800.448.2244)
- HITACHI AMERICA, LTD., DIGITAL MEDIA DIVISION
- HITACHI Inspire the Next
- LIMITED WARRANTY:
- LIMITED WARRANTY
- HOUSEHOLD
- COVERAGE
- TO OBTAIN WARRANTY SERVICE
- THIS LIMITED WARRANTY NOT VALID IF:
- PRECAUCIÓN
- HITACHI SE PREOCUPA!
- MONTAJE SOBRE PARED: SI USTED DECIDE MONTAR SU PANTALLA DE PANEL DELGADOSOBRE LA PARED, SIEMPRE:
- PRECAUCIONES PARA LAS PILAS
- CÓMO INSTALAR LAS PILAS
- RUIDO DE ENCENDIDO:
- IMÁGENES FANTASMAS:
- NIEVE:
- IMAGEN DIGITALIZADA O CUADRICULADA (ENTRADA DIGITAL):
- HITACHI
- GARANTIA LIMITADA
Brand : HITACHI
Model : LE48M4S9
Category : Television