CL2554N - Television HITACHI - Free user manual and instructions
Find the device manual for free CL2554N HITACHI in PDF.

User questions about CL2554N HITACHI
0 question about this device. Answer the ones you know or ask your own.
Ask a new question about this device
Download the instructions for your Television in PDF format for free! Find your manual CL2554N - HITACHI and take your electronic device back in hand. On this page are published all the documents necessary for the use of your device. CL2554N by HITACHI.
USER MANUAL CL2554N HITACHI
IMPORTANT SAFEGUARDS....2
TV INSTALLATION....3
- Inserting batteries into the Remote Control....3
- Aerial connection & Mains connection ....3
• TV controls....3 - Switching ON and OFF ....3
IDENTIFICATION OF REMOTE CONTROL FUNCTIONS ....4
LANGUAGE SELECTION......4
TUNING IN THE TV CHANNELS ....5
- Automatic Tuning ....5
- Edit ....5
- Manual Tuning ....6
- Selecting a programme number ....7
• Volume control ....7 - Picture controls ....7
- Sound controls ....7
-
Features Menu ....7
-
Format selection....7
- Child lock....8
- Clock menu ....8
- Wake Time menu ....8
- Wake PR menu....8
- Sleep - Auto turn off timer setting....8
- Recall....8
TELETEXT 9
CONNECTING EXTERNAL EQUIPMENT ....10
TROUBLESHOOTING....11
SPECIFICATIONS ....11
IMPORTANT SAFEGUARDS
For your own protection, please read these safety instructions completely before operating the appliance, and keep this manual for future reference.
Carefully observe all warnings, precautions, and instructions on the appliance, and those described in the operating instructions, and adhere to them.
INSTALLATION
Water and Moisture :
Do not use mains power operated sets near water, for example near a bathtub, washbowl, kitchen sink, laundry tub, in a wet basement, or near a swimming pool etc.
Accessories :
Do not place the set on an unstable trolley, stand, tripod, bracket or table. The set may fall, causing serious injury to a child or adult and serious damage to the set. Use only a trolley, stand, tripod, bracket or table recommended by the manufacturer.
Ventilation :
The slots and openings in the cabinet are provided for necessary ventilation. To ensure reliable operation of the set, and to protect it from overheating, these slots and openings must never be blocked or covered.
Never cover the slots and openings with a cloth or any other materials.
Never block the slots and openings by placing the set on a bed, sofa, rug or other similar surface.
Never place the set in a confined space such as a bookcase, or built-in cabinet, unless proper ventilation is provided.
Do not place the set near or over a radiator, heat source or where it is likely to be exposed to direct sunlight.
Power Cord Protection :
Route the power cord so that it is unlikely to be walked on pinched by items placed on or against it, paying particular attention to the plugs, receptacles, and the point where the cord exits from the appliance.
USE
Power sources :
This set should be operated only from the type of power source indicated on the marking label. If you are not sure of the type of electrical power supplied at your home, consult your dealer or local power company. For those sets designed to operate from battery power, or other sources, refer to the operating instructions.
Overloading :
Do not overload wall outlets, extension cords or convenience receptacles beyond their capacity, since this can result in fire or electric shock.
Object and Liquid Entry :
Never allow objects or liquid to enter the interior of the set as this may result in damage to the set, cause an electric shock or even cause a fire.
Attachments :
Do not use attachments not recommended by the manufacturer, as they may cause hazards.
Cleaning :
Unplug the set from the mains before cleaning. Do not use liquid cleaners or aerosols. Use a cloth lightly dampened with water for cleaning the exterior of the set.
SERVICE
Damage Requiring Service :
Unplug the set from the wall outlet and refer servicing to qualified service personnel under the following conditions.
When the power cord or plug is damaged or frayed.
If liquid has been spilled or objects have fallen into the set.
If the set has been exposed to rain or water.
If the set has been subject to excessive shock by being dropped or the cabinet has been damaged.
If the set does not operate normally when following the operating instructions. Adjust only those controls that are specified in the operating instructions. Improper adjustment of other controls may result in damage and will often require extensive work by a qualified technician to restore the set to normal operation.
When the set exhibits a distinct change in performance this indicates a need for service.
Servicing :
Please do not attempt to repair or service this set yourself as removal of the back cover could expose you to dangerous voltages.
Replacement Parts :
When replacement parts are required, be sure the service technician has used replacement parts specified by the manufacturer that have the same characteristics as the original parts. Unauthorized substitutions may result in fire, electric shock or other hazards.
Safety Check :
Upon completion of any service or repair to the set, ask the service technician to perform routine safety checks (as specified by the manufacturer) to determine that the set is in a safe operating condition.
TV INSTALLATION
INSERTING BATTERIES INTO THE REMOTE CONTROL
Insert the batteries (two 1.5V type AAA) supplied with the set. Make sure that the polarity matches with the (+) and (-) marks inside the battery compartment. Do not forget to Replace the battery cover.
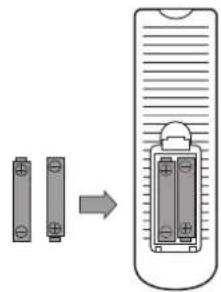
text_image
Diagram showing a device transitioning from two battery cells to a rectangular device with internal components, indicating a process or transformation.AERIAL CONNECTION & MAINS CONNECTION
When using an outdoor aerial, it is usually connected to the set by means of 75 ohms coaxial cable. For correct colour reception an effective aerial installation is most important. Plug the mains cable into the power socket with 220-240 V / 50Hz AC.
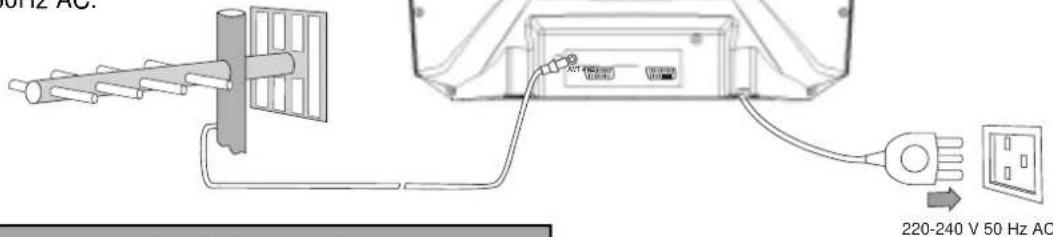
text_image
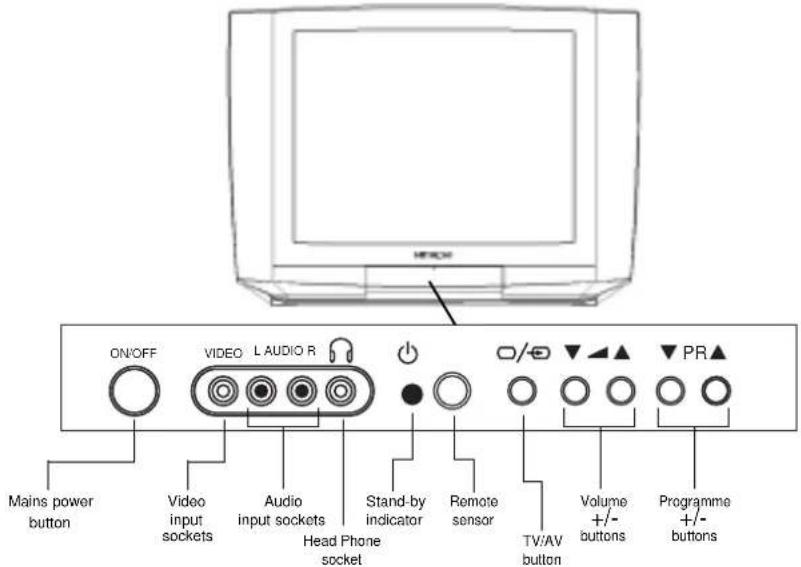
220Hz AC. 220-240 V 50 Hz ACTV CONTROLS
text_image
ON/OFF VIDEO L AUDIO R Mains power button Video input sockets Audio input sockets Head Phone socket Stand-by indicator Remote sensor TV/AV button Volume +/- buttons Programme +/- buttonsSWITCHING ON AND OFF
□ SWITCHING ON
Switch the set on with the power button, (ON/OFF) and then PR UP or DOWN buttons on the front of the set. Or POWER button or the «PR ▲ and PR ▼» button or one of the NUMBER buttons on the remote control.
□ SWITCHING OFF
Press POWER button (☐) on the remote control to return the set to its standby mode. If you don't use the set for an extended period of time turn it off with MAIN POWER button on the set.
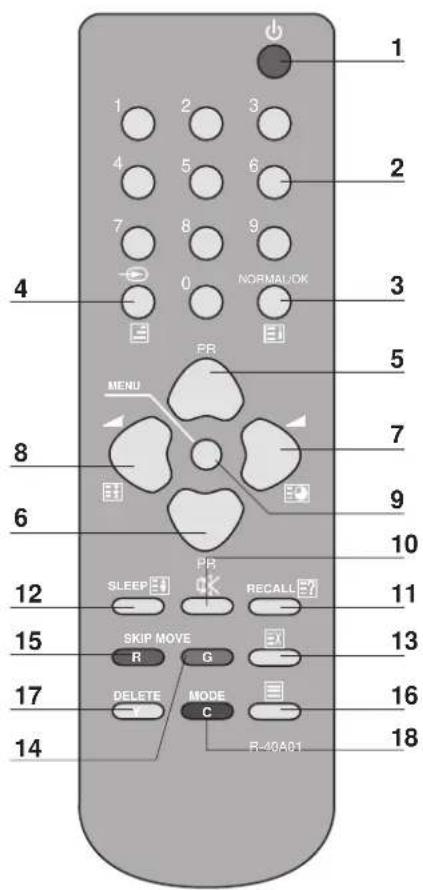
IDENTIFICATION OF REMOTE CONTROL FUNCTIONS
TV MODE TELETEXT MODE
- POWER ON/OFF (stand-by mode)
- 0 - 9 Channel selector
- OK
- NORMAL Picture selection
- □/→ TV/AV selector
- VOLUME DOWN (CURSOR LEFT)
- MENU Display ON/OFF
- MUTE
- RECALL Display status of viewed channel
- SLEEP TV auto off-time selection
- not used
- MOVE (Edit mode only)
- SKIP (Edit mode only)
- TV / TEXT
- DELETE (Edit mode only)
- MODE


text_image
1 2 3 4 5 6 7 8 9 NORMALOK 0 PR MENU MENU MENU MENU MENU MENU MENU MENU MENU MENU MENU MENU MENU MENU MENU MENU MENU MENU MENU MENU MENU MENU MENU MENU MENU MENU MENU MENU MENU MENU MENU MENU MENU MENU MENU MENU MENU MENU MENU MENU MENU MENU MENU MENU MENU MENU MENU MENU MENU MENU Output 10 Output 11 Output 12 Output 13 Output 14 Output 15 Output 16 Output 17 Output 18 Output R-40A01- TV / TEXT
- POWER ON/OFF (stand-by mode)
- 0 - 9 Teletext page selector
- INDEX page
- □/→ MIX
- PAGE UP
- ▼ PAGE DOWN
- SUBPAGE
- HOLD
- MENU
- MUTE
- ☐? Revealing hidden answer
- Doubling teletext character size
- Temporary cancelation of teletext
- GREEN KEY
- RED KEY
- CYAN KEY
- YELLOW KEY
LANGUAGE SELECTION
The on screen Menu language is set to English at the factory. If you wish to select another language please follow the instructions below.
Press remote control MENU button to display Main Menu.
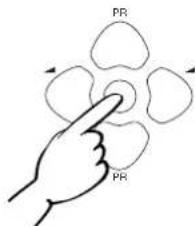
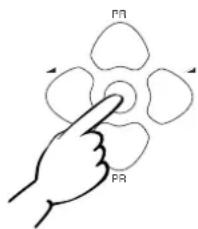
Move the cursor to FEATURES by using "◀ or ▶" and "▲ or ▼" buttons, then press OK button.
Position the cursor at LANGUAGE by using "▲ or ▼" buttons and select country code of the desired language by pressing "◀ or ▶" buttons.
text_image
PR PR"GB" English
"D" German
"I" italian
"F" French
"E" Spanish
"NL" Dutch
"N" Norwegian
"SF" Finish
"DK" Danish
"S" Swedish
Press MENU button to return to Main Menu for further operations.
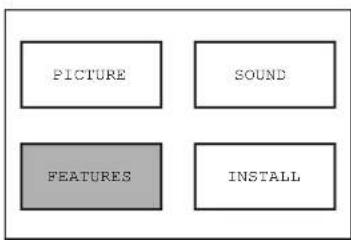
flowchart
graph TD
    A["PICTURE"]
    B["SOUND"]
    C["FEATURES"]
    D["INSTALL"]
text_image
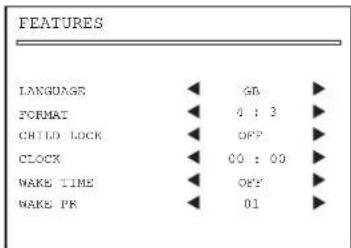
FEATURES LANGUAGE GB FORMAT 4 : 3 CHILD LOCK OFF CLOCK 00 : 00 WAKE TIME OFF WAKE PR 01TUNING IN THE TV CHANNELS
AUTOMATIC TUNING
□ MENU SELECTION
Press remote control MENU button to display main menu.
Move the cursor to INSTALL by using "◀ or ▶" and "▲ or ▼" buttons.
Then press OK button to get INSTALL menu.
text_image
PR PR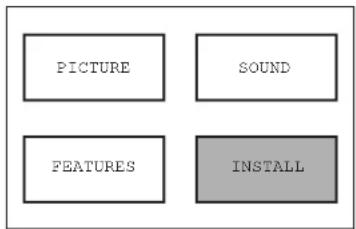
flowchart
graph TD
    A["PICTURE"]
    B["SOUND"]
    C["FEATURES"]
    D["INSTALL"]
□ COUNTRY SELECTION
Position the cursor at ATSS Menu and select country code where TV is used by pressing "◀" buttons. The following countries can be selected :
"GB" Great Britain
"F" France
"D" Germany
"B" Belgium
"E" Spain
"I"
"CH"
"A"
"DK"
"SF"
Italy
Switzerland
Austria
Denmark
Finland
"NL"
"N"
"S"
"|r|"
"Other"
Holand
Norway
Sweden
text_image
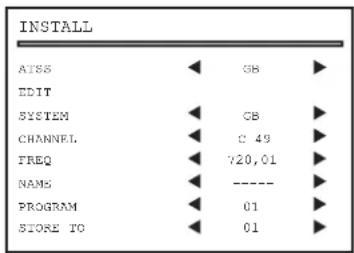
INSTALL AISS ◀ GB ▶ EDIT SYSTEM ◀ GB ▶ CHANNEL ◀ 0.49 ▶ FREQ ◀ 720,01 ▶ NAMS ◀ --------▶ PROGRAM ◀ 01 ▶ STORE TO ◀ 01 ▶☐ ATSS - AUTO TUNING AND SORTING SYSTEM
After selecting country code, press and hold the OK button for 3-4 seconds until "Please wait!" is displayed, then auto program tuning starts searching all the available TV stations in your area. When auto tuning and sorting is completed, the EDIT menu with the recorded programs appears on the screen.
Press MENU button 3 times, then the menu display will disappear from TV screen. Now you can select program using "▲" buttons and you can enjoy watching TV.
EDIT
The EDIT menu shows you the programme position assignment. When using the AUTO TUNING method, the broadcasts may not be found and stored in the order you desired. For example, BBC1 may not be allocated to programme number 01, and BBC2 may not be allocated to programme number 02, etc. The EDIT menu enables you to change the programme position assignment according to your personal preference.
To reach the EDIT menu you have to first select INSTALL menu from the MAIN menu.
□ CHANGING ORDER OF CHANNELS
Position the cursor to the programme number you want to move and press
MOVE button. The programme turns to red colour then use the "▲ or ▼" buttons to move the programme to the programme number you wish to store it to and press MOVE button again to confirm the operation. Press MENU to return to EDIT menu.
| EDIT | |||
| PR | NAME | CH | |
| 04 | CJ4 | C12 | |
| 03 | ITV | C22 | |
| 02 | BBC2 | C06 | |
| 01 | B3C1 | C08 | |
| 00 | ----- | -- | ✓ |
| 99 | ----- | -- | ✓ |
| 98 | ----- | -- | ✓ |
□ DELETE PROGRAMME POSITION DATA
Position the cursor to the programme number you wish to delete using "▲ or ▼" buttons. Press the DELETE button. The deleted programme is instantly moved to programme NR 99. The programme located at NR 99 will automatically move to NR 98.
TUNING IN THE TV CHANNELS
□ SKIPPING THE CHANNELS
Position the cursor to the programme number you wish to skip, then press the SKIP button. A skipped programme is marked with the sign "√" at its left end. The channel corresponding to a skipped programme will not appear on screen when changing channels using "▲r" buttons.
| EDIT | |||
| PR | NAME | CH | |
| 04 | CH4 | C12 | |
| 03 | ITV | C22 | |
| 02 | BBC2 | C06 | |
| 01 | BBC1 | C08 | |
| 00 | ---- | -- | √ |
| 99 | ---- | -- | √ |
| 98 | ---- | -- | √ |
MANUAL TUNING
Tuning by ATSS (Auto Tuning Sorting System) is recommendable, as it is the easiest tuning method. But Manual Tuning is also possible using the following procedure.
□ BROADCASTING SYSTEM SELECTION
Select INSTALL Menu and using the "▲ or ▼" buttons, move the cursor to SYSTEM menu then by "◀" buttons select the appropriate TV broadcasting systems. For example in UK, GB is to be selected.
"F" France SECAM L/L'
"GB" England / Ireland PAL-I/I'
"EURO" Western Europe PAL-SECAM B/G
"E.EURO" Eastern Europe PAL-SECAM D/K
| INSTALL | |||
| ATSS | GB | ||
| EDIT | |||
| SYSTEM | GB | ||
| CHANNEL | C 49 | ||
| FREQ | 720,01 | ||
| NAME | ---- | ||
| PROGRAM | 01 | ||
| STORE TO | 01 | ||
□ ACTIVATING MANUAL TUNING
Move the cursor to FREQ. (channel frequency) menu and press "◀ or ▶" buttons for more than 3 seconds to activate Manual Tuning.
When one channel is tuned, the corresponding station name is indicated automatically.
To tune the next channel, press "or" buttons again.
□ CHANNEL AND FREQ. MENU
If you know the channel or frequency number you want to search, enter the data by 0...9 buttons. TV will tune that channel quickly.
□ STORING CHANNEL NAME
When one channel is tuned, the corresponding channel NAME will be detected automatically. But in some cases the, NAME will not be detected due to the broadcasting situation. You may put in the channel NAME yourself.
Position the cursor to NAME and press ▶ button. A green flashing cursor appears on the left end of NAME line ("■----"). Then press "▲ or ▼" buttons until you get right the letter or symbol. Move the cursor to the next position by using "◀ or ▶" buttons and repeat the operation. Press OK button to store the NAME.
□ PROGRAM MENU
The number on the right side of the PROGRAM menu indicates the programme number of the currently displayed channel.
□ STORE TO MENU
Select STORE TO menu and select the program number by 0...9 buttons or by "◀ or ▶" buttons to which you want to store the currently displayed channel then press OK button.
Warning ! If you store to a number already programmed the previous programme will be erased automatically.
DAILY TV OPERATION
SELECTING A PROGRAMME NUMBER
The set has a total of 100 programme numbers, 0...99. The numbered buttons 0...9 are used for direct programme selection. In order to select a two digit programme, press the second numbered button within two seconds. You can also step through the channels, one at a time with the “▲ or ▼” buttons.
VOLUME CONTROL
□ VOLUME CONTROL
Adjust the volume with VOLUME button (▲) DOWN/UP «▲ or ▼» buttons on the front of the set, or with the LEFT/RIGH «or » buttons on the remote control.
□ MUTE
Pressing the MUTE button (✗) once to turn the sound off. The sound returns if the MUTE button is pressed once more.
PICTURE CONTROLS
Select PICTURE Menu and press OK button. Use « ▲ or ▼ » buttons to select the function you wish to adjust and then by « ▶ » buttons, adjust the level. To exit, press MENU button.
The last set value is automatically stored in FAVOURITE mode. By pressing NORMAL/OK button repeatedly, you can call up three picture settings; NORMAL I (hard picture), NORMAL II (soft picture) FAVOURITE (adjust picture).

text_image
PICTURE BRIGHT. CONTRAST COLOUR SHARP.SOUND CONTROLS
Select SOUND menu and press OK button. Use «▲ or ▼» buttons and «◀ » buttons, adjust the sound to your favourite level. To exit, press MENU button.
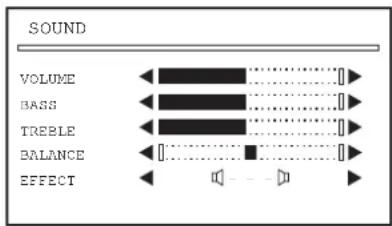
text_image
SOUND VOLUME BASS TREBLE BALANCE EFFECTFEATURES MENU
Select FEATURES menu and press OK button. This menu offers various function.
☐ LANGUAGE SELECTION MENU
Please refer to page 4 for detailed explanation of Language Selection.
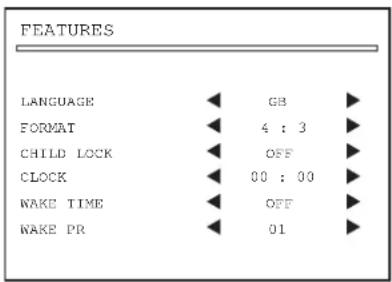
text_image
FEATURES LANGUAGE ◀ G8 ▶ FORMAT ◀ 4 : 3 ▶ CHILD LOCK ◀ OFF ▶ CLOCK ◀ 00 : 00 ▶ WAKE TIME ◀ OFF ▶ WAKE PR ◀ 01 ▶☐ FORMAT SELECTION MENU
Select FORMAT menu and by «◀ or ▶» buttons, you may choose one of the following formats :
4 : 3 for normal TV screen, or 16 : 9 for wide TV screen, or ZOOM for expanded picture.
DAILY TV OPERATION
FEATURES MENU
Position the cursor on the CHILD LOCK menu and by pressing «◀ or ▶» buttons, you may select ON or OFF. When the CHILD LOCK is ON and TV is in STAND-BY mode it can not be operated without the remote control hand set and LED indicator lights up orange instead of red.
□ CLOCK MENU
The clock is set automatically if program NR 1 is selected on screen for at least 6 seconds, provided the program NR 1 has teletext data. You may also set the clock by using the 0...9 buttons.
Note : If you turn off the TV with the MAIN POWER button, the clock setting will be lost and must be reset.
□ WAKE TIME MENU
Select WAKE TIME menu and chose ON or OFF using «◀ or ▶» buttons. When you select ON, the timer menu will appear, then set the WAKE TIME using the 0....9 buttons.
WAKE TIME menu will function only when the TV is in the STAND-BY mode and both CLOCK and WAKE TIME programmes are stored.
□ WAKE PR MENU
Select the WAKE PR menu and using 0...9 buttons, set the program number to be switched on at the WAKE TIME.
SLEEP - AUTO TURN OFF TIMER SETTING
By pressing the SLEEP button repeatedly, you can select one of the following settings :
0 → 30min → 60 min → 90 min → 120min → 0. The set will turn off after the period of time you selected elapses.
Automatic Switch Off with No broadcast signal :
If a broadcasting signal is not present for about 30 minutes, the set will be automatically turned off. In AV mode, however, this function does not operate.
If the TV is switched off with the MAIN POWER switch, the SLEEP TIMER menu returns to 0 position automatically.
RECALL
RECALL button is used to display the current program status on TV screen.
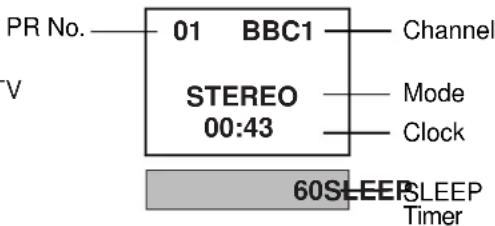
text_image
PR No. 01 BBC1 Channel STEREO Mode 00:43 Clock 60SLEEP SLEEP TimerTELETEXT
The teletext service is carried on a TV transmission signal, therefore it is only available when receiving a TV programme. Your choice of programme also governs which teletext service you will receive (CEEFAX for BBC1 and 2, Teletext for ITV and Channel 4).
□ SWITCHING TELETEXT ON/OFF
Press the TELETEXT button (☐). The index page viewed last page will appear. Press the TELETEXT button to return to the TV mode.
☐ COLOUR BUTTONS FOR FAST TEXT
The red, green, yellow and blue FASTEXT topics are displayed at the bottom of the screen.
If FASTEXT is transmitted, pressing the corresponding coloured button on the remote control will allow easy selection of a particular topic.
□ SELECTING PAGES
The NUMBERED buttons 0..9 are used to enter a page number. The selected page number appears at the top of the screen and the page appears after a short time. The UP/DOWN buttons increase or decrease the current page number by 1.
INDEX PAGE
You can switch directly to the programme preview (with FASTTEXT) or the overview page of the station you are currently viewing by pressing the INDEX (☐) button.
PAGE HOLD
Several sub pages can be combined under a page number and are scrolled at an interval determined by the television station. The presence of sub pages is indicated by, for example, 3/6 beneath the time, which means that you are looking at the 3rd page of a total of 6 pages.
If you want to look at a sub page for a longer period of time, press the HOLD (☐) button. The contents of the sub page shown are kept on the screen and no longer updated or switched to other sub pages.
The HOLD symbol (☐) will be displayed on the top left hand side instead of the page No.
Pressing the HOLD button again, the current sub page appears.
☐ CALLING UP SUBPAGE DIRECTLY
Pressing the SUB PAGE (☐) button, «— — — —» appears at the top of the screen. Enter the sub page number that you want to call up with the NUMBERED buttons 0..9, for example, the 2nd page, sequence 0002. The desired sub page will be displayed. You can change the sub page number with the red or green button.
To exit, press SUB PAGE (button again.
□ WATCHING TELEVISION DURING TELETEXT MODE
Some pages are continually updated, for example, stock market reports, sports announcements and the latest news. If you want to watch television and stay informed at the same time, press CANCEL (☒) button.
The regular programme is still visible and the TELETEXT symbol (☐) appears at the top of the screen. Pressing the CANCEL button again, the teletext page appears with the updated information.
□ REVEAL ANSWER
This function can be used on certain pages to reveal the solution of riddles. Press the REVEAL button (☐?) to reveal a hidden answer and press again to hide it.
☐ DOUBLING CHARACTER SIZE
Repeatedly pressing the SIZE button (☐ doubles the character size in the following order:
Upper half of the page → Lower half of the page → Return to normal size.
☐ VOLUME AND BRIGHTNESS CONTROL IN TELETEXT MODE
Pressing the MENU button in teletext mode, the volume and brightness control menu will be displayed in the bottom of the screen. You can adjust volume and brightness using the corresponding colour button on the remote control.
CONNECTING EXTERNAL EQUIPMENT
HEAD PHONE SOCKET (STEREO)
When you insert a headphone plug (3.5 mm) stereo into the headphone socket, the sound from the speaker will automatically be muted.
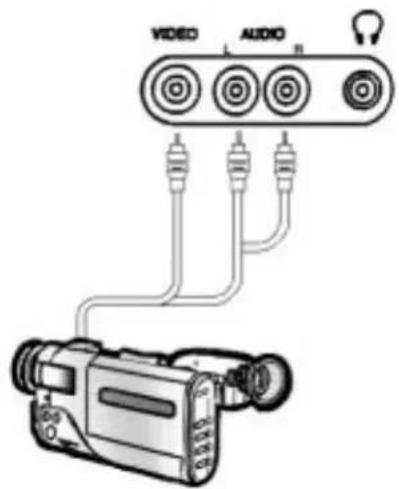
FRONT AV SOCKET (AV2)
Connect the AV (AUDIO/VIDEO) socket with an appropriate cable to the corresponding socket of the external equipment.
Select AV mode by pressing the AV button (☐/→) twice. Press the AV button twice to return to the TV mode.
text_image
VIDEO AUDIOSCART SOCKET (AV1)
This is used to connect a VCR, a PAY-TV decoder, a Camcoder and a video game console.
In most cases, the set changes automatically to AV mode when the VCR connected is in play back mode.
If not, press the AV button (☐/→) on the remote control or on the front of the set, and select AV1 symbol.
SCART SOCKET (AV2)
This is used to connect : VCR, Camecorder and S-VHS VCR.
If external equipment has a S-VHS signal output, you can also receive the S-VHS signal with an appropriate cable (e.g. with an S-VHS plug to Scart plug) by selecting S-VHS mode with the AV button (☐/→☐)
NB. If equipment is connected to the front AV SOCKET and the SCART SOCKET 2, only one piece of equipment can be used.
NB. External equipment must be switched off to return to the TV mode.

text_image
Connect to VCR RF Out Connect to VCR Aerial Connect to VCR SCART AV1 AV2 TV VCRSometimes a performance problem can be easily solved by checking seemingly apparent but often overlooked possibilities. Checking these points before asking for service could save you time and money.
| SYMPTOM | CHECKPOINT |
| No picture and sound | Check the TV set is plugged in.Check the Volume, Brightness, and Contrast controls are not set at minimum. |
| Picture is OK, but no sound | Check the volume Control is not set at minimum.Check that the mute function is off |
| Sound is OK, but no picture | Check the brightness and Contrast controls are not set at minimum. |
| No colour | Check the colour control is not set at minimum. |
| Excessive noise in picture | Check the aerial cable is not broken, disconnected or damaged. |
| Diagonal stripes appear on the picture | The picture may be affected by an interfering signal. (eg. from nearby amateur radio transmitters or another TV set). The interference can be reduced to some extent by adjusting the direction or height of the aerial. |
| Picture has « snow » | Check the aerial cable is not broken, disconnected or damaged. Small dots all over the screen are caused by a weak aerial signal. |
| Ghost images appear | Check that the aerial direction has not changed after a storm or strong wind etc... Ghost images are caused by a signal being reflected from a large building or a hill: the direction or height of the aerial should be chosen well in order to minimise the ghosting images. |
SPECIFICATIONS
| TV standard | PAL - SECAM B/G D/K, PAL I/I, SECAM L/L' |
| Sound system | - NICAM B/G, I, D/K, L,- FM 2Carrier B/G, D/K |
| Mains voltage | 220-240 V - 50 Hz |
| Power consumption | 25" & 28": 75 W approx. |
| Power consumption in Stand by | less than 2.5W |
| Sound Output Power | 7W x 2 (at 60% mod, 10%THD) |
| Speaker | 25" & 28": 12W 8 ohm x 2 |
| Teletext system | 10 pages memory FASTEXT (FLOF or TOP) |
| Aerial input | 75 ohm unbalanced |
| Channel coverage | Off-air channels, S-cable channels and hyperband |
| Tuning system | Frequency synthesizer tuning system |
| Screen size | 25": 63cm / 28": 71cm |
| Visual screen size | 25": 59cm / 28": 66cm |
| Visual screen size | On Screen Display |
| Channel indication | 100 programmes |
| Program Selection Aux. Terminal | - EURO-SCART 1: Audio / Video In and Out, R/G/B In, Slow and Fast switching.- EURO-SCART 2: Audio / Video In, S-VHS In.- Audio-Video Jack on front of cabinet in common connection with EURO-SCART 2.- Stereo headphone jack (3.5mm) on front of cabinet. |
| Dimensions | 25": 753 (W) x 540 (H) x 442 (D)28": 806 (W) x 591 (H) x 540 (D) |
| Weight | 25": 25.5 Kg / 28": 34.5 Kg |
| Remote Control Unit | Type R-40A01 (requires two 1.5V penlight batteries type AAA size) |
HITACHI
Hitachi, Ltd. Tokyo, Japan
International Sales Division
THE HITACHI ATAGO BUILDING,
No. 15–12 Nishi Shinbashi, 2 – Chome,
Minato – Ku, Tokyo 105-8430, Japan.
Tel: 03 35022111
HITACHI EUROPE LTD,
Whitebrook Park
Lower Cookham Road
Maidenhead
Berkshire
SL6 8YA
UNITED KINGDOM
Tel: 01628 643000
Fax: 01628 643400
Email: consumer-service@hitachi-eu.com
HITACHI EUROPE S.A.
364 Kifissias Ave. & 1, Delfon Str.
152 33 Chalandri
Athens
GREECE
Tel: 1-6837200
Fax: 1-6835964
Email: service.hellas@hitachi-eu.com
HITACHI EUROPE GmbH
Munich Office
Dornacher Strasse 3
Email: HSE-DUS.service@hitachi-eu.com
HITACHI EUROPE S.A.
Gran Via Carlos III, 101-1
08028 Barcelona
SPAIN
Tel: 93 409 2550
Fax: 93 491 3513
Email: atencion.cliente@hitachl-eu.com
HITACHI EUROPE srl
Via Tommaso Gulli N.39, 20147
Milano, Italia
ITALY
Tel: +39 02 487861
Tel: +39 02 38073415 Servizio Clienti
Fax: +39 02 48786381/2
Email: customerservice.italy@hitachi-eu.com
HITACHI Europe AB
Box 77 S-164 94 Kista
SWEDEN
Tel: +46 (0) 8 562 711 00
Fax: +46 (0) 8 562 711 13
Email: csgswe@hitachi-eu.com
HITACHI EUROPE S.A.S
Lyon Office
B.P. 45, 69671 BRON CEDEX
FRANCE
Tel: 04 72 14 29 70
Fax: 04 72 14 29 99
HITACHI EUROPE LTD (Norway) AB
STRANDVEIEN 18
1366 Lysaker
NORWAY
Tel: 67 5190 30
Fax: 67 5190 32
Email: csgnor@hitachi-eu.com
HITACH EUROPE AB
Egebækgård
Egebækvej 98
DK-2850 Nærum
DENMARK
Tel: +45 43 43 6050
Fax: +45 43 60 51
Email: csgnor@hitachi-eu.com
HITACHI EUROPE AB
Neopoli / Niemenkatu 73
FIN-15140 Lahti