
VT-1284 G - Iron Vitek - Free user manual and instructions
Find the device manual for free VT-1284 G Vitek in PDF.


| Product Type | Steam Iron |
| Brand | Vitek |
| Model | VT-1284 G |
| Color | White/Blue (typical) |
| Power Supply | 220-240 V, 50/60 Hz |
| Power Consumption | 2400 W |
| Soleplate Material | Ceramic |
| Water Tank Capacity | 300 ml |
| Steam Output | Up to 40 g/min |
| Steam Boost | 150 g/min |
| Spray Function | Yes |
| Vertical Steaming | Yes |
| Anti-Drip System | Yes |
| Self-Cleaning Function | Yes |
| Auto Shut-Off | Yes, after 8 minutes of inactivity |
| Cord Length | 2.5 m |
| Weight | 1.2 kg |
| Dimensions (W×D×H) | 30 × 15 × 20 cm |
| Included Accessories | Measuring cup |
| Care and Cleaning | Descale regularly with vinegar solution; wipe soleplate with damp cloth |
| Safety Features | Thermal fuse, insulated plug |
| Spare Parts Availability | Soleplate, water tank, spray nozzle (contact service center) |
Frequently Asked Questions - VT-1284 G Vitek
User questions about VT-1284 G Vitek
0 question about this device. Answer the ones you know or ask your own.
Ask a new question about this device
Download the instructions for your Iron in PDF format for free! Find your manual VT-1284 G - Vitek and take your electronic device back in hand. On this page are published all the documents necessary for the use of your device. VT-1284 G by Vitek.
USER MANUAL VT-1284 G Vitek
ENGLISH
- Do not use the iron after dropping, in case of visible damage or leakage.
- Place the iron on a flat stable surface or use a stable ironing board.
• Always take the power plug out of the mains socket before filling the iron water tank with water.
• Water inlet lid should be closed during ironing. - Attention! The unit surfaces get hot during its operation. Do not let open skin areas contact with iron hot surfaces or outgoing steam to avoid burns.
- Pour out water from the tank only after unplugging the iron.
- Never leave the operating iron unattended.
- This unit is not intended for usage by children under 8 years old.
- During the operation and cooling down of the iron keep it in a place, out of the reach of children under 8 years old.
- Children from 8 years old and disabled persons can use the unit only when they are under supervision of a person who is responsible for their safety and who has given them all the necessary and understandable instructions on use of the unit in a safe way and information about danger that can be caused by improper usage of the unit.
ENGLISH
STEAM STATION
The unit is intended for steam and dry ironing and for vertical steaming of clothes, linen and fabrics.
Description
- Removable water tank
- Water inlet lid
- Water tank clamp/tank carrying handle
- Iron rest
- Iron clamp
- Soleplate
- Iron handle
- Steam supply button
- Soleplate temperature control knob
- ON/OFF indicator of the heating element of the iron
- Power cord protection
- Iron base
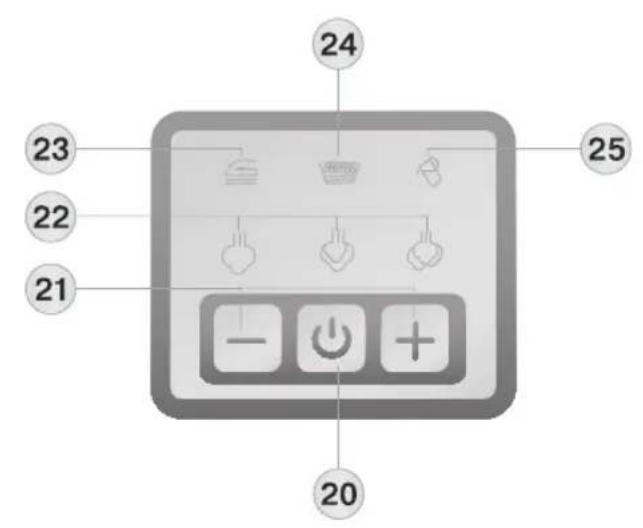
- Control panel
- Boiler body
- Power cord
- Steam hose
- Flat pullout bar for power cord fixing
- Steam hose/power cord storage
- Boiler drain opening plug
- ON/OFF button of the steam station
- Steam intensity setting buttons
- Steam generation intensity indicators
- Pilot lamp
- Indicator of boiler cleaning necessity
- Empty water tank indicator
Control panel
Attention!
For additional protection it is reasonable to install a residual current device (RCD) with nominal operation current not exceeding 30 mA. To install RCD contact a specialist.
SAFETY MEASURES
Before using the unit, read this instruction manual carefully. Keep this manual for future reference.
Use the unit according to its intended purpose only, as it is stated in this user manual. Mishandling the unit can lead to its breakage and cause harm to the user or damage to his/her property.
- Before switching the unit on, make sure that your home mains voltage corresponds to unit operating voltage.
- The power cord is equipped with a "europlug"; plug it into the socket with reliable grounding contact.
- To avoid fire, do not use adapters for plugging the unit in.
-
To avoid mains overloading, do not switch on several electrical appliances with high power consumption at a time.
• Use only the accessories supplied. -
Do not use the unit near containers filled with water, next to a kitchen sink, in wet basements or near a swimming pool.
- Before using the unit, closely examine the power cord and the steam hose and make sure that they are not damaged. If you find any damages of the power cord or the steam hose, do not use the unit.
- Provide that the power cord does not contact with hot surfaces and sharp furniture edges.
- Do not use the unit after dropping it, in case of visible damage or leakage.
- Place the unit on a flat stable surface; before using an ironing board, make sure that it is reliable and steady.
- Always take the power cord plug out of the socket before filling the tank set on the boiler body with water.
- Do not fill the water tank with scented liquids, vinegar, starch solution, descaling reagents, chemicals etc.
- Do not direct outgoing steam at people and animals.
- Provide that the power cord and the steam hose are not on the ironing board and make sure that they do not touch hot surfaces or sharp furniture edges.
- Place the iron on the rest between operations and after you finish ironing.
- Attention! The iron soleplate and certain boiler parts heat up during the operation. Keep open skin areas away from direct contact with hot surfaces to avoid burns; avoid the steam going out from the soleplate openings
- Never leave the unit connected to the mains unattended. Unplug the unit every time before cleaning or when you do not use it.
- Before plugging in/unplugging the unit set the soleplate temperature control knob to the position «MIN».
- To unplug the unit, always pull its plug, but not the power cord.
• Pour out water only after unplugging the unit. - Do not open the boiler drain opening lid during the operation; wait till the unit cools down completely.
- To avoid electric shock, do not immerse the boiler body, the iron, the power cord and the plug into water or other liquids. Do not touch the boiler body, the iron, the power cord or the power plug with wet hands.
- Clean the unit regularly.
- During the operation do not allow children to touch the unit body parts, the steam hose, the power cord or the plug.
- This unit is not intended for usage by children under 8 years of age.
- This unit is not intended for usage by people (including children over 8) with physical, neural, mental deviations or with insufficient experience
ENGLISH
or knowledge. Such persons can use this unit only if they are under supervision of a person who is responsible for their safety and if they are given all the necessary and understandable instructions concerning the safe usage of the unit and information about danger that can be caused by its improper usage.
- Do not leave children unattended not to let them use the unit as a toy.
- For children safety reasons do not leave polyethylene bags, used as a packaging, unattended.
Attention! Do not allow children to play with polyethylene bags or packaging film. Danger of suffocation!
- Do not disassemble the unit by yourself, if any malfunction is detected or after it was dropped, apply to the nearest authorized service center.
- Transport the unit in the original package only.
- Keep the unit out of reach of children and disabled persons.
Use tap water to fill the tank. If tap water is hard, it is recommended to mix it with distilled water in proportion 1:1, if tap water is too hard, mix it with distilled water in proportion 1:2 or use distilled water only.
BEFORE THE FIRST USE
After unit transportation or storage at low temperature, it is necessary to keep it for at least two hours at room temperature before switching on.
- Unpack the steam station and remove all packaging elements that can prevent proper unit operation.
- Remove the protection from the iron soleplate (6), if there is any.
- Wipe the soleplate (6) with a soft dry cloth.
- Wipe the iron body and the boiler body (14) with a soft cloth.
- Make sure that the voltage of the mains corresponds to the operating voltage of the unit.
- Place the unit on a flat steady heat- and water-resistant surface so that it is on the same level with your ironing board. When setting the steam station on the ironing board, make sure that the ironing board is reliable and steady.
FILLING THE WATER TANK
Note: Before removing the water tank (1), make sure that the unit is unplugged.
- Remove the water tank (1) pressing the clamp (3) and pulling the tank towards yourself.
- Open the water inlet lid (2) and fill the water tank (1) with water.
- Close the lid (2) and install the water tank (1) to its place until the clamp (3) clicks.
Filling the water tank during operation
If during ironing the water level in the tank (1) drops below the minimum level required for normal unit operation you'll hear a sound signal and the indicator (25) will start flashing. You can refill the water tank (1) without removing it from the boiler body (14).
- Press and hold the button (20) ⏻, wait till the unit is switched off (in this case all indicators on the control panel (13) should go out). Disconnect the unit from the mains.
- Open the water inlet lid (2) and carefully fill the water tank (1) with water.
Notes:
- Do not fill the water tank (1) with scented liquids, vinegar, starch solution, descaling reagents, chemical agents etc.
- Do not exceed the "MAX" mark.
USING THE UNIT
- Place the unit on a flat steady heat- and water-resistant surface so that it is on the same level with your ironing board. When setting the steam station on the ironing board, make sure that the ironing board is reliable and steady.
- While the first switching on the heating element burns, therefore occurrence of a small amount of smoke or extraneous smell is possible, it is normal.
- After switching the unit on and during the operation you will hear characteristic sounds of a working pump. These sounds are caused by normal operation and are not a malfunction.
- Before using the unit, iron a piece of cloth to clean the steam ducts of the iron soleplate (6) and the boiler. During the first operation some particles may appear from the iron soleplate (6) openings, it is normal and not a malfunction.
- After setting the required soleplate (6) temperature with the temperature control knob (9), the soleplate starts heating up, during the heating of the soleplate (6) some water may leak from the soleplate steam openings or some steam may appear. It is normal.
Attention! The boiler body (14), the iron rest (4), the iron soleplate (6) and the steam hose (16) heat up during the operation, do not touch the hot surfaces of the unit, take the iron by its handle (7) only.
- Make sure that the steam hose (16) doesn't bend and twist during the operation.
- When using the steam station for the first time or in case you haven't used the steam station for some time, press the steam supply button (8) several times, directing the steam away from the clothes. This will remove the condensate from the steam hose (16).
- Constant temperature of the soleplate (6) is maintained during the operation; the indicator (10) periodically lights up and goes out.
ENGLISH
- During steam ironing, the boiler heating element periodically switches on or off, and one of the steam generation intensity indicators (22) will flash or light constantly. It is normal.
- Before starting steam ironing, wait till the boiler reaches the required temperature (the set steam generation intensity indicator (22) lights constantly) and the soleplate (6) heats up (the indicator (10) goes out); otherwise water will leak from the steam openings of the soleplate (6).
IRONING TEMPERATURE
- Always check the recommended ironing temperature indicated on the tag before ironing.
- If there is no tag with recommendations for ironing, but you know the type of fabric, use the table below to determine the proper temperature.
| Signs | Fabric type (temperature) |
| • | Synthetics, nylon, acrylic, polyester, silk(low temperature) - dry ironing only |
| • • Wool (medium temperature) | |
| • • • Cotton, linen (high temperature) | |
| MAX | Maximum temperature |
- This table is only valid for smooth materials. Other types of fabrics (crimped, raised etc.) should be ironed at low temperature.
- Sort items by ironing temperature first: synthetics to synthetics, wool to wool, cotton to cotton etc.
- The iron heats up faster than it cools down. For this reason it is recommended to begin ironing at low temperature (for instance, synthetic fabrics).
- After that, start ironing at higher temperature (wool). Cotton and linen items should be ironed last.
- If an item is made of mixed fabrics, the iron should be set to the lowest ironing temperature (for instance, if an item is made of acrylic and cotton, it should be ironed at temperature used for acrylic “•”).
- If you cannot determine the fabric structure, find a place that is hidden while wearing and select the ironing temperature experimentally (always start with the lowest temperature and raise it gradually until you get the desired result).
– Corduroy and other fabrics that become glossy quickly should be ironed strictly in one direction (in direction of the pile) with little pressure. - To avoid appearance of glossy spots on synthetic and silk fabrics, iron them backside.
Setting the ironing temperature
-
Turn the temperature control knob (9) to set the required ironing temperature: «•», «••», «•••» or «MAX» depending on the type of fabric.
-
When the iron soleplate is heating, the indicator (10) lights up. Once the soleplate (6) reaches the set temperature, the indicator (10) will go out, you can start ironing.
- During operation the indicator (10) will go out and light up again, this indicates that the iron heating element switches on and off, maintaining the pre-set temperature.
STEAM SUPPLY
- Do not use steam ironing on fabrics that require low temperature ironing (synthetic fabrics or silk).
- You can iron woolen clothes both from the back side and face side, but in the latter case iron it only through a cloth, switch the steam supply on pressing and holding the button (8). Steam ironing helps to avoid gloss.
Steam intensity setting
- The steam intensity is set with the «-», «+» buttons (21). Select «low», «medium» or «high» steam intensity, the indicators (22) show the selected level.
- Flashing of one of the indicators (22) shows that the boiler heating element is heating up. The unit is ready to operate when the indicator (22) lights constantly.
STEAM IRONING
- Make sure that the water tank (1) is filled with water.
- Place the iron on the rest (4), first install the tip of the iron soleplate into the clamp (5) and then lower the iron base (12).
- Insert the plug into the socket; you will hear a sound signal.
- Switch the unit on by pressing the button (20) the pilot lamp (23) will light up.
- Turn the temperature control knob (9) to set the required ironing temperature: «•», «••», «•••» or «MAX».
- Set the required steam intensity with the «-», «+» buttons (21), one of the indicators (22) will be flashing.
- When the indicator (10) on the iron goes out and the indicator (22) lights constantly, you can start ironing.
- For short-time steam supply press the button (8), for continuous steam supply press the button (8) and hold it.
- During intervals in operation place the iron on the rest (4) or on its base (12); before setting the iron on the rest (4) wait till the steam is released completely from the soleplate (6) openings. Make sure that no water drops accumulate on the rest (4); if the water drops appear, wipe them with a soft cloth or a paper towel.
- After you finish using the steam station, set the sole-plate temperature control knob (9) to the «MIN» position.

ENGLISH
- Place the iron on its rest (4).
- Switch the unit off by pressing and holding the button (20), the pilot lamp (23) will go out and you'll hear a sound signal.
- Unplug the unit.
- Wait till the unit cools down completely, then remove the water tank (1) and drain the water from it (see «CLEANING AND CARE»).
VERTICAL STEAM
Vertical steam function can be used only at high ironing temperatures when the iron temperature control knob (9) is set to «···» or «MAX».
Hold the iron vertically at the distance of 10-30 cm from the clothes and press the steam supply button (8).
Important information
- Vertical steam is not recommended for synthetic fabrics.
- Never steam clothes put on a person as the steam temperature is very high, use a clothes hanger or a stand. Do not direct steam at people, plants, animals or objects which can be damaged by moisture.
DRY IRONING
- Turn the temperature control knob (9) to set the required ironing temperature: «•», «••», «•••» or «MAX».
- When the soleplate (6) temperature reaches the set one, the indicator (10) will go out, you can start ironing.
- Holding the iron by the handle, do not press the steam supply button (8).
- After you finish ironing, set the temperature control knob (9) to the "MIN" position.
AUTOMATIC SWITCH-OFF FUNCTION
If you don't use the unit for 10 minutes (don't press any buttons, don't press the steam supply button (8)) or use the unit in dry ironing mode, it will be switched off automatically.
CLEANING AND CARE
Before cleaning unplug the unit and wait till it cools down completely.
After every use
Drain water from the water tank (1).
- Remove the water tank (1), pressing the clamp (3) and pulling the tank (1) towards you.
- Open the lid (2) and pour out water from the water tank (1), then install the tank back to its place.
Regular cleaning
- Clean the unit body with a slightly damp cloth and then wipe dry.
- Remove the scale on the iron soleplate (6) with a cloth soaked in vinegar-water solution and then wipe the soleplate surface with a dry cloth.
- Do not use abrasive substances to clean the iron soleplate and body.
- Avoid contact of the iron soleplate (6) with sharp metal objects.
Cleaning the boiler
If you do not use the unit for more than 5-10 days, pour water out of the boiler.
To prolong the unit lifetime we recommend to clean the boiler regularly, it is especially important in regions with "hard" tap water. The indicator (24) informs about the necessity to perform descaling.
Attention! Before cleaning the boiler, make sure that the unit has completely cooled down after use (that means no less than two hours have passed).
- Remove the iron from the rest (4) and place it on a flat steady surface next to the unit.
- Remove the water tank (1), having pressed the clamp (3).
- Shake the boiler body (14) several times.
- Put the boiler body (14) on its side.
- Unscrew the boiler drain opening plug (19) turning it counterclockwise.
- Pour the remaining water out.
- Put the boiler body (14) on its side and pour about 300 ml cold water into the boiler.
Attention!
- Do not pour water into the boiler directly from the tap.
-
Do not pour acid solutions or descaling reagents into the boiler.
-
Screw the boiler drain opening plug (19) turning it clockwise.
- Shake the boiler body (14) several times.
- Unscrew the boiler drain opening plug (19); pour the water out of the boiler.
- Pour water into the boiler again, shake the boiler body once more and pour the water out.
- Screw the plug (19) turning it clockwise.
- Set the boiler vertically, install the water tank (1) back to its place and place the iron on the rest (4).
STORAGE
- Before you take the unit away for storage, make sure that unit has cooled down completely.
- Drain the remaining water from the water tank (1).
- Clean the unit.
ENGLISH
TROUBLESHOOTING
| Failure Possible Cause Solution | ||
| The iron doesn't heat up | The unit is off | Switch the unit on by pressing the button (20) ⏻ and turn the temperature control knob (9) on the iron. |
| No steam is generated | The unit is off | Switch the unit on with the button (20) ⏻ |
| Not enough water in the water tank (1) | Fill the water tank (1) with water. | |
| Water leaks from the steam openings of the iron soleplate | The selected temperature mode is not appropriate for steam ironing | Set the ironing temperature within the range between «···», «···» and «MAX». |
| If you make a long pause during ironing, the steam in the steam hose can cool down and condense | It is normal. Press the steam supply button (8), directing the soleplate (6) away from the clothes. Hold the button till the water stops leaking from the steam openings. | |
| Scale and other dirt inside the boiler. | Wait till the unit cools down completely and clean the boiler - see «Cleaning the boiler (14) ». | |
- If you are not going to use the steam station for more than 5-10 days, pour the water out of the boiler (see. «Cleaning the boiler»).
- Pull out the clamp (17), place the power cord (15) and the steam hose (16) in the cord storage (18) and then push the clamp (17) back.
- Place the iron on its rest (4).
- Keep the unit away from children in a dry cool place.
DELIVERY SET
Steam station with iron - 1 pc.
Removable water tank - 1 pc.
Instruction manual - 1 pc.
TECHNICAL SPECIFICATIONS
Power supply: 220-240 V \~ 50/60Hz
Maximal power consumption: 2400 W
Pressure: 6 bar
Water tank capacity: 1.7 l
The manufacturer preserves the right to change
the specifications of the unit without a preliminary notification.
Unit operating life is 3 years
Guarantee
Details regarding guarantee conditions can be obtained from the dealer from whom the appliance was purchased. The bill of sale or receipt must be produced when making any claim under the terms of this guarantee.

This product conforms to the EMC-Requirements as laid down by the Council Directive 2004/108/EC and to the Low Voltage Regulation (2006/95/EC)
русский
A production date of the item is indicated in the serial number on the technical data plate. A serial number is an eleven-unit number, with the first four figures indicating the production date. For example, serial number 0606xxxxxx means that the item was manufactured in June (the sixth month) 2006.
RUS


- ENGLISH
- STEAM STATION
- DESCRIPTION
- CONTROL PANEL
- ATTENTION
- SAFETY MEASURES
- BEFORE THE FIRST USE
- AFTER UNIT TRANSPORTATION OR STORAGE AT LOW TEMPERATURE, IT IS NECESSARY TO KEEP IT FOR AT LEAST TWO HOURS AT ROOM TEMPERATURE BEFORE SWITCHING ON
- FILLING THE WATER TANK
- FILLING THE WATER TANK DURING OPERATION
- NOTES
- USING THE UNIT
- IRONING TEMPERATURE
- SETTING THE IRONING TEMPERATURE
- STEAM SUPPLY
- STEAM INTENSITY SETTING
- STEAM IRONING
- VERTICAL STEAM
- IMPORTANT INFORMATION
- DRY IRONING
- AUTOMATIC SWITCH-OFF FUNCTION
- CLEANING AND CARE
- AFTER EVERY USE
- REGULAR CLEANING
- CLEANING THE BOILER
- ATTENTION! BEFORE CLEANING THE BOILER, MAKE SURE THAT THE UNIT HAS COMPLETELY COOLED DOWN AFTER USE (THAT MEANS NO LESS THAN TWO HOURS HAVE PASSED)
- STORAGE
- DELIVERY SET
- TECHNICAL SPECIFICATIONS
- UNIT OPERATING LIFE IS 3 YEARS
- GUARANTEE
- РУССКИЙ
- RUS
Brand : Vitek
Model : VT-1284 G
Category : Iron