
GX10i - Mobile Phone SHARP - Free user manual and instructions
Find the device manual for free GX10i SHARP in PDF.


| Product Type | Mobile Phone |
| Brand | Sharp |
| Model | GX10i |
| Network | GSM 900/1800/1900 with GPRS |
| Main Display | Colour TFT-LCD (65,536 colours) |
| Sub-Display | Monochrome LCD with status indicators |
| Camera | Built-in digital camera (C-MOS sensor), supports JPEG format, zoom function |
| Battery | Rechargeable Li-ion (XN-1BT11), standard charging time approx. 2 hours |
| Talk Time | Depends on network and usage (not specified) |
| Standby Time | Depends on network and usage (not specified) |
| Memory | Phonebook up to 500 entries on phone, SIM-dependent; Java applications up to ~700 KB total for games, pictures, sounds |
| Connectivity | Infrared port, data cable (RS232C), WAP browser, MMS, SMS |
| Java Support | Java MIDP applications (JBlend engine), pre-loaded game Stormy Sight |
| Audio | Polyphonic ringtones (up to 16 chords), voice memo recording, handsfree kit support |
| Safety (SAR) | 0.681 W/kg (head, 10g tissue) |
| Key Features | Camera with timer, MMS messaging, WAP browsing, Java games, melody editor, profiles (Normal/Meeting/Activity/Car/Silent) |
| Maintenance | Clean with soft dry cloth; do not use solvents |
| Spare Parts / Accessories | Li-ion spare battery (XN-1BT11), cigarette lighter charger (XN-1CL10), car holder (XN-1CH11), data cable (RS232C: XN-1DC10) |
| Manual Pages | 165 |
Frequently Asked Questions - GX10i SHARP
User questions about GX10i SHARP
0 question about this device. Answer the ones you know or ask your own.
Ask a new question about this device
Download the instructions for your Mobile Phone in PDF format for free! Find your manual GX10i - SHARP and take your electronic device back in hand. On this page are published all the documents necessary for the use of your device. GX10i by SHARP.
USER MANUAL GX10i SHARP
Declaration of Conformity
Hereby, Sharp Telecommunications of Europe Ltd declares that this GX10i is in compliance with the essential requirements and other relevant provisions of Directive 1999/5/EC.
A copy of the original declaration of conformity can be found at the following Internet address: http://www.sharp-mobile.com
Introduction
Congratulations and thank you for choosing the GX10i.
About This User Guide
This user guide is carefully designed to help you learn about your phone's features and operations quickly and effectively.
NOTICE
- We strongly recommend that you keep separate permanent written records of all important data. Data may be lost or altered in virtually any electronic memory product under certain circumstances. Therefore, we assume no responsibility for data lost or otherwise rendered unusable, whether as a result of improper use, repairs, defects, battery replacement, use after the specified battery life has expired or any other cause.
- We assume no responsibility, directly or indirectly, for financial losses or claims from third parties resulting from the use of this product and any of its functions, such as stolen credit card numbers, the loss or alteration of stored data, etc.
- All company and/or product names are trademarks and/or registered trademarks of their respective holders.
1 l n t r o d u c t i o n
- Screen layout illustrated in this user guide may differ from the actual one.
The information described in this user guide is subject to change without notice. - Not all the functions described in this user guide may be supported in all networks.
- We assume no responsibility for downloaded contents, information, etc. from network.
Copyright
According to copyright laws, the reproduction, alteration and use of material which is protected by copyright (music, pictures, etc.) is only permitted for personal or private use. If the user is not in possession of more extensive copyright or has not received the explicit permission from the copyright owner to reproduce, alter or use a copy which has been made or modified in this way, this is considered to be a violation of the copyright laws and gives the copyright owner the right to claim for damages. For this reason, avoid the illegal use of material which is protected by copyright.
Windows is a registered trademark of Microsoft Corporation in the United States and/or other countries.
Powered by JBlend ^® , ©1997-2003 Aplx Corporation. All rights reserved. Java and all Java-based trademarks and logos are trademarks or registered trademarks of Sun Microsystems, Inc. in the U.S. and other countries. JBlend and all JBlend-based trademarks and logos are trademarks or registered trademarks of Aplx Corporation in Japan and other countries.
In this product, JBlend ^® is incorporated. JBlend ^® is a Java execution environment that Aplx developed for implementing advanced performance and fast operation on small-memory systems. JBlend and JBlend logo are trademarks or registered trademarks of Aplx Corporation in Japan and other countries.

Powered by Mascot Capsule ^® /Micro3D Edition ^TM Mascot Capsule ^® is a registered trademark of HI Corporation ©2002-2003 HI Corporation. All Rights Reserved.
Licensed by Inter Digital Technology Corporation under one or more of the following United States Patents and/or their domestic or foreign counterparts and other patents pending, including U.S. Patents: 4,675,863: 4,779,262: 4,785,450 & 4,811,420.
Licensed under U.S. Patent 4,558,302 and foreign counterparts.
T9 Text input is licensed under one or more of the following: U.S. Pat. Nos. 5,818,437, 5,953,541, 5,187,480, 5,945,928, and 6,011,554; Australian Pat. No. 727539; Canadian Pat. No. 1,331,057; United Kingdom Pat. No. 2238414B; Hong Kong Standard Pat. No. HK0940329; Republic of Singapore Pat. No. 51383; Euro. Pat. No. 0 842 463 (96927260.8) DE/DK, FI, FR, IT, NL,PT.ES,SE,GB; Republic of Korea Pat. Nos. KR201211B1 and KR226206B1; and additional patents are pending worldwide.
Useful functions and services of the phone
Your phone offers you the following features:
- The built-in digital camera can take pictures.
- You can create and read SMS messages.
- Multimedia Messaging Service (MMS) can personalise your phone in various ways: you can send and receive multimedia messages with graphical images, photographs or sound attached.
- WAP browser helps you to access a variety of information on the mobile internet.
- You can play with Java ^TM applications. You can also download various kinds of Java ^TM applications from Vodafone via the mobile Internet.
- The main display of colour TFT-LCD makes the screens clearer, more beautiful and easier to view.
- Sub-Screen allowing you to see who is calling and new message indicators.
- You can create various melodies for original ring tones using up to 16 chords.
- Voice memo function allows you to record and play back your voice message.
Table of Contents
Introduction 1
Useful functions and services of the phone ..3
Table of Contents 4
Your Phone 7
Accessories 7
Getting Started 8
Inserting the SIM Card and the Battery .....10
Charging the Battery 13
Turning Your Phone On and Off .....15
Display Indicators 15
Sub-Screen 17
Call Functions 19
Making a Call 19
Speed Dialling 19
Redialling 20
Ending a Call 20
Answering a Call 20
Incall Menus ....21
Phonebook 24
Entering Characters ....24
Creating a New Entry 25
Finding a Name and Number 28
Editing Phonebook Entries 28
Deleting Phonebook Entries 29
Checking Your Own Numbers 29
View Groups 29
Memory Status 30
Speed Dial List 30
Sending Messages 31
Using the Menu ....32
List of Menu Functions 33
Camera 34
Using the Timer 36
Sending Pictures 37
Deleting Pictures 37
My Phone ....38
JavaTM 38
My Java™ Games 39
My Pictures 40
My Sounds 43
My Bookmarks 45
My Text Templates 46
Table of Contents 4
Memory Status 47
Fun & Games 48
Java ^TM Games .....48
Other Games 51
Melody Editor 52
Tone Editor 59
Profiles 63
Activating a Profile ....63
Customising Profiles ......63
Resetting Profile Settings ....64
Ringer Volume 64
Ringer Type 64
Vibration 65
Keypad Tones 65
Warning Tone 66
Power On/Off Sound 66
Message Alert 67
Low Battery Alert 68
Any Key Answer 68
Organiser 69
Calculator 69
Calendar 70
Clock & Alarm 71
Voice Memo 75
Help List 76
Call Manager 77
Call Log 77
Call Timers 78
Call Costs 79
Data Counter 81
Diverts 82
Settings 84
Phone Settings 84
Call Settings 89
Network Settings 93
Internet Settings 95
Infrared 99
Security 100
Master Reset 104
Vodafone live! 105
Viewing the WAP Browser ....105
Navigating a WAP Page 105
Messages 107
MMS (Multimedia Messaging Service) ...107
SMS (Short Message Service) 114
Cell Broadcast 118
5 Table of Contents
Cell Information 119
Data Transmission 120
System Requirements ....120
Software Installation and Setup ....120
Using the Modem Setup ....120
Transmitting Picture/Image Files ......121
Troubleshooting 122
Safety Precautions and Conditions of
Use 124
CONDITIONS OF USE ......124
ENVIRONMENT 126
PRECAUTIONS CONCERNING
VEHICLE USE 127
Index 128
QUICKSTART GUIDE 134
Table of Contents 6
Your Phone
Please check the following carefully. Your phone should come complete with:
• GSM 900/1800/1900 GPRS handset
- Rechargeable Li-ion battery
- AC charger
- Hands free kit
• C D - R O M
- User guide
Accessories (optional)
• Li-ion spare battery (XN-1BT11)
• Cigarette lighter charger (XN-1CL10)
• Car holder (XN-1CH11)
• Data cable (RS232C cable: XN-1DC10)
Some of the above accessories may not be offered by every region.
For details, please contact your dealer.
7 Your Phone
Getting Started


Getting Started 8
- Earpiece
- Navigation Keys (Arrow Keys):
Move the cursor to select menu items, adjust the earpiece volume, etc.
Up/Down arrow keys:
Search the Phonebook entries in stand-by mode.
Left arrow key: Adjusts the earpiece volume in stand-by mode.
Right arrow key: Displays the Phonebook menu in stand-by mode.
-
Centre Key: Displays the Main Menu and executes the functions. in this manual indicates this key.
-
Left Soft Key: Executes the function at the bottom left on the screen.
- Send Key: Makes or accepts calls, views the call in stand-by mode.
- Voice Mail Key: Used to connect to Voice mail centre. (Depends on the SIM card.)
- * /Shift Key: Used to enter * or switch the text mode.
9 Getting Started
- Main-Screen Display
- Hands free Connector
- Right Soft Key: Executes the function at the bottom right on the screen.
- End/Power Key: Ends a call, turns power on/off.
- Keypad
- Microphone
- External Connector: Used to connect either the charger or data cable.
- Aerial
- Sub-Screen Display
- Camera
- Mirror: For self portraits.
- LED Indicator
- Infrared Port: Sends and receives data via infrared.
- Speaker
- Side Keys
Up/Down keys: Move the cursor to select menu items, etc.
- Battery Cover
Inserting the SIM Card and the Battery
1.Slide off the battery cover.

natural_image
Line drawing of a mobile phone with an arrow indicating left side (no text or symbols present)2.Slide the SIM card into the SIM holder.
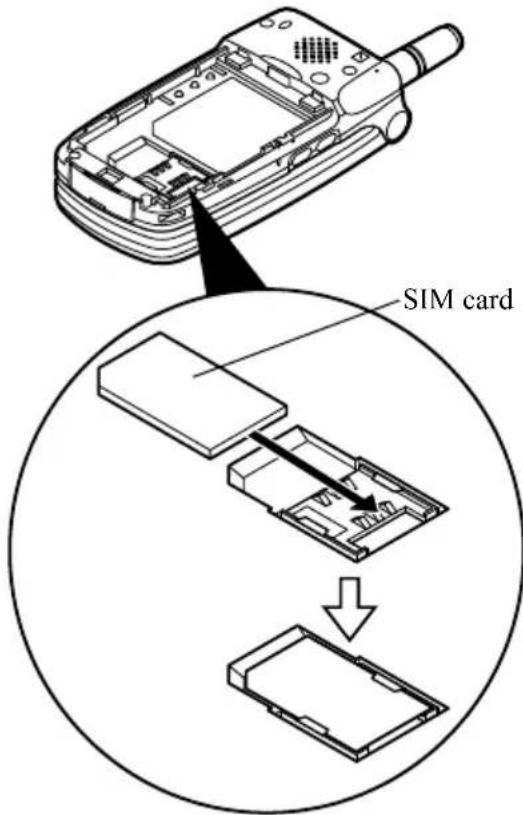
Getting Started 10
3.Hold the battery so that the metal contacts of the battery are facing down, slide the guides on the top of the battery into the battery slots and then insert it ②
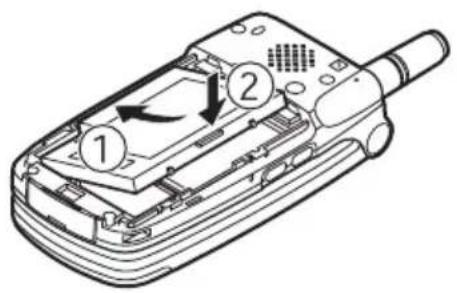
- Replace the battery cover so that the marks are aligned and slide it as shown.
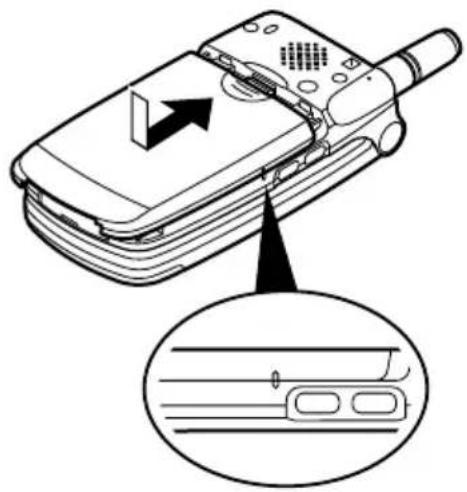
Note
• Make sure that only 3V SIM cards are used.
- Use only the approved battery (XN-1BT11).
11 Getting Started
Removing the SIM Card and the Battery
- Make sure to turn off your phone and disconnect charger and other accessories. Slide off the battery cover.

natural_image
Line drawing of a flip phone with an arrow indicating left side (no text or symbols)- Pick up the battery using the protruding edge and remove the battery from the phone.
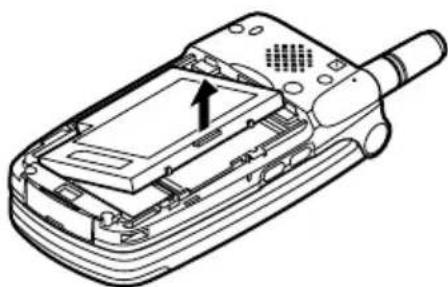
natural_image
Line drawing of a mobile phone casing with an internal panel and handle (no text or symbols)3.Slide the SIM card by pushing the back of the card and remove it from the SIM holder.
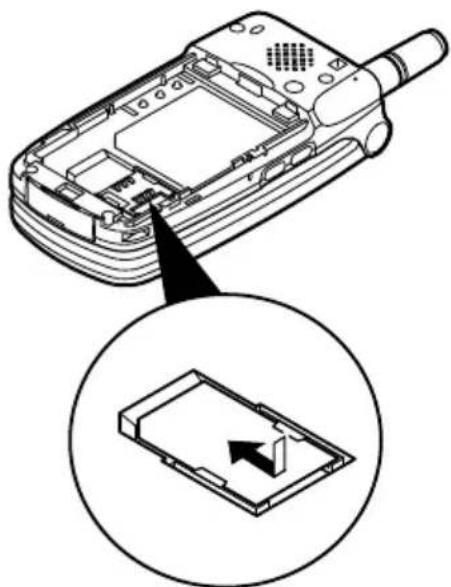
natural_image
Diagram of a mobile phone casing with an inset showing internal components (no text or symbols)Getting Started 12
Battery Disposal
The device is supported by a battery. In order to protect the environment, please read the following points concerning battery disposal:
• Take the used battery to your local waste depot, dealer or customer service centre for recycling.
- Do not expose the used battery to an open flame, put into water or dispose with the household waste.
Charging the Battery
You must charge the battery for at least 2 hours before using your phone for the first time.
To Charge Using the Charger
- Connect the charger to the external socket located at the bottom of the phone with the charger's "PUSH TOP" mark facing towards you, and to an AC outlet.

The LED indicator lights in red. Standard charging time: Approx. 2 hours.
Note
- Charging time may be longer than above depending on the state of the battery and the surrounding conditions. (See “Battery” on page 125.)
To disconnect the charger
Push and hold the side buttons of the charger, then disconnect the charger from the external socket of the phone.
- When charging is complete, the LED indicator turns off. Unplug the charger from the AC outlet, then unplug the charger connector from the phone.
Note
- Do not use any non approved charger, this may damage your phone and invalidate any warranty, please see “Battery” on page 125 for details.
- When the phone is charging, the animated battery status icon ( ) will be displayed in the upper right of the screen.
To Charge Using the Cigarette Lighter Charger The cigarette lighter charger (option) supplies power for charging from the cigarette lighter socket of a car.
Battery Level Indicator
The current battery level is displayed in the upper right hand side of the screen and the Sub-screen.
Low Battery During Use
When the battery is running low, an alarm will sound and the “” will appear on the screen and the Sub-screen.
If you are using your phone and you hear the “low battery” alarm, attach your charger as soon as possible. The phone may not be able to continue normal operation if you continue to use it. The battery may only last five minutes before the phone powers itself down during a call.
| Charge Level Indicators | |
| Full level (greater than 60%) | |
| Partial level (less than 60%) | |
| Partial level (less than 30%) | |
| Low level (less than 10%) | Charging the battery is recommended. |
| Empty | Charge the battery. |
Turning Your Phone On and Off
To turn the power on, press and hold approximately 2 seconds.

The stand-by screen appears.
To turn the power off, press and hold approximately 2 seconds.

Entering the PIN Code
If activated you will be asked to enter a PIN (Personal Identification Number) code after turning on your phone.
1.Enter your PIN code.
- Press

Note
- If your PIN code is entered incorrectly three times in a row, the SIM card is locked. See “Enabling/Disabling the PIN Code” on page 100.
Display Indicators

-
/ Indicates the strength of received signal/the service is out of range.
-
: Appears when in call.
3 Abc ABC abc 123 / :
Indicates the input mode (Upper case only the first letter of the word mode/Upper case mode/Lower case mode/Numeric mode).
-
: Appears when the T9 text input mode is activated.
-
/ / Appears when a new SMS, MMS Alert or WAP Alert has arrived.
-
/ : Appears when viewing secured WAP browser.
-
/ 📄 Appears when a picture or image/sound is attached to MMS.
-
: Indicates a Phonebook entry stored in the phone memory.
9.: Indicates a Phonebook entry stored on the SIM card.
-
📄 indicates the battery level.
-
: Appears when your phone is roaming outside of your network.
-
: Appears when your phone is in data communication mode.
-
: Appears when your phone is in fax communication mode.
-
Appears when your phone is GPRS enabled and within range. Flashes during GPRS transmission.
-
Appears when Alarm is set.
-
: Appears when "Diverts" (p. 82) is set to "All Calls".
-
: Appears when the data cable is connected to your phone.
-
: Appears when "Ringer Volume" (p. 64) is set to "Silent".
-
Appears when Vibration alert is set.
-
(No display)

Indicates the phone's mode (Normal mode/Meeting mode/Activity mode/Car mode/Silent mode).
- : Appears when a voicemail message is stored.
- : Appears when up, down, right or left navigation is available.
- /: Appears when “Infrared” is on/during connection.
- /: Appears when the Java ^TM application is executed/suspended.
Softkey Indicators
To execute the operation indicated, press each corresponding key.
- Area at the lower left of a screen: Displays the operation executed by left softkey.
- Area at the lower right of a screen: Displays the operation executed by right softkey.
Sub-Screen
Status Indicators
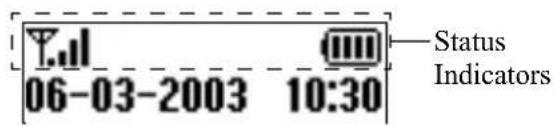
1.: Indicates the received signal strength.
2. : Appears when GPRS is within range and can be used.
Flashes during in GPRS communication mode.
3. ☐: Appears when a new SMS, MMS Alert or WAP Alert has arrived.
4. ☐: Appears when Alarm is set.
5.: Indicates the battery level.
6. / : Appears when "Infrared" is on/during connection.
7. 🔺: Appears when “Diverts” (p. 82) is set to “All Calls”.
-
: Appears when the data cable is connected to your phone.
-
: Appears when “Ringer Volume” (p. 64) is set to “Silent”.
Call Functions
Making a Call
- Enter the area code and the phone number you wish to dial.
If you enter the wrong number, press [Clear] to delete the number to the left of the cursor.
- Press

to
dial.
Emergency Calls
-
Enter 112 (international emergency number) using the keypad.
-
Press

to
dial.
Note
- Emergency calls may not be available on all mobile phone networks when certain network services and/or phone features are in use. Contact your network operator for more information.
- This Emergency number can normally be used to make an emergency call in any country, with or without a SIM card inserted, if a GSM network is within range.
19 Call Functions
International Calls
-
Press and hold until a “+” (international dialling prefix) sign appears.
-
Enter the country code, followed by the area code and the number.
-
Press

to
dial.
Note
- Enter the area code omitting the first 0 when making international calls, in most cases. (It differs for some countries.)
Speed Dialling
In the Speed Dial List, up to 9 phone numbers out of the Phonebook can be set. You can call the numbers using the digit keys (10ac and 9mn) 0-
For details on setting the Speed Dial List, see “Speed Dial List” on page 30.
- Press and hold any of the digit keys ( to 2ABC and 0- ).

The phone number stored in the Speed Dial List is displayed, then dialled.
Redialling
You can redial the numbers in the call log list that you may have missed, received or dialled. Each list can contain up to 10 numbers.
- Press

during
stand-by.
- Press

to sol

catego
ry between
“Dialled Numbers”, “Missed Calls” and “Received Calls”.
- Select the number you wish to call by pressing or ▼.

- Press

dial t

Automatic Redialling
This setting allows you to automatically redial the number if the first attempt was unsuccessful.
If you wish to stop redialling, press

[End].
To Set the Auto Redial Function
-
Press to display the Main Menu.
-
Press or to select "Settings", then press.

-
Press or to select "Call Settings", then press
-
Press or to select "Auto Redial", then press
-
Select "On" to enable the Auto Redial function or "Off" to disable it, then press
Note
- When you receive an incoming call, the Auto Redial function will be interrupted.
• Automatic redialling is not available for fax and data calls.
Ending a Call
- Press to end the call.
Answering a Call
When an incoming call is detected, the phone rings and the LED indicator flashes green.
1.Open your phone.
- Press to answer the call.
or
Press any key except . [Reject], and when the “Any Key Answer” function is enabled. Set the Any Key Answer function in the profile in each mode. (p. 68)
Tip
- When the hands free kit is connected to the phone, you can answer calls by pressing the Side keys (up or down).
- If you have subscribed to the Calling Line Identification (CLI) service and the caller's network sends the number, the caller's number will appear on the screen. If the caller's name and number are stored in the Phonebook, the caller's name will appear on the screen.
- If the number is a restricted number, the display shows “Withheld”.
- When receiving a call from the person whose picture is registered in the Phonebook, receiving display and the picture are displayed alternately.
Rejecting an Incoming Call
You can reject a call you do not wish to answer.
- Press or [Reject] or press and hold the Side keys (up or down) whilst the phone is ringing.
Incall Menus
Your phone has additional functions available whilst a call is in progress.
Adjusting the Earpiece Volume
You can adjust the earpiece volume during a call.
-
During a call, press ◀.
-
Press to increase the earpiece volume or press to decrease the earpiece volume.
Each press of or adjusts the earpiece volume by one of 5 levels.
- Press [OK].
Tip
- You can also adjust the earpiece volume using the Side keys (Volume up key or Volume down key) during a call.
Putting a Call on Hold
This function allows you to manage two calls at the same time. If you wish to make another call whilst you are talking to someone, you can put the current call on hold to call someone else.
To make another call during a call
-
During a call, press [Options] to display the Options Menu.
-
Select "Hold", then press.
The current call is put on hold.
To retrieve a call, press [Options] and select "Retrieve", then press .
3.Enter the phone number you wish to make another call to, then press .
Tip
- You can also make another call by entering the phone number during a call instead of steps 1 and 2. The current call is automatically put on hold.
Call Waiting
This service notifies you of another incoming call whilst you have a call in progress.
-
During a call, press [Answer] to answer the second call. The first call is put on hold and you can now talk to the second caller.
-
Press [Options] and select "Swap" to switch between the two calls.
-
Press [Options] and select "End Call", then press to end the current call and return to the held call.
Note
- You need to set "Call Waiting" to "On" if you use Call Waiting service (p. 89).
- Call Waiting service may not be available on all networks. Contact your network operator for more information.
- If you do not wish to answer the second call, press [Reject] in step 1. The call log of the second call will be saved as a missed call.
Conference Call
Conference call is a call with more than 2 participants. You may include up to 5 participants in a conference call.
Making a Conference Call
To make a conference call, you must have one active call and one held call.
-
Press [Options] to display the Options Menu.
-
Press o to select "Multiparty", then press
-
Press or to select "Join All", then press to join the conference call.
-
Press to end the conference call.
Note
- Conference call service may not be available on all networks. Contact your network operator for more information.
Adding New Participants to the Conference Call
-
Press [Options] to display the Options Menu.
-
Press or to select "Dial", then press.
3.Enter the number you wish to include in the conference call.
-
Press to dial.
-
Press [Options] to display the Options Menu.
-
Press on to select "Multiparty", then press
-
Press or to select "Join All", then press to join the conference call. If you wish to add other participants, repeat steps to 7.
To End the Call with a Conference Call Participant
-
During a conference call, select the person who you wish to disconnect the call by pressing or.
-
Press [Options] to display the Options Menu.
-
Press or to select "End Call", then press
To Have a Private Conversation with one of the participants
If you wish to have a private conversation with one of the participants, you may select the participant from the conference list and put the other participants on hold.
-
During the conference call, select the person that you wish to talk to by pressing ☑ or .
-
Press [Options] to display the Options Menu.
-
Press or to select "Multiparty", then press
-
Press or to select "Private", then press.
5.Once you have finished the private conversation, press [Options] and select "Multiparty", then press
- Press or to select "Join All", then press to return to the conference call.
Muting the Microphone
- During a call, press [Mute] to mute the microphone. To unmute the microphone, press [Unmute].
Phonebook
You can store the phone numbers and E-mail addresses of your friends, family and colleagues in the Phonebook.
Group name (p. 26)
You can classify the phone numbers and names stored in the Phonebook, such as "Family" and "Business".
Entering Characters
When entering characters to create Phonebook entries, SMS or MMS, etc., press the corresponding keys.
Table of Characters
Pressing each key scrolls characters in the following order.
Note
- Depending on the type of the data entry screen, usable characters are limited.
Normal Mode
| Key | Upper Case Characters | Lower Case Characters | Numeric |
| 1 | .(full-stop) , (comma) - (hyphen) ? !;(apostrophe) @ _ ( ) / ” : 1 | 1 | |
| 2 | ABC2ÃÃÃÃÃÃÃÃ€Ç abc2ãáaáãããæç 2 | ||
| 3 | DEF3ÉÊÊE def3éêèë 3 | ||
| 4 | GHI4ÎÎÎÎ | ghi4ÎÎÎÎ | 4 |
| Key | Upper Case Characters | Lower Case Characters | Numeric |
| 5JKL | JKL5 jkl5 5 | ||
| 6MNO | MNO6OÓÓÓÓÓÓÑ | mno6óóóóóóñ | 6 |
| 7XPS | PQRS7 pqrs7ß 7 | ||
| 8TUV | TUV8ÚÜÚÚÚ | tuv8úüüù | 8 |
| 9RED | WXYZ9ÝP | wxyz9ýp | 9 |
| 0.. | (space)+ = <> € £ ¥ % &0 | 0 | |
| *+0 | *+P? | ||
| # | .,?!:; -+#×@’“()_&€£%/”<->§= ¥¿i^[ ]{}xx∆ΦΓΛΩΠΨΣθ≡4 (space) | ||
1 - 9 Press and hold to enter 0 - 9 numbers.

^*+0 : Press and hold to shift to Sentence mode, Capital letter, Small letter, Numeric.
: Press and hold to shift between Normal and T9 mode.
Note
- When you send an SMS with Optimisation set "On" in SMS Settings, characters with an accent will be sent as characters with no accent. For details, see "Optimisation" on page 115.
Changing the Input Mode
To change the input mode, press for approximately 2 seconds.
T9 Text Input
T9 text input method is a shortcut to enter text easily and quickly.
-
Press and hold until "T9" is displayed.
-
Press each key once for any letter you require on that key.
To enter the word "How", press 4 _GHI 6 ^MNO 9 ^MNT2
-
Press or until the correct word is shown if the character combination, that was initially displayed, is not correct.
-
Press to select the word.
Note
- If the correct word is not shown in step 3, enter the correct word again after switching to the normal input mode.
Tip
- If you press instead of step 4, a space is inserted next to the selected word.
Symbols and Punctuation
To enter symbols or punctuation, press .#
Using Text Template
You can use the sentences registered in My Text Templates when entering characters.
For details on creating the text template, see “Adding Phrases to My Text Templates” on page 46.
-
Press [Options] to display the Options Menu.
-
Press or to select "Insert Template", then press ○.
-
Select a desired text template by pressing ⬆, then press ⬇
The selected text template will be inserted.
Creating a New Entry
You can choose either the phone (up to 500) or SIM card memory locations to store the new entry.
The amount of phone numbers that you can store to the SIM card is dependant on its capacity. Contact your network operator for SIM details.
Phonebook Memories
Select the location for storing the Phonebook memory before storing a new entry.
-
Press to display the Phonebook menu.
-
Press or to select "Settings", then press.
-
Press or to select "Save Nos. to", then press
- Select "SIM Card" to store the entry on the SIM memory or "Phone Memory" by pressing 🙏, then press ⬇ When selecting "Choice", you can choose SIM card or phone memory every time you store a new Phonebook entry.
Storing Names and Numbers
- Press to display the Phonebook menu.
- Press or to select "Add New Name", then press ○.
- If you select "Choice" in step 4 in "Phonebook Memories" on page 25;
Select "SIM Card" or "Phone Memory" by pressing ▲ or ▼ then press . The name entry prompt appears.
4.Enter a name, then press. For details on entering characters, see "Entering Characters" on page 24. The phone number prompt appears. -
Enter the phone number, then press. Up to 40 digits can be entered.
-
Select a desired number type by pressing or, then press
- Press [Save].
You can divide the phone numbers of the Phonebook into groups. You can also register E-mail address, personal data, and picture/image data. (See "Storing Optional Data" for details.)
Storing Optional Data
You can store optional data after entering a phone number. (See “Storing Names and Numbers” for details.)
Note
- E-mail address, personal data, and picture/image data cannot be stored on the SIM card.
Selecting Group Name
- Press or to highlight the right side of “.” then press.
- Select a desired group name by pressing or, then press
You can set to display the available group names when you store/edit the Phonebook, see "View Groups" on page 29.
Entering E-mail Address
-
Press or to highlight the right side of “”, then press.
-
Enter the E-mail address, then press . Up to 60 characters can be entered.
Entering Personal Data
- Press or to highlight the right side of “”. then press .
6.Enter the personal data, then . ☐ Up to 60 characters can be entered.
Storing Picture/Image Data
You may store a picture/image for use with the Phonebook.
When you receive a call from a person with a Phonebook entry which also has a linked picture/image, when the person calls, the linked picture/image will be displayed.
-
Press or to highlight the right side of “”, then press.
-
Select the desired picture/image, then press . The selected picture/image will appear on the screen.
-
Specify the range for displaying the picture/image by pressing ▼ or , then
- Press [Save].
press
Note
- The stored picture/image is automatically saved under the “in Phonebook” section of the Saved Pictures. - The picture/image cannot be deleted in the Saved Pictures. Remove the picture/image data from the Phonebook.
Adding the Phone Number from the Call Log Entries
-
Display the call log entry you wish to store (p. 77).
-
Press
-
Press or to select "Save to Phonebook", then press ○.
-
Follow the procedure from step 3 in “Storing Names and Numbers” on page 26.
Storing after Inputting a Phone Number
- Enter the phone number, then press [Save].
- Follow the procedure from steps 3 to 7 in "Storing Names and Numbers" on page 26.
Finding a Name and Number
Two methods of searching through the Phonebook are available:
Search by Name
-
Press to display the Phonebook menu.
-
Select "View Names", then press .
-
Enter a name or the first character(s) of the name. Matched results will be displayed alphabetically. If there is no entry in the Phonebook that satisfies the exact search criteria, the name that provides the closest alphabetical match will be displayed.
-
Scroll through list by pressing or to select the desired name, then press [Select]. The detailed screen of the Phonebook appears.
5.Press
- Press or to select the desired phone number, then press to dial.
Tip
- If you press and select "Search" after step 2, you can also search the name and number.
- You can also dial the desired phone number by pressing the digit key corresponding to the list number instead of step 6.
Search in Alphabetical Order
-
Press or whilst in stand-by to open the Phonebook.
-
Scroll the list by pressing or to find the desired name.
-
If you wish to do a name search, perform steps 3 and 4 in "Search by Name".
Editing Phonebook Entries
You can edit Phonebook entries.
-
Search for the desired Phonebook entry. For details on searching through Phonebook entries, see “Finding a Name and Number”.
-
Press
-
Press or to select "Edit", then press.
-
Select an entry you wish to change by pressing or then press [Edit].
5.Edit entry as required.
6.Press

If you wish to edit another item, repeat steps 4 to 6.
- Press [Save] to save the change(s).
Deleting Phonebook Entries
- Search for the desired Phonebook entries.
For details on searching through Phonebook entries, see “Finding a Name and Number” on page 28.
- Press

- Press or to select "Delete", then press.

- Select "Yes", then press.
The selected entry will be deleted.
To cancel deletion, select "No" at step 4, then press
Checking Your Own Numbers
You can check and edit your own voice, data and fax phone numbers in the Phonebook.
-
Press to display the Phonebook menu.
-
Press or to select "Own Numbers", then press
-
Press or to select the phone number you wish to check from either "Voice", "Data" or "Fax", then press
Note
- "Data" or "Fax" may not be displayed depending on SIM card.
Editing Your Phone Numbers
-
Perform steps 1 to 3 in "Checking Your Own Numbers".
-
Press

-
Press [Clear] to erase the phone number and enter a new phone number.
-
Press to save the phone number.
View Groups
You can set the available group names when you store/edit the Phonebook.
-
Press to display the Phonebook menu.
-
Press or to select "Settings", then press.
-
Select "View Groups", then press .
-
Select a desired group name by pressing . " indicates that the group has been selected. To cancel the selected group, press again. The checkbox becomes blank again.
Memory Status
This function helps you to check the number of entries stored in the Phonebook.
- Press to display the Phonebook menu.
- Press or to select "Settings", then press.
- Press or to select "Memory Status", then press ○.
You can check the following memory status.
“SIM Card : xxx/xxx”
"Speed Dial : xx/xx"
"Phone : xxx/500"
Note
- The number of locations available on the SIM is dependant on its capacity.
Speed Dial List
You can set a maximum of 9 phone numbers to the Speed Dial List.
Use the phonebook entries on the SIM card.
Adding Phonebook entries to the Speed Dial List
- Search for the desired Phonebook entries. For details on searching through Phonebook entries, see steps 1 to 4 in “Search by Name” on page 28.
- Press or to select the phone number.
- Press
- Press or to select "Add to Speed", then press
- Select the number you wish to add by pressing or then press.
Viewing the Speed Dial List
- Press to display the Phonebook menu.
- Press or to select "Settings", then press.
- Press or to select "Speed Dial List", then press ○.
The stored names and phone numbers in the selected entry are displayed in order.
Sending Messages
- Search for the desired Phonebook entries.
For details on searching through Phonebook entries, see steps 1 to 4 in "Search by Name" on page 28.
- Press or to highlight the right side of

- Press or to select "Send Message", then
press
If you highlight the right side of “” or
“ ” in step 2:
- Press or to select "MMS" or "SMS", then
press ○.
5.Enter your message.
For details on creating a message, see “Creating a New MMS” on page 107 or “Creating a New SMS” on page 115.
31 Phonebook
Using the Menu
Using the Main Menu
- Press during stand-by mode.
- Press or to navigate to required location.
- Press or to access function.
To Select Another Item within the Main Menu To return to the previous screen after selecting a function from the Main Menu or Sub Menu, press Every time you press, the screen goes back one by one.
Operation Guidance
Your phone uses softkeys to help you to navigate the phone ( and ). These keys change usage depending on the situation. The function of each softkey at any given time is highlighted at the bottom left and bottom right of the screen.
Shortcut Keys
When pressing several key combinations during standby mode, you can shortcut to the specified menus.
To access the desired menu directly, press and digit keys for the menu's corresponding number during stand-by mode. See the following table as reference.
Example: To access "Language" Sub Menu using shortcut keys
Press


Note
- The shortcut keys work for the first three menu levels only.
Side Keys
The Side keys (up or down) function the same as pressing ▲ or .
List of Menu Functions
| Menu No./Main Menu | Menu No./Sub Menu1 |
| 1 Camera | |
| 2 My Phone | 1 My Java^TM Games2 My Pictures3 My Sounds4 My Bookmarks5 My Text Templates6 Memory Status |
| 3 Fun & Games | 1 Java^TM Games2 Other Games3 Melody Editor4 Tone Editor |
| 4 Profiles | 1 Normal2 Meeting3 Activity4 Car5 Silent |
| 5 Organiser | 1 Calculator2 Calendar3 Clock & Alarm4 Voice Memo5 Help List |
| 6 Call Manager | 1 Phonebook2 Call Register3 Diverts |
| Menu No./Main Menu | Menu No./Sub Menu1 |
| 7 Settings | 1 Phone Settings2 Call Settings3 Network Settings4 Internet Settings5 Infrared6 Security7 Master Reset |
| 8 Vodafone live! | 1 Vodafone live!2 New3 Chat4 Games5 Find & Seek6 News7 Sport8 Shopping9 Search |
| 9 Info-Service * | |
| 0 Messages | 1 MMS2 SMS3 Cell Broadcast4 Cell Info5 Vodafone Messenger6 Vodafone Mail |
* Depends on the contents of SIM card.
Camera (M 1)
Your phone incorporates an integrated digital camera. This allows you to take and send pictures wherever you are.
Taking Pictures
Put the phone into the camera mode to take a picture. You can send the pictures registered in the Saved Pictures with your message.
- Press and hold for approximately 2 seconds whilst stand-by.
The phone switches to the camera mode. The camera view can be seen through the "on screen" viewer.
- Press or the Side keys (up or down) to take the picture.
The shutter sound occurs and a static image of the taken picture is displayed.
- Press [Save].
"Save to My Phone" is displayed, then the picture is registered.
If you want to send a picture by MMS after taking the picture, press in step 3.
The camera returns to step 1. Repeat process as desired.
- Press to return to stand-by.
Tip
- To leave Camera Mode without registering the taken picture after step 2 in “Taking Pictures”:
Press and select "Yes", then press
• To take a picture of yourself, press or the Side keys (up or down) whilst checking the image reflected on the mirror on the back of the phone. Place/Hold the phone at least 40 cm away from yourself.
Using the Zoom Function
Press [Zoom] to magnify the photographic subject. Press [Wide] to restore the original magnification.
Note
- When "Select Picture Size" is set to "Large", you cannot use the zoom function.
To select the picture size
-
Press [Options] before step 2 in "Taking Pictures" to display the Options Menu.
-
Press or to select "Select Picture Size", then press ○.
-
Select the picture size by pressing or, then press ○.
To select the mode
- Press [Options] before step 2 in "Taking Pictures" on page 34 to display the Options Menu.
- Press or to select "Select Mode", then press
- Select the mode by pressing or, then press
Note
- Vertical stripes may be reflected to a picture by light source. Change the mode in this case.
Retaking Pictures
After steps 1 and 2 in "Taking Pictures" on page 34, press [Back].
Further shooting is available.
Note
- The Digital Camera Uses a C-MOS Sensor. Although this camera has been manufactured to the highest specification, some pictures may still appear too bright or too dark.
- If the phone has been left in a warm place for a long time before taking or registering a picture, the picture quality may be poor.
In the Case of No Available Memory
When the number of pictures that can be taken becomes 5 or less, or when the remaining capacity becomes 27.5 Kbytes (when “Medium” is selected as the picture size) or less, “” will appear on screen. The screen returns to step 2 in “Taking Pictures” on page 34. The number of pictures that can be taken is displayed in the upper left of the screen. (The number of pictures that can be taken is approximate.)
When you run out of picture capacity, see "Deleting Pictures/Images" on page 42 and erase unneeded pictures.
Meanings of Indicators in Camera Mode
Delay timer indicator (p. 36)
: Whilst the timer setting is on. Picture brightness indicators (p. 36)
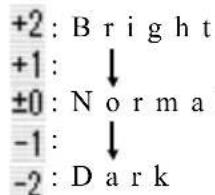
Picture size indicators (p. 34)

Mode indicator (p. 35)
1: Mode 1 2: Mode 2
Making Adjustments According to Lighting Conditions
Adjusting the Brightness of the Picture
Adjust the brightness of the picture by pressing


Once the phone has returned to the stand-by screen the brightness settings return to default.
Viewing the Taken Pictures
The taken pictures can be viewed in the Saved Pictures.
-
In camera mode, press [Options]. The Options Menu is displayed.
-
Select "Existing Pictures", then press. The list of Saved Pictures is displayed.
-
Select the file name you wish to view by pressing ▲ or ▼ then press .
The selected picture is displayed.
- Once you have finished, press [Back] to return to the list.
Tip
- Your pictures are given file names which show the time and date when the picture was taken. Example: The file name “13-05-03_12-34-56” is displayed for the picture taken at 12:34:56 of 13th May 2003. The file names of your pictures can be changed (p. 41).
Using the Timer
Taking a Picture with the Timer
-
In camera mode, press [Options]. The Options Menu is displayed.
-
Press or to select "Delay Timer", then press
-
Press or to select "On", then press. " " appears on the screen and the phone returns to camera mode.
-
Press to take the picture. Delay timer begins.
10 seconds after the timer sound occurs, the camera takes a picture, and sounds a tone.
Note
- Whilst the delay timer is operating, the LED indicator and the icon flash.
- If is pressed whilst the delay timer is operating, the picture is taken instantly.
- If there is an incoming call or alarm functioning, or is pressed, whilst the delay timer is operating, the camera operation is cancelled. In this case, the timer setting is cancelled.
- The zooming function with [Zoom] / [Wide], or the adjustment of brightness of the picture with ▼, is unavailable whilst the delay timer is operating.
Cancelling the Delay Timer
-
Press [Options] whilst the delay timer setting is on. The Options Menu is displayed.
-
Press or to select "Delay Timer", then press
-
Press or to select "Off", then press. "☐" go e s o f f.
Sending Pictures
See "Sending Messages" on page 42 for instructions.
Deleting Pictures
See “Deleting Pictures/Images” on page 42 for instructions.
My Phone
My Phone contains several types of picture/image and sound data along with Java ^TM applications which can be controlled collectively. Also included in My Phone are frequently used text message phrases and accessed WAP pages (addresses) which you can use and edit.
Java™
Using Java™ Applications
Various kinds of Vodafone specific Java ^TM applications can be used in this phone.
To use Java ^TM applications, download the Java ^TM applications via the mobile Internet.
Some Java ^TM applications offer the ability to connect to a network either within a game or network based application.
Note
- Java ^TM applications may be both localised (no connectivity) and network based (using the mobile Internet to update information/play games). The network may charge you more for using network-based applications. Please contact your service provider for more information.
Downloading Java™ Applications
Confirmation screen
Before downloading the Java ^TM application you will be asked to confirm what you are about to receive.
After checking the information on the confirmation screen, the Java ^TM application can be downloaded.
Note
- User authentication might be required before downloading the application on some information screens.
Download
-
Press to display the Main Menu.
-
Press or to select "My Phone", then press
-
Select "My Java ^TM Games", then press ☐
-
Press or to select "Download More", then press ○.
The Java ^TM application download site is displayed.
- Select the Java TM application you wish to download.
After a WAP browser is displayed variously, the confirmation screen will appear after a whilst.
-
Press [Get]. Downloading starts
-
Press [OK] even if it carries out complete.
My Java™ Games (M 2-1)
Along with the preloaded Java ^TM application, downloaded applications are stored in the Saved Games.
Your phone has one preloaded Java ^TM application.
Note
- The phone can store approximately 700Kbytes of information across the Saved Games, Saved Pictures and Saved Sounds. The Saved Games can store up to 50 applications.
Executing Java™ Applications
- Press to display the Main Menu.
- Press on to select "My Phone", then press
- Select "My Java™ Games", then press
-
Select "Saved Games", then press. The list of Saved Games is displayed. The downloaded Java™ applications are sequentially displayed from the latest one.
-
Select the title of the Java ^TM application you wish to execute by pressing ☐ or , then press . The selected Java ^TM application is executed. When using network connection type Java ^TM applications, connection to the network can be selected.
To end the Java ^TM application
- Press

- Press or to select "End", then press. The screen returns to stand-by screen.

To suspend the Java ^TM application
- Press

- Press or to select "Suspend", then press. To resume the Java™ application, press during stand-by screen and select "Resume", then press
Checking the Information of the Java™ Application
- Perform steps 1 to 4 in "Executing Java™ Applications".
-
Select the Java™ application you wish to check, then press [Options]. The Options Menu is displayed.
-
Select "File Information", then press . The detailed information screen is displayed.
- Press or to scroll through the screen.
- When you have finished, press [Back] twice. The screen returns to the Saved Games.
Deleting Java™ Applications
- Perform steps 1 to 4 in "Executing Java™ Applications" on page 39.
- Select the Java ^TM application you wish to delete, then press [Options]. The Options Menu is displayed.
- Press or to select "Delete", then press.
- Select "Yes", then press. The selected application is deleted. To cancel deletion, select "No" at step 4, then press .
Note
- You cannot delete preloaded Java ^TM applications.
My Pictures (M 2-2)
Pictures that are taken by a digital camera or images that are downloaded from mobile Internet sites can be managed.
TEL: This is the folder where the pictures/images registered in the Phonebook are saved.
P: Images in PNG format
J: Pictures/Images in JPEG format
E: e-Animation file (NEVA)
G: Images in GIF format
B: Images in BMP format
B: Images in WBMP format
WP: Images in WPNG format
The date and time when the photo was taken is displayed as a file name for the picture.
Downloading Picture/Image File
- Press to display the Main Menu.
- Press or to select "My Phone", then press
- Select "My Pictures", then press.
- Select "Download More", then press . The picture/image file download site is displayed.

Viewing Pictures/Images
-
Press to display the Main Menu.
-
Press or to select "My Phone", then press
。
-
Select "My Pictures", then press.
-
Select "Saved Pictures", then press .
The list of Saved Pictures is displayed.
- Select the file name you wish to view by pressing
[NO TEXT]
or then press
C
The selected picture/image is displayed.
6.Once you have confirmed the picture/image, press
[NO TEXT]
[Back] to return to the Saved Pictures.
Checking the Picture/Image Data
Select the desired data in step 5 in "Viewing Pictures/Images", then select "File Information" after pressing
θ
[Options] to display the Options Menu.
The file type and size of the selected picture/image are displayed. Whether the picture/image can be copied, forwarded, or saved is also displayed.
To return to the Saved Pictures, press [Back] twice.
Changing the File Name
-
Perform steps 1 to 4 in "Viewing Pictures/Images".
-
Select the file name you wish to change by pressing
△
or , then press
[Options].
The Options Menu is displayed.
- Select "Rename", then press .
4.Enter a new file name.
To correct the last character, press [Clear] briefly.
Press and hold [Clear] to clear all characters.
- Press
O
Note
- Following characters cannot be used for a file name: \, :, *, ?, ", <, > and . (full-stop).
Adjusting the Size of the Picture/Image
The pictures/images that are registered in the Saved Pictures can be adjusted for use as a wallpaper during stand-by or as an incoming call display.
When the picture/image size is modified, the data size is updated.
-
Perform steps 1 to 4 in "Viewing Pictures/Images".
-
Select the file name you wish to adjust by pressing ▲ or ▼ then press [Options]. The Options Menu is displayed.
-
Press or to select "Adjust Size", then press.
-
Select the picture/image size you wish to change by pressing or, then press.
-
Specify the range for displaying the picture/image by pressing ▼, ◀, ▶ or then
-
Press To cancel registration, press [Back] at any time before step 6.
Note
- "Adjust Size" may not be available depending on the picture/image original and copyright issued.
Sending Messages
-
Perform steps 1 to 4 in "Viewing Pictures/Images" on page 41.
-
Select the file name you wish to send by pressing ▲ or , then press [Options]. The Options Menu is displayed.
-
Press or to select "Send Message", then press ○.
-
Enter your message. For details on creating a message, see “Creating a New MMS” on page 107.
Note
- Pictures/images with a red icon cannot be sent attached to a message.
Deleting Pictures/Images
press 1. Perform steps 1 to 4 in "Viewing Pictures/Images" on page 41.
-
Select the file name you wish to delete by pressing ▲ or ▼ then press [Options]. The Options Menu is displayed.
-
Press or to select "Delete", then press.
-
Select "Yes", then press. The selected picture/image is deleted. To cancel deletion, select "No" at step 4, then press .
My Sounds (M 2-3)
The ring tones instead created by Melody Editor and the WAVE data recorded by Voice Memo are managed in the Saved Sounds. Default ring tones are not contained.
S: Sound file in SMAF format
S: Original ring tone (composed in Melody Editor)
M: Sound file in Standard MIDI format
IM: Sound file in i Melody format
w: Sound file in WAVE format
Note
- SMAF (Synthetic music Mobile Application Format) is a format of music data for mobile phones.
Downloading Sound Files
- Press to display the Main Menu.
- Press or to select "My Phone", then press
- Select "My Sounds", then press.
- Select "Download More", then press . The sound file downloaded site is displayed.
Playing Back Sounds
- Press to display the Main Menu.
- Press or to select "My Phone", then press
- Select "My Sounds", then press.
- Select "Saved Sounds", then press . The Saved Sounds is displayed.
- Select the sound you wish to play back by pressing or then press. The selected sound is played. To stop playing, press [Stop].
Checking the Sound Data
Select the desired sound as in step 5 in "Playing Back Sounds", then select "File Information" after pressing [Options].
The file type and size of the selected sound are displayed. Whether the sound can be copied, forwarded or saved is also displayed.
To return to the Saved Sounds, press [Back] twice.
Changing the File Name
-
Perform steps 1 to 4 in "Playing Back Sounds" on page 43.
-
Select the file name you wish to change by pressing ▲ or , then press [Options]. The Options Menu is displayed.
-
Select "Rename", then press .
-
Enter a new file name. To delete the last character, press [Clear] briefly. Press and hold [Clear] to clear all characters.
-
Press

Note
- Following characters cannot be used for a file name: \, :, *, ?, ", <, > and . (full-stop).
Tip
- When "Data Edit" is displayed in the menu in step 2, you are able to edit the sound (p. 57). Once you have completed editing the newly saved file overwrites the old file. This new file then becomes the original ring tone.
Setting the Tone and Strength
-
Perform steps 1 to 4 in "Playing Back Sounds" on page 43.
-
Select the file name you wish to edit by pressing or , then press [Options]. The Options Menu is displayed.
-
Press or to select "Tone Set" or "Strength Set", then press For full details, see pages 55 to 57.
Note
- If "Tone Set" and "Strength Set" are not displayed in the menu in step 2, you cannot change the settings.
Sending Messages
-
Perform steps 1 to 4 in "Playing Back Sounds" on page 43.
-
Select the file name you wish to send by pressing ▲ or ▼ then press [Options]. The Options Menu is displayed.
-
Press or to select "Send Message", then press ○.
If you select your original ring tone in step 2;
- Press or to select the file format "SMAF", "MIDI" or "i Melody", then press
5.Enter your message.
For details on creating a message, see "Creating a New MMS" on page 107.
Note
- Sounds with a red icon cannot be sent attached to a message.
- Only the first part of the data will be converted if you select "i Melody" in step 4.
Deleting Sounds
- Perform steps 1 to 4 in "Playing Back Sounds" on page 43.
- Select the file name you wish to delete by pressing ▲ or ▼ then press [Options].
The Options Menu is displayed.
- Press or to select "Delete", then press.
- Select "Yes", then press. The selected sound has been deleted. To cancel deletion, select "No" at step 4, then press .
My Bookmarks (M 2-4)
You can store desired (or frequently used) pages (addresses) in My Bookmarks. It can save your time in accessing WAP pages sites.
Adding a Bookmark
- Press to display the Main Menu.
- Press or to select "My Phone", then press
- Press or to select "My Bookmarks", then press 0. The list of My Bookmarks is displayed.
- Press [Options] to display the Options Menu. When you add a bookmark for the first time, press [Add] instead, then skip to step 6.
- Press or to select "Add", then press.
6.Enter the bookmark title, then press.
7.Enter the URL address, then press.
Accessing Bookmarked Pages
- Perform steps 1 to 3 in "Adding a Bookmark".
- Select a bookmarked page you wish to access by pressing or, then press.
Editing Bookmarks
-
Perform steps 1 to 3 in "Adding a Bookmark" on page 45.
-
Select the desired bookmark to edit by pressing or, then press [Options]. The Options Menu is displayed.
-
Press or to select "Edit", then press.
-
Edit the bookmark title. For details on entering characters, see “Entering Characters” on page 24.
-
Press
-
Edit the URL address.
-
Press
Deleting Bookmarks
-
Perform steps 1 to 3 in "Adding a Bookmark" on page 45.
-
Select the desired bookmark to delete by pressing ▲ or ▼ then press [Options]. The Options Menu is displayed.
-
Press or to select "Delete", then press.
-
Press or to select "Yes", then press. The selected bookmark has been deleted. To cancel deletion, select "No" at step 4, then press
My Text Templates (M 2-5)
You can register up to 20 text templates for use in SMS and MMS.
You can input messages or others more easily by registering frequently used text.
128 characters may be registered in any text template.
Adding Phrases to My Text Templates
-
Press to display the Main Menu.
-
Press or to select "My Phone", then press
-
Press or to select "My Text Templates", then press The list of My Text Templates is displayed.
-
Select the number you wish to register by pressing ▲ or ▼ then press .
-
Enter the text, then press. For details on entering characters, see “Entering Characters” on page 24.
Editing Text Templates
-
Perform steps 1 to 3 in "Adding Phrases to My Text Templates".
-
Select the number you wish to edit by pressing or then press.
-
Press or to select "Edit", then press.
-
Enter new text. To correct the last character, press [Clear] briefly. Press and hold [Clear] to clear all characters.
5.Press
Viewing Text Templates
- Perform steps 1 to 3 in "Adding Phrases to My Text Templates" on page 46.
- Select the number you wish to view by pressing or , then press .
- Press or to select "Confirm", then press. The selected text template is displayed.
- After confirmation, press [Back] to return to template list.
Deleting Text Templates
- Perform steps 1 to 3 in “Adding Phrases to My Text Templates” on page 46.
- Select the text template you wish to delete by pressing 🔍 or , then Ⓧ press
-
Press or to select "Delete", then press.
-
Select "Yes", then press. The selected text template is deleted. To cancel deletion, select "No" at step 4, then press .
Memory Status (M 2-6)
This function helps you to check the memory status of the Galleries.
- Press to display the Main Menu.
- Press or to select "My Phone", then press
- Press or to select "Memory Status", then press ○.
Fun & Games
Java™ Games
Settings (M 3-1-2)
Operation Priority
You can set the method of incoming phone calls and alarm whilst a Java ^TM application is operated.
-
Press to display the Main Menu.
-
Press or to select "Fun & Games", then press ○.
-
Select "Java ^TM Games", then press
-
Press or to select "Settings", then press.
-
Select "Operation Priority", then press
-
Select the option you wish to set by pressing ▼, then press ○
The options available are:
- "Incoming Call"
• “ Alarm ”
- Press or to select methods, then press.
• “ Priority ”:
The Java ^TM application is suspended automatically, and you can receive the call or the alarm will sound. After finishing the call or alarm, the suspend icon () is displayed to let you know there is a suspended Java ^TM application.
- "Notice":
The marquee (character scrolls) is displayed on the first line on the screen whilst the Java ^TM application continues. If you press the Java ^TM application is suspended, and you can receive the call. After finishing the call, the suspend icon (i) is displayed and you will know there is a suspended Java ^TM application.
Volume
You can set the sound volume of the Java ^TM application such as sound effect to one of the five levels or silent. When “Ringer Volume” (p. 64) is set to “Silent”, the set up has a priority.
-
Perform steps 1 to 4 in "Operation Priority".
-
Press or to select "Sound Volume", then press
The current volume level is displayed.
- Press to increase the volume or press to decrease the volume and then press
Backlight
You can select the method of backlight during the operation of the Java ^TM application from the following three types:
- “On”: Lit whilst the Java TM application is operated.
- “Off”: Unlit whilst the Java application is operated even if a key is pressed.
- “Normal Settings”: Works with the main backlight setting. (p. 85)
-
Perform steps 1 to 4 in "Operation Priority" on page 48.
-
Press or to select "Backlight", then press
-
Select "On/Off", then press.
-
Select "On", "Off" or "Normal Settings" by pressing ▲ or , then ○ press
To Set the Blinking Operation
You can set whether the blinking operation, which is embedded in Java ^TM application, is enabled.
-
Perform steps 1 and 2 in "Backlight".
-
Press or to select "Blink", then press.
-
Select "On" or "Off" by pressing or, then press ○.
Vibration
When vibrator is set in the Java ^TM application, you can choose whether the operation is enabled or disabled.
When a SMAF file is specified in the Java ^TM application, you can operate the vibrator set in the SMAF file.
Note
- SMAF (Synthetic music Mobile Application Format) is a format of music data for mobile phones.
-
Perform steps 1 to 4 in "Operation Priority" on page 48.
-
Press or to select "Vibration", then press
-
Press or to select "Enable", "Disable" or "Link to Sound", then press
When you set "Link to Sound", the Java ^TM application is synchronised with the vibrator.
Online Services
You can adjust the display settings of the confirmation screen when a Java ^TM application attempts to connect to the network.
- Perform steps 1 to 4 in "Operation Priority" on page 48.
- Press or to select "Online Services", then press ○.
- Press or to select "Yes", then press. To cancel confirmation, select "No", then press .
Java ^TM Reset
To reset all settings in a Java ^TM application
- Perform steps 1 to 4 in "Operation Priority" on page 48.
- Press or to select "Java TM Reset", then press
- Enter your handset code, then press. If you enter a wrong handset code, the screen will return to step 4 in "Operation Priority" on page 48.
-
Select "Settings Reset", then press .
-
Press or to select "Yes", then press. All settings in a Java™ application will be reset To cancel resetting, select "No", then press.
To clear all Java ^TM applications
All Java ^TM applications stored in Saved Games are cleared. The preloaded Java ^TM application cannot be deleted.
- Perform steps 1 to 4 in "Operation Priority" on page 48.
- Press or to select "Java TM Reset", then press
- Enter your handset code, then press . ◯ If you enter a wrong handset code, the screen will return to step 4 in “Operation Priority” on page 48.
- Press or to select "All Clear", then press
- Press or to select "Yes", then press. All Java™ applications are cleared. To cancel clearing, select "No", then press.
Java ^TM Information (M 3-1-3)
The information about the license of Java ^TM can be displayed.
Download More (M 3-1-4)
See "Download" on page 38 for instructions.
Other Games (M 3-2)
Your phone comes complete with 3 games (PK Game, Collection Hunter, Air Hockey).
You can enjoy these 3 games soon after purchase. You can also enjoy various games by downloading Java™ application games provided in the Internet sites. (p. 38)
Starting Games
- Press to display the Main Menu.
- Press or to select "Fun & Games", then press ○.
- Press or to select "Other Games", then press The game list is displayed.
- Press or to select the desired game, then press ○.
- Select "New Game", then press.
- When you have finished playing, press .
Note
- If an incoming call is detected during gameplay, the game will be stopped.
Game Guide
-
Perform steps 1 to 4 in "Starting Games".
-
Press or to select "Guide", then press. Game instructions are displayed.
Collection Hunter (M 3-2-2)
Check of a collection and reset of a game can be performed in “Collection Hunter”.
To Check Collection
- Perform steps 1 to 3 in "Starting Games".
- Press or to select "Collection Hunter", then press .
- Press or to select "Collection View", then press
To Reset the Game - Perform steps 1 to 3 in "Starting Games".
- Press or to select "Collection Hunter", then press
- Select "Reset Game", then press.
- Press or to select "Yes", then press.
Air Hockey (M 3-2-3)
The level of the game can be chosen for "Air Hockey".
To Select a Game Level
- Perform steps 1 to 3 in "Starting Games" on page 51.
- Press or to select "Air Hockey", then press
- Press or to select "Level", then press.
- Press or to select the level, then press.
Setting up Game Options (M 3-2-4)
- Perform steps 1 to 3 in "Starting Games" on page 51.
- Press or to select "Game Settings", then press ○.
- Press or to select "Backlight" or "Enable Vibrate" to change the settings, then press
- Press or to select "On" or "Off", then press
- Press or to select "Sound Volume" to adjust the sound volume, then press
- Press to increase the sound volume or press to decrease the sound volume and then press
Note
- If you wish to mute the sound during gameplay, press
x_+0 . Press again to return the volume.
Melody Editor (M 3-3)
Use this to create an original ring tone, or to send a melody attached to an MMS.
You can input up to 190 tones × 16 chords, or 380 tones × 8 chords per melody.
The original ring tone is registered in the Saved Sounds.
Creating Your Original Ring Tone (M 3-3-1)
- Press to display the Main Menu.
- Press or to select "Fun & Games", then press
- Press or to select "Melody Editor", then press
- Select "Create New", then press .
-
Enter the title. Up to 24 characters can be entered. For details on entering characters, see “Entering Characters” on page 24.
6.Press -
Press or to select a tempo, then press.

The music tempo is described below.
- “Allegro (Fast)”: 150
• “Moderato (Normal)”: 125
• “Andante (Slow)”: 107
• “Adagio (Very Slow)”: 94
Tempo is defined by the number of crotchets ( ) played per minute.

-
Select "8 Chords" or "16 Chords" by pressing or then press.
-
Specify the musical scale and rest using the digit keys.
For details on specifying the sound level and rest, see “Specify the Musical Scale and Rest” on page 54.
- Specify the types of musical notes or rest using x_+0 or keys.
For details on specifying the musical notes and rest, "Specifying the Types of Notes and Rests" on page 54.
-
Press key after inputting one note. Input the next note after the cursor moves to the right.
-
Repeat steps 9 to 11 to input notes.
When you press during input, the melody that you have entered is played back.
When you press [Options] and select "Play before Cursor" whilst entering notes, the melody, that is displayed on the screen, is played back up to the cursor position.
When you press [Options] and select "Select Chord", you can select another chord. Repeat steps 9 to 11 to input notes for the new chord.
-
When you finish inputting, press ⏻ [Options] to display the Options Menu.
-
Select "Save", then press
-
Press or to select "Save to My Phone", then press ○.
The ring tone you have created is registered in the Saved Sounds.
Note
- If there is not enough capacity or memory in the Saved Sounds to store the new ring tone, the message "Maximum Capacity: 80 Not registered" or "Not registered. Memory Full" is displayed respectively. The screen then returns to that of step 15. Delete unnecessary data (p. 45), then save again.
Specify the Musical Scale and Rest
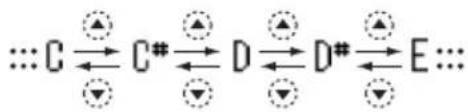
Using the key shown below, specify the musical scale and rest.
| Do | Re | Mi | Fa | Sol | La | Ti | Rest |
| 1.00 | 2ABC | 3DEF | 4OH | 5JL | 6MNO | 7POB | 0... |
When you press the key shown above once, a crotchet is specified in the middle scale (no mark).
When you press the same key repeatedly, the note will shift cycle through the available octave ranges.
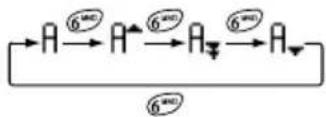
When you press or whilst a note is selected, the note will raise one semitone higher or lower.
When entering rest: Crotchet rest is entered.
chemical
Chemical reaction diagram showing C- to E with labeled arrows and circles indicating electron movementSpecifying the Types of Notes and Rests
Specify notes and rests by pressing repeatedly.

When you make a dotted note or triplet, press after selecting the target note.


Note
- You cannot make a dotted semiquaver (semiquaver rest) or a dotted semibreve (semibreve rest).
- Three continuous notes are required for triplet.
To specify a tie, press after selecting the target notes.
An underscore ( ) is displayed next to the note, and the note is tied with the next one.
To enter the next note, press and move the cursor to the right. Then, repeat the operation on the previous page.
If the cursor is positioned next to a note, you can repeat the note immediately left of the cursor when ☑ or ▼ is pressed.
Set the Tone
The phone can play notes using different instruments.
-
Perform steps 1 to 13 in "Creating Your Original Ring Tone" on page 52.
-
Press or to select "Tone Set", then press
-
Select a category of the tone by pressing or.
- Select a tone by pressing or, then press.
When “Play Current Chord” is selected, the melody entered is played back in the selected tone. When “Confirm Tones” is selected, the syllable names are played back in the selected tone.
- Select "OK", then press.
Now you can create a melody.
You can select from the following 128 tones.
| Category Tone Category Tone | |||
| Pianos | PianoBright PianoE. Grand PianoHonky-TonkElectric Piano 1Electric Piano 2HarpsichordClavi | Chimes | CelestaGlockenspielMusic BoxVibraphoneMarimbaXylophoneTubular BellsDulcimer |
| Organs | Drawbar Organ Perc. Organ Rock Organ Church Organ Reed Organ Accordion Harmonica Tango Accordion | Guitars | Nylon Guitar Steel Guitar Jazz Guitar Clean Guitar Muted Guitar Overdriven Gtr. Distortion Gtr. Gtr. Harmonics |
| Basses | Acoustic Bass Finger Bass Pick Bass Fretless Bass Slap Bass 1 Slap Bass 2 Synth Bass 1 Synth Bass 2 | Strings 1 | Violin Viola Cello Contrabass Tremolo Strings Pizz. Strings Harp Timpani |
| Strings 2 | Str. Ensemble 1 Str. Ensemble 2 Synth Strings 1 Synth Strings 2 Choir Aahs Voice Oohs Synth Voice Orchestra Hit | Brasses | Trumpet Trombone Tuba Muted Trumpet French Horn Brass Section Synth Brass 1 Synth Brass 2 |
| Category Tone Category Tone | |||
| Reeds | Soprano SaxAlto SaxTenor SaxBaritone SaxOboeEnglish HornBassoonClarinet | Flutes/Pipes | PiccoloFluteRecorderPan FluteBlown BottleShakuhachiWhistleOcarina |
| Synth Leads | Square LeadSawtooth LeadCalliope LeadChiff LeadCharang LeadVoice LeadFifth LeadBass & Lead | Synth Pads | New Age PadWarm PadPolysynth PadChoir PadBowed PadMetallic PadHalo PadSweep Pad |
| Synth Effects | RainSoundtrackCrystalAtmosphereBrightnessGoblinsEchoesScience Fiction | Ethnics | SitarBanjoShamisenKotoKalimbaBagpipeFiddleShanai |
| Category Tone Category Tone | |||
| Percussions | Tinkle BellAgogoSteel DrumsWoodblockTaiko DrumsMelodic TomSynth DrumReverse Cymbal | Effects | Gtr. Fret NoiseBreath NoiseSeashoreBird TweetTelephone RingHelicopterApplauseGunshot |
| Original | Original 1 (Piano)*Original 2 (Glockenspiel)*Original 3 (Reed Organ)*Original 4 (Nylon Guitar)*Original 5 (Violin)* | ||
* The default setting tone.
To create your original tone, see “Creating Your Original Tone” on page 61.
Setting the Strength of the Original Ring Tone
The strength of the original ring tone can be set in 3 levels for each melody.
When you purchase this phone, the strength of the original ring tone is set to “forte (Loud)”.
-
Perform steps 1 to 13 in “Creating Your Original Ring Tone” on page 52.
-
Press or to select "Strength Set", then press
-
Select a strength of the tone by pressing then press


When “Play Current Chord” is selected, the original ring tone entered is played back in the selected strength of the tone.
- Select "OK", then press.
Now you can create an original ring tone.
Deleting an Original Ring Tone
Perform steps 1 to 4 in “Deleting Sounds” on page 45.
Editing Original Ring Tones
- Perform steps 1 to 3 in “Creating Your Original Ring Tone” on page 52.
-
Press or to select "Existing Melodies", then press ○.
-
Press or to select an original ring tone you wish to edit, then press [Options]. The Options Menu is displayed.
-
Press or to select "Data Edit", then press
-
Edit the title and press .
-
Press or to select a tempo, then press.
-
Press or to select the number of chords, then press ○.
-
Select a note you wish to change by pressing or ▶, then edit notes.
When you add notes, enter the note correctly on the cursor.
To delete a note, press [Clear] briefly.
Press and hold [Clear] to clear all tones.
-
When you finish editing, press [Options] to display the Options Menu.
-
Select "Save", then press
-
Select "Save to My Phone", then press
-
Press or to select "Over Write", then press
The original ring tone is changed. If you select “New”, the melody before the correction is not modified. The original ring tone is registered as a new original ring tone.
Note
- When the number of chords is modified in step 7, the confirmation screen may be displayed. When you select "Yes", a section of the melody may be deleted.
- When you are going to add notes in step 8, you cannot add any notes if you have already entered 380 notes (for 8 chords melodies) or 190 notes (for 16 chords melodies).
Tip
- To delete the continuous melody, press [Options] and then press after selecting "DEL after Cursor" or "DEL before Cursor." You can delete the melody after the cursor or before the Cursor.
Copying and Pasting Notes
You can copy and move a part of a melody to another position.
Only original ring tones or editable melodies can be copied or moved.
-
Perform steps 1 to 7 in “Editing Original Ring Tones” on page 57.
-
Press [Options] to display the Options Menu.
-
Press or to select "Copy" or "Cut", then press ○.
-
Move the cursor to the first note to be copied or to be cut and press
-
Move the cursor to the last note to highlight the area and press
The highlighted area will be saved temporarily in the memory. If you select “Cut” in step 3, the highlighted area will be cut.
-
Press [Options] to display the Options Menu.
-
Press or to select "Paste", then press.
-
Move the cursor to the point you wish to paste the notes, then press
Saved notes are pasted.
Tone Editor (M 3-4)
You can make a tone and use it for the original ring tone.
Up to five types of tones can be registered respectively for 8 chords and 16 chords.
FM Sound Source
Various types of tones can be composed by combining the functions that generate one sine wave called an “Operator”. The combination of the operator is called an algorithm.
The operator acts as the modulator (modulating part) or the carrier (modulated part) depending on the algorithm.

flowchart
graph TD
    A["Feedback"] --> B["Operator1"]
    B -->|Modulate| C["Operator2"]
    C --> D["Various Tones"]
    B -->|Modulate| C
- In each operator, various parameters such as multiple or envelope can be set.
- By setting the feedback to the specified operator, wider tone ranges can be created.
Setting an Algorithm
Set the combination of the operator.
Select from 4 types of combinations in 8 chords, and 2 types in 16 chords.
| 8 Chords | |||
| Algorithm3 | Algorithm4 | Algorithm5 | Algorithm6 |

flowchart
graph LR
    A["1"] --> B["2"]
    B --> C["Algorithm1"]
    D["1"] --> E["2"]
    E --> F["Algorithm2"]
1 (Green number): The modulator (modulating part)
2 (White number): The carrier (modulated part)
Setting the Operator
The meaning and content of the parameter that can be set to the operator is described below.
| Parameter Meaning | ||||
| Multiple (13 levels) | When the value of the carrier is large, the sound becomes high. You can set various types of notes by changing the values of the modulator. | |||
| Envelope (Continuous/Decay) | This sets continuous same note or fade-out. | |||
| Sustain (On/Off) | This sets a note to be sustained after completing the note. If you want to have a note with reverberation, set this function on. | |||
| Key Scale Rate (2 levels) | Set the function to “2” if you want to a short note. | |||
| Key Scale Level (4 levels) | This function sets the rate of reducing the volume as a note becomes higher. | |||
| Total Level (64 levels) | In the carrier, the volume increases as the level increases.In the modulator, the melody becomes brighter as this level increases. The melody becomes softer as this level diminishes. | |||
| Attack Rate (15 levels) | This sets the time from the beginning of the sound to the maximum volume. | |||
| Decay Rate(16 levels) | This sets the time from the maximum volume to the volume of the sustain level. | |||
| Sustain Level(16 levels) | In sustaining note, this displays the volume of the sound that continues to produce. In fading-out note, this displays the volume when the note starts fading-out. | |||
| Release Rate(16 levels) | In sustaining note, this displays the sustaining time from note completion to no sound. In fading-out note, this displays the time from starting fade-out to no sound. | |||
| Wave Shape(8 types) | Select the basic wave type from eight types. | |||
| Type 1 | Type 2 | Type 3 | Type 4 | |
 |  |  |  | |
| Type 5 | Type 6 | Type 7 | Type 8 | |
 |  |  |  | |
| Vibrato(4 levels/Off) | Set the vibrato. If the vibrato is used, select from 4 levels. | |||
| Tremolo(4 levels/Off) | Set the tremolo. If the tremolo is used, select from 4 levels. | |||
| Feedback(8 levels) | Set the level of modulation in the modulator feedback for Operator 1. | |||
Set the Effect Frequency
Define the frequency of the vibrato or tremolo.
The frequency becomes faster as the figure increases.
Creating Your Original Tone
-
Press to display the Main Menu.
-
Press or to select "Fun & Games", then press ○.
-
Press or to select "Tone Editor", then press
-
Select "For 8 Chords" or "For 16 Chords" by pressing ☑, then press .
-
Select the number you wish to register and press
-
Press or to select "Rename", then press.
7.Enter the title.
Up to 16 characters can be entered.
For details on entering characters, see “Entering Characters” on page 24.
8.Press
-
Press or to select "Base Tone Set", then press ○.
-
Select a category of the tone by pressing


-
Select a base tone by pressing or, then press When “Confirm Tones” is selected, the syllable names are played back in the selected tone.
-
Select "OK", then press
-
Press or to select "Details Editor", then press ○.
-
Press or to select "Algorithm x", then press
-
Select an algorithm you wish to set by pressing or ▼, then press. If you do not wish to change the operator, skip to step 20.
-
Select an operator you wish to change by pressing ▲ or ▼ then press . The basic note parameter is set in advance.
-
Select a parameter you wish to change by pressing ▲ or ▼
-
Press or to change the content of the parameter. For details of parameter, see pages 60 to 61. When you press the syllable names are played back in the selected content of the parameter. Repeat steps 17 and 18 to change another content of the parameter.
-
Press or to select "Setup End", then press If you do not wish to change the effect frequency, skip to step 22.
-
Press or to select "Effect Frequency", then press ○.
-
Select the effect frequency you wish to set by pressing ▲ or , then ● press
-
Press or to select "Details End", then press
-
Press or to select "Save", then press. Your original tone is registered.
Profiles (M 4)
You can easily alter the phone tone (e.g. the ringer volume, keypad tones, etc.) according to your environment.
Tone sound and vibration set can be customized for each profile.
There are 5 profiles including one user definable profile:
- Normal
• Meeting - Activity
- Car
- Silent
Activating a Profile
- Press to display the Main Menu.
- Press or to select "Profiles", then press.
- Select the profile you wish to activate by pressing ▲ or ▼ then press .
- Press or to select "Activate", then press. The profile will now be activated.
Note
- When a profile is set, the icon which corresponds to the profile name appears in the stand-by screen:
Normal: Is the default setup. (not displayed in the stand-by screen)
Meeting: For use when discretion is needed.
Activity: For use in busy environments.
Car: For use in the car. (connected to a hands free kit)
Silent: For use when silence is needed.
All sounds are muted and you are alerted to calls with the vibrator.
Tip
- You can also activate a profile by pressing and holding for approximately 2 seconds instead of steps 1 and 2.
Customising Profiles
- Perform steps 1 and 2 in "Activating a Profile".
- Select the profile you wish to customise by pressing ▲ or , then press .
- Press or to select "Edit", then press.
-
Select the setting you wish to customise by pressing ▲ or , then press .
-
Change the setting you want. For details about settings, see pages 64 to 68.
Resetting Profile Settings
- Perform steps 1 and 2 in "Activating a Profile" on page 63.
- Select the profile you wish to reset by pressing or ▼, then press .
- Press or to select "Edit", then press.
- Press or to select "Set to Default", then press ○.
5.Enter your handset code, then press. - Press or to select "Yes", then press. To cancel the resetting, select "No", then press.
Note
- If you enter a wrong handset code in step 5, the screen returns to step 4.
Ringer Volume
You can adjust the ringer volume to one of 5 levels. When it is set to “Silent”, the volume of games and Java™ applications is muted.
- Perform steps 1 to 3 in "Customising Profiles" on page 63.
- Press of to select "Ringer Volume", then press. The current volume level is displayed.
- Press to increase the ringer volume or press to decrease the ringer volume and then press. To select "Step Tone", press at level 5. To select "Silent", press at level 1.
Ringer Type
You can select the ring tone from 30 tones including 5 patterns, 15 sound effects and 10 melodies. You can also select a sound in the Saved Sounds as the default ring tone excluding the WAVE format.
- Perform steps 1 to 3 in "Customising Profiles" on page 63.
-
Press or to select "Assign Melody", then press ○.
-
Press or to select "Preset Melody" or "My Sounds", followed by
-
Select the ring tone you wish to use by pressing or ▼.
If you wish to hear the demo, press [Play]. To stop playing, press [Stop].
- When selection is complete, press .
Vibration
When the vibrator option is set to on, the phone will vibrate for incoming calls regardless of the ringer volume and tone settings.
-
Perform steps 1 to 3 in "Customising Profiles" on page 63.
-
Press or to select "Vibration", then press
-
Press or to select "Enable", "Disable" or "Link to Sound", then press
Tip
- When "Link to Sound" is selected in step 3, melodies are synchronised with the vibrator for the ring tone. However, this function may not work depending on data.
- When you select "Enable" or "Link to Sound" in step 3, "appears on the stand-by screen.
Keypad Tones
When the keypad tone is set to on, you will hear a confirmation tone each time you press a numerical key.
-
Perform steps 1 to 3 in "Customising Profiles" on page 63.
-
Press or to select "Keypad Tones", then press ○.
-
Press or to select "On" or "Off", then press If you select "Off", the screen returns to step 1.
-
Set "Volume", then press.
-
Press to increase the volume or press to decrease the volume, then press
-
Press or to select "Melody", then press.
-
Press or to select either "Preset Melody", "My Sounds" or "Default Tone", then press
When you select "Preset Melody" or "My Sounds" in step 7:
- Select the keypad tone.
For details on selecting a ring tone, see "Ringer Type" on page 64.
-
Press or to select "Duration", then press
-
Set the duration by pressing or, then press
Warning Tone
This function enables your phone to emit the warning tone when an error occurs.
-
Perform steps 1 to 3 in "Customising Profiles" on page 63.
-
Press or to select "Warning Tone", then press ○.
-
Press on to select "On" or "Off", then press If you select "Off", the screen returns to step 1.
-
Select "Volume", then press .
-
Press to increase the volume or press to decrease the volume, then press
-
Press or to select "Melody", then press.
-
Press or to select "Preset Melody" or "My Sounds", then press
-
Select the warning tone. For details on selecting a ring tone, see “Ringer Type” on page 64.
-
Press or to select "Duration", then press
-
Select the duration by pressing or, then press ○.
Power On/Off Sound
You can set the phone to make a sound (with selected melody, volume and duration) when the phone is turned on or off.
-
Perform steps 1 to 3 in "Customising Profiles" on page 63.
-
Press or to select "Power On Sound" or "Power Off Sound", then press
-
Press or to select "On" or "Off", then press If you select "Off", the screen returns to step 1.
-
Select "Volume", then press.
-
Press to increase the volume or press to decrease the volume and then press.
-
Press or to select "Melody", then press.
-
Press or to select "Preset Melody" or "My Sounds", then press
-
Select the ring tone. For details on selecting a ring tone, see "Ringer Type" on page 64.
-
Press or to select "Duration", then press
-
Enter the duration of ring tone in 2 digits (01 to 10 seconds) using the digit keys, then press
Message Alert
When receiving messages, special ring tones can be set.
-
Perform steps 1 to 3 in "Customising Profiles" on page 63.
-
Press or to select "Message Alert", then press ○.
-
Press on to select "MMS", "SMS" or "WAP", then press .
-
Select "Volume", then press .
-
Press to increase the volume or press to decrease the volume and then press
-
Press or to select "Melody", then press.
-
Press or to select "Preset Melody" or "My Sounds", then press
-
Select the ring tone. For details on selecting a ring tone, see “Ringer Type” on page 64.
-
Press or to select "Vibration", then press
-
Press or to select "Enable", "Disable" or "Link to Sound", then press
-
Press or to select "Duration", then press
- Enter the duration of ring tone in 2 digits (01 to 99 seconds) using the digit keys, then press .
Low Battery Alert
Adjust the volume of the alarm when the battery becomes low.
- Perform steps 1 to 3 in "Customising Profiles" on page 63.
- Press or to select "Low Battery Alert", then press ○.
- Press to increase the volume or press to decrease the volume and then press
Any Key Answer
- Perform steps 1 to 3 in "Customising Profiles" on page 63.
- Select "Any Key Answer", then press .
- Select "On" or "Off" by pressing on, then press ☐.
Organiser
Calculator (M 5-1-1)
The calculator function performs the 4 arithmetic calculations using up to 12 digits.
- Press to display the Main Menu.
- Press or to select "Organiser", then press
- Select "Calculator", then press.
- Select "Calculator", then press .
The calculator appears on the display.
5.Key operations for calculation are as follows.

To enter a decimal point, press .#
To clear the entered number or operand, press [C].
To do the calculations, press

69 Organiser
- If you wish to start a new calculation, press
When calculation is complete, press

Rate Conversion
You can also use the calculator as a currency calculator to convert from/to a home currency using a conversion rate that you enter.
To Set a Currency Conversion Rate (M 5-1-2)
- Perform steps 1 to 3 in "Calculator".
- Press of to select "Exchange Rate", then press ○.
- Press or to select "Foreign Domestic" or "Domestic Foreign", then press. To delete all digits, press [Clear].
4.Enter the currency conversion rate, then press.
To Convert a Value
-
Perform steps 1 to 4 in "Calculator".
2.Enter the value to be converted, then press. -
Press or to select "In Domestic" or "In Foreign", then press
The result is displayed.
If you select "Exchange Rate" in step 3, you can set a currency conversion rate.
- When calculation is complete, press .
Note
- You cannot perform step 2 when a sign of the four fundamental processes of arithmetic is displayed.
Calendar (M 5-2)
The Calendar function helps you organise and manage your busy schedule. You can view the stored schedule on a monthly basis.
-
Press to display the Main Menu.
-
Press or to select "Organiser", then press
O
- Press or to select "Calendar", then press
The current month will be displayed and current date will be highlighted.
-
Select the day for the schedule by pressing, or then press.
-
Press or and select the note number, then press ○.
6.Enter the schedule content, press. Up to 3 schedule items can be stored. For details on entering characters, see "Entering Characters" on page 24. If you wish to add another item, repeat steps 5 and 6.
- When you have finished entering, press [Back]. The screen returns to the calendar. Dates with scheduled tasks/meetings are underlined.
Note
• The calendar can be displayed for dates from January 2000 through to December 2099.
Find a Particular Date
You can move the view to a specified date in the calendar.
-
Press [Options] to display the Option Menu.
-
Select "Go to Date", then press .
-
Enter the date of the calendar to be displayed, then press ○.
The specified date is displayed.
Deleting Schedules
To Delete Schedule Items
-
Perform steps 1 to 3 in "Calendar" on page 70.
-
Select the day by pressing, ▲ or ▼ then ▶ press ○.
-
Select the item you wish to delete by pressing or ▲, then press [Options].
The Options Menu is displayed.
-
Press or to select "Delete", then press.
-
Select "1 Data", then press.
-
Select "Yes", then press. To cancel deleting, select "No" at step 6, then press .
To Delete All Scheduled Tasks/Meetings for a Specific Day
-
Perform steps 1 to 3 in "Calendar" on page 70.
-
Select the day you wish to delete by pressing, then press The Options Menu is displayed.
-
Press or to select "Delete", then press.
-
Select "1 Day" to delete all contents for a day, then press ○.
-
Select "Yes", then press .
To cancel deleting, select "No" at step 5, then press
To Delete All Scheduled Entries
-
Perform steps 1 to 3 in "Calendar" on page 70.
-
Press [Options] to display the Options Menu.
-
Press or to select "Delete" to delete all scheduled entries, then press
-
Press or to select "All Data" to delete all scheduled entries, then press
-
Select "Yes", then press .
To cancel deleting, select "No" at step 3, then press
.
Clock & Alarm
You need to set the correct time and date in order for your phone's various time-based functions to work correctly.
[Options]. Setting the Date and Time (M 5-3-4)
-
Press to display the Main Menu.
-
Press or to select "Organiser", then press
-
Press or to select "Clock & Alarm", then press ○.
71 Organiser
-
Press or to select "Set Date/Time", then press ○.
-
Enter the day, month, year and time using the digit keys, then press When you enter the time in a 12-hour clock format, press and change am/pm. The order in which the date and time appears is based on the format setting. See “To Select the Date Format”.
To Select the Time System
-
Perform steps 1 to 3 in "Setting the Date and Time" on page 71.
-
Press or to select "Clock Settings", then press ○.
-
Select "Time Format", then press .
-
Press or to select "12 hour" or "24 hour", then press
To Select the Date Format The date format can be switched between “Day-Month-Year”, “Month-Day-Year” or “Year-Month-Day”.
-
Perform steps 1 to 3 in "Setting the Date and Time" on page 71.
-
Press or to select "Clock Settings", then press ○.
-
Press or to select "Date Format", then press
-
Press or to select "D-M-Y", "M-D-Y" or "Y-M-D", then press
To Set the Clock Display
-
Perform steps 1 to 3 in "Setting the Date and Time" on page 71.
-
Press or to select "Clock Settings", then press ○.
-
Press or to select "Display Format", then press ○.
-
Press or to select "Time Only", "Date Only" or "Date & Time", then press. To set hide clock, select "Off" at step 4, then press. When "Wallpaper" is set to "On", the date is not displayed in the main screen.
To Set Daylight Saving Time You can switch to daylight saving time without having to change the clock time itself.
-
Perform steps 1 to 3 in "Setting the Date and Time" on page 71.
-
Press or to select "Clock Settings", then press ○.
- Press or to select "Daylight Saving", then press ○.
- Press on to select "On", then press.
Setting the Time Zone (M 5-3-3)
- Perform steps 1 to 3 in "Setting the Date and Time" on page 71.
- Press or to select "Set Time Zone", then press
- Select "Change Zone", then press.
- Press or to set the home city, then press.
To Customise the Time Zone
- Perform steps 1 to 3 in "Setting the Date and Time" on page 71.
- Press or to select "Set Time Zone", then press ○.
- Press or to select "Set Custom Zone", then press ○.
- Enter the time using the digit keys, then press . Each press of switches - and +.
Setting Alarm (M 5-3-1)
Alarm function allows you to be alerted at a specified time.
Note that the clock must be set for the alarm to function properly.
- Press to display the Main Menu.
- Press or to select "Organiser", then press
- Press or to select "Clock & Alarm", then press ○.
- Select "Set Alarm", then press .
- Select "List Alarm", then press .
- Press or to select the desired alarm number, then press. Up to 5 alarm times can be specified.
- Select "Set Time", then press .
- Enter the alarm time using the digit keys, then press When you enter the alarm time in a 12-hour clock format, press and change am/pm.
- Press or to select "Repeat Daily", then press
73 Organiser
- Press or to select "On" or "Off", then press
- Press or to select "Alarm Status", then press
- Press or to select "On", then press.
- Press [Save].
To Change the Type of Alarm Tone
- Perform steps 1 to 6 in "Setting Alarm" on page 73.
- Press or to select "Alarm Tone", then press
- Select "Melody", then press .
- Press or to select "Preset Melody" or "My Sounds", then press
- Select the alarm tone. If you wish to hear the demo play, press [Play]. To stop playing, press [Stop].
- When selection is complete, press .
To Change the Alarm Vibration
- Perform steps 1 to 6 in "Setting Alarm" on page 73.
- Press or to select "Alarm Tone", then press
- Press or to select "Vibration", then press
- Press or to select "Enable", "Disable" or "Link to Sound", then press
To Change the Duration of Alarm
- Perform steps 1 to 10 in "Setting Alarm" on page 73.
- Press or to select "Alarm Tone", then press
- Press or to select "Duration", then press
The current duration is displayed.
- Enter the length of the duration in 2 digits (02 to 59 seconds) using the digit keys, then press
Changing Alarm Settings
-
Perform steps 1 to 5 in "Setting Alarm" on page 73.
-
Select the number you wish to change by pressing

or then press

- Change Alarm settings.
For details on changing Alarm settings, see "To Change the Type of Alarm Tone" on page 74.
Disabling Alarm Function
-
Perform steps 1 and 2 in "Changing Alarm Settings".
-
Press or to select "Alarm Status", then press
-
Press or to select "Off", then press.
-
Press [Save].
Resetting an Alarm Setting
-
Perform steps 1 to 5 in "Setting Alarm" on page 73.
-
Select the number you wish to reset by pressing or , then press .
-
Press or to select "Reset Alarm", then press
-
Press or to select "Yes", then press.
75 Organiser
Resetting All Alarm Settings
-
Perform steps 1 to 4 in "Setting Alarm" on page 73.
-
Press or to select "Clear All", then press
-
Press or to select "Yes", then press.
Voice Memo (M 5-4)
This allows you to record a voice message of up to 10 seconds, which can be used to remind you of schedule entries or be sent within an MMS. The recorded voice memo is registered in the My Sounds.
Recording a Voice Memo
-
Press to display the Main Menu.
-
Press or to select "Organiser", then press.
-
Press or to select "Voice Memo", then press
-
Press to start recording. To stop recording before the recording time is over, press [Stop]
-
Select "Save" to save the voice memo, then press
If you wish to exit the voice memo, press [Exit], then select "Yes".
Tip
- You can also record a voice memo by pressing and instead of steps 1 to 3.
- If you wish to record a voice memo again, select "Record Again" in step 5. The screen will return to step 4.
To Play Back the Saved Voice Memo
- Perform steps 1 to 4 in "Recording a Voice Memo" on page 75.
- Press or to select "Playback", then press.
- Press
The recorded voice memo is played back.
To stop playback, press [Stop].
Help List (M 5-5)
You can view the help list and use it to guide you in the phone's functions.
- Press to display the Main Menu.
-
Press or to select "Organiser", then press.
-
Press or to select "Help List", then press
The help list is displayed.
- Check the key operation by pressing and .
- When you have finished, press [Back].
Call Manager
Call Log
The phone will record the last 10 missed calls, received calls and dialled numbers.
Viewing Call Log
- Press to display the Main Menu.
- Press or to select "Call Manager", then press
- Press or to select "Call Register", then press
- Press or to select "Missed Calls", "Received Calls" or "Dialled Numbers", then press The selected call log list is displayed.
- Select the number you wish to view by pressing or ▼.
- Press [View].
Call record "1" is the most recent.
When you press , call record "2" will be displayed.
If you wish to dial the number, press

- When you have finished, press [Back] to return to step 4.
77 Call Manager
Tip
- You can also confirm call records by pressing stand-by mode.

- You can switch between histories by pressing on in step 5 only when you enter by in stand-by mode.
Sending Messages
- Perform steps 1 to 5 in "Viewing Call Log".
- Select the file name you wish to send by pressing ▲ or , then press .
- Press or to select "Send Message", then press ○.
- Press on to select "MMS" or "SMS", then press ○.
- Enter your message. For details on creating a message, see “Creating a New MMS” on page 107 or “Creating a New SMS” on page 115.
Deleting Call Log
Deleting Single Call Record
- Perform steps 1 to 5 in "Viewing Call Log".
- Press
-
Press or to select "Delete", then press.
-
Press or to select "Yes", then press. The selected call record will be deleted. To cancel deletion, select "No" in step 4, then press .
To Delete All Call Log (M 6-2-4)
-
Perform steps 1 to 3 in "Viewing Call Log" on page 77.
-
Press or to select "Clear Logs", then press
-
Select "All Calls", then press .
-
Press or to select "Yes", then press. All call log records will be deleted. To cancel deleting, select "No" in step 4, then press .
Tip
- If you select "Missed Calls", "Received Calls" or "Dialled Numbers" in step 3, the call log in the selected category will be deleted.
Call Timers (M 6-2-5)
This function lets you check the duration of your calls.
Checking the Duration of the Last Call
-
Press to display the Main Menu.
-
Press or to select "Call Manager", then press
-
Press or to select "Call Register", then press
-
Press or to select "Call Timers", then press
-
Select "Last Call", then press . The duration of the last call is now displayed.
-
When you have finished, press [Back] to return to call timers menu.
Checking the Total Call Time
-
Press or to select "All Calls", then press in step 5 in "Checking the Duration of the Last Call".
-
When you have finished, press [Back].
Resetting All Call Timers
-
Perform steps 1 to 4 in "Checking the Duration of the Last Call".
-
Press or to select "Clear Timers", then press
-
Press ▲ or ▼ to select "Yes", then press ○ To cancel resetting, select "No", then press ○
4.Enter your handset code, then press . The Call Timers are reset to zero.
Call Costs (M 6-2-6)
This function lets you check the charges for your calls. Charging Advice is not supported on all networks. Please check with your service provider for availability.
Checking the Cost of the Last Call
-
Press to display the Main Menu.
-
Press or to select "Call Manager", then press
-
Press or to select "Call Register", then press
-
Press or to select "Call Costs", then press
-
Select "Last Call", then press . The cost of the last call is now displayed.
-
When you have finished, press [Back] to return to call costs menu.
Checking the Total Call Cost
-
Press or to select "All Calls", then press in step 5 in "Checking the Cost of the Last Call".
-
When you have finished, press [Back].
Setting the Charge Rate
Set the charge rate to calculate the call cost and set the maximum limit for call cost.
-
Perform steps 1 to 4 in "Checking the Cost of the Last Call" on page 79.
-
Press or to select "Cost Units", then press
-
Press or to select "Set Units", then press
4.Enter your PIN2 code, then press.
-
Enter a cost per unit, then press . ☐ To enter a decimal point, press #
-
Enter a currency unit (up to 3 characters), then press
Checking the Charge Rate
-
Select "Read Units", then press at step 3 in "Setting the Charge Rate". The charge rate is now displayed.
-
When you have finished, press [Back].
Setting the Charge Limit
This function is useful if you wish to make sure you do not exceed a certain charge limit.
-
Perform steps 1 to 4 in "Checking the Cost of the Last Call" on page 79.
-
Press or to select "Max Cost", then press
-
Press or to select "Set Limit", then press
4.Enter your PIN2 code, then press.
- Enter a value, then press. To enter a decimal point, press
Checking the Charge Limit
-
Select "Read Limit", then press at step 3 in "Setting the Charge Limit". The value of the charge limit is now displayed.
-
When you have finished, press [Back].
Resetting All Call Costs
- Perform steps 1 to 4 in "Checking the Cost of the Last Call" on page 79.
- Press ☐ to select “Clear Costs”, then press
- Press or to select "Yes", then press. To cancel resetting, select "No", then press.
- Enter your PIN2 code, then press . The Call Costs are reset to zero.
Checking the Residual Credit
- Perform steps 1 to 4 in "Checking the Cost of the Last Call" on page 79.
- Press or to select "Residual Credit", then press ○.
- When you have finished, press [Back].
Data Counter (M 6-2-7)
You can confirm the amount of bytes which you used in the GPRS transmission.
- Press to display the Main Menu.
- Press or to select "Call Manager", then press
- Press or to select "Call Register", then press
- Press or to select "Data Counter", then press
-
Press or to select "Last Data" or "All Data", then press. You can now check the amount of bytes.
-
When you have finished, press [Back].
Resetting All Data Counter
- Perform steps 1 to 4 in "Data Counter".
- Press or to select "Clear Counter", then press
- Press or to select "Yes", then press. The Data Counter is reset to zero. To cancel resetting, select "No" at step 3, then press
Diverts (M 6-3)
This service is used to divert incoming calls to your voice mail system or to another number depending on certain conditions in which you cannot answer a call.
Divert Calls
- Press to display the Main Menu.
- Press or to select "Call Manager", then press
- Press or to select "Diverts", then press
- Select one of the divert options by pressing or ▲, then press ○
The divert options available are:
- “All Calls”: Diverts all voice calls without ringing.
- “When Busy”: Diverts incoming calls when you are on a call.
- “No Answer”: Diverts incoming calls if you do not answer a call within a certain period of time.
-
“Not Reachable”: Diverts incoming calls when your phone is out of network service or switched off.
-
Select "On", then press.
- If you wish to divert calls to a number which is located in the Phonebook, search for the desired Phonebook entry.
Press or [Search] to search the number by name or press or to search in alphabetical order, then press. For details on searching the Phonebook entries, see "Finding a Name and Number" on page 28.
- If you wish to divert calls to a number which you can enter manually, enter the phone number.
8. Press

If you select "No Answer" in step 4:
- Enter the period of time using the digit keys (05 to 30 seconds), then press
Note
- When a divert is set to "All Calls", "appears on the stand-by screen.
Tip
- If you select "By Service" instead of selecting "On" in step 5, you can select the divert option.
Checking the Divert Status
- Perform steps 1 to 3 in "Divert Calls" on page 82.
- Select the divert option you wish to check by pressing ▲ or , then ○ press
- Press or to select "Status", then press. You can now check the status of the selected divert option.
- When you have finished, press [Back].
Cancelling All Divert Settings
- Perform steps 1 to 3 in "Divert Calls" on page 82.
- Press or to select "Cancel All", then press
- Press or to select "Yes", then press. To cancel the resetting, select "No" in step 3, then press.
- Press [OK]. All divert settings are cancelled.
To cancel the Divert Settings Individually
- Perform steps 1 to 3 in "Divert Calls" on page 82.
- Select the divert option you wish to cancel by pressing ☑, then press .
- Press or to select "Off", then press.
- Press [OK].
The selected divert has been cancelled.
Settings
Phone Settings
Changing the Language (M 7-1-1)
You can change the display language that the phone uses for the display messages and text entry.
- Press to display the Main Menu.
- Press or to select "Settings", then press.
- Select "Phone Settings", then press .
- Select "Language", then press.
- Press or to select the desired language, then press ○.
Wallpaper for the Stand-by Screen (M 7-1-2)
For the stand-by screen, an animation and 3 illustrations are provided.
Pictures taken with the digital camera or images downloaded from a WAP site can be used for wallpapers.
To Set Built-in Animations or Illustrations
- Perform steps 1 to 3 in "Changing the Language".
- Press or to select "Wallpaper", then press
- Press or to select "On", then press.
- Select "Animation" or "Illustration 1" to "Illustration 3" by pressing or, then press
- Press again to set.
The selected animation or illustration is displayed on the stand-by screen.
Note
• Even if an animation is selected, the stand-by screen displays a static picture/image when you do not operate the phone for about 30 seconds (It is different according to the selected data).
Tip
- To cancel the Wallpaper setting, select "Off" in step 3.
To Set My Pictures for the Stand-by Screen
-
Perform steps 1 to 3 in "To Set Built-in Animations or Illustrations" on page 84.
-
Press or to select "My Pictures", then press
The file names of the pictures/images that are registered in the Saved Pictures is displayed.
- Select the picture/image by pressing or, then press
The selected picture/image is displayed.
- Specify the range for displaying the picture/image by pressing ▼ or , then
The selected picture/image is displayed on the stand-by screen.
Note
- Some pictures/images cannot be used because of their picture/image and data types.
Backlight (M 7-1-3)
You can turn the backlight of the main screen display on or off when you press the keypad or the optional cigarette lighter charger is connected to the phone.
You can change or specify the amount of time the backlight is ON for, which will help conserve battery life.
To Turn On/Off the Backlight
-
Perform steps 1 to 3 in "Changing the Language" on page 84.
-
Press or to select "Backlight", then press
-
Press or to select "On/Off", then press.
-
Select "On" to set backlight on or "Off" to set backlight off by pressing or, then press.
When you select "On" in step 4:
- Enter the duration of the backlight using 2 digits, then press
To Turn On/Off the Backlight whilst Charging with the Cigarette Lighter Charger
-
Perform steps 1 and 2 in "To Turn On/Off the Backlight".
-
Press or to select "In Car", then press.
-
Select "On" to set backlight on or "Off" to set backlight off by pressing or, then press.
Adjust the Brightness of the Backlight (M 7-1-4)
You can adjust the brightness of the backlight of the main screen display at four levels.
-
Perform steps 1 to 3 in "Changing the Language" on page 84.
-
Press or to select "Brightness", then press
-
Press (Light) or (Dark) to adjust the brightness for maximum clarity.
-
Press
Note
- The brightness of the backlight does not affect the brightness of the Sub-Screen.
Display Saving (M 7-1-5)
This phone's screen will automatically turn off after a given amount of time if the phone is left open. This is in order to conserve battery life.
You can change the time before the Display Saving will go into effect from between 2 and 20 minutes.
Tip
- When you purchase this phone, the Display Saving is set to work after 10 minutes.
-
Perform steps 1 to 3 in "Changing the Language" on page 84.
-
Press or to select "Display Saving", then press ○.
-
Enter the time until the Display Saving works in two digits (02 to 20 minutes) using the digit keys, then press ○.
Note
- The Display Saving does not work whilst you are calling, using WAP, or using a Java ^TM application.
To Cancel the Display Saving Function The display saving continues until either a key is pressed or there is an incoming alert. The first key press will only cancel the display saver. You must press another key in order to input any numerical or text value.
Setting the Greeting Message (M 7-1-6)
You can set the message which will appear when the phone is turned on.
-
Perform steps 1 to 3 in "Changing the Language" on page 84.
-
Press or to select "Greeting Message", then press ○.
-
Press on to select "On", then press.
4.Enter the message, then press. Up to 16 characters can be stored as a message. For details on entering characters, see "Entering Characters" on page 24.
Tip
- To cancel the Greeting Message setting, select "Off" in step 3.
Assign Pictures (M 7-1-7)
Pictures/images can be displayed when turning the power on or off, when receiving an incoming call, or when operating the alarm.
Pictures taken by a digital camera or images downloaded from a WAP site can be used.
To Set Built-in Pictures/Images
- Perform steps 1 to 3 in "Changing the Language" on page 84.
87 Settings
-
Press or to select "Assign Pictures", then press ○.
-
Select the screen to set the picture/image by pressing or, then press.
-
Select “Animation 1” or “Animation 2” by pressing ▲ or , then press .
or
Select "Illustration 1" or "Illustration 2" by pressing ▲ or ▼ when press when you select "Alarm" in step 3.
The selected picture/image is displayed.
5.Press

Tip
- To cancel the picture/image setting, select "Off" in step 4.
To Set My Pictures
-
Perform steps 1 to 3 in "To Set Built-in Pictures/Images".
-
Press or to select "My Pictures", then press
The file name of the pictures/images that are registered in the Saved Pictures is displayed.
-
Select the picture/image by pressing or, then press The selected picture/image is displayed.
-
Specify the range for displaying the picture/image by pressing ▼ or , then
Note
- Some pictures/images cannot be used because of their picture/image and data types.
External Display (M7-1-8)
You can change the settings of the Sub-Screen Display.
To Turn On/Off the Sub-Screen Display
You can turn the Sub-Screen Display on or off when the phone is closed.
-
Perform steps 1 to 3 in "Changing the Language" on page 84.
-
Press or to select "External Display", then press
-
Press or to select "LCD On/Off", then press
-
Select "On" to set Sub-Screen Display on or "Off" to set Sub-Screen Display off by pressing or, then press
To Turn On/Off the Backlight of the Sub-Screen Display
You can turn the backlight of the Sub-Screen Display on or off when the phone is closed.
press You can also change or specify the duration of the Sub-Screen Display backlight.
-
Perform steps 1 to 3 in "Changing the Language" on page 84.
-
Press or to select "External Display", then press
-
Press or to select "Backlight", then press
-
Select "On" to set backlight on or "Off" to set backlight off by pressing ☐, then press.
When you select "On" in step 4:
- Enter the duration of the backlight using 2 digits, then press
To Adjust the LCD Contrast of the Sub-Screen You may sometimes need to adjust the LCD contrast of the Sub-Screen to suit certain lighting conditions.
-
Perform steps 1 to 3 in “Changing the Language” on page 84.
-
Press or to select "External Display", then press
- Press or to select "LCD Contrast", then press
- Press (Dark) or (Light) to adjust the contrast for maximum clarity. LCD contrast can be adjusted in 9 levels.
- Press
Phone Setting Reset (M 7-1-9)
The phone settings can be reset to their default settings.
- Perform steps 1 to 3 in "Changing the Language" on page 84.
- Press or to select "Set to Default", then press ○.
3.Enter your handset code, then press. - Press or to select "Yes", then press. To cancel resetting, select "No" in step 4, then press .
All phone settings are reset.
Note
- If you enter a wrong handset code in step 3, operation is cancelled.
89 Settings
Call Settings
Set various types of functions and services.
Call Waiting (M 7-2-1)
If you wish to be able to receive another incoming call whilst you have a call in progress, you must activate the Call Waiting service.
- Press to display the Main Menu.
- Press or to select "Settings", then press.
- Press or to select "Call Settings", then press
- Select "Call Waiting", then press .
- Select "On" to activate the Call Waiting service or "Off" to deactivate it by pressing or, then press.
- Press [OK].
Note
- Call Waiting service may not be available on all mobile phone networks. Contact your network operator for more information.
To Check the Call Waiting Service Status
-
Perform steps 1 to 4 in "Call Waiting" on page 89.
-
Press or to select "Status", then press.
Now you can check the status of the Call Waiting service.
- Press [Back].
Display Call Timers (M 7-2-2)
-
Perform steps 1 to 3 in "Call Waiting" on page 89.
-
Press or to select "Display Call Timers", then press
-
Select "On" or "Off" by pressing on, their press.
Caller No. Status (M 7-2-3)
This lets you control whether to show your phone number or caller's phone number when calling another party.
Caller No. Status is not supported on all networks. Please check with your service provider for availability.
-
Perform steps 1 to 3 in "Call Waiting" on page 89.
-
Press or to select "Caller No. Status", then press ○.
-
Select the option you wish to set by pressing or ▼, then press ○
The options available are:
- “Show Callers No.”: Displays whether caller numbers are displayed or not.
- “Show Your No.”: Displays whether your phone number is notified to your caller or not. This function can be turned On/Off with this option.
Select "On" to activate the option you wish to set or "Off" to deactivate it by pressing or, then
press . - “Show Called No.”: Displays whether the phone number of the phone you are connected to is displayed or not, even if your call is diverted to another phone number.
- “Hide if Called”: Displays whether your phone number is hidden or not from any callers.
To Check the Caller No. Status
-
Perform steps 1 to 3 in "Caller No. Status".
-
Press or to select "Status", then press. Now you can check the status of the Caller No. Status.
-
Press [OK].
Personal Call (M 7-2-4)
A specified ring tone or vibrator setting can be associated to a pre-registered phone number.
Up to 20 phone numbers can be registered.
-
Perform steps 1 to 3 in "Call Waiting" on page 89.
-
Press or to select "Personal Call", then press
-
Select the number you wish to set by pressing or ▲, then press .
-
Enter the phone number, then press. If you wish to select the phone number in the Phonebook, search for the desired Phonebook entry. Press or [Search] to search the number by name or press or to search in alphabetical order, then press. For details on searching the Phonebook entries, see "Finding a Name and Number" on page 28.
-
Press or to select "Assign Melody", then press ○.
-
Select a ring tone. For details on selecting a ring tone, see “Ringer Type” on page 64.
-
Press or to select "Vibration", then press
-
Press or to select "Enable", "Disable" or "Link to Sound", then press For details on setting the vibrator, see "Vibration" on page 65.
-
When setting is complete, select "Setup End", then press ○.
Group Call (M 7-2-5)
Phone numbers can be registered or updated in groups.
To Set Group Ring Tone
Different ring tones can be set for each group. When you purchase this phone, groups are set to off. If you do not set a group ring tone the default ring tone will be used.
-
Perform steps 1 to 3 in "Call Waiting" on page 89.
-
Press or to select "Group Call", then press
-
Select the group you want to set by pressing ▲ or ▼ then press .
-
Press or to select "On", then press.
-
Press or to select "Assign Melody", then press ○.
-
Select a ring tone.
For details on selecting a ring tone, see "Ringer Type" on page 64.
-
Press or to select "Vibration", then press
-
Press or to select "Enable", "Disable" or "Link to Sound", then press For details on setting the vibration, see "Vibration" on page 65.
-
When setting is complete, select "Setup End", then press ○.
Tip
- To cancel the ring tone setting, select "Off" in step 4.
Auto Redial (M 7-2-6)
See “Automatic Redialling” on page 20 about this function.
Minute Minder (M 7-2-7)
Minute Minder function informs you of your talk time by sounding a tone after every minute.
-
Perform steps 1 to 3 in "Call Waiting" on page 89.
-
Press or to select "Minute Minder", then press ○.
-
Press or to select "On" or "Off", then press
Call Setting Reset (M 7-2-8)
The call settings can be reset to their default settings.
-
Perform steps 1 to 3 in "Call Waiting" on page 89.
-
Press or to select "Set to Default", then press ○.
3.Enter your handset code, then press.
- Press or to select "Yes", then press. To cancel resetting, select "No" at step 4, then press All call settings are reset.
Note
- If you enter the wrong handset code in step 3, the operation is cancelled and the screen returns to step 3 in “Call Waiting” on page 89.
Network Settings
Selecting a Network Automatically (M 7-3-1)
Each time the power is turned on, your phone will always try to connect first to the most recently available network, then to the subscribed network, and lastly to the preferred network.
If none of these are found, it will then search for any other available GSM networks.
- Press to display the Main Menu.
- Press or to select "Settings", then press.
- Press of to select "Network Settings", then press ○.
- Select "Select Network", then press.
- Select "Automatic", then press.
To Set the Network Manually
- As in step 5 in "Selecting a Network Automatically", press or to select "Manual", then press
- Select the network from the list by pressing or ▲, then press .
Adding a New Network
- Perform steps 1 to 4 in "Selecting a Network Automatically".
- Press or to select "Add New Network", then press ○.
- Press or to select "Add", then press.
4.Enter the country code. - Press
6.Enter the network code. - Press
8.Enter a new network name. - Press [OK].
Editing the Preferred List
To Change the Position of a Network in the Preferred List
- Perform steps 1 to 4 in "Selecting a Network Automatically".
- Press or to select "Set Preferred", then press
-
Select the name of the network to change the position from the list by pressing or, then press.
-
Press or to select "Insert" or "Add to End", then press.
To Delete a Network from the Preferred List
-
Perform steps 1 to 3 in “To Change the Position of a Network in the Preferred List” on page 93.
-
Press or to select "Delete", then press.
Changing the Network Password (M 7-3-2)
-
Perform steps 1 to 3 “Selecting a Network Automatically” on page 93.
-
Press or to select "Change Password", then press .
-
Enter the old password, then press .
-
Enter a new password, then press .
-
Enter a new password again, then press. If you enter the incorrect password in step 5, the screen will return to step 4 and you will be asked to enter the password again.
6.Press
Selecting an Applicable Zone (M 7-3-3)
You need to select the applicable zone when using your phone in different area.
For America:
-
Perform steps 1 to 3 in “Selecting a Network Automatically” on page 93.
-
Press or to select "Zone Selection", then press .
-
Press or to select "America", then press
For other countries, select “Europe, Asia, etc.”, then press .
Internet Settings (M 7-4)
WAP/MMS Settings
WAP Settings and MMS Settings can perform following various setups, respectively.
WAP Settings
| Item Description Operation | ||
| Profile Name* | WAP Profile Name (Unique Name) | Select "Profile Name" and press ○.Enter the strings you like and press ○ |
| IP Address* IP address | Select "IP Address" and press ○.Enter IP address for WAP and press ○ | |
| Homepage Homepage | Select "Homepage" and press ○.Enter Homepage URL, if needed, and press ○ | |
| Port Number* | Security Option | Select "Port Number" and press ○.Enter Port Number (1024-65535) and press ○ |
| Item Description Operation | |||
| Circuit Prompt Circuit Prompt | Select “Circuit Prompt” and press ○.Select “Enable” or “Disable” and press ○ | ||
| Connection Type | Bearer Connection Type | Select “Connection Type” and press ○Select “GPRS Then CSD”, “GPRS” or “CSD” and press ○. | |
| GPRS Settings (If “GPRS Then CSD” or “GPRS” will be selected as connection type, they should be set) | |||
| APN* | Access Point Name | Select “APN” and press ○.Enter Access Point Name and press ○ | |
| UserName User Name | Select “UserName” and press ○.Enter User Name and press ○. | ||
| Password Password | Select "Password" and press ○.Enter Password and press ○. | ||
| Linger Time | Linger Time | Select "Linger Time" and press ○.Enter second time (0-99999) and press ○ | |
| CSD Settings (If "GPRS Then CSD" or "CSD" will be selected as connection type, they should be set) | |||
| Phone No.* | Access Point Number | Select "Phone No." and press ○.Enter Access Point Number and press ○ | |
| Line Type | ISDN or Analogue | Select "Line Type" and press ○.Select "ISDN" or "Analogue" and press ○ | |
| UserName User Name | Select "UserName" and press ○.Enter User Name and press ○. | ||
| Item Description Operation | |||
| Password | Password | Select “Password” and press ○.Enter Password and press ○. | |
| Linger Time | Linger Time | Select “Linger Time” and press ○.Enter second time (0-99999) and press ○ | |
*: Item to be set as mandatory.
MMS Settings
| Item Description Operation | |||
| Profile Name* | MMS Profile Name (Unique Name) | Select "Profile Name" and press ○.Enter the strings you like and press ○ | |
| IP Address* IP address | Select "IP Address" and press ○.Enter IP address for MMS and press ○ | ||
| Item Description Operation | |||
| Relay Server URL* | MMS Relay Server | Select “Relay Server URL” and press ○Enter URL of the Relay Server and press ○ | |
| Port Number* | Security Option | Select “Port Number” and press ○. Enter Port Number (1024-65535) and press ○ | |
| Connection Type | Bearer Connection Type | Select “Connection Type” and press ○Select “GPRS Then CSD”, “GPRS” or “CSD” and press ○. | |
| GPRS Settings (If “GPRS Then CSD” or “GPRS” will be selected as connection type, they should be set) | |||
| APN* | Access Point Name | Select “APN” and press ○. Enter Access Point Name and press ○ | |
| Item Description Operation | |||
| UserName | User Name | Select "UserName" and press ○.Enter User Name and press ○. | |
| Password | Password | Select "Password" and press ○.Enter Password and press ○. | |
| Linger Time | Linger Time | Select "Linger Time" and press ○.Enter second time (0-99999) and press ○ | |
| CSD Settings (If "GPRS Then CSD" or "CSD" will be selected as connection type, they should be set) | |||
| Phone No.* | Access Point Number | Select "Phone No." and press ○.Enter Access Point Number and press ○ | |
| Line Type | ISDN or Analogue | Select "Line Type" and press ○.Select "ISDN" or "Analogue" and press ○ | |
*: Item to be set as mandatory.
To Set up your Account Information
This information should be supplied by your Internet service provider.
-
Press to display the Main Menu.
-
Press or to select "Settings", then press.
-
Press or to select "Internet Settings", then press ○.
-
Press or to select "WAP Settings" or "MMS Settings", then press .
-
Select the profile name you wish to edit by pressing ▲ or ▼ then press .
-
Press or to select "Edit", then press.
-
Select the item you wish to edit, then press .
8.Edit each item.
- When you have finished editing, select "Setup End", then press
To Select Network Connection Profile
-
Perform steps 1 to 4 in "To Set up your Account Information".
-
Select the profile name to use by pressing or ▼, then press
-
Press or to select "Activate", then press.
WAP Push Setting (M 7-4-3)
You can select whether to accept the information supplied by your Internet service provider or not.
- Press to display the Main Menu.
- Press or to select "Settings", then press.
- Press or to select "Internet Settings", then press ○.
- Press or to select "WAP Push Setting", then press ○.
- Press or to select "Allow" or "Reject", then press ○.
Tip
- To cancel the information supply, select "Reject", then press
Infrared (M 7-5)
You can use the built-in infrared modem to establish contact between your phone and a PC equipped with an infrared port.
- Press to display the Main Menu.
- Press or to select "Settings", then press.
- Press or to select "Infrared", then press.
- Press or to select "On", then press.

“”will appear on the screen.
The infrared setting will return to off when no data is transmitted/received via infrared communication.
Security (M 7-6)
Enabling/Disabling the PIN Code (M 7-6-1)
If the PIN code is enabled you will be asked in enter the PIN code each time the phone is switched on. Your PIN code is stored on the SIM and you should have been made aware of the code when you purchased the SIM. Contact your service provider for further details.
-
Press to display the Main Menu.
-
Press or to select "Settings", then press.
-
Press or to select "Security", then press.
-
Press on to select "PIN Entry", then press
-
Press or to select "On" or "Off", then press
6.Enter your PIN code, then press.
Note
- If you enter the wrong PIN code three times in step 6, the SIM will lock. To remove the lock, contact your service provider/SIM vendor.
Changing PIN Code
This allows you to change the PIN code stored on the SIM.
-
Perform steps 1 to 3 in "Enabling/Disabling the PIN Code".
-
Press or to select "PIN Entry", then press
-
Press or to select "Change PIN", then press
4.Enter the existing PIN code, then press.
5.Enter a new PIN code, then press.
- Enter a new PIN code again, then press. If you enter a code different from the code which you entered in step 6, the screen returns to step 5. Enter the correct code again.
Handset Lock (M 7-6-2)
The Handset Lock is an additional security feature which prevents unauthorised use of the phone or certain features. The default Handset Lock code is “0000”.
-
Perform steps 1 to 3 in "Enabling/Disabling the PIN Code".
-
Press or to select "Handset Lock", then press ○.
-
Press or to select "On" or "Off", then press
-
Enter your handset code, then press. If you enter an incorrect handset code, the screen will clear and you will be prompted to enter the code again.
Changing Handset Code The default handset code is "0000".
-
Perform steps 1 to 2 in "Handset Lock" on page 100.
-
Press or to select "Change Code", then press
3.Enter the old handset code, then press.
4.Enter a new handset code, then press.
- Enter a new handset code again, then press. If you enter a code different from the code which you entered in step 5, the screen returns to step 4. Enter the correct code again.
Changing PIN2 Code (M 7-6-3) PIN2 code is used to protect certain functions in the phone such as Fixed Dialling No. and call cost limits. The following shows you how to change PIN2 code.
-
Perform steps 1 to 3 in "Enabling/Disabling the PIN Code" on page 100.
-
Press or to select "Change PIN2", then press
3.Enter the existing PIN2 code, then press.
4.Enter a new PIN2 code, then press.
- Enter a new PIN2 code again, then press . ◯ If you enter a code different from the code which you entered in step 5, the screen returns to step 4. Enter the correct code.
Call Barring (M 7-6-4)
This function lets you place restrictions on incoming and outgoing calls. To activate Call Barring you will need the call barring password, which will be available from your service provider.
-
Perform steps 1 to 3 in "Enabling/Disabling the PIN Code" on page 100.
-
Press or to select "Call Barring", then press
-
Press or to select call barring option, then press ○.
The call barring functions available are:
- “Bar Foreign Calls”: Restricts all outgoing international calls.
- “Only Local & Home”: Restricts all outgoing international calls except to your home country.
- “Bar Incoming Calls”: Restricts all incoming calls.
- “Bar Inc. if Abroad”: Restricts all incoming calls when you are outside of the coverage from your registered network operator.
-
“Bar Outgoing Calls”: Restricts all outgoing calls except emergency calls.
-
Select one of the call barring options by pressing ▲ or ▼ then press .
The call barring options available are:
- “All Services”: Restricts all services.
- “Voice Calls”: Restricts all voice calls.
- “Data”: Restricts all data calls.
- “Fax”: Restricts all fax calls.
- “Messages”: Restricts all messages.
-
"All except Msgs.": Restricts all services except messages.
-
Select "On", then press .
If you select "Off", the selected call barring setting is cancelled.
-
Enter the network password, then press To change the network password, see "Changing the Network Password" on page 94.
-
Press [OK].
The selected call barring function is activated. If you enter a wrong network password, the entered password is cleared. Enter the correct the password.
Checking Call Barring Status
-
Perform steps 1 to 4 in "Call Barring" on page 101.
-
Press or to select "Status", then press. Now you can check the status of the selected call barring option.
-
When you finish the confirmation, press [Back].
Cancel All Call Barring Settings
-
Perform steps 1 to 2 in "Call Barring" on page 101.
-
Press or to select "Cancel All", then press
3.Enter the network password, then press
- Press ☑[OK]. All call barring settings are cancelled.
To Cancel the Call Barring Setting Individually
- Perform steps 1 to 3 in "Call Barring" on page 101.
- Select the call barring option you wish to cancel by pressing 🔒 or , then Ⓞ press
- Press or to select "Off", then press.
- Enter the Barring password, then press . The selected call barring setting is cancelled.
Fixed Dialling No. (M 7-6-5)
When the Fixed Dialling No. is enabled, you can call to only predefined numbers.
Enabling Fixed Dialling No.
- Perform steps 1 to 3 in "Enabling/Disabling the PIN Code" on page 100.
- Press or to select "Fixed Dialling No.", then press ○.
3.Enter a PIN2 code, then press. - Select "Settings", then press.
- Select "On", then press . ◯ If you select "Off", Fixed Dialling No. is disabled.
Adding a New Name
-
Perform steps 1 to 3 in "Enabling Fixed Dialling No."
-
Press or to select "Edit Dial List", then press
3.Press - Press or to select "Add New Name", then press ○.
- Add a name and a phone number. For details on adding a name and a phone number, see “Storing Names and Numbers” on page 26.
Searching a Registered Name
- Perform steps 1 to 3 in "Adding a New Name".
- Press or to select "Search", then press.
- Search for the desired name. For details on searching a name, see “Finding a Name and Number” on page 28.
Editing a Registered Name
- Perform steps 1 and 2 in "Adding a New Name" on page 103.
- Select a name you wish to edit, then press.
- Press or to select "Edit", then press.
- Edit the selected name. For details on editing a name, see “Editing Phonebook Entries” on page 28.
Deleting a Registered Name
- Perform steps 1 and 2 in "Adding a New Name" on page 103.
- Select a name you wish to delete, then press.
- Press or to select "Delete", then press.
- Select "Yes", then press. The selected name will be deleted. To cancel deletion, select "No" at step 4, then press .
Master Reset (M 7-7)
The settings can be reset to their default settings.
- Press to display the Main Menu.
-
Press or to select "Settings", then press.
-
Press or to select "Master Reset", then press
4.Enter your handset code, then press. - Press or to select "Yes", then press. To cancel resetting, select "No" at step 5, then press All settings are reset.
Note
- If you enter a wrong handset code in step 4, operation is cancelled.
Vodafone live!
Your phone contains a WAP browser used for surfing on the Mobile Internet, where you can get a lot of useful information. Normally, pages are designed for a mobile phone.
Your phone is already set up to use the Vodafone WAP and MMS services.

OPENWAVE

Viewing the WAP Browser
- Press [] during stand-by.
- Select the menu you wish to view by pressing or ▲, then press 📋
To Exit the WAP Browser
- Press to exit the browser.
Navigating a WAP Page
- ▲ ▼ ◀ ▶:
Move the highlights around in the screen.
• / : Used to select an action displayed in the lower left corner of the screen.
•: Used to select an action displayed in the lower right corner of the screen. - (press and hold): Used to start the Go to URL.
- tol (press and hold): Used to start the Bookmark (WAP).
- : Exit (short press) Turn off the phone. (press and hold)
- : Launch browser option menu.
Browser Menu
When you have started browsing, you can reach browsing options by pressing 📋
The Browser Menu contains the following:
Back: Go to the previous screen.
Home: Go to the homepage you set in the WAP Settings.
Bookmarks: Add the site you are currently browsing to your list of bookmarks, or see the list of bookmarks.
Go to URL: Input the URL of the site you wish to go, and go to the site.
Show URL: Display the URL you are currently browsing.
SnapShots: Save the page you are currently browsing to your list of Snap Shots, or see the list of Snap Shots.
Save Items: Save images or sounds to the My Pictures or My Sounds.
Alert Inbox: See the list of WAP push messages. You can receive push messages via WAP Services. This means that a service provider sends WAP content to your phone, without any set up.
Reload: Refresh the contents of the WAP page.
Settings: Includes “Restart Browser”, some settings, etc.
Tip
- The information accessed through the WAP browser on the Internet will be stored in the cache memory of your phone. When the same information is accessed again, the WAP browser reads and displays the information stored in the cache memory instead of accessing the Internet (depending on the contents of the Internet site).
The amount of information in the cache memory differs according to the memory status and the contents of the stored information. When the cache memory is full, old information is deleted in place of new information. Your phone cannot selectively delete the information in the cache memory.
Messages
Your phone allows you to send and receive short messages, MMS and WAP mails.
MMS (Multimedia Messaging Service)
About MMS
MMS allows you to further personalise your messages with pictures, sounds and animations.
Note
- Some MMS functions may not always be available depending on your network. Contact your network operator for more information.
Setting up MMS (M 0-1-5)
- Press [ ] during stand-by.
- Select "MMS", then press .
- Press or to select "Settings", then press.
- Select the desired item to set, then press.
The items available are:
- “Roam. Download”
- "Delivery Report"
- “Delivery Rep. Allow”
- "Expiry Time"
- “Sender Visibility”
- “Anonymous Reject”
- "Slide Interval"
5.Edit the each item. - When you finish setting, press [Back].
Creating a New MMS (M 0-1-1)
- Press [ ] during stand-by.
- Select "MMS", then press .
- Select "Compose", then press .
4.Enter your message, then press.
5.Enter phone number or E-mail address of the recipient, then press
If you wish to select the phone number or E-mail address in the Phonebook, search for the desired Phonebook entry.
Press or [Search] to search the number by name or press or to search in alphabetical
order, then press For details on searching the Phonebook entries, see "Finding a Name and Number" on page 28.
-
Select "Send", then press . The confirmation screen of file size is displayed.
-
Select "Yes", then press . After the message has been sent, the message is added to the Sent box.
Note
- This phone allows you to enter up to 256 characters as a subject, and enter up to 10 addresses of the recipients for sending MMS. However, these may be limited depending on your network. In this case, sending the MMS may fail. Contact your network operator for more information.
To Enter the Subject of the Message
-
Perform steps 1 to 3 in "Creating a New MMS" on page 107.
-
Press [Options] to display the Options Menu.
-
Select "Subject", then press.
4.Enter the subject of your message, then press.
To Add Recipients
-
Perform steps 1 to 5 in “Creating a New MMS” on page 107.
-
Press or to select "Add address", then press
-
Select "To" to add recipients or "Cc" to send a copy of this MMS to other recipients by pressing or, then press
-
Select a desired number from the list by pressing ▲ or ▼ then press .
-
Enter the phone number or E-mail address of the other recipients, then press
-
Press [Back] twice.
To Use the Text Template
-
Perform steps 1 to 3 in “Creating a New MMS” on page 107.
-
Press [Options] to display the Options Menu.
-
Press or to select "Insert Template", then press ○.
-
Select the desired template from the list by pressing ▲ or ▼ then press .
To Save a Message in the Drafts Box
You can save a message in the Drafts box temporarily and send it later, without sending it immediately.
-
Perform steps 1 to 5 in "Creating a New MMS" on page 107.
-
Press or to select "Save", then press to save the message in the Drafts box.
Note
- You can send it later following the instructions in "Sending a Message in the Drafts Box" on page 110.
Turning the Slide Show Setting On or Off
-
Perform steps 1 to 3 in "Creating a New MMS" on page 107.
-
Press [Options] to display the Options Menu.
-
Press or to select "Slide Show", then press
-
Press or to select "On" or "Off", then press
If You Select "On"
- You can create messages which have up to 3 slides. Each slide can contain one picture/image, one sound file and up to 512 characters of text (up to the message total 30kb limit).
- The slide options available are: Add Slide: To add a new slide. Delete Slide: To delete the active slide. Previous Slide: To navigate to the previous slide. Next Slide: To navigate to the next slide.
- EVA data cannot be attached as a slide data to a message.
If You Select "Off"
- You can attach a maximum of 6 pictures/images or sounds in all.
Inserting Attached Data
You can send pictures/images and sounds saved in the Saved Pictures or Saved Sounds attached to MMS.
-
Perform steps 1 to 3 in "Creating a New MMS" on page 107.
-
Press [Options] to display the Options Menu.
-
Press or to select "Picture" or "Sound", then press ○.
-
Select the file name you wish to attach by pressing ▲ or ▼ then press . The selected picture/sound is attached.
5.Press
To Add Attached Data
- Perform step 1 to 3 in "Inserting Attached Data" on page 109. The list of attached data is displayed.
- Select the file name you wish to add by pressing or then press [Options].
- Press or to select "Add Picture" or "Add Sound", then press
- Perform steps 4 and 5 in "Inserting Attached Data" on page 109.
To Delete Attached Data
- Perform steps 1 to 3 in "Inserting Attached Data" on page 109. The list of attached data is displayed.
- Select the file name you wish to delete by pressing ▲ or ▼ then press [Options].
- Press or to select "Remove", then press.
- Press or to select "Yes", then press.
Sending a Message in the Drafts Box
- Perform steps 1 and 2 in "Creating a New MMS" on page 107.
- Press or to select "Drafts", then press.
- Select the desired message to send in the Drafts box by pressing or, then press [Options]. The Options Menu is displayed.
- Press or to select "Send", then press. The confirmation screen of file size is displayed.
- Select "Yes", then press. The phone begins the sending process and the MMS is sent.
Reading MMS (M 0-1-2)
Messages you receive are stored in the Inbox, and outgoing messages are stored in the Drafts box until you send them, after which they move to the Sent box.
Incoming Messages
The MMS indicator ( ) will appear when you are receiving an incoming message.
- Perform steps 1 and 2 in “Creating a New MMS” on page 107.
-
Press or to select "Inbox", then press . Messages are marked with " " denote mails with attachments.
-
Press or to select the desired message, then press ○.
The message is displayed.
-
Scroll the screen by pressing or to read the message.
-
When you finish viewing, press [Done].
To Check the Sender and Receiver Phone Number or E-mail Address
-
Perform steps 1 to 3 in "Incoming Messages" on page 110.
-
Press [Options] to display the Options Menu.
-
Press or to select "Details", then press.
The sender's phone number or E-mail address, time and date stamp, subject, attachment and size are displayed.
Replying to a Message to the Sender from Inbox
-
Perform steps 1 and 2 in "Creating a New MMS" on page 107.
-
Press or to select "Inbox", then press.
-
Press [Options] to display the Options Menu.
-
Press or to select "Reply", then press.
5.Enter your message.
For details on entering characters, see “Entering Characters” on page 24.
- Press
The phone number or E-mail address of the recipient is automatically filled in the sender's phone number or E-mail address.
- Press
The subject field is automatically filled in with the original subject preceded by "Re:".
- Select "Send", then press .
The confirmation screen of file size is displayed.
- Select "Yes", then press.
Tip
- You can reply to a message to all addresses of selected messages by selecting "Reply All" in step 5.
Forwarding a Message
- Perform steps 1 to 3 in “Replying to a Message to the Sender from Inbox” on page 111.
- Press or to select "Forward", then press.
-
Enter phone number or E-mail address of the recipient, then press
If you wish to select the phone number or E-mail address in the Phonebook, search for the desired Phonebook entry.
Press or [Search] to search the number by name or press or to search in alphabetical order, then press. For details on searching the Phonebook entries, see “Finding a Name and Number” on page 28. -
Select "Send", then press . The confirmation screen of the file size is displayed.
-
Select "Yes", then press.
Note
- When the message with attached data is forwarded the data is also sent. However, if there is any material which the phone recognises as having copyright, it will not be sent.
- “Subject” field is automatically filled in with the original subject preceded by “Fw:”. The original message and subject cannot be changed.
Modifying a Message
- Perform steps 1 to 3 in "Replying to a Message to the Sender from Inbox" on page 111.
- Select "Edit", then press .
- Modify the message.
- Press
- Select "Send", then press . The confirmation screen of the file size is displayed.
- Select "Yes", then press .
Note
- Messages cannot be edited if they contain particular data such as Slide Show, XHTML, copyrights or unknown format.
Storing the Phone Number or E-mail Address of a Sender in the Phonebook
- Perform steps 1 to 3 in “Replying to a Message to the Sender from Inbox” on page 111.
- Press or to select "Save to Phonebook", then press ○.
For details on entering a name, see “Storing Names and Numbers” on page 26.
Retrieving MMS
When “” is in the Inbox, the following can be done.
-
Perform steps 1 and 2 in "Creating a New MMS" on page 107.
-
Press or to select "Inbox", then press.
-
Press or to select a desired alert to download.
-
Press to display the Alert Menu.
-
Press or to select "Download", then press
Deleting Messages
-
Perform steps 1 and 2 in "Creating a New MMS" on page 107.
-
Press or to select "Inbox", "Drafts" or "Sent", then press
-
Select the message you wish to delete by pressing ▲ or ▼ then press [Options]. The Options Menu is displayed.
-
Press or to select "Delete Message", then press ○.
-
Press or to select "One Message" or "All Messages", then press
-
Select "Yes", then press .
To cancel deletion, select "No", then press .
Note
- You cannot delete locked messages.
To Lock Message
-
Perform steps 1 and 2 in "Creating a New MMS" on page 107.
-
Press or to select "Inbox" or "Sent", then press ○.
-
Select the message you wish to lock by pressing or , then press [Options]. The Options Menu is displayed.
-
Press or to select "Lock/Unlock", then press
Making a Call to the Sender of a Message
You can make a call to the sender of a message in Inbox whose address (From) is the phone number.
-
Perform steps 1 and 2 in "Replying to a Message to the Sender from Inbox" on page 111.
-
Press [Options] to display the Options Menu.
-
Press or to select "Call", then press.
SMS (Short Message Service)
About SMS
The Short Message Service (SMS) allows you to send text messages of up to 1024 characters to other GSM users.
Using SMS with Your Phone
Messages longer than 160 characters may be composed. During sending, the messages will be split. If the receiver has a suitable phone the messages will recombine during reception, if not your message will appear as a number of separate 152 characters messages.
You can send or receive SMS even if you are talking on the phone.
You can also use My Text Templates to help you compose SMS.
Setting up SMS (M 0-2-4)
Before you can use SMS to send and receive messages, you have to set up some personal and system information.
To set up the Service Centre Address
-
Press [] during stand-by to display the Message menu.
-
Press or to select "SMS", then press.

-
Press or to select "Settings", then press.
-
Select "Message Centre", then press .
5.Enter the centre number.
If you wish to enter a country code for a message to an international number, press and hold until a “+” sign appears.
- Press
Validity Period
This indicates the number of days and hours for which a message you send may remain undelivered to the message recipient.
During this period, the message service centre will continually try to deliver the message to the recipient.
-
Perform steps 1 to 3 in "Setting up SMS".
-
Press or to select "Message Lifetime", then press ○.
-
Select the validity period by pressing on, then press
Message Format
-
Perform steps 1 to 3 in "Setting up SMS".
-
Press or to select "Message Format", then press ○.
-
Select the message format by pressing then press


Connection Type
-
Perform steps 1 to 3 in "Setting up SMS" on page 114.
-
Press or to select "Connection Type", then press ○.
-
Select the connection type by pressing then press


Optimisation
When set "On" (default), double-byte characters such as European characters with an accent will be converted into single-byte characters and sent.
When "Off", double-byte characters will be sent as displayed.
Please note that you may be charged double for double-byte characters sent in an SMS when Optimisation is set "Off".
-
Perform steps 1 to 3 in "Setting up SMS" on page 114.
-
Press or to select "Optimisation", then press
-
Press or to select "On" or "Off", then press
Creating a New SMS (M 0-2-1)
-
Press [] during stand-by.
-
Press or to select "SMS", then press.
-
Select "Compose", then press .
4.Enter your message. For details on entering characters, see "Entering Characters" on page 24.
5.Press
To Use the Text Template
-
Perform steps 1 to 3 in "Creating a New SMS".
-
Press [Options] to display the Options Menu.
-
Press or to select "Insert Template", then press ○.
-
Select the desired template from the list by pressing ▲ or ▼ then press .
To Save the Message in the Outbox
-
Perform steps 1 to 5 in "Creating a New SMS".
-
Enter the SMS phone number of the recipient, then press ○.
-
Press or to select "Save", then press.
Sending a Message
-
Perform steps 1 to 5 in "Creating a New SMS" on page 115.
-
Enter the SMS phone number of the recipient, then press ○.
-
If you wish to select the SMS phone number in the Phonebook, search for the desired Phonebook entry. Press or [Search] to search the number by name or press to search in alphabetical order, then press. For details on searching the Phonebook entries, see "Finding a Name and Number" on page 28.
-
Press or to select "Send", then press. The phone begins the sending process and the SMS is sent.
Reading SMS
Incoming Messages
The SMS indicator ( ) will appear when an incoming message arrives.
-
When you receive a SMS, press during standby.
-
Press to select the desired message. The sender's phone number and a part of the message are displayed. When the sender's phone number is stored in the Phonebook, the sender's name is displayed instead of the phone number. Messages are marked with " " denote unread messages. If the Inbox or Outbox is full, " flashes. Delete unnecessary messages.
-
Press
-
Scroll the screen by pressing or to read the message.
-
When you have finished viewing, press .
Replying to the Sender
-
Perform steps 1 to 3 in "Reading SMS".
-
Press [Options] to display the Options Menu.
-
Press or to select "Reply", then press.
4.Enter your message.
For details on entering characters, see “Entering Characters” on page 24.
5.Press

Follow the procedure from step 2 in "Sending a Message" on page 116.
Calling the Message Sender
-
Perform steps 1 to 3 "Reading SMS" on page 116.
-
Press [Options] to display the Options Menu.
-
Press or to select "Call Sender", then press
Forwarding a Message
-
Perform steps 1 to 3 in "Reading SMS" on page 116.
-
Press [Options] to display the Options Menu.
-
Press or to select "Forward", then press.
-
Enter the SMS phone number of the recipient, then press ○.
For details on searching the Phonebook entries, see "Finding a Name and Number" on page 28.
- Press or to select "Send", then press.
The phone begins the sending process and the SMS is sent.
Modifying a Message
-
Perform steps 1 and 2 in "Creating a New SMS" on page 115.
-
Press or to select "Outbox", then press.
-
Select the desired message to modify in the Outbox by pressing ▼ or , then press
-
Press [Options] to display the Options Menu.
-
Select "Edit", then press .
6.Modify the message, then press .
Follow the procedure from step 2 in "Sending a Message" on page 116.
Deleting Messages
-
Perform steps 1 and 2 in "Creating a New SMS" on page 115.
-
Press or to select "Inbox" or "Outbox", then press ○.
-
Select the message you wish to delete by pressing ▲ or , then press .
-
Press [Options] to display the Options Menu.
-
Press or to select "Delete", then press.
-
Press or to select "Yes", then press. The selected message is deleted.
Extracting Phone Numbers from the Received Messages and making a call
you can make a call using a telephone number embedded in the received SMS message.
-
Perform steps 1 and 2 in "Reading SMS" on page 116.
-
Press [Options] to display the Options Menu.
-
Press or to select "Extract Numbers", then press ○.
Any kinds of numbers are listed.
-
Press or to select the telephone number, then press
-
To make a call, press. To save this telephone number in the phonebook, press [Save].
For details on entering a name, see "Storing Names and Numbers" on page 26.
Tip
- Selecting "Save to phonebook" in step 3 instead allows you to go to the phone number entry prompt with the sender's number entered. For details on entering a name, see "Storing Names and Numbers" on page 26.
Cell Broadcast (M 0-3)
You can receive Cell Broadcast messages or general messages like weather reports, traffic reports, etc. broadcast to all subscribers in a certain network area. This function may not be available on all mobile phone networks. Contact your network operator for more information.
Enabling/Disabling Cell Broadcast (M 0-3-1)
- Press [] during stand-by.
- Press or to select "Cell Broadcast", then press ○.
- Press on to select "On/Off", then press.
- Select "On" to set Cell Broadcast on or "Off" to set it off by pressing or, then press.
Reading Cell Broadcast Messages (M 0-3-2)
- When you receive a Cell Broadcast message, press
- Scroll the screen by pressing or to read the message.
- When you finish viewing, press .
Subscribing to Cell Broadcasts
Select the page of the cell broadcast message that you want.
- Press [] during stand-by.
- Press or to select "Cell Broadcast", then press ○.
- Press or to select "Settings", then press.
- Press or to select "Set Info Subjects", then press ○.
- Press or to select "Create Subject", then press ○.
- Press to add the channel.
7.Enter the appropriate channel code obtained from your service provider, and a title for the channel.
Setting Languages
Allows you to select your preferred language for the cell broadcast message display.
Cell Information (M 0-4)
The Cell Information is the message information that operators sent to subscribers in certain areas.
When you receive Cell Information, the message will be displayed on the stand-by screen.
Note
- This function may not be available on all mobile phone networks. Contact your network operator for more information.
Enabling/Disabling Cell Information
-
Press [ ] during stand-by.
-
Press on to select "Cell Info", then press
-
Press or to select "On" or "Off", then press
Note
- If Cell Information is set to "On", the Stand-by Time will decrease.
Data Transmission
Your PC can be set up to use the GX10i as a modem. You can either use Infrared (IrDA) or a data cable "XN-1DC10" (option) to connect to the PC.
Refer to XN-1DC10 attached manual for the connection method of a data cable.
System Requirements
OS: Windows®98*, Windows®Me, Windows®2000, Windows®XP
* Windows ^® 98 Second Edition, or Windows ^® 98 + Internet Explorer 5.01 or later
Interface: Infrared (IrDA) or Serial port (D-sub 9-pin connector)
CD-ROM drive
Software Installation and Setup
-
Install Modem setup software from the included CD-ROM.
-
Insert the CD-ROM and double-click [setup.exe] to start installation.
- Follow the instructions on the screen to complete installation.
When installation has completed, “SHARP GSM GPRS” icon appears in the control panel.
When you perform the following operations (step 2 to 4), refer to GSM/GPRS Modem Option Help after executing [SHARP GSM GPRS] in the control panel.
- Install Modem driver.
- Make the Dial-up connection.
- Set GSM/GPRS Modem Option which is stored in the control panel.
If you wish to use GSM, fill the GSM connection column.
If you wish to use GPRS, fill the GPRS connection column.
Note
- Modem setup software may not run on certain PCs.
Using the Modem Setup
The software in the CD-ROM supplied is provided based on the END USER LICENSE AGREEMENT, and can be used and duplicated only in compliance with the conditions of the pertinent END USER LICENSE AGREEMENT.
The software installer displays the END USER LICENSE AGREEMENT upon startup.

natural_image
Line drawing of a mobile phone with a close-up view showing its internal components (no text or symbols)- When using the infrared modem function for executing data transmission, align the infrared port with each other.
Note
- The maximum distance for communicating between the infrared ports is 20 cm within a 30° angle.
- When transmitting data via infrared communication, you need to set the infrared setting to "On". (p. 99)
- It is not recommended that you make or answer a call during data transmission. The operation may be interrupted.
121 Data Transmission
Transmitting Picture/Image Files
By installing software for data transmission into your PC, you can transmit picture/image files between your phone and a PC.
The data cable (RS232C) "XN-1DC10" (option) is necessary for connection to a PC.
Download software for data transmission from the download page in the following site.
http://www.sharp-mobile.com
Note
- Some large picture/image files may not be able to be transmitted from the PC to the phone.
Troubleshooting
| Problem Solution | |
| The phone does not turn on. | Make sure the battery is properly inserted and charged. |
| PIN code or PIN2 code is rejected. | Make sure you have entered the correct code (4 to 8 digits).Your SIM card/protected functions will become locked after 3 unsuccessful attempts.Contact your SIM provider if you do not have the correct PIN code. |
| SIM card becomes locked. | Enter PUK code (8 digits) provided by your service provider (if supported).If the attempt is successful, enter the new PIN code and confirm your phone is operational again. Otherwise contact your dealer. |
| The display is difficult to read. | Adjust the LCD contrast. |
| Problem Solution | |
| Phone functions do not work after the phone is turned on. | ·Check the radio signal strength indicator as you may be outside the service area.·Check to see if any error message is displayed when you turn your phone on. If so, contact your dealer.·Make sure the SIM card is correctly inserted. |
| Calls cannot be made or received. | ·If the message “SIM Card Error” is displayed at start-up, you cannot use your SIM card or SIM card is damaged. Contact your dealer or network service provider.·Check your call barring, fixed dialling setting, remaining battery and call forwarding settings.·Check if your phone is currently performing data communication using Infrared (IrDA) or a data cable.·Check the remaining balance if you are using a pre-paid SIM card. |
| Call quality is poor. | ·Your current location may not provide good call quality (i.e., in a car or train). Move to a location where radio signal strength is greater. |
| Cannot access network service. | ·Check whether your account has been registered, and whether the service is available. |
| Cannot send or receive SMS. | ·Make sure you are correctly subscribed for the Short Message Service, that the network supports this service, and that the centre number is set up correctly. If not, contact your network service provider. |
| Cannot connect to MMS service provider. | ·MMS settings and configuration may be missing or incorrect or network does not support it. Check your service provider's access point number. Contact your service provider to confirm the correct settings. |
| Problem Solution | |
| Limited memory available. | • Delete any unnecessary data. |
123 Troubleshooting
Safety Precautions and Conditions of Use
Your phone conforms to international regulations insofar as it is used under normal conditions and in accordance with the following instructions.
CONDITIONS OF USE
Electromagnetic waves
- Do not switch on your phone aboard an aircraft (as your phone may interfere with the aircraft's electronic systems). Current legislation forbids this use and legal action can be taken against the user.
- Do not switch on your phone in a hospital, except in designated areas.
-
Use of your phone's function may affect the performance of medical electronic units (pacemakers, hearing aids, insulin pumps, etc.). When the phone function is on, do not bring it near medical equipment or into areas in which medical equipment is being used. If you have a hearing aid or a pacemaker, only use the phone on the opposite side of your body from where it is located. The phone should be kept at least 6 inches (15.24 cm) from a pacemaker ANYTIME the phone is switched on.
-
Do not switch on your phone near gas or flammable substances.
- Observe the rules concerning the use of mobile phones at gasoline stations, chemical plants and at all sites where a risk of explosion exists.
Caring for your phone
- Do not allow children to use your phone without supervision.
- Do not open or attempt to repair your phone yourself. The product can only be repaired by authorized service personnel.
- Do not drop your phone or subject it to severe impacts. Bending the body and pushing the display or keys with extreme force could damage the phone.
- Do not use solvents to clean your phone. Use only a soft, dry cloth.
- Do not carry your phone in your back pocket as it could break when you sit down. The display is made of glass and is particularly fragile.
- Avoid touching the external connector on the underside of the phone, since the delicate components within can be damaged by static electricity.
Battery
- Use your phone only with batteries, chargers and accessories recommended by the manufacturer. The manufacturer disclaims any liability for damage caused by the use of other chargers, batteries or accessories.
- Network configuration and phone usage will affect talk-time and stand-by time.
Using the games or camera will hasten battery consumption.
- When the battery charging alert is displayed on the screen, charge the battery as soon as possible. If you continue using your phone ignoring the alert, the phone may cease to function, and all data and settings you have stored may be lost at any moment.
- Before removing the battery from the phone, make sure the phone is switched off.
- Replace and charge the new battery as soon as possible after removing the old one.
-
Do not touch the battery terminals. Batteries can cause damage, injury or burns if a conductive material touches exposed terminals. When the battery is detached from the phone, use a cover made of non-conductive material for keeping and carrying the battery safely.
-
Recommended temperature for using and storing batteries is approximately 20^ .
- The batteries' performance is limited in low temperatures, particularly below 0^ and the phone may not work temporarily regardless of the amount of remaining battery power.
- Exposing the phone to extreme temperatures will shorten battery life.
- The battery can be charged and discharged hundreds of times but it will eventually wear out. When the operating time (talk-time and stand-by time) is noticeably shorter than normal, it is time to buy a new battery.
CAUTION
RISK OF EXPLOSION IF BATTERY IS REPLACED BY AN INCORRECT TYPE,
DISPOSE OF USED BATTERIES ACCORDING TO THE INSTRUCTIONS
See "Battery Disposal" on page 13.
Aerial Care
- Do not touch the aerial unnecessarily, whilst using the mobile phone. If it is held, call quality may be hindered leading to shortened talk-time and stand-by time because the mobile phone may have to operate on a higher power level than is necessary.
- Use only the aerial supplied or one approved by Sharp for your mobile phone. Using unauthorised or modified aerials may damage the mobile phone. Moreover, since the mobile phone may violate the appropriate regulations, it may lose performance or exceed the limitation of SAR levels.
- To avoid impaired performance, do not damage the aerial of the mobile phone.
- Whilst talking directly to the microphone, please hold the mobile phone so that the aerial is upwards over your shoulder.
- To avoid interfering with blasting operations, please turn off the mobile phone in a blasting area or in a place where a “turn off two-way radio” sign is posted.
- Do not remove the RF cap of the back cabinet.
Camera Operation
- Learn picture quality, file formats, etc. beforehand. The display supports up to 65,536 colours. The taken pictures can be saved in JPEG format (JPEG high-colour).
- Be careful not to move your hand whilst taking pictures. If the phone moves whilst taking a picture, the picture can be blurred. When taking a picture, hold the phone firmly to prevent it from moving, or use the delay timer.
- Clean the lens cover before taking a picture. Fingerprints, oils, etc. on the lens cover hinder clear focusing. Wipe them off with a soft cloth before taking a picture.
Others
- As with any electronic storage unit, data may be lost or corrupted under various circumstances.
- Before connecting the phone with a PC or a peripheral unit, read the operation manual for the other unit carefully.
- If the phone's battery has been removed for some time, or the phone has been reset, the unit's clock and calendar may be reinitialised. The date and time should be updated in this case.
- Use only the attached hands free kit. Some phone's functions may not work when unauthorised hands free kits are used.
ENVIRONMENT
- Keep your phone away from extreme heat. Do not leave it on the dashboard of a car or near a heater. Do not leave it in any place that is extremely damp or dusty.
- Since this product is not waterproof, do not use it or store it where fluids such as water can splash onto it. Raindrops, water spray, juice, coffee, steam, perspiration, etc. will also cause a malfunction.
Safety Precautions and Conditions of Use 126
PRECAUTIONS CONCERNING VEHICLE USE
- It is the user's responsibility to verify if local laws permit the use of a mobile phone in a vehicle. Give full attention to driving. Pull off onto the side of a road and park the car before making or answering a call.
- If local laws permit, we recommend that you use your phone with the supplied hands free kit.
- Use of your phone's function may interfere with the vehicle's electronic systems, such as the ABS anti-lock brakes or the air-bag. To ensure no such problem occurs, please check with your dealer or car manufacturer before connecting your phone.
- Only allow qualified service maintenance personnel to install the vehicle accessories.
The manufacturer disclaims any liability for damage which may result as a consequence of improper use or use contrary to the instructions contained herein.
SAR
Your Sharp mobile phone has been designed, manufactured and tested so as not to exceed the limits for exposure to electromagnetic fields recommended by the Council of the European Union. These limits are part of comprehensive guidelines developed by independent scientific organisations. The guidelines include a substantial safety margin designed to assure the safety of the phone user and others and to take into account variations in age and health, individual sensitivities and environmental conditions. European standards provide for the amount of radio frequency electromagnetic energy absorbed by the body when using a mobile phone to be measured by reference to the Specific Absorption Rate (SAR). The SAR limit for the general public is currently 2 watts per kilogram averaged over 10 grams of body tissue. Your Sharp mobile phone SAR value is 0.681 watts per kilogram. This has been tested to ensure that this limit is not exceeded even when the phone is operating at its highest certified power. In use however your Sharp mobile phone may operate at less than full power because it is designed to use only sufficient power to communicate with the network.
Index
A
Accessories 7
B
Battery 10
Charging 13
Disposal 13
Inserting 10
Removing 12
Battery Level Indicator 14
C
Calculator 69
Rate Conversion 69
Calendar 70
Deleting Schedules 71
Find a Particular Date 70
Call 19
Answering 20
Ending 20
Holding 21
Making 19
Making Another Call During a Call 21
Rejecting 21
Call Costs 79
Checking Charge Limit 80
Checking Charge Rate 80
Checking Cost of Last Call 79
Checking Residual Credit 81
Checking Total Call Cost 79
Resetting All Call Costs 81
Setting Charge Limit 80
Setting Charge Rate 80
Call Log 77
Deleting 77
Sending Messages 77
Viewing 77
Call Manager 77
Call Settings 89
Auto Redial 92
Call Waiting 89
Caller No. Status 90
Display Call Timers 90
Group Call 91
Minute Minder 92
Personal Call 91
Resetting 92
Call Timers 78
Checking Duration of Last Call 78
Checking Total Call Time 78
Resetting All Call Timers 78
Call Waiting 22, 89
Camera 9, 34
Brightness 36
Deleting 37
Indicators 35
Memory 35
Mode 35
Picture Size 34
Retaking Pictures 35
Sending 37
Taking Pictures 34
Timer 36
Viewing 36
Zoom Function 34
Cell Broadcast 118
Enabling/Disabling 118
Reading 118
Setting Languages 119
Subscribing 119
Cell Information 119
Enabling/Disabling 119
Centre Key 9
Clock & Alarm 71
Changing Alarm Settings 75
Disabling Alarm Function 75
Resetting Alarm Setting 75
Resetting All Alarm Settings 75
Setting Alarm 73
Setting Date and Time 71
Setting Time Zone 73
Clock Setting 71
Setting Date and Time 71
Conference Call 22
Adding New Participants 23
Ending Call with a Participant 23
Making 22
Private Conversation 23
D
Data Counter 81
Resetting 81
Data Transmission 120
Modem Setup 120
Software Installation/Setup 120
System Requirements 120
Transmitting Picture/Image Files 121
Diverts 82
Cancelling All Divert Settings 83
Cancelling Divert Settings Individually 83
Checking Divert Status 83
Divert Calls 82
E
Earpiece 9
Earpiece Volume 21
Emergency Calls 19
End/Power Key 9
Entering Characters 24
Changing Input Mode 25
Symbols and Punctuation 25
T9 Text Input 25
Table of Characters 24
Text Template 25
External Connector 9
F
Fun & Games 48
H
Hands free Connector 9
Help List 76
|
Indicators 15
Main Screen 15
Sub-Screen 17
Infrared 99
Infrared Port 9
International Calls 19
Internet Settings 95
WAP Push Setting 99
WAP/MMS Settings 95
J
Java™ 38
Downloading 38
Java™ Games 48
Clearing All Applications 50
Downloading 51
Information 51
Online Services 50
Resetting 50
Settings 48
L
LED Indicator 9
M
Main Screen Display 9
Master Reset 104
Melody Editor 52
Copying/Pasting Notes 59
Creating Your Original Ring Tone 52
Deleting 57
Editing 57
Musical Scale/Rest 54
Strength 57
Tone 55
Types of Notes/Rests 54
Memory Status 47
Menu 32
List of Menu Functions 33
Main Menu 32
Operation Guidance 32
Shortcut Keys 32
Side Keys 32
Messages 107
MMS 107
SMS 114
Microphone 9
Muting 23
Mirror 9
MMS 107
Adding Recipients 108
Check the Sender and Receiver Phone Number or E-mail Address 111
Creating 107
Deleting 113
Extracting Phone Numbers 118
Forwarding 112
Inserting Attached Data 109
Lock/Unlock 113
Making a Call 113
Modifying 112
Reading 110
Replying 111
Retrieving 113
Saving in Drafts Box 109
Sending Message in Drafts Box 110
Setting up 107
Storing the Phone Number or E-mail Address of a Sender in the Phonebook 112
Turning the Slide Show Setting On or Off 109
My Bookmarks 45
Accessing 45
Adding 45
Deleting 46
Editing 46
My Java™ Games 39
Checking Information 39
Deleting 40
Ending 39
Executing 39
Suspending 39
My Phone 38
My Pictures 40
Adjusting Size 41
Changing File Name 41
Checking 41
Deleting 42
Downloading 40
Sending Messages 42
Viewing 41
My Sounds 43
Changing File Name 44
Checking 43
Deleting 45
Downloading 43
Playing Back 43
Sending Messages 44
Strength 44
Tone 44
My Text Templates 46
Adding Phrases 46
Deleting 47
Editing 46
Using 25, 108, 115
Viewing 47
N
Navigation Keys (Arrow Keys) 9, 32
Network Settings 93
Adding New Network 93
Changing Network Password 94
Editing Preferred List 93
Selecting a Network Automatically 93
Selecting an Applicable Zone 94
0
Organiser 69
Other Games 51
Setting up Game Options 52
Starting 51
P
Phone Settings 84
Assign Pictures 87
Backlight 85
Brightness of Backlight 86
Built-in Animations/Illustrations 84
Changing Language 84
Display Saving 86
External Display 88
Greeting Message 87
Resetting 89
Wallpaper 84
Phonebook 24
Adding Number from Call Log
27
Creating New Entry 25
Deleting 29
Editing 28
Group Name 24, 26
Memory Status 30
Searching 28
Sending Messages 31
Storing Inputted Number 27
View Groups 29
Your Own Number 29
PIN Code 100
PIN2 Code 101
Profiles 63
Activating 63
Any Key Answer 68
Customising 63
Keypad Tones 65
Low Battery Alert 68
Message Alert 67
Power On/Off Sound 66
Resetting 64
Ringer Type 64
Ringer Volume 64
Vibration 65
Warning Tone 66
Q
Quickstart Guide 134
R
Redialling 20
Auto Redial 20
S
SAR 127
Security 100
Call Barring 101
Changing Handset Code 101
Changing PIN Code 100
Changing PIN2 Code 101
Enabling/Disabling PIN code 100
Fixed Dialling No. 103
Handset Lock 100
Settings 84
Call Settings 89
Infrared 99
Network Settings 93
Phone Settings 84
Security 100
SIM Card 10
Inserting 10
Removing 12
SMS 114
Calling 117
Creating 115
Deleting 117
Forwarding 117
Modifying 117
Reading 116
Replying 116
Saving in Outbox 115
Sending 116
Setting up 114
Storing Sender's Number in Phonebook 118
Speaker 9
Speed Dialling 19, 30
T
Tone Editor 59
Algorithm 60
Creating Your Original Tone 61
Effect Frequency 61
FM Sound Source 59
Operator 60
Troubleshooting 122
Turning Your Phone On/Off 15
V
Vodafone live! 105
Browser Menu 106
Navigating WAP Page 105
Viewing WAP Browser 105
Voice Memo 75
Playing Back 76
Recording 75
QUICKSTART GUIDE: INTRODUCTION
More than voice and text – now it's pictures, music and games!
Congratulations on your new Sharp GX10i. With this advanced handset, you will be able to do far more than "talk and text". Now you can take full advantage of all the new Vodafone live! services.
For instance:
• Taking and sending colour photos
- Playing arcade quality games
- Amazing your friends with polyphonic ringtones
- Accessing the mobile internet quickly and easily

How to do all this is described in detail inside this manual. But if you are already familiar with how a mobile phone works, you probably want to try out the new features straight away – the things
you couldn't do before.

In which case, the next three pages will show you how to:
• Take your first picture with the camera
- Send it as a multimedia message with text
- Try out a Java™ game using animation, 2D and 3D effects
- Experiment with ringtones, and...
Access the Vodafone live! portal

We'll also show you how to connect up to the Vodafone live! portal, to discover what the world's largest mobile community has to offer you and your phone: from new ringtones to games,
entertainment and news services.


QUICKSTART GUIDE: NAVIGATION & CAMERA
Trying out your phone

OK. Your SIM card's in the handset, and you've charged the battery (see "Getting Started", p.8).
Turning it on: Press and hold the red key for two seconds (the same to turn off).
Navigation and selection:
The GX10i uses icons to help you navigate (like on your PC).
- Press the central silver key to access the icons on the Main Menu.
- Use to move up and down the on-screen menus, and the key or to select.
• takes you back to a previous menu.
•The soft keys select whatever is at the bottom left and right of the screen – often as an alternative to the menu keys.
Using the camera

Taking a photo:
- From the start-up screen, press and hold for two seconds to go into Camera mode (see Section M1: Camera, p.34 for full details).
- Press to capture the image on screen.
- Press [Save] ("Save to My Phone" is shown), or press to Send your picture to someone else (see next page). Or press [Back] instead to re-take.
Note: always returns you to Phone mode.
Viewing photos:
- In Camera mode, press [Options].
- Select "Existing Pictures", then press
- Go to the picture file you want to view (they're named by time and date), and press .
Using a photo as wallpaper:
- Go to the Main Menu.
- Select "Settings", "Phone Settings", "Wallpaper", "On", "My Pictures".
- Press, and select your photo from the list.
- Press [Select].
QUICKSTART GUIDE: MESSAGING & GAMES
Picture Messaging

Use the MMS (Multi Media Messaging) function to send your photo together with a text message.
- From the Main Menu scroll up to "Messages".
- Press and select "MMS".
- Press and select "Compose".
- Press and write your text message.
Attaching your photo:
- Press [Options]. Select "Picuture" and press
- Choose the photo you want. Press

- Press [Back] to go back to your message.
Note: Repeat the same steps, choosing "Sound" instead of "Picture" to attach a sound – for instance a voice memo from yourself (see Section M5-4, p.75 on how to record).
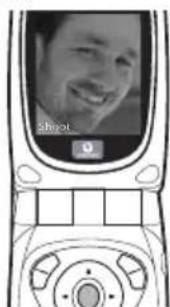
natural_image
Line drawing of a smiling mobile phone with a face on screen (no text or symbols visible)Sending: From the text entry screen:
- Press, and key in a mobile number (or an email address: to enter text first press and hold -to get the @ symbol, press the key 3 times).
-
Press, choose "Send" and press [Select].
-
You'll be asked to OK the file size: select "Yes", press, and watch it being sent.
Tip: Try sending to yourself to see how it works.
Problems? You may need to be registered for MMS – speak to Vodafone customer services.
Playing games

Your phone comes with two built-in games and one pre-loaded Java™ game: Stormy Sight. To try out the enhanced gameplay of this Java™ game, go to the Main Menu:
- Select "Fun & Games", and press .
- Select "Java™ Games", and press
- Select "Saved Games", and press .
- Select "Stormy Sight", and press to play.
You can download further Java™ games by selecting "Download More" in the "Java™ Games" menu. This will take you to the Vodafone live! portal (see next page).
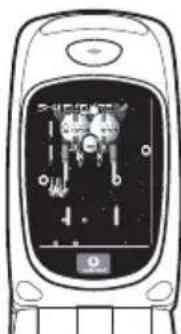
natural_image
Front view of a modern mobile phone with visible screen and keypad (no text or symbols)QUICKSTART GUIDE: RINGTONES & PORTAL
Polyphonic Ringtones

The Sharp GX10i comes with a range of amazing ringtones already loaded for you to try out.
Choosing a ringtone:
- From the Main Menu select "Profiles", select "Normal", then go to "Edit" and press
- Select "Assign Melody", then "Preset Melody" and press ☐. Choose a melody.
- To hear it, select [Play]. To stop, press [Stop].
- If you like it, you can press to select. Or try out another ringtone.
Download a new ringtone: You can also download one of the many amazing new polyphonic ringtones, which the download will store in the "My Sounds" folder in the "My Phone" section of the Main Menu.
First you need to access the Vodafone live! portal.
Accessing the Vodafone live! portal
- Your phone is already set up to use the mobile internet browser. On the start-up screen you'll see the Vodafone live! logo at the bottom right. Press to select it, and this will start the connection process (see the Vodafone section, p.105).
- Once connected you'll see a menu of icons which take you to different areas of the portal for you to explore.

- To download a ringtone, go to "Downloads" and follow the prompts to listen to and download a new ringtone. You can now choose it on your phone as before.
The tip of the iceberg: This portal has a whole world of news and entertainment to offer you. For more details, please refer to the Vodafone live! guide.
natural_image
Illustration of a smiling mobile phone with a screen displaying a person's face (no text or symbols visible)natural_image
Front view of a vintage mobile phone with visible keypad and screen (no text or symbols)QUICKSTART GUIDE: KLINGELTÖNE & PORTAL
Polyphone Klingeltöne

natural_image
Line drawing of a mobile phone with a smiling face and control panel (no readable text or symbols)natural_image
Front view of a vintage mobile phone with visible screen and keypad (no text or symbols)GUIDA RAPIDA: SUONERIE E PORTALE
Suonerie polifoniche

natural_image
Line drawing of a smiling mobile phone with a screen displaying a person's face (no text or symbols visible)natural_image
Front view of a vintage mobile phone with visible keypad and screen (no text or symbols)GUÍA RÁPIDA: TONOS DE LLAMADA Y PORTAL
natural_image
Front view of a vintage mobile phone with visible screen and keypad (no text or symbols)HANDLEIDING VOOR DE SNELLE BEGINNER: RINGTONES & PORTAL
Polyfone ringtones

natural_image
Line drawing of a smiling mobile phone with a face on screen (no text or symbols)natural_image
Front view of a mobile phone with visible screen and keypad (no text or symbols)GUIA DE INÍCIO RÁPIDO: TOQUES DE CHAMADA E PORTAL
Toques polifónicos

SNABBGUIDE: INLEDNING
natural_image
Diagram of a mobile phone front panel with visible ports and internal circuitry (no text or symbols)SNABBGUIDE: RINGSIGNALER & PORTAL
Polyfona ringsignaler

natural_image
Line drawing of a smiling mobile phone with a screen displaying a photo (no readable text or symbols)natural_image
Front view of a vintage mobile phone with visible screen and keypad (no text or symbols)GYORS KEZELÉSI ÚTMUTATÓ: CSENGŐHANGOK ÉS A PORTÁL
- Declaration of Conformity
- Introduction
- About This User Guide
- NOTICE
- Copyright
- Useful functions and services of the phone
- Table of Contents
- Fun & Games 48
- Profiles 63
- Organiser 69
- Call Manager 77
- Settings 84
- Vodafone live! 105
- Messages 107
- Table of Contents
- Data Transmission 120
- Troubleshooting 122
- Safety Precautions and Conditions of
- Use 124
- Index 128
- QUICKSTART GUIDE 134
- Your Phone
- Accessories (optional)
- Inserting the SIM Card and the Battery
- Note
- Getting Started
- Removing the SIM Card and the Battery
- Battery Disposal
- Charging the Battery
- To Charge Using the Charger
- To disconnect the charger
- Battery Level Indicator
- Low Battery During Use
- Turning Your Phone On and Off
- Entering the PIN Code
- Softkey Indicators
- Sub-Screen
- Call Functions
- Making a Call
- Emergency Calls
- Call Functions
- International Calls
- Speed Dialling
- Redialling
- Automatic Redialling
- Ending a Call
- Answering a Call
- Tip
- Rejecting an Incoming Call
- Incall Menus
- Adjusting the Earpiece Volume
- Putting a Call on Hold
- Call Waiting
- Conference Call
- Making a Conference Call
- Muting the Microphone
- Phonebook
- Entering Characters
- : Press and hold to shift between Normal and T9 mode.
- Changing the Input Mode
- T9 Text Input
- Symbols and Punctuation
- Using Text Template
- Creating a New Entry
- Phonebook Memories
- Storing Names and Numbers
- Storing Optional Data
- Selecting Group Name
- Entering E-mail Address
- Entering Personal Data
- Storing Picture/Image Data
- Adding the Phone Number from the Call Log Entries
- Storing after Inputting a Phone Number
- Finding a Name and Number
- Search by Name
- Search in Alphabetical Order
- Editing Phonebook Entries
- Deleting Phonebook Entries
- Checking Your Own Numbers
- Editing Your Phone Numbers
- View Groups
- Memory Status
- Speed Dial List
- Adding Phonebook entries to the Speed Dial List
- Viewing the Speed Dial List
- Sending Messages
- Phonebook
- Using the Menu
- Using the Main Menu
- Operation Guidance
- Shortcut Keys
- Side Keys
- Camera (M 1)
- Taking Pictures
- Using the Zoom Function
- To select the picture size
- To select the mode
- Retaking Pictures
- In the Case of No Available Memory
- Meanings of Indicators in Camera Mode
- Making Adjustments According to Lighting Conditions
- Viewing the Taken Pictures
- Using the Timer
- Taking a Picture with the Timer
- Cancelling the Delay Timer
- Sending Pictures
- Deleting Pictures
- My Phone
- Java™
- Using Java™ Applications
- Downloading Java™ Applications
- Confirmation screen
- Download
- My Java™ Games (M 2-1)
- Executing Java™ Applications
- Checking the Information of the Java™ Application
- Deleting Java™ Applications
- My Pictures (M 2-2)
- Downloading Picture/Image File
- Viewing Pictures/Images
- Checking the Picture/Image Data
- Changing the File Name
- Adjusting the Size of the Picture/Image
- Deleting Pictures/Images
- My Sounds (M 2-3)
- Downloading Sound Files
- Playing Back Sounds
- Checking the Sound Data
- Setting the Tone and Strength
- Deleting Sounds
- My Bookmarks (M 2-4)
- Adding a Bookmark
- Accessing Bookmarked Pages
- Editing Bookmarks
- Deleting Bookmarks
- My Text Templates (M 2-5)
- Adding Phrases to My Text Templates
- Editing Text Templates
- Viewing Text Templates
- Deleting Text Templates
- Memory Status (M 2-6)
- Fun & Games
- Java™ Games
- Settings (M 3-1-2)
- Volume
- Backlight
- To Set the Blinking Operation
- Vibration
- Online Services
- Other Games (M 3-2)
- Starting Games
- Game Guide
- Collection Hunter (M 3-2-2)
- Air Hockey (M 3-2-3)
- To Select a Game Level
- Setting up Game Options (M 3-2-4)
- Melody Editor (M 3-3)
- Creating Your Original Ring Tone (M 3-3-1)
- Specify the Musical Scale and Rest
- Specifying the Types of Notes and Rests
- Set the Tone
- Deleting an Original Ring Tone
- Editing Original Ring Tones
- Copying and Pasting Notes
- Tone Editor (M 3-4)
- FM Sound Source
- Setting an Algorithm
- Setting the Operator
- Set the Effect Frequency
- Creating Your Original Tone
- Profiles (M 4)
- Activating a Profile
- Customising Profiles
- Resetting Profile Settings
- Ringer Volume
- Ringer Type
- Keypad Tones
- Warning Tone
- Power On/Off Sound
- Message Alert
- Low Battery Alert
- Any Key Answer
- Organiser
- Calculator (M 5-1-1)
- Organiser
- Rate Conversion
- Calendar (M 5-2)
- Find a Particular Date
- Deleting Schedules
- Clock & Alarm
- Organiser
- Setting the Time Zone (M 5-3-3)
- To Customise the Time Zone
- Setting Alarm (M 5-3-1)
- Organiser
- Changing Alarm Settings
- Disabling Alarm Function
- Resetting an Alarm Setting
- Organiser
- Resetting All Alarm Settings
- Voice Memo (M 5-4)
- Recording a Voice Memo
- To Play Back the Saved Voice Memo
- Help List (M 5-5)
- Call Manager
- Call Log
- Viewing Call Log
- Call Manager
- Deleting Call Log
- Call Timers (M 6-2-5)
- Checking the Duration of the Last Call
- Checking the Total Call Time
- Resetting All Call Timers
- Call Costs (M 6-2-6)
- Checking the Cost of the Last Call
- Checking the Total Call Cost
- Setting the Charge Rate
- Checking the Charge Rate
- Setting the Charge Limit
- Checking the Charge Limit
- Resetting All Call Costs
- Checking the Residual Credit
- Data Counter (M 6-2-7)
- Resetting All Data Counter
- Diverts (M 6-3)
- Divert Calls
- Press
- Checking the Divert Status
- Cancelling All Divert Settings
- Settings
- Phone Settings
- Changing the Language (M 7-1-1)
- Wallpaper for the Stand-by Screen (M 7-1-2)
- To Set Built-in Animations or Illustrations
- Backlight (M 7-1-3)
- Adjust the Brightness of the Backlight (M 7-1-4)
- Display Saving (M 7-1-5)
- Setting the Greeting Message (M 7-1-6)
- Assign Pictures (M 7-1-7)
- Settings
- 5.Press
- To Set My Pictures
- External Display (M7-1-8)
- Phone Setting Reset (M 7-1-9)
- Settings
- Call Settings
- Call Waiting (M 7-2-1)
- Display Call Timers (M 7-2-2)
- Caller No. Status (M 7-2-3)
- To Check the Caller No. Status
- Personal Call (M 7-2-4)
- Group Call (M 7-2-5)
- To Set Group Ring Tone
- Auto Redial (M 7-2-6)
- Minute Minder (M 7-2-7)
- Call Setting Reset (M 7-2-8)
- Network Settings
- Selecting a Network Automatically (M 7-3-1)
- Adding a New Network
- Editing the Preferred List
- To Delete a Network from the Preferred List
- Changing the Network Password (M 7-3-2)
- Selecting an Applicable Zone (M 7-3-3)
- Internet Settings (M 7-4)
- WAP/MMS Settings
- To Set up your Account Information
- To Select Network Connection Profile
- WAP Push Setting (M 7-4-3)
- Infrared (M 7-5)
- Security (M 7-6)
- Enabling/Disabling the PIN Code (M 7-6-1)
- Changing PIN Code
- Handset Lock (M 7-6-2)
- Call Barring (M 7-6-4)
- Checking Call Barring Status
- Cancel All Call Barring Settings
- Fixed Dialling No. (M 7-6-5)
- Searching a Registered Name
- Editing a Registered Name
- Deleting a Registered Name
- Master Reset (M 7-7)
- Vodafone live!
- Viewing the WAP Browser
- To Exit the WAP Browser
- Navigating a WAP Page
- Browser Menu
- Messages
- MMS (Multimedia Messaging Service)
- About MMS
- Setting up MMS (M 0-1-5)
- Creating a New MMS (M 0-1-1)
- To Enter the Subject of the Message
- To Add Recipients
- To Use the Text Template
- To Save a Message in the Drafts Box
- Turning the Slide Show Setting On or Off
- If You Select "On"
- If You Select "Off"
- Inserting Attached Data
- To Add Attached Data
- To Delete Attached Data
- Sending a Message in the Drafts Box
- Reading MMS (M 0-1-2)
- Incoming Messages
- Replying to a Message to the Sender from Inbox
- Forwarding a Message
- Modifying a Message
- Storing the Phone Number or E-mail Address of a Sender in the Phonebook
- Retrieving MMS
- Deleting Messages
- To Lock Message
- Making a Call to the Sender of a Message
- SMS (Short Message Service)
- About SMS
- Using SMS with Your Phone
- Setting up SMS (M 0-2-4)
- To set up the Service Centre Address
- Validity Period
- Message Format
- Connection Type
- Optimisation
- Creating a New SMS (M 0-2-1)
- To Save the Message in the Outbox
- Sending a Message
- Reading SMS
- Replying to the Sender
- Calling the Message Sender
- Extracting Phone Numbers from the Received Messages and making a call
- Cell Broadcast (M 0-3)
- Enabling/Disabling Cell Broadcast (M 0-3-1)
- Reading Cell Broadcast Messages (M 0-3-2)
- Subscribing to Cell Broadcasts
- Setting Languages
- Cell Information (M 0-4)
- Enabling/Disabling Cell Information
- Data Transmission
- System Requirements
- Software Installation and Setup
- Using the Modem Setup
- Data Transmission
- Transmitting Picture/Image Files
- Troubleshooting
- Safety Precautions and Conditions of Use
- CONDITIONS OF USE
- Electromagnetic waves
- Caring for your phone
- Battery
- CAUTION
- Aerial Care
- Camera Operation
- Others
- ENVIRONMENT
- PRECAUTIONS CONCERNING VEHICLE USE
- SAR
- Index
- A
- B
- C
- D
- E
- F
- H
- |
- J
- L
- M
- N
- 0
- P
- 27
- Q
- R
- S
- T
- V
- QUICKSTART GUIDE: INTRODUCTION
- More than voice and text – now it's pictures, music and games!
- Access the Vodafone live! portal
- QUICKSTART GUIDE: NAVIGATION & CAMERA
- Trying out your phone
- Navigation and selection:
- Using the camera
- Taking a photo:
- Viewing photos:
- Using a photo as wallpaper:
- QUICKSTART GUIDE: MESSAGING & GAMES
- Picture Messaging
- Attaching your photo:
- Sending: From the text entry screen:
- Playing games
- QUICKSTART GUIDE: RINGTONES & PORTAL
- Polyphonic Ringtones
- Choosing a ringtone:
- Accessing the Vodafone live! portal
- QUICKSTART GUIDE: KLINGELTÖNE & PORTAL
- Polyphone Klingeltöne
- GUIDA RAPIDA: SUONERIE E PORTALE
- Suonerie polifoniche
- GUÍA RÁPIDA: TONOS DE LLAMADA Y PORTAL
- HANDLEIDING VOOR DE SNELLE BEGINNER: RINGTONES & PORTAL
- Polyfone ringtones
- GUIA DE INÍCIO RÁPIDO: TOQUES DE CHAMADA E PORTAL
- Toques polifónicos
- SNABBGUIDE: INLEDNING
- SNABBGUIDE: RINGSIGNALER & PORTAL
- Polyfona ringsignaler
- GYORS KEZELÉSI ÚTMUTATÓ: CSENGŐHANGOK ÉS A PORTÁL
Brand : SHARP
Model : GX10i
Category : Mobile Phone