
PHOTOVAULT - CD Player SONY - Free user manual and instructions
Find the device manual for free PHOTOVAULT SONY in PDF.

| Product Type | CD-R Mini Station (8 cm CD-R burner) |
| Brand | SONY |
| Model | PHOTOVAULT (MCS1) |
| Dimensions (W × H × D) | 112 × 24 × 91 mm |
| Weight (unit only) | Approx. 190 g |
| Power supply | AC adapter (5 V DC, 2 A) or 4 AA batteries (alkaline, Ni-Mn, NiMH) |
| Copy sources | Memory Stick, Memory Stick Duo (adapter), Memory Stick PRO, digital still camera (USB Mass Storage/PTP), USB storage media (Sony Micro Vault) |
| Compatible discs | 8 cm CD-R (156-210 MB), Orange Book Part II |
| Writing speed | Max. 4x |
| Reading speed | Max. 4x |
| Video output | NTSC/PAL, JPEG Baseline images (EXIF) |
| Interfaces | USB (devices), Memory Stick slot, composite video output |
| Main functions | Data copy to CD-R without computer, slideshow viewing on TV, disc finalization, data verification |
| Battery life (alkaline batteries) | Approx. 10 copies of a 128 MB Memory Stick |
| Maintenance | Clean the casing with a soft dry cloth, clean the lens with an air duster |
| Safety | Class 1 laser, do not open, avoid moisture |
| Supplied accessories | AC adapter, video cable, power cord, 8 cm CD-R, batteries, instruction manual, warranty card |
| Operating temperature | 5°C to 40°C, 5% to 95% RH (no condensation) |
| Storage temperature | -40°C to 60°C, 5% to 95% RH (no condensation) |
| Spare parts and repairability | Not specified by the manufacturer; refer maintenance to qualified technician |
Frequently Asked Questions - PHOTOVAULT SONY
User questions about PHOTOVAULT SONY
0 question about this device. Answer the ones you know or ask your own.
Ask a new question about this device
Download the instructions for your CD Player in PDF format for free! Find your manual PHOTOVAULT - SONY and take your electronic device back in hand. On this page are published all the documents necessary for the use of your device. PHOTOVAULT by SONY.
USER MANUAL PHOTOVAULT SONY
Operating Instructions GB
Mode d'emploi FR
Dangerously high voltages are present inside the unit. Do not open the cabinet. Refer servicing to qualified personnel only.
For customers in the U.S.A.
Owner's Record
The model number and the serial number are located on the bottom of the drive. Record the serial number in the space provided below. Refer to this number whenever you call your Sony dealer regarding this product.
Model No. MCS1
Serial No. ____
If you have any questions about this product, you may call; Sony Customer Information Service Center 1-866-654-SONY(7669) or
http://www.mediabysony.com
FCC Notice
This equipment has been tested and found to comply with the limits for a Class B digital device, pursuant to Part 15 of the FCC Rules. These limits are designed to provide reasonable protection against harmful interference in a residential installation. This equipment generates, uses, and can radiate radio frequency energy and, if not installed and used in accordance with the instructions, may cause harmful interference to radio communications. However, there is no guarantee that interference will not occur in a particular installation. If this equipment does cause harmful interference to radio or television reception, which can be determined by turning the equipment off and on, the user is encouraged to try to correct the interference by one or more of the following measures:
– Reorient or relocate the receiving antenna.
- Increase the separation between the equipment and receiver.
- Connect the equipment into an outlet on a circuit different from that to which the receiver is connected.
- Consult the dealer or an experienced radio/TV technician for help.
The supplied interface cable must be used with this equipment in order to comply with the limits for a digital device pursuant to Subpart B of Part 15 of FCC Rules.
Caution:
You are cautioned that any changes or modifications not expressly approved in this manual could void your authority to operate this equipment.
The use of optical instruments with this product will increase eye hazard.
For customers in Canada
This Class B digital apparatus complies with Canadian ICES-003.
For customers in Europe
This equipment conforms with the following European Directives: 89/336/EEC, 92/31/EEC (EMC Directive), 93/68/EEC (CE Marking Directive).
This equipment complies with EN 55022 Class B and EN 55024 for use in the following areas: residential, commercial and light-industrial.
Audio and picture distortion may occur if this equipment is positioned in close proximity to any equipment emitting electromagnetic radiation.
This equipment has been tested and found to comply with the limits set forth in the EMC Directive for using connection cables shorter than 3 metres (9,8 feet).
This CD-R drive is classified as a CLASS 1 LASER PRODUCT and complies with the Laser Products Safety Standard IEC 60825-1:1993+A1:1997+A2:2001.
Repair and maintenance only by authorized Sony technicians.
Improper use and repairs can create a safety hazard.
CLASS 1 LASER PRODUCT
LASER KLASSE 1 PRODUKT
LUOKAN 1 LASERLAITE KLASS 1 LASER APPARAT
The CLASS 1 LASER PRODUCT label is located on the bottom of the equipment.
Maximum optical power of MCS1 is 0.22 mW Maximum optical power of laser diode is 26 mW.
Caution – Use of controls or adjustments or performance of procedures other than those specified herein may result in hazardous radiation exposure.
Table of Contents
Introduction
What This Product Can Do.... 4
Compatible media and devices ..... 5
Supplied Accessories 6
Locating the Controls and Connectors ... 6
Basic Operation
Preparations 9
Using the AC adapter 9
Using the battery pack 9
Copying Data to a CD-R 11
Inserting the CD-R 11
Copying data from a “Memory Stick” media 12
Copying data from a digital still camera 14
Viewing Digital Images on a Television 17
Advanced Operation
Various Copy Functions .... 19
Adding data 19
Copying the same data to multiple CD-Rs 20
Copying data larger than the remaining CD-R capacity ...... 20
Finalizing a disc 22
Copying data from a USB storage media 23
Verifying copied data 23
Various Playback Functions ...... 25
Viewing other index pages in 6-image steps ...... 25
Viewing images as a slide show .... 25
Changing the slide show time interval 26
Rotating an image 26
Changing the Video Signal of the MCS1 27
Other Functions 28
Auto power-off 28
Switching the operation mode ..... 28
Miscellaneous
Precautions 29
Maintenance 30
Notes on Handling a “Memory Stick” Media 30
Power Supply 31
About Batteries 31
Specifications 32
Troubleshooting 33
Problems during copying ...... 33
Problems with displaying digital images on a television 34
Other problems 34
Message Icons 35
- “Memory Stick”, MEMORY STICK, “Memory Stick PRO”, and “Memory Stick Duo”, are trademarks of Sony Corporation.
- All other names of systems, products and services are trademarks of their respective owners. In the manual, the ^TM or ^® marks are not specified.
What This Product Can Do
The Mini CD-R Station MCS1 (simply called “the MCS1” in this manual) is a backup tool specially designed to use 8 cm CD-R discs. You can copy data from “Memory Stick” media to this small and convenient media for safekeeping.
A built-in USB connector allows connection of digital still cameras or USB storage media, for direct copying of data onto CD-Rs without having to use a computer. CD-R created with the MCS1 can then be used on a computer.
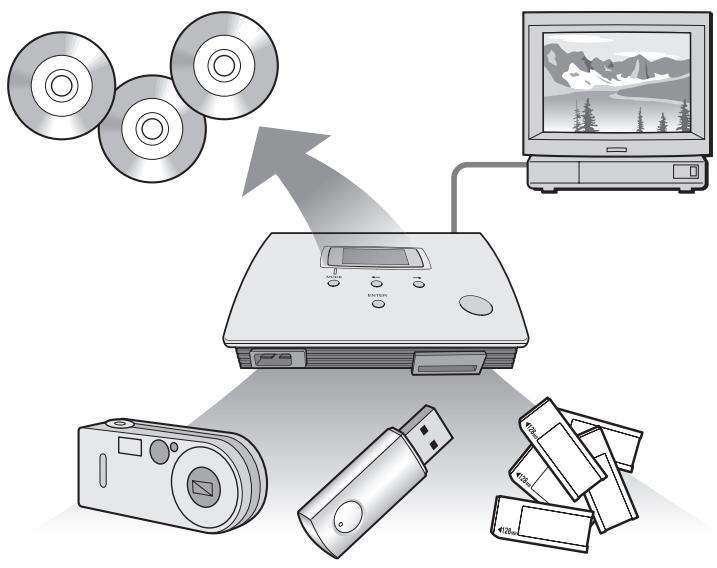
The MCS1 also has an output for connection to a television, which lets you view digital pictures (JPEG) stored on media inserted in the unit or devices connected to it.
Notes
- Only still images in Baseline JPEG (EXIF) format can be viewed. The MCS1 cannot reproduce images in other formats or play back video files.
- Depending on the JPEG format of your files, the MCS1 may not be able to display some files.
Compatible media and devices
Copy source media and devices\*
Data from the following types of media and devices can be used to copy.
| Category | Supported media and devices |
| “Memory Stick” media | “Memory Stick” media“Memory Stick Duo” media (adapter required)“Memory Stick PRO” media“Memory Stick PRO Duo” media (adapter required)* Parallel high-speed data transfer not supported. |
| Digital camera with USB interface | Digital still camera compatible with Mass Storage Class or PTP |
| USB storage media | Sony USM64D/128D/256DSony USM128E/256E/512E |
* You can find the latest information about compatibility at: http://www.sony.net/photovault/
Note
The MCS1 cannot be connected to devices or media other than those listed above, such as a computer or printer. It also cannot be used in conjunction with a USB hub.
Compatible CD-R
The MCS1 is compatible with 8 cm CD-R conforming to the Orange Book Part II specifications, having a storage capacity of 156 to 210 MB. The actual amount of data that can be stored is less than the amount shown on the disc package.
Notes
- 8 cm CD-RW cannot be used.
- Depending on the make of your 8 cm CD-R, you may not always be able to write data to disc.
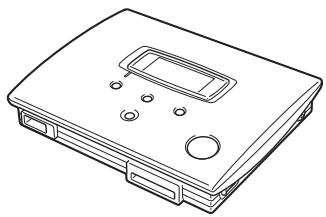
Supplied Accessories
After unpacking the unit, make sure that all the parts listed below are present. If anything is missing, contact the Sony dealer where you purchased this product or a Sony service representative in your area.
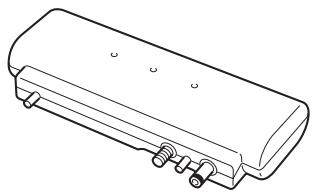
- Mini CD-R Station MCS1
- Battery pack (1)
natural_image
Line drawing of a rectangular electronic device casing with control panel and buttons (no text or symbols)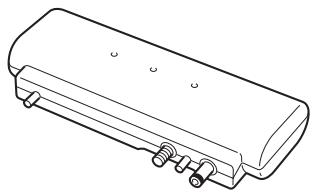
natural_image
Technical line drawing of a mechanical component with springs and mounting holes (no text or symbols)- AC adapter (1)
- Power cord (1)
• Video output cable (1) - 8 cm CD-R (1)
- Operating Instructions (1)
- Warranty Card (1)
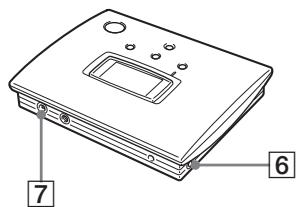
Locating the Controls and Connectors
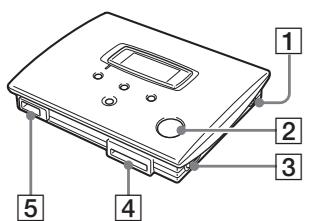
1 POWER button
2 Disc window
3 OPEN lever
4 Memory Stick slot
5 USB connector
6 VIDEO OUT connector
7 DC IN connector
flowchart
graph TD
    A["MODE COPY"] --> B["OK ENTER"]
    C["MODE"] --> D["ENTER"]
    E["10"] --> F["11"]
    G["12"] --> H["12"]
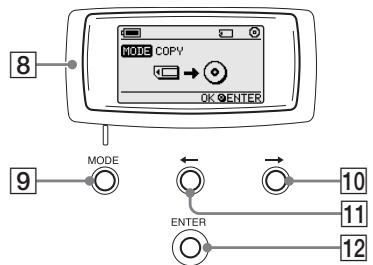
8 Display window
9 MODE button
10 → (Forward) button
11 ← (Back) button
12 ENTER button
Display window
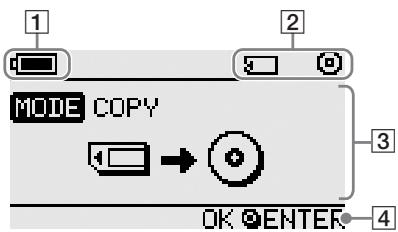
1 Remaining charge indicator
The icon shown here indicates the remaining charge of the battery pack of the MCS1.
Indicates that the AC adapter is connected or that the battery pack is fully charged.
Indicates that the battery pack is beginning to run low on charge. If you are using Ni-Mn batteries, replace them.
Indicates that the battery pack is running quite low on charge. If you are using NiMH batteries, replace them.
Indicates that the battery pack is nearly depleted of charge. If you are using alkaline batteries, replace them.
☐ (Flashing) Indicates that the battery pack is completely depleted of charge. The power will shut off now.
2 Connected device indicator
The icon shown here indicates the type of media currently inserted in or connected to the MCS1.
“Memory Stick” media
Digital still camera and USB storage media
CD-R
Finalized CD-R. For details, see page 22.
The icon showing completion of the finalization process also appears here. For details, see page 22.
3 Operation mode/message display
Gives information about the current operation status and shows various messages.
4 Navigation guide indicator
Shows what functions the buttons of the unit performs in the current operation mode.
Basic Operation
Preparations
The MCS1 can be powered either from the supplied AC adapter or from the supplied battery pack. It is not possible to use both together.
Using the AC adapter
At home, the supplied AC adapter is normally used to power the unit.
1 Connect the power cord to the supplied AC adapter.
2 Plug the cable from the AC adapter into the DC IN connector on the MCS1.
3 Plug the power cord into an AC outlet.
Using the battery pack
By attaching the battery pack to the unit, you can operate the MCS1 also in places where there is no AC outlet.
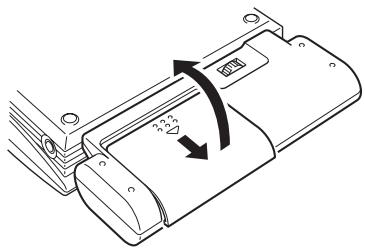
1 Plug the battery pack straight into the MCS1, and turn the fastening screw to lock the pack in place.
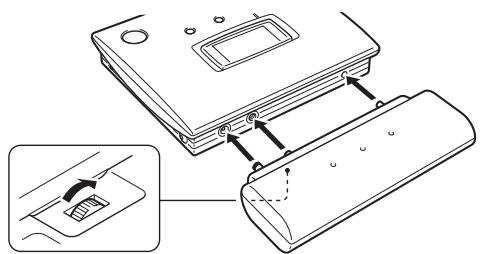
2 Slide the battery compartment lid in the direction shown by the arrow to open it.
natural_image
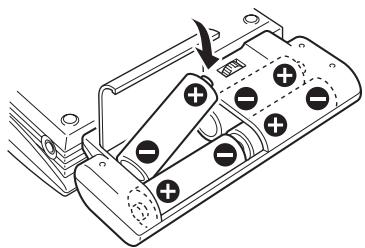
Diagram of a device casing with directional arrows indicating rotation or movement (no text or symbols)3 Insert four AA batteries into the battery pack.
Make sure that the plus and minus orientation of the batteries is correct, as shown inside the compartment.
natural_image
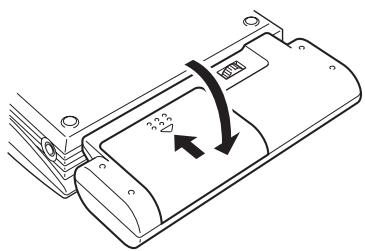
Diagram of a battery pack with positive and negative terminals, no text or symbols present4 Close the battery compartment lid.
Types of batteries that can be used
Batteries are not supplied with the MCS1. Purchase one of the following types of batteries:
• AA alkaline batteries
• AA Ni-Mn batteries
- AA NiMH rechargeable batteries (cannot be charged with this unit)
Notes
- You cannot use manganese batteries with the MCS1.
- For details on the remaining charge indicator, see the explanation on page 7. Particularly in the case of Ni-Mn and NiMH batteries, voltage decreases rapidly when charge runs low, so it is best to replace batteries early.
To remove the batteries
Turn the fastening screw to disengage the lock and then pull the battery pack off the MCS1.
Copying Data to a CD-R
Inserting the CD-R
To copy data to a CD-R, proceed as follows.
Notes
- Be sure the MCS1 is placed on a flat surface.
- Do not let anything shake or strike the MCS1 during copying.
1 Hold down the POWER button for at least 2 seconds to turn on the MCS1.
2 Push and slide the OPEN lever to open the cover.
3 Insert a new CD-R and close the cover.
Notes
- Insert the CD-R with the label facing upwards.
- Do not touch the recording side of the CD-R.
- Push the cover of the MCS1 down until it audibly snaps shut.
- Due to CD-R recording characteristics, the actual amount of data that can be stored on a disc is less than the amount shown on the disc package.
- Depending on the files you copy, the amount of space copied may be larger than the size of the files copied.
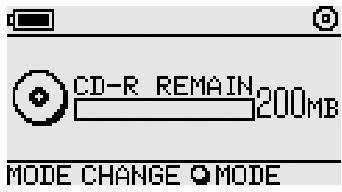
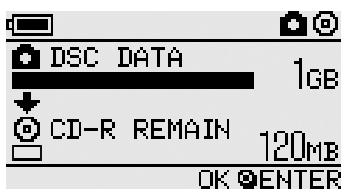
The disc is detected and its remaining storage capacity appears in the display window.
Notes
- If you insert a CD-R that already contains data into the MCS1, it automatically enters the video output mode. For details, see “Adding data” on page 19.
- To prevent the possibility of losing data, be sure to observe the following precautions.
- Never open the cover of the MCS1 during copying.
- While copying data from a “Memory Stick” media, do not remove the “Memory Stick” media.
- While copying data from a digital still camera, do not turn the camera off or disconnect the USB cable.
- While copying data from USB storage media, do not remove the USB storage media.
- A maximum of 3,000 files (including folders) can be copied.
Copying data from a “Memory Stick” media
Note
The entire contents of the “Memory Stick” media are copied to the CD-R in one operation. It is not possible to selectively copy files.
1 Turn on the MCS1, insert a CD-R, and then wait for it to be detected.
For details, see “Inserting the CD-R” on page 11.
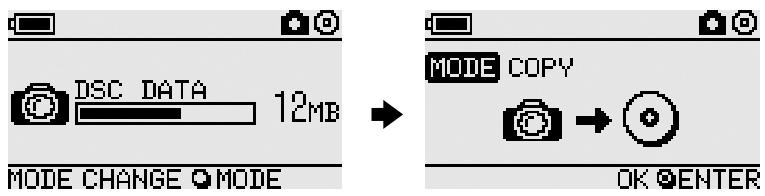
2 Once the CD-R is detected, insert the "Memory Stick" media into the Memory Stick slot of the MCS1.
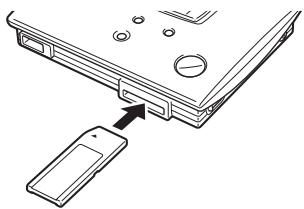
natural_image
Diagram showing a device with a magnified inset view of its internal components (no text or symbols)The usage status of the “Memory Stick” media is shown in the display window. After about two seconds, the display changes as follows.
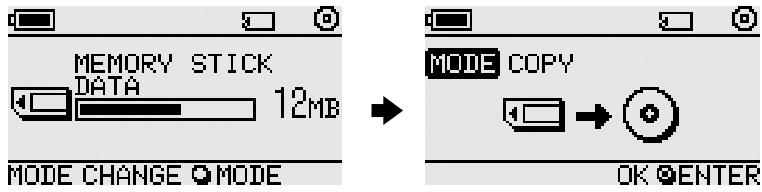

If the size of the data to be copied exceeds the remaining capacity of the CD-R, the display window shows the following. In such a case, you can split the data over several CD-R. For details, see “Copying data larger than the remaining CD-R capacity” on page 20.
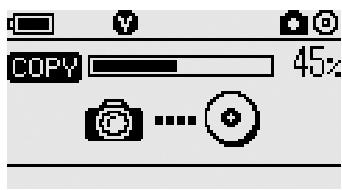
3 Press the ENTER button.
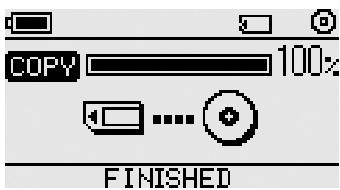
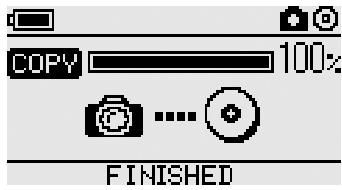
The data copy process starts. During copying, the progress status is shown in the display window. When copying is complete, the indication changes as follows.

If you want to give the CD-R to other people or want to use the CD-R with copied data in a device other than the MCS1, it is recommended to finalize the disc. This ensures that the CD-R can be read by most computers. For details on the finalization procedure, see page 22. Note that you are unable to add data to a finalized disc.
Note
8 cm discs are not compatible with some computers.
When the copying process is finished...
You can continue to copy the same data to another CD-R. For details, see “Copying the same data to multiple CD-R” on page 20.
To shut down the MCS1, proceed as follows.
1 Hold down the POWER button to turn the MCS1 off.
2 Pull the "Memory Stick" media straight out of the Memory Stick slot.
Note
The MCS1 cannot erase data on a “Memory Stick” media. If you wish to erase the contents of a “Memory Stick” media, use the digital still camera, computer or other device where the “Memory Stick” media is normally used. Before doing so, verify that the data was correctly written to CD-R. Verify this by playing it on the MCS1 and using the video output, or by playing it on a computer or other device.
3 Remove the CD-R.
(1) Push and slide the OPEN lever to open the cover.
(2) While pressing the center of the disc, grasp the edges of the CD-R and lift it out.
4 Close the cover.
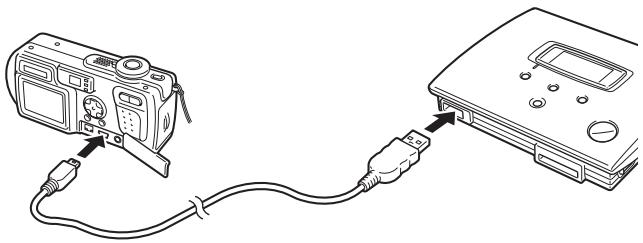
Copying data from a digital still camera
You can connect most USB-compatible digital still cameras to the MCS1 to copy their data to a CD-R. Use the USB cable supplied with your camera to make the connection.
You can find the latest information about compatible digital cameras at:
http://www.sony.net/photovault/
Note
It is not possible to copy specific files only.
1 Turn on the MCS1, insert a CD-R, and then wait for it to be detected.
For details, see “Inserting the CD-R” on page 11.
2 Using the USB cable supplied with the digital still camera, connect the camera to the MCS1.
natural_image
Line drawing showing connection between a camera and a device with USB cable (no text or symbols)3 Turn the digital still camera on and set it to the PLAY* mode.
The usage status of the camera memory is shown in the display window. After about two seconds, the display changes as follows.
* Mode for viewing images. The actual name may differ depending on the digital still camera. For details, see the section on connecting to the computer in the operating instructions supplied with your digital camera.
Note
Make sure that the digital still camera has sufficient battery capacity before starting the copy process. If the battery fails during copying, data is not written correctly.

If the size of the data to be copied exceeds the remaining capacity of the CD-R, you can split the data over several CD-R. For details, see “Copying data larger than the remaining CD-R capacity” on page 20.
4 Press the ENTER button.
The data copy process starts. During copying, the progress status is shown in the display window. When copying is complete, the indication changes as follows.

Hint
If you want to give the CD-R to other people or want to use the CD-R with copied data in a device other than the MCS1, it is recommended to finalize the disc. This ensures that the CD-R can be read by most computers. For details on the finalization procedure, see page 22. Note that you are unable to add data to a finalized disc.
When the copying process is finished...
You can continue to copy the same data to another CD-R. For details, see “Copying the same data to multiple CD-R” on page 20.
To shut down the MCS1, proceed as follows.
1 Hold down the POWER button to turn the MCS1 off.
2 Turn the digital still camera off and disconnect the USB cable.
Note
The MCS1 cannot erase data in the digital still camera. If you wish to erase the memory contents of the camera, use the functions of the camera itself. Before doing so, verify that the data was correctly written to CD-R. Verify this by playing it on the MCS1 and using the video output, or by playing it on a computer or other device.
3 Remove the CD-R.
(1) Push and slide the OPEN lever to open the cover.
(2) While pressing the center of the disc, grasp the edges of the CD-R and lift it out.
4 Close the cover.
Viewing Digital Images on a Television
If you connect the MCS1 to a television using the supplied video output cable, you can view digital images (JPEG images) on the television screen. The images may come from a CD-R or a “Memory Stick” media inserted in the MCS1, or from a digital still camera connected to it.
Notes
- Only still images in Baseline JPEG (EXIF) format can be viewed. The MCS1 cannot reproduce images in other formats or play back video files.
- You may experience problems viewing JPEG files other than those taken with a digital still cameras (Exif files).
- You may experience problems viewing images of 6 megapixels or greater.
1 Use the supplied video output cable to connect the VIDEO OUT connector of the MCS1 to the video input connector on the television.
2 Turn on the television and set the TV/Video selector to "Video".
Note
The selection method of the video input may differ depending on your television model. For details, refer to the documentation supplied with your television.
3 Hold down the POWER button for at least 2 seconds to turn the MCS1 on.
4 Prepare the media containing the digital images you want to view.
- To view digital images contained on a CD-R, insert the CD-R into the MCS1.
- To view digital images contained on a “Memory Stick” media, insert the “Memory Stick” media into the Memory Stick slot on the MCS1.
- To view digital images in a digital still camera, connect the camera to the MCS1 using the USB cable supplied with the camera.
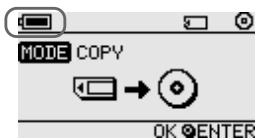
When displaying digital images from CD-R, the following indication appears in the display window of the MCS1.

Hint
If several media are available to the MCS1 at the same time, you can use the MODE button to select one of them. For details, see “Switching the operation mode” on page 28.
When you perform this procedure, an index of six digital images first appears on your television screen.
You can perform the following in the index with the MCS1 controls.
To display an image full-screen
1 Use the ←/→ buttons to move the cursor to the desired digital image.
2 Press the ENTER button.
The selected image is shown in full size on the screen.
To display other images
While an image is displayed full-screen, you can use the / buttons to display the previous or next image. To return to the index, press the ENTER button.
Advanced Operation
Various Copy Functions
Adding data
As long as a disc has not been finalized, you can add more data to it until the disc capacity is reached. The steps for adding data are basically the same as when writing data for the first time (using a new disc), except for the following points.
- When a non-finalized CD-R is inserted in the MCS1, the unit automatically goes into video output mode for displaying images from copy source media or devices. To copy new data, you must manually switch to copy mode. To do this, press the MODE button repeatedly until “COPY: MS” or other similar indications including the source media or device appears in the display window. See “Switching the operation mode” on page 28.
- The MCS1 creates a new folder each time it copies data. The name of the folder is always the creation date of the newest file copied. For example, if the newest file copied was created 2004/02/01, the folder name becomes “01022004_001”. If you copy other data where the newest file has the same date as above, the folder name becomes “01022004_002”, and so on.
Notes
- If data was written to the CD-R in a computer or other device other than the MCS1, it may no longer be possible to add more data using the MCS1.
- You cannot add data to finalized CD-R.
- When you copy data to a CD-R, the amount of space copied may be larger than the size of the files copied.
Copying the same data to multiple CD-Rs
When you have copied some data onto a CD-R, you can copy the same data onto another CD-R. To do this, proceed as follows after the first copy is finished.
1 Remove the copied CD-R from the MCS1 and insert the new CD-R.
(1) Push and slide the OPEN lever to open the cover.
(2) While pressing the center of the disc, grasp the edges of the CD-R and lift it out.
(3) Place the new CD-R inside the MCS1 and close the cover.
2 Continue to copy data.
The method for copying data is different, depending on the type of media or device that is used as a source. Proceed to the appropriate page.
Copying data larger than the remaining CD-R capacity
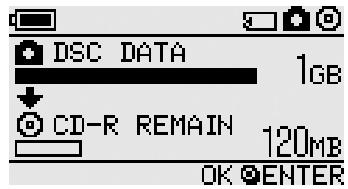
When the size of the data to be copied from a digital still camera exceeds the remaining capacity of the CD-R, the following indication appears in the display window. We have used the copy of data from a digital still camera to illustrate.
In this case, you can perform the following steps to split up the data and copy it onto multiple CD-R.

You can cancel the copy by pressing the MODE button.
1 Press the ENTER button.
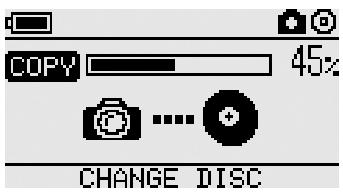
The data copy process starts. During copying, the progress status is shown in the display window.
Notes
- Never open the cover of the MCS1 during copying.
- Do not remove the “Memory Stick” media or disconnect the digital still camera during copying.
When copying of the first portion of data is complete, the indication “CHANGE DISC” appears in the display window.
2 Remove the CD-R.
(1) Push and slide the OPEN lever to open the cover.
(2) While pressing the center of the disc, grasp the edges of the CD-R and lift it out.
3 Place the next CD-R in the MCS1 and close the cover.
4 Repeat steps 1 to 3 until the following indication appears in the display window.
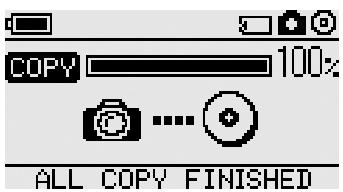
The procedure comprised of steps 1 to 3 can be repeated until all the data is copied. This condition is indicated by the indication “ALL COPY FINISHED”.
Finalizing a disc
After data is written to a CD-R, the procedure of locking the remaining area so that no more data can be written is called finalization. This enables most other devices such as computers, CD-ROM drives, etc., to read the data on the disc.
After it is finalized, no more data can be added to a CD-R, even if there is still some free capacity.
Note
Even when a disc is finalized, some computers or CD-ROM drives may still not be able to play the disc. If you experience problems, try reading the disc in another computer or CD-ROM drive.
To finalize a CD-R, proceed as follows.
1 Hold down the POWER button for at least 2 seconds to turn the MCS1 on.
2 Push and slide the OPEN lever to open the cover.
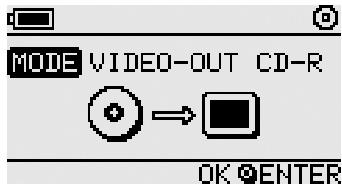
3 Insert the CD-R to finalize and close the cover.
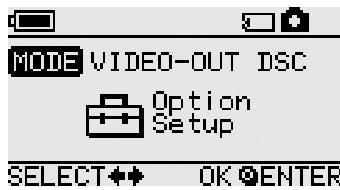
The indication “VIDEO-OUT CD-R” appears in the display window.
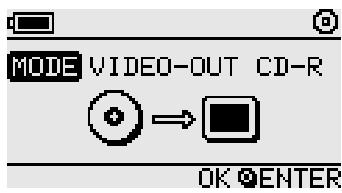
4 Press the MODE button several times until the following indication is shown in the display window.
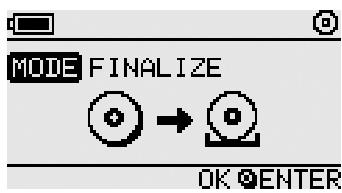
5 Press the ENTER button.
A confirmation message appears. Press the ENTER button and finalization of the CD-R starts. When finalization is completed, the display window changes to “FINISHED”.

Copying data from a USB storage media
You can connect a USB storage media to the USB connector of the MCS1, and copy all the data it contains to CD-R. To do so, follow the same procedure as the one outlined in “Copying data from a digital still camera” on page 14.
You can also use the supplied video output cable to connect the MCS1 to your television and display JPEG files on USB storage media on your television screen. For details, see “Viewing Digital Images on a Television” on page 17.
The MCS1 is compatible with Sony USB storage media (USM64D/128D/256D, USM128E/256E/512E). You can find the latest information about compatible USB storage media at:
http://www.sony.net/photovault/
Verifying copied data
By comparing the original data and the one copied to CD-R, it is possible to verify its integrity.
Use the following procedure to configure the MCS1 to perform this verification automatically when copy ends. If you are unable to perform this verification from your computer, for example, we recommend verifying the integrity of your data this way.
Note
Verifying the integrity of the data takes approximately as long as the copy itself.
1 Press the POWER button for more than two seconds.
The MSC1 starts. Perform the following procedure before inserting a CD-R or connecting any type of media to the MCS1.
2 Press the ENTER button for more than two seconds.
3 Using the ← and → buttons, select "VERIFY".
By default, the verification setting is QUICK. The QUICK setting starts data integrity verification after the copy is complete, allowing the copy to be completed faster than with the VERIFY setting.
4 Press the ENTER button.
The “V” mark appears at the top of the display window, indicating that data is automatically verified when copy ends.

Hint
You can cancel the verification by pressing the MODE button.
Various Playback Functions
While displaying digital images stored on a media connected to or inserted in the MCS1, you can access various functions for controlling the display and adjusting the image shown on the television.
For details on connecting the MCS1 to a television, see “Viewing Digital Images on a Television” on page 17.
Viewing other index pages in 6-image steps
If you press and hold the button for 2 seconds when the index is displayed, the next group of 6 images is displayed.
Similarly, if you press and hold the ← button for 2 seconds when the index is displayed, the previous group of 6 images is displayed.
Viewing images as a slide show
When a full-screen image or the index is displayed, pressing and holding the ENTER button for approximately 2 seconds enables the slide show mode. If you activate this mode when the index is displayed, the slide show begins at the currently selected image.
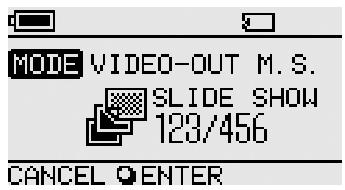
The default interval setting for slide show mode is approximately 5 seconds, but this varies according to the file size. Images are automatically switched at this rate. If desired, you can change the interval setting. For details, see “Changing the slide show time interval” on page 26.
When you press the ENTER button, the slide show mode is terminated and regular full-screen display resumes.
Changing the slide show time interval
1 If you press and hold the MODE button for 2 seconds during regular full-screen display,
The slide show time interval setting appears on the television screen.
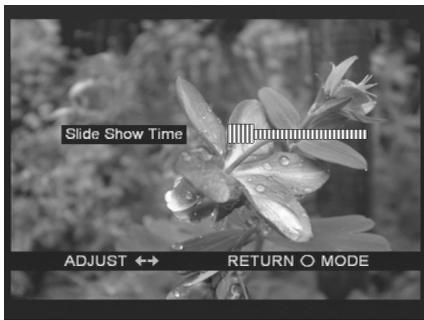
2 Use the ←/→ buttons to change the setting.
3 When the desired time interval has been set, press the MODE button.
The MCS1 returns to the index.

Hint
This setting is preserved even if the MCS1 is turned off.
Rotating an image
While a single image is being shown in full size on the screen, you can rotate the image by pressing and holding one of the / buttons for 2 seconds. The image is rotated 90^ at a time in the direction of the arrow.
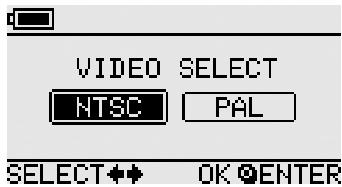
Changing the Video Signal of the MCS1
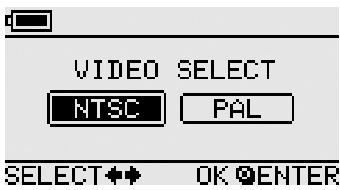
You can change the video signal used by the MCS1. You can choose between NTSC and PAL.
Note
Perform this setup procedure while there are no CD-R or other media inserted in the MCS1. If a CD-R or other media is inserted, the procedure below does not work.
1 Hold down the POWER button for at least 2 seconds to turn the MCS1 on.
2 Press and hold the MODE button for at least 2 seconds.
The following indication appears in the display window.

Hints
- The video signal that appears in the display window is the one currently in use.
- The default setting is NTSC.
- Below are some examples of regions that use these video signals.
NTSC: U.S.A., Japan, etc.
PAL: Europe, etc.
3 If you want to change the video signal, use the ←/→ buttons to move the cursor to "NTSC" or "PAL".
4 Press the ENTER button.
The video signal is changed.
Other Functions
Auto power-off
The MCS1 incorporates an auto power-off function.
If the MCS1 is idle for more than five minutes, the unit automatically turns itself off. To turn it on again, hold down the POWER button for at least 2 seconds.
In the following cases, auto power-off is disabled:
• While data is copied to a CD-R
- While the slide show function is active
- During finalization
- While an error message is displayed
Switching the operation mode
The MCS1 has six operation modes. Normally, the operation mode is selected automatically, but you may want to switch it manually in the following cases.
- When multiple media or devices are connected at the same time
- When you want to add data to a non-finalized CD-R
- When you want to finalize a non-finalized CD-R

Hint
When several media and/or devices are connected simultaneously, the priority order becomes the following:
- With VIDEO OUT
- Digital still camera or USB storage media.
- "Memory Stick" media
- CD-R
- When copying data
- Digital still camera
- "Memory Stick" media
The operation mode of the MCS1 can be switched using the MODE button. Each push of the button cycles through the settings.
Miscellaneous
Precautions
Usage and storage locations
Do not use or store this drive in locations subject to high humidity, high temperatures, strong vibrations, or direct sunlight.
Operation
- Do not move the drive during operation, to prevent the possibility of malfunctions.
- Place the drive on a level surface for operation.
- Do not place any objects on top of the drive.
- Protect the drive from sudden temperature changes. Do not use the drive immediately after moving it from a cold to a warm location or after the ambient temperature has risen drastically. Otherwise, condensation inside the drive can occur. If the temperature changes drastically during operation, stop using the drive while keeping the drive turned on and let it stand for about an hour before using it again.
Lens
- If this drive no longer operates properly because the lens is dirty, clean it with any commercially available pressurized air duster.
- Do not touch the lens in this drive. Furthermore, to avoid dust sticking to the lens, do not open the tray other than to remove or insert the disc.
Notes on discs
Note the following to protect data stored on discs.
- Do not stick any labels on the disc nor scratch or otherwise damage the disc.
- Do not touch the data side of the disc (opposite the label), and hold the disc as shown below.
- Do not store the disc in locations subject to high humidity, high temperatures, direct sunlight, or high levels of dust.
• Take care not to spill any liquid on the disc. - Return the disc to its case when not in use to prevent data damage.
- Use an oil-based felt pen when writing on the label surface of a disc.
- Do not use a disc with tape, seals, or paste on it, as the disc may damage the drive.
Maintenance
Cleaning the cabinet
Wipe the outside of the drive with a soft, dry cloth. To remove stubborn stains, moisten the cloth with a mild, neutral detergent. Do not use solvents, cleaning alcohol, benzene or other substances that may damage the finish.
Cleaning the disc
- Fingerprints and other contamination on the disc surface can lead to reading errors. Always keep the disc clean.
- To clean the disc, lightly wipe it from the center outwards.
- To remove stubborn stains, lightly moisten the cloth before wiping the disc, and use a dry cloth afterwards.
- Do not use benzene, record cleaning liquid, antistatic fluids or other substances that may damage the surface of the disc.
- Never use cleaners on an unused disc. Use specific CD cleaners to take off dust.
- You may not be able to write on the discs if there are scratches or dust on the unrecorded area. Be careful not to damage the discs.
Notes on Handling a "Memory Stick" Media
- Do not touch the connector section or allow metal objects to come into contact with it.
- Use only the label designed for the “Memory Stick” media to attach on its label space.
- Attach a label only to the designated labeling space.
- Keep the “Memory Stick” media in the supplied storage case to carry or store.
- Do not bend, drop or apply a strong shock to the “Memory Stick” media.
- Do not disassemble or modify the “Memory Stick” media.
- Keep the “Memory Stick” media away from water.
- Keep the “Memory Stick” media away from a location subject to:
– extremely high temperature, for example, in a car parked in the sun. - direct sunlight.
– high humidity and corrosive substances. - In the following cases, data on the “Memory Stick” media may be damaged (erased):
- When the “Memory Stick” media is removed or the MCS1 is turned off while data is being read.
- When the “Memory Stick” media is used in a location subject to static electricity or electrical noise.
Notes on using the "Memory Stick Duo" media
- Before using the “Memory Stick Duo” media with the MCS1, make sure to insert the “Memory Stick Duo” media into the Memory Stick Duo adapter. If you insert the “Memory Stick Duo” media directly into the Memory Stick slot on the MCS1, you may not be able to remove it.
- When inserting the “Memory Stick Duo” media into the Memory Stick Duo adapter, make sure it is inserted with proper orientation.
- When inserting the Memory Stick Duo adapter containing the “Memory Stick Duo” media into the Memory Stick slot on the MCS1, make sure it is inserted in the correct direction. Inserting it incorrectly may damage to the MCS1 or the adapter.
For details, refer to the documentation of the “Memory Stick Duo” media.
Notes on using the "Memory Stick PRO" media
When the “Memory Stick PRO” media is used in the MCS1, data read speed is the same as for a normal “Memory Stick” media because the MCS1 does not support high-speed transfers.
Power Supply
Power supply precautions
- Use only the supplied AC adapter. Using any other kind of adapter is dangerous and may lead damage or malfunction.
- Connect the AC adapter to an outlet that can easily be reached. If there is any problem, immediately unplug the adapter from the AC outlet.
- Do not place the AC adapter on a bookshelf, in a built-in cabinet or in another confined location.
- To prevent the risk of fire and electric shock, do not use the AC adapter in locations that may be subject to splashes of water, or in locations with high humidity. Do not place any containers with liquids close to the AC adapter.
- AC adapter MCS-AC1 AC 100 V-240V, 50/60 Hz 5 V DC, 2A
About Batteries
The life of a set of batteries differs, depending on ambient temperature, the battery type, and other factors.
| Operation | Battery life |
| Copying data to CD-R | Approx. 10 copies of a 128MB Memory Stick.Battery life is shorter when copying from a digital still camera or USB storage media. |
Notes
- Battery life is measured with Sony Stamina alkaline batteries LR6 (SG) (made in Japan).
- Besides AA alkaline batteries, Ni-Mn batteries, or NiMH rechargeable batteries can also be used. With Ni-Mn and NiMH batteries, you will need to watch the remaining battery charge carefully. For details, see page 7.
- The remaining battery capacity is shown in the display window. This indication is only an approximation. Actual remaining capacity may be different, depending on operation status. For details, see page 7.
- Turn off the MCS1 before replacing the batteries.
- For prolonged use, powering the MCS1 from the AC adapter is recommended.
- Remove the batteries when they are exhausted, or when the MCS1 will not be in use for a long period of time. Leaving the batteries inserted may lead to injury or burns due to battery fluid leaks caused by excessive discharge.
- Remove the batteries when transporting the battery pack and MCS1, or the battery pack alone.
Specifications
Compatible discs
8 cm CD-R conforming to Orange Book Part II specifications.
Discs with a storage capacity of 156 to 210 MB are supported. Depending on the manufacturer, some 8 cm CD-R may not be usable in the MCS1.
Write speed
Maximum 4x speed
Read speed
Maximum 4x speed
Write method
Track-at-once
Laser wavelength
$$ \lambda = 7 8 5 \mathrm{nm} $$
Interfaces
USB connector
USB storage media, digital still camera (compatible with Mass Storage Class or PTP)
Memory Stick slot
Compatible with standard “Memory Stick” media, “Memory Stick Duo” media (adapter required), “Memory Stick PRO” media, and “Memory Stick PRO Duo” media (adapter required). Parallel high-speed data transfer not supported.
Video output
NTSC/PAL (switchable), Baseline JPEG (EXIF) images only
Operating environment
41°F to 104°F (5°C to 40°C), 5% to 95% RH (non-condensing)
Storage environment
-40^ to 140^ (-40^ to 60^), 5% to 95% RH (non-condensing)
Power requirements
5 V DC from the supplied AC adapter
Batteries (sold separately, for supplied battery pack)
AA alkaline batteries
AA Ni-Mn batteries
AA NiMH rechargeable batteries
Battery life
See page 31.
External dimensions (W × H × D)
MCS1
$$ 4. 4 \times 0. 9 \times 3. 6 \text { in. } (1 1 2 \times 2 4 \times 9 1 \mathrm{mm}) $$
Battery pack
$$ 4. 2 \times 0. 7 \times 1. 6 \text { in. } (1 0 7. 8 \times 1 8. 3 \times 4 0. 1 \mathrm{mm}) $$
Mass
MCS1 Approx. 6.7 oz. (190 g)
Battery pack Approx. 1.0 oz. (28 g) (without batteries)
Supplied accessories
MCS1, battery pack, video output cable, AC adapter, power cord, 8 cm CD-R, operating instructions, warranty card
Design and specifications are subject to change without notice.
Troubleshooting
If a problem occurs during operation of the MCS1, read the troubleshooting guide carefully and attempt to solve the problem. If the problem persists, contact your Sony dealer or a Sony Service Center, or visit http://www.sony.net/photovault/.
Problems during copying
| Symptom | Cause/Remedy |
| The “Memory Stick” media is not detected. | → When the USB connector of the MCS1 is in use, it has priority over the “Memory Stick” media, therefore it is not detected even if it is inserted. Disconnect the device connected to the USB connector and try inserting the “Memory Stick” media again. You can also switch the operation mode manually by pressing the MODE button (page 28). |
| The digital still camera or USB storage media is not detected. | → The operation mode of the MCS1 may have been changed. Try disconnecting the digital still camera or USB storage media, and then reconnecting it. You can also switch the operation mode manually by pressing the MODE button (page 28).→ Verify that the digital still camera is on and set to the PLAY mode.→ Some digital still cameras may not be detected by the MCS1.→ If a USB storage media other than the Sony Micro Vault USB storage media is used, the MCS1 may not be able to detect it. |
| The CD-R is not detected. | → If a disc that does not meet specifications is inserted, the MCS1 does not detect it.→ If the disc is inserted upside down, the MCS1 does not detect it. Make sure that the disc label is facing up and the recording side down.→ Make sure that the cover of the MCS1 is properly closed.→ If the disc is scratched or otherwise damaged, the MCS1 may not be able to detect it. Do not use such a disc. |
| Cannot write data. | → If data has already been written to the disc, there may not be sufficient free capacity. Use a new disc or a disc with sufficient free capacity. |
Problems with displaying digital images on a television
| Symptom | Cause/Remedy |
| The video output mode is not enabled. | → The operation mode of the MCS1 may have been changed. Switch the MCS1 to video output mode manually by pressing the MODE button (page 28). |
| The media with digital images is not detected automatically. | → Disconnect any other storage media connected to the MCS1, and then insert the media containing the digital images that you want to display on your television screen. You can also change the operation mode of the MCS1 manually by pressing the MODE button (page 28). |
| No digital image appears on the television screen. | → Make sure that the video output cable is securely connected.→ If the image is not in JPEG format (such as TIFF or other format files), the MCS1 cannot display it on the television.→ Make sure that the television or video to which the MCS1 is connected is displaying the correct input channel. |
| The image is distorted. | → The video output signal may not be set to the correct format (NTSC/PAL). Select the correct setting for your country or region (page 27). |
Other problems
| Symptom | Cause/Remedy |
| The MCS1 does not start. | → Verify whether the AC adapter or battery pack is connected correctly.→ When using the battery pack, verify that the batteries are inserted with correct orientation.→ When using the battery pack, the batteries may be exhausted. Replace all batteries with fresh ones. |
| Batteries are used up very quickly. | → If the MCS1 is being used at very low ambient temperature, the battery life may be much shorter. In such a case, using the AC adapter is recommended. |
| The MCS1 is on, but the unit does not operate. | → Condensation may have occurred inside the MCS1. Remove any CD-R and “Memory Stick” media and disconnect all other equipment, then wait about one hour. |
| A CD-R to which data was copied cannot be read on a computer. | → Some computers and CD-ROM drives may not be able to read discs that have not been finalized. Perform the finalization procedure.→ If you are unable to read 8 cm discs written with the MCS1, your computer and/or CD-ROM drive may be damaged. Try reading the disc with another computer and/or drive. |
Message Icons
If a problem occurs during operation of the MCS1, one of the following message icons may appear in the display window.
| Icon | Meaning |
 | The disc is damaged, or device was disconnected (or cover was opened) during copying. |
 | The “Memory Stick” media is damaged. |
| [5T06] | The memory in digital still camera or USB storage media is damaged. |
| [T0XX] | The disc was not detected correctly. |
 | The “Memory Stick” media was not detected correctly. |
 | The memory in digital still camera or USB storage media was not detected correctly. |
| [WABY] | The batteries are exhausted. |
AVERTISSEMENT
CLASS 1 LASER PRODUCT
LASER KLASSE PRODUKT
Table des matières
Introduction
natural_image
Line drawing of a rectangular electronic device with a central display and four circular ports (no text or symbols)- Batterie (1)
natural_image
Technical line drawing of a rectangular electronic component with mounting holes and coiled pins (no text or symbols)natural_image
Mechanical assembly diagram showing a battery holder with positive and negative terminals, no text or symbols presentnatural_image
Technical line drawing of a mechanical component with directional arrows indicating movement (no text or symbols)natural_image
Diagram of a device with a smartphone inserted into a housing component (no text or symbols visible)natural_image
Diagram showing connection between a camera and a device via USB cable (no text or symbols present)The following indication appears in the display window.

Conseil
Piles AA NiMH rechargeables
CLASS 1 LASER PRODUCT
LASER KLASSE PRODUKT
Índice
Introducción
natural_image
Line drawing of a rectangular electronic device with a central display and mounting holes (no text or symbols)- Adaptador de ca (1)
natural_image
Technical line drawing of a rectangular electronic component with mounting holes and coiled pins (no text or symbols)1 Remaining charge indicator