
C520 - Digital piano KORG - Free user manual and instructions
Find the device manual for free C520 KORG in PDF.
| Product type | Digital Piano |
| Dimensions (W x D x H) | 1396 x 462 x 869 mm (with stand) |
| Weight | 53 kg (with stand) |
| Power Supply | DC24V via external AC adapter |
| Keyboard | 88 weighted keys, graded hammer action RH3, touch sensitive (8 curves + fixed) |
| Maximum Polyphony | 62 notes (variable depending on sounds and modes) |
| Sound Generation | Piano eXperience stereo sampling (EPx) |
| Playing Modes | Single, Layer, Split, Performance (30 memories) |
| Sounds | 40 types + 30 performances (including acoustic pianos, electric pianos, organs, strings, basses, etc.) |
| Effects | Reverb (8 types), Chorus (6 types), Insert effects (24 types: tremolo, delay, rotary speaker, equalizer...) |
| Metronome | Built-in with tempo, time signature, accent, volume, and drum pattern controls |
| Built-in Recorder | 2 tracks, 45,000 notes per song, Overdub/Overwrite/Pedal Punch/Auto Punch recording |
| Pedals | 3 pedals (Damper, Sostenuto, Soft) with half-pedaling function, all assignable |
| Speakers and Amplification | 2 x 35W, 2 x 13 cm Bass Reflex speakers + 2 tweeters |
| Connections | Headphone jacks (2x), Audio outputs L/MONO and R, Audio inputs L/MONO and R, MIDI IN/OUT, USB (type B), Pedal input |
| Music Rest | Included with sheet music holders |
| Included Accessories | AC adapter, Song Book, CD-ROM with KORG USB-MIDI driver |
| Maintenance and Cleaning | Clean with a dry, soft cloth. Do not use liquid detergents, alcohol, or abrasive products. |
| Safety | Do not expose to moisture, heat, or dust. Do not insert metal or liquid objects into the instrument. |
| Repairability | Contact an authorized KORG service center for any repairs. Do not open the device. |
Frequently Asked Questions - C520 KORG
User questions about C520 KORG
0 question about this device. Answer the ones you know or ask your own.
Ask a new question about this device
Download the instructions for your Digital piano in PDF format for free! Find your manual C520 - KORG and take your electronic device back in hand. On this page are published all the documents necessary for the use of your device. C520 by KORG.
USER MANUAL C520 KORG
Using the unit in the following locations can result in a malfunction.
- In direct sunlight
- Locations of extreme temperature or humidity
- Excessively dusty or dirty locations
- Locations of excessive vibration
Power supply
Please connect the designated AC adapter to an AC outlet of the correct voltage. Do not connect it to an AC outlet of voltage other than that for which your unit is intended.
Interference with other electrical devices
This product contains a microcomputer. Radios and televisions placed nearby may experience reception interference. Operate this unit at a suitable distance from radios and televisions.
Handling
To avoid breakage, do not apply excessive force to the switches or controls.
Care
If the exterior becomes dirty, wipe it with a clean, dry cloth. Do not use liquid cleaners such as benzene or thinner, or cleaning compounds or flammable polishes.
Keep this manual
After reading this manual, please keep it for later reference.
Keeping foreign matter out of your equipment
- Never set any container with liquid in it near this equipment. If liquid gets into the equipment, it could cause a breakdown, fire, or electrical shock.
- Be careful not to let metal objects get into the equipment. If something does slip into the equipment, unplug the AC adapter from the wall outlet. Then contact your nearest Korg dealer or the store where the equipment was purchased.
DISCLAIMER
The information contained in this manual has been carefully revised and checked through. Due to our constant efforts to improve our products, the specifications might differ to those in the manual. Korg is not responsible for any eventual differences found between the specifications and the contents of the instruction manual - the specifications being subject to change without prior notice
WARRANTY
KORG products are manufactured according to the strictest electrical and mechanical regulations that exist in various countries of the world. These products are warranted by the KORG distributor only in each country. Any KORG product that is not sold with the manufacturer's or distributor's warranty, or without a serial number, cannot benefit from servicing under the warranty. This regulation is for the consumer's own protection.
DATA RESET
When the instrument is turned off, any unsaved parameters or songs are reset.
CE MARK FOR EUROPEAN HARMONIZED STANDARDS
The CE mark that is attached to our company's products of AC mains operated apparatus until December 31, 1996 means it conforms to the EMC Directive (89/336/EEC) and to the CE mark Directive (93/68/EEC).
The CE mark that is attached after January 1, 1997 means it conforms to the EMC Directive (89/336/EEC), to the CE mark Directive (93/68/EEC) and to the Low Voltage Directive (73/23/EEC).
In addition, the CE mark that is attached to our company's products of Battery operated apparatus means it conforms to the EMC Directive (89/336/ EEC) and to the CE mark Directive (93/68/EEC).
THE FCC REGULATION WARNING (FOR THE U.S.A. ONLY)
This equipment has been tested and found to comply with the limits for a Class B digital device, pursuant to Part 15 of the FCC Rules. These limits are designed to provide reasonable protection against harmful interference in a residential installation. This equipment generates, uses, and can radiate radio frequency energy and, if not installed and used in accordance with the instructions, may cause harmful interference to radio communications. However, there is no guarantee that interference will not occur in a particular installation. If this equipment does cause harmful interference to radio or television reception, which can be determined by turning the equipment off and on, the user is encouraged to try to correct the interference by one or more of the following measures:
Reorient or relocate the receiving antenna.
- Increase the separation between the equipment and receiver.
- Connect the equipment into an outlet on a circuit different from that to which the receiver is connected.
- Consult the dealer or an experienced radio/TV technician for help.
Unauthorized changes or modification to this system can void the user's authority to operate this equipment.
UPDATING THE SOFTWARE
The system software of your C-520 can be updated. From time to time, Korg might release new versions including bug fixes and new features. Please check our website for more information.
ASSISTANCE AND SERVICE FOR MUSICIANS
For repairs, contact your nearest Authorized KORG Service Center. For more information on KORG products, and to find software and accessories for your piano, please contact your local Authorized KORG distributor.
KORG ON THE INTERNET
Korg Inc.: www.korg.co.jp
Korg USA: www.korg.com
Korg UK: www.korg.co.uk
Korg Canada: www.korgcanada.com
Korg Italy: www.korgpa.com
Contents
Introduction 6
Main features 6
Control panel 8
Connections 11
Connecting to external audio devices 11
Before you begin 12
Open the key cover 12
Turning the instrument on 12
Using the music stand 12
Adjusting the volume 13
Using the headphones 13
Listening to the Demo 13
Basic functions 15
Playing a single sound (Single mode) 15
Playing two sounds at the same time (Layer mode) 16
Playing different sounds with the left and right hand (Split mode) .17
Using the pedals 18
Transposing 18
Changing the brilliance 19
Turning the effects on/off 19
Using performances 20
Choosing performances 20
Changing the sounds assigned to a performance 21
Editing a performance 21
The metronome 22
Starting and stopping the metronome, adjusting the tempo 22
Tempo and time signature display 22
Adjusting the tempo 22
Choosing a time signature 23
Drum patterns 23
Adjusting the metronome level 24
Adjusting the drum pattern's reverb 24
Selecting the accent 25
Saving the metronome settings 25
Playing back a song 26
Accessing the Song Play mode 26
How to select a song 26
How to start playback 27
Starting from a different measure 27
Muting/unmuting a recorder's part 28
Changing the song's tempo 28
Play along with the song 28
Cycle Play 29
Recording a song 30
Quick recording procedure 30
Step 1: Entering the Record mode 30
Step 2: Selecting sounds 31
Step 3: Setting the record options 32
Step 4: Setting the time signature and tempo 33
Step 5: Recording 33
Step 6: Second-pass recording 34
Changing sounds to a recorded song 34
Changing tempo to a recorded song 35
Pedal Punch recording 35
Auto Punch recording 35
Saving the song 36
Editing a song 37
Setting Cycle Play 37
Erasing a track 37
Cutting measures at the end of the song 38
Quantizing the song 38
Transposing the song 39
Deleting the song 39
Saving the song after editing 39
Editing sounds and performances 41
Accessing the Sound edit mode 41
Exit from the Sound edit mode 41
Saving a sound 41
Saving a performance 42
Setting the volume 43
Adjusting the panning 43
Adjusting the effects 44
Setting the reverb effect 44
Setting the chorus or modulation effect 45
Setting the insert effects 45
Setting the octave transposition 46
Adjusting the fine tune 47
Programming the pedals 47
Selecting a scale 48
Resetting the current sound and performance 49
Global settings 50
Touch settings 50
Turning the internal speakers on or off 50
Master tuning 51
Brilliance 51
Default split point 51
Assigning functions to the pedals 52
Quarter Tone (SubScale realtime programming) 53
Fast Play 53
Mute Level. 53
Turning the keyboard on or off (Local Control) 54
MIDI Clock 54
MIDI IN Channels 54
MIDI OUT Channels 55
MIDI Filters 56
Data transfer via the USB port 56
Erasing songs from the User Song album 57
General Reset 58
System version number 58
MIDI 59
What is MIDI? 59
What is MIDI Over USB? 59
What can you do with MIDI? 59
MIDI connections 59
Standard MIDI settings 60
Using the C-520 as a multitimbral tone generator 60
Program Change 60
Control Change 61
Installing the Korg USB MIDI Driver 62
Connecting the C-520 to a personal computer 62
KORG USB-MIDI Driver system requirements 62
Please note before use 62
Windows: Installing the KORG USB-MIDI Driver 63
Mac OS X: Installing KORG USB-MIDI Driver 63
Assembling the stand 64
Cautions for assembly 64
Assembling procedure 64
Check after assembly 66
Caution 66
Error messages 67
Troubleshooting 68
Polyphony 68
Technical specifications 69
Appendix / Appendix / Anhang / Appendix 277
Sounds / Timbres / Klange / Suoni 277
Performances/‘Performance'-Speicher 283
Effects / Effects / Effekte / Effetti 285
Songs/Morceaux/Songs/Brani musicali 286
MIDI Implementation Chart 288
Introduction
Main features
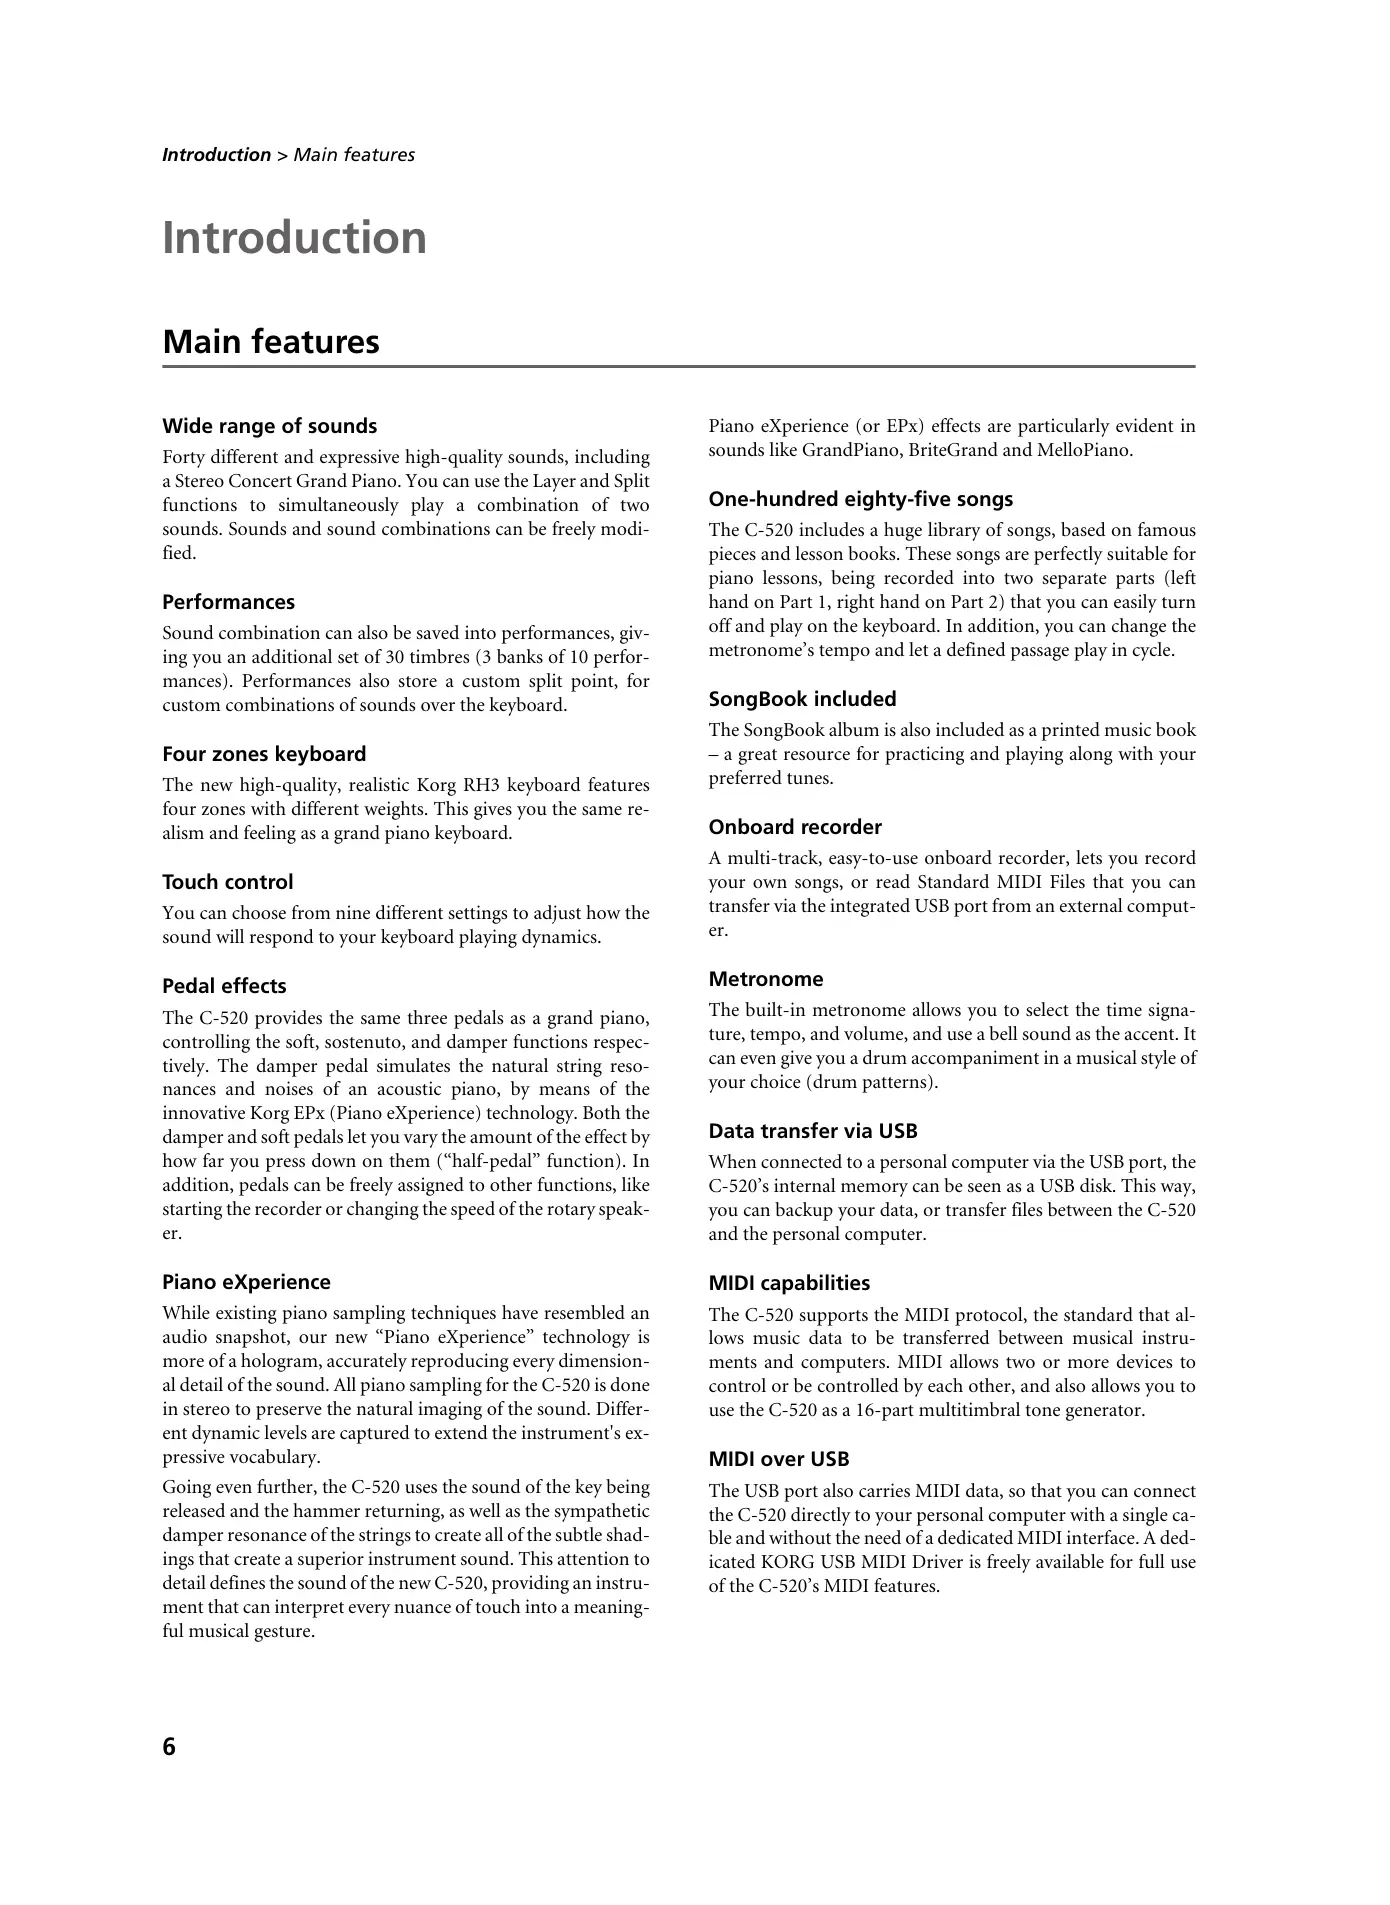
Wide range of sounds
Forty different and expressive high-quality sounds, including a Stereo Concert Grand Piano. You can use the Layer and Split functions to simultaneously play a combination of two sounds. Sounds and sound combinations can be freely modified.
Performances
Sound combination can also be saved into performances, giving you an additional set of 30 timbres (3 banks of 10 performances). Performances also store a custom split point, for custom combinations of sounds over the keyboard.
Four zones keyboard
The new high-quality, realistic Korg RH3 keyboard features four zones with different weights. This gives you the same realism and feeling as a grand piano keyboard.
Touch control
You can choose from nine different settings to adjust how the sound will respond to your keyboard playing dynamics.
Pedal effects
The C-520 provides the same three pedals as a grand piano, controlling the soft, sostenuto, and damper functions respectively. The damper pedal simulates the natural string resonances and noises of an acoustic piano, by means of the innovative Korg EPx (Piano eXperience) technology. Both the damper and soft pedals let you vary the amount of the effect by how far you press down on them ("half-pedal" function). In addition, pedals can be freely assigned to other functions, like starting the recorder or changing the speed of the rotary speaker.
Piano eXperience
While existing piano sampling techniques have resembled an audio snapshot, our new "Piano eXperience" technology is more of a hologram, accurately reproducing every dimensional detail of the sound. All piano sampling for the C-520 is done in stereo to preserve the natural imaging of the sound. Different dynamic levels are captured to extend the instrument's expressive vocabulary.
Going even further, the C-520 uses the sound of the key being released and the hammer returning, as well as the sympathetic damper resonance of the strings to create all of the subtle shadings that create a superior instrument sound. This attention to detail defines the sound of the new C-520, providing an instrument that can interpret every nuance of touch into a meaningful musical gesture.
Piano eXperience (or EPx) effects are particularly evident in sounds like GrandPiano, BriteGrand and MelloPiano.
One-hundred eighty-five songs
The C-520 includes a huge library of songs, based on famous pieces and lesson books. These songs are perfectly suitable for piano lessons, being recorded into two separate parts (left hand on Part 1, right hand on Part 2) that you can easily turn off and play on the keyboard. In addition, you can change the metronome's tempo and let a defined passage play in cycle.
SongBook included
The SongBook album is also included as a printed music book - a great resource for practicing and playing along with your preferred tunes.
Onboard recorder
A multi-track, easy-to-use onboard recorder, lets you record your own songs, or read Standard MIDI Files that you can transfer via the integrated USB port from an external computer.
Metronome
The built-in metronome allows you to select the time signature, tempo, and volume, and use a bell sound as the accent. It can even give you a drum accompaniment in a musical style of your choice (drum patterns).
Data transfer via USB
When connected to a personal computer via the USB port, the C-520's internal memory can be seen as a USB disk. This way, you can backup your data, or transfer files between the C-520 and the personal computer.
MIDI capabilities
The C-520 supports the MIDI protocol, the standard that allows music data to be transferred between musical instruments and computers. MIDI allows two or more devices to control or be controlled by each other, and also allows you to use the C-520 as a 16-part multitimbral tone generator.
MIDI over USB
The USB port also carries MIDI data, so that you can connect the C-520 directly to your personal computer with a single cable and without the need of a dedicated MIDI interface. A dedicated KORG USB MIDI Driver is freely available for full use of the C-520's MIDI features.
Temperaments
In addition to the Equal temperament, the C-520 allows you to select nine alternative temperaments, for historically accurate performance of classical music, or experimenting. When selecting an acoustic piano sound, the typical Stretched Tuning is automatically selected.
Adjustable pitch
The Transpose function lets you change the pitch of the piano, and the Master Tuning function allows you to make fine tune adjustments.
Effects
The C-520 provides built-in digital effects that can simulate the natural ambience of a concert hall (reverb) and add rich-
ness to the sound (chorus). In addition, each sound includes an insert effect (delay, phaser, equalizer, rotary speaker, etc...), that is specially suited to each particular sound.
Powerful integrated amplification
The C-520 includes a powerful, 2 × 35 Watt amplifier, with four speakers in bass reflex box. This gives the most authentic sound reproduction, together with enough volume deliver the full power of an acoustic piano.
Two sets of headphones
You can connect two stereo headphones, to play with your teacher or another musician. Connecting a headphone set automatically disconnects the speakers, so there is no risk to disturb others when practicing by night.
Control panel
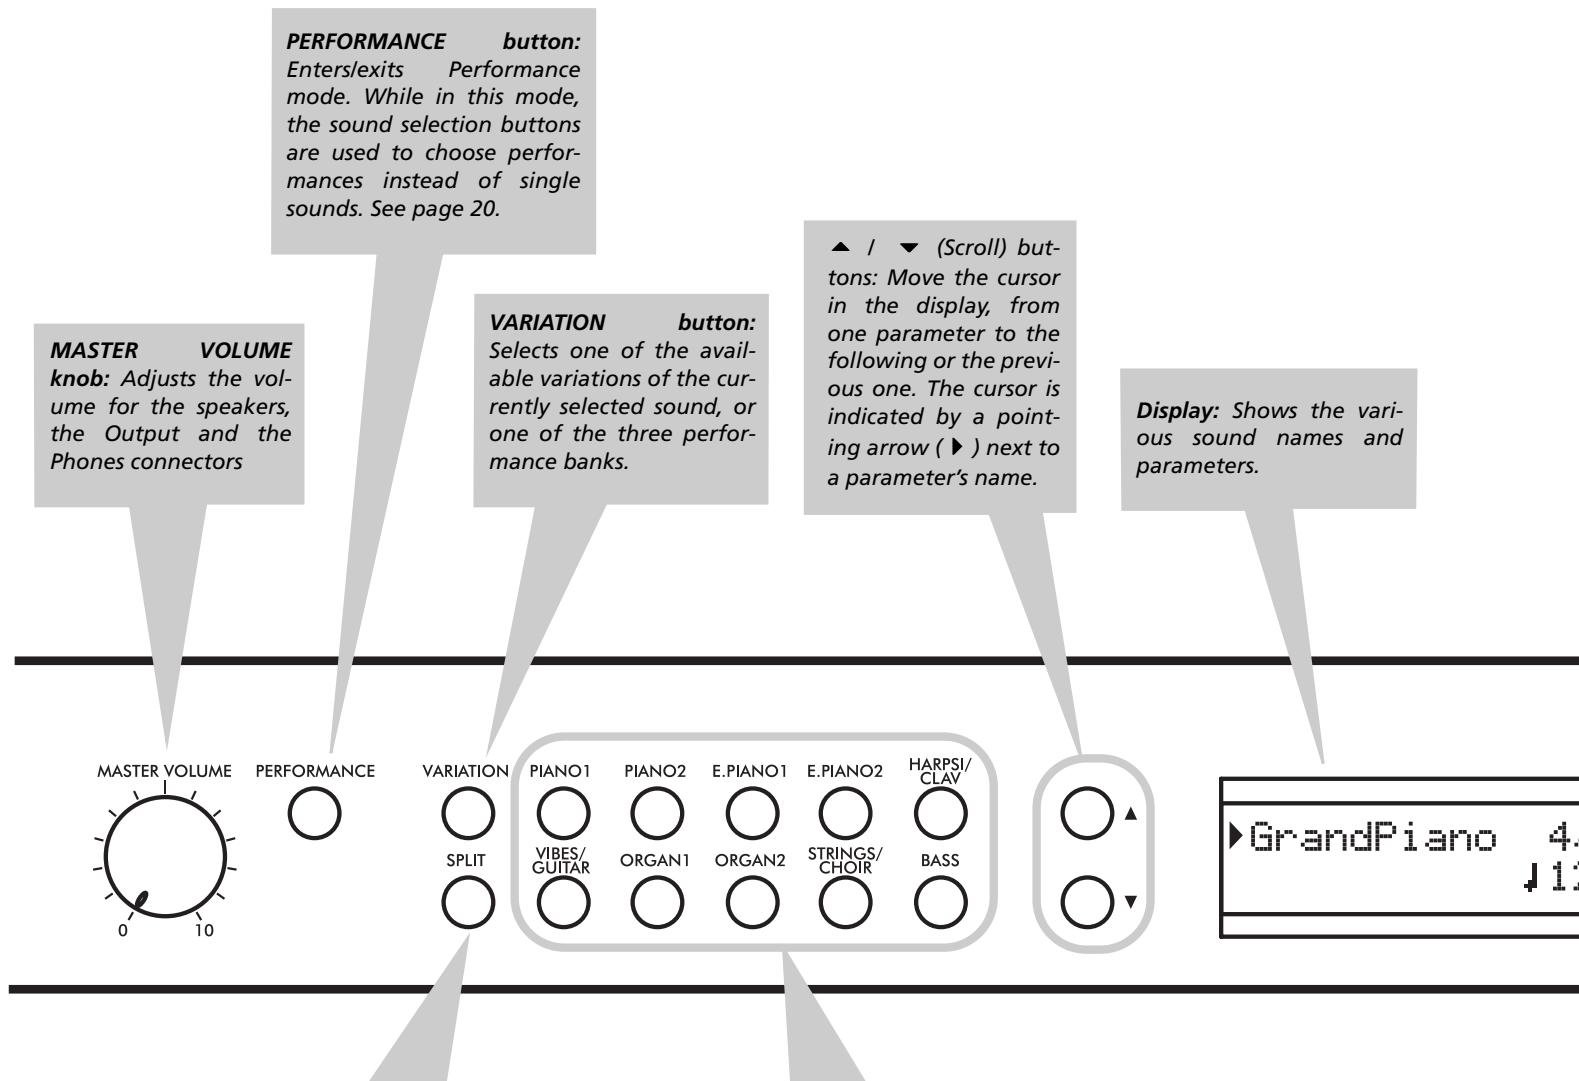
SPLIT button: Turns Split mode on or off. When in Split mode, a sound is assigned to your right hand, and a different one to the left hand. Keep it pressed and play a note on the keyboard to choose a different split point. See page 17.
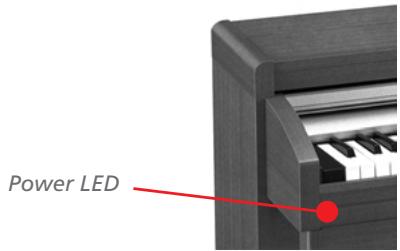
POWER switch: On/Off switch. When in the Standbay position, the piano is turned off.
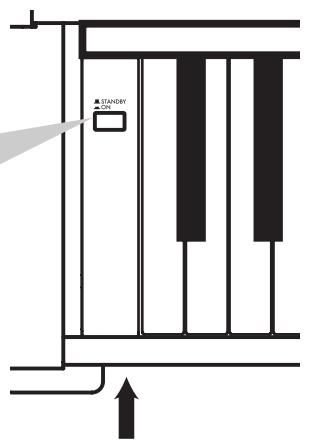
Power LED
SOUND SELECTION buttons: Press a button to select a sound (Single mode). You can press two buttons at the same time, to play two sounds at the same time on the keyboard (Layer mode). Press SPLIT to play a sound with your right hand, and a different one with your left hand (Split mode). See page 15. When the PERFORMANCE indicator is turned on (Performance mode), these buttons allow for selection of performances. See page 20.
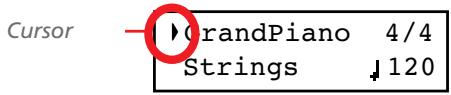
+/YES / -/NO (Value) buttons: Change the value of the parameters appearing in the display. The editable parameter is shown by the cursor () placed on its left, or (when editing text) with the character/cipher in edit flashing. By keeping them pressed, the values start changing automatically, first slowly, then slightly faster. By pressing them together, the parameter is reset to its default value.
While in the Main page, these buttons can be used to select a different variation of the current sound.
EDIT button: Press it to access the Edit mode relevant to the current type of data selected in the display. Four Edit modes are available: Sound (see page 41), Performance (see page 41), Song (see page 37) and Global (see page 50). Global edit mode can be accessed by keeping the EDIT button pressed for more than one second).
REVERB button:
Turns the reverb on/off. This adds ambience to the sound. Keep it pressed for more than one second to access the Reverb edit page (see page 19).
CHORUS button:
Turns the chorus on/off. This makes the sound richer. Keep it pressed for more than one second to access the Chorus edit page (see page 19).
METRONOME
button:
Turns the metronome click on/off. The tempo and time signature depend on the chosen values, or the selected song (see page 22).

+/YES

- /NO

EDIT

EXIT

REVERB

TRANSPOSE

CHORUS

BRILLIANCE

METRONOM

DEMO

D S

SET NE

ECORD
PART1


PART2


AY/PAUSE
TEMPO/MET. SET buttons: Adjust the metronome tempo. The + button makes it faster, while the - button makes it slower. Pressed together, they give access to metronome editing. See page 22.
RECORDERS
tions: Control the playback or recording of the songs. See page 26, page 30.
EXIT button: Press it to exit Edit mode, or to return to the Main page from other pages. When exiting from the Edit mode, the Save procedure will be recalled. When a drum pattern is assigned to the Metronome, and it is running, this button doubles as a Fill In control (see page 23, page 33).
TRANSPOSE button:
Press this button to open the Transpose page and change the master transpose value. When the indicator is turned on, transposition is active. Changes made after pressing this button are not saved to memory, and are reset when turning the instrument off. See page 18.
BRILLIANCE
Press this button to open the Brilliance page and change the brilliance value. When the indicator is turned on, a brilliance variation is active. Changes made after pressing this button are not saved to memory, and are reset when turning the instrument off. See page 19.
DEMO button: Turns the Demo mode on/off, to listen to the demo songs. Select the songs with the sound selection buttons (see page 13). You can play together with the demo songs.
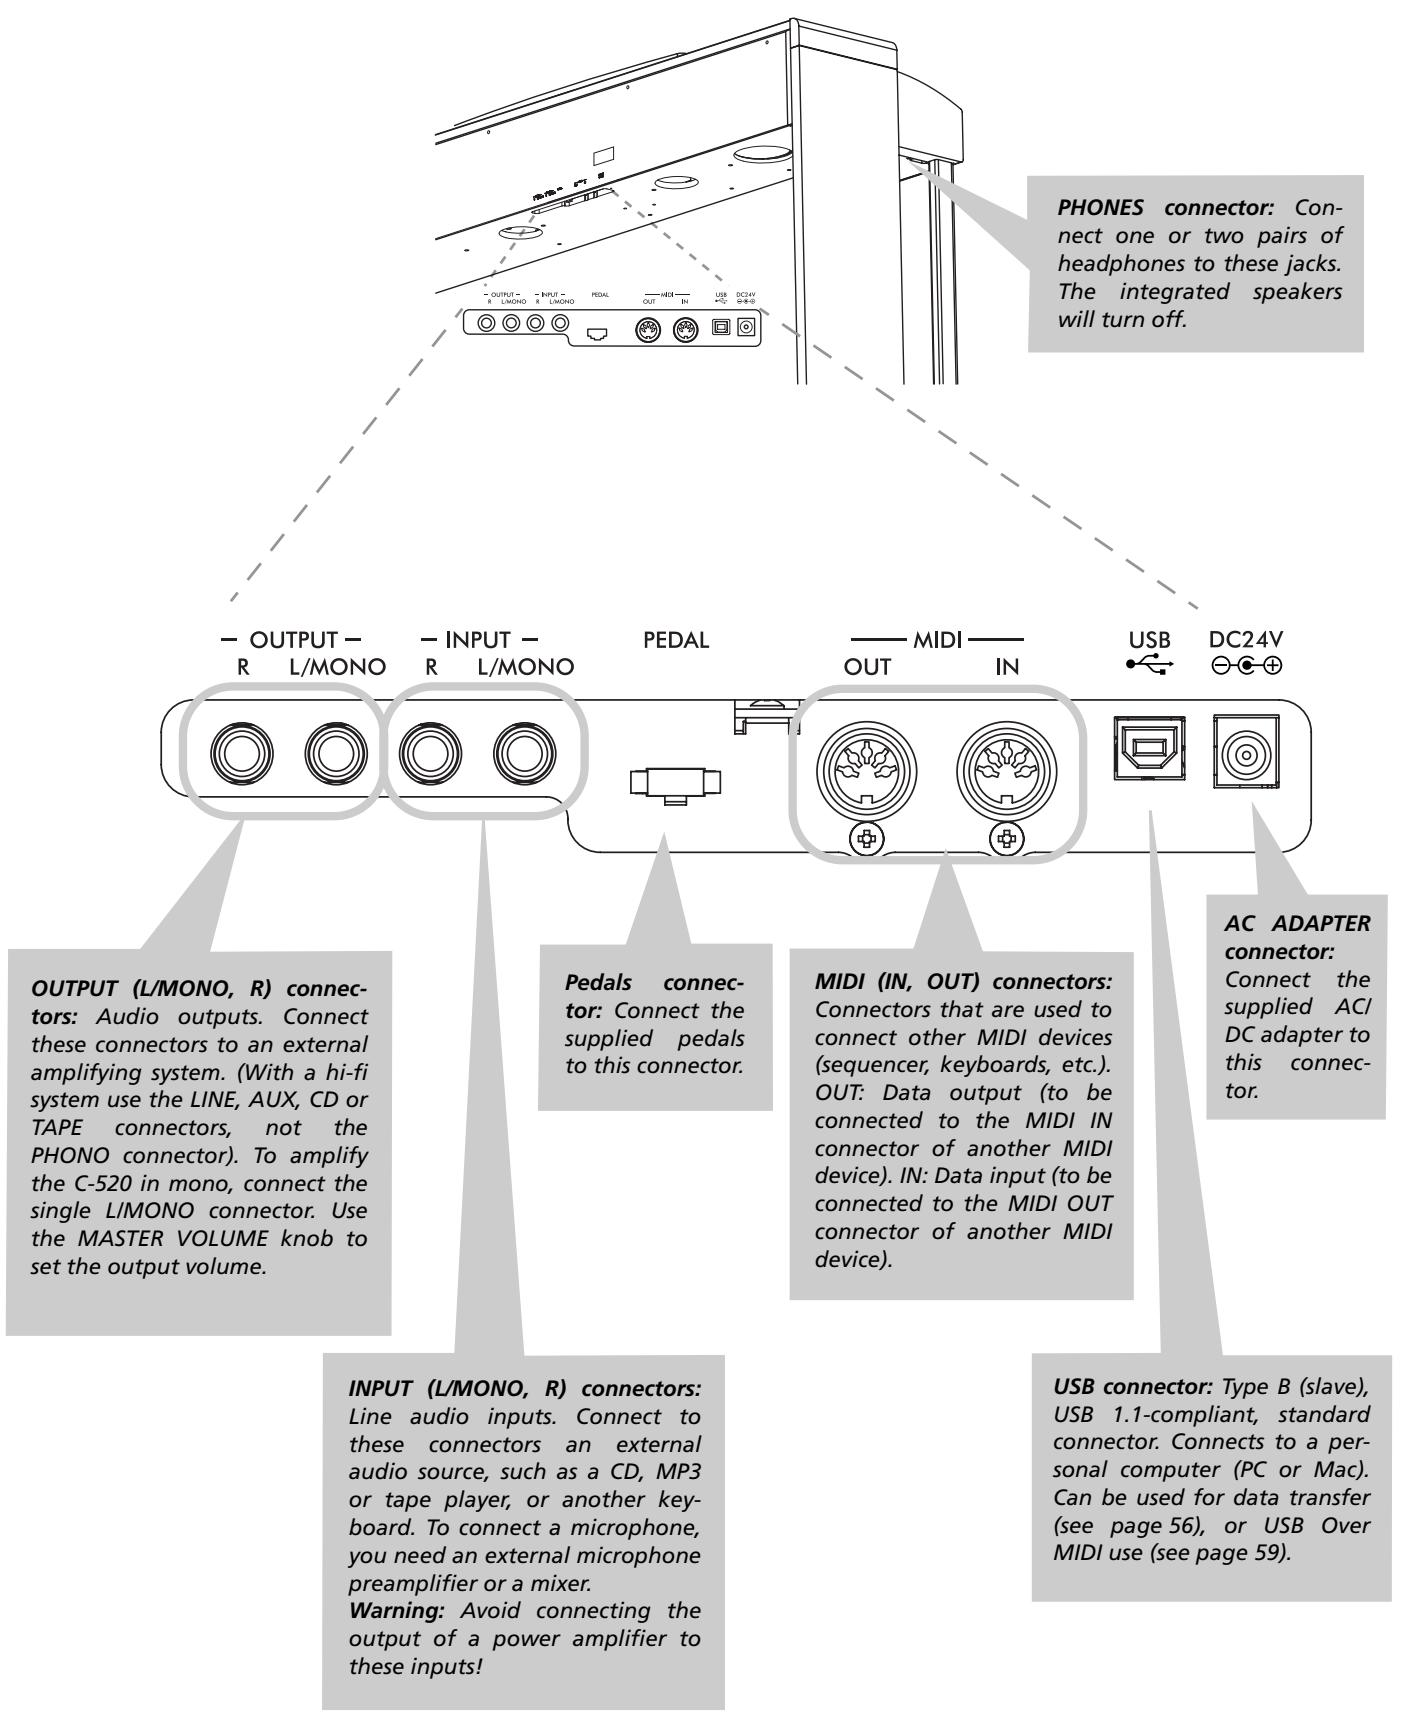
Connections
Connecting to external audio devices
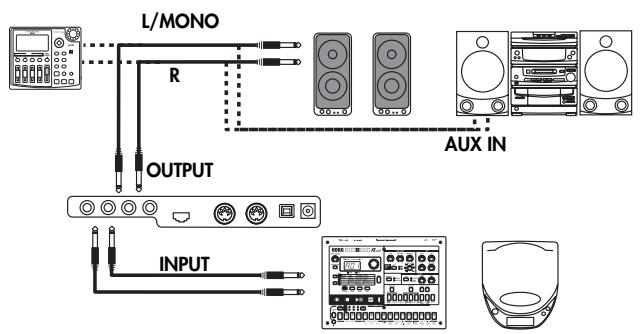
Connecting to an external amplification system
Use the OUTPUT connectors, if you like to connect your C-520 to a high-quality mixer, stereo hi-fi, or a couple of active monitors. When using a stereo hi-fi, connect the OUTPUTs to the LINE, AUX, CD or TAPE inputs (never use the PHONO inputs). For mono amplification, connect only the L/MONO output.
Connecting other audio devices to the C-520
Use the INPUT connectors, to connect a computer, mixer, drum machine, synthesizer, MP3 or tape player, to your C-520, and hear their sound run through its speakers. For mono
amplification, connect only the L/MONO output. Do not connect the output of a power amplifier!
Before you begin
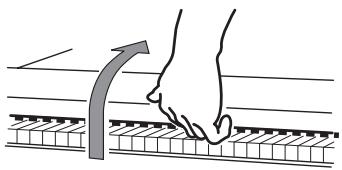
Open the key cover
Gently lift the center of the sliding key cover by the indented portion, and support it while you slide it carefully and fully into the C-520. Before you open the key cover, make sure that no foreign objects such as papers or coins are on the top of the key cover itself, otherwise, these objects may fall into the instrument.
Turning the instrument on
Insert the DC plug of the supplied AC adapter into the DC inlet of the C-520, then connect the AC plug to a wall socket.
After having connected the power cable, press the POWER switch. When the instrument is turned on, the buttons on the control panel and the display will light up. Also, an LED on the front of the instrument, also visible when the key cover is closed, will light up.
To close the key cover, gently lift the center by the indented portion, and slide it forward.
Note: Be careful not to pinch your fingers or hand while opening or closing the key cover.
Note: The key cover may be damaged if you use excessive force when opening or closing it.
To turn the instrument off, press the POWER switch again.
Using the music stand
Opening and closing the music stand
Tilt the music stand upright, and use the two stoppers located on the rear to hold the music stand in place.
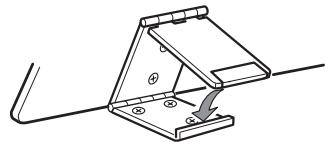
To lower the music stand,
release the stoppers and rest the music stand on the flat top.
Using the score holders
To keep a music book open, use the two score holders in front of the music stand. Push on the shorter side to make them slide up. Push on the longer side to make them slide down. Do not apply excessive strength or weight to the holders, or you will risk to break them.

Adjusting the volume
Rotate the MASTER VOLUME knob towards the right to increase the volume; towards the left to decrease the volume. The maximum value is "10"; the minimum (silence) is "0". This control adjusts the output level of the headphones, the internal speakers and of the OUTPUTs.
Using the headphones
For playing or practicing during night hours, or when you don't want to be heard by others in the same room, connect one or two pairs of high-quality headphones (32Ω impedance suggested) to the appropriate PHONES connectors. These connectors are standard 1/4" phone jacks. If your headphones
Listening to the Demo
The C-520 contains 20 pre-recorded demo songs. Listen to them to experience the rich sound and expressive potential of this instrument. Here is a list of the available demo songs:
| Button | Bank 1 (1-10) | Bank 2 (11-20) |
| PIANO 1 | GrandPiano1 | GrandPiano2 |
| PIANO 2 | Honky-Tonk | Piano Pad |
| E.PIANO 1 | El. Piano 1 | El. Piano 2 |
| E.PIANO 2 | Digi Piano | Vintage EP |
| HARPSI/CLAV | Harpsichord | Clav. |
| VIBES/GUITAR | Vibes | Ac. Guitar |
| ORGAN 1 | Jazz Organ1 | Jazz Organ2 |
| ORGAN 2 | Full Pipe | Pipe Flute |
| STRING/CHOIR | Strings | Choir |
| BASS | Ac. Bass | El. Bass |
During the demo playback you can't use any other buttons. However, you can still play the keyboard to play along with the demo songs.
Listen to all songs at once
You can listen to all demo songs with a single command.
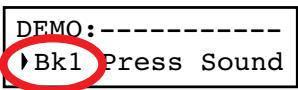
- Press the DEMO button. The sound selection indicators will blink sequentially from left to right. The Demo page will appear in the display:
Bk1 Press Sound
- Wait some seconds, without pressing any button. The first demo song will begin to play. The indicator corresponding
It does not control the volume of an audio device connected to the INPUT connectors. Use the audio device's own controls to set its volume.
It is always better to start with a low volume and then increase gradually.
have a mini-jack adapter, grasp the adapter when plugging in or out the headphones.
Warning: When using headphones, protect your hearing by avoiding extended listening at high volumes.
to the demo song currently in play will turn on. The name of the song will be shown in the display:

All demo songs will be played back one after the other. After the last song, the playback will begin again from the first song.
- To pause the current song, press the PLAY/PAUSE button. Press it again to restart playback from the same position.
- To stop the playback and exit the demo mode, press the DEMO or the EXIT button.
Listen to a specified song
You can select just one demo song to be played back.
-
First of all, you must select one of the demo song banks.
-
To select the first bank (Bk1, songs 1-10), press the DEMO button once. The indicators will blink sequentially, from left to right. The Demo page will appear in the display:
- To select the second bank (Bk2, songs 11-20), press the + / YES button.
To return to the first bank, press the -/NO button. -
Press one of the sound selection buttons to select the corresponding demo song in the selected bank. The demo is based on the sound associated with the button. The indicator on the selected demo button will stay on, while the other indicators will turn off.
-
After the end of the selected song, all the songs will be played back in cycle.
- If you want to select a different song, press one of the sound selection buttons.
-
To pause the current song, press the PLAY/PAUSE button. Press it again to restart playback from the same position.
-
To stop the current song without exiting from the Demo mode, press STOP. Choose a different song and wait for it to start playing back.
- To stop the playback and exit the demo mode, press the DEMO or EXIT button.
Basic functions
Playing a single sound (Single mode)
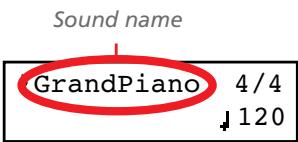
When you turn the instrument on, it is in Single mode.

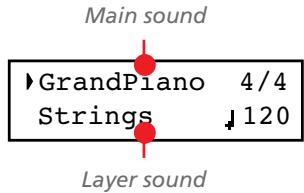
The single Grand Piano sound is selected, and plays over the full keyboard. Its name is shown in the display:
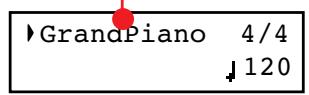
Main sound
You can replace it with any of the 40 sounds supplied with the instrument. See the list of sounds in the following table (more details on each sound are on page 277):
| Button | Sound | |||||
| Var. 1 | Var. 2 | Var. 3 | Var. 4 | Var. 5 | Var. 6 | |
| PIANO 1 | GrandPiano* | BriteGrand* | Rock Piano | Piano&Str. | ||
| PIANO 2 | Honky-Tonk | MelloGrand* | Piano&Pad | Elec.Grand | M1 Piano | |
| E.PIANO 1 | Tine EP 1 | SuitTineEP | DynoTineEP | Tine EP 2 | ||
| E.PIANO 2 | Dig. EP 1 | Dig. EP 2 | Reed EP | TremReedEP | ||
| HARPSI/CLAV | Harpsi 8' | Harpsi 16' | Clav | Synth Clav | ||
| VIBES/GUITAR | Vibes 1 | Vibes 2 | Nylon Gtr. | |||
| ORGAN1 | Jazz Organ | Perc.Org.1 | Perc.Org.2 | |||
| ORGAN2 | Church Org | Pipe Flute | Pipe Tutti | |||
| STRINGS/CHOIR | Strings | Slow Str. | String Pad | Choir | ScatVoices | Vocal Pad |
| BASS | Ac. Bass | El. Bass | Fretless B | Bass&Ride | ||
- Note: The EPx effects are not available when you are in Layer mode.
Selecting a sound
You can use the sound selection buttons to select a different sound.
- Press one of the sound selection buttons in order to select a sound type.
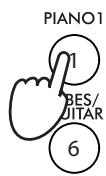

The indicator on the button you pressed will light. The name of the selected sound will appear in the display:
- Use the VARIATION button to select one of the available variations of the base sound (see table above). When the last variation has been selected, press it again to select the base sound again.
As an alternative, use the + / YES button to scroll the sound variation list forward; the - / NO button to scroll it backwards.
Playing two sounds at the same time (Layer mode)
You can play two sounds at the same time on the keyboard. It is like having two "overlapping" sounds. This is called the Layer mode.

Keep in mind that, when in Layer mode, the total number of voices that you can play at the same time is reduced, depending on the total number of oscillators used by the selected sounds.
Entering the Layer mode
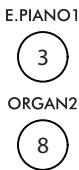
To access Layer mode from any other mode, press together two sound selection buttons. The lowest-numbered sound in the following diagram will be the Main sound, while the highest-numbered sound will be the Layer sound:
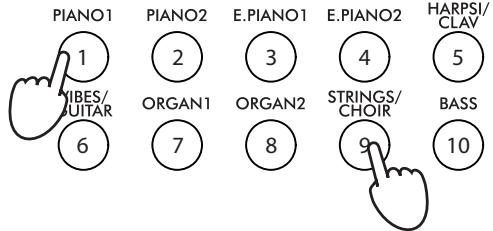
The name of the two sounds will appear in the display:
Exit from the Layer mode
To exit Layer mode, press a single sound selection button, or the SPLIT button. You will return to the Single mode, with a single sound playing on the keyboard, or to the Split mode, with a sound on the left and one on the right of the split point.
Selecting a different pair of sounds
To select different sounds, press a different pair of sound selection buttons. The last selected variation of the sounds corresponding to the new buttons will be selected.
Selecting a variation of the Main sound
You can select a variation of the current Main sound.
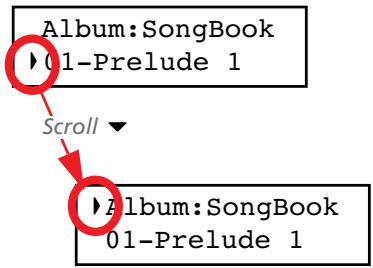
- Be sure the cursor is in the first line of the display. If it isn't, use the SCROLL button to move it there:
- Use the VARIATION button to select a different sound variation. As an alternative, use the + / YES and -/NO buttons to choose a different sound variation.
Selecting a variation of the Layer sound
You can select a variation of the current Layer sound.
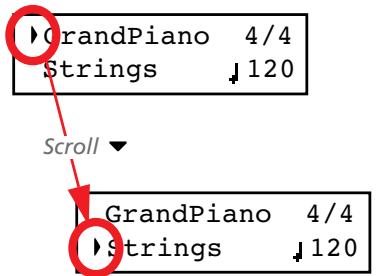
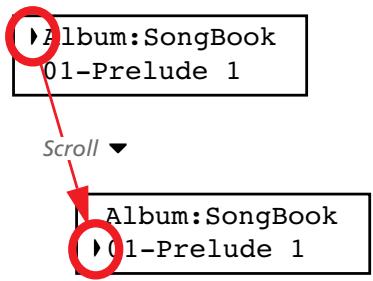
- Use the SCROLL button to move the cursor to the Layer sound.
- Use the VARIATION button to select a different sound variation. As an alternative, use the + / YES and -/NO buttons to choose a different sound variation.
- If you desire so, use the SCROLL buttons to move the cursor back to the Main sound.
Balancing layered sounds
You can adjust the sound's volume balance.
- Keep the Main sound button pressed, to increase its volume and (after the maximum value has been reached) decrease the volume of the Layer sound. Release the button when done.
- Keep the Layer sound button pressed, to increase its volume and (after the maximum value has been reached) decrease the volume of the Main sound. Release the button when done.
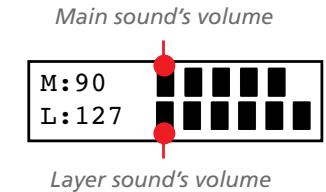
While the volume is changing, a meter is shown in the display:
Playing different sounds with your left and right hand (Split mode)
You can play a sound with your right hand (the Main sound), and a different one with the left hand (the Left sound). This is called the Split mode.
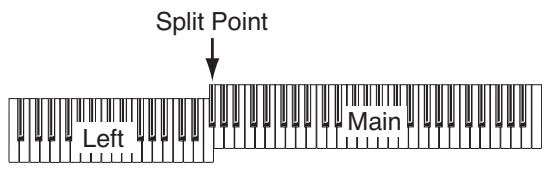
Entering the Split mode
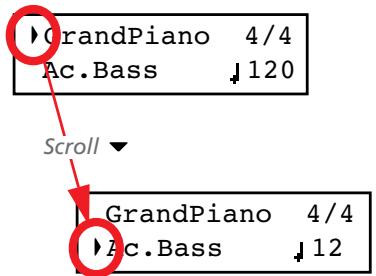
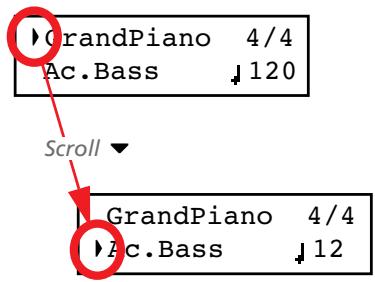
To access Split mode from any other mode, press the SPLIT button. The Main sound of the Single or Layer mode will be assigned to the right half of the keyboard (Main area, shown in the first line of the display), and a Bass sound will be assigned to the left half of the keyboard (Left area, shown in the second line of the display).
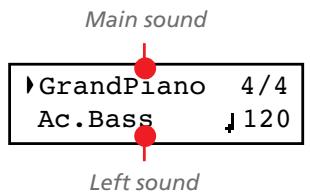
While the Ac.Bass sound will be chosen as the Left sound the first time you enter Split mode, the last selected sound will be assigned if you return to Split mode later.
Exit from the Split mode
To exit Split mode, press the SPLIT button again to return to the Single mode, or press two sound selection buttons together to enter Layer mode.
Choosing a different split point
If the selected split point is too high or too low, you can choose a different one. Please note that you can set a default split point, to have it ready each time you turn the instrument on (see "Default split point" on page 51).
- Keep the SPLIT button pressed. The current split point is shown in the display while you keep the button pressed.
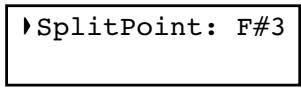
- Play a note to set a different split point.
- Release the SPLIT button.
Selecting a different Main sound
You can select a different Main sound after accessing the Split mode. Use the sound selection buttons as you would do to select a sound in Single mode.
Selecting a variation of the Main sound
You can select a variation of the Main sound after accessing the Split mode.
- Be sure the cursor is in the first line of the display. If it isn't, use the SCROLL button to move it there:
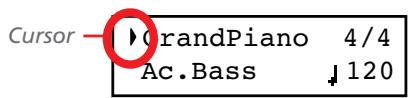
- Use the VARIATION button to select a different sound variation. As an alternative, use the + / YES and -/NO buttons to choose a different sound variation.
Selecting a different Left sound
You can select a different Left sound after accessing the Split mode.
- Keep the SPLIT button pressed. The indicator of the Left sound lights up.
- Use the sound selection buttons to select a different sound.
- Release the SPLIT button.
As an alternative, use the display controls:
- Use the SCROLL buttons to move the cursor to the Left sound.
- Use the sound selection buttons as you would do to select a sound in Single mode.
- Use the buttons to move the cursor back to the Main sound.
Selecting a variation of the Left sound
You can select a variation of the Left sound after accessing the Split mode.
- Keep the SPLIT button pressed. The indicator of the Left sound lights up.
- Use the VARIATION button to select a different sound variation.
- Release the SPLIT button.
As an alternative, use the display controls:
- Use the SCROLL buttons to move the cursor to the Left sound.
- Use the VARIATION button to select a different sound variation. As an alternative, use the + / YES and -/NO buttons to choose a different sound variation.
- If you want, use the SCROLL buttons to move the cursor back to the Main sound.
Balancing sounds in Split mode
You can adjust the sound's volume balance.
- Keep the Main sound button (the one whose indicator is turned on) pressed, to increase its volume and (after the maximum value has been reached) decrease the volume of the Left sound. Release the button when done.
- Keep the SPLIT button pressed, or press the SCROLL button to move the cursor to the second line of the display. The indicator of the Left sound lights up. Then, keep the Left sound button pressed, to increase its volume and (after the maximum value has been reached) decrease the volume of the Main sound. Release the button when done.
While the volume is changing, a meter is shown in the display:
Main sound's volume
Left sound's volume
Using the pedals
The C-520 has three assignable pedals, usually acting as damper, sostenuto, and soft. However, you can assign the pedals different functions (see page 47 for sound-level assignment, or page 52 for global programming).
With the default settings, you can use these pedals to add expression to your playing, as on a traditional piano.
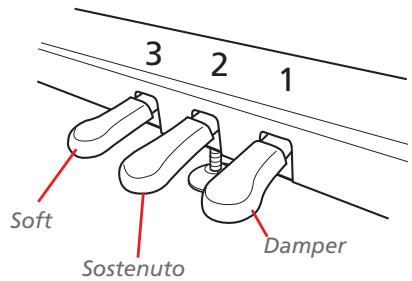
(1) Damper pedal
The damper pedal simulates the natural string resonances of an acoustic piano. Pressing this pedal will sustain the sound,
Transposing
In some cases, a song may be written in a difficult key (e.g., many black keys), or you may wish to shift the pitch to match another instrument or vocalist. In such cases, you can transpose (shift the pitch) so that you can use an easier fingering, or use the same familiar fingering to play at a different pitch. This is called the Transpose function.
producing a richly resonant decay. You can control the damper's depth by how far down you press on the pedal ("half-pedaling").
Sounds like GrandPiano, BriteGrand and MelloGrand also trigger EPx effects while in Single and Split mode. However, these effects are not available when you are in Layer mode.
(2) Sostenuto pedal
Pressing this pedal will apply the damper effect only to the notes that are already being held down on the keyboard, and will sustain only those notes. The damper effect will not be applied to any additional notes that you play while holding down the Sostenuto pedal (apart for the notes already held).
(3) Soft pedal
Pressing this pedal will make the tone softer. You can control the soft effect depth by how far down you press on the pedal ("half-pedaling")
For example if you transpose upward by one semitone, playing the notes shown at the lower left will produce the pitches shown at the right.

Note: When the instrument is turned on, transposing is reset.
- Press the TRANSPOSE button to show the Transpose display:
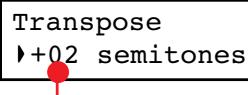
Transpose value
If you do no changes, just wait some seconds for the page to automatically disappear. Otherwise, you can exit from this page by pressing the EXIT button.
- Use the +/ YES and -/ NO buttons to change the transpose value in steps of one semitone, within a range of ± 11 semitones. When a transposition is active, the indicator turns on.
- Press the EXIT button to exit from this page.
- Press the TRANSPOSE button again to turn transposition off. The indicator will turn off.
- Press the TRANSPOSE button if you want to turn transposition on again, with the last value selected. The indicator will turn on again. Wait some seconds for the page to disappear, or press the EXIT button to exit immediately.
Changing the brilliance
Brilliance is the sound's brightness, that may be affected by the sound of the room the piano is placed into. For example, a heavy carpeted room sounds duller than a room containing less carpeting or furniture. You can set an overall increase or decrease of brilliance for all sounds.
This is the same parameter you can change in the Brilliance page of the Global mode (see page 51). However, contrary to the changes you can make in the Global mode, the changes made with this button cannot be memorized, and are reset when turning the instrument off.
Note: When the instrument is turned on, brilliance set in this page is reset. (Brilliance may have permanently been set in Global mode, see page 51).
- Press the BRILLIANCE button to show the Brilliance display:
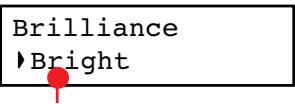
Brilliance setting
Turning the effects on/off
The C-520 has two global effects (reverb and chorus), in addition to an insert effect for each sound (see diagram on page 44). The reverb simulates the sound reverberation in a room, while the chorus simulates a modulating effect that makes the sounds richer.
The insert effect is part of the sound itself, and should remain on to avoid a dramatic change in timbre. On the contrary, you
If you do no changes, just wait some seconds for the page to automatically disappear. Otherwise, you can exit from this page by pressing the EXIT button.
- Use the + / YES and - / NO buttons to change the brilliance value. When a brilliance change is active, the indicator turns on.
- Press the EXIT button to exit from this page.
- Press the BRILLIANCE button again to turn brilliance changes off. The indicator will turn off.
- Press the BRILLIANCE button if you want to turn brilliance on again, with the last value selected. The indicator will turn on again. Wait some seconds for the page to disappear, or press the EXIT button to exit immediately.
can turn the reverb and chorus on/off as you like, by using the REVERB and CHORUS buttons on the control panel.
However, selecting a different sound will reset the status of the buttons, since it is saved with the sound itself. To permanently change the effect's status, edit the sound by keeping one of these buttons pressed for a couple seconds. See page 44 for more details.
Using performances
Performances are registrations of sound combinations. Instead of selecting single sounds, or a combination of sounds, you simply select a performance. A performance then recalls one or two sounds, each one with their own settings, plus the memorized split point (if the sounds are in Split mode).
There are 30 performances (10 groups × 3 banks each). Each group corresponds to one of the numbered sound select buttons ( 1 10 ). You can then choose one of the three banks inside the selected group by using the VARIATION button (more details are on page 283).
| Button | Performance | ||
| Bank 1 | Bank 2 | Bank 3 | |
| 1 (PIANO 1) | Split&Layr | Digital EP* | Baroque* |
| 2 (PIANO 2) | Grand&Ride | PaddedTine* | Harpsi-Ch* |
| 3 (E.PIANO 1) | Grand&Ebas | R&B EPno* | Harpsi-Org* |
| 4 (E.PIANO 2) | PnoStrings* | EP Choir* | Church Mix* |
| Button | Performance | ||
| Bank 1 | Bank 2 | Bank 3 | |
| 5 (HARPSI/CLAV) | EGrand Pad* | EP&NoFret | Guitar Pad* |
| 6 (VIBES/GUITAR) | Piano Pad* | Scat&Bass | GrandPiano |
| 7 (ORGAN1) | Pno Choirs* | Vibes&Bass | BriteGrand |
| 8 (ORGAN2) | Pno Guitar* | Bass&Guitr | MelloGrand |
| 9 (STRINGS/CHOIR) | Piano BX3* | Org&Bass 1 | 2 Pianists |
| 10 (BASS) | DualManual | Org&Bass 2 | PnoEXp- DEMO** |
- Note: These performances, with sounds set in Layer mode, do not use EPx effects.
** Note: Performance 30 (PnoExpDEMO) is designed to demonstrate our "Piano eXperience" technology, by exaggerating the amount of key-off/hammer return portion of the Grand Piano sound; it is not intended to be a play-able timbre. Normally, these additional Piano eXperience sounds are not perceived as separate elements, but together with the other sample layers, they are a vital part of the realism and the authentic piano tone.
Choosing performances
Here is how to choose a performance.
Note: While in Performance mode, you cannot switch between Single, Layer and Split modes. However, if you select a performance with two sounds in Split, the SPLIT indicator will turn on.
- Press the PERFORMANCE button to enter Performance mode. The indicator turns on, and the latest selected performance is recalled.
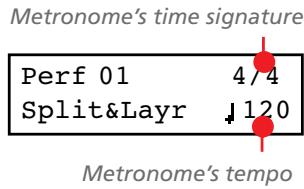
| Perf.01 | 4/4 |
| Split&Layr | 120 |
- Use the sound selection buttons to select a different group of performance.
| PIANO1 | PIANO2 | E.PIANO1 | E.PIANO2 | HARPSI/CLAV |
| 1 | 2 | 3 | 4 | 5 |
| VIBES/GUITAR | ORGAN1 | ORGAN2 | STRINGS/CHOIR | BASS |
| 6 | 7 | 8 | 9 | 10 |
- If needed, use the VARIATION button to select a different performance inside the same group. There are three performances for each group of performances.
As an alternative, use the +/YES and -/NO buttons to choose a different performance inside the selected group.
- Press the PERFORMANCE button again to exit Performance mode. The previous sound or combination of sounds will be recalled. The indicator will turn off.
Changing the sounds assigned to a performance
You can change the sound or sounds assigned to the current performance, without the need of accessing the Edit mode.
Note: You cannot change performance sounds while in Performance Edit mode.
Note: The EPx effects are not available when you are in Layer mode.
- While you are in the Main page of the Performance mode, press both SCROLL / buttons together. The sound (or sounds) assigned to the performance are shown in the display:
Main sound
Piano&Str.
Ac. Bass
Layer/Left sound
- If there are two sounds, use the SCROLL / buttons to move the cursor to the sound you want to change.
- Use the + / YES and - / NO button to choose a different sound.
- Press the EXIT button to exit from the above page. If you chose a different performance, changes are lost.
- To save the changes use one of the save procedures explained in "Saving a performance" on page 42.
Editing a performance
You can edit any performance according to your taste. You can also save any combination of sounds over an existing performance. See "Editing sounds and performances" on page 41.
The metronome
The C-520 incorporates a metronome, with which you can beat the tempo during practice or song recording. The metronome can beat ordinary times, or drum patterns.
Starting and stopping the metronome, adjusting the tempo
Use the METRONOME button to start and stop the metro-nome.
-
Press the METRONOME button to make the metronome start (the indicator on the button turns on).
-
Press the METRONOME button again to stop it (the indicator turns off).
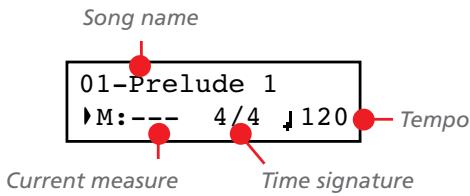
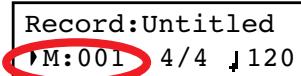
Tempo and time signature display
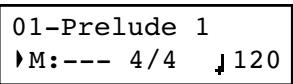
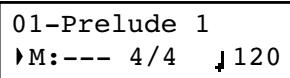
The metronome's tempo and time signature are always shown in the Main page:
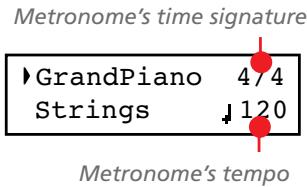
The metronome's tempo and time signature also appear in Performance mode:
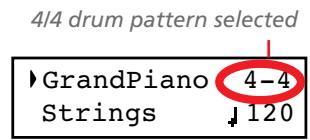
When a drum pattern is selected as the time signature, the separator between the fraction's numerator and denominator is a
hyphen (-) (see page 23 for information o how to select drum patterns):
When listening to a song, the tempo and time signature are those of the current song. You can use the TEMPO buttons to adjust the tempo while the song plays. On the contrary, the time signature cannot be modified after recording:
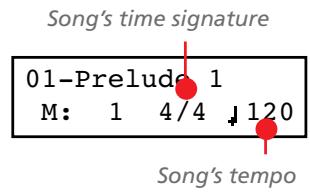
(Pleases remember you can exit from the Song Play page and return to the Main page by pressing the EXIT button.)
Adjusting the tempo
When turning the metronome on for the first time, while in the Main page, the default tempo of 120 BPM (beats per minute) is chosen. You can adjust it by using the TEMPO buttons.
When turning it on from the Song Play (page 26) or Record page (see page 30), the tempo is that of the current song. You can adjust it by using the TEMPO buttons.
The last change is preserved, until you don't choose a different song and start playing it back.
Choosing a time signature
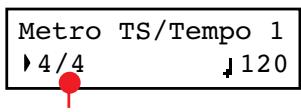
When turning the metronome on from the Main page, the default time signature of 4/4 is chosen, but you can adjust it by accessing the Metronome page (as shown below).
Note: If the PLAY/PAUSE button is flashing, you cannot change the time signature.
Note: If you enter editing later, you might see a different edit page instead of the first one. Use the SCROLL button to reach it.
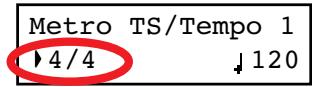
- Press the TEMPO + and TEMPO - (or MET. SET) buttons together. The first Metronome page, Metro TS/Tempo, will appear, with the Time Signature parameter selected:
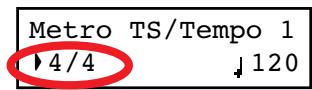
- Use the +/ YES and -/ NO buttons to select a time signature. Ordinary times are at the beginning, while drum patterns are at the end. You can quick jump from the one to the other by pressing the +/ YES and -/ NO button together.
| Ordinary times | ||
| 1/2 ~ 16/2 | 1/4 ~ 16/4 | 1/8 ~ 16/8 |
- Press the EXIT button to return to the Main page.
Drum patterns
Instead of an ordinary time signature (4/4, 3/4, etc...), a drum pattern can be assigned to the metronome. This will give you the sense you are playing together with a real drum player. You can also record a drum pattern into a song.
Note: Contrary to ordinary metronome "clicks", drum pattern notes can also be recorded by the internal recorder. They can also be transmitted via MIDI, so you can record them on an external sequencer, or make them play with an external instrument (see "MIDI" on page 59).
Drum patterns are in the second half of the time signature list. While the list is selected, either scroll to it, or press both the + YES and -NO buttons together, to quick jump to the drum patterns. Press these buttons together again to quick jump to the ordinary time signatures (4/4 selected).
| Drum patterns | |||
| 8 Beat 1 | Ballroom 2 | Bossa 1 | Swing 2 |
| 8 Beat 2 | Ballroom 3 | Bossa 2 | Swing 3 |
| 8 Beat 3 | Slow 6/8 | Samba | Slow Waltz 1 |
| 16 Beat 1 | Funk 1 | Cha Cha | Slow Waltz 2 |
| 16 Beat 2 | Funk 2 | Salsa | Waltz |
| Drum patterns | |||
| 16 Beat 3 | Rock | Mambo | Foxtrot |
| Ballad 1 | Rock 6/8 | Tango | March |
| Ballad 2 | Dance | Rhumba | |
| Ballad 3 | Beguine | Gospel | |
| Ballroom 1 | Unplugged Latin | Swing 1 | |
Here is how to use the drum patterns:
- While in the Main page, press the METRONOME button to start the metronome. A Count In is heard, then the drum pattern begins.
- While in the Main page (either with a sound or a performance selected), or in the Record page, press EXIT (or a pedal with the Fill In function assigned, see page 52). A Fill In is played, then a variation of the base drum pattern starts playing.
- Press EXIT (or the pedal) again. A second Fill In is played, then the base drum pattern returns playing.
- Press the METRONOME button to stop the metronome.
Adjusting the metronome level
You can adjust the metronome's level, in relation to the overall instrument's volume.
-
Press the TEMPO/MET.Set buttons together. The first Metronome page should appear.
-
Press the SCROLL button to go to the second Metro-nome page, Metro Lev/Rev. The Lv (Level) parameter will be selected:
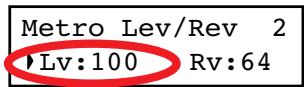
- Use the +/YES and -/NO buttons to change the metro-nome's volume.
- Press the EXIT button to return to the Main page.
Adjusting the drum pattern's reverb
You can add a reverb effect to the drum patterns.
Note: Reverb does not apply to the metronome click (i.e., when an ordinary time signatures is chosen).
-
Press the TEMPO/MET.Set buttons together.
-
If you are not there, use the SCROLL / buttons to select the Rv (Reverb) parameter:
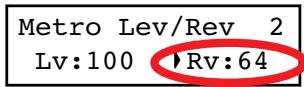
- Use the +/YES and - /NO buttons to change the metro-nome's reverb.
- Press the EXIT button to return to the Main page.
Selecting the accent
The accented beat of the ordinary times signatures can be changed to a marcato or bell sound.
Note: The accent does not apply to drum patterns.
- Press the TEMPO/MET.Set buttons together.
- If you are not there, use the SCROLL / buttons to go to the Metro Accent page:
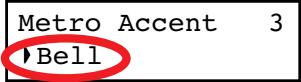
- Use the + / YES and - / NO buttons to turn the bell on or off, and choose one of the available accent options.
| Option | Meaning |
| Off | No accent |
| Marcato | The first beat is played louder |
| Bell | The first beat is played by a bell sound |
- Press the EXIT button to return to the Main page.
Saving the metronome settings
Metronome settings can be saved, so that they are not reset to the default values when turning the instrument off. This procedure saves time signature, volume setting, reverb setting, accent. On the contrary, tempo settings are always reset.
-
Press the TEMPO/MET.Set buttons together. The first Metronome page appears.
-
Press the SCROLL button four times, to go to the fourth Metronome page. The Metro Settings Save parameter will be selected:

- Press + / YES to confirm saving, or -/NO to cancel saving. You are automatically kept back to the Main page.
Playing back a song
The C-520 incorporates a multitrack recorder, with which you can record and play back songs. Since you can turn off a single part (say, the left hand), and leave another part playing (say, the right hand), this can be very useful for practicing.
Together with the C-520 come a huge number of classical songs (185), with which you can play along for practicing or for enjoying your preferred tunes. Songs are organized in "albums", that include famous lesson books (Beyer, Burgmüller),
a collection of famous songs, and all the pieces included in the supplied SongBook.
The recorder can also read 16-track songs in the Standard MIDI Files (SMF) format, that can be created on a computer or easily found on the market or in the public domain. Please note that, while the C-520 complies with General MIDI (GM) sound mapping, it does not include all GM sounds. For a detailed list of sounds, see page 277.
Accessing the Song Play mode
After you press the SONG button, the Song Play page appears:
To return to the Main page, just press one of the sound selection buttons to select a sound, or press the EXIT button. The selected song will still be active, but you will no longer see its name in the display, until you press the SONG button again.
How to select a song
To play a song, you must first select it from an album. Songs are contained into a permanent memory, and are preserved when turning the instrument off.
- If you are in the Main page, press the SONG button twice. If you are already in Song Play mode, press the SONG button once to access the Song Selection page:
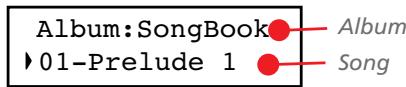
- Use the + / YES and -/NO buttons to select one of the available songs inside the selected album. If the name is longer than the display, it will scroll up to the end, then returns to the beginning.
- To select a different album, use the SCROLL button to move the cursor to the first line of the display:
As an alternative, you can use the first six sound select buttons to choose an album. See table on the next page.
4. Use the +/ YES and -/ NO buttons to select one of the available albums. Various song albums are available (see page 286 for a detailed list of the included songs):
| Album | Content | Corresponding sound button |
| Song | Songs created using the internal recorder, or created with an external sequencer and then transferred to the C-520 via a USB connection (see page 56) | (1) PIANO 1 |
| SongBook | All the songs of the supplied SongBook | (2) PIANO 2 |
| Classics | A collection of famous classical pieces | (3) E.PIANO 1 |
| Beyer A | The “Preparatory School, Op. 101” lesson book by Ferdinand Beyer, split in two separate parts (A and B) | (4) E.PIANO 2 |
| Beyer B | (5) HARPSI/CLAV | |
| Burgmllr | Burgmüller's “25 Easy and Progressive Studies, Op. 100” lesson book | (6) VIBES/GUITAR |
- After having selected an album, use the SCROLL button to move the cursor to the song name again, then choose a different song:
- Press the PLAY/PAUSE button to start playback and return to the Song Play page, or the EXIT button to just return to the Song Play page, without starting the song.
How to start playback
After having selected a song, you can play it back.
Note: During playback, song parts can be sent out via MIDI. Song parts are
the following: Part 1, Part 2, and Drum (this latter is active only if a drum patterns is playing).

Starting from a different measure
You can start playback from a measure different than the first one.
Note: When releasing the +YES or -/NO button, you may hear the EPx effects, due to Damper data recorded in the song.
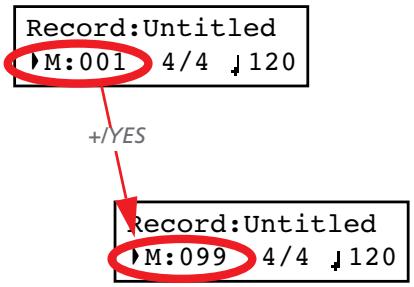
-
While in the Song Play page, the M (Measure) parameter is selected. Use the + / YES and -/NO buttons to choose a
-
Press PLAY/PAUSE to start playing the song. The indicator on the button turns on.
- Press PLAY/PAUSE again to stop the song at the current position. The indicator on the button starts flashing.
- Press PLAY/PAUSE again to resume playback. The indicator on the button stays on steadily.
- Press STOP to stop the song. The indicator on the PLAY/ PAUSE button turns off. The song returns to the beginning (measure "---").
different measure (+/YES is sometimes called Fast Forward, while -/NO is called Rewind):
- Press the PLAY/PAUSE button to start playback from the selected measure.
Muting/unmuting a recorder's part
During playback, you can mute or unmute a recorder's part. Muting is useful to play a part on the keyboard, while letting the recorder to continue playing the other.
Depending on the settings made in Global mode (see "Mute Level" on page 53), muting may completely silence the part, or just attenuate it. Attenuation is very useful for practicing, since it lets you play over a part that you can still hear at a very soft level.
Note: The part's status is automatically restored when you choose a different song (it is turned on if there are notes, or turned off if the part is empty).
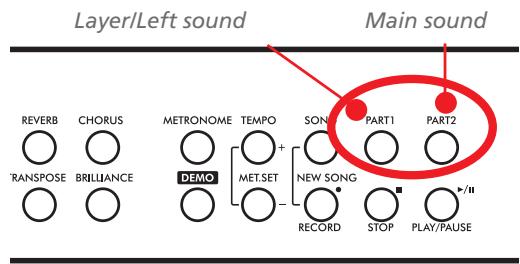
- Press the PART 1 or PART 2 button, depending on the part you want to mute (usually, Part 1 = left hand, Part 2 = right
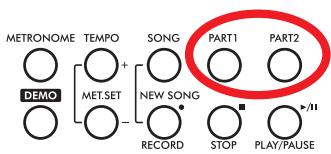
hand. This may be different with songs imported via USB). The muted part's indicator turns off.
At this point, you can play the muted part on the keyboard.
- Press the same button again, to unmute the part and let its indicator turn on again.
Changing the song's tempo
Each song contains its own tempo. You can, however, change it during playback, for example to make it easier playing along with the song.
- Use the TEMPO + button to increase the tempo and make the song play faster.
Play along with the song
During playback, you can play along with the song. The latest selected sounds are still active on the keyboard. You can select different sounds, as seen before. When you press a sound selection button, the Main page appears. Press the SONG button to return to the Song Play page.
- Use the TEMPO - button to decrease the tempo and make the song play slower.
- Press both the + / YES and - / NO buttons at the same time to recall the original tempo of the song.
When selecting different sounds, their effects are also recalled. Be careful, since this can dramatically affect the song's overall sound. When selecting a different song, the song's effects are selected again.
When practicing, you can choose a passage to be repeated again and again. This way, you can try it until it is perfect. This is called the Cycle Play function.
Note: When the Cycle Play is activated, the Fast Play function no longer works (see page 53).
Note: If you enter editing later, you might see a different edit page instead of the first one. Use the SCROLL button to reach it.
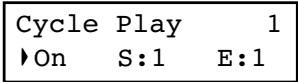
- While in Song Play mode, press the EDIT button. The first page of the Song Edit mode, Cycle Play, will appear.

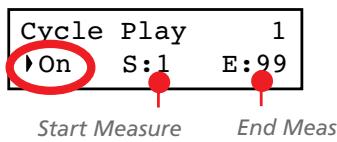
- Press the + / YES button to turn the Cycle Play mode on. The S (Start Measure) and E (End Measure) parameters will appear:
- Press the SCROLL button to select the S (Start Measure) parameter, and use the + / YES and -/NO buttons to choose the measure where the cycle will be starting. Keep them pressed to scroll faster.
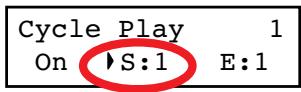
By default, the "S" parameter corresponds to the first measure.
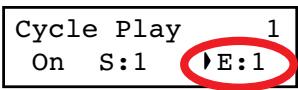
- Press the SCROLL button to select the E (Ending Measure) parameter, and use the + / YES and -/NO buttons to choose the measure where the cycle will be ending. Keep them pressed to scroll faster.
- Press the EXIT button to return to the Song Play page. You'll notice the Cycle Play icon appearing on the top right corner of the display, indicating the function has been activated:

This icon will stay steadily on when cycle measures are playing back. It will flash when measures located before or after the cycle measures are playing (for example, it will flash if measure 2 or 16 is playing back, when the cycle is delimited by measures 4 and 12).
- Press PLAY/PAUSE to start playing. The song will cycle between the chosen starting and ending points.
During playback, you can press the PLAY/PAUSE button to pause the song, or restart it from the current point. You can press the STOP button to stop the song and go back to the Cycle's Start Measure.
Note: If the S (Start Measure) parameter has a value other than 1, the song will be set to pause even if you press STOP.
Turning the Cycle Play off
The Cycle Play will continue until you don't select a different song, or turn the instrument off. Otherwise, you can manually turn it off.
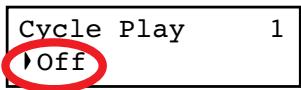
- While in Song Play mode, press the EDIT button. The first page of the Song Edit mode should appear.
- Press the -/NO button to turn the Cycle Play mode off.
- Press the EXIT button to return to the Song Play page. The Cycle Play icon on the top right corner of the display will be gone.
Recording a song
You can use the onboard recorder to create a song composed of up to three parts (left hand, right hand, drum). This song can then be played back on the C-520, or transferred to a computer (see "Data transfer via the USB port" on page 56) and played back on any other sequencer (see "MIDI" on page 59). User-created songs are first contained in a temporary, non-permanent memory, and are to be saved into a special album called the User Song album. You must save a song into this album, before turning the instrument off or choosing a different song.
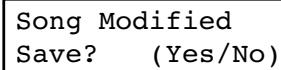
When you try to select a different song while a new or modified song has not yet been saved, you are asked whether you want to save it or not (the "Song Modified" message appears). If you press the + / YES button you are kept to the Save Song page. See "Saving the song" on page 36 for more information.
Note: A song is recorded into a temporary memory, that is lost when the instrument is turned off. To preserve a new or modified song, save it into the User Song album before turning the instrument off. See "Saving the song" on page 36.
Quick recording procedure
Recording a song on the C-520 is very easy. Here is a short procedure. More detailed procedures follow, starting from "Step 1: Entering the Record mode".
- Select the preferred sound, sound combination or performance.
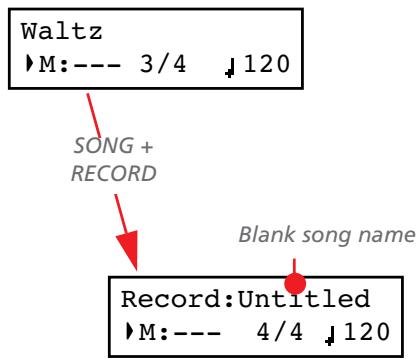
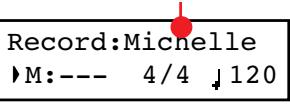
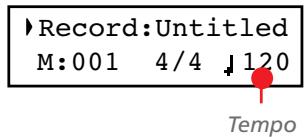
- Press the SONG and RECORD buttons together to access Record mode with a new, empty song.
Record:Untitled M:-4/4 120
-
Use the TEMPO buttons to set the tempo.
-
Press the TEMPO/MET.Set buttons together to open the Metro TS/Tempo page. Select the time signature, then press the EXIT button to exit.
Time Signature
- Either play the keyboard, press the PLAY/PAUSE button, or (if you chose a drum pattern as the time signature) the METRONOME button to start recording.
- Play freely.
- Press the STOP or RECORD button to stop recording.
Step 1: Entering the Record mode
Entering Record mode with a new, blank song
To enter record with a new, empty song with default settings, press the SONG and RECORD buttons at the same time (the recorder must not be playing).
If you try to access Record mode while a new or modified song has not been saved, you are asked whether you want to save it or not:
If you press the + / YES button you are kept to the Save Song page. See "Saving the song" on page 36 for more information.
Entering Record mode with an existing user song
You can enter recording with the current User song (i.e., a song contained in the UserSong album), to add more notes (Overdub recording) or add an additional part to. You can even record an existing part again (Overwrite recording).
To record over an existing song, select the song and press the RECORD button.
Existing song name
Step 2: Selecting sounds
When you enter Record mode with a new, empty song, the sounds that were selected for playing on the keyboard are also selected for recording. If you enter recording on a part already recorded, the sound previously used to record that part is selected again. If you are not happy with them, you can still select different sounds now.
Note: Sounds also carry their own effects. By choosing a sound, you also choose its associated effects.
Use the sound selection buttons to select different sounds for recording. You can also select a different mode (e.g., switching from Single to Split) during recording.
When you enter Record on a new, empty song, both recorder's parts are ready for recording (actually, if you play something on the keyboard, recording begins). Therefore, everything you play on the keyboard will be recorded to the song. Depending on the current mode (Single, Layer or Split), one or both parts will be recorded.
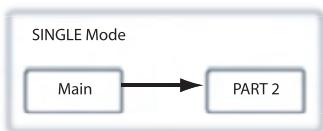
Each sound is recorded into a separate recorder's part. Normally, the Main sound goes to Part 2, while the Layer or Left sound go to Part 1 (see diagram).
You can change this, for example if you don't want to record the Layer sound, or if you want to record the Main sound into Part 1 instead of Part 2. To change a part's status, repeatedly press the corresponding PART button:
Please remember that you can only access Record mode on User songs. Songs contained in albums other than UserSong cannot be modified.
Exit from the Record mode
To exit from the Record mode, press the RECORD button again (or the STOP button, to end the Record session). The RECORD indicator will turn off.
Here is what the indicators' status mean:
| Part 1/2 status | Meaning |
| On | The part already contains data. It may happen when you are recording over an existing song, or doing second-pass recording. During recording, you will hear this part, but not record over it. |
| Off | The part does not contain data or is in mute, and is not enabled for recording. |
| Flashing | The part is enabled for recording. If you are recording in Overdub mode, new data will be added to the old data (if any). If you are recording in Overwrite mode, new data will replace the old data. |
What if I record a Layer or Split on a single part?
When only a single part is enabled for recording, only the Main sound will be recorded. The Layer or Left sound will be ignored.
Example 1: Recording a single sound
When you enter recording with a single sound on a new, empty song, both PART indicators will be flashing. You don't need to do anything else. Go on with actual recording, and your sound will be recorded over Part 2. When recording is finished, the PART 1 indicator will turn off, and the PART 2 indicator will stay steadily on.
Example 2: Recording a single sound into Part 1
When you enter recording with a single sound on a new, empty song, both PART indicators will be flashing. Press the PART 2 button to turn its indicator off. At this point, you can go on with actual recording over Part 1.
Example 3: Recording first with a single sound then both
When you enter recording a single sound on a new, empty song, both PART indicators will be flashing. This means both sounds will be recorded. Go on with actual recording in Single mode, then switch to the Layer or Split mode (by respectively pressing two sound selection buttons, or pressing the SPLIT
button). The Main sound will be recorded over Part 2, while the Layer or Left sound will go to Part 1.
Example 4: Recording each hand of a piano piece in two separate parts
In this case, enter recording in Single mode, and press the PART 1 button to turn its indicator off. Only the PART 2 in-
indicator will continue flashing. Go on recording your right hand.
When done, start recording your left hand, with the PART 1 indicator flashing, and the PART 2 indicator steadily on. This way, you will be recording your left hand to Part 1, while Part 2 will be playing back the recorded right hand.
Step 3: Setting the record options
Before starting to record, you can set some options.
Note: The Pedal Punch and Auto Punch functions will not work on an empty song. At least one track must already be recorded.
- While the RECORD indicator is lit, press the EDIT button to access the Record Option pages. The first page is the Record Mode option page:
Record Mode 1 Overwrite
Use the + / YES and -/NO buttons to choose a recording mode.
| Recording mode | Meaning |
| Overdub | Notes are added to a previous recording |
| Overvwrite | Notes replace any older recording (everything is deleted) |
| Pedal Punch | Lets you use a pedal to enter recording on the fly (see “Pedal Punch recording” on page 35) |
| Pnc (Auto Punch) | Lets you set a start and end measure for recording (see “Auto Punch recording” on page 35) |
- Press SCROLL to go to the second page, and set the Quantize value. This is the quantize that happens during recording:
Quantize 2 Off
Use the + / YES and -/NO buttons to change the quantize value, indicated as a musical figure. "Off" means free rhythm, with no quantization.
| Quantize values | |||||
| Off | 1/32 = | 1/24 = | 1/16 = | 1/12 = | 1/8 = |
Quantization is a way of correcting timing errors; notes played too soon or too late are moved to the nearest axis of a rhythmic

"grid", set with this parameter, thus playing perfectly in time. For example, when you select 1/16, all notes are moved to the nearest 1/16 division. When you select 1/8, all notes are moved to the nearest 1/8 division.
Beware that choosing too low a value will over-correct, and make everything sound mechanical.
- Press SCROLL to go to the third page, and set the Tempo Record mode:
Tempo Record 3 Auto
Use the + / YES and -/NO buttons to change the mode. There are three options:
| Tempo Record mode | Meaning |
| Manual | The latest manual tempo setting (made using the TEMPO buttons) is considered the current tempo value. No tempo change events will be recorded. This is very useful to record the song much slower than its actual tempo |
| Auto | The recorder plays back all recorded tempo events. No tempo change events are recorded |
| Record | All tempo changes made during recording will be recorded |
- If done, press the EXIT button to return to the Record page.
Step 4: Setting the time signature and tempo
Before starting to record, tempo and time signature are those you last selected with the TEMPO and MET.set buttons. You can however choose a different tempo and time signature.
Note: After having started recording a song, you can no longer change its time signature. However, you can append a second section with a different time signature (see "Step 6: Second-pass recording" on page 34, step 6).
Note: You can record a drum pattern only during the first pass. You will not be able to add or change it later. However, you can append a second section using a drum pattern (see "Step 6: Second-pass recording" on page 34, step 6).
- If you wish to set a different time signature at the beginning of the song, press the TEMPO/MET. SET buttons together to access the Metro TS/Tempo page:
Use the + / YES and -/NO buttons to choose a time signature. You can select either an ordinary time signature (4/4, 3/4 and the like), or a drum pattern (8 Beat, Jazz, Waltz...). In case you choose a drum pattern, it will be recorded with the song as the Drum part, and sent out via MIDI.
- If done, press the EXIT button to return to the Record page.
- If you wish to set a different starting tempo, use the TEMPO buttons to change the tempo value.
Step 5: Recording
After you have entered the Record mode, chosen the part(s) to be recorded, and having set the various options, you can start recording.
A: Recording with no metronome
Here is how to record freely, without using the metronome.
- Press the PLAY/PAUSE button to start recording. The indicator on the PLAY/PAUSE button will turn on. As an alternative, you can play a note on the keyboard, or press the pedal assigned as the Play/Pause function.
To start with a pick-up measure (or anacusis), start with the PLAY/PAUSE button, then wait until the desired beat is playing. Assuming the Fast Play option has been left on, the initial pause will be ignored during playback (see "Fast Play" on page 53).
- Press STOP to stop recording. As an alternative, press the RECORD button, or the pedal assigned as the Stop function. The indicator on the RECORD button turns off. The song returns to the beginning.
B: Recording with the metronome
Here is how to record, if you chose an ordinary time signature.
- Press the METRONOME button to hear the click before starting to record.
- Press the PLAY/PAUSE button to start recording. The indicator on the PLAY/PAUSE button will turn on. As an alternative, you can play a note on the keyboard, or press the pedal assigned as the Play/Pause function.
To start with a pick-up measure (or anacusis), start with the PLAY/PAUSE button, then wait until the desired beat is playing. Assuming the Fast Play option has been left on,
the initial pause will be ignored during playback (see "Fast Play" on page 53).
- Press STOP to stop recording. As an alternative, press the RECORD button, or the pedal assigned as the Stop function. The indicator on the RECORD button turns off. The song returns to the beginning.
C: Recording with a drum pattern
Recording with a drum pattern is a bit different, since you must decide how to start the drum pattern.
-
Use one of the following ways to start recording:
-
If you want to start with a keyboard-only intro, and start the drum pattern at a measure other than the first one, press the PLAY/PAUSE button. As an alternative, you can play a note on the keyboard, or press the pedal assigned as the Play/Pause function. When it is time to start the drum pattern, press the METRONOME button, and wait until the next measure for the drum pattern to actually start (it will start with a 1-measure intro).
-
If you want to immediately start with a drum pattern, press the METRONOME button to start recording. A 1-measure intro will play, then the regular pattern will start playing.
An Intro will be played back before the main pattern of the drum pattern begins.
-
During recording, you can press the EXIT button to trigger a Fill In, break the rhythm, and go to a variation of the basic pattern. Press it again to play a different Fill In, and return to the basic pattern.
-
Press STOP to stop recording. As an alternative, press the RECORD button, or the pedal assigned as the Stop func-
tion. The indicator on the RECORD button turns off. The song returns to the beginning.
Note: After 999 measures, the record automatically ends.
Step 6: Second-pass recording
After the first recording, you can start recording again over the same song, to add parts or notes.
- Press the RECORD button again. Its indicator will turn on. The Record page will appear again:
- If needed, set the Record options again (see page 32). You can choose Overdub to add notes, Overwrite to replace notes (up to the point where you stop recording), or one of the Punch options to record over a passage.
- Choose the part to be recorded. When you enter Record mode again, the indicator of the recorded part will be turned on, the other off. Press a PART button to make its indicator start flashing, and record over that part(s).
- If needed, select a different sound or sound combination. Please remember that if you record in Layer or Split mode over a single recorder's part, only the Main sound will be recorded.
When you record over an already recorded part, the sound is the same as the previous recording. However, you can select a different sound.
- If needed, change the tempo with the TEMPO buttons. If the Tempo Record option (see page 32) has been activated, any tempo change will be recorded.
- You cannot change the time signature (or drum pattern) chosen during the first recording pass. However, if you are starting to record from the end
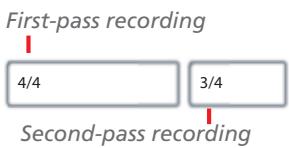
of the song (you can move there by assigning the highest possible value to the M, Measure, parameter), you can choose a different time signature (or a drum pattern) for a new section to be appended at the end of the current section. This is useful to create a song with different time signatures, or with a drum pattern starting to play at a section following the first one (see diagram). - Choose a measure to start recording from. You can start recording from a measure other than the first one, by changing the M (Measure) parameter before starting the recorder.
- Start recording.
- When done, press the STOP or RECORD button to stop recording.
Changing sounds to a recorded song
If you are not happy with the sounds used for recording, it is easy to replace them with different sounds.
Note: When you choose different sounds, effects are also changed. Each sound, sound combination or performance also includes its own set of effects.
- Press the RECORD button to access recording again.
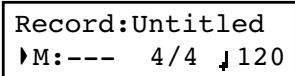
- Be sure you are at the beginning of the song (measure shown as “---”):

- Make the PART 1 and/or PART 2 indicator flash, depending on the part(s) you want to change the sound to.
- Choose a different sound (or sounds). If you are editing a single part, and you select a Layer or Split sound combination, only the Main sound will be considered.
- Press RECORD to exit song recording.
Changing tempo to a recorded song
If you are not happy with the tempo used for recording (may you recorded with a slower tempo), it is easy to adjust it after recording.
Note: After having started recording a song, you can no longer change its time signature. However, you can append a second section with a different time signature (see "Step 6: Second-pass recording" on page 34, step 6).
-
Press the RECORD button to access recording again.
-
Be sure you are at the beginning of the song (measure shown as “---”):
- Be sure neither the PART 1 or PART 2 indicator is flashing.
- Use the TEMPO buttons to adjust the tempo.
- Press PLAY/PAUSE to start the song. Just let a few beats play.
- Press STOP or RECORD to exit song recording.
Pedal Punch recording
With Pedal Punch recording, you can use a pedal to start and stop recording.
Note: The Pedal Punch function will not work on an empty song. At least one track must already have been recorded.
Warning: The Pedal Punch function overwrites existing notes.
- Be sure a pedal is assigned the Pedal Punch function (see "Assigning functions to the pedals" on page 52).
- Be sure to choose the Pedal Punch recording mode (see "Step 3: Setting the record options" on page 32):
Record Mode 1 Pedal Punch
Auto Punch recording
With Auto Punch recording, you can set the start and stop recording points, so that recording automatically begins and ends at the defined measures.
Note: The Auto Punch function will not work on an empty song. At least one track must already be recorded.
Warning: The Auto Punch function overwrites existing notes.
- Be sure to choose the Pnc (Auto Punch) recording mode (see "Step 3: Setting the record options" on page 32):
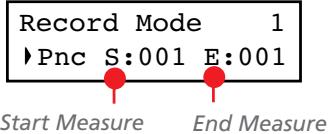
- Press the EXIT button to return to the Record page.
- Make the PART 1 and/or PART 2 indicator flash, depending on the part(s) you want to record.
- Press PLAY/STOP to start the recorder. The song will be heard.
- When it is time to start recording, press the pedal set to the "Pedal Punch" function, and start recording.
-
When finished, press the pedal again to end recording. The recorder stops.
-
Use the SCROLL / buttons to move the cursor to the S (Start Measure) or E (End Measure) parameters, and use the + /YES and -/NO buttons to choose the start and end recording measures.
- Press the EXIT button to return to the Record page.
- Make the PART 1 and/or PART 2 indicator flash, depending on the part(s) you want to record.
- Press PLAY/STOP to start the recorder. Recording will automatically begin at the "Start" position, and stop at the "End" position.
- When finished, press STOP to end recording.
Saving the song
After recording, the song is stored into a temporary, non-permanent memory. To preserve it from deletion when turning the instrument off or choosing a different song, you must save it into the User Song album. There are several ways to do it.
By choosing the Save Song command
You can select the Save Song command at any moment. The Save Song page also allows you to assign or modify the name of the song, and save all the changes.
- After having pressed the EDIT button while in Song Play mode, use the SCROLL button to go to the Save Song edit page:
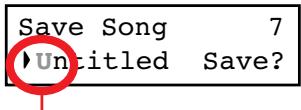
Flashing character
- Use the SCROLL buttons to select the character to be edited (it will start flashing). Use the + /YES and -/NO buttons to change it. Press the SCROLL / buttons together to insert a new character, or the + /YES and -/NO buttons together to delete the character at the cursor's position.
| ! | # | $ | % | & | ' | ( ) | + , | - | 0 | 1 | 2 | 3 | 4 | 5 | 6 | 7 | 8 | 9 ; | = | @ | |||||||||
| A | B | C | D | E | F | G | H | I | J | K | L | M | N | O | P | Q | R | S | T | U | V | W | X | Y | Z | [ ] | ^ | _ | |
| a | b | c | d | e | f | g | h | i | j | k | l | m | n | o | p | q | r | s | t | u | v | w | x | y | z | { } |
Note: The first character is a blank space. When saving, it will be automatically removed if added to the beginning or end of the name.
You can give the song a long name (as explained below). If it will not fit the display, it will scroll entirely when it is selected. When saved, the ".MID" extension will be automatically added to the file name.
When you reach the end of the name, a flashing asterisk (*) appears:
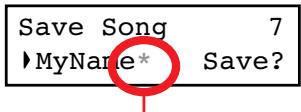
Flashing asterisk
At this point, you can either use the + / YES and -/NO buttons to choose a new character, or press SCROLL to move the cursor to the Save command:
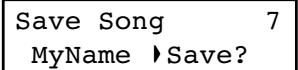
- Press the + / YES button to save the song into the User Song album, or the -/NO button to return to the Song Play mode, without saving the song. As an alternative, you can press EXIT to exit without saving, or to continue recording the current song.
- The "Are you sure?" message appears. Press + /YES to confirm, -/NO to cancel and exit.
At the end, the Song Play display will appear again, and you will be able to choose a different song for playing.
By choosing to record a new song
You can press the SONG + RECORD button combination to start recording a new song. If an unsaved song is still in memory, the Song Modified page will appear (see below).
By choosing a different song
If you try to choose a different song, while the current one has been recorded or modified and has not yet been saved, you are prompted to save it.
- Press the SONG button to select a different song. If the current song has been recorded or edited, but not yet been saved, the "Song Modified" message will appear.
Song Modified Save? (Yes/No)
- Press the -/NO button to delete the song or abandon the changes to a previously saved song. Or press EXIT to return to the current song without saving. Otherwise, press the +/YES button to make the Save Song page appear:
Save Song Untitled Save?
- From here on, the save procedure is the same seen above.
How I delete a Song from the UserSong album?
To delete a song from memory after having saved it, use the procedure described in "Erasing songs from the User Song album" on page 57.
Editing a song
After having been recorded, a user-created song can be edited, and then saved again in the User Song album. Please note that songs contained in albums other than UserSong cannot be edited. The only Edit function that can be accessed with these songs is the Cycle Play.
Setting Cycle Play
Cycle Play allows you to repeat a passage during play, to practice with it over and over.
Note: If you enter editing later, you might see a different edit page instead of the first one. Use the SCROLL button to reach it.
- While in Song Play mode, press the EDIT button. The first page of the Song Edit mode will appear. This is the Cycle
Play mode, whose use has been seen above (see "Cycle Play" on page 29):
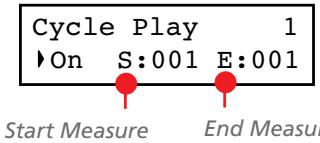
- Press the EXIT button to return to the Main page and start practicing.
Erasing a track
You can erase a single or all song tracks, to start recording them again, or just remove them from the song (for example, the voice track you want to sing live).
- After having pressed the EDIT button, use the SCROLL button to go to the Erase Track edit page:
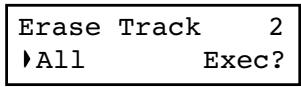
- Use the +/ YES and -/ NO buttons to select one of the following tracks:
| Option | Meaning |
| All | All tracks – this results in an empty song |
| Tr01 (P2), Tr02 (P1) | Respectively, Recorder Parts 2 (Track 1) and 1 (Track 2) |
| Tr 10 (Dr) | Drum part (Track 10) |
| Tr03 ~ 09, 11 ~ 16 | Tracks 3 ~ 9, 11 ~ 16 (Extra tracks) |
- Press the SCROLL button to move the cursor to the Exec command.
- Press +/ YES to start erasing. The "Are you sure?" message appears. Press +/ YES to confirm, -/NO to cancel and keep the track.
- Press the EXIT button to return to the Main page and save the changes (see "Saving the song after editing" on page 39), or the SCROLL button to go to the next edit page (see below).
Cutting measures at the end of the song
You can cut measures at the end of the song. For example, you could have recorded a long section, and then you erased it. After recording a shorter section, you ended up with a series of empty measures at the end of the song. With this function, you can cut them away.
- After having pressed the EDIT button while in Song Play mode, use the SCROLL button to go to the Cut Measures edit page:
Cut Measures 3
From: 99 Exec?
- Choose a measure where you want to start cutting. The value ranges from 1, to the last measure of the song.
- Press the SCROLL button to move the cursor to the Exec command.
- Press +/ YES to start cutting. The "Are you sure?" message appears. Press +/ YES to confirm, -/NO to cancel and keep the measures.
- Press the EXIT button to return to the Main page and save the changes (see "Saving the song after editing" on page 39), or the SCROLL button to go to the next edit page (see below).
Quantizing the song
Quantize allows you to correct any timing error after recording (see page 32 for more information). With this function, all parts (including the Drum part) will be quantized.
- After having pressed the EDIT button while in Song Play mode, use the SCROLL button to go to the Quantize edit page:
Quantize 4
Q:1/16 Exec?
- Choose one of the quantization options (from 1/32 to 1/8). A "b ~ f" character added after the value means swing-
quantization (i.e., correction with a 'human' feel). Triplets are intermediate-values (12, 24).
| Quantize values | |||||
| 1/4 = ∫ | 1/8a = ∫ | 1/12 = ∫3 | 1/16a = ∫ | 1/24 = ∫3 | 1/32 = ∫ |
| b ~ f = swing | |||||
- Press the SCROLL button to move the cursor to the Exec command.
- Press +/ YES to start quantization. The "Are you sure?" message appears. Press +/ YES to confirm quantization, -/ NO to cancel and keep the original value.
- Press the EXIT button to return to the Main page and save the changes (see "Saving the song after editing" on page 39), or the SCROLL button to go to the next edit page (see below).
Transposing the song
You can transpose the entire song, to make it match a different key.
- After having pressed the EDIT button while in Song Play mode, use the SCROLL button to go to the Transpose edit page:
| Transpose | 5 |
| V:+00 | Exec? |
- Choose a transposition value (in semitones).
| Value | Meaning |
| -127 | 127 semitones lower |
| +00 | No transposition |
| +127 | 127 semitones higher |
Deleting the song
The Delete Song command allows you to delete the whole song from memory, resulting in an empty song. This is the same as choosing the New Song command from the control panel (see page 36).
- After having pressed the EDIT button while in Song Play mode, use the SCROLL button to go to the Delete Song edit page:
| Delete Song | 6 |
| Exec? |
Saving the song after editing
With the Save Song page you can assign or modify the name of the edited song, and save all changes.
- After having pressed the EDIT button while in Song Play mode, use the SCROLL button to go to the Save Song edit page:
| Save Song | 7 |
| Uncitled Save? |
Flashing character
-
Use the SCROLL buttons to select the character to be edited (it will start flashing). Use the + /YES and -/NO buttons to change it. Press the SCROLL / buttons together to
-
Press the SCROLL button to move the cursor to the Exec command.
- Press +/ YES to start transposing. The "Are you sure?" message appears. Press +/ YES to confirm, -/NO to cancel and keep the original value.
-
Press the EXIT button to return to the Main page and save the changes (see "Saving the song after editing" on page 39), or the SCROLL button to go to the next edit page (see below).
-
Press + / YES to execute the command, or -/NO to cancel, and exit from the Song Edit mode.
If you press +/ YES, the "Are you sure?" message appears. Press +/ YES to confirm, or -/NO to cancel.
- Press the EXIT button to return to the Main page and save the changes (see "Saving the song after editing" on page 39), or the SCROLL button to go to the next edit page (see below).
insert a new character, or the + / YES and -/NO buttons together to delete the character at the cursor's position.
| ! | # | $ | % | & | ' | ( ) | + , | - | 0 | 1 | 2 | 3 | 4 | 5 | 6 | 7 | 8 | 9 ; | = | @ | |||||||||
| A | B | C | D | E | F | G | H | I | J | K | L | M | N | O | P | Q | R | S | T | U | V | W | X | Y | Z | [ ] | ^ | _ | |
| a | b | c | d | e | f | g | h | i | j | k | l | m | n | o | p | q | r | s | t | u | v | w | x | y | z | { } |
Note: The first character is a blank space. When saving, it will be automatically removed if added to the beginning or end of the name.
You can give the song a long name (as explained below). If it will not fit the display, it will scroll entirely when it is selected. When saved, the ".MID" extension will be automatically added to the file name.
When you reach the end of the name, a flashing asterisk () appears:
Save Song
MyName*
Save?
Flashing asterisk
At this point, you can either use the + / YES and -/NO buttons to choose a new character, or press SCROLL to move the cursor to the Save command:
Save Song
MyName Save?
- Press the + / YES button to save the song into the User Song album, or the -/NO button to return to the Song Play mode, without saving the song. As an alternative, you can press EXIT to exit without saving, or to continue recording the current song.
- The "Are you sure?" message appears. Press + / YES to confirm, -/NO to cancel and exit.
At the end, the Song Play display will appear again, and you will be able to choose a different song for playing.
Editing sounds and performances
The Sound edit mode is where you can edit sounds or performances. Edit parameters are exactly the same in both cases, but performances also memorize the split point (if the sounds are in Split mode).
Single sounds and sound combinations can be programmed in different ways. For example, when you press the PIANO button, the Piano volume can be set to the maximum. If you press the PIANO and STRINGs buttons together,
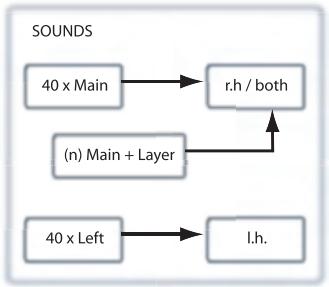
to turn the Layer mode on, the Piano volume could be lowered, to mix it with the Strings sound. It is like having a different sound when the Piano is playing alone, and when it is playing in layer with a String sound.
Left sounds are exactly the same as Main sounds. When you are in Split mode, it is like having two different Main sounds assigned to each of your hand.
There are 40 Main sounds, 40 Left sounds, plus a variable number of Layer combinations. There is space for any kind of sound combination you wish to add to your sonic palette.
Accessing the Sound edit mode
To access the Sound edit mode, choose a sound, sound combination or performance, then press EDIT.
During editing, the Layer/Left parameters can only be accessed when you are in Layer or Split mode. If you are in Sound
mode, you can switch mode at any time during editing. If you are in Performance mode, you cannot switch mode. However, if you select a performance with two sounds in Split, the SPLIT indicator will light.
Exit from the Sound edit mode
After having edited some parameter, press EXIT to exit the Sound edit mode. If nothing was modified, you immediately exit. If something was modified, the Sound Modified message will appear:
Sound Modified Save? (Yes/No)
Press +/ YES to save, -/NO (or EXIT) to cancel. If you choose to cancel, all changes will be deleted when choosing a different sound. If you choose to save, the edited sound replaces the older sound.
Saving a sound
If you make some changes during editing, when you press EXIT to exit the Sound edit mode, you are prompted to save your sound. See above.
Saving a performance
There are three ways to save a performance. Please find them below.
After editing a sound
- If you entered Sound edit mode with the PERFORMANCE indicator turned off (Sound mode), after modifying something and pressing EXIT, the Sound Modified page (seen above) will appear:
Sound Modified Save? (Yes/No)
While in this page, the PERFORMANCE indicator will start flashing.
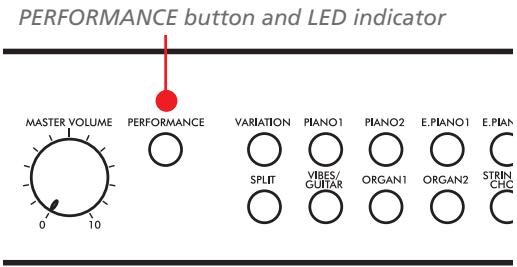
- Press the PERFORMANCE button to save the current sound or sound combination into a performance. After you press the button, the Performance Name page appears:
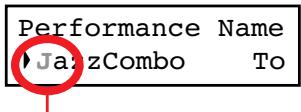
Flashing character
- If you want, edit the performance name. A performance's name can be up to 10 characters long.
Use the SCROLL buttons to select the character to be edited (it is flashing). Use the + / YES and -/NO buttons to change it. Press the SCROLL buttons together to insert a new character, or the + / YES and -/NO buttons together to delete the character at the cursor's position.
- When you reach the end of the name, pressing SCROLL moves the cursor to the To command:
Performance Name JazzCombo To
- Press the + / YES button to go to the Save To Performance page:
Save To: Perf 01 JazzCombo Save?
- Use the sound selection buttons (including the VARIATION button) to select the location where you want to save your performance.
VARIATION
PIANO1
D1 PI
O2 E.PI
NOT
E.PIANO2
HARPSI/CLAV


%

ORGAN

ORGAN2

STRINGS/CHOOB

BASS


Here is the table of the Performance's locations:
| Button | Performance # | ||
| Bank 1 | Bank 2 | Bank 3 | |
| 1 (PIANO 1) | 01 | 11 | 21 |
| 2 (PIANO 2) | 02 | 12 | 22 |
| 3 (E.PIANO 1) | 03 | 13 | 23 |
| 4 (E.PIANO 2) | 04 | 14 | 24 |
| 5 (HARPSI/CLAV) | 05 | 15 | 25 |
| 6 (VIBES/GUITAR) | 06 | 16 | 26 |
| 7 (ORGAN1) | 07 | 17 | 27 |
| 8 (ORGAN2) | 08 | 18 | 28 |
| 9 (STRINGS/CHOIR) | 09 | 19 | 29 |
| 10 (BASS) | 10 | 20 | 30 |
- The location number appears in the top right corner of the display, while the name of the performance already stored at that location appears in the lower left corner:
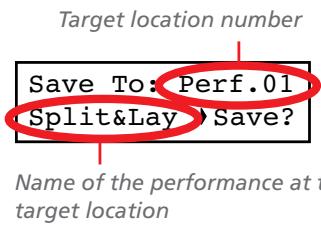
- Press the + / YES button to save the performance into the selected location, or the EXIT button to return to the Main page without saving, with the last performance still selected. If you press + / YES , the "Are you sure?" message appears.
Press + / YES to confirm, -/NO to cancel.
After editing a performance
- If you entered Sound edit mode with the PERFORMANCE indicator turned on (Performance mode), after modifying something and pressing EXIT, the Perf Modified page will appear:
Perf.Modified Save? (Yes/No)
- While this page is shown, press the + / YES button to save the changes into a performance. After you press the but
ton, the Save To Performance page (seen above) will appear. You will be able to save the current sound or sound combination into a performance. (See procedure above.)
By pressing the Performance button
While in the Main page, keep the PERFORMANCE button pressed. The Performance Name page (seen above) will appear. You will be able to save the current sound or sound combination into a performance. (See procedure above.)
Setting the volume
Use this page to set each sound's volume.
Note: If you return to editing later, you might see a different edit page instead of the first one. Use the SCROLL button to reach it.
- After having pressed the EDIT button, the Volume page will appear:
| Volume | 1 |
| M:127 | L:120 |
- While the Main (M) part is selected, use the + / YES and -/ NO buttons to select a different value.
| Value | Meaning |
| 0 | Minimum – no sound |
| 127 | Maximum – very loud |
Adjusting the panning
Panning is the position of each part in the stereo front (or "panorama").
- After having pressed the EDIT button, use the SCROLL button to go to the Pan edit page, with the M (Main) parameter selected:
| Pan | 2 |
| M:R07 | L:L07 |
While the Main (M) part is selected, use the + / YES and -/ NO buttons to select a different value.
| Value | Meaning |
| L64 | Hard Left |
| C00 | Center |
| R63 | Hard Right |
- If you are in Layer or Split mode, press the SCROLL button to select the L (Layer/Left) parameter (only available in Layer or Split mode):
| Volume | 1 |
| M:127 | ▶L:120 |
- While the Layer/Left (L) part is selected, use the + / YES and -/NO buttons to select a different value.
-
Press the EXIT button to return to the Main page and save the changes (see "Exit from the Sound edit mode" on page 41), or the SCROLL button to go to the next edit page (see below).
-
If you are in Layer or Split mode, press SCROLL again to go to select the L (Layer/Left) parameter (only available in Layer or Split mode):
| Pan M:R07 | 2 ►L:L07 |
- While the Layer/Left (L) part is selected, use the +/YES and -/NO buttons to select a different value.
- Press the EXIT button to return to the Main page and save the changes (see "Exit from the Sound edit mode" on page 41), or the SCROLL button to go to the next edit page (see below).
Adjusting the effects
The C-520 is equipped with three types of effects:
| Effect | Meaning |
| IFX (Insert Effect) | The sound pass entirely through this effect. This is used for effects being part of the sound itself, like the phaser of the rotary speaker. There is a separate IFX for each of the sounds. |
| Rev (Reverb) | This effect adds ambience to the sounds. In Layer or Split mode, there is a single reverb for all selected sounds. |
| Ch (Chorus) | This effect adds modulation to the sounds. In Layer or Split mode, there is a single chorus for all selected sounds. |
The following diagram shows the effect's routing:
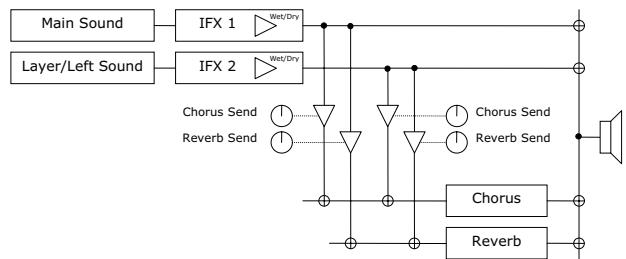
Use the following parameters to select the reverb, chorus and insert effects, and adjust how much of the sound must be processed.
Setting the reverb effect
Reverb adds ambience to the sound. Either you are in Single, Layer or Split mode, a single reverb effect is available for both sounds (see diagram). A different amount of reverb can be applied to each sound, thanks to the Reverb Send parameter (see below).
- After having pressed the EDIT button, use the SCROLL button to go to the Reverb Type edit page, with the reverb type selected:
| Reverb Type | 3 |
| Hall 1 | On |
Use the +/ YES and -/ NO buttons to select a different reverb. See below the list of available reverb effects (a more detailed list is on page 285).
| Reverb | ||
| Hall 1 | Hall 2 | Hall 3 |
| Wet Plate | Dry Plate | |
| Room 1 | Room 2 | Bright Room |
- Press SCROLL again to select the Reverb On/Off parameter:
| Reverb Type | 3 |
| Hall 1 | On |
Use the + / YES and -/NO buttons to turn reverb on or off. This corresponds to the status of the REVERB indicator.
- Press SCROLL to go to the Reverb Send edit page, with the M (Main) parameter selected:
| Reverb | Send | 4 |
| M:127 | L:100 | |
Use the + / YES and - / NO buttons to set the amount of reverb applied to the Main sound (0 ~ 127).
- If you are in Layer or Split mode, press SCROLL again to select the L (Layer/Left) parameter:
| Reverb | Send | 4 |
| M:127 | ▶L:100 | |
Use the + / YES and - / NO buttons to set the amount of reverb applied to the Layer/Left sound (0 ~ 127).
- Press the EXIT button to return to the Main page and save the changes (see "Exit from the Sound edit mode" on page 41), or the SCROLL button to go to the next edit page (see below).
Setting the chorus or modulation effect
The chorus or modulation effect adds depth to the sound. Either you are in Single, Layer or Split mode, a single chorus effect is available for both sounds (see diagram above). A different amount of chorus can be applied to each sound, thanks to the Chorus Send parameter (see below).
- After having pressed the EDIT button, use the SCROLL button to go to the Chorus Type edit page, with the chorus type selected:
| Chorus Type | 5 |
| ✓Chorus | Off |
Use the +/ YES and -/ NO buttons to select a different chorus effect. See below the list of available chorus-type effects (a more detailed list is on page 285).
| Chorus | ||
| Chorus | Harm. Chorus | Chorus Delay |
| Ensemble | Flanger | Tremolo |
- Press SCROLL again to select the Chorus On/Off parameter:
| Chorus Type | 5 |
| Chorus | Off |
Setting the insert effects
In addition to the reverb and chorus effects, common to both sounds in Layer and Split mode, an insert effect (IFX) is available for each sound (see diagram above). The insert effect strongly modifies the sound, and is to be considered as part of the sound itself.
- After having pressed the EDIT button, use the SCROLL button to go to the IFX Type edit page, with the IFX assigned to the Main sound selected:
| IFX M/L Type 7 •EQ1 Phaser |
Use the + / YES and -/NO buttons to turn the chorus on or off. This corresponds to the status of the CHORUS indicator.
- Press SCROLL to go to the Chorus Send edit page, with the M (Main) parameter selected:
| Chorus | Send | 6 |
| M:127 | L:Off | |
Use the + / YES and - / NO buttons to set the amount of chorus applied to the Main sound (0 ~ 127).
- If you are in Layer or Split mode, press SCROLL again to select the L (Layer/Left) parameter:
| Chorus | Send | 6 |
| M:127 | ▶L:Off | |
Use the +/ YES and -/ NO buttons to set the amount of chorus applied to the Layer/Left sound (0 ~ 127).
- Press the EXIT button to return to the Main page and save the changes (see "Exit from the Sound edit mode" on page 41), or the SCROLL button to go to the next edit page (see below).
Use the + / YES and -/NO buttons to select a different effect. "Off" means no effect. See below the list of available IFX effects (a more detailed list is on page 285).
| IFX | |||
| LoGain | HiGain | HLGain | MdGain |
| Echo1 | Echo2 | Echo3 | |
| Dly4th | Dly3/4 | Dly8th | |
| Pan | Trem. | Phaser | Rotary |
| AmpSim | Comp. | Limit. | Excit. |
| Wah | PhaTrm | AmpTrm | CmpAmp |
| OD-Wah | WahAmp |
- If you are in Layer or Split mode, press SCROLL again to select the IFX assigned to the Layer/Left sound:
| IFX M/L Type 7 LoGain ▸Phaser |
Use the + / YES and -/NO buttons to select a different effect.
Press the SCROLL button to go to the IFX Wet/Dry edit page, with the M (Main) parameter selected:
IFX Wet/Dry 8 M:W099 L:D020
Use the + / YES and -/NO buttons to set the amount of IFX applied to the Main sound.
| Value | Meaning |
| -Wet | Wet, i.e., maximum effect applied. Negative (inverted) phase. |
| W-99 ~ W-51 | Mostly wet, with negative value. |
| D-50 ~ D-01 | Mostly dry, i.e., minimum effect applied. Nega-tive (inverted) phase. |
| Dry | Dry, i.e., with no effect at all. |
| D001 ~ D050 | Mostly dry, i.e., minimum effect applied. |
| W051 ~ W099 | Mostly wet. |
| Wet | Wet, i.e., maximum effect applied. |
This is the diagram of the mix between Wet and Dry settings:
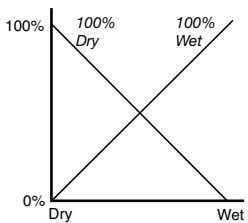
- If you are in Layer or Split mode, press SCROLL again to select the L (Layer/Left) parameter:
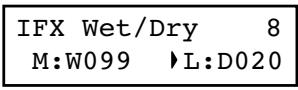
Use the + / YES and -/NO buttons to set the amount of IFX applied to the Layer/Left sound.
- Press the EXIT button to return to the Main page and save the changes (see "Exit from the Sound edit mode" on page 41), or the SCROLL button to go to the next edit page (see below).
Setting the octave transposition
Here you can set the individual octave transposition for the Main and the Layer/Left sounds.
- After having pressed the EDIT button, use the SCROLL button to go to the Octave edit page, with the M (Main) parameter selected:
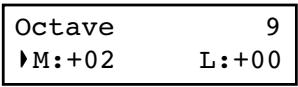
Use the + / YES and - / NO buttons to change the octave transposition, within a range of ± 4 octaves.
| Value | Meaning |
| -04 ~ -01 | Four to one octave lower |
| +00 | No transposition |
| +01 ~ +04 | One to four octave higher |
- If you are in Layer or Split mode, press SCROLL again to select the L (Layer/Left) parameter:

Use the +/ YES and -/ NO buttons to change the octave transposition.
- Press the EXIT button to return to the Main page and save the changes (see "Exit from the Sound edit mode" on page 41), or the SCROLL button to go to the next edit page (see below).
Adjusting the fine tune
You can fine tune the Main and the Layer sounds (in Layer mode), so that there is some "beating" between them.
- After having pressed the EDIT button, use the SCROLL button to go to the Fine Tune edit page:
| Fine Tune | 10 |
| M:+00 | L:+00 |
Use the + / YES and - / NO buttons to adjust fine tune for the Main sound, within a range of ± 99 cents (1 cent = 1/100 of a semitone).
| Value | Meaning |
| -99 ~ -01 | Ninety-nine to one cent lower |
| +00 | No transposition |
| +01 ~ +99 | One to 99 cents higher |
Programming the pedals
By default, the three pedals act (from right to left) as damper, sostenuto and soft. You can freely reassign them according to your need or preference. You can either assign them to the sounds by these pages, or globally (see page 52). Global programming override these settings.
Hint: Use sound programming to assign sound effects, like damper, rotary speaker speed and glide; use global program
- If you are in Layer or Split mode, press SCROLL again to select the L (Layer/Left) parameter:
| Fine Tune | 10 |
| M: +00 | ▶L: +00 |
Use the + / YES and -/NO buttons to change the fine tune of the Layer/Left sound.
- Press the EXIT button to return to the Main page and save the changes (see "Exit from the Sound edit mode" on page 41), or the SCROLL button to go to the next edit page (see below).
ming to assign global controls, like drum pattern, recorder and quarter tone control.
Note: When a function other than Sound is assigned to a pedal in Global edit, therefore overriding sound programming, a (G) abbreviation appears in the following pedal assignment pages.
- After having pressed the EDIT button, use the SCROLL button to show the Pedal assignment page for the pedal you wish to reprogram:
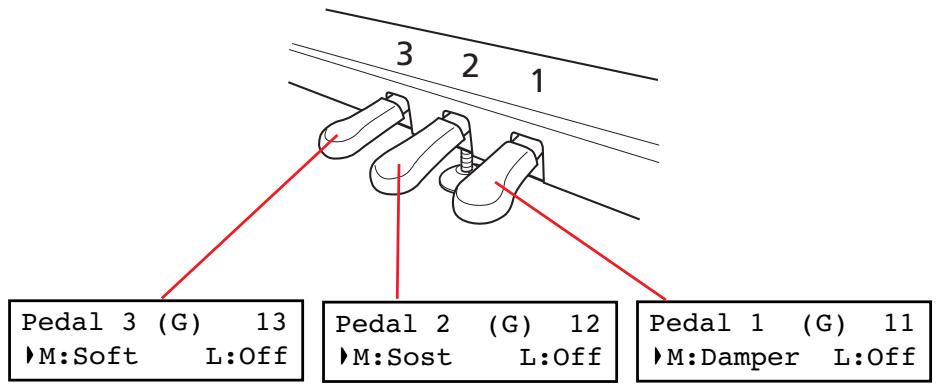
- Use the SCROLL buttons to move the cursor to the M (Main) or L (Layer/Left) parameter. Use the + / YES and -/ NO buttons to choose the required function.
You can assign different functions to the Main and Layer/ Left sounds, depending on the type of sound. This allows for a great flexibility in pedal assignment. Some examples:
- A Grand Piano is the Main sound, and a String Ensemble is the Layer sound. Pedal 1 triggers the Damper effect for the Piano sound only (it is Off for the Layer sound),
allowing for long, held Piano notes. At the same time, Pedal 3 triggers the Soft effect for both sounds.
- A Grand Piano is the Main sound, and an Acoustic Bass is the Left sound. The Damper effect is assigned to the Main sound on Pedal 1 (it is Off for the Left sound), while the Glide effect is assigned to the Left sound on Pedal 3 (it is Off for the Main sound). When you want Piano notes to be held, press the rightmost pedal (#1) as in a traditional piano; when you want the Bass to glide, press the leftmost pedal (#3). You can use both pedals at the same time.
Here are the effects that can be assigned to the pedals in Sound edit mode:
| Setting | Function |
| Off | The pedal does not affect the sound |
| Damper | Damper pedal |
| Sost. (Sostenuto) | Sostenuto pedal |
| Soft | Soft pedal |
| Glide | Glide function. When the pedal is depressed, the sound “glides” slightly toward the lower pitch. Try it on the Ac.Guitar sound (left pedal). |
| Rotary | Rotary Speaker control, typical of electro-mechanical organs. Try it on the Percussion Organ 1 & 2 sounds (left pedal). |
- Press the EXIT button to return to the Main page and save the changes (see "Exit from the Sound edit mode" on page 41), or the SCROLL button to go to the next edit page (see below).
Selecting a scale
There are numerous classical compositions that were composed using scales (or "temperaments") that differ from the "equal temperament" commonly used today. In order to reproduce the original sound of such compositions, the C-520 provides other classical scales, in addition to the equal temperament. In addition, scales to play ethnic and experimental music are given.
You can assign the alternative temperament, or "sub scale", to both sounds, or just one of them. The other sound will continue playing using the equal temperament (or, in some cases, the stretch one).
- Press SCROLL to go to the SubScale Type edit page:
SubScale Type 14 Kirnberger
- Use the + / YES and - / NO buttons to select one of the available scales, chosen among the following ones:
| Scale | Meaning |
| Equal Temp. | Nearly all keyboard instruments today use equal temperament. This temperament spaces all semitones at equal distances, and allows identical scales to be played in any key. |
| Pure Major | Major chords in the selected key are perfectly tuned. |
| Pure Minor | Minor chords in the selected key are perfected tuned. |
| Arabic | An arabic scale, with the E and B notes tuned a quarter tone lower. |
| Pythagorean | Pythagorean scale, based on the music theories of the great Greek philosopher and mathematician. It is most suitable for melodies. |
| Werckmeister | This is the Werckmeister III scale invented by Andreas Werckmeister, the German organist and music theoretician. This scale was created in the later Baroque period to allow relatively free transposition. |
| Scale | Meaning |
| Kirnberger | This is the Kirnberger III scale invented by Johann Phillip Kirnberger in the early 18th century, and is used mainly for tuning harpsi-chords. |
| Slendro | Scale of the Indonesian Gamelan. The octave is divided in 5 notes (C, D, F, G, A). The remaining notes are tuned as in the Equal tuning. |
| Pelog | Scale of the Indonesian Gamelan. The octave is divided in 7 notes (all white keys). The black keys are tuned as in the Equal tuning. |
| Stretched | Simulates the “stretched” tuning of an acousti piano. Basically an equal tuning, the lowest notes are slightly lower, while the highest notes are slightly higher than the standard. This scale is automatically recalled when select-ing the GrandPiano, BriteGrand and MelloPi-ano sounds. |
- Press SCROLL to go to the SubScale Switch edit page, with the M (Main) parameter selected:
SubScale Sw. 15
M:On L:Off
- Use the +/YES and -/NO button to turn the sub scale on or off for the Main sound. If it is off, the sound will continue playing using the equal temperament.
- Press SCROLL to select the L (Layer/Left) parameter:
SubScale Sw. 15 M:On L:Off
- Use the +/ YES and -/ NO button to turn the sub scale on or off or the Layer/Left sound. If it is off, the sound will continue playing using the equal temperament.
- Press the EXIT button to return to the Main page and save the changes (see “Exit from the Sound edit mode” on page 41), or the SCROLL button to go to the next edit page (see below).
Resetting the current sound and performance
Any custom programming of the current sound, sound combination or performance, can be reset to the original values.
Hint: To reset all data, use the dedicated function in Global mode (see "General Reset" on page 58).
- After having pressed the EDIT button, use the SCROLL button to show the Reset Sound/Performance page:
Reset Snd/Prf 16
Exec?
- Press +/ YES to start resetting. The "Are you sure?" message appears. Press +/ YES to confirm resetting, -/NO to cancel and leave your custom data untouched.
If you choose to reset, the current performance, sound or sound combination is reset to the factory values.
Global settings
Global edit is where you can edit some general parameters, not tied to the single sounds or songs.
Accessing Global edit
Keep the EDIT button pressed for more than one second, to access the Global edit mode.
Exit from the Global edit mode
After having edited some parameter, press EXIT to exit the Global mode. If nothing was modified, you exit immediately. If something was modified, the Save page will appear:

Press + / YES to save, -/NO to cancel.
Touch settings
The keyboard sensitivity, or touch, can be programmed.
- After having kept the EDIT button pressed, use the SCROLL button to show the Touch Sensitivity page:
Touch Sens. 1 Medium 2
- Use the + / YES and - / NO button to change sensitivity. The following table lists the available touch settings.
| Setting | Touch sensitivity |
| Fixed | Fixed dynamic = 100. |
| Soft 1~3 | Loud notes can be produced even by playing lightly. |
| Medium 1~2 | Normal piano touch. |
| Hard 1~3 | Loud notes can be produced only by playing very hard. |
This is the diagram of the touch curves:
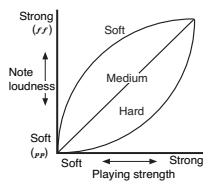
- Press the EXIT button to return to the Main or Song Play page and save the changes (see "Exit from the Global edit mode" on page 50), or the SCROLL button to go to the next edit page (see below).
Turning the internal speakers on or off
Whether you prefer listening to the internal speakers or to an external amplification system, you can turn the internal speakers on or off.
Note: The speakers are automatically turned on when the instrument is turned on again.
Hint: You can also turn the speaker off, by inserting a jack in the headphone connectors.
- After having kept the EDIT button pressed, use the SCROLL button to show the Speaker page:
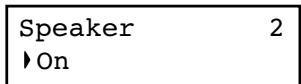
- Use the + / YES and - / NO button to turn the internal speakers on or off.
- Press the EXIT button to return to the Main or Song Play page, or the SCROLL button to go to the next edit page (see below).
Master tuning
In order to adapt the C-520 pitch to that of another instrument, you can adjust the pitch. Standard tuning is A4 = 440 Hz.
Note: If you enter editing later, you might see a different edit page instead of the first one. Use the SCROLL button to reach it.
- After having kept the EDIT button pressed, the Master Tune page will appear:
| Master | Tune | 3 |
| 1440.0 | Hz |
- Use the + / YES and - / NO button to select a different tuning.
| Setting | Tuning |
| 415 ~ -439.5 | Lower tuning. The lowest value corresponds to about -100 cents (one semitone) from the standard tuning. |
| 440 | Standard tuning |
| 440.5 ~ 465 | Higher tuning. The highest value corresponds to about +100 cents (one semitone) over the standard tuning. |
- Press the EXIT button to return to the Main or Song Play page and save the changes (see "Exit from the Global edit mode" on page 50), or the SCROLL button to go to the next edit page (see below).
Brilliance
Brilliance is the sound's brightness. You can set an overall increase or decrease of brilliance.
This is the same parameter you can change with the BRILLIANCE button (see page 19). However, contrary to the button, these changes can be memorized, and are preserved even when turning the instrument off.
Note: Brilliance changes can be recorded into a song. If you later change them again, values recorded in the song are left unchanged.
- After having kept the EDIT button pressed, use the SCROLL button to show the Brilliance page. As an alternative, press the BRILLIANCE button to immediately access the Brilliance page:
| Brilliance | 4 |
| Normal |
After having chosen a brilliance value different than Normal, the BRILLIANCE indicator will turn on.
- Use the +/ YES and -/ NO button to change the brilliance. The following table lists the available settings.
| Setting | Brilliance |
| Very Mellow, Mellow | The sound becomes darker. |
| Normal | Normal tone. |
| Bright, Very Bright | The sound becomes brighter. |
- Press the EXIT button to return to the Main or Song Play page and save the changes (see "Exit from the Global edit mode" on page 50), or the SCROLL button to go to the next edit page (see below).
Default split point
You can set a default split point, that will be automatically recalled each time you press the SPLIT button when playing sounds.
Note: The split point may be different from the default split point, if you change it after turning the instrument on. Also, it may vary when choosing a performance with two sounds in Split mode. The last selected split point remains selected, until you turn the instrument off.
- After having kept the EDIT button pressed, use the SCROLL button to show the Split Point page:
| Split Point 5 F#3 |
- Use the + / YES and - / NO button to change the split point. When you change this value, if you are in Split mode the current split point is also changed.
- Press the EXIT button to return to the Main or Song Play page and save the changes (see "Exit from the Global edit
mode" on page 50), or the SCROLL button to go to the next edit page (see below).
Assigning functions to the pedals
By default, the three pedals act as (from right to left) damper, sostenuto and soft. You can freely reassign them according to your need or preference. You can either assign them to the sounds (see page 47), or globally by these pages. Global programming override sound settings.
Hint: Use sound programming to assign sound effects, like damper, rotary speaker velocity and glide; use global program
ming to assign global controls, like drum pattern, recorder and quarter tone control.
Note: When a function other than Sound is assigned to a pedal, therefore overriding sound programming, a (G) abbreviation appears in the pedal assignment pages in Sound Edit mode.
- After having kept the EDIT button pressed, use the SCROLL button to show the Pedal assignment page for the pedal you wish to reprogram:
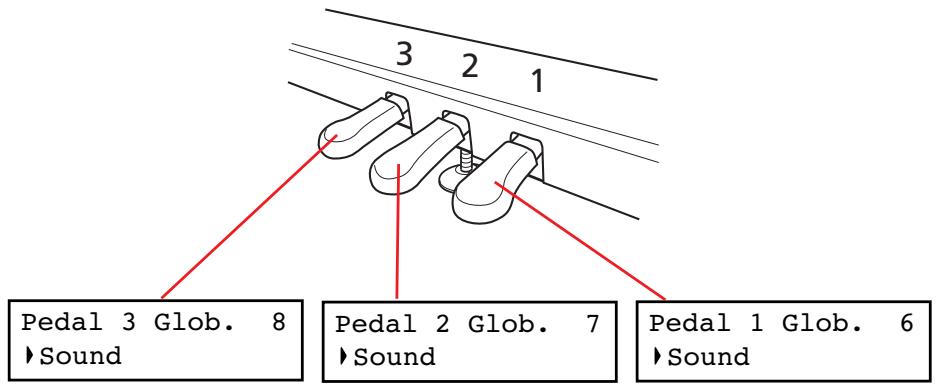
- Use the + / YES and - / NO button to choose the assigned function.
| Setting | Function |
| Sound | The pedal is programmed by the selected sound, sound combination or performance (see “Programming the pedals” on page 47). |
| Fill In | The pedal triggers as the Fill In command for the drum pattern (see “Drum patterns” on page 23). |
| Quarter Tone | The pedal activates the Quarter Tone function. When this function is turned on, you can detune some notes in realtime, to make custom scales. See “Quarter Tone (SubScale realtime programming)” below. |
| Transpose Up | Each time the pedal is pressed, the master transpose is raised by one semitone. |
| Setting | Function |
| Transpose Down | Each time the pedal is pressed, the master transpose is lowered by one semitone. |
| Play/Pause | The pedal duplicates the PLAY/PAUSE button's function. |
| Stop | The pedal duplicates the STOP button's function. |
| Pedal Punch | This is used for Pedal Punch recording. This function is detailed on page 35. |
- Press the EXIT button to return to the Main or Song Play page and save the changes (see "Exit from the Global edit mode" on page 50), or the SCROLL button to go to the next edit page (see below).
Quarter Tone (SubScale realtime programming)
The Quarter Tone function allows you to program a custom scale in realtime, for example those sudden scale change typical of Arabic music. Changes are not saved anywhere (they are only used in realtime), so the scale is easily "wiped-out" when selecting a different sound or performance, or when pressing the Quarter Tone pedal again.
Note: Quarter Tone can only be used if the SubScale has been activated for the Main and/or Layer/Left sounds in Sound edit mode (see "SubScale Switch" on page 48).
You can assign the "Quarter Tone" function to any of the pedals.
- Assign the Quarter Tone function to one of the pedals, as seen above.
Fast Play
When you record a song with the onboard recorder, or read a Standard MIDI File from an external sequencer, one or more empty beats can exist at the beginning of the song. However, when the Fast Play function is activated, all empty beats are skipped, making the song playback immediately begin from the first note. If setup data are contained inside these empty beats, they are read faster.
Mute Level
Muting is useful with piano lessons, when you may want to play one or both song parts to play them on the keyboard. You mute a part by pressing the corresponding PART button while in Song Play mode.
In this page, you can choose either the mute completely silences a part, or just attenuates it.
- After having kept the EDIT button pressed, use the SCROLL button to show the Mute Level page:
| Mute Level | 10 |
| Volume: 0 |
- Keep the Quarter Tone pedal pressed. The keyboard will not play at this time. Press the notes you want to lower a quarter tone.
- Release the Quarter Tone pedal.
- Play with your new scale. Notes you pressed on step 2 are now lowered of a quartertone.
- To reset the original scale, press and release the Quarter Tone pedal again, without playing any note. All pitches will be reset, and the scale selected by the sound or performance will be recalled (see "Selecting a scale" on page 48).
As an alternative, you can reset the Quarter Tone settings by choosing a different sound or performance.
- After having kept the EDIT button pressed, use the SCROLL button to show the Fast Play page:
| Fast Play | 9 |
| On |
- Use the + / YES and - / NO button to turn the Fast Play function on or off.
-
Press the EXIT button to return to the Main or Song Play page and save the changes (see “Exit from the Global edit mode” on page 50), or the SCROLL button to go to the next edit page (see below).
-
Use the + / YES and - /NO button to choose the mute level.
| Setting | Perceived level |
| 0 | Silence |
| 1 ~ 30 | Soft |
| 31 ~ 60 | Medium |
| 61 ~ 90 | Loud |
- Press the EXIT button to return to the Main or Song Play page and save the changes (see “Exit from the Global edit mode” on page 50), or the SCROLL button to go to the next edit page (see below).
Turning the keyboard on or off (Local Control)
Local is the parameter that allows you to establish whether the keyboard has to play the internal sounds and transmit MIDI data at the same time (Local On), or whether it just has to transmit MIDI data and not play the internal sound (Local Off).
Local Off should be chosen when you wish to use the C-520 as a mute keyboard, to play another instrument via the MIDI OUT port. It should also be chosen when C-520 is connected to an external sequencer via its MIDI IN and MIDI OUT connectors. This will avoid the notes to be played twice, by the keyboard and by the sequencer, producing an annoying "echo" effect.
Normally, you will choose Local On (automatically selected when turning the C-520 on), so that playing the keyboard will produce sound.
MIDI Clock
MIDI Clock allows for synchronization of two MIDI devices, for example the internal recorder of the C-520, and an external sequencer.
Note: When the power is turned on, the MIDI Clock will be automatically set to Internal.
- After having kept the EDIT button pressed, use the SCROLL button to show the MIDI Clock page:
MIDI Clock 12 External MIDI
MIDI IN Channels
When C-520 is controlled from an external MIDI device, it can work as a 16-part multitimbral tone generator. You can select a different sound on each of the 16 MIDI channels. These channels are not accessible from the control panel, and are separate from the Main, Layer/Left, Recorder Part 1 and Part 2, and Drum tracks. Therefore, you can continue playing with the piano while MIDI data are received from an external MIDI device.
Note: MIDI data is received both from the MIDI IN port, and the USB port at the same time. For more information about MIDI Over USB, see "What is MIDI Over USB?" on page 59.
Note: When the power is turned on, the Local will be automatically set to On.
- After having kept the EDIT button pressed, use the SCROLL button to show the Local Control page:
Local Control 11 On
- Use the + / YES and - / NO button to turn the function on or off.
-
Press the EXIT button to return to the Main or Song Play page, or the SCROLL button to go to the next edit page (see below).
-
Use the + / YES and - / NO button to choose the source of the clock message.
| Setting | MIDI Clock |
| Internal | The MIDI Clock is generated by the C-520 itself. The message is also sent to the MIDI OUT and USB ports. |
| External MIDI | The MIDI Clock is received from an external MIDI device connected to the C-520's MIDI IN port. |
| External USB | The MIDI Clock is received from an external device connected to the C-520's USB port. |
-
Press the EXIT button to return to the Main or Song Play page, or the SCROLL button to go to the next edit page (see below).
-
After having kept the EDIT button pressed, use the SCROLL button to show the MIDI IN Channels page:
MIDI IN Ch. 13 Ch:1 Track 1
- Use the +/ YES and -/ NO button to choose one of the 16 available channels (Ch) to be programmed.
- Press the SCROLL button to move the cursor to the assigned track.
MIDI IN Ch. 13
Ch:1 Track1
- Use the +/YES and -/NO buttons to choose a different track. Here is a list of the available tracks for each of the MIDI IN channels:
| Tracks | Meaning |
| Off | No data received on the selected channel. This is useful when an external sequencer is sending data to two (or more) different devices. Turn off all channels you want to reserve to the other device(s). |
| Track 1~16 | One of the 16 tracks of the C-520. |
| Global | Global track. All notes and pedal controls (damper, sustainauto, soft) received via the MIDI IN are considered as if they came from the integrated keyboard and pedals. The split point (if any) is considered. |
MIDI OUT Channels
The standard MIDI has 16 separate channels available for transmission and reception of data. C-520 can transmit on six channels at the same time. To transmit data from the C-520, you need to choose which of the 16 MIDI channels you wish to transmit data on, and which track they are assigned to.
Note: MIDI data is sent both to the MIDI OUT port, and the USB port at the same time. For more information about MIDI Over USB, see "What is MIDI Over USB?" on page 59.
- After having kept the EDIT button pressed, use the SCROLL button to show the MIDI OUT Channels page:
| MIDI OUT Ch. 14 ►Ch:1 Main |
- Use the +/ YES and -/ NO button to choose one of the 16 available channels (Ch) to be programmed.
- Press the SCROLL button to move the cursor to the assigned track.
| MIDI OUT Ch. 14 Ch:1 | Main |
- Press the SCROLL button to move the cursor to the channel again.
| MIDI IN Ch. 13 >Ch:01 Tr01 |
- Use the +/ YES and -/ NO button to choose another channel to be programmed, and repeat the above procedure.
-
Press the EXIT button to return to the Main or Song Play page and save the changes (see "Exit from the Global edit mode" on page 50), or the SCROLL button to go to the next edit page (see below).
-
Use the +/YES and -/NO buttons to choose a track transmitting on the selected channel. Here is a list of the available tracks for each of the MIDI OUT channels:
| Tracks | Meaning |
| Off | No data sent on the selected channel. This is useful when you want to play notes on the piano alone, without sending them to another MIDI device connected to the C-520's MIDI OUT port. |
| Main | Main sound |
| Layer | Layer sound (when in Layer mode) |
| Left | Left Sound (when in Split mode) |
| Part 1, 2 | Recorder part 1 or 2 |
| Drum | Drum (when a drum pattern is selected) |
- Press the SCROLL button to move the cursor to the channel again.
| MIDI OUT Ch. 14 •Ch:1 Main |
- Use the +/ YES and -/ NO button to choose another channel to be programmed, and repeat the above procedure.
- Press the EXIT button to return to the Main or Song Play page and save the changes (see “Exit from the Global edit mode” on page 50), or the SCROLL button to go to the next edit page (see below).
MIDI Filters
When you choose a sound, operate the damper pedal, adjust the level balance in Layer mode, or make other adjustments on the control panel, a MIDI message is sent to a connected external MIDI (and/or USB) device. At the same time, C-520 can receive a MIDI message from an external MIDI (and/or USB) device connected to its MIDI IN (or USB port), to control the sounds, damper pedal, volume adjustment, and other data.
You can choose to deactivate (i.e., "filter") these data selectively, to avoid unwanted changes or mixing data generated by external devices and internal controls. Also, you could want to avoid sending MIDI data to an external MIDI device, for example Program Change message selecting unwanted sounds on a different musical instrument.
- After having kept the EDIT button pressed, use the SCROLL button to show the MIDI Filters page:
| MIDI Filters 15 Flt:CC Off |
Data transfer via the USB port
The USB is a high-speed data port installed on most modern computers. You can use it to transfer data from the internal memory of the C-520, to a computer and vice-versa. Before you do this, you must enable USB connection for data transfer.
Note: While data transfer is active, no MIDI over USB communication is allowed.
Windows ME, 2000, XP, and Mac OS 9.0.4 to OS X, are supported with no need for special drivers. To use the C-520 with Windows 98SE you need the dedicated KORG Driver, a special software that you can freely download from our website.
Warning: Since activating the USB port for data transfer automatically deactivates MIDI over USB, exit from any MIDI software on your personal computer before turning the USB Connect function on. Failing to do so could damage the C-520's internal memory data.
Warning: When you turn the USB connection off, the C-520 will be reinitialized and all unsaved data in the instrument's memory will be deleted. Save any unsaved sound, performance, song, or global setting, before activating the USB connection.
- Use the + / YES and - / NO buttons to choose one of the filters to be programmed. Here is a list of the available filters:
| Filter | Meaning |
| CC | Control Changes messages, e.g., pedal, modulation, volume, pan, etc. |
| PC | Program Change messages, i.e., the messages sent to select a sound. |
| PB | Pitch Bend |
| SysEx | System Exclusive, e.g., the messages used to program effect parameters. |
- Press the SCROLL button to move the cursor to the status of the selected filter:
| MIDI Filters 15 Flt:CC Off |
- Use the + / YES and - / NO buttons to change the filter's status. On means that the corresponding data is filtered (not sent or received), Off means that it is not filtered (it is sent and received).
-
Press the EXIT button to return to the Main or Song Play page and save the changes (see “Exit from the Global edit mode” on page 50), or the SCROLL button to go to the next edit page (see below).
-
First of all, connect the C-520 to a personal computer via a standard USB cable. Make sure that the connector is oriented correctly, and insert it all the way into the jack.

- Then, turn USB Data Connect on on the C-520, to let the computer see its internal memory as a USB disk.
After having kept the EDIT button pressed, use the SCROLL button to show the USB Connect page:
| USB Connect 16 ▶Enable? |
- Press the + / YES button to activate data connection. The Disable command will appear in the display.
| USB Connect 16 Disable? |
Warning: Do not press the -INO button while transferring data, or you could damage the C-520's memory content, and cause malfunctioning on your personal computer
At this point, the C-520 should appear on your computer's desktop or disk window as an external USB drive, with the name KORG SSD (i.e., KORG Solid State Disk, the technical name of the internal permanent memory).

KORG SSD (E:)
Windows

KORG SSD
Mac OS X
- Move files to or from the C-520 and the personal computer as you would with any other USB drive. When moving files, consider the following:
Warning: Do not turn the C-520 off before disconnecting it from the personal computer. Doing so, could damage the C-520's memory content, and cause malfunctioning on your personal computer.
Data inside the C-520's memory are organized in four folders (also called 'subdirectories'). Each folder contains a different type of data created by yourself. The different data is explained in the following table.
| Folder | Content |
| Global | Global settings, Metronome settings |
| Perform | Performances |
| Preset | Modified sounds and sound combinations |
| UserSong | Your personal songs, i.e., songs you created with the internal recorder, or created with an external sequencer. You can copy from the computer to this folder songs in Standard MIDI File format (files with the“.MID” extension). To select the correct sounds on the C-520, imported songs must comply with the General MIDI (GM) standard. Not all GM sounds can be played, since C-520 includes only a subset of the GM standard. |
This is the diagram of the data:

GLOBAL

PERFORM

PRESET

USERSONG
-
After data transfer is completed, remove the KORG SSD icon from the computer desktop. Please refer to your computer's documentation for any care on ejecting/removing USB storage devices. However, here is what you should commonly do:
-
On a Windows PC: Right-click the KORG SSD icon displayed in the right side of your computer's taskbar. In the menu that appears, left-click "Stop USB disk driver (drive name)." Make sure that a message indicating that the "USB disk may be disconnected safely" is displayed. At this point, the C-520 should have been automatically disconnected from your personal computer, and the Enable command should appear again in the C-520's display, meaning connection has been deactivated.
- On a Mac: Drag the KORG SSD icon over the Eject icon on the Dock (Mac OS 9: drag it to the trashcan on the desktop), and wait until the icon disappears. When it is no longer shown, go to the C-520 and press the -/NO button to deactivate data connection. The C-520 will be reinitialized, and the Enable command will appear in the display again, meaning connection has been deactivated.
- When the Enable command appears in the display again, the USB connection has been safely turned off.
USB Connect 16 Enable?
- Press the EXIT button to return to the Main or Song Play page, or the SCROLL button to go to the next edit page (see below).
Erasing songs from the User Song album
You can erase a song from the User Song album. On the contrary, songs of the other albums cannot be erased.
Note: You can erase a song from the User Song album also via an external computer, by means of the USB data connection (see above).
- After having kept the EDIT button pressed, use the SCROLL button to show the Erase Song page:
Erase Song 17 Prelude Exec?
- Use the + / YES and -/NO buttons to choose the song of the User Song album you wish to delete. If the name is longer than the display, it will scroll up to the end, then return to the beginning.
- Press the SCROLL button to move the cursor to the Exec command.
- Press +/ YES to start deletion. The "Are you sure?" message appears. Press +/ YES to confirm deletion, -/NO to cancel and keep the song.
- Press the EXIT button to return to the Main or Song Play page, or the SCROLL button to go to the next edit page (see below).
General Reset
You can reset all memory data to the original factory settings. This includes sounds, sound combinations, performances, global data.
Warning: The general reset will delete all your user data, like custom performances, Layer sound balancing and global data! Backup this data to a personal computer before doing a general reset. User Songs will not be deleted.
- After having kept the EDIT button pressed, use the SCROLL button to show the General Reset page:
General Reset 18 Exec? (Yes/No)
- Press +/ YES to start the reset procedure (or -/NO or EXIT to cancel and exit). The "Are you sure?" message appears. Press +/ YES again to confirm reset, -/NO to cancel and leave your custom data untouched.
If you choose to reset, the instrument is reset, and all data are restored to the original values. Please do not turn the instrument off during reset.
System version number
You can see the operating system's version number while in Global mode. Press both the SCROLL and + /YES buttons
together. The version number will appear in the display. Press EXIT to close the message.
MIDI
What is MIDI?
MIDI, is the abbreviation of Musical Instrument Digital Interface. It is an international standard that was created to connect and transfer data between electronic musical instruments, computers and other devices.
What is MIDI Over USB?
You can let the C-520 communicate MIDI data with a computer using the USB port instead of the MIDI ports. This way, you can connect your C-520 to a personal computer without the need of a dedicated MIDI interface.
Most C-520 MIDI features can be used on a Windows XP or Mac OS X computer with no need of special software. Howev-
What can you do with MIDI?
Thanks to MIDI, you can use the C-520 to control other instruments, use other instruments to control the C-520, and use a sequencer to create complex musical pieces.
MIDI connections
Always connect the MIDI OUT connector of the instrument to the MIDI IN connector of another instrument. Never connect two connectors of the same instrument to each other.
Connect the MIDI OUT connector of the transmitting (master) device to the MIDI IN connector of the receiving (slave) device.

To connect the C-520 to a computer using the MIDI ports, you need a MIDI interface for the computer, sequencing or musical notation software, and two standard MIDI cables. Connect the C-520 MIDI OUT connector to the MIDI IN connector of
er, for full and easy use of all MIDI features, we suggest you to install the "KORG USB MIDI Driver", a special software that you can find in the CD that comes with your C-520. Relevant instructions come with the software itself. See "Installing the Korg USB MIDI Driver" on page 62.
When you use the C-520 keyboard or pedal, or select a sound, the notes, pedal activation and change in sound are transmitted to another instrument, or are recorded by an external sequencer.
the computer. Connect the C-520 MIDI IN connector to the MIDI OUT connector of the computer.
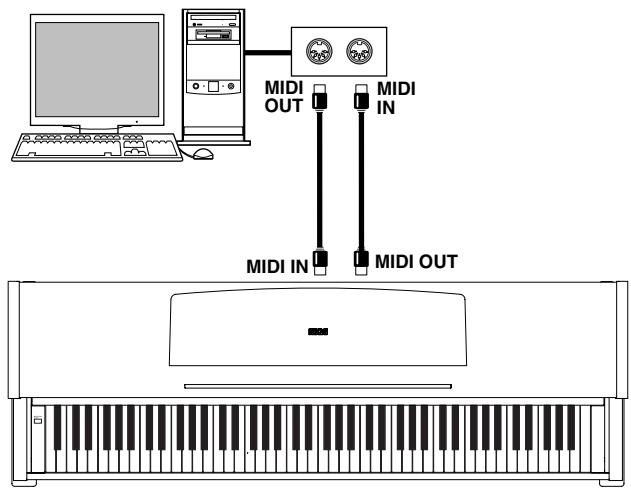
Standard MIDI settings
When turning the instrument on, the default MIDI factory settings of the C-520 are programmed as follows:
| Parameter | Setting |
| Transmission channels (see “MIDI OUT Channels” on page 55) | 01 = Main sound 02 = Layer sound 03 = Left sound 04 = Recorder Part 1 05 = Recorder Part 2 10 = Drum |
| Parameter | Setting |
| Reception channel(s) (see “MIDI IN Channels” on page 54) | All 16 tracks (1-16) |
| Local (see “Turning the keyboard on or off (Local Control)” on page 54) | On |
Using the C-520 as a multitimbral tone generator
When C-520 is controlled from an external MIDI device, it can work as a 16-part multitimbral tone generator. You can select a different sound on each of the 16 MIDI channels.
Note: Sounds on the C-520 are set as in the General MIDI (GM) standard. However, not all sounds of the standard are available.
- Use a MIDI cable to connect the C-520's MIDI IN to the MIDI OUT of a sequencer etc. As an alternative, connect
Program Change
The sounds of the C-520 can be selected via MIDI, by sending a Program Change message on the channel where you wish to assign the sound. The "Sounds / Timbres / Klänge / Suoni" table on page 277 lists the Program Change numbers corresponding to each C-520 sound.
Transmitting Program Change messages
You can send a MIDI Program Change message to a MIDI device connected to the C-520 MIDI OUT (or USB port), to change its sound. When selecting one of the internal sounds of the C-520 by using the sound selection buttons, a MIDI Program Change number will be transmitted on the sound's MIDI channel. Program Change numbers are shown in the table on page 277.
the C-520 to a personal computer through the USB port (see "Installing the Korg USB MIDI Driver" on page 62).
- Transmit MIDI data from the connected sequencer (or other device). See "Program Change" on page 60 for instructions on how to select a sound using the MIDI Program Change message. Program Change reception must be activated on the C-520 (it is by default).
Read the other devices user's manual for details on sending Program Change messages.
Receiving Program Change messages
When a Program Change message is received from an external device on a MIDI channel, the corresponding internal sound will be selected on the C-520 for that MIDI channel. Program Change numbers are shown in the table on page 277.
Program Change enable/disable
The C-520 usually receives Program Change data. If you don't want to receive (or transmit) them, use the Filter function. Please remember that to enable full remote program switching, both the PC and CC filters must be turned off, to allow transmission of Program Change and Bank Select messages. See "MIDI Filters" on page 56.
Control Change
When you operate the damper pedal, adjust the balance in Layer mode, or make other adjustments on the control panel, a Control Change message is sent to a connected external MIDI device. At the same time, C-520 can receive a Control Change message from an external MIDI device connected to its MIDI IN, to control the damper pedal, volume adjustment, and other data.
Control Change enable/disable
The C-520 usually receives Control Change data. If you don't want to receive (or transmit) them, use the Filter function. See "MIDI Filters" on page 56.
Installing the Korg USB MIDI Driver
The USB port can be used to transfer MIDI data between the C-520 and a personal computer (this is called the MIDI Over USB function). This is useful when your computer is not fitted with a MIDI interface.
USB can be used in parallel with the MIDI ports. For example, you can connect your C-520 to a sequencer running on your
computer, and at the same time control another MIDI instrument connected to the MIDI ports of the piano.
Connecting the C-520 this ways makes it, at the same time, a MIDI input device, a controller, and a sound generator.
Connecting the C-520 to a personal computer
Please install the KORG USB-MIDI Driver, before connecting the C-520 to a personal computer. Be sure your personal com
computer meets the requirement shown on "KORG USB-MIDP Driver system requirements" below.
KORG USB-MIDI Driver system requirements
Windows
Computer: A computer with an USB port, that satisfies the requirements of Microsoft Windows XP.
Operating system: Microsoft Windows XP Home Edition / Professional / x64 Edition (a driver for the x64 Edition is in beta release.)
Macintosh
Computer: An Apple Macintosh with an USB port that satisfies the requirements of Mac OS X.
Operating system: Mac OS X version 10.3 or later.
Please note before use
Copyright to all software included in this product is the property of Korg Inc.
The license agreement for this software is provided separately. You must read this license agreement before you install this software. Your installation of this software will be taken to indicate your acceptance of this agreement.
Windows: Installing the KORG USB-MIDI Driver
Please connect the C-520 to the computer via an USB cable only after having installed the KORG USB-MIDI Driver Tools.
Warning: C-520 cannot use the KORG MIDI Data Filer at the same time.
Note: You must install a separate driver for each USB port you will use.
- Insert the included CD-ROM into your CD-ROM drive.
Normally, the "Digital Piano Application Installer" will start up automatically.
If your computer is set so that the installer does not run automatically, double-click "KorgSetup.exe" on the CD-ROM.
- Please follow the installation instructions appearing on-screen.
- Restart the computer, and turn on the C-520. Connect the C-520 to the computer via an USB cable.
- Select the following command from the task bar to open the installation instructions:
Start > all programs > KORG > KORG USB-MIDI Driver Tools > Installation manual
- Select the following command from the task bar to open the installation program:
Start > all programs > KORG > KORG USB-MIDI Driver Tools > Install KORG USB-MIDI Device - Please follow the installation instructions appearing on-screen to install the KORG USB-MIDI Driver.
Driver's ports
After installation, the following ports will be shown in your MIDI application (e.g., sequencer) among the other MIDI devices:
C520 KEYBOARD: This allows for reception of MIDI messages from the C-520 (keyboard and controller's data) to the MIDI application running on the computer.
C520 SOUND: This allows for transmission of MIDI messages from the MIDI application running on the computer, to the internal tone generator of the C-520.
Mac OS X: Installing KORG USB-MIDI Driver
- Insert the included CD-ROM into your CD-ROM drive.
- Please double click on the "KORG USB-MIDI Driver.pkg" in the "KORG USB-MIDI Driver" folder inside the CD-ROM, to run the installer. Install it according to the instructions appearing on-screen.
Driver's ports
After installation, the following ports will be shown in you MIDI application (e.g., sequencer) among the other MIDI devices:
C520 KEYBOARD: This allows for reception of MIDI messages from the C-520 (keyboard and controller's data) to the MIDI application running on the Mac.
C520 SOUND: This allows for transmission of MIDI messages from the MIDI application running on the Mac, to the internal tone generator of the C-520.
Assembling the stand
Cautions for assembly
- When placing the piano on the stand, be careful not to pinch your hands.
- Be sure that the correct parts are assembled in the correct orientation and position, and follow the steps in order.
Assembling procedure
- Open the packing carton and take out the contents. Check that all of the following items are available.
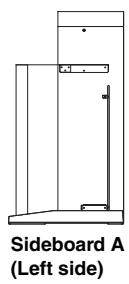

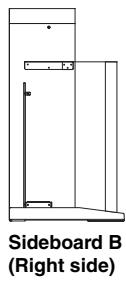
Assembly Accessories
| Screws (a) (M6 x 20)...4pcs. | Screws (b) (M4 x 14)...6pcs. | Caps...4pcs. |
| Cable holder ...2 pcs. | Piano Fasteners ...2 pcs. | Adjuster...1pc. |
NB: You will need a cross-point (Phillips #2) screwdriver for assembly.
-
Screw the adjuster into the pedal box as far as it will go, and attach the pedal cable.Use screws (a) to fasten the side pan
-
Do not apply weight to the front edge of the piano before tightening the screws, otherwise the piano may fall down.
els to the pedal box. Make sure that there is no gap between the side panels and the pedal box.
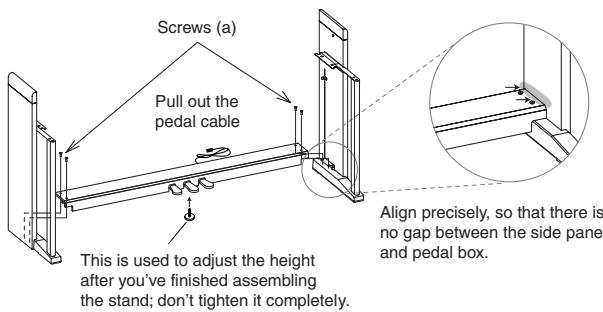
- With the finished surface (woodgrain) facing forward, curve (bow) the back panel slightly and fit it into the grooves of the side panel.
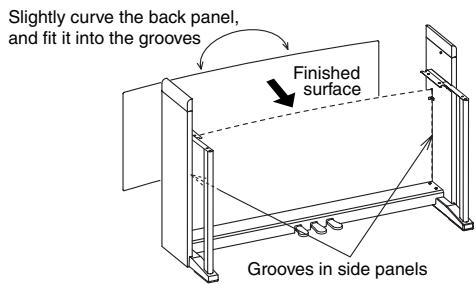
- Use screws (b) to fasten the side panels.
Start by fastening the bottom edge of the back panel (four places). In two places, pass the screw through a cable holder to attach it to the stand. Attach the power cable holder at either the right side or the left side depending on the position of the AC outlet you'll be using. Tighten these screws.
Then fasten the top edge of the back panel (two places). Don't tighten these screws completely yet, since you'll be
adjusting this area after you attach the instrument to the stand.
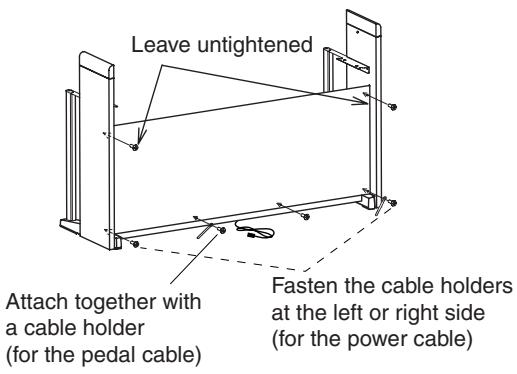
- Make sure that the stand is not tilted and that there are no gaps in it, and then firmly tighten all of the screws, except for the two screws you left untightened.
- Attach the instrument.
Note: The side panels are easily scratched; please use caution.
Lift the instrument with both hands, being careful to keep them not closer than 70mm from both ends of the piano to avoid pinching. Position the screw heads protruding from the inside of the left and right sides of the stand, so that they are aligned with the grooves of the metal fitting at the left and right ends of the instrument. and gently lower the instrument onto the stand. If the instrument is aligned correctly, the screws on the inside of the side panels will fit firmly into the grooves of the metal fittings.
Warning: Carefully lower the left and right ends of the instrument evenly, keeping the instrument level, and being careful not to pinch your hand or drop the instrument. Lifting only one side is very dangerous and may also damage the metal fixtures of the instrument itself. You must raise or lower both left and right ends of the instrument simultaneously, keeping the instrument level.
You can perform this step more easily if you use your body to apply pressure to the side panel of the stand while sliding the instrument onto the stand.
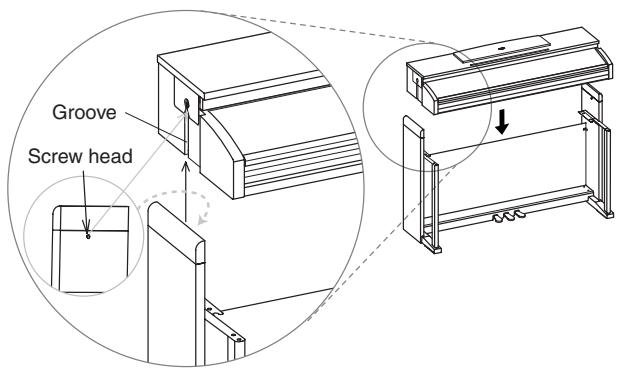
- While pressing the upper edge of the stand, tighten the two back panel screws that you had left untightened.
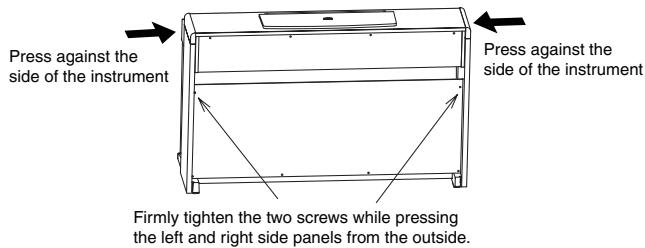
- Make sure that there are no uneven gaps between the top surface of the instrument and the top of the side panels.
If you notice any unsightly gap, make adjustments by loosening the screws (a) that fasten the side panel to the pedal box.
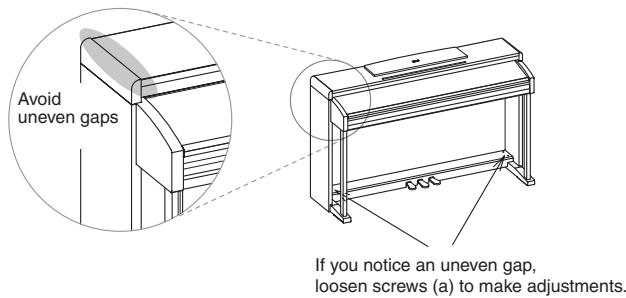
If there is a very noticeable gap between the instrument and the side panels of the stand, or if the gap is uneven, it may be that the instrument was not placed correctly on the stand. If so, lift up the entire instrument and place it correctly on the stand.
- Fasten the instrument fastening bolts from below the instrument.
Then loosen the adjuster, and adjust it so that it is in firm contact with the floor.
Note: Unless the adjuster is in firm contact with the floor, the pedal will wobble, possibly causing malfunctions.
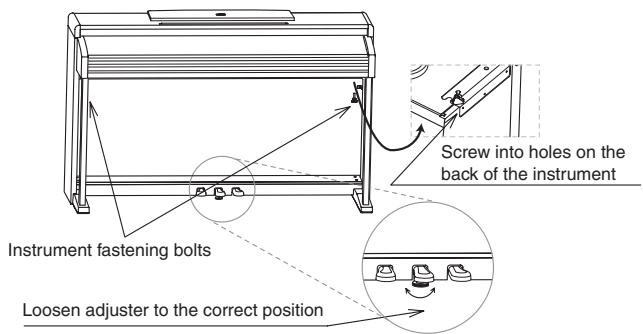
Verify that all screws are firmly tightened. Finally, place caps on the heads of pedal box screws (a).
- Connect the included power cable to the AC adaptor.

- Connect the pedal cable and the DC plug of the AC adaptor to the bottom of the instrument, and use the cable retainers to fasten the cables.
Note: Pay attention to the orientation of the connector when connecting the pedal cable.
Note: When placing your digital piano, be careful that the stand is not resting on the AC adaptor cable.
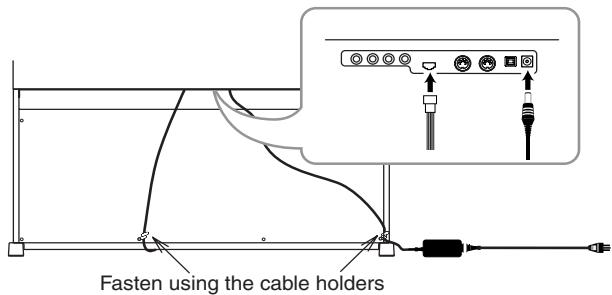
Check after assembly
[·] Are any parts left over?
If any parts are left over, check the diagrams to see where they should be used.
[·] Make sure that all screws are tight.
Caution
Caution when transporting the instrument
Remove the piano from its stand, and transport them separately. After transportation, refer to these instructions and reassemble the piano and stand.
Screw loosening
After assembly, the various screws and bolts of the stand may loosen as time goes by, causing the stand to wobble. If this occurs, re-tighten the screws.
Disassembly
If you need to pack up the piano, reverse the assembly order by which the piano was attached to the stand and the stand was assembled. After disassembly, save the screws and other parts so that no parts are lost.
Error messages
Write Protect
While saving a song, you are trying to write over a write-protected file. The song has been previously copied from a PC, and it had the write-protect attribute turned on while on the computer's disk. Change name to the song before repeating the save operation.
Out of Memoy
The song is too long, and the memory has been filled out. When the maximum memory capability has been reached, recording is automatically stopped. Press EXIT to close this message.
Maximum song length reached
A song can't exceed 999 measures in length. When you reach that limit, the recorder is automatically stopped. Please note that recording can end earlier, if there is not enough memory for all 999 measures to be recorded.
Loading Song Error
The song could not be loaded, for problems in file integrity, excessive file size, or other errors.
USB Working Wait please
Disconnecting the C-520 from the computer cannot be done yet, since the computer is still working on the files. This may happen when you press Enable, and then immediately after Disable. Wait a little for the USB operation to complete.
Memory Full
The internal storage memory (the one preserved when turning the instrument off, and seen when connecting the C-520 via USB) is full, so you cannot save the song. To free some space, you can either delete some songs by connecting the C-520 via USB, or using the dedicated internal function (see "Erasing songs from the User Song album" on page 57).
Invalid Name
Your song's name is still blank (i.e., no characters were inserted, or all characters were deleted). Assign a name to the song, and try saving again.
SongExists Execute
The song already exists in the internal storage memory. If you press + /YES the older version is deleted and replaced by the new one. If you press -/NO or EXIT saving is canceled, and the older version is preserved.
Record Mode Not Allowed
You are trying to access recording on a protected song (i.e., all the songs contained in albums different than UserSong). This is not possible.
Song Modified Save?
A new or modified song exists in memory, and has not yet been saved. Press + / YES to save it, or -NO to cancel and abandon all changes. In this latter case, the song in memory will be lost.
Sound Modified Save?
The current sound or sound combination has been modified. Press + / YES to save it, or -NO to cancel and abandon all changes.
Perf. Modified Save?
The current performance has been modified. Press + / YES to save it, or -NO to cancel and abandon all changes.
Globals Modified Save?
Global settings have been modified. Press + / YES to save it, or -NO to cancel and abandon all changes.
Save Global Failure
There was an error during save. Global settings have not been saved.
Save Preset Failure
There was an error during save. The sound or sound combination has not been saved (a preset is the common technical name for sounds and sound combinations).
Save Midi Failure
There was an error during save. Midi settings have not been saved.
General Reset Wait Please
You are resetting the internal data.
General Reset / nn%
This message shown the percentage of data being reset. Warning: Do not turn the instrument off while this message is in the display.
Troubleshooting
If during use any of the following problems should occur, carefully examine the instrument to see if you can find out what the problem is, and try resolving it by following the suggestions below. If the instrument will still not function properly refer to your dealer or to an Authorized Korg Service Center.
| Problem | Possible remedy | Page |
| The instrument will not turn on. | Check that the AC adapter is correctly connected to the piano and the out-let. | 10 |
| No sound. | (1) Make sure that the volume is not set on 0. If it is, bring it up to an adequate level. | 12 |
| (2) Make sure there is not a jack plugged into one of the PHONES connectors. This would turn the internal speakers off. if so, unplug the jack. | 13 | |
| (3) Make sure that the MIDI Local function is not set on OFF. If it is, set it to ON (or turn the instrument off and then on again). | 54 |
Polyphony
The C-520 contains sampled sounds, which have been recorded, analyzed and processed from the actual sounds of the original musical instruments. These sounds usually consist of one or more different samples reproduced by pressing a key. Each sample is played back by a single oscillator. Sounds using just one oscillator have a full polyphony of max. 62 voices, while sounds using two oscillators have a limited polyphony of max. 31 notes. Sounds using more oscillators have a more limited polyphony. When the number of notes exceeds the limit of the sound, some notes will be stopped, so that the new ones can be heard.
Furthermore, when playing in Layer mode with more than two notes, the max. polyphony depends on how many oscillators are used in total.
Please refer to the table on page 277 for more information about the number of oscillators used by each sound.
Technical specifications
| Specifications | C-520 |
| Keyboard | 88 key, Graded Hammer Action (RH3) |
| Touch selection | Eight velocity curves, plus fixed |
| Key cover | Wooden sliding key cover |
| Tuning | Transpose, Fine tuning, 10 Temperaments + Quarter Tone |
| Sound generation | Piano eXperience stereo sampling |
| Polyphony | 62 notes (max). The use of 2- (or more) oscillator sounds and the Layer mode reduces the maximum number of simultaneous notes. |
| Modes | Single, Layer, Split, Performance (30) |
| Sounds | 40 types; (7 Acoustic Pianos, Honky-Tonk, Electric Grand, 8 Electric Pianos, 2 Harpsichords, 2 Clavs, 2 Vibra-phones, Acoustic Guitar, 3 Jazz Organs, 3 Church Organs, 3 Strings, 3 choirs, 4 Basses.) |
| Effects | 8 Reverb types ,6 Chorus types 24 Insert types including Tremolo, Delay, Rotary Speaker, Equalizer, etc. Brilliance (5 settings) |
| Demo | 205 songs; 20 demo songs 185 classical songs with separate R.H. and L.H. parts |
| Metronome | Tempo, Time Signature, Accent (Standard, Bell), Volume controls, Drum patterns |
| Recorder | 2 parts, 45,000 notes per song Controls: Record, Play/Pause, Stop, Part 1 On/Off, Part 2 On/Off. Functions: Cycle, Erase Track, Quantize, Transpose, Delete Song, Rename Song. |
| Pedals | Damper (support half-pedaling), Soft (support half-pedaling), Sostenuto All freely assignable |
| Connections | Audio output (OUTPUT L/MONO, R), Audio input (INPUT L/MONO, R), 2 × Headphones, MIDI (IN, OUT), Pedals, USB (supports Ms Windows XP, Apple Mac OS X 10.2 or later) |
| Controls | Power switch, Master Volume, Performance, Variation, Split, Sound selectors, Scroll, Value (Yes/No), Edit, Exit, Reverb, Chorus, Transpose, Brilliance, Demo, Metronome, Tempo, Recorder |
| Display | 2 line × 16 character backlit LCD |
| Amplification | 2 × 35 Watt amplifier, 2 × 13cm woofer in bass-reflex boxes, 2 × tweeter |
| Power supply | DC24V, External switching adapter |
| Dimensions (W x D x H) | 54.96" × 18.19" × 34.21" inch (1396 × 462 × 869 mm), including stand; with music stand folded down |
| Weight | 116.84 lbs. (53 kg), including stand |
| Music stand | With score holder |
| Included accessories | AC adapter; Song Book, CD-ROM with KORG USB-MIDI Driver for Windows XP and Mac OS X |
Sounds processed with INFINITY™.
Korg reserves the right to change the specifications without notice.
KORG
CONCERT
C-520
DIGITAL PIANO
!o|dωe,p οροN
PRECAUTIONS
This equipment has been tested and found to comply with the limits for a Class B digital device, pursuant to Part 15 of the FCC Rules. These limits are designed to provide reasonable protection against harmful interference in a residential installation. This equipment generates, uses, and can radiate radio frequency energy and, if not installed and used in accordance with the instructions, may cause harmful interference to radio communications. However, there is no guarantee that interference will not occur in a particular installation. If this equipment does cause harmful interference to radio or television reception, which can be determined by turning the equipment off and on, the user is encouraged to try to correct the interference by one or more of the following measures:
Reorient or relocate the receiving antenna.
- Increase the separation between the equipment and receiver.
- Connect the equipment into an outlet on a circuit different from that to which the receiver is connected.
- Consult the dealer or an experienced radio/TV technician for help.
Unauthorized changes or modification to this system can void the user's authority to operate this equipment.
SERVICE ET ASSISTANCE AU MUSCIEN
Editorune performance 90
Le métronome 91
Spcifications techniques 139
Appendix / Appendice / Anhang / Appendix 277
Sounds / Timbres / Klange / Suoni 277
Performances/‘Performance'-Speicher 283
Effects / Effets / Effekte / Effetti 285
Songs/Morceaux/Songs/Brani musicali 286
MIDI Implementation Chart 288
Introduction
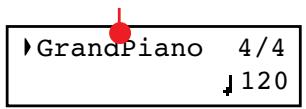
Timbre principal Main
Timbre principal Main
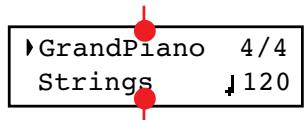
Timbre Layer
Quitter le mode Layer
| Drum patterns | |||
| Ballad 1 | Rock 6/8 | Tango | March |
| Ballad 2 | Dance | Rhumba | |
| Ballad 3 | Beguine | Gospel | |
| Ballroom 1 | Unplugged Latin | Swing 1 | |
Song Modified Save? (Yes/No)
| Valeurs de quantification | |||||
| Off | 1/32 = | 1/24 = | 1/16 = | 1/12 = | 1/8 = |
Song Modified Save? (Yes/No)
Save Song Untitled Sav
Cut Measures 3
From: 99 Exec?
Transpose 5 V:+00 Exec?
Delete Song 6 Exec?
Save Song 7 MyName Save?
Sound Modified Save? (Yes/No)
Sound Modified Save? (Yes/No)
| Perf.Modified Save? (Yes/No) |
| Volume | 1 |
| M:127 | ▶L:120 |
| Reverb Type | 3 |
| Hall 1 | On |
| Réverbération | ||
| Hall 1 | Hall 2 | Hall 3 |
| Wet Plate | Dry Plate | |
| Room 1 | Room 2 | Bright Room |
| Reverb Type | 3 |
| Hall 1 | On |
| Reverb | Send | 4 |
| M:127 | L:100 | |
| Reverb | Send | 4 |
| M:127 | ▶L:100 | |
| Chorus | ||
| Chorus | Harm. Chorus | Chorus Delay |
| Ensemble | Flanger | Tremolo |
Master Tune 3
440.0 Hz
Brilliance
| Mute Level | 10 |
| Volume: 0 |
USB Connect 16 Enable?
USB Connect 16 Enable?
General Reset 18 Exec? (Yes/No)
Activer/désactiver Program Change
Activer/désactiver Control Change
Maximum song length reached
USB Working / Wait please
Record Mode Not Allowed
Song Modified / Save?
Sound Modified / Save?
Perf. Modified / Save?
Globals Modified / Save?
General Reset / Wait Please
Specifications techniques
This equipment has been tested and found to comply with the limits for a Class B digital device, pursuant to Part 15 of the FCC Rules. These limits are designed to provide reasonable protection against harmful interference in a residential installation. This equipment generates, uses, and can radiate radio frequency energy and, if not installed and used in accordance with the instructions, may cause harmful interference to radio communications. However, there is no guarantee that interference will not occur in a particular installation. If this equipment does cause harmful interference to radio or television reception, which can be determined by turning the equipment off and on, the user is encouraged to try to correct the interference by one or more of the following measures:
Reorient or relocate the receiving antenna.
- Increase the separation between the equipment and receiver.
- Connect the equipment into an outlet on a circuit different from that to which the receiver is connected.
- Consult the dealer or an experienced radio/TV technician for help.
Unauthorized changes or modification to this system can void the user's authority to operate this equipment.
AKTUALISIERUNG DES BETRIEBSSYSTEMS
© 2006 Korg Inc. Printed in Japan.
Inhalt
Einleitung 144
| Ballad 1 | Rock 6/8 | Tango | March |
| Ballad 2 | Dance | Rhumba | |
| Ballad 3 | Beguine | Gospel | |
| Ballroom 1 | Unplugged Latin | Swing 1 |
(Part 1= linke Hand,
Song Modified Save? (Yes/No)
| 'Quantize'-Werte | |||||
| Off | 1/32 = | 1/24 = | 1/16 = | 1/12 = | 1/8 = |
Song Modified Save? (Yes/No)
Save Song Untitled Save?
| ‘Quantize’-Werte | |||||
| 1/4 = | 1/8a = | 1/12 = | 1/16a = | 1/24 = | 1/32 = |
| b ~ f = Swing | |||||
Save Song 7
ByName <Save?
Sound Modified Save? (Yes/No)
Sound Modified Save? (Yes/No)
| Volume | 1 |
| M:127 | ▶L:120 |
| Reverb | ||
| Hall 1 | Hall 2 | Hall 3 |
| Wet Plate | Dry Plate | |
| Room 1 | Room 2 | Bright Room |
| Chorus | ||
| Chorus | Harm. Chorus | Chorus Delay |
| Ensemble | Flanger | Tremolo |
Global Modified Save? (Yes/No)
| Mute Level | 10 |
| Volume: 0 |
USB Connect 16 Enable?
USB Connect 16 Enable?
General Reset 18 Exec? (Yes/No)
Maximum song length reached
Record Mode Not Allowed
Sound Modified Save?
Perf. Modified Save?
Globals Modified Save?
General Reset Wait Please
Songs/Morceaux/Songs/Brani musicali 286
MIDI Implementation Chart 288
Introduzione
Accordature alternative
| Pattern percussivi | |||
| Ballad 1 | Rock 6/8 | Tango | March |
| Ballad 2 | Dance | Rhumba | |
| Ballad 3 | Beguine | Gospel | |
| Ballroom 1 | Unplugged Latin | Swing 1 |
Song Modified Save? (Yes/No)
Tempo Record 3 Auto
Song Modified Save? (Yes/No)
Save Song Untitled Save?
| Transpose | 5 |
| V:+00 | Exec? |
Save Song 7 MyName Save?
Sound Modified Save? (Yes/No)
Sound Modified Save? (Yes/No)
| Reverb Type | 3 |
| Hall 1 | On |
| Riverbero | ||
| Hall 1 | Hall 2 | Hall 3 |
| Wet Plate | Dry Plate | |
| Room 1 | Room 2 | Bright Room |
| Reverb Type 3 Hall 1 ▶On |
| Reverb | Send | 4 |
| M:127 | L:100 | |
| Reverb | Send | 4 |
| M:127 | ▶L:100 | |
| Chorus | ||
| Chorus | Harm. Chorus | Chorus Delay |
| Ensemble | Flanger | Tremolo |
| Chorus Send 6 |M:127 L:Off |
| Mute Level | 10 |
| Volume: 0 |
USB Connect 16 Enable?
USB Connect 16 Enable?
General Reset 18 Exec? (Yes/No)
Maximum song length reached
USB Working Wait please
Record Mode Not Allowed
Sound Modified Save?
Perf. Modified Save?
Globals Modified Save?
General Reset Wait Please
| 1 | Dig. EP 1 | 121 | 0 | 5 | 2 | An electronic piano sound created by means of the FM synthesis, extremely popular during the mid 80s. Wide dynamic range. It is particu- larly suited to pop music of the age. | Timbre de piano électrique créé par la synthèse FM. Très populaire mi années 80. Le tim- bre varie en fonc- tion du clavier. Particulièrement adapté à la pop music de cette époque. | Ein E.Piano-Klang, der mit einem FM- Synthesizer erzeugt wurde und Mitte der 1980er um die Welt ging. GroßBer Dynamikumfang. Eignet sichbiosponders für das Pop-Repertoire jener Tage. | Pianoforte elettronico creato mediana sintesi FM, molto popo- lare durante gli Anni '80. Grande spettro dinamico. Particularmente adatto al pop di quegli anni. |
| 2 | Dig. EP 2 | 121 | 1 | 5 | 2 | As the above, but slightly brighter. | Comme le précédent, mais plus éclatant. | Wieiben, nur etwas heller. | Come il preced- dente, ma legger- mente più brillante. |
| Var. | Name / Nom / Name / Nome | CC 0 | CC32 | PC* | Osc. | Description | Description | Beschreibung | Descrizione |
| 3 | Reed EP | 121 | 3 | 4 | 1 | An electric piano sound, often heard in pop music. | Piano électrique souvent utilisé pourJMJJJJJJJJJJJJJJJJJJJJJJJJJJJJJJJJJJJJJJJJJJJJJJJJJJJJJJJJJJJJJJJJJJJJJJJJJJJJJJJJJJJJJJJJJJJJJJJJJJJJJJJJJJJJJJJJJJJJJJJJJJJJJJJJJJJJJJJJJJJJJJJJJJJJJJJJJJJJJJJJJJJJJJJJJJJJJJJJJJJJJJJJJJJJJJJJJJJJJJJJJJJJJJJJJJJJJJJJJJJJJJJJJJJJJJJJJJJJJJJJJJJJJJJJJJJJJJJJJJJJJJJJJJJJJJJJJJJJJJJJJJJJJJJJJJJJJJJJJJJJJJJJJJJJJJJJJJJJJJJJJJJJJJJJJJJJJJJJJJJJJJJJJJJJJJJJJJJJJJJJJJJJJJJJJJJJJJJJJJJJJJJJJJJJJJJJJJJJJJJjjJJJJJJJJJJJJJJJJJJJJJJJJJJJJJJJJJJJJJJJJJJJJJJJJJJJJJJJJJJJJJJJJJJJJJJJJJJJJJJJJJJJJJJJJJJJJJJJJJJJJJJJJJJJJJJJJJJJJJJJJJJJJJJJJJJJJJJJJJJJJJJJJJJJJJJJJJJJJJJJJJJJJJJJJJJJJJJJJJJJJJJJJJJJJJJJJJJJJJJ JJJJJJJJJJJJJJJJJJJJJJJJJJJJJJJJJJJJJJJJJJJJJJJJJJJJJJJJJJJJJJJJJJJJJJJJJJJJJJJJJJJJJJJJJJJJJJJJJJJJJJJJJJJJJJJJJJJJJJJJJJJJJJJJJJJJJJJJJJJJJJJJJJJJJJJJJJJJJJJJJJJJJJJJJJJJJJJJJJJJJJJJJJJJJJJJJJJJJJJJJBJJJJJJJJJJJJJJJJJJJJJJJJJJJJJJJJJJJJJJJJJJJJJJJJJJJJJJJJJJJJJJJJJJJJJJJJJJJJJJJJJJJJJJJJJJJJJJJJJJJJJJJJJJJJJJJJJJJJJJJJJJJJJJJJJJJJJJJJJJJJJJJJJJJJJJJJJJJJJJJJJJJJJJJJJJJJJJJJJJJJJJJJJJJJJJJJJJJJJJBBB | Suono di piano elettrico usato spesso nel pop. | |
| 4 | TremReedEP | 121 | 5 | 4 | 1 | As the above, but with a tremolo effect. | Comme le précédent, mais avec un effet de trémolo. | Wie oben, aber mit einem Tremolo-Effekt. | Come il precedente, ma con il tremolo. |
| HARPSI/CLAV | |||||||||
| 1 | Harpsi 8 | 121 | 0 | 6 | 3 | This is the classic instrument for baroque music. Harpsichord uses plucked strings, so there is no touch response. | C'est l'instrument parfait pourJMJJJJJJJJJJJJJJJJJJJJJJJJJJJJJJJJJJJJJJJJJJJJJJJJJJJJJJJJJJJJJJJJJJJJJJJJJJJJJJJJJJJJJJJJJJJJJJJJJJJJJJJJJJJJJJJJJJJJJJJJJJJJJJJJJJJJJJJJJJJJJJJJJJJJJJJJJJJJJJJJJJJJJJJJJJJJJJJJJJJJJJJJJJJJJJJJJJ JJJJ JJJJ JJJJ JJJJ JJJJ JJJJ JJJJ JJJJ JJJJ JJJJ JJJJ JJJJ JJJJ JJJJ JJJJ JJJJ JJJJ JJJJ JJJJ JJJJ JJJJ JJJJ JJJJ JJJJ JJJJ JJJJ JJJJ JJJJ JJJJ JJJJ JJJJ JJJJ JJJJ JJJJ JJJJ JJJJ JJJJ JJJJ JJJJ JJJJ JJJJ JJJJ JJJJ JJJJ JJJJ JJJJ JJJJ JJJJ JJJJ JJJJ BBJ JJJ JJJ JJJ JJJ JJJ JJJ JJJ JJJ JJJ JJJ JJJ JJJ JJJ JJJ JJJ JJJ JJJ JJJ JJJ JJJ JJJ JJJ JJJ JJJ JJJ JJJ JJJ JJJ JJJ JJJ JJJ JJJ JJJ JJ JJ JJ JJ JJ JJ JJ JJ JJ JJ JJ JJ JJ JJ JJ JJ JJ JJ JJ JJ JJ JJ JJ JJ JJ JJ JJ JJ JJ JJ JJ JJ JJ JJ JJ JJ JJ JJ JJ JJ JJ JJ JJ JJ JJ JJ JJ JJ JJ JJ JJ JJ JJ JJ JJ JJ JJ JJ JJ JJ JJ JJ JJ JJ JJ JJ JJ JJ JJ JJ JJ JJ JJ JJ JJ JJ JJ JJ JJ JJ JJ JJ JJ JJ JJ JJ JJ JJ JJ JJ JJ JJ JJ JJ JJ JJ JJ JJ JJ JJ JJ JJ JJ JJ JJ JJ JJ JJ JJ JJ JJ JJ JJ JJ JJ JJ JJ JJ JJ JJ JJ JJ JJ JJ JJ JJ JJ JJ JJ JJ JJ JJ JJ JJ JJ JJ JJ JJ JJ JJ JJ JJ JJ JJ JJ JJ JJ JJ JJ JJ BBJ JJ JJ JJ JJ JJ JJ JJ JJ JJ JJ JJ JJ JJ JJ JJ JJ JJ JJ JJ JJ JJ JJ JJ JJ JJ JJ JJ JJ JJ JJ JJ JJ JJ JJ JJ JJ JJ JJ JJ JJ JJ JJ JJ JJ JJ JJ JJ JJ JJ JB JJ JJ JJ JJ JJ JJ JJ JJ JJ JJ JJ JJ JJ JJ JJ JJ JJ JJ JJ JJ JJ JJ JJ JJ JJ JJ JJ JJ JJ JJ JJ JJ JJ JJ JJ JJ JJ JJ JJ JJ JJ JJ JJ JJ JJ JJ JJ JJ JJ JJ JJ JJ JJ JJ JJ JJ JJ JJ JJ JJ JJ JJ JJ JJ JJ JJ JJ JJ JJ JJ JJ JJ JJ JJ JJ JJ JJ JJ JJ JJ JJ JJ JJ JJ JJ JJ JJ JJ JJ JJ JJ JJ JJ JJ JJ JJ JJ JJ JJ JB JB JB JB JB JB JB JB JB JB JB JB JB JB JB JB JB JB JB JB JB JB JB JB JB JB JB JB JB JB JB JB JB JB JB JB JB JB JB JB JB JB JB JB JB JB JB JB JB JB JB JB JB JB JB JB JB JB JB JB JB JB JB JB JB JB JB JB JB JB JB JB JB JB JB JB JB JB JB JB JB JB JB JB JB JB JB JB JB JB JB JB JB JB JB JB JB JB JB JB BB JB JB JB JB JB JB JB JB JB JB JB JB JB JB JB JB JB JB JB JB JB JB JB JB JB JB JB JB JB JB JB JB JB JB JB JB JB JB JB JB JB JB JB JB JB JB JB JB JB JB JB JB JB JB JB JB JB JB JB JB JB JB JB JB JB JB JB JB JB JB JB JB JB JB JB JB JB JB JB JB JB JB JB JB JB JB JB JB JB JB JB JB JB JB JB JB JB JB JB BJB JB JB JB JB JB JB JB JB JB JB JB JB JB JB JB JB JB JB JB JB JB JB JB JB JB JB JB JB JB JB JB JB JB JB JB JB JB JB JB JB JB JB JB JB JB JB JB JB JB JB JB JB JB JB JB JB JB JB JB JB JB JB JB JB JB JB JB JB JB JB JB JB JB JB JB JB JB JB JB JB JB JB JB JB JB JB JB JB JB JB JB JB JB JB JB JB JB JB JB IB JB IB IB IB IB IB IB IB IB IB IB IB IB IB IB IB IB IB IB IB IB IB IB IB IB IB IB IB IB IB IB IB IB IB IB IB IB IB IB IB IB IB IB IB IB IB IB IB IB IB IB IB IB IB IB IB IB IB IB IB IB IB IB IB IB IB IB IB IB IB IB IB IB IB IB IB IB IB IB IB IB IB IB IB IB IB IB IB IB IB IB IB IB IB IB IB IB IB IB IB IBIBIBIBIBIBIBIBIBIBIBIBIBIBIBIBIBIBIBIBIBIBIBIBIBIBIBIBIBIBIBIBIBIBIBIBIBIBIBIBIBIBIBIBIBIBIBIBIBIBIBIBIBIBIBIBIBIBIBIBIBIBIBIBIBIBIBIBIBIBIBIBIBIBIBIBIBIBIBIBIBIBIBIBIBIBIBIBIBIBIBIBIBIBIBIBIBIBIBIBIBIEIBIBIBIBIBIBIBIBIBIBIBIBIBIBIBIBIBIBIBIBIBIBIBIBIBIBIBIBIBIBIBIBIBIBIBIBIBIBIBIBIBIBIBIBIBIBIBIBIBIBIBIBIBIBIBIBIBIBIBIBIBIBIBIBIBIBIBIBIBIBIBIBIBIBIBIBIBIBIBIBIBIBIBIBIBIBIBIBIBIBIBIBIBIBIBIBIBIBIBIRBJBJBJBJBJBJBJBJBJBJBJBJBJBJBJBJBJBJBJBJBJBJBJBJBJBJBJBJBJBJBJBJBJBJBJBJBJBJBJBJBJBJBJBJBJBJBJBJBJBJBJBJBJBJBJBJBJBJBJBJBJBJBJBJBJBJBJBJBJBJBJBJBJBJBJBJBJBJBJBJBJBJBJBJBJBJBJBJBJBJBJBJBJBJBJBJBJBJBJBJJBBJBJBJBJBJBJBJBJBJBJBJBJBJBJBJBJBJBJBJBJBJBJBJBJBJBJBJBJBJBJBJBJBJBJBJBJBJBJBJBJBJBJBJBJBJBJBJBJBJBJBJBJBJBJBJBJBJBJBJBJBJBJBJBJBJBJBJBJBJBJBJBJBJBJBJBJBJBJBJBJBJBJBJBJBJBJBJBJBJBJBJBJBJBJBJBJBJBJBJ BJBJBJBJBJBJBJBJBJBJBJBJBJBJBJBJBJBJBJBJBJBJBJBJBJBJBJBJBJBJBJBJBJBJBJBJBJBJBJBJBJBJBJBJBJBJBJBJBJBJBJBJBJBJBJBJBJBJBJBJBJBJBJBJBJBJBJBJBJBJBJBJBJBJBJBJBJBJBJBJBJBJBJBJBJBJBJBJBJBJBJBJBJBJBJBJBJBJBJBJBIJKJKJKJKJKJKJKJKJKJKJKJKJKJKJKJKJKJKJKJKJKJKJKJKJKJKJKJKJKJKJKJKJKJKJKJKJKJKJKJKJKJKJKJKJKJKJKJKJKJKJKJKJKJKJKJKJKJKJKJKJKJKJKJKJKJKJKJKJKJKJKJKJKJKJKJKJKJKJKJKJKJKJKJKJKJKJKJKJKJKJKJKJKJKJKJKJKJKJKJKDKDKDKDKDKDKDKDKDKDKDKDKDKDKDKDKDKDKDKDKDKDKDKDKDKDKDKDKDKDKDKDKDKDKDKDKDKDKDKDKDKDKDKDKDKDKDKDKDKDKDKDKDKDKDKDKDKDKDKDKDKDKDKDKDKDKDKDKDKDKDKDKDKDKDKDKDKDKDKDKDKDKDKDKDKDKDKDKDKDKDKDKDKDKDKDKDKDKDKDK DKDKDKDKDKDKDKDKDKDKDKDKDKDKDKDKDKDKDKDKDKDKDKDKDKDKDKDKDKDKDKDKDKDKDKDKDKDKDKDKDKDKDKDKDKDKDKDKDKDKDKDKDKDKDKDKDKDKDKDKDKDKDKDKDKDKDKDKDKDKDKDKDKDKDKDKDKDKDKDKDKDKDKDKDKDKDKDKDKDKDKDKDKDKDKDKDKDKDKDKdkDKDKDKDKDKDKDKDKDKDKDKDKDKDKDKDKDKDKDKDKDKDKDKDKDKDKDKDKDKDKDKDKDKDKDKDKDKDKDKDKDKDKDKDKDKDKDKDKDKDKDKDKDKDKDKDKDKDKDKDKDKDKDKDKDKDKDKDKDKDKDKDKDKDKDKDKDKDKDKDKDKDKDKDKDKDKDKDKDKDKDKDKDKDKDKDKDKDKDKTKDKDKDKDKDKDKDKDKDKDKDKDKDKDKDKDKDKDKDKDKDKDKDKDKDKDKDKDKDKDKDKDKDKDKDKDKDKDKDKDKDKDKDKDKDKDKDKDKDKDKDKDKDKDKDKDKDKDKDKDKDKDKDKDKDKDKDKDKDKDKDKDKDKDKDKDKDKDKDKDKDKDKDKDKDKDKDKDKDKDKDKDKDKDKDKDKDKDKDKOKKOKOKOKOKOKOKOKOKOKOKOKOKOKOKOKOKOKOKOKOKOKOKOKOKOKOKOKOKOKOKOKOKOKOKOKOKOKOKOKOKOKOKOKOKOKOKOKOKOKOKOKOKOKOKOKOKOKOKOKOKOKOKOKOKOKOKOKOKOKOKOKOKOKOKOKOKOKOKOKOKOKOKOKOKOKOKOKOKOKOKOKOKOKOKOKOKOKOKOKOK OK OK OK OK OK OK OK OK OK OK OK OK OK OK OK OK OK OK OK OK OK OK OK OK OK OK OK OK OK OK OK OK OK OK OK OK OK OK OK OK OK OK OK OK OK OK OK OK OK OK OK OK OK OK OK OK OK OK OK OK OK OK OK OK OK OK OK OK OK OK OK OK OK OK OK OK OK OK OK OK OK OK OK OK OK OK OK OK OK OK OK OK OK OK OK OK OK OK OK OK Ok OK OK OK OK OK OK OK OK OK OK OK OK OK OK OK OK OK OK OK OK OK OK OK OK OK OK OK OK OK OK OK OK OK OK OK OK OK OK OK OK OK OK OK OK OK OK OK OK OK OK OK OK OK OK OK OK OK OK OK OK OK OK OK OK OK OK OK OK OK OK OK OK OK OK OK OK OK OK OK OK OK OK OK OK OK OK OK OK OK OK OK OK OK OK OK OK OK OK OKOK OK OK OK OK OK OK OK OK OK OK OK OK OK OK OK OK OK OK OK OK OK OK OK OK OK OK OK OK OK OK OK OK OK OK OK OK OK OK OK OK OK OK OK OK OK OK OK OK OK OK OK OK OK OK OK OK OK OK OK OK OK OK OK OK OK OK OK OK OK OK OK OK OK OK OK OK OK OK OK OK OK OK OK OK OK OK OK OK OK OK OK OK OK OK OK OK OK OKOKOK OK OK OK OK OK OK OK OK OK OK OK OK OK OK OK OK OK OK OK OK OK OK OK OK OK OK OK OK OK OK OK OK OK OK OK OK OK OK OK OK OK OK OK OK OK OK OK OK OK OK OK OK OK OK OK OK OK OK OK OK OK OK OK OK OK OK OK OK OK OK OK OK OK OK OK OK OK OK OK OK OK OK OK OK OK OK OK OK OK OK OK OK OK OK OK OK OKOKOKOK OK OK OK OK OK OK OK OK OK OK OK OK OK OK OK OK OK OK OK OK OK OK OK OK OK OK OK OK OK OK OK OK OK OK OK OK OK OK OK OK OK OK OK OK OK OK OK OK OK OK OK OK OK OK OK OK OK OK OK OK OK OK OK OK OK OK OK OK OK OK OK OK OK OK OK OK OK OK OK OK OK OK OK OK OK OK OK OK OK OK OK OK OK OK OK OKOKOKOKOKOKOKOKOKOKOKOKOKOKOKOKOKOKOKOKOKOKOKOKOKOKOKOKOKOKOKOKOKOKOKOKOKOKOKOKOKOKOKOKOKOKOKOKOKOKOKOKOKOKOKOKOKOKOKOKOKOKOKOKOKOKOKOKOKOKOKOKOKOKOKOKOKOKOKOKOKOKOKOKOKOKOKOKOKOKOKOKOKOKOKOKOKOKOKOK | ||
| VIBES/GUITAR | |||||||||
| 1 | Vibes 1 | 121 | 0 | 11 | 2 | A sampled orches- tral vibraphone with a great dynamic range. | Echantillonnage d'un vibraphone orchestral avec une vaste gamme de dynamiques. | Sample eines Orchestervibra- phons mit großem Dynamikumfang. | Campione di vibrafono orches- trale, dotato di un grande spettro dinamico. |
| 2 | Vibes 2 | 121 | 1 | 11 | 2 | As the above, but with no tremolo. | Comme le précédent, mais sans tré- molo. | Wieiben, aber ohne Tremolo- Effekt. | Come il prece- dente, ma alla tremolo. |
| 3 | Nylon Gtr. | 121 | 0 | 24 | 2 | A gorgeous, full- sounding nylon- strings guitar. The leftmost pedal is used to trigger glide down. | Guitare à cordes en nylon au son chaud et naturel. La pédale toute à gauche insère un glissé. | Besonderss überzeu- gende Nylongi- tarre. Mit dem linken Pedal kon- nen Sie die Ton- Höhe nach unten beugen. | Una magnifica chi- tarra con corde di nylon. Il pedale di sinistra attiva il glide. |
| Var. | Name / Nom / Name / Nome | CC 0 | CC32 | PC* | Osc. | Description | Description | Beschreibung | Descrizione |
| ORGAN 1 | |||||||||
| 1 | Jazz Organ | 121 | 0 | 16 | 4 | An aggressive tone- wheel electric organ, often heard in jazz and rock music. The rotary effect is sampled right at the source. The leftmost pedal is used to switch between fast (pedal up) and slow (pedal down) rotary speaker, with several degrees in the middle (half pedal). | Le son d'un orgue électric à “tim- bre denté”. Très utilisé par le jazz et le rock. L'effet rotary est direct- ment échantil- lonnaïè à la source. La pédale toute à gauche permet d'activer l'effet rotary speaker Rap- idement (pédale soulevée) et Lente- ment (pédale abaisée), avec plu- sieurs degrés pré- vus entre ces deux extrémités (mi- pédale). | Eine aggressive Sinustonorgel, wie sie im Jazz- und Rock-Buch stehen. Der Rotary-Effekt wurde mitgesa- mpelt. Mit dem linken Pedal kon- nen Sie die schelle (Pedal hoch) und langsame (Pedal geadrückt) Geschwindigkeit wählten. Auch Zwis- chenwerte sind möglich. | Organo elettro- meccanico dal suono aggressivo, usato spesso nel jazz e nel rock. L'effetto di rotary speaker è campi- onato all'origine. Il pedale di sinistra è usato per passare tra il rotary fast (pedale alzato) e slow (pedale abbassato), con diverse gradazioni nel mezzo (mezzo- pedale). |
| 2 | Perc.Org.1 | 121 | 0 | 17 | 3 | As the above, but with the rotary speaker applied as a generated effect, and a more trans- parent sound. The leftmost pedal is used to switch between rotary speaker fast and slow (press for switch). | Comme le précédent mais avec l'effet rotary speaker appliqué comme un effet génére et un tim- bre beaucoup plus transparent. La Pédale toute à gauche permet de passer à l'effet rapide et à l'effet lent (appuyez sur la pédale pour passer d'un état à l'autre). | Wie oben, allerd- ings wird der Rotary-Effekt nachträglich hin- zugefügt. Das macht das Klang- bild etwas trans- parenter. Mit dem linken Pedal kann abwechselnd die hohe und niedrige Rotary-Geschwind- igkeit gewählt werden (die Umschaltung erfolgt beim Drücken). | Come il pre- dente, ma con il rotary speaker applicativo come effetto generato internamente, ed un suono più tras- parente. Il pedale di sinistra è usato per passare tra il rotary speaker fast e slow (promete e rilasciate per il cambiamento di velocità). |
| 3 | Perc.Org.2 | 121 | 1 | 17 | 3 | A variation of the above. The left- most pedal is used to switch between rotary speaker fast and slow (press for switch). | Une variation du pré- cedent. La Pédale toute à gauche permet de passer à l'effet rapide et à l'effet lent (appuyez sur la pédale pour passer d'un état à l'autre). | Variation des obigen Klangs. Mit dem linken Pedal kann abwechselnd die hohe und niedrige Rotary-Geschwindigkeit gewählt werden (die Umschaltung erfolgt beim Drucken). | Variazione del pre- cedente. Il pedale di sinistra è usato per passare tra il rotary speaker fast e slow (promete e rilasciate per il cambiamento di velocità). |
| ORGAN 2 | |||||||||
| 1 | Church Org | 121 | 0 | 19 | 4 | A grandious, Tutti pipe organ, with a lot of sampled reverb. Great for sacred music from the Baroque to the late Romantic age. | Le timbre typique d'un grand orgue à tutoaux et TUTTI, avec de nombreux effets de réverbération échéanton- nés. Idéal pour jouer de la musique sacrée de la péri- ode baroque au bas Romantique. | Eine imposante Tutti-Kirchenorgel mit viel (gesa- mpeltem) Hall. Eig- net sich besonders für Barock- und spätromantische Musik. | Grandioso suono di Tutti, con molto riverbero campi- onato all'origine. Eccellente per la musica sacra creata dal barocco al tardo romanti- cismo. |
| 2 | Pipe Flute | 121 | 0 | 20 | 3 | A recitativo-like pipe organ, with a particularly emo- tional blend of Flute and Vox Humana. | Récit d'orgue à tutoaux avec une Flüste particulière- ment émotion- nante et unda maris. | Rezitativorgel mit einer geschmack- vollen Mixtur von Flöte und Vox Humana. | Organo a canne molto adatto ai recitativi, con un espressivo mix di Flauti e Vox Humana. |
| 3 | Pipe Tutti | 121 | 1 | 19 | 2 | A slightly softer Tutti, especially suited for Baroque music. | Un TUTTI leggere-ment plus doux. Parfait pour la musique Baroque. | Eine etwas run-dere Tutti-Orgel für Barockmusik. | Tutti più conte-nuto, particolarm-ente adatto alla musica barocca. |
| STRINGS/CHOIR | |||||||||
| 1 | Strings | 121 | 0 | 48 | 3 | A large strings ensemble sampled in stereo, with a realistic natural reverb. Very dynamic and expressive. | Ensemble de cordes à grande échelle échantillonnées en stéreo avec une réverbération très réaliste. Trés dynamique et expressif. | Großes, in Stereo gesampelteres Stre-ichersemble mit realistischem Hall. Sehr dynamisch und exprssiv. | Grande orchestra d'archi campio-nata in stereo, con un riverbero natu-rale molto realis-tico. Moltodinamico ed espressivo. |
| 2 | Slow Str. | 121 | 0 | 49 | 2 | Emotive, cinematic strings with a slower attack. Great for movie soundtracks. | Un timbre de cordes cinéma-tiques et emotion-nantes avec une attaque lente. Par-fait pour la colonne sonore d'un film. | Gefühlsbetonte, langsam ein-setzende Streicher für Filmmusik. | Archi estrema-mente expressivi, con un carattere molto “visivo” ed un attacco più lento dei prece-denti. Eccellenpe per le colonne sonore. |
| 3 | String Pad | 121 | 0 | 50 | 2 | Sampled strings with a synthetic quality. They are particularly suited for layers. | Qualité synthé-tique pour l'éché-tillonnage de ces cordes. Parfaites pour jouer des superpositions de timbres.. | Gesampelter Stre-icher, die keinet syn-thetisch wirken. Eignen sich besides für Layer. | Archi campionati, ma con un caratere sintetico. Partic-olarmente adatti ai layer. |
| 4 | Choir | 121 | 0 | 52 | 2 | A large mixed choir, with natural reverb. | Un grand timbre de choeur, avec une réverbération naturelle. | Großer gemischter Chor mit tatsächli-chem Hall. | Grande coro misto, con un riverbero naturale. |
| 1 | ScatVoices | 121 | 0 | 53 | 2 | A synthetic choir, with a lot of breath. | Un choeur spa-cieux mais synthé. | Synthesischer Chor, der ausgesprochen breit wirkt. | Coro sintetico, con molto soffio. |
| 2 | Vocal Pad | 121 | 0 | 54 | 2 | Lush, warm pad with a vocal heri-tage. Great for lay-ers. | Un timbre popre, mais chaud avec son heritage vocal. parfait pour jour des superpositiones de timbres. | Warme Synthesiz-erfläche, die an Stimmen erinnert. Eignet sich besides für Layer. | Pad caldo e avvol-gente, con un'origine marcatamente vocale. Eccellenpe per i layer. |
| BASS | |||||||||
| 1 | Ac. Bass | 121 | 0 | 32 | 2 | Upright acoustic bass, with a round, full-bodied sound. The ideal Left Hand in Jazz and Latin music. | Basse droite acosu-tique avec un timbre rond et plein. Style de doigté Left Hand idéal pour le Jazz et la musique latine. | Akustischer Kontra-bass mit warmem, vollem Klang. Der ideale „linke Klang“ für Jazz-und lateinamerika-nische Musik. | Contrabbasso acus-tico, con un suono rotondo e piano. Eccellente alla mano sinistra, quando si sua musica Jazz o Latin. |
| 2 | El. Bass | 121 | 0 | 33 | 2 | A fingered electric bass, with a full, round sound. | Une bassé elektrischer Bass mit vollem, rundem Klang. | Geuzpfter elektrischer Bass mit vollem, rundem Klang. | Basso elettrico suonato con le dita, dal suono rotondo e piano. |
| 3 | Fretless B | 121 | 0 | 35 | 1 | A mellow, singing fretless bass. | Une basse douce. | Runder, singender Fretless-Bass. | Morbido basso fretless, molto espessivo. |
| 4 | Bass&Ride | 121 | 1 | 32 | 3 | The same acoustic bass as above, but with the addition of a ride cymbal for single-handed Jazz accompaniments. | La mêmeasse acoustique de cette précédente mais avec un timbre de cymbale à intro-duire dans les morceaux de Jazz. | Der gleiche akus-tische Bass wie oben, thismal mit Ride-Becken-zugabe für Jazzbe-gleitungen. | Lo stesso contrab-basso di Ac. Bass, ma con l'aggiunta di un piatto ride per un più ricco arrivagnamento Jazz con la sola mano sinistra. |
| DRUM KITS (Selected only by Drum Patterns or via MIDI / Sélectionné uniquely avec les Drum Patterns ou via MIDI / Können nur als Pattern oder via MIDI gewählt werden / ) | |||||||||
| 1 | Standard Kit | 120 | 0 | 0 | 1/2*** | ||||
| 2 | Jazz Kit | 120 | 0 | 32 | 1/2*** | ||||
| 3 | Brush Kit | 120 | 0 | 40 | 1/2*** | ||||
Legend:
Var.: Variation. CC0: Bank Select MSB. CC32: Bank Select LSB. PC: Program Change Number. Numbering is from 0-54; if the transmitting device uses numbers from 1-55, you will need to increment the number by one. Osc: Number of oscillators used by the sound.
Notes:
- Program Change numbers comply with the General MIDI standard. However, only listed numbers have effect on the C-520, while other numbers are ignored.
The GrandPiano, BriteGrand and MelloGrand sounds lose the EPx features when in Layer. This will help save polyphony.
* 1 oscillator in case of mono drum samples, 2 oscillators in case of stereo drum samples.
Legende :
Btn: Button. Bank: Select it with the VARIATION button.
Notes:
- These performances, with sounds set in Layer mode, do not use EPx effects.
** Performance 30 (PnoExpDEMO) is designed to demonstrate our "Piano eXperience" technology, by exaggerating the amount of key-off/hammer return portion of the Grand Piano sound; it is not intended to be a play-able timbre. Normally, these additional Piano eXperience sounds are not perceived as separate elements, but together with the other sample layers, they are a vital part of the realism and the authentic piano tone.
Legende:
| Reverb | Description / Beschreibung | Chorus | Description |
| Hall 1 | Reverb (Smooth Hall) | Chorus | Chorus |
| Hall 2 | Reverb (Smooth Hall) | Harm.Chor. | Harmonic Chorus |
| Hall 3 | Reverb (Smooth Hall) | Chorus Dly | Chorus Delay |
| Wet Plate | Reverb (Wet Plate) | Ensemble | Ensemble |
| Dry Plate | Reverb (Dry Plate) | Flanger | Flanger |
| Room 1 | Reverb (Room) | Tremolo | Tremolo |
| Room 2 | Reverb (Room) | ||
| BrightRoom | Reverb (Bright Room) | ||
| IFX | Description | IFX | Description |
| EQ | Single FX | ||
| LoGain | Low Boost | Pan | Auto Pan |
| HiGain | Hi Boost | Trem. | Tremolo |
| HLGain | Hi-Lo Boost | Phaser | Phaser |
| MdGain | Mid Boost | Rotary | Rotary Speaker |
| Delay | AmpSim | Amp Simulator | |
| Echo 1 | Short Delay | Comp. | Compressor |
| Echo 2 | Medium Delay | Limit. | Stereo Limiter |
| Echo 3 | Long Delay | Excit. | Exciter |
| Dly4th | Midi BPM Sync (quarters) | Wah | Wah |
| Dly3/4 | Midi BPM Sync (quarters/triplets) | Double FX | |
| Dly8th | Midi BPM Sync (eights) | PhaTrm | Phaser / Tremolo |
| AmpTrm | Amp Simulator / Tremolo | ||
| CmpAmp | Compressor / Amp Simulator | ||
| OD-Wah | Overdrive / Wah | ||
| WahAmp | Wah / Amp Simulator | ||
Songs / Morceaux / Songs / Brani musicali
Album:SongBook
| # | Title | Composer | # | Title | Composer |
| 1 | Prelude 1 (The Well-Tempered Clavier, Book 1) | J.S.Bach | 17 | La fille aux cheveux de lin | C Debussy |
| 2 | Invention No.1 | J.S.Bach | 18 | Arabesque No.1 | C Debussy |
| 3 | Jesu, Joy of Man's Desiring | J.S.Bach | 19 | Prelude (Suite Bergamasque) | C Debussy |
| 4 | Sonata K.545 | W.A.Mozart | 20 | Golliwog's Cake walk | C Debussy |
| 5 | Turkish March (Sonata K.331) | W.A.Mozart | 21 | Claire de lune (Suite Bergamasque) | C Debussy |
| 6 | For Elise | L.v.Beethoven | 22 | Waltz No.6 Db-major Op.64-1 | F.Chopin |
| 7 | Piano Sonata Op.13-2 | L.v.Beethoven | 23 | Waltz No.7 E-minor Op.64-2 | F.Chopin |
| 8 | A Maiden's Prayer | T.Badarzewska | 24 | Nocturne Op.9-2 | F.Chopin |
| 9 | Arabesque Op.100-2 | F.Burgmuller | 25 | Mazurka Op.7-1 | F.Chopin |
| 10 | La styrienne Op.100-14 | F.Burgmuller | 26 | Fantasie-Impromptu Op.66 | F.Chopin |
| 11 | La chevaleresque Op.100-25 | F.Burgmuller | 27 | Etude Op.10-3 | F.Chopin |
| 12 | Springs Song Op.62-6 | F.Mendelssohn | 28 | Etude Op.10-5 | F.Chopin |
| 13 | Traumerei Op.15-7 | R.Schumann | 29 | Promenade (Tableaux d'une exposition) | M.P.Moussorgsky |
| 14 | Heidenroslein | G.Lange | 30 | Gymnopedie No.1 | E.Satie |
| 15 | Spinning Song | A.Ellmenreich | 31 | Je Te Veux | E.Satie |
| 16 | Dolly's Dreaming and Awakening | T.Oesten | 32 | Salut d'Amour | E.Elgar |
Album: Classics
| # | Title | Composer | # | Title | Composer |
| 1 | Frohlicher Landmann | R.Schumann | 12 | Moments Musicaux Op.94-3 | F.P.Schubert |
| 2 | La Violette Op.99-1 | R.Streabbog | 13 | Jagerlied Op.19-3 | F.Mendelssohn |
| 3 | Menuett G dur BWV.Anh.114 | J.S.Bach | 14 | Von fremden Landern und Menschen (Kinderszenen) | R.Schumann |
| 4 | Gavotte | J.S.Bach | 15 | Etudes de Mechanisme, Op.849-No.1 | Carl Czerny |
| 5 | 3 Sonatinen 1 C-dur Op.20-1 | Fr.Kuhlau | 16 | Wiener Marsch | Carl Czerny |
| 6 | 6 Sonatinen 1 C-dur Op.55-1 | Fr.Kuhlau | 17 | The New Doll Op.39-9 | P.I.Tchaikovsky |
| 7 | Sonatine C-dur Op.36-1 | M.Clementi | 18 | Sonata K331, 1st Mov. Theme | W.A.Mozart |
| 8 | Piano Sonate Op.49-2-1 | L.v.Beethoven | 19 | Anitras Tanz Op.46 No.3 | Greig |
| 9 | Piano Sonate Op.27-2-1 | L.v.Beethoven | 20 | Blumenlied ("Flower Song") | G.Lange |
| 10 | Menuett G-dur Op.10 | L.v.Beethoven | 21 | Tango (Espana) | I.Albeniz |
| 11 | Andante | J.Haydn | 22 | Libestraume Nr.3 | F.Liszt |
Album: Beyer A - Ferdinand Beyer: Preparatory School, Op.101 / La scuola preparatoria, Op.101
| # | Title | Note | # | Title | Note |
| 1 | Thema, Var. 1 ~ 12 | Part 1: Teacher | 3 | Study 3 ~ 53 | Student only |
| 2 | Thema, Var. 1 ~ 8 | Part 2: Student | … | 53 | |
| 53 |
Album: Beyer B - Ferdinand Beyer: Preparatory School, Op.101 / La scuola preparatoria, Op.101
| # | Title | Note | ||
| 54 | Study 54 ~ 106 | |||
| ... | ||||
| 106 |
Album: Burgmuller - F.J.F. Burgmuller: 25 Easy and Progressive Studies, Op.100 / 25 Studi Facili e Progressivi, Op.100
| # | Title | Composer | # | Title | Composer |
| 1 | La candeur | F.Burgmüller | 14 | La Styrienne | F.Burgmüller |
| 2 | L'Arabesque | 15 | Ballade | ||
| 3 | La pastorale | 16 | Douce plainte | ||
| 4 | La petite reunion | 17 | La babillarde | ||
| 5 | Innocence | 18 | Inquietude | ||
| 6 | Progres | 19 | Ave Maria | ||
| 7 | Le courant limpide | 20 | La tarentelle | ||
| 8 | La gracieuse | 21 | L'harmonie des anges | ||
| 9 | La chasse | 22 | Barcarolle | ||
| 10 | Tendre fleur | 23 | Le retour | ||
| 11 | La bergeronnette | 24 | L'hirondelle | ||
| 12 | L'adieu | 25 | La chevaleresque | ||
| 13 | Consolation | ||||
| Function | Transmitted | Recognized | Remarks | ||
| Basic Channel | Default | 1-16 | 1-16 | Memorized | |
| Changed | 1-16 | 1-16 | |||
| Mode | Default | 3 | |||
| Messages | X | X | |||
| Altered | ********** | ||||
| Note Number: | 0-127 | 0-127 | 0 - 120 in the case of piano sounds | ||
| True Voice | ********** | 0-127 | |||
| Velocity | Note On | O 9n, V=1-127 | O 9n, V=1-127 | ||
| Note Off | X V=64 | X | |||
| Aftertouch | Poly (Key) | O | O | Recorded though the Global channel *1 | |
| Mono (Channel) | O | O | *1 | ||
| Pitch Bend | O | O | *1 | ||
| Control Change | 0, 32 | O | O | Bank Select (MSB, LSB) *2 | |
| 1, 2 | O | O | Modulations *1, 2 | ||
| 6 | O | O | Data Entry MSB *1, 2 | ||
| 38 | O | O | Data Entry LSB *2 | ||
| 7 | O | O | Volume *2 | ||
| 11 | O | O | Expression *1, 2 | ||
| 10, 91, 93 | O | O | Panpot, Reverb Send, Chorus Send *2 | ||
| 64, 66, 67 | O | O | Damper, Sostenuto, Soft *2 | ||
| 65, 5 | O | O | Portamento On/Off, Portamento Time *1, 2 | ||
| 71, 72, 73 | O | O | Resonance, EG time (Release, Attack) *1, 2, 3 | ||
| 74 | O | O | Brightness *2, 3 | ||
| 75, 76, 77, 78 | O | O | Decay Time, Vibrato Rate, Depth, Delay *1, 2, 3 | ||
| 98, 99 | O | O | NRPN (LSB, MSB) *1, 2 | ||
| 100, 101 | O | O | RPN (LSB, MSB) *1, 2, 4 | ||
| 120, 121 | X | O | All sounds off, Reset all controllers *2 | ||
| Program Change | O | O | Transmitted/recognized numbers: *2 | ||
| True # | ********** | 0-127 | 0-7, 11, 16, 17, 19, 20, 24, 32, 33, 35, 48-50, 52-54 | ||
| System Exclusive | O | O | *5 | ||
| System Common | Song Position | X | X | ||
| Song Select | X | X | |||
| Tune | X | X | |||
| System Real Time | Clock | O | O | ||
| Commands | O | O | |||
| Aux Messages | Local On/Off | X | O | ||
| All Notes Off | X | O (123-127) | |||
| Active Sense | O | O | |||
| Reset | X | X | |||
| Notes | *1: Only recorder data are transmitted. *2: Sent and received when MIDI Filter is set to Off in Global mode. *3: Received, but not recorded by the onboard Recorder. *4: LSB, MSB = 01,00: Fine Tune. *5: Includes Inquiry and GM Mode On. | ||||
Care Card
Garantie
- Power supply
- Interference with other electrical devices
- Handling
- Care
- Keep this manual
- Keeping foreign matter out of your equipment
- DISCLAIMER
- WARRANTY
- DATA RESET
- CE MARK FOR EUROPEAN HARMONIZED STANDARDS
- THE FCC REGULATION WARNING (FOR THE U.S.A. ONLY)
- UPDATING THE SOFTWARE
- ASSISTANCE AND SERVICE FOR MUSICIANS
- KORG ON THE INTERNET
- Contents
- Introduction
- Main features
- Wide range of sounds
- Performances
- Four zones keyboard
- Touch control
- Pedal effects
- Piano eXperience
- One-hundred eighty-five songs
- SongBook included
- Onboard recorder
- Metronome
- Data transfer via USB
- MIDI capabilities
- MIDI over USB
- Temperaments
- Adjustable pitch
- Effects
- Powerful integrated amplification
- Two sets of headphones
- Control panel
- REVERB button:
- CHORUS button:
- button:
- TRANSPOSE button:
- BRILLIANCE
- Connections
- Connecting to external audio devices
- Connecting to an external amplification system
- Connecting other audio devices to the C-520
- Before you begin
- Open the key cover
- Turning the instrument on
- Using the music stand
- Opening and closing the music stand
- Using the score holders
- Adjusting the volume
- Using the headphones
- Listening to the Demo
- Listen to all songs at once
- Listen to a specified song
- Basic functions
- Playing a single sound (Single mode)
- Selecting a sound
- Playing two sounds at the same time (Layer mode)
- Entering the Layer mode
- Exit from the Layer mode
- Selecting a different pair of sounds
- Selecting a variation of the Main sound
- Selecting a variation of the Layer sound
- Balancing layered sounds
- Playing different sounds with your left and right hand (Split mode)
- Entering the Split mode
- Exit from the Split mode
- Choosing a different split point
- Selecting a different Main sound
- Selecting a different Left sound
- Selecting a variation of the Left sound
- Balancing sounds in Split mode
- Using the pedals
- Damper pedal
- Transposing
- Sostenuto pedal
- Soft pedal
- Changing the brilliance
- Turning the effects on/off
- Using performances
- Choosing performances
- Changing the sounds assigned to a performance
- Editing a performance
- The metronome
- Starting and stopping the metronome, adjusting the tempo
- Tempo and time signature display
- Adjusting the tempo
- Choosing a time signature
- Drum patterns
- Adjusting the metronome level
- Adjusting the drum pattern's reverb
- Selecting the accent
- Saving the metronome settings
- Playing back a song
- Accessing the Song Play mode
- How to select a song
- How to start playback
- Starting from a different measure
- Muting/unmuting a recorder's part
- Changing the song's tempo
- Play along with the song
- Turning the Cycle Play off
- Recording a song
- Quick recording procedure
- Step 1: Entering the Record mode
- Entering Record mode with a new, blank song
- Entering Record mode with an existing user song
- Step 2: Selecting sounds
- Exit from the Record mode
- What if I record a Layer or Split on a single part?
- Example 1: Recording a single sound
- Example 2: Recording a single sound into Part 1
- Example 3: Recording first with a single sound then both
- Example 4: Recording each hand of a piano piece in two separate parts
- Step 3: Setting the record options
- Step 4: Setting the time signature and tempo
- Step 5: Recording
- A: Recording with no metronome
- B: Recording with the metronome
- C: Recording with a drum pattern
- Step 6: Second-pass recording
- Changing sounds to a recorded song
- Changing tempo to a recorded song
- Pedal Punch recording
- Auto Punch recording
- Saving the song
- By choosing the Save Song command
- By choosing to record a new song
- By choosing a different song
- How I delete a Song from the UserSong album?
- Editing a song
- Setting Cycle Play
- Erasing a track
- Cutting measures at the end of the song
- Quantizing the song
- Transposing the song
- Deleting the song
- Saving the song after editing
- Editing sounds and performances
- Accessing the Sound edit mode
- Exit from the Sound edit mode
- Saving a sound
- Saving a performance
- After editing a sound
- After editing a performance
- By pressing the Performance button
- Setting the volume
- Adjusting the panning
- Adjusting the effects
- Setting the reverb effect
- Setting the chorus or modulation effect
- Setting the insert effects
- Setting the octave transposition
- Adjusting the fine tune
- Programming the pedals
- Selecting a scale
- Resetting the current sound and performance
- Global settings
- Accessing Global edit
- Exit from the Global edit mode
- Touch settings
- Turning the internal speakers on or off
- Master tuning
- Default split point
- Assigning functions to the pedals
- Quarter Tone (SubScale realtime programming)
- Fast Play
- Mute Level
- Turning the keyboard on or off (Local Control)
- MIDI Clock
- MIDI IN Channels
- MIDI OUT Channels
- MIDI Filters
- Data transfer via the USB port
- Erasing songs from the User Song album
- General Reset
- System version number
- MIDI
- What is MIDI?
- What is MIDI Over USB?
- What can you do with MIDI?
- MIDI connections
- Standard MIDI settings
- Using the C-520 as a multitimbral tone generator
- Program Change
- Transmitting Program Change messages
- Receiving Program Change messages
- Program Change enable/disable
- Control Change
- Control Change enable/disable
- Installing the Korg USB MIDI Driver
- Connecting the C-520 to a personal computer
- KORG USB-MIDI Driver system requirements
- Windows
- Macintosh
- Please note before use
- Windows: Installing the KORG USB-MIDI Driver
- Driver's ports
- Mac OS X: Installing KORG USB-MIDI Driver
- Assembling the stand
- Cautions for assembly
- Assembling procedure
- Assembly Accessories
- Check after assembly
- Caution
- Caution when transporting the instrument
- Screw loosening
- Disassembly
- Error messages
- Write Protect
- Out of Memoy
- Maximum song length reached
- Loading Song Error
- USB Working Wait please
- Memory Full
- Invalid Name
- SongExists Execute
- Record Mode Not Allowed
- Song Modified Save?
- Sound Modified Save?
- Perf. Modified Save?
- Globals Modified Save?
- Save Global Failure
- Save Preset Failure
- Save Midi Failure
- General Reset Wait Please
- General Reset / nn%
- Troubleshooting
- Polyphony
- KORG
- CONCERT
- C-520
- DIGITAL PIANO
- !o|dωe,p οροN
- PRECAUTIONS
- SERVICE ET ASSISTANCE AU MUSCIEN
- Quitter le mode Layer
- Activer/désactiver Program Change
- Activer/désactiver Control Change
- USB Working / Wait please
- Song Modified / Save?
- Sound Modified / Save?
- Perf. Modified / Save?
- Globals Modified / Save?
- General Reset / Wait Please
- AKTUALISIERUNG DES BETRIEBSSYSTEMS
- Inhalt
- Introduzione
- Accordature alternative
- Legend:
- Notes:
- Legende :
- Legende:
- Songs / Morceaux / Songs / Brani musicali
Brand : KORG
Model : C520
Category : Digital piano