AC-VQL1BP - Battery charger SONY - Free user manual and instructions
Find the device manual for free AC-VQL1BP SONY in PDF.

User questions about AC-VQL1BP SONY
0 question about this device. Answer the ones you know or ask your own.
Ask a new question about this device
Download the instructions for your Battery charger in PDF format for free! Find your manual AC-VQL1BP - SONY and take your electronic device back in hand. On this page are published all the documents necessary for the use of your device. AC-VQL1BP by SONY.
USER MANUAL AC-VQL1BP SONY
Operating Instructions GB
The model and serial numbers are located on the bottom of the unit.
Record the serial number in the space provided below.
Refer to these numbers whenever you call upon your Sony dealer regarding this product.
Model No. AC-____ Serial No.
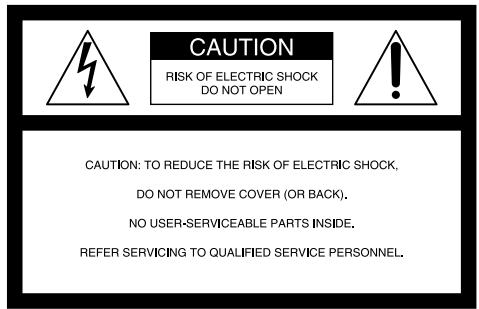
WARNING
To reduce fire or shock hazard, do not expose the unit to rain or moisture.
To avoid electrical shock, do not open the cabinet.
Refer servicing to qualified personnel only.
The unit must be connected to an earthed MAINS socket-outlet.
CAUTION
Replace the battery with the specified type only. Otherwise, fire or injury may result.
text_image
CAUTION RISK OF ELECTRIC SHOCK DO NOT OPEN CAUTION: TO REDUCE THE RISK OF ELECTRIC SHOCK, DO NOT REMOVE COVER (OR BACK). NO USER-SERVICEABLE PARTS INSIDE. REFER SERVICING TO QUALIFIED SERVICE PERSONNEL.
This symbol is intended to alert the user to the presence of uninsulated “Dangerous voltage” within the product’s enclosure that may be of sufficient magnitude to constitute a risk of electric shock to persons.

This symbol is intended to alert the user to the presence of important operating and maintenance (servicing) instructions in the literature accompanying the appliance.
The Graphical Symbols with Supplemental Marking is located on the bottom of the unit.
IMPORTANT SAFEGUARDS
For your protection, please read these safety instructions completely before operating the appliance, and keep this manual for future reference.
Carefully observe all warnings, precautions and instructions on the appliance, or the one described in the operating instructions and adhere to them.
Use
Power Sources
This set should be operated only from the type of power source indicated on the marking label. If you are not sure of the type of electrical power supplied to your home, consult your dealer or local power company. For those sets designed to operate from battery power, or other sources, refer to the operating instructions.
Grounding
This set is equipped with a three-wire grounding type plug (a plug having a third pin for grounding). Follow the instructions below:
This plug will only fit into a grounding-type power outlet. This is a safety feature. If you are unable to insert the plug into the outlet, contact your electrician to have a suitable outlet installed. Do not defeat the safety purpose of the grounding plug.
Overloading
Do not overload wall outlets, extension cords or convenience receptacles beyond their capacity, since this can result in fire or electric shock.
Object and Liquid Entry
Never push objects of any kind into the set through openings as they may touch dangerous voltage points or short out parts that could result in a fire or electric shock. Never spill liquid of any kind on the set.
Attachments
Do not use attachments not recommended by the manufacturer, as they may cause hazards.
Cleaning
Unplug the set from the wall outlet before cleaning or polishing it. Do not use liquid cleaners or aerosol cleaners. Use a cloth lightly dampened with water for cleaning the exterior of the set.
Installation
Water and Moisture
Do not use power-line operated sets near water – for example, near a bathtub, washbowl, kitchen sink, or laundry tub, in a wet basement, or near a swimming pool, etc.
Power-cord Protection
Route the power cord so that it is not likely to be walked on or pinched by items placed upon or against them, paying particular attention to the plugs, receptacles, and the point where the cord exits from the appliance.
Accessories
Do not place the set on an unstable cart, stand, tripod, bracket, or table. The set may fall, causing serious injury to a child or an adult, and serious damage to the set. Use only a cart, stand, tripod, bracket, or table recommended by the manufacturer. An appliance and cart combination should be moved with care. Quick stops, excessive force, and uneven surfaces may cause the appliance and cart combination to overturn.
Ventilation
The slots and openings in the cabinet are provided for necessary ventilation. To ensure reliable operation of the set, and to protect it from overheating, these slots and openings must never be blocked or covered.
– Never cover the slots and openings with a cloth or other materials.
– Never block the slots and openings by placing the set on a bed, sofa, rug, or other similar surface.
– Never place the set in a confined space, such as a bookcase, or built-in cabinet, unless proper ventilation is provided.
- Do not place the set near or over a radiator or heat register, or where it is exposed to direct sunlight.
Lightning
For added protection for this set during a lightning storm, or when it is left unattended and unused for long periods of time, unplug it from the wall outlet and disconnect the antenna or cable system. This will prevent damage to the set due to lightning and power-line surges.
Service
Damage Requiring Service
Unplug the set from the wall outlet and refer servicing to qualified service personnel under the following conditions:
- When the power cord or plug is damaged or frayed.
– If liquid has been spilled or objects have fallen into the set.
– If the set has been exposed to rain or water. - If the set has been subject to excessive shock by being dropped, or the cabinet has been damaged.
- If the set does not operate normally when following the operating instructions. Adjust only those controls that are specified in the operating instructions. Improper adjustment of other controls may result in damage and will often require extensive work by a qualified technician to restore the set to normal operation.
- When the set exhibits a distinct change in performance – this indicates a need for service.
Servicing
Do not attempt to service the set yourself as opening or removing covers may expose you to dangerous voltage or other hazards. Refer all servicing to qualified service personnel.
Replacement parts
When replacement parts are required, be sure the service technician has used replacement parts specified by the manufacturer that have the same characteristics as the original parts. Unauthorized substitutions may result in fire, electric shock, or other hazards.
Safety Check
Upon completion of any service or repairs to the set, ask the service technician to perform routine safety checks (as specified by the manufacturer) to determine that the set is in safe operating condition.
For the customers in the U.S.A
CAUTION
You are cautioned that any changes or modifications not expressly approved in this manual could void your authority to operate this equipment.
Note:
This equipment has been tested and found to comply with the limits for a Class B digital device, pursuant to Part 15 of the FCC Rules. These limits are designed to provide reasonable protection against harmful interference in a residential installation. This equipment generates, uses, and can radiate radio frequency energy and, if not installed and used in accordance with the instructions, may cause harmful interference to radio communications.
However, there is no guarantee that interference will not occur in a particular installation. If this equipment does cause harmful interference to radio or television reception, which can be determined by turning the equipment off and on, the user is encouraged to try to correct the interference by one or more of the following measures:
– Reorient or relocate the receiving antenna.
– Increase the separation between the equipment and receiver.
- Connect the equipment into an outlet on a circuit different from that to which the receiver is connected.
- Consult the dealer or an experienced radio/TV technician for help.
For the customers in Europe
This product with the CE marking complies with both the EMC Directive and Low Voltage Directive issued by the Commission of the European Community.
Compliance with these directives implies conformity to the following European standards:
• EN60065: Product Safety
• EN55103-1: Electromagnetic Interference (Emission)
• EN55103-2: Electromagnetic Susceptibility (Immunity)
This product is intended for use in the following Electromagnetic Environment(s):
E1 (residential), E2 (commercial and light industrial), E3 (urban outdoors) and E4 (controlled EMC environment ex. TV studio).
Disposal of Waste Electrical and Electronic Equipment for business use (Applicable in the European Union and other European countries with separate collection systems)
This symbol on the product or on its packaging indicates that this product shall not be treated as household waste. Instead it shall be handed over to the applicable take-back scheme for the recycling of electrical and electronic equipment. By ensuring this product is disposed of correctly, you will help prevent potential negative consequences for the environment and human health, which could otherwise be caused by inappropriate waste handling of this product. The recycling of materials will help to conserve natural resources. For more detailed information about recycling of this product, please contact your local Sony office or visit Sony Europe's web site for business customers: http://www.sonybiz.net/environment
< Notice for the customers in the countries applying EU Directives >
The manufacturer of this product is Sony Corporation, 1-7-1 Konan Minato-ku Tokyo, 108-0075 Japan. The Authorized Representative for EMC and product safety is Sony Deutschland GmbH, Hedelfinger Strasse 61, 70327 Stuttgart, Germany. For any service or guarantee matters please refer to the addresses given in separate service or guarantee documents.
NOTICE FOR THE CUSTOMERS IN THE UNITED KINGDOM
A moulded plug complying with BS 1363 is fitted to this equipment for your safety and convenience.
Should the fuse in the plug supplied need to be replaced, a fuse of the same rating as the supplied one and approved by ASTA or BSI to BS1362 (i.e., marked with ◎ or 🌐 mark) must be used.
If the plug supplied with this equipment has a detachable fuse cover, be sure to attach the fuse cover after you change the fuse. Never use the plug without the fuse cover. If you should lose the fuse cover, please contact your nearest Sony service station.
PRECAUTION
The set is not disconnected from the AC power source (mains) as long as it is connected to the wall outlet, even if the set itself has been turned off.
The nameplate is located on the bottom of the unit.
Do not use this unit placed in a narrow space, such as between a wall and furniture.
Use this unit close to a wall outlet. This ensures that the power plug can be quickly unplugged from the wall outlet to turn off the power if a malfunction occurs during use.
Table of contents
CAUTION 8
Notes on Use ....10
Using this unit abroad....12
Features 13
Functions....14
Identifying the part ....15
Using as AC adaptor 16
Charging the battery pack 18
Charging check 21
Troubleshooting 24
Specifications 26
GB
CAUTION
- Do not use the unit in damp, oily, humid or dusty environments.
Such environments cause fires or even electric shocks.
- Do not allow water or foreign matter to get into this unit.
These can cause a fire or even an electric shock. If they get inside this unit, disconnect the power cord from the wall outlet and contact your nearest Sony dealer.
- Do not allow this unit or the battery packs to get wet.
These can cause a fire or an electric shock.
- Do not place this unit near water.
Allowing water to get inside this unit or battery packs, allowing them to get wet or using them in the bathroom, these can cause a fire or an electric shock.
- Do not attempt to disassemble or modify the unit.
These can cause a fire or an electric shock. Contact your nearest Sony dealer about inspections or repairs.
- Do not attempt to shock or use force such as hammering, stomp or dropping.
These can cause a fire or an electric shock.
- Do not charge except specified battery packs.
These can cause a fire, smoke or even an electric shock.
- Avoid damaging the power cord or connecting cord.
A damaged AC power cord or DC cable can cause a fire or even an electric shock.
- Do not attempt to modify or damaging the cord or cable.
- Do not put anything heavy on or pull the cord or cable.
- Do not place this unit near a heater. Do not attempt to heat it.
- Be sure to hold the plug when disconnecting the cord or cable.
If the cords are damaged, stop using the unit and contact your nearest Sony dealer.
- Insert the plug part of the power cord into a wall outlet firmly.
If the plug part is not inserted firmly, it can cause a fire or smoke which can lead to burns or other injuries.
- Use this unit with power supply voltage indicated on this unit.
Using this unit with any power supply voltage other than indicated can cause a fire or even an electric shock.
- Do not use this unit in extremely hot places.
These can cause a fire, smoke or an electric shock.
Use this unit at temperatures under 40 ^ ( 104 ^ ).
Do not leave this unit under the direct sunlight for extended periods of time.
- Do not hold the unit or battery packs for an extended amount of time if they are plugged in.
These can become hot when energized which can lead to burns.
- Do not cover this unit with any object or material.
Covering the unit will prevent it from radiating heat and that can cause deformation and even lead to a fire.
- Do not touch this unit with wet hands.
That can cause an electric shock.
- Place this unit on a stable place.
If place this unit is not placed on a stable place, it could fall or be dropped which can damage the unit or cause an injury.
- Use the supplied power cord.
Not using the supplied power cord can cause an electric shock or damaged.
- Place the cords correctly.
Someone could trip over the power cord or connecting cable and be injured in a fall.
- When the unit is not being used, disconnect the power plug.
When storing this unit, disconnect the power cord from the wall outlet and detach the battery packs. Leaving them connected can cause a fire.
- Connect the safety grounding wire.
If the grounding wire is disconnected, that can cause an electric shock. Connect the grounding wire as follows.
Using the supplied grounding wire enables safety ground connection.
If the grounding wire cannot be connected, contact your nearest Sony dealer.
- Check the power consumption of the equipment used with this unit so that the rated outlet will not be exceeded.
It can become hot which can lead to damage.
Notes on Use
This unit does not have dust-proof, splash-proof or water-proof specifications.
Charging
- Be sure to use genuine Sony battery packs with this unit.
- Do not charge any other battery pack than the one meant for this unit.
- Attach the battery pack firmly.
Charging temperature
- For maximum battery efficiency, the recommended temperature range when charging is +10^ to +30^ (+50^ to +86^) . Charging becomes more difficult at lower temperatures.
- Although this unit enables quick charging, charging outside the recommended temperature range may lead to a longer charging time in order to protect the battery pack. Once the charging time has been extended, quick charging will not be restored even if the temperature is brought within the recommended temperature range. Remove and reinstall the battery to recharge it again.
Where not to place this unit
Regardless of whether this unit is in use or in storage, do not place it in any of the following locations. Doing so may lead to malfunction.
- Locations of extremely high temperature
- Locations exposed to direct sunlight such as dashboards or near a heater. The temperature gets extremely high inside a car with the windows closed in summer or in strong sunshine, and leaving the unit inside may cause it to be deformed or malfunction.
- Locations of excessive vibration
- Locations with strong electromagnetism or radiant rays
- Locations with excessive sand
– In locations such as the seashore and other sandy areas or where dust clouds occur, protect the unit from sand and dust. Sand and dust can cause malfunction.
Precautions on use
- Attach the battery pack to this unit firmly when you charge the battery pack.
- The battery terminal may be damaged if the battery pack is not attached correctly.
- Do not use this unit in the location with strong electromagnetism or rays.
Electromagnetic waves can cause the unit not to record or playback video correctly.
- To protect the battery pack, remove the battery pack from the unit as soon as the charging is completed.
- Do not apply mechanical shock or drop the unit.
- Keep the unit away from a TV or AM receivers.
Noise from the equipment may enter a TV or radio if it is placed nearby.
- Make sure that nothing metallic comes into contact with the metal parts of this unit or connecting plate. It may cause a short circuit.
- Do not connect this unit to a voltage adaptor (travel converter) for overseas travel. It can cause fires or damages.
- The battery pack and this unit can become warm during or immediately after recharging.
- Unplug this unit from the wall outlet after use. To disconnect the cord, pull it out by the plug.
- The nameplate indicating the operating voltage and power consumption is located on the bottom of this unit.
- Connect the power cord to the wall outlet after ground connection.
Disconnect the power cord to the wall outlet before ground disconnection.
- Do not expose this unit to moisture. Do not place objects containing water, such as vase or the like, on this unit.
Maintenance
- Wipe this unit with a soft dry cloth when it is dirty.
- When the unit is very dirty, wipe it using a cloth with a little neutral solvent added, and then wipe it dry again.
- Do not use thinners, benzine, alcohol, etc. These may cause the surface of this unit to damage.
- When you use chemical cleaning clothes, refer to their instructions manual.
- Using a volatile solvent like an insecticide, or keeping this unit touching a rubber or vinyl plastic products for a long time may cause a deterioration or damage of this unit.
Using this unit abroad
Use a commercially available AC plug Adaptor (not supplied), if necessary, depending on the design of the wall outlet.
Do not connect this unit to a voltage adaptor (travel converter) for overseas travel. It can cause fires or damages.
Features
AC-VQL1BP is an AC adaptor/charger that can supply DC power to the Sony external equipment and be attached and charge the four Sony lithium ion battery packs*.
* This unit can charge a maximum of two battery packs simultaneously (one of each by A slot and B slot).
(When attaching two battery packs to the slots of the same system simultaneously, this unit cannot charge the battery packs simultaneously. After charging of the battery pack attached first is completed, this unit switches to charging of the other battery pack attached to the same system automatically.)
- For charging lithium ion type battery packs.
You cannot be used to recharge Ni-Cd or Ni-MH type batteries. - Cannot be used with some models of equipment (camcorder, etc.).
Confirm the compatibility of your equipment before use.
Features
Attaching the maximum four battery packs simultaneously
There are two charging system A and B. This unit can be attached a maximum four battery packs. Each system charges a battery pack. After the charging is complete, it starts charging the other battery pack attached to the same system automatically.
Two system DC output terminals
There are two DC output terminal systems A and B. This unit can operate the external equipment as an AC adaptor. (This unit cannot operate as DC output and charge the battery pack on the same system.)
Display "BATTERY LOG" and charging information
When attaching the "InfoLITHIUM" battery pack (L series) to this unit, the usage history and charging condition of the battery pack are displayed.
- Total charging time, total number of charging cycles, the year and month of the last use
- Usable time of the battery pack attached, remaining time until charging will finish
(The indicated values are approximated. The information displayed to charge the battery packs is limited.)
Effective charging
You can select “full charging” or “normal charging” with charging mode change switch. If you are in a hurry, set to “normal charge” to finish charging one of the battery pack when normal charging is completed and start charging another battery pack. If the battery pack that has charged fully, this unit indicates that charging is completed without charging the battery pack.
Self-check function
When trouble has occurred with a battery pack or this unit, a warning will be indicated in the display window.
For details, refer to "Charging the battery pack" (p. 18).
What is "InfoLITHIUM"?
"InfoLITHIUM" is a lithium ion battery pack which can exchange data with compatible electronic equipment about its battery consumption. We recommend that you use an "InfoLITHIUM" battery pack (L series) with electronic equipment that has the Ⓞ InfoLITHIUM mark.
"InfoLITHIUM" is a trademark of Sony Corporation.
"BATTERY LOG"
This unit can display the information recorded on the battery packs.
• Total charging time
• Total number of charging cycles
• The year and month of the last use
Functions
Caution on each display (Read carefully before use.)
While charging the battery pack, this unit shows charging condition and battery pack information, so long as the following conditions are met.
- Using the "InfoLITHIUM" battery pack
- Using electronic device with the ⓘ InfoLITHIUM mark
Make sure that you use a battery pack with the InfoLITHIUM mark. Check in the instruction manual supplied with your video device whether it is "InfoLITHIUM" compatible.
If you use the battery pack with two or more video equipments etc., the battery information of the last used equipment will be displayed.
"BATTERY LOG" is compatible with rechargeable battery pack NP-F970, NP-F770, NP-F570. Other models are not compatible or have limit to display.
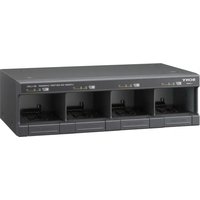
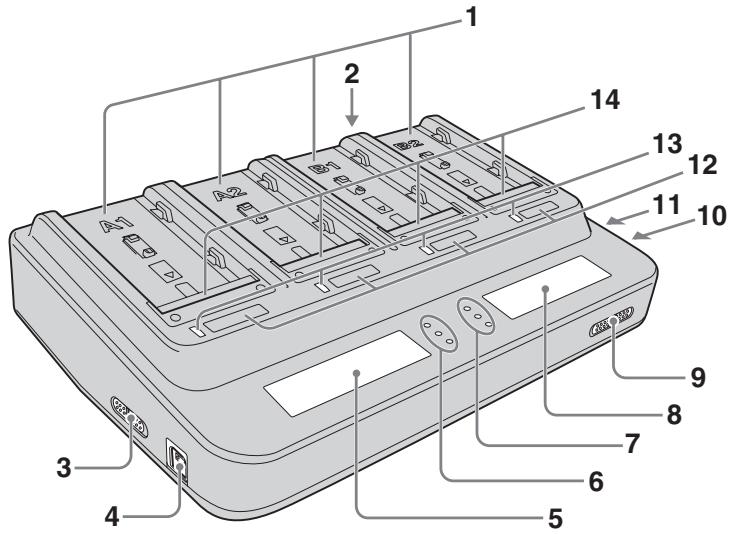
Identifying the part
text_image
1 2 3 4 5 6 7 8 9 10 11 12 13 141 Slot (A1, A2, B1, B2)
2 AC input terminal
3 Output change switch A
4 DC OUT connector A
5 Display window A
6 Log indicator lamp A
7 Log indicator lamp B
8 Display window B
9 Charging mode change switch
10 DC OUT connector B
11 Output change switch B
12 DISPLAY change button (A1, A2, B1, B2)
13 CHARGE lamp (A1, A2, B1, B2)
14 Terminal shutter
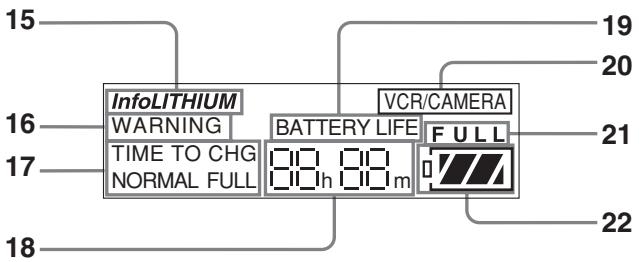
Display Window
text_image
15 InfoLITHIUM WARNING TIME TO CHG NORMAL FULL 16 17 18 19 20 VCR/CAMERA BATTERY LIFE FULL 21 2215 "InfoLITHIUM" indicator
16 WARNING indicator
17 TIME TO CHG (charge) indicator
18 Time indicator
19 BATTERY LIFE indicator
20 VCR/CAMERA indicator
21 Full charge indicator
22 Battery life indicator
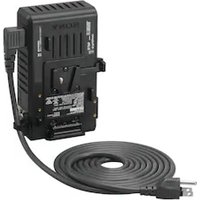
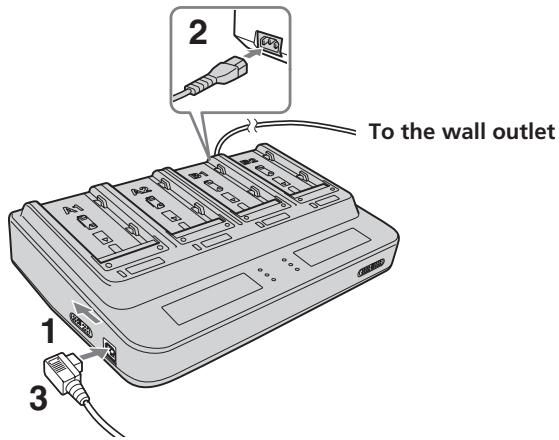
Using as AC adaptor
For details, refer to the instruction manual of the video equipment.
text_image
To the wall outlet 1 2 3Switches and settings have two systems for A system and B system. Set the switch for the system you are using.
1 Set the output change switch to "VCR/CAMERA."
2 Connect the power cord to this unit and connect the power cord to a wall outlet.
There is a beep and the display window comes on.
Notes
Securely push the power cord all the way into the wall outlet.
3 Connect the connecting cord to the DC OUT connector.
4 Connect the connecting cord to the video equipment.
For detail of the direction of the connecting cord, refer to the instruction manual of the video equipment.
When using the connecting cord DK-415
natural_image
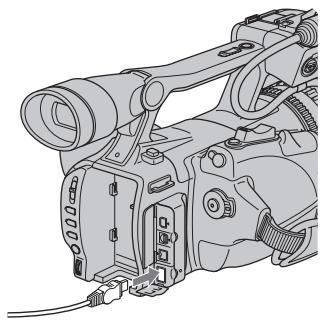
Technical line drawing of a video camera with attached cable and sensor (no text or symbols)When using the connecting cord DK-215
natural_image
Line drawing of a digital camera with lens and external components (no text or symbols)Notes
- Setting the output change switch to "CHARGE" while operation this unit cuts the power supply to the video equipment.
- You cannot charge the battery pack attached to this unit in "VCR/CAMERA" mode.
- You can use one system of this unit as an AC adaptor and use the other system as a charger.
- Keep this unit away from your video equipment if the image is distorted.
- The illustrated example is of connection to an HVR-Z7, HVR-V1 digital HD video camera recorder.
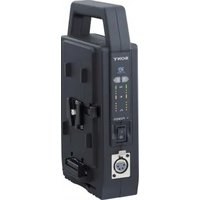
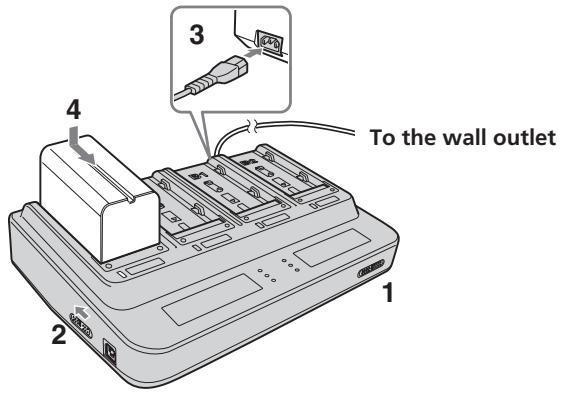
Charging the battery pack
For details, refer to the instruction manual of the video equipment.
text_image
4 To the wall outlet 1 2 3Switches and settings have two systems for A system and B system. Set the switch for the system you are using.
1 Set the charging mode change switch to "NORMAL CHARGE" or "FULL CHARGE."
Set to "FULL CHARGE" when you need full charging the battery pack.
Set to "NORMAL CHARGE" when you want to finish until normal charging.
For details, refer to "Changing the charging mode" (p. 19).
2 Set the output change switch to "CHARGE."
For details, refer to "Attaching two or more battery packs simultaneously" (p. 20).
3 Connect an AC power cord to this unit and connect the AC power cord to a wall outlet.
There is a beep and the display window comes on.
Notes
Securely push the power cord all the way into the wall outlet.
4 Attach the battery pack.
For detail of attachment or removing the battery pack, refer to “Attaching and removing the battery pack” (p. 21).
5 When charging is completed, remove the battery pack.
When charging condition that is set by the charging mode change switch is completed, this unit stops charging. When the CHARGE lamp of this unit turns off, charging has been completed. About charging completed, refer to “Changing the charging mode” (p. 19).
Refer to "Attaching and removing the battery pack" (p. 21) to remove the battery pack.
Notes
- If the output change switch is set to "VCR/CAMERA" during charging, charging stops.
- If the CHARGE lamp does not light up or it flashes, check that the battery pack is attached to this unit correctly. If the battery pack is not attached firmly, it will not be charged.
- Quick charging is only performed with "InfoLITHIUM" battery packs.
- Depending on the battery pack being used, the information displayed on the display window may be limited.
- If any troubles occur while charging, the CHARGE lamp will flash and "WARNING" will be indicated on the display window.
For details, refer to "Troubleshooting" (p. 24).
Changing the charging mode
There are two kinds of charging. They are “normal charging” and “full charging.” You can change the charging mode by sliding the charging mode change switch.
| Normal charging(NORMAL CHARGE) | When normal charging is completed, the battery life indicator displays as illustrated on the right. |  |
| Full charging(FULL CHARGE) | When full charging is completed, the battery life indicator displays as illustrated on the right. It takes a long time than normal charging and the video equipment attached the full charged battery pack can use little longer. |  |
* In the normal charging mode, "FULL" is not displayed when normal charging is completed.
Charging time
| NP-F970 | NP-F770 | NP-F570 | |
| Normal charging time | 200 min. | 135 min. | 85 min. |
| Full charging time | 260 min. | 195 min. | 145 min. |
- The approximate times shown are when charging an empty battery pack with this unit at +25^ .
- The charging time may differ depending on the condition of the battery pack or ambient temperature.
Use the battery pack before charging is not completed.
Remove the battery pack when required. It can be used even if charging is not completed. The battery life differs depending on the charging time.
Notes
- The indicated time is an approximate time when charging the battery pack with this unit at +25^ . The indicated time may differ depending on the ambient temperature from the actual charging time. The charging time may be not indicated depending on the condition of the battery pack, this is not a malfunction.
- To indicate the battery life of a new battery pack, first attach it to your video equipment and use it for about 20 seconds and then charge it with this unit.
- The normal charging time and battery life differ depending on the using battery pack and condition of use.
- When the charging mode change switch is set to "NORMAL CHARGE," charging is completed at normal charging and charging to full charge is not operated.
- Before charging has been completed in each mode, the charging mode can be changed.
Attaching two or more battery packs simultaneously
- This unit can be attached up to four battery packs simultaneously. (This unit has two systems A and B and each system has two slots.)
- The two battery packs attached to each one of the slot of the A system (A1 or A2) and attached to each one of the slot of the B system (B1 or B2) (the two battery packs attached to the different systems) can be charged simultaneously. When you want to charge two battery packs quickly, attach one to the A system's slot and the other to the B system's slot. Charging of two battery packs start simultaneously.
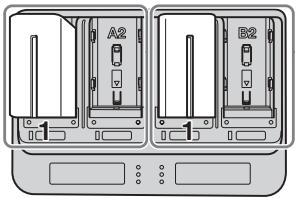
When attaching two battery packs to the slots of the different systems
The two battery packs are charged simultaneously.
natural_image
Diagram of two electronic devices labeled A2 and B2 with ports and connectors, no readable text or symbols present.The two battery packs attached to each one of the slot of the A system (A1 or A2) and attached to each one of the slot of the B system (B1 or B2) (the two battery packs attached to the different systems) can be charged simultaneously.
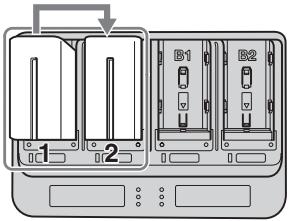
When attaching two battery packs to the slots of the same system
Two battery packs are not charged simultaneously. When charging of one of them is completed, the other one's charging will start automatically.
text_image
1 2 B1 B2When attaching two battery packs to the slots of the A system simultaneously, charging of the battery pack attached to the slot A1 starts first.
When attaching two battery packs to the slots of the A system not simultaneously, charging of the battery pack attached first will start first. After charging of the first battery pack is completed, charging of the other battery pack will start automatically. B system is same as A system.
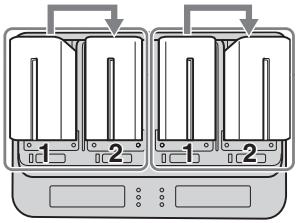
When attaching four battery packs simultaneously
One of the battery pack attached to the A system's slot and one of the battery pack attached to the B system's slot are charged simultaneously.
text_image
Diagram showing two identical containers with labeled parts, indicating a device or appliance assembly.After charging of the battery packs attached to the slot1 of the A and B system (A1, B1) is completed, charging of the battery packs attached to the slot2 of the A and B system (A2, B2) will start.
Notes
- This unit can be attached up to four battery pack, but it can charge up to two battery packs.
- Two battery packs attached to the same systems cannot be charged simultaneously. (When charging of one of them is completed, the other one's charging will start automatically.)
Attaching and removing the battery pack
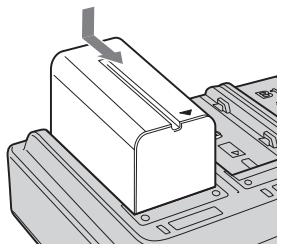
① Place the battery pack on this unit with the ▶ mark facing the terminal shutter.
② Slide the battery pack in the direction of the arrow.
Press the battery pack until the terminal shutter completely enters this unit.
Removing the battery pack
Slide the battery pack in the opposite direction of attaching and lift it straight out.
natural_image
Technical line drawing of a mechanical component with a downward arrow indicating force or motion (no text or symbols present)
natural_image
Diagram of a mechanical component with an upward arrow indicating motion (no text or symbols present)Notes
- Do not lift this unit by holding the battery pack.
- Do not attempt to shock to the terminal shutter. When attaching the battery pack to this unit, be sure not to hit the terminal shutter against the battery pack.
Charging check
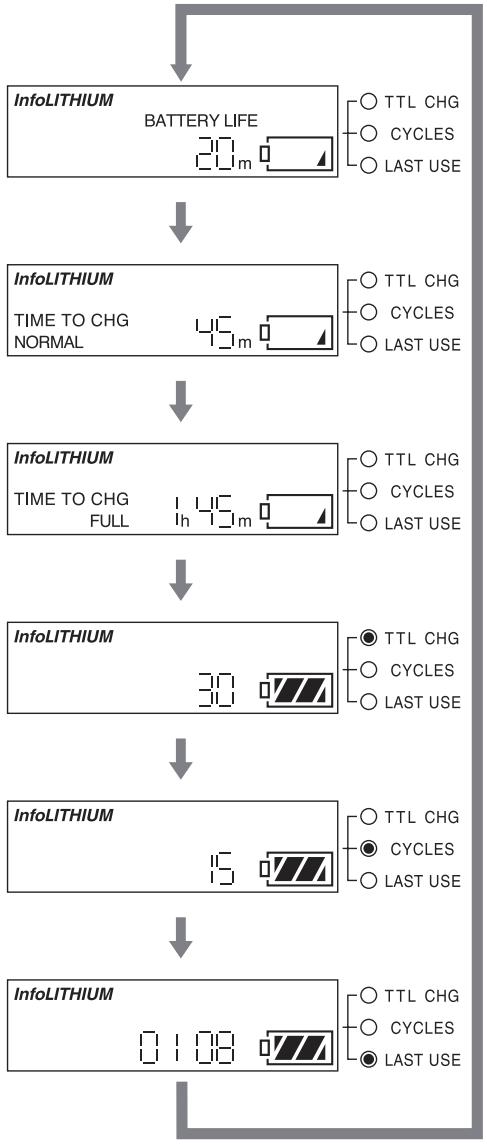
When charging starts, the battery life is displayed on the display window.
Depending on the using video equipment, the battery life may not be displayed. Refer to the instruction manual of the video equipment.
- Each time that you press the DISPLAY change button, the information displayed can be changed. The lights of the DISPLAY change button and log indicator lamp indicates the slot number and information item of the displayed information.
- The time display of the battery pack not charging disappears after about 10 seconds of display and switches to the time display of the charging battery pack automatically.
This explanation is related to a charging check with the display for a battery pack attached to the slot A1. The other slots are same as the slot A1.
Each time that you press the DISPLAY change button, the information displayed can be changed as following.
Battery life
The battery life of the battery pack attached to the slot A1 is indicated.
Normal charging time
Remaining time until normal charging of the battery pack attached to the slot A1 will be completed is indicated.
Full charging time
Remaining time until full charging of the battery pack attached to the slot A1 will be completed is indicated.
(When the charging mode change switch is set to “NORMAL CHARGE,” this is not indicated.)
Total charging time
Total charging time of the battery pack attached to the slot A1 is indicated.
Total number of charging cycles
Total number of charging cycles of the battery pack attached to the slot A1 is indicated.
Last use
The year and month of the last use of the battery pack attached to the slot A1 with video equipment etc. is indicated. It is displayed in order of month-year.
flowchart
graph TD
    A["InfoLITHIUM"] --> B["BATTERY LIFE 20 m"]
    B --> C["InfoLITHIUM TIME TO CHG NORMAL 45 m"]
    C --> D["InfoLITHIUM TIME TO CHG FULL 145 m"]
    D --> E["InfoLITHIUM 30"]
    E --> F["InfoLITHIUM 15"]
    F --> G["InfoLITHIUM 0.108"]
    style A fill:#f9f,stroke:#333
    style B fill:#ccf,stroke:#333
    style C fill:#cfc,stroke:#333
    style D fill:#fcc,stroke:#333
    style E fill:#cff,stroke:#333
    style F fill:#ffc,stroke:#333
    style G fill:#cfc,stroke:#333
Notes
When battery life, normal charging time or full charging time is displayed on the display window, the log indicator lamp does not light on.
Battery life
Approximate battery life using with the last used video equipment etc. indicated.
Normal charging time
Approximate remaining time until normal charging is completed is indicated.
Full charging time
Approximate remaining time until full charging is completed is indicated.
TTL CHG (total charging time)
Approximate total charging time since the first charging of the battery pack is indicated. The minimum unit indicated is five hours.
CYCLE (total number of charging cycles)
Approximate total number of charging cycles since the first charging of the battery pack is indicated. The minimum unit is 5 and the times indicated in multiples of five. Continuation charging and stopping in the middle of charging may not be counted as number of charging.
LAST USE (last use year and month)
When attaching the battery pack to this unit, the year and month of last use with the video equipment etc. is indicated. It is displayed in order of month-year.
Example:
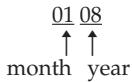
The last use year and month is January of 2008.
“-- --” is displayed when using this unit with video equipment that does not have its calendar set.
Notes
- "BATTERY LOG" display is compatible with the rechargeable battery pack NP-F970, NP-F770, NP-F570. There are restrictions on the content which can be indicated with other models.
- The all indicated times are approximate value. This approximate value can be used as reference the condition of use. It is not related with the deterioration of the battery pack or this unit.
- When attaching the battery pack to this unit, the information of the last used video equipment etc. may not be indicated. The video light or some models of the video equipment etc. may not be compatible. When attaching the battery pack to the equipment, if the power of the equipment does not turn on, it is not recognized as the last use. If the last use year and month is unclear, “-- --” is indicated on the display window. This is not a malfunction.
- If the temperature of the battery pack is high or low during charging or attaching to this unit, the following display will be indicated. In this case, the attached battery pack is charged with low charging current value for protecting the battery pack. This is not a malfunction.
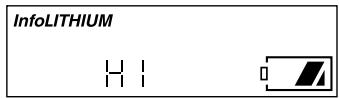
text_image
InfoLITHIUM H I
text_image
InfoLITHIUM LoTroubleshooting
Please check the following before contacting your nearest Sony dealer. If this unit does not operate correctly after check, contact your nearest Sony dealer.
The video equipment does not work.
- The power plug is disconnected from the wall outlet.
→ Connect the power plug to the wall outlet. - The connecting cord is not connected correctly.
→ Connect the connecting cord correctly. - The output change switch is set to "CHARGE."
→ Set the output change switch of the using system to "VCR/CAMERA."
The battery pack is not charged.
- The power plug is disconnected from the wall outlet.
→ Connect the power plug to the wall outlet. - The battery pack is not attached to this unit correctly.
→ Check the direction of the battery pack and reattach the battery pack correctly. - The output change switch is set to "VCR/CAMERA."
→ Set the output change switch of the using system to "CHARGE."
- The first attached battery pack is charging.
→ After charging the first attached battery pack is completed, charging of the other battery pack starts.
- The full charged or nearly full charged battery pack is attached to this unit.
→ Charging skips with the full charged battery pack.
- It is in the temperature protected condition.
→ Use this unit at the recommended temperature range. Even if it was at the recommended temperature range when starting charging, the temperature rises during charging, it will exceed the recommended temperature range and may become in the temperature protected condition.
Power immediately turns off even though there is sufficient battery life, or the indicated battery life differs from the actual battery life.
- Continuation charging or discharging is repeated several times.
→ Recharge the battery pack after using until it has been emptied. The remaining time will be indicated correctly.
Display is not changed.
→ Refer to "Notes on the battery life display."
The CHARGE lamp blinks and "WARNING" is indicated on the display window.
- A battery pack that has not used for long time is charging.
→ The battery pack that has not used for long time may not leave enough the minimum capacity to recognize between this unit and battery pack. In this case, remove the battery pack from this unit and reattach it.
If "WARNING" is indicated after reattaching the battery pack, check through the following chart.
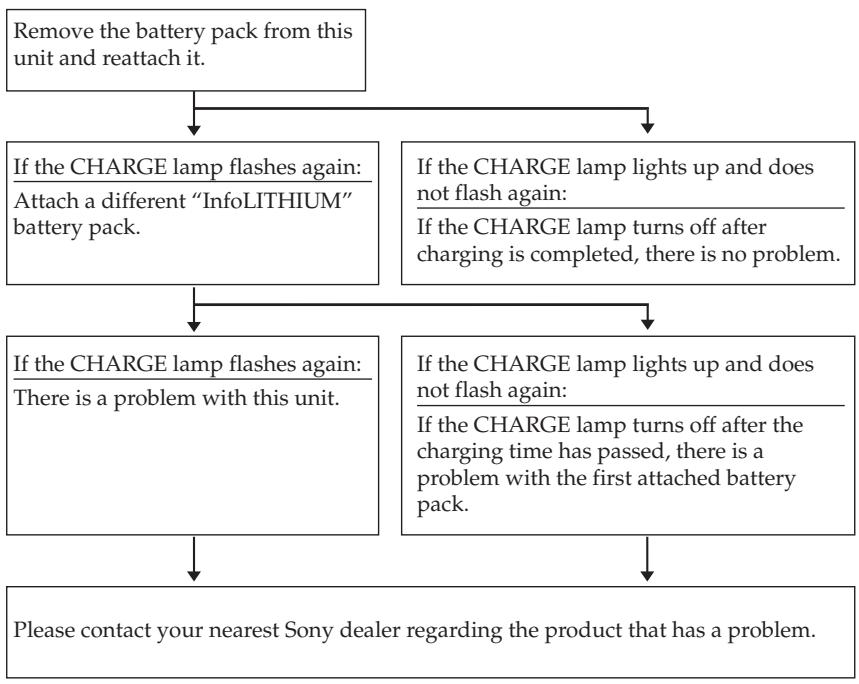
flowchart
graph TD
    A["Remove the battery pack from this unit and reattach it."] --> B{If the CHARGE lamp flashes again: Attach a different "InfoLITHIUM" battery pack.}
    A --> C{If the CHARGE lamp lights up and does not flash again: If the CHARGE lamp turns off after charging is completed, there is no problem.}
    B --> D{If the CHARGE lamp flashes again: There is a problem with this unit.}
    B --> E{If the CHARGE lamp lights up and does not flash again: If the CHARGE lamp turns off after the charging time has passed, there is a problem with the first attached battery pack.}
    D --> F["Please contact your nearest Sony dealer regarding the product that has a problem."]
    E --> F
Specifications
AC adaptor/charger (AC-VQL1BP)
| Power requirements | 100 V - 240 V AC 50/60 Hz |
| Output voltage | DC OUT: 8.4 V 2.0 A (VCR A/VCR B)Battery charge terminal: 8.4 V 2.3 A (BATT A/BATT B) |
| Operating temperature | 0 °C to +40 °C (+32 °F to +104 °F) |
| Storage temperature | -20 °C to +60 °C (-4 °F to +140 °F) |
| Dimensions | Approx. 220 × 61 × 155 mm (w/h/d)(8 3/4 × 2 1/2 × 6 1/8 inches) |
| Mass | Approx. 770 g (1 lb 11 oz.) |
Hot switching inrush current, measured in accordance with European standard EN55103-1: 14 A (230 V)
Included items
AC adaptor/charger (AC-VQL1BP main body)......(1)
Power cord......(1)
Connecting cord (DK-215) ...... (1)
Connecting cord (DK-415) ...... (1)
Set of printed documentation
Design and specifications are subject to change without notice.
AVERTISSEMENT
natural_image
Technical line drawing of a video camera with attached cable and sensor (no text or symbols)natural_image
Line drawing of a digital camera with attached lens and external components (no text or symbols)Remarques
natural_image
Technical line drawing of two electronic device modules labeled A2 and B2, showing internal components without any text or symbols.text_image
Diagram showing two identical 3D printer units with labeled parts and directional arrows indicating assembly or operation.natural_image
Diagram of a mechanical component with a directional arrow indicating movement (no text or symbols present)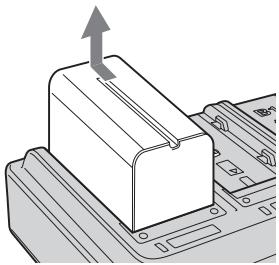
natural_image
Diagram of a mechanical component with an upward arrow indicating motion (no text or symbols present)Remarques
text_image
InfoLITHIUM H I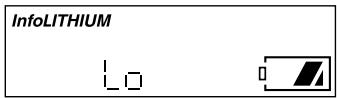
text_image
InfoLITHIUM LoDépannage
natural_image
Illustration of a digital video camera with attached cable and sensor (no text or symbols)natural_image
Line drawing of a digital camera with attached lens and external connectors (no text or symbols)Notas
text_image
Diagram showing two labeled electronic devices (1 and 2) with internal components, likely illustrating a device layout or status change.text_image
Diagram showing two identical electrical circuit breakers with labeled terminals and directional arrows indicating connection points.natural_image
Technical line drawing of a mechanical component with a downward arrow indicating force or motion (no text or symbols)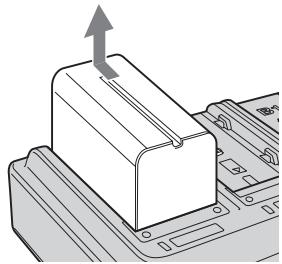
natural_image
Diagram of a mechanical component with an upward arrow indicating motion (no text or symbols present)Notas
natural_image
Technical line drawing of a video camera with attached cable and sensor (no text or symbols)使用连接电缆 DK-215 时

natural_image
Line drawing of a digital camera with lens and attached cable (no text or symbols)注
text_image
Diagram showing two labeled electronic devices (B1 and B2) with internal components and a directional arrow indicating flow or movement.text_image
Diagram showing two identical containers with labeled sections 1 and 2, each containing vertical bars, connected by arrows indicating process flow.natural_image
Diagram of a mechanical component with a downward arrow indicating force or direction (no text or symbols present)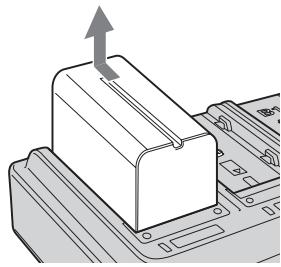
natural_image
Diagram of a mechanical component with an upward arrow indicating motion (no text or symbols present)注
text_image
InfoLITHIUM H I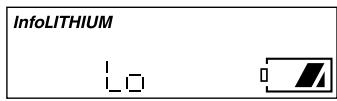
text_image
InfoLITHIUM Lo故障排除
Printed on 70% or more recycled paper using VOC (Volatile Organic Compound)-free vegetable oil based ink.
Printed in Japan