VT-1836 - Vacuum Cleaner Vitek - Free user manual and instructions
Find the device manual for free VT-1836 Vitek in PDF.


| Brand | Vitek |
| Model | VT-1836 |
| Product Type | Cylinder Vacuum Cleaner |
| Dimensions (L x W x H) | 400 x 280 x 240 mm |
| Weight | 4.8 kg |
| Power Supply | 220-240 V, 50 Hz |
| Power Consumption | 1200 W |
| Dust Capacity | 1.5 L |
| Filtration System | HEPA H11 & Washable Pre-Filter |
| Noise Level | 72 dB(A) |
| Cord Length | 5 m |
| Cleaning Type | Dry |
| Dust Bag Type | Bagless |
| Accessories Included | Crevice Tool, Brush Tool, Extension Wand |
| Maintenance | Empty dust container and wash pre-filter regularly |
| Filter Washable | Yes (pre-filter) |
| Overheat Protection | Automatic shut-off |
| Replacement Filter | Available as spare part |
| Repairability | Authorized service centers available |
| Certifications | CE, RoHS |
Frequently Asked Questions - VT-1836 Vitek
User questions about VT-1836 Vitek
0 question about this device. Answer the ones you know or ask your own.
Ask a new question about this device
Download the instructions for your Vacuum Cleaner in PDF format for free! Find your manual VT-1836 - Vitek and take your electronic device back in hand. On this page are published all the documents necessary for the use of your device. VT-1836 by Vitek.
USER MANUAL VT-1836 Vitek
natural_image
Simple line drawing of a pair of hair blisters (no text or symbols)
natural_image
Line drawing of a steam iron (no text or symbols)
natural_image
Line drawing of a vacuum cleaner (no text or symbols)
natural_image
Line drawing of a kitchen feeder (no text or symbols)
natural_image
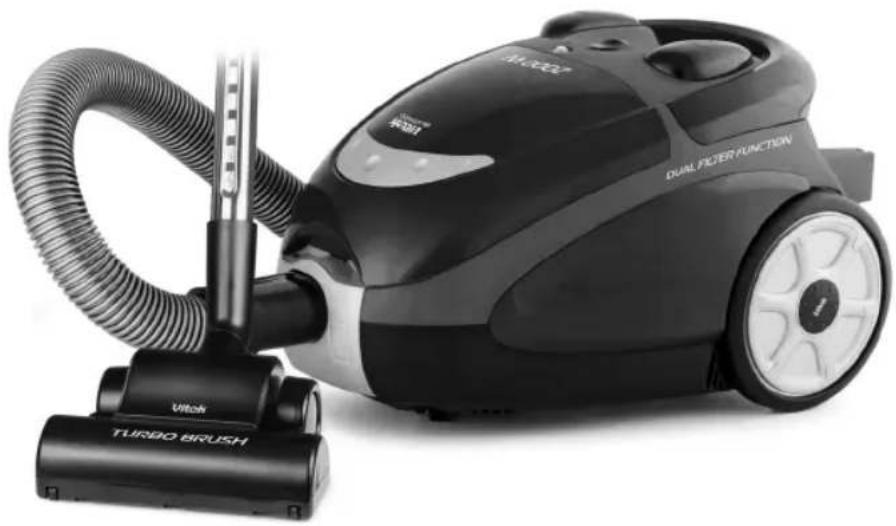
Black and white photo of a DUAL FILTER FUNCTION vacuum cleaner with turbo brush (no visible text or symbols on the device body)MANUAL INSTRUCTION
GB MANUAL INSTRUCTION 5
SCG UPUSTVO ZA UPOTREBU 29
PL INSTRUKCJA OBSŁUGI 33
CZ NÁVOD K POUŽITÍ 37
natural_image
Illustration of a hairdryer head and cable with directional arrows indicating movement (no text or symbols)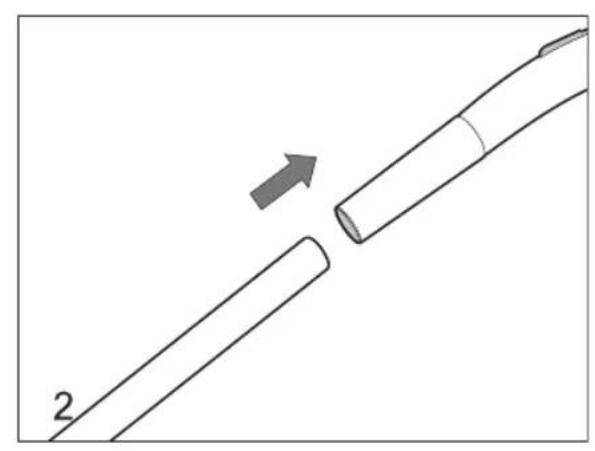
natural_image
Diagram showing two elongated objects with an arrow indicating a process or transformation (no text or symbols)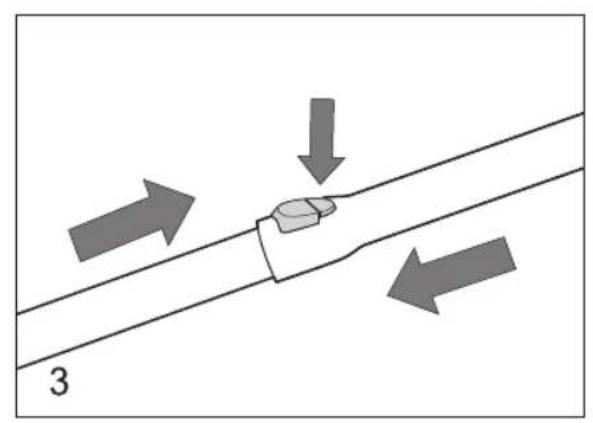
natural_image
Diagram showing a pipe with a small object and directional arrows indicating flow or movement (no text or symbols)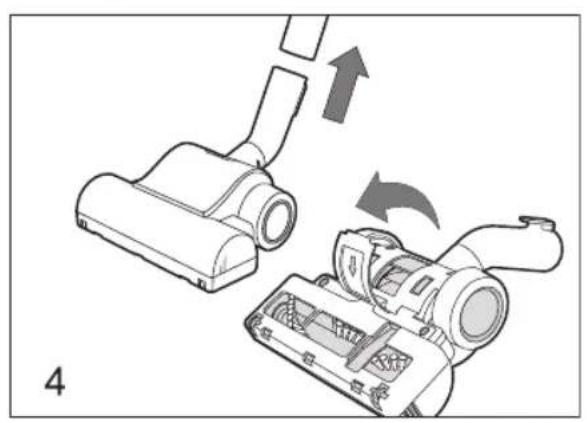
natural_image
Diagram showing a vacuum cleaner being inserted into a device, with arrows indicating the process (no text or symbols present)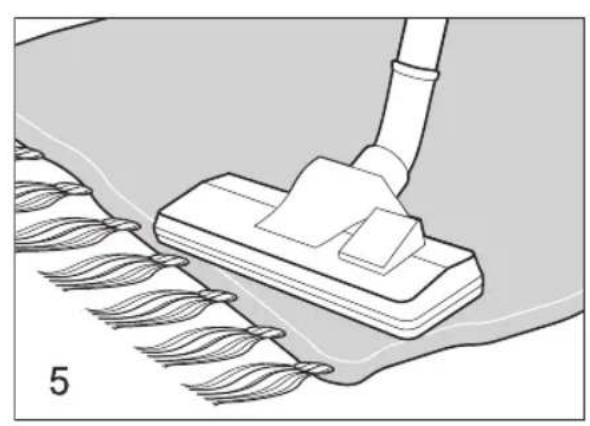
natural_image
Diagram of a cleaning or cleaning process showing a brush applying material to a surface with twine stripes (no text or symbols)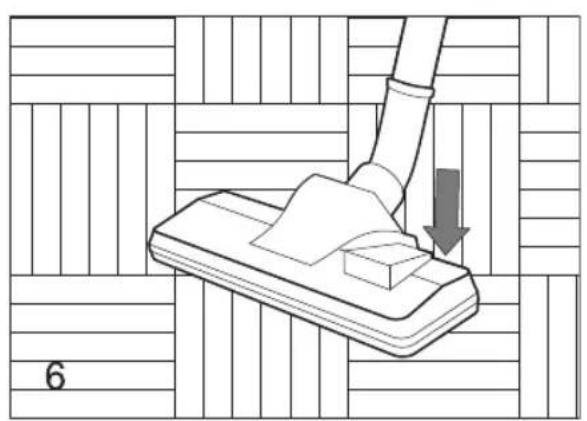
natural_image
Illustration of a hand using a tool to press or lift a block on a tiled floor, with no visible text or symbols.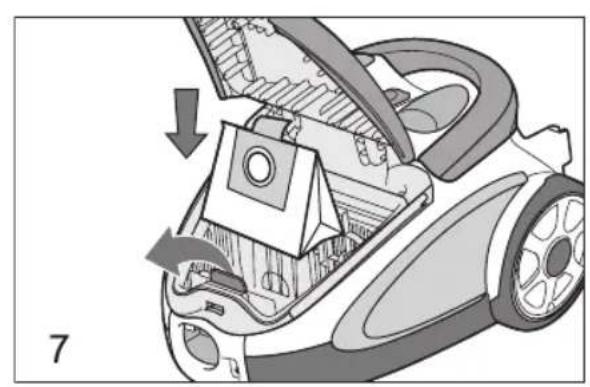
natural_image
Diagram of a car interior showing internal components and a downward arrow indicating motion (no text or symbols)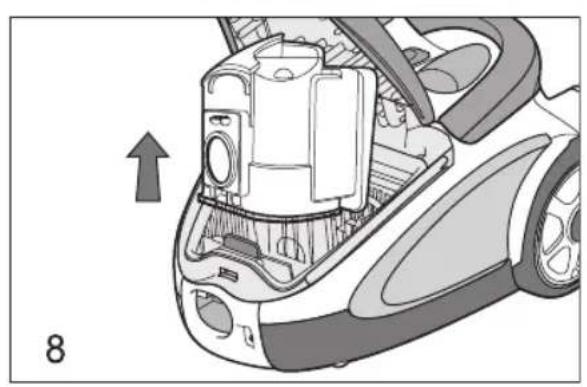
natural_image
Interior view of a car's air conditioner unit showing internal components and airflow direction (no text or symbols)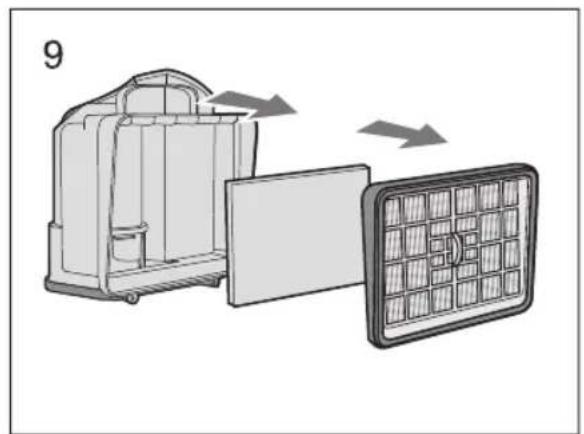
natural_image
Diagram showing a device with internal components and a grid-patterned panel, no text or symbols present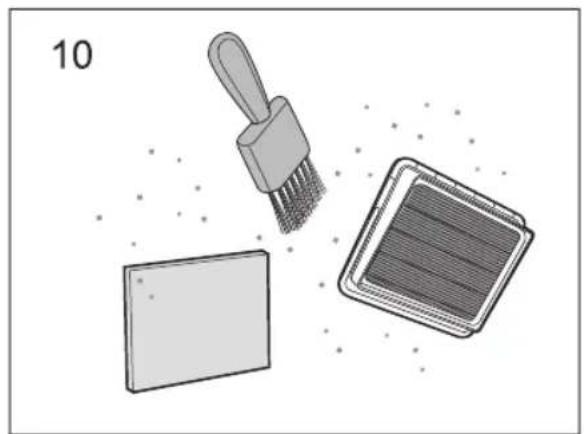
natural_image
Illustration of a brush applying paint to a square plate and a grid-patterned plate, with no text or symbols present.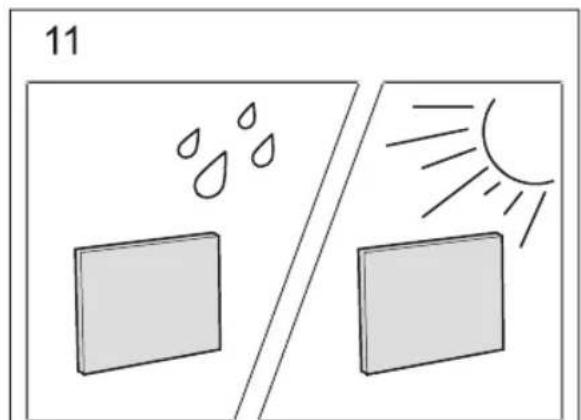
natural_image
Illustration of a kitchen sink with faucet and a washing machine (no text or symbols)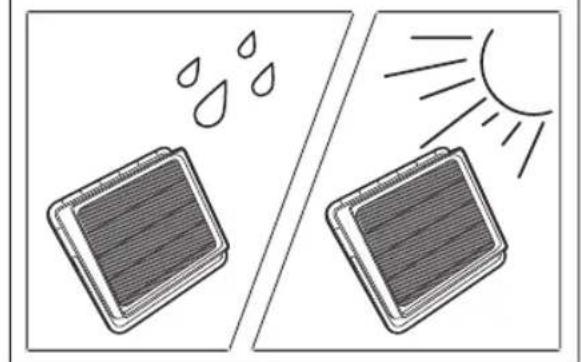
natural_image
Illustration of two solar panels under sunlight, one with raindrops and the other with sun rays (no text or symbols)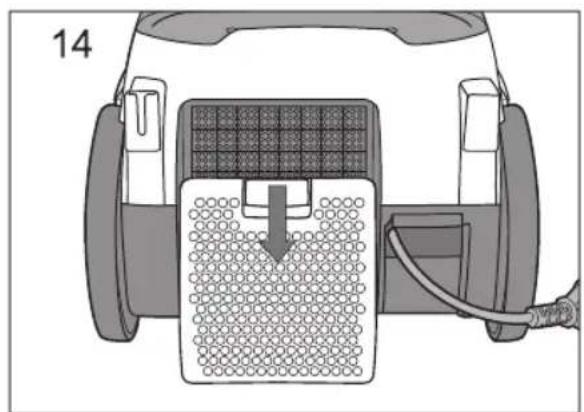
natural_image
Diagram of a vehicle's rear view showing airflow or heat distribution inside a container with a grid-patterned chamber (no text or symbols)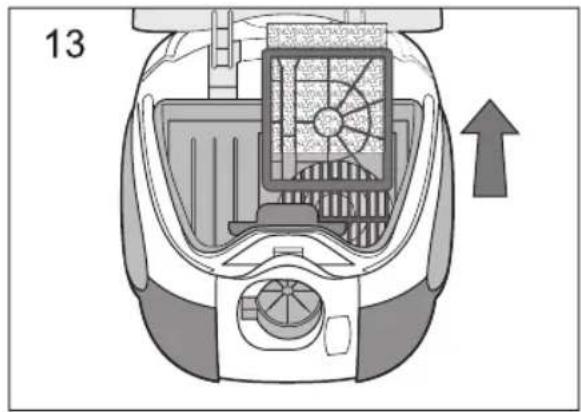
ENGLISH
VACUUM CLEANER
Dear customer!
We thank you for purchasing VITEK household appliance.
Technology, design, functionality and full compliance with quality standards guarantee you reliability and comfort while using our vacuum cleaner without a dust bag.
Our vacuum cleaner is equipped with HEPA filter (the filter is capable of detaining the dust particles of 0,3 mcm and more), installed in the dust-box container. HEPA filters successfully detain such particles as spores, ash, pollen, bacteria and microscopical dust particles.
It helps avoiding irritation of the respiratory organs of children, as well as of those people that suffer from allergy, asthma or especially sensitive to allergens.
DESCRIPTION
- Turbo brush
- Telescopic extension pipe
- Flexible hose handle
- Flexible hose tip
- Flexible hose tip lock button
- Dust box compartment cover
- Cover lock
- Holder of the cloth or paper dust box
- Inlet filter
- Dust box container
- Power cord reel button
- Carrying handle
- Full dust box indicator
- Power control
- On/off button
- Outlet filter cover
- Outlet filter
- Brush location
Description of the dust box container:
- Dust box container handle
- Dust box cover lock button
- Net pre-filter
- Main HEPA-filter
- Bottom cover of the container
-
Crevice nozzle
-
Furniture upholstery cleaning brush
- Small brush
- Floor/carpet brush
- Cloth dust box
- Paper dust box
USER MANUAL
IMPORTANT SAFETY INSTRUCTIONS PLEASE, READ CAREFULLY ALL INSTRUCTIONS BEFORE USING THE VACUUM CLEANER
WARNING
In order to reduce the risk of fire, electric shock and injury:
- Never leave the vacuum cleaner unattended when it is plugged into the power supply socket. Always unplug the vacuum cleaner when not in use and before its maintenance.
- In order to reduce the risk of electric shock, do not use the vacuum cleaner outdoors or on wet surfaces.
- Do not allow children to use the vacuum cleaner as a toy. Pay special attention if there are children or handicapped near to the working appliance.
- Check the power cord regularly. Do not use the appliance if it or its power cord is damaged.
- Address the authorized center for repair or power cord replacement.
- Use this appliance only for household purposes and in accordance with the user manual.
- Do not use power cord for carrying. Do not close the door with the power cord through the doorway. Avoid power cord contact with sharp edges and corners. When using, do not cross the power cord with vacuum cleaner – you might damage it. Keep the power cord away from heated surfaces.
- To disconnect the appliance do not pull the power cord.
To disconnect the appliance, always take up the plug. - Do not touch the plug or the vacuum cleaner with wet hands.
ENGLISH
- Do not block the inlet or the outlet by any objects.
Do not turn the appliance on if its inlet or outlet is blocked. Watch for the filters to be free from dust, fuzz, hair or other rubbish that blocks normal air intake. - Keep hair, free hanging clothes elements, fingers and other parts of the body away from the vacuum cleaner inlet.
- Always turn the vacuum cleaner off by the on/off button prior to unplugging it.
- Be especially careful cleaning the staircase landings.
- Do not use the vacuum cleaner to pick up flammable or combustible liquids (gasoline, cleaning fluids, perfumes, etc.), or use in areas where they may be present.
- Do not pick up burning or smoking cigarettes, matches, or hot ashes, water or other liquids, as well as fine dust, like plaster, concrete, flour or ashes. It may cause serious electric motor damage and such cases are not covered by the warranty.
- Do not use the vacuum cleaner if the: - dust box container or the container filters are not installed; - cloth or paper dust box is not installed.
- While reeling, secure the power cord with your hands, do not let the plug hit the floor.
KEEP THE USER MANUAL HANDY
SAFETY PRECAUTIONS
If the intake power of the vacuum cleaner suddenly dropped when using, turn the vacuum cleaner off at once and check the telescopic extension pipe or the flexible hose for obstruction. Turn the vacuum cleaner off, then unplug it – remove the obstruction and only then continue using it.
- Do not use the vacuum cleaner near heated surfaces, ashtrays, or in the places where flammable or combustible liquids may be present.
- Plug the appliance only with dry hands.
- Prior to usage, pick up sharp objects from the floor to avoid damaging the filters.
- Never pull the power cord to unplug. Always take up the plug.
VACUUM CLEANER ASSEMBLY
Fully unpack the vacuum cleaner and check it for damages. Before plugging the appliance, make sure that the power supply voltage corresponds to the vacuum cleaner operating voltage.
Always turn off and unplug the vacuum cleaner when servicing it or changing the attachment brushes.
1. Attaching and removing the flexible hose (picture 1)
Insert the tip of the flexible hose (4) into the air inlet, located on the front side of the vacuum cleaner.
Insert the flexible hose until you hear a click, confirming the correct attachment.
To remove the flexible hose, press the fixation button (5) and remove the flexible hose.
2. Attachment of the telescopic extension pipe and brushes
- Attach the telescopic extension pipe (2) to the handle of the flexible hose (3) (fig 2). Press the holder button (fig 3) and extend the lower part of the telescopic extension pipe to the required length.
- Choose the required attachment: turbo brush (1), crevice nozzle (24), furniture upholstery cleaning brush (25), small brush (26) or floor/ carpet brush (27) and attach it to the telescopic extension pipe (fig 4).
Using of attachments and brushes Floor/carpet turbo brush (1)
Turbo brush (1) can be used for cleaning of floors and carpets with long or short pile, ideal for animal hair removal from carpets. Cylindrical brush with rigid bristle spins in the airflow. Its bristles effectively “comb” the animal hair out and “sweeps” the motes from the pile of the carpets.
Note: Do not use turbo brush for cleaning of the carpets with long fringes and the pile over 15 mm to avoid damaging the carpet by the brush spin. Do not run the turbo brush over power cords and make sure to turn the vacuum cleaner right after use.
ENGLISH
Crevice nozzle (24)
For cleaning the radiators, chinks, corners and sofa pillows.
Furniture upholstery cleaning brush (25)
This brush is designed to clean cloth surfaces of the soft furniture.
Small brush (26)
This brush is designed for the dust removal of the furniture surfaces.
Pile of the brush protects the polished surfaces of the furniture.
Floor/carpet brush (27) (fig. 5-6)
Turn the switch on the brush to the desired position, depending on the type of the surface to be cleaned.
USAGE INSTRUCTIONS
Extend the power cord to the desired length and plug it into the power supply socket before use. Yellow mark on the power cord warns of the maximum cord length.
Do not extend the power cord beyond the red mark.
Attention:
- Always make sure the vacuum cleaner has the dust box container (10) and its filters (22, 23) installed before turning it on.
-
when using the cloth (28) or paper (29) dust box, make sure it is properly installed.
-
Press the on/off button (15) to turn the vacuum cleaner on.
-
While using, adjust the suction power by the governor (14).
-
When finished using, press the on/off button (15) and unplug the appliance.
-
Press the reeling button (11) to reel the power cord and secure it by your hand to avoid its whipping and damage.
Usage of the cloth or paper dust box (fig 7)
- Open the cover (6), pressing the catch (7).
- Press the dust box holder (8), install the cloth (28) or paper dust box (29), release holder (8), make sure the dust box frame is firmly set.
- Close the cover (6).
Removal of the paper or cloth dust box:
- open the cover (6), press the holder (8) and remove the dust box.
- paper dust box (29) is disposable and is subject to utilization when full
- cloth dust box (28) is nonexpendable. Remove the dust and rubbish from it by sliding the plastic clamp. Then place the clamp back to its place.
SERVICING
1. Removing the dust box container (10) and cleaning it from dust and rubbish (fig 8).
- Turn the vacuum cleaner off and unplug it
- Press the catch (7) and open the cover (6).
- Extract the dust box container (10), taking it by the handle (19).
- Open the lower cover of the dust box container (21), by pressing the lock button (20).
- Remove the dust and rubbish from the dust box container.
Note:
- it is recommended to clean the dust box container after each use of the vacuum cleaner.
- Dust box container filling indicator (13) will light, reminding you to clean the container and filters.
2. Disassembling the dust box container (fig 9).
- Turn the vacuum cleaner off and unplug it, remove the dust box container and clean it from the dust and rubbish, close the lower cover.
- Remove the HEPA-filter (23) from the dust box container (10).
- Turn the net pre-filter counter-clockwise (22) and remove it from the dust box container.
3. Cleaning of the filters (fig 10)
Maintain the filters clean (22, 23), for they define the efficiency of the vacuum cleaner. Clean the filters at the least three, four times a year, and if heavily used – more often. Replace the filters as needed.
- Turn the vacuum cleaner off and unplug it, remove the container (10) and clean it from the dust and rubbish, remove the filters (22, 23) from it.
ENGLISH
- Clean from the dust and rubbish the net prefilter (22) and the main HEPA-filter (23).
- Wash the net pre-filter (22) and the HEPA-filter (23) under the stream of slightly warm water (fig 11). Do not use dishwashing machine for washing of the filters.
- Dry the filters (22, 23). Do not use hair-drier for drying of the filters (fig 11).
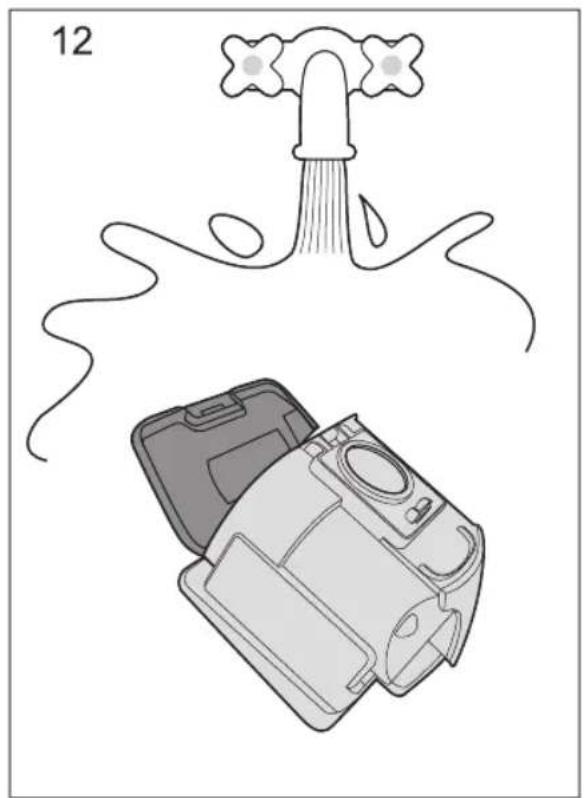
- Wash the dust box container (10) and dry it (fig 12).
Assemble the dust box container:
- Install the net pre-filter (22) and turn it clockwise until it clicks.
- Install the main HEPA-filter (23) into the dust box container (10).
- Press the holder (8) and install the dust box container (10) to its place, close the cover (6).
4. Removal of the inlet filter (9) (fig 13).
- Open the cover (6), pressing the catch (7).
- Remove the dust box container (10).
- Remove the plastic frame with inlet filter (9) upwards.
- Remove the inlet filter (9), wash it in a stream of warm water and dry it carefully.
• Install the inlet filter (9) into the plastic frame and install it to its place.
• Install the container (10), cloth (28) or paper dust box (29) and close the cover (6).
5. Removal of the outlet filter (fig 14).
- Press the catch downwards and remove the outlet filter cover (16).
- Remove the filter (17) and wash it under the stream of water, dry it and install to its place.
• Install the outlet filter cover (16).
6. Cleaning of the turbo brush
Remove the turbo brush from the telescopic pipe, remove the threads and hair reeled on the cylindrical brush.
If the cylindrical brush does not spin during the appliance usage:
- Open the cover from the lower part of the turbo brush and clean the propeller form hair and threads (fig 4).
7. Case of the vacuum cleaner
- Clean the case with a wet cloth.
- Do not permit liquid into the case.
- Do not use solvents or abrasive substances for cleaning.
TECHNICAL CHARACTERISTICS
Power supply: 220 V \~ 50 Hz
Power consumption: 2000 W
Suction power: 450 W
Dust box capacity T-BOX system: 1,1 l
Cloth bag 3,5 l. + 3 paper bags
Specifications subject to change without prior notice.
MINIMUM SERVICE LIFE - 5 YEARS
GUARANTEE
Details regarding guarantee conditions can be obtained from the dealer from whom the appliance was purchased. The bill of sale or receipt must be produced when making any claim under the terms of this guarantee.
CE This product conforms to the EMC-Requirements as laid down by the Council Directive 89/336/EEC and to the Law Voltage Regulation (73/23 EEC)
DEUTSCH
STAUBSAUGER
A production date of the item is indicated in the serial number on the technical data plate. A serial number is an eleven-unit number, with the first four figures indicating the production date. For example, serial number 0606xxxxxxx means that the item was manufactured in June (the sixth month) 2006.
DE
- MANUAL INSTRUCTION
- ENGLISH
- VACUUM CLEANER
- DESCRIPTION
- Description of the dust box container:
- USER MANUAL
- IMPORTANT SAFETY INSTRUCTIONS PLEASE, READ CAREFULLY ALL INSTRUCTIONS BEFORE USING THE VACUUM CLEANER
- WARNING
- KEEP THE USER MANUAL HANDY
- SAFETY PRECAUTIONS
- VACUUM CLEANER ASSEMBLY
- Attaching and removing the flexible hose (picture 1)
- Attachment of the telescopic extension pipe and brushes
- Using of attachments and brushes Floor/carpet turbo brush (1)
- Crevice nozzle (24)
- Furniture upholstery cleaning brush (25)
- Small brush (26)
- Floor/carpet brush (27) (fig. 5-6)
- USAGE INSTRUCTIONS
- Attention:
- Usage of the cloth or paper dust box (fig 7)
- Removal of the paper or cloth dust box:
- SERVICING
- Removing the dust box container (10) and cleaning it from dust and rubbish (fig 8).
- Note:
- Disassembling the dust box container (fig 9).
- Cleaning of the filters (fig 10)
- Assemble the dust box container:
- Removal of the inlet filter (9) (fig 13).
- Removal of the outlet filter (fig 14).
- Cleaning of the turbo brush
- Case of the vacuum cleaner
- TECHNICAL CHARACTERISTICS
- MINIMUM SERVICE LIFE - 5 YEARS
- GUARANTEE
- DEUTSCH
- STAUBSAUGER
- DE
Brand : Vitek
Model : VT-1836
Category : Vacuum Cleaner