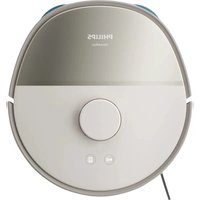
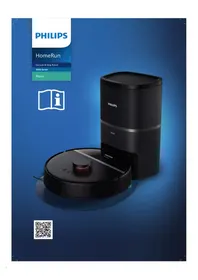
FC8820/01 SMARTPRO ACTIVE - Robot vacuum PHILIPS - Free user manual and instructions
Find the device manual for free FC8820/01 SMARTPRO ACTIVE PHILIPS in PDF.
| Product type | Robot vacuum cleaner |
| Brand | Philips |
| Model | FC8820/01 SMARTPRO ACTIVE |
| Dimensions (approx.) | 34 cm diameter, 9 cm height |
| Weight (approx.) | 3 kg |
| Battery type | Rechargeable Li-ion battery 14.4 V (ref. CP0113) |
| Max runtime | 100 minutes |
| Charging time | 4 hours |
| Compatible floors | Hard floors (parquet, linoleum, tiles) - avoid thick carpets |
| Suction modes | Automatic, Z, random, along walls, spiral, manual via remote control |
| Cleaning system | 3 steps: side brushes + suction + dry wipes (optional) |
| Sensors | 3 drop sensors (stairs), dirt sensor (dust) |
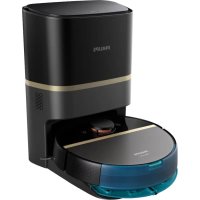
| Docking station | Yes, with scheduling |
| Remote control | Yes, with CR2025 battery included |
| Included accessories | Dry wipe holder, 2 dry wipes, virtual wall unit, pointer (FC8820), adapter, USB cable |
| Side brushes | 2, replaceable (ref. CP0107) |
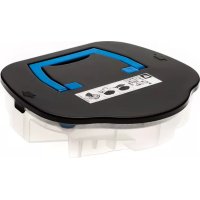
| Filter | Washable (do not clean with water), replaceable (ref. CP0109) |
| Dust bin capacity | Approximately 0.6 L (estimate) |
| Noise level | Approx. 60 dB (estimate) |
| Support and spare parts | www.philips.com/support, Consumer Service |
Frequently Asked Questions - FC8820/01 SMARTPRO ACTIVE PHILIPS
User questions about FC8820/01 SMARTPRO ACTIVE PHILIPS
0 question about this device. Answer the ones you know or ask your own.
Ask a new question about this device
Download the instructions for your Robot vacuum in PDF format for free! Find your manual FC8820/01 SMARTPRO ACTIVE - PHILIPS and take your electronic device back in hand. On this page are published all the documents necessary for the use of your device. FC8820/01 SMARTPRO ACTIVE by PHILIPS.
USER MANUAL FC8820/01 SMARTPRO ACTIVE PHILIPS
Always here to help you
Register your product and get support at
www.philips.com/welcome

FC8820
FC8810
natural_image
Black Philips vacuum cleaner with visible control panel and sensor array (no text or symbols on device body)
flowchart
graph TD
    A["Open Panel 1"] --> B["Grid Pattern 1"]
    B --> C["Open Panel 2"]
    C --> D["Grid Pattern 2"]
    D --> E["Open Panel 3"]
    E --> F["Grid Pattern 3"]
    F --> G["Open Panel 4"]
    G --> H["Grid Pattern 4"]
    H --> I["Open Panel 5"]
    I --> J["Grid Pattern 5"]
    J --> K["Open Panel 6"]
    K --> L["Grid Pattern 6"]
    L --> M["Open Panel 7"]
    M --> N["Grid Pattern 7"]
    N --> O["Open Panel 8"]
    O --> P["Grid Pattern 8"]
    P --> Q["Open Panel 9"]
    Q --> R["Grid Pattern 9"]
    R --> S["Open Panel 10"]
ENGLISH 6
DEUTSCH 26
ESPAÑOL 47
FRANÇAIS 67
ITALIANO 88
PORTUGUÊS 109
NEDERLANDS 130
Introduction
Congratulations on your purchase and welcome to Philips! To fully benefit from the support that Philips offers, register your product at www.philips.com/welcome.
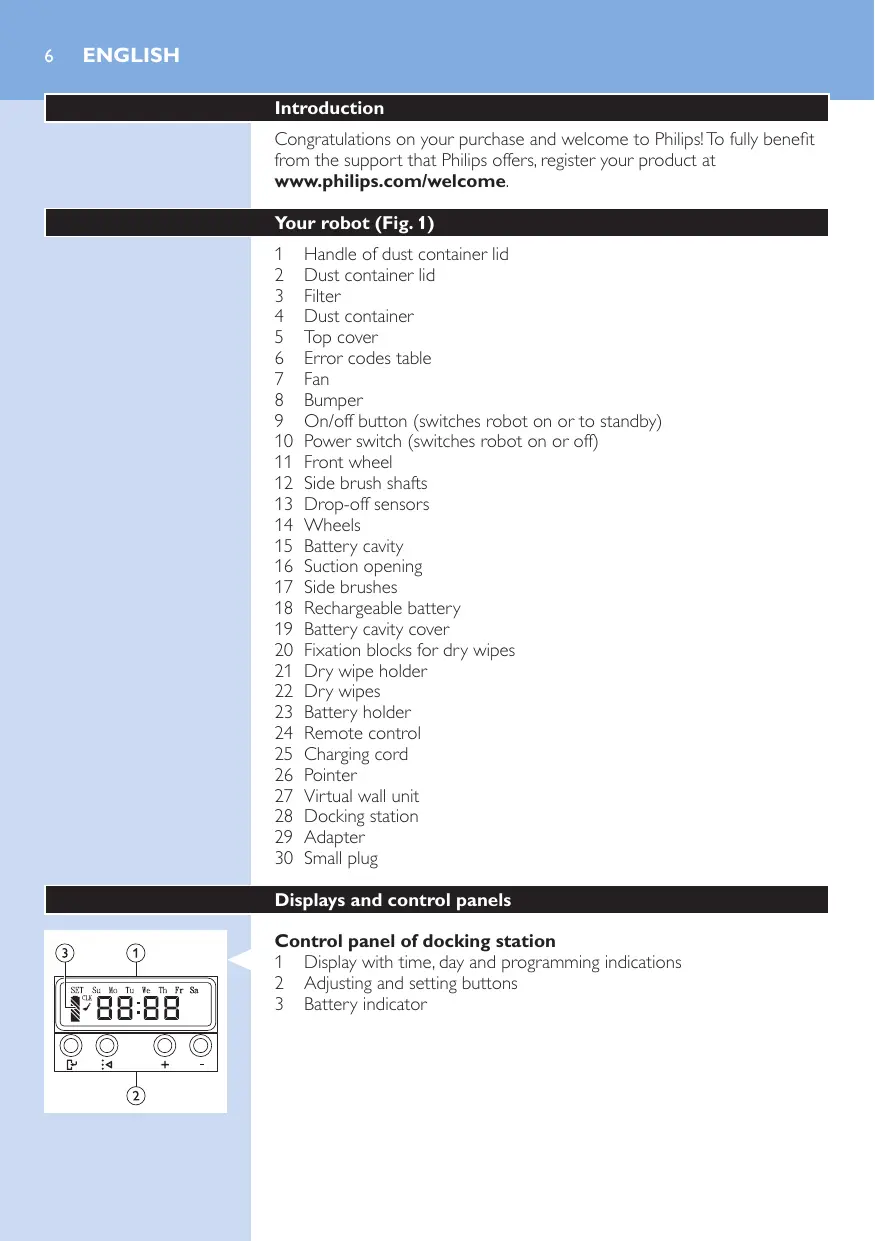
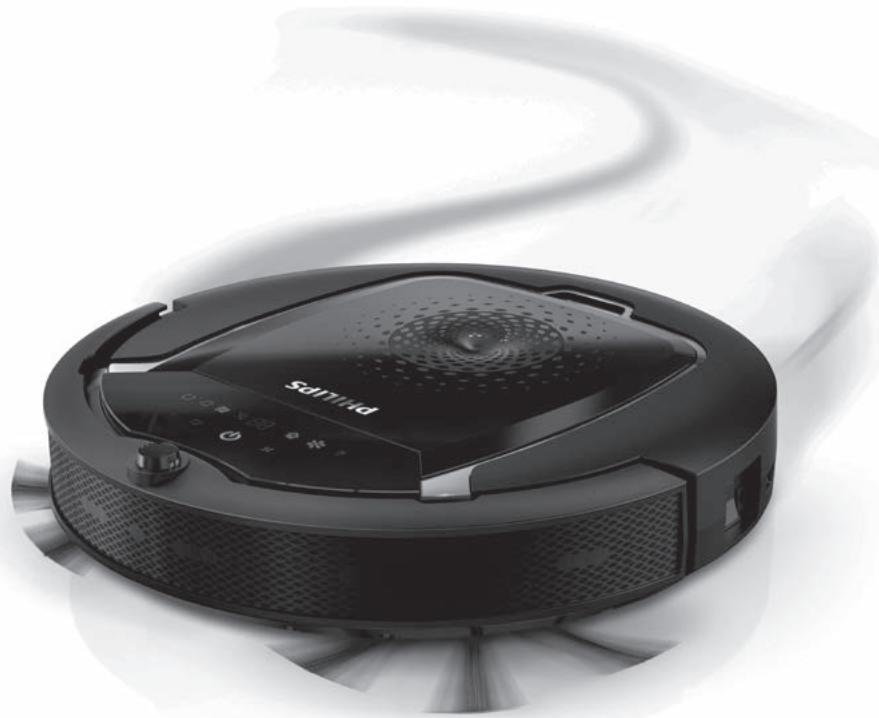
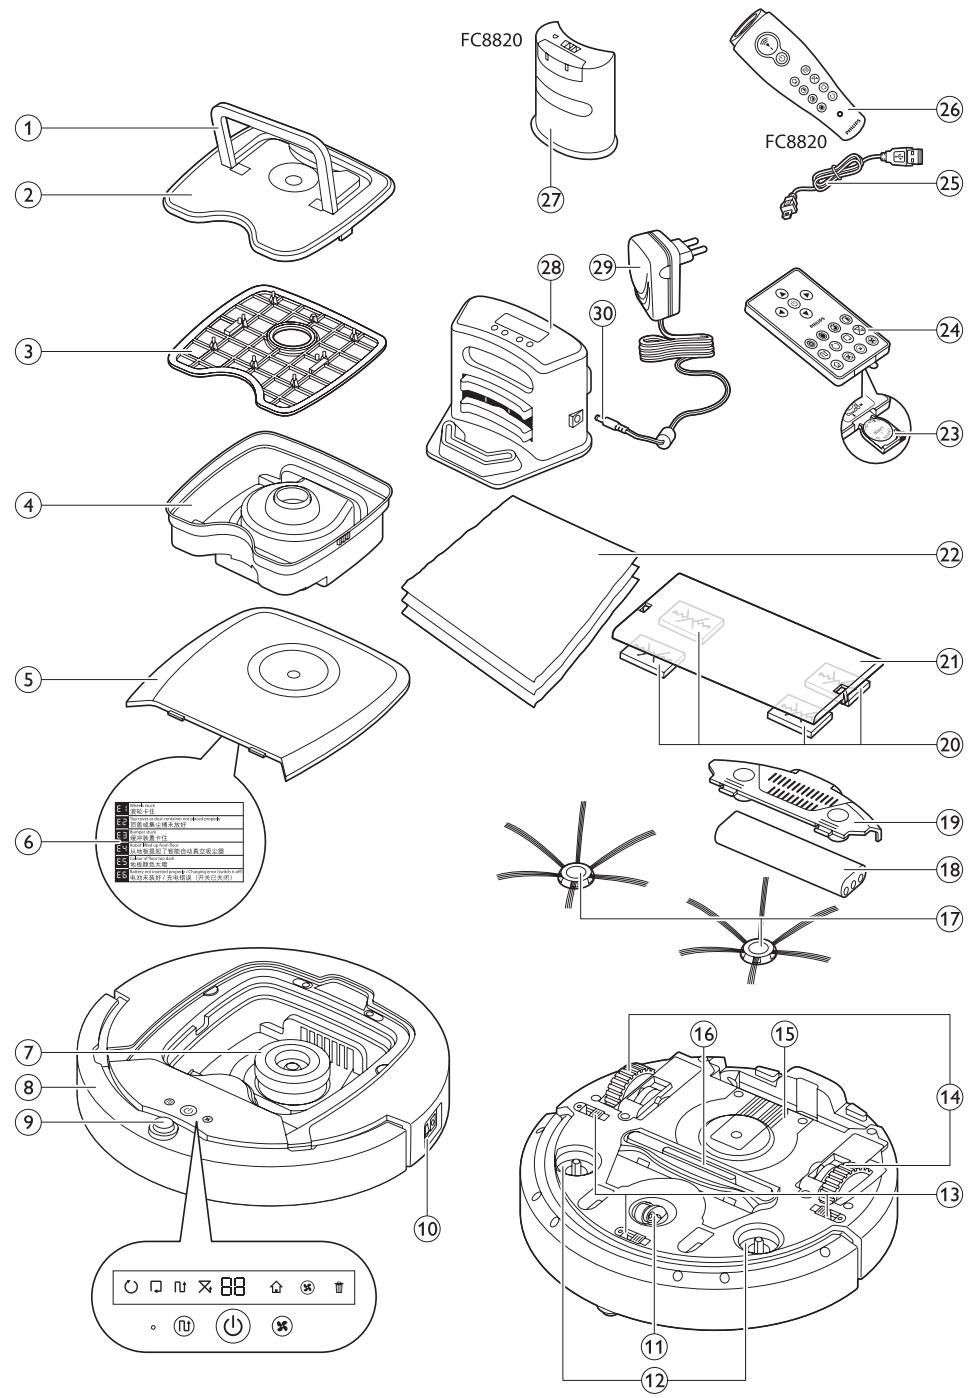
Your robot (Fig. 1)
1 Handle of dust container lid
2 Dust container lid
3 Filter
4 Dust container
5 Top cover
6 Error codes table
7 Fan
8 Bumper
9 On/off button (switches robot on or to standby)
10 Power switch (switches robot on or off)
11 Front wheel
12 Side brush shafts
13 Drop-off sensors
14 Wheels
15 Battery cavity
16 Suction opening
17 Side brushes
18 Rechargeable battery
19 Battery cavity cover
20 Fixation blocks for dry wipes
21 Dry wipe holder
22 Dry wipes
23 Battery holder
24 Remote control
25 Charging cord
26 Pointer
27 Virtual wall unit
28 Docking station
29 Adapter
30 Small plug
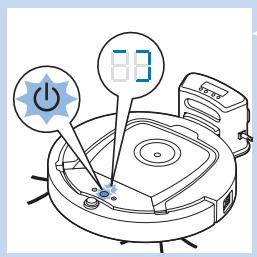
Displays and control panels
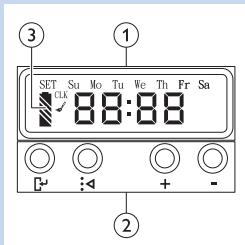
Control panel of docking station
1 Display with time, day and programming indications
2 Adjusting and setting buttons
3 Battery indicator
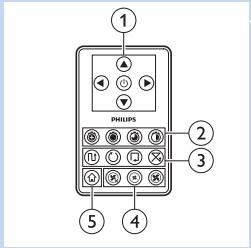
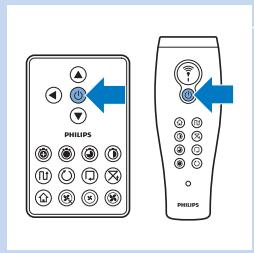
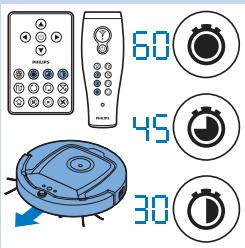
Remote control
1 Navigation buttons and on/off
2 Cleaning time buttons
3 Cleaning mode buttons
4 Fan speed buttons
5 Docking button
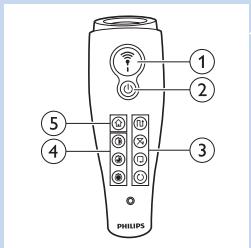
Pointer (FC8820)
1 Pointer button
2 On/off button
3 Cleaning mode buttons
4 Cleaning time buttons
5 Docking button
How your robot works
What your robot cleans
This robot is equipped with features that make it a suitable cleaner to help you clean the floors in your home.
The robot is especially suitable for cleaning hard floors, such as wooden, tiled or linoleum floors. It may experience problems cleaning soft floors, such as carpet or rugs. If you use the robot on a carpet or rug, please stay close by the first time to see if the robot can deal with this type of floor.
The robot also needs supervision when you use it on black and shiny hard floors.
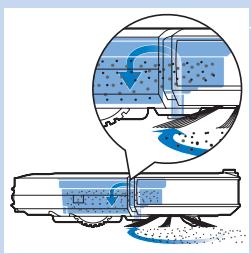
How your robot cleans
natural_image
Isometric illustration of a robotic vacuum cleaner inside a mounting bracket (no text or symbols)Cleaning system
The robot has a 3-stage cleaning system to clean your floors efficiently.
- The two side brushes help the robot clean in corners and along walls. They also help to work dirt loose from the floor.
natural_image
Diagram of a mechanical device emitting blue liquid, showing internal components and flow direction (no text or symbols)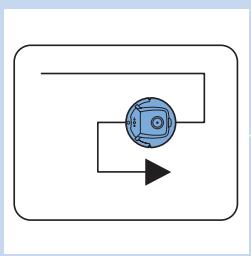
flowchart
graph TD
    A[" "] --> B[" "]
    B --> C[" "]
    C --> A

natural_image
Simple diagram with a blue circular object and two arrows pointing toward it, enclosed in a rounded rectangle (no text or symbols)
natural_image
Simple diagram with a circular component and an arrow, no text or symbols present
flowchart
graph TD
    A["Process Node"] --> B{Cyclical Path}
    B --> C["Downward Arrow"]
    C --> D["End"]
- The suction power of the robot picks up loose dirt and transports it through the suction opening into the dust container.
- The robot comes with a dry wipe holder that allows you to clean your hard floor even more thoroughly with dry wipes.
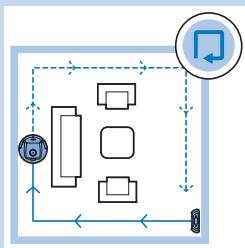
Cleaning patterns
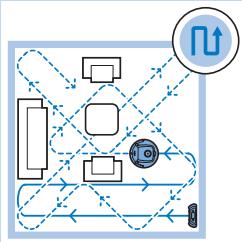
In its auto cleaning mode, the robot uses an automatic sequence of cleaning patterns to clean each area of the room optimally. The cleaning patterns it uses are:
1 Z-pattern or zigzag pattern
2 Random pattern
3 Wall-following pattern
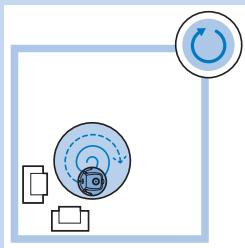
4 Spiral pattern
During auto cleaning, the robot uses these patterns in a fixed sequence:
1 Z-pattern
2 Random pattern
3 Wall-following pattern
4 Spiral pattern
- When the robot has completed this sequence of patterns, it starts moving in Z-pattern again. The robot continues to use this sequence of patterns to clean the room until the rechargeable battery is empty, or until it is switched off manually.
- If the robot detects a particularly dirty area during its cleaning run, it switches to spiral mode and to turbo fan speed to ensure thorough dirt removal.
Note: You can also select each mode individually by pressing the appropriate button on the remote control or pointer (FC8820 only). For more details, see chapter 'Using your robot', section 'Cleaning modes'.
How your robot avoids height differences

- The robot has three drop-off sensors in its bottom. It uses these drop-off sensors to detect and avoid height differences such as staircases.
Note: It is normal for the robot to move slightly over the edge of a height difference, as its front drop-off sensor is located behind the bumper.
Caution: In some cases, the drop-off sensors may not detect a staircase or other height difference in time. Therefore monitor the robot carefully the first few times you use it, and when you operate it near a staircase or another height difference.
Before first use
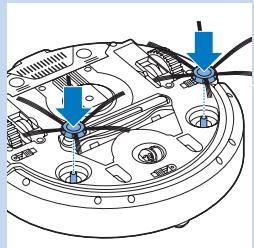
Mounting the side brushes
natural_image
Technical diagram of a mechanical component with arrows indicating assembly or force direction (no text or symbols present)1 Unpack the side brushes and place the robot upside down on a table or on the floor.
2 Push the side brushes onto the shafts on the bottom of the robot.
Note: Make sure you attach the side brushes properly. Press them onto the shaft until you hear them lock into position with a click.
natural_image
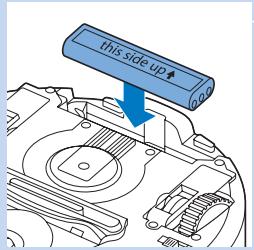
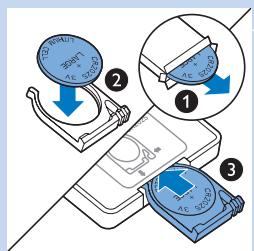
Diagram of a mechanical device with blue arrows pointing to a component (no text or symbols visible)Inserting the rechargeable battery into the robot
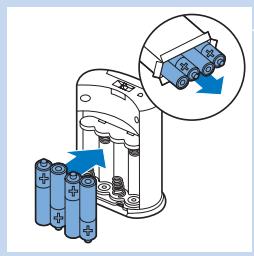
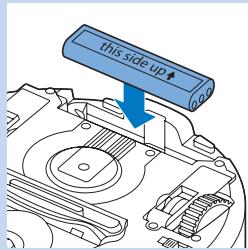
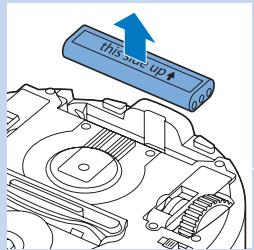
You have to insert the rechargeable battery before use.
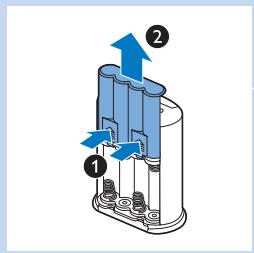
1 Press the ribbed sections on the battery cavity cover to unlock it.
2 Slide the battery cavity cover off the robot.
3 Remove the plastic from the rechargeable battery.

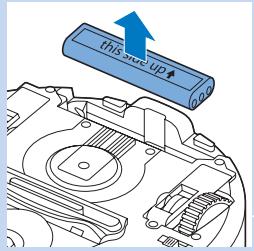
4 Place the rechargeable battery into the battery cavity.
Note: Make sure that the print on the battery points upwards and that the connectors point in the right direction.
5 Slide the battery cavity cover back onto the robot.
Removing the protection tag from the remote control
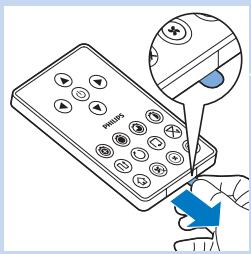
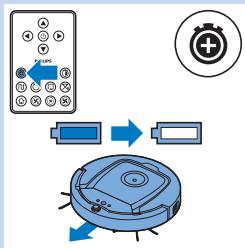
The remote control works on a CR2025 coin-shaped battery. This battery is protected with a protection tag that has to be removed before use.
1 Pull the battery protection tag out of the battery compartment of the remote control.
Now the remote control is ready for use.
Preparing for use
Installing the docking station
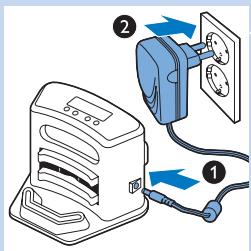
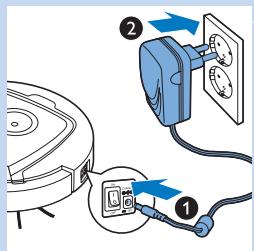
1 Insert the small plug of the adapter into the socket on the docking station (1) and insert the adapter into the wall socket (2). The display of the docking station lights up.
2 Place the docking station on a horizontal, level floor against the wall.
Tip: To ensure the docking station stays firmly in the selected spot, you can fasten it to the wall with screws or with two strips of double-sided tape.
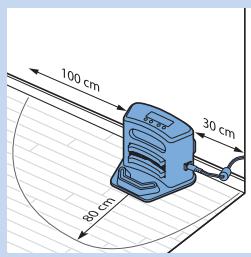
Note: Make sure that there are no obstacles or height differences 80cm in front, 30cm to the right and 100cm to the left of the docking station.
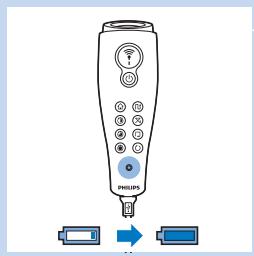
Charging
When you charge the rechargeable battery for the first time and when the rechargeable battery is empty, the charging time is four hours.
Your robot can be charged in two ways:
- On the docking station, either manually or automatically during use;
- By connecting the robot directly to the mains
Note: When the rechargeable battery is fully charged, your robot can clean for up to 100 minutes.
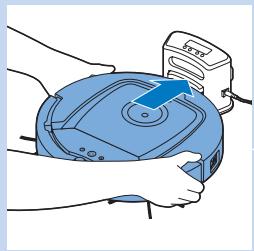
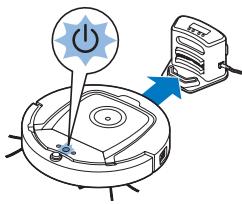
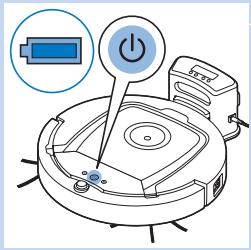
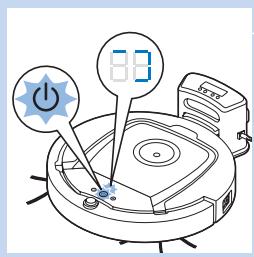
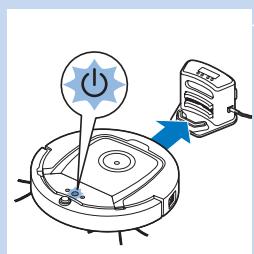
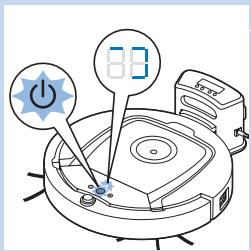
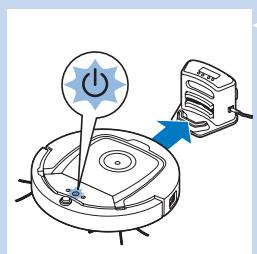
Charging on the docking station
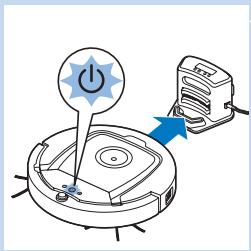
1 Place the robot on the plugged-in docking station.
2 Press the power switch to switch on the robot.
3 The battery indicator on the display of the docking station and the light in the on/off button on the robot start flashing.
Note: Because this is the first time you charge the robot, the display of the robot shows the booting indicator.
4 When the rechargeable battery is fully charged, the battery indicator on the display of the docking station and the light in the on/of button on the robot stop flashing.
Charging automatically during use
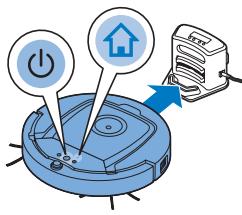
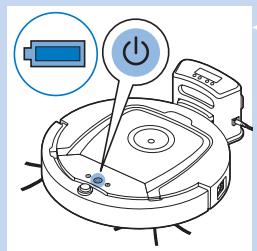
1 When the robot has finished cleaning or when only 15% of the battery power remains, it automatically returns to the docking station to recharge. When the robot returns to the docking station, the light in the on/off button flashes.
2 When the robot is positioned correctly on the docking station, the battery indicator on the display of the docking station starts to flash.
natural_image
Illustration of hands operating a blue robotic device with a mounted sensor (no text or symbols visible)


3 When the rechargeable battery is fully charged, the battery indicator on the display of the docking station and the light in the on/of button on the robot stop flashing.
Note: The robot only returns to the docking station automatically when it started cleaning from the docking station.
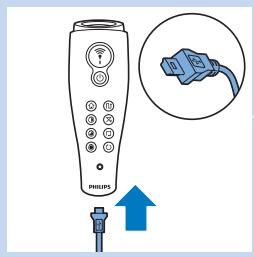
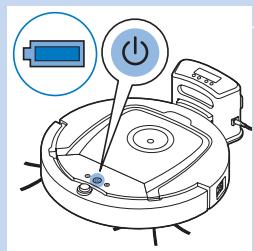
Charging directly from the mains
1 Insert the small plug of the adapter into the socket on the robot (1). Insert the adapter into a wall socket (2).
2 Press the power switch to switch on the robot.
3 When the robot is connected to the mains correctly, the light in the on/off button of the robot starts flashing. This indicates that the rechargeable battery is being charged.
4 When the rechargeable battery is fully charged, the light in the on/off button of the robot stops flashing.
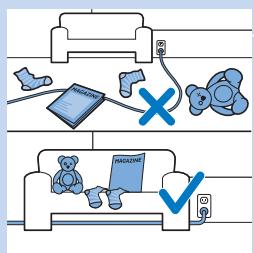
Preparing the room for a cleaning run
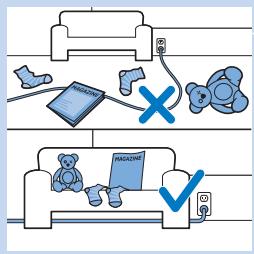
- Before you start the robot on its cleaning run, make sure that you remove all loose and fragile objects from the floor.
Using your robot
Starting and stopping
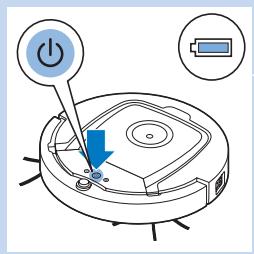
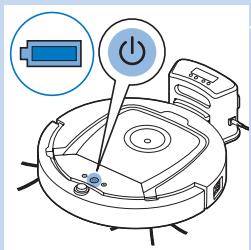
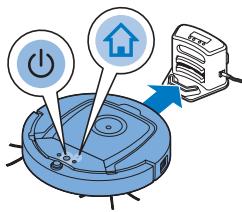
1 Press the on/off button. The light in the on/off button goes on and the robot starts cleaning.
- You can press the on/off button on the robot.
- You can also press the on off button on the remote control or on the pointer (FC8820).
flowchart
graph TD
    A["Camera"] --> B["Modules"]
    B --> C["Control Unit"]
    C --> D["Modules"]
    D --> E["Modules"]
    E --> F["Modules"]
    F --> G["Modules"]
    G --> H["Modules"]
    H --> I["Modules"]
    I --> J["Modules"]
    J --> K["Modules"]
    K --> L["Modules"]
    L --> M["Modules"]
    M --> N["Modules"]
    N --> O["Modules"]
    O --> P["Modules"]
    P --> Q["Modules"]
    Q --> R["Modules"]
    R --> S["Modules"]
    S --> T["Modules"]
    T --> U["Modules"]
    U --> V["Modules"]
    V --> W["Modules"]
    W --> X["Modules"]
    X --> Y["Modules"]
    Y --> Z["Modules"]
flowchart
graph TD
    A["Component 1"] --> B["Component 2"]
    B --> C["Component 3"]
    C --> D["Component 4"]
    D --> E["Component 5"]
    E --> F["Component 6"]
    F --> G["Component 7"]
    G --> H["Component 8"]
    H --> I["Component 9"]
    I --> J["Component 10"]
    J --> K["Component 11"]
    K --> L["Component 12"]
    L --> M["Component 13"]
    M --> N["Component 14"]
    N --> O["Component 15"]
    O --> P["Component 16"]
    P --> Q["Component 17"]
    Q --> R["Component 18"]
    R --> S["Component 19"]
    S --> T["Component 20"]
    T --> U["Component 21"]
    U --> V["Component 22"]
    V --> W["Component 23"]
    W --> X["Component 24"]
    X --> Y["Component 25"]
    Y --> Z["Component 26"]
    Z --> AA["Component 27"]
    AA --> AB["Component 28"]
    AB --> AC["Component 29"]
    AC --> AD["Component 30"]
    AD --> AE["Component 31"]
    AE --> AF["Component 32"]
    AF --> AG["Component 33"]
    AG --> AH["Component 34"]
    AH --> AI["Component 35"]
    AI --> AJ["Component 36"]
    AJ --> AK["Component 37"]
    AK --> AL["Component 38"]
    AL --> AM["Component 39"]
    AM --> AN["Component 40"]
    AN --> AO["Component 41"]
    AO --> AP["Component 42"]
    AP --> AQ["Component 43"]
    AQ --> AR["Component 44"]
    AR --> AS["Component 45"]
    AS --> AT["Component 46"]
    AT --> AU["Component 47"]
    AU --> AV["Component 48"]
    AV --> AW["Component 49"]
    AW --> AX["Component 50"]
2 Unless you press one of the mode buttons, the robot continues cleaning in auto cleaning mode until its battery runs low. In auto cleaning mode it follows repeated sequences of Z-pattern, random, wall-following and spiral movements. For more information on the cleaning modes, see section ‘Cleaning modes’.
3 When the battery runs low, the light in the on/off button starts flashing and the robot returns to the docking station to charge.
4 You can also press the on/off button to interrupt or stop the cleaning run. If you press the on/off button again and there is still enough energy in the rechargeable battery, the robot continues cleaning in the auto cleaning mode.
5 You can also make the robot return to the docking station before the rechargeable battery runs low by pressing the docking button on the remote control or the pointer (FC8820). The docking indicator on the display of the robot lights up and the robot returns to the docking station.
Note: If you did not start the robot from the docking station, it does not return to the docking station automatically when the rechargeable battery runs low. If there is still enough energy in the rechargeable battery, you can press the docking button to make the robot return to the docking station. If the rechargeable battery is completely empty, you have to place the robot on the docking station manually.
Cleaning modes
Next to the auto cleaning mode, this robot has four individual cleaning modes that can each be activated by pressing the appropriate button.
Z-pattern mode
- In Z-pattern mode, the robot cleans by making Z-shaped loops through the room to clean large areas.

flowchart
graph TD
    A["Module 1"] --> B["Camera"]
    B --> C["Processing Unit"]
    C --> D["Output Module"]
    D --> E["Feedback Loop"]
    E --> A
    style A fill:#f9f,stroke:#333
    style B fill:#ccf,stroke:#333
    style C fill:#cfc,stroke:#333
    style D fill:#fcc,stroke:#333
    style E fill:#cff,stroke:#333
flowchart
graph TD
    A["Device"] --> B["Module 1"]
    B --> C["Module 2"]
    C --> D["Module 3"]
    D --> E["Module 4"]
    E --> F["Module 5"]
    F --> G["Module 6"]
    G --> H["Module 7"]
    H --> I["Module 8"]
    I --> J["Module 9"]
    J --> K["Module 10"]
    K --> L["Module 11"]
    L --> M["Module 12"]
    M --> N["Module 13"]
    N --> O["Module 14"]
    O --> P["Module 15"]
    P --> Q["Module 16"]
    Q --> R["Module 17"]
    R --> S["Module 18"]
    S --> T["Module 19"]
    T --> U["Module 20"]
    U --> V["Module 21"]
    V --> W["Module 22"]
    W --> X["Module 23"]
    X --> Y["Module 24"]
    Y --> Z["Module 25"]
    Z --> AA["Module 26"]
    AA --> AB["Module 27"]
    AB --> AC["Module 28"]
    AC --> AD["Module 29"]
    AD --> AE["Module 30"]
    AE --> AF["Module 31"]
    AF --> AG["Module 32"]
    AG --> AH["Module 33"]
    AH --> AI["Module 34"]
    AI --> AJ["Module 35"]
    AJ --> AK["Module 36"]
    AK --> AL["Module 37"]
    AL --> AM["Module 38"]
    AM --> AN["Module 39"]
    AN --> AO["Module 40"]
    AO --> AP["Module 41"]
    AP --> AQ["Module 42"]
    AQ --> AR["Module 43"]
    AR --> AS["Module 44"]
    AS --> AT["Module 45"]
    AT --> AU["Module 46"]
    AU --> AV["Module 47"]
    AV --> AW["Module 48"]
    AW --> AX["Module 49"]
    AX --> AY["Module 50"]
flowchart
graph TD
    A["Reset"] --> B["Lock"]
    B --> C["Reset"]
    C --> D["Reset"]
    D --> E["Reset"]
    E --> F["Reset"]
    F --> G["Reset"]
    G --> H["Reset"]
    H --> I["Reset"]
    I --> J["Reset"]
    J --> K["Reset"]
    K --> L["Reset"]
    L --> M["Reset"]
    M --> N["Reset"]
    N --> O["Reset"]
    O --> P["Reset"]
    P --> Q["Reset"]
    Q --> R["Reset"]
    R --> S["Reset"]
    S --> T["Reset"]
    T --> U["Reset"]
    U --> V["Reset"]
    V --> W["Reset"]
    W --> X["Reset"]
    X --> Y["Reset"]
    Y --> Z["Reset"]
Random mode
- In this mode, the robot cleans the room in a mixed pattern of straight and crisscross movements.
Wall-following mode
- In this mode, the robot follows the walls of the room to give the area alongside the walls an extra clean.
Spiral mode
- In this mode, the robot makes a spiral movement with the fan at turbo speed to clean a dirty area thoroughly.
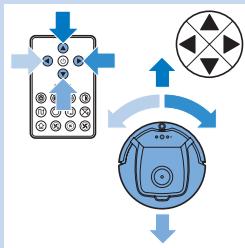
Manual driving
flowchart
graph TD
    A["Remote Control"] --> B["Sensor"]
    B --> C["Robot Device"]
    C --> A
    style A fill:#f9f,stroke:#333
    style B fill:#ccf,stroke:#333
    style C fill:#cfc,stroke:#333
1 Use the arrow buttons above and below and to the left and right of the on/off button on the remote control to navigate the robot through the room.
Note: Do not press the downward arrow when the robot is close to a height difference or a staircase.
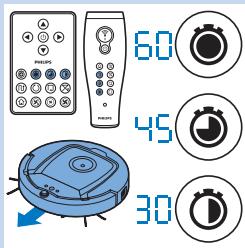
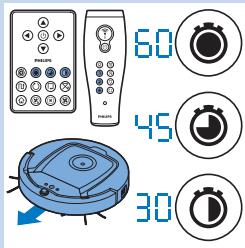
Using the cleaning time buttons

- Press the maximum cleaning time button to make the robot clean in auto cleaning mode until its rechargeable battery runs low. When the robot has finished cleaning, it returns to the docking station automatically if it started from the docking station. If the robot started from another point in the room, press the docking button to send it back to the docking station.
- The other cleaning time buttons allow you to let the robot operate for 60, 45 and 30 minutes respectively. When the cleaning time is finished, the robot automatically returns to the docking station when it started from the docking station. If the robot started from another point in the room, press the docking button to send it back to the docking station.
Using cleaning programs
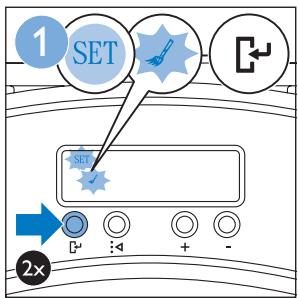
Setting clock time and day
If you want to use cleaning programs, you have to set the clock time and the day of the week on the display of the docking station first. For the pictures that belong to the steps below, see the fold-out pages at the back.
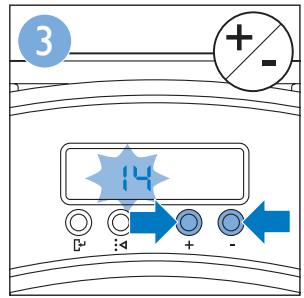
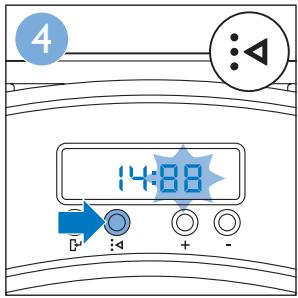
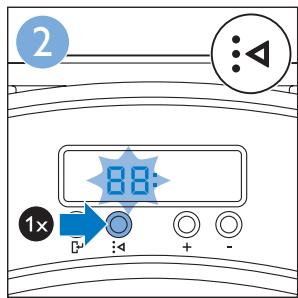
1 Press the set button. The set mode indicator and the clock time indicator start flashing.
2 Press the select button once. The hour indication starts flashing.
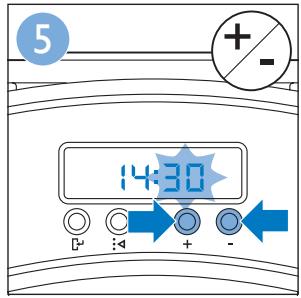
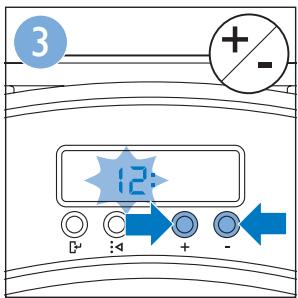
3 Use the + and - buttons on the remote control to set the hour. The set hour appears on the display.
4 Press the select button to confirm the hour set. The minutes indication starts flashing.
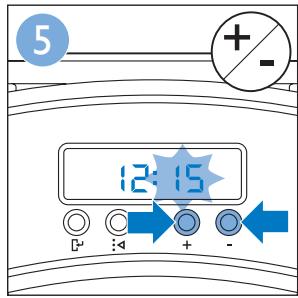
5 Use the + and - buttons on the remote control to set the minutes. The set minutes appear on the display.
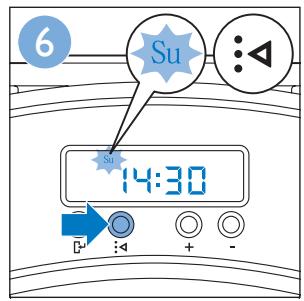
6 Press the select button to confirm the minutes set. The indication 'Su' for Sunday starts flashing.
7 Use the + and - buttons on the remote control to set the current day of the week.
8 Press the select button to confirm the day of the week.
9 Press the set button to confirm the clock time and day of the week setting. Both the set mode indicator and the clock time indicator stop flashing and turn solid.
Programming cleaning times
If you have set the time and the day of the week on the display of the docking station, you can program cleaning times for your robot. For the pictures that belong to the steps below, see the fold-out pages at the back. The programming options available are:
| Program | Indication on display |
| Cleaning every day | All day indications are on |
| Cleaning on weekdays | Mo to Fri indications are on |
| Cleaning on 2 consecutive days | Indications of 2 days are on, e.g. Fri and Sa |
| Cleaning 1 day a week | Indication of selected day is on |
1 Press the set button. The set mode indicator and the cleaning program indicator start flashing.
2 Press the select button once. The hour indication starts flashing.
3 Use the + and - buttons on the remote control to set the hour. The set hour appears on the display.
4 Press the select button to confirm the hour set. The minutes indication starts flashing.
5 Use the + and - buttons on the remote control to set the minutes. The set minutes appear on the display.
6 Press the select button to confirm the minutes set. The indication 'Su' for Sunday starts flashing.
7 Use the + and - buttons on the remote control to toggle between cleaning programs (see the table above for the programming options available).
8 Press the select button to confirm the program selected.
9 Press the set button to confirm the programming. Both the set mode indicator and the cleaning program indicator stop flashing and turn solid.
10 When you have set a cleaning program, the display shows the cleaning program indicator and the day or days selected. If you leave the robot on standby and its rechargeable battery is fully charged, it will start cleaning at the programmed time on the programmed day or days.
Fan speed buttons

You can use the fan speed buttons to increase the fan speed to turbo or to switch off the fan. The default setting is normal fan speed.
1 Turbo fan speed increases the suction power of the robot.
2 You can switch off the fan by pressing this button.
3 Press this button for normal fan speed.
Clap response
- When all icons on the display flash, the robot is malfunctioning. To stop the icons flashing and see what is wrong, clap you hands once. This makes the error code appear on the display. See chapter 'Error codes' for the explanation of what these error codes mean.
Using the dry wipe attachment
The dry wipe attachment is a feature that allows you to clean hard floors with dry wipes.
Preparing the dry wipe attachment for use
1 Turn the robot upside down and place it on the floor or on a table.
2 Place the dry wipe on a table and place the dry wipe attachment on the wipe with its fixation lugs pointing towards you.
3 Fold both ends of the dry wipe around the dry wipe attachment and fasten the dry wipe onto the attachment by pushing the fixation blocks into the recesses.
natural_image
Illustration of a blue solar panel with grid lines and a blue arrow indicating rotation (no text or symbols)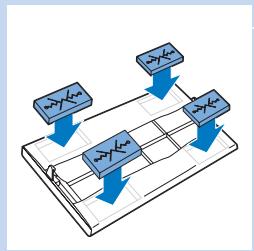
flowchart
graph TD
    A["Input Node 1"] --> C["Processing Grid"]
    B["Input Node 2"] --> C
    D["Input Node 3"] --> C
    C --> E["Output Node 4"]
natural_image
Mechanical assembly diagram showing a blue component inserted into a circular housing with internal components (no text or symbols)
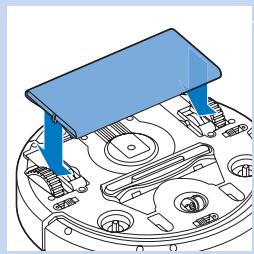
4 Insert the fixation lug of the dry wipe attachment into the opening just behind the wheel on one side of the robot and push until you hear it lock into place with a click. Then repeat these actions on the other side.
5 Turn the robot and place it on the floor on its wheels with the dry wipe attachment touching the floor.
Using the robot with the dry wipe attachment
When the dry wipe attachment is attached, you can use the robot in any mode and on all hard floors. Do not use the dry wipe attachment on carpet or rugs.
Removing the dry wipe attachment
Remove the dry wipe attachment as soon as you have finished wiping the floor.
1 Turn the robot upside down and place it on the floor or on a table.
2 Push one end of the dry wipe attachment towards the wheel on the other side of the robot to release it. Then pull the attachment off the robot.
Using the pointer (FC8820)
Charging the pointer
The pointer has a rechargeable battery that can be charged with the USB cable supplied.
1 Insert the micro-USB plug into the socket in the bottom of the pointer.
2 Insert the USB plug into a USB charger or a USB port on your laptop.
3 The charging light on the pointer lights up solid. Charging takes 30 minutes. When the charging light goes off, the rechargeable battery is fully charged.
natural_image
Illustration of a handheld electronic device with control buttons and a connector icon, no text or symbols present.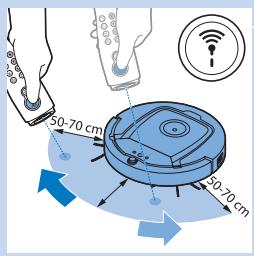
Navigating the robot with the pointer
- When you press and hold the pointer button, the pointer emits a beam of infrared light. With this beam you can drag the robot in a particular direction. As long as you keep the button pressed and keep pointing in the direction you want the robot to move, it continues to move in that direction. When you release the pointer button, the robot starts cleaning in auto cleaning mode.
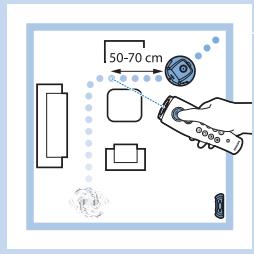
- With the pointer you can send the robot to a specific area in the room to give this area an extra-thorough clean.
Using the virtual wall unit (FC8820)
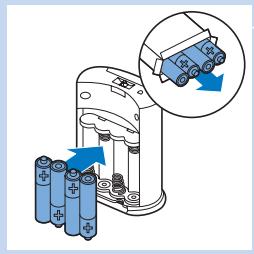
Placing the batteries in the virtual wall unit
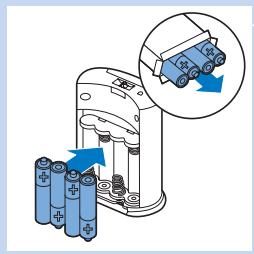
The virtual wall unit operates on four AA batteries.
1 Push the two release tabs at the bottom of the back cover (1) and slide the back cover upwards and off the virtual wall unit (2).
natural_image
Illustration of a battery charger with an inset showing a blue battery being inserted (no text or symbols present)
natural_image
Illustration of a blue mobile phone with a magnified inset showing a small device (no text or symbols)

2 Take four new AA batteries from the pack and insert them into the battery compartment of the virtual wall unit.
Note: Make sure the + and - poles of the batteries point in the right direction.
3 Slide the back cover onto the virtual wall unit again.
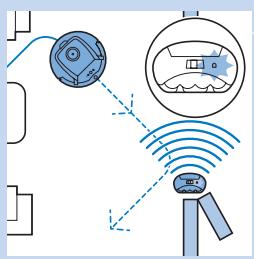
Positioning the virtual wall unit to stop the robot
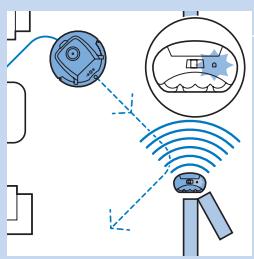
You can use the virtual wall unit to prevent the robot from entering a room or area that you want to keep it out of.
1 Place the unit at a spot beyond which you do not want the robot to go, e.g near an open door to a room that is off-limits to the robot or at the top of a staircase.
2 Switch on the virtual wall unit with the on/off slide on top of the unit.
3 Switch on the robot for a normal cleaning run.
4 When the robot comes too close to the virtual wall unit, the light on the virtual wall unit starts flashing and the virtual wall unit emits a beam of infrared light. This beam of infrared light makes the robot change its course and move away from the virtual wall unit.
Cleaning and maintenance
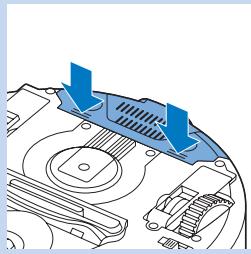
Emptying and cleaning the dust container
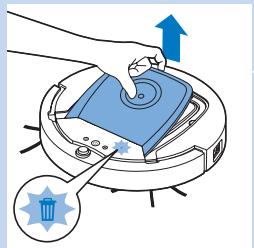
Empty and clean the dust container when the dust container full icon on the display of the robot lights up.
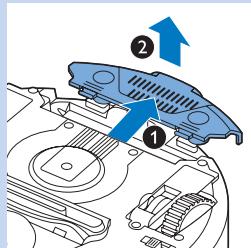
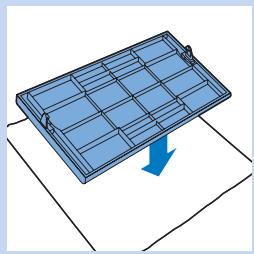
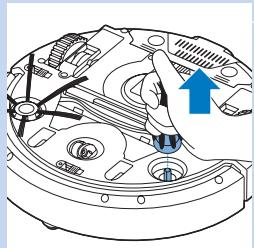
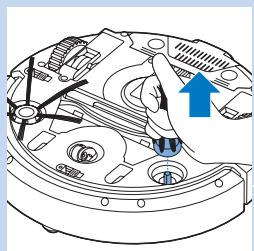
1 Remove the top cover.
Note: Make sure the power switch is in 'off' position.

natural_image
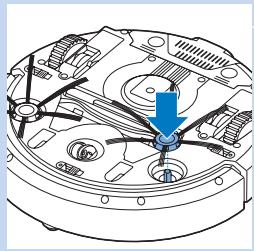
Diagram showing two views of a mechanical device with blue arrows indicating direction (no text or symbols)2 Pull up the handle of the dust container lid and lift the dust container out of the dust container compartment.
Note: When you remove or reinsert the dust container, take care not to damage the blades of the motor fan.
natural_image
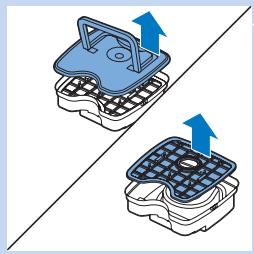
Two identical diagrams showing a blue and black plate with grid patterns, each with an upward arrow indicating rotation or movement (no text or symbols present)3 Carefully lift the lid off the dust container and take out the filter.
natural_image
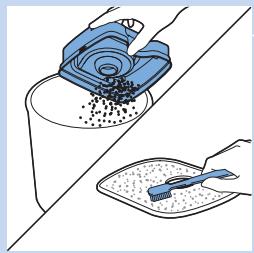
Illustration of a hand pouring liquid into a container and a tray with a blue spatula (no text or symbols)4 Shake the dust container over a dustbin to empty it. Clean the filter and the inside of the dust container with a cloth or a toothbrush with soft bristles. Also clean the suction opening in the bottom of the dust container.
Caution: Do not clean the dust container and the filter with water or in the dishwasher.

natural_image
Two 3D-printed wafers with blue arrows indicating internal components, no text or symbols present5 Put the filter back into the dust container. Then place the lid on the dust container.

6 Put the dust container back into the dust container compartment and put the top cover back onto the robot.
Caution: Always make sure the filter is present inside the dust container. If you use the robot without the filter inside the dust container, the motor will be damaged.
Cleaning sensors, wheels and side brushes
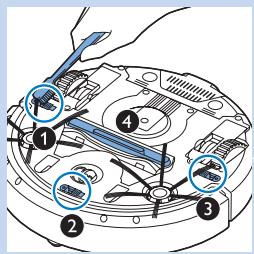
To maintain good cleaning performance, you have to clean the drop-off sensors, the wheels and the side brushes from time to time.
1 Make sure the power switch is in 'off' position.
2 Place the robot upside down on a flat surface.
3 Use a brush with soft bristles (e.g. a toothbrush) to remove dust or fluff from the drop-off sensors. Also check if there is any dirt or fluff blocking the suction opening.
Note: It is important that you clean the drop-off sensors regularly. If the drop-off sensors are dirty, the robot may fail to detect height differences.
4 Use a brush with soft bristles (e.g. a toothbrush) to remove dust or fluff from the front wheel and side wheels.
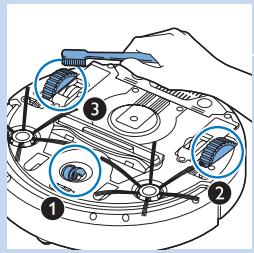
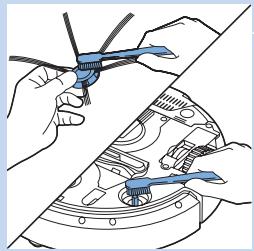
5 To clean the side brushes, grab them by the bristles and pull them off their shafts.
natural_image
Technical line drawing of a mechanical component with no visible text or symbols6 Remove fluff, hairs and threads from the shaft and from the side brush with a soft brush (e.g. a toothbrush) or a cloth.
7 Check the side brushes and the bottom of the robot for any sharp objects that could damage your floor.
natural_image
Illustration of hands using a helicopter to adjust the engine compartment (no text or symbols present)Replacement
You can order spareparts and accessories at
www.shop.philips.com/service or at your Philips dealer. You can also contact the Philips Consumer Care Centre in your country.
Replacing the filter
Replace the filter if it is very dirty or damaged. You can order a new filter under order number CP0109. See 'Emptying and cleaning the dust container' in chapter 'Cleaning and maintenance' for instructions on how to remove the old filter from the dust container and how to place a new filter in the dust container.
Replacing the side brushes
natural_image
Technical diagram of a mechanical assembly with no visible text or symbolsReplace the side brushes after some time to ensure proper cleaning results.
Note: Always replace the side brushes when you notice signs of wear or damage. We also recommend that you replace both side brushes at the same time. You can order spare side brushes as a set under order number CP0107.
1 Make sure that the power switch is in 'off' position.
2 To replace the side brushes, grab the old side brushes by the bristles and pull them off their shafts.
3 Push the new side brushes onto the shafts.
natural_image
Mechanical assembly diagram showing a central component with directional arrows, no visible text or symbolsReplacing the rechargeable battery
Replace the rechargeable battery when you can no longer recharge it or when it runs out of power quickly. You can order a new rechargeable battery under order number CP0113 for FC8820 and order number CP0112 for FC8810.
1 Let the robot run until the rechargeable battery is empty to make sure that the rechargeable battery is completely discharged before you remove it and dispose of it.
2 Push and slide the battery cavity cover off the robot and take out the old rechargeable battery.
3 Place the new rechargeable battery in the battery cavity and slide the battery cavity cover back onto the robot.
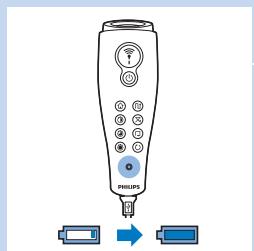
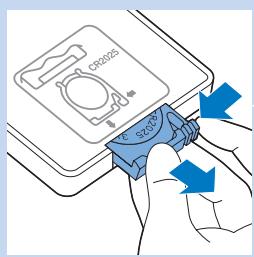
Replacing the battery of the remote control
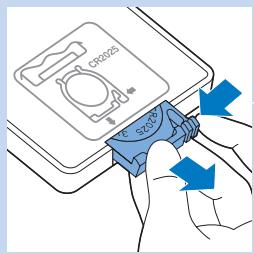
The remote control works on a CR2025 coin-shaped battery. Replace the battery when the robot no longer responds when you press the buttons on the remote control.
1 Hold the remote control upside down. Push the release button on the battery holder and at the same time slide the battery holder out of the remote control.
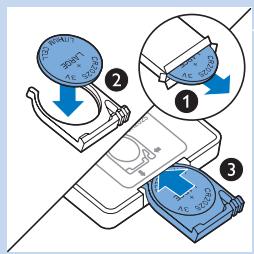
2 Remove the empty battery from the battery holder and place a new battery in the battery holder. Then slide the battery holder back into the remote control.
Ordering new dry wipes
You can order new dry wipes under order number CP0123.
Troubleshooting
This chapter summarises the most common problems you could encounter with this appliance. If you are unable to solve the problem with the information below, visit www.philips.com/support for a list of frequently asked questions or contact the Consumer Care Centre in your country.
| Problem | Cause | Solution |
| The robot does not start cleaning when I press the on/off button. | The rechargeable battery is empty. | Charge the rechargeable battery (see chapter ‘Preparing for use’). |
| The small plug is still inserted in the socket on the robot. | The robot does not work on mains power. It only works on its rechargeable battery.Therefore, always disconnect the adapter from the robot and the mains before use. | |
| E1 is on the display. | One or both wheels are stuck. | Set the on/off switch to ‘off’. Remove the fluff, hair, thread or wire that is caught around the wheel suspension. |
| One or both side brushes are stuck. | Clean the side brushes (see chapter ‘Cleaning and maintenance’). | |
| E2 is on the display. | The top cover is not present or is not closed properly. | When the top cover is not present or is not closed properly, the robot does not work.Place the top cover on the robot properly. |
| E3 is on the display. | The bumper is stuck. | Press the on/off button to stop the robot. Lift the robot so that its bumper comes free. |
| E4 is on the display. | The robot was lifted while it was cleaning. | Press the on/off button to stop the robot. Then press the on/off button again to make the robot resume cleaning normally. |
| E5 is on the display. | The robot is cleaning a dark or black surface, which triggers the drop-off sensors. This causes the robot to move in an unusual pattern. | Press the on/off button and then move the robot to a lighter coloured piece of the floor. If the problem continues to occur on lighter coloured floors, go to www.philips.com/support or contact the Consumer Care Centre in your country. |
| The robot is cleaning a floor that reflects sunlight quite strongly. This triggers the drop-off sensors and causes the robot to move in an unusual pattern. | Close the curtains to block sunlight from entering the room. | |
| E6 is on the display. | The rechargeable battery has not been inserted correctly. | See chapter ‘Before first use’ for instructions on how to insert the rechargeable battery. |
| The power switch is set to ‘off’ while the robot is on the docking station. | Set the power switch to ‘on’. | |
| The robot does not clean properly. | The bristles of one or both side brushes are crooked or bent. | Soak the brush or brushes in warm water for a while. If this does not restore the bristles to their proper shape, replace the side brushes. See chapter ‘Replacement’ for instructions on how to replace the side brushes. |
| The filter in the dust container is dirty. | Clean the filter in the dust container with a cloth or a toothbrush with soft bristles. | |
| If brushing does not help to clean the filter, replace the filter with a new one (see chapter Replacement). | ||
| The suction opening in the bottom of the dust container is clogged. | Clean the suction opening (see chapter ‘Cleaning and maintenance'). | |
| The front wheel is jammed with hair or other dirt. | Clean the front wheel (see chapter ‘Cleaning and maintenance'). | |
| The battery can no longer be charged or runs empty very fast. | The rechargeable battery has reached the end of its life. | Replace the rechargeable battery (see chapter ‘Replacement'). |
| The battery of the remote control runs empty too fast. | Perhaps you did not insert the correct type of battery. | For the remote control, you need a CR2025 coin-shaped battery. If the problem persists, go to www.philips.com/support or contact the Consumer Care Centre in your country. |
Error codes
| Error code | Possible cause | Solution |
| E1 | Wheels stuck | Remove the robot from the obstacle and press the on/off button to resume cleaning. |
| E2 | Top cover or dust container not placed properly | Place the dust container in and the top cover on the robot properly. The error code disappears from the display automatically. |
| E3 | Bumper stuck | Remove the robot from the obstacle. The error code disappears from the display automatically. |
| E4 | Robot lifted up from floor | Put the robot back on the floor to make the error code disappear. |
| E5 | Colour of floor too dark | Place the robot on a lighter area of the floor. Clean the drop-off sensors. |
| E6 | Battery not inserted properly | Read the instructions in ‘Inserting the rechargeable battery into the robot’ in chapter ‘Before first use’. |
| Charging error | Check if the power switch is in ‘on’ position when the robot is on the docking station. |
Einführung
natural_image
Isometric illustration of a robotic vacuum cleaner inside a blue-lit container (no text or symbols)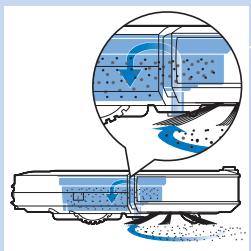
natural_image
Diagram of a car airfoil with airflow visualization showing fluid flow around the hull (no text or symbols)Reinigungssystem
natural_image
Technical line drawing of a mechanical device with multiple ports and mounting holes (no text or symbols)natural_image
Technical diagram of a mechanical component with arrows indicating assembly or force direction (no text or symbols present)natural_image
Technical diagram of a mechanical device with blue arrows indicating directional flow or force (no text or symbols)natural_image
Illustration of hands operating a blue robotic device with a control panel (no text or symbols visible)


natural_image
Illustration of a blue solar panel with a downward arrow indicating compression or disassembly (no text or symbols)natural_image
Mechanical assembly diagram showing a component with springs and housing (no text or labels)
natural_image
Diagram showing battery charging process with arrows indicating rotation and charge accumulation (no text or symbols)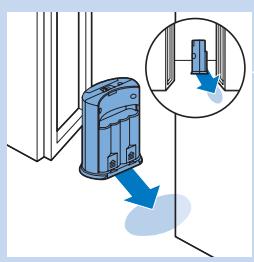
natural_image
Illustration of a blue appliance with a downward arrow pointing to a wall detail (no text or symbols)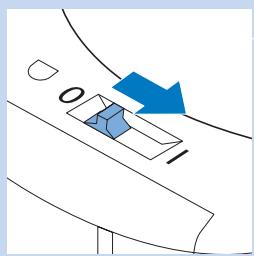


natural_image
Diagram showing two mechanical components with blue arrows indicating motion or force direction (no text or symbols)natural_image
Two identical diagrams showing a blue and black plate with grid patterns, each with an upward arrow indicating rotation or movement (no text or symbols present)natural_image
Illustration showing a hand pouring liquid into a container and a tray with a blue spatula (no text or symbols)natural_image
Two 3D-printed wafers with blue arrows indicating internal components, no text or symbols presentnatural_image
Technical line drawing of a mechanical assembly with no visible text or symbolsnatural_image
Illustration of hands assembling or adjusting a mechanical component with blue components (no text or symbols visible)natural_image
Technical line drawing of a mechanical component with no visible text or symbols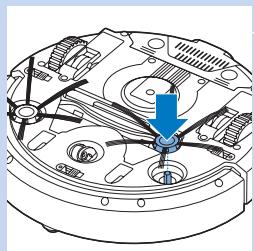
natural_image
Technical diagram of a mechanical assembly with no visible text or symbols
natural_image
Isometric illustration of a robotic vacuum cleaner inside a blue-lit container (no text or symbols)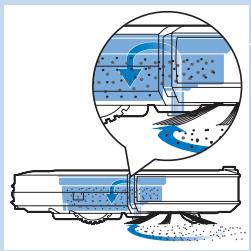
natural_image
Diagram of a car with airflow visualization showing air flow and exhaust (no text or symbols)Sistema de limpieza
natural_image
Simple diagram with a blue circular object and two intersecting lines, no text or symbols present.
natural_image
Simple diagram with a circular component and directional arrow, no text or symbols present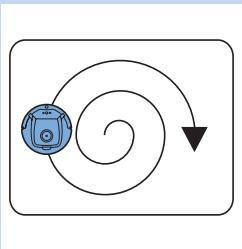
flowchart
graph TD
    A["Device Icon"] --> B{Spiral Path}
    B --> C["Downward Arrow"]
natural_image
Technical line drawing of a mechanical device with multiple ports and mounting holes (no text or symbols)natural_image
Technical diagram of a mechanical assembly with arrows indicating components (no text or symbols present)natural_image
Technical diagram of a mechanical device with blue arrows indicating directional flow or force (no text or symbols)natural_image
Illustration of hands using a robotic vacuum cleaner to clean a blue circular device (no text or symbols visible)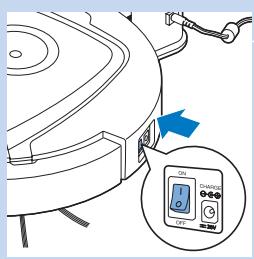
flowchart
graph TD
    A["Remote Device"] --> B["Radio"]
    B --> C["Smart Speaker"]
    C --> D["Smart Phone"]
natural_image
Illustration of a blue solar panel with grid lines and a blue arrow indicating rotation (no text or symbols)natural_image
Mechanical assembly diagram showing a blue component inserted into a circular housing with internal gears and mounting holes (no text or symbols visible)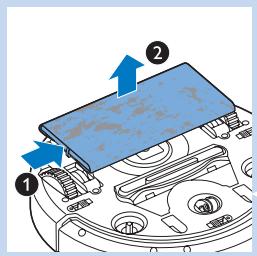

natural_image
Illustration of a battery charger with an inset showing a blue arrow indicating rotation or movement (no text or symbols present)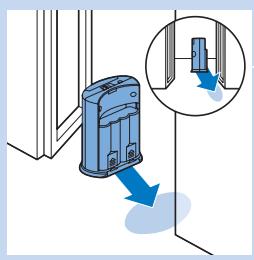
natural_image
Illustration of a blue doorbell with a downward arrow indicating force or damage, next to an inset showing a small blue doorbell with a downward arrow (no text or symbols present)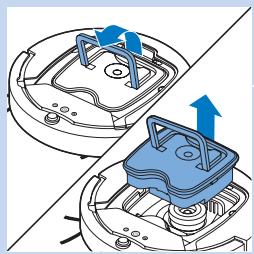
natural_image
Diagram showing two mechanical components with blue arrows indicating motion or force direction (no text or symbols)
natural_image
Two identical 3D-printed battery packs with blue and gray coloring, each showing a side view of a blue upward arrow (no text or symbols)natural_image
Illustration showing a hand pouring liquid into a container and a tray with a blue tool, both without any text or symbols.natural_image
Two blue wafers with grid patterns and directional arrows, no text or symbols present
natural_image
Technical line drawing of a mechanical component with no visible text or symbolsnatural_image
Illustration of hands assembling a mechanical component with blue tools (no text or symbols visible)natural_image
Technical diagram of a mechanical assembly with no visible text or symbolsnatural_image
Technical diagram of a mechanical assembly with no visible text or symbolsnatural_image
Isometric illustration of a robotic vacuum cleaner inside a container with blue mesh and dotted pattern (no text or symbols)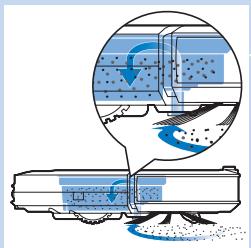
natural_image
Illustration of a train with blue snow patches and a magnified view showing airflow or water flow (no text or symbols)natural_image
Technical line drawing of a mechanical device with multiple ports and mounting holes (no text or symbols)natural_image
Technical diagram of a mechanical assembly with arrows indicating components (no text or symbols present)natural_image
Technical diagram of a mechanical device with blue arrows indicating directional flow or force (no text or symbols)natural_image
Illustration of hands operating a blue robotic device with a control panel (no text or symbols visible)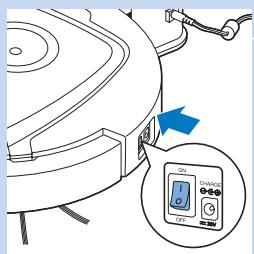


Charge
natural_image
Illustration of a blue solar panel with a downward arrow indicating compression or disassembly (no text or symbols)natural_image
Mechanical assembly diagram showing a blue component inserted into a circular housing with internal components (no text or labels)natural_image
Illustration of a Philips remote control with an attached plug and blue upward arrow (no text or symbols)Charge du pointeur
natural_image
Illustration of a handheld electronic device with control buttons and an arrow pointing to two blue rectangular connectors (no text or symbols)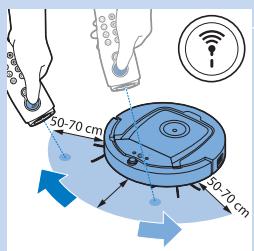
natural_image
Diagram showing battery charging mechanism with arrows indicating rotation and charge accumulation (no text or symbols)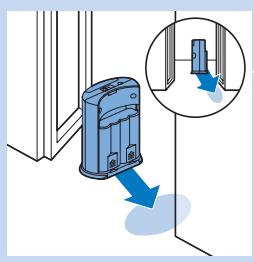
natural_image
Illustration of a blue electrical outlet with a magnified inset showing a component detail (no text or symbols)
natural_image
Diagram showing two mechanical components with blue arrows indicating motion or force direction (no text or symbols)natural_image
Two blue-and-white illustrations of a grid-patterned container with arrows indicating upward movement (no text or symbols)natural_image
Illustration showing a hand pouring liquid into a container and a tray with a blue spatula (no text or symbols)natural_image
Two 3D-printed wafers with blue arrows indicating internal components, no text or symbols presentnatural_image
Technical line drawing of a mechanical component with no visible text or symbolsnatural_image
Illustration of hands using a helicopter to adjust or install a mechanical component (no text or symbols visible)Remplacement
natural_image
Technical diagram of a mechanical assembly with no visible text or symbolsnatural_image
Technical diagram of a mechanical assembly with no visible text or symbolsnatural_image
Isometric illustration of a robotic vacuum cleaner inside a mounting bracket (no text or symbols)Sistema di pulizia
natural_image
Diagram of a mechanical device emitting blue fluid, with an inset showing internal flow or particle distribution (no text or symbols)natural_image
Technical line drawing of a mechanical device with multiple ports and mounting holes (no text or symbols)natural_image
Technical diagram of a mechanical component with arrows indicating assembly or force direction (no text or symbols present)natural_image
Technical diagram of a mechanical device with blue arrows indicating directional flow or force (no text or symbols present)Ricarica sulla docking station
natural_image
Illustration of hands operating a blue robotic device with a mounted sensor (no text or symbols visible)


Ricarica automatica durante l'uso
natural_image
Illustration of a blue solar panel with grid lines and a blue arrow indicating rotation (no text or symbols)natural_image
Mechanical assembly diagram showing a blue component inserted into a circular housing with internal gears and mounting holes (no text or symbols)natural_image
Illustration of a handheld electronic device with control buttons and an arrow pointing to two battery cells (no text or symbols)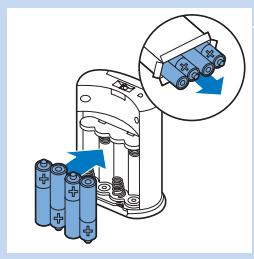
natural_image
Illustration of a battery charger with an inset showing a blue battery being inserted (no text or symbols present)
natural_image
Illustration of a blue door lock mechanism with a magnified inset showing the lock detail (no text or symbols)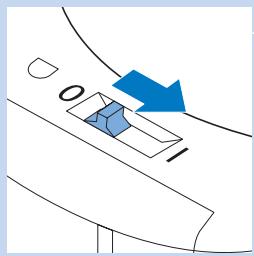
natural_image
Diagram showing two mechanical components with blue arrows indicating motion or force direction (no text or symbols)natural_image
Two identical diagrams showing a blue and gray container with arrows indicating upward motion, no text or symbols present.natural_image
Illustration showing a hand pouring liquid into a container and a spatula over a tray (no text or symbols)natural_image
Diagram showing two blue plastic containers with arrows indicating downward flow, no text or symbols presentnatural_image
Technical diagram of a mechanical assembly with no visible text or symbolsnatural_image
Illustration of hands assembling or repairing a mechanical component with blue tools (no text or symbols visible)natural_image
Technical diagram of a mechanical assembly with no visible text or symbolsnatural_image
Technical diagram of a mechanical assembly with internal components and a blue arrow indicating direction (no text or labels)natural_image
Isometric illustration of a robotic vacuum cleaner inside a transparent chamber (no text or symbols)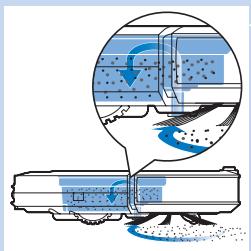
natural_image
Illustration of a train with blue snow patches and a magnified inset showing airflow or water flow (no text or symbols)Sistema de limpeza
flowchart
graph TD
    A["Central Node"] --> B["Arrow Right"]
    B --> C["Arrow Left"]
natural_image
Simple diagram with a blue circular object and two intersecting lines, no text or symbols present.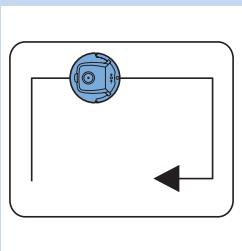
natural_image
Simple diagram with a circular component and directional arrow, no text or symbols present
flowchart
graph TD
    A["Device Icon"] --> B{Spiral Path}
    B --> C["Downward Arrow"]
Padrões de limpeza
natural_image
Technical line drawing of a mechanical device with multiple ports and mounting holes (no text or symbols)natural_image
Technical diagram of a mechanical assembly with arrows indicating components (no text or symbols present)natural_image
Technical diagram of a mechanical device with blue arrows indicating directional flow or force (no text or symbols)natural_image
Illustration of hands operating a blue robotic device with a control panel (no text or symbols visible)


Carregamento

natural_image
Illustration of a blue solar panel with grid lines and a blue downward arrow, placed on a grid plane (no text or symbols)natural_image
Mechanical assembly diagram showing a blue component inserted into a circular housing with gears and mounting holes (no text or symbols)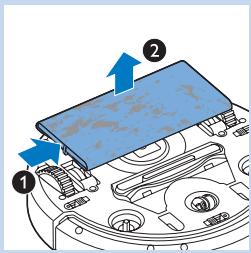
Deslocar o robot com o apontador

natural_image
Diagram of a battery holder with an inset showing a blue component being inserted (no text or symbols present)natural_image
Illustration of a blue industrial device with a magnified inset showing a component (no text or symbols)1 Retire a tampa superior.
natural_image
Diagram showing two mechanical components with blue arrows indicating motion or force direction (no text or symbols)natural_image
Two 3D diagrams showing a grid-patterned device with blue arrows indicating upward motion, no text or symbols present.natural_image
Illustration showing a hand pouring liquid into a container and a tray with granular material, both without any text or symbols.natural_image
Diagram showing two blue wafers with arrows indicating process flow, no text or symbols present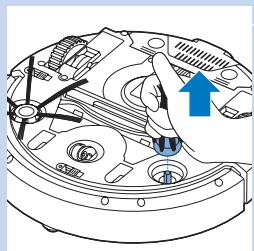
natural_image
Technical diagram of a mechanical component with no visible text or symbols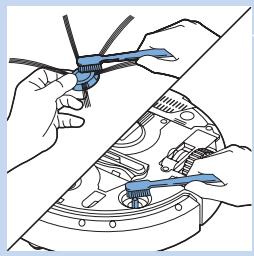
natural_image
Illustration of hands using a small blue tool to adjust or install a mechanical component (no text or symbols visible)natural_image
Technical diagram of a mechanical assembly with no visible text or symbolsSubstitua as escovas laterais ocasionalmente para assegurar bons resultados de limpeza.
natural_image
Technical line drawing of a mechanical assembly with no visible text or symbols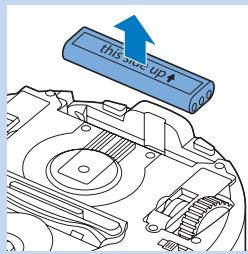
natural_image
Illustration of a robotic vacuum cleaner with blue mesh insulation (no text or symbols)Reinigingssysteem
natural_image
Diagram showing a car being processed with blue liquid and a curved arrow indicating flow (no text or symbols)natural_image
Technical diagram of a mechanical device with labeled components (no text or symbols present)natural_image
Technical diagram of a mechanical assembly with arrows indicating components (no text or labels)natural_image
Technical diagram of a mechanical assembly with blue arrows indicating directional components (no text or labels)natural_image
Illustration of hands using a handheld device to clean or install a blue circular device (no text or symbols visible)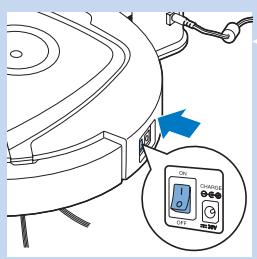
flowchart
graph TD
    A["Device with sensor"] --> B["Battery"]
    B --> C["Sensor"]
    C --> D["Control Panel"]
natural_image
Illustration of a blue grid-patterned panel with a blue arrow pointing downward (no text or symbols)natural_image
Mechanical assembly diagram showing a blue component inserted into a circular housing with internal components (no text or symbols visible)natural_image
Illustration of a handheld electronic device with control buttons and an arrow pointing to two blue rectangular connectors (no text or symbols)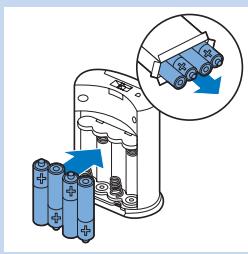
natural_image
Diagram showing battery charging process with arrows indicating charging direction (no text or symbols)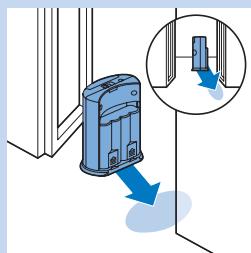
natural_image
Illustration of a blue industrial device with a magnified inset showing a component (no text or symbols)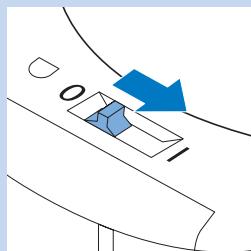
natural_image
Diagram showing a blue arrow pointing to a 3D object on a curved surface, with no readable text or symbols.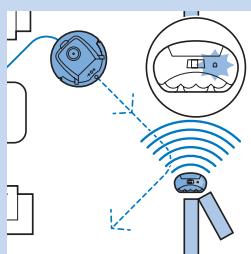
flowchart
graph TD
    A["Device"] --> B["Server"]
    B --> C["Data Bus"]
    C --> D["Server"]
    D --> E["Wireless Signal Path"]
    style A fill:#f9f,stroke:#333
    style B fill:#bbf,stroke:#333
    style C fill:#bfb,stroke:#333
    style D fill:#ffb,stroke:#333
    style E fill:#fff,stroke:#333
natural_image
Diagram showing two mechanical components with blue arrows indicating motion or force direction (no text or symbols)natural_image
Two blue-and-white diagrams showing a grid-patterned container with arrows indicating upward movement (no text or symbols)natural_image
Illustration showing a hand pouring liquid into a container and a tray with a blue spatula (no text or symbols)natural_image
Two 3D-printed wafers with blue arrows indicating internal components, no text or symbols presentnatural_image
Mechanical assembly diagram showing internal components with a blue arrow indicating direction (no text or labels)natural_image
Illustration of hands assembling a mechanical component with blue tools (no text or symbols visible)natural_image
Technical diagram of a mechanical assembly with no visible text or symbolsnatural_image
Technical diagram of a mechanical assembly with internal components and a blue arrow indicating direction (no text or labels)De accu vervangen


natural_image
Diagram showing two open panels with grid patterns and directional arrows, no text or symbols present