Range - Car seat Beemoo - Free user manual and instructions
Find the device manual for free Range Beemoo in PDF.

| Brand | Beemoo |
| Model | Range |
| Product Type | Car Seat |
| Category | Child Car Seat |
| Age Group | From birth to approximately 4 years (Group 0+/1) |
| Weight Range | 0-18 kg (approx.) |
| Installation Method | ISOFIX and top tether, or vehicle seat belt |
| Orientation | Rear-facing for infants, forward-facing for older children |
| Harness Type | 5-point harness |
| Recline Positions | Multiple positions for comfort |
| Headrest Adjustment | Adjustable headrest height |
| Dimensions (L x W x H) | Approximately 45 x 44 x 62 cm |
| Weight (net) | Approximately 6.5 kg |
| Power Source | None (manual operation) |
| Safety Standards | ECE R44/04 or ECE R129 (i-Size) compliant |
| Side Impact Protection | Integrated side impact protection system |
| Fabric Cover | Removable and washable |
| Cleaning Instructions | Hand wash cover with mild soap, air dry. Wipe plastic parts with damp cloth. |
| Spare Parts Availability | Contact Beemoo or authorized retailers for replacement parts |
| Warranty | 2 years (check manufacturer policy) |
Frequently Asked Questions - Range Beemoo
User questions about Range Beemoo
0 question about this device. Answer the ones you know or ask your own.
Ask a new question about this device
Download the instructions for your Car seat in PDF format for free! Find your manual Range - Beemoo and take your electronic device back in hand. On this page are published all the documents necessary for the use of your device. Range by Beemoo.
USER MANUAL Range Beemoo
natural_image
Line drawing of a car comfort seat with adjustable straps and seatbelt (no text or symbols)IMPORTANT!
READ CAREFULLY AND KEEP FOR FUTURE REFERENCE.
Model: Beemoo Raise i-Size
Booster Seat
E4*129R03/04*0111*02
VIKTIGT!
LÄS NOGA OCHBEHÅLL FÖR FRAMTIDA REFERENS.
Modell: Beemoo Raise i-Size
Bältesstol
E4*129R03/04*0111*02
ADVARSEL!
LES N∅YE OG BEHOLD FOR FREMTIDIG REFERANSE.
Modell: Beemoo Raise i-Size
Beltestol
E4*129R03/04*0111*02
ADVARSEL!
LÆS OMHYGGELIGT OG GEM TIL FREMTIDIG REFERENCE.
Model: Beemoo Raise i-Size
Beltestol
E4*129R03/04*0111*02
TÄRKEÄÄ!
LUE OHJEET HUOLELLISESTI JA SÄILYTÄ NE TULEVAA TARVETTA VARTEN.
Read and follow these instructions carefully and keep for future reference.

Suitable for children:
100-150cm
This i-Size car seat can be installed forward-facing with the ISOFIX anchorage in a vehicle equipped with ISOFIX anchorage points, in combination with a 3-point belt, approved to UN/ECE Regulation No.16 or other.
When there is no ISOFIX anchorage available in the vehicle position, this i-Size car seat can be installed forward-facing with a 3-point belt, approved to UN/ECE Regulation No.16 or other.

Forward facing

Height limit: 100-150 cm

Age approx.: 4-12 yrs

UN Regulation no. R129 i-Size
IMPORTANT
READ CAREFULLY AND KEEP THESE INSTRUCTIONS FOR FUTURE REFERENCE
- For the correct usage of the airbag in combination with the seat; read the vehicle manual.
- For the suitable positions in the car, read the vehicle manual.
- Before installing the ISOFIX restraint system, please read the vehicle manual care fully regarding the instruction of ISOFIX fix point.
- When used without the ISOFIX anchorages connected, the seat should always be restrained by the vehicle belt when it is transported without the child.
- When the child exceeds the length limit 150 cm, the child must change to a seat suitable for taller children, normally the vehicle seat.
- This child safety seat is designed for children from 100-150 cm, in the forward-facing direction.
Beemoo

- Any luggage or other objects liable to cause injuries in the event of a collision shall be properly secured.
- Never leave your child unattended in the child restraint system even for a short time.
- The car seat must be replaced if involved in an accident, even if it may look undamaged.
- The child restraint must not be used without the cover.
- The seat cover should not be replaced with any other than the one recommended by the manufacturer since the cover constitutes an integral part of the restraint performance.
- Do not use this child car seat at the home. It has not been designed for home use and should only be used in your car.
- Never use a second-hand product, as you can never be certain what has happened to it.
- Do not use in any configuration not shown in the instructions.
- This child restraint should be securely belted in the vehicle even when not in use.
- Always make sure that any straps holding the seat restraint to the vehicle shall be tight, any straps restraining the child should be adjusted to the child's body, and check that no straps are twisted.
• Ensuring that any lap straps is worn low down, so that the pelvis is firmly engaged. - Do not use any load bearing contact points other than those described in the instructions and marked on the child car seat.
- The child should always be fastened when it is in the vehicle.
- It is dangerous to make any alteration or additions to the device without the approval of the competent authority, and a danger of not following closely the installation instructions provided by the child restraint manufacturer.
- This child car seat is designed for children from 15 to 36kg . Never overload the child car seat more than one child or with other loads.
- If position of the adult safety-belt buckle relative to the main load bearing contact points on the child car seat is unsatisfactory. Please contact the manufacturer if in doubt about this point.
- Before you adjust any movable or adjustable parts of the car seat, you must remove your child from the car seat.
- The child car seat should be kept away from sunlight if the seat is not provided with a textile, otherwise it may be too hot for the child's skin.
- If in doubt, consult either the car seat manufacturer or the retailer.

UK


WARNING
Only suitable if the approved vehicles are fitted with 3-point safety belts, approved to UN/ECE Regulations No. 16 or other equivalent standards.
- Diagonal belt
- Abdominal belt
The vehicle rear seat is the safest position for children under 12 years. This car seat must be installed in a forward-facing direction. Rearward facing and sideward facing is strictly prohibited. Do not install the car seat at the front of the car due to the airbag.
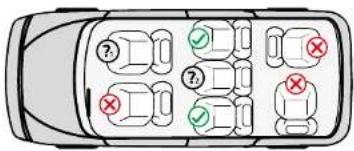

Approved position.

Not recommended position.

Do not install the car seat at the passenger front seat due to the airbag.

Only suitable for three-point seat belt.

WARNING!
Only suitable if the approved vehicles fitted with three-point safety belts, approved to UN/ECE Regulation No.16 or other equivalent standards.
| Direction Size Installation Type | |||
| Forward facing 100-135 | cm ISOFIX + 3-point belt Booster seat | ||
| Forward facing 100-135 | cm 3-point belt Booster seat | ||
| Forward facing 135-150 | cm ISOFIX + 3-point belt Booster cushion | ||
| Forward facing 135-150 | cm 3-point belt Booster cushion | ||
Beemoo

SAFETY NOTICE
WARNING! Please read the instruction manual carefully before use. Incorrect installation could cause serious injury, if in this case, the manufacturer is not responsible. Check whether the car seat is installed correctly. Proper installation is crucial to ensure the safety of children. The fixing of the safety seat must follow the instructions on the belting stickers located on both sides of the seat or the instructions in the manual.
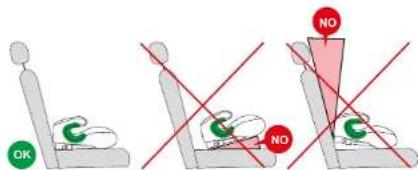
ATTENTION!
Move the front seat as far forward as possible to ensure that the child's legs have a comfortable space for movement.
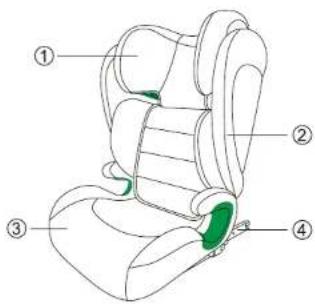
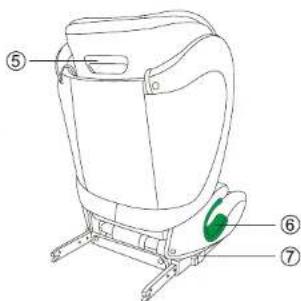
1-Headrest
5-Headrest adjuster
2-Backrest
6-Belt guidance

3-Base
7-ISOFIX button

UK
INSTALLATION ISOFIX – INSTALL BOOSTER SEAT IN THE VEHICLE Applicable to vehicles equipped with ISOFIX system that meets the requirements of ECE R14.
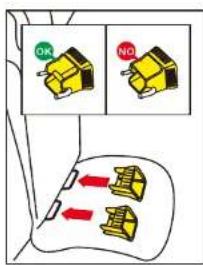
- Find the ISOFIX fixed anchor point on the car and clip the two guide sleeves to the two ISOFIX fixed anchor points of the car to facilitate subsequent installation.
- Press and hold the ISOFIX unlock button while sliding outwards to adjust the ISOFIX connectors on both sides of the car seat to the longest state.
- Connect the ISOFIX connector of the car seat to the ISOFIX anchor point of the car until you hear a "click"-sound.
Tip: For the location of the ISOFIX fixed anchor point, please check your car user manual or contact your car manufacturer or local dealer.
Beemoo

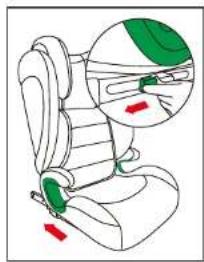
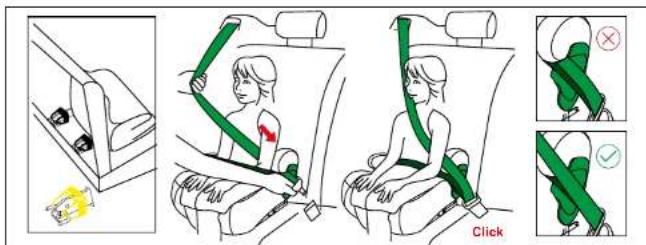
INSTALLATION ISOFIX + 3-POINT SAFETY BELT
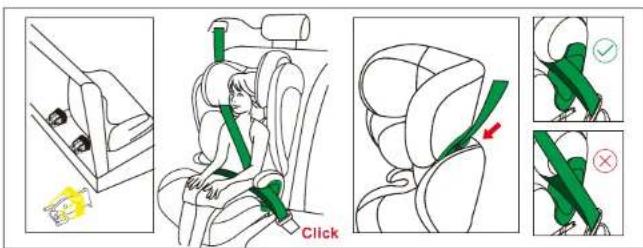
- Follow above steps for the ISOFIX installation.
- Let the child sit in the car seat and adjust the length of the safety belt guide hook according to the child's height.
- Pull out the cars three-point safety belt. The shoulder belt of the safety belt should pass through the guide hook and the top of the armrest, and the abdominal belt of the safety belt should pass through the guide grooves on both sides of the car seat and is fixed to the car buckle. Hear a "click"-sound to ensure that the buckle is firmly locked.
- Adjust and tighten the car seat belt according to the size of the child. Check that the belt is not turned over or twisted in any way, and make sure that the position of the waist blet is as low as possible, so that the child's pelvis can be better fixed.
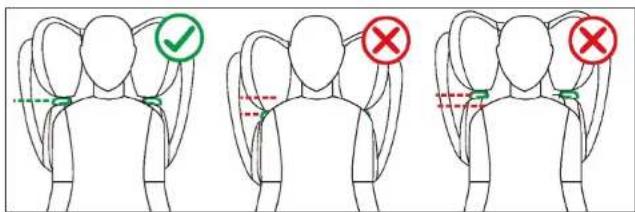
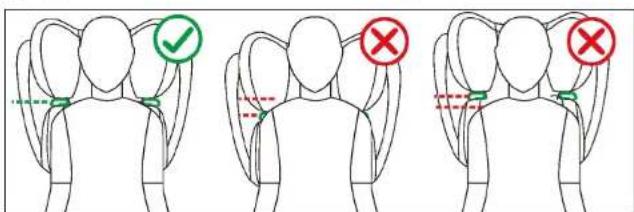
NOTE! Make sure that the shoulder belt is level with your child's shoulder.
UK UK
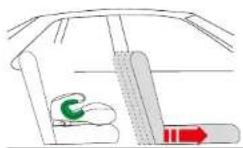
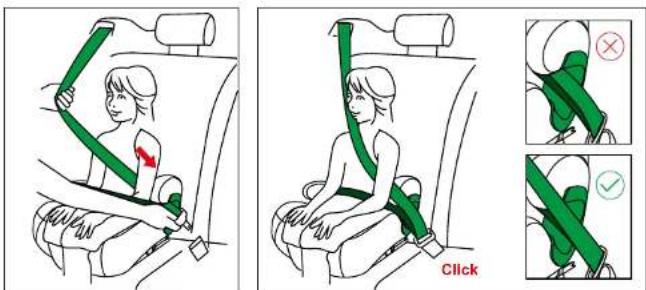
INSTALLATION 3-POINT SAFETY BELT

-
Ensure that the ISOFIX connector of the car seat is retracted into the base. For the suitable positions in the car, read the vehicle manual.
-
Let the child sit in the car seat and adjust the length of the safety belt guide hook according to the child's height.
-
Pull out the cars three-point safety belt. The shoulder belt of the safety belt should pass through the guide hook and the top of the armrest, and the abdominal belt of the safety belt should pass through the guide grooves on both sides of the car seat and is fixed to the car buckle. Hear a "click"-sound to ensure that the buckle is firmly locked.
-
Adjust and tighten the car seat belt according to the size of the child. Check that the belt is not turned over or twisted in any way, and make sure that the position of the waist blet is as low as possible, so that the child's pelvis can be better fixed.
WARNING! When used without the ISOFIX anchorages connected, the seat should always be restrained by the vehicle belt when it is transported without the child.
NOTE! Make sure that the shoulder belt is level with your child's shoulder.
Beemoo

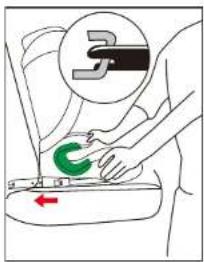
CAR SEAT USED AS UNIVERSAL BOOSTER CUSHION
When the child exceeds the length limit 135 cm, the child must change to a seat suitable for longer children. By removing the backrest and using the car seat as a booster cushion, it can be used until the child is 150 cm.
When the child exceeds the length limit 150 cm, the child must change to a seat suitable for longer children, normally the vehicle seat.
When using the car seat as a booster seat without the backrest, please make sure to fold the flap on the back of the seat underneath the seat cover.
natural_image
Three-step line drawing showing a car seat with green adjustment knobs, no text or symbols present
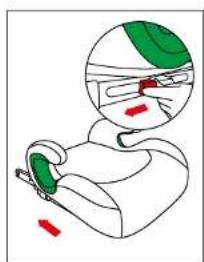
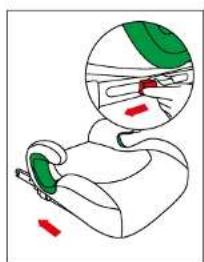
INSTALLATION ISOFIX - INSTALL BOOSTER CUSHION IN THE VEHICLE
Applicable to vehicles equipped with ISOFIX system that meets the requirements of ECE R14.

natural_image
Illustration of a person wearing a helmet with green and red markings, no text or symbols present
- Find the ISOFIX fixed anchorage point on the car and clip the two guide sleeves to the two ISOFIX fixed anchorage points of the car to facilitate subsequent installation.
- Press and hold the ISOFIX unlock button while sliding outwards to adjust the ISOFIX connectors on both sides of the anchorage seat to the longest state.
- Connect the ISOFIX connector of the anchorage seat to the ISOFIX anchorage point of the car until you hear a "click" sound.
Tip: For the location of the ISOFIX fixed anchorage point, please check your car's user manual or contact your car manufacturer or local dealer.
Beemoo
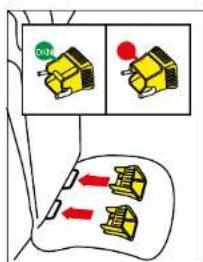
BUCKLE UP WITH ISOFIX + 3-POINT SAFETY BELT
Applicable to vehicles equipped with ISOFIX system that meets the requirements of ECE R14.
- Follow above steps for the ISOFIX installation.
- Let the child sit in the car seat. Pull out the cars three-point safety belt. The shoulder strap of the safety belt should be placed on top of the armrest, and the abdominal strap of the safety belt should pass through the guide grooves on both sides of the car seat and is fixed to the car buckle. Hear a "click"-sound to ensure that the buckle is firmly locked.
- Adjust and tighten the car seat belt according to the size of the child. Check that the belt is not turned over or twisted in any way, and make sure that the position of the waist blet is as low as possible, so that the child's pelvis can be better fixed.
UK UK

INSTALLATION 3-POINT SAFETY BELT DETACH ISOFIX FROM CAR SEAT
- Ensure that the ISOFIX connector of the car seat is retracted into the base. For the suitable positions in the car, read the vehicle manual.
- Let the child sit in the car seat. Pull out the cars three-point safety belt. The should der strap of the safety belt should be placed on top of the armrest, and the abdominal strap of the safety belt should pass through the guide grooves on both sides of the car seat and is fixed to the car buckle. Hear a "click"-sound to ensure that the buckle is firmly locked.
- Adjust and tighten the car seat belt according to the size of the child. Check that the belt is not turned over or twisted in any way, and make sure that the position of the waist blet is as low as possible, so that the child's pelvis can be better fixed.
- Press and hold the ISOFIX unlock switch on both sides at the same time. The ISOFIX lock indicator turns red, which means it is unlocked.
- Pull the car seat outwards to remove it.
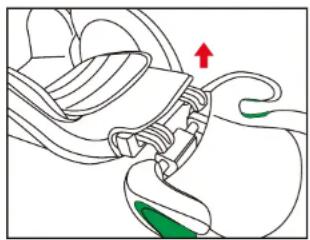
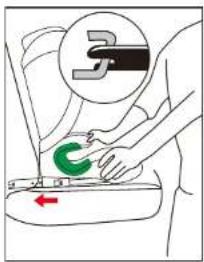
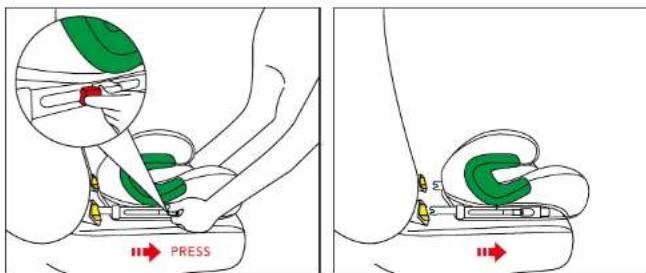
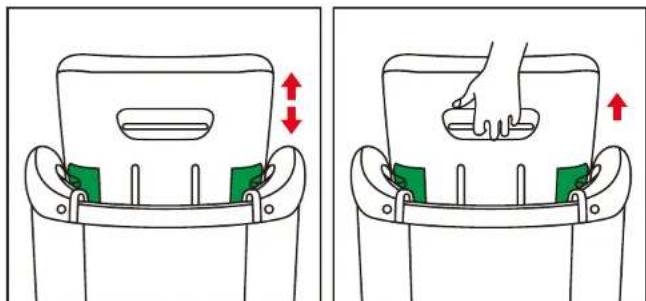
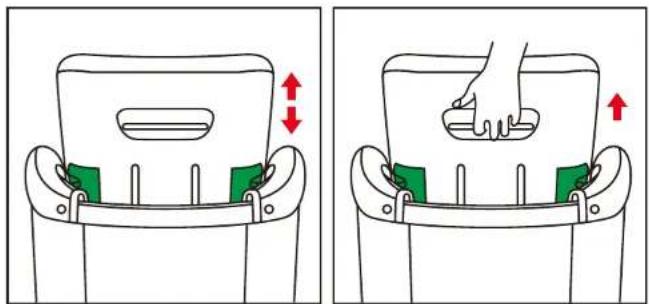
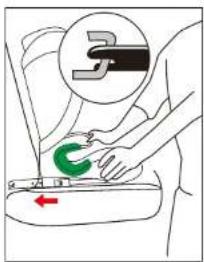
HEADREST HIGHT ADJUSTMENT
natural_image
Diagram showing two views of a device with green buttons and red directional arrows indicating movement (no text or symbols)Pull up the handle of the seat headrest to adjust it up and down, release the handle to lock the head position.
Note: Please ensure that the seat headrest is locked.
Beemoo

UK
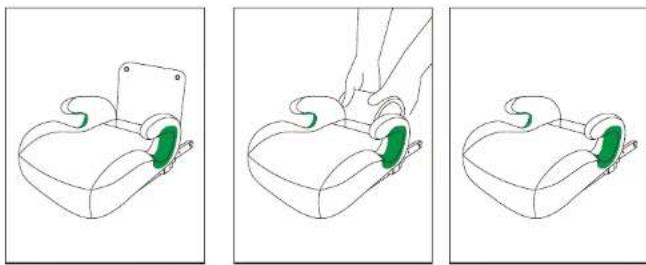
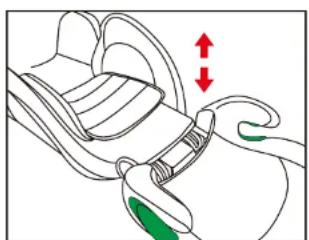
DISASSEMBLY/ASSEMBLY THE CAR SEATS BACK AND BASE
natural_image
Diagram of a car seatbelt with red and green arrows indicating movement (no text or symbols)
natural_image
Diagram of a car seatbelt with a red arrow indicating direction (no text or symbols)Lay the seat down with the backrest fully reclined. Hold the base with one hand and pull up the back of the chair with the other to separate the backrest from the base.
Assemble the backrest by inserting it in the same reclined position as disassembled. Insert the backrest into the connecting shafts and fold the backrest back up.
Beemoo

MAINTENANCE
- In daily use, check the car seat regularly. NOTE! The car seat must be replaced if involved in an accident.
- Please keep the car seat in a dry and ventilated place to avoid humidity and mold.
- Clean the seat belt and the plastic parts by swiping them with a damp sponge or cloth and leave it to dry.
- To remove drink- and food stains on the seat belt and buckle, disassemble the seat belt from the car seat and rinse it gently with warm water, and leave it to dry.
- For cleaning the clothing of the car seat, please see below:
WASHING INSTRUCTIONS
ATTENTION! Never use any solvent, chemical detergent, or lubricant on any part of your child seat.
- Hand wash, water temperature below 30 °C.
- Do not bleach.
• Dry clean, any solvent except trichloroethylene - Do not tumble dry.
- Do not iron.
REMOVE & ASSEMBLE THE CAR SEAT CLOTHING
- First remove the crotch pad and the buckle of the car seat, then remove the shoulder straps and cushion. Remove the clothing of the car seat.
- To reassemble the clothing, operate by follow above instructions in reverse order.


SE
BRUKSANVISNING
VIKTIGT!
UN Regulation no. R129 i-Size
VIKTIGT
LÄS NOGGRANT OCH BEHÅLL DESSA INSTRUKTIONER FÖR FRAMTIDA REFERENS

WARNING

Godkänd position.

Ej rekommenderad position.

INSTALLATION ISOFIX – MONTERA BÄLTESSTOLEN I FORDONET


SE
INSTALLATION 3-POINT SAFETY BELT

22 23
Beemoo

BILSÄTE SOM UNIVERSELL BÄLTKUDDE
natural_image
Three-step line drawing showing a car seat with green adjustment knobs, no text or symbols present
SE
INSTALLATION ISOFIX - MONTERA BÄLTESKUDDE I FORDONET

natural_image
Illustration of a person wearing a helmet and holding a device, with no visible text or symbols.
HÖJDJUSTERING AV NACKSTÖDET
natural_image
Two-step diagram showing a hand pressing down on a green component in a chair seat, with red arrows indicating movement direction (no text or symbols)natural_image
Diagram of a car seatbelt with red and green arrows indicating movement (no text or symbols)
natural_image
Diagram of a car seatbelt with a red arrow indicating direction (no text or symbols)UN Regulation no. R129 i-Size
VIKTIG

ADVARSEL!

Godkjent stilling.


NO
INSTALLASJON 3-PUNKS SIKKERHETSBELTE

36 37
Beemoo

BILSETE BRUKT SOM UNIVERSELL BELTEPUTE
natural_image
Three-step line drawing showing a car seat with green adjustment knobs, no text or symbols present
NO
INSTALLASJON ISOFIX - INSTALLER BELTEPUTE I KJ∅RET∅YET
natural_image
Illustration of a person wearing a helmet with green and red markings, no text or symbols present
natural_image
Two-step diagram showing a hand pressing down on a green component in a container, with red arrows indicating direction (no text or symbols)natural_image
Diagram of a car seatbelt buckle with red and green arrows indicating movement (no text or symbols)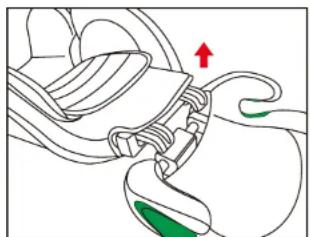
natural_image
Diagram of a car seatbelt with a red arrow indicating upward motion (no text or symbols)UN Regulation no. R129 i-Size
VIGTIGT

ADVARSEL!

Godkendt position.

Uegnet position.

4-ISOFIX
5 - Justering af nakkestøtte
6 - Seleguide 7 - ISOFIX-knap

DK
MONTERING MED ISOFIX – MONTÉR AUTOSTOLEN I K∅RET∅JETKJ∅RET∅YET


DK
MONTERING MED BILENS TREPUNKTSSELE

50 51
Beemoo

ANVENDELSE SOM UNIVERSAL SELEPUDE
natural_image
Three-step line drawing showing a car seat with green adjustment knobs, no text or symbols present
DK
MONTERING MED ISOFIX – MONTÉR SELEPUDE I K∅RET∅JET

natural_image
Illustration of a person wearing a helmet with green and red markings, no text or symbols present
natural_image
Diagram showing two views of a device with green buttons and red directional arrows indicating movement (no text or symbols)natural_image
Diagram of a car seatbelt buckle with red and green arrows indicating movement (no text or symbols)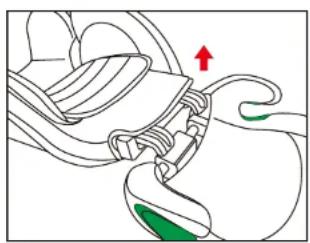
natural_image
Diagram of a car seatbelt with a red arrow indicating direction (no text or symbols)
UN Regulation no. R129 i-Size
TÄRKEÄÄ
! TÄRKEÄÄ!
1 - Niskatuki 2 - Selkänoja 3 - Istuinosa 4 - ISOFIX
FI FI
ASENNUS KOLMIPISTEVYÖLLÄ

64 65
Beemoo
ISTUIMEN KÄYTTÖ ISTUINKOROKKEENA
natural_image
Three-step line drawing showing a car seat with green adjustment knobs, no text or symbols presentFI FI
ISOFIX-ASENNUS - ASENNA ISTUINKOROKE AJONEUVOON

natural_image
Illustration of a person wearing a helmet and holding a tool, with no visible text or symbols
natural_image
Diagram of a mechanical device with a green component and directional arrow (no text or symbols)natural_image
Diagram of a car seatbelt with green clamps and red directional arrows indicating movement (no text or symbols)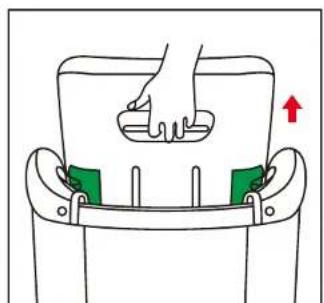
natural_image
Diagram of a mechanical component with green parts and a red arrow indicating direction (no text or symbols)natural_image
Diagram of a car seatbelt with red and green arrows indicating movement or positioning (no text or symbols)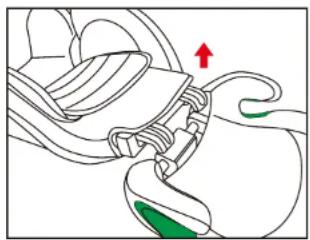
natural_image
Diagram of a car seatbelt with a red arrow indicating direction (no text or symbols)UN Regulation no. R129 i-Size
WICHTIG

ACHTUNG

Approved position.

Not recommended position.

Do not install the car seat at the passenger front seat due to the airbag.

Only suitable for three-point seat belt.

ACHTUNG!


DE
INSTALLATION 3-PUNKT-SICHERHEITSGURT

Beemoo

natural_image
Three-step line drawing showing a car seat with green-labeled buttons, no text or symbols present
DE
natural_image
Illustration of a person wearing a helmet and holding a device, with no visible text or symbols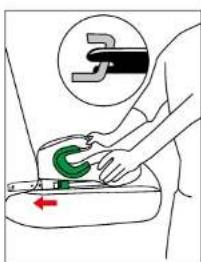
natural_image
Diagram showing two views of a device with green buttons and red directional arrows indicating movement (no text or symbols)natural_image
Line drawing of a car seatbelt buckle with red and green arrows indicating movement (no text or symbols)