
PPX1020 - Projector PHILIPS - Free user manual and instructions
Find the device manual for free PPX1020 PHILIPS in PDF.

| Product type | Pocket projector |
| Brand | PHILIPS |
| Model | PPX1020 |
| Display technology | 0.37" LCoS |
| Light source | RGB LED |
| Native resolution | 800 x 600 pixels (SVGA) |
| Compatible resolutions | SVGA, XGA, WXGA |
| Contrast | 400:1 |
| Brightness (highlight mode) | Up to 20 lumens |
| Projected image size | 5.2 to 81 inches (diagonal) |
| Projection distance | 0.2 m to 3 m |
| Horizontal frequency | 31 – 69 kHz |
| Vertical frequency | 56 – 85 Hz |
| Power supply | Via USB connection (Y-USB cable, 1A) |
| Dimensions (W x H x D) | 88 x 25 x 88 mm |
| Weight | 0.15 kg |
| Recommended ambient temperature | 5 – 40 °C |
| Relative humidity | 20 – 80% (without condensation) |
| Compatible operating systems | Windows XP (SP2), Vista, Windows 7 |
| Minimum PC configuration | 2 GHz processor, 1 GB RAM, 40 MB disk |
| Connection | High-speed USB 2.0 |
| Package contents | Projector, USB cable, tripod, carrying case, user guide, warranty card |
| Focus adjustment | Adjustment wheel on top |
| Tripod mount | Thread underneath the device |
| Folding stand | Integrated on the bottom |
| Care and cleaning | Wipe with a dry, soft cloth. Avoid solvents. |
| Safety | Do not look directly into the lens. Do not open or repair yourself. Avoid moisture and dust. |
| Repairability | Have any repairs done by an authorized specialist. |
| Warranty | Do not remove the rating plate. |
Frequently Asked Questions - PPX1020 PHILIPS
User questions about PPX1020 PHILIPS
0 question about this device. Answer the ones you know or ask your own.
Ask a new question about this device
Download the instructions for your Projector in PDF format for free! Find your manual PPX1020 - PHILIPS and take your electronic device back in hand. On this page are published all the documents necessary for the use of your device. PPX1020 by PHILIPS.
USER MANUAL PPX1020 PHILIPS
natural_image
Black and silver PicoPix projector device with visible lens and ventilation grille (no text or symbols on body)DE Bedienungsanleitung 2
EN User Manual 5
FR Guide d'utilisation 8
IT Manuale d'istruzioni 11
NL Handleiding 14
ES Manual del usuario 17
PT Manual de Instruções 20
SE Bruksanvisning 23
FI Käyttöohje 26
HU Használati útmutató 29
PL Instrukcja obsługi 32
RO Manual de utilizare 35
CZ Návod k obsluze 38
SK Užívatel'ský manuál 41
TR Kullanma kılavuzu 44
GR Οδηγίες Χρήσης 47
RU Руководство пользователя 50
1 Übersicht
Sehr geehrter Kunde
Geräteunterseite
2 Inbetriebnahme
Verpackungsinhalt
Pocket Projektor
USB Kabel
Stativ
Tasche
Bedienungsanleitung
Garantiekarte
Hinweis

Copyright © 2010 PHILIPS
1 Overview
Dear Customer
Thank you for purchasing our Pocket Projector.
We hope you enjoy your device and its many functions!
General Safety Information
Do not make any changes or settings that are not described in this user manual. Physical injury or damage to the device or loss of data can result from improper handling. Take note of all warning and safety notes indicated.
Setting Up the Device
Protect the device against direct sunlight, heat, large temperature fluctuations and moisture. Do not place the device in the vicinity of heaters or air conditioners. Observe the information on temperature and humidity in the technical data.
In the event that the device becomes too hot, or if you see smoke coming from the device, you must immediately disconnect the device from the USB socket. Have your device examined by trained professionals at a technical service location. To prevent the spread of fire, open flames should be kept away from the device.
Do not plug in the device in moist rooms. Never touch the mains cable or the mains connection with wet hands.
Under the following conditions, a layer of moisture can appear inside the device which can lead to malfunctions:
- if the device is moved from a cold to a warm area;
· after a cold room is heated; - when this device is placed in a damp room.
Proceed as follows to avoid any moisture build-up:
1 Seal this device in a plastic bag before moving it to another room, in order for it to adapt to room conditions.
2 Wait one to two hours before you take the device out of the plastic bag.
The device should not be used in a very dusty environment. Dust particles and other foreign objects may damage the unit.
Do not expose the device to extreme vibrations. It may damage the internal components.
Do not allow children to handle the device without supervision. The packing materials should be kept out of the hands of children.
Repairs
Do not make any repairs to the device yourself. Improper maintenance can result in injuries or damage to the device. Only have your device repaired by an authorised service centre.
Do not remove the type label from your device; this would void the warranty.
High Power LED
This device is equipped with an high power LED (Light Emitting Diode), which emits very bright light. Do not stare directly into the projector lens to avoid eyes injury or irritations.
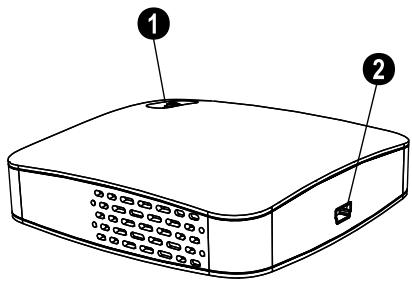
Top of the Device
① Focus setting
② Mini USB connection
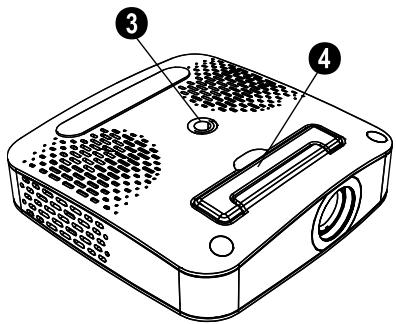
Bottom of the Device
③ Tripod socket
4 Fold-out base
2 Basic Operation
Packing Contents
Pocket Projector
USB Cable
Tripod
Pouch
User Manual
Warranty Card
Notice

Missing Package Contents
If one of the parts is missing or damaged, please contact your retailer or our customer service.
Installing the Software
1 Close all open programs and applications before beginning the installation process.
2 Connect the Pocket Projector to an available USB 2.0 port.
3 Select PicoPix 1020 viewer as drive in the Windows Explorer and start the program PicoPix viewer Install.exe with a double-click.
4 Your computer will now prepare for the installation process. Follow the instructions of the installation wizard and restart the computer.
Notice

Disconnect the Device from the Computer
Disconnect the device from the computer before restarting. The computer may try to boot from the Pocket Projector, which was recognized as a USB storage medium.
Set up the Device
1 Connect the device to your computer on two USB sockets by means of the Y-USB cable because the current consumption is 1A.
2 Start the program PicoPix viewer. In the Statusbar appears a symbol.
3 The Pocket Projector is switched on and projects the image from the computer.
Notice

Screen Resolution of the Computer
The best picture quality can be reached, if the screen resolution of the computer is set to 800x600 pixel.
4 Adjust the focus using the focus wheel.
5 Disconnect the USB cable from the computer if you finish the presentation to save energy and exit PicoPix viewer.
Notice

Exit the Program PicoPix viewer
1) Click on the PicoPix viewer symbol in the Windows task bar using the right mouse key.
2) Click on Exit.
Uninstalling the Software
1 Close all open programs and applications before beginning the uninstall process. Load the uninstall program by clicking on PicoPix viewer > Uninstall PicoPix viewer in the Start menu. Your computer will now prepare for the uninstall process.
2 Follow the instructions on the screen.
3 At the conclusion of the uninstall process you must restart your computer.
4 After rebooting has occurred, removal of PicoPix viewer from your computer will be complete.
Technical Data
Technology / Optical
Display technology....0,37" LCoS
Light source....RGB LED
Resolution.... 800 x 600 pixel
Supported Resolutions ......SVGA/XGA/WXGA
Brightness (Bright Mode) up to 20 lumen
Contrast ratio....400:1
Projected image size....5,2–81 inch
Screen distance....0,2m up to 3m
Horizontal Scan Rate 31–69 kHz
Vertical Scan Rate 56–85 Hz
Power Supply....via USB plug
Dimensions (L × H × W)....88 × 25 × 88 mm
Weight....0,15 kg
Recommended Ambient....5–40°C
Relative Humidity....20–80% (non-condensing)
Minimum PC Requirements
Processor....Intel Pentium M or AMD Athlon Clock rate....2GHz or higher Operating System.....Windows XP Professional (SP2), .....Vista, Windows 7
RAM....1GB DDR SDRAM Free Hard Drive Space ....40 MB USB Port.....USB 2.0
All data are provided for reference purposes only. Sagemcom reserves the right to make any changes without prior notice.

The CE marking certifies that the product meets the main requirements of the European Parliament and Council directive 1999/5/CE on telecommunications terminal equipment, regarding safety and health of users and regarding electromagnetic interference.
The declaration of compliance can be consulted on the site www.sagem-ca.at/doc
Preservation of the environment as part of a sustainable development logic is an essential concern of Sagemcom. The desire of Sagemcom is to operate systems observing the environment. The desire of Sagemcom is to operate systems observing the environment and consequently it has decided to integrate environmental performances in the life cycle of this products, from manufacturing to commissioning use and elimination.

Packaging: The presence of the logo (green dot) means that a contribution is paid to an approved national organisation to improve package recovery and recycling infrastructures to facilitate. Please respect the sorting rules set up locally for this kind of waste.
Batteries: If your product contains batteries, they must be disposed of at appropriate collection points.

Product: The crossed-out waste bin stuck on the product means that the product belongs to the family of electrical and electronic equipment. In this respect, the European regulations ask you to dispose of it selectively;
- At sales points in the event of the purchase of similar equipment.
- At the collection points made available to you locally(drop-off centre, selective collection, etc.).
In this way you can participate in the re-use and upgrading of Electrical and Electronic Equipment Waste, which can have an effect on the environment and human health.
The paper and cardboard packaging used can be disposed of as recyclable paper. Have the plastic wrapping and Styrofoam packaging recycled or dispose of it in the non-recyclable waste, depending on the requirements in your country.
Trademarks: The references mentioned in this manual are trademarks of the respective companies. The lack of the trademarks ® and ™ does not justify the assumption that these dedicated terminologies are free trademarks. Other product names used herein are for identification purposes only and may be trademarks of their respective owners. Sagemcom disclaims any and all rights in those marks.
Neither Sagemcom nor its affiliates shall be liable to the purchaser of this product or third parties for damages, losses, costs, or expenses incurred by the purchaser or third parties as a result of accident, misuse, or abuse of this product or unauthorized modifications, repairs, or alterations to this product, or failure to strictly comply with Sagemcom operating and maintenance instructions.
Sagemcom shall not be liable for any damages or problems arising from the use of any options or any consumable materials other than those designated as original Sagemcom products or Sagemcom approved products.
Sagemcom shall not be held liable for any damage resulting from electromagnetic interference that occurs from the use of any interface cables other than those designated as Sagemcom products.
All rights reserved. No part of this publication may be reproduced, stored in a retrieval system or transmitted in any form or by any means, electronic, mechanical, photocopying, recording, or otherwise, without the prior written permission of Sagemcom. The information contained herein is designed only for use with this product. Sagemcom is not responsible, if this information is applied to other devices.
This user manual is a document that does not represent a contract.
Errors, printing errors and changes are reserved.
Copyright © 2010 PHILIPS
1 Aperçu
Très cher client
LED haute performance
2 Mise en service
Copyright © 2010 PHILIPS
1 Panoramica
Stimato cliente,
2 Messa in funzione
Copyright © 2010 PHILIPS
1 Overzicht
Geachte klant
Onderzijde
2 Ingebruikneming
Inhoud verpakking
Pocket Projector
USB kabel
Statief
Draagtas
Handleiding
Garantiebewijs
Opmerking

Ontbrekende delen
Minimale systeemeisen
Processor....Intel Pentium M of AMD Athlon Processorfrequentie....2GHz of hoger Besturingssysteem.....Windows XP Professional (SP2), .....Vista, Windows 7
Werkgeheugen....1GB DDR SDRAM Vrij geheugen....40 MB USB-aansluting....USB 2.0
Copyright © 2010 PHILIPS
1 Esquema
Parte inferior del aparato
③ Rosca del trípode
4 Pata desplegable

Copyright © 2010 PHILIPS
1 Descrição geral
Estimado cliente
2 Funcionamento básico
Copyright © 2010 PHILIPS
1 Översikt
Bäste kund
Apparatens undersida
2 Idrifttagning
Copyright © 2010 PHILIPS
1 Yleiskuva
Arvoisa asiakas
Laitteen alapuoli
2 Käyttöönotto
Pakkauksen sisältö
Taskuprojektori
USB-kaapeli
Jalusta
Laukku
Käyttöohje
Takuukortti
Huomautusten

Copyright © 2010 PHILIPS
1 Áttekintés
Tisztelt Vásárló!
2 Alapmûveletek
A csomag tartalma
Zsebprojektor
USB-kábel
Háromlábú állvány
Hordtasak
Használati útmutató
Jótállási kártya
Megjegyzés

Hiány
Copyright © 2010 PHILIPS
1 Opis ogólny
Szanowny Kliencie!
Dół urządzenia
Copyright © 2010 PHILIPS
1 Sumar
Stimate client
2 Funcții de bază
Conținut ambalaj
Projector portabil
Cablu USB
Stativ
Geantă
Manual de instructiuni de utilizare
Copyright © 2010 PHILIPS
1 Přehled
Vážený zákazníku,
2 Základní ovládání
Obsah dodávky
Kapesní projektor
USB kabel
Stativ
Sáček
Návod k obsluze
Záruční list
Poznámka

Copyright © 2010 PHILIPS
1 Prehl'ad
Vážený zákazník,
Copyright © 2010 PHILIPS
1 Genel bakış
Sayın müşterimiz,
Cihaz alt kısmı
2 İlk çalıştırma
Ambalaj içeriği
Program PicoPix viewer bitir
Copyright © 2010 PHILIPS
1 Περίληψη
Αγαπητέ πελάτη
Copyright © 2010 PHILIPS
1 Общие сведения
2 Основные операции
Комплект поставки
Карманный проектор
USB-кабель
Штатив
Сумка
PHILIPS and the PHILIPS' Shield Emblem are registered trademarks of Koninklijke Philips Electronics N.V. and are used by Sagemcom under license from Koninklijke Philips Electronics N.V.
Documents Business Unit