
RT 910 RIP - CD Player HYUNDAI - Free user manual and instructions
Find the device manual for free RT 910 RIP HYUNDAI in PDF.


| Product Type | CD Player |
| Brand | Hyundai |
| Model | RT 910 RIP |
| Dimensions (approx.) | 140mm x 140mm x 30mm |
| Weight (approx.) | 0.5kg (including batteries) |
| Power Supply | 2x AA batteries or AC adapter (not included) |
| Playback Functions | Play, Pause, Stop, Skip, Repeat (1/All), Shuffle, Program |
| Anti-Shock Protection | ESP (Electronic Anti-Shock) for skip-free playback |
| Supported Disc Formats | CD, CD-R, CD-RW |
| Audio Output | 3.5mm headphone jack; built-in speaker |
| Battery Life (approx.) | 8 hours continuous playback on alkaline batteries |
| Cleanliness | Clean the lens with a soft brush; avoid touching the lens with fingers |
| Safety Precautions | Do not expose to moisture; keep away from heat sources; use only specified batteries |
| Spare Parts | Available: batteries, remote control (RM-910RIP), AC adapter |
| Repairability | Serviceable by authorized technicians; user-replaceable batteries |
| User Manual Languages | EN, CS, HU, PL, SK (downloadable PDF) |
Frequently Asked Questions - RT 910 RIP HYUNDAI
User questions about RT 910 RIP HYUNDAI
0 question about this device. Answer the ones you know or ask your own.
Ask a new question about this device
Download the instructions for your CD Player in PDF format for free! Find your manual RT 910 RIP - HYUNDAI and take your electronic device back in hand. On this page are published all the documents necessary for the use of your device. RT 910 RIP by HYUNDAI.
USER MANUAL RT 910 RIP HYUNDAI
natural_image
Black-and-white photo of a vintage rotary gramophone with open lid and wooden frame (no visible text or symbols)NÁVOD K POUŽITÍ / NÁVOD NA POUŽITIE INSTRUKCJA OBSŁUGI / INSTRUCTION MANUAL HASZNÁLATI ÚTMUTATÓ
GRAMOFON SE STEREOFONNÍM RADIOPŘIJÍMAČEM GRAMOFÓN SO STEREOFONNÝM RADIOPRIJÍMAČOM GRAMOFON Z RADIOODBIORNIKIEM STEREOFONICZNYM TURNTABLE WITH STEREO RADIO RECEIVER SZTEREÓ RÁDIÓS LEMEZLEJÁTSZÓ
UPOZORNĚNÍ:
Z DŮVODU ZAMEZENÍ RIZIKA POŽÁRU NEBO ZRANĚNÍ ELEKTRICKÝM PROUDEM NEVYSTAVUJTE TOTO ZAŘÍZENÍ DEŠTI ANI VLHKOSTI. NEODNÍMEJTE KRYT. UVNITŘ SE NENACHÁZÍ ŽÁDNÉ SOUČÁSTI URČENÉ K OBSLUZE UŽIVATELEM. PŘENE-CHEJTE SERVIS KVALIFIKOVANÉMU SERVISNÍMU PERSONÁLU.


POZOR:
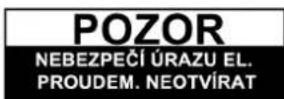
Z DŮVODU ZAMEZENÍ RIZIKA ÚRAZU ELEKTRICKÝM PROUDEM NEODNÍMEJTE KRYT (ANI ZADNÍ KRYT) PŘÍSTROJE. UVNITŘ SE NENACHÁZÍ ŽÁDNÉ SOUČÁSTI URČENÉ K OBSLUZE UŽIVATELEM. PŘENECHEJTE SERVIS KVALIFIKOVANÉMU SERVISNÍMU PERSONÁLU.





TO PREVENT FIRE OR SHOCK HAZARD, DO NOT EXPOSE THIS APPLIANCE TO RAIN OR MOISTURE. DO NOT REMOVE COVER. NO USER SERVICEABLE PARTS INSIDE. REFER SERVICING TO QUALIFIED SERVICE PERSONNEL.


CAUTION:
TO REDUCE THE RISK OF ELECTRIC SHOCK, DO NOT REMOVE COVER (OR BACK). NO USER - SERVICEABLE PARTS INSIDE. REFER SERVICING TO QUALIFIED SERVICE PERSONNEL.

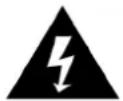
The lighting flash with arrowhead symbol, within an equilateral triangle, is intended to alert user to the presence of uninsulated „dangerous voltage“ within the product's enclosure that may be of sufficient magnitude to constitute risk of electric shock to persons.

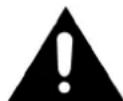
The exclamation point within an equilateral triangle is intended to alert user to the presence of important operating and maintenance (servicing) instruction in the literature accompanying the appliance.
IMPORTANT SAFEGUARDS FOR AUDIO PRODUCTS
- Read Instructions - All the safety and operating instruction should be read before the product is operated.
- Retain Instructions - The safety and operating instruction should be retained for future reference.
- Heed Warnings - All warning on the product and in the operating instructions should be adhered to.
- Follow Instructions - All operating and use instructions should be followed.
- Cleaning - Unplug this product from the wall outlet before cleaning. Do not use liquid cleaners or aerosol cleaners. Use a damp cloth for cleaning.
- Attachments - Do not use attachments not recommended by the product manufacturer as they may cause hazards.
- Water and Moisture - Do not use this product near water - for example, near a bath tub, wash bowl, kitchen sink, or laundry tub; or in a wet basement, or near a swimming pool, and the like.
- Accessories - Do not place this product on an unstable cart, stand tripod,

bracket, or table. The product may fall, causing serious injury to a childor adult, and serious damage to the product. Use only with a cart, standtripod, bracket, or table recommended by the manufacturer or sold with the product. Any mounting of the product should follow the manufacturer's instructions and should use a mounting accessory recommended by themanufacturer.
-
Ventilation - Slots and openings in the cabinet are provided for ventilation and to ensure reliable operation of the product and to protect it from overheating, and these openings must not be blocked or covered. The openings should never be blocked by placing the product on a bed, sofa, rug, or other similar surface. This product should not be placed in a built-in installation such as a bookcase or rack unless proper ventilation is provided or the manufacturer's instruction have been adhered to.
-
Power Sources - This product should be operated only from the type of power source indicated on the marking label. If you are not sure of the type of the power supply to your home, consult your product dealer or local power company. For products intended to operate from battery power, or other sources, refer to the operating instruction.
-
Grounding or Polarization - This product may be equipped with a polarized alternating - current line plug (a plug having one blade wider than the other). This plug will fit into the power outlet only one way. This is a safety feature. If you are unable to insert the plug fully into the outlet, try reversing the plug. If the plug should still fail to fit, contact your electrician to replace your obsolete outlet. Do not defeat the safety purpose of the polarizes plug. Alternate Warnings - This product is equipped with a three - wire grounding type plug, a plug having a third (grounding) pin. This plug will only fit into a grounding type power outlet. This is a safety feature. If you are unable to insert the plug into the outlet, contact your electrician to replace your obsolete outlet. Do not defeat the safety purpose of the grounding type plug.
-
Power Cord Protection - Power supply cords should be routed so that they are not likely to be walked on or pinched by items placed upon or against them, paying particular attention to cords at plugs, convenience receptacles, and point where they exit from the product.
-
Protective Attachment Plug - The product is equipped with an attachment plug having overload protection. This is a safety feature. See Instruction Manual for replacement or resetting of protective device. If replacement of the plug is required, be sure the service technician has used a replacement plug specified by the manufacturer that has the same overload protection as the original plug.
-
Lightning - For added protection for this product during a lightning storm, or when it is left unattended and unused for long periods of time, unplug it from the wall outlet and disconnect the antenna or cable system. This will prevent damage to the product due to lightning and power - line surges.
-
Power Lines - An outside antenna system should not be located in the vicinity of overhead power lines or other electric light or power circuits, or where it can fall into such power lines or circuits. When installing an outside antenna system, extreme care should be taken to keep from touching such power lines or circuits as contact with them might be fatal.
-
Overloading - Do not overload wall outlets, extension cords, or integral convenience receptacles as this can result in a risk of fire or electric shock.
-
Object and Liquid Entry - Never push objects of any kind into this product through openings as they may touch dangerous voltage points or short-out parts that could result in a fire or electric shock. Never spill liquid of any kind on the product.
-
Servicing - Do not attempt to service this product yourself as opening or removing covers may expose you to dangerous voltage or other hazards. Refer all servicing to qualified service personnel.
-
Damage Requiring Service - Unplug this product from the wall outlet and refer servicing to qualified service personnel under the following conditions:
a. When the power supply cord or plug is damaged,
b If liquid has been spilled, or objects have fallen into the product,
c If the product has been exposed to rain or water,
d If the product does not operate normally by following the operating instructions.
Adjust only those controls that are covered by the operating instructions as an improper adjustment of other controls may result in damage and will often require extensive work by a qualified technician to restore the product to its normal operation.
e If the product has been dropped or damage in any way, and
f When the product exhibits a distinct change in performance - this indicates a need for service.
- Replacement Parts - When replacement parts are required, be sure the service technician has used replacement parts specified by the manufacturer or have the same characteristics as the original part. Unauthorized substitutions may resultfire,electric shock, or other hazards.
- Safety Check - Upon completion of any service or repairs to this product, ask the service technician to perform safety checks to determine that the product is in proper operating condition.
- Heat - The product should be situated away from heat sources such as radiators, heat register, stoves, or other products (including amplifiers) that produce heat.
LOCATION OF PARTS

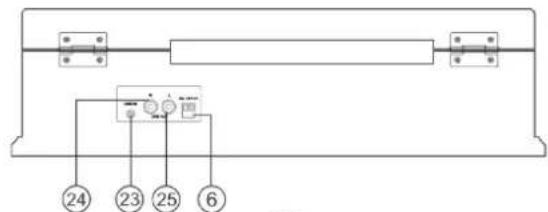
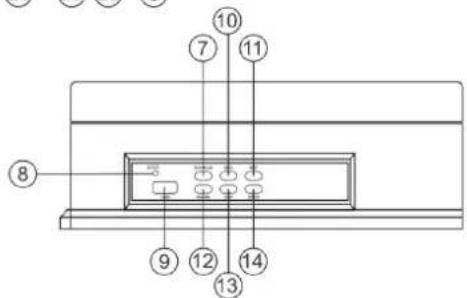
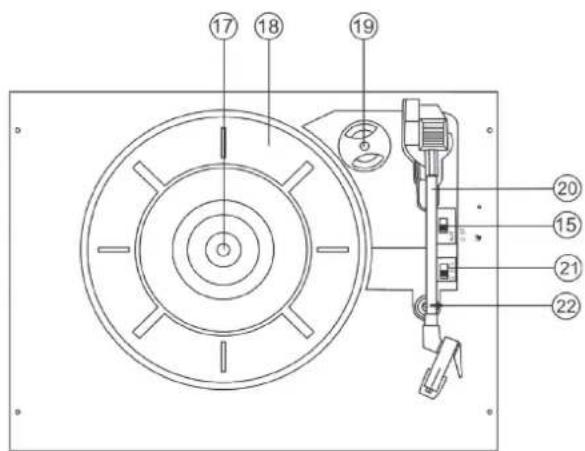
- Speaker
- Function switch (AM FM PH/AUX USB) Knob
- Tuning Knob
- Volume Control Knob
- Power Led Indicator
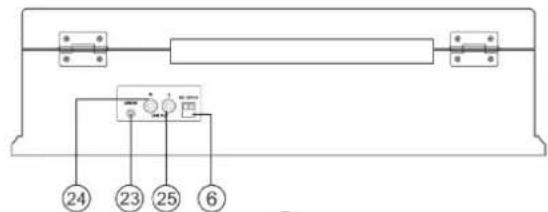
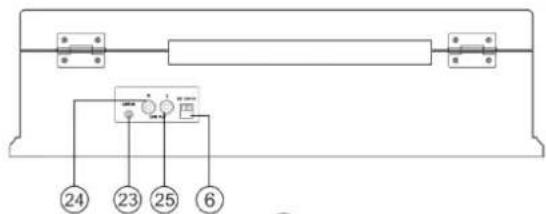
- DC Input Jack
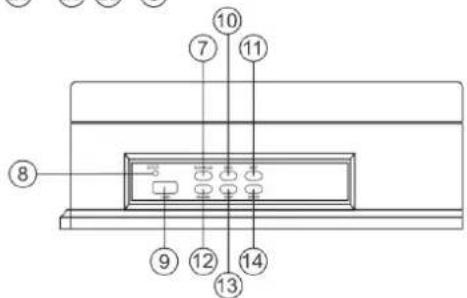
- Play/Pause Button
- Playback/Pause/Recording Light Indicator
- USB 2.0 Port
- Back Button
- Next Button
- Record Button
- Stop Button
- Delete Button
- AUTO STOP Switch
- Spindle
- Turntable
- Adaptor for 45 rpm records
- Tone Arm
- Speed control Switch (33, 45, 78 rpm)
- Security Hook/Arm Rest
- Line In
- RCA line-out jack - right channel
- RCA line-out jack - left channel
POWER SOURCE
Insert the adaptor plug into the DC IN jack on the rear of the unit, then connect the AC/DC adaptor (DC 12V, 1A / AC100-240V, 50-60 Hz) to AC wall outlet.
UNPACKING THE TURNTABLE
- Carefully remove unit from it's package and take it out of the plastic bag.
- Open lid and remove black tie-wrap by untwisting and gently sliding out from under TONE ARM (2).
- Remove white protective needle cover by gently pulling towards front of unit.
TURNTABLE OPERATION
- Power on the unit by turning the volume control knob clockwise position. The power indicator (5) at the front of the unit will light up.
- Turn the FUNCTION SWITCH (2) to PH/AUX mode.
- Move the SPEED CONTROL SWITCH (21) to the desired speed, select from 33, 45 or 78 rpm. Place the record on the turntable (18) (use the spindle adaptor if required - 19).
- Adjust the VOLUME CONTROL (4) and set this at mid range.
- Use a finger to raise the tone arm (20) off its rest. Move the tone arm over the record and gently release the tone arm to the point where you want to play the record.
- Adjust the VOLUME CONTROL KNOB (4) to your desired sound level.
- When AUTO STOP (15) is on ON position, after playing finished, the TONE ARM (20) will stop automatically at the center.
When AUTO STOP (15) is on OFF position, after playing finished, the TONE ARM (20) will not stop automatically and it will keep in the center of the disk unless turning off the device or switch other function.
Note: If you find the disk can not be finished the playing completely on ON position of AUTO STOP (15), please turn to OFF position of AUTO STOP (15), then the disk will be finished at the end.
RADIO OPERATION
- Power on the unit by turning the volume control knob clockwise position. The power indicator (5) at the front of the unit will light up.
- Turn the Function Switch (2) to AM or FM mode.
- Turn the TUNING KNOB (12) to select your desired position.
- Adjust the VOLUM CONTROL KNOB (4) to your desired sound level.
-
- STOP
When playing or pausing, press STOP, it will enter stop mode. When recording, press STOP button, the recording will be finished.
- STOP
-
PLAY/PAUSE
The unit is in play mode as default. Insert the USB flash into the USB port. Insert the USB flash into the USB Port, press PLAY/PAUSE button during stop, the unit will be in play mode; Press PLAY/PAUSE button during playing, the unit will be in pause mode; Press PLAY/PAUSE button during pausing, the unit will be in play mode.
- NEXT & BACK
Press NEXT button to the next song. Press BACK button to reverse to the previous song. Press and hold the NEXT or BACK button for fast forward and rewind respectively.
- RECORD
Press RECORD button once to start recording function, the LED indicator of RECORD/ERASE will be on. Press STOP button to stop the recording, the LED indicator of RECORD/ERASE will be off. During recording, the buttons are invalid except STOP.
5. DELETE
This delete function is only apply to the track that it is currently under playback. When deleting, the LED indicator of RECORD/ERASE will be flash twice; Once deleted the current track, it will automatically into play mode
- Connect the RCA Line-out Jack (24/55) into the external amplifier to play the music from outside source.
LINE IN OPERATION
- Power on the unit by turning the volume control knob clockwise. Turn the FUNCTION SWITCH (2) to PH/AUX mode. Connect the music source you want to play with Line-in jack (23), then you can use the unit to play the connect music source.
ACCESSORY: ADAPTER FOR 45 RPM
To play a 45 rpm record, place the supplied adaptor (9) on the SPINDLE (7)
TROUBLESHOOTING GUIDE
The unit will not operate.
- Check that the unit is properly connected to an A/C power outlet.
No sound is coming from the unit
- Check that the ON/OFF VOLUME KNOB (4) and see the volume level..
- The white protective needle cover has not been removed from the tone arm.
The tone arm will not move
- Remove black tie wrap from the tone arm.
- The tone arm hold down clip has not been released.
No Radio
- The FUNCTION SWITCH (2) has not been moved from the PH/AUX position.
- Adjust the ON/OFF VOLUME KNOB (4) and see the volume level.
- Rotate the TUNING KNOB (3) to find the desired radio station.
SPECIFICATION
Power Source: DC 12V, 1A / AC100-240V, 50-60 Hz
Power Consumption: 8W
Frequency Range: AM 530 - 1600 KHz
FM 88 - 108 MHz
Speed: 33/45/78 RPM
Speaker: 70 mm x 30 mm x 2 mm
Unit Dimension: 40,5 (L) x 30,5 (W) x 11,5 (H) cm
Weight (NETTO): 4.3 Kg
WE RESERVE THE RIGHT TO CHANGE TECHNICAL SPECIFICATIONS.
WARNING: DO NOT USE THIS PRODUCT NEAR WATER, IN WET AREAS TO AVOID FIRE OR INJURY OF ELECTRIC CURRENT. ALWAYS TURN OFF THE PRODUCT WHEN YOU DON'T USE IT OR BEFORE A REVISION. THERE AREN'T ANY PARTS IN THIS APPLIANCE WHICH ARE REPARABLE BY CONSUMER. ALWAYS APPEAL TO A
QUALIFIED AUTHORIZED SERVICE. THE PRODUCT IS UNDER A DANGEROUS TENTION.


TO AVOID DANGER OF SUFFOCATION, KEEP THE PLASTIC BAG AWAY FROM BABIES AND CHILDREN. DO NOT USE THIS BAG IN CRIBS, BEDS, CARRIAGES OR PLAYPENS. THIS BAG IS NOT A TOY.
Disposal of old Electrical & Electronic Equipment (Applicable in the European Union and other European countries with separate collection systems).

This symbol on the product or on its packaging indicates that this product shall not be treated as household waste. Instead it shall be handed over to the applicable collection point for the recycling of electrical and electronic equipment. By ensuring this product is disposed of correctly, you will help prevent potential negative consequences for the environment and human health, which could otherwise be caused by inappropriate waste handling of this product. The recycling of materials will
help to conserve natural resources. For more detailed information about recycling of this product, please contact your local Civic Office, your household waste disposal service or the shop where you purchased the product.
Hereby, ETA a.s. declares that the radio equipment type RT910RIP is in compliance with Directive 2014/53/EU. The full text of the EU declaration of conformity is available at the following internet address: http://www.hyundai-electronics.cz/declaration_of_conformity
FIGYELMEZTETÉS:
TÜZ VAGY ÁRAMÜTÉS OKOZTA BALESETI KOCKÁZAT ELKERÜLÉSE ÉRDEKÉBEN ÓVJA A KÉSZÜLÉKET AZ ESÖTÖL, NEDVESSÉGTÖL. NE TÁVOLÍTSA EL A KÉSZÜLÉK BORÍTÁSÁT. A KIJELZÖK FORRASZTÁSA STABIL. A KÉSZÜLÉK BELSEJE NEM TARTALMAZ A FELHASZNÁLÓ ALTAL KEZELHETŐ ALKATRÉSZEKET. A JAVÍTÁST BÍZZA SZAKKÉPZETT SZEMÉLYRE.

VIGYÁZAT:
ÁRAMÜTÉS OKOZTA BALESETI KOCKÁZAT ELKERÜLÉSE ÉRDEKÉBEN NE TÁVOLÍTSA EL A KÉSZÜLÉK BORÍTÁSÁT (A HÁTOLDALI BORÍTÓT SEM). A KÉSZÜLÉK BELSEJE NEM TARTALMAZ A FELHASZNÁLÓ ALTAL KEZELHETŐ ALKATRÉSZEKET. A JAVÍTÁST BÍZZA SZAKKÉPZETT SZEMÉLYRE.



| EN - English | ||
| Charging adapter | ||
| A | Manufacturer's name or trademark, business registration number and address | Shenzhen Cenwell Technology Co., Ltd., 2F, 3F, 301, Building C, Shengshun Industrial park, No. 142-4 Junxin Road, Niuhu Community, Guanlan Town, Longhua district, Shenzhen, China |
| B | Model identifier CW1201000EU | |
| C | Input voltage 100-240 V | |
| D | Input frequency 50/60 Hz | |
| E | Output voltage 12,0 V | |
| F | Output current 1,0 A | |
| G | Output power 12,0 W | |
| H | Average efficiency in active mode 83,34% | |
| I | Low load efficiency (10%) | 73,62% |
| J | Power consumption without load | 0,075 W |
Licensed by Hyundai Corporation, Korea


- UPOZORNĚNÍ:
- POZOR:
- CAUTION:
- IMPORTANT SAFEGUARDS FOR AUDIO PRODUCTS
- LOCATION OF PARTS
- POWER SOURCE
- UNPACKING THE TURNTABLE
- TURNTABLE OPERATION
- RADIO OPERATION
- DELETE
- LINE IN OPERATION
- ACCESSORY: ADAPTER FOR 45 RPM
- TROUBLESHOOTING GUIDE
- The unit will not operate.
- No sound is coming from the unit
- The tone arm will not move
- No Radio
- SPECIFICATION
- WE RESERVE THE RIGHT TO CHANGE TECHNICAL SPECIFICATIONS.
- FIGYELMEZTETÉS:
- VIGYÁZAT:
Brand : HYUNDAI
Model : RT 910 RIP
Category : CD Player