
H-1434 - CD Player HYUNDAI - Free user manual and instructions
Find the device manual for free H-1434 HYUNDAI in PDF.


| Product Type | CD Player |
| Brand | Hyundai |
| Model | H-1434 |
| Dimensions (W x D x H) | 430 x 250 x 100 mm |
| Weight | 2.5 kg |
| Power Supply | AC 220-240 V, 50 Hz |
| Power Consumption | 15 W |
| Playable Discs | CD, CD-R, CD-RW |
| Functions | Play, Pause, Stop, Skip, Repeat, Shuffle, Program, Open/Close |
| Audio Output | Stereo RCA (2 x 0.5 V RMS) |
| Headphone Jack | 3.5 mm stereo |
| Remote Control | Included (batteries not included) |
| Display | LED, track number and time |
| Maintenance | Clean lens with CD cleaner; wipe exterior with dry cloth |
| Safety | Kein Wasser in der Nähe; nicht öffnen |
| Spare Parts | Remote control, power cord (available from Hyundai service) |
| Reparability | Repairs by qualified technician only |
| Additional Information | User manual available in PDF format |
Frequently Asked Questions - H-1434 HYUNDAI
User questions about H-1434 HYUNDAI
0 question about this device. Answer the ones you know or ask your own.
Ask a new question about this device
Download the instructions for your CD Player in PDF format for free! Find your manual H-1434 - HYUNDAI and take your electronic device back in hand. On this page are published all the documents necessary for the use of your device. H-1434 by HYUNDAI.
USER MANUAL H-1434 HYUNDAI
CD/MP3/USB/SD/MMC-RADIO PLAYER
CD/MP3/USB/SD/MMC-СТЕРЕОМАГНИТОЛА
Dear customer!
Thank you for purchasing our product. For safety, it is strongly recommended to read this manual carefully before connecting, operating and/or adjusting the product and keep the manual for reference in future.
Description
Control elements
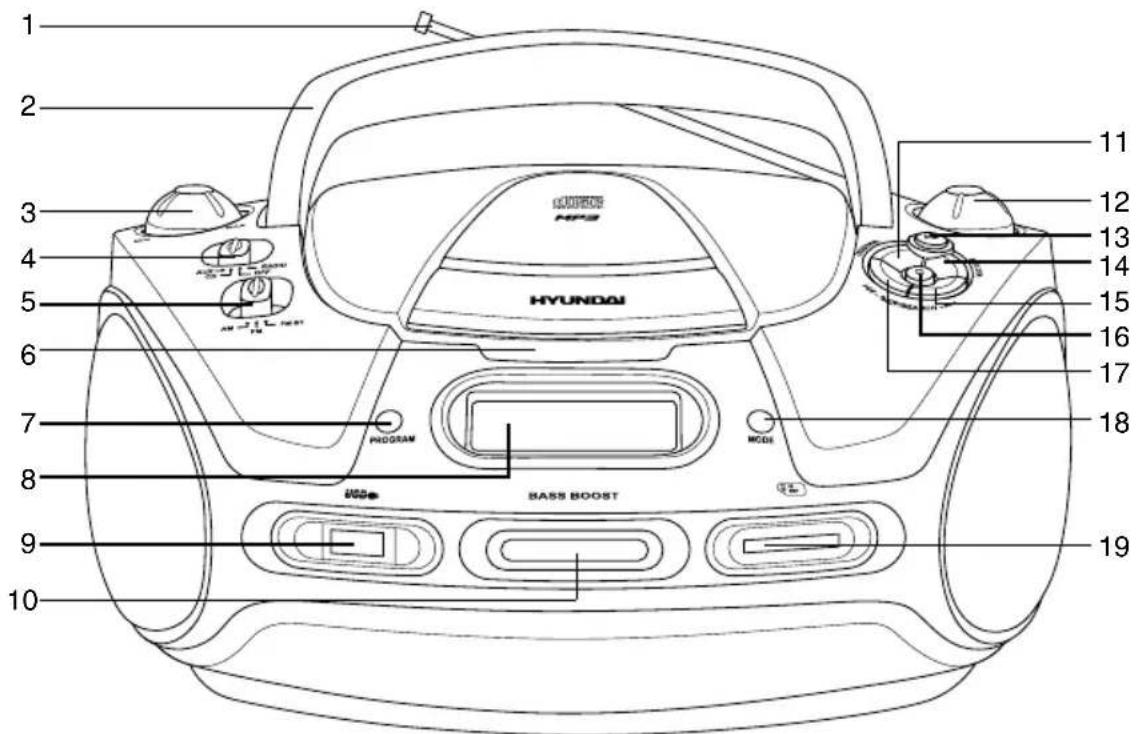
- Telescopic FM antenna
- Handle
- VOLUME regulator
- Function switch
- Band switch
- Disc compartment door
- PROGRAM button
- LCD display
- USB port
- BASS BOOST button
- CD/SD/USB button
-
TUNING regulator
-
PLAY/PAUSE button
- FOLDER button
- SKIP/SEARCH button
- STOP button
- SKIP/SEARCH button
- MODE button
- SD/MMC memory card slot
Not indicated:
Back panel: Headphone jack, AUX in jack,
Power cord socket
Bottom: Battery compartment
Important safeguards
- Attention: The owner's manual contains important operating and maintenance instructions. For your safety, it is necessary to refer to the manual.
- Dangerous voltage: Uninsulated dangerous voltage that may be of sufficient magnitude to constitute a risk of electrical shock to persons is present within this product enclosure.
- Caution: To reduce the risk of electric shock, do not dismantle the body. Prefer servicing to qualified service personnel. Do not use the unit in places where it can be exposed to water, moisture and dust. Make sure that pins or other foreign objects do not get inside the unit; they may cause malfunctions, or create safety hazards such as electrical shock.
Power supply
Battery operation
- Open the battery compartment cover.
- Insert 8 x UM-2 "C" size batteries. Please observe correct battery polarities or the set will not work.
- Close the battery compartment cover.
AC operation
- Before the first connecting of the appliance check that voltage indicated on the rating label corresponds the mains voltage in your home.
- Plug the corresponding end of cord into the AC socket on the rear of the set.
- Insert the plug into power supply.
Caution:
- When the set is only used with AC or is not used for 2 weeks or more, please remove the batteries, to avoid damage to the set from leakage of batteries.
• Always switch off the unit when not in use.
• Always unplug the appliance from power supply, when no use long time.
Headphone jack
- For private listening, insert 3.5 mm headphone into the stereo headphone jack.
- Adjust volume to the appropriate level as desired.
- When the stereo headphone jack is plugged, speaker will disconnect automatically.
AUX line in jack
You can connect the audio output of an external device (such as a CD-player) to this unit, to listen to the sound of that device through the amplifier of this unit.
- To connect an external audio device (eg. MP3 player), please use a standard stereo cable (not included) with 3.5 mm to 3.5 mm plugs to connect the headphone out or audio line-out of the external device to the AUX input socket of this unit.
- Slide the function switch to AUX position.
- Turn on the external device.
Radio operation
- Set the function switch to RADIO position.
-
Select your desired broadcasting band by setting the band switch to the desired position. AM of FM will be displayed.
-
Rotate TUNING regulator to tune to your desired radio station frequency. The radio frequency will be shown on the display.
- Rotate VOLUME regulator to adjust sound volume level.
- To turn off the radio set the function switch to OFF position.
Antenna
- For FM reception, adjust the telescopic antenna appropriately to obtain the best reception on the band selected.
- The AM signals are picked up through the built-in antenna. The set should be placed to
an appropriate position for the best reception.
FM/FM stereo reception
- In particular when stereo signal is weak and much noise are received, it is preferable to receive programs in mono mode. Set the band switch to FM ST position to receive radio programs in stereo mode.
- If the program is received in FM stereo, "ST" indicator will light up.
Disc operations
Insertion and removal of discs
- Pull up the CD compartment door. Place a disc into the compartment with the label-side (printed side of disc) facing upwards. Press down in the center part of disc until the disc locks onto the center spindle.
- When the disc has been placed onto the center spindle, gently lower the CD-door downwards until it locks shut. The disc is now ready to be played.
- When opening the CD-door, always ensure the disc is not in motion (not spinning) when you open the CD-door. Always press STOP button to stop the disc spinning first.
- To remove the disc, follow the same procedure as described above, except to remove the disc instead of inserting it into the compartment, by placing one finger at the middle of disc (center spindle) and the other at the edge of the disc and gently pulling upwards.
Always hold a disc by its edges. Avoid getting any fingerprints, smudges or dirt onto the surface of a disc. In case this happens, use a special CD-cleaning cloth or cleaning kit to remove the dirt or smudges.
Important: Please make sure to always fold down the handle before opening the CD door.
Compact disc operation
- Set function switch to CD position.
-
Put a disc into the CD compartment and close the CD door.
-
The display will show the total number of tracks after a few seconds.
- If there is no disc in the unit, the display will show "NO". If the CD compartment door is not closed properly, the display shows "---".
Play/pause mode
- Press PLAY/PAUSE button to start playback, the display will show the current track number and playback symbol.
- Press PLAY/PAUSE button to pause at any track when playing, playback symbol on the display flashes. Press this button again to resume playback.
- To stop playback, press STOP button. The display will show the total number of tracks on the disc.
Skip and search mode
- Press SKIP/SEARCH button once to skip to the next track. Press and hold this button to search for a particular point at high speed forward. Release the button to resume normal playback.
- Press SKIP/SEARCH button once to skip to the beginning of the current track. Press SKIP/SEARCH button twice to skip back to previous track. Press and hold this button to search for a particular point at high speed backward. Release the button to resume normal playback.
- If you use an MP3 disc containing folders, you can select a folder. In stop mode, press repeatedly FOLDER button. The number of the current folder will be displayed. After you selected a folder you can select tracks in the current folder as described above.
Repeat mode
- Press MODE button once for single track repeat playing. REP will be displayed.
- If you use an MP3 disc containing folders, press this button again to repeat all tracks in the current folder. The track number and folder number will be shown every few seconds alternatively.
- Press MODE button again for all track
repeat playing.
- Press MODE button again for all track random playing. RANDOM will be displayed.
- To cancel repeat or random playback, press MODE button again.
Program mode
Up to 20 tracks can be programmed for disc play in any order or the same track can be repeated up to 20 times.
- Before use, be sure to stop the CD by pressing STOP button.
- Press PROGRAM button. The display will show "P01" and "PROGRAM". This indicates that the set is now in memory programming mode, at the first memory position.
- If you use an MP3 disc, press FOLDER button to select a folder.
- Select a desired track by using SKIP/SEARCH and SKIP/SEARCH buttons.
- Press PROGRAM button again to confirm. The set will advance to next memory position, the display will show "P02". Repeat two steps described above to enter additional memories into the program if necessary.
• After the maximum of 20 songs (or less) have been selected as described above, press PLAY/PAUSE button to start playing the programmed tracks.
- The "PROGRAM" symbol will remain on to indicate that you have saved a program-memory (sequence).
- To check the program you stored, after the programming is completed, in stop mode press PROGRAM button (for MP3 discs - after PROGRAM button press FOLDER button to see the folder number), then press SKIP/SEARCH button repeatedly to see all programmed track numbers.
- The program memory will be cleared when you press STOP button twice, open the disc compartment door or turn off the disc player or power supply.
Good quality sound is guaranteed only when playing licensed MP3 discs.
USB/SD/MMC-card playback
- This unit is equipped with a USB socket that can accept and play MP3 files stored on standard USB flash (compatible with USB version 2.0) up to 8 Gb.
- This unit is also equipped with an SD/MMC card socket that can accept and play MP3 files stored on standard SD cards up to 32 Gb.
- To use USB drives/SD/MMC cards for MP3 playback, slide the function switch to CD position. Insert the USB drive or SD/MMC card into the appropriate socket and repeatedly press CD/SD/USB button until the display shows “USB” or “CARD” (depending on which one is being used).
- All operations with files contained in USB/SD/MMC are the same as operations with MP3 discs.
Always switch off the unit or change mode to CD before removing a USB flash drive or SD/MMC card, to prevent damage to your USB device or memory card.
Note: Although this product is fully compatible with USB 2.0 and SD/MMC card standard formats, a small percentage of USB flash drives and SD/MMC cards might not be readable, due to those device manufacturers non-compliance with the full (official) USB and SD cards standards.
"Dynamic Bass Boost" system
For increased bass at all volume levels, press BASS BOOST button for an emphasized bass sound. Press the button again to disable the function.
Maintenance and care
- Check your batteries regularly, old or discharged batteries should be replaced. If the unit is not going to be used for some time or is being run exclusively on the alternative power,
remove the batteries to avoid leakage and damage.
- Electronic products of this kind should never be subjected to moisture or extreme temperatures.
- Do not use the unit in places where it can be exposed to water, moisture and dust.
- If necessary, clean the unit with a piece of cloth dampened with water only (be sure the AC power cord is disconnected from the power supply).
- When pick up the CD disc, always hold the edge of the disc, never touch the surface of the disc, it would scratch the disc surface and may occur sound distortion or raise reading problem.
Accessories
Radio player 1 pc
Power cord 1 pc
Instruction manual 1 pc
Warranty card 1 pc
Consumer information 1 pc
Specifications
| Supported formats MP3, CDDA | |
| Supported storage CD/CD-R/CD-RW/USB/SD/MMC | |
| Power supply 220 V, 50 Hz (8 x UM2 batteries) | |
| Output power, RMS 2.5 W x 2 | |
| FM frequency range 64 - 108 MHz | |
| AM frequency range 540 - 1600 kHz | |
| Net/Gross weight 1.81 kg/2.06 kg | |
| Unit dimension (L x W x H) 280 mm x 220 mm x 142 mm | |
| Gift box dimension (L x W x H) 302 mm x 242 mm x 167 mm | |
Specifications and functions are subject to change without notice. It is connected with continual improvement of the device.


- DEAR CUSTOMER
- DESCRIPTION
- NOT INDICATED
- IMPORTANT SAFEGUARDS
- POWER SUPPLY
- BATTERY OPERATION
- AC OPERATION
- CAUTION
- HEADPHONE JACK
- AUX LINE IN JACK
- RADIO OPERATION
- ANTENNA
- FM/FM STEREO RECEPTION
- DISC OPERATIONS
- INSERTION AND REMOVAL OF DISCS
- COMPACT DISC OPERATION
- PLAY/PAUSE MODE
- SKIP AND SEARCH MODE
- REPEAT MODE
- PROGRAM MODE
- USB/SD/MMC-CARD PLAYBACK
- DYNAMIC BASS BOOST" SYSTEM
- MAINTENANCE AND CARE
- ACCESSORIES
Brand : HYUNDAI
Model : H-1434
Category : CD Player