
RC606 - CD Player HYUNDAI - Free user manual and instructions
Find the device manual for free RC606 HYUNDAI in PDF.


| Product type | Portable CD Player |
| Brand | Hyundai |
| Model | RC606 |
| Disc support | CD, CD-R, CD-RW |
| Playback modes | Normal, Random, Repeat (1/All), Program |
| Anti-skip protection | Electronic anti-skip (e.g., 40 seconds) |
| Display | LCD with track number, time, and mode indicators |
| Audio output | 3.5 mm stereo headphone jack, line out |
| Power supply | DC 3V (2× AA batteries) or DC 4.5V AC adapter (optional) |
| Battery life | Approx. 8 hours (alkaline batteries) |
| Dimensions (W×D×H) | 140 × 140 × 28 mm |
| Weight | 200 g (without batteries) |
| Material | Plastic casing |
| Special features | Programmable tracks, intro scan, direct track selection |
| Accessories included | Headphones, user manual, warranty card |
| Safety class | Class 1 laser product |
| Operating temperature | 5°C to 35°C |
| Storage temperature | -20°C to 60°C |
| Humidity | 5% to 90% (non-condensing) |
| Country of origin | China |
| Repairability | User replaceable batteries, external parts available as spare |
| Cleaning | Use a soft, dry cloth; avoid solvents; clean lens with CD lens cleaner |
Frequently Asked Questions - RC606 HYUNDAI
User questions about RC606 HYUNDAI
0 question about this device. Answer the ones you know or ask your own.
Ask a new question about this device
Download the instructions for your CD Player in PDF format for free! Find your manual RC606 - HYUNDAI and take your electronic device back in hand. On this page are published all the documents necessary for the use of your device. RC606 by HYUNDAI.
USER MANUAL RC606 HYUNDAI
NÁVOD K POUŽITÍ / NÁVOD NA POUŽITIE INSTRUKCJA OBSŁUGI / INSTRUCTION MANUAL FELHASZNÁLÓI KÉZIKÖNYV
STEREOFONNÍ RÁDIO AM/FM SE STEREOFONNÍM PŘEHRÁVAČEM CD A MP3 STEREOFÓNNE RÁDIO AM/FM SO STEREOFÓNNYM PREHRÁVAČOM CD A MP3 RADIO STEREOFONICZNE AM/FM Z ODTWARZACZEM STEREOFONICZNYM CD I MP3 AM/FM STEREO RADIO WITH STEREO CD/MP3 PLAYER AM FM SZTEREO RÁDIÓ SZTEREO CD/MP3 LEJÁTSZÓVAL
PŘÍPRAVA K POUŽITÍ
VYBALENÍ A SESTAVENÍ
ZDROJ NAPÁJENÍ

PŘEHRÁVÁNÍ KOMPAKTNÍCH DISKŮ
DŮLEŽITÉ: Otváranie a zatváranie veka CD
- Veko otvorte tak, že ho zdvihnite na doraz, dokial' podpera veka nezaklapne v otvorenej polohe.
- Pokial' chcete veko zavriet', mierne ho zdvihnite, až sa uvolní podpera a potom veko l'ahko zavrite.
ABY NEDOŠLO K POŠKODENIE SKRÍNE ALEBO VEKA, NIKDY SA NEPOKÚŠAJTE VEKO ZAVRIET TLAKOM. VŽDY VEKO NAJSKÓR ZDVIHNITE, ABY SA UVOLNILA JEHO PODPERA.

- Ladiaca stupnica rádia AM.
- Ladiaca stupnica rádia FM.
- Ovládač hlasitosti VOLUME a vypnutí ON/OFF.
- Opierka veka CD.
- Veko CD.
- Tanier CD.
- Ovládací tlačidla CD.
- Reproduktory
- Páčka zdvihnutia krytu CD disku
- Gombík ladenia TUNING
- Tlačidlá funkcií (AM/FM/CD/MP3)
-
Indikátor stareofónneho príjmu FM ST
-
Kontrolka PROGRAMU
- Zobrazenie čísla stopy CD nebo MP3
- Kontrolka PREHRÁVANIE/PAUZA
- Kontrolka OPAKOVANIE
- Tlačidlo OPAKOVANIE /VŠETKO
- Tlačidlo PROGRAM
- Tlačidlo PRESKOČENIE SPÄT
- Tlačidlo PRESKOČENIE VPRED
- Tlačidlo PRESKOČENIE /PAUZA
- Tlačidlo STOP
23.
ZADNÝ PANEL

- Anténa FM
- Vstup pre napájací adaptér
- Výstup pro sluchadlá
NÁVOD NA POUŽITIE
POČÚVANIE RÁDIA
- Zapnite prístroj otočením ovládača hlasitosti. Svetlo ukazovatel'a ladenia sa „rozsvieti“. na nízku úroveň.
- Prepnete prepínač funkcií AM/FM na požadované pásmo (AM nebo FM).
- Otáčaním ladiaceho gombíku TUNING naladíte požadovanú rozhlasovú stanicu.
- Otáčaním gombíku VOLUME nastavte hlasitost' na požadovanú úroveň.
- Ked' skončite počuvane, vypnite prístroj.
INFORMÁCIE O ANTÉNE
PREHRÁVANIE KOMPAKTNÝCH DISKOV
ŹRÓDŁO ZASILANIA
ODTWARZANIE PŁYT KOMPAKTOWYCH
UNPACKING AND SET UP
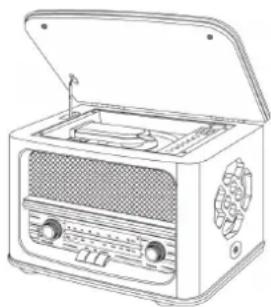
- Carefully remove the unit from the display carton and remove all packing materials from the unit.
- Unwind the FM Antenna wire and extend it to its full lenght.
- Place the unit on stable, level surface, convenient to an AC outlet, out of direct sunlight, and away from sources of excess heat, dust, moisture, humidity or strong magnetic fields.
- Open the CD door. Lift the CD diskette cover, remove the transit cards which was used to secure the laser during shipment and dispose of this card.
- Connect the plug to your AC outlet.
POWER SOURCE
This system is designed to operate on DC 12 V 2A only. Attempting to operate this system from any other power source may cause damage to the system and such damage is not covered by your warranty.
IMPORTANT: Raising and lowering the CD door
- To open the lid, raise it as far as it will go until the lid support bracket „locks“ into the open position.
- To close the lid, lift it upward slightly until the lid support bracket „unlocks“ and then gently lower the lid.
TO AVOID DAMAGING THE CABINET OR THE LID, NEVER FORCE THE LID CLOSE. ALWAYS RAISE THE LID TO RELEASE THE LID SUPPORT BRACKET.
Door support bracket pull forward to relase and lower door

PROTECT YOUR FURNITURE
This model is equipped with non-skid rubber „feet“ to prevent the product from moving when you operate the controls. These „feet“ are made from non-migrating rubber material specially formulated to avoid leaving any marks or stains on your furniture. However certain types of oilbased furniture polished, wood preservatives, or cleaning sprays may cause the rubber „feet“ to soften, and leave marks or rubber residue on the furniture. To prevent any damage to you furniture we strongly recommend that you purchase small self-adhesive felt pads, available at hardware stores and home improvement centres everywhere, and apply these pads to the bottom of the rubber „feet“ before you place the product on fine wooden furniture.
LOCATION OF CONTROL AND INDICATORS
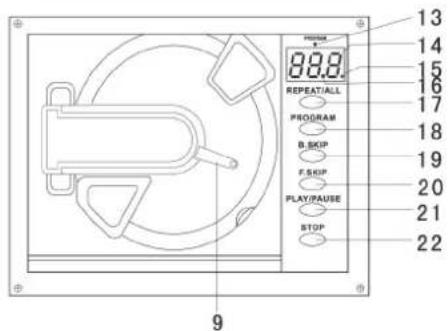
FONT PANEL TOP VIEW (CD PLAYER)
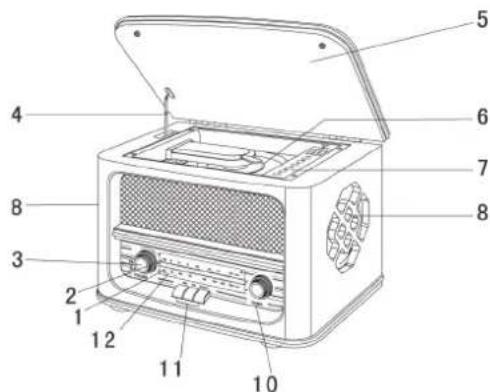

- AM Tuning Dial Scale.
- FM Tuning Dial Scale.
- Power ON/OFF- VOLUME Control.
- CD Door Support Bracket.
- CD Door.
- CD Tray.
- CD Control Buttons.
- Speakers
- CD Diskette Cover
- TUNING Control
-
Function Buttons (AM/FM/CD/MP3)
-
FM ST or CD Indicator
- PROGRAM Indicator
- CD/MP3 Track Number Display
- PLAY/PAUSE Indicator
- Repeat Indicator
- REPEAT/ALL Button
- PROGRAM Button
- B.SKIP Button
- F.SKIP Button
- PLAY/PAUSE Button
- STOP Button
BACK PANEL

- FM Antenna
- DC Input Jack
- Headphone out
OPERATING INSTRUCTIONS
- Power on the unit by turning the volume control knob clockwise position. The Tuning Dial light comes „on“
- Press the function buttons (MW/FM) for the desired band, MW or FM.
- Rotate the TUNNING control to tune to the desired radio station. If you tune to an FM Stereo station, the FM ST. Indicator will come „On“.
- Adjust the VOLUME control as desired.
- When you finish listening turn off the unit.
ANTENNA INFORMATION
AM – The MW bar antenna is inside the cabinet. If AM reception is unsatisfactory try repositioning the cabinet slightly until the internal antenna is picking up the strongest signal.
FM – The FM wire antenna is located on the back cabinet. If necessary adjust the position and direction of this antenna until you find the position that provides the best reception.

PLAYING COMPACT DISCS & MP3 DISCS
NOTE: Although this CD player can read CD-R, CD-RW and MP3 discs in addition to notmal CD, however, the playability of CD-R/RW & MP3 discs may be affected by the type of software that was used to create the discs, as well as the quality and condition of the blank media you are using. 100% playability cannot be guaranteed. This is not an indication of a problem with the player.
- Power on the unit by turning the volume control knob clockwise position.
- Press the function buttons (CD/MP3) for the CD function.
The CD track number display comes „On“
- Place your disc on the CD spindle with the printed label side facing up and lower th CD diskette cover.
- The disc will spin for a few seconds while the player reads the disc at the read time, the discs will automatically playback, then the disc stops and the display shows the total number of tracks on the discs..
- Press the PLAY/PAUSE button to begin playback from the first track. The Play indicator comes „On“.
Note: You may leave the CD door open during playback if you wish, but we recommend closing the door again for better sound and also to prevent excess dust from accumulating on the CD.
- Adjust the VOLUME control as desired.
- Playback will continue until the end of disc. When the disc ends the display again shows the total number of tracks on the disc. You may also stop palyback at any time by pressing the STOP button.


PAUSE CONTROL
In play mode, press the PLAY/PAUSE button once. Pause playback but the disc continues to spin and the display flashes. Press the PLAY/PAUSE button once more to cancel pause and resume playback. The display stops flashing.
SKIPPING TRACKS AND HIGH SPEED MUSIC SEARCH
During CD/R-RW & MP3 Playback, repeatedly press the F. SKIP (Forward Skip) or B. SKIP (Back Skip) button to select the desired track or desired passage of the track. Repeatedly press TRACK+10 or TRACK-10 button on the remote control, it will help you to choose the desired track 10 number tracks one time.

REPEAT PLAYBACK
This feature allows you to continuously repeat a single track or the entire disc.
TO REPEAT A SINGLE TRACK
Press the REPEAT/ALL button once. The repeat indicator flashes. Press the B.SKIP or F.SKIP button to select the desired track, then press the PLAY/PAUSE button to begin repeat playback of the selected track.
TO REPEAT THE ENTIRE DISC
Press the REPEAT/ALL button twice. The repeat indicator remain „On“. Press the PLAY/PAUSE button to begin repeat playback of the entire disc. To cancel repeat playback press the REPEAT/ALL button until the repeat Indicator goes „Off“. Repeat palyback is also cancelled by pressing the STOP button or setting the function selector to the MW or FM position.

PROGRAMMED PLAYBACK
This feature allows you to program of the CD 20 tracks and MP3 99 tracks on a disc for playback in any desired order.
Note: You can program tracks while a disc is stopped or playing.
-
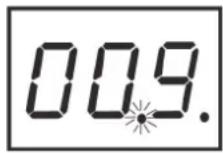
Press the PROGRAM button to enter the Program Mode. The Program number briefly shows „0 0 1“, the „0 0 1“ and the Program indicator flash.
-
Press the F.SKIP or B.SKIP button to select the first track number you wish to enter in the program memory. Example: Track Number „0 0 8“.
-
When the desired track number appears on the display, press the PROGRAM button again to memorize the track. The programnumber briefly shows „0 0 2“, then „0 0 2“ flashes.
-
Repeat steps 2-3, select a different track number each time until you have entered up to CD 20 tracks and MP3 99 tracks in the program memory. Note: You may program the same track number to play multiple times in the program sequence if desired.
-
Press the PLAY/PAUSE button to begin programmed playback. The PROGRAM indicator stop flashing and remains „On“. Playback will begin with the first track you have programmed track has been played.
-
After the last track has been played the player stops and the display shows the total number of tracks on the disc. However the program sequence remains in the memory.
-
The programmed sequence may be cancelled by press STOP button twice, switching to the MW, FM or shutting the system „Off“.


PROGRAM REPEAT PLAYBACK
You can use the program and repeat features together to continuously repeat a programmed sequence of tracks.
- First, program the desired tracks according to steps 1-5 on page 8-9. When programmed playback begins press the REPEAT/ALL button twice to activate all tracks repeat feature.
- The repeat indicator lights and all the tracks in your programmed sequence will be repeated continuously.
- To cancele programmed repeat playback, press the REPAT/ALL button again to repeat indicators go „Off“.
NOTE: All of buttons on the remote control have the same function as these buttons in the CD tary.
SPECIFICATION:
Frequency Range: AM 530 – 1600 kHz FM 87,5 – 108 MHz
Power Source: DC 12 V 2A AC 100-240 V / 50 Hz
Power Consumption: 19 W
Power Consumption Off mode: 0 W
Antennas: Built-in Ferrite Bar for AM External Antenna for FM
Speaker: 4" Dynamic type x 2
Weight (NETTO) 4,3 kg
WE RESERVE THE RIGHT TO CHANGE TECHNICAL SPECIFICATIONS.
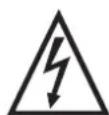
WARNING: DO NOT USE THIS PRODUCT NEAR WATER, IN WETAREAS TO AVOID FIRE OR INJURY OF ELECTRIC CURRENT. ALWAYS TURN OFF THE PRODUCT WHEN YOU DON'T USE IT OR BEFORE A REVISION. THERE AREN'TANY PARTS IN THIS APPLIANCE WHICH ARE REPARABLE BY CONSUMER.ALWAYSAPPEALTOA
QUALIFIED AUTHORIZED SERVICE. THE PRODUCT IS UNDER A DANGEROUS TENTION.
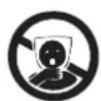

TO AVOID DANGER OF SUFFOCATION, KEEP THIS PLASTIC BAG AWAY FROM BABIES AND CHILDREN. DO NOT USE THIS BAG IN CRIBS, BEDS, CARRIAGES OR PLAYPENS. THIS BAG IS NOT A TOY.
Disposal of old Electrical & Electronic Equipment (Applicable in the European Union and other European countries with separate collection systems).

This symbol on the product or on its packaging indicates that this product shall not be treated as household waste. Instead it shall be handed over to the applicable collection point for the recycling of electrical and electronic equipment. By ensuring this product is disposed of correctly, you will help prevent potential negative consequences for the environment and human health, which could otherwise be caused by inappropriate waste handling of this product. The recycling of materials will
help to conserve natural resources. For more detailed information about recycling of this product, please contact your local Civic Office, your household waste disposal service or the shop where you purchased the product.
Hereby, ETA a.s. declares that the radio equipment type RC606 is in compliance with Directive 2014/53/EU. The full text of the EU declaration of conformity is available at the following internet address: http://www.hyundai-electronics.cz/declaration_of_conformity
ELŐKÉSZÍTÉS A HASZNÁLATBA VÉTELHEZ
KICSOMAGOLÁS ÉS BEÜZEMELÉS
ÁRAMFORRÁS

| EN - English | ||
| Charging adapter | ||
| A | Manufacturer's name or trademark, business registration number and address | "Shenzhen Cenwell Technology Co., Ltd., 2F, 3F, 301, Building C, Shengshun Industrial park, No. 142-4 Junxin Road, Niuhu Community, Guanlan Town, Longhua district, Shenzhen, China" |
| B | Model identifier CW1202000EU | |
| C | Input voltage 100-240 V | |
| D | Input frequency 50/60 Hz | |
| E | Output voltage 12,0 V | |
| F | Output current 2,0 A | |
| G | Output power 24,0 W | |
| H | Average efficiency in active mode 87,78 % | |
| I | Low load efficiency (10%) | 84,62 % |
| J | Power consumption without load | 0,065 W |
Licensed by Hyundai Corporation Holdings, Korea


- NÁVOD K POUŽITÍ / NÁVOD NA POUŽITIE INSTRUKCJA OBSŁUGI / INSTRUCTION MANUAL FELHASZNÁLÓI KÉZIKÖNYV
- PŘÍPRAVA K POUŽITÍ
- VYBALENÍ A SESTAVENÍ
- ZDROJ NAPÁJENÍ
- PŘEHRÁVÁNÍ KOMPAKTNÍCH DISKŮ
- DŮLEŽITÉ: OTVÁRANIE A ZATVÁRANIE VEKA CD
- NÁVOD NA POUŽITIE
- POČÚVANIE RÁDIA
- INFORMÁCIE O ANTÉNE
- PREHRÁVANIE KOMPAKTNÝCH DISKOV
- ŹRÓDŁO ZASILANIA
- ODTWARZANIE PŁYT KOMPAKTOWYCH
- UNPACKING AND SET UP
- POWER SOURCE
- IMPORTANT: RAISING AND LOWERING THE CD DOOR
- PROTECT YOUR FURNITURE
- LOCATION OF CONTROL AND INDICATORS
- BACK PANEL
- OPERATING INSTRUCTIONS
- ANTENNA INFORMATION
- PLAYING COMPACT DISCS & MP3 DISCS
- PAUSE CONTROL
- SKIPPING TRACKS AND HIGH SPEED MUSIC SEARCH
- REPEAT PLAYBACK
- TO REPEAT A SINGLE TRACK
- TO REPEAT THE ENTIRE DISC
- PROGRAMMED PLAYBACK
- PROGRAM REPEAT PLAYBACK
- SPECIFICATION
- WE RESERVE THE RIGHT TO CHANGE TECHNICAL SPECIFICATIONS
- DISPOSAL OF OLD ELECTRICAL & ELECTRONIC EQUIPMENT (APPLICABLE IN THE EUROPEAN UNION AND OTHER EUROPEAN COUNTRIES WITH SEPARATE COLLECTION SYSTEMS)
- ELŐKÉSZÍTÉS A HASZNÁLATBA VÉTELHEZ
- KICSOMAGOLÁS ÉS BEÜZEMELÉS
- ÁRAMFORRÁS
Brand : HYUNDAI
Model : RC606
Category : CD Player