
RTC 611 - CD Player HYUNDAI - Free user manual and instructions
Find the device manual for free RTC 611 HYUNDAI in PDF.

| Product Type | Nostalgic Music System with CD Player, Radio, and Turntable |
| Model | RTC 611 |
| Brand | Hyundai |
| Dimensions (L x W x H) | 491 x 460 x 340 mm |
| Weight | 9.6 kg |
| Power Supply | AC 230V ~ 50Hz |
| Power Consumption | 13W |
| Audio Output Power | 2 x 2W RMS |
| Radio Frequency Bands | FM 88-108 MHz, AM/MW 530-1600 kHz |
| CD Player Frequency Response | 100 Hz - 16 kHz |
| Headphone Jack | 3.5mm stereo, 8-32 Ohms |
| Turntable Speeds | 33, 45, 78 rpm |
| Functions | CD playback, AM/FM radio, Phono turntable, Headphone output, Speaker on/off control |
| Safety Features | Automatic laser shut-off when CD door open, Turntable auto-stop |
| Maintenance | Clean CD with soft cloth; use lens cleaning disc as needed |
| Included Accessories | User manual, built-in AC power cord |
| Spare Parts / Reparability | No user-serviceable parts; contact qualified service personnel |
Frequently Asked Questions - RTC 611 HYUNDAI
User questions about RTC 611 HYUNDAI
0 question about this device. Answer the ones you know or ask your own.
Ask a new question about this device
Download the instructions for your CD Player in PDF format for free! Find your manual RTC 611 - HYUNDAI and take your electronic device back in hand. On this page are published all the documents necessary for the use of your device. RTC 611 by HYUNDAI.
USER MANUAL RTC 611 HYUNDAI
natural_image
Black-and-white photo of a vintage gramophone with floral embroidery, displayed on a wooden base (no visible text or symbols)NÁVOD K POUŽITÍ / NÁVOD NA POUŽITIE INSTRUKCJA OBSŁUGI / INSTRUCTION MANUAL
RETRO HUDEBNÍ SYSTÉM RETRO HUDOBNÝ SYSTÉM CENTRUM MUZYCZNE RETRO NOSTALGIC MUSIC SYSTEM
POHLED ZEPŘEDU
natural_image
Diagram of a mechanical assembly with concentric circles and a tool inserted, no text or symbols presentnatural_image
Two views of a mechanical component with arrows indicating direction, labeled A and B, showing internal structure (no text or symbols beyond labels)Poznámky:
AM/MW 530 – 1600 kHz
Přehrávač CD
Kmitočtová odezva 100 Hz – 16 kHz
Obecné
POHL'AD Z PREDU
1) Vložte diel ① do dielu ②.
2) Vložte diel ③ do dielu ②.
3) Podržte diel ① a otočením dielu ④ ho pripojte k dielu ①.
4) Podržte diel ④ a otočením dielu ⑤ ho pripojte k dielu ④.
5) Potom nasad'te reproduktor do dielu ⑥. Polohu REPRODUKTORA môžete upravit' otáčaním dol'ava alebo doprava.
ZAPNUTIE/VYPNUTIE reproduktora
natural_image
Diagram of a mechanical assembly with concentric circles and a tool inserted (no text or symbols)natural_image
Two circular diagrams showing mechanical components labeled A and B, with arrows indicating motion direction (no text or symbols beyond labels)Poznámky:
AM/MW 530 – 1600 kHz
Prehrávač CD
Kmitočtová odozva 100 Hz – 16 kHz
Obecné
Slúchadlá stereofónny konektor 3,5 mm, 8 – 32 ohmov
natural_image
Symbol of a trash bin crossed with a diagonal line and a horizontal bar below (no text or labels)WIDOK Z PRZODU
natural_image
Diagram of a mechanical assembly with concentric circles and a tool inserted into a housing (no text or symbols)natural_image
Close-up of a mechanical component with labeled parts C and B, showing a curved arrow indicating rotation (no text or symbols beyond labels)Ważne:
Wymiary (DxSxW) 491 (D) x 460 (Š) x 340 (V) mm
Waga (NETTO) 9,6 kg
AM/MW 530 – 1600 kHz
Odtwarzacz CD
natural_image
Symbol of a trash bin crossed with no text or labels, accompanied by a black rectangular block below (no readable text or symbols)Producent: Hyundai Corporation, Seoul, Korea
Importer: DIGISON Polska sp. z o. o., ul. Krzemieniecka 46, Wrocław 54 613 Poland
Dear customer, thank you for purchasing our product. Please read the operating instructions carefully before putting the appliance into operation and keep these instructions including the warranty, the receipt and, if possible, the box with the internal packing.
PRECAUTIONS
- This product is designed for use in moderate dimares. Do not use or install this unit where it would be exposed to direct sunlight or in extremely hot temperatures, or near a radiator, stove or appliance that produces heat.
- Do not take this unit into the bathroom, or near a swimming pool.
Do not use it where it would be exposed to water, moisture, dripping or splashing. - No objects filled with liquids, such as vases, shall be placed on the product.
- No naked flame sources, such as lighted candies, should be placed on the product.
- If water gets inside the unit. Unplug the power cord from the supply socket and consult your dealer.
- Do not handle the power cord with wet hands.
To avoid electric shock, NEVER touch any internal parts.
Repairs/Servicing should be left to qualified service personnel.
- When connecting or disconnecting from the mains supply, hold the plug, not the cord pulling the cord may damage it and could be dangerous.
- Do not drop the unit, spill liquid into it or allow objects to fall in it.
- If the unit fails to operate, disconnect from the mains and cosult qualified service personnel.
- When plugged in, a very small current will flow. To save electricity and for safety when not using the unit for an extended period of time, it is recommended that the product is completely disconnected at the AC mains socket.
- Consult your nearest dealer when damage, disconnection or contact failure is found with the cord.
- Do not bend the cord sharply, pull or twist it.
- Do not modify the power cord in any manner.
- Do not insert any metallic object into the unit.
- Unplug the power cord when there is the possibility of lighting.
- In case of malfunction due to electrostatic discharge just reset the product reconnect of power source may be required to resume normal operation.
POSITIONING THE UNIT
- A minimum distance of 6 INCHES must be maintained to provide sufficient ventilation.
- Allow adequate ventilation for the unit ventilation should not be impeded by covering the ventilation openings with items such as newspapers, table cloths, curtains etc. Do not stand it on a thick pile carpet, or install it in a place with poor air flow.
- Place the unit on a flat even surface.
- Do not use the unit in excessively hot, cold, dusty, damp or humid place.
- Condensation may form inside the CD player if the unit is left anywhere warm and damp, or if you move the unit from somewhere cold (e.g. Your car boot) to a warm room. In this case, let the unit stand for 1-2 hours, or gradually increase the room temperature so the unit is dry before you use it.
- Do not place it where it could be subject to vibration.
- Do not place it where it could be magnetised by a magnet or speaker since there are magnets in the speakers, do not place tapes or magnetic cards on them as recorded data could be erased.
- When this unit is used near a TV, the TV picture could be distorted. if this happens, move the unit away from the TV. If this does not correct the situation, avoid using the unit when the TV is turned on.
- Keep the CD door closed so the lens is not contaminated by dust. DO not touch the lens.
SAFETY MECHANISM:
This unit incorporates a safety interlock mechanism which switches the laser beam on and off, so that when the disc holder is open, the laser beam stops automatically.
LOCATION OF CONTROLS
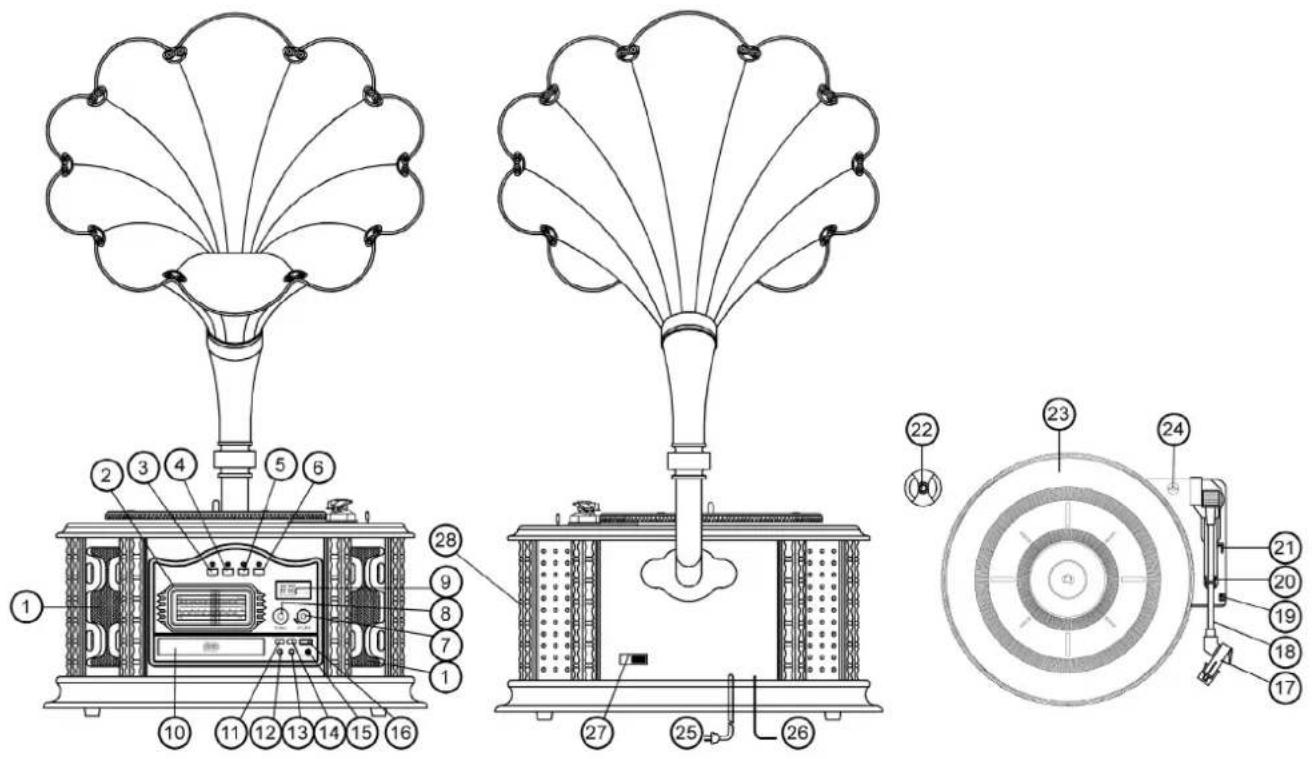
FRONT VIEW
- Speaker Window
- Stereo Radio Display
- Function Button
- CD Button
- AM Button
- FM Button
- Volume Button
-
Tuning Button
-
CD Play/Pause Indicator
- CD Door
- CD LED Play/Pause
- CD Back Button
- CD Next Button
- CD Stop Button
- 3.5mm Earphone Jack
- CD Open/Close Button
TOP VIEW
- Tone Arm
- Tone Arm Rest
- Speed Control Switch
-
Tone Arm Lock
-
Control Perch
- The Big Disc Switchboard
- Turntable
- Turntable Screw
REAR VIEW
- AC Power Cord
- FM ANT
- Speaker on/off Switch
- Power ON/OFF
PREPARATION FOR USE
Carefully unpack the Main unit from its carton(do not attempt to connect Anything at this stage). You should have the following items:
1) This User Guide.
2) Main Unit with built in AC plug.
If any these items is missing, consult your dealer Keep any packaging in case you want to transport the Main unit at some later date.
Connections
- Check that the main supply is 230 V \~ 50 HZ.
- Connect the AC Power cord to the AC outlet.
- Unwind the FM antenna.
AC power operation
- If you wish to power your unit from an electrical outlet, find a location that is close and within easy access of an outlet. Do not stretch the cable-if you cannot reach a supply you should find an alternative location for the system.
- Connect the AC power cord into a suitable outlet and switch on at the mains
- Plug if the socket has a switch.
Switching on Main Power
Your system comes fitted with a cable and plug.
Ensure the voltage is compatible and plug the unit into an outlet to switch on. Press the Power ON/OFF Switch to "ON" position, then the unit is on. Press the Power ON/OFF Switch to "OFF" position, then the unit is off
Adjusting the sound
To adjust the sound turn the Volume Knob located on the Left side of Your system.
Using Headphones
Plug your headphones into the headphones socket located in the middle of your System on the right hand side.
The sound will be heard through the headphones, not the speakers.
Please note:
Headphones should have a 3.5mm diameter stereo plug and an impedance of 8-32 Ohms.
INSTALLATION OF SPEAKER
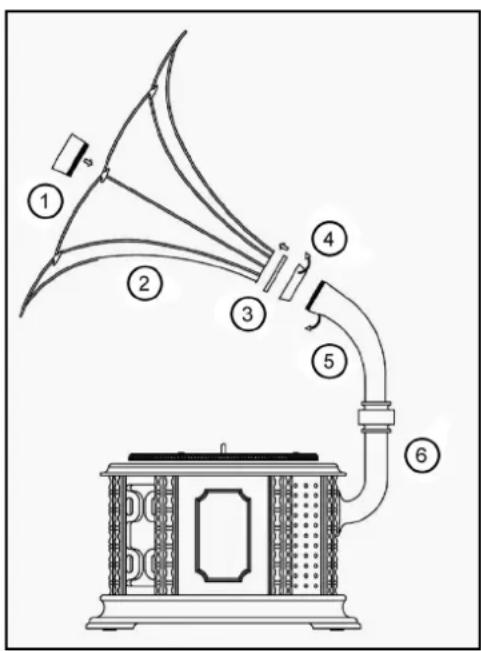
1) Put ① into ②.
2) Put ③ onto ②.
3) Hold ① and turn ④ to right to connect with ①.
4) Hold ④ and turn ⑤ to right to connect with ④.
5) Then put the speaker onto ⑥.
You can choose the position of SPEAKER by turning left or right.
SPEAKER ON/OFF
- If you want the sound come from the speaker, push the SPEAKER ON/FF Switch (27) button to ON position while the unit is playing.
- When you push the SPEAKER ON/OFF Switch (27) to OFF position, there is no sounds from speaker.
Note: When PHONO, CD or RADIO is playing, you can use the SPEAKER ON/OFF switch to control sounds from SPEAKER or not. You can use the VOLUME BUTTON (7) to control volume.
USING THE RADIO
To turn the radio on
Turn the Function knob to Radio position.
Use the AM/FM Band Selector to select the band.
Turn the Tuning Knob to select the channel you want.
Antenna
For best FM reception, extend the wire antenna located at the back of the unit.
Move it around until you get the best FM reception.
To turn the radio off
Set the Function Selector to Off, Phono, CD, or Radio mode.
USING THE PHONO PLAYER
UNPACKING THE TURNTABLE
1) Carefully remove the unit from the styro foam and take it out of the plastic bag.
2) Open the lid and remove the tie-wrap by untwisting and gently sliding it out from under the Tone Arm.
3) Remove packing material.
4) Remove the protective needle cover by gently pulling it toward the front of the Unit.
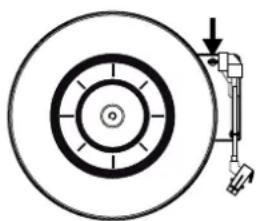
- Using a coin. Turn the large chrome screw (24) clockwise until it is down. This allows the turntable (23) to float on its shock absorbers.
natural_image
Diagram of a mechanical assembly with concentric circles and a tool inserted, no text or symbols present- Release the security Hook by gently pushing it to the right. This will unlock the Tone Arm (17) from the Tone Arm Lock (20). Use the security hook whenever moving the unit to another location.
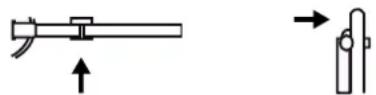
TURNTABLE OPERATION
1) Plug the unit into a standard AC 230 V \~ 50 HZ Outlet.
2) Set the speed control switch (19) to the desired speed (33,45,78rpm)
3) Open the FUNCTION KNOB (3), turn to PHONO position, then use control Perch(21)to put up the arm. Or you can control it by your hand, put it onto the disc gently. Choose the volume what you like by re-adjusting the volume.
4) At the end of the record, the tone arm (17) will automatically stop and the turntable (23) will stop spinning.
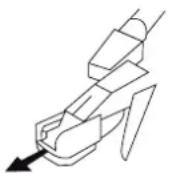
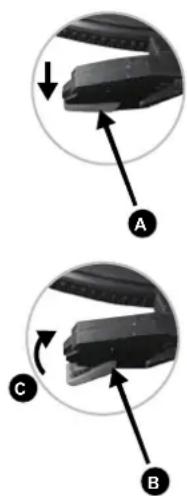
HOW TO REPLACE THE NEEDLE
Removing old needle
1) Set a screwdriver at the tip of the needle and push down to the direction A.
2) Remove the needle by pulling it down and forward.
Installing a new needle
1) Hold the tip of the needle and insert the other edge by pressing in the direction B.
2) Push up in the direction C until it locks at the tip.
CARE & MAINTENANCE
Cleaning CDS
Use a soft cloth to wipe off any fingerprints and dust from the disc surface.
Wipe in a straight line from the centre to the outside of the disc. Small dust Particles and light stains will not affect reproduction quality.
- Never use chemicals such as record sprays, anti-static sprays, benzine or thinners to clean your CDs.
- To reduce the risk of scratches, please put the CD back into the bag after using.
- Do not expose CDs to direct sunlight, high humidity or high temperatures for long periods.
- Do not stick paper or write anything on either side of the CD.
- Only discs displaying this symbol can be played on this unit.
Cleaning the Lens
Adirty lens will cause sound skipping and, if the lens is very dirty, the CD may not work.
Please use cleaning disc.
USING THE CD PLAYER
Handle Compact Discs
To remove a CD from its storage case, press down on the centre of the case and lift the disc out. Hold the disc by the edges. Avoid touching the recorded side of the disc.
Loading CDs
Set the Fubction Selector to the CD position. Open the CD door by hand Do not force open the CD door by hand at any time. Place the CD in the comparment with the label side facing upwards.
Close the CD door by hand. When fully closed the CD will rotate briefly.
The LED Display will indicate the total number of tracks on the disc.
natural_image
Two circular diagrams showing mechanical components with arrows indicating motion, labeled A, B, and C (no text or symbols beyond labels)Please note:
- Do not put anything other than a CD in the compartment. Other objects can damage the mechanism.
- Do not force open/close the CD door by and any time.
- Keep the CD door closed when not in use to prevent dirt and dust from getting into the mechanism.
- Never insert more than one CD at a time.
- If a disc is deeply scratched or too dirty, it may not play.
Playing Cds
Once you have loaded a CD, press the CD Play/Pause Button.
The LED Display Shows the track currently playing. The Play indicator light up when playing.
You can open the CD door at any time by pressing the Stop Button and then open the CD door by hand on the top of the player.
To stop play at any time, press the Stop Button.
Pause
To stop a track temporarily, press the Play/Pause Button.
The disc will pause and LED Display flashing at the current play position.
The Play indicator light up.
To resume play, press the Play/Pause Button again.
Skip Forward or Backward through tracks
The Skip/Seach function can be used at any time during play.
To select the next track, press (NEXT) Forward Skip Button. If you are on the last track of the disc, the player will move to track1.
To go back to the beginning of the current track press (BACK) Backward Skip Button once.
To go back to the previous track press (BACK) Backward Skip Button twice.
To play a particular track, load the disc in the CD player and press (NEXT)
Forward Skip Button until the track number you want is shown in the LED Display.
Press the Play/Pause Button to play that track.
CAUTION
- This product uses a laser. Avoid any direct exposure to the laser beam. Use of controls, adjustments or procedures not listed in this guide may result in hazardous exposure.
- Use this music system according to the manufacturer instructions only.
- Use only as intended.
- Keep away from children, it is not a toy.
SPECIFICATION
Power Supply
AC 230V\~50HZ
Audio Output Power 2WattsX2RMS
Power Consumption 13W
Unit Dimension 491 (L) X 460 (W) X 340 (H) mm
Net Weight (NETTO) 9,6 kg
Radio frequency coverage
FM 88 - 108 MHz
AM/MW 530 – 1600 kHz
CD Player
Frequency Response 100 Hz – 16 kHz
General
Headphones: 3.5 mm stereo jack plug, 8 - 32 Ohms
We reserve the right to change technical specifications.
WARNING: Do not use this product near water, in wet areas to avoid fire or injury of electric current. Always turn off the product when you don't use it or before a revision. There aren't any parts in this appliance which are reparable by consumer. Always appeal to a qualified authorized service. The product is under a dangerous tention.
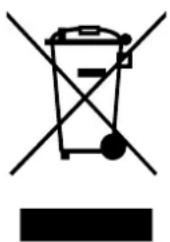
Old electrical appliances, used batteries and accumulators disposal
natural_image
Symbol of a trash bin crossed with a diagonal line and a horizontal bar below (no text or labels)This symbol appearing on the product, on the product accessories or on the product packing means that the product must not be disposed as household waste. When the product/ battery durability is over, please, deliver the product or battery (if it is enclosed) to the respective collection point, where the electrical appliances or batteries will be recycled. The places, where the used electrical appliances are collected, exist in the European Union and in other European countries as well. By proper disposal of the product you can prevent possible
negative impact on environment and human health, which might otherwise occur as a consequence of improper manipulation with the product or battery/ accumulator. Recycling of materials contributes to protection of natural resources. Therefore, please, do not throw the old electrical appliances and batteries/ accumulators in the household waste. Information, where it is possible to leave the old electrical appliances for free, is provided at your local authority, at the store where you have bought the product. Information, where you can leave the batteries and accumulators for free, is provided to you at the store, at your local authority.
Poznámky / Notatka / Notes:
ZÁRUČNÍ LIST
ZÁRUČNÍ PODMÍNKY
Licensed by Hyundai Corporation, Korea


- POHLED ZEPŘEDU
- Poznámky:
- Přehrávač CD
- Obecné
- POHL'AD Z PREDU
- ZAPNUTIE/VYPNUTIE reproduktora
- Prehrávač CD
- WIDOK Z PRZODU
- Ważne:
- Odtwarzacz CD
- PRECAUTIONS
- POSITIONING THE UNIT
- SAFETY MECHANISM:
- FRONT VIEW
- TOP VIEW
- REAR VIEW
- PREPARATION FOR USE
- Connections
- AC power operation
- Switching on Main Power
- Adjusting the sound
- Using Headphones
- Please note:
- INSTALLATION OF SPEAKER
- SPEAKER ON/OFF
- USING THE RADIO
- To turn the radio on
- Antenna
- To turn the radio off
- USING THE PHONO PLAYER
- UNPACKING THE TURNTABLE
- TURNTABLE OPERATION
- HOW TO REPLACE THE NEEDLE
- Removing old needle
- Installing a new needle
- CARE & MAINTENANCE
- Cleaning CDS
- Cleaning the Lens
- USING THE CD PLAYER
- Handle Compact Discs
- Loading CDs
- Playing Cds
- Pause
- Skip Forward or Backward through tracks
- CAUTION
- SPECIFICATION
- Power Supply
- Radio frequency coverage
- CD Player
- General
- Old electrical appliances, used batteries and accumulators disposal
- ZÁRUČNÍ LIST
- ZÁRUČNÍ PODMÍNKY
Brand : HYUNDAI
Model : RTC 611
Category : CD Player