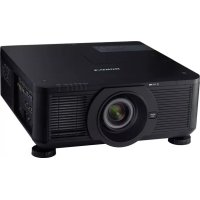
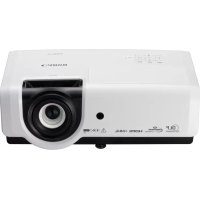
LV-7295 - Projecteur professionnel CANON - Notice d'utilisation et mode d'emploi gratuit
Retrouvez gratuitement la notice de l'appareil LV-7295 CANON au format PDF.

| Type de produit | Projecteur multimédia |
| Résolution native | XGA (1024 x 768) |
| Luminosité | 3000 lumens |
| Contraste | 2000:1 |
| Technologie d'affichage | DLP |
| Durée de vie de la lampe | 3000 heures (mode normal), 4000 heures (mode éco) |
| Alimentation électrique | 100-240 V, 50/60 Hz |
| Dimensions approximatives | 320 x 240 x 90 mm |
| Poids | 2.5 kg |
| Connectivité | HDMI, VGA, S-Video, Composite Video, Audio In/Out |
| Fonctions principales | Projection d'images, vidéos et présentations, compatibilité avec divers formats de fichiers |
| Entretien et nettoyage | Nettoyage régulier du filtre à air, remplacement de la lampe selon l'utilisation |
| Pièces détachées et réparabilité | Lampe de remplacement, filtre à air, support de montage |
| Sécurité | Ne pas exposer à l'humidité, éviter les chocs, respecter les consignes de sécurité lors de l'utilisation |
| Informations générales | Idéal pour les présentations en milieu professionnel et éducatif, garantie constructeur de 2 ans |
FOIRE AUX QUESTIONS - LV-7295 CANON
Questions des utilisateurs sur LV-7295 CANON
0 question sur cet appareil. Repondez a celles que vous connaissez ou posez la votre.
Poser une nouvelle question sur cet appareil
Téléchargez la notice de votre Projecteur professionnel au format PDF gratuitement ! Retrouvez votre notice LV-7295 - CANON et reprennez votre appareil électronique en main. Sur cette page sont publiés tous les documents nécessaires à l'utilisation de votre appareil LV-7295 de la marque CANON.
MODE D'EMPLOI LV-7295 CANON
POWER PROJECTOR LV-7290
LV-7295
LV-7390
LV-8225
LV-7391
LV-7296
BASIC SERIAL COMMAND SPECIFICATIONS
Revision 1
- CONTENTS -
- Overview....3
- Serial Interface Specifications....3
2.1. Transfer Specifications .... 3
2.2. Connection....3
-
Notes for Communication......4
-
Functional Execution Command Table....5
-
Status Read Command Table 7
-
Functional Execution Command......8
6.1. Format 8
6.2. Command Pipelining....8
6.3. Transfer Example....8
6.4. Operation Requirements....9
6.5. POWER ON Command....10
6.6. POWER OFF Command (Quick Power OFF) 10
6.7. POWER OFF Command....10
6.8. Computer 1 Command....10
6.9. Computer 2 Command....10
6.10. Video Command 11
6.11. VOLUME + Command 11
6.12. VOLUME – Command.... 11
6.13. AUDIO MUTE ON Command....11
6.14. AUDIO MUTE OFF Command 11
6.15. VIDEO MUTE ON Command 12
6.16. VIDEO MUTE OFF Command 12
6.17. Screen Normal size Command....12
6.18. Screen Wide size Command....12
6.19. Image Standard Command 12
6.20. Image Real Command....12
6.21. Image Cinema Command....13
6.22. Image1 Command....13
6.23. Image2 Command....13
6.24. Image3 Command....13
6.25. Image4 Command....13
6.26. Image Blackboard (Green) Command 13
6.27. Image Dynamic Command....13
6.28. MENU ON Command....14
6.29. MENU OFF Command 14
6.30. DISPLAY CLEAR Command 14
6.31. BRIGHTNESS + Command 14
6.32. BRIGHTNESS – Command .... 14
6.33. IMAGE (Toggle) Command 14
6.34. Direct on Setting Command 15
6.35. Direct on Cancel Command....15
6.36. Power Management Ready Command....15
6.37. Power Management OFF Command 15
6.38. Power Management Shut down Command 15
6.39. D.ZOOM + Command 15
6.40. D.ZOOM – Command....16
6.41. Computer1 S-Video Command....16
6.42. Image Colorboard Command 16
6.43. POINTER RIGHT Command....16
6.44. POINTER LEFT Command 16
6.45. POINTER UP Command....16
6.46. POINTER DOWN Command....17
6.47. ENTER Command....17
6.48. FREEZE ON Command 17
6.49. FREEZE OFF Command....17
6.50. Computer 1 Analog RGB Command....17
6.51. Computer 1 Scart Command....17
6.52. Computer 1 Component Command .... 18
6.53. AUTO PC ADJ. Command....18
6.54. PRESENTATION TIMER Command 18
6.55. PRESENTATION TIMER (Exit) Command 18
6.56. KEYSTONE ↑ Command....18
6.57. KEYSTONE ↓ Command....18
7. Status Read Command....19
7.1. Format 19
7.2. Transfer Example....19
7.3. Operation Requirements....19
7.4. Status Read Command 19
7.5. Input Mode Read Command 22
7.6. Lamp Time Read Command 22
7.7. Setting Read Command....22
7.8. Temp Read Command....22
7.9. Lamp Mode Read Command 23
1. Overview
1.1. These specifications define projector control commands for LV-7290/LV-7295/LV-7390/LV-8225/LV-7391/LV-7296.
1.2. The projector control commands are used to remotely control a projector through RS-232C from a computer.
2. Serial Interface Specifications
2.1. Transfer Specifications
| Item | Specifications |
| Synchronous system | Asynchronous |
| Transmission Speed | 9600 / 19200 |
| Data Length | 8 bit |
| Parity | N/A |
| Stop Bit | 1 |
| Flow Control | N/A |
1) Transmission speed: initial setting value is 19200.
2) Transmission speed can be changed in service mode.
2.2. Connection
Dedicated serial cable must be used for connection to a computer and a projector.
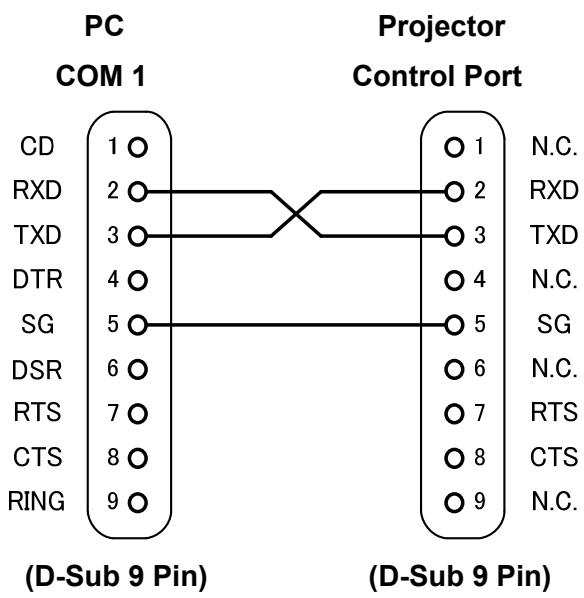
flowchart
graph LR
    subgraph PC COM 1
        CD["CD"] --> 1["1"]
        RXD["RXD"] --> 2["2"]
        TXD["TXD"] --> 3["3"]
        DTR["DTR"] --> 4["4"]
        SG["SG"] --> 5["5"]
        DSR["DSR"] --> 6["6"]
        RTS["RTS"] --> 7["7"]
        CTS["CTS"] --> 8["8"]
        RING["RING"] --> 9["9"]
    end

    subgraph Projector Control Port
        N.C.NC.[N.C.] --> 1_1["1"]
        RXD_RXD["RXD"] --> 2_2["2"]
        TXD_TXD["TXD"] --> 3_3["3"]
        N.C.N.C.[N.C.] --> 4_4["4"]
        SG_SG["SG"] --> 5_5["5"]
        N.C.N.C.[N.C.] --> 6_6["6"]
        RTS_RTS["RTS"] --> 7_7["7"]
        CTS_CTS["CTS"] --> 8_8["8"]
        N.C.N.C.[N.C.] --> 9_9["9"]
    end

    PC COM 1 --> Projector_Control_Port
    Projector_Control_Port --> PC_COM 1
    Projector_Control_Port --> PC_COM 1
3. Notes for Communication
- The projector control command is defined as one command/one line that starts with "C" and ends with carriage return (0x0D).
- There are two types of Commands: Functional Execution Commands and Status Read Commands.
Example of Functional Execution Command: "C05" [CR]
Example of Status Read Command: "CR0" [CR]
- When it takes more than one second to receive one command, it does not operate.
The information of buffer is cleared when it takes more than one second to receive carriage return (0x0D) after the projector receives the first data "C".
- For Command pipelining, wait for the interval of 100ms after receiving a response.
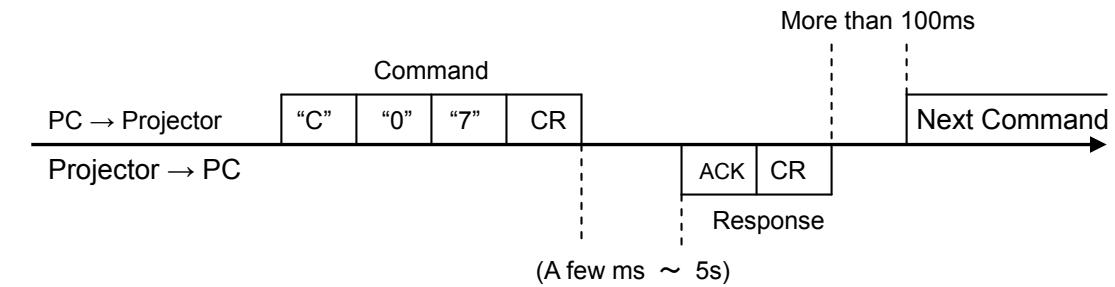
flowchart
graph LR
    A["PC → Projector"] --> B["C"]
    B --> C["0"]
    C --> D["7"]
    D --> E["CR"]
    E --> F["Response"]
    F --> G["ACK"]
    G --> H["CR"]
    H --> I["Next Command"]
    style A fill:#f9f,stroke:#333
    style I fill:#bbf,stroke:#333
    note right of F (A few ms ~ 5s)
    note right of H (More than 100ms)
3.4.1. When a command is issued before receiving a response, the function is not executed properly.
3.4.2. Except for when there is no Response for more than 5 seconds.
- It takes about 5 seconds for internal initialization after plugging in AC power. During this time, it cannot process commands. Do not issue any command.
- The number of characters of response to Status Read Commands depends on commands. Please see [7. Status Read Commands].
-
Characters for commands must be Capital (A - Z).
-
Functional Execution Command Table
| Command | Item | Command | Item |
| C00 | POWER ON | C20 | BRIGHTNESS + |
| C01 | POWER OFF(Quick Power OFF) | C21 | BRIGHTNESS - |
| C02 | POWER OFF | C22 | ——— |
| C03 | ——— | C23 | ——— |
| C04 | ——— | C24 | ——— |
| C05 | Computer 1 | C25 | ——— |
| C06 | Computer 2 | C26 | ——— |
| C07 | Video | C27 | IMAGE (Toggle) |
| C08 | ——— | C28 | Direct on Enable |
| C09 | VOLUME + | C29 | Direct on Disable |
| C0A | VOLUME - | C2A | Power Management Ready |
| C0B | AUDIO MUTE ON | C2B | Power Management OFF |
| C0C | AUDIO MUTE OFF | C2C | ——— |
| C0D | VIDEO MUTE ON | C2D | ——— |
| C0E | VIDEO MUTE OFF | C2E | Power Management Shut down |
| C0F | Screen Normal size(4:3) | C2F | ——— |
| C10 | Screen Wide size(16:9) | C30 | D.ZOOM + |
| C11 | Image Standard | C31 | D.ZOOM - |
| C12 | Image Real | C32 | ——— |
| C13 | Image Cinema | C33 | ——— |
| C14 | Image 1 | C34 | Computer 1 S-video |
| C15 | Image 2 | C35 | ——— |
| C16 | Image 3 | C36 | ——— |
| C17 | Image 4 | C37 | ——— |
| C18 | Blackboard | C38 | ——— |
| C19 | Dynamic | C39 | Image Colorboard |
| C1A | ——— | C3A | POINTER RIGHT |
| C1B | ——— | C3B | POINTER LEFT |
| C1C | MENU ON | C3C | POINTER UP |
| C1D | MENU OFF | C3D | POINTER DOWN |
| C1E | DISPLAY CLEAR | C3E | ——— |
| C1F | ——— | C3F | ENTER |
—— means no function.
| Command | Item | Command | Item |
| C40 | ——— | C80 | ——— |
| C41 | ——— | C81 | ——— |
| C42 | ——— | C82 | ——— |
| C43 | FREEZE ON | C83 | ——— |
| C44 | FREEZE OFF | C84 | ——— |
| C45 | ——— | C85 | ——— |
| C46 | ——— | C86 | ——— |
| C47 | ——— | C87 | ——— |
| C48 | ——— | C88 | ——— |
| C49 | ——— | C89 | Auto PC ADJ. |
| C4A | ——— | C8A | PRESENTATION TIMER |
| C4B | ——— | C8B | PRESENTATION TIMER(Exit) |
| C4C | ——— | C8C | ——— |
| C4D | ——— | C8D | ——— |
| C4E | ——— | C8E | KEYSTONE ↑ |
| C4F | ——— | C8F | KEYSTONE ↓ |
| C50 | Computer 1 Analog RGB | C90 | ——— |
| C51 | Computer 1 Scart | C91 | ——— |
| C52 | ——— | C92 | ——— |
| C53 | ——— | C93 | ——— |
| C54 | Computer 1 Component | C94 | ——— |
—— means no function.
- Status Read Command Table
| Command | Item | Memo |
| CR0 | Status Read | |
| CR1 | Input Mode Read | |
| CR2 | ——— | |
| CR3 | (Corresponding) Lamp Time Read | |
| CR4 | Setting Read | |
| CR5 | ——— | |
| CR6 | Temp Read | |
| CR7 | Lamp Mode Read |
—— means no function.
6. Functional Execution Command
6.1. Format
6.1.1 PC issues a command in format as below.
"C" COMMAND [CR]
Command: two characters (See Basic Functional Execution Command Table)
A projector changes received data to decode and returns a result after being ready to receive next command.
[ACK][CR] : (0x06、0x0D)When received Functional Execution Commands.
6.1.2 “?”[CR]: When the received data cannot be decoded.
6.2. Command Pipelining
When some functions need the command pipelining, the performance is the same as that of the remote control;
6.2.1. System: issues any command every 100 ms.
6.2.2. When receiving the appropriate command, the function is executed for 120 ms from the moment.
6.2.3. When receiving the same command continuously within 120 ms, the function is executed for another 120 ms from the moment.
6.2.4. When there is no incoming command after 120 ms, the execution of pipelining is stopped.
6.2.5. When the projector receives other incoming commands within 120ms, the execution of pipelining is stopped.
6.3. Transfer Example
Switch the projector to video mode with Basic Command.
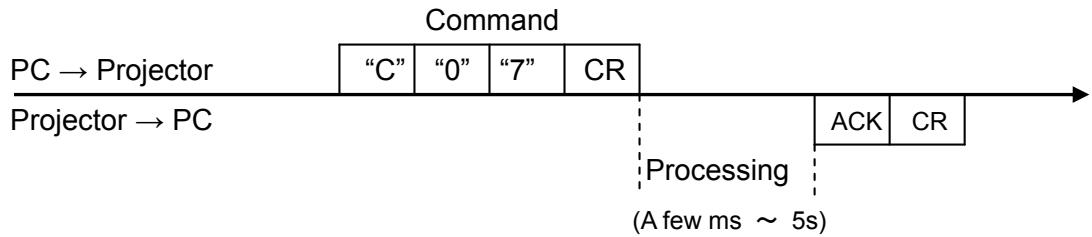
flowchart
graph LR
    A["PC → Projector"] --> B["C"]
    B --> C["0"]
    C --> D["7"]
    D --> E["CR"]
    F["Projector → PC"] --> G["Processing (A few ms ~ 5s)"]
    G --> H["ACK"]
    G --> I["CR"]
6.4. Operation Requirements
1) When the projector's status is any of below, Functional Execution Commands are limited.
| Projector Status | Available Functional Execution Commands |
| In Standby | C00: POWER ON |
| Countdown in process | C00: POWER ON → Countdown is terminatedC01: POWER OFFC02: POWER OFF → Countdown is terminated |
| Cooling Down in process | NONE (No Execution) |
| Cooling Down due to Abnormal Temperature | NONE (No Execution) |
| Abnormal Temperature Status | NONE (No Execution) |
| Abnormal Power Status | NONE (No Execution) |
| Power Save / Cooling Down in process | NONE (No Execution) |
| Power Save Status | C00: POWER ONC01: POWER OFF |
| Auto input : On1/On2 setting | Although transmit Input source commands, Auto input does not operate. |
Note) When the status is as above, even if the projector receives other commands, it returns [ACK] [CR].
2) When Eco mode is selected in Standby mode of Setting menu and projector is in Standby, Functional Execution Commands are invalid.
6.5. POWER ON Command
| Command | “C00” [CR] | |
| Detail | Power ONWhen already Power is ON, nothing is done.When sending this command during processing Countdown, Countdown is terminated. | |
| Response | Acceptable | [ACK] [CR] |
| Unacceptable | “?”[CR] | |
6.6. POWER OFF Command (Quick Power OFF)
| Command | “C01” [CR] | |
| Detail | Power OFF (Standby)When Power is OFF with POWER button of the projector and remote control, “Power OFF?” is displayed. However, as soon as this command is sent, Quick Power OFF is executed. | |
| Response | Acceptable | [ACK] [CR] |
| Unacceptable | “?”[CR] | |
6.7. POWER OFF Command
| Command | “C02” [CR] | |
| Detail | Power OFF (Standby).The command operates the same Power OFF function as POWER button of the projector and remote control.Once this command is sent, “Power OFF?” is displayed. If this command is sent again while it is displayed, Power OFF is executed.When sending this command during Countdown, Countdown is terminated. | |
| Response | Acceptable | [ACK] [CR] |
| Unacceptable | “?”[CR] | |
6.8. Computer 1 Command
| Command | “C05” [CR] | |
| Detail | Select Computer 1 InputAlthough projector returns “OK”, Auto input is not executed with this command while Input search is set to On1 or On2. | |
| Response | Acceptable | [ACK] [CR] |
| Unacceptable | “?”[CR] | |
6.9. Computer 2 Command
| Command | “C06” [CR] | |
| Detail | Select Computer2 InputNote 1) Although projector returns “OK”, Auto input is not executed with this command while Input search is set to On1 or On2.Note 2) When “Monitor out” is selected in Terminal menu, projector returns “OK” and displays “Monitor out” on the screen. | |
| Response | Acceptable | [ACK] [CR] |
| Unacceptable | “?”[CR] | |
6.10. Video Command
| Command | “C07” [CR] | |
| Detail | Select Video InputAlthough projector returns “OK”, Auto input is not executed with this command while Input search is set to On1 or On2/ | |
| Response | Acceptable | [ACK] [CR] |
| Unacceptable | “?”[CR] | |
6.11. VOLUME + Command
| Command | “C09” [CR] | |
| Detail | Volume Up.This command operates the same way as “VOLUME+” button of the projector and remote control. | |
| Response | Acceptable | [ACK] [CR] |
| Unacceptable | “?”[CR] | |
6.12. VOLUME – Command
| Command | “C0A” [CR] | |
| Detail | Volume DownThis command operates the same way as “VOLUME-” button of the projector and remote control. | |
| Response | Acceptable | [ACK] [CR] |
| Unacceptable | “?”[CR] | |
6.13. AUDIO MUTE ON Command
| Command | “C0B” [CR] | |
| Detail | Sound Mute ON.This command works the same way as “MUTE” button of the remote control for Mute ON, but does not work for Mute OFF. | |
| Response | Acceptable | [ACK] [CR] |
| Unacceptable | “?”[CR] | |
6.14. AUDIO MUTE OFF Command
| Command | “C0C” [CR] | |
| Detail | Sound Mute OFF.This command works the same way as “MUTE” button of the remote control for Mute OFF, but does not work for Mute ON. | |
| Response | Acceptable | [ACK] [CR] |
| Unacceptable | “?”[CR] | |
6.15. VIDEO MUTE ON Command
| Command | “C0D”[CR] | |
| Detail | Video Mute ON.This command works the same way as “BLANK” button of the remote control for Blank ON, but does not work for Blank OFF. | |
| Response | Acceptable | [ACK] [CR] |
| Unacceptable | “?”[CR] | |
6.16. VIDEO MUTE OFF Command
| Command | “C0E” [CR] | |
| Detail | Video Mute OFF.This command works the same way as “BLANK” button of remote control for Blank OFF, but does not work for Blank ON. | |
| Response | Acceptable | [ACK] [CR] |
| Unacceptable | “?”[CR] | |
6.17. Screen Normal size Command
| Command | “C0F” [CR] | |
| Detail | Set Aspect mode to Normal.This command is invalid while D.Zoom is in operation. | |
| Response | Acceptable | [ACK] [CR] |
| Unacceptable | “?”[CR] | |
6.18. Screen Wide size Command
| Command | “C10” [CR] | |
| Detail | Set Aspect mode to 16:9.This command is invalid while D.Zoom is in operation. | |
| Response | Acceptable | [ACK] [CR] |
| Unacceptable | “?”[CR] | |
6.19. Image Standard Command
| Command | “C11” [CR] | |
| Detail | Set image to Standard mode. | |
| Response | Acceptable | [ACK] [CR] |
| Unacceptable | “?”[CR] | |
6.20. Image Real Command
| Command | “C12” [CR] | |
| Detail | Set image to High contrast mode. | |
| Response | Acceptable | [ACK] [CR] |
| Unacceptable | “?”[CR] | |
6.21. Image Cinema Command
| Command | “C13” [CR] | |
| Detail | Set image to Cinema mode. | |
| Response | Acceptable | [ACK] [CR] |
| Unacceptable | “?”[CR] | |
6.22. Image1 Command
| Command | “C14” [CR] | |
| Detail | Set image to User 1 mode. | |
| Response | Acceptable | [ACK] [CR] |
| Unacceptable | “?”[CR] | |
6.23. Image2 Command
| Command | “C15” [CR] | |
| Detail | Set image to User 2 mode. | |
| Response | Acceptable | [ACK] [CR] |
| Unacceptable | “?”[CR] | |
6.24. Image3 Command
| Command | “C16” [CR] | |
| Detail | Set image to User 3 mode. | |
| Response | Acceptable | [ACK] [CR] |
| Unacceptable | “?”[CR] | |
6.25. Image4 Command
| Command | “C17” [CR] | |
| Detail | Set image to User 4 mode. | |
| Response | Acceptable | [ACK] [CR] |
| Unacceptable | “?”[CR] | |
6.26. Image Blackboard (Green) Command
| Command | “C18” [CR] | |
| Detail | Set image to Blackboard (Green) mode. | |
| Response | Acceptable | [ACK] [CR] |
| Unacceptable | “?”[CR] | |
6.27. Image Dynamic Command
| Command | “C19” [CR] | |
| Detail | Set image to Presentation mode. | |
| Response | Acceptable | [ACK] [CR] |
| Unacceptable | “?”[CR] | |
6.28. MENU ON Command
| Command | “C1C” [CR] | |
| Detail | Display On-Screen Display Menu. | |
| Response | Acceptable | [ACK] [CR] |
| Unacceptable | “?”[CR] | |
6.29. MENU OFF Command
| Command | “C1D” [CR] | |
| Detail | Hide On-Screen Display Menu. | |
| Response | Acceptable | [ACK] [CR] |
| Unacceptable | “?”[CR] | |
6.30. DISPLAY CLEAR Command
| Command | “C1E” [CR] | |
| Detail | Hide On-Screen Display.Hide On-Screen Display unconditionally. | |
| Response | Acceptable | [ACK] [CR] |
| Unacceptable | “?”[CR] | |
6.31. BRIGHTNESS + Command
| Command | “C20” [CR] | |
| Detail | Brightness of User Control +1. | |
| Response | Acceptable | [ACK] [CR] |
| Unacceptable | “?”[CR] | |
6.32. BRIGHTNESS – Command
| Command | “C21” [CR] | |
| Detail | Brightness of User Control –1. | |
| Response | Acceptable | [ACK] [CR] |
| Unacceptable | “?”[CR] | |
6.33. IMAGE (Toggle) Command
| Command | “C27”[CR] | |
| Detail | Switch Image Setting status.This command works the same way as “IMAGE” button of the remote control. | |
| Response | Acceptable | [ACK] [CR] |
| Unacceptable | “?”[CR] | |
6.34. Direct on Setting Command
| Command | “C28” [CR] | |
| Detail | Enable Direct power on function.This status is stored in EEPROM and retained regardless of Power OFF/ON. | |
| Response | Acceptable | [ACK] [CR] |
| Unacceptable | “?”[CR] | |
6.35. Direct on Cancel Command
| Command | “C29” [CR] | |
| Detail | Cancel Direct power on function.This status is stored in EEPROM and retained regardless of Power OFF/ON. | |
| Response | Acceptable | [ACK] [CR] |
| Unacceptable | “?”[CR] | |
6.36. Power Management Ready Command
| Command | “C2A” [CR] | |
| Detail | Set Power management mode to Standby mode.This status is stored in EEPROM and retained regardless of Power ON/OFF. | |
| Response | Acceptable | [ACK] [CR] |
| Unacceptable | “?”[CR] | |
6.37. Power Management OFF Command
| Command | “C2B” [CR] | |
| Detail | Set Power management mode to OFF mode.This status is stored in EEPROM and retained regardless of Power ON/OFF. | |
| Response | Acceptable | [ACK] [CR] |
| Unacceptable | “?”[CR] | |
6.38. Power Management Shut down Command
| Command | “C2E” [CR] | |
| Detail | Set Power management mode to Exit mode.This status is stored in EEPROM and retained regardless of Power OFF/ON. | |
| Response | Acceptable | [ACK] [CR] |
| Unacceptable | “?”[CR] | |
6.39. D.ZOOM + Command
| Command | “C30” [CR] | |
| Detail | Enter Digital Zoom mode and expand image size.This command works the same way as “D.ZOOM +” button of the remote control. | |
| Response | Acceptable | [ACK] [CR] |
| Unacceptable | “?”[CR] | |
6.40. D.ZOOM - Command
| Command | “C31” [CR] | |
| Detail | Enter Digital Zoom mode and reduce image size.This command works the same as “D.ZOOM -” button of the remote control. | |
| Response | Acceptable | [ACK] [CR] |
| Unacceptable | “?”[CR] | |
6.41. Computer1 S-Video Command
| Command | “C34” [CR] | |
| Detail | Select S-Video of Computer1 input.Although projector returns “OK”, Auto input is not executed with this command while Auto input is set to On1 or On2, | |
| Response | Acceptable | [ACK] [CR] |
| Unacceptable | “?”[CR] | |
6.42. Image Colorboard Command
| Command | “C39” [CR] | |
| Detail | Set image to Colorboard mode. | |
| Response | Acceptable | [ACK] [CR] |
| Unacceptable | “?”[CR] | |
6.43. POINTER RIGHT Command
| Command | “C3A” [CR] | |
| Detail | Move the Pointer of On-Screen Display Menu to the right.This command works differently from the pointer “>” of the projector and remote control, and has no function of Volume +. | |
| Response | Acceptable | [ACK] [CR] |
| Unacceptable | “?”[CR] | |
6.44. POINTER LEFT Command
| Command | “C3B” [CR] | |
| Detail | Move the Pointer of On-Screen Display Menu to the left.This command works differently from the pointer “<” of the projector and remote control, and has no function of Volume -. | |
| Response | Acceptable | [ACK] [CR] |
| Unacceptable | “?”[CR] | |
6.45. POINTER UP Command
| Command | “C3C” [CR] | |
| Detail | Move up the Pointer of On-Screen Display Menu.This command works the same way as the pointer “▲” of the projector. | |
| Response | Acceptable | [ACK] [CR] |
| Unacceptable | “?”[CR] | |
6.46. POINTER DOWN Command
| Command | “C3D” [CR] | |
| Detail | Move down the Pointer of On-Screen Display Menu.This command works the same way as the pointer “▼” of the projector. | |
| Response | Acceptable | [ACK] [CR] |
| Unacceptable | “?”[CR] | |
6.47. ENTER Command
| Command | “C3F” [CR] | |
| Detail | This command works the same way as “OK” button of the projector and remote control. | |
| Response | Acceptable | [ACK] [CR] |
| Unacceptable | “?”[CR] | |
6.48. FREEZE ON Command
| Command | “C43” [CR] | |
| Detail | Freeze on-screen image.This command works the same way as “FREEZE” button of the remote control for Freeze ON, but does not work for Freeze OFF. | |
| Response | Acceptable | [ACK] [CR] |
| Unacceptable | “?”[CR] | |
6.49. FREEZE OFF Command
| Command | “C44” [CR] | |
| Detail | Cancel Freeze mode.This command works the same way as “FREEZE” button of the remote control for Freeze OFF, but does not work for Freeze ON. | |
| Response | Acceptable | [ACK] [CR] |
| Unacceptable | “?”[CR] | |
6.50. Computer 1 Analog RGB Command
| Command | “C50” [CR] | |
| Detail | Select Analog RGB input in Computer 1.Although projector returns “OK”, Auto input is not executed with this command while Input Auto input set to On1 or On2. | |
| Response | Acceptable | [ACK] [CR] |
| Unacceptable | “?”[CR] | |
6.51. Computer 1 Scart Command
| Command | “C51” [CR] | |
| Detail | Select Scart input in Computer 1Although projector returns “OK”, Auto input is not executed with this command while Auto input is set to On1 or On2. | |
| Response | Acceptable | [ACK] [CR] |
| Unacceptable | “?”[CR] | |
6.52. Computer 1 Component Command
| Command | “C54” [CR] | |
| Detail | Select Component input in Computer 1.Although projector returns “OK”, Auto input is not executed with this command while Auto input is set to On1 or On2. | |
| Response | Acceptable | [ACK] [CR] |
| Unacceptable | “?”[CR] | |
6.53. AUTO PC ADJ. Command
| Command | “C89” [CR] | |
| Detail | Execute Auto PC function.This command operates the same as “AUTO PC” of main menu.Projector suspends Auto PC operation when receiving this command another time. | |
| Response | Acceptable | [ACK] [CR] |
| Unacceptable | “?”[CR] | |
6.54. PRESENTATION TIMER Command
| Command | “C8A” [CR] | |
| Detail | Execute P- timer.This command works the same way as “P-TIMER” button of the remote control. | |
| Response | Acceptable | [ACK] [CR] |
| Unacceptable | “?”[CR] | |
6.55. PRESENTATION TIMER (Exit) Command
| Command | “C8B” [CR] | |
| Detail | Exit P- timer menu.This command works the same as holding on the “P-TIMER” button of the remote control | |
| Response | Acceptable | [ACK] [CR] |
| Unacceptable | “?”[CR] | |
6.56. KEYSTONE ↑Command
| Command | “C8E” [CR] | |
| Detail | Correct keystone distortion by reducing upper part of image. | |
| Response | Acceptable | [ACK] [CR] |
| Unacceptable | “?”[CR] | |
6.57. KEYSTONE ↓Command
| Command | “C8F” [CR] | |
| Detail | Correct keystone distortion by reducing down part of image. | |
| Response | Acceptable | [ACK] [CR] |
| Unacceptable | “?”[CR] | |
7. Status Read Command
7.1.Format
7.1.1. PC issues commands in format as below;
"CR" Command [CR]
Command : 1 character(See Basic Status Read Command Table)
7.1.2. When a projector receives the appropriate command, it returns a character line as the required data.
Required Data [CR]
Required Data : A character line(See Basic Status Read Command Table)
7.1.3. When the received data cannot be decoded, the projector returns “?” [CR].
7.2.Transfer Example
Get input mode for projector with basic commands
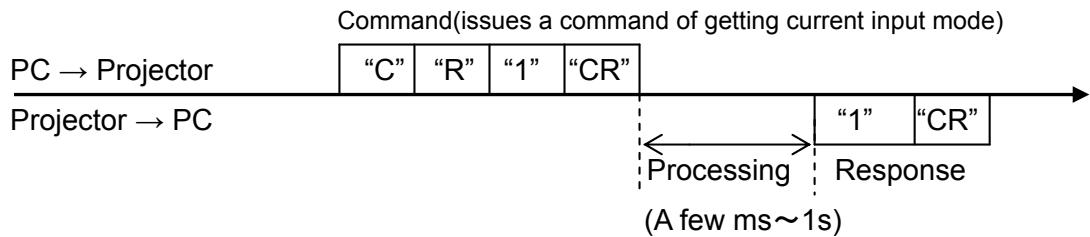
flowchart
graph LR
    A["PC → Projector"] --> B["C"]
    B --> C["R"]
    C --> D["1"]
    D --> E["CR"]
    E --> F["1"]
    F --> G["CR"]
    G --> H["Processing (A few ms~1s)"]
    H --> I["Response"]
    I --> J["1"]
    J --> K["CR"]
(Shows Computer 1 is selected)
7.3. Operation Requirements
When Eco mode is selected in Standby mode of Setting menu and projector is in Standby, Status Read Commands are invalid.
7.4. Status Read Command
| Command | “CR0” [CR] | |
| Detail | Get the projector's operating status | |
| Response | Acceptable | “%1” [CR] |
| %1 | “00” = Power ON“80” = Standby“40” = Countdown in process“20” = Cooling Down in process“10” = Power Failure“28” = Cooling Down in process due to Temperature Anomaly“88” = Coming back after Temperature Anomaly“24” = Power Save/Cooling Down in process“04” = Power Save“21” = Cooling Down is in process after Power off due to lamp failure“81” = Standby after Cooling Down due to lamp failure | |
| Unacceptable | “?” [CR] | |
[Details of Response]
"00" [CR]
Status : Power ON
Normal image is on the screen.
"80" [CR]
Status: Standby
When the status is Standby, Status Read Commands are always acceptable, but Functional Execution Commands are not acceptable except POWER ON Command.
"40" [CR]
Status: Countdown in process
When “Display” in Setting Menu is ON and POWER ON is executed, it starts Countdown.
When “Display” in Setting Menu is OFF, processing Countdown is not executed and the status quickly moves to Power ON.
"20" [CR]
Status: Cooling Down in process
When the status is Power ON, and POWER OFF Command ("C01"[CR]) is executed, it moves to Cooling Down status.
This status automatically moves to Standby after lamp turns off and the fan spin finishes after about 90 seconds. The fan spin time depends on a model.
This function is used to cool down the lamps and other optical parts and is quite important for projector's reliability.
During this time, Functional Execution Commands are invalid.
"10" [CR]
Status: Power Failure
When the power supply voltage inside the projector reaches abnormal status, the projector is automatically turned off. The projector returns "10"[CR], which shows it moves to Power OFF status due to power failure. Fan also stops unlike Cooling Down status.
"28" [CR]
Status: Cooling Down in process due to Temperature Anomaly
When the inside temperature is out of the operating temperature, it automatically starts Cooling Down. Response for this status is "28"[CR].
Even if the temperature decreases during this process, Cooling Down is executed.
"88" [CR]
Status: Coming back after temperature anomaly
When the status moves to Standby after Cooling Down due to temperature anomaly, it returns "88" [CR].
This shows that the status turns to Standby because of abnormal temperature.
This status maintains until next operation is done. When Power On is executed, the
information of temperature anomaly is canceled and normal operation is executed.
"24" [CR]
Status: Processing Power Save / Cooling Down
Power management function in Setting menu works and the status goes to Power Save / Cooling Down.
During this time, Functional Execution Commands are invalid (not executed).
This status moves to Power Save at set hours after the operation of Cooling Down.
![CANON LV-7295 - "24" [CR] - 1](/content/2025/01/99736/images/65df498eabe24c0866cc033837e1b146e58f4ed7628149988f63c3db99967fa1.jpg)
flowchart
graph LR
    A["Status: No signal"] --> B["Response: "00""]
    B --> C["5 minutes with no signal"]
    C --> D["Power Save / Cooling Down"]
    D --> E["24"]
    E --> F["After about 90 sec."]
    F --> G["04"]
"04" [CR]
Status: Power Save
This shows that it moves to Power Save status by Power management function in Setting menu.
"21" [CR]
Status: Cooling Down in process after turned off due to lamp failure
When a projector is turned off because of lamp failure, it automatically starts Cooling Down operation, in which the projector returns "21" [CR].
"81"[CR]
Status: Standby after Cooling Down due to lamp failure
This value is returned when Cooling Down operation due to lamp failure has been completed and the status has been moved to Standby. The status is kept until the next operation starts.
7.5.Input Mode Read Command
| Command | “CR1” [CR] | |
| Detail | Get the selected Input No. | |
| Response | Acceptable | “%1” [CR] |
| %1 | "1" = Computer 1 is selected"2" = Computer 2 is selected"3" = Video is selected | |
| Unacceptable | “?” [CR] | |
7.6. Lamp Time Read Command
| Command | “CR3” [CR] | |
| Detail | Get the total lamp running hours (Not actual lamp used hour, but Eco mode corresponding value). | |
| Response | Acceptable | “%1” [CR] |
| %1 | Shows the time period with 5 digits numbers.Example: “00410”[CR] ····shows 410 hours | |
| Unacceptable | “?” [CR] | |
7.7. Setting Read Command
| Command | “CR4” [CR] | |
| Detail | Get screen setting status such as Ceiling / Rear. | |
| Response | Acceptable | “%1” [CR] |
| %1 | “11”[CR] = Normal Screen Setting“10”[CR] = Picture is top/bottom reversed.(Status: Rear & Ceiling ON)“01”[CR] = Picture is left/right reversed. (Status: Rear ON)“00”[CR] = Picture is top/bottom and left/right reversed.(Status: Ceiling ON) | |
| Unacceptable | “?” [CR] | |
7.8.Temp Read Command
| Command | “CR6” [CR] | |
| Detail | Get the temperature data inside the projector.With some temperature sensors installed in the projector, it is possible to get all the temperature at once. | |
| Response | Acceptable | “%1_%2_%3” [CR] |
| %1%2%3 | %1=Temperature of sensor 1%2=Temperature of sensor 2%3=Temperature of sensor 3Temperature data is shown as “00.0”.When the temperature goes down to -, the first character becomes “-” instead of a space, like “-05.5” [CR].When no temperature data can be returned due to hardware problems, the first character becomes “E” like”E00.0” [CR].When several temperature sensors are equipped, Responses are returned continuously.“_31.5 _ _35.2 _ _33.4”[CR]The first data is sensor 1, then one space, and the data of sensor 2 follows. | |
| Unacceptable | “?”[CR] | |
7.9. Lamp Mode Read Command
| Command | “CR7” [CR] | |
| Detail | Get lamp mode status.For 1 lamp projector, get if it is lighting or not. | |
| Response | Acceptable | “%1” [CR] |
| %1 | “00” [CR]=Light is out.“01” [CR]=Light is on. | |
| Unacceptable | “?”[CR] | |