Theragun Relief - Appareil de massage THERABODY - Notice d'utilisation et mode d'emploi gratuit
Retrouvez gratuitement la notice de l'appareil Theragun Relief THERABODY au format PDF.

| Marque | Therabody |
| Modèle | Theragun Relief |
| Type d'appareil | Appareil de massage à percussion |
| Usage prévu | Soulager les douleurs et tensions musculaires quotidiennes, réduire le stress et les nœuds |
| Alimentation | Batterie rechargeable via USB-C (câble fourni) |
| Autonomie | Environ 120 minutes |
| Vitesses | 3 niveaux (basse, moyenne, haute) |
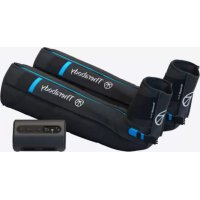
| Accessoires inclus | 3 embouts : Amortisseur, Balle Standard, Pouce |
| Poignée | Triangle multi-prise brevetée |
| Commande | Bouton unique (appui long pour marche/arrêt, appui court pour changer de vitesse) |
| Nettoyage | Essuyer avec une lingette désinfectante ; ne pas immerger ni passer au lave-vaisselle |
| Entretien | Vérifier l'usure des embouts ; remplacer si nécessaire |
| Sécurité | Ne pas appliquer de pression excessive ; éviter le contact direct avec les os ; ne pas utiliser pendant la charge |
| Indicateur de batterie | LED sur le bouton : orange (faible), bleu (moyen), vert (élevé), vert fixe (pleine) |
| Attention | L'appareil ne s'éteint pas automatiquement ; le piston peut chauffer après usage (normal) |
FOIRE AUX QUESTIONS - Theragun Relief THERABODY
Questions des utilisateurs sur Theragun Relief THERABODY
0 question sur cet appareil. Repondez a celles que vous connaissez ou posez la votre.
Poser une nouvelle question sur cet appareil
Téléchargez la notice de votre Appareil de massage au format PDF gratuitement ! Retrouvez votre notice Theragun Relief - THERABODY et reprennez votre appareil électronique en main. Sur cette page sont publiés tous les documents nécessaires à l'utilisation de votre appareil Theragun Relief de la marque THERABODY.
MODE D'EMPLOI Theragun Relief THERABODY

Therabody
THERAGUN RELIEF
User Manual
TABLE OF CONTENTS
| EN | 3-13 |
| ES | 14-19 |
| FR | 20-25 |
| IT | 26-31 |
| DE | 32-37 |
| RU 38-43 | |
| NL | 44-49 |
| ESMX | 50-55 |
| FRCA | 56-61 |
| SC | 62-67 |
| TC | 68-73 |
| KR | 74-79 |
| JP | 80-85 |
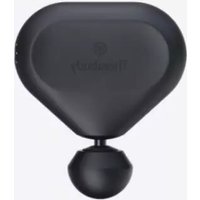
1. Product Overview
THERAGUN RELIEF
Comfortable, everyday massage for everybody.
Feel better throughout the day with the Theragun Relief, our easy-to-use percussive massage therapy device scientifically proven to relieve daily aches and pains and reduce stress, muscle tension and knots. With simple, one button control and a patented multi-grip handle so you can comfortably reach your entire body without strain, a Theragun Relief is an easy addition to your daily routine.
Intended Use
The Theragun Relief's percussive massage therapy is intended to relieve daily aches and pains, reduce muscle tension, tightness and stress, and ease painful knots. Choose from 3 attachments that provide a soothing full body massage, comfortable relief for sensitive areas, or target painful trigger points.

EN
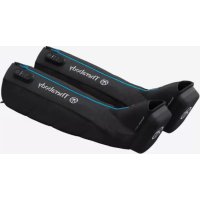
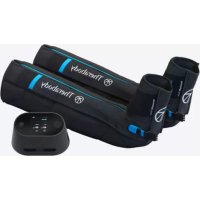
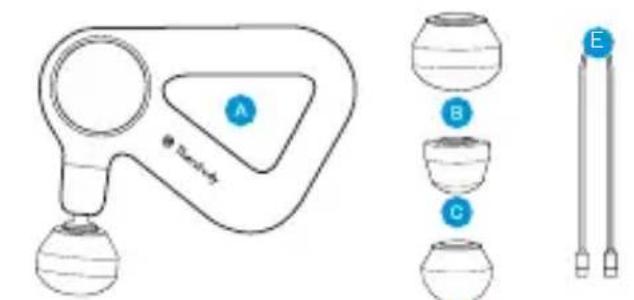
2. What's in the box
8
C

0


Theragund device
Three attachments

Dampener

Thumb

Standard Ball

USB-C charging cable
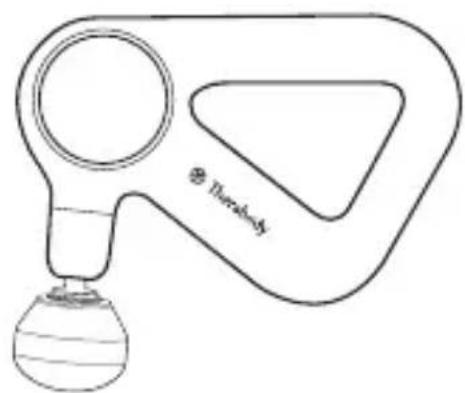
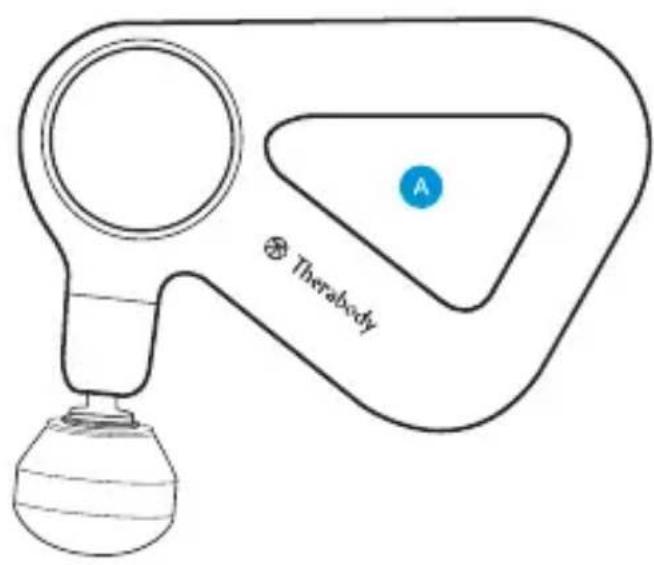
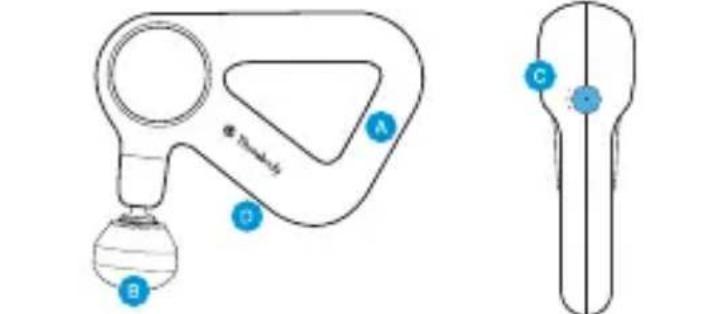
3. Getting To Know Your Theragun Relief
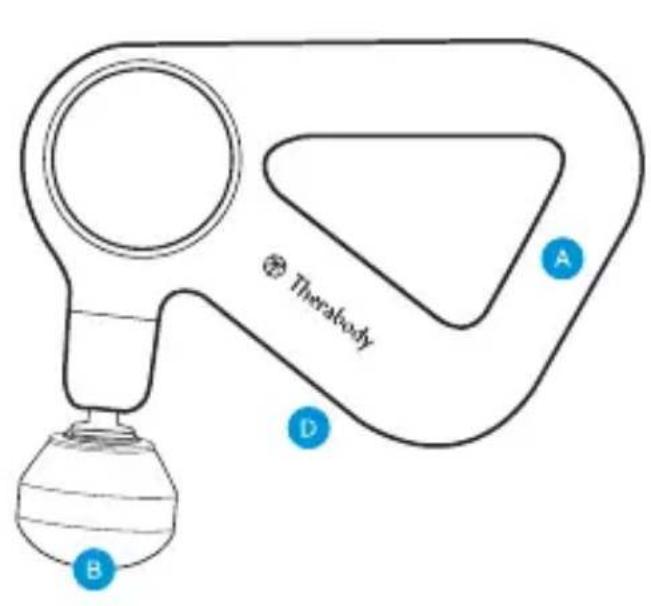

Patented triangle multi-grip handle

Interchangeable percussive attachments

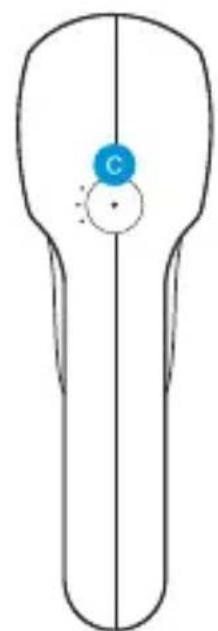
Button USB-C Port
4. Getting started
Step 1
Pick up and hold the device.
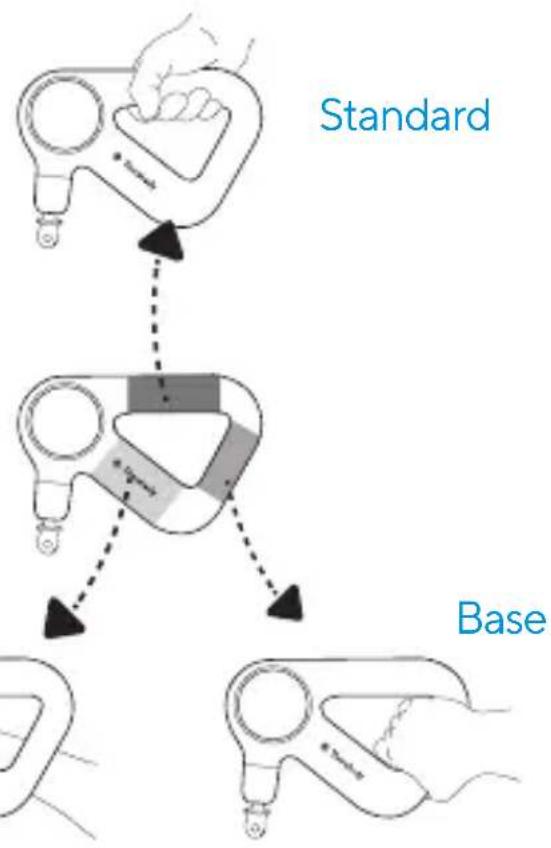
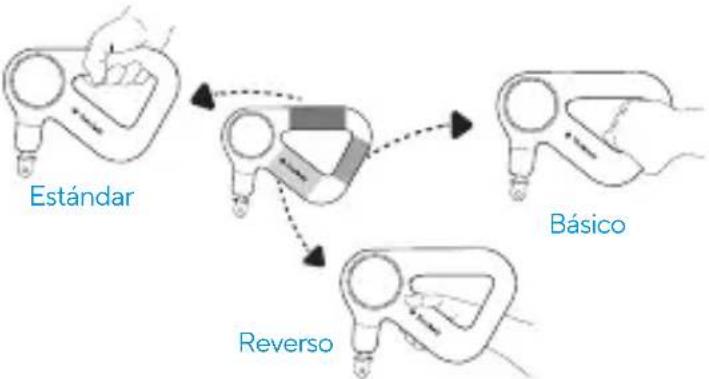
Slide your hand into the ergonomically designed Theragun Triangle handle. Our patented Theragun Triangle handle design is three-sided, so you can hold the Theragun Relief from any side in a variety of ways, making it easier than ever to treat hard-to-reach areas like your back without strain on your hands, wrists, and forearms.
Reverse
Step 2 Turn on and try the device.
Firmly long press the button to turn on the device. Move the device back and forth across your intended treatment areas. Apply light to moderate pressure as needed. Never apply excessive pressure or any level of pressure that causes pain, discomfort, or impedes normal function of the device. Do not start by putting pressure directly on an area of discomfort. Instead, work slowly around the area to reduce tension.
Step 3 Download the Therabody app
Search for the Therabody app in the App Store or Play Store and download the app to your phone. We'll guide you through a stress-free setup, including creating a Therabody account for further information about the Theragun Relief. The Therabody app can help you discover routines that help you get the most out of your Theragun Relief.

Scan the QR code to get started.
Step 4 Feel the difference. Every day
Whether you use your Theragun Relief for a soothing massage or a more pointed treatment for pain relief, the Theragun Relief is the perfect addition to your daily wellness routine.

EN
5. Using the Theragun Relief
- To power on the Theragun Relief, long press the button on the device.
- Move the device across the areas in need of treatment, gradually applying light-to-moderate pressure as needed. Spend approximately 15-20 seconds on each treatment area before gliding the device to the next treatment area.
- Short press the button to toggle between the three speeds (low, medium, and high) based on your preferences.
- Warning: The device does not automatically shut off. To turn off your Theragun Relief, firmly long press the button until the device powers off.
6. Connecting the Attachments
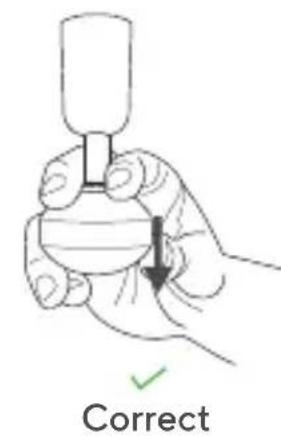
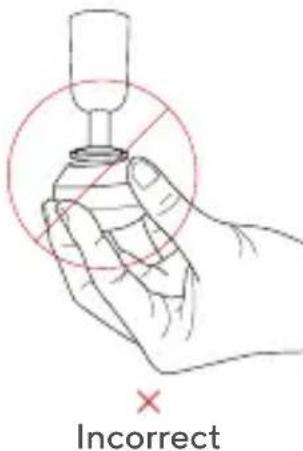
- Ensure that the device is powered off before connecting or removing any attachments.
- Align the attachment with the tip of the arm and push to connect.
- To remove the attachment, hold the triangle grip with one hand, and the attachment with the other hand. Place one finger on each side of the plastic connector and firmly pull off the attachment.
- Warning: Do not place your finger between the attachment and the end of the arm, as this may cause pinching and injury.
- Note: The device's piston (metal rod) may become warm after use; this is normal.
It is recommended that you swap out the attachments if you start to notice signs of wear.
Using the Attachments
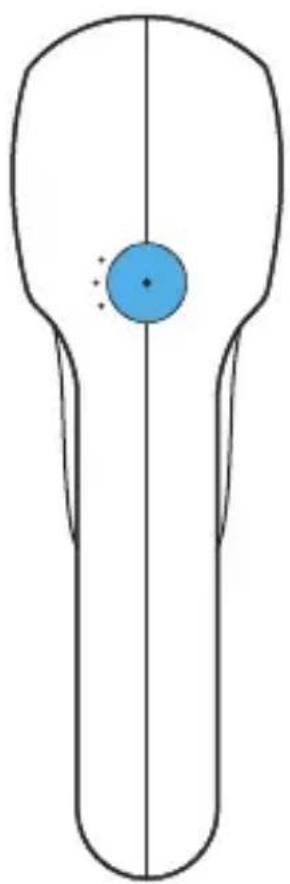
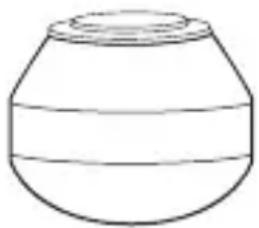
The Theragun Relief has three targeted, high-quality attachments designed for a more personalized treatment. The Dampener, Standard Ball, and Thumb attachments are comfortable and hygienic without absorbing sweat, lotion, or oils.
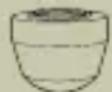
Dampener
For tender or sensitive areas and overall use.
Use the Dampener attachment for a firm yet softer, soothing
full-body massage. The Dampener attachment is specifically designed for general use and a low-impact treatment around tender, sensitive or bony areas. Do not directly contact bones (i.e., spine, knee cap) using this device. Its wide base maximizes surface area for greater, more efficient contact with the body.
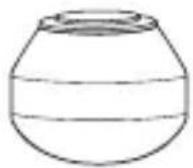
Standard Ball
For large and small muscle groups
Use the Standard Ball attachment for a full-body massage. The Standard Ball attachment is specifically designed for overall use on both large and small muscle groups. With a smaller shape and higher impact level than the Dampener, it is a firmer option for overall use and is your go-to attachment for tension.
Thumb
For trigger points and the lower back.
Relieve pain with the high pressure point Thumb attachment.
Specifically designed to mimic a human thumb, use this attachment for point therapy on the lower back. Use the Thumb anywhere you may have otherwise used your thumb for pain relief.
EN
EN
7. The Theragun Relief After Care & Cleaning
Device Maintenance
The following maintenance instructions are important to ensure that your device continues to work as it was designed. Failure to follow these instructions may cause your device to stop working.
Care and Cleaning
- The Theragun Relief is NOT waterproof or machine washable. Do not allow any liquid or water to enter the device.
- Ensure that the device is powered off before cleaning.
- To clean, wipe the inner surface with a disinfectant wipe to remove any residue.
- Once the device is residue-free, use a clean disinfectant wipe to thoroughly clean the device surface and attachments, wiping in a circular motion.
8. Charging
-
The battery level is continuously displayed on the LED light of the button when the device is on.
-
To view the battery level when the device is off, briefly press the button, and the LED battery light will flash to indicate the battery level.
-
Flashing orange: Low battery
- Flashing blue: Medium battery
-
Flashing green: High battery
Solid green: Full battery -
Ensure that the device is powered off before charging; the device will not power on while charging.
- The device is USB-C enabled. To charge the device, plug one end of the USB-C cable included in the package into the device and the other end into your adapter.
- The LED light on the button will flash while the device is charging.
- The LED light on the button will turn solid green when the device has a full battery.
- Unplug the USB-C cable from the Theragun Relief when charging is complete.
The battery life of the Theragun Relief is approximately 120 minutes.
**Note: If using an alternative USB-C cable, ensure that it is from a trusted source and has not suffered any structural damage. Do not try to use the device while charging.
SeeWarnings insert for important safety instructions
Guía de Inicio Rápido
Conoce tu Theragun Relief
Terapia de masaje percusivo
Tratimiento de masaje eficaz de Theragun con 3 cabezales differs.
Amortiguidor reduce dolores y molestias en zonas delicadas o sensibles
Bola estandar
utilizalo para masajear
todoe el cuerpo y reducir
la tension
Pulgar utilizalo en la zona lumbar y en los+puntos gatillo para aliviar los nudos dolorosos
Conectar un cabezal
Elige un casingal segun tus necessities. Empuja con firmeza para conectarlo, tira con firmeza para sacarlo.
Encendido
Mantén pulsado el botón. Pulsa de nuevo el botón para cambiar entre las 3 velocidades.
Explora nuestros sencillas tarjetas de rutinas bajo a caso. Elige entre:
Refresca tus piernas, Reduce la tension en el cuello, Alivia el dolor lumbar
1. Descripción general del producto
THERAGUN RELIEF
Masaje comodo y diario para todo el mundo.
Sientete mejo durante todo el dia con el Theragun Relief,我不想 dispositivo de terapia de masaje percusiva fácil de usar, cristificamente probado para aliviar los dolores y molestias cotidianos y reducir el estres, la tension muscular y los nudos. Con un manejo sencillo con un solo boton y un mango multiagarre patentado para que你能ninger comofoldamente a todas partes del cuerpo sin esfuerzo, el Theragun Relief es un complemento sencillo para tu rutina diaria.
Uso previsto
La terapia de masaje percusiva del Theragun Relief está destinada a aliviar los dolores y molestias diarios, reducir la tension muscular, la tirantez y el estrés, además de aliviar los nudos dolorosos. Elige entre 3 cazales que proportionsionan un relajante masaje de cuerpo completeo, un alivio como para las zonas sensibles o espécíficos para los+puntos gatillo dolorosos.
- Contenido de la caja
Tres cabezales
Amortiguidor
Pulgar
Dispositivo Theragun
Bola estandar
3. Introducciona tu Theragun Relief


Mango multiagarre triangularpatentado
Cabezales percusivos intercambiables
Botón Puerto USBC
4. Guía de inizio=rápido
ES
Paso 1 Coger y sujetar el dispositivo.
Mete la mano en el mango triangular de Theragun de Diseño ergonomico. Nuestro mango triangular de Theragun patentado tiene tres caras, por lo que pueda sostener el Theragun Relief desdeequalquierlado de diversasomaneras,facilitandoquesea mas fácil que nunca tratatar zonas dificilesde alcanzar comola espalda sin tensión en las manos,los muñecas y los antebrazos.
Paso 2 Encender y probar el dispositivo.
Mantén pulsado el botón para encender el dispositivo. Mueva el dispositivo hacía adelante y hacía atrás por las zonas que querres tratar. Aplica una presión de ligera a moderada, según tus necessities. Nunca apliques demasiad presión ni ningún nivel de presión que provoque dolor, molestias o impida la función normal del dispositivo. No comiences ejerciendo presión directamente sobre una zona que te的结果 incómoda. En vez de ese, trabajo lentamente el airea circundente a fin de reduir la tensión.
Paso 3 Descarga la aplicacion de Therabody
Busca la aplicacion de Therabody en App Store o Play Store y descargarate en tu téléphone. Te guiaremos para que realizes una configuracion sencilla, incluyendo laarea de hacerte una cuenta de Therabody para Obtener mas informacion sobre el Theragun Relief. La aplicacion de Therabody peut=}ayudarte a descuberir rutinas que te ayuden a sacar el maximum partir a tu Theragun Relief.
Paso 4 Siente la diferencia. Cada día.
No importa si piensas usar el Theragun Relief para darte un masaje relajante o hacerte un tratamiento más especialico para aliviar el dolor, Theragun Relief es el complemento perfecto para tu rutina de bienestar diaria.
Escanee el número QR para empezar.