RCBM41N - Bouilloire Royal Catering - Notice d'utilisation et mode d'emploi gratuit
Retrouvez gratuitement la notice de l'appareil RCBM41N Royal Catering au format PDF.

| Type de produit | Bouilloire de brassage (cuve à empâtage) |
| Marque | Royal Catering |
| Modèle | RCBM-41N |
| Capacité | 40 litres |
| Puissance nominale | 2500 W |
| Tension / Fréquence | 230 V ~ 50 Hz |
| Plage de température | 10°C à 100°C (par incréments de 0,1°C) |
| Plage de minuterie | 0 à 180 minutes |
| Dimensions (avec couvercle) | ∅400 x 650 mm |
| Poids | 10,5 kg |
| Matériau principal | Acier inoxydable |
| Type de chauffage | Électrique, résistance intégrée |
| Modes de fonctionnement | Manuel et automatique (jusqu'à 9 étapes) |
| Pompe de circulation | Intégrée, débit réglable (vanne bleue) |
| Affichage | Écran LED avec température, puissance et temps |
| Mémoire de programme | 10 recettes préprogrammables |
| Accessoires inclus | Filtre long, tamis supérieur et inférieur, tube central, tube de trop-plein, robinet de vidange |
| Sécurité | Thermostat de sécurité anti-surchauffe, arrêt automatique en cas d'erreur |
| Entretien | Nettoyage avec pompe, utiliser des produits doux pour surfaces alimentaires |
| Réparabilité | Pièces détachées disponibles auprès du fabricant, réparation par service agréé |
FOIRE AUX QUESTIONS - RCBM41N Royal Catering
Questions des utilisateurs sur RCBM41N Royal Catering
0 question sur cet appareil. Repondez a celles que vous connaissez ou posez la votre.
Poser une nouvelle question sur cet appareil
Téléchargez la notice de votre Bouilloire au format PDF gratuitement ! Retrouvez votre notice RCBM41N - Royal Catering et reprennez votre appareil électronique en main. Sur cette page sont publiés tous les documents nécessaires à l'utilisation de votre appareil RCBM41N de la marque Royal Catering.
MODE D'EMPLOI RCBM41N Royal Catering
BEDIENUNGSANLEITUNG
User manual | Instrukcja | Návod k použití | Manuel d'utilisation | Istruzioni per l 'uso | Manual de instrucciones
HOME BREW MESH TUN
RCBM-4IN
RCBM-42N

natural_image
Abstract line drawing of stylized mythical creatures or mythical creatures (no text or symbols)| Deutsch | 3 |
| English | 9 |
| Polski | 14 |
| Česky | 20 |
| Français | 25 |
| Italiano | 31 |
| Español | 37 |
PRODUKTNAME BIERBRAU SET MAISCHEKESSEL 421 BIERBRAU SET MAISCHEKESSEL 621
PRODUCT NAME HOME BREW MESH TUN 42L HOME BREW MESH TUN 62L
NAZWA PRODUKTU KOCIOE WARZELNY DO PIWA 42L KOCIOE WARZELNY DO PIWA 62L
NÁZEV VÝROBKU MLADINOVÝ KOTEL 42L MLADINOVÝ KOTEL 62L
NOM DU PRODUIT FERMENTEUR DE BIÈRE 42L FERMENTEUR DE BIÈRE 62L
NOME DEL PRODOTTO FERMENTATORE PER BIRRA 42L FERMENTATORE PER BIRRA 62L
NOMBRE DEL PRODUCTO FERMENTADORA DE CERVEZA 42L FERMENTADORA DE CERVEZA 62L
MOBELL
PRODUCT MODEL
MODEL PRODUKTU
MODEL VÝROBKYI
MOPELE
MORELLO
MORENO
HERSTELLER
MANUFACTURER
PRODUCENT
VÝKOBCE
FABRICAN
PRODUTORE
FABRICANTE
ANSCHRIFT DES HERSTELLERS
MANUFACTURER ADDRESS
ADRES PRODUCENTA
ADRESA VÝROBCE
ADRESSE DU FABRICANT
INDIRIZZO DEL PRODUTTORE
DIRECCIÓN DEL FABRICANTE
RCBM-41N RCBM-42N
EXPONDO POLSKA SP. Z O.O. SP. K.
UL. NOWY KISIELIN-INNOWACYINA 7, 66-002 ZIELONA GÓRA | POLAND, EU
TECHNISCHE DATEN
| Parameter | Werte | |
| Produktname | BIERBRAU SETMAISCHIEKESSEL42L | BIERBRAU SETMAISCHEKESSEL62L |
| Modell | RCBM-41N | RCBM-42N |
| Nennspannung[V-/V Frequenz][Hz] | 230/50 | |
| Nennklistung [W] | 2500 | 3.000 |
| Kapazität [l] | 40 | 60 |
| Temperaturbereich | von 10°C bis 100°C alle 0,1°C | |
| Zeitbereich [min] | 0-180 | |
| Abmessungen[mm] | ∅400x650 mitDeckel | ∅400x775 mitDeckel |
| Gewicht [kg] | 10,5 | 12 |
- ALLGEMEINE BESCHREIBUNG
Diese Anleitung ist als Hilfe für eine sichere und zuverlässige Nutzung gedacht. Das Produkt wurde strikt nach den technischen Vorgaben und unter Verwendung modernster Technologien und Komponenten sowie unter Wahrung der höchsten Qualitätsstandards entworfen und angefertigt.
VOR INBETRIEBNAHME MUSS DIE ANLEITUNG GENAU DURCHGELESEN UND VERSTANDEN WERDEN.
Für einen langen und zuverlässigen Betrieb des Geräts muss auf die richtige Handhabung und Wartung entsprechend den in dieser Anleitung angeführten Vorgaben geächtet werden. Die in dieser Anleitung angegebenen technischen Daten und die Spezifikation sind aktuell. Der Hersteller behält sich das Recht vor, im Rahmen der Verbesserung der Qualität Änderungen vorzunehmen. Unter Berücksichtigung des technischen Fortschrits und der Geräuschreduzierung wurde das Gerät so entworfen und produziert, dass des Infolge der Geräuschrommission entstehende Risiko auf dem niedrigsten Niveau gehalten wird.
ERLÄUTERUNG DER SYMBOLE

Das Produkt erfüllt die geltenden Sicherheitsnormen.

Gebrauchsanweisung beachten.

Recycling Produkt.

ACHTUNGI oder WARNUNGI oder HINWEIS! um auf bestimmte Umstande aufmerksam zu machen (Allgemeines Wamzeichen).

ACHTUNG! Heiße Fläche. Verbrennungsgefahr!
HINWEISI In der vorliegenden Anleitung sind Beispielbilder vorhanden, die von dem tatsächlichen Aussehen das Produkt abweichen können. Die originale Anweisung ist die deutschsprachige Fassung. Sonstige Sprachfassungen sind Übersetzungen aus der deutschen Sprache.
- NUTZUNGSSICHERHEIT
ACHTUNG! Lesen Sie alle Sicherheitshinweise und alle Anweisungen durch. Die Nichtbeachtung der Warnungen und Anweisungen kann zu elektrischen Schlägen, Feuer und / oder schweren Verletzungen bis hin zum Tod führen.
Die Begriffe 'Gerat' oder 'Produkt' in den Wamungen und Beschreibung des Handbuchs beziehen sich auf
2.1. ELEKTRISCHE SICHERHEIT
a) Der Gerätestecker muss mit der Steckdose kompatibel sein. Andern Sie den Stecker in keiner Weise. Originalstecker und passende Steckdosen vermindem das Risiko eines elektrischen Schlags.
b) Vermeiden Sie das Berühren von geordeten Bauteilen wie Rohrleitungen, Heizkörpern, Öfen und Kuhlschranken. Es besteht das erhöhte Risiko eines elektrischen Schlags, wenn Ihr Körper durch nasse Oberflächen und in feuchter Umgebung geordet ist. Wasser, das in das Gerät eintritt, erhöht das Risiko von Beschädigungen und elektrischen Schlagen.
c) Berühren Sie das Gerät nicht mit nassen oder feuchten Händen.
d) Verwenden Sie das Kabel nicht in unsachgemaßer Weise. Verwenden Sie es niemals zum Tragen des Gerats oder zum Herausziehen des Stockers. Halten Sie das Kabel von Hitze. Öl, scharfen Kanten oder beweglichen Teilen fem. Beschädigte oder geschweißte Kabel erhöhen das Risiko eines eicktrischen Schlags.
c) Wenn sich die Verwendung des Gerats in feuchter Umgebung nicht verhindem lasst, verwenden Sie einen Fehlerstromschutzschalter (RCD). Mit einem RCD verringert sich das Risiko eines elektrischen Schlags.
f) Es ist verboten, das Gerät zu verwenden, wenn das Netzkabel beschädigt ist oder offensichtliche Gebrauchsspuren aufweist. Ein beschädigtes Netzkabel sollte von einem qualifizierten Elektriker oder vom Kundendienst des Herstellers ersetzt werden.
g) Tauchen Sie Kabel, Stecker bzw. das Gerät nicht in Wasser oder andere Flüssigkeiten, um einen Stromschlag zu vermeiden. Verwenden Sie das Gerät nicht auf nassen Oberflächen.
h) Die Stockdose an der das Gerät angeschlossen ist, muss geordet worden.
i) Vor dem Herauszichen des Gerätssteckers, das Gerät zuerst ausschalten.
Die Stockclose muss mit einer 16 A Sicherung abgesichert sein.
2.2 SICHERHEIT AM ARBEITSPLATZ
a) Halton Sie Ihren Arbeitsplatz sauber und gut beleuchtet. Unordnung oder schlechte Beleuchtung kann zu Unfällen führen. Handeln Sie vorausschauend, beobachten Sie, was getan wird, und nutzen Sie Ihren gesunden Menschenverstand bei der Verwendung des Gerätes.
b) Benutzen Sie das Gerät nicht in explosionsgefahrdeten Bereichen, zum Beispiel in Gegenwart von brennbaren Flussigkeiten, Gasen oder Staub. Gerate können unter Umständen Funken erzeugen, welche Staub oder Dämpfe entzünden können.
c) Im Falle eines Schadens oder einer Storung sollte das Gerät sofort ausgeschaltet und dies einer autorisierten Person gemeldet werden.
d) Wenn Sie nicht sicher sind, ab das Gerät ordnungsgemäß funktioniert, wenden Sie sich an den Service des Herstellers.
e) Reparaturen dürfen nur vom Service des Herstellers durchgeführt werden. Fuhren Sie keine Reparaturen auf eigene Faust durch!
f) Zum Löschen des Gerates bei Brand oder Feuer, nur Pulverfeuerloscher oder Kohlendioxidlöscher (CO₂) verwenden.
g) Überprufen Sie regelmäßig den Zustand der Sicherheitsinformationsaufkleber. Falls die Aufkleber unleserlich sind, sollten diese erneuert werden.
h) Bewahren Sie die Gebrauchsanleitung für den weiteren Gebrauch auf. Sollte das Gerät an Dritte weitergegeben werden, muss die Gebrauchsanleitung mit ausgebindiert werden.
i) Verpackungselemente und kleine Montageteile außerhalb der Reichweite von Kindern aufbewahren.
HINWEISI Kinder und Unbeteiligte müssen bei der Arbeit mit diesem Gerät gesichert werden.
2.3. PERSÖNLICHE SICHERHEIT
a) Es ist nicht gestattet, das Gerät im Zustand der Ermüdung, Krankheit, unter Einfluss von Alkohol, Drogen oder Medikamenten zu betreiben, wenn das die Fähigkeit das Gerät zu bedienen, einschränkt.
b) Das Gerät darf nicht von Kindern oder Personen mit eingeschränkten physischen, sensorischen und geistigen Fähigkeiten oder ohne entsprechende Erfahrung und entsprechendes Wissen bedient werden. Dies ist nur unter Aufsicht einer für die Sicherheit zuständigen Person und nach einer Einweisung in die Bedienung der Maschine gestattet
c) Seien Sie aufmerksam und verwenden Sie Ihren gesunden Menschenverstand beim Betreiben des Gerätes. Ein Moment der Unaufmerksamkeit während der Arbeit kann zu schweren Verletzungen führen.
d) Vergewissern Sie sich vor dem Anschließen des Gerats an eine Stromquelle, dass der Schalter ausgeschaltet ist.
e) Überschatzen Sie Ihre Fähigkeiten nicht. Sorgen Sie für einen sicheren Stand während der Arbeit. Dies gibt Ihnen eine bessere Kontrolle über das Gerät im Falle unerwarteter Situationen.
f) Das Gerät ist kein Spielzeug. Kinder sollten in der Nahe des Geräts unter Aufsicht stehen, um Unfälle zu vermeiden.
2.4. SICHERE ANWENDUNG DES GERÄTS
a) Benutzen Sie das Gerät nicht, wenn der EIN /AUS Schalter nicht ordnungsgemäß funktioniert. Geräte, die nicht über den Schalter gesteuert werden können, sind gefährlich und müssen repariert werden.
b) Trennen Sie das Gerät von der Stromversorgung, bevor Sie mit der Einstellung. Reinigung und Wartung beginnen. Eine solche vorbeugende Maßnahme verringert das Risiko einer verschentlichen Aktivierung des Gerats.
c) Nicht verwendete Werkzeuge sind außerhalb der Reichweite von Kindern sowie von Personen aufzubewahren, welche weder das Gerät noch die Anleitung kennen. In den Händen unerfahrener
d) Halten Sie das Gerät stets in einem einwandfreien Zustand. Prufen Sie vor jeder Inbetriebnahme, ob am Gerät und seinen beweglichen Teilen Schaden vorliegen (defekte Komponenten oder andere Faktoren, die den sicheren Betrieb der Maschine beeinträchtigen konnten). Im Falle eines Schadens muss das Gerät vor Gebrauch in Reparatur gegeben werden.
e) Halten Sie das Gerät außerhalb der Reichweite von Kindern.
f) Reparatur und Wartung von Geräten dürfen nur von qualifiziertem Fachpersonal und mit Originalersatzteilen durchgeführt werden. Nur so wird die Sicherheit während der Nutzung gewährleistet.
g) Um die Funktionsfähigkeit des Gerätes zu gewährleisten, dürfen die werksmäßig montierten Abdeckungen oder Schrauben nicht entfernt werden.
h) Beachten Sie bei Transport zwischen Lager und Bestimmungsort und Handhabung des Gerates die Grundsätze für Gesundheits- und Arbeitsschutz des Landes, in dem das Gerät verwendet wird.
i) Es ist verboten, das Gerät während des Betriebs zu schieben, umzustellen oder zu drehen. j) Lassen Sie dieses Gerät während des Betriebs nicht unbeaufsichtigt.
k) Das Gerät muss regelmäßig gereinigt werden, damit sich nicht dauerhaft Schmutz festsetzt.
1) Das Gerät ist kein Spielzeug. Reinigung und Wartung durfen nicht von Kindern ohne Aufsicht durch eine erwachsene Person durchgeführt werden...
m) Ein leeres Gerät darf nicht eingeschaltet werden. n) Es ist untersagt, in den Aufbau des Gerats einzugreifen, um seine Parameter oder Konstruktion zu ändem.
o) Geräte von Feuer und Warmequellen fernhalten.
p) Den Deckel während des Kochens nicht alnehmen.
ACHTUNG! Obwohl das Gerät mit dem Gedanken an die Sicherheit entworfen wurde, besitzt es bestimmte Schutzmechanismen. Trotz der Verwendung zusätzlicher Sicherheitselemente besteht bei der Bedienung immer noch ein Verletzungsrisiko. Es wird empfohlen, bei der Nutzung Vorsicht und Vermunft halten zu lassen.
- ANWENDUNGSGEBIET
Das Bierbrau Set mit dem Maischekessel dient zur Herstellung von Maische und der Bienwürze. Bitte verwenden Sie das Bierbrau Set nicht für
- das Zubereiten von Getränken und flüssigen Speisen - das Aufwärmen und Erhitzen entzündlicher, gesundheitsschädlicher, sich leicht verflüchtigender oder ähnlicher Flüssigkeiten bzw. Stoffe.
Für alle Schäden bei nicht bestimmungsgemäßer Verwendung haftet allein der Betreiber.
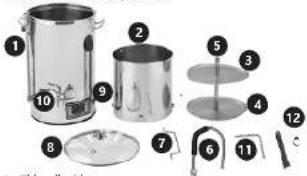
3.1. AUFBAU DES GERATES

text_image
1. Guatemala 2 3 4 5 6 7 8 9 10 11 12-
Hauptbehälter
-
Behälter mit Sieben
-
Oberes Sieb
-
Unteres Sieb
-
Haltestange
-
Überlaurich (gebogen)
-
Giff für den Benalter mit Sieben
-
DECKEL
-
EIN/AUS-Schalter der Pumpe und des Gerätes
-
Ablasshahn
-
Unteres kohr
-
Jungelacher Eilts
-
langlicher Filter
-
VORBEREITUNGEN FÜR DAS BRAUEN
• Vor der Verwendung muss das Gerät auf eine ebene,
stabile und sichere Flache gestellt werden.
- Das gefüllte Gerät enthalt kochende, heiße Hussigkeit und wiegt bis zu 70 Kilogramm. Eine stabile Position des Gerätes muss unbedingt gegeben sein, damit während des Brauvorgangs das Umpumpen stattfinden kann. Nicht stabile Positionen sind zu vermeiden.
• Das Gerät darf während des Brauprozesses nicht umgestellt werden. Die Griffe sind nur zum Tragen des leeren Gerätes vorgesehen.
- Hygiene ist eine Grundvoraussetzung für gelungenes Brauen, deswegen müssen die Teile dieses Gerates immer gereinigt sein.
- Zum Sterilisieren des Zulbehörs kann in einem Boiler heißes Wasser vorbereitet werden.
-
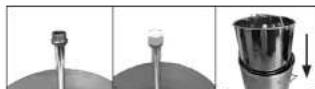
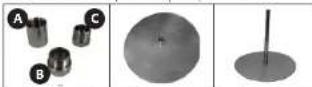
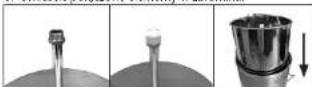
MONTAGE DES ÜBERLAUFKANALS
-
Installieren Sie das Verbindungsstück B am unteren Sieb.
-
Installieren Sie die Verbindungsstück A an der
Anschlussstelle B.
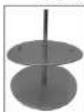
- Befestigen Sie das Zentralrohr an der Anschlussstelle A.

-
Montieren Sie das Verbindungsstück C am Zentralrohr.
-
Setzen Sie die weiße Kappe auf das Zentralrohr.
-
Legen Sie die miteinander verbundnenen Elemente in den Tank.
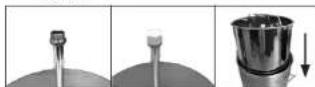
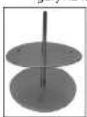
7 Entfernen Sie nach dem Hinzufügen von Wasser und Zutaten die weiße Kappe und das Verbindungsstück C. 8. Montieren Sie den oberen Sieb mit den Griffen nach oben am Zentralrohr.

ACHTUNG: Während des Betriebs sollte die zentrale Rohröffnung geöffnet sein.
- PROGRAMMIEREN DER EINSTELLUNGEN
text_image
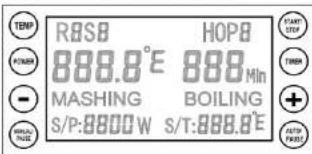
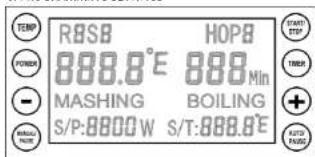
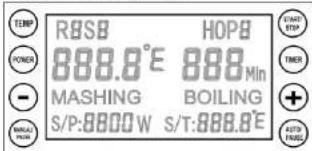
R8SB HOPB 888.0°E 888 Min MASHING BOILING S/P:8800W S/T:888.0°E +/- + OUTPUT FIRST6.1. EINSTELLEN DES MANUELLEN MODUS
-
Schalten Sie das Gerät ein und drücken Sie die Taste MANUAL.
-
Die Taste TEMP dient zur Einstellung der Temperatur, POWER zur Einstellung der Wattzahl, und TIMER stellt die Dauer des Braucens ein. Alle 3 Parameter müssen vor Inbetriebnahme des Gerats eingestellt werden. Die Reihenfolge des Einstellens ist hierbei beliebig.
-
Die Taste START drucken, wenn alle 3 Parameter eingestellt sind. Dann setzt sich der Handmodus in Betrieb. Der aufblinkende Buchstabe "H" in der linken oboren Ecke bedeutet, dass das Gerät mit dem Aufheizen beginnt.
-
Die Standard Siedetemperatur ist auf 100°C programmiert, daher startet der Timer erst dann, wenn die Temperatur von 100°C erreicht ist Hierzu den Deckel für 1 - 2 Minuten auflegen, bis auf dem Display 100°C angezeigt werden.
-
Wenn das Gerät mit dem Sieden beginnt, das Display aber eine niedrigere Temperatur anzeigt, muss die Temperatur erneut auf 100°C eingestellt werden. Anschließend aktivieren Sie bitte den Timer.
-
Drücken Sie die Tasten und gleichzeitig, bis auf der Anzeige das Zeichen C1/F1 zu sehen ist. Der konkrete Temperaturbereich beträgt von -10°C bis +10°C oder von -50°F bis +50°F.
-
Durch Drücken der Taste Manual/Pause während des Erhitzens wird das Gerät auf die ursprünglichen Einstellungen zurückgesetzt. Dann können Temp (Temperatur)/Power (Kraft)/Timer (Zeit) geändert werden. Danach die Taste Manual drücken, um die Wahl zu bestätigen und zum Aufheizen zurückzugehen.
-
Wenn die Taste TEMP gedrückt und für 5 Sekunden gehalten wird, ändert sich die Temperatureinheit von Celsius in Fahrenheit. Dies kann nur nach dem Einschalten des Gerätes und vor der Einstellung der sonstigen Arbeitsparameter vorgenommen werden.
6.2. MEMORY-FUNKTION IM MANUELLEN MODUS
- Halten Sie die Taste MANUAL/PAUSE im Programmiermodus für 5 Sekunden gedruckt und lassen Sie sie dann los. So werden die letzten Einstellungen im Gerät abgespeichert. Dieser Vorgang wird durch einen Klingelton signalisiert.
- Danach START drucken; das Gerät ist jetzt so einsatzbereit und wie in den letzten Einstellungen gespeichert.
- Durch Drucken von STOP wird die Arbeit des Gerats angehalten.
- Wird die Taste AUTO/PAUSE im Standby-Modus für 5 Sekunden gedrückt, wird das Gerät – wie unten gezeigt (die Anzeige gibt die aktuelle Temperatur an) – wieder auf die fabrikmäßige Einstellung zurückgestellt. Die Bestätigung wird durch einen langsameren Klingelton signalisiert.
text_image
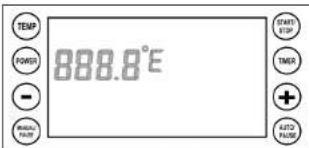
TEMP POWER - Negative Party 888.8°E START/STOP TIMER + AUTO FLUIDMANUAL/PAUSE
TEMP
POWER
TIMER
Zur Inbetriebnahme des Gerates START drucken; der Buchstabe "H" im oberen rechten Eck beginnt aufzublinken
Drücken Sie MANUAL/PAUSE. Während des Aufheizens kehrt das Gerät in den Einstellungsmodus der Parameter zurück. Jetzt die Temperatur einstellen, und mit MANUAL die Parameter bestätigen.
MANUAL/PAUSE drücken und 5 Sekunden halten, dann loslassen. Sie hören einen Ton, der die Speicherung der Einstellungen bestätigt.
Drücken Sie MANUAL nochmals. Das Gerät beginnt zu arbeiten. STOP drücken. Das Gerät hält den Betrieb an.
6.3. EINSTELLUNG IM AUTO-MODUS
1. Das Gerät einschalten und dann die Taste AUTO drücken.
2. ROS1 wird im rechten oberen Eck des Displays angezeigt. Jetzt folgende Parameter festlegen: TEMP (Temperatur), TIMER (Zeit) und POWER (Kraft) (wie oben).
3. Nach Einstellen des ersten Schritts (ROS1) die Taste AUTO drucken und den zweiten Schritt (ROS2) einstellen. Die weiteren Schritte 3 bis 9 werden analog zum ersten und zweiten eingestellt. Fabrikmäßig ist das Gerät so eingestellt, dass Schritt 3 die Siedeprozudur (BOILING) darstellt und der letzte Schritt des gesamtten Arbeitsganges ist. Nach Abschluss des Siedens stellt das Gerät den Betrieb automatisch ein. Wenn zwischen Schritt Nr. 2 und dem Siedevorgang andere Schritte notwendig
sein sollten, ist in Schritt Nr. 3 der Temperatwert zu ändern und das Sieden ist dann in einem der folgenden Schritte einzustellen. Hierbei ist daran zu denken, dass die Temperatur in den folgenden Schritten höher sein muss als in den vorangegangenen. Im Schritt des Siedens (BOILING) können POWER (Kraft) und TIMER (Zelt) eingestellt werden, die Temperatur ist standardmäßig auf 100°C eingestellt. Nach Einstellen von Kraft und Zeit bitte AUTO drucken – das Gerät geht in den Modus der Einstellung zur Erinnerung der Hopfenzugabe über – beschrieben in Pkt. 9 oben.
- Nach Einstellen sämtlicher erforderlicher Schritte (nach Bedarf – maximal bis zu 9 Schritten) die Taste START drücken, um alle eingestellten Schritte zu bestätigten. Das Gerät beginnt den Betrieb bei dem ersten eingestellten Schritt R051. In dieser Zeit leuchtet auf dem Display R051 auf. Das Wasser im Behälter wird auf die für diesen Schritt (R051) eingestellte Temperatur aufgeheizt. Wenn die eingestellte Temperatur erreicht ist ördön ein Ionsignal – R051 und MASHING beginnen, auf dem Display zu blinken – dies ist die Erinnerung an das Hinzufügen von Zutaten. Nach Hinzufügen der Zutaten drücken Sie AUTO. Das Gerät führt nun den weiteren Verlauf von R051 durch; d.h. das Aufzeizen auf die eingestellte Temperatur in der eingestellten Zeit. Nach Abschluss von Schritt R051 geht das Gerät zum nächsten Schritt über; also über R052 bis hin zum letzten Schritt, der im Siedon (BOILING) besteht.
- Die Programmeinstellung berücksichtigt nur einen Siedeprozess – wenn das Sieden z.B. in Schritt 3 eingestellt wird, so werden die Schritte 4 – 9 übergangen. Die Siedestärke (POWER) kann während des laufenden Betriebs eingestellt werden.
- Wenn der Schritt ROS1 beendet wird, ertont ein Signalton. Das Programm wird nicht in den nächsten Schritt übergehen, solange nicht der AUTO Knopf gedrückt wird. Dies ist eine Erinnerung zum Zugeben der Zutaten.
- Die Erinnerung an den Schritt BOILING (Sieden) funktioniert grundsätzlich wie die Erinnerung an das Hinzufügen von Zutaten. Wenn das Gerät den Schritt abschließt, der dem Sieden vorausgeht, wird ein Tonsignal in Gang gesetzt. Das Programm beginnt nicht mit dem Schritt Sieden, wenn dies nicht über die Taste AUTO bestätigt wird. Dies ist die Erinnerung an das Entzuckern.
- Die Taste PAUSE hält den Vorgang und den Timer an. Dann können die Parameter geändert werden. Durch Drücken der Taste AUTO wird die Arbeit des Geräts fortgesetzt.
- Drücken der Taste START während des Betriebs im Auto-Modus bewirkt das Auslassen des aktuell ausgeführten Schrittes; das heißt das Gerät geht zum nächsten Schritt über.
- Einstellung zur Erinnerung an die Zugabe des Hopfens für den Siedeprozess: in Schritt ROS3 (BOILING) (dieser Schritt ist fabrikmäßig als Sieden eingestellt; dieses kann in jedem weiteren der 9 verfügbaren Schritte eingestellt werden) kann die Erinnerung an das Hinzufügen des Hopfens eingestellt werden (und somit auch die Siedezzeit). Nach Einstellen der Heizstärke und der Heizdauer in Schritt ROS3 (BOILING) erscheint auf dem Display
„HOP1“ und der Zeitwert blinkt auf. Die Zeit mit den Tasten – oder + einstellen. Um weitere Erinnerungen für die Zugabe von Hopfen hinzuzufugen, drucken Sie die Taste TIMET. Somit lassen sich 9 Erinnerungen einstellen. Achten Sie darauf, dass die Siededauer (BOILING) langer sein muss als beim ersten Sieden des Hopfens (HOP1); die erste Heizdauer des Hopfens (HOP1) muss langer sein als die zweite Heizdauer aus. D.H. Siedezheit (BOILING) > Siedezheit des Hopfens HOP1 > Siedezheit des Hopfens HOP2 > Siedezheit des Hopfens HOP3 > Siedezheit des Hopfens HOP4 > Siedezheit des Hopfens HOP5 > Siedezheit des Hopfens HOP6 > Siedezheit des Hopfens HOP7 > Siedezheit des Hopfens HOP8 > Siedezheit des Hopfens HOP9. Drucken Sie START, um den Heizvorgang zu beginnen.
- Bei Drucken und Halten von POWER und TIMER auf leerem Display, geht das Gerät in die Option der Rezeptauswahl über. Drücken Sie „* oder „†, um die gewünschte Rezeptur zu wählen. Es können bis zu 10 Rezepturen programmiert werden. Drucken Sie die Taste Start, um die gewählte Rezeptur zu bestätigen. Das Display bleibt leer. Danach drucken Sie die Taste AUTO/PAUSE, um in den Modus zur Änderung der Rezepte zu gelangen. Es kann auch die Taste START gedrückt werden, um sofort die gewünschte Rezeptur aufzurufen oder man druckt AUTO/PAUSE um zu bearbeiten und das Programm Schritt für Schritt zu prüfen.
- Bei Drücken der Taste STOP werden sämtliche Arbeitsphasen übergangen. Das Gerät schaltet sich ab und zeigt END an, wobei dies über einen 30 Sekunden anhaltenden Ton signalisiert wird. Wird nun erneut STOP gedrückt, wird der Standby Status auf dem Display aufgerufen (leorer Bildschirm).
6.4. MEMORY-FUNKTION IM AUTO-MODUS - Nach Einstellen aller Parameter im Auto-Modus drücken Sie die Taste STOP bis das Display einen leeren Bildschirm anzeigt Das Gerät nicht ausschalten! Halten Sie sich an die nachstehenden Schritte, um das Programm zu speichern.
- Drücken Sie die Taste MANUAL, um in die manuelle Bearbeitung zu gehen. Drücken Sie dann MANUAL und halten Sie die Taste 5 Sek lang. Auf diese Weise können die letzten Einstellungen im manuellen Modus (Manual) und dem automatischen Modus (AUTO) gespeichert werden. Die gespeicherten Programme werden durch einen Klingelton bestätigt.
- Das Gerät durch Drücken der Taste AUTO aus und dann erneut einschalten. Auf dem Display erscheint Schritt 1 des zuletzt ausgewählten Programms.
- Die Taste START drücken – das Gerät wird in Betrieb genommen.
- Das Gerät speichert Programme nicht „gesammelt“ ab. Jeder Speichervorgang muss gemäß den oben beschriebenen Schritten vorgenommen werden.
AUTO/PAUSE drücken, um die Rezeptur zu bearbeiten. Temp/Power/Timer können eingestellt werden
Erneut AUTO drücken, um den nächsten Schritt zu bearbeiten/ prüfen.
Während des Siedens AUTO drücken, um die Hopfen-Erinnerung einzustellen.
Wenn Sie die Erinnerung an den Hopfen übergehen sollten, nochmals START drücken; das Gerät beginnt mit dem Aufheizen
START drucken (betrifft nicht den Schritt Sieden / BOILING/); das Gerät beginnt zu erhitzen. RXSX im rechten oberen Eck des Displays beginnt zu blinken, wenn das Gerät in Betrieb ist.
Drücken Sie „“ oder „+“ um die erste Erinnerung (Timer) für die Zugabe des Hopfens einzustellen.
Die Taste TIMER drücken, um die 2. Erinnerung an die Zugabe des Hopfens einzustellen. Den Timer zur 3, 4, 5... 9. Erinnerung nochmals drücken. Die einzelnen Erinnerungen sollten so eingestellt werden, dass die Zeit der ersten Erinnerung niedriger ist als die Siedszeit (BOILING), aber hoher als die zweite Erinnerungszeit die zweite hoher als die dritte usw., clh. BOILING > HOP1 > HOP2 > HOP3 > HOP4 > HOP5 > HOP6 > HOP7 > HOP8 > HOP9
START drücken, um mit dem Aufheizen zu beginnen
6.5. AUSWAHL DER REZEPTUR IM AUTO-MODUS
• Power und Timer drücken und bei leerem Display 5 Sek. halten, um in die Rezeptwahl zu gelangen
• Zu Wahl des Rezepts „- oder „-“ drücken
- Start/Stop drucken, um die gewählte Rezeptur zu bestätigen.
Das Gerät nicht ausschalten.
- Auto/Pause drücken, um zur Bearbeitung der Rezeptur zu gelangen. Power/Timer/Temp können bearbeitet werden oder durch Drücken von Start/Stop kann das Gerät in Betrieb genommen werden.
- BRAUPROZESS (BEISPIEL)
• Vor und nach jeder Benutzung bitte das Gerät grundlich reinigen. - Den langlichen Filter am Zapfhahn (innen im Kessel) anbringen und die gewünschte Wassermenge einfullen.


länglicher Filter
DE
- Setzen Sie das untere Rohr in die Pumpenöffnung, bevor Sie die Maschine starten, um zu verhindem, dass das Loch durch Malz verstopft wird.
- Das Wasser auf 65°C-68°C aufheizen, dann Malz in den Tank füllen und vorsichtig umrühren.
- Wenn die entsprechende Temperatur erreicht ist, die Kreiselpumpe in Betrieb setzen, den Durchflussstrom festlegen (wie im folgenden Abschnitt beschrieben).
• Die Standard-Heizzeit beträgt 60 Minuten für den ersten Ansatz (je nach Rezept).
• Die Temperatur für den zweiten Ansatz betragt 78-80°C. Zeit: 20 Minuten (ie nach Rezent)
- Wenn sich der Ansatz gebildet hat, den Behalter mit den Sieben vorsichtig anheben und ihn auf den Stützringen am Band des Haupttanks platzieren.
- Das Malz im Korb mit Wasser besprühen (Nachguss). Danach den Korb 10 Minuten abtropfen lassen.
Das Wasser bis zum Siedepunkt erhitzen (dies kann getan werden, während der Korb abstropft). Die Siedezzeit beträgt 90 Minuten (je nach Rezept).
- Hopfen usw. zum lt. Rezept richtigen Zeitpunkt hinzufügen.
- Nach dem Kochen der Maische auf 20°C abkühlen lassen und danach durch den Kran mit dem länglichen Filter vorne am Tank in den Garbehälter einfullen.
8. KREISELPUMPE
• Die Pumpe nicht ohne Wasser in Betrieb nehmen!
- Es wird davon abgeraten, die Pumpe zum Umpumpen der Maische nach dem Abkühlen zu verwenden, weil sich am Pumpeeningang kein Filter befindet. Dies kann dazu fuhren, dass der Sud in die Pumpe gelangt, diese blockiert und das System beschädigt.
• Vor dem Einschalten der Pumpe dafür sorgen, dass sich Wasser im Boiler befindet.
• Die Pumpe während des Aufheizens der Maische nicht anschalten.
- Das Ventil (blauces Ventil) am Kreislaufrohr anschließen. - Das gekrümmte Überlaufrohr einsetzen. Die zwei Griffe an die Verbindung drücken, um sie an dieser Stelle zu verriegeln.
- Erst jetzt die Pumpe einschalten.
- Mit dem blauen Ventil den entsprechenden Durchlaufwert einstellen (wenn das Durchpumptempo zu hoch ist, läuft der Sud aus dem Netz in das zentrale Rohr, der Boden des Tanks kann austrocknen, wodurch die Zutaten anbrennen können und das Heizelement der Gefahr des Überhitzens ausgesetzt ist).
- Es muss der entsprechende Durchflusswert eingestellt werden.
• Die Pumpe nach Vorbereitung des Ansatzes ausschalten. Das Überlaufrehr (gekrümmtes Rohr) vor Verschließen des Ventils und Ausschalten der Pumpe nicht entfernen.

9. WARTUNG
- Nach Gebrauch muss das Gerät gründlich gereinigt werden. Trockene Bestandteile können am Metall oder im Inneren der Pumpe festkleben.
- Gießen Sie 5 – 10 | Wasser mit einer Temperatur von 60°C für 15 Min. in das Gerät. Während des Reinigens die Pumpe laufen lassen.
- Keine scharfen Gegenstände zum Entfernen von Rückstanden verwenden. Zum Reinigen der Tanks einen weichen Lappen oder einen Reinigungsschwamm zu Hilfe nehmen (es kann etwas Essig verwendet werden).
- Rückstände im Boiler müssen vor dem nächsten Verbrauch entfernt werden.
- Die Pumpe bitte durchspulen. Hierzu den Wasserschlauch an das Überlaufrohr (gekrümmtes Rohr) anschließen und die Pumpe währenddessen nicht anschalten.
- Es können geeignete Reinigungsmittel verwendet werden (bitte vorher prufen, welchem Zweck diese dienen).
• Die Elektroteile des Gerätes nicht mit Wasser in Berührung bringen.
• Das Gerät nicht in Wasser tauchen.
• Das Gerät an einem trockenen Platz aufbewahren.
- Vor jeder Reinigung und Einstellung, dem Austausch von Zubehor oder wenn das Gerät nicht benutzt wird, muss der Netzstecker gezogen werden und das Gerät vollständig abkühlen.
- Zur Reinigung des Geräts dürfen nur milde Reinigungsmittel verwendet werden, die für Oberflächen, mit denen Lebensmittel in Kontakt kommen, bestimmt sind.
- Lassen Sie nach jeder Reinigung alle Teile gut trocknen, bevor das Gerät erneut verwendet wird.
- PROBLEMLÖSUNGEN
| Die Zutaten vorstopfen die Pumpe | A: Die Pumpe durchspulen; dabei das Rohr an den gekrümmten Schlauch anbringenB: Die Pumpe zorlegen und die Bestandteile entfernen. |
| Die Temperatur erreicht keine 100°C | A: Mit dem Docken 1-2 Min. abdockenB: Die Temperatureinstellung ändern. |
| C1-Korrektur der Temp. in Celsius | A: Drücken Sie „-1, -1“ in den Einstellungen zur Temperaturkorrektur C1 gleichzeitig. Der Einstellungsbereich beträgt – 10°C bis +10°C |
| F1-Korrektur der Temp. in Fahrenheit | A: Drücken Sie „-1, -1“ in den Einstellungen zur Temperaturkorrektur C1 gleichzeitig. Der Einstellungsbereich beträgt – 50°F bis +50°F |
| ERR-1 erscheint auf dem Display | A: Temperatur von mehr als – 20°C – Niedrigtemperaturwarnung.B: Die Verbindung des Sensors hat sich gelockert.C: Den Boden des Gerats offen und den Sensor prufen. Wenn sich dieser gelobt hat, wieder kornekt verbinden. |
| ERR-2 erscheint auf dem Display | A: Temperatur höher als 120°C – Warnung vor Überhitzern/Audrocknen des Boilers.B: Beschädigter Sensor - Kontakt mit dem Kundendienst aufnehmen. |
| Das Gerät schaltet sich während des Heizens von selbst aus | A: Die Heizkraft verringern.B: Das Sicherheitshermostat (Überhitzungsthermostat) austauschen. |
USER MANUAL
EN
TECHNICAL DATA
| Parameter description | Parameter value | |
| Product name | HOME BREWMESH TUN 42L | HOME BREWMESH TUN 62L |
| Model | RCBM-41N | RCBM-42N |
| Rated voltage[V~]/ Frequency[Hz] | 230/50 | |
| Rated power [W] | 2.500 | 3.000 |
| Volume [] | 40 | 60 |
| Temperature range | from 10°C to 100 °C, increments of 0.1°C | |
| Time range [min] | 0-180 | |
| Dimensions [mm] | ∅400x650with lid | ∅400x775with lid |
| Weight [kg] | 10.5 | 12 |
- GENERAL DESCRIPTION
The user manual is designed to assist in the safe and trouble-free use of the device. The product is designed and manufactured in accordance with strict technical guidelines, using state-of-the-art technologies and components. Additionally, it is produced in compliance with the most stringent quality standards.
DO NOT USE THE DEVICE UNLESS YOU HAVE THOROUGHLY READ AND UNDERSTOOD THIS USER MANUAL.
To increase the product life of the device and to ensure trouble-free operation, use it in accordance with this user manual and regularly perform maintenance tasks. The technical data and specifications in this user manual are up to date. The manufacturer reserves the right to make changes associated with quality improvement. The device is designed to reduce noise emission risks to a minimum, taking into account technological progress and noise reduction opportunities.
LEGEND
| CE | The product satisfies the relevant safety standards. |
| Read instructions before use. | |
| The product must be recycled. | |
| WARNING! or CAUTION! or REMEMBER! Applicable to the given situation (general warning sign). | |
| ATTENTION! Hot surface, risk of burns! |
PLEASE NOTE! Drawings in this manual are for illustration purposes only and in some details may differ from the actual product.
The original operation manual is written in German. Other language versions are translations from the German.
2. USAGE SAFETY
ATTENTION! Read all safety warnings and all instructions. Failure to follow the warnings and instructions may result in electric shock, fire and/or serious injury or even death.
The terms "device" or "product" are used in the warnings and instructions to refer to < HOME BREW MESH TUN>. Do not use in very humid environments or in the direct vicinity of water tanks. Prevent the device from getting wet. Risk of electric shock! Do not put your hands or other items inside the device while it is in use! Do not cover the ventilation openings!
2.1.ELECTRICAL SAFETY
a) The plug must fit the socket. Do not modify the plug in any way. Using original plugs and matching sockets reduces the risk of electric shock.
b) Avoid touching earthed elements such as pipes, heaters, boilers and refrigerators. There is an increased risk of electric shock if the earthed device is exposed to rain, comes into direct contact with a wet surface or is operating in a damp environment. Water getting into the device increases the risk of damage to the device end of electric shock.
c) Do not touch the device with wet or damp hands. d) Use the cable only for its designated use. Never use it to carry the device or to pull the plug out of a socket. Keep the cable away from heat sources, oil, sharp edges or moving parts. Damaged or tangled cables increase the risk of electric shock.
e) If using the device in a damp environment cannot be avoided, a residual current device (RCD) should be applied. The use of an RCD reduces the risk of electric shock.
f) Do not use the device if the power cord is damaged or shows obvious signs of wear. A damaged power cord should be replaced by a qualified electrician or the manufacturer's service centre.
g): To avoid electric shock, do not immerse the cord, plug or device in water or other liquids. Do not use the device on wet surfaces.
h) The socket to which the device is connected must be grounded.
i) Before disconnecting the device's plug from the power supply, first switch off the device.
j) The electrical socket must be secured with a 16 A fuse.
2.2.SAFETY IN THE WORKPLACE
a) Make sure the workplace is clean and well lit. A messy or poorly lit workplace may lead to accidents. Try to think ahead, observe what is going on and use common sense when working with the device.
b) Do not use the device in a potentially explosive environment, for example in the presence of flammable liquids, gases or dust. The device generates sparks which may ignite dust or fumes.
c) If you discover damage or irregular operation, immediately switch the device off and report it to a supervisor without delay.
d) If there are any doubts as to the correct operation of the device, contact the manufacturer's support service.
c) Only the manufacturer's service point may repair the device. Do not attempt any repairs independently!
f) In case of fire, use a powder or carbon dioxide (CO _2 ) fire extinguisher (one intended for use on live electrical devices) to put it out.
g) Regularly inspect the condition of the safety labels. If the labels are illegible, they must be replaced.
h) Please keep this manual available for future reference. If this device is passed on to a third party, the manual must be passed on with it.
i) Keep packaging elements and small assembly parts in a place not available to children.
REMEMBER! When using the device, protect children and other bystanders.
2.3. PERSONAL SAFETY
a) Do not use the device when tried, ill or under the influence of alcohol, narcotics or medication which can significantly impair the ability to operate the device.
b) The device is not designed to be handled by persons (including children) with limited mental and sensory functions or persons lacking relevant experience and/or knowledge unless they are supervised by a person responsible for their safety or they have received instruction on how to operate the device.
c) When working with the device, use common sense and stay alert. Temporary loss of concentration while using the device may lead to serious injuries.
d) To prevent the device from accidentally switching on, make sure the switch is on the OFF position before connecting to a power source.
c) Do not overestimate your abilities. When using the device, keep your balance and remain stable at all times. This will ensure better control over the device in unexpected situations.
f) The device is not a toy. Children must be supervised to ensure that they do not play with the device.
2.4. SAFE DEVICE USE
a) Do not use the device if the ON/OFF switch does not function properly (does not switch the device on and off). Devices which cannot be switched on and off using the ON/OFF switch are hazardous, should not be operated and must be repaired.
b) Disconnect the device from the power supply before commencement of adjustment, cleaning and maintenance. Such a preventive measure reduces the risk of accidental activation.
c) When not in use, store in a safe place, away from children and people not familiar with the device who have not read the user manual. The device may pose a hazard in the hands of inexperienced users.
d) Keep the device in perfect technical condition. Before each use check for general damage and especially check for cracked parts or elements and for any other conditions which may impact the safe operation of the device, if damage is discovered, hand over the device for repair before use.
e) Keep the device out of the reach of children.
f) Device repair or maintenance should be carried out by qualified persons, only using original spare parts. This will ensure safe use.
g) To ensure the operational integrity of the device, do not remove factory-fitted guards and do not loosen any screws.
h) When transporting and handling the device between the warehouse and the destination, observe the occupational health and safety principles for manual transport operations which apply in the country where the device will be used.
i) Do not move, adjust or rotate the device in the course of work.
j) Do not leave this appliance unattended while it is in use.
k) Clean the device regularly to prevent stubborn grime from accumulating.
The device is not a toy. Cleaning and maintenance may not be carried out by children without supervision by an adult person.
m) Do not run the device when empty.
n; it is forbidden to interfere with the structure of the device in order to change its parameters or construction.
o) Keep the device away from sources of fire and heat.
p) Do not remove the lid during cooking.
ATTENTION! Despite the safe design of the device and its protective features, and despite the use of additional elements protecting the operator, there is still a slight risk of accident or injury when using the device. Stay alert and use common sense when using the device.
3. SCOPE OF APPLICATION
Home brew mesh tun is designed for preparing mash and wort. Do not use the device to:
• took soups or other drinks;
• warm or heat flammable, noxious, particularly volatile, or any other toxic substances.
The user is liable for any damage resulting from non-intended use of the device!
3.1 THE DEVICE

text_image
Labeled diagram of a cooking pot with numbered items for identification- Main tank
- Tank with sieves
- Top sieve
- Bottom sieve
- Central tube
- Overflow tube (curved)
- Handle on tank with sieves
- Lid
- Pump and device ON / OFF buttons
- Drain tap
- Bottom pipe
- long filter
4 BREWING PREPARATION - Ensure the device is standing on a safe, stable horizontal surface.
- When full, the device holds hot, boiling liquid, and may weigh up to 70 kg. A stable horizontal position is required to ensure successful pumping during the brewing process. Avoid unstable surfaces.
• Do not move the device during the brewing process. The
handles are only designed to transport an empty device
• Always clean all device elements as hygiene is
essential for a successful brewing process
• To sterilise the accessories, heat up some hot water in the boiler before use.

text_image
5. OVERFLOW CHANNEL ASSEMBLY 1. Install the connector B to the bottom sieve. 2. Install the connector A to the connector B. 3. Install the central pipe to the connector A.- Install the connector C on the central pipe.
- Install the white cap on the central pipe.
- Place the connected elements in the tank
-
After adding water and ingredients, remove the
white cap and the connector C. -
Install the upper sieve with the handles facing up on the central pipe.
CAUTION: During operation, the central pipe hole should be open.
- PROGRAMMING SETTINGS
text_image
TEMP R8SB HOPB 888.0°E 888 Min MASHING BOILING S/P:8800W S/T:888.0°E START STEP TIME +/- + AUTO PASE6.1 MANUAL MODE SETTINGS
1. Tum the power on and then press the MANUAL button.
2. Use the TEMP button to set the temperature, POWER button to set the power and the TIMER button to set the process timer – all 3 parameters have to be configured to start the device. You can configure them in any order.
3. Once all 3 parameters have been configured, press the START button to activate manual mode. The flashing "H" letter in the top left corner means the device has begun heating up.
4. The pre-programmed default boiling temperature is 100°C, and the Timer will not start before the temperature reaches 100°C. To do that cover with a lid for 1-2 minutes for the display to reach 100°C.
5. When the device begins boiling, but a lower temperature is displayed, perform the following temperature configuration to set the temperature to 100^ C and start the timer.
-
Press the „-” and „+” buttons simultaneously until C1/F1 appears on the display. The temperature can be adjusted by between -10°C and -10°C or -50°F to +50°F.
-
Press the Manual/Pause button during the heating process to restore the device to its initial settings. Then the temperate, power and timer settings can be changes. Press the Manual button to continue heating up.
-
To change the temperate units from Celsius to Fahrenheit press and hold the TEMP button for 5 seconds. This stetting can be changed only directly after the device is turned on, before changing any other parameters.
6.2 MEMORY FUNCTION IN MANUAL MODE
-
Press and hold the MANUAL/PAUSE button for 5 seconds in programming mode and then release. This will store the last settings to the memory. A bell will sound once the most recent settings have been saved to memory.
-
Press the START button after performing the above sequence and the device will be ready to be used according to the most recently saved parameters.
-
Press the STOP button to stop the device.
- To restore factory settings, press and hold the AUTO/PAUSE button for 5 seconds in standby mode, as shown below (only the current temperature is shown on the display). A slower bell sounds confirms this operation.
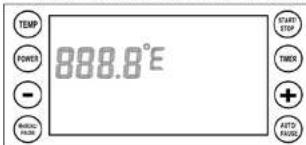
text_image
TEMP POWER - MASCAL PAVING 888.8°E STARTS STOP TIMER + AUTO PAVINGMANUAL/PAUSE
TEMP POWER TIMER
To start the device, press the START button. The letter "H" will flash in the top right corner.
Press the Manual/Pause button during the heating process. The device will restore its initial settings. Now set the temperature, power and time then press the MANUAL button to confirm the new settings.
Press and hold the MANUAL/PAUSE button for 5 seconds and then release. Once the settings have been saved you will hear the sound of a bell.
Press MANUAL once again Press STOP to stop the and the device will start device
6.3 AUTO MODE SETTINGS
- Turn on the device then press the AUTO button.
- ROS1 will be displayed in the top right corner of the display. Enter the following parameters: temperature, time, and power (as above).
- Once the first step (ROS1) has been configured, press the AUTO button, and configure the second step (ROS2). Programme subsequent steps (3 to 9) analogously to step one and two.
The factory settings of the device are such that step 3 is the BOILING procedure and it is the last step of the entire process - once boiling is over the device will stop working. If any additional steps are required between step 2 and the boiling step, then change the temperature setting in step 3 and configure one of the subsequent steps as the boiling process. Remember for the temperature ins subsequent steps to be higher than in the preceding step. In the BOILING stage, POWER and TIMER may also be set. The default temperature is set at 100^ . After setting the power and timer press AUTO - the device will switch to hop adding reminder mode - described in section 9 below.
-
Once all the needed steps have been configured (as required - up to 9 steps), press the START button to confirm all settings. The device will start with ROS1, the first configured step. ROS1 will flash on the display during that time and the device will heat up the water to the temperature set for that step (ROS1). Once the pre-set temperature has been reached, an acoustic signal will sound, ROS1 and MASHING will flash on the display this is a reminder to add ingredients. Once the ingredients have been added, press AUTO and the device will continue with step ROS1 - heating at a pre-set temperature and for a pre-set time. Once step ROS1 ends, the device will move onto the next step - ROS2 and so on until the last configured step which should entail BOILING.
-
Only one boiling process may be programmed once complete no more steps will be performed. The boiling POWER can be set during operation.
-
When the ROS1 step is completed, the device will sound a reminder. The program will not go to the next step until the AUTO button is pressed. This is a reminder to add ingredients.
-
The reminder in the BOILING step works on a similar principle to the reminder to add ingredients. Once the device ends the step before boiling - an acoustic signal will sound. Press the AUTO button to confirm start of the boiling step. This is a reminder for spraying (sparging).
-
The PAUSE button will stop the device and timer. Now the parameters can be adjusted. Press the AUTO button again to continue operation.
-
To skip the current step in auto mode and go to the next step press the START button.
-
To set a reminder to add hops during the boiling process: during step R053 (BOILING) according to factory settings, step R053 is pre-set as the boiling step, but any other out of the 9 available steps can be configured as boiling a reminder to ass hops may be configured (and also its boiling time) once the heating power and boiling time on step R053 (BOILING) have been set...HOP-1 will be shown on the display and a flashing time value. Use or buttons to set the time. In order to add further hop reminders, press the TIMER button -9 such reminders can be set, however remember that the boiling time (BOILING) has to be longer than the first hop boiling time (HOP1), and the first hop boiling time (HOP1) has to be longer than the second hop boiling time (HOP2) and so on. Therefore, boiling time (BOILING) > hop boiling time HOP1 > hop boiling time HOP2 > hop boiling time HOP3 > hop boiling time HOP4
hop boiling time HOP5 > hop boiling time HOP6 hop boiling time HOP7 > hop boiling time HOP8 hop boiling time HOP9. Press the START button to begin heating.
-
Press and hold the POWER and TIMER buttons for 5 seconds with the display empty to switch to recipe selection mode. Press, "or +" to choose the required recipe. Up to 10 recipes may be pre-programmed. Press the Start button to select the chosen recipe, the display will be empty, then press the AUTO/PAUSE button to enter recipe edition mode. Press the START button to begin the selected recipe immediately or press the AUTO/PAUSE button to edit or check the pre-set programme step-by-step.
-
Press the STOP button to skip all steps and the device will turn off, END will be displayed and a bell will sound for 30s. Press the STOP button again to go into stand-by mode (empty display).
6.4. MEMORY FUNCTION IN AUTO MODE
-
Once all parameters have been set in Auto mode, press the STOP button until the display is empty. Do not turn the device off! Follow the step below to save a programme.
-
Press the MANUAL button to enter manual editing mode, then press and hold the MANUAL button for 5 seconds. This will store the last settings to the memory both in manual and auto mode. A bell will sound to confirm that the programme has been saved.
-
Turn the device off and on, then press the AUTO button and step one from the most recently selected programme will appear on the display.
-
Press the START button to activate the device.
-
This device does not remember programmes in batches. Each save has to be performed in accordance with the steps described above.
Press AUTO/PAUSE to edit a recipe. Temp/Power/Timer may be set.
Press AUTO again to edit/check the next step.
Press AUTO during boiling to set the hops reminder
Press START (not applicable to the BOILING step), and the device will begin the heating up process. RXSX in top right corner of the display will begin flashing when the device is in use.
If you want to skip the hop reminder, press START once again - the device will start heating up.
Press "or " to set the first reminder (Timer) to add hops. Then press the TIMFR button to set the second hop reminder. Press the Timer button again for the third, fourth, fifth... ninth reminder. Given reminders should be set so that the time for the first reminder is shorter than the boiling time but longer that the second reminder time, the second longer than the third, and so on: BOILING>HOP1>HOP2>HOP3>HOP4>HOP5>HOP6>HOP7>HOP8>HOP9 Press the START button to begin heating.
6.5. RECIPE SELECTION IN AUTO MODE
- Press and hold the Power and Timer buttons for 5 seconds when the display is empty to enter recipe selection mode - Press + or - to choose a recipe.
- Press Start/Stop to select the chosen recipe.
Do not turn the device off.
- Press the Auto/Pause button to enter options for the selected recipe. Power/Timer/lemp can be edited or press the Start/Stop button to start the device.
- THE BREWING PROCESS (SAMPLE)
- Clean the device before and after every use.
- Attach the long filter to the discharge tap (inside the boiler) and pour the required volume of water into the tank.
long filter
Place the bottom pipe in the pump hole before starting the device to prevent the hole from becoming blocked by malt.
- Heat up the water to 66°C-68°C, add malt to the tank and then stir gently.
- Activate the circulation pump and once the required temperature has been reached, set the flow stream (follow the steps in the subsequent paragraph).
• The standard heating time for the first mash is 60 minutes (depending on the recipe).
• The temperature and time for the second mash are 78 -80°C, and 20 min (depending on the recipe).
- Once the mash is made, gently lift the container with the sieves and place it on the support rings on the ring on the main tank.
• Cool the malt in the basket by spraying it with water. Leave the bask to drip for 10 minutes after spraying.
- Heat up water to boiling temperature (you can do this whilst the basked is dripping) – boiling time is 90 min (depending on the recipe).
- Add hops etc at the correct moment (according to recipe). - Once the wort has boiled, cool it to 20°C. The pour it into the fermentation tank using the tap with the long filter on the front of the tank.
- CIRCULATION PUMP
• Do not start the pump without water!
- Using the pump to pump out wort after cooling is NOT recommended, as there is no filter at pump inlet. This could lead to the brew contaminating the pump, which might potentially damage and clog the system. - Make sure there is water in the boiler before activating the pump.
- Do not activate the pump during wort heating process.
- Close the (blue) valve on the circulation tube.
- Insert the curved overflow tube. Press two handles on the connector to lock it in place.
• Now you can start the pumping process.
- Use the blue valve to set an appropriate flow rate (if the flow rate is too high, the malt will flow from the sieve to the sieve to the central tube and that might cause the ingredients to burn and the heating element may overheat).
- Select a correct flow rate.
- Activate the pump once the mesh is ready. Do not remove the (curved) flow tube before closing the valve and switching off the pump!

9 MAINTENANCE
- Clean the device after use. Dry ingredients may adhere to the metal and the pump interior.
- Pour 5L-10L of 60°C water into the device for 15 min. Activate the pump when cleaning.
- Do not use sharp tools for scraping leftovers. To clean the device, use a soft cloth or sponge (you may use vinegar).
- Make sure all leftovers are removed before next use. - Rinse the pump by connecting the water hose to the (curved) overflow tube – do not activate the pump.
• Appropriated detergents may be used (makes suretouse them in accordance with manufacturer's recommendations).
- Ensure no electrical part of the device got wet. - Do not submerge the device in water.
- Store the device in a dry room.
- Unplug the mains plug and allow the device to cool completely before each cleaning, adjustment or replacement of accessories, or if the device is not being used.
- Use only mild, food safe detergents to wash the device. - After cleaning the device, all parts should be dried completely before using it again.
- TROUBLESHOOTING
| Ingredients clsg up in the pump | A: Flush the pump by connecting the tube to the curved hoseB: Dismantle the pump to remove blockage. |
| The temperature does not reach 100°C | A: Cover with lid for 1 - 2 minutes.B: Adjust temperature settings. |
| C1 - temperature adjustment in Celsius | A: Press, -^ and +^ simultaneously in C1 temperature adjustment mode.Temperature can be adjusted by between -10^ C and +10^ C . |
| F1 - temperature adjustment in Fahrenheit | A: Press, -^ and +^ simultaneously in F1 temperature adjustment set-ings. Temperature can be adjusted by between -50^ F to +50^ F . |
| ERR 1 appears on the display | A: The temperature is below -20^ C - low temperature warningB: The sensor connection is not tight.C: Open the bottom and check the sensor - if it is not connected, then re-connect it. |
| ERR 2 appears on the display | A: The temperature exceeds 120^ C - boiler overheated/dry warning.B: Sensor damage - contact your nearest service. |
| The device switches off by itself during the heating-up stage. | A: Reduce the heating power.B: Replace safety thermostat (pro- testing against overheating). |
DANE TECHNICZNE
| Opis parametru | Wartość parametru | |
| Nazwa produktu | KOCIOŁ WARZELNY DO PIWA 42L | KOCIOŁ WARZELNY DO PIWA 62L |
| Model | RCBM-41N | RCBM-42N |
| Napięcie zasilania IV-/ Zczystotliwość [Hz] | 230/50 | |
| Moc znamionowa [W] | 2500 | 3.000 |
| Pojomność [J] | 40 | 60 |
| Zakres temperatur | od 10°C do 100°C co 0,1°C | |
| Zakres czasu [min] | 0-180 | |
| Wymiary [mm] | ∅400x650 z pokrywa | ∅400x775 z pokrywa |
| Cieżar [kg] | 10.5 | 12 |
- OGOLNY OPIS
Instrukcja przeznaczona jest do pomocy w bezpiecznym i niezawodnym użytkowaniu. Produkt jest zaprojektowany i wykonany ścisłe według wskazań technicznych przy uzyciu najnowszych technologii i komponentów oraz przy zachowaniu najwyższych standardów jakości.
PRZED PRZYSTĄPIENIEM DO PRACY NALEŻY DOKŁADNIE PRZECZYTAĆ I ZROZUMIEĆ NINIEJSZĄ INSTRUKCJĘ.
Dla zapewnienia drugiej i niezawodnej pracy urządzenia naliczy obać o jego prawidłową obsługę oraz konserwację zgodnie ze wskazówkami zawartymi w tej instrukcji. Dane techniczne i specyfikacje zawarte w tej instrukcji obsługą się aktualne. Producent zastrzega sobie prawo dokonywania zmian związanych z podwyższeniem jakości. Uzwegłodniając postęp techniczny i możliwość ograniczenia hałasu, urządzenie zaprojektowano i zbudowano tak, aby ryzyko jakie wynika z emisji hałasu ograniczyć do najnizszogo poziomu.
OBJAŠNIENIE SYMBOLI
CE Produkt spełnia wymagania odpowiednich norm bezpieczeństwa.
Przed uzyciem należy zapoznać się z instrukcję.
Produkt podlegający recyklingowi.
UWAGAI lub OSTRZEŻENIE! lub PAMIĘTAI opisująca daną sytuacje (ogólny znak ostrzegawczy).
UWAGA! Gorąca powierzchnia może sprowadować nparzenial
UWAGA! Ilustracje w niniejszej instrukcji obsługi maja charakter poglądowy i w nicktórych szczegółach mogą różnic się od rzeczywistego wyględu produktu.
Instrukcją oryginalną jest niemiecka wersja instrukcji. Pozostałe wersje językowe są tłumaczeniami z języka niemieckiego.
2.BEZPIECZEŃSTWO UŻYTKOWANIA
UWAGAI Przoczytaj wszystkie ostrzeżenia dotyczące bezpieczeństwa oraz wszystkie instrukcje. Niezastosowanie się do ostrzeżeń i instrukcji może spowodować porażenie prądern, pożar i/lub ciężkie obrażenia ciała lub śmierć.
Temin „urządzenie” lub „produkt” w ostrzezeniach i w opisie instrukcji odnosi się do «KOCIÓŁ WARZELNY DO PIWA». Nie należy używać urządzenia w pomieszczoniach o bardzo dużej wilgotności / w bezpośrednim pobilzu zbiorników z wocii. Nie wolno dopuszcażać do zamoczenia urządzenia. Ryzyko porazonia pradem! Nie wkiaćać rąk przedmiotów do wenętrza pracującego urządzenia! Nie wolno załąnić uktorów wentylacyjnych urządzeńami
2.1. BEZPIECZENSTWO ELEKTRYCZNE
a) Wtyczka urządzenia musi pasować do gniazda. Nie modyfikować wtyczki w jakikołwiek sposób. Oryginalne wtyczki i pasujące gniazda zmniejszają nyzyko porazenia pradem.
b) Unikać dotykania uziemionych elementów, takich jak runy, grzejniką, piace i lodówki. Istnicje zwiększone ryzyko porażenia prądem, jeśli ciało jest uziemione i dotyka urządzenia narazonego na bezpośrednie działanie deszczu, mokrej nawierzchni i pracy w wilgotnym otoczeniu. Przedostanie się wody do urządzenia zwiększa ryzyko jego uszkodzenia oraz porażenia prądem.
c) Nie wolno dotykać urządzenia mokrymi lub wilgotnymi rekoma.
d) Nie należy używać przewodu w sposób niewiaściwy. Nigdy nie używać go do przenoszenia urządzenia lub do wyciegania wtyczki z gniazda. Trzymać przewód z dala od źródeł ciepła, oleju, ostrych krawodzi lub nuchomych części. Uszkodzone lub popłatane przewody zwiększaja ryzyko porażenia orądem.
e) Jeśli nie można uniknąć używania urządzenia w środowisku wilgotnym, należy stosować wyłącznik różnicowo-prądowy (RCD). Używanie RCD zmniejsza przysko porażenia pradem.
f) Zabrania się używania urządzenia, jeśli przewód zasilający jest uszkodzony lub nosi wyrążne oznaki zuzycia. Uszkodzony przewód zasilający powinien być wymieniony przez wykwalifikowanego elektryka lub scwis producenta
g) Aloy uniknąć porażenia prądem elektrycznym, nie należy zanurzać kabla, wtyczki ani samego urządzenia w wodzie lub innym płynic. Nie wolno używać urządzenia na mnkrych powierzchniach.
h) Gniazdo do którego podłączone jest urządzenie musi być uziemione.
i) Przed odłączeniem wtyczki urządzenia od prądu należy najpoierw wyłączyć urządzenie.
j) Gniazdo elektryczne musi być zabezpieczone bezpiecznikiem 16 A.
2.2 BEZPIECZEŃSTWO W MIEJSCU PRACY
a) Utrzymywać porządek w miejscu pracy i dobro oświcticnic. Nieporzadek lub zie oświctlenie może prowadzić do wypadków. Nalezy być przewidującym, obsernować co się robi i zachowywać rozsadek podczas używania urządzenia.
b) Nie używać urządzenia w strefie zagrożenia wybuchem, na przykład w obecności łatwopalnych cieczy, gazów lub pyłów. Urządzenie wytwarzają iskry, mogące zapalić pył lub opary.
c) W razie stwierdzenia uszkodzenia lub nieprawidłowości w pracy urządzenia nalczy je bezzwołcznie wyłączyć i zgłosić to do osoby uprawnionej.
d) W razie wątpliwości czy urządzenia działa poprawnie, należy skontaktować się z serwisem producenta.
c) Naprawy urządzenia może wykonać wyłącznie serwis producenta. Nie wolno dokonywać napraw samodzielnie!
f) W przypadku zaprószenia ognia lub pozaru, do gaszenia urządzenia pod napięciem należy używać wyłącznie gaśnic proszkowych lub śnicgowych (CO₂).
g) Należy regularnie sprawdzać stan naklejek z informacjami dotyczącymi bezpieczeństwa. W przypadku gdy, naklejki są niczytelną należy je wymienić.
h) Zachować instrukcję użytkowania w celu jej późniejszego uzycia. W razie, gdyby urządzeniec miałe zostać przekazane osobom trzocim, to wraz z nim należy przekazać również instrukcję użytkowania.
i) Elementy opakowania oraz drobne elementy montazowe należy przechowywać w miejscu niedostępnym dla dzieci.
PAMIĘTAJI! Należy chronić dzieci i inne osoby postronne podczas pracy urządzeniem.
2.3. BEZPIECZENSTWO OSOBISTE
a) Niedozwolone jest obsługwanie urządzenia w stanie zmeczenia, choroby, pod wpływem alkoholu, narkotyków lub leków, które ograniczaja w istotnym stopniu zdolności obsługi urządzenia.
b) Urządzenie nie jest przeznaczone do tego, by było użytkowane przez osoby (w tym dzieci) o ograniczonych funkcjach psychicznych sensorycznych i umysłowych lub nieposiadające odpowiednicego doswiadczenia i/łub wiedzy, chyba że są one nadzorowane przez osobę odpowiedzialną za ich bezpieczeństwo lub otrzymały od niej wskazówki dotyczące tego, jak należy obsługiuwać urządzenie.
c) Należy być uważnym, kierować się zdrowy rozsecikiem podczas pracy urządzeniem. Chwila nieuwagi podczas pracy, może doprowadzić do poważnych obrażeń ciała.
d) Aby zapobiegać przypadkowemu uruchomicniu upewnji się, że przełącznik jest w pozycji wyłączonej przed podłączeniem do źródła zasilania.
e) Nie należy przeceniar swich możliwości. Utrzymywać balans i równowagę ciała przez cały czas pracy. Umożliwia to lepsza kontrolę nad urządzeniem w nieprzekiewanych sytuaciach.
f) Urządzenie nie jest zabawka. Dzieci powinny być pilnowane, aby nie bawiły się urządzeniem.
2.4. BEZPIECZNE STOSOWANIE URZADZENIA
e nalczy używać urządzenia, jeśli przełącznik ON/OFF nie działa sprawnic (nie załącza i nie wyłącza sie). Urządzenia, które nie mogą być kontrolowane za pomocą przełącznika są niebezpiczne, nie mogą prorować i muszą zostać naprawione.
b) Przed przystapieniem do regulacji, czyszczenia i konserwacji urządzenie należy adłączyć od zasilania. Tako środk zapobiegawczy zmniejsza ryzyko przypadkowego uruchomienia.
c) Nieużywane urządzenia należy przechowywać w miejscu medostępnym dla dzieci oraz osób nieznających urządzenia lub tej instrukcii obsługi. Urządzenia są niebezpieczne w rękach niedościwiedzonych użytkowników.
d) Utrzymywać urządzenie w dobrym stanie technicznym. Spraw Doźć przed każdą pracą czy nie posiada uszkodzeń ogólnych lub związanych z elementami ruchonymi tpekniecia części i elementów lub wszelkie inne warunki, które mogą mieć wpływ na bezpieczne działanie urządzenia). W przypadku uszkodzenia, oddeć urządzenie do naprawy przed uzyciem.
e) Urządzenie należy chronic przed dziećmi.
f) Naprawa oraz konserwacja urządzeń powinna być wykonywana przez wykwalifikowane osoby przy użyciu wyłącznie oryginalnych części zamiennych. Zapewni to bezpieczeństwo użytkowania.
g) Aby zapewnić zaprojektowana integralność operacyjna urządzenia, nie nalczy usuwać zainstałowanych fabrycznie osłon lub odkręcać śrub.
h) Przy transportowaniu i przonoszeniu urządzenia z miejsca magazynowania do miejsca użytkowania należy uwzględnić zasady bezpieczeństwa i higieny pracy przy rocznych pracach transportowych obowiązujących w kraju, w którym urządzenia są użytkowane.
i) Zabrania się przesuwania, przestawiania i obracania urządzenia będącego w trakcie pracy.
j) Nie nalczy pozostawiać włączonego urządzenia bez nadzoru.
k) Nalczy regularnie czyścić urządzenie, aby nie dopuścić do trwałego osadzenia się zanieczyszczeń.
Urzadzenie nie jest zabawka. Czyszczenie konserwacja nie mogą być wykonywane przez dzieci bez nadzoru osoby doroslej.
m) Nie wolno uruchamiać pustego urządzenia. n) Zabrania się ingerowania w konstrukcję urządzenia celem zmiany jego parametrów lub budowy.
o) Trzymać urządzenia z dala od źródeł ognia i ciepła. p) Nie zdejmować pokrywy podczas gotowania.
⚠ UWAGAI Pomimo iz urządzenie zostało zaprojektowano tak aby było bezpieczne, posładało odpowiednie środki ochrony oraz pomimo uzycia dodatkowych elementów zabezpieczajcych użytkownika nadal istnieje niewielkie ryzyko wypadku lub odniescienia obrażeń w trakcie pracy z urządzeniem. Żełca się zachowanie ostrozności i rozsądku podczas jego uzykowania.
- OBSZAR ZASTOSOWANIA
Kociot warzelny do piwa słuzy do przygotowywania zacieru oraz brzeczki piwnej.
Kotla warzelnego do piwa nie należy stosować do: - przygotowywania płynnych potraw;
• odgrzewania i rozgrzewania zapalnych, szkodliwych dla zdrowia, łatwo ulatniających się lub tym podobnych cioczy /lub materiałów.
Odpowiedzialność za wszelkie szkody powstałe w wyniku użytkowania niezgodnego z przeznaczeniem ponosi użytkownik.
3.1. STRUKTURA URZADZENIA
text_image
1 2 3 4 5 6 7 8 9 10 11 12 3. Zhiyanki oianyu-
Zbiornik główny
-
Zbiornik z sitami
-
Sito góme
-
Sito dolne
-
Rurka centralna
-
Rurka przelewowa (zakrzywiona)
-
Uchwyt zbiornika
z sitami
B. Pokrywka
-
Przyciski ON/OFF
-
Kran spustowy
-
Rurka dolna
12 podlužny filt
- PRZYCOTOWANIE WARPZENIA
- Przed użyciem urządzenie musi być ustawione na
poziomei, stabilnej bezpiecznej powierzchni.
• Pełne naczynie zawiera gotujący się gorący płyn
I może wazyć nawet ok. 70 kg. Stabilna pozycja pozioma urządzenia jest warunkiem koniecznym do przepompowywania podczas procesu warzenia. Należy unikać niestabilnych powierzchni.
- Urządzenie nie może być przemieszczane podczas procesu warzenia. Uchwyty przewidziane są do przenoszenia urządzenia tylko na pusto.
- Higiena jest podstawą wyniku udanego warzenia, dlatego należy zawsze czyścić części wyposażenia urządzenia.
- Dla sterylizacji akcesonów dopuszcza się przed użyciem podgrzać pewną ilość goracej wody w bojlerze.
-
MONTAZ KANAŁU PRZELEWOWEGO
-
Zamontować łącznik B do dolnego sita.
-
Zamontować łącznik A do łącznika B.
-
Zamontować rurkę centralną do łącznika A.
-
Zamontować łącznik C na rurce centralnej.
-
Zamontować biała nakrętkę na rurce centralnej.
-
Umieścić połączone elementy w zbiorniku.
-
Po dodaniu wody oraz składników zdemontować białą nakrętkę oraz łącznik C.
-
Zamontował góme sito skierowane uchwytami do góry na rurce centralnej.
UWAGA. W trakcie pracy urządzenia, otwór turki centralnej powinien być otwarty.
- PROGRAMOWANIE USTAWIEN
text_image
TEMP R8SB HOPB 000.0°E 000 Min MASHING BOILING S/P:0000W S/T:000.0°E START STOP THER +/- + AUTO PUSH6.1. USTAWIENIE TRYBU RECZNEGO
- Nacisnać przyosk zasilania, a później przycisk
MANUAL
- Przycisk TEMP służy do ustawiania temperatury. POWER mocy w Wattach, a TIMER czasu trwania procesu - wszystkie 3 parametry muszą zostać ustawione zanim urządzenie zacznie pracować.
Kazde z nich można nastawiac w dowolnej kolejności.
-
Nacisnąć przycisk START gdy wszystkie 3 parametry zostaną nastawione – wtedy uruchomi się tryb ręczny. Mrugająca literka „H” w górnym lewym rogu oznacza, że urządzenie zaczeło podprzewać.
-
Domyślną temperatura wrzenia zaprogramowano na 100°C, toteż Timer nie wystartuje zanim temperatura nie osiągnie wskazanych 100°C. W tym celu położyć pokrywkę na 1-2 minuty dla osiągnięcia 100°C na wyświetlaczu.
-
Kiedy urządzenie zacznie wrzeć, lecz wyświetlacz wskazuje niższą temperaturę, przeprowadzić następujące ustawienia temperatury na 100°C i uruchomic Timer.
-
Nadisnąć przyciski, -1, +jednocześnie aż nawyswietlaczu pojawi się znak C1/F1. Zakres korekty temperatury wynosi od - 10°C do +10°C albo - 50°F do +50°F.
-
Naciskając przycisk Manual/Pause podczas podgrzewania, urządzenie powróci do ustawień wstępnych. Można wtedy zmienić temp (temperaturę) /Power (moc) /Timer (czas), następnie naciskając przycisk Manual zatwierdzić ustawienia i powrócić do podgrzewania.
-
Naciśnięcie i przytrzymanie przycisku TEMP przez 5 sekund zmieni jednostkę temperatury z Celsjusza na Fahrenheit. Tej zmiany można dokonać tylko po włączeniu, przed nastawieniem jakichkolwiek innych parametrów pracy urządzenia.
6.2 FUNKCIA PAMIECI W TRYBIE RECZNYM
Przytrzymaj naciśnięty przycisk MANUAL/PAUSE w trybie programowania przez 5 sekund, a następnie zwolnji przycisk. W ten sposób można zapisać w pamięci urządzenia ostatnie ustawienie. Zapamiętanie ostatniego ustawienia sygnalizowane jest dźwiękiem drzwonka.
-
Naciśnij przycisk START po powyzszej operacji, a urządzenie będzie gotowe do pracy według ostatnie zapamiętanych parametrów.
-
Naciskając przycisk STOP zatrzymujemy prace urządzenia.
-
Naciśnięcie przycisku AUTO/PAUSE przez 5 sekund w stanie spoczymku, jak pokazane ponizej wyświetlacz wskazuje jedynie aktualną temperaturej przywraca ustawienia fabryczne. Potwierdzenie sygnalizowane jest wolniejszym dźwięciem drzwonka.

text_image
TEMP POWER - WINDA FUSE 888.8°E START STOP TIMER + AUTO FAUSEMANUAL/PAUSE
TEMP POWER TIMER
Aby uruchomić urządzenie naciśnij przycisk START; literka „H” zacznie mrugać w prawym gónym rogu.
Naciśnij przycisk MANUAL/PAUSE podczas podgrzewania. Urządzenie powróci do trybu ustawień parametrów. Można wtedy nastawić temperaturę, moc, czas, a przyciskiem MANUAL zatwierdzamy zadane parametry.
Przytrzymaj wciśnięty przycisk MANUAL/PAUSE przez 5 sekund, a następnie zwolnij przycisk. Usłyszysz dźwięk dzwonka potwierdzający zapisanie ustawień.
Naciśnij jeszcze raz
MANUAL, a urządzenie
zacznie pracować.
Nacišnij STOP.
a urzaczenie sie
zatrzyma.
6.3. USTAWIENIE TRYBU AUTO
- Włącz urządzenie, następnie naciśnij przycisk AUTO.
-
R051 wyświetli się w prawym gónym rogu wyświetlacza, wprowadź następujące parametry – TEMP (temperatura), TIMER (czas) i POWER (moc) (jak powyżej).
-
Po ustawioniu pierwszo kroku (ROS1), naciśnić przydzisk AUTO i ustaw drugi krok (ROS2), kojelnje kroki nr 3 do 9 programujemy analogicznie do pierwszo i drugiego. Fabrzycznie urządzenie ustawione jest tak, zo krok 3 jest procedura gotowania (BOILING) I jest to ostatni krok całego procesu pracy – po zakończeniu gotowania urządzenie automatycznie zakończy pracy. Jeśli potrzebne są jeszcze inne kroki pomiędzy krokiem nr 2 a krokiem gotowania należy w kroku z zmonić wartości temperatury a gotowanie ustawic w jednym z kolejnych kroków. Nakczy przy tym pamiećą by temperatura w dalszych krokach była wyzsa niż wie wcześniejszych krokiach. W kroku gotowania (BOILING) można ustawć POWER (moc) oraz TIMER (czag). temperatury jest ustawiona domyśline na 100°C. Po ustawieniu mocy i czasu naciśną AUTO – urządzenie przedzlic do trybu ustawania przypomnickia o dodaniu chmielu opisane w p. 9 ponizej.
-
Po ustawienu wszystkich zójanych kroków przedby potrzeby – maksymanie 9 kroków, nacśnji przycijk START by zatwierdzić wszystkie ustawione kroki. Urządzenie rozpoczęce pracę od pierwszego ustawionego kroku RDS1. W tym czasie na wyświetlaczu będzie migać RDS1 a woda w zobiorniku będzie podzugwnana do ustawionej w tym kroku (RDS1) temperatury. Po osiągnięcnie ustawionej temperatury będzie słychać sygnał dźwiłkowy a RDS1 oraz MASHING będą migać na wyświetlaczu – jest to przyjonciecie o dodaniu składników. Po dodaniu składników nacśnji AUTO i urządzenie będzie realizować ołąszą część kroku RDS1 – grazine w ustawionego temperaturze i ustawionymi czasie. Po zakor Auctioniu kroku RDS1 urządzenie przejoźne do koljnego kroku – RDS2 i tak daje do ostatnego ustawionego kroku, którym powinno być gotowanie (BOILING).
-
Programowanie uwzględnia tylko 1 proces gotowania – jeśli gotowanie będzie ustawione np. w kroku 3 to kroki 4 9 będą pominięte. Mozna ustawić moc gotowania (POWER) podczas pracy.
-
Goby krok R051 zostanie zakończony, urządzenie wyda dźwięk przypomnienia, program nie przejcie do następnego kroku dopóki nie zostanie wcisniety przycisk AUTO. Jest to przypomnienie o dodaniu składników.
-
Przypomnienie w kroku BOILING (gotowanie) działa na podobnej zasadzie jak przypomnicie o dodaniu składników. Kiedy urządzenie zakończy krok poprzedzający gotowanie- uruchomi się sygnął dźwiękowy. Program nie rozpoźnicke kroku gotowania jeśli nie potwierdzimy przyciskiem AUTO. To jest przypomnienie o spryskiwaniuwysładzaniu.
-
Przycisk PAUSE zatrzyma działanie urządzenia oraz odliczanic czasu. Wtedy możemy skorygować parametry, następnie naciskając przycisk AUTO kontynuować pracę urządzenia.
9 Naciśnięcie przycisku START podczas pracy w trybie auto spowoduje pominięcie aktualnie wykonywanego kroku i przejście do następnego kroku.
-
Ustawienie przypowniemna o dodaniu chimielu w procesie gotowania: w kroku RO53 (BOILING) (rok RO53 jest fabrycznic ustawiony jako gotowanie, można go ustawić w każdym innym z 9 dostępnych kroków), można ustawić przypowniemne o dodaniu chimielu a (tym samym czas jego gotowania) po ustawieniu mocy grzezione oraz czas gotowania w kroku RO53 (BOILING) na wyświetliczu pokaże się „HOP 1” oraz migające wartość czasu. Ustaw czas przycziskami lub . W celu dodania kolojnych przypowniemn o dodaniu chimielu naciśni przyczisk TIMER - można ustawić 9 takich przypowniemn, przy czym ni Legacy pomiątec o tym, że czas gotowania (BOILING) musti być wkolszty od pierwszego czasu gotowania chimielu (HOP1) a pierwszy czas gotowania chimielu (HOP1) musti być wkolszty od drugiego czasu gotowania chimielu (HOP2), itd., czylić czas gotowania (BOILING) > czas gotowania chimielu HOP1 > czas gotowania chimielu HOP2 > czas gotowania chimielu HOP3 > czas gotowania chimielu HOP4 > czas gotowania chimielu HOP5 > czas gotowania chimielu HOP6 > czas gotowania chimielu HOP7 > czas gotowania chimielu HOP8 > czas gotowania chimielu HOP9. Nacisnji przyczisk START aby rozpczące podgrzewanie.
-
Nacisnięcie i przytrzymanie przycisku POWER oraz TIMER przez 5s na pustym wyświetlaczu, przechodzi
do opcji wyboru receptury. Naciśnij „” lub „+” by wybrać żądana receptury. Można zaprogramować do 10 receptur. Naciśnij przycisk Start by zatwierdzić wybraną receptury, wyświetlacz będzie pusty, następnie naciśnij przycisk AUTO/PAUSE by wejść w tryb edycji recepty. Można naciść przycisk START by natychmiast uruchomić wybrana receptury lub naciść przycisk AUTO/PAUSE by edytować lub sprawdzić krek po karku zadany program.
- Naciśniecie przycisku STOP pominie wszystkie etapy pracy, a urządzenie wyłączy się wyświetlając END i sygnalizując dzwonkiem przez 30s. Naciskając ponownie przycisk STOP uruchomimy stan spoczynku na wyświetlaczu (pusty ekran na wyświetlaczu).
6.4. FUNKCIA PAMIĘCI W TRYBIE AUTO - Po ustawieniu wszystkich parametrów w trybie Auto, naciśnij przycisk STOP aż ukaże się pusty ekran na wyświetlaczu. Nie wyłącać wedy urządzenia! Trzymać se pomiszcych kırków aby zapisać program pracy.
- Nacisnąć przycisk MANUAL aby wejść w tryb ręcznej edycji, następnie nacisnąć i przytrzymać wdismęty przycisk MANUAL przez 5 sekund. W ten sposób można zapisać ostatnie ustawienie w trybie ręcznym (Manual) i automatycznym (AUTO). Zapisanie
programu potwierdozone jest dźwiękiem i z dumbńka. - Wyłączyć i ponownie włączyć urządzenie, nacisnąć przycisk AUTO, a na wyświetlaczu ukaże się krok 1 z ostatnio wybranego programu.
- Naciśnicy przycisk START, a urządzenie się uruchomi.
- To urządzenie nie zapamiętuje programów zbiorowo. Każdy kolejny zapis musi być dokonany zgodnie z powyżej opisanymi krokami.
Naciśnij AUTO/PAUSE by edytować receptuę.
Można ustawić Temp/Power/Timer.
Naciśnij ponownie AUTO by edytować/sprawdzić następny krok.
Naciśnij AUTO podczas gotowania by ustawić przypomnienie o rhmielu.
Naciśnij START (nie dotyczy kroku gotowanie IBOILING), a urządzenie zacznie podgrzewać RXSX w prawym górnym rogu wyświetlacza zacznie mrugać kiedy urządzenie pracuje.
Jeśli chcesz pominąć ustawienie przypomnienia o chmielu, naciśnij jeszcze raz START, urządzenie zacznie podgrzewać.
Naciśnij „ lub „ by ustawić pierwsze przypomnienie (Timer) o dodaniu chmielu. Naciśnij przycik TIMER. By ustawić drugiec przypomnienie o dodaniu chmielu. Naciśnij przycisk Timer ponownie dla trzeciego, czwartego, piątogo, drziewałego przypomnienia. Poszczególne przypomnienia powinny być ustawione tak, by czas pierwszego przypomnienia był niniejszy od czasu gotowania (BOILING) ale wickyszy od drugiego czasu przypomnienia, czas drugiego był większy od trzeciego. Itd:BOILING>HOP1> HOP2>HOP3> HOP4> HOP5>HOP6>HOP7>HOP8>HOP9.
Naciśnij przycisk START by zacząć podgrzewanie.
6.5. WYBOR RECEPTURY W TRYBIE AUTO
- Naciśnij i przytrzymaj przycisk Power i Timer przez 5 sekund przy pustym wyświetlaczu, by wejść w tryb wyboru receptury.
• Naciśnij „- lub „+“ dla wyboru receptury. - Naciśnij Start/Stop by potwierdzić wybraną recepture. Nie wyłączaj wtedy urządzenia.
-
Naciśnij przycisk Auto/Pause by wejść w opcje edycji receptury. Można edytować Power/Timer/Temp lub nacisnąć przycisk Start/Stop by uruchomic urządzenie.
-
PROCES WARZENIA (PRZYKŁADOWY)
- Przed i po każdym użyciu wyczyść urządzenie.
- Zamocuj podłużny filtr do kranika wylotowego (wewnątrz kotła) i wiej preferowaną ilość wody do zbiornika.


podluzny filtr
- Umiejscowić rurkę dolną w otworze pompy przed uruchomieniem urządzenia, aby zapobiec zatkaniu otworu przez słód.
- Podgrzej wodę do 66°C-68°C i następnie dodaj słód
do zbiornika, a po tym zamieszaj delikatnie. - Uruchom pompę cyrkulacyjną po osiągnięciu właściwej temperatury, ustaw strumień przepływu (jak opisano w następnym akapicie).
- Standardowy czas grzania wynesi 60 min dla
pierwszego zacieru (w zaleznoścji od przepisu).
• Temperatura dla drugiego zacieru wynosi czas 20 min. tw zależności od przepisut
- Po utworzeniu zacieru ostrożnie podnieś zbiornik z sitami, i umieść go na pierścieniach wspierających znajdujących się na obręczy zbiomika głównego.
- Spryskaj słód w koszyku wodą celem wysłodzenia. Pozostaw kosz do ocieknięcia na ok. 10 min. po spryskaniu.
- Podgrzej wodę do temperatury wrzenia, (mozna tego dokonać podczas ociekania kosza)—czas gotowania wynosi 50 min (w zależności od przepisu).
• Dodaj chmiel ltp. w odpowiednim czasie wedle
receptury
- Po zagotowaniu brzeczki należy ją schłodzić do 20°C. Następnie przelać ją do zbiornika fermentacyjnego przez kranik z podłużnym filtrem z przodu zbiornika.
-
POMPA CYRKULACYJNA
-
Zabrania się uruchamiać pompy bez wody!
• Nie zaleca się używania pompy do
przepompowywania brzeczki po schłodzeniu, ponieważ nie ma filtra na wejściu pompy. Może to doprowadzić do tego, ze wywar dostanie się do pompy, potencialnie blokując i uszkadzając system. - Przed włączeniem pompy w bojlerze musi znajdować
sie woda. - Nie włącać pompy podczas podgrzewania brzeczki.
- Zamknać (niebieski) zawór na rurce cyrkulacyjnej.
-
Włoz zakrzywnia rurkę przelewową. Naciśnij dwa uchwyty na łączniku by zablokować ją na miejscu.
-
Dopiero teraz można włączyć pompowanie.
- Ustaw odpowiednią wartość przepływu niebieskim zaworem (jeśli tempo przepompowywania jest za wysokie, słód przelcje się z sita do centralnej rurki, a dno zoiomika może wyschnąć, przez co składniki mogą ulec przypadeniu, a element grzewczy może się przegrzaści.
- Należy ustawić właściwą wartość przepływu.
- Wyłączyć pompę po przygotowaniu zacieru. Nie usuwać rurki przelewowej (zakrzywionej) przed zamknięciem zaworu i wyłaczeniu pomowy!


- KONSERWACJA
- Należy wyczyścić urządzenie po uzyciu. Suche składniki moga przyskień się do metalu oraz wpelcza pomny.
- Zalej urządzenie 5L-10L wody o temp. 60°C na 15 min. Podczas czyszczecnia włączyć pompc.
- Nie używać ostrych narzędzi do czyszczenia pozostałości. Do czyszczenia zbiornika wykorzystać miękką ścieroczkę lub gałoke czyszczącą (można użyć octu).
- Jakiekółwiek ślady resztek w bojlerze należy usunąć przed kolejnym użyciem.
- Przepłukać pompę przyłączając wąż z wodą do rurki przelewicowej (zakrzywicnej) – nie włącać w tym czasie pompy.
- Można użyć odpowiednich środków czyszczących (uprzednio sprawdzając ich przeznaczenie).
- Nie mocyć żadnych elementów elektronicznych urządzenia
- Nie zanurzać urządzenia w wodzie.
- Przechowywać urządzenie w suchym pomieszczeniu.
- Przed każdym czyszczeniem, regulacja, wymianą osprzętu, a także jeżeli urządzenie nie jest używane, należy wyciągnąć wtyczkę sieciową i całkowicie ochłodzić urządzenie.
- Do czyszczenia urządzenia wolno stosować tylko łagodne środki czyszczące przeznaczone do czyszczenia powierzchni mających styczność z żywnością
-
Po każdym czyszczeniu wszystkie elementy należy dobrze wysuszyć, zanim urządzenie zostanie ponownie użyte.
-
ROZWIAZYWANIE PROBLEMÓW
| Składnik biokują się w pompie. | A: Przełącz pompe podłączając runke da zakrzywnego węga B: Rozbierz pompe by usunąć składnik. |
| Temperatura nie osiąga 100°C | A: Przykryj pckrywka na 1-2 min B: Skoryguj ustawienia temperatury. |
| C1 - korekta temperatury w stopnłach Celjusza | A: Naciśnij, °1, °1 jednoceśnie w ustawieniach koroty temperatury C1. Zaireś ustawienia wynosi od -10°C do -10°C |
| F1-Korekta temperature w fahrenhetach | A: Nacsimy, -2^ , +2^ jednostecnie w korekcie temperatury C1. Zakres ustawienia wymosi od-50°C do +50^ |
| ERR-1 pojawie się na wyswietlaczu | A: Temperatura jest ponizoj -20^ – ostrzeżenie o niskiej temp.B: Połączenie czujnika się palużowoło.C: Otwórz dno urządzenia i sprawdz czujnik – jeśli się polużował, podłącz go punownie. |
| ERR-2 pojawie się na wyswietlaczu | A: Temperatura wyżuża od 120°C – ostrzeżenie o przegrzaniu/ wyschnięciu boglera.B: Uszkodzenie czujnika – skuntaktujący się z serwisem. |
| Urządzenie samo się wyłącza podczas podgrzewania | A: Zmniejsz moc podgrzewania.B: Wymień temmostat zabezpieczający (przed przegrzaniem). |