HKEEPHEAT 700 PLUS - Four HOOVER - Notice d'utilisation et mode d'emploi gratuit
Retrouvez gratuitement la notice de l'appareil HKEEPHEAT 700 PLUS HOOVER au format PDF.

| Caractéristiques | Détails |
|---|---|
| Type d'appareil | Four |
| Capacité | 70 litres |
| Puissance | 2200 W |
| Modes de cuisson | Chaleur tournante, grill, cuisson traditionnelle |
| Température maximale | 250 °C |
| Énergie | Classe énergétique A |
| Dimensions (L x P x H) | 60 x 60 x 60 cm |
| Poids | 30 kg |
| Fonctionnalités supplémentaires | Minuterie, éclairage intérieur, nettoyage par catalyse |
| Sécurité | Verrouillage de sécurité, porte froide |
| Entretien | Nettoyage facile grâce au revêtement intérieur |
| Accessoires inclus | Grille, plat à rôtir |
FOIRE AUX QUESTIONS - HKEEPHEAT 700 PLUS HOOVER
Questions des utilisateurs sur HKEEPHEAT 700 PLUS HOOVER
0 question sur cet appareil. Repondez a celles que vous connaissez ou posez la votre.
Poser une nouvelle question sur cet appareil
Téléchargez la notice de votre Four au format PDF gratuitement ! Retrouvez votre notice HKEEPHEAT 700 PLUS - HOOVER et reprennez votre appareil électronique en main. Sur cette page sont publiés tous les documents nécessaires à l'utilisation de votre appareil HKEEPHEAT 700 PLUS de la marque HOOVER.
MODE D'EMPLOI HKEEPHEAT 700 PLUS HOOVER

HOOVER
USER INSTRUCTIONS
OVENS EN 02
ISTRUZIONI PER L'USO
FORNI IT 18
POKNY PRO UZIVATELE
TROUBY CZ 35
BEDIENUNGSPANLEITUNG
ÖFEN DE 52
INSTRUCCIONES DE USO
HORNOS ES 69
MODE D'EMPLOI
FOURS FR 86
KORISNICKE UPUTE
PEÇNICE HR 103
- During cooking, moisture may condense inside the oven cavity or on the glass of the door. This is a normal condition. To reduce this effect, wait 10-15 minutes after turning on the power before putting food inside the oven. In any case, the condensation disappears when the oven reaches the cooking temperature.
- Cook the vegetables in a container with a lid instead of an open tray.
- Avoid leaving food inside the oven after cooking for more than 15/20 minutes.
- WARNING: the appliance and accessible parts become hot during use. Be careful not to touch any hot parts.
- WARNING: the accessible parts can become hot when the oven is in use. Children must be kept at a safe distance.
- WARNING: ensure that the appliance is switched off before replacing the bulb, to avoid the possibility of electric shocks.
- WARNING: in order to avoid any danger caused by the accidental resetting of the thermal interruption device, the appliance should not be powered by an external switching device, such as a timer, or be connected to a circuit that is regularly switched on and off.
Children under 8 must be kept at a safe distance from the appliance if not continuously supervised.
Children must not play with the appliance. - The appliance can be used by those aged 8 or over and by those with limited physical, sensorial or mental capacities, without experience or knowledge of the product, only if supervised or provided with instruction as to the operation of the appliance, in a safe way with awareness of the possible risks.
- Cleaning and maintenance should not be carried out by unsupervised children.
- Do not use rough or abrasive materials or sharp metal scrapers to clean the oven door glasses, as they can scratch the surface and cause the glass to shatter.
- The oven must be switched off before removing the removable parts and, after cleaning, reassemble them according the instructions.
- Only use the meat probe recommended for this oven.
- Do not use a steam cleaner for cleaning operations.
- Connect a plug to the supply cable that is able to bear the voltage, current and load indicated on the tag and having the earth contact. The socket must be suitable for the load indicated on the tag and must be having the earth contact connected and in operation. The earth conductor is yellow-green in colour. This operation should be carried out by a suitably qualified professional. In case of incompatibility between the socket and the
appliance plug, ask a qualified electrician to substitute the socket with another suitable type. The plug and the socket must be conformed to the current norms of the installation country. Connection to the power source can also be made by placing an omnipolar breaker between the appliance and the power source that can bear the maximum connected load and that is in line with current legislation. The yellow-green earth cable should not be interrupted by the breaker. The socket or omnipolar breaker used for the connection should be easily accessible when the appliance is installed.
- The disconnection may be achieved by having the plug accessible or by incorporating a switch in the fixed wiring in accordance with the wiring rules.
- If the power cable is damaged, it must be substituted with a cable or special bundle available from the manufacturer or by contacting the customer service department.
The type of power cable must be H05V2V2-F. - This operation should be carried out by a suitably qualified professional. The earth conductor (yellow-green) must be approximately 10 mm longer than the other conductors. For any repairs, refer only to the Customer Care Department and request the use of original spare parts.
- Failure to comply with the above can compromise the safety of the appliance and invalidate the guarantee.
- Any excess of spilled material should be removed before cleaning.
- A long power supply failure during an occurring cooking phase may cause a malfunction of the monitor. In this case contact customer service.
- The appliance must not be installed behind a decorative door in order to avoid overheating.
- When you place the shelf inside, make sure that the stop is directed upwards and in the back of the cavity.
The shelf must be inserted completely into the cavity - WARNING: Do not line the oven walls with aluminum foil or single-use protection available from stores. Aluminum foil or any other protection, in direct contact with the hot enamel, risk melting and deteriorating the enamel of the insides.
- WARNING: Never remove the oven door seal.
- CAUTION: Do not refill the cavity bottom with water during cooking or when the oven is hot.
- No additional operation/setting is required in order to operate the appliance at the rated frequencies.
General Instructions
4
1.1 Safety indications
1.2 Electrical safety
1.3 Recommendations
1.4 Installation
1.5 Waste management
1.6 Conformity declaration
Product Description
5
2.1 Overview
2.2 Accessories
2.3 First use
2.4 Use of Keepheat functions
Use of the Oven
7
3.1 Display description
3.2 Product Setting
3.3 Operating In Manual Mode
3.4 Operating In Recipes Mode
3.5 Operating In Special Functions Mode
3.6 Operating In My Chef Mode
3.7 Function Descriptions
3.8 WIFI Function
3.9 Cooking Modes
3.10 Keep Heat Function Modes
3.11 Preservation Guidelines
3.12 Recipes
Oven Cleaning and Maintenance
16
4.1 General notes on cleaning
4.2 Maintenance
- Removal of the oven window
- Removal and cleaning of the glass door
- Changing the bulb
Troubleshooting
17
5.1 F.A.Q.
1. General Instructions
We thank you for choosing one of our products. For the best results with your oven, you should read this manual carefully and retain it for future reference. Before installing the oven, take note of the serial number so that you can give it to customer service staff if any repairs are required. Having removed the oven from its packaging, check that it has not been damaged during transportation. If you have doubts, do not use the oven and refer to a qualified technician for advice. Keep all of the packaging material (plastic bags, polystyrene, nails) out of the reach of children. When the oven is switched on for the first time, strong smelling smoke can develop, which is caused by the glue on the insulation panels surrounding the oven heating for the first time. This is absolutely normal and, if it occurs, you should wait for the smoke to dissipate before putting food in the oven. The manufacturer accepts no responsibility in cases where the instructions contained in this document are not observed.
NOTE: the oven functions, properties and accessories cited in this manual will vary, depending on the model you have purchased.
1.1 Safety Indications
Only use the oven for its intended purpose, that is only for the cooking of foods; any other use, for example as a heat source, is considered improper and therefore dangerous. The manufacturer cannot be held responsible for any damage resulting from improper, incorrect or unreasonable usage.
The use of any electrical appliance implies the observance of some fundamental rules:
-
do not pull on the power cable to disconnect the plug from the socket;
-
do not touch the appliance with wet or damp hands or feet;
- in general the use of adaptors, multiple sockets and extension cables is not recommended;
- in case of malfunction and/or poor operation, switch off the appliance and do not tamper with it.
1.2 Electrical Safety
ENSURE THAT AN ELECTRICIAN OR QUALIFIED TECHNICIAN MAKES THE ELECTRICAL CONNECTIONS.
The power supply to which the oven is connected must conform with the laws in force in the country of installation. The manufacturer accepts no responsibility for any damage caused by the failure to observe these instructions. The oven must be connected to an electrical supply with an earthed wall outlet or a disconnector with multiple poles, depending on the laws in force in the country of installation. The electrical supply should be protected with suitable fuses and the cables used must have a transverse section that can ensure correct supply to the oven.
CONNECTION
The oven is supplied with a power cable that should only be connected to an electrical supply with 220-240 Vac 50Hz power between the phases or between the phase and neutral. Before the oven is connected to the electrical supply, it is important to check:
-
power voltage indicated on the gauge;
-
the setting of the disconnector.
The grounding wire connected to the oven's earth terminal must be connected to the earth terminal of the power supply.
WARNING
Before connecting the oven to the power supply, ask a qualified electrician to check the continuity of the power supply's earth terminal. The manufacturer accepts no responsibility for any accidents or other problems caused by failure to connect the oven to the earth terminal or by an earth connection that has defective continuity.
NOTE: as the oven could require maintenance work, it is advisable to keep another wall socket available so that the oven can be connected to this if it is removed from the space in which it is installed. The power cable must only be substituted by technical service staff or by technicians with equivalent qualifications.
1.3 Recommendations
After each use of the oven, a minimum of cleaning will help keep the oven perfectly clean.
Do not line the oven walls with aluminium foil or single-use protection available from stores. Aluminium foil or any other protection, in direct contact with the hot enamel, risks melting and deteriorating the enamel of the insides. In order to prevent excessive dirtying of your oven and the resulting strong smokey smells, we recommend not using the oven at very high temperature. It is better to extend the cooking time and lower the temperature a little. In addition to the accessories supplied with the oven, we advise you only use dishes and baking moulds resistant to very high temperatures.
1.4 Installation
The manufacturers have no obligation to carry this out. If the assistance of the manufacturer is required to rectify faults arising from incorrect installation, this assistance is not covered by the guarantee. The installation instructions for professionally qualified personnel must be followed. Incorrect installation may cause harm or injury to people, animals or belongings. The manufacturer cannot be held responsible for such harm or injury.
The oven can be located high in a column or under a worktop. Before fixing, you must ensure good ventilation in the oven space to allow proper circulation of the fresh air required for cooling and protecting the internal parts. Make the openings specified on last page according to the type of fitting.
1.5 Waste management and environmental protection
This appliance is labelled in accordance with European Directive 2012/19/EU regarding electric and electronic appliances (WEEE). The WEEE contain both polluting substances (that can have a negative effect on the environment) and base elements (that can be reused). It is important that the WEEE undergo specific treatments to correctly remove and dispose of the
pollutants and recover all the materials. Individuals can play an important role in ensuring that the WEEE do not become an environmental problem; it is essential to follow a few basic rules:
-
the WEEE should not be treated as domestic waste;
-
the WEEE should be taken to dedicated collection areas managed by the town council or a registered company.
In many countries, domestic collections may be available for large WEEEs. When you buy a new appliance, the old one can be returned to the vendor who must accept it free of charge as a one-off, as long as the appliance is of an equivalent type and has the same functions as the purchased appliance.
SAVING AND RESPECTING THE ENVIRONMENT
Where possible, avoid pre-heating the oven and always try to fill it. Open the oven door as infrequently as possible, because heat from the cavity disperses every time it is opened. For a significant energy saving, switch off the oven between 5 and 10^ minutes before the planned end of the cooking time, and use the residual heat that the oven continues to generate. Keep the seals clean and in order, to avoid any heat dispersal outside of the cavity. If you have an electric contract with an hourly tariff, the "delayed cooking" programme makes energy saving more simple, moving the cooking process to start at the reduced tariff time slot.
1.6 Declaration of compliance
By placing the mark on this product, we are confirming compliance to all relevant European safety, health and environmental requirements which are applicable in legislation for this product.
With this the Candy Hoover Group, declares that this appliance marked with C complies with the essential requirements of the Directive 2014/53/EU.
To receive a copy of the declaration of conformity, please contact the manufacturer at: www.candy-group.com.
2. Product Description
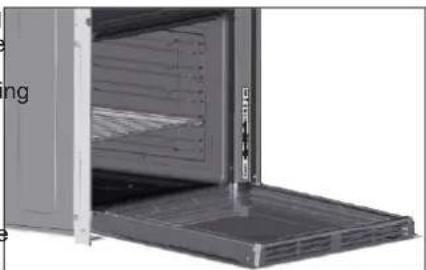
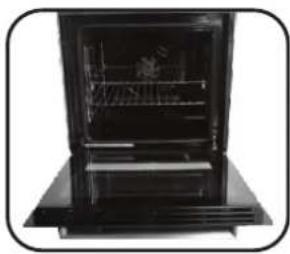
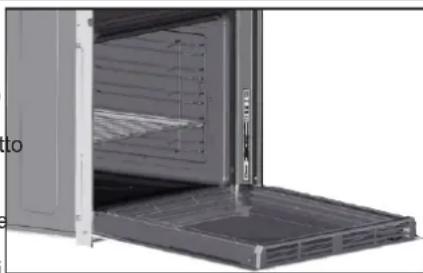
2.1 Overview

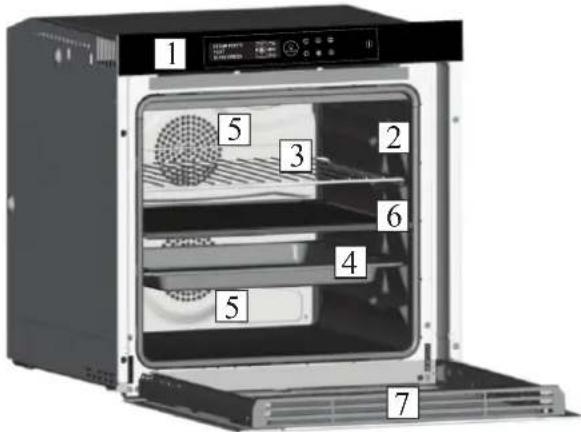
- Control panel
- Shelf positions
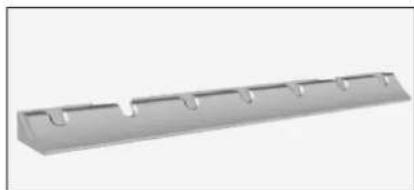
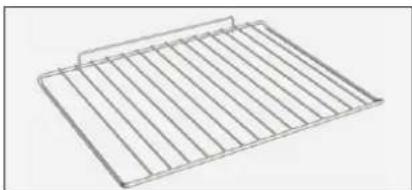
- Metal grill
- Drip pan
- Fan (behind the steel plate)
- Separator
7.Oyen door
2.2 Accessories
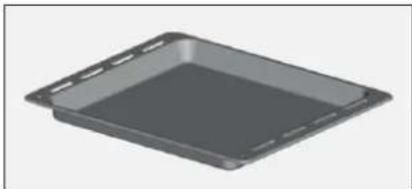
1 Drip pan
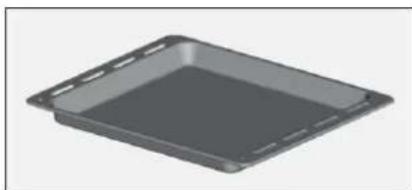
It collects the residues that drip during the cooking of food on the grills.
2 Metal grill
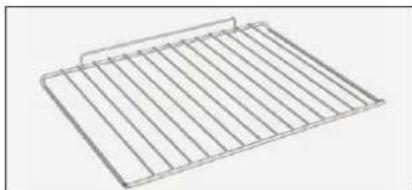
It holds baking trays and plates.
3 Separator

The separator divides oven into two cavities. It separates upper and lower cavity when you want to use oven in dual mode.
Note: It must be used in third shelf.
Warning: Never leave the separator inside the oven when the Pyrolytic mode is on.
4 Led vision
It is an illumination system which replaces the traditional « light bulb ». 14 LED (for non-pyrolitic versions) lights are integrated within the door. These produce white high quality illumination which enables to view the inside of the oven with clarity without any shadows on all the shelves.
Advantages :
This system, besides providing excellent illumination inside the oven, lasts longer than the traditional light bulb its easier and to maintain and most of all saves energy.
-Optimum view
-Long life illumination
- Very low energy consumption, -95% in comparison with the traditional illumination.
2.3 First Use
PRELIMINARY CLEANING
- Clean the oven before using for the first time.
- Wipe over external surfaces with a damp soft cloth.
- Wash all accessories and wipe inside the oven with a solution of hot water and washing up liquid.
- Set the empty oven to the maximum temperature and leave on for about 1 hour, this will remove any lingering smells of newness.
2.4 Use of Keepheat functions
PRESERVATION PROCESS
Please enter to Manual Mode to access to preservation mode section.
For more details about preservation please refer to chapter 3.11 and 3.12.
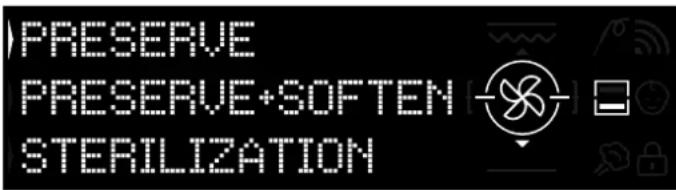
Figure 1
In order to ensure all preservation advantages and consumption benefits, we invite you to check the provided quick guide, which refers to the specific temperature required for each type of food, preservation and sterilization modes.
In order to preserve food in the healthiest, safest and best way, it is necessary to follow these steps:
- Use the function "sterilize" to sterilize recipients*
- Portion pre-cooked food
- Pack food in suitable sterilized recipients or vacuum bags**
- Select the most suitable function according to the type of food***
- Start preservation****
- Consume food*
NOTE:
Sterilization modes: including also tips and tricks.
Sterilization process must be applied only in half cavity mode.
*Recipients can vary according to the type of food. In particular:
- Liquid or semi-liquid preparations (ex. Soups): use rigid containers as jars and cover the surface with some oil. Reduce at minimum the volume occupied by liquid. Alternatively, it is possible to use vacuum bags. Sous vide kit with related user manual is included in the product only for specific models.
- Solid-malleable preparations (ex. lasagna, flans): use pans, trays or recipients hermetically covered.
- Solid-shaped preparations (ex. meat, fish): use only vacuum bags. Avoid preserving solid preparations partially immersed in liquids. It is necessary to preserve separately solids and liquids and then mix them.
- Dry preparations: use vacuum bags.
TIP:
***It is suggested to preserve meat, cereals and legumes at 70^ (preserve + soften), all the other preparations at 63^ (preserve function).
WARNING:
*** Do not preserve spinaches.
- Please note that vegetables and baked pastry must be preserved just for few days.
- We suggest pre-heating of the oven for 20 minutes.
**** Food can be consumed.
- Immediately: food is packed immediately after cooking, it is still warm and will be preserved in the oven for a short time before eating. Within 4 hours it can be even not packed at all.
- After a minimum of 4 hours in the oven: cold food is already preserved in vacuum bags.
- After a minimum of 5 hours in the oven: cold food is preserved not in vacuum bags.
- After 1 week: food is cooked, correctly packed and preserved in the oven.
- In case of black out, it is possible to consume food until 1 hour. After 1 hour, the oven must be reset from the beginning.
COOK + PRESERVE PROCESS
- Use the function "sterilization" to sterilize recipients
- Portion raw ingredients
- Pack food in suitable sterilized recipients or vacuum bags
- Select the "Cook + Preserve" function according to the type of food*
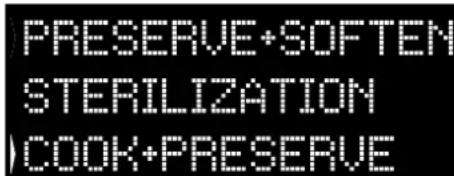

Figure 2
- Set the cooking time
- Start cooking cycle
- After finishing cooking time, the product automatically switches to preservation mode
- Consume food
*It is suggested to cook meat and legumes.
CALIBRATION
Calibration is a dedicated system for Keepheat, which allows verifying correct functioning of temperature probe.
NOTE:
- If the oven works correctly, "CALIBRATION OK" will appear on display.
- Calibration cycle could be executed in any time, but after few number of cooking processes the pop up "CALIBRATION SUGGESTED" will appear on display while selecting Preservation mode menu.
3. Use of the Oven
3.1 Display description

ON/OFF ① The oven is switched on and off with this button.
3.2 Product Setting
- At first launch you need to follow an installation process to be able to use the oven. Press ON/OFF to go ahead. (Figure 3)

Figure 3
- Select the language from the drop down menu. (Figure 4)

Figure 4
- Press OK to go ahead. (Figure 5)

Figure 5
- Set the time by pressing the PLUS and MINUS buttons. Press OK to go ahead. (Figure 6)

Figure 6
- The installation process is completed. Press OK then go to home page to start use the oven
For more details see quick guide.
3.3 Operating In Manual Mode
- Press the OK button when arrow on the display at MANUAL to set a cooking in 3 simple steps. (Figure 7)

Figure 7
- If the oven is switched off, the display shows the clock. When the oven is inactive, all the functions are available except the cooking duration and end of cooking.
-
If the clock is not set, the oven does not work: the display flashes, showing "12:00".
-
Select the desired Cooking mode by pressing OK while arrow on the display at desired function. Press DOWN in order to see all available functions. (Figure 8)

Figure 8
- Press PLUS or MINUS to select the desired temperature in selected function. Press OK to go ahead or BACK to return to the cooking functions selection. (Figure 9)

Figure 9
- Press DOWN to change the cooking duration. It is done by pressing PLUS and MINUS Buttons while arrow on the display at DURATION Tab. Press OK to begin the cooking or BACK to return to the temperature setting. (Figure 10)

Figure 10
- In the OPTIONS, it is possible to:
exclude pre heating,
- set end of cooking time.
When a cooking is running you can:
-
change the temperature
-
change the cooking duration
-
press STOP to finish the cooking

Figure 11
3.4 Operating In Recipes Mode
Please refer to chapter 3.12 Recipes.

Figure 12
3.6 Operating In My Chef Mode
Please refer to chapter 3.7 Function Descriptions.

Figure 14
3.5 Operating In Special Functions Mode
Please refer to chapter 3.9 Cooking Modes.

Figure 13
3.7 Function Descriptions
| FUNCTION DESCRIPTION | |
| CHILD LOCK Entering in the setting menu from the home page, with this function it is possible to lock the oven when it is off. When the child lock is set the icon is on. | |
| MEAT PROBE If the meat probe is detected (by the Sys Info message) the icon is switched on and any running cooking program is stopped. If the meat probe is removed while a cooking program is running, the program is stopped and return home menu. | |
| ONE-FI Enter in the setting menu from the home page. With this functon it is possible to set the Wifi. NOTE: Please see the dedicated chapter 3.8 Wi-Fi Function. | |
| DOUBLE CAVITY (backlighted): With this button, with a double oven with the separator inside the cavity, it is possible to select the upper or the lower cavity. | |
| MY CHEF With this button, when the oven is not off or it is not cooking, it is possible to enter in a special menu where there are; ·“MY RECIPES” (that is a list of stored recipes, max 5; if no recipe is stored it is shown a black display with “---”), ·“MY WIZARD” (that is the last program received by App; if no programs were received it is shown a black display with “---”) ·“LAST USED” (that is the last cooking program used, different from Preservation cooking programs; if no program is stored it is shown a black display with “---”) | |
H-KEEPHEAT is fully connected, equipped with countless and innovative functions to cook and preserve your food thanks to extra Tips&Hints dedicated.
- Get access to dedicated low-temperature recipes
- Access My Chef and get more than 150 extra recipes
- Manage H-KEEPHEAT
For more details, please check related Quick Guide, at the following link: http://go.candy-group.com/hoover-ov.
WIRELESS PARAMETERS
| Parameter | Specifications (Wi-Fi) | Specifications (Bluetooth) |
| Wireless Standart | 802.11 b/g/n Bluetooth v4.2 | |
| Frequency Range | 2,412 GHz. - 2,484 GHz | 2,412 GHz. - 2,484 GHz |
| Max Transmit Power | 802.11b. DSSS 1 Mbps= +19.5 dBm | Basic data rate: RF Transmit Power (Typ): +4 dBm Enhanced data rate: RF Transmit Power (Typ): +2 dBm BLE: RF Transmit Power (Typ): +7.5 dBm |
| 802.11b. CCK 11 Mbps= +18.5 dBm | ||
| 802.11g. OFDM 54 Mbps= +18.5 dBm | ||
| 802.11n. MCS7= +14 dBm | ||
| Minimum Receiving Sensitivity | 802.11b =1024 bytes -80 dBm | Basic data rate: Sensitivity@ 0.1% BER: -98 dBm Enhanced data rate: Sensitivity@ 0.01% BER: -98 dBm BLE: Sensitivity@ 0.1% BER: -98 dBm |
| 802.11g =1024 bytes -70 dBm | ||
| 802.11n =1024 bytes -65 dBm | ||
| 802.11n HT40 =1024 bytes -65 dBm |
| Product information for networked equipment | |
| Power consumption of the product in networked standby if all wired network ports are connected and all wireless network ports are activated: | 2,0 W |
| How to activate wireless network port: | Navigate to settings -> ONE-FI ->If display shows ONE-FI RESET (means that oven is not enrolled wifi module is off and user can only start a new 5nrol5ent)Press the confirm button►Wifi module is switched on and wifi icon blinks 1s on 1s off.If display shows ONE-FI OFF (means that oven is enrolled but wifi module is off)Press the up or down arrow to toggle to ONE-FI ON and press the confirm button►Wifi module is switched on and wifi icon is always on. |
| How to deactivate wireless network port: | Navigate to settings -> ONE-FI ->If display shows ONE-FI READ ONLY (means that oven is enrolled and wifi mod is on)Press the up or down arrow to toggle to ONE-FI OFF and press the confirm button►Wifi module is switched off and wifi icon is not shown. |
Quick Guide Hoover OVEN - Enrollment on App Procedure for devices with Bluetooth 4.0 (or higher)
This quick guide illustrates the steps to follow to enroll your appliance on the App Hoover Wizard, using a device with Bluetooth 4.0 (or higher) technology. In this case, the procedure is simplified and faster (Easy Enrollment).
If you are using a device without Bluetooth technology (or less than 4.0), please follow the instructions described on the next section.
STEP1
- Mark down the appliance Serial Number.
- Mark down the Wi-Fi Name and Password (WPA/ WEP Key) which are normally placed on the back of your Wi-Fi router. NOTES
- The frequency of the home Wi-Fi network has to be set on the 2.4 GHz band. You cannot configure the appliance if your home network is set to the 5 GHz band.
- If you are having trouble locating the WPA/WEP Password, please contact your Internet Provider.
Please make sure your smartphone is connected to the same WiFi network and has the Bluetooth enabled within the "Settings". Refer to the manual for more details.
STEP2
- Download the Hoover Wizard App from the Store.
- Open the Hoover Wizard App and create your user profile by taping on "Register". Accept the privacy policy and fill in the required fields. NOTES
- The App is available for Android (version 4.4 or higher) and iOS (version 8.0 or higher) devices.
- If you already have a Hoover Wizard user profile, you can login using your credentials.
STEP3
- In the homepage, tap on the icon with the three bars on the top left to enter your profile, then tap on "REGISTER NEW APPLIANCE" and select the name of the product that you want to enroll.
STEP4
- Insert the purchase date of your appliance (DD/MM/YYYY), then tap on "Proceed".
STEP5
- Insert the 16 digits of the serial number or scan the QR code on the appliance. Tap on "Next". Check data correctness of the data and tap on "Confirm". Once the system has recognized the product, tap on "Next".
STEP6
1)Tap on the icon ONE-Fl.
2)Set the oven on ONE-FI RESET (the oven will beep).
3)The WIFI icon will blink.
- In App - Tap on "Confirm". Wait for APP to connect to the appliance.
NOTES
- Enrollment must be completed within 5 minutes.
- In case of any issue, tap "Retry", making sure you have enabled Bluetooth on your device (smartphone / tablet). If the process has not been completed correctly yet, tap on "Proceed with Standard Enrollment".
- To ensure correct data transfer, we recommend you to stay with the device close to the appliance.
STEP7
- Insert the password of your home Wi-Fi network.
- Select the type of password (WEP or WPA), then tap on "Confirm".
The enrollment process is now finished. NOTES - If this is not automatically synchronised by the App, please insert the name of your home Wi-Fi network in the first box; pay attention to the difference between lowercase and uppercase.
IF THE SET UP IS NOT SUCCESSFUL
It's important to establish a good Wi-Fi signal strength between the home router and the appliance: low Wi-Fi signal strength would cause the failure of the final stage of the set up. To assess if this is the case, start the connection process again from Step 1; when you get to Step 6, when you get to Step 6, place your device (smartphone or tablet) next to the router and search for "WIFIOVEN-xyzk" net generated by the appliance. If this does not come up as an option, it means that the router cannot see the appliance. In this case, we highly recommend you to bring the router near the appliance (if possible) or contact your internet provider to purchase a compatible "Wi-Fi Range Extender" to increase the signal strength.
Remote control mode
- Tap on the icon ONE-FL.
- Set the oven on ONE-FI ON (the oven will beep).
- The WIFI icon will blink.
Quick Guide Hoover OVEN - Enrollment on App
Procedure for devices without Bluetooth 4.0 (or less than 4.0) This quick guide outlines the steps you should follow to enroll your appliance using the App Hoover Wizard, utilizing a device without Bluetooth technology. We recommend you to proceed with a smartphone/tablet equipped with this technology to make the procedure simpler.
STEP1
- Make a note of the appliance Serial Number and Wi-Fi Name and Password (WPA/WEP Key), which are normally found on the back of your Wi-Fi router.
- Please make sure that your smartphone/ tablet is connected to the same Wi-Fi network.
NOTES
- The frequency of the home Wi-Fi network has to be set on the 2.4 GHz band. You can not configure the appliance if your home network is set to the 5 GHz band.
-If you are having trouble locating the WPA/WEP Password, please contact your Internet Provider.
STEP2
- Download the Hoover Wizard App from the Store.
-
Open the Hoover Wizard App and create your user profile by taping on "Register". Accept the privacy policy and fill in the required fields. NOTES
-
The App is available for Android (version 4.4 or higher) and iOS (version 8.0 or higher) devices.
- If you already have a Hoover Wizard user profile, you can login using your credentials.
STEP3
- In the homepage, tap on the icon with the three bars on the top left to enter your profile, then tap on "REGISTER NEW APPLIANCE" and select the name of the product that you want to enroll.
STEP4
- Insert the purchase date of your appliance (DD/MM/YYYY), then tap on "Proceed".
- Insert the 16 digits of the serial number or scan the QR code on the appliance. Tap on "Next". Check data correctness and tap on "Confirm". Once the system has recognized the product, tap on "Next".
STEP5
1) Tap on the icon ONE-FL.
2) Set the oven on ONE-FI RESET (the oven will beep) and wait 5 min.
3) The WIFI icon will blink.
In App - Tap on "Confirm". NOTES
- Enrollment must be completed within 5 minutes.
- To ensure correct data transfer, we recommend that you stay with
the device close to the appliance.
STEP6
- Exit the Hoover Wizard App.
- Go to your device Wi-Fi settings.
STEP7
- In the list of available Wi-Fi networks, select "WIFIOVEN-xyzk".
NOTES
- If you do not find it, wait few more seconds or proceed with a new scan.
STEP8
- Exit from the settings of your device.
- Return to the Hoover Wizard App and wait for the App to detect the appliance.
- Once the "Wi-Fi Network is active" screen appears, tap on "Next".
STEP9
- Insert the password of your home Wi-Fi network.
- Select the type of password (WEP or WPA), then tap on "Confirm". NOTES
- If this is not automatically synchronised by the App, please insert the name of your home Wi-Fi network in the first box; pay attention to the difference between lowercase and uppercase.
STEP10
- Wait until the end of the data transfer process between the App and the product, then tap on "Confirm". "CONNECTED" appears on the appliance display and then "REMOTE CONTROL ON".
- The enrollment process is now finished.
IF THE SET UP IS NOT SUCCESSFUL
It's important to establish a good Wi-Fi signal strength between the home router and the appliance: low Wi-Fi signal strength would cause the failure of the final stage of the set up. To assess if this is the case, start the connection process again from Step 1; when you get to Step 5, place your device (smartphone or tablet) next to the router and search for "WIFIOVEN-xyzk" net generated by the appliance. If this does not come up as an option, it means that the router cannot see the appliance. In this case, we highly recommend you to bring the router near the appliance (if possible) or contact your internet provider to purchase a compatible "Wi-Fi Range Extender" to increase the signal strength.
Remote control mode
- Tap on the icon ONE-FI.
- Set the oven on ONE-FI ON (the oven will beep).
- The WIFI icon will blink.
3.9 Cooking Modes
| Suggested temperature °C | Function(Depends on the oven model) | Full cavity* | Upper cavity** | Lower cavity*** |
| L3 | GRILL: use the grill with the door closed.The top heating element is used alone and you can adjust the temperature. Five minutes preheating is required to get the elements red-hot. Success is guaranteed for grills, kebabs and gratin dishes. White meats should be put at a distance from the grill; the cooking time is longer, but the meat will be tastier. You can put red meats and fish fillets on the shelf with the drip tray underneath. | √ | ||
| 180°C | MULTI-LEVEL: This function ensures cooking different food at the same time in one or more shelf positions. Heat penetrates into the food better and both cooking and preheating times are reduced. This cooking method gives better heat distribution and smells are not mixed. Allow about ten minutes extra when cooking food at the same time.This function is particularly indicated also for gratin and lasagna (200°C). | √√√ | ||
| 230°C | CONVECTION + FAN: This function gives better heat distribution thanks to the combination of the fan and heating elements. This function is ideal for bakery such as bread, pizza and focaccia, ensuring an homogeneous cooking result thanks to assisted heat distribution. | √ | ||
| 160°C | BOTTOM HEATING: Using the lower element. Ideal for cooking all pastry based dishes. Use this for flans, quiches, tarts, pate and any cooking that needs more heat from below. | √ | ||
| 170°C | BOTTOM HEATING + FAN: the bottom heating element is used with the fan circulating the air inside the oven. This function is ideal for cakes, tarts and croissants. It prevents food from drying and encourages rising process for a perfect cooking result. Place the shelf in the bottom position. | √ | √ | |
| 180-200 °C160-170 °C | *CONVENTIONAL: This function uses both top and bottom heating elements.Preheat the oven for about ten minutes. This method is ideal for all roasted meat (180/200°C) and fish (160-170°C).Place the food and its dish on a shelf in mid position. | √ | ||
| 210°C | DEFROST: The fan circulates air at room temperature around the frozen food so that it defrosts in a few minutes without the protein content of the food being changed or altered. | √ | ||
| 40°C | LEAVENING: Thanks to a very gentle warming of the cavity, this function ensures bread or bakery food rising during cooking process | √ | ||
| 200°C | GRILL+FAN: use the turbo-grill with the door closed.The top heating element is used with the fan circulating the air inside the oven.Preheating is necessary for red meats but not for white meats. Ideal for cooking thick food items, whole pieces such as roast pork, poultry, etc. Place the food to be grilled directly on the shelf centrally, at the middle level. Slide the drip tray under the shelf to collect the juices. Make sure that the food is not too close to the grill. Turn the food over halfway through cooking. | √ | √ | |
| 180°C | *MASTER BAKE: This function allows to cook in a healthier way, by reducing the amount of fat or oil required. The combination of heating elements with a pulsating cycle of air ensured a perfect baking result. This function is particularly indicated for gratin. | √ |
*Tested in accordance with the EN 60350-1 for the purpose of energy consumption declaration and energy class.
3.10 Keep Heat Function Modes
| Pre-set temperature °C | KEEPHEAT Function (Depends on the oven model) | Full cavity* | Upper cavity** | Lower cavity*** |
| 63 | PRESERVE: This function allows preserving all food such as meat, fish, legumes. | √ | √ | |
| 70 | PRESERVE + SOFTEN: This function allows preserving fat meat, cereals and legumes improving their tenderness and juiciness. | √ | √ | |
| 70 + 63 | COOK + PRESERVE: This function allows to cook at low temperature, ensuring food tenderness and succulence (especially for meat) and to switch automatically to preservation. | √ | √ | |
| 121 (for 15 min) | STERILIZE: This function is mandatory before preservation and it allows sterilizing jars. | √ | √ |
To use the Full Cavity Mode, remove the separator from the oven.
To use the half cavity, use the separator in the oven. Delta temperature between upper and lower cavity can vary from 160^ to 240^ .
NOTES:
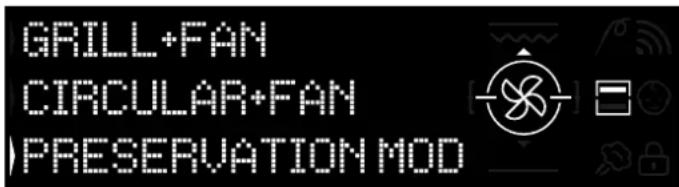
Figure 15
Keep Heat Functions are only available for half cavity functions.
- For use, please insert separator to oven.
- Please wait for screen showing half cavity as seen in the Figure 15.
- Press Double cavity button on the screen in order to select cavity you want to start preservation mode.
- Then please refer to 3.3 Operating In Manual Mode in order to start any keep-heat functions.
3.11 Preservation Guidelines
| PRODUCT CATEGORY | FOOD | RECOMMENDED STORAGE TEMPERATURE | RECOMMENDED CONTAINER | RECOMMENDATIONS |
| White meat Grilled chicken breast 70°C Vacuum bag Salt before cooking | ||||
| Stewed chicken 70°C Vacuum bag If there is plenty of sauce, transfer the sauce in a separate bag | ||||
| Chicken thighs in white wine 70°C Vacuum bag If there is plenty of sauce, transfer the sauce in a separate bag | ||||
| Cubed turkey in sauce 70°C Vacuum bag If there is plenty of sauce, transfer the sauce in a separate bag | ||||
| Pork escalopes 70°C Vacuum bag Divide slices of meat into several bags to avoid excessive overlaps | ||||
| Pork stew 70°C Vacuum bag If there is plenty of sauce, transfer the sauce in a separate bag | ||||
| Pork fillet with herbs 70°C Vacuum bag Salt before cooking | ||||
| Stewed sausages 70°C Vacuum bag If there is plenty of sauce, transfer the sauce in a separate bag | ||||
| Pork shank 70°C Vacuum bag If there is plenty of sauce, transfer the sauce in a separate bag | ||||
| Stewed veal 70°C Vacuum bag If there is plenty of sauce, transfer the sauce in a separate bag | ||||
| Roast veal 70°C Vacuum bag Salt before cooking | ||||
| Veal escalopes | 70°C Vacuum bag Salt before cooking | |||
| Veal ossobuco | 70°C | Vacuum bag | If there is plenty of sauce, transfer the sauce in a separate bag | |
| Veal shank | 70°C Vacuum bag Salt before cooking | |||
| Stewed ribs | 70°C Vacuum bag Salt before cooking | |||
| Red meat | Beef stew | 70°C | Vacuum bag | If there is plenty of sauce, transfer the sauce in a separate bag |
| Braised beef | 70°C | Vacuum bag | If there is plenty of sauce, transfer the sauce in a separate bag | |
| Roast beef | 70°C Vacuum bag Season with herbs and reduce salt | |||
| Stewed meatballs | 70°C | Vacuum bag | If there is plenty of sauce, transfer the sauce in a separate bag | |
| Pizzaola style meat 70°C Vacuum bag If there is plenty of sauce, transfer the sauce in a separate bag | ||||
| Lamb sirloin 70°C Vacuum bag Season with herbs and reduce salt | ||||
| Roasted lamb leg | 70°C Vacuum bag Season with herbs and reduce salt | |||
| Stewed lamb | 70°C Vacuum bag If there is plenty of sauce, transfer the sauce in a separate bag | |||
| Duck breast 70°C Vacuum bag Season with herbs and reduce salt | ||||
| Duck thigh 70°C Vacuum bag Salt before cooking | ||||
| Mixed meatloaf | 70°C | Vacuum bag | Season with herbs and reduce salt | |
| White fish | Fillet of sea bass, Livornese style | 63°C | Vacuum bag | If there is plenty of sauce, transfer the sauce in a separate bag |
| Fillet of sea bass in white wine | 63°C | Vacuum bag | If there is plenty of sauce, transfer the sauce in a separate bag | |
| Sea bream in white wine | 63°C | Vacuum bag | If there is plenty of sauce, transfer the sauce in a separate bag | |
| Stewed monkfish | 63°C | Vacuum bag | If there is plenty of sauce, transfer the sauce in a separate bag | |
| Stewed squids | 63°C | Vacuum bag | If there is plenty of sauce, transfer the sauce in a separate bag | |
| whole fish 63°C Vacuum bag Salt before cooking | ||||
| roast fish | 63°C | Vacuum bag | Salt before cooking | |
| Grilled fish | 63°C | Vacuum bag | Do not put lemon with the fish in the bag, it would become bitter | |
| Grilled squids | 63°C | Vacuum bag | Salt before cooking | |
| Clams | Stewed cuttlefish | 63°C | Vacuum bag | If there is plenty of sauce, transfer the sauce in a separate bag |
| Boiled octopus | 63°C | Vacuum bag | Cook directly in a vacuum bag without adding water | |
| Stewed curled octopus | 63°C | Vacuum bag | If there is plenty of sauce, transfer the sauce in a separate bag | |
| Shellfish | Prawns in white wine | 70°C | Vacuum bag | increase the storage temperature (see table) |
| Prawn sauce | 70°C | Vacuum bag | increase the storage temperature (see table) | |
| Vegetables | Cauliflower | 63°C | Vacuum bag | cook with a few drops of vinegar to reduce oxidation |
| Courgettes stirried with garlic and parsley | 63°C | Vacuum bag | cook with a few drops of vinegar to reduce oxidation | |
| Mediterranean sweet peppers | 63°C | Vacuum bag | cook with a few drops of vinegar to reduce oxidation | |
| Peppers stirried with garlic and parsley | 63°C | Vacuum bag | cook with a few drops of vinegar to reduce oxidation | |
| Broccoli | 63°C | Vacuum bag | cook with a few drops of vinegar to reduce oxidation | |
| Artichokes stirried with garlic and parsley | 63°C | Vacuum bag | cook with a few drops of vinegar to reduce oxidation | |
| Grilled vegetables | 63°C Vacuum bag salt before cooking | |||
| Roasted pumpkin | 63°C Vacuum bag salt before cooking | |||
| Vegetables au gratin | 63°C | Vacuum bag | salt before cooking | |
| Stewed peas | 63°C Vacuum bag salt before cooking | |||
| Boiled legumes | 63°C Vacuum bag drain well from the cooking water | |||
| Stewed legumes | 63°C | Vacuum bag | If there is plenty of sauce, transfer the sauce in a separate bag | |
| Boiled cereals | 63°C Vacuum bag salt before cooking | |||
| Couscous | 63°C Vacuum bag drain well from the cooking water | |||
| First courses | Polenta | 63°C | Vacuum bag | cook to a fairly dry consistency before storing |
| Vegetarian crêpes | 63°C | Vacuum bag | Bag each portion individually to prevent breakage | |
| Cereal pies 63°C Vacuum bag Season with herbs and reduce salt | ||||
| Bulgur | 63°C Vacuum bag Season with herbs and reduce salt | |||
| Quinoa | 63°C Vacuum bag Season with herbs and reduce salt | |||
| Soups | Pulses soup | 63°C | Vacuum container | Once the container is filled, add a little oil on the surface to reduce oxidation |
| Cereal soup | 63°C | Vacuum container | Once the container is filled, add a little oil on the surface to reduce oxidation | |
| Vegetable soup | 63°C | Vacuum container | Once the container is filled, add a little oil on the surface to reduce oxidation | |
| Vegetable cream | 63°C | Vacuum container | Once the container is filled, add a little oil on the surface to reduce oxidation | |
| Cream of legumes | 63°C | Vacuum container | Once the container is filled, add a little oil on the surface to reduce oxidation | |
| Meat broth | 70°C | Vacuum container | Maintain a delicate taste as the flavour will tend to concentrate during storage | |
| Vegetable stock | 63°C | Vacuum container | Maintain a delicate taste as the flavour will tend to concentrate during storage | |
| Fruit | Baked apples | 83°C | Vacuum bag | Season with spices and cinnamon before baking |
| Baked pears | 63°C | Vacuum bag | Season with spices and cinnamon before baking | |
3.12 Recipes
| Traditional cooking | ||||
| Title | Cooking mode Temperature (℃) Duration (m) | Category | ||
| Rice with cuttlefish and peas | conventional 200 20 | first course | ||
| Leek tart | conventional 175 40 | vegetables | ||
| Croissants | convection + fan 200 | 180 5-10 cakes | ||
| Quiche Lorraine | conventional 190 30 | first course | ||
| Tarte tatin | conventional 220-1 | 80 15-30 | cakes | |
| Fish lasagne | conventional 190 20 | fish | ||
| Baked tomatoes | convection + fan 200 | 30/40 | vegetables | |
| Roast beef | conventional 200 90 | meat | ||
| Empanadas | conventional 200 15 | meat | ||
| Sw ordfish rolls | conventional 180 | 8/10 | fish | |
| Low temperature cooking | ||||
| Title | Cooking mode | Temperature (°C) | Duration (minutes) | Category |
| Praw n and mango salad | cook & preserve | 70 | 25 first course | |
| Octopus w ith potatoes | multilevel | 90 | 90 first course | |
| Courgette and pea purée | multilevel | 90 | 35 vegetables | |
| Cacio e pepe' gnocchi | multilevel | 100 12 | pasta&bastery | |
| Tomato and ricotta orecchiette | multilevel | 100 | 9 | pasta&bastery |
| Scallops, fennel and olives | cook & preserve | 70 | 12 | fish |
| Salmon w ith citrus fruits and ginger | cook & preserve | 70 | 14 | fish |
| Seabass w ith artichokes | cook & preserve | 70 | 22 | fish |
| Duck w ith juniper berries | cook & preserve | 70 120 | meat | |
| Medium-rare veal tagliata | cook & preserve | 70 | 20 | meat |
| Veal w ith tuna sauce | multilevel | 80 | 120-40 | meat |
| Caesar salad | multilevel | 80 120 | vegetables | |
| Salt cod w ith peppers and broccoli | multilevel | 80 | 30 | fish |
| Asparagus and saffron orzotto | multilevel | 90 | 90 vegetables | |
| Ratatouille | multilevel | 80 | 45 vegetables | |
| Cauliflower er panna cotta | multilevel | 90 | 90 vegetables | |
| Pumpkin and carrot mash | multilevel | 90 | 40 vegetables | |
| Courgettes w ith mint | multilevel | 80 | 30 vegetables | |
| Pears, red w ine and cinnamon | multilevel | 90 120 | cakes | |
| Crème brûlée | multilevel | 80 | 40 | cakes |
4. Oven cleaning and maintenance
4.1 General notes on cleaning
-
The lifecycle of the appliance can be extended through regular cleaning.
-
Wait for the oven to cool before carrying out manual cleaning operations.
WARNING:
-
Never use abrasive detergents, steel wool or sharp objects for cleaning, so as to not irreparably damage the enamelled parts.
-
Use only water, soap or bleach-based detergents (ammonia).
GLASS PARTS
It is advisable to clean the glass window with absorbent kitchen towel after every use of the oven. To remove more obstinate stains, you can use a detergent-soaked sponge, well wrung out, and then rinse with water.
OVEN WINDOW
If dirty, the seal can be cleaned with a slightly damp sponge.
ACCESSIONS
Clean accessories with a wet, soapy sponge before rinsing and drying them: avoid using abrasive detergents.
DRIP PAN
After using the grill, remove the pan from the oven.
- Pour the hot fat into a container and wash the pan in hot water, using a sponge and washing-up liquid.
NOTES:
- If greasy residues remain, immerse the pan in water and detergent. Alternatively, you can wash the pan in the dishwasher or use a commercial oven detergent.
- Never put a dirty pan back into the oven.
4.2 Maintenance
REMOVAL OF THE OVEN DOOR
- Open the front window.
- Open the clamps of the hinge housing on the right and left side of the front window by pushing them downwards.
- Replace the window by carrying out the procedure in reverse.
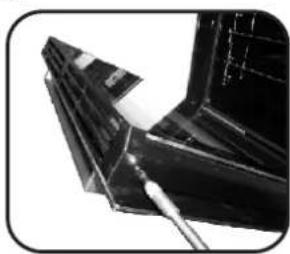
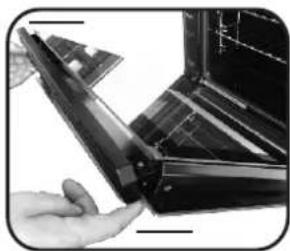
REMOVAL AND CLEANING OF THE GLASS DOOR
- Open the oven door.
2.3.4. Lock the hinges, remove the screws and remove the upper metal cover by pulling it upwards.
5.6. Remove the glass, carefully extracting it from the oven door - At the end of cleaning or substitution, reassemble the parts in reverse order.
1.
5.
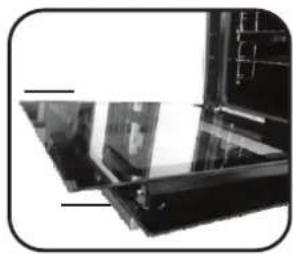

6.
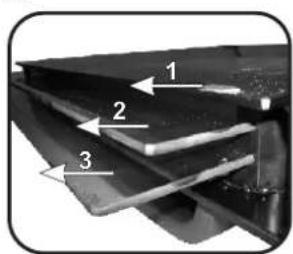
3.

4.
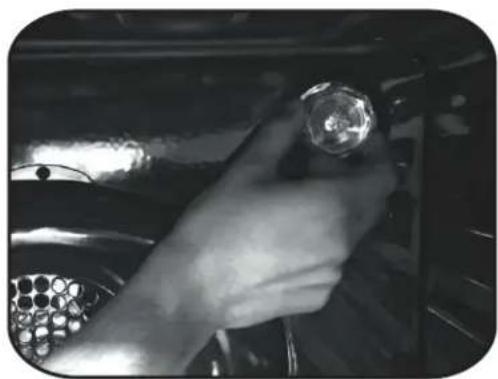
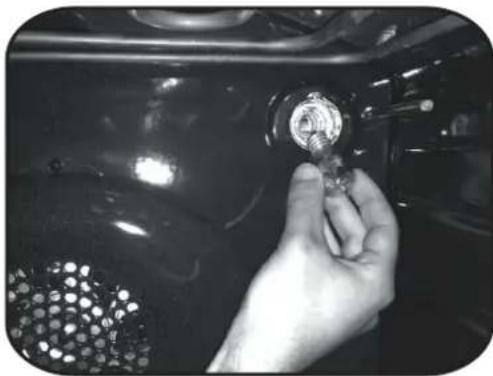
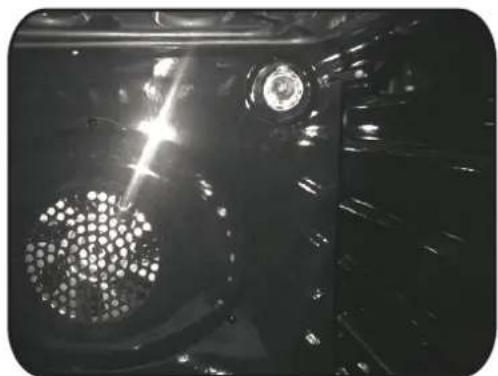
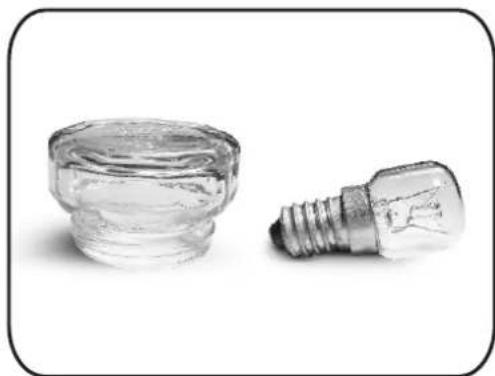
CHANGING THE BULB
- Disconnect the oven from the mains supply.
- Undo the glass cover, unscrew the bulb and replace it with a new bulb of the same type.
- Once the defective bulb is replaced, replace the glass cover.
5. Troubleshooting
5.1 FAQ
| PROBLEM POSSIBLE CAUSE SOLUTION | ||
| The oven does not heat up | The clock is not set Set the clock | |
| The oven does not heat up | The child lock is on | Deactivate the child lock |
| The oven does not heat up | A cooking function and temperature has not been set | Ensure that the necessary settings are correct |
| No reaction of the touch user interface | Steam and condensation on the user interface panel | Clean with a microfiber cloth the user interface panel to remove the condensation layer |
- Durante la cottura l'umidità potrebbe condensarsi all'interno della cavity del forno o sul vetro dello sportello. Questa condizione è normale. Per ridurre quello effetto, dopo l'accensione attendere 10-15 minuti prima di collocare gli alimenti nel forno. In agli caso, la condensa scompare quando il forno raggiunge la temperature di cottura.
- Per cuocere la verdura, utilizzare un contentore dotato di coperchio invoce di un vassoio aperto.
- Evitare di lasciare gli alimenti nelorno per più di 15 - 20 minuti dopo la cottura.
- AVVERTENZA: l'elettrodomestico e i componenti accessibili divertano caldi durante l'uso. Attenzione a non toccare componenti caldi.
- AVVERTENZA: i componenti accessibili divertano caldi quando si utilizes ilorno. Tenere lontani i bambini a una distanza di sicurezza.
AVVERTENZA: per evitare scosse elettriche, accertarsi che l'elettrodomestico sua spento prima di sostuire la lampadina. - AVVERTENZA: per evitare pericoli causati dal reset accidentale del disposativo di interruzione termica, l'elettrodomestico non deve essere alimentato tramite un disposativo di commutazione esterno, ad es. un timer, e non deve essere collegato a un circuito che si accende e si spegne regolarmente.
- Tenere lontani i bambini di età inferiore a 8 anni a una distanza di sicurezza dall'elettrodomestico, se non sono sorvegliati continuamente.
- Impedire ai bambini di giocare con l'elettrodomestico.
- L'elettrodomestico più essere utilizzato da persone di almeno 8 anni e da personne affette da limitazioni delle capacità fisiche, sensoriali o mentali, alla esperienza o conoscenza del prodotto, solo quello supervisione e dello averle istruite sull'uso dell'elettrodomestico, in maniera sicura e consapevole dei possibili rischi.
- La pulizia e la manutenzione non deve essere effettuata da bambini alla supervisione.
-
Non utilizzato materiali ruvidi o abrasivi oppure raschietti metallici affiliati per pulire i vetri dello sportello del forno, in quanto potrebbero graffiare la superficie e rovinare il vetro.
-
Prima di rimuovere i componenti estraibili, il fornò delve essere spento; dopo la pulizia, rimontare i componenti seguito le istruzioni.
- Per quello forno utilizzato solo la sonda per la carne consigliata.
- Non utilizzato elettrodomestici a vapore per le operazioni di pulizia.
Collegare la spina al cavo di alimentazione e accertarsi sua in grado di sostenere la tensione, la corrente e il carico indicati sull'etichetta; accertarsi, inoltre, che sera presente il contatto di terra. La presa deve essere in grado di sostenere il caricoindicato sull'etichetta e deve essere dotata di contatto di terra perfettamente funzionante. Il conduttore di terra è di colore giallo-verde.
Questa operazione deve essere effettuata da un professionista qualificato. In caso di incompatibilità tra la presa e la spina dell'elettrodomestico, chiedere a un elettricista qualificato di sostuire la presa con un'altra di tipo adatto. La spina e la presa devono essere conformi alle norme vigenti nel paese di installatione. Il collegamento alla fonte di alimentazione può essere effettuatoanche interponendo tra l'elettrodomestico e la fonte di alimentazione un interruptore omnipolare in grado di sostenere il carico massimo collegato e conforme alle norme vigenti. Il cavo di terra giallo-verde non devesse interrotto dall'interruttore. La presa o l'interruttore omnipolare utilizzato per il collegamento deve essere lavoramente accessibile quando l'elettrodomestico è installato.
- Per interrompere l'alimentazione, la spina deve essere facilemente accessibile oppure nel cablaggio fisso deve essere incorporato un Interruttore, in conformità alle norme sul cablaggio.
- Se il cavo di alimentazione si danneggia, delve essere sostituito con un cavo o un fascio di conduttori reperibili presso il fabbricante o rivolgendosi all'assistenza clienti.
- Il cavo di alimentazione deve essere di tipo H05V2V2-F.
- Questa operazione deve essere effettuata da un professionista qualificato. Il conduttore di terra (giallo-verde) deve essere lungo circa 10mm in più rispettoagli altri conduttori. Per eventuali riparazioni, rivolgersi escludiva
mente all'assistenza clienti e chiedere che vengano utilizzati ricambi originali.
- In caso contrario, la sicurezza dell'elettro-domestico potrebbe compromettersi e la garanzia potrebbe essere annullata.
- Eventuali fuoriuscite di materiali in effesso devono essere eliminare prima della pulizia.
- Un blackout prolongato durante la cottura potrebbe causare malfunzionamenti del monitor. In tal caso, rivolgersi all'assistenza clienti.
- Per evitare che l'elettrodomestico si surriscaldi, non installarlo dietro sportelli decorativi.
- Quando si colloca il ripiano nell'elettrodomestico, accertarsi che il blocco sia diretto verso l'alto e verso la parte interna della cavity.
Il ripiano deve essere completamente insertito nella cavity. - AVVERTENZA: non rivestire le pareti con pellicole di alluminio o protezioni monouso reperibili in commercio. Le pellicole di alluminio o altre protezioni a contatto diretto con lo smalto caldo potrebbero fondersi e rovinare lo smalto interno.
- AVVERTENZA: non rimuovere mai la guarnizione dello sportello del forno.
- ATTENZIONE: non riempire d'acqua la parte inferiore del forno durante la cottura o quando il forno è caldo.
Il funzionamento dell'elettrodomestico alle frequenze nominali non richiede alcuna operazione o impostazione supplementare.
Istruzioni generali
21
1.1 Indicazioni di sicurezza
1.2 Sicurezza elettrica
1.3 Raccomandazioni
1.4 Installazione
1.5 Gestione dei rifui
1.6 Dichiarazione di conformità
Descrizione del prodotto
22
2.1 Panoramica
2.2 Accessori
2.3 Primo utilizzato
2.4 Utilizzo delle funzioni Keepheat
Utilizzo delorno
24
3.1 Desrzione del display
3.2 Impostazione del prodotto
3.3 Funzionamento in modalità Manuale
3.4 Funzionamento in modalità Ricette
3.5 Funzionamento in modalità Funzioni speciali
3.6 Funzionamento in modalità My Chef
3.7 Descrizioni delle funzioni
3.8 Funzione Wi-Fi
3.9 Modalità di cottura
3.10 Modalità di funzionamento Keepheat
3.11 Linee guida per la conservazione
3.12 Ricette
Pulizia e manutenzione del forno
33
4.1 Note generali sulla pulizia
4.2 Manutenzione
Rimozione della finestra del forno
Rimozione e pulizia dello sportello di vetro
Sostituzione della lampadina
Solutione dei problemi
34
5.1 Domande frequenti
1. Indicazioni generali
Vi ringraziamo per aver scelto uno dei nostri prodotti. Per ottenere i migliori risultati con il forn, si consiglia di leggere attendamente questo manuale e di conservarlo per futuro riferimento. Prima di montare il forn, annotarne il numero di matricola in modo da poterlo comuncare al personale di assistenza nel caso in cui siano necessari interventi di riparazione. Dopo avee molto il forn dall'imballaggio, controllare che non sa stato danneggiato durante il trasporto. In caso di dubbi, non utilizzato il forn e richiedere assistenza ad un tecnico qualificato. Mantenere lontano dai bambini tut il materiale utilizzato per l'imballaggio (sacchetti di plastica, polistirolo, chiodi). Quando il forn si accende per la primaolta, si avverte un forte odore di fumo, provocato alla colla sui pannelli di isolamento che circondano le resistenze di riscaldamento del forn. Si tratta di un fenomeno normale e, nel caso in cui si verificasse, attendere che il fumo scompaia prima di introdurre cibo nel forn stesso. Il produttore non si assume responsabilità nel caso in cui non vengano rispetto le istruzioni containute nel presente documento.
NOTA: le funzioni, le proprieta e gli accessori del forno riportati sul manuale possono essere diversi a seconda del modello da voi acquistato.
1.1 Indicazioni di sicurezza
Utilizzare il fornso solamente per lo scopo per il quale è stato progettato,cisione la cottura di cibo; qualsiasi altri uso, ad esempio come fonte di calore, è considerato improprio e quindi pericoloso.
Il produttore non più essere ritenuto responsable per eventuali incidenti derivanti dall'uso non corretto, improprio o non ragionevole dell'elettrodomestico.
L'utilizzo di qualsiasi elettrodomestico implica il rispetto di alcune norme fondamentali:
- non tirare il cavo di alimentazione per staccare la spina alla presa;
- non toccare l'elettrodomestico con mani o piedi bagnati o umidi;
-
in generale, l'utilizzo di adattatori, multiple e prolonghe non è consigliato;
-
in caso di errato funzionamento e/o funzionamento poco performante, spegnere l'elettrodomestico e non modificarlo.
1.2 Sicurezza elettrica
ACCERTARSI CHE I COLLEGAMENTI ELETTRICI SIANO EFFETTUATI DA UN ELETTRICISTA O DA UN TECNICO QUALIFICATO.
La rete di alimentazione alla quale si collega il forno deve rispetto le leggi in vigore nelle stato in cui viene installato. Il produttore non si assume responsabilità per anni causati dal mancato rispetto di queste istruzioni. Il forno deve essere collegato ad una rete di alimentazione elettrica, con un'uscita a parete con messa a terra oppure un interrottore automatico multipolare, a seconda delle leggi in vigore nelle stato in cui viene installato.
L'alimentazione elettrica deve essere protetta tramite apposti fusibili; i cavi utilizzati devono essere una sezione trasversale in grado di garantire un'alimentazione corretta al forno.
COLLEGAMENTO
Il forno è alimentato da un cavo che deve essere collegato unicamente ad una rete di alimentazione elettrica da 220-240 V ca, 50 Hz tra le fasi o tra fase e neutro. Prima di collegare il forno alla rete di alimentazione elettrica, è importante controllare quanto segue:
-
tensione di alimentazione riportata sull'indicatore;
-
impostazione dell'interruttore automatico.
Il cavo di messa a terra collegato al morsetto di terra del forno deveseessere a sua volta collegato al morsetto di terra della rete di alimentazione.
ATTENZIONE
Prima di collegare ilorno alla rete di alimentazione, chiedere ad un technique qualificato di controllare la continuità del morsetto di terra della rete di alimentazione. Il produttore non si assume responsabilità per incidenti o altri problemi causati dal mancato collegamento del forno al morsetto di terra o da un collegamento di terra con continuità difettosa.
NOTA: considerando che il fornò potrebbe richiedere attività di manutenzione, si consiglia di tenera a disposizione un'altra presa a parete in modo da potere collegare a quella il fornò se viene molto dallo spazio nel quale è montato. Il cavo di alimentazione deve essere sostituito unicolemente a personale di assistenza techniciano o da techniciani con qualifiche equivalenti.
1.3 Consigli
Dopogni utilizzato del fornso, si consiglia di effettuare una rapida pulizia per mantenerlo sempre in condizioni ottimali.
Non copire le pareti del forno con fogli di alluminio o protezioni monouso disponibili in commercio. I fogli di alluminio o le altre protezioni, se a diretto contatto con lo smalto caldo, rischiano di fondersi e di danneggiare lo smalto interno stesso. Per evitare di sporcare eccessivamente il forno e causare odore di fumo acre, si consiglia di non utilizzato il forno a temperature molto elevate. è meglio prolongare il tempo di cottura e abbassare leggermente la temperature. Oltreagli accessori forniti con il forno, si consiglia di utilizzato solo piatti e stampi di cottura resistenti alle temperature elevate.
1.4 Installazione
Il produttore non è obbligato ad effettuarla. Se è necessaria l'assistenza del produttore per correggere errors dovuti ad un'installazione non corretta, quello intervento in assistenza non è coperto da garanzia. Le istruzioni di installatione destinate al personale professionalmente qualificato devono essere rispetto. Un'installazione non corretta può causare lesioni o danni alle persona, agli animali o alle cose. Il produttore non si assume la responsabilità per tali lesioni o danni.
Il forno può essere posizionato in alto all'interno di una colonna o sotto un piano di lavoro. Prima del fissaggio, è necessario garantire una corretta ventilazione nella zona del forno per permettere la corretta circolazione dell'aria fresca necessaria per raffreddare e proteggere i componenti interni. Praticare le aperture specificate all'ultima giornata a seconda del tipo di inserimento.
1.5 Gestione rifiuti protezione ambientale
Questo elettrodomestico dispone di contrassegno ai sensi della Direttiva Europea 2012/19/CE in materia di apparecchi elettrici ed elettronici (RAEE).
I RAEE contengono via sostenze inquinanti (che possono avere un effetto negativo sull'ambiente) via elementi base (che possono essere riutilizzati).
É importante che i RAEE siano sottoposti a trattamenti
specifici in modo da togliere e smaltire in modo corretto gli inquinanti e recuperare tutti i materiali. Spetta ai singoli individui garantire che i RAEE non diventino un problema a livello ambientale. Esistono alcune regole specifiche da rispetto:
- i RAEE non devono essere trattati come rifiuti domestici;
- i RAEE devono essere portati nelle aree di smaltimento specifiche, gestite dai comuni o da società autorizzate.
In molti stati, nel caso di RAEE di grande dimensioni sono disponibili servizi di prelievo a domicilio. Nel caso di acquisto di un nuovo elettrodomestico, quello vecchio più essere restituito al venditore che locke accettare Gratisamente in un'unica soluzione, a condizione che l'elettrodomestico sia di tipo simile ed abbia le stesse funzioni di quello acquistato.
RISPARMIO E RISPETTO DELL'AMBIENTE
Cercare per quanto possibile di evitare il preriscaldamento e cercare di riempire sempre il forno. Aprire la porta del forno il meno possibile, in quanto il calore del vano di cottura si disperde agli volta che la porta viene aperta. Per un buon risparmio di energia, spegnere il forno tra 5 e 10 minuti prima del tempo previsto di cottura; utilizzato il calore residuo che il forno continua a essere.
Mantenere pulite e in buone condizioni le guarnizioni, per evitare di dispersere il calorie all'esterno del vano di cottura. Se si dispone di un contratto di fornitura di elettricità con tariffa oraria, il programma "cottura ridadata" simplifica il risparnio energetico, facendo iniziare il processo di cottura nel periodo a tariffa ridotta.
1.6 Dichiarazione di conformità
Apponendo il marchio su questo prodotto, confermiamo la conformità a tutti i requisiti di legge europei in materia di sicurezza, salute e tutela ambientale applicabili per legge a questo prodotto.
Con la presente Candy Hoover Group dichiara che questo elettrodomestico contrassegnato con C è conforme ai requisiti essenziali della Direttiva 2014/53/UE.
Per ricevere una copia della dichiarazione di conformità, si prega di contattare il produttore su: www.candy-group.com.
2. Descrizione del prodotto
2.1 Panorama
- Pannello di controllo
- Posizioni dei ripiani
- Griglia in metallo
- Leccarda
- Ventola (dietro il piatto di acciaio)
- Separatore
- Sportello del forno
2.2 Accessori
1 Vaschetta raccogligocce
Raccoglie i residui di cibo che gocciolano durante la cottura.
2 Griglia metallica
Serve per sostenere teglie e piastre di cottura.
4 Visualizzazione a LED
Si tratta di un sistema di illuminazione che sostituisce la tradizione "lampadina". All'interno della porta sono integrati 14 LED (per le versioni non pirolitiche) o 10 LED High Power (per le versioni pirolitiche). Producono un'illuminazione bianca di alta qualità che permette di vedere l'interno del forn o con chiarezza alla ombre su tutti i ripiani.
Vantaggi:
Questoistema,或者其他 fornire un'ottima illuminazione all'interno del forso, dura più a lungo della tradizionale lampadina, è più facile da sopporre a manutenzione e soprattutto consente di risparmiare energia.
Vista ottimale
- Illuminazione di lunga durata
- Bassissimo consumo energetico, -95% rispetto all'illuminazione tradizionale.
3 Separatore
Il separatore divide il forno in due cavity. Separa la cavity superiore da quella inferiore quando si desidera utilizzato il forno in due modalità.
Nota: delve essere utilizzato nel terzo ripiano.
Avverenza: non lasciare mai il separatore all'interno delorno con la modalità pirolitica attiva.
NOTA: Per un corretto utilizzo del forn, si consiglia di non porre gli alimenti a diretto contatto con grigie e vassoi, ma diutilizzare carte forn o o appositi contentitori.
2.3 Primo utilizzato
PULIZIA PRELIMINARE
- Pulire il forn o prima di utilizzarlo per la primaolta.
- Pulire le superfici esterne con un panno morbido e umido.
- Lavare gli accessori e pulire l'interno delorno con una soluzione di acqua calda e detersivo per stoviglie.
- Impostare il forno vuoto alla massima temperatura e lasciarlo acceso per circa un'ora per eliminare il caratteristico odore di nuovo.
2.4 Utilizzo delle funzioni Keepheat
PROCESSO DI CONSERVAZIONE
Attivare la modalità Manuale per accederere alla sezione della modalità di conservazione.
Per ulteriori dettagli sulla conservazione, fare riferimento ai capitoli 3.11 e 3.12.

Figura 1
Per ottener tutti ivantaggi della conservazione e i benefici di consumo, si consiglia di controllare la guida rapida fornita in dotazione che indica la temperature specifica richiesta per agli tipo di alimento e modalità di conservazione e sterilizzazione.
Per conservare gli alimenti in maniera ottimale, più salute e più sicura, è necessario seguire QUESTe istruzioni:
- Utilizzare la funzione "sterilizza" per sterilizzato i recipienti*
- Dividere in porzioni gli alimenti precotti
- Confezionare gli alimenti in idonei recipienti sterilizzati o in sacchetti per il sottovuoto**
- Selezionare la funzione più adatta al tipo di alimento***
- Avviare la conservazione***
- Consumare gli alimenti****
NOTA:
Modalità di sterilizzazione: sono inclusi suggerimenti e trucchi.
- Ilprocessodi sterilizzazionedeveseessere aplicato solo in modalita a mezza cavità.** I recipienti possono variare a seconda del tipo di alimento.In particolare si ricorda che:
- Pietanze liquide o semiliquide (ad es. zuppe): adoperare contentitori rigidi, ad es. barattoli, e copire d'olio la superficie. Ridurre al minimo il volume occupato dal liquido. In alternatively, è possible utilizzato sacchetti per il sottovuoto. Il kit per il sottovuoto con relativo manuale dell'utente è incluso solo con specifici modelli del prodotto.
- Pietanze solide malleabili (ad es. lasagna, flan): utilizzato tegami, vassoi o recipienti con copertura ermetica.
- Pietanze solide (ad es. carne, pesce):'utilizzare solo sacchetti per il sottovuoto. Evitare di conservare le pietanze solide parzialmente immerse in liquido. É necessario conservare separatamente solidi e liquidi e poi mescolarli.
- Pietanze secche: utilizzato sacchetti per il sottuvuto.
SUGGERIMENTO:
** Si consiglia di conservare carne, cereali e legumi a 70~^ C (conservazione e ammonbidimento), tutte le altre pietanze a 63^ (funzione di conservazione).
AVVERTENZA:
*** Non conservare gli spinaci.
- Tenere presente che le verdure e gli impasti cotti devono essere conservati solo per pochi giorni.
- Si consiglia di preriscaldare ilorno per 20 minuti.
Gli alimenti possono essere consumati. - Immediamente: gli alimenti vengono confezionati immediamente durante la cottura, sono ancora caldi e saranno conservati nel forno per un breve periodo di tempo prima di essere consumati. Entro 4 ore gli alimenti possonoanche non essere confezionati.
Dopo almeno 4 ore nelorno: gli alimenti freddi sono più conservati in sacchetti per il sottovuoto.
- Dopo almeno 5 ore nel forno: gli alimenti freddi vengono conservati non in sacchetti per il sottuvuoto.
- Dopo una settimana: gli alimenti vengono cotti, confezionati correttamente e conservati nel forno.
- In caso di interruzione della rete elettrica, è possible consumare gli alimenti fino a un'ora dopo. Dopo un'ora, il forno deve essere reimpostato.
PROCESSO DI COTTURA E CONSERVAZIONE
- Utilizzare la funzione "sterilizza" per sterilizzato i recipienti
- Dividere in porzioni gli ingredienti crudi
- Confezionare gli alimenti in idonei recipienti sterilizzati o in sacchetti per il sottovuoto
- Selezionare la funzione "Cottura e conservazione" in base al tipo di alimento*
Figura 2
- Impostare il tempo di cottura
- Avviare il ciclo di cottura
- Al terme del tempo di cotura, il prodotto passa automaticamente alla modalità di conservazione
-
Consumare gli alimenti
-
É preferibile per cucinare carne e legumi.
TARATURA
La taratura è un sistema dedicato alla funzione Keepheat che consente di verificare il correto funzionamento della sonda di temperatura.
NOTA:
- Se ilorno funziona correttamente, sul display appeare il messaggio "CALIBRATION OK".
Il ciclo di calibrazione potrebbe essere eseguito in qualsiasi momento, ma dopo alcuni cicli di processi di cottura, quando si selezione la modalità di conservazione, sul display viene visualizzato il messaggio "CALIBRATION SUGGESTED".
3. Utilizzo del forno
3.1 Descrizione del display

ON/OFF ① → Questo pulsante permette di accendere e spegnere ilorno.
3.2 Impostazione del prodotto
- Al primo utilizzato è necessario eseguire una procedura di installatione per poter usare ilorno. Premere ON/OFF per continuare. (Figura 3)

Figura 3
- Entrare nella sezione impostazioni e selezionare la lingua dal menu a tendina (Figura 4).

Figura 4
- Premere OK per continuare. (Figura 5)

Figure 5
- Impostare l'ora premendo i pulsanti PIU e MENO. Premere OK per continuare. (Figura 6)

Figura 6
- La procedura di installatione è completeness. Premere OK e poi andare alla pagina principale per iniziare ad utilizzare ilorno. Per maggiori dettagli consultare la relativa guidara rapida.
3.3 Funzionamento in modalità manuale
- Premere il pulsante OK quando la freccia sul display è su MANUALE per impostare una cottura in 3 semplici passi. (Figura 7)

Figura 7
-
Se il forno è spento, viene visualizzato l'orologio. Quando il forno non è attivo, sono disponibili tutte le funzioni ad eccezione di durata cottura e fine cottura.
-
Se l'orologio non è regolato, il fornò non funzioni: il display lampeggia,indicando "12:00".
-
Selezionare il modo di cottura desiderato premendo OK nelle la freccia sul display si trovare in corrispondenza della funzione desiderata. Premere GIU per visualizzare tutte le funzioni disponibili. (Figura 8)

Figura 8
- Premere PIU o MENO per selezionare la temperatura desiderata nella funzione selezionata. Premere OK per proseguire o BACK per ritornare alle funzioni di cottura. (Figura 9)

Figura 9
- Premere GIU per cancellare la durata della cottura. Si esegue premendo i pulsanti PIU e MENO nelle la freccia sul display si trova sulla schedà DURATA. Premere OK per iniziare la cottura o BACK per ritornare alle impostazioni della temperatura. (Figura 10)

Figura 10
-
Nella schermata OPZIONI è possibile:
-
escludere il pre-riscaldamento,
-
impostare la fine del tempo di cottura.
-
Quando è in funzione un programma di cottura, è possibile:
modificare la temperatura
-
modificare il tempo di cottura
-
premere FINE per terminare la cottura

Figura 11
3.4 Funzionamento in modalità Ricette
Fare riferimento al capitolo 3.12 Ricette.

Figura 12
3.6 Funzionamento in modalità My Chef
Fare riferimento al capitolo 3.7 Descrizione delle funzioni.

Figura 14
3.5 Funzionamento in modalità Funzioni speciali
Fare riferimento al capitolo 3.9 Modalità di cottura.

Figura 13
3.7 Descrizioni delle funzioni
| FUNZIONE | DESCRIZIONE |
| SICUREZZA BAMBINIAccedendo al menu delle impostazioni alla pagina iniziale, con questa funzione è possibile bloccare il forno quando è spento. Quando la sicurezza bambini è impostata, l'icona è accesa. | |
| SONDA PER LA CARNESe viene rilevata la sonda per la carne (da un messaggio informativo delsystema), l'icona si accede e ilprogramma di cottura viene interrotto. Se la sonda per la carneiene rimossa durante un programma di cotturaprogramma viene interrotto e si torna al menu principale. | |
| ONE-FIAccedere al menu delle impostazioni alla pagina principale. Con questa funzione è possibile impostare lafunzione Wi-Fi.NOTA: vedere il capitolo 3.8 Funzione Wi-Fi. | |
| DOPPIA CAVITÀ (retroilluminata):Con questo pulsante, con un doppio forno con il separatore all'interno della cavity, è possible selezionare lacavity superiore o inferiore. | |
| MY CHEFCon questo pulsante, quando il forno non è spento o non è in fase di cottura, è possibile accederate a un menu speciale con:"LE MIE RICETTE"(un elenco contenente fino a cinque ricette memorizzate; se non è memorizzata alcunaricetta, il display è vuoto e indica"----") "MY WIZARD"(l'ultimo programma ricevuto da App; se non è stato ricevuto alcun programma, il display èvuoto e indica"----") "ULTIMI USATI"(l'ultimo programma di cottura usato, diverso dai programmi di conservazione. Se non èmemorizzato alcun programma, il display è vuoto e indica"---") |
H-KEEPHEAT è totalmente connesso, è dotato di numerous funzioni innovative e consente di conservare gli alimenti grazie a suggerimenti e trucchi dedicati.
- Ricette a bassa temperatura dedicate.
My Chef con otre 150 ricette extra
Gestione di H-KEEPHEAT
Per maggiori dettagli, consultare la Guida rapida al seguente link: http://go.candy-group.com/hoover-ov.
PARAMETRI WIRELESS
| Parametro Specifiche (Wi-Fi) | Specifiche (Bluetooth) | |
| Standard Wireless | 802.11 b/g/n | Bluetooth v4.2 |
| Range di frequenza | 2,412 GHz. - 2,484 GHz | 2,412 GHz. - 2,484 GHz |
| Potenza massima di | 802.11b. DSSS 1 Mbps= +19.5 dBm | Velocità dei dati di base: Potenza di trasmissione RF (tip): +4 dBm Velocità dei datiumentati: Potenza di trasmissione RF (tip): +2 dBm BLE: Potenza di trasmissione RF (tip): +7,5 dBm |
| 802.11b. CCK 11 Mbps= +18.5 dBm | ||
| 802.11g. OFDM 54 Mbps= +18.5 dBm | ||
| 802.11n. MCS7= +14 dBm | ||
| Sensibilità minima di | 802.11b =1024 bytes -80 dBm | Velocità dei dati di base: Sensibilità a 0,1% BER: -98 dBm Velocità dei datiumentati: Sensibilità a 0,01% BER: -98 dBm BLE: Sensibilità a 0,1% BER: -98 dBm |
| 802.11g =1024 bytes -70 dBm | ||
| 802.11n =1024 bytes -65 dBm | ||
| 802.11n HT40 =1024 bytes -65 dBm | ||
| Informazioni sui prodotti per apparecchiature collegate in rete | |
| Consumo energetico del prodotto in standby di rete se tutte le porte di rete cablate sono collegate e tutte le porte di rete wireless sono attive: | 2,0 W |
| Come attivare la porta di rete wireless: | Passare alle impostazioni -> ONE-FI -> • Se il display在哪 ONE-FI RESET (significa che il forno non è registrato, il modulo Wi-Fi è spento e l'utente può essere avviare una nuova registrazione) Premere il pulsante di conferma Il modulo Wi-Fi è accesso e l'icona Wi-Fi lampeggia per 1s accesa e 1s spenta. • Se il display visualità ONE-FI OFF (significa che il forno è registrato m il modulo Wi-Fi è spento) Premere la freccia su o più per passare a ONE-FI ON e premere il pulsanti di conferma Il modulo Wi-Fi è accesso e l'icona Wi-Fi lampeggia per 1s accesa e 1s spenta. |
| Come disattivare la porta di rete wireless: | Passare alle impostazioni -> ONE-FI -> • Se il display visualità ONE-FI READ ONLY (SOLA LETTURA) (significa che il forno è registrato e il modulo Wi-Fi è accesso) • Premere la freccia su o più per passare a ONE-FI OFF e premere il pulsante di conferma Il modulo Wi-Fi è spento e l'icona Wi-Fi non viene visualizzata. |
Guida Rapida Hoover OVEN - Registrazione su App Procedure per dispositivi con Bluetooth 4.0 (o superiore)
Questa guida rapida illustra i passaggi da seguire per arruolare il proprio elettrodomestico sull'App Hoover Wizard, utilizzando un dispositivo dotato di technologia Bluetooth 4.0 (o superiore). In tal caso, la procedura risulta amplificata e più veloce (Easy Enrollment). Se stai utilizzato un dispositivo senza和技术ia Bluetooth (o con versione inferiore alla 4.0), segui la procedura descritta sul retro.
STEP1
- Annota il numero seriale del prodotto
Recupera il nome e la password WPA/WEP della tua rete Wi-Fi
domestica, solitamente posti sul retro del router.
NOTA
-
La frequenza della rete Wi-Fi domestica deve essere impostata sulla banda a 2,4 GHz. Non è possible configurare l'elettrodomestico se la rete di casa è impostata sulla banda a 5 Ghz.
-
Se dovessi ave problemi nel trovare la password WPA/WEP, contatta il loro fornitore internet.
Assicurati che il loro smartphone/tablet sia collegato alla medesima rete Wi-Fi e di aver attivato il Bluetooth all'interno delle"Impostazioni". Consultare il relative manuale per maggiori dettagli..
STEP2
- Scarica l'App Hoover Wizard dallo store.
- Apri l'App Hoover Wizard e crea il suo profilo utente facendo tap su "Registrati". Accetta l'informativa sulla privacy e completei i campi.
NOTA
-
L'App è disponibile per dispositivi Android (dalla versione 4.4) e iOS (dalla versione 8).
-
Se hai gia creato un profilo utente Hoover Wizard, fai loginutilizzando le tue credenziali.
STEP3
- Nella homepage dell'App, fai tap sull'icona con le tre barre in alto a sinistra per accedere al suo profilo utente, quindi premi su "ASSOCIA UN NUovo ELETTRODOMESTICO" e selezione il nome del prodotto che vuoi registrale.
STEP4
- Inserisci la data di acquisto del tuo prodotto (GG/MM/AAAA), quando fai tap su "Procedi".
STEP5
- Inserisci le 16 cifre del numero seriale oppure scansiona il QR code presente
sull'elettrodomestico. Fai tap su "Avanti". Controlla la correttezza dei dati e fai tap su "Conferma". Una volta che il systema ha riconosciutto il prodotto, fai tap su "Avanti".
STEP6
1)Clicca sull'icona ONE-FL.
2) Imposta il forno su ONE-FI RESET (il forno émetterà un segnale acustico).
3)Licona del WIFI iniziera lampeggiare.
Sull'App - Fai tap su "Conferma". Attendere la connessione dell'App con l'elettrodomestico.
NOTA
-L'arruolamento delve essere completato entro 5 minuti.
- In caso di problemi, fai tap su "Riprova", assicurandoti di aver attenuato il Bluetooth sul loro dispositivo (smartphone/tablet). Se il processo non dovesse ancorta completeness, fai tap su "Procedi con Standard Enrollment".
NOTA
- Per garantire il corretto trasferimento dei dati, consiglio di rimanere in prossimità dell'elettrodomestico con il dispositivo.
STEP7
- Inserisci la password della rete Wi-Fi domestica.
- Seleziona il tipo di password (WEP o WPA), quando fai tap su "Conferma".
L'arruolamento del prodotto è terminato.
NOTA - Se non importato automaticamente dall'App, inserisci nel primo riquadro il nome della tua rete Wi-Fi domestica. Fai attenzione alla differenza fra lettere minuscole e maiuscole.
SE LA PROCEDURE NON VA A BUON FINEE
importante che il segnale Wi-Fi dal router all'elettrodomestico sia sufficientemente potente: un segnale debole potrebbe causare il fallimento della procedura. Per verificarlo, riprendi l'arruolamento dallo Step 1; una volta giunto allo Step 6, posizionati colwhose dispositivo (smartphone o tablet) accanto al router eorca la rete "WiFIOVEN-xyzk"generata dall'elettrodomestico. Se non compare nell'élenco,dificilmente il router sare in grado di connettersi. Raccomandiamo in quello caso di avvincare (se possibile) l'apparato all'elettrodomestico o di contattare il suo fornitore Internet e richiedere l'acquisto di un "Wi-Fi Range Extender" per incrementare la potenza del segnale.
Abilitazione Controllo Remoto
- Clicca sull'icona ONE-FL.
- Imposta il fornso su ONE-FI ON (il forn o emettera un segnale acustico).
L'icona del WIFI rimarra accesa
Guida Rapida Hoover OVEN - Registrazione su App Procedure per dispositiviswana Bluetooth (o inferiore alla versione 4.0)
Questa guida rapida illustra i passaggi da seguire per arruolare il proprio elettrodomestico sull'App Hoover Wizard, utilizzando un dispositivo privo di Bluetooth. Suggeriamo di procedere con uno smartphone/tablet dotato di tale Tecnologia al fine di renderare la procedura più semplice. Se stai utilizzato un dispositivo con Tecnologia Bluetooth 4.0 (o superiore), segui la procedura descritta sul retro.
STEP1
- Annota il numero seriale del prodotto ed il nome e la password WPA/WEP della tua rete Wi-Fi domestica, solitamente posti sul retro del router
- Assicurati che il suo smartphone/tablet sia collegato alla medesima rete Wi-Fi.
NOTA
-
La frequenza della rete Wi-Fi domestica deve essere impostata sulla banda a 2,4 GHz. Non è possible configurare l'elettrodomestico se la retEDI casa è impostata sulla banda a 5 GHz.
-
Se dovessi ave problemi nel trovare la password WPA/WEP, contatta il loro fornitore internet.
STEP2
- Scarica l'App Hoover Wizard dallo store.
- Aprí l'App Hoover Wizard e crea il tuo profilo utente facendo tap su "Registrati". Accetta l'informativa sulla privacy e completing i campi.
NOTA
- L'App è disponibile per disposittivi Android (dalla versione 4.4) e iOS (dalla versione 8).
- Se hai già creato un profilo utente Hoover Wizard, fai login utilizzando le tue credenziali.
STEP 3
Nella homepage dell'App, fai tap sull'icona con le tre barre in alto a sinistra per accedere al tuo profilo utente, quindi premi su "ASSOCIA UN NUovo ELETTRODOMESTICO" e selezione il nome del prodotto che vuoi registrale.
STEP4
- Inserisci la data di acquisto del tuo prodotto (GG/MM/AAAA), quando fai tap su "Procedi".
- Inserisci le 16 cifre del numero serialle oppure scansiona il QR code presente sull'elettrodomestico. Fai tap su "Avanti". Controlla la correttezza dei dati e fai tap su "Conferma". Una volta che ilsystema ha riconosciuto il prodotto, fai tap su "Avanti".
STEP5
1) Clicca sull'icona ONE-FL.
2) Imposta il forno su ONE-FI RESET (il forno emettera un segnale acustico) e attendere 5 min.
3) L'icona del WIFI iniziera a lampeggiare.
Sull'App - Fai tap su "Conferma".
NOTA
L'arruolamento deve essere completato entro 5 minuti.
- Per garantire il corretto trasferimento dei dati, consigliamo di
rimanere in prossimità dell'elettrodomestico con il dispositivo.
STEP6
- Esci dall'App Hoover Wizard.
- Entra nelle impostazioni Wi-Fi del tuo dispositivo.
STEP7
- Dall'elenco delle reti Wi-Fi disponibili, selezione "WIFIOVENXYZk".
NOTA
- Se non dovessi trovarla, esegui una nuova scansiono o attendi quale altri secondo.
STEP8
- Esci dalle impostazioni del dispositivo.
- Ritorna nell'App Hoover Wizard, attendendo il riconoscimento dell'elettrodomestico da parte delsystema.
- Quando appeare la scritta "Rete Wi-Fi attiva", fai tap su "Avanti".
STEP9
- Inserisci la password della rete Wi-Fi domestica.
- Seleziona il tipo di password (WEP o WPA), quindi fai tap su "Conferma".
NOTA
- Se non importato automaticamente dall'App, inserti nel primo riquadro il nome della tua rete Wi-Fi domestica. Fai attenzione alla differenza fra lettere minuscole e maiuscole.
STEP 10
- Attendi la fine della procedura di trasferimento dei dati fra l'App ed il prodotto, quando fai tap su "Conferma". Sul display della macchina appara "CONNESSA" e in seguito "CONTROLLO REMOTO ON".
L'arruolamento del prodotto è terminato.
SE LA PROCEDUREN NON VA A BUON FINE
É importante che il segnale Wi-Fi dal router all'elettrodomestico sia sufficientemente potente: un segnale debole potrebbe causare il fallimento della procedura. Per verificarlo, riprendi l'arruolamento dallo Step 1; una volta giunto allo Step 5, posizionati colwhose dispositoso (smartphone o tablet) accanto al router eorca la rete "WIFIOVEN-xyzk" generata dall'elettrodomestico. Se non compare nell'élencco, dificilmente il router sare in grado di connettersi. Raccomandiamo in quello caso di avvincare (se possibile) l'apparato all'elettrodomestico o di contattare il suo fornitore Internet e richiedere l'accusto di un "Wi-Fi Range Extender" per incremente la potenza del segnale.
Abilitazione Controllo Remoto
- Clicca sull'icona ONE-FI.
- Imposta il fornso su ONE-FI ON (il forn o emettera un segnale acustico).
L'icona del WIFI rimarra accesa.
3.9 Modalità di cottura
| Temperatura suggerita (°C) | Funzione (A seconda del modello di forno) | Cavità completa | Cavità superiore | Cavità inferiore |
| L3 | GRILL: per la cottura alla griglia lo sportello delve essere chiuso.Si attiva solo l'elemento scaldante superiore ed è possibile regolare la temperatura.Gli elementi divertano roventi dopo 5 minuti di preriscaldamento. Ideale per cottura alla griglia e la preparazione di kebab e pietanze gratinate. Le carni bianche devono essere collocate distanti alla griglia. La cottura durerà di più ma la carne sarea più gustosa. La carne rossa e i filetti di pesce posso sono essere collocati sul ripiano, posizionando il vassoio di gocciolamento inferiormente. | ✓ | ||
| 180°C | COTTURA MULTILIVELLO: Questa funizione permette di cucinare divers alimenti in contemporanea in uno o più positioni. Il calore penetrata meglio nel cibo e i tempi di cottura e preriscaldamento si riducono. Questo metododi di cottura garantisce una migliorie distribuzione di calore e gli odori non si mascolano. Quando si cuocchio più alimenti contemporaneamente, prolungare la cottura di circa 10 minuti. Questa funizione è particolarmente indicata a gratinati e lasagne (200°C). | ✓ | ✓ | ✓ |
| 230°C | COTTURA VENTILATA: Questa funizione permette una migliorie distribuzione di calore grazie alla combinazione della ventola e delle resistenze. Quetsa funizione è ideale per i panificati come pane, pizza e focaccia, assicurando risultati di cottura omogenea grazie alla distribuzione di calore assistita. | ✓ | ||
| 160°C | RESISTENZA INFERIORE: uso dell'elemento inferiore. Ideale per la cottura di tutti i piatti a base di impasti. Utilizzato questa modalità per sformati, quale, crostate, pâté e tutte le cotture che richiedono che il calore provenga dal basso. | ✓ | ||
| 170°C | RESISTENZA INFERIORE VENTILATA: La resistenza inferiore viene utilizzata con la ventola che viene che consente la circolazione dell'aria all'interno del forno. Questa funizione è ideale per torte, tartine e croissant, impedendo che si seccinho e favorendo il processo di crescita per un perfetto risultato di cottura. Collocare il ripiano nella posizione inferiore. | ✓ | ✓ | |
| 180-200 °C160-170 °C | * STATICO: Questa funizione utilizza la ventola ed entrambre le resistenze Priscaldare il forno per circa 10 minuti. Questo metododi di cottura è ideale per arrosti di carne (180/200°C) e pesce (160-170°C). Collocare l'alimento è il relativivo piatto su un ripiano in posizione centrale. | ✓ | ||
| 210°C | SCONGELAMENTO: la ventola consente la circolazione dell'aria a temperature ambiente attorno agli alimenti congelati in modo da scongelarli in pochi minuti perché il contentuto proteico degli alimenti. | ✓ | ||
| 40°C | LIEVITAZIONE: grazie al riscaldamento particolarmente delicato della cavità, Questa funizione garantisce la crescita del pane e altri alimenti da panetteria o pasticceria durante il processo di cottura. | ✓ | ||
| 200°C | GRILL VENTILATO: utilizzato il turbo-grill con lo sportello chiuso.La resistenza superioreiene utilise utilizzata con la ventola che consente la circolazione dell'aria all'interno del forno. Il preriscaldamento è necessario per le carri rosse ma non per nelle bianche. Ideale per la cottura di alimenti spessi e pezzi interni, ad es. arrosto di maiale o pollame. Collocare gli alimenti da grigliare direttamente al centro del ripiano, in posizione intermedia. Far scorrere la leccarda sulla scaffare per raccogliere i succhi. Accertarsi che gli alimenti non siano vicini al grill. Girare l'alimento a metà cottura. | ✓ | ✓ | |
| 180°C | * MASTER BAKE: Questa funizione consente di cucinare in modo più sano, riducendo la quantità di olio o grasso impiegato. La combinazione delle resistenze a ciclo di aria pulsata garantisce risulati ottimali di cottura. Questa funizione è particolarmenteindicata per i gratinati. | ✓ |
*Verificato in base allo standard EN 60350-1 ai fini della dichiarazione del consumo elettrico e della classe energetica.
3.10 Modalità di funzionamento Keepheat
| Preimpostare la temperatura (℃) | Funzione KEEPHEAT (A seconda del modello di forno) | Cavità completa | Cavità superiore | Cavità inferiore |
| 63 | CONSERVAZIONE: QUESTA funzione consente di conservare tutti gli alimenti, ad es. carne, pesce e legumi. | √ | √ | |
| 70 | CONSERVAZIONE E AMMORBIDIMENTO: QUESTA funzione consente di conservare carne grassa, cereali e legumi, rendendoli più teneri e succosi. | √ | √ | |
| 70 + 63 | COTTURA E CONSERVAZIONE: QUESTA funzione consente di cuocere a bassa temperature, preservando la tenerezza e la succosità degli alimenti (soprattutto per la carne) e di passare automaticamente alla conservazione. | √ | √ | |
| 121 (per 15 minuti) | STERILIZZAZIONE: l'uso di QUESTa funzione è indispensableile prima della conser- vazione e consente di sterilizzare i recipienti. | √ | √ |
Perutilizzare la modalita a cavita completa,rimuovere il separatore dal forno.
Perutilizare la modalita a mezza cavita, inseire il separatore nel forno. La temperatura tra la cavita superiore e quella inferioriore puo variere da 160^ a 240^
NOTE:

Figura 15
Le funzioni Keepheat sono disponibili solo in modalità a mezza cavità.
- Perutilizzarle, inseire il separatore del forno.
- Attendere che lo schermo visualizzi la mezza cavity, come illustrato nella Figura 15.
- Premere il pulsante della doppia cavità sullo schermo per selezionare la cavità desiderata per avviare la modalità di conservazione.
Fare riferimento al capitolo 3.3 Funzionamento in modalità manuale per avviare le funzioni Keepheat.
3.11 Linee guida per la conservazione
| GRUPPO MERCELOGICO | CUCINA | TEMPERATURA DI CONSERVAZIONE CONSIGLIATA | CONTENITORE CONSIGLIATO | RACCOMANDAZIONI |
| Came bianca | Petto di pollo arrostito | 70 °C | Sacchetto per sotrovolo | Salare prima della cottura |
| Stufato di pollo | 70 °C | Sacchetto per sotrovolo | Se il succo è abbondante, trasseriro in un sacchetto separato | |
| Anche di pollo al vino bianco | 70 °C | Sacchetto per sotrovolo | Se il succo è abbondante, trasseriro in un sacchetto separato | |
| Spezzatino di tacchino in salsa | 70 °C | Sacchetto per sotrovolo | Se il succo è abbondante, trasseriro in un sacchetto separato | |
| Scaloppine di maiale | 70 °C | Sacchetto per sotrovolo | Conservare le fette di carne in più sacchéotti per evitare la sovrapposizioneccessiva | |
| Stufato di maiale | 70 °C | Sacchetto per sotrovolo | Se il succo è abbondante, trasseriro in un sacchetto separato | |
| Filetto di maiale con erbe aromatiche | 70 °C | Sacchetto per sotrovolo | Salare prima della cottura | |
| Salsicce stufate | 70 °C | Sacchetto per sotrovolo | Se il succo è abbondante, trasseriro in un sacchetto separato | |
| Stinco di maiale | 70 °C | Sacchetto per sotrovolo | Se il succo è abbondante, trasseriro in un sacchetto separato | |
| Stufato di vitello | 70 °C | Sacchetto per sotrovolo | Se il succo è abbondante, trasseriro in un sacchetto separato | |
| Arrosto di vitello | 70 °C | Sacchetto per sotrovolo | Salare prima della cottura | |
| Scaloppine di vitello | 70 °C | Sacchetto per sotrovolo | Salare prima della cottura | |
| Ossobuco di vitello | 70 °C | Sacchetto per sotrovolo | Se il succo è abbondante, trasseriro in un sacchetto separato | |
| Stinco di vitello | 70 °C | Sacchetto per sotrovolo | Salare prima della cottura | |
| Costine stufate | 70 °C | Sacchetto per sotrovolo | Salare prima della cottura | |
| Carne rossa | Stufato di manzo | 70 °C | Sacchetto per sotrovolo | Se il succo è abbondante, trasseriro in un sacchetto separato |
| Brasato di manzo | 70 °C | Sacchetto per sotrovolo | Se il succo è abbondante, trasseriro in un sacchetto separato | |
| Roastbeef di manzo | 70 °C | Sacchetto per sotrovolo | Condire con erbe aromatiche e ridurre il sale | |
| Polpette stufate | 70 °C | Sacchetto per sotrovolo | Se il succo è abbondante, trasseriro in un sacchetto separato | |
| Carne alla piazza | 70 °C | Sacchetto per sotrovolo | Se il succo è abbondante, trasseriro in un sacchetto separato | |
| Fileto di manzo | 70 °C | Sacchetto per sotrovolo | Condire con erbe aromatiche e ridurre il sale | |
| Coscia di vitello arrosta | 70 °C | Sacchetto per sotrovolo | Condire con erbe aromatiche e ridurre il sale | |
| Coscia stufata | 70 °C | Sacchetto per sotrovolo | Se il succo è abbondante, trasseriro in un sacchetto separato | |
| Petto d'anatra | 70 °C | Sacchetto per sotrovolo | Condire con erbe aromatiche e ridurre il sale | |
| Coscia d'anatra | 70 °C | Sacchetto per sotrovolo | Salare prima della cottura | |
| Polpettone misto | 70 °C | Sacchetto per sotrovolo | Condire con erbe aromatiche e ridurre il sale | |
| Pesce bianco | Filetto di branzino alla livomese | 63 °C | Sacchetto per sotrovolo | Se il succo è abbondante, trasseriro in un sacchetto separato |
| Filetto di branzino al vino bianco | 63 °C | Sacchetto per sotrovolo | Se il succo è abbondante, trasseriro in un sacchetto separato | |
| Trancio di orata al vino bianco | 63 °C | Sacchetto per sotrovolo | Se il succo è abbondante, trasseriro in un sacchetto separato | |
| Rana pescatrice stufata | 63 °C | Sacchetto per sotrovolo | Se il succo è abbondante, trasseriro in un sacchetto separato | |
| Calamari stufati | 63 °C | Sacchetto per sotrovolo | Se il succo è abbondante, trasseriro in un sacchetto separato | |
| pesce intero | 63 °C | Sacchetto per sotrovolo | Salare prima della cottura | |
| Pesce arrosto | 63 °C | Sacchetto per sotrovolo | Salare prima della cottura | |
| Pesce alla griglia | 63 °C | Sacchetto per sotrovolo | Non collocate il limone nel sacchetto insieme ai pesce perché lo renderebbe amaro | |
| Calamari alla griglia | 63 °C | Sacchetto per sotrovolo | Salare prima della cottura | |
| Vongole | Peppie stufate | 63 °C | Sacchetto per sotrovolo | Se il succo è abbondante, trasseriro in un sacchetto separato |
| Polpo bolito | 63 °C | Sacchetto per sotrovolo | Cuocere direttamente in un sacchetto per sottuvoto senza aggignere acqua | |
| Moscardini stufati | 63 °C | Sacchetto per sotrovolo | Se il succo è abbondante, trasseriro in un sacchetto separato | |
| Crostacei | Gamberi al vino bianco | 70 °C | Sacchetto per sotrovolo | Aumontare la temperature di conservazione (v. tabella) |
| Salsa di gamberi | 70 °C | Sacchetto per sotrovolo | Aumontare la temperature di conservazione (v. tabella) | |
| Verdure | Cavoilore | 63 °C | Sacchetto per sotrovolo | Cuocere con poche gocce di aceto per ridurre l'ossidazione |
| Zucchini saltate con aglio e prezemolo | 63 °C | Sacchetto per sotrovolo | Cuocere con poche gocce di aceto per ridurre l'ossidazione | |
| Peperoni | 63 °C | Sacchetto per sotrovolo | Cuocere con poche gocce di aceto per ridurre l'ossidazione | |
| Peperoni saltati con aglio e prezemolo | 63 °C | Sacchetto per sotrovolo | Cuocere con poche gocce di aceto per ridurre l'ossidazione | |
| Broccoli | 63 °C | Sacchetto per sotrovolo | Cuocere con poche gocce di aceto per ridurre l'ossidazione | |
| Carciofi saltati con aglio e prezemolo | 63 °C | Sacchetto per sotrovolo | Cuocere con poche gocce di aceto per ridurre l'ossidazione | |
| Verdure alla griglia | 63 °C | Sacchetto per sotrovolo | Salare prima della cottura | |
| Zucca arosità | 63 °C | Sacchetto per sotrovolo | Salare prima della cottura | |
| Verdure al gratin | 63 °C | Sacchetto per sotrovolo | Salare prima della cottura | |
| Piselli stufati | 63 °C | Sacchetto per sotrovolo | salare prima della cottura | |
| Legumi boliti | 63 °C | Sacchetto per sotrovolo | Scolare bene l'acqua di cottura | |
| Legumi stufati | 63 °C | Sacchetto per sotrovolo | Se il succo è abbondante, trasseriro in un sacchetto separato | |
| Cereali boliti | 63 °C | Sacchetto per sotrovolo | salare prima della cottura | |
| Cuscus | 63 °C | Sacchetto per sotrovolo | Scolare bene l'acqua di cottura | |
| Primi piatti | Polenta | 63 °C | Sacchetto per sotrovolo | Cuocere fino a una consistenza piuttosto asciutta prima di conservare |
| Crèpe vegetariane | 63 °C | Sacchetto per sotrovolo | Confianzare agli porzione singularmente per prevenir la rotture | |
| Torte di cereali | 63 °C | Sacchetto per sotrovolo | Condire con erbe aromatiche e ridurre il sale | |
| Bulgur | 63 °C | Sacchetto per sotrovolo | Condire con erbe aromatiche e ridurre il sale | |
| Quinoa | 63 °C | Sacchetto per sotrovolo | Condire con erbe aromatiche e ridurre il sale | |
| Zuppe | Zuppa di legumi | 63 °C | Contenitore per sotrovolo | Una volta riempito il contentore, aggungere un po' d'olivo sulla superficie per ridurre l'ossidazione |
| Zuppa di cereali | 63 °C | Contenitore per sotrovolo | Una volta riempito il contentore, aggungere un po' d'olivo sulla superficie per ridurre l'ossidazione | |
| Crema di verdure | 63 °C | Contenitore per sotrovolo | Una volta riempito il contentore, aggungere un po' d'olivo sulla superficie per ridurre l'ossidazione | |
| Crema di legumi | 63 °C | Contenitore per sotrovolo | Una volta riempito il contentore, aggungere un po' d'olivo sulla superficie per ridurre l'ossidazione | |
| Brodo di carne | 70 °C | Contenitore per sotrovolo | Non insaporireccessivamente, poché l'aroma tendsa concentrarsi durante il periododi conservazione | |
| Brodo vegetale | 63 °C | Contenitore per sotrovolo | Non insaporireccessivamente, poché l'aroma tendsa concentrarsi durante il periododi conservazione | |
| Fruitta | Mele cotte | 63 °C | Sacchetto per sotrovolo | Condire con spezie e cannella prima della cottura |
| Pere cotte | 63 °C | Sacchetto per sotrovolo | Condire con spezie e cannella prima della cottura |
3.12 Ricette
| Cottura tradizione | ||||
| Titolo | Modalità di cottura | Temperatura (°C) | Durata (minuti) | Categoria |
| Riso seppie e piselli | statica | 200 | 20 | primi piatti |
| Torta di porri | statica | 175 | 40 | verdure |
| Croissant | cottura ventilata | 200-180 | 5-10 | dolci |
| Quiche Lorraine | statica | 190 | 30 | primi piatti |
| Tarte tatin | statica | 220-180 | 15-30 | dolci |
| Lasagne di pesce | statica | 190 | 20 | pesce |
| Pomodori alorno | cottura ventilata | 200 | 30/40 | verdure |
| Roastbeef di manzo | statica | 200 | 90 | carne |
| Empanadas | statica | 200 | 15 | carne |
| Involtini di pesce spada | statica | 180 | 8/10 | pesce |
| Cottura a bassa temperatura | ||||
| Titolo | Modalità di cottura | Temperatura (°C) | Durata (minuti) | Categoria |
| Insalata di gamberetti e mango | cottura e conservazione | 70 | 25 | primi piatti |
| Polpo con patate | multilivello | 90 | 90 | primi piatti |
| Pure di zucchini e piselli | multilivello | 90 | 35 | verdure |
| Gnocchi cacio e pepe | multilivello | 100 | 12 | pasta e pane |
| Orecchiette pomodoro e ricotta | multilivello | 100 | 9 | pasta e pane |
| Capesante, finocchio e olive | cottura e conservazione | 70 | 12 | pesce |
| Salmone con agrumi e zenzero | cottura e conservazione | 70 | 14 | pesce |
| Branzino con carciofi | cottura e conservazione | 70 | 22 | pesce |
| Anatra con bacche di ginepro | cottura e conservazione | 70 | 120 | carne |
| Tagliata di vitello molto cotta | cottura e conservazione | 70 | 20 | carne |
| Vitello e salsa tonnata | multilivello | 80 | 120-40 | carne |
| Insalata Caesar | multilivello | 80 | 120 | verdure |
| Baccalà con peperoni e broccoli | multilivello | 80 | 30 | pesce |
| Orzotto allo zafferano e asparagi | multilivello | 90 | 90 | verdure |
| Ratatouille | multilivello | 80 | 45 | verdure |
| Pannacotta al cavolfiore | multilivello | 90 | 90 | verdure |
| Pasticcio di zucca e carote | multilivello | 90 | 40 | verdure |
| Zucchini alla mentala | multilivello | 80 | 30 | verdure |
| Pere, vino rosso e cannella | multilivello | 90 | 120 | dolci |
| Creme brûlée | multilivello | 80 | 40 | dolci |
4.1 Note generali sulla pulizia
-La pulizia regolare prolunga la durata dell'elettrodomestico.
- Attendere che il fornso si raffreddi prima di effettuare le operazioni di pulizia manuale.
AVVERTENZE:
- Per evitare danni irreparabili ai componenti smaltati, per la pulizia non adoperare mai detersivi abrasivi, oggetti appuntiti o lana d'acciaio.
- Utilizzato solo acqua, sapone o detersivi a base di caneddgina (ammoniaca).
COMPONENT IN VETRO
Dopogni utilizzato, si consiglia di pulire la finestra di vetro del fornò con un panno da cucina assorbente. Per rimuovere macchie ostinate, è possibile adoperare una spugna imbevuta di detersivo, ben strizzata, e risciacquare con acqua.
FINESTRA DEL FORNO
Se la guarnizione è sporca, cui è sere pulita con una spugna lievamente bagnata.
ACCESSORI
Pulire gli accessori con una spugna umida saponata prima di risciacquarli e asciugarli; evitare l'uso di detersivi abrasivi.
LECCARDA
Dopo averutilizzato ilgrill,rimuovere il vassoio dal forno.
- Versare il grasso caldo in un contentatore e lavare il vassoio in acqua calda con una spugna e detersivo liquido per stoviglie.
NOTE:
- Se rimangono residui grassi, immergere il vassoio in acqua e detersivo. In alternatively, è possible lavare il vassoio in lavastoviglia o con un comune detersivo per forn.
Non ricollocare mai un vassoio sporco nel forno.
4.2 Manutenzione
RIMOZIONE DELLO SPORTELLO DEL FORNO
- Aprière la finestra anteriore.
- Apire i morsetti dell'involucro della cerniera sul lato destro e sinistro della finestra anteriore premendoli verso il basso.
- Sostituire la finestra effettuatinga procedura in ordine inverso.
RIMOZIONE E PULIZIA DELLO SPORTELLO DI VETRO
- Apire lo sportello del forno.
2.3.4. Bloccare le cerniere, rimuovere le viti e il coperchio metallico superiore tirandolo verso l'alto.
5.6. Rimuovere il vetro extraendolo con attenzione dallo sportello delorno - Al termine della pulizia o della sostituzione, rimontare i componenti effettuantlo la procedura in ordine inverso.
1.
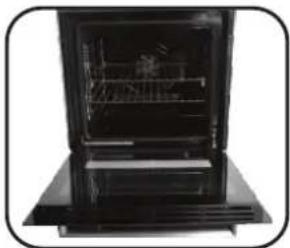
5.
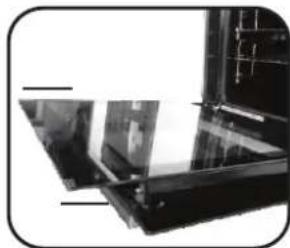

6.
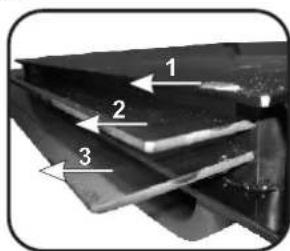
3.
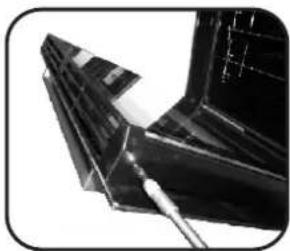
7.
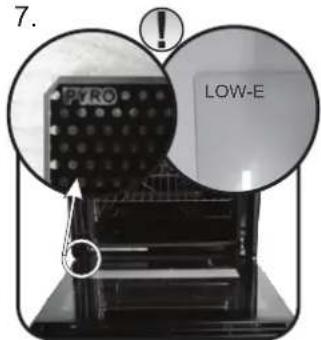
4.
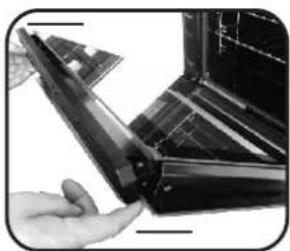
SOSTITUZIONE DELLA LAMPADINA
- Scollegare ilorno alla rete elettrica.
- Svitare la lampadina sotto il coperchio di vetro e sostituirla con una lampadina nuova dello stesso tipo.
- Dopo la sostituzione della lampadina, rimontare il coperchio di vetro.

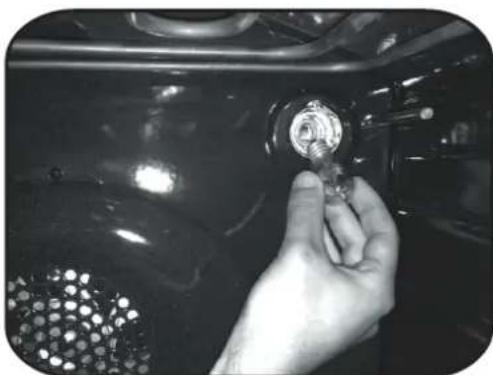

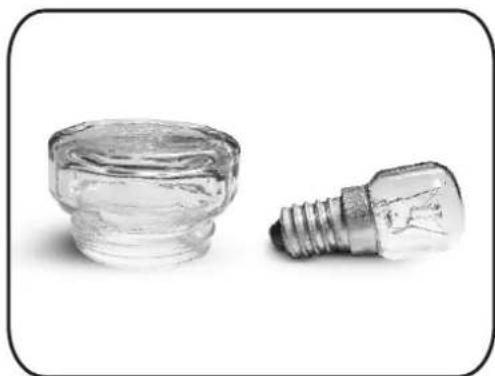
5. Risoluzione degli inconvenienti
5.1 FAQ
| PROBLEMA | POSSIBLE CAusa COSA FARE | |
| Il fornno non scalda | L'orologio non è regolato | Regolare l'orologio |
| Il fornno non scalda | Il blocco di sicurezza bambini è attivato | Disattivare il blocco di sicurezza bambini |
| Il fornno non scalda | Non sono state impostate la funzione e la temperature di cottura | Accertarsi che le impostazioni necessarie siano corrette |
| Nessuna reazione quando si usa l'interfaccia utente di tipo touch | Vapore e condensa sul pannello interfaccia utente | Pulire con un panno in microfiba il pannello interfaccia utente per togliere lo strato di condensa |
- Pri plněni nádržky na vodu nesmi hladina vody prěkročit maximálné hladinu vyznacenouna nádržce.
- VAROVÁNÍ: Nebezpeci popálení a poskození spotřebieče: pri použiti funkce páry muže uvolnéna pára zpùsobit popáleniny: Po použiti funkce vařeni s párou dvírká otevírejte opatrné, abyste predešli zraněni.
- Během vařeni muže v dutině trouby nebo na skle dvířek docházet ke kondenzaci vlhkosti. Jedné se o normální stav. Chcete-li tento efekt omezit, počkejte po zapnutí napájení 10–15 minut, než vložǐte jidlo do trouby. Kondenzace v každém pripadě zmizí, jakmile trouba dosáhne teploty vařeni.
- Vaße zeleninu v nadobě s víkem namistostovevřeneho zásobniku.
- Nenechávejte jidlo uvnittrouby po uvařeni po dobu delsí než 15–20 minut.
- UPOZORNENI: spotrebič a pristupné Časti se během používání zahrivaji na vysokou teplotu. Davejte pozor, abyste se nedotkli horkych Časti.
- UPOZORNENI: pristupné casti se mohou pri použivani trouby zahrat. Děti museji byt udržovány v bezpečné vzdálenosti.
- UPOZÖRNÉNİ: preddvyménou zárovky zajistete, ze spotbrebic bude vypnuty, aby nedoslo k urazu elektrickým proudem.
- UPOZORNÉNÍ: abyste se vyhnuli nebezpecí zpúsobenému náhodným resetovámim tepelného prerušovace, nesmi byt tento spotbrebić napajen externím spinacím zařizením, jak je Časovac, ani nesmi byt pripojen do okruhu, ktery se pravidelné zapíná a vypíná.
- Děti mladží 8 let se musí zdržovat v bezpečné vzdálenosti od spotřebiče,Pokud nejsou pod neustálým dohledem.
- Děti si se spotřebiečem nesměji hrát. Spotřebieč mohou používat osoby ve věku 8 avice let a osoby s omezenými fyzickými, senzorickými nebo duševnimi schopnostmi, bez zkušeností nebo znalostí o produktu pouze tehdy, když jsou pod dohledem nebo jim byly udělenyPokyny týkajíci se provozu spotřebieč bezpečnám zpùsobem a jsou si vědomy možných rizik.
- Cişte ná udžbu nesměj provadet deti, které jsou bez dohledu.
K cišění skla dvírek trouby nepoužívejte hrubé nebo abrazivné prostředky ani ostré
kovové skrabky, protoze mohou poskrabat povrch a zpusobit Rozbiti skla.
- Pred vyjmutim odnimatelnych casti musi byt trouba vypnuta a po yvcisteni je znovusestavte podlePokynu.
- Používejte pouze sondu na maso doporučenou pro tutó troubu.
K cisteni spotrebié nepouzivejte parni cistic. - Pripojte zástrčku k napajecimu kabelu, ktery je schopen vydržet napěti, proudly a zátež uvedené na stitku a ktery je opatřen uzemnovacim kontaktem. Zásuvka musí byt vchodná pro zatízení uvedené na stitku a musí mit zapojený a funkčné uzemnovaci kontakt.
Uzemnovaci vodič má Žlutozelenou barvu. Tuto operaci by měl provadět odborní s odpovídají kvalifikaci. V pripaděnekompatibility mezi zásuvkou a zástrčkou spotřebiece požádejte kvalifikovaného elektrárě, aby zásuvku nahradil jiným vchodnám typem. Zástrčka i zásuvka museji odpovídat platnám normám zěme instalace. Připojení k napajecimu zdroji lze provest také tak, ze mezi spotřebiec a zdroj energia, ktery zvladne maximálné pripojenou zátež a který je v souladu se stavajicimi právními predepisy, se umisti omnipólární vypínač. Žlutozelený uzemnovaci kabel by neměl byt prerušen vypínačem. Zásuvka nebo omnipólární vypínač používaný pro pripojení by měl byt pri instalaci spotřebiece snadno pristupné.
- Odpojení lze zajistit pristupnou zástrčkounelo zacleněním spínače v pevném zapojení v souladu s pravidly elektroinstalace.
- Pokud je napajeci kabel poškozen, musi byt nahrazen kabeilem nebo speciánlíms svazkem, ktery je k dispozici u vyrobce.
Pripadne se obratte na zakaznicky servis.
Typ napajeciho kabelu musi byt H05V2V2F. Tento ukon by mél provadět adekvátne kvalifikovany odborník. Uzemnovaci vodic (žlutozelený) musi byt približné o 10 mm delsí než ostatní vodíče. V pripadě jakychkoli oprav se obracejte pouze na oddělení peće o zákazníky a vyžadujte použítí originálnich nahradnich dìlú.
- Nedodrženi vyse uvedenych pokynu muze ohrozit bezpečnost spotřebrice a zneplatnit záruku.
- Před cistěním by měl být odstraněn veškéri prebytek Rozliteho materialú.
- Dlouhodoby vypadek napajeni behem probihajici faze vareni muze zpusobit poruchu monitoru. V takovem pripadse se obratte na zakaznicky servis.
- Spotrebič nesmi byt instalovan za ozdobnymi dvířky, aby nedocházelo k prehrát.
Kdyz dovnitr umistite polici, ujistete se, ze zarazka smerije nahoru a dozadu do dutiny. Police musi byt zcelazasunuta do dutiny.
VAROVANI: Nevykladejte steny trouby alobalem ani jakoukoli ochranou na jedem pouziti zakoupenou v obchodě. Hliníkové folie nebo jakákoli jiná ochrana v prímém kontaktu se zahrátym smaltem preydavují riziko roztavení a poškození smaltu ve vnitné (£asti.
VAROVANI: Neodstrańujte těsněni dvířek trouby. - POZOR: Nedoplńujte na dno dutiny vodu během vařeni nebo když je trouba horká.
- Pro provoz spotbrebié prj jmenovitych frekvencich neni nutna zadna dalsi operace/nastaveni.
ObecnéPokyny
38
1.1 BezpečnostníPokyny
1.2 Bezpečnost elektrickych zařizení
1.3 Dopurocení
1.4 Instalace
1.5 Nakladání odpady
1.6 Prohlášeni o shodě
Popis výrobku
39
2.1 Pvehled
2.2 Prisluşenstvi
2.3 První použití
2.4 Používáni funkci Keepheat
Používáni trouby
41
3.1 Popis displeje
3.2 Nastaveni vyrobku
3.3 Ovladani v rezimu Manual
3.4 Ovladani v rezimu Recepty
3.5 Ovladani v rezimu Speciálni funkce
3.6 Ovladani v rezimu Muj sefkuchar
3.7 Popisy funkci
3.8 Funkce Wi-Fi
3.9 Režimi pripravy
3.10 Režimi funkce Keep Heat
3.11 Pokyny pro udržováni
3.12 Recepty
Čistěné a udžba trouby
44
4.1 Obecné poznámky k Čištěné
4.2 Udrzba
- Demontáž okna trouby
- Demontáž a cistěnéskleněnych dvířek
Vymena zarovky
Rešeni problému
45
5.1 Casté otázky
1. Obecné pokyny
Dekujeme, ze jste si vybrali jedem z nasich produktu. Pro dosaženi nejlepsich vysledku pri pouzivani trouby si pozorné prěctěte tento námod a uchovejte jej pro budouci použiti. Pred instalaci trouby si zapiste vyrobní cislo, abyste je mohl sdělit personalá zákaznického servisu v pripadé potřeby apravy Po vyjmuti trouby z obalu zkontrolujte, zda nebyla během prěpravy poskozena. Pokud mate pochybnosti, troubu nepoužívejte a poradte se s kvalifikovanym technikem. Veskery obalovy materiá (plastové sáčky, polystyren, hěrbíky) uchovávejte mimo dosah déti. Pri pvnim zapnuti trouby se muž objevt silné zapachajíc kouri, ktery je zpusoben lepidlem na izolačnich panelech obklopujicič ohřev trouby. Jedná se o zcela normalí stav, aPokud k němu dojede, meli bisté prěd vlozenim jidla do trou počkat, než se kouri Rozptyli. Vyrobce neprijíma zádnou odpovednost v pripadech, kdy nejsou doprženyPokyny uvedene v toto dokumentu.
POZNÁMKA: funkce trouby, vlastnosti a príslušenstvi uvedene v teto priruce se budou lišit v závislosti na vámí zakupeném modelu.
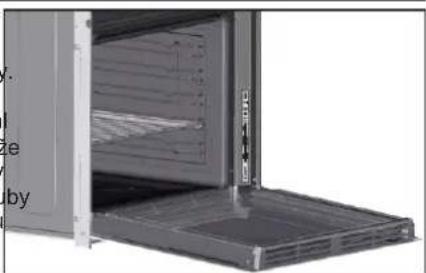
1.1 BezpečnostníPokyny
Troubu pouzivejte pouze k urcenemu ucelu, tj. pouze k vaeni potravin; jakekoli jine pouziti, napriklad jako zdroj tepla, je považovano za nevhodne, a proto nebezpecne.Vyrobce nenese odpovednost za skody zpusobene nevhodnym, nespravnym nebo neprimerenym pouzitim.
Používani jakéhokoli elektrického spotřebrice vyžaduje dodžovani některych základnich pravidel:
-
netaheje za napajeci kabel, abyste odpojili zastrcku zezasuvky;
-
nedotykejte se spotbreic mokryma nebo vhlkyma rukama nebo nohama;
-
obecné se nedoporucije pouziti adaptéru, VICENÁsobnych zásuvek a prodlužovacích kabelú;
-
v pripadé poruchy a/nebo špatné funkčnosti spotřebic vypněte a nemanipulujte s nim.
1.2 Elektrická bezpečnost
ZAJISTÉTE, ABY ELEKTRICKÁ PřIPOJENI PROVEDL ELEKTRIKÁR NEBO KVALIFIKOVANY TECHNIK.
Napajeci zdroj, ke kteremu je trouba pripojena, musi opovidat zakonum platnym v zemi instalace. Vyrobce neprijima zdnou opovednost za jakekoli skody zpusobene nedodrzenim tchtoPokynu. Trouba musi byt pripojena k elektrickemu napajeni s uzemnenou zasuvkou nebo odpojovaem s vice poly, v zavislosti na prvnich predipsech platnych v zemi instalace. Elektricke napajeni musi byt chraneno vhdnymi pijstkami a pouzite kabely musi mit pricny pruz, ktery zajisti spravne napajeni trouby.
PRIPOJENI
Trouba je dodávána s napajecim kabelem, ktery by mél byt pripojovan pouze k elektrickému napajeni s vykonem 220-240 V AC 50 Hz mezi fázemi nebo mezi fázi a nulovym vodicem. Pred pripojenim trouby k elektrickému napajeni je duležité zkontrolovat:
- napajci napeti uvedené na méridle;
-nastaveni odpojovace
Uzemnovaci vodic priopojen k uzemnovaci svorce trouby musi byt priopojen k uzemnovaci svorce napajecho zdroje.
VAROVANI
Před pripojením troubyknapajecimu zdrojipozádeje kvalifikovaného elektrikäre,abyzkontrovalo kontinuitu uzemnovaci svorky napajechio zdroje.Vyrobcne neprijímažadnou odpovédnostaprpadné nebody nebo jine problemyzpusobéne nezapojenim troubykuzemnovacivsorce nebo uzeměním,teré ma vadnu kontinuitu.
POZNÁMKA: vzhledem k tomu, ze u trouby mohou byt vyžadovány udžrărské práce, je vchodné mit k disposizci jinou zásuvku, aby k ni mohla byt trouba pripojena v pripadě premistění z mista, na kterém je instalovaná. Napajeci kabel smi yvměnovat pouze personal technického servisne nebo technici s opodvidajíc kualifikaci.
1.3 Dopuroceni
Po kazdem pouziti trouby pomuze ciisteni v minimalmi mire udrzet troubu dokonale cistou.
Nevykladeje steny trouby hlinikovou folli ani jakoukoli ochranou na\ nedno pouziti zakoupenou v obchodne. Hliniková folie nebo jakákoli jina ochrana v přmém kontaktu se zahrátym smaltem predstavuje riziko roztaveni a poskozeni smaltyve vinitnim prostoru. Abyste pfredeši\ nadmémemu znečistěni trouby a ysvlednému silnému zapachu koure, doporučujeme troubupoužívat pri velmi vysokte teplote. Je lepsi\ prodloužit dobu vafeni a trochu snizit teplotu. Kromě prisluşenstvi\ dodavaného s troubou vám doporučujeme používat pouze nadobí a\ formу na pečeni odolné vúčí velmi vysokým teplotám.
1.4 Instalace
Vyrobci nejsou povinni provadet instalaci. Pokud je pro odstraneni zavad zpusobenych nespravnou instalaci vyzadovana pomoc vyrobce, nevztahuje se na tutu pomoc zaruka. Je nutne dodržovatPokyny pro instalaci odborné kvalifikovanym personálem.
Nesaprvná instalace muze zpusobit zraneni osob, zvifat nebo skodu na povjetn. Vyrobce nenese za takovou skodu nebo zraneni odpopednost.
Troubu je mozné umistit do vysisi pozice ve skrini nebo pod pracovni desku. Pfreusazenim na misto musite zajistit dobre vetrani v prostoru trouby, aby bo lo umozneno dostatecn proudeni cerstveho vzduchu potfebnego pro chlazeni a ochranu vinitnich casti.Vyvtorte otvory uvedenayposledni strane podle typu usazeni.
1.5 Nakladání s odpady a ochranaŽivotniho prostředí
Tento spotbreic je oznacen v souladus evropskou smernici 2012/19/EU tykajici se likvidace oppadu z elektrickeho a elektronickeho zafrzeni (OEEZ). OEEZ obsahuje zneciustujici latky (ktere mohou mit negativni dopad na zivotni prostfedi) i zakladni prky (ktere lze znovu pouzit).Je dulezite,aby OEEZ prosel specifikymi upravami, a zneciustujici latky tak byly spravné
odstrány a zlikvidovány, a aby byly obnoeny vsechny materiały. Jednotlivc mohou hrát duležitou roli pri zajistovani toho, aby se OEEZ nestal zátež pro zivotn prostředí. Je nezbytné doržovat nekolik základnich pravidel:
-
OEEZ se nésmí likvidovat jako domovní odpad;
-
OEEZ by mél byt odvezen do vyhrazenych sbernych oblasti spravovanych městskou radou nebo registrovanou spoletcnosti. Pro objemny OEEZ mohou byt v mnoha zemich k dispozici sbery z domacnosti. Pri zakupeni noveho spotrebice lze vratit stary spotrebic prodejci, ktery je povinen jej Jednorazove bezplatne prijmout,Pokud je spotrebic obdobného typu a ma stejné funkce jako zakupeny spotrebic.
OCHRANA A RESPEKTOVÁNÍ ZIVOTNIHO PROSTREDI
Pokud je to mozné, vyhněte se predehrívani trouby a vždy se ji snažte naplinit. Otevirejte dvířka trouby tak zridka, jak je to Jen mozné, protoze teplo z dutiny se pri kázdem otevérirozptyluje.
Chcete-li dosaahnout vyznamne uspory energie, vypnete troubu 5 až 10 minut pfed planovanym ukoncenim doby vareteni a pouzijte zbytkové teplo, ktere trouba dale generuje. Tseseni udrzujte v cistote a v dobrem stavu, aby se zarbanilo rozptlyu tepla mimo dutinu. Pokud mate smlouvu na dodavku elektiny s hodinovym tarifem, program "odlozene vareteni"dale zjednoduuse uporu energie posunutim zaćatu procesu vareteni na dobu snizeneho tarifu.
1.6 Prohlášení o shodě
Umisténim značky na tento vyrobek potvrzujeme shodu se vsemi prisluşnymi evropskymi požadavy na bezpečnost, ochranu zdrav iživotniho prostředi, které jsou stanovené v právnich predpisech platněch pro tento vyrobek.
Skupina Candy Hoover Group tímtó prohlăsju, Že tento spotřebic oznaceny je C v souladu se základnimi požadavyk směrnice 2014/53/EU.
Chcete-li obdržet kopii prohlášeni o shodě, kontaktujte prosim vyrobce na adrese: www.candy-group.com.
2. Popis vyrobku
2.1 Přehled
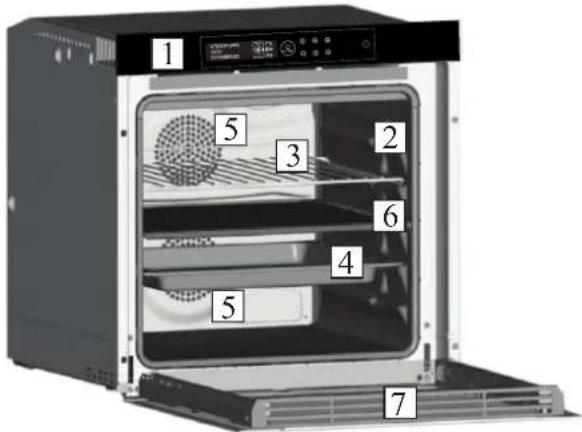
- Ovladaci panel
- Pozice
- Kovový rost
- Odkapávací plech
- Ventilator (za ocelovou deskou)
- Přepážka
- Dvifka trouby
2.2 Príslušenstvī
1 Odkapávací plech
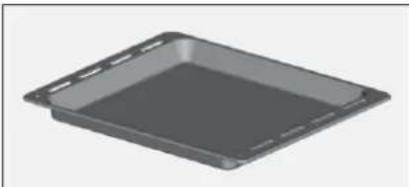
Shromažduje zbytky, které odkapavaji během pečeniPokrmu na rostech.
2 Kovovy rost
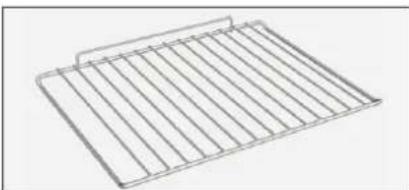
Drží pečici plechy a talíř.
3 Pře pážka

Prepazka rozděluje troubu na dva vnitři prostory. Oddeluje horni a dolní vnitří prostor v pripadě, ze chcete použít troubu v duálnim režimu.
Poznamka: Musi se používat ve třeti pozici.
Varovani: Nikdy nenechávejte prepažku uvnitř trouby, když je zapnutý pyrolytický režim.
4 Osvetleni LED
Jedna se o osvetlovaci system, ktery nahrazuje tradični „žárovku". Ve dvirkach je vestaveno 14 svetel LED (plati pro nepyrolyticke varianty). Vyvtáreji vysoce kvalitní osvetlení, které umoznjuje jasně sledovat vinitřek trouby ve všech pozicích bez jakychkoli stinú.
Vyhody:
Tento systém nejen zajistuje vnikajici osvetleni vnitfku trouby, ale také vydrzi déle než tradicni zarovka, snaze se udrzuje a predevsim šetri energii.
- Optimánlí sledovan
-Osvétlenísdlouhouživotnosti
Velmi nizka spotbreba energia, nižsí o 95% ve srovnáns tradičním osvětlením.
2.3 První použití
PREDBEZNÉ CISTENI
- Pred prvnim pouzitim troubu yvciistete.
- Otrete vnejisi povrchy vlhkym mekkym hadrikem.
-
Umyjte všekere príslušenstvi a vytrete vnitrek trouby roztokem horké vody a myciho prostředku na nádobi.
-
Nastavte prázdnou troubu na maximálí teplotu a ponechte ji zapnutou zhruba po dobu 1 hodiny. To odstrani veškéré zapachy novosti.
2.4 Používáni funkci Keepheat
UDRžOVÁNÍ
Vstupte do rezimu Manuál, abyste získali pristup k volbě rezimu udržováni.
Podrobnějši informace o udžováni majdete v kapitolách 3.11 a 3.12.

Obrazek 1
Aby byly zaruceny vsechny vyhody udrzovani a prinosy pro spotrebu, vyzyvame vaskahlendnuti do dodané stručné píručky, vizrajdete konkrétni požadované teploty pro jaknotlivi tepy potravin a režimi udrzovani a sterilizace. Nejzdravějsi, nejbezměnejsi a nejlepsi udrzovaniPokmú je podminěno dodržovám těchto krokú:
- Použijte funkci „Sterilizace" ke sterilizaci nádob*
- Naporcujte uvaene potraviny
- Zabalte potraviny do vhodnych sterilizovanych nadob nebo vakuovych sáčkú**
- Vyberte nejvhodnejsi funkci podle typovotrav***
- Spustte udrzovani*
- ZkonzumujtePokrm*
POZNÁMKA:
Sterilizačni režimi: obsahuji také tipy a triky.
- Sterilizace se musi používat pouze v režimu poloviny vinitriho prostoru.
** Nadoby se mohou lisit podle typ potravin. Konkrétne: - Tekute nebo polotekutePokrmy (napr. polevky): pouzivejte pavne nadoby jako sklenice a Pokryjte povrch trochou oleje. Snižte objem obsazeny tekutinou na minimum. Jinak lze pouzivat vakuové sácky. Sada sous-vide s prišlùsnou uživatelskou priručkou se dodáva pouze s určitymi modely vyrobku.
TvarnePokmy (napr.lasagne,kolace):pouzivejte hermeticky zakryte pekace,plechy nebo nadoby. - PevnéPokrmy (napr. maso, ryby): používejte pouze vakuové sácky. Vyhněte se udržovani pevnychPokrmu căstecné ponořenčv tekutině. PevnéPokrmy a tekutiny je nutné udržovat odděleně a potom je smichat.
- SuchéPokrmy: používejte vakuové sáčky.
TIP:
*** Doporučuje se udržovat maso, obiloviny a lušěniny pri 70 °C (udržovani + změknuti), věchny ostatniPokrzypri 63 °C (funkce udržovani).
VAROVÁNÍ:
*** Neudržujte špenát.
- Pamatujte, ze zelenina a upecené pečivo se musi udržovat jen několik dnu.
- Doporucjeme predehrivat troubu 20 minut.
**** Pokrm Ize zkonzumovat.
- Okamžité: pamkrn byzalen ihned po upečeni, je stale teplý a bude udržován v troube po krátkou dobu pred konzumaci. Do 4 hodin ho dokonce neni nutné vubec balit.
- Po minimálne 4 hodinách v troube: studéné jidlo je již udržovANO ve vakuovych sáčich.
- Po minimálne 5 hodinách v troube: studenté jidlo je udržováno, není ve vakuovych sáčcích.
- Po 1 týdnu: jidlo je upečeno, správně zabaleno a udržováno v troube.
-V pripadé vypadku napajeni Ize jidlo zkonzumovat do jegne hodiny. Po jegne hodiné je nutné resetovat troubu od zaćátku.
PECENI + UDRZOVANI
- Použijte funkci „Sterilizace" ke sterilizaci nadob
- Naporcujte surové ingredience
- Zabalte potraviny do vchodnych sterilizovanych nadob nebo vakuovych sáčku
- Vyberte funkci, Pečeni + udžovani podle typu potravin*
Obrazek 2
- Nastavte dobu pečeni
- Spustte cyklus pecni
- Po uplynuti doby pečeni se spotbrebić automatický prěpne do režimu udržovani
- ZkonzumujtePokrm
- Doporučuje se k pečeni masa a lustěnin.
KALIBRACE
Kalibrace je proces určeny pro funkci Keepheat, který umoznije ořěit správnou funkčnost teplotní sonyd.
POZNÁMKA:
- Pokud trouba funguje správné, na displeji se zobrazi „CALIBRATION OK" (Kalibrace v pořádku).
- Kalibračni cyklus lze provadět kdykoli, ale po určitěm počtu cyklu pečeni se pri volbě nabídky režimu ydržováni na displeji zobrázi prěkryvné okno s textem "DOPORUCENA KALIBRACE".
3. Použití trouby
3.1 Popis displeje

ZAP/NYP ① → Timto tlačitkom troubu zapneta vypnete.
3.2 Nastavení produktu
- Pri prvnim spusteni je nutné dodržet proces instalace, aby bylo możné troubu použit. Stiskněte tlacitko ON/OFF (ZAP/VYP) aPokračujte. (Obrázek 3)

Obrázek 3
-Vstupte do sekce nastaveni a vyberte jazyk z rozbalovaci nabidky. (Obrazek 4)

Obrazek 4
- Stiskněte tlačitko OK a pokračujte. (Obrázek 5)

Obrázek 5
- Nastavte Čas stisknutim tlacitek PLUS a MINUS. Stiskněte tlacitko OK aPokračujte. (Obrázek 6)

Obrázek 6
- Proces instalace je dokončen.
Stiskněte tlacitko OK, poté prejdete na domovskou stranku a začněte troubu používat. Dalási podrobnosti naleznete v príslušné rychlém prúvodci.
3.3 Prooz v manuálím režimu
- Stiskněte tlacitko OK, kdyz je šipka na displeji na volbě MANUAL (MANUAL), a nastavte vařeni ve 3 Jednoduchych krocích. (Obrázek 7)
- Vestlige je trouba vypnutá, na displeje se objeví hodiny. Když není trouba zapnutá, jsou k dispozici vsechny funkce kromě doby vařeni a konce vařeni.
-
Pokud nejsou hodiny nastaveny, trouba nefunguje: dispiej bliká aukazuje "12:00".
-
Vyberte požadovaný režim vařeni stiskutím tlacitka OK, když je šipka na displeji na požadované funkci. Stiskutím tlacitka DOLU zobrazite všechny dostupné funkce. (Obrázek 8)

Obrazek 8
- Stiskutim PLUS nebo MINUS vyberte požadovanou teplotu u vybrane funkce. Stiskněte tlacitko OK aPokracujte, nebo stiskněte tlacitko ZPET a vratte se k vyberu funkci vařeni. (Obrázek 9)

- Stisknutim tlacitka DOLU zmenite dobu vareni. To Ize provest stisknutim tlacitek PLUS a MINUS, kdyz je sipka na displeji na kartedURATION (TRVAN). Stisknete tlacitko OK a spustte vareni, nebo stisknete tlacitko ZPET a vratte se k nastaveni teploty. (Obrazek 10)
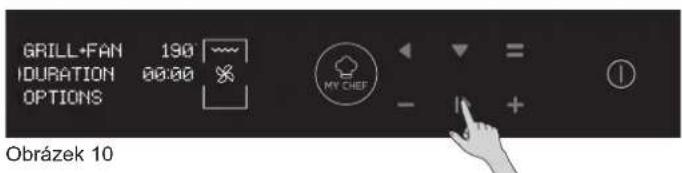
-Vrámci volby OPTIONS (MOZNOSTI) Ize:
vyloučit predehřev,
- nastavit konec doby vafeni.
- Bēhem pečeni muzete:
upravit teplotu,
- změnit dobu vařeni.
- stisknout tlačitko STOP a vařeni ukončit.

Obrázek 11
3.4 Ovladani v rezimu Recepty
Viz kapitola 3.12 Recepty.

Obrázek 12
3.6 Ovladani v rezimu Muj šefkuchař
Viz kapitola 3.7 Popisy funkci.

Obrazek 14
3.5 Ovladani v rezimu Speciálni funkce
Viz kapitola 3.9 Režimi przypravy.

Obrazek 13
3.7 Popisy fungkci
| FUNKCE | POPIS |
| DÉTSKÍ ZÁMEK Po vstupu do nabídky nastavení z úvodní strányk lze pomoci títo funkce uzamknout troubu, když je vypnutá. Když je nastaven dětský zámek, svítí tato ikona. | |
| SONDA DO MASA Pokud je zjiistěna sonda do masa (signalizována hlásením Informace o systému), rozsvítí se tato ikona a jakýko probíhajici program pečeni se zastavi. Pokud je sonda do masa vyjmuta v prúběhu programu pečeni, program se zastaví a provede se návrat do úvodní nabídky. | |
| ONE-FI Z úvodní strányk vstupte do nabídky nastavení. Pomoci títo funkce lze nastavit Wi-Fi. POZNÁMKA: Viz príslušná kapitola 3.8 Funkce Wi-Fi. | |
| DVA VNITRNI PROSTORY (podsviceno): Pomoci tohoto tlacítka lze vybrat horní nebo dolné vnitřné prostor v prípadě, ze je v komořezasunutá prěpážka. | |
| MÜJ ŠÉFKUCHAR V prípadě, ze trabba není vypnutá nebo nepeće, lze pomoci tohoto tlacítka vstoupit do specialníní nabídky, kde jsou položky: ·“MOJE RECEPTY” (toto jeseznam uložených receptů, max. 5; pokud není uložen zhádný recept, na Černém displeji se zobrazují znaky „---“) ·“MÜJ PRÜVODCE” (toto je posledné program prijátý aplikác; pokud nebyly prijátý zhádné programy, na Černém displeji se zobrazují znaky „---“) ·“NAPOSLEDY POUŽITO” (toto je posledné použitý program pečeni lišić se od udržovacích programů; pokud není uložen zhádný program, na Černém displeji se zobrazují znaky „---“) |
Trouba H-KEEPHEAT ma moznost pripojen a diky dalsim pripravenym tipum a radam je dispozici bezpoct inovativnich funkci pro pecenia udrzovani potravin.
Ziskjepte pristup k pripravenym receptum pro peceni nizkych teplotach
Vstupte do nabidky Muj šefkuchař a ziskje tvice než 150 dalšich receptu
Ovladeje treetbu H-KEEPHEAT
Podrobnjsi informace najdete v pfrisusne strucne priruce na nasledujicim odkazu: http://go.candy-group.com/hoover-ov.
PARAMETRY BEZDRÁTOVÉHO PRENOSU
| Parametr Specifikace ( | Wi-Fi) | Specifikace (Bluetooth) |
| Bezdrátoy standard | 802.11 b/g/n | Bluetooth v4.2 |
| Frekvenčné rozsah | 2,412 GHz. - 2,484 GHz | 2,412 GHz. - 2,484 GHz |
| Maximálné vysilác výkon | 802.11b. DSSS 1 Mbps= +19.5 dBm | Základné rychlost prěnosu dat: RF vysilác výkon (typ): +4 dBm Zvýşená rychlost prěnosu dat: RF vysilác výkon (typ): +2 dBm BLE: RF vysilác výkon (typ): +7,5 dBm |
| 802.11b. CCK 11 Mbps= +18.5 dBm | ||
| 802.11g. OFDM 54 Mbps= +18.5 dBm | ||
| 802.11n. MCS7= +14 dBm | ||
| Minimálné príjímáci citlivost | 802.11b =1024 bytes -80 dBm | Základné rychlost prěnosu dat: Citlivost@ 0,1 % BER: -98 dBm Zvýşená rychlost prěnosu dat: Citlivost@ 0,01% BER: -98 dBm BLE: Citlivost@ 0,1 % BER: -98 dBm |
| 802.11g =1024 bytes -70 dBm | ||
| 802.11n =1024 bytes -65 dBm | ||
| 802.11n HT40 =1024 bytes -65 dBm |
| Informace o produktu pro zařizeni v situ | |
| Spotřeba energie produktu v sitovém pohotovostnim režimu, tokud jsou prípojeny všechny porty kabelové sítě a všechny porty bezdrátové sítě jsou aktivováncy: | 2,0 W |
| Jak aktivovat port bezdrátové sítě: | Přejděte na nastavení -> ONE-FI -> • Pokud se na displeji zobrazi ONE-FI RESET (OBNOVENÍ ONE-FI) (znamená to, ze trouba není zaregistrována, modul Wi-Fi je vypnutý a uživotel můž spustit pouze novou registraci) Stisknéte tlačitko potvrzení▶. Modul Wi-Fi je zapnutý a ikona Wi-Fi bliká, prěcemž 1 s svítí, 1 s nesvití. • Pokud se na displeji zobrazi ONE-FI OFF (ONE-FI VYPNUTO) (znamená to, ze trouba je zaregistrována, ale modul Wi-Fi je vypnutý). Stisknutím šipky nahoru nebo dolů prepněte na ONE-FI ON (ONE-FI ZAPNUTO) a stisknéte tlačitko potvrzení▶. Modul Wi-Fi je zapnutý a ikona Wi-Fi ståle svítí. |
| Jak deaktivovat port bezdrátové sítě: | Přejděte na nastavení -> ONE-FI -> • Pokud se na displeji zobrazi ONE-FI READ ONLY (ONE-FI POUZE KE ČTENÍ) (znamená to, ze trouba je zaregistrována a modul Wi-Fi je zapnutý). • Stisknutím šipky nahoru nebo dolů prepněte na ONE-FI OFF (ONEFI VYPNUTO) a stisknéte tlačitko potvrzení▶. Modul Wi-Fi je vypnutý a ikona Wi-Fi není zobrazena. |
Rychly pruvodce pro troubu Hoover - registrace pomoci aplikace
Postup pro zařizení stechnologii Bluetooth 4.0 (nebo vyšši) DULEZITÉ
Tento rychly pruvodce znázornuju kroky, které je třeba provest pro zaregistrovani vašeho spotřebrice v applikaci Hoover Wizard pomoci zařizení s technologii Bluetooth 4.0 (nebo vyssí). V tomto pripadě je postup zjednodušený a rychlejsi (snadna registrace). Pokud použiváte zařizení bez technologie Bluetooth (nebo verzi nizsí než 4.0), postupujte podlePokynu popsanych v dalí Časti.
KROK 1
- Poznačte si seriove cislo spotřebie.
- Poznacte si nazev Wi-Fi a heslo (klic WPA/WEP), ktere se obvykle nachazeji na zadni strane Wi-Fi routeru. POZNÁMKY
- Frekvence domáci site Wi-Fi musi byt nastavena na pásmo 2,4 GHz. Pokud je vase domáci sít nastavena na pásmo 5 GHz, nebude moźne spotřebic nakonfigurovat.
- M ate-li potiže s nalezenim hesla WPA/WEP, obratte se na sveho poskytovatele internetu.
Zkontrolujte, zda je văš chytrý Telefon prípojen ke stejné síti Wi-Fi a zda je u něj v Časti „Settings" (Nastavení) povoleno rozhraní Bluetooth. Dališ podrobnosti naleznete v přirucce.
KROK 2
- Stáhněte si z obchodu aplikaci Hoover Wizard.
- Spustte aplikaci Hoover Wizard a vytrofte svuj uživatelský profil klepnutim na „Register" (Registrovat). Přijměte zásady ochrany-Speedůnich udajú a vyplné požadovaná pole. POZNÁMKY
- Aplikace je k dispozici pro zařizeni Android (verze 4.4 nebo vyssí) a iOS (verze 8.0 nebo vyssí).
- Pokud již mate uživatelský profil Hoover Wizard, mužete se prihlásit pomoci svych prihlasovacích udajú.
KROK 3
- Na uvodni strancé klepnutim na ikonu se třemi pruhy v levém hornim rohu vstupte do svého profilu, potě klepněte na „REGISTER NEW APPLIANCE" (REGISTROVAT NOVÍ SPOTREBIC) a vyberte název produktu, který chcete zaregistrovat.
KROK 4
Zadejte datum nakupu vaseho spotbrebié (DD/MM/RRRR), poté klepněte na „Proceed“ (Pokracovat).
KROK 5
Vlozte 16 cislic sérióvho cisla nebo naskenujte QR kód na spotbrebiči. Klepnéte na „Next" (Dalši). Zkontrolujte správnost udajú a klepnéte na „Confirm" (Potvrdit). Jakmile systém Rozpozná produkt, klepnéte na „Next" (Dalši).
KROK 6
1) Klepnete naikonu ONE-FL.
2) Nastavte troubu na ONE-FI RESET (OBNOVENI ONE-FI) (trouba pipne).
3) Ikona Wi-Fi bude blinkat.
V aplikaci - klepněte na „Confirm" (Potvrdit). Počejtte, až se aplikace prípoji ke spotřebici.
POZNÁMKY
- Registrace musi byt dokonçena do 5 minut.
- V pripadé jakéhokoli problénu klepnéte na „Retry" (Opakovat) a ujistěte se, ze jste v zařizení (chytrém Telefonu / tabletu) povolili Bluetooth. Pokud proces jestě nebyl správně dokončen, klepnéte na „Proceed with Standard Enrollment" (Pokracovat standardní registrací).
- Aby byl zajistén správný prenos dat, doporučujeme vám zústat se zařazenim v blizkosti spotřebice.
KROK7
Vložte heslo své domáci sítě Wi-Fi.
- Vyberte typ hesla (WEP nebo WPA), poté klepněte na „Confirm" (Potvrdit).
- Proces registrace je nyní dokončen.
POZNÁMKY
- Pokud neni automaticicky synchronizován aplikác, vlozte do prvního pole název své domáci sítě Wi-Fi; věnujte pozornost rozdilu mezi malými a velkými pismeny.
POKUD NASTAVENI NENI USPEŠNE
Je dulezite zajist Dobrou silu signalu Wi-Fi mezi domacim routerem a spotbreicem: nizka sila signalu Wi-Fi by zpu sobila selhani posledni faze nastaveni. Abyste posoudili, zda se jegna o tento priad, spustte proce pripojen znovu od kroku 1; kdyz se dostanete ke kroku 6, umistete sv zaifzeni (chytry Telefon nebo tablet) vedle routeru a vhyhdeje tsi,WIFIOVEN-xyzk" vtvorenou spotbreicem. Pokud se neobjev jaka jegna z moznosti, znamento, ze router nevidi spotbreic. V toto pripad velemi dopurucujeme, abyste router premistili blizko ke spotbreici (pokud je to mozné), nebo se obratte na svheho poskytovatele internetu ohledne porizenik kompatibilniho prodlužovace dosahu Wi-Fi ke zvyşeni sily signalu.
Režim dalkového ovladani
Klepnete na ikonu ONE-FL.
- Nastavte troubu na ONE-FI ON (ONE-FI ZAPNUTO) (trouba pipne).
- Ikona Wi-Fi bude blikat.
Rychly pruvodce pro troubu Hoover - registrace pomoci aplikace
Postup pro zařizení bez technologie Bluetooth 4.0 (nebos verzi nižsí než 4.0)
DULEZITE
Tento rychly pruvodce popisuje kroky, ktere bye ste meli provest pro zaregistrovani vaheho spotbrebiče pomoci aplikace Hoover Wizard s vyuzitim zařizení bez technologie Bluetooth. Doporučujeme, abystePokračovali schytrém Telefonem / tabletem vybavenýmtutto technologii, aby byl postup Jednoduší.
KROK 1
- Poznameneije si seriove cislo spotrebice a nazev Wi-Fi a heslo (klic WPA/WEP), ktere lze obvykle nalezt na zadni strane Wi-Fi routeru.
Zkontrolujte, zda je váschytrý Telefon / tablet pripojen ke stejné siti Wi-Fi.
POZNAMKY
- Frekvence domáci site Wi-Fi musí byt nastavena na pásmo 2,4 GHz. Pokud je vase domáci sít nastavena na pásmo 5 GHz, nebude moźne spotřebic nakonfigurovat.
- Máté-li potiže s nalezenim hesla WPA/WEP, obratte se na svého poskytovatele internetu.
KROK 2
- Stáhněte si z obchodu aplikaci Hoover Wizard.
-
Spustte aplikaci Hoover Wizard a vytvorte svuj uživatelský profil klepnutím na „Register“ (Registrovat). Prijměte zásady ochrany osobnich udajú a vyplné požadovaná pole. POZNÁMKY
-
Aplikace je k dispozici pro zařizeni Android (verze 4.4 nebo vyšsí) a iOS (verze 8.0 nebo vyšsí).
- Pokud jiz mate uživatelský profil Hoover Wizard, mužete se přilásit pomoci svych prihlásovacích udajú.
KROK 3
- Na uvodni strancie klepnutim na ikonu se tremi pruhy v levem hornim rohu vstupte do sveho profilu, pote klepnete na "REGISTER NEW APPLIANCE" (REGISTROVAT NOVY SPOTREBIC) a vyberte nazev produktu, ktery chcete zaregistrovat.
KROK 4
Zadejte datum nakupu vaseho spotbrebece (DD/MM/RRRR), poté klepněte na „Proceed" (Pokracovat).
Vlozte 16 cislic seriovho cisla nebo naskenujte QR k od na spotfebici. KlepneTe na "Next" (Dalsi). Zkontrolujte spravnost udaju a klepneTe na "Confirm" (Potvrdit). Jakmile system Rozpozná produkt, klepneTe na "Next" (Dalsi).
KROK 5
1) Klepněte naikonu ONE-FL.
2) Nastavte troubu na ONE-FI RESET (OBNOVENI ONE-FI) (trouba pipne) a počejtje 5 minut.
3) Ikona Wi-Fi bude blikat.
Vaplikaci - klepnete na,Confirm" (Potvrdit). POZNÁMKY
- Registrace musi byt dokoncena do 5 minut.
- Aby byl zajistén správný prenos dat, doporučujeme, abyste zustali se zařazenim v blízkosti spotřebače.
KROK 6
- Ukoncete aplikaci Hoover Wizard.
- Prejdtete do nastaveni Wi-Fi site zaizeni.
KROK7
VseznamudostupnychWi-Fi siti vyberte"WIFIOVEN-xyzk". POZNAMKY
- Pokud ji nenajdete, počejte jestě pár sekund, nebo proved'te nové vyhledání.
KROK 8
- Ukoncete rezim nastaveni svheo zaifeni.
Vratte se do applikace Hoover Wizard a pockejte, dokud applikace nedetekuje vash spotrebič. - Jakmile se objevi obrazovka „Wi-Fi Network is active" (Sit' Wi-Fi je aktivni), klepněte na „Next" (Dalši).
KROK 9
Vložte heslo své domáci sítě Wi-Fi.
- Vyberte typ hesla (WEP nebo WPA), poté klepněte na „Confirm" (Potvrdit).
POZNAMKY
- Pokud není automaticy synchronizován aplikác, vložte do prvního pole název své domác sítě Wi-Fi; věnujte pozornost rozdilu mezi malými a velkými písmeny.
KROK 10
- Pockejte až do konce procesu prénosu dat mezi aplikaci a produktem, poté klepněte na „Confirm“ (Potvrdit). Na displeji spotřebie se zobraź „CONNECTED“ (PRIPOJENO) a poté „REMOTE CONTROL ON“ (DALKOVÉ OVLÁDÁNÍ ZAPNUTO).
- Proces registrace je nyní dokončen.
POKUD NASTAVENI NENI USPEŠNE
Je duležite zajistit dobrou silu signalu Wi-Fi mezi domácim routerem a spotřebicem: nizka sila signalu Wi-Fi by zpusobila selhání posledné fáze nastavení. Abyste posoudili, zda se jegnó o tento prípad, spustte proce pripojeni znovu od kroku 1; když se dostanete ke kroku 5, umistěte své zařizení (chytrý Telefon nebo tablet) vedle routeru a vyhledje tít „WIFIOVEN-xyzk" vytrorenou spotřebicem. Pokud se neobjevi jaká jesta z moznosti, znamená to, ze router nevidi spotřebic. V toto prípadě velmi doporučujeme, abyste router premistili blízko ke spotřebici (pokud je to moźné), nebo se obratte na svého poskytovatele internetu ohledné pořízení kompatibilního prodlužovace dosahu Wi-Fi ke zvyšeni sily signalu.
Režim dalkového ovladani
- Klepněte na ikonu ONE-FL.
- Nastavte troubu na ONE-FI ON (ONE-FI ZAPNUTO) (trouba pipne).
- Ikona Wi-Fi bude blikat.
3.9 Režimi přípravy
| Doporučená teplota °C | Funkce (závisí na modelu trouby) | Celý vinitřni prostor | Horní vinitřni prostor | Dolní vinitřni prostor |
| L3 | GRIL: použiveje gril se zavřenymi dvířky. Horní topné těleso se používa samostatné a muzete upravovat teplutu. Rozžhaveni těles do ruda vyžadujé pět minut přeðřiváni. Üspěch je zaručen pro grilovanéPokorny, kebab y gratinovanéPokorny. Bile maso se umístůte dále od grilu; doba pečeni je delísi, ale maso bude chutnéjsí. Tmavé maso a rybi filety muzetePokládat na rost nad odkapávací plech. | √ | ||
| 180°C | VICEUROVNOVÉ: Tato funkce umozžnju seoucasné pečeni rúznychPokrmùvjdné nebo vice pozicich. Teplo proníká doPokrmu lpea zkrátse také doba pečeni a přeðřevu. Tato metoda pečeni zajístůte lepsí distribucítepla a zabražuje smiseni vūní. Při současném pečeni vicePokrmùlastavte o deset minut delí dobu. Tato funkce je vchodná zejměna pro gratinováni a lasagne (200 °C). | √ √ √ | √ | |
| 230°C | STATICKÍ + VENTILÁTOR: Tato funkce zajístůte lepsí distribucítepla díky kombinaci ventilátoru a topněch těles. Díky asistované distribucítepla zaručujete tato funkce homogenni vysledek pečeni, proto je ideálni pro pečivo, napřiklad chléb, pizzu a focacciu. | √ | ||
| 160°C | SPODNÍ OHřEV: Použivání spodniho tělesa. Ideálni k pečeni veškerého pečiva. Tuto funkci použivejte pro koláče, kyse, dortíky, pašíky a jakékdli pečeni, které vyžadujévice pepla zespodu. | √ | ||
| 170°C | SPODNÍ OHřEV + VENTILÁTOR: Spodní topné těleso se používa spelečné s ventilátorem zajístujícím cirkulaci vžduchu uvníť trouby. Tato funkce je ideálni pro koláče, dorty a croissanty. Zabražuje vysoušeniPokrmu a podporuje kvašeni, aby byl vysledek dokonalý. Umistěte rost do dolní pozice. | √ | √ | |
| 180-200 °C160-170 °C | *STATICKÍ: Tato funkce vyžíva jak vrchní, tak dolní topné těleso. Přeðehřivejte troubu po robu zhruba deseti minut. Tato metoda je ideálni pro veškeré pečeni maso (180/200 °C) a ryby (160-170 °C). UmistětePokrm a跟他 námobu na rostu do střední pozice. | √ | ||
| 210°C | ROZMRAZOVÁNÍ: Ventilator zajístůte prouděné vžduchu oPokojové teploté kolem zmrzléhoPokrmu a tak jej za několik minut rozmrazi bez toho, aby se jakkoli zmeñil obsah proteinú vPokrmu. | √ | ||
| 40°C | KYNUTI: Díky velmi jemnému ohřevu vinitřniho prostoru zajístůte tato funkce kynutí chleba nebo pečiva během pečeni. | √ | ||
| 200°C | GRIL + VENTILÁTOR: používejte turbo gril se zavřenymi dvířky. Horní topné těleso se používa spelečné s ventilátorem zajístujícím cirkulaci vžduchu uvníť trouby. Přeðehřev je nezbytný u tmavého masa, ale nikoli u bileho masa. Ideálni pro pečeniPokrmu o vlíké tloušte, celych kusú jak je pečené vegřové, drübež atd. UmistětePokrm určěnyke grilováni přimo do středu rostu ve střední pozici. Zasuťte pod rost okkapávací plech pro zachyceni stáv. Zajistěte, aby nebylPokrm přilíš blízkó u grilu. V polovině pečeniPokrm obratte. | √ √ | √ | |
| 180°C | *MASTER BAKE: Tato funkce umozžnju prípravovatPokrmy zdravěji tak, ze snížuje potřeboné množstvi tuku nebo oleje. Kombince topněch těles s cyklem pulzujiciho vžduchu zaručujé dokonalý vysledek pečeni. Tato funkce je vchodná zejměna pro gratinováni. | √ |
- Testovano podle normy EN 60350-1 pro učely prohlášeni o spotřeba energia a stanoveni energetické třidy.
3.10 Režimi funkce Keep Heat
| Přednastavená teplota °C | Funkce KEEPHEAT (závisí na modelu trouby) | Celý vinitřné prostor* | Horní vinitřné prostor** | Dolní nvitřné prostor*** |
| 63 | UDRžOVÁNÍ: Tato funkce umožnjue udržovat všechnyPokrmy, napřiklad maso, ryby a lušěniny. | ✓ | ✓ | |
| 70 | UDRžOVÁNÍ + ZMÉKNUTÍ: Tato funkce umožnjue udržovat tučné maso, obiloviny a lušěniny; zvyšuje jegich měkkost a štavnatost. | ✓ | ✓ | |
| 70 + 63 | PEČENÍ + UDRžOVÁNÍ: Tato funkce umožnjue peci pri nižsí teplotě, Čímž zajistůte měkkost a štavnatostPokrmú (zejména masa), a automatické prepnúť na udržovány. | ✓ | ✓ | |
| 121 (po dobu 15 min) | STERILIZACE: Tato funkce je nutné před udržováním a umožnjue sterilizovat sklenice. | ✓ | ✓ |
- Chcete-li pouzǐ cel y vinitīn prostor, vyjměte z trouby prepažku.
- Chcete-li pouzit polovinu vnitriho prostoru, vlozte do trouby prepazku. Rozdil mezi teplotami horniho a dolniho vnitriho prostoru se muze lisit od 160^ do 240^ .
POZNÁMKY:

Obrazek 15
Funkce Keep Heat jsou k dispozici pouze pro funkce s polovinou vnitriho prostoru.
- Chcete-li je použit, vložte do trouby prépážku.
- Počkejte, než se na displeji zobraź polovina vnitřinho prostoru, jak je znázorněno na obrázku 15.
- Na obrazovce stiskněte tlacitko Dva vnitřni prostory, abyste vybrali prostor pro spustěné režimu udržováni.
Potom spoustejte jakekoli funkce Keep Heat, jak je popsano v kapitole 3.3 Ovladani v rezimu Manual.
3.11 Pokyny pro udržovani
| KATEGORIE PRODUKTU | POTRAVINY | DOPORUÇENÁ UKLADXACI TEPLOTA | DOPORUÇENÜ OBAI | DOPORUÇENİ |
| Bilé maso | Grlovaná kućci prsα | 70 °C | Vakuvov sáček | Prid pflirjavou osoite |
| Dušené kuće | 70 °C | Vakuvov sáček | Pokud je mnho fíravy, přemistěte ji do samostnatného sáčku | |
| Kufeci stehna na bilém viné | 70 °C | Vakuvov sáček | Pokud je mnho fíravy, přemistěte ji do samostnatného sáčku | |
| Kruti kostky v omáčice | 70 °C | Vakuvov sáček | Pokud je mnho fíravy, přemistěte ji do samostnatného sáčku | |
| Veprov fízky | 70 °C | Vakuvov sáček | Rozdělte platýmasa do nikolíka sáčku, aby se piliš nepřékrývaly | |
| Dušené veprové | 70 °C | Vakuvov sáček | Pokud je mnho fíravy, přemistěte ji do samostnatného sáčku | |
| Veprov filt s bylinkami | 70 °C | Vakuvov sáček | Prid pflirjavou osoite | |
| Dušené klobásy | 70 °C | Vakuvov sáček | Pokud je mnho fíravy, přemistěte ji do samostnatného sáčku | |
| Vepová kložka | 70 °C | Vakuvov sáček | Pokud je mnho fíravy, přemistěte ji do samostnatného sáčku | |
| Dušené teleci | 70 °C | Vakuvov sáček | Pokud je mnho fíravy, přemistěte ji do samostnatného sáčku | |
| Teleci pečené | 70 °C | Vakuvov sáček | Prid pflirjavou osoite | |
| Teleci fízky | 70 °C | Vakuvov sáček | Prid pflirjavou osoite | |
| Teleci ossobuco | 70 °C | Vakuvov sáček | Pokud je mnho fíravy, přemistěte ji do samostnatného sáčku | |
| Teleci kložka | 70 °C | Vakuvov sáček | Prid pflirjavou osoite | |
| Dušené Šëbrinka | 70 °C | Vakuvov sáček | Prid pflirjavou osoite | |
| Tmavé maso | Dušené hovézi kousky | 70 °C | Vakuvov sáček | Pokud je mnho fíravy, přemistěte ji do samostnatného sáčku |
| Dušené hovézi | 70 °C | Vakuvov sáček | Pokud je mnho fíravy, přemistěte ji do samostnatného sáčku | |
| Hovézi pečené | 70 °C | Vakuvov sáček | Ochutte bylinkami a omezte sūl | |
| Dušené masové kuličky | 70 °C | Vakuvov sáček | Pokud je mnho fíravy, přemistěte ji do samostnatného sáčku | |
| Maso à la pizzaiola | 70 °C | Vakuvov sáček | Pokud je mnho fíravy, přemistěte ji do samostnatného sáčku | |
| Jehnčí svilová | 70 °C | Vakuvov sáček | Ochutte bylinkami a omezte sūl | |
| Pečené jehnčí kyta | 70 °C | Vakuvov sáček | Ochutte bylinkami a omezte sūl | |
| Dušené jehnčí | 70 °C | Vakuvov sáček | Pokud je mnho fíravy, přemistěte ji do samostnatného sáčku | |
| Kachni prsα | 70 °C | Vakuvov sáček | Ochutte bylinkami a omezte sūl | |
| Kachni stehno | 70 °C | Vakuvov sáček | Prid pflirjavou osoite | |
| Sekaná masová smës | 70 °C | Vakuvov sáček | Ochutte bylinkami a omezte sūl | |
| Bilé ryby | Filé z moškého okouna a la livomese | 63 °C | Vakuvov sáček | Pokud je mnho fíravy, přemistěte ji do samostnatného sáčku |
| Filé z moškého okouna na blém viné | 63 °C | Vakuvov sáček | Pokud je mnho fíravy, přemistěte ji do samostnatného sáčku | |
| Pražma na blíém viné | 63 °C | Vakuvov sáček | Pokud je mnho fíravy, přemistěte ji do samostnatného sáčku | |
| Dušené mošký das | 63 °C | Vakuvov sáček | Pokud je mnho fíravy, přemistěte ji do samostnatného sáčku | |
| Dušené olhne | 63 °C | Vakuvov sáček | Pokud je mnho fíravy, přemistěte ji do samostnatného sáčku | |
| Celà ryba | 63 °C | Vakuvov sáček | Prid pflirjavou osoite | |
| Pečené ryba | 63 °C | Vakuvov sáček | Prid pflirjavou osoite | |
| Grilovaná ryba | 63 °C | Vakuvov sáček | Nevklaïdeje do sáčku s rybou citrón, zhoříl by | |
| Grilované olhne | 63 °C | Vakuvov sáček | Prid pflirjavou osoite | |
| Skeble | Dušené sépie | 63 °C | Vakuvov sáček | Pokud je mnho fíravy, přemistěte ji do samostnatného sáčku |
| Vařené chobotnice | 63 °C | Vakuvov sáček | Vařte přimo ve vakuovém sáčku bez přidáváni vody | |
| Dušené chobotnice kadefava | 63 °C | Vakuvov sáček | Pokud je mnho fíravy, přemistěte ji do samostnatného sáčku | |
| Koryšl | Gamát na blíém viné | 70 °C | Vakuvov sáček | Zvystukuladaci lepiotu (viz tabulka) |
| Krevetová omáčka | 70 °C | Vakuvov sáček | Zvystukuladaci lepiotu (viz tabulka) | |
| Zelenina | Kvéták | 63 °C | Vakuvov sáček | Pečte s nikolíka kapkami octa, aby se snížila oxidace |
| Smažené cukety s Česnekem a petrželi | 63 °C | Vakuvov sáček | Pečte s nikolíka kapkami octa, aby se snížila oxidace | |
| Stefomohské sliadé papriky | 63 °C | Vakuvov sáček | Pečte s nikolíka kapkami octa, aby se snížila oxidace | |
| Smažené papriky s Česnekem a petrželi | 63 °C | Vakuvov sáček | Pečte s nikolíka kapkami octa, aby se snížila oxidace | |
| Brokolice | 63 °C | Vakuvov sáček | Pečte s nikolíka kapkami octa, aby se snížila oxidace | |
| Smažené artyčoky s Česnekem a petrželi | 63 °C | Vakuvov sáček | Pečte s nikolíka kapkami octa, aby se snížila oxidace | |
| Grilovaná zelénina | 63 °C | Vakuvov sáček | pred pflirjavou osoite | |
| Pečená dyné | 63 °C | Vakuvov sáček | pred pflirjavou osoite | |
| Gratinová zelénina | 63 °C | Vakuvov sáček | pred pflirjavou osoite | |
| Dušený hrášek | 63 °C | Vakuvov sáček | pred pflirjavou osoite | |
| Vafěné luktíniny | 63 °C | Vakuvov sáček | Dükladné zbavité vody z vafeni | |
| Dušené luktíniny | 63 °C | Vakuvov sáček | Pokud je mnho fíravy, přemistěte ji do samostnatného sáčku | |
| Vafěné obiloviny | 63 °C | Vakuvov sáček | pred pflirjavou osoite | |
| Kuskus | 63 °C | Vakuvov sáček | Dükladné zbavité vody z vafeni | |
| První chod | Polenta | 63 °C | Vakuvov sáček | Prid ulozenim upečte tsk, aby by pkom dostiSuchy |
| Vegetariánské livance | 63 °C | Vakuvov sáček | Kázdou porcji dego samostnatného sáčku, aby se předěsto přetženi | |
| Obilína kolače | 63 °C | Vakuvov sáček | Ochutte bylinkami a omezte sūl | |
| Bulgur | 63 °C | Vakuvov sáček | Ochutte bylinkami a omezte sūl | |
| Merlik | 63 °C | Vakuvov sáček | Ochutte bylinkami a omezte sūl | |
| Polévky | Luštěninová poálezka | 63 °C | Vakuvov nádoba | Jakmile naplinite nádobu, přidjeite na povrch trochu oleje, aby se snížila oxidace |
| Oblína poálezka | 63 °C | Vakuvov nádoba | Jakmile naplinite nádobu, přidjeite na povrch trochu oleje, aby se snížila oxidace | |
| Zeleninová poálezka | 63 °C | Vakuvov nádoba | Jakmile naplinite nádobu, přidjeite na povrch trochu oleje, aby se snížila oxidace | |
| Zeleninová poálezka se smetanou | 63 °C | Vakuvov nádoba | Jakmile naplinite nádobu, přidjeite na povrch trochu oleje, aby se snížila oxidace | |
| Luštěninová poálezka se smetanou | 63 °C | Vakuvov nádoba | Jakmile naplinite nádobu, přidjeite na povrch trochu oleje, aby se snížila oxidace | |
| Masový vývar | 70 °C | Vakuvov nádoba | Uchová si jemnou chuf, která se během skladováni koncentruje | |
| Zeleninový bujón | 63 °C | Vakuvov nádoba | Uchová si jemnou chuf, která se během skladováni koncentruje | |
| Ovoce | Pečená húška | 63 °C | Vakuvov sáček | Prid pečenim ochute kofenim a skofici |
3.12 Recepty
| Tradičné pečeni | ||||
| Název | Režim připravy | Teplota (°C) | Délka (minute) | Kategorie |
| Ryže se sépi a hráškem | statický | 200 | 20 | první chod |
| Pórkový kolák | statický | 175 | 40 | zelenina |
| Croissanty | statický + ventilálator | 200–180 | 5–10 | koláće |
| Quiche Lorraine | statický | 190 | 30 | první chod |
| Tarte tatin | statický | 220–180 | 15–30 | koláće |
| Rybi lasagne | statický | 190 | 20 | ryby |
| Pečená rajcata | statický + ventilálator | 200 | 30/40 | zelenina |
| Hovězí pečeně | statický | 200 | 90 | maso |
| Empanadas | statický | 200 | 15 | maso |
| Rolky z mečouna | statický | 180 | 8/10 | ryby |
| Pečeni prì nízkích teplotách | ||||
| Název | Režim prípravy | Teplota (°C) | Délka (minuty) | Kategorie |
| Salát z garnátú a manga | pečeni a udržování | 70 | 25 | první chod |
| Chobotnice s bramborem | viceúrovnové | 90 | 90 | první chod |
| Pyré z cuket a hrášku | viceúrovnové | 90 | 35 | zelenina |
| Noky se sýrem a pepřem | viceúrovnové | 100 | 12 | těstoviny a pečivo |
| Orecchiette s rajčaty a ricottou | viceúrovnové | 100 | 9 | těstoviny a pečivo |
| Mušle, fenykl a olivy | pečeni a udržování | 70 | 12 | ryby |
| Losos s citrusovým ovocem a záźvorem | pečeni a udržování | 70 | 14 | ryby |
| Mofský okoun s artyčoky | pečeni a udržování | 70 | 22 | ryby |
| Kachna s jalovcovými bobulemi | pečeni a udržování | 70 | 120 | maso |
| Středné propěcená telecí tagliata | pečeni a udržování | 70 | 20 | maso |
| Telecí s tuñákovou omáčkou | viceúrovnové | 80 | 120-40 | maso |
| Salát Caesar | viceúrovnové | 80 | 120 | zelenina |
| Slaná treska s paprikami a brokolicí | viceúrovnové | 80 | 30 | ryby |
| Orzotto s chřestem a šafránem | viceúrovnové | 90 | 90 | zelenina |
| Ratatouille | viceúrovnové | 80 | 45 | zelenina |
| Květáková panna cotta | viceúrovnové | 90 | 90 | zelenina |
| Kaše z dýně a mrkve | viceúrovnové | 90 | 40 | zelenina |
| Cukety s mátou | viceúrovnové | 80 | 30 | zelenina |
| Hrušky, Červené vino a skořice | viceúrovnové | 90 | 120 | koláče |
| Crème brûlée | viceúrovnové | 80 | 40 | koláče |
4. Čišění a udžba trouby
4.1 Obecné poznámky k cistěné
- Zivotnost spotrebice muzete prodlouzit prostrechnictvim pravidelnoho cisteni.
- Pred provaděním ručniho Čistěné počeje, až trouba vychladne.
VAROVÁNÍ:
- Nikdy nepouzivejte pri Čišěni brusné mycí prostředky, drátěnku nebo ostř prešemetry. Špredejete tak neopravitelnému poskození smaltovaných dlù.
- Používejte pouze myci prostředky na bázi vody, mydla nebo bělidla (čpavek).
SKLENENE DILY
Doporucje se cistit sklenene okno savou kuchynskou uterkou po kazdem pouziti trouby. Chcete-li odstranit odolnej'skvrny, muzete pouzit dobre vydimanou houbu napustenou mycim prostredkem a potom oplachnout vodou.
OKNO TROUBY
Je-li tésněni znečistěné, mužete jej vyčistit mirné navlhčenou houbickou.
PřÍSLUŠENSTVI
Prisluenstvi vycistete pred oplachovanim a susenim mokrou mydlovou houbickou: vyvarujte se pouziti abrazivnich mycich prostredku.
ODKAPÁVACÍ PLECH
Po pouziti grilu vyjmete plech z trouby.
- Nalijte na plech horky tuk a umyte jev horke vode pomoci houbicky a prostfedku na myti nadobi.
POZNÁMKY:
- Pokud stale ulpivaji mastne skvrny, ponorte plech do vody a myciho prostredku. Alternativne muzete plech umyt v mycce na nadobí nebo použit komerční saponát na trouby.
- Nikdy nedávejte znečistěný plech zpět do trouby.
4.2 Udrzba
DEMONTAZ DVIREK TROUBY
- Otevretecelnikokno.
- Otevreté svorky krytu závesu na pravé a levé straně Čelniho okna stlacenim směrem dolù.
3.Vratte okno zpét provedenim prédchoziho postupu v opacné poradi krokú.
DEMONTAZ A CISTENI SKLENENYCH DVIREK
- Otevretedvirka trouby.
2.3.4. Zajistete zavesy, vysroubujte srouby a demontujte horni kovovy kryt vytazenim smereh nahoru.
5.6.Vyjmte sklo tak, ze ho opatrnne vytahnete z dvirek trouby - Na konci ciżěni nebo vymény díly znovu sestavte provedením kroků v opacné poradi.
1.
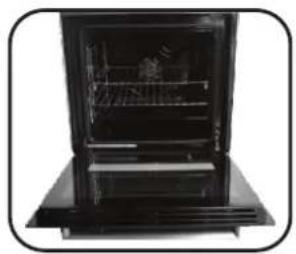
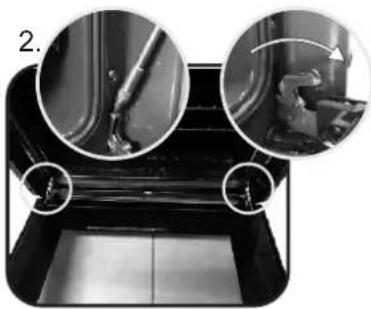
3.
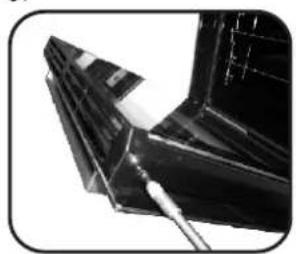
4.
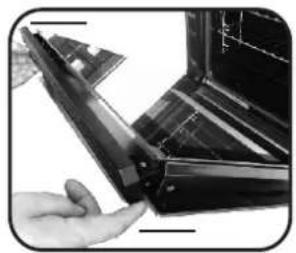
5.
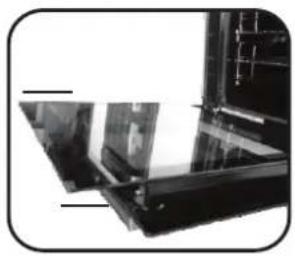
6.
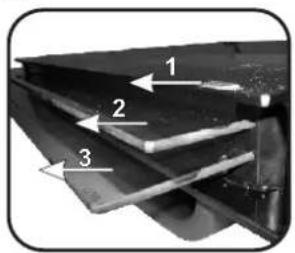
7.

VYMENA ZAROVKY
- Odpoje troubu od sit'oveho napajeni.
- Sejměte skleněný kryt, vyšroubujte zarovku a vyměnéte ji za novou zarovku stejněho typu.
- Jakmile je vadna zarovka vymenena, vra'te zpét skleneny kryt.
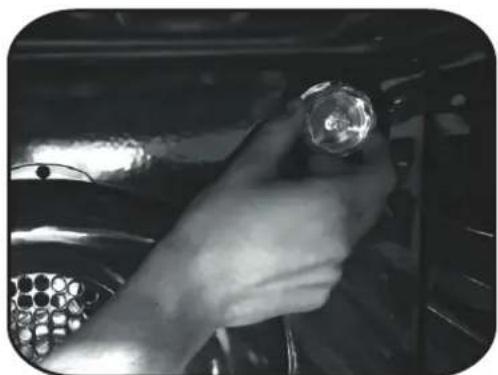

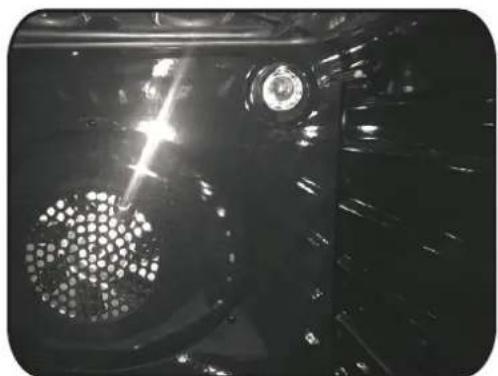

5. Odstrańovani poruch
5.1 Casté dotazy
| PROBLEM MOZNÁ PRÍCINA REŠENÍ | ||
| Trouba nehřeje | Hodiny nejsou nastaveny Nastavte | hodiny |
| Trouba nehřeje | Dětská pojistka je nastavena | Deaktivujte dětskou pojistku |
| Trouba nehřeje | Funkce vařeni a teplota nebyly nastaveny | Ujistěte se, ze potřebná nastaveni jsou správná |
| Žádná reakce dotykového uživatelského Rozhranić | Pára a kondenzace na panelu uživatelského Rozhranić | Očistěte panel uživatelského Rozhranić hadříkem z mikrovlákna a odstrańte vrstvu kondenzace |
- Beim Befüllen des Wassertanks darf der Füllstand des Wassers den auf dem Tank angegebenen Maximalwert niö überschreiben
- WARNUNG: Es besteht das Risiko einer Verbrennung und Beschädigung des Gerätes: Bei Verwendung der Dampffunktion kann freigesetzer Dampf Verbrennungen verursachen: Offnen Sie die Tur vorsichtig, um Verletzungen nach der Verwendung einer Kochfungtion mit Dampf zu vermeiden.
- Wahlrend des Garvorgangs kann Feuchtigkeit im Ofenraum oder auf dem Glas der Turk kondensieren. Dies ist ein normaler Zustand. Um diesen Effekt zu verringn, warten Sie 10-15 Minuten nach dem Einsatz den Geräts, bevor Sie die Speisen in den Ofen stellen. In jedem Fall verschwindet das Kondensat, wenn der Ofen die Gartemperatur erreicht hat.
- Das Gemüse in einem Behälter mit Deckel anstelle einer offen den Schale kochen.
- Vermeiden Sie es, Speisen nach dem Garvorgang länger als 15/20 Minuten im Ofen zu halten.
- WARNING: Während des Gebrauchs werden das Gerät und dessen zugänglichen Teile frei. Achten Sie darauf, dass Sie keine freißen Teile berühren.
- WARNING: Die zugänglichen Teile konnen während des Betriebs des Ofens heißt werden. Kinder mussen einen sicheren Abstand wahren.
- WARNING: Stellen Sie sicher, dass das Gerät ausgeschaltet ist, bevor Sie die Glühbirne austauschen, um Stromschläge zu vermeiden.
- WARNUNG: Um eine Gefährung durch das versehentliche Zurücksetzen des Überhitzungsschutzes zu vermeiden, damit these Gerät nicht durch eine externes Schaltgerät, z. B. einen Timer, betrieben werden oder an einen Schaltkreis angeschlossen werden, der regelmäßige einund ausgeschaltet wird.
- Kinder unter 8 Jahren mussen in sicherem Abstand vom Gerät gehalten werden, wenn sie nicht ständig überwacht werden.
- Kinder)dürfen keinesfalls mit dem Gerät spielen. Das Gerät darf von Personen ab 8 Jahren und von Personen mit
eingeschränkten körperlichen, sensorischen oder geistigen Fähigkeiten, ohne Erfahrungnder Kenntnis des Produkts nur dann benutzt werden, wenn sie beaufsichtigt oder mit Anweisungen zur Bedienung des Gerats ausgestattet werden, undzarw auf sichere Weise und im Bewusstsein der möglichen Risiken.
Die Reinigung und Wartung darf nicht von unbeaufsichtigten Kindern durchgefuhrt werden.
- Verwenden Sie keine rauen oder abrasiven Materialien oder scharfen Metallabstreifer zur Reinigung der Ofenturscheiben, da diese die Oberfläche zerkratzen und das Glas zerbrechen konnen.
- Vor dem Ausbau der abnehmbaren Teile muss der Ofen ausgeschelt und nach der Reinigung gemäß den Anweisungen wieder zusammengebaut werden.
- Verwenden Sie nur den für diesen Ofen empfohlenen Kerntemperaturfuhler.
- Reinigen Sie das Kochfeld keinesfalls mit einem Dampfreiniger.
- Schlieben Sie einen Stecker an das Stromkabel an, der für die auf dem Typenschild angegebenen Spannungs-, Strom- und Belastungswerte geeignet ist und einen Schutzkontakt hat. Die Steckdose muss für die auf dem Typenschild angegebene Last geeignet sein und über einen Funktionsfähigen Schutzkontakt verfügen.
Der Schutzleiter hat die Farbe Gelb-Grün.
These Arbeits darf nur von qualifiziertem Personal durchgefuhrt werden. Falls Steckdose und Gerästecker nicht kompatibel sind, wenden Sie sich an einer qualifizierten Elektriker, um einen entsprechenden Austausch vorzunehmen.
Stecker und Steckdose müssen den geltenden Vorschriften des jeweiligen Landes entsprechen. Der Anschluss an die Spannungsvorsorgung kann auch erfolgen, indem ein allpoliger Trennschalter zwischen Gerät und Spannungssquelle installiert wird, der für die maximale angeschlossene Last geeignet ist und den geltenden Vorschriften entspricht.
Der gelb-grüne Schutzleiterarf nicht vom Trennschalter unterbrochen werden.Die fur denAnschluss verwendete Steckdose bzw. der allpolige Trennschalter muss leicht
erreichbar sein, wenn das Gerät installiert ist.
Die Trennung kann durch einen zugänglichen Stecker oder einen vorschriftsmäßig in die Festverdraughtung eingebundenen Schalter erfolgen.
- Wenn das Netzkabel beschädigt ist, muss es durch ein Kabel oder ein spezielles Bündel ersetzt werden, das beim Hersteller oder beim Kundendienst erhältlich ist.
- Es muss ein Netzkabel vom Typ H05V2V2-F verwendet werden. Diese Arbeiten müssen von einem entsprechend qualifizierten Fachmann durchgeführt werden. Der Schutzleiter (gelb-grün) muss ca. 10 mm länger sein als die anderen Leiter. Wenden Sie sich bei Reparaturen nur an den Kundendienst und fordern Sie die Verwendung von Original-Ersatzteilen an.
- Die Nichteinhaltung der oben genannten Bestimmungen kann die Sicherheit des Gerätes beeinträchtigen und zum Erlöschen der Garantie führen.
- Überschüssiges Verschüttungsmaterial solte vor der Reinigung entfernt werden.
- Ein längerer Stromausfall während des Kochbetriebs kann zu einer Fehlfunktion des Geräts führen. Wenden Sie sich in thisem Fall an den Kundendienst.
- Das Gerätarf nicht hinter einer decorativen Tur installiert werden, um eine Überhitzung zu vermeiden.
- Wenn Sie den Einlegebodeninnen platzieren, achten Sie darauf, dass der Anschlag nach oben und in die Rückseite des Garraums gerichtet ist.
Der Einlegeboden muss vollständig in den Garraum eingesetzt werden
- WARNING: Kleiden Sie die Ofenwände nicht mit Aluminiumfolie oder Einwegschutz aus dem Einzelhandel aus. Aluminiumfolie oder anderer Schutz in direktem Kontakt mit der bereits Emaille kann schmelzen und die Emailleauskleidung im Ofeninneren beeinträchtigen.
- WARNING: Niemals die Turdichtung des Ofens entfern.
VORSICHT: Füllen Sie den Garraumboden während des Garens oder bei bereits Backofen nicht wieder mit Wasser auf.
- Für den Betrieb des Gerätes mit den Nennfrequenzen ist keine zusätzliche Bedienung/Einstellung erforderlich.
Allgemeine Anweisungen
54
1.1 Sicherheitshinweise
1.2 Elektrische Sicherheit
1.3 Empfehlungen
1.4 Installation
1.5 Abfallentsorgung
1.6 Konformitätserklarung
Produktbeschreibung
56
2.1 Übersicht
2.2 Zubehör
2.3 Erste Inbetriebnahme
2.4 Verwendung der Keepheat-Funktionen (Wärme halten)
Betrieb des Backofens
58
3.1 Beschreibung der Anzeige
3.2 Einstellen des Produkts
3.3 Betrieb im manuellen Modus
3.4 Betrieb im Rezepte-Modus
3.5 Betrieb im Modus Sonderfunktionen
3.6 Betrieb im My Chef-Modus
3.7 Funktionsbeschreibungen
3.8 WIFI-Funktion
3.9 Funktionen zum Garen
3.10 Keep Heat-Funktionsmodus
3.11 Konservierungsrichtlinien
3.12 Rezepte
Reinigung und Wartung des Backofens
67
4.1 Allgemeine Reinigungshinweise
4.2 Wartung
- Entfernen des Backofenfensters
- Entfernen und Reinigen der Glastür
- Wechseln der Gluhbirne
Fehlerbehebung
68
5.1 Fragen und Antwerten
1. Allgemeine Hinweise
Wir danken Ohnen, dass Sie sich für eines unserer Produkte entschieden haben. Um die besten Ergebnisse mit Ihrem Ofen zu erzielen, sollen Sie diese Anleitung sorgfältig lessen und für später Verwendung aufbewahren. Notieren Sie sich vor der Installation des Ofens die Seriennummer, damit sie sie im Reparaturfall dem Kundendienst geben können.
Nachdem Sie den Ofen aus der Verpackung genommen haben, überprüfen Sie, ob er während des Transports beschädigt wurde. Wenn Sie Zweifel haben, benutzen Sie den Ofen nicht und wenden Sie ein einen qualifierten Techniker. Bewahren Sie das gesamte Verpackungsmaterial (Plastiktuten, Polystyrol, Nagel) außerhalb der Reichweite von Kindern auf. Wenn der Ofen zum ersten Mal eingeschäftet wird, kann sich geruchsintensiver Rauch bilden, der durch den Klebstoff auf den Dammplatten verursacht wird, die den Ofen umgeben, wenn dieser erstmalig beheizt wird. Dies ist vollig normal, und wenn es dazu kommt, sollen den Siwarten, bis sich der Rauch aufgelost hat, bevor Sie Lebensmittel in den Ofen stellen. Der Hersteller übernimmt keine Verantwortung fur den Fall, dass die in thisem Dokument enthaltenen Anweisungen nicht eingehalten werden.
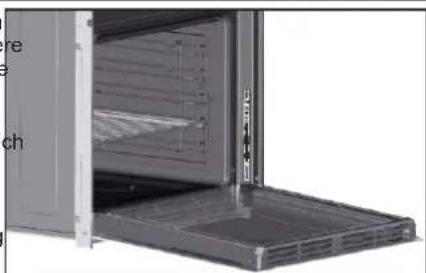
HINWEIS: Die in thisem Handbuch genommen Ofenfunktionen, eigenschaften und -zubehörteile variieren je nach Modell, das Sie gekauft haben.
1.1 Sicherheitshinweise
Verwenden Sie den Ofen nur für den vorgesehenen Zweck, d.h. nur zum Garen von Lebensmitteln; jeder andere Verwendung, z.B. als Wärmequelle, gilt als unzulässig und davon gefährlich. Der Hersteller haftet nicht für Schaden, die durch unsachgemäßen, falschen oder unsachgemäßen Gebrauch entstehen. Die Verwendung von Elektrogeräten setzt die Einhaltung einiger grundlegender Regel vor aus:
-
ziehen sie nicht am Stromkabel, um den Stecker aus der Steckdose zuziehen;
-
berühren Sie das Gerät nicht mit nassen oder feuchten Händen oder Füssen;
-
im Allgemeinen wird die Verwendung von Adaptern,
Mehrfachsteckdosen und Verlängerungskabeln nicht empfohlen;
- bei Fehlfunktionen und/oder mangelhaftem Betrieb das Gerätausschalten und nicht manipulieren.
1.2 Elektrische Sicherheit
STELLEN SIE SICHER, DASS EIN ELEKTRIKER ODER FACHMANN DIE ELEKTRISCHEN ANSCHLUSSE VORNIMMT.
Die Stromversorgung, an die der Ofen angeschlossen ist, muss den im Installationsland geltenden Gesetzen entsprechen. Der Hersteller übernimmt keine Verantwortung für Schäden, die durch die Nichtbeachtung dieser Anleitung entstehen. Der Ofen muss an ein Stromnetz mit geerdeter Wandsteckdose oder einem mehrpoligen Trennschalter angeschlossen werden, je nach den im Installationsland geltenden Gesetzen. Die elektrische Versorgung soll mit geeigneten Sicherungen geschützt werden und die verwendeten Kabel<müssen einen Querschnitt aufweisen, der eine korrekte Versorgung des Ofens gewährleistet.
VERBINDUNG
Der Ofen wird mit einem Netzkabel gefelwert, das nur an ein Stromnetz mit 220 -240 Vac 50Hz Leistung zwischen den Phasen oder zwischen Phase und Neutraleiter angeschlossen werden sollen. Bevor der Ofen an die Stromversorgung angeschlossen wird, ist es wichtig, Folgendes zu überprüfen:
-
die auf dem Messgerät angezeigte Netzspannung;
-
die Einstellung des Trennschalters.
Die Erdungsleitung, die an die Erdungsklemme des Ofens angeschlossen ist, muss an die Erdungsklemme der Stromversorgung angeschlossen werden.
WARNING
Bevor Sie den Ofen an die Stromversorgung anschließen, bitten Sie einen qualifizierten Elektriker, die Kontinuität der Erdungsklemme des Netzeits zu überprüufen. Der Hersteller übernimmt keine Verantwortung für Unfälle oder andere Probleme, die durch den Ausfall des Anschlusses des Ofens an die Erdungsklemme oder durch einen Erdanschluss mit fehlerhafter Kontinuität verursacht werden.
HINWEIS: Da der Ofen Wartungsarbeiten erfordern konnte, ist es ratsam, eine weitere Steckdose vorzuhalten, damit der Ofen an diese angeschlossen werden kann, wenn er aus dem Raum, in dem er installiert ist, entfern wird. Das Netzkabelarf nur durch technisches Servicepersonal oder durch gleichwertige Fachkräfte ersetzt werden.
1.3 Empfehlungen
Nach jedem Gebrauch des Ofens hilt ein Minimum an Reinigung, den Ofen perfect sauber zu halten.
Kleiden Sie die Ofenwände nicht mit Aluminiumfolie oder Einwegschutz aus dem Einzelhandel aus. Aluminiumfolie oder anderer Schutz in direktem Kontakt mit der früben Emaille kann schmelzen und die Emailleauskleidung im Ofeninneren beeinträchtigen. Um eine übermäßige Verschmutzung Ihres Ofens und die daraus resultierenden starken Rauchgerüche zu vermeiden, empfehlen wir, den Ofen nicht be sehr hohen Temperaturen zu betreiben. Es ist better, die Garzeit zu verlangern und die Temperatur etwas zu senken. Zusätzlich zu dem im Lieferumfang des Ofens enthaltenen Zubehor empfehlen wir Ihnen, nur Geschirr und Backformen zu verwenden, die gegen sehr hohe Temperaturen beständig sind.
1.4 Installation
Die Hersteller sind nicht verpflichtet, dies zu tun. Ist zur Behebung von Störungen, die durch unsachgemäß Installation entstehen, die Mitwirkung des Herstellers erforderlich, so fällt diese Mitwirkung nicht unter die Garantie. Die Montageanleitung für fachlich qualifiziertes Personal ist zu beachten. Falsche Installation kann zu Schäden oder Verletzungen von Personen, Tieren oder Gegenständen führen. Der Hersteller kann für solche Schäden nicht haftbar gemacht werden. Der Ofenarf nur erhöht in einer Kuchenzeile oder unter einer Arbeitsplatte montiert werden. Vor der Befestigung müssen Sie für eine gute Belüfung des Garraumes sorgen, damit die für die Kühlung und den Schutz der Innenteile erforderliche Frischluft ordnungsgemäß zirkulieren kann. Die auf der letzten Seite angegebenen Öffnungen entsprechend der Art der Befestigung vormehmen.
1.5 Abfallwirtschaft und Umweltschutz

Dieses Gerät ist entsprechend der EU-Richtlinie 2012/19/EU für Elektro- und Elektronik-Altgeräte (WEEE) gekennzeichnet. Unter die WEEE fallende Elektro- und Elektronik-Altgeräte enthalten sowohl umweltschädliche Stoffe (die negativen Folgen für die Umwelt verursachen) als auch wiederverwendbare Grundstoffe. Es ist wichtig, dass die Elektrround Elektronik-Altgeräte einer spezifischen
Behandlung unterzogen werden, um die Schadstoffe korrekt zu entfern und zu entsorgen und alle Materialien zurückzugewinnen. jeder kann dazu beitragen, dass Altelektrogeräte nicht zu einem Umweltproblem werden. Daher sollen den unbedingt einige Grundregeln beachtet werden: - Elektro- und Elektronik-Altgeräte führen nicht als Hausmüll entsorgt werden;
- Elektro- und Elektronik-Altgeräte sollen in speziellen Sammelstellen entsorgt werden, die von der Stadtverwaltung oder einem registrierten Unternehmen verwaltet werden.
In vielen Ländern sind inländische Sammlungen für große Elektrround Elektronik-Altgeräte verfügbar. Bei Kauf eines neuen Geräts können Altgeräte möglicherweise an Handler, die einen kostenlosten 1-2u-1-Umtausch vornehmen müssen, zureckgegeben werden, solange das Gerät dem selbst Typ entspricht und über die gleichen Funktionen wie das bereitgestellte Gerät verfügbar.
UMWELTSCHUTZ
Wenn möglich, vermeiden Sie es, den Ofen vorzuheizen und versuchen Sie immer,他们在内。Sie im Falle führte mit dem Innenraum bei dem Offnen entweicht. Um eine erhebliche Energieeinsparung zu erzielen, schalten Sie den Ofen zwischen 5 und 10 Minuten vor dem geplanten Ende der Garzeit aus und nutzen Sie die Restwärme, die der Ofen weiterhin erzeugt. Halten Sie die Dichtungen sauber und in Ordnung, um eine Wärmeverteilung außerhalb des Innenaums zu vermeiden. Wenn Sie über einen Stromanietervertrag mit Stundentarif haben, erleichtet das Programm „Verzogtes Kochen" das Energiesparen und verschiett den Garvorgang auf das Zeitfenster des reduzierten Tarifs.
1.6 Konformitätserklarung
Mit der Verwendung des €-Kennzeichens auf thisem Produkt bestätigen wir, dass sãmtliche relevanten Sicherheits-, Gesundheits- und Umweltvorschriften eingehalten werden, die für diese Produkte in Europa gesetzlich festgelegt sind.
Hiermit erklart die Candy Hoover Group, dass ces miC gekennzeichene Gerat den grundlegenden Anforderungen der Richtlinie 2014/53/EU entspricht. Um eine Kopie der Konformitatserklarung zu erhalten, wenden Sie sichitte an den Hersteller unter:www.candy-group.com.