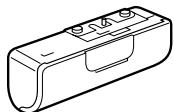
WM-GX688 - Lecteur de cassette portable SONY - Notice d'utilisation et mode d'emploi gratuit
Retrouvez gratuitement la notice de l'appareil WM-GX688 SONY au format PDF.

| Type de produit | Lecteur de cassette portable avec radio AM/FM |
| Marque | Sony |
| Modèle | WM-GX688 |
| Dimensions (sans pile) | 108,4 × 77,7 × 23,0 mm |
| Dimensions (avec pile rechargeable NC-6WM) | 108,4 × 77,7 × 23,4 mm |
| Poids (sans pile) | 148 g |
| Poids (avec pile rechargeable NC-6WM) | 172 g |
| Alimentation | 1 pile R6 (AA) 1,5 V DC ou pile rechargeable NC-6WM 1,2 V 600 mAh Ni-Cd ; adaptateur secteur AC-E15L / AC-E15HG (en option) |
| Autonomie des piles (alcaline LR6) | Lecture cassette : 31,5 h ; Radio : 32 h ; Enregistrement micro : 10 h ; Enregistrement radio : 6,5 h |
| Autonomie de la pile rechargeable NC-6WM | Lecture cassette : 8,5 h ; Radio : 10 h ; Enregistrement micro : 4 h ; Enregistrement radio : 3 h |
| Gammes de fréquences radio | FM : 76 – 90 MHz (Japon) / 87,5 – 108 MHz (USA/Eur) ; AM : 531 – 1710 kHz |
| Fonctions de lecture | Lecture automatique, avance rapide, rembobinage, AMS (recherche de plage), lecture A-B répétée, inversion de sens, Skip Reverse, Rewind Auto Play |
| Réduction de bruit | Dolby B NR activable en lecture |
| Enregistrement | Par micro intégré (fourni) ou depuis la radio ; niveau d'enregistrement fixe ; enregistrement automatique sur les deux faces |
| Amplification sonore | RV (aigus), MB (basses modérées), GRV (basses puissantes) |
| Protection auditive | AVLS (limiteur de volume automatique) |
| Verrouillage des touches | Fonction HOLD sur l'appareil et la télécommande |
| Compteur de bande | Affichage numérique avec remise à zéro |
| Préréglages radio | Jusqu'à 16 stations (8 FM + 8 AM) ; mémorisation automatique ou manuelle |
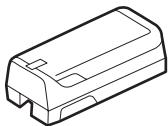
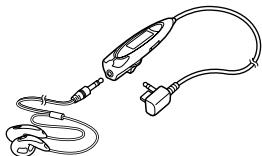
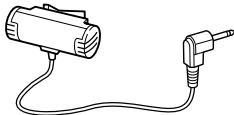
| Accessoires fournis | Télécommande, micro, écouteurs, pile rechargeable NC-6WM, chargeur, boîtier à piles |
| Entretien et nettoyage | Nettoyer avec un chiffon doux et sec ; ne pas utiliser de solvants ; nettoyer les têtes de lecture avec un coton-tige imbibé d'alcool |
| Réparabilité | Les piles rechargeables sont remplaçables ; les pièces détachées sont disponibles auprès du service après-vente Sony |
FOIRE AUX QUESTIONS - WM-GX688 SONY
Questions des utilisateurs sur WM-GX688 SONY
0 question sur cet appareil. Repondez a celles que vous connaissez ou posez la votre.
Poser une nouvelle question sur cet appareil
Téléchargez la notice de votre Lecteur de cassette portable au format PDF gratuitement ! Retrouvez votre notice WM-GX688 - SONY et reprennez votre appareil électronique en main. Sur cette page sont publiés tous les documents nécessaires à l'utilisation de votre appareil WM-GX688 de la marque SONY.
MODE D'EMPLOI WM-GX688 SONY
Operating Instructions (page 52)
SAHONGSHENG (643)
使用说明书(第76页)


WALKMAN
WALKMAN is a registered trademark of Sony Corporation
WALKMAN(號克)是本公司之全资子公司SONYCorporation)的通端上表信于
WALKMAN是Sony公司的注册商标。
WM-GX688
危险
4
6
8
10
14
18
AMS 19
PB MODE 20
BNR 21
A-B 22
24
25
26
29
30
32
SOUND 34
AVLS 35
36
37
39
40
41
43
45
46
48
14
3 REVIVE MEGA BASS GROOVE 34
A-B 22
·16 9 AMS 19
8 JR
10
40
38
.
24
NC-6WM
AC
39
1
3
AC
1
2


3
REMOTE

HOLD
TYPE I
TYPE II
TYPE IV
1
① OPEN
(2)
FWD
REV
2

L

FWD
REV

/ FF* 1
REW
FF
REW
FF REW
FF
REW
FF 2
FF
REW 2
REW

18

8
AREA 4
1
2
①ENTER
② AREA 1 RADIO ON/ BAND
(3)
TUNE/PRESET
18 JR
TUNE/PRESET
1 2
3 4 5 6 7 8 JR USA* Eur* 1 2 3...
1: 2: 3: 4: 5:
6: 7: 8: JR:
USA Eur
32
*
2-①
.
.
30
31
④ENTER
3 AM FM
4
5
RADIO OFF
RADIO ON/BAND·OFF
2
15
AM
FM
25
26
TYPE I
17
1
① OPEN
(2)
FWD
REV
FWD
REV
FWD
FWD REV
2
(1)
FM
②
10

TUNE/PRESET
RADIO ON/BAND
3
REC
REC
| AM | ||
| ISS | 1 2 3 | |
| FWD | REV | |
| REV | ||
| REV | ||
| VOL | RV/MB/GRV | |
| AVLS ONR | ||
| VOL | ||
| NORM | RV | |
| MB GRV | ||
| REC | 2 | |
| TYPE I | ||
FWD
REV
10
24
| ←●REPEAT | FWDREV | ||||
| ←●REPEAT | FWDREV | ||||
| ■ | |||||
| / | FF | REW | |||
| * | 1 | ||||
| / | FF | REW | : | ... | |
| : | |||||
| ... | |||||
| FF | AMS | ... | |||
| 2 | |||||
| REW | AMS | ... | |||
| 2 | |||||
AMS
9
AMS
AMS
4
4
AMS
PB MODE
| PB MODE | ||
| ← | ← | |
| → | → | 1 * |
| * REV | REV | |
MODE
MENU
SET
PB MODE
*B NR
BNR
Dolby
ON
D
| PB DQNIR | |
| ON | BNR |
| BNR | |
SOUND
BNR
SOUND
MENU
SET
ON
PB DNNR
•
.
BNR
BNR
B NR
ON
A-B
A
B
1

2
A
2

B
1

REPEAT
A
2

REPEAT
B
A-B
REP
A-B


FWD REV REV FWD A-B
·2
A-B
A-B
? 43
·90
A-B
FWD /
000
REV
ENTER/COUNTER RESET
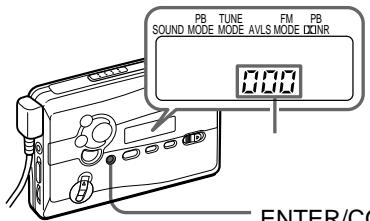
ENTER/COUNTER RESET
:

1 RADIO ON/BAND
RADIO ON/
BAND·OFF 1
2 RADIO ON/BAND
AM FM
RADIO ON/BAND·OFF 1
3 MENU TUNE MODE
4 SET MANUAL
5 TUNE/PRESET
-
- TUNE/PRESET
TUNE/PRESET

AM FM 8
1 RADIO ON/BAND
RADIO ON/
BAND·OFF 1
2 RADIO ON/BAND FM
AM
RADIO ON/BAND·OFF 1
3 A
ENTER
28
8 30 31

AM FM 8
1 RADIO ON/BAND
RADIO ON/
BAND·OFF 1
2 RADIO ON/BAND
AM FM
RADIO ON/BAND·OFF 1
3 ENTER
4 TUNE/PRESET
ENTER
5 TUNE/PRESET
6 ENTER
* 3
28
.
30 31
1 27
1 3
2
TUNE/PRESET
3 ENTER
4
TUNE/PRESET
5 ENTER

1 RADIO ON/BAND
RADIO ON/
BAND·OFF 1
2 RADIO ON/BAND FM
RADIO ON/BAND·OFF 1
3 MENU TUNE MODE
4 SET PRESET
5 TUNE/PRESET
- -
FM MENU
FM MODE SET
LOCAL MONO
AM
| AREA 1 | Sapporo | |
| AM 1 | 567kHz | NHK 1 |
| 2 | 747kHz | NHK 2 |
| 3 | 1287kHz | |
| 4 | 1440kHz | |
| FM 1 | 80.4MHz | FM |
| 2 | 82.5MHz | FM |
| 3 | 85.2MHz | NHK FM |
| 4 | 88.2MHz | NHK FM |
| AREA 2 | Sendai | ||
| AM | 1 | 891kHz | NHK 1 |
| 2 | 1089kHz | NHK 2 | |
| 3 | 1260kHz | ||
| FM | 1 | 77.1MHz | FM |
| 2 | 82.5MHz | NHK FM | |
| AREA 3 | Northern Kanto | ||
| AM | 1 | 594kHz | NHK 1 |
| 2 | 693kHz | NHK 2 | |
| 3 | 810kHz | AFN FEN | |
| 4 | 954kHz | TBS | |
| 5 | 1134kHz | ||
| 6 | 1197kHz | ||
| 7 | 1242kHz | ||
| 8 | 1530kHz | ||
| FM | 1 | 76.4MHz | FM |
| 2 | 78.8MHz | ||
| 3 | 80.0MHz | TOKYO FM | |
| 4 | 80.3MHz | NHK FM | |
| 5 | 81.6MHz | NHK FM | |
| 6 | 83.2MHz | NHK FM | |
| 7 | 86.3MHz | FM | |
| AREA 4 | Southern Kanto | ||
| AM | 1 | 594kHz | NHK 1 |
| 2 | 693kHz | NHK 2 | |
| 3 | 810kHz | AFN FEN | |
| 4 | 954kHz | TBS | |
| 5 | 1134kHz | ||
| 6 | 1242kHz | ||
| 7 | 1422kHz | ||
| FM | 1 | 76.1MHz | FM |
| 2 | 78.0MHz | FM | |
| 3 | 78.6MHz | FM | |
| 4 | 79.5MHz | FM | |
| 5 | 80.0MHz | TOKYO FM | |
| 6 | 81.3MHz | FM | |
| 7 | 82.5MHz | NHK FM | |
| 8 | 84.7MHz | FM | |
| AREA 5 | Nagoya | ||
| AM | 1 | 729kHz | NHK 1 |
| 2 | 909kHz | NHK 2 | |
| 3 | 1053kHz | CBC | |
| 4 | 1332kHz | ||
| 5 | 1431kHz | ||
| FM | 1 | 77.8MHz | FM |
| 2 | 78.9MHz | FM | |
| 3 | 80.7MHz | FM | |
| 4 | 81.8MHz | NHK FM | |
| 5 | 82.5MHz | NHK FM | |
| 6 | 83.6MHz | NHK FM | |
| AREA 6 | Osaka |
| AM 1 | 558kHz | |
| 2 | 666kHz | NHK 1 |
| 3 | 828kHz | NHK 2 |
| 4 | 1008kHz | ABC |
| 5 | 1143kHz | KBS |
| 6 | 1179kHz | |
| 7 | 1314kHz | |
| 8 | 1431kHz | |
| FM 1 | 76.5MHz | |
| 2 | 80.2MHz | FM802 |
| 3 | 82.8MHz | NHK FM |
| 4 | 85.1MHz | FM |
| 5 | 86.5MHz | NHK FM |
| 6 | 88.1MHz | NHK FM |
| 7 | 89.4MHz | FM |
| 8 | 89.9MHz | FM |
| AREA 7 | Hiroshima | ||
| AM | 1 | 702kHz | NHK 2 |
| 2 | 918kHz | ||
| 3 | 1071kHz | NHK 1 | |
| 4 | 1116kHz | ||
| 5 | 1350kHz | ||
| 6 | 1575kHz | AFN FEN | |
| FM | 1 | 78.2MHz | FM |
| 2 | 88.3MHz | NHK FM | |
| AREA 8 | Fukuoka | ||
| AM | 1 | 612kHz | NHK 1 |
| 2 | 1017kHz | NHK 2 | |
| 3 | 1278kHz | RKB | |
| 4 | 1413kHz | ||
| FM | 1 | 77.9MHz | FM |
| 2 | 78.7MHz | FM | |
| 3 | 80.7MHz | FM | |
| 4 | 81.6MHz | NHK FM | |
| 5 | 84.8MHz | NHK FM | |
| JR | JR | * | Shinkansen |
| FM 1 | 76.0MHz |
| 2 | 76.6MHz |
| 3 | 77.5MHz |
| 4 | 78.8MHz |
| 5 | 79.6MHz |
| * | 2 |
1 RADIO ON/BAND
2 ENTER
3 AREA 1 RADIO ON/BAND
4 TUNE/PRESET
USA Eur
2
| USA | FM: 87.5 - 108MHz AM: 530 - 1 710kHz |
| Eur | FM: 87.5 - 108MHz AM: 531 - 1 602kHz |
5 ENTER
6 25
26
USA Eur AREA1 8 JR
26 27
1 3 ENTER
4 AREA1 8 JR
26 27
AREA1 8 JR 30 31
SOUND
RV
MB
GRV
SOUND
MENU
SET
SOUND
GRV
AVLS—
| AVLS | |
| AVLS | ◎ AVLS |
| AVLS | |
AVLS
MODE
AVLS
AVLS
MODE
MENU
SET

AVLS
AVLS
SET

AVLS
AVLS
HOLD


100
| LR6 SG ** | 31.5 | 32 | 10 | 6.5 |
| NC-6WM 100% | 8.5 | 10 | 4 | 3 |
| 40 | 42 | 13 | 9 | |
| * EIAJ | HF | |||
| ** | LR6 SG | |||
| · | ||||
| · | A-B | AMS |
1
2 AC
AC-E15L
AC-E15HG
DC IN 1.5V
3 AC
.
AC AC-E15L AC-E15H
EIAJ
AC
- AC-E15HG
10
CHK-1W
C-1KW/
300

Ni-Cd
TEL 03-3434-0261
http://www.baj.or.jp
60
40 0
1
.
.
90
.
A-B AMS
A-B AMS
36
| A-B | A-B 2 | A-B 2 |
| REC | 17 | |
| AVLS | AVLS | |
| 35 | ||
| RV MB | ||
| GRV | 34 | |
| ---- | 15 | |
1
6
1
90
DOLBY NR OFF 40 15 000 Hz EIA
100 8,000 Hz
1
0.4 mV
1
8 300
DC 3 mW + 3 mW EIAJ' 16
DC 1.5 V
NC-6WM 1.2 V 600 mAh
Ni-Cd 3 1
EIAJ
38
108.4 × 77.7 × 23.0 mm / /
108.4 × 77.7 × 23.4 mm / /
EIAJ*
148 g
172 g + NC-6WM EIAJ*
FM 76.0 90.0MHz
AM 531 1 710kHz
AC AC-E15L
AC AC-E15HG
NC-6WM
C-1KW CHK-1W
** MDR-ED238SP GROOVE
MDR-Q33SL MDR-E888SP MDR-848SP MDR-EX70SL
- EIAJ
**
REMOTE
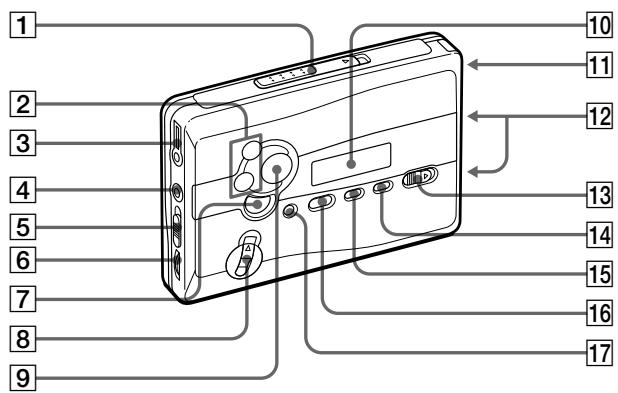
1 OPEN
2 :FF •AMS /REW •AMS: TUNE /PRESET
3 REMOTE
4 MIC
ISS AM
6 VOL
7 :■:RADIO OFF
REC 9 REPEAT
10
11
12
13 HOLD
14 SET
15 MENU
16 RADIO ON /BAND FM AM
17 COUNTER RESET
ENTER
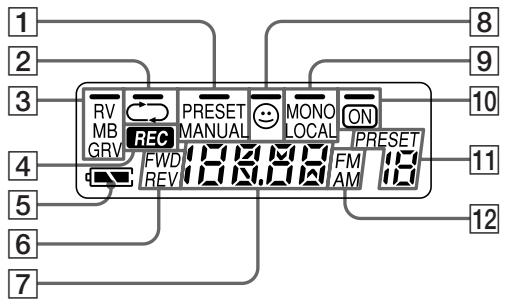
1 PRESET/MANUAL
2 /
3 RV/MB/GRV
4REC
5 10 BN R ON
6 PRESET FWD/REV
7
8AVLS
FM MONO/LOCAL
10 BN RON
11 PRESET
12 FM/AM
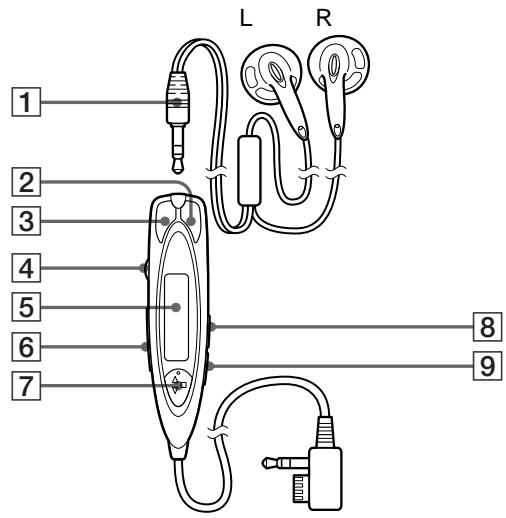
1
2REW
3FF
4 VOL
5
6 HOLD
7

: RADI O N/
BAND·OFF
SOUND
9 MODE
5
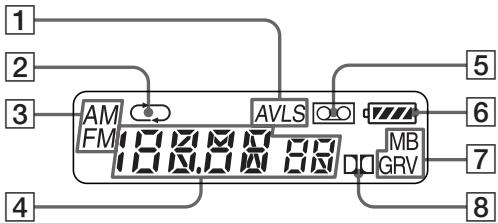
1 AVLS
5
2
6
3
7
4
8
RV/MB/GRV
B NR ON
Choosing a Power Source
Dry Battery
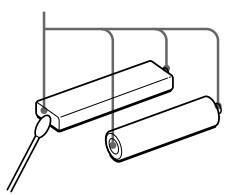
Attach the supplied battery case, and then insert one R6 (size AA) battery with correct polarity.
Note
- For maximum performance we recommend that you use a Sony alkaline battery.
Rechargeable Battery
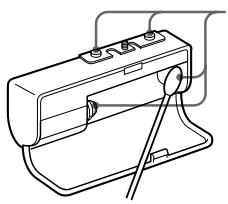
1 Insert the supplied rechargeable battery (NC-6WM) into the charger with correct polarity. See the and indications on your charger.
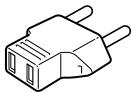
2 Plug in the charger to the house current (mains). Japanese model: Full charging takes about 3 hours. "Sony World Model": Full charging takes about 1 hour. If the plug does not fit to your mains, attach the supplied AC plug adaptor.
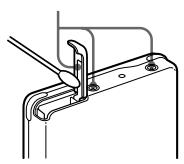
3 Insert the fully charged battery into the rechargeable battery compartment.
You can charge the battery about 300 times.
When to replace/charge the battery
Replace or charge the battery when "□" flashes in the display.
Battery life
| (Approx. hours) | (EIAJ*) |
| Sony alkaline LR6 (SG)** | |
| Tape playback | 31.5 |
| Radio reception | 32 |
| MIC recording | 10 |
| Radio recording | 6.5 |
| Rechargeable battery (NC-6WM) | |
| Tape playback | 8.5 |
| Radio reception | 10 |
| MIC recording | 4 |
| Radio recording | 3 |
| Sony alkaline LR6 (SG)** and Rechargeable NC-6WM | |
| Tape playback | 40 |
| Radio reception | 42 |
| MIC recording | 13 |
| Radio recording | 9 |
- Measured value by the standard of EIAJ (Electronic Industries Association of Japan). (Using a Sony HF series cassette tape)
**When using a Sony LR6 (SG) "STAMINA" alkaline dry battery (produced in Japan).
Note
- The battery life may be shorter depending on the operating condition, the surrounding temperature and battery type.
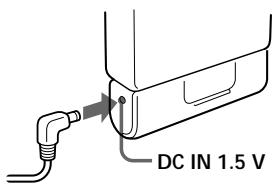
House Current
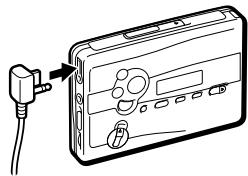
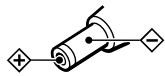
Remove the rechargeable battery if inserted. Attach the battery case and connect the AC power adaptor AC-E15L for Japan (not supplied) or AC-E15HG (not supplied) to the DC IN 1.5 V jack of the battery case and to the wall outlet.
Do not use any other AC power adaptor.
Specifications for AC-E15HG vary for each area. Check your local voltage and the polarity of the plug before purchasing.

Polarity of the plug
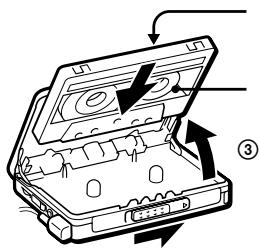
Playing a Tape
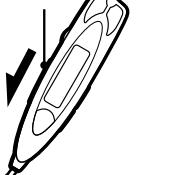
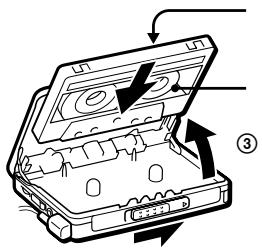
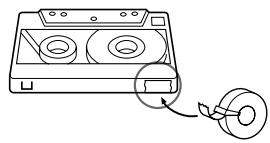
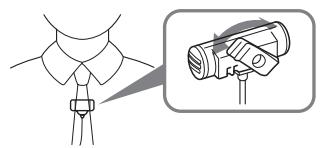
1 Insert a cassette and if the HOLD function is on, slide the HOLD switch in the opposite direction of the arrow to unlock the controls.
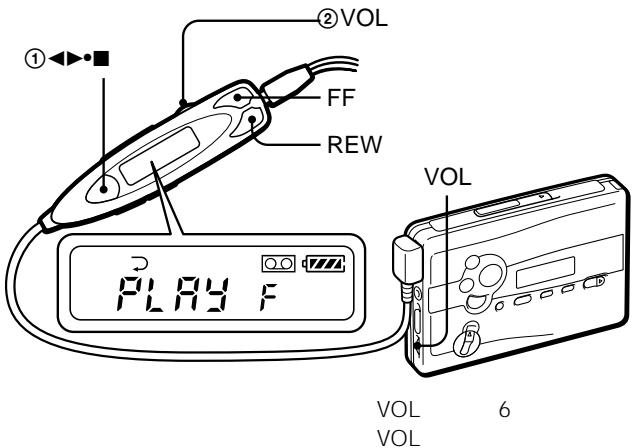
2 Press (play) (stop) on the remote control and adjust the volume with VOL. (On the main unit, press REPEAT.)
When adjusting the volume on the main unit
Set the VOL control on the remote control at maximum.
When adjusting the volume on the remote control
Set the VOL control on the main unit to around 6.
Operation on the remote control
| To | Press |
| Switch playback to the other side | ▲▶■ for 2 seconds or more during playback |
| Stop playback | ▲▶■ once during playback |
Operation on the main unit
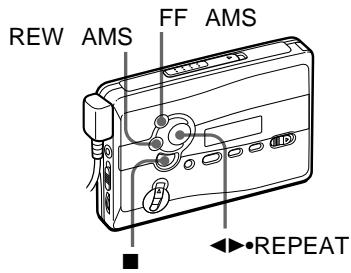
| To | Press |
| Switch playback to the other side | ▲●REPEAT during playback |
| Stop playback | ■ (stop) |
Other tape operations
| To | Press |
| Fast forward | FF during stop* or during playback During playback, the tape is fast-forwardsed as long as FF is pressed. |
| Rewind | REW during stop* or during playback During playback, the tape is rewound as long as REW is pressed. |
| To | Press |
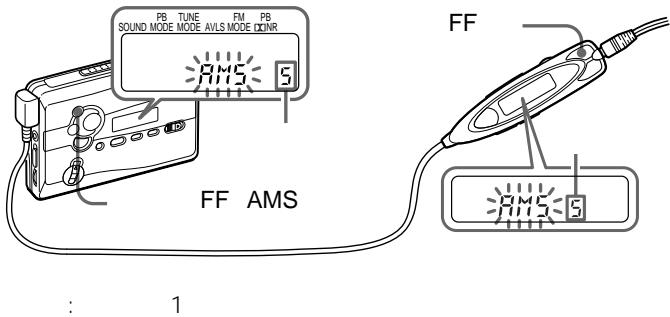
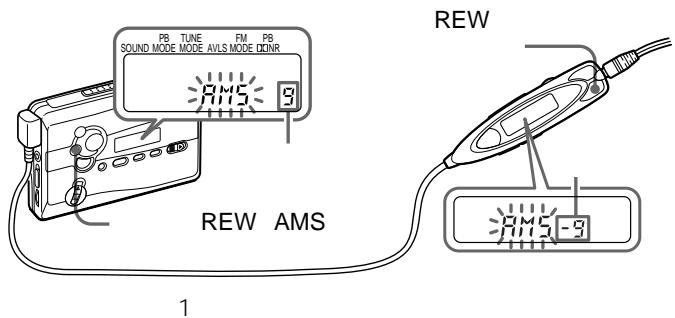
| Play the next track/succeeding 9 tracks from the beginning (AMS**) | FF once/repeatedly during playback |
| Play the current track/previous 8 tracks from the beginning (AMS**) | REW once/repeatedly during playback |
| Play the other side from the beginning (Skip Reverse function) | FF for 2 seconds or more during stop |
| Play the same side from the beginning (Rewind Auto Play function) | REW for 2 seconds or more during stop |
- If on the remote control is pressed during fast forward or rewind, the Walkman switches to playback.
**Automatic Music Sensor
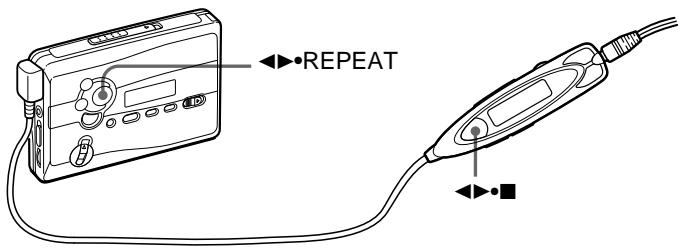
A-B Repeat
A-B Repeat plays back repeatedly any portion of the tape you specified. Specify by tagging the beginning (point A) and the end (point B) of the portion during playback.
On the remote control
1 Press for 2 seconds or more during playback to tag point A.
"A-" will flash in the display of the main unit.
2 Press again to tag point B.
"A-B" will flash and the tape will be rewound to point A. Then "REP" appears in the display and the specified portion is played repeatedly.
On the main unit
1 Press REPEAT for 2 seconds or more during playback to tag point A. "A-" will flash in the display of the main unit.
2 Press REPEAT again to tag point B.
"A-B" will flash and the tape will be rewound to point A. Then "REP" display and the specified portion is played repeatedly.
To cancel the A-B Repeat playback
Press REPEAT on the main unit.
On the remote control, press

Notes
- You cannot specify a repeat portion to include both sides of the tape.
- You cannot specify a repeat portion of shorter than 2 seconds.
After repeated operation, the actual portion that is played back may shift off somewhat from the exact portion specified with the tags due to tape slack. - A-B Repeat will repeat 50 times before returning to normal playback if not canceled manually.
- Do not use the A-B Repeat function with tapes longer than 90 minutes. If you do, the tape may be damaged.
Recording
You can record radio programs from the built-in radio, or record with the supplied microphone. In either case, use a new or fully charged battery.
Note
- If the record-protect tab is broken, you cannot record on that side.
1 Insert a normal (TYPE I) tape.
To record on both sides Insert the cassette with the side to be first recorded on as the FWD (forward) side*.
- Make sure that "FWD" is displayed. If not, press and hold until "REV" changes to "FWD".
To record on one side only
Insert the cassette with the side to be recorded on as the REV (reverse) side**.
**Make sure that "REV" is displayed. If not, press and hold until "FWD" changes to "REV".
Note
- When the cassette holder is opened, the direction of the tape will be automatically set to "FWD".
2 Select a recording source:
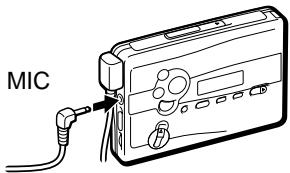
To record with the microphone Connect the supplied microphone to the MIC (PLUG IN POWER) jack.
To record from the radio Tune in to the station you want to record (see "Listening to the Radio").
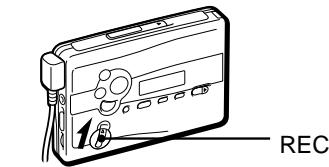
3 Slide REC.
"REC" appears in the display and recording starts after about 2 seconds.
If you have started recording from the FWD side, recording will switch to reverse side automatically at the end of the FWD side.
To stop recording
Press (on the remote control, press to stop recording).
To reduce noise while recording AM programs
Set the ISS (Interference Suppress Switch) to the position that reduces noise the most.
To monitor the recording sound
You can monitor the recording sound through headphones/earphones. Adjust monitoring level using VOL.
Note
- You may hear some noise in the monitor sound in the RV, MB, or GRV mode, but this does not affect recording.
Notes on recording
The recording level is fixed.
Sound emphasis (RV, MB, or GRV), AVLS and Dolby B NR settings do not affect recording.
- Actual recording will start about 2 seconds after you slide REC. Slide REC about 2 seconds before the moment you want to start recording, or you will miss the beginning of your recording.
- When recording on both sides, recording will not be made for about 10 seconds while the tape is switching sides.
- Do not use a high-position (TYPE II) or metal (TYPE IV) tape. If you do, the sound may be distorted when you play back the tape, or the previous recording may not be erased completely.
- Do not connect or disconnect the earphones to/from ☑REMOTE while recording from the radio. The recording condition may change abruptly, or noise may be recorded.
- To avoid noise interference, do not place it near a lamp cord or a fluorescent lamp when recording with the microphone.
- If a howling effect occurs, turn down the volume.
- All other operation cannot be made while recording. For other operation, stop recording first.
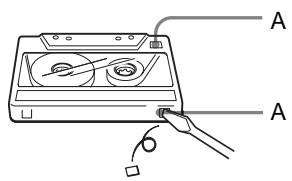
To prevent a tape from being accidentally recorded over
Break off the tabs from side A and/or B. To reuse the tape for recording, cover the tab hole with adhesive tape.
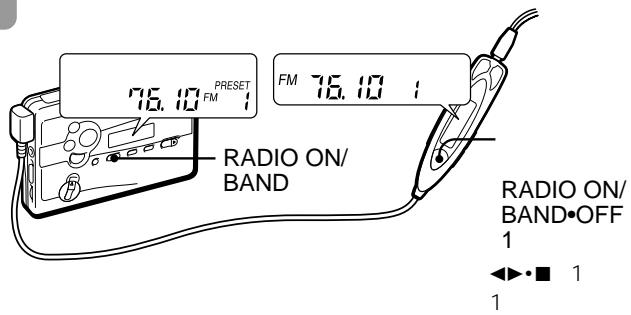
Listening to the Radio
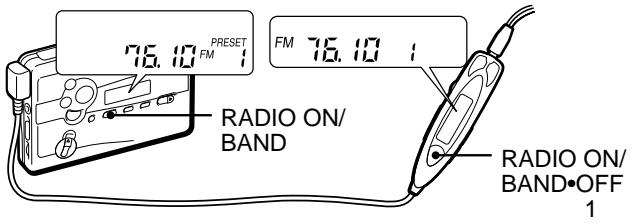
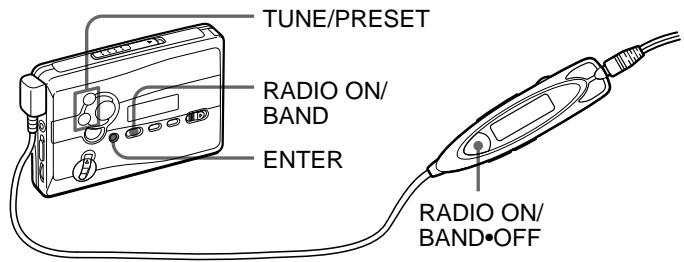
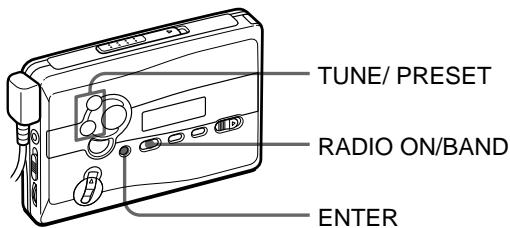
1 Press RADIO ON/BAND to turn on the radio.
2 Press RADIO ON/BAND repeatedly to select AM or FM.
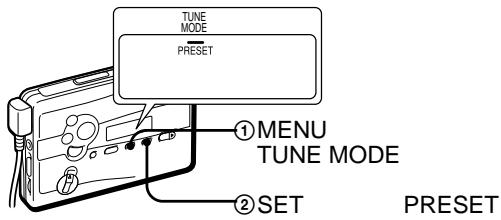
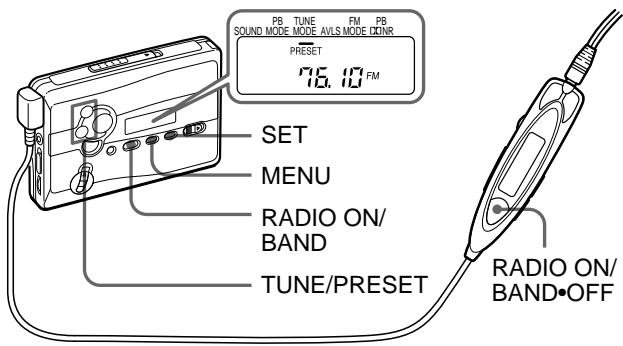
3 Press MENU on the main unit repeatedly and set " _ " (the cursor) in the display of the main unit to TUNE MODE.
4 For manual tuning
① Press SET to choose MANUAL.
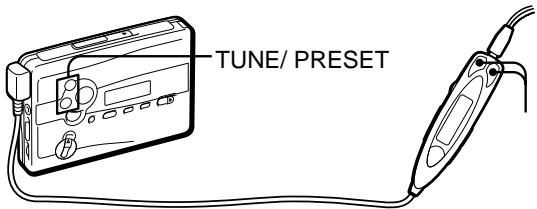
② Press TUNE/PRESET ^+ or - repeatedly to tune in to the desired station.
Hold down TUNE/ PRESET + or - for a few sounds to scan for stations.
For preset tuning
① Press SET to choose PRESET.
② Press TUNE/PRESET ^+ or - repeatedly to recall the desired preset station.
To use preset tuning, preset stations first (see "Tuning in to the Ready- preset Stations for Each Area" or Preseting Radio Stations").
To turn off the radio
Press RADIO OFF.
To improve the broadcast reception
- For AM: Reorient the unit itself.
- For FM: Extend the remote control cord (antenna). If the reception is still not good, press MENU repeatedly to set the cursor in the display to FM MODE. Then press SET to choose from "MONO" (monaural), "LOCAL" or none (stereo) for best reception.
To operate from the remote control
To turn on the radio, press RADIO ON/BAND·OFF for more than one second (while the tape is in stop mode only). To select the band, press RADIO ON/BAND·OFF for more than one second while the radio is on. To tune in or recall a preset station, press PRESET+ or -. To turn off the radio, press RADIO ON/BAND·OFF.
Tuning in to the Ready-preset Stations for Each Area (Manual Area Call)
For each of the nine areas in Japan (Sapporo, Sendai, Northern Kanto, Southern Kanto, Nagoya, Osaka, Hiroshima, Fukuoka and the Shinkansen), this Walkman is factory preset with frequency data for major stations receivable in the area. Once your present area is selected, you can tune in to the stations on the area by preset tuning. For the factory preset stations for each area, see pages 30 to 31 of the Japanese text.
1 Press RADIO ON/BAND to turn on the radio.
2 Press ENTER. The frequency digits will flash in the display.
3 Hold down RADIO ON/ BAND until "AREA 1" flashes.
4 While "AREA 1" is flashing, press TUNE/ PRESET+ or - repeatedly to select and area number from 1 to 8 or "JR" and then press ENTER.
5 Tune in to the desired preset station by "preset tuning" (see "Listening to the Radio").
Presetting Radio Stations
Once you store your favorite stations in memory, you can play them easily. You can preset up to 16 stations - 8 each for FM and AM.
Tuning in to and Storing Radio Stations Automatically (Auto-Memory Scanning function)
1 Press RADIO ON/BAND to turn on the radio.
2 Press RADIO ON/BAND repeatedly to select AM or FM.
3 Press ENTER until "A" appears in the display. The Walkman starts searching and storing stations. Then the preset number appears.
Note
- Do not remove the power sources until all the stations are stored.
Storing Radio Stations Manually (Manual-Memory function)
You can preset the stations in any order.
1 Press RADIO ON/BAND to turn on the radio.
2 Press RADIO ON/BAND repeatedly to select AM or FM.
3 Press ENTER. The frequency digits will flash in the display.
4 Press TUNE/PRESET + or - repeatedly to tune in to the desired station and press ENTER. The preset number will flash in the display.
5 Press TUNE/PRESET + or - repeatedly to select the desired preset number and press ENTER. The station is preset to the number of your choice.
Notes
- If you cannot complete step 4 or 5 while the indications are flashing, repeat from step 3.
- If you preset a new station to the same preset number, the previously stored station will be erased.
To cancel the stored station
Follow the procedure above and in step 4, instead of tuning in to a station, press and hold TUNE/ PRESET + or - until "---" is displayed. Press ENTER while "---" is flashing. The preset number will flash in the display. Press TUNE/PRESET + or - repeatedly to select the preset number you want to cancel and press ENTER.
Receiving Stations Outside Japan
1 Press RADIO ON/BAND to turn on the radio.
2 Press ENTER.
The frequency digits will flash in the display.
3 Press and hold RADIO ON/BAND until "AREA 1" flashes.
4 While "AREA 1" is flashing, press TUNE/ PRESET + or - to select "USA" or "Eur".
5 Press ENTER.
6 Tune in to and store stations as necessary following the procedure of "Listening to the Radio" and "Presetting Radio Stations".
Area indication and frequency range
| Area* | Frequency range | |
| FM (MHz) | AM (kHz) | |
| USA | 87.5 - 108 | 530 - 1 710 |
| Eur | 87.5 - 108 | 531 - 1 602 |
| Japan (AREA 1-8, JR) | 76 - 90 | 531 - 1 710 |
- USA: USA, Canada, and Central and South America
Eur: European and other countries
To receive stations in Japan
Select "AREA 1 to 8" or "JR" in step 4 above.
Using the Menu
Adjusting playback modes
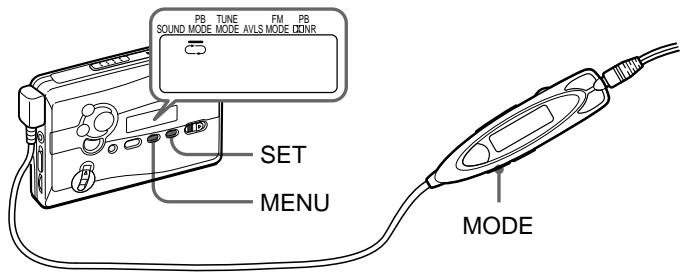
To select playback direction mode
Press MENU repeatedly to set the cursor in the display to PB MODE. Then press SET to select the desired mode.
| To play | Select |
| both sides repeatedly | ←→ |
| both sides once from the FWD side | → |
To play a tape recorded with Dolby* B NR system
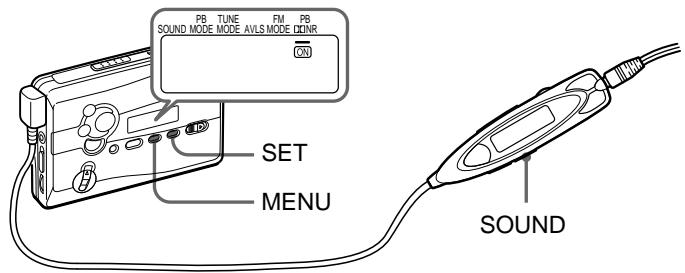
Press MENU repeatedly to set the cursor in the display to PB NR (Dobly noise reduction). Then press SET to show "ON".
- Manufactured under license from Dolby Laboratories. "Dolby"and the double-D symbol are trademarks of Dolby Laboratories..
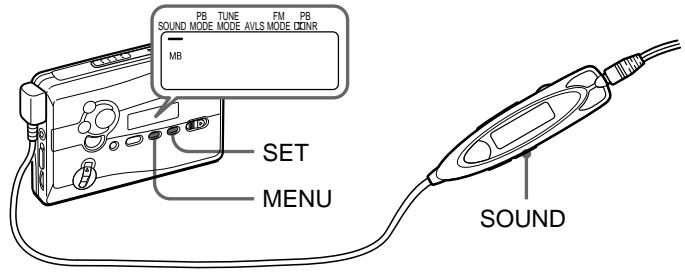
Emphasizing Sound
On the main unit:
1 Press MENU repeatedly to set the cursor in the display to SOUND.
2 Press SET repeatedly to select the sound emphasis of your choice.
On the remote control:
1 Press SOUND repeatedly. With each press, the indications change.
The indications change as follows:
RV:Sound Revitalizer. Emphasizes treble sound.
MB: Mega Bass. Emphasizes bass sound (moderate effect).
GRV:Groove. Emphasizes bass sound (strong effect).
no message : normal (no effect).
Notes
- If the sound is distorted with the mode "GRV", turn down the volume of the main unit or select other modes.
- You cannot change the mode during fast-forward or rewind.
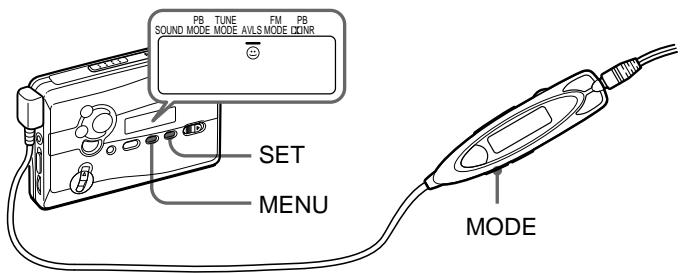
Protecting Your Hearing — AVLS (Automatic Volume Limiter System)
On the main unit:
Press MENU repeatedly in the playback, stop or radio mode to set the cursor to AVLS in the display. Then press SET to show
On the remote control: Hold down MODE until "AVLS" appears in the display.
To cancel the AVLS function
Press SET so that " ⑦ " disappears from the display on the main unit. On the remote control, hold down MODE again until "AVLS" disappears.
Note
- The AVLS setting will be canceled when you replace the battery.
Using Other Functions
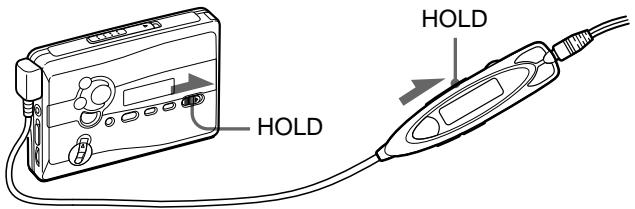
Locking the Controls - HOLD Function
Slide the HOLD switch in the direction of the arrow to lock the controls of the Walkman or the remote control.
To use the tape counter
The tape counter is displayed on the main unit during playback, recording, fast forward, rewind, and stop (except when the radio is turned on). The number will increase when playing back the FWD side, and decrease when playing back the REV side. To reset the counter to "000", press ENTER/COUNTER RESET.
Notes
- The tape counter may show some deviation.
- The tape counter will not be displayed when the cassette compartment is empty.
R6(AA
Sony
1 (NC-6WM)
- -
2 ( )
3
"Sony 1
AC
3
300
(EIAJ*)
| Sony | LR6(SG)** |
| 31.5 | |
| 32 | |
| MIC( ) | 10 |
| 6.5 |
| (NC-6WM) | |
| 8.5 | |
| 10 | |
| MIC( ) | 4 |
| 3 | |
| Sony | LR6(SG)**NC-6WM |
| 40 | |
| 42 | |
| MIC( ) | 13 |
| 9 |
*EIAJ(Electronic Industries Association of Japan : (Sony HF) **LR6(SG) Sony STAMINA
1
HOLD HOLD
2
( )

VOL
.(
REPEAT
VOL
VOL 6

A-B
A-B
(A
(B
A-B
REPEAT

1 2
A
"A - "
2 B
"A-B"
A
"REP"
A-B
50
·90
A-B
1 REPEAT 2
A
"A - "
2 REPEAT
B
"A-B"
A
"REP"
"FWD"
2
MIC(PLUG IN POWER)
1 (TYPEI)
FWD( )*
- “FWD”
"FWD"
, “REV”

3REC
"REC"
2
FWD(
FWD
REV(
)**
**“REV”
"REV"
,“FWD”


).
AM ()(TYPEII)(TYPEIV)
ISS(Interference Suppress Switch: REMOTE
VOL
RV ,MB,GRV
(RV, MB, GRV), AVLS Dolby( ) BNR
REC 2
2 REC
10
① SET PRESET
1 RADIO ON/BAND
② TUNE/PRESET ^+
2 RADIO ON/BAND
AM FM
3 MENU
“_”( TUNE MODE
4
① SET MANUAL
RADIO OFF
② TUNE/PRESET ^+
AM:
TUNE/PRESET + -
FM: ( )
MENU
FM MODE . SET “MONO”( ),“LOCAL”, ( )
RADIO ON/BAND OFF 1 ( ) .
RADIO ON/BANDOFF 1
, PRESET + -
OFF
RADIO ON/BAND
Manual Area Call
9 ( , 1,,,,,,,,
30 31
1 RADIO ON/BAND
2 ENTER
3 RADIO ON/BAND “AREA 1”
4 "AREA 1" TUNE/PRESET + - 1 8 "JR" ENTER
5 “ ”(“
FM AM 8 16
( )
1 RADIO ON/BAND
2 RADIO ON/BAND AM FM
3 “A” ENTER Walkman
(
1 RADIO ON/BAND
2 RADIO ON/BAND AM FM
3 ENTER
4 TUNE/PRESET + ENTER
5 TUNE/PRESET + ENTER
5 3
6
4 TUNE/PRESET ^+ ENTER
TUNE/PRESET +
ENTER
| * | FM(MHz) | AM(kHz) |
| USA | 87.5 - 108 | 530 - 1 710 |
| Eur | 87.5 - 108 | 531 - 1 602 |
| 76 - 90 | 531 - 1 710 | |
| (AREA 1-8, JR) |
- USA :
Eur:
4 “AREA1 8 J" JR
1 RADIO ON/BAND
2 ENTER
3 "AREA 1"
RADIO ON/BAND
4 "AREA 1"
TUNE/PRESET +
“USA” “Eur”
5 ENTER
| MENU PB MODE SET . |
| FWD |
| Dolby( )* B NR |
| MENU PB DQN(R) ) . SET “ON” |
| *Dolby Laboratories “Dolby” -D Dolby Laboratories |
1 MENU
SOUND
2 SET
1 SOUND
RV:Sound Revitalizer( ).
MB:Mega Bass.
GRV:Groove.
- "GRV"

选择电源
干电池
安装附带的电池盒,然后对正确极性装入一节R6(AA,3号)电池。
注
- 为获得最佳效果,建议您使用Sony牌碱电池。
充电池
1 以正确极性将附带的充电池(NC-6WM)装入充电器。
请注意充电器上的 、指示。
2 把充电器接插到家庭用电源插座。
日本机型:完全充电约需3小时。
“Sony世界机型”:完全充电约需1小时。
如果插头与所用主电源插座不匹配,请装上附带的AC电源插头转接器。
3 将完全充电后的电池装入充电池室。
充电池大约可充电使用300次。
何时更换电池/给电池充电
“□”在显示窗中闪烁时,即请更换电池或给电池充电。
电池寿命
(大约时数) (EIAJ*)
| Sony 碱电池 LR6(SG)** | |
| 录音带放音 | 31.5 |
| 听收音机 | 32 |
| MIC 录音 | 10 |
| 收音机录音 | 6.5 |
| 充电池(NC-6WM) | |
| 录音带放音 | 8.5 |
| 听收音机 | 10 |
| MIC录音 | 4 |
| 收音机录音 | 3 |
| 同时使用Sony碱电池LR6(SG)**和充电池NC-6WM | |
| 录音带放音 | 40 |
| 听收音机 | 42 |
| MIC录音 | 13 |
| 收音机录音 | 9 |
- 按 EIAJ(Electronic Industries Association of Japan) 标准测定的值。(使用 Sony HF 系列磁带)
**使用LR6(SG)型Sony“STAMINA”碱电池(日本制)时。
注
- 电池寿命,可能因操作条件,环境温度和电池型式而缩短些。
家用电源
如果装有充电池,请将其取出。装上电池盒,将用于日本的AC-E15L AC电源转接器(未附带)或AC-E15HG(未附带)连接到电池盒的DCIN1.5V插孔和墙上插座。
请勿使用任何其他的AC电源转接器。
AC-E15HG的规格根据地区而异,在购买之前请核查您所在地区的电压和插头的电极。
插头的电极
播放录音带
1 装入盒带,如果遥控器的HOLD功能仍打开着,即请沿相反于箭头方向滑动HOLD开关以释放控制器。
2 按遥控器上的 (放音)(停止)并用VOL旋钮调节音量。(主机上,则请按PEPEAT。)
在主机上调节音量时
请把遥控器上的VOL控制设定于最大。
在遥控器上调节音量时
请把主机上的VOL控制设定于6左右。
在遥控器上的操作
| 要 | 请按 |
| 换播放另一面 | 播放中按▲▶■2秒以上 |
| 停止播放 | 播放中按一次 |
在主机上的操作
| 要 | 请按 |
| 换播放另一面 | 播放中按 ←▶·REPEAT |
| 停止播放 | 按■(停止) |
其他磁带操作
| 要 | 请按 |
| 快进绕 | 停止中*或播放中,请按FF播放中,只要按着FF,磁带便将继续快进绕。 |
| 重绕 | 停止中*或播放中,请按REW播放中,只要按着REW,磁带便将继续进行重绕。 |
| 要 | 请按 |
| 从头播放下一曲/接下9首曲子(AMS**) | 播放中按一次/反复按FF |
| 从头播放现在放音中曲子/前面8首曲子(AMS**) | 播放中按一次/反复按REW |
| 从头播放另外一面(跳越倒绕功能) | 停止中按FF 2秒以上 |
| 从头播放同一面(重绕自动播放功能) | 停止中按REW 2秒以上 |
- 如果在快进绕或重绕过程中按了遥控器上的▲▶●■,Walkman将转换为放音。
**自动乐曲探测
A-B 反复
A-B反复功能反复播放您所指定的录音带的任一部分。请在放音中标记该部分的起点(A点)和终点(B点)。
在遥控器上
1 在放音中按 键2秒钟以上以标记A点。
“A-”将闪烁于主机的显示窗中。
2 再按一次 键以标记B点。
“A-B”将闪烁,录音带即被卷绕到A点。随着,“REP”将出现于显示窗中而反复播放所指定的部分。
在主机上
1 在放音中按2秒▶REPEAT键以标记A点。
“A-”将闪烁于主机的显示窗中。
2 再按一下 REPEAT键以标记B点。
“A-B”将闪烁而录音带被卷绕到A点。随着,“REP”出现于显示窗中而反复播放所指定的部分。
要解除A-B反复放音时
请按主机上的 REPEAT,或按遥控器上的 。
注
- 您不能指定跨越录音带两面的重复部分。
- 您不能指定短于2秒钟的重复部分。
- 在反复操作之后,由于录音带的松弛,实际播放的部分可能和所标记指定的部分稍有不同。
- 在恢复普通放音之前,如果不手动取消,A-B反复将重复50次。
- 请勿用长度90分钟以上的磁带去使用A-B反复功能。否则,该磁带可能会损坏。
录音
您可以从内装的收音机录制广播节目,也可以用附带的麦克风进行录音。无论如何,都请使用新的或充足了电的电池。
注
- 如果防误抹小翼已被折断,则无法在该面录音。
1 插入标准型(TYPE I)录音带。
要在两面录音时
将要先录音的面作为FWD(正)面*插入录音带。
- 确认是否显示“FWD”。如果没有,请按住■直到“REV”变为“FWD”。
只要录一面时
将要录音的面作为REV(反)面**插入录音带。
**确认是否显示“REV”。如果没有,请按住■直到“FWD”变为“REV”。
注
- 录音带座打开着时,走带方向将被自动地设定为“FWD”。
2 选择录音源:
要用麦克风录音时
将附带的麦克风连接到MIC(PLUG IN POWER)插孔。
要从收音机录音时
请调入您想录音的电台(参见“听收音机”)。
3滑动REC。
“REC”即出现于显示窗中,约2秒钟之后,开始录音。
如果您是从FWD面开始录音的,在录完FWD面时,录音将自动转换到反面。
要停止录音时
请按(或按遥控器上的 )以停止录音。
要在录AM节目时减小噪声
请将ISS(干扰抑制开关)设定于能将噪声减至最小的位置。
要监听录音中的声音
您可以用头戴式耳机/耳塞式耳机来监听正在录制的声音。可用VOL控制旋钮调节监听的音量。
注
- 在RV、MB或GRV方式下,您可能会在监听的声音中听到一些噪音,但这并不影响录音。
录音须知
- 录音电平被固定。
- 声音增强功能(RV、MB或GRV)、AVLS和Dolby B NR设定不影响录音。
- 实际录音将在您滑动REC约2秒钟之后开始。请在您要开始录音时刻的约2秒钟之前滑动REC,否则您将错过录音的开始部分。
-
在两面录音时,在录音带换面过程中,录音将有约10秒钟不进行。
-
请勿用高位(TYPE II)或金属(TYPE IV)型的录音带录音。否则播放录音带时声音可能会失真,以前的录音内容也可能不会被完全抹消。
- 从收音机录音时,请勿将耳机接到/拔出;REMOTE插孔。否则录音条件可能会突然改变,也可能录下噪音。
- 用麦克风录音时,请勿将麦克风靠近电灯线或日光灯,以避免噪音干扰。
- 如果发生啸叫,请调低音量。
- 在录音时所有其他操作都无法进行。要进行其他操作,请先停止录音。
要防止录音带被误录时
请折断A面和/或B面的防误抹小翼。要重新用该录音带录音,用胶带盖住折断防误抹小翼后的缺口。
听收音机
1 按RADIO ON/BAND打开收音机。
2 反复按RADIO ON/BAND选择AM或FM。
3 反复按主机上的MENU,将主机显示窗中的“____”(光标)设为TUNE MODE。
4 要手动调台时
① 按SET选择MANUAL。
② 反复按TUNE/PRESET+或-调入所要的电台。按住TUNE/PRESET+或-数秒以扫描电台。
要预约调谐时
① 按 SET 选择 PRESET。
② 反复按TUNE/PRESET+或-选出所要的预约电台。要使用预约调谐时,请先预约电台(参见“调入各地区已预约电台”或“预约电台”)。
要关掉收音机时
按 RADIO OFF 键。
要改善广播接收效果时
- 收听AM节目时:调转机器方位。
- 收听FM节目时:请拉长遥控器导线(天线)。如果接收效果仍不好,请反复按MENU将主机显示窗中的游标设为FM MODE。然后按SET以便从“MONO”(单耳声)、“LOCAL”或无显示(立体声)模式中选择最佳接收效果。
要从遥控器进行操作时
要打开收音机时,请按RADIOON/BAND·OFF1秒以上(限当录音带处于停止状态时)。
要选择波段时,请在打开着收音机时,按下RADIOON/BAND·OFF1秒以上。
要调入或选出预调电台时,请向上/向下逐渐调整PRESET+或-。
要关掉收音机时,请按RADIOON/BAND·OFF。
调入各地区已预约电台(手动地区呼叫)
对日本9个地区(札幌、仙台、北关东、南关东、名古屋、大阪、广岛、福冈和新干线)的各地区,Walkman已在工厂预调能接收该地区的主要电台的频率数据。一旦您选择了现在的地区,您就可用预约调谐调入所在地区的电台。有关各地区的工厂预调电台,请参见日语版的第30至31页。
1 按 RADIO ON/BAND 键打开收音机。
2 按ENTER键。频率数字即将在显示窗中闪烁。
3 按住RADIO ON/BAND键,直至“AREA1”起闪烁。
4 在“AREA1”闪烁中,反复按TUNE/PRESET+或-键,以便在1至8或“JR”中选一个地区号,然后按ENTER键。
5 利用“预约调谐”调入所要的预约电台。(参见“听收音机”)
预约电台
一旦在本机的存储器中储存了喜欢的电台,便可简单地操作收听。您最多可以预调16个电台一FM和AM各8个。
自动调入和储存广播电台(自动储存扫描功能)
1 按RADIO ON/BAND打开收音机。
2 反复按 RADIO ON/BAND 选择 AM 或 FM。
3 按ENTER直到“A”出现于显示窗中。
Walkman即开始搜索并储存电台。
随即出现预约号。
注
- 在所有电台储存完毕之前请勿拔开关掉电源。
手动储存广播电台(手动储存功能)
您可以按任意顺序预约电台。
1 按 RADIO ON/BAND 打开收音机。
2 反复按 RADIO ON/BAND 选择 AM 或 FM。
3 按ENTER键。频率数字将闪烁于显示窗中。
4 反复按 TUNE/PRESET+ 或 - 调入所要的电台并按 ENTER 键。
预约号将闪烁于显示窗中。
5 反复按TUNE/PRESET+或-选择所要的预约号并按ENTER键。
电台即被预约为您所选择的号码。
注
- 如果您不能在指示闪烁着时完成步骤4或5,请从步骤3开始重复。
- 如果您给一个新电台预设了相同的预约号,则以前所储存的电台将被抹消。
要取消已储存的电台时
请按照上述步骤操作,在步骤4,不调入电台而按住TUNE/PRESET+或-直到“----”显示出来。在“---”闪烁着时按ENTER键。预约号将闪烁于显示窗中。反复按TUNE/PRESET+或-选择您要取消的预约号并按ENTER键。
在日本国外接收电台
1 按RADIO ON/BAND打开收音机。
2 按ENTER键。频率数字将闪烁于显示窗中。
3 按住 RADIO ON/BAND 键直到“AREA 1”起闪烁。
4 在“AREA1”闪烁中,按TUNE/PRESET+或-键以选择“USA”或“Eur”。
5 按ENTER键。
6 按照“听收音机”和“预约电台”的操作步骤,调入并储存所要的电台。
地区指示和频率范围
| 地区* | 频率范围 FM(MHz) | AM(kHz) |
| USA | 87.5-108 | 530-1710 |
| Eur | 87.5-108 | 531-1602 |
| Japan (AREA 1-8, JR) | 76-90 | 531-1710 |
- USA:美国、加拿大和中南美 Eur:欧洲和其他国家
在日本国内接收电台
在上面步骤4中选择“AREA1到8”或“JR”。
使用项目单
调整播放模式
要选择播放方向模式时
请反复按MENU把显示器中的游标设定于PB MODE,然后按SET以选择所要模式。
| 要 | 请选择 |
| 反复放双面 | ←→ |
| 从FWD面放一次双面 | → |
要播放用杜比 \*B减噪系统录的录音带时
反复按MENU把显示器中的游标设定于PB NR(标比减噪),然后按SET以显示“ON”。
- 经杜比实验室授权生产。 “杜比”,“Dolby”和双D标志是杜比实验室的商标。
增强声音
在主机上:
1 反复按MENU把显示器中的游标设定于SOUND。
2 反复按 SET 以选择所喜欢的声加强模式。
在遥控器上:
1 反复按SOUND,每按一下,指示灯即随着改变显示。
指示灯呈如下显示:
RV:Sound Revitalizer(声音再生器)。增强高音。
MB:Mega Bass(强低频)。增强低音(中等效果)。
GRV:Groove(最佳状态)。增强低音(强烈效果)。
无信息指示:普通(无效果)。
注
- “GRV”模式时,如果声音失真了,即请转小主机音量或选其他模式。
- 快进绕或重绕时,是不能改变此模式的。
保护您的听觉-AVLS(自动音量限制系统)
在主机上:
在播放,停止或收音机模式中反复按MENU把显示器中的游标设定于AVLS,然后按SET以显示“ ”。
在遥控器上:
按下MODE至显示器中出现“AVLS”。
要解除AVLS功能时
按SET使主机上的显示器中的“@”消失显示。
遥控器上则再按住MODE至“AVLS”消失显示。
注
- 当更换电池时,AVLS设定将被抹去。
利用其他功能
锁定控制器-HOLD功能
沿箭头所指方向滑动HOLD开关以锁定Walkman或遥控器上的控制器。
要利用磁带计数器时
在放音、录音、快进,倒带和停止(收音机打开时除外)时磁带计数器显示在主机上。播放FWD面时数字增加,播放REV面时数字减少。要将计数器重调为“000”时,请按ENTER/COUNTERRESET键。
注
- 磁带计数器显示可能稍有误差。
- 盒带室空着时,将不显示磁带计数器。

http://www.world.sony.com/
Sony online
二株式会社 141-0001東京都品川区北品川6-7-35
お問い合わせはお客様ご相談 semen一八
- ナビダバイル

0570-00-3311
受付時間:
(全国のからても市内通話料金で利用んだけは)
月~金
携帶電話·PHSてのご利用は…03-5448-3311
9:00~20:00
Fax 0466-31-2595
士·日·祝日
9:00~17:00